linux配环境心得:conda/本地配cuda,cudnn及pytorch心得
- 我们服务器遇到的大多数找不到包的问题
- 一,服务器安装cuda和cudnn
- 使用conda在线安装cuda和cudnn
- 使用conda进行本地安装
- 检查conda安装的cuda和cudnn
- 本地直接安装cuda和cudnn
- 方法一:直接更换镜像
- 方法二:在nvidia官网下载cuda和cudnn之后进行安装
- 二:服务器安装pytorch
- 换源或换命令安装pytorch
- 本地安装pytorch
- 报错: xxx.whl is not a supported wheel on this platform
- 检查pytorch是否成功安装:
- 三:服务器运行git命令(git reset/ git clone)
我们服务器遇到的大多数找不到包的问题
都是因为国内的网络环境以及墙的问题,导致我们服务器使用了源,或conda使用了源的问题。
使用命令: conda install ,提示找不到包,很可能是因为我们使用了源,然后源里没存那个包。
使用命令: conda search cudatoolkit,找不到包,那其实是这个源里没这个包,不是说conda真的装不上那个特定版本的cuda。
又比如,使用git clone, git reset,一直报很奇怪的错,网上搜索的方法试了又试,都解决不了这个问题,之后发现是国内链接github比较慢,使用一下学术加速就解决了。
又比如,conda install pytorch -c pytorch,怎么都装不上,找不到包,也是连接pytorch官网比较满
所以这里,笔者通过在autodl上搭建环境的例子,重新整一遍linux新环境中配置cuda,cudnn,pytorch以及安装好一个github包,并通过git硬调apex版本,来掩饰一下,当国内网不好,或使用的服务器网不好的时候,我们有多少种方法把环境给配好。(比如本地安装,换源,conda换pip之类的。)
一,服务器安装cuda和cudnn
使用conda在线安装cuda和cudnn
一般情况下,我们使用conda在虚拟环境中安装cuda和cudnn,我们会先搜索conda能提供的cuda包和cudnn包再安装。
比如使用如下所示代码:
conda search cudatoolkit
conda search cudnn
之后安装显示出来的列表里图里有的cuda和cudnn版本。
conda install cudatoolkit==xx.xx
conda install cudnn==xx.xx
比如当我在autodl上默认环境中运行:conda search cudatoolkit时,显示出来的是如下画面:
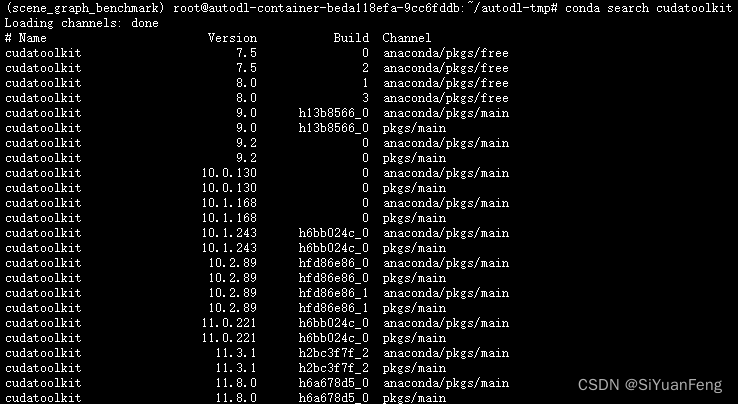
可以看到,显示出来的包不全,导致我们配环境也配的很困难(conda search cudnn同理,同样是不全。)
不管是直接使用命令进行安装conda install cudatoolkit==xx.xx,还是使用命令conda search cudatoolkit --info自己根据链接下载里面对应的包再本地安装,前提是我们得能搜索到对应的包啊,连包都搜索不到怎么安装(比如我们想安装11.1版本的cuda,我们至少得能搜索到cuda11.1啊,但这里的cudatoolkit连11.1都搜索不到。)
为什么conda能提供的cuda版本和cudnn版本这么少?我尝试运行了一下这两行命令进行搜索:
conda search cudatoolkit -c conda-forge
conda search cudnn -c conda-forge
这回能搜索到一系列的包。
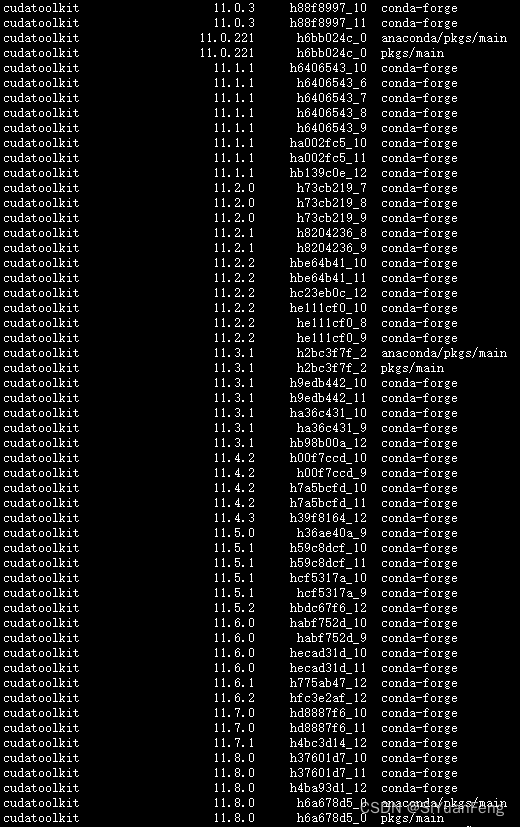
确定原因:是网络和源的问题,导致conda搜索不到。
尝试换一下源再搜索:
#conda清除添加源,恢复默认源
conda config --remove-key channels
#添加一些清华源(有时候清华源崩了,可以换阿里源,阿里源崩了,可以换中科大源。国内安环境遇到问题,比如查找不到包的问题,很多都是网络的问题)
conda config --add channels https://mirrors.tuna.tsinghua.edu.cn/anaconda/pkgs/free/
conda config --add channels https://mirrors.tuna.tsinghua.edu.cn/anaconda/cloud/conda-forge/
conda config --add channels https://mirrors.tuna.tsinghua.edu.cn/anaconda/cloud/pytorch/
这时候再重新运行命令:
conda search cudatoolkit
conda search cudnn
这时候就能显示一系列能安装的conda 包了(conda搜索不到包,还是源的问题。)
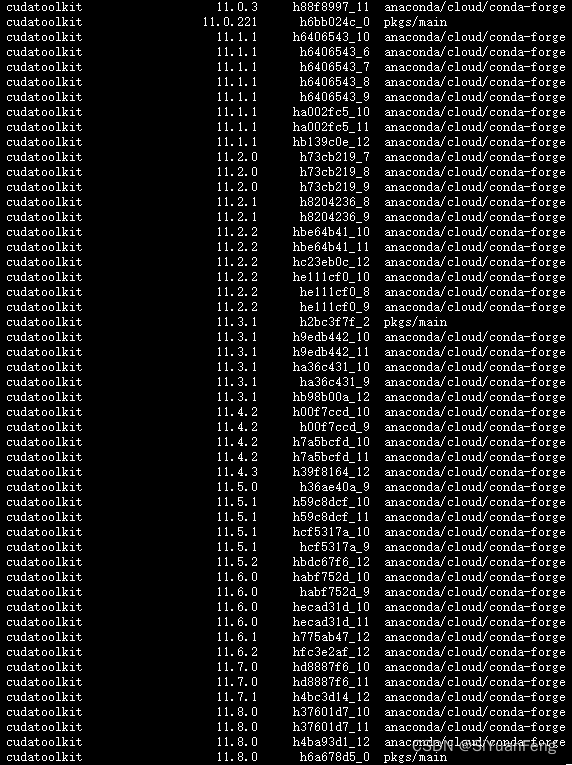
这时候运行命令就可以了:
conda install cudatoolkit==xx.xx
conda install cudnn==xx.xx
使用conda进行本地安装
有时候直接去搜索conda-forge,去安装的时候,因为服务器没法访问外网,如果不是用源里面的文件,可能下载速度会很慢。我们可以使用这条命令:
conda search cudatoolkit --info
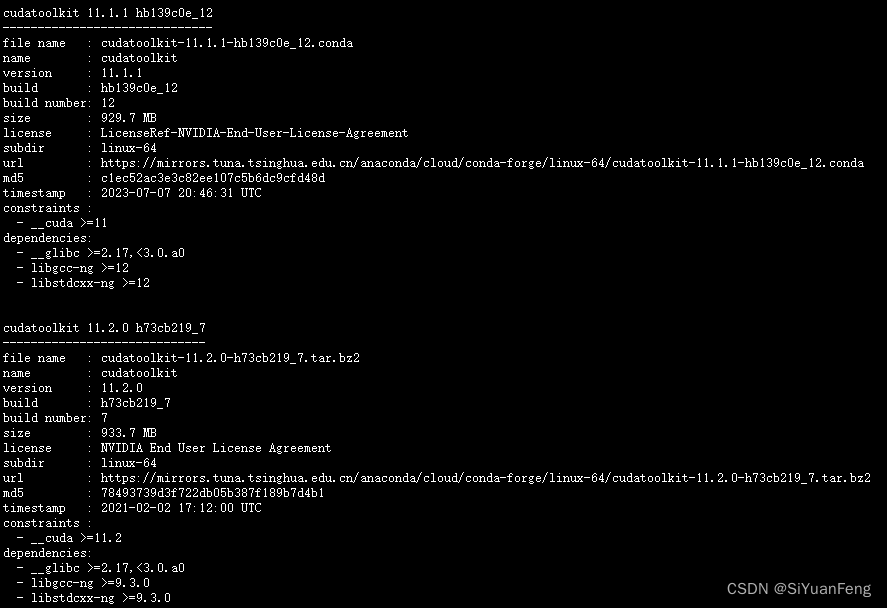
访问搜索出来的包的url,然后自己下载好,上传到服务器上,之后使用命令安装。
比如我们下载的两个包是cudatoolkit-11.3.1-h2bc3f7f_2.conda和cudnn-8.2.1-cuda11.3_0.conda,我们可以运行这两个命令进行安装。(下载的如果是压缩包,记得解压)
conda install ./cudatoolkit-11.3.1-h2bc3f7f_2.conda
conda install ./cudnn-8.2.1-cuda11.3_0.conda
检查conda安装的cuda和cudnn
conda list | grep cudatoolkit
conda list | grep cudnn
本地直接安装cuda和cudnn
方法一:直接更换镜像
实际上我们没必要把每一步都按照自己的想法去强迫其实现,这样会很浪费我们的时间,有时候同一张卡,我们直接升降配置换个镜像,就可以配好了。这能极大的提升我们做科研的速度。(不过我还是想把整体配环境的流程配一遍)
方法二:在nvidia官网下载cuda和cudnn之后进行安装
比如我们想安装cuda11.1.1和配套的cudnn7.6.5,我们首先要在nvidia官网的cuda-toolkit页面下载cuda11.0。
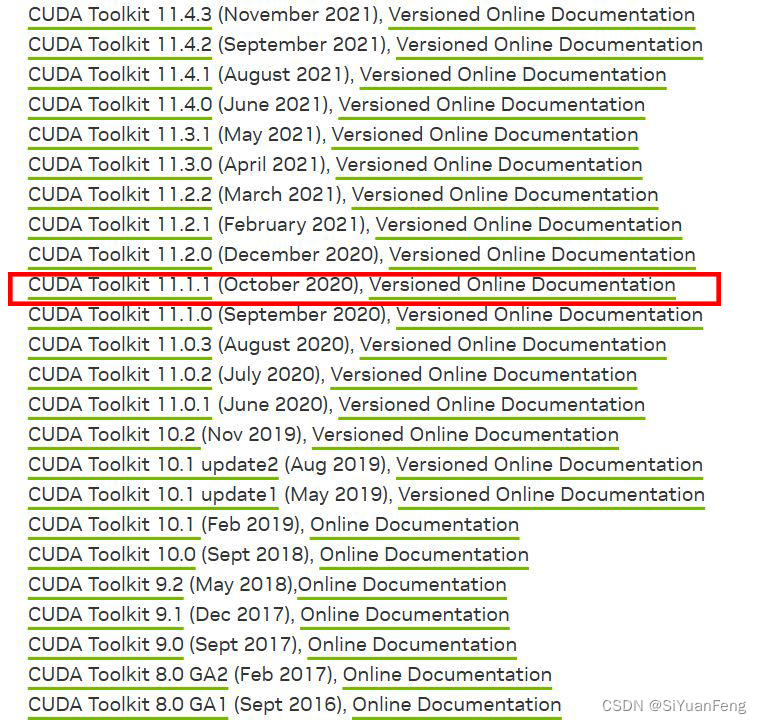
我们点进该页面,之后选择相关的文件,然后下载就可以了。
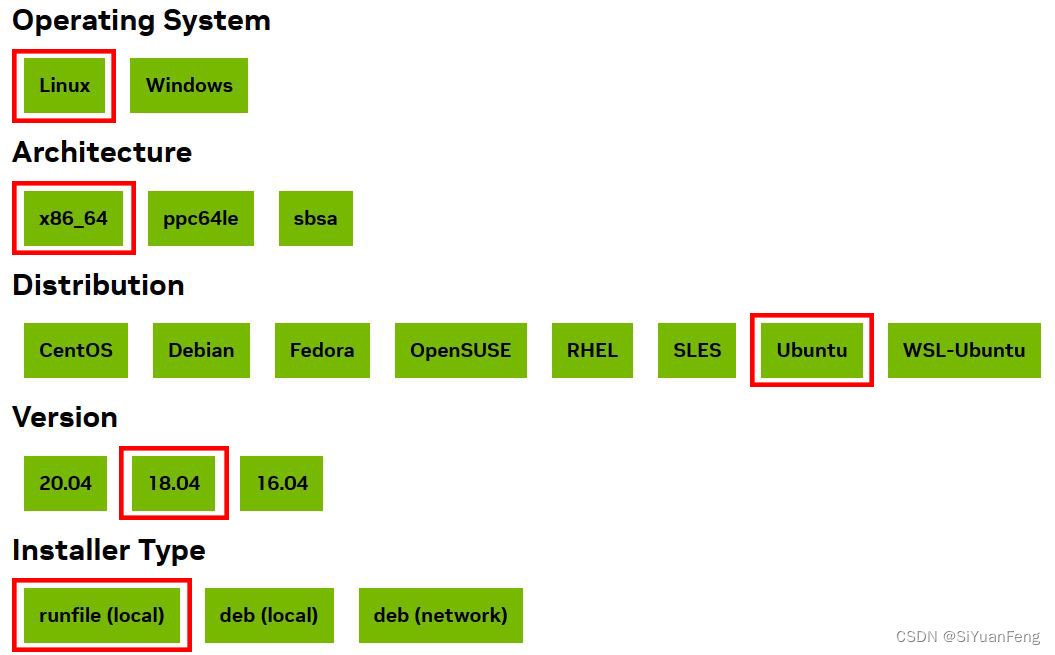
之后按照这个页面下面的链接运行即可成功安装上。
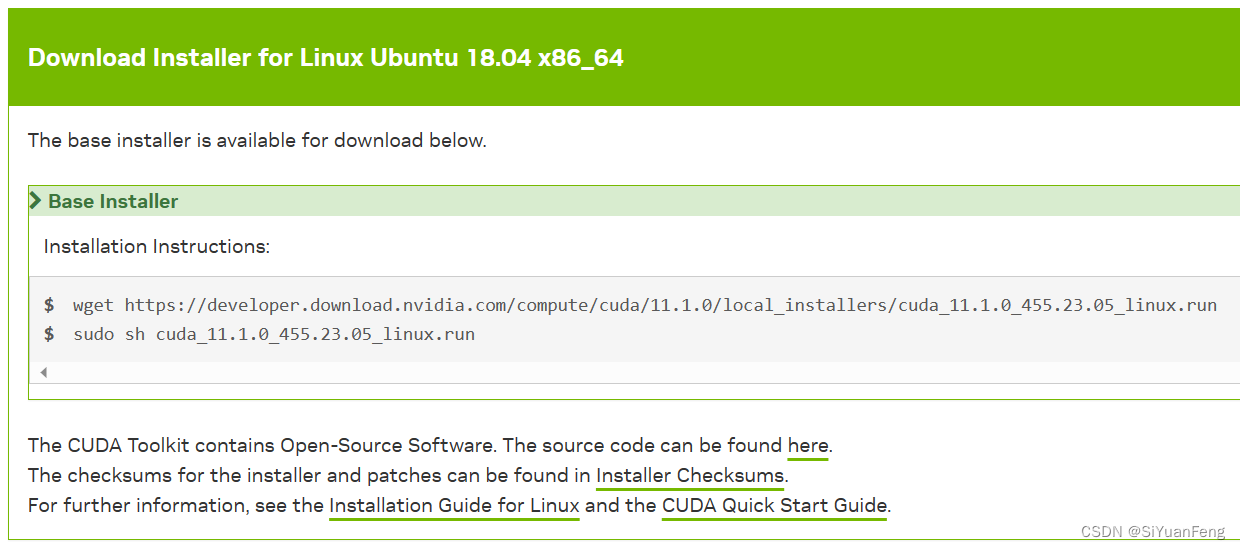
之后是配置cuda的环境变量的部分。具体安装过程如图所示:安装CUDA并配置环境变量。或参考这个帖子的配置环境变量过程:Linux系统下CUDA和cuDNN环境配置 。
接着我们进入nvidia-cudnn网址进一步下载cudnn
(这一步需要登陆)
安装cudnn之后,要执行一些列复制头文件的命令,参考此网址即可。对命令具体不懂的,可以询问ChatGPT 。
二:服务器安装pytorch
换源或换命令安装pytorch
pytorch官网
比如官网的conda安装命令是:
conda install pytorch==1.8.0 torchvision==0.9.0 torchaudio==0.8.0 -c pytorch
实际上这个版本还有对应的pip安装命令:
pip install torch==1.8.0+cu111 torchvision==0.9.0+cu111 torchaudio==0.8.0 -f https://download.pytorch.org/whl/torch_stable.html
在安装pytorch的过程中,我们还可以换源
换源安装pytorch
本地安装pytorch
pytorch离线下载网址
比如如果pytorch官网告诉我们的安装命令是:
conda install pytorch==1.8.0 torchvision==0.9.0 torchaudio==0.8.0 -c pytorch
我们可以去上面的离线包下载网址,把对应python版本和cuda版本的pytorch,torchvision还有torchaudio都下载上:
torchvision-0.9.0+cu111-cp38-cp38-linux_x86_64.whl
torchaudio-0.8.0-cp38-cp38-linux_x86_64.whl
torch-1.8.0+cu111-cp38-cp38-linux_x86_64.whl
之后我们把下载的包上传到服务器以后,在本地路径上直接pip安装就可以了。
pip install torch-1.8.0+cu111-cp38-cp38-linux_x86_64.whl
pip install torchvision-0.9.0+cu111-cp38-cp38-linux_x86_64.whl
pip install torchaudio-0.8.0-cp38-cp38-linux_x86_64.whl
报错: xxx.whl is not a supported wheel on this platform
不过本地安装pytorch的whl文件的一个问题就是,我们可能需要改一下文件的名字(因为新版的pip必须把文件名按规定的语法来修改才能安装上)
具体可以参考这三个网址:ERROR: torch-1.12.0+cu116-cp38-cp38-win_amd64.whl is not a supported wheel on this platform.,xxx.whl is not a supported wheel on this platform-查看pip支持的安装包版本,用whl安装pytorch踩坑实录(whl is not a supported wheel on this platform.)
我改了文件名后,成功安装上了。
我改的文件名:
torch-1.8.0+cu111-py38-none-linux_x86_64.whl
然后就成功安装上了
pip install torchvision-0.9.0+cu111-py38-none-linux_x86_64.whl
最后:
pip install torchaudio-0.8.0-py38-none-linux_x86_64.whl
检查pytorch是否成功安装:
import torch
print(torch.__version__)
print(torch.cuda.is_available())
# 打印当前可见可用的GPU数目
print(torch.cuda.device_count())
# 获取GPU名字
print(torch.cuda.get_device_name())
三:服务器运行git命令(git reset/ git clone)
这个同样是源或网络的问题,autodl有一个学术加速。


![[XSCTF]easyxor](https://img-blog.csdnimg.cn/5ae276a2b4f741629aa1354e7cf4a914.png)

