17 SpringCloud Alibaba入门简介
17.1 why会出现SpringCloud alibaba
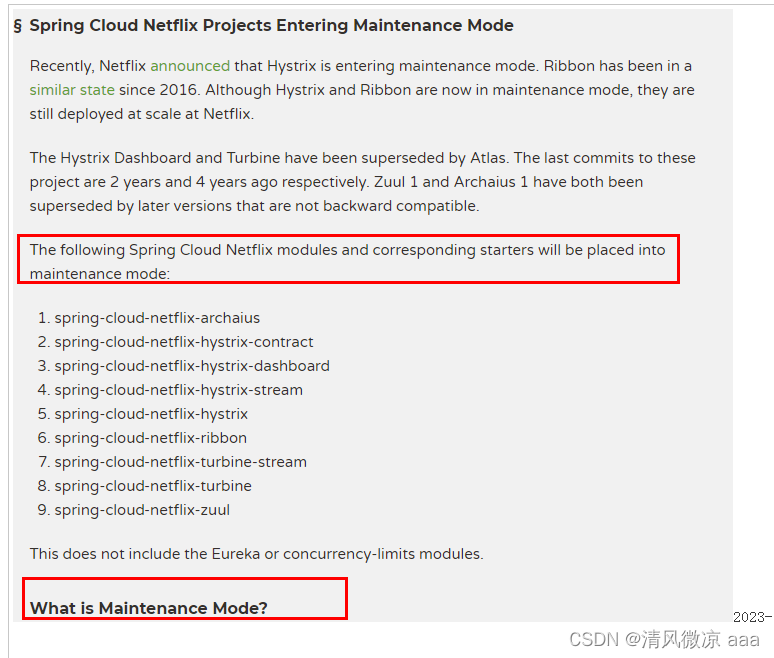
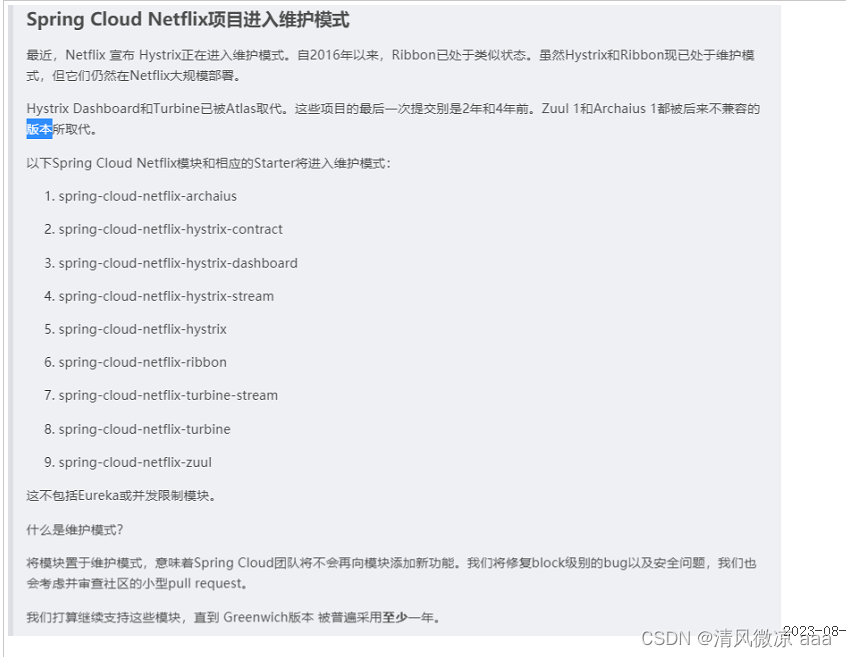
- Spring Cloud Netflix项目进入维护模式
-
https://spring.io/blog/2018/12/12/spring-cloud-greenwich-rc1-available-now
-
说明
-
- Spring Cloud Netflix Projects Entering Maintenance Mode
- 什么是维护模式
- 将模块置于维护模式,意味着 Spring Cloud 团队将不会再向模块添加新功能。我们将修复 block 级别的 bug 以及安全问题,我们也会考虑并审查社区的小型 pull request。

- 将模块置于维护模式,意味着 Spring Cloud 团队将不会再向模块添加新功能。我们将修复 block 级别的 bug 以及安全问题,我们也会考虑并审查社区的小型 pull request。
- 进入维护模式意味着什么呢?
- Spring Cloud Netflix 将不再开发新的组件
- 我们都知道Spring Cloud 版本迭代算是比较快的,因而出现了很多重大ISSUE都还来不及Fix就又推另一个Release了。进入维护模式意思就是目前一直以后一段时间Spring Cloud Netflix提供的服务和功能就这么多了,不在开发新的组件和功能了。以后将以维护和Merge分支Full Request为主
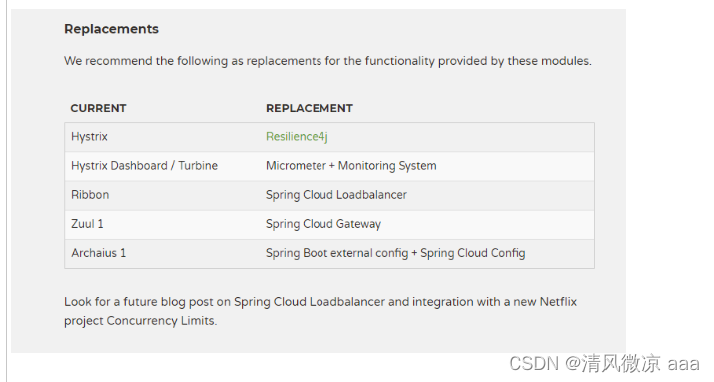
- 新组件功能将以其他替代平代替的方式实现
- 什么是维护模式
17.2 SpringCloud alibaba带来了什么
是什么
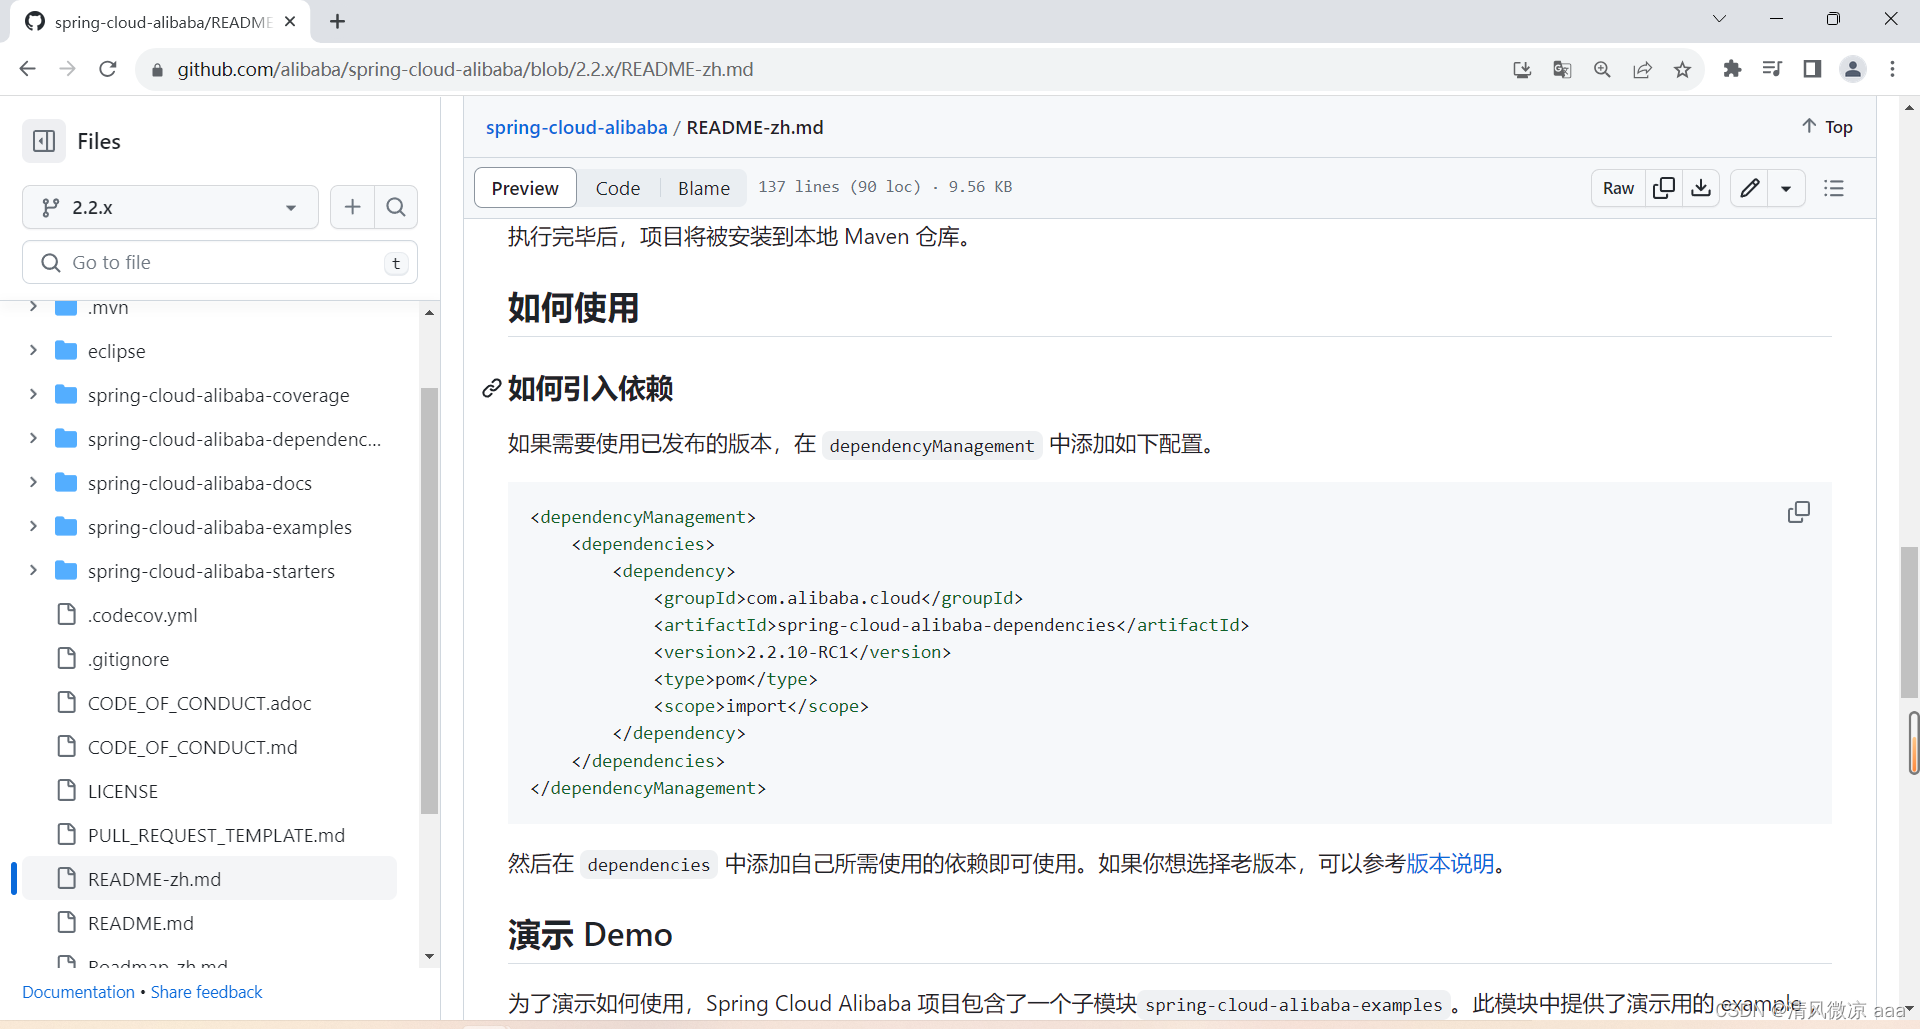
- 官网:
https://github.com/alibaba/spring-cloud-alibaba/blob/master/README-zh.md
- 诞生:
- 2018.10.31,Spring Cloud Alibaba 正式入驻了 Spring Cloud 官方孵化器,并在 Maven 中央库发布了第一个版本。

- 2018.10.31,Spring Cloud Alibaba 正式入驻了 Spring Cloud 官方孵化器,并在 Maven 中央库发布了第一个版本。
去哪下:
https://github.com/alibaba/spring-cloud-alibaba/blob/master/README-zh.md

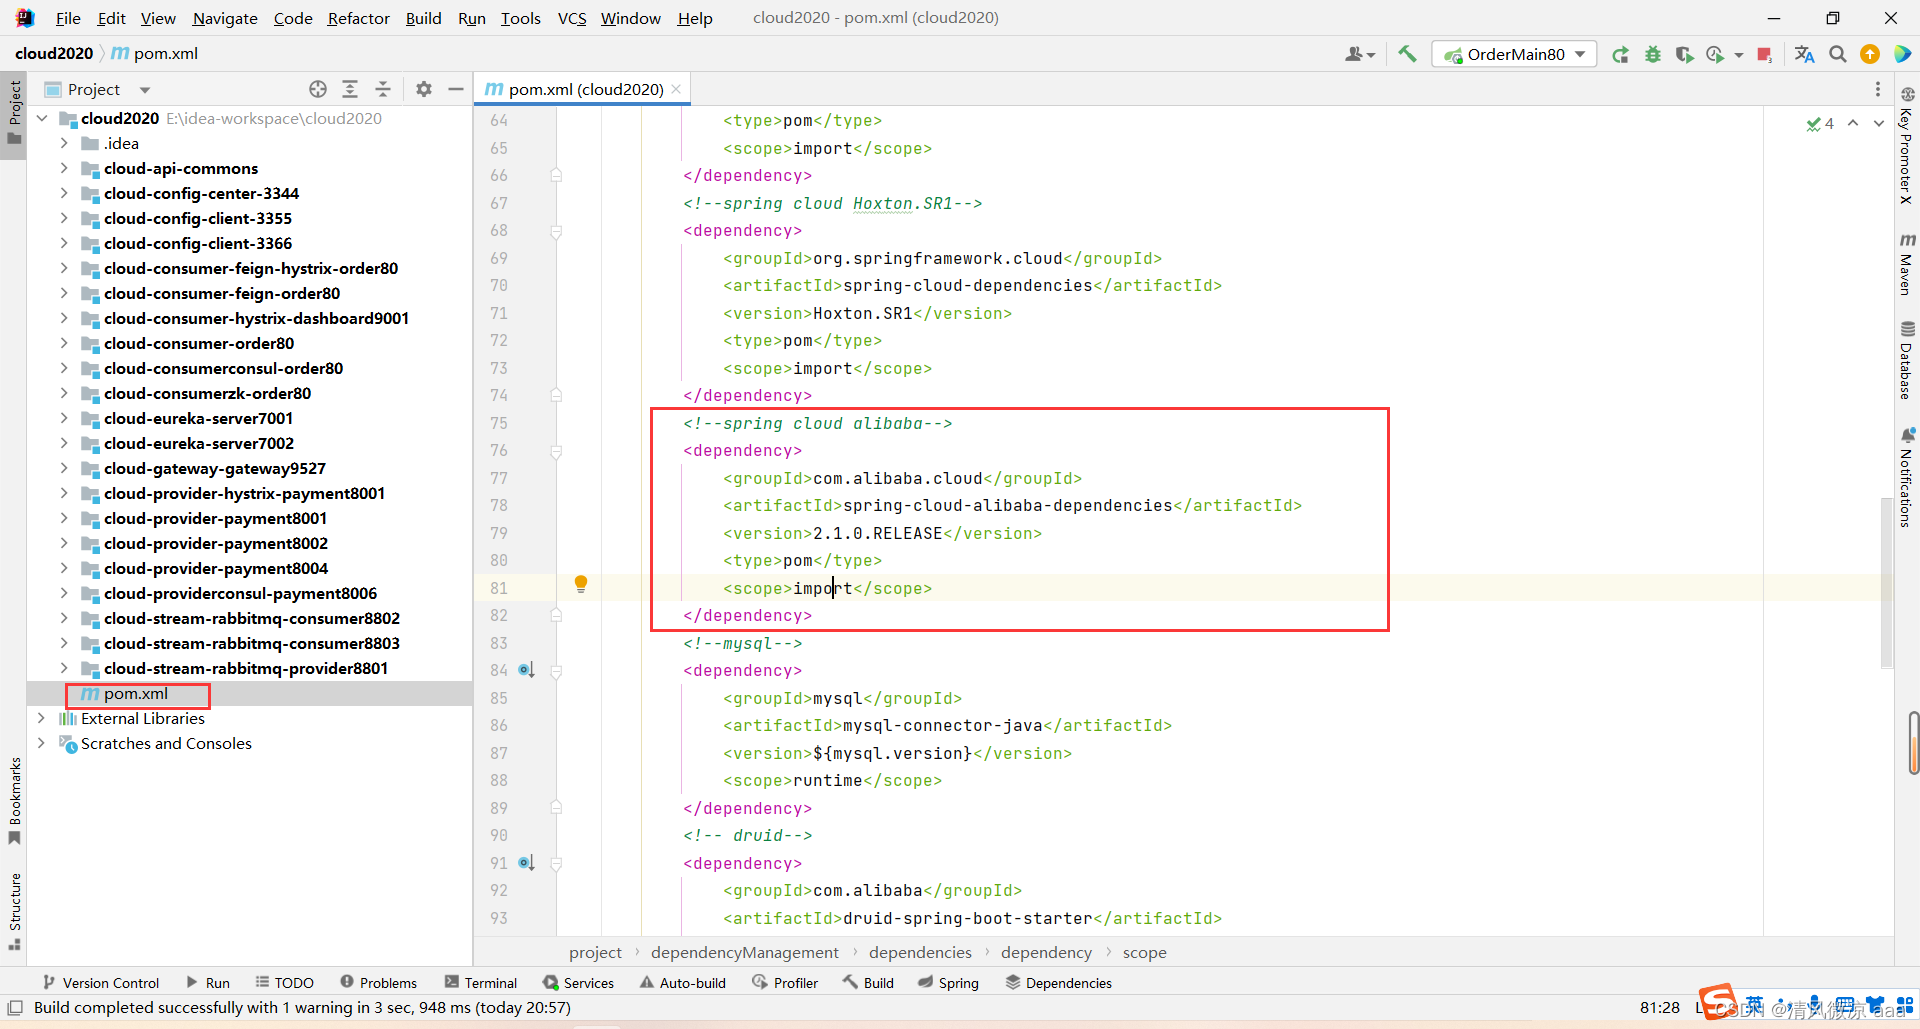
- 之前在pom文件已经引入此依赖了
能干嘛:
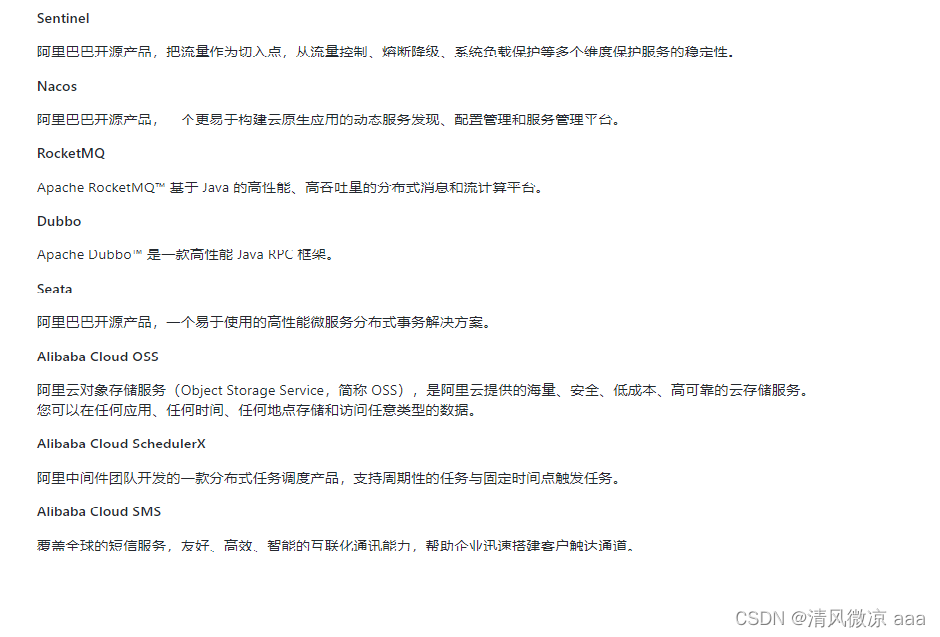
- 服务限流降级:默认支持 Servlet、Feign、RestTemplate、Dubbo 和 RocketMQ 限流降级功能的接入,可以在运行时通过控制台实时修改限流降级规则,还支持查看限流降级 Metrics 监控。
- 服务注册与发现:适配 Spring Cloud 服务注册与发现标准,默认集成了 Ribbon 的支持。
- 分布式配置管理:支持分布式系统中的外部化配置,配置更改时自动刷新。
- 消息驱动能力:基于 Spring Cloud Stream 为微服务应用构建消息驱动能力。
- 阿里云对象存储:阿里云提供的海量、安全、低成本、高可靠的云存储服务。支持在任何应用、任何时间、任何地点存储和访问任意类型的数据。
- 分布式任务调度:提供秒级、精准、高可靠、高可用的定时(基于 Cron 表达式)任务调度服务。同时提供分布式的任务执行模型,如网格任务。网格任务支持海量子任务均匀分配到所有 Worker(schedulerx-client)上执行。
怎么玩
- 如下图:
17.3 SpringCloud alibaba学习资料获取
-
官网:https://spring.io/projects/spring-cloud-alibaba#overview
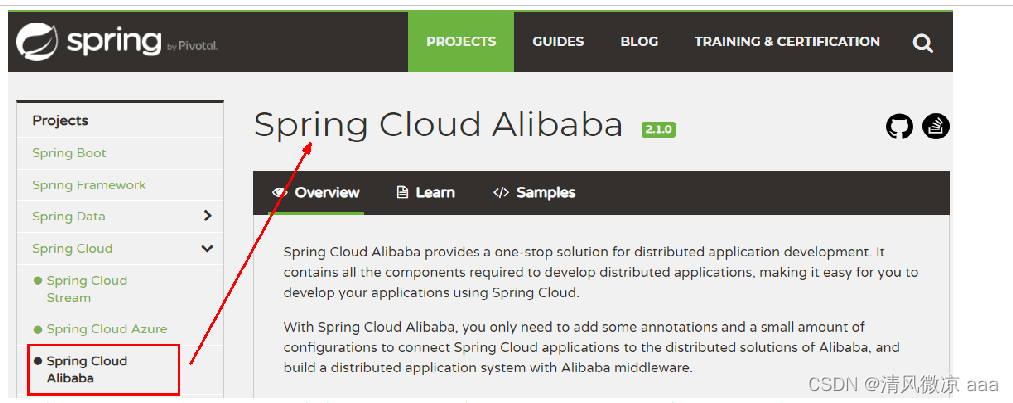
- Spring Cloud Alibaba 致力于提供微服务开发的一站式解决方案。此项目包含开发分布式应用微服务的必需组件,方便开发者通过 Spring Cloud 编程模型轻松使用这些组件来开发分布式应用服务。
- 依托 Spring Cloud Alibaba,您只需要添加一些注解和少量配置,就可以将 Spring Cloud 应用接入阿里微服务解决方案,通过阿里中间件来迅速搭建分布式应用系统。
- SpringCloud Alibaba进入了SpringCloud官方孵化器,而且毕业了
- 即:这个网址是改版之前的网址,改版后加入到了SpringCloud中,所以之后查看SpringCloud中的阿里巴巴即可
-
英文
-
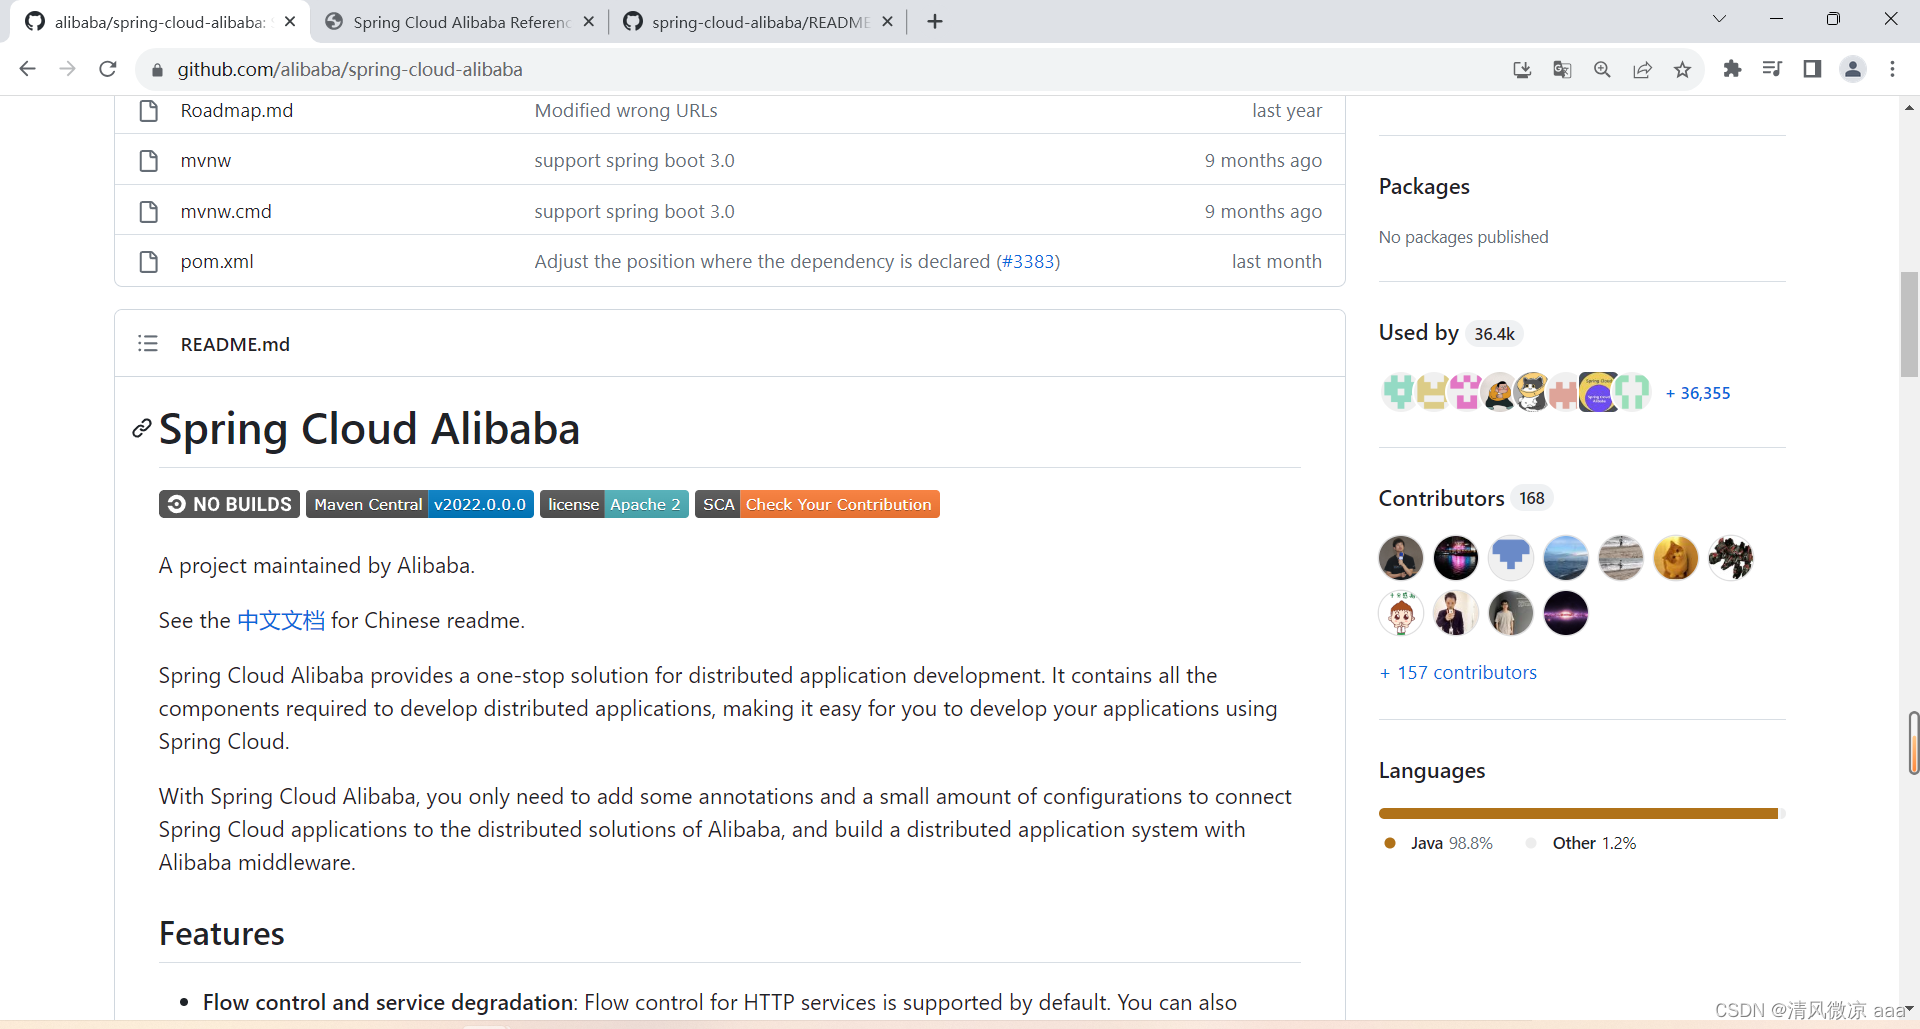
https://github.com/alibaba/spring-cloud-alibaba
-
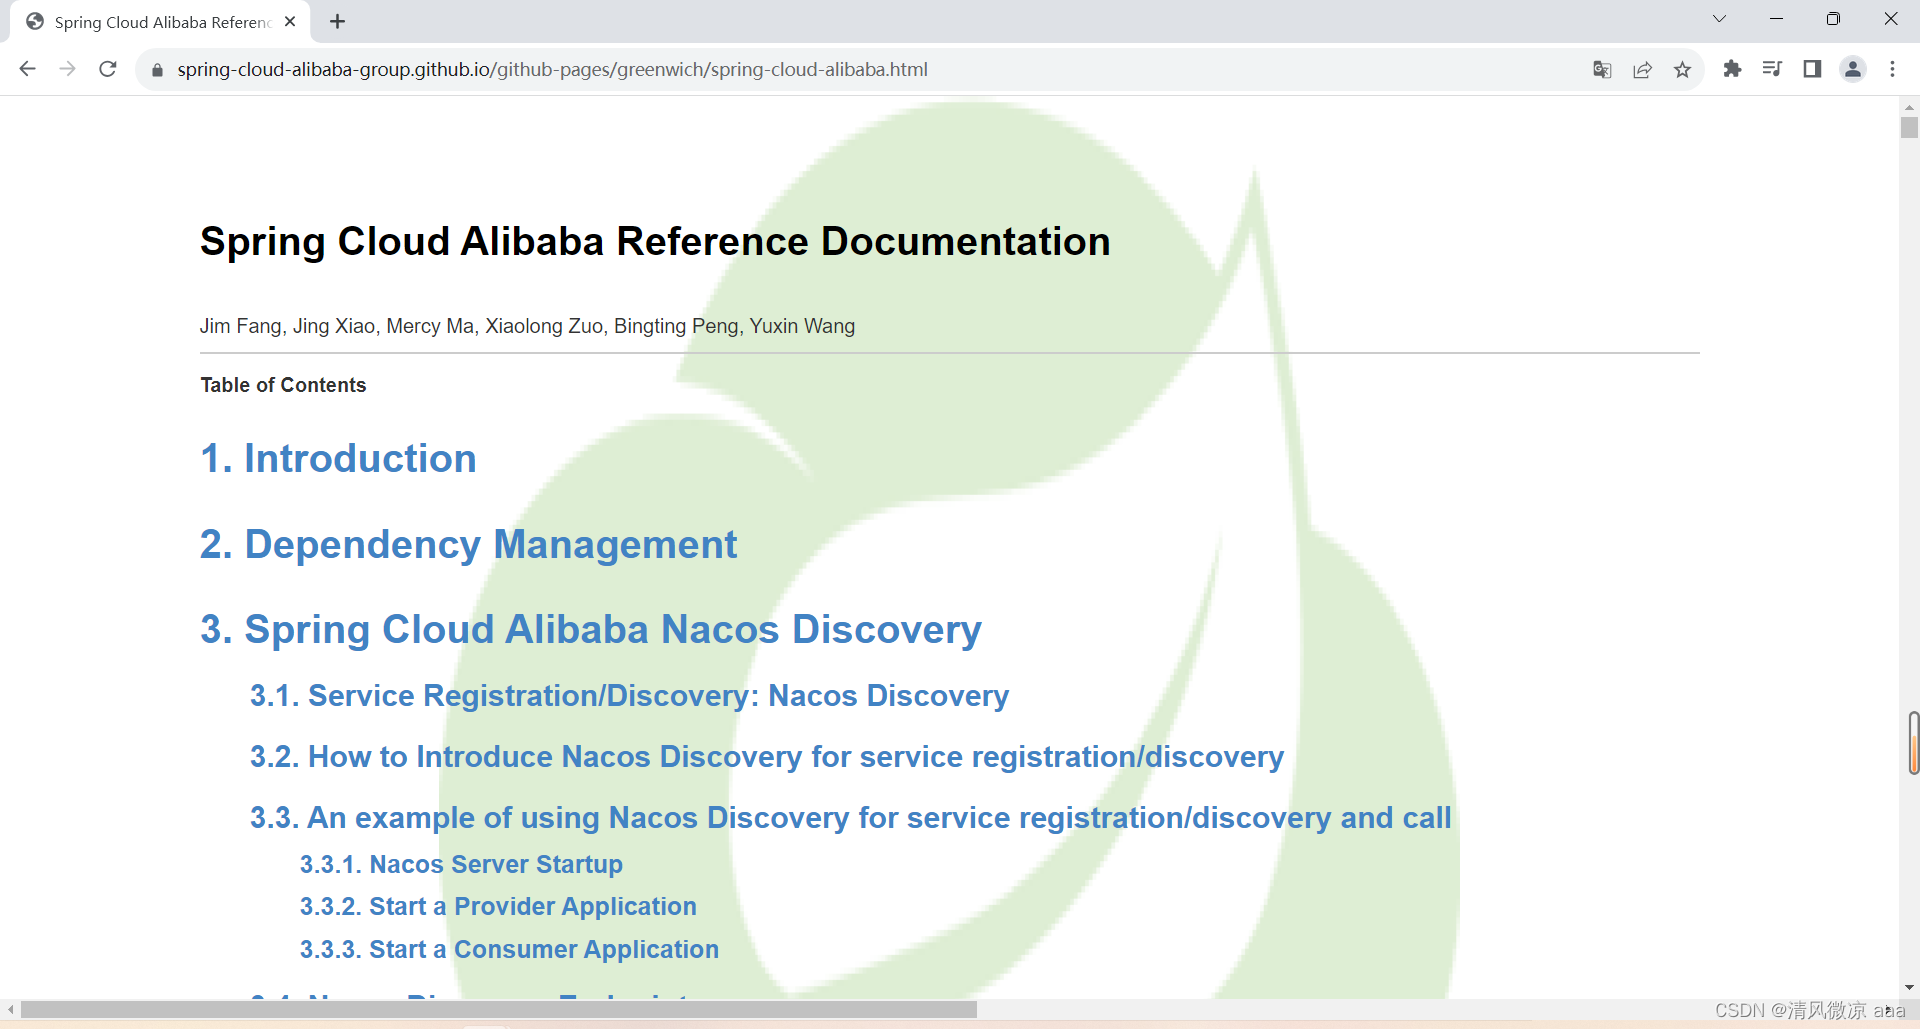
英文文档:https://spring-cloud-alibaba-group.github.io/github-pages/greenwich/spring-cloud-alibaba.html
-
-
中文
- 中文文档:https://github.com/alibaba/spring-cloud-alibaba/blob/master/README-zh.md
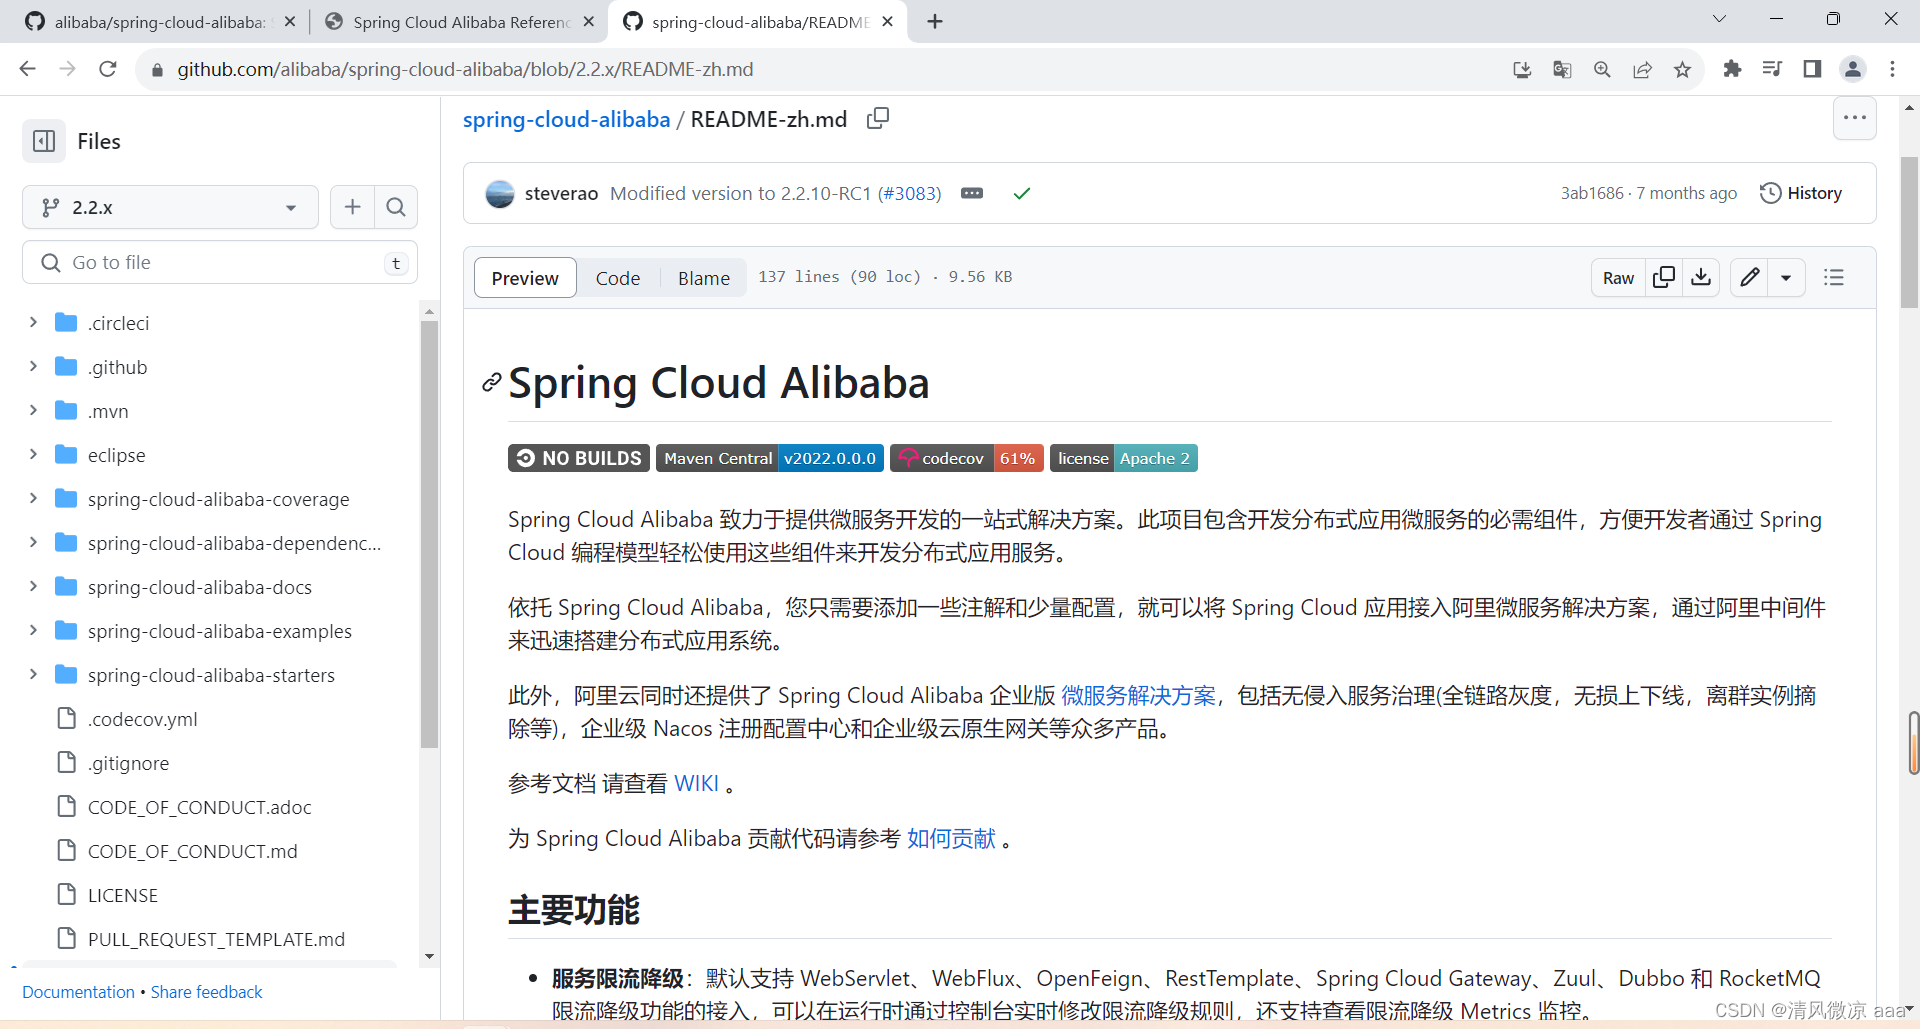
- 中文文档:https://github.com/alibaba/spring-cloud-alibaba/blob/master/README-zh.md
18 Nacos服务注册和配置中心
- SpringCloud Alibaba----Nacos服务注册和配置中心
18.1 Nacos简介
18.1.1 为什么叫Nacos
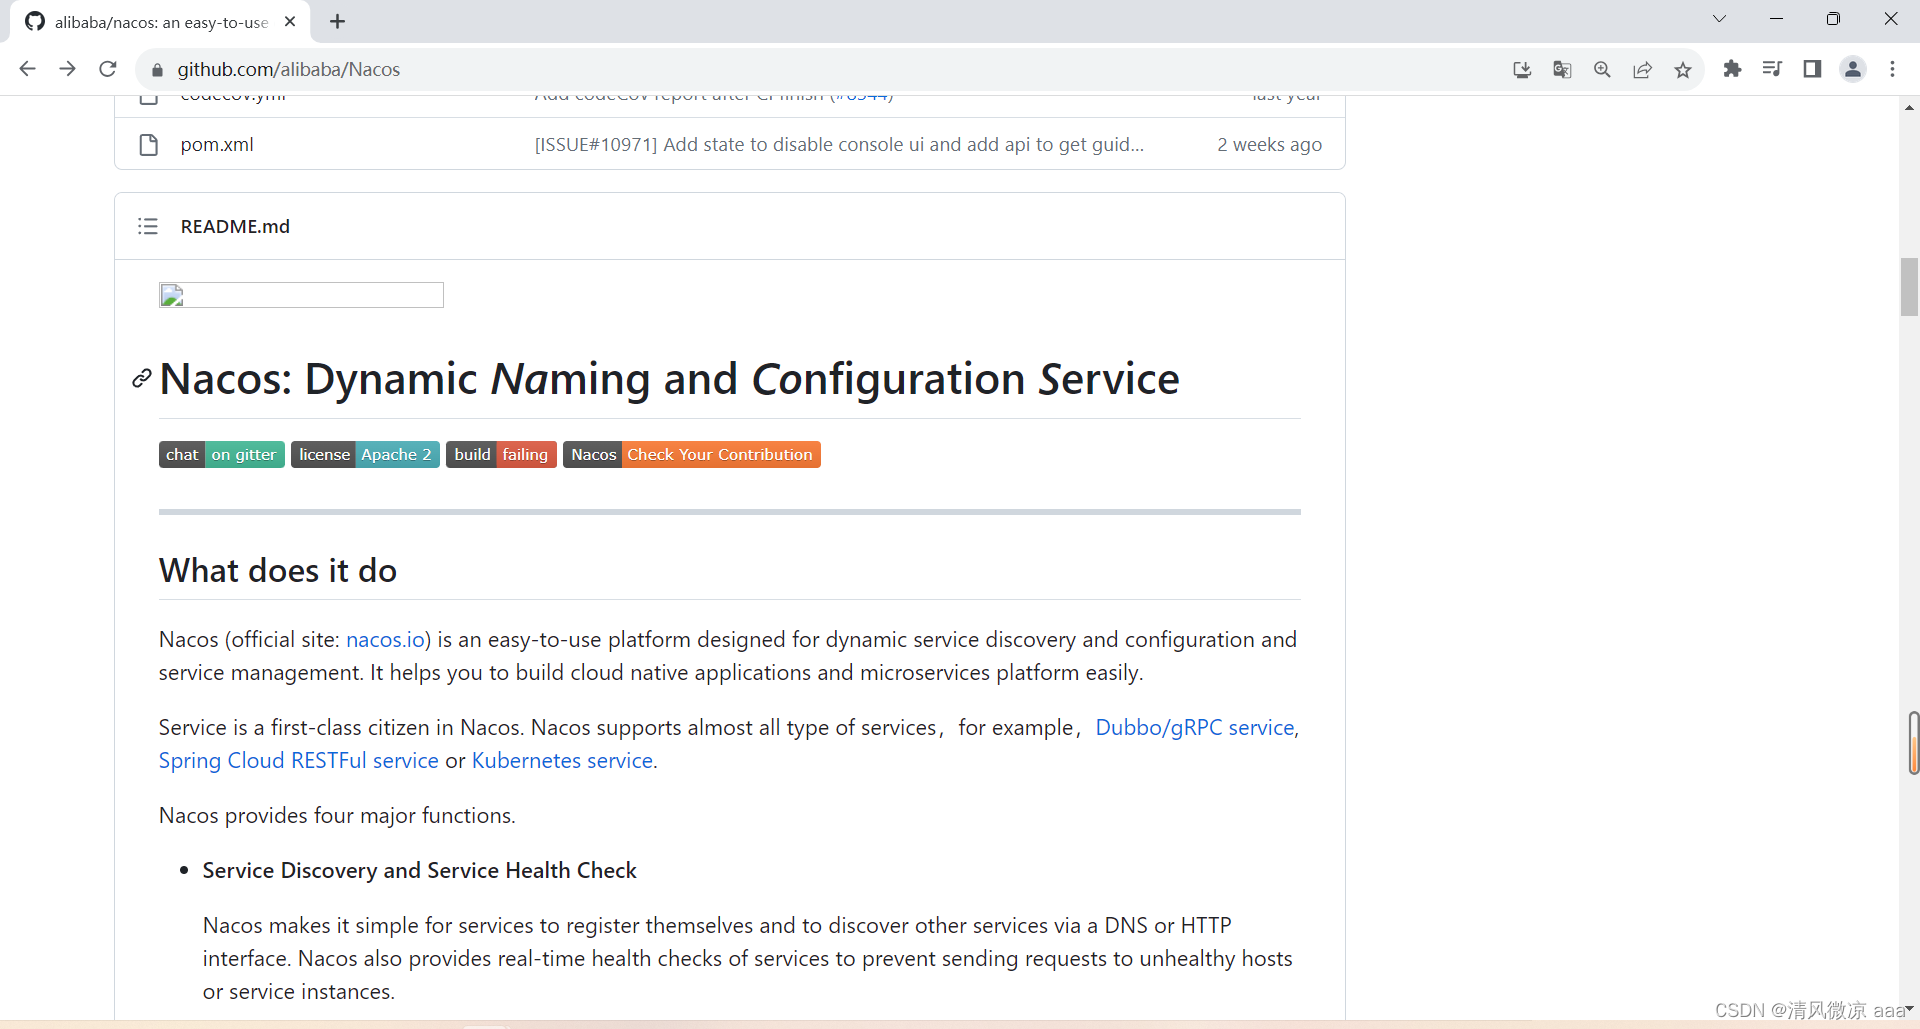
- 前四个字母分别为Naming和Configuration的前两个字母,最后的s为Service。
- github网址:https://github.com/alibaba/Nacos
18.1.2 是什么
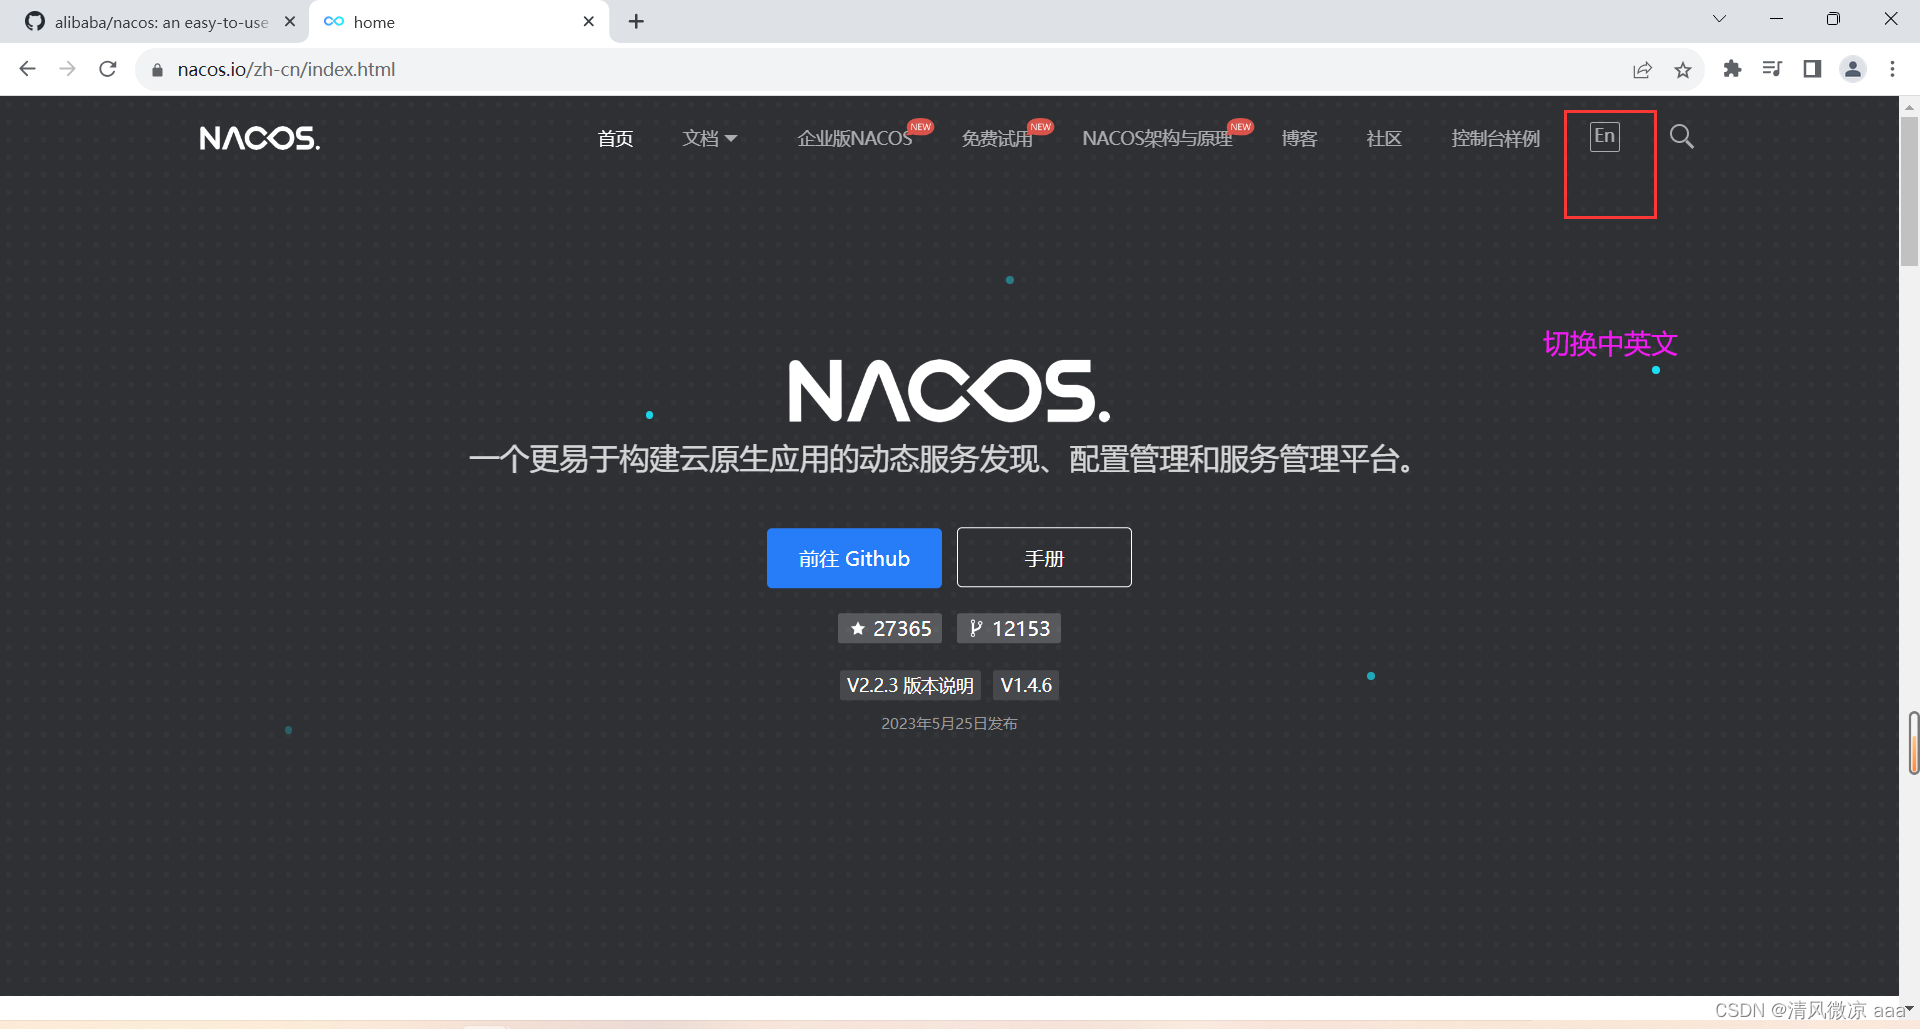
- 一个更易于构建云原生应用的动态服务发现、配置管理和服务管理平台。
- Nacos: Dynamic Naming and Configuration Service
- Nacos就是注册中心 + 配置中心的组合
- 等价于:Nacos = Eureka+Config +Bus
18.1.3 能干嘛
- 替代Eureka做服务注册中心
- 替代Config做服务配置中心
18.1.4 去哪下
-
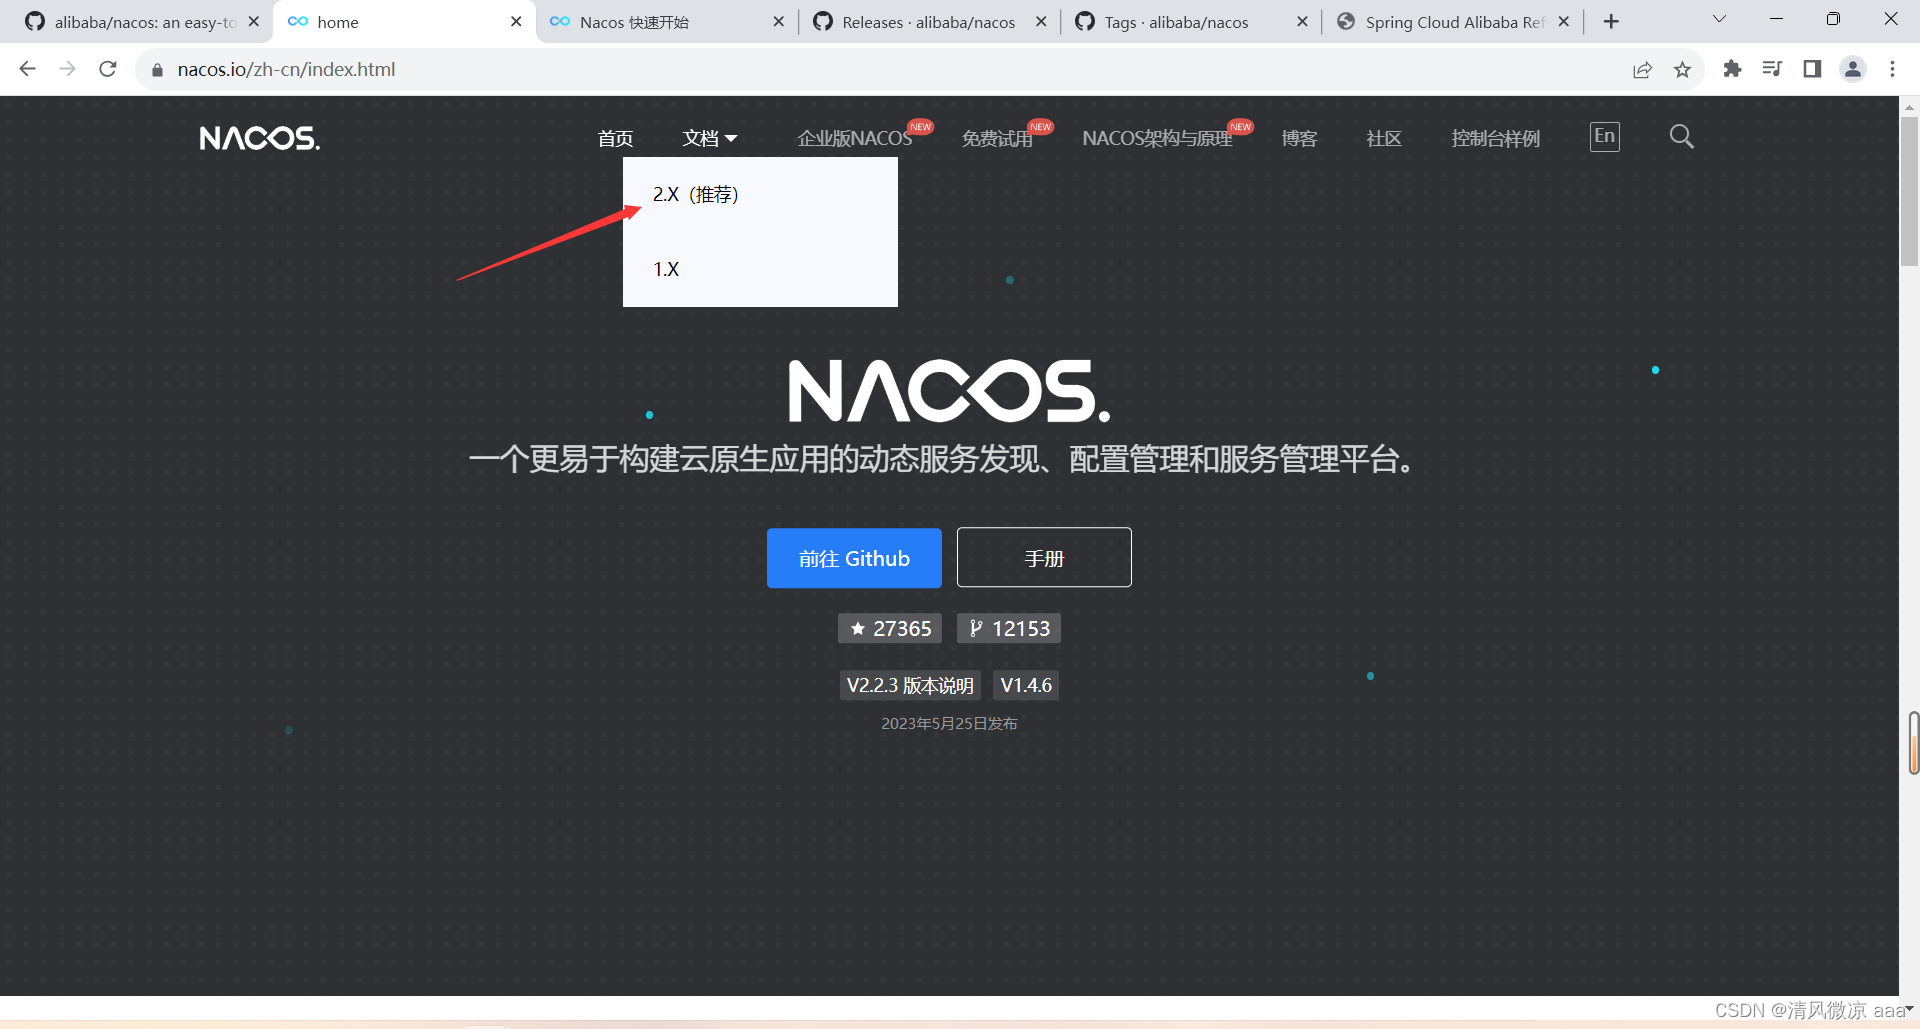
官网:https://nacos.io/zh-cn/index.html
-
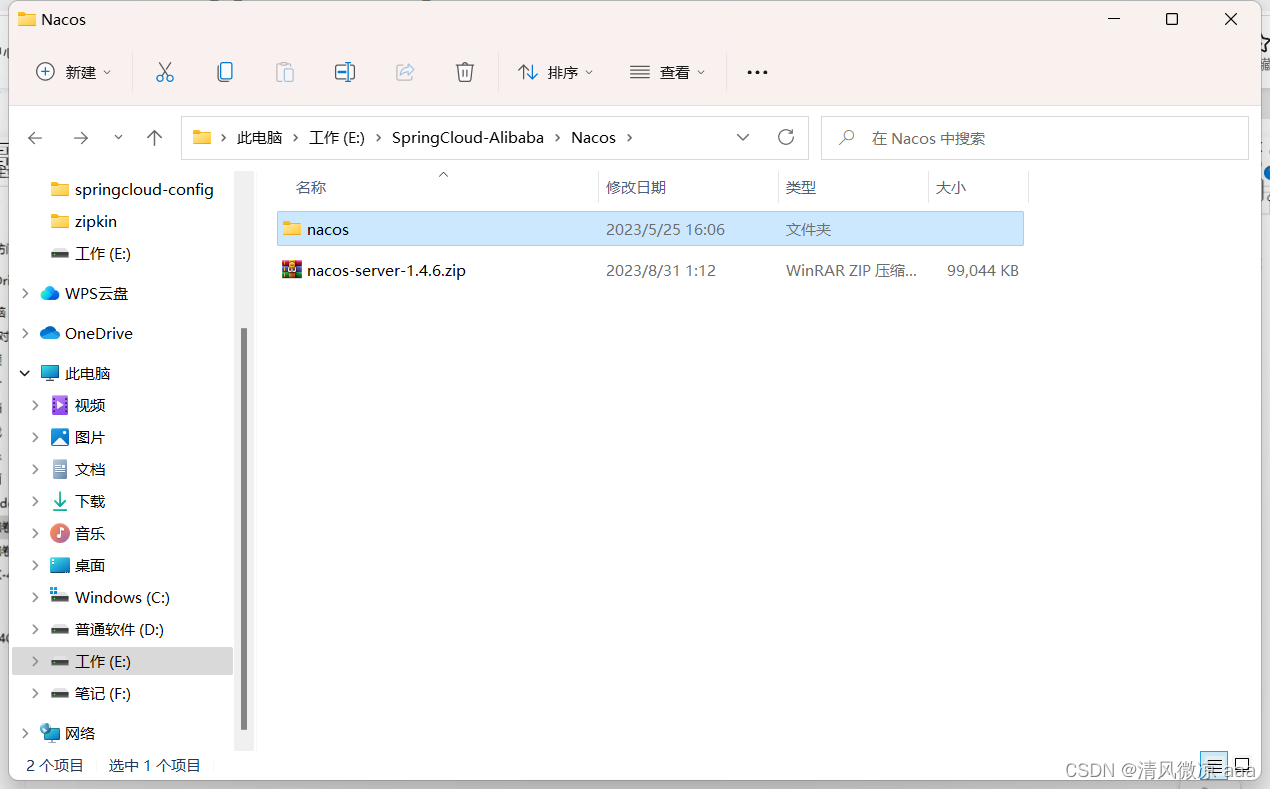
下载地址:
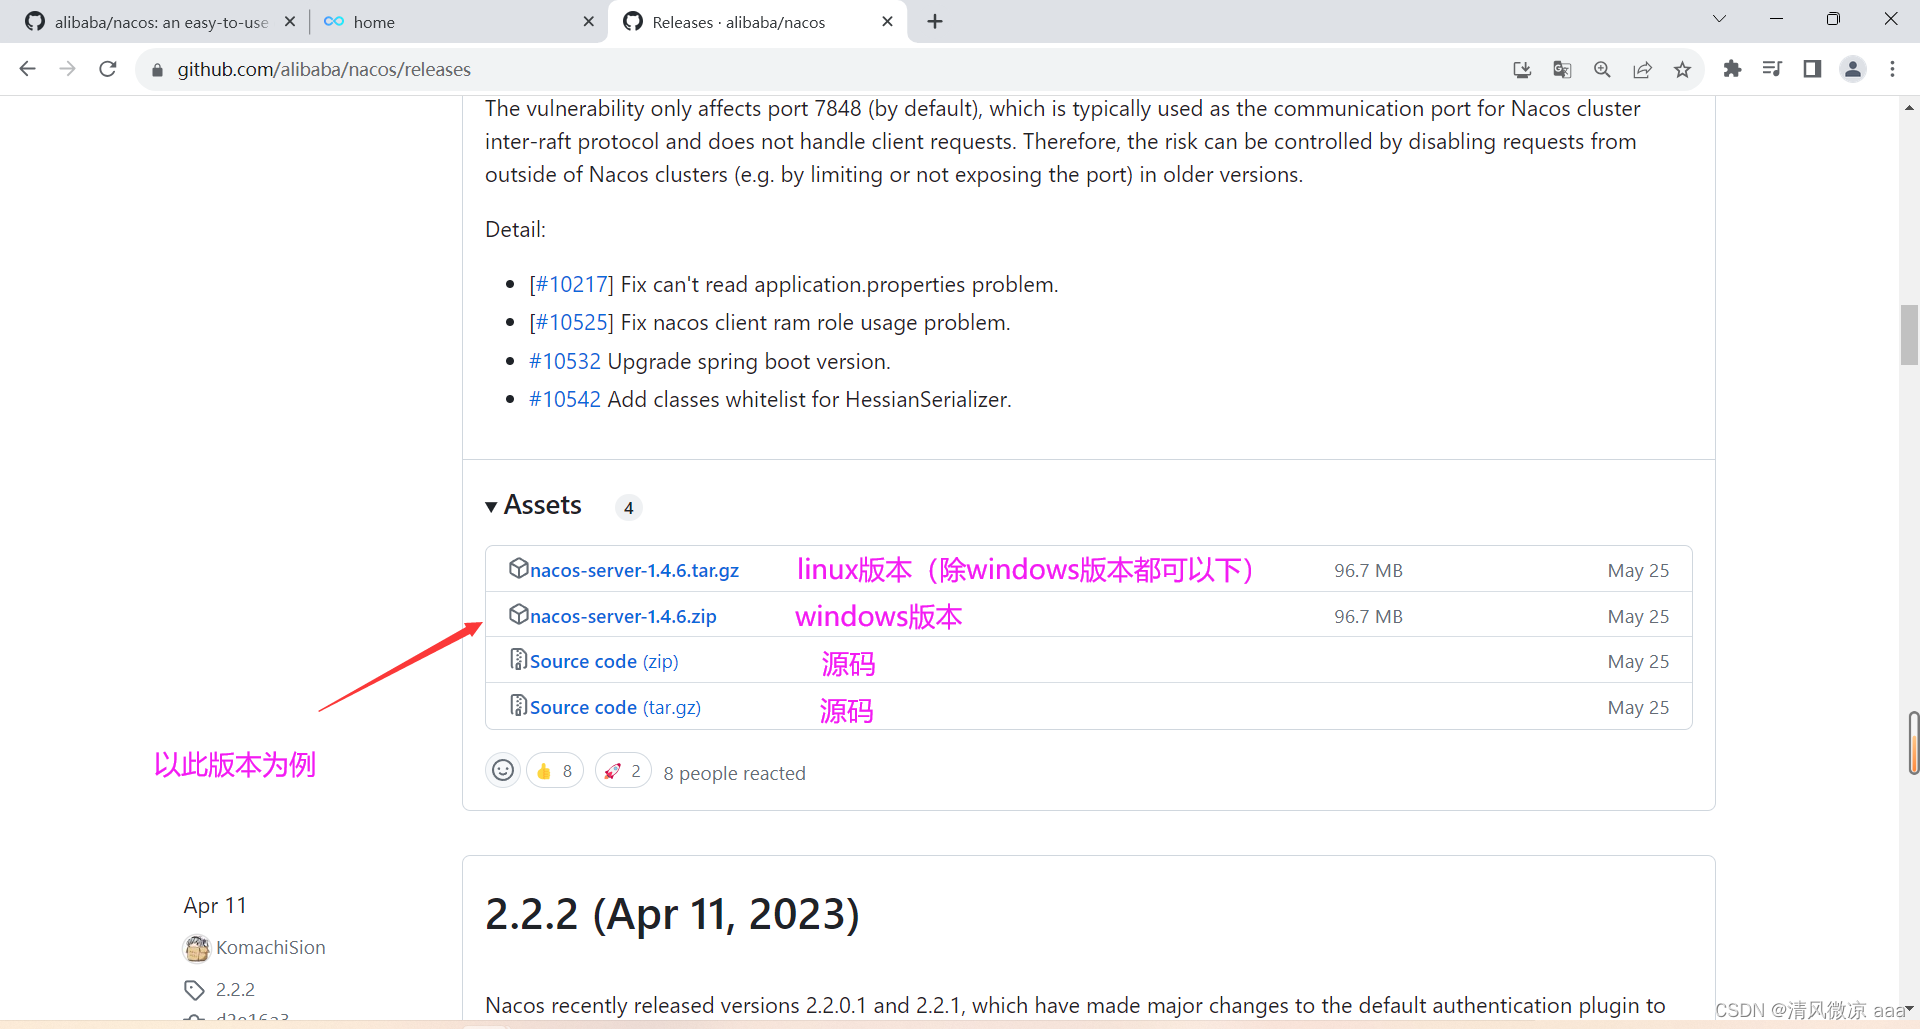
https://github.com/alibaba/nacos/releases
-
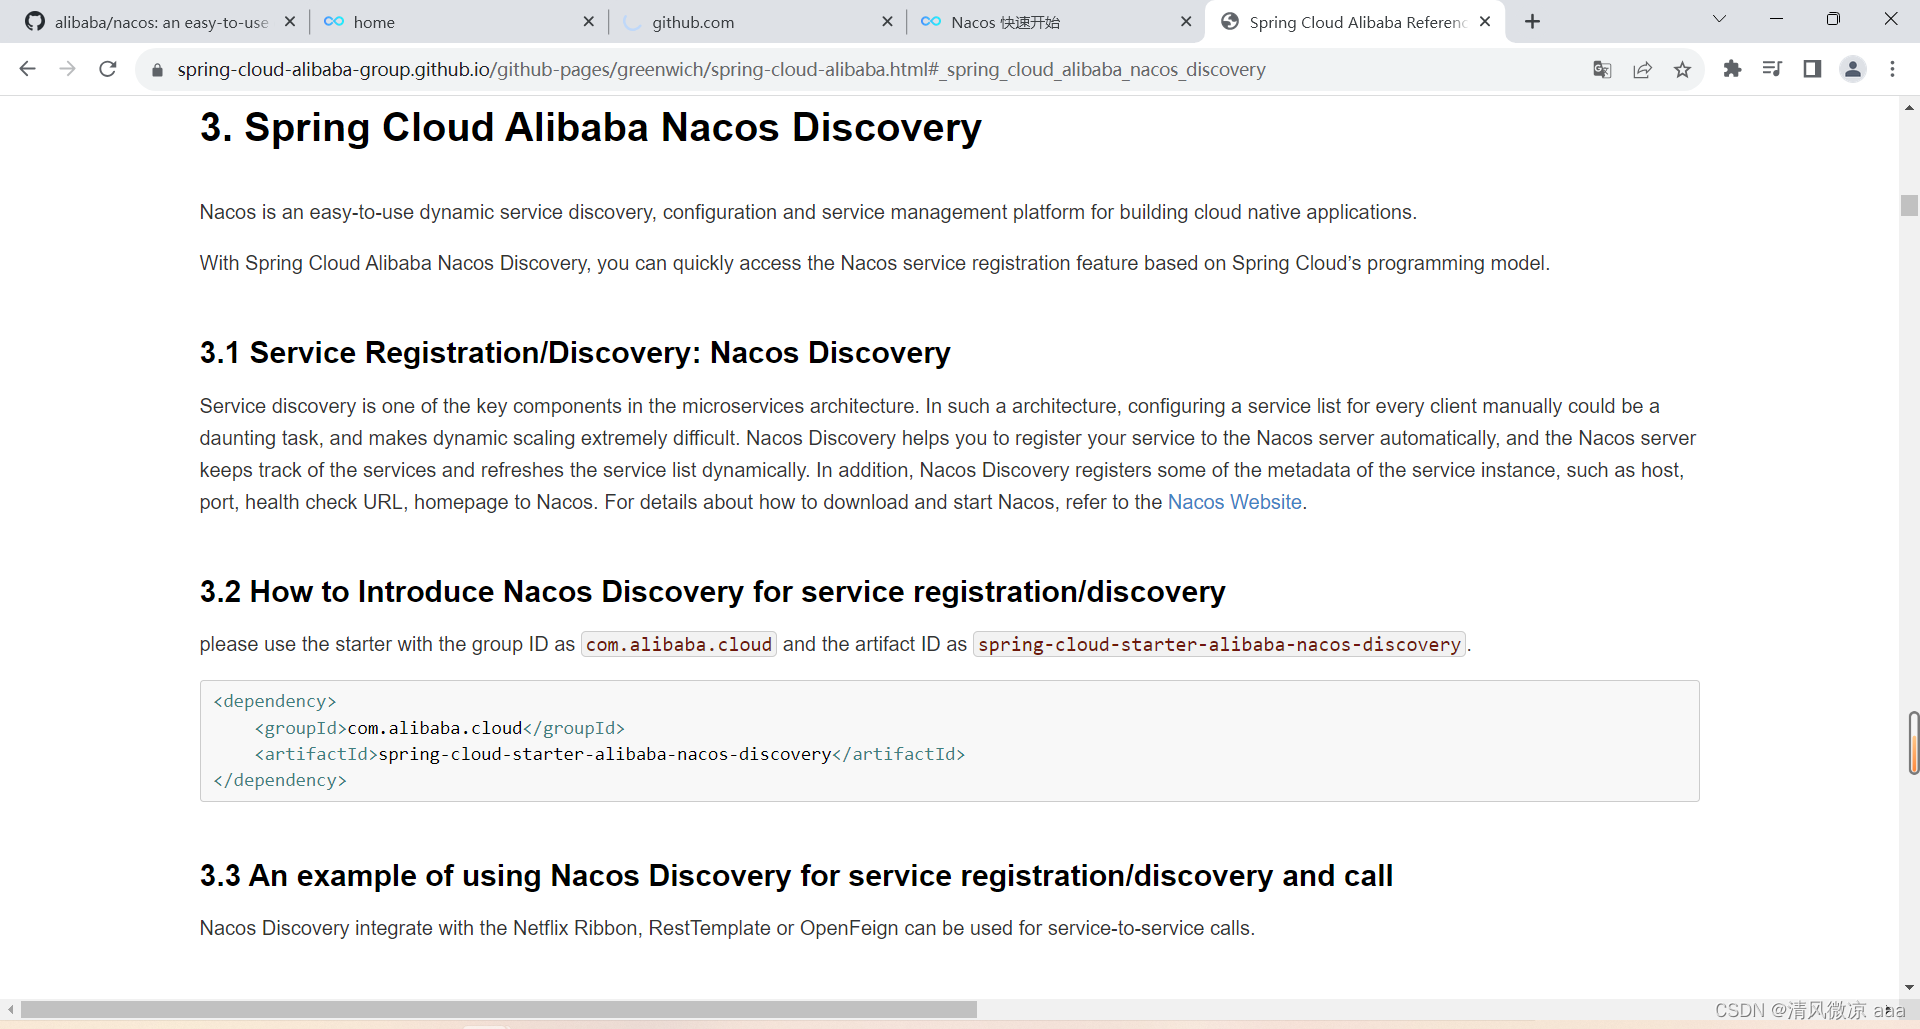
spring-cloud-alibaba在GitHub上面的总文档:使用Nacos
https://spring-cloud-alibaba-group.github.io/github-pages/greenwich/spring-cloud-alibaba.html#_spring_cloud_alibaba_nacos_discovery
-
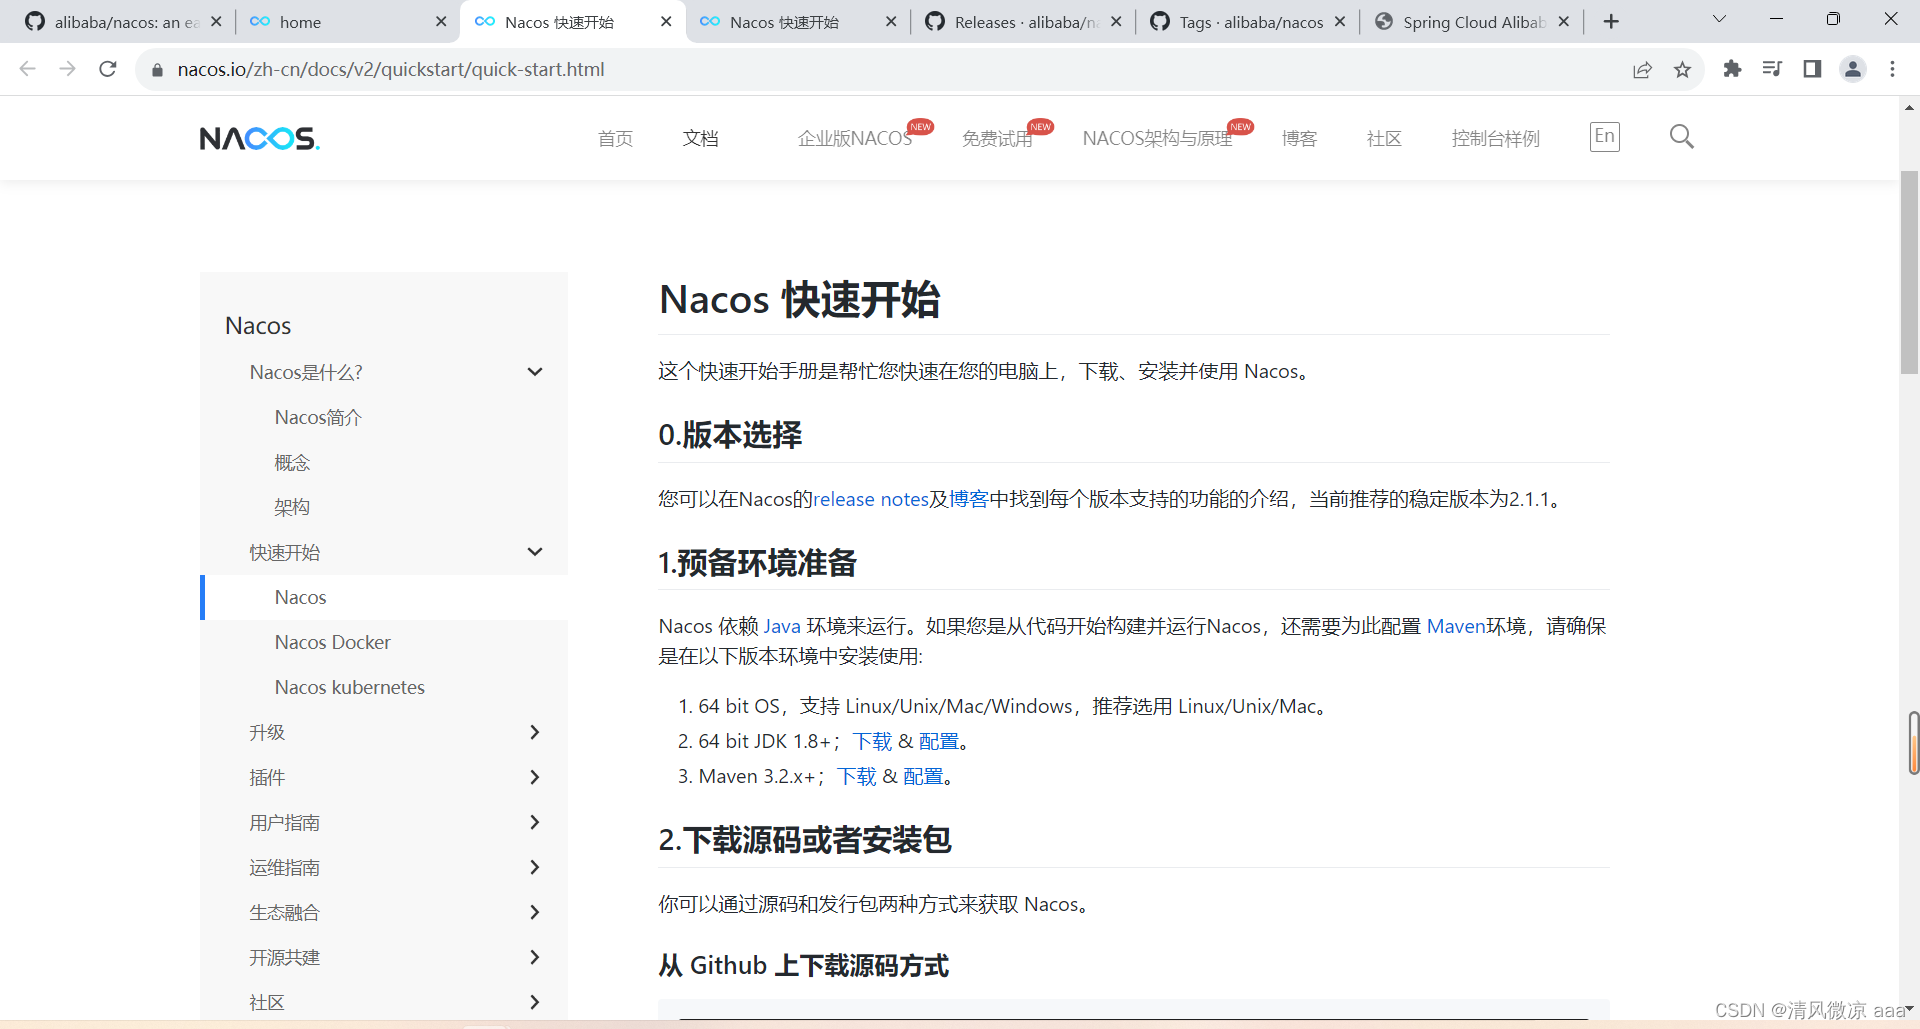
也可以直接在Nacos官网中查看文档:
18.1.5 各种注册中心比较(简单讲解)
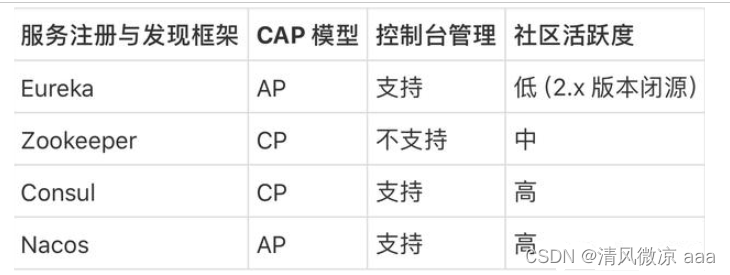
据说 Nacos 在阿里巴巴内部有超过 10 万的实例运行,已经过了类似双十一等各种大型流量的考验
18.2 安装并运行Nacos
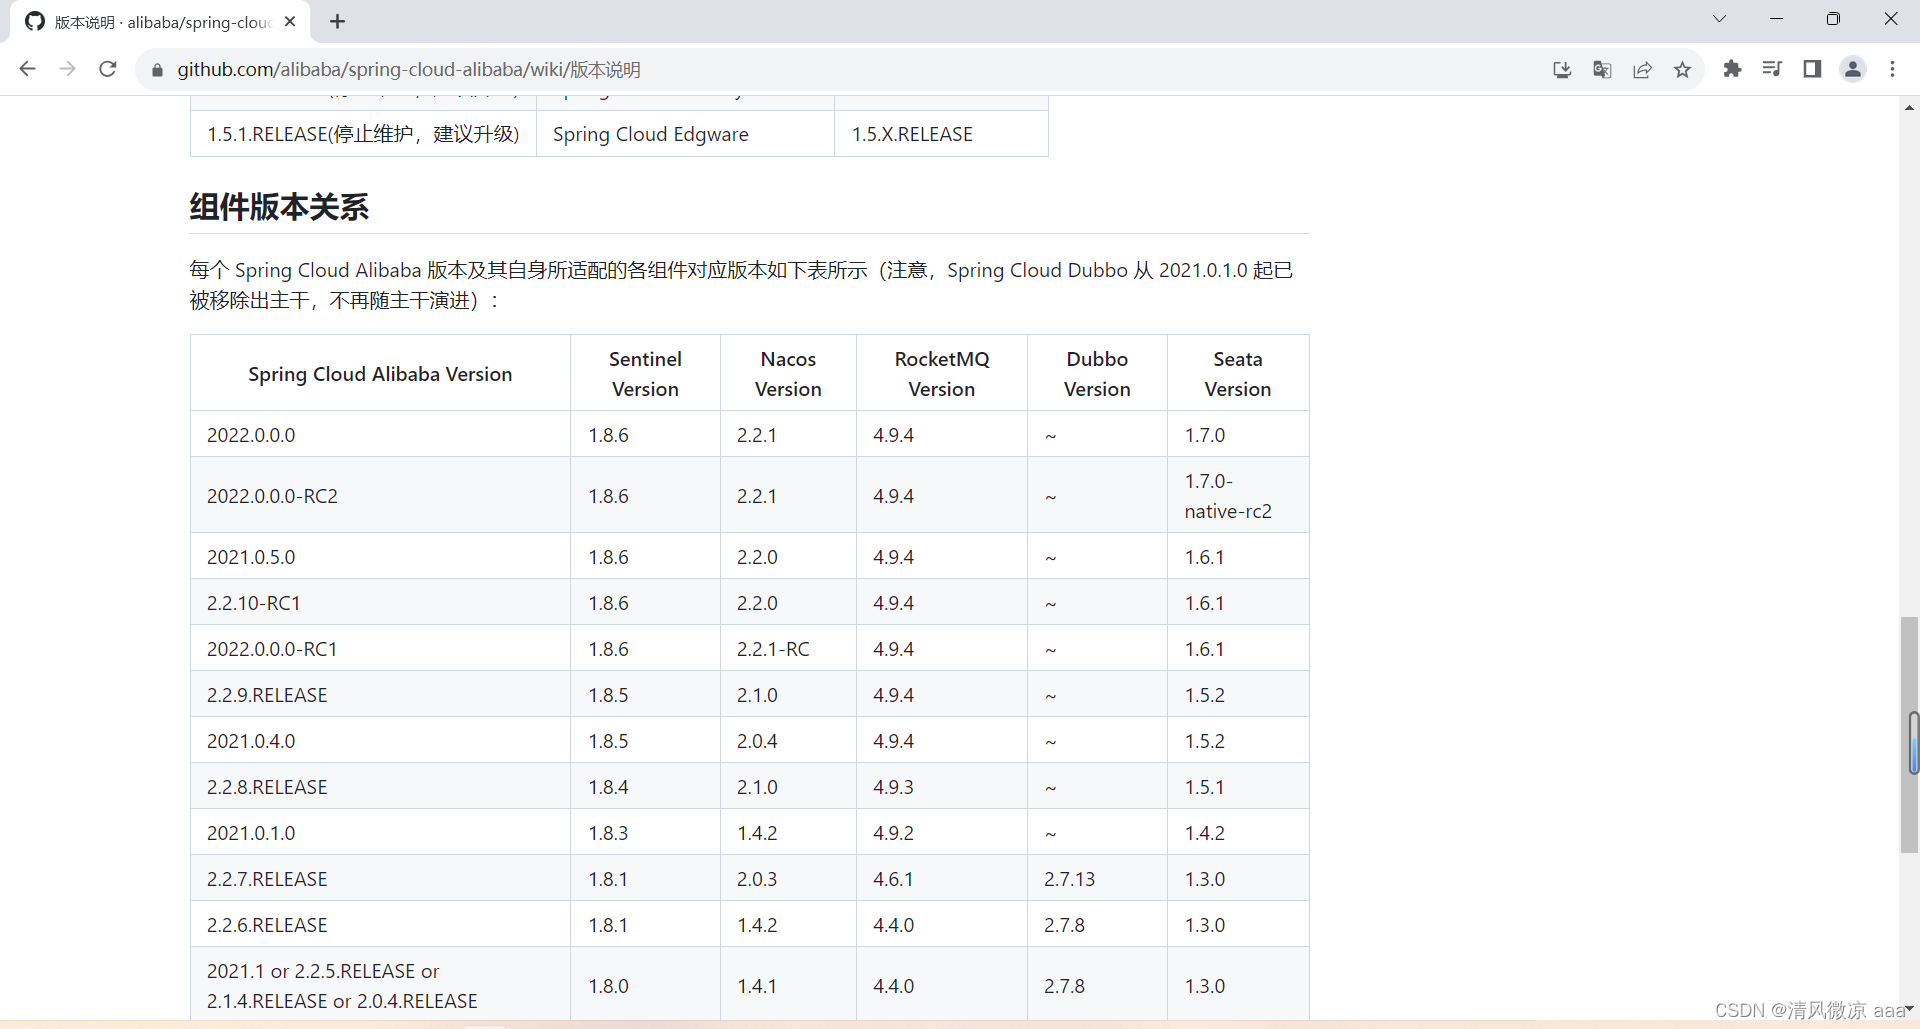
18.2.1 新老版本说明
-
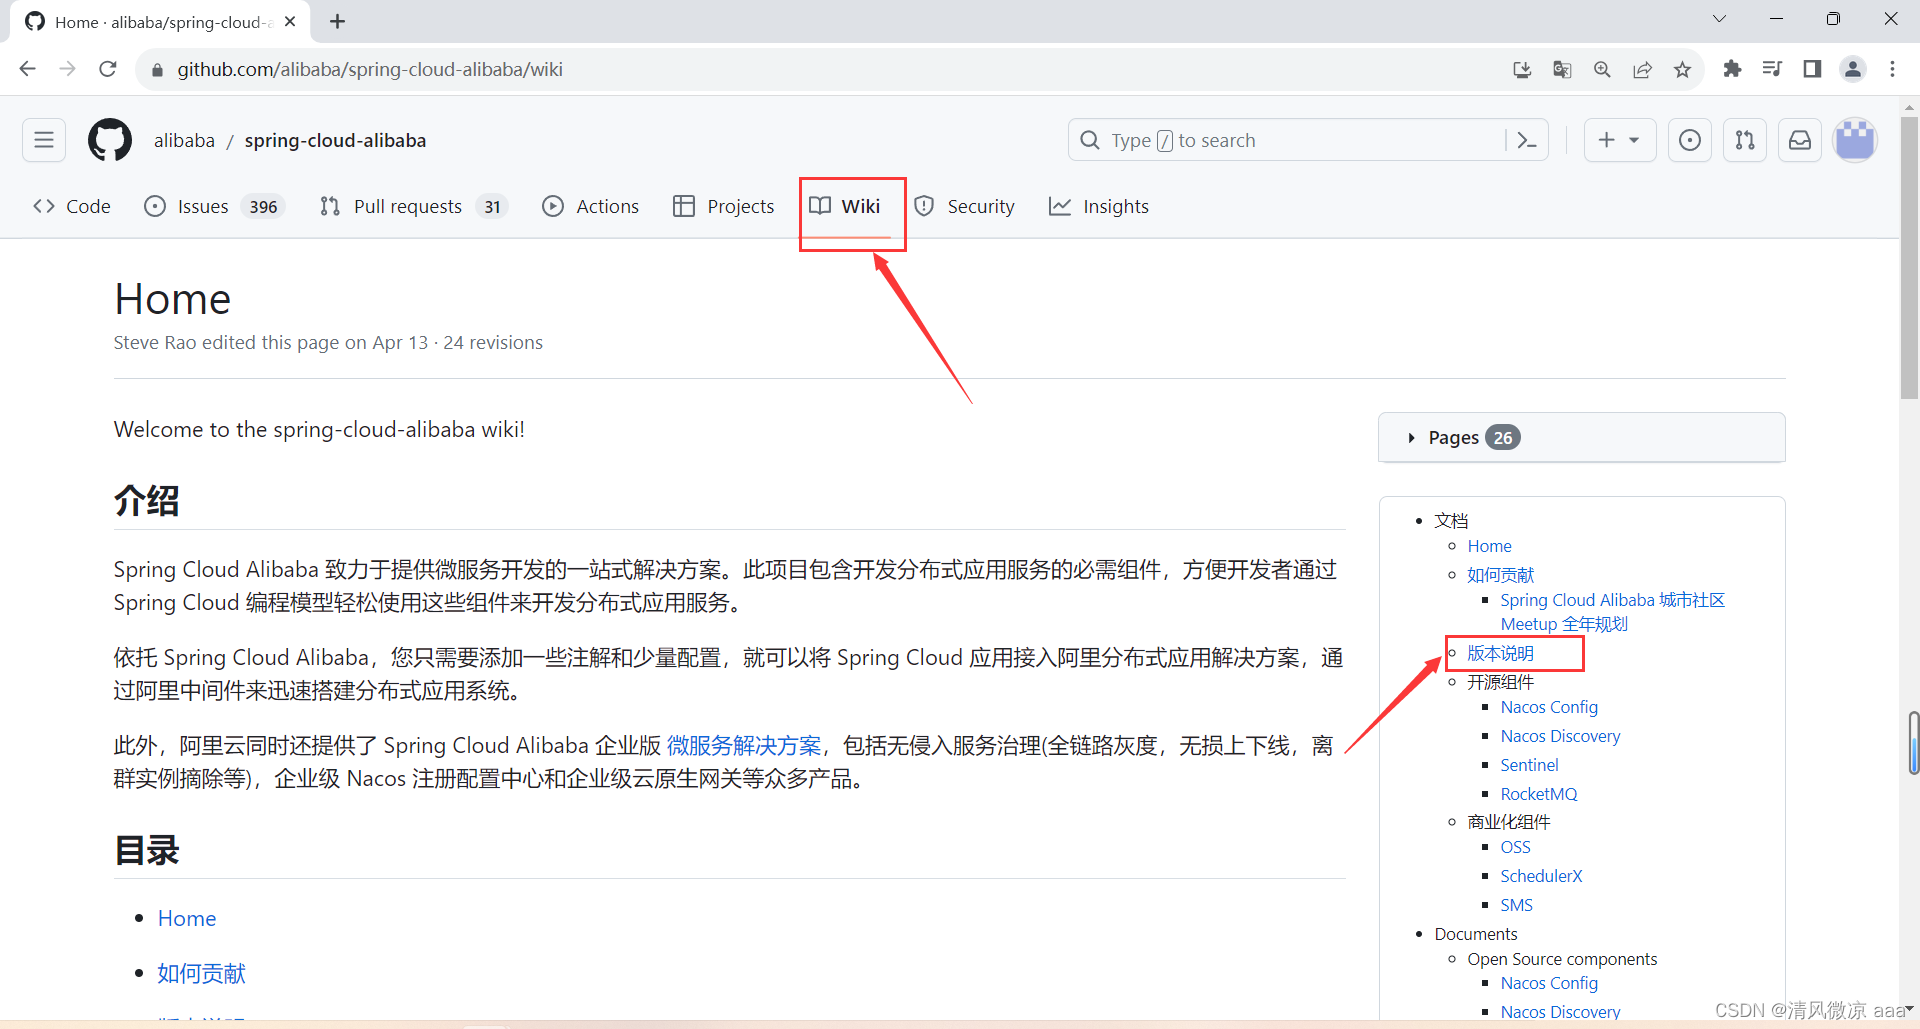
GitHub官网查看各个组件对应的版本:
https://github.com/alibaba/spring-cloud-alibaba
-
老版本的直接启动即可
-
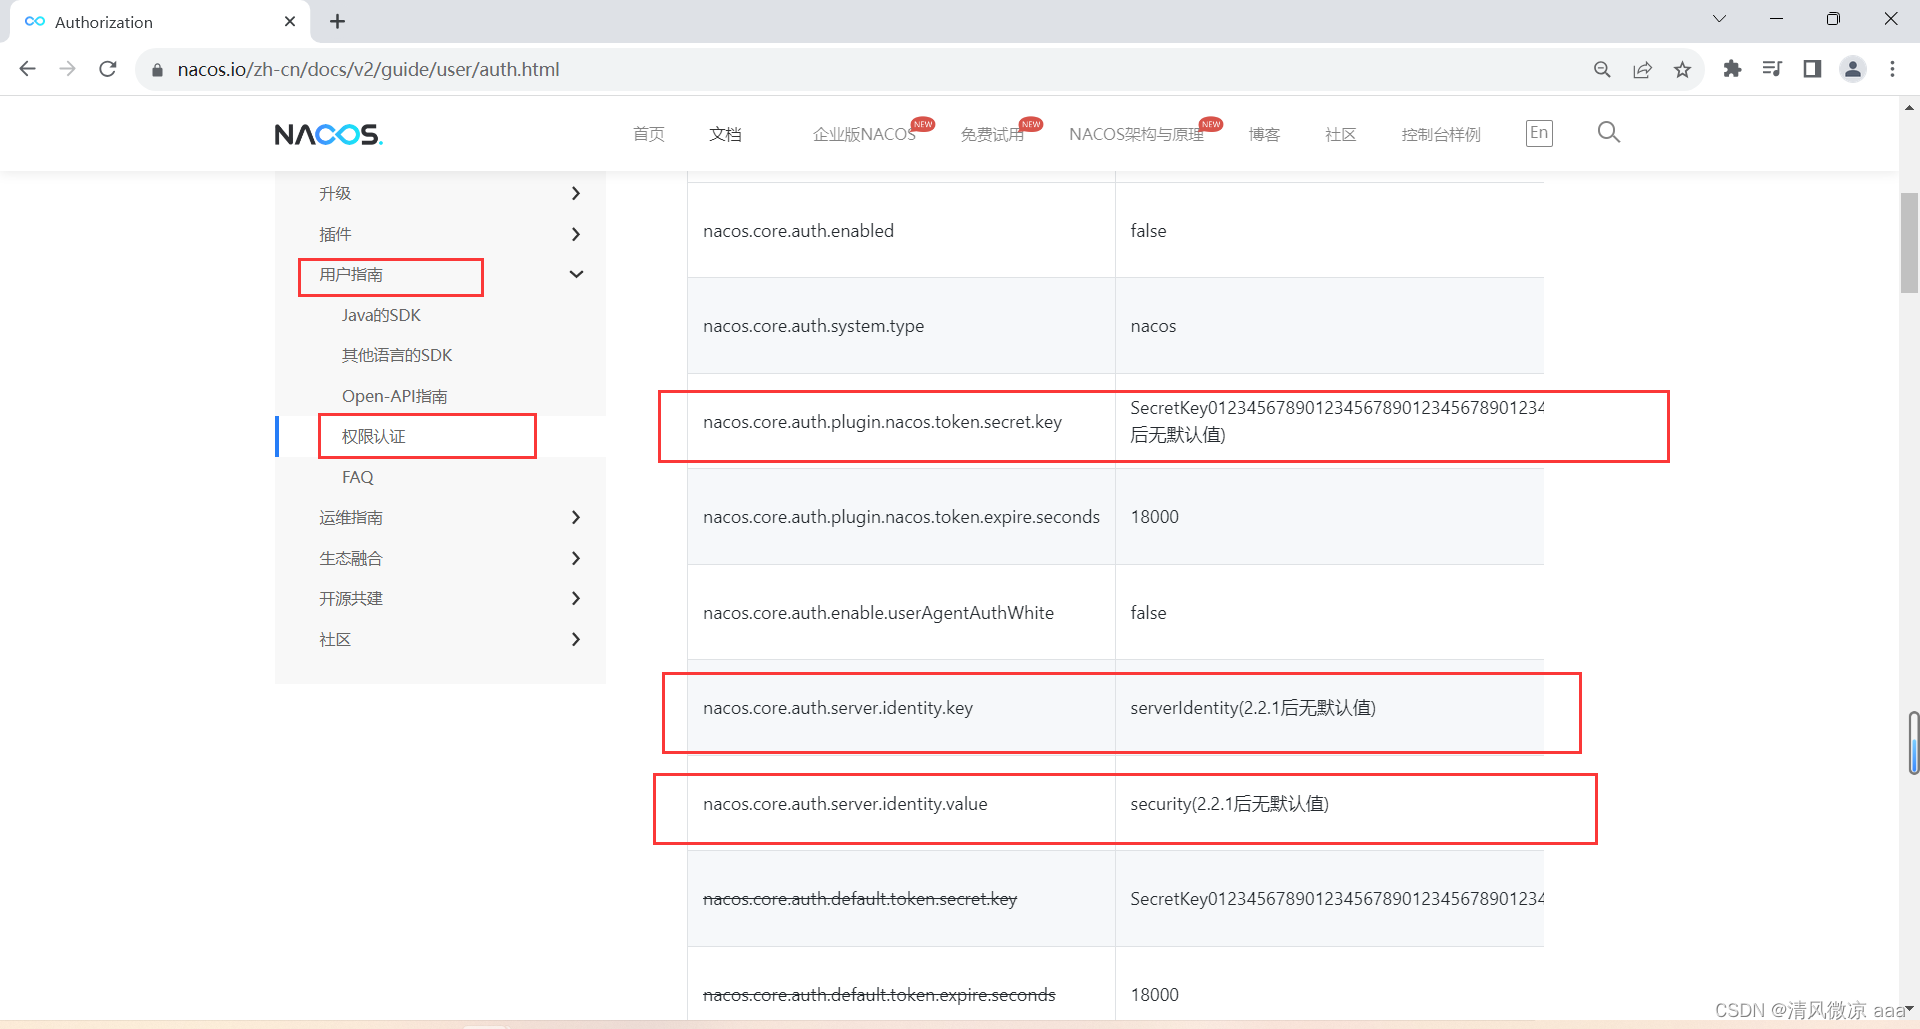
新版本需要修改配置文件才能启动成功:
-
官方文档说明:

-
原因:老版本的鉴权有默认值,新版本为了安全去掉了默认值所以需要手动配置
-
如何修改查看:B站动力节点SpringCloud视频
-
18.2.2 运行
-
下载之后解压压缩包
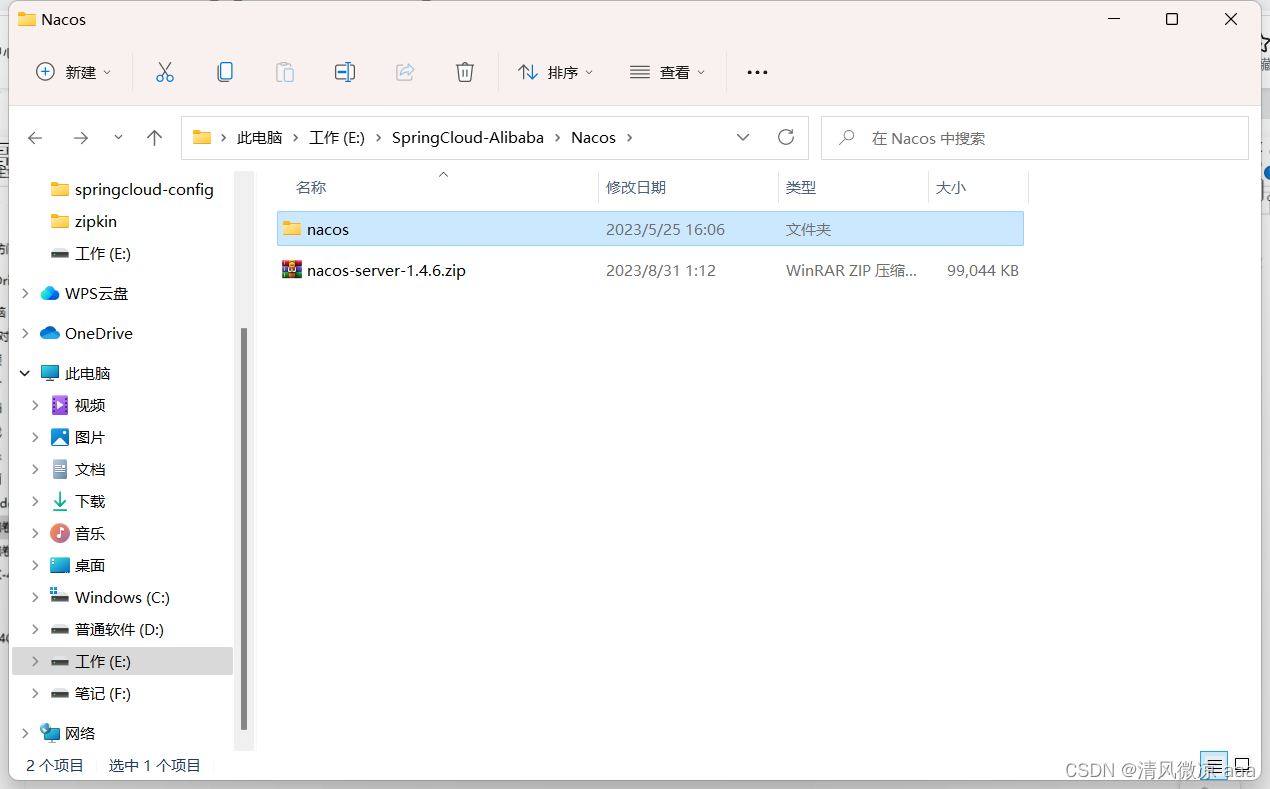
-
本地Java8+Maven环境已经OK -
在bin目录中输入cmd,进入到命令行窗口
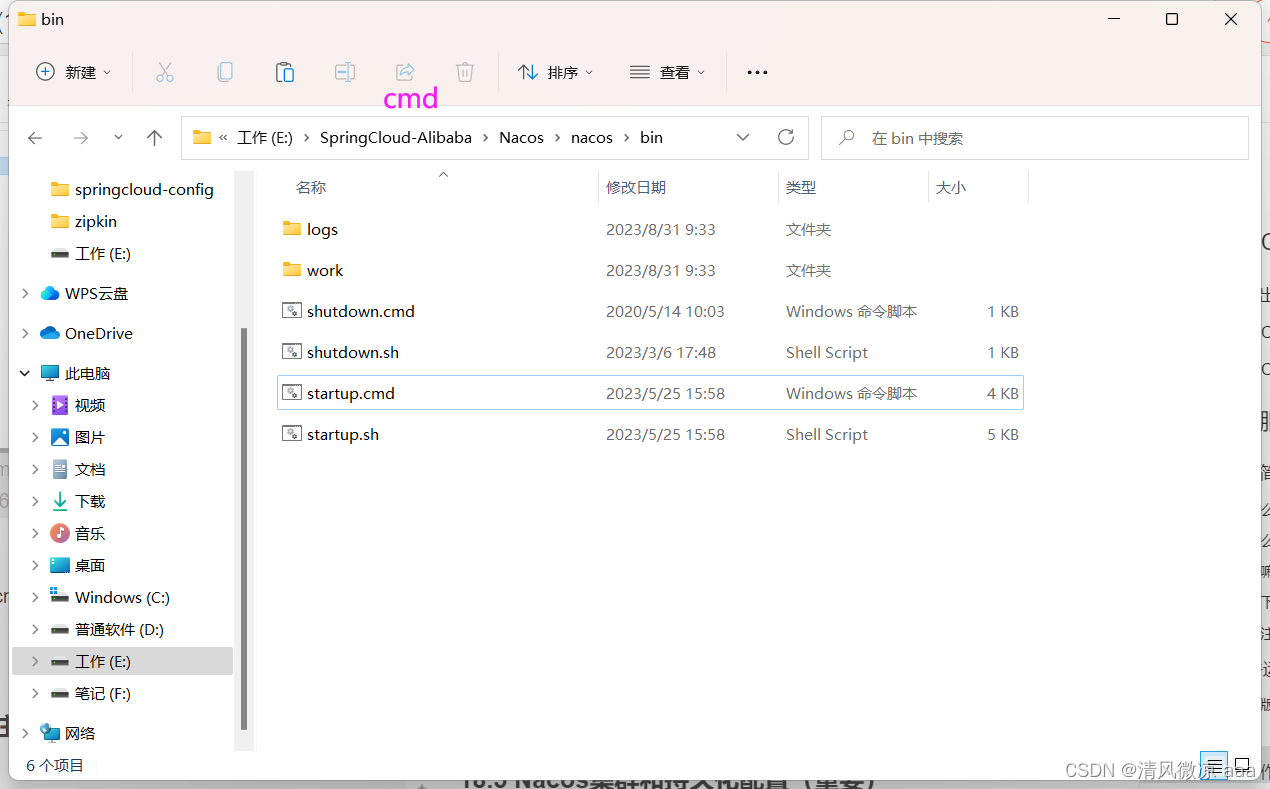
- 启动命令:
startup.cmd -m standalone - standalone代表着单机模式运行,非集群模式
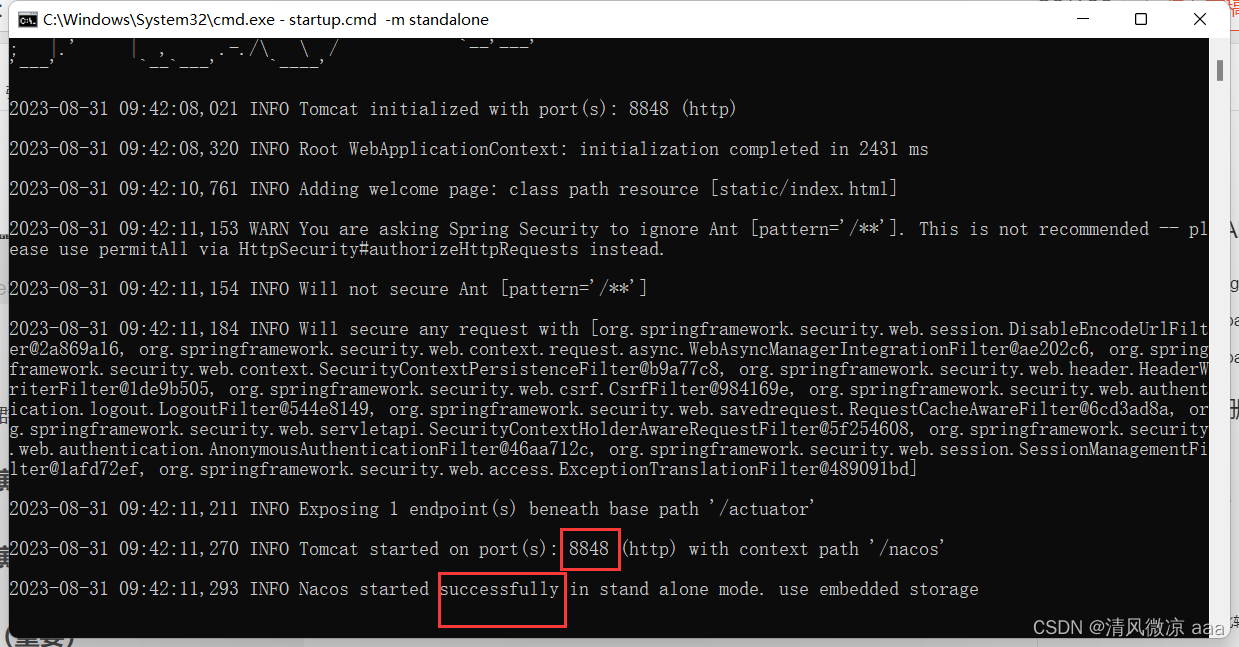
- 启动命令:
-
命令运行成功后直接访问:
http://localhost:8848/nacos- 默认账号密码都是nacos
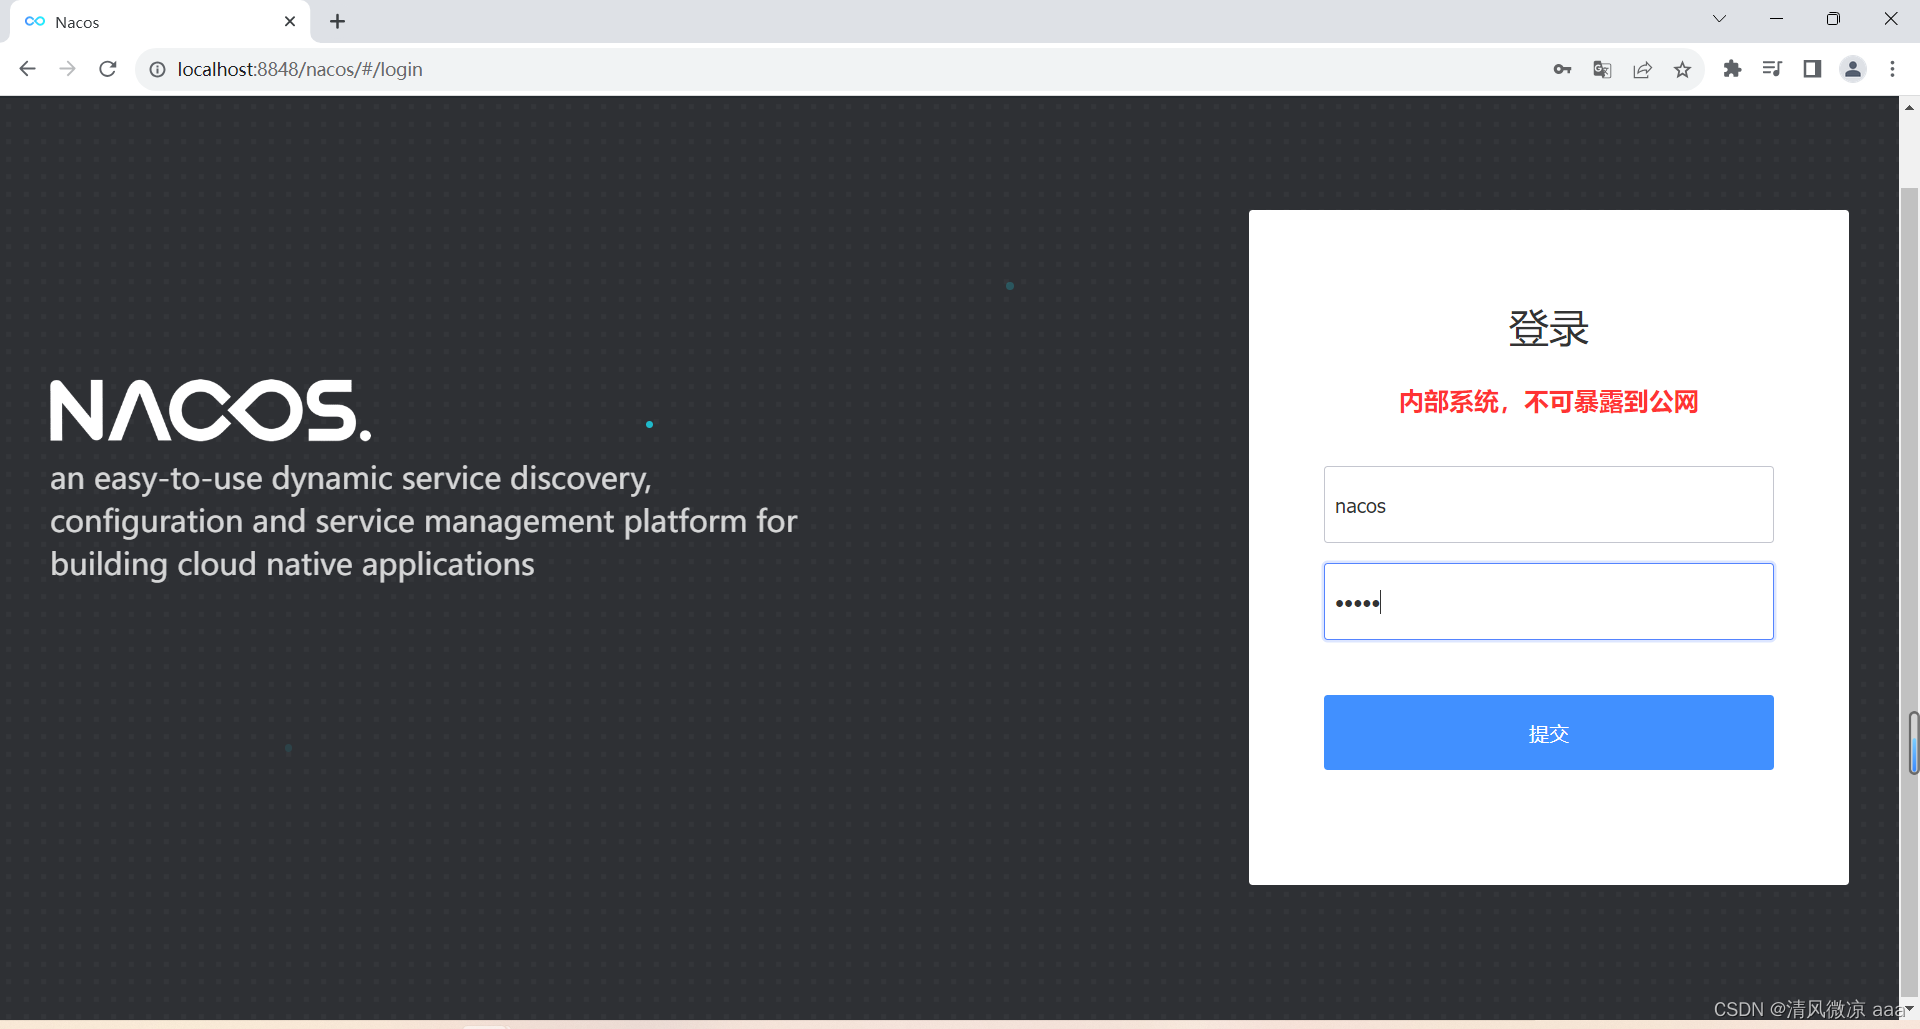
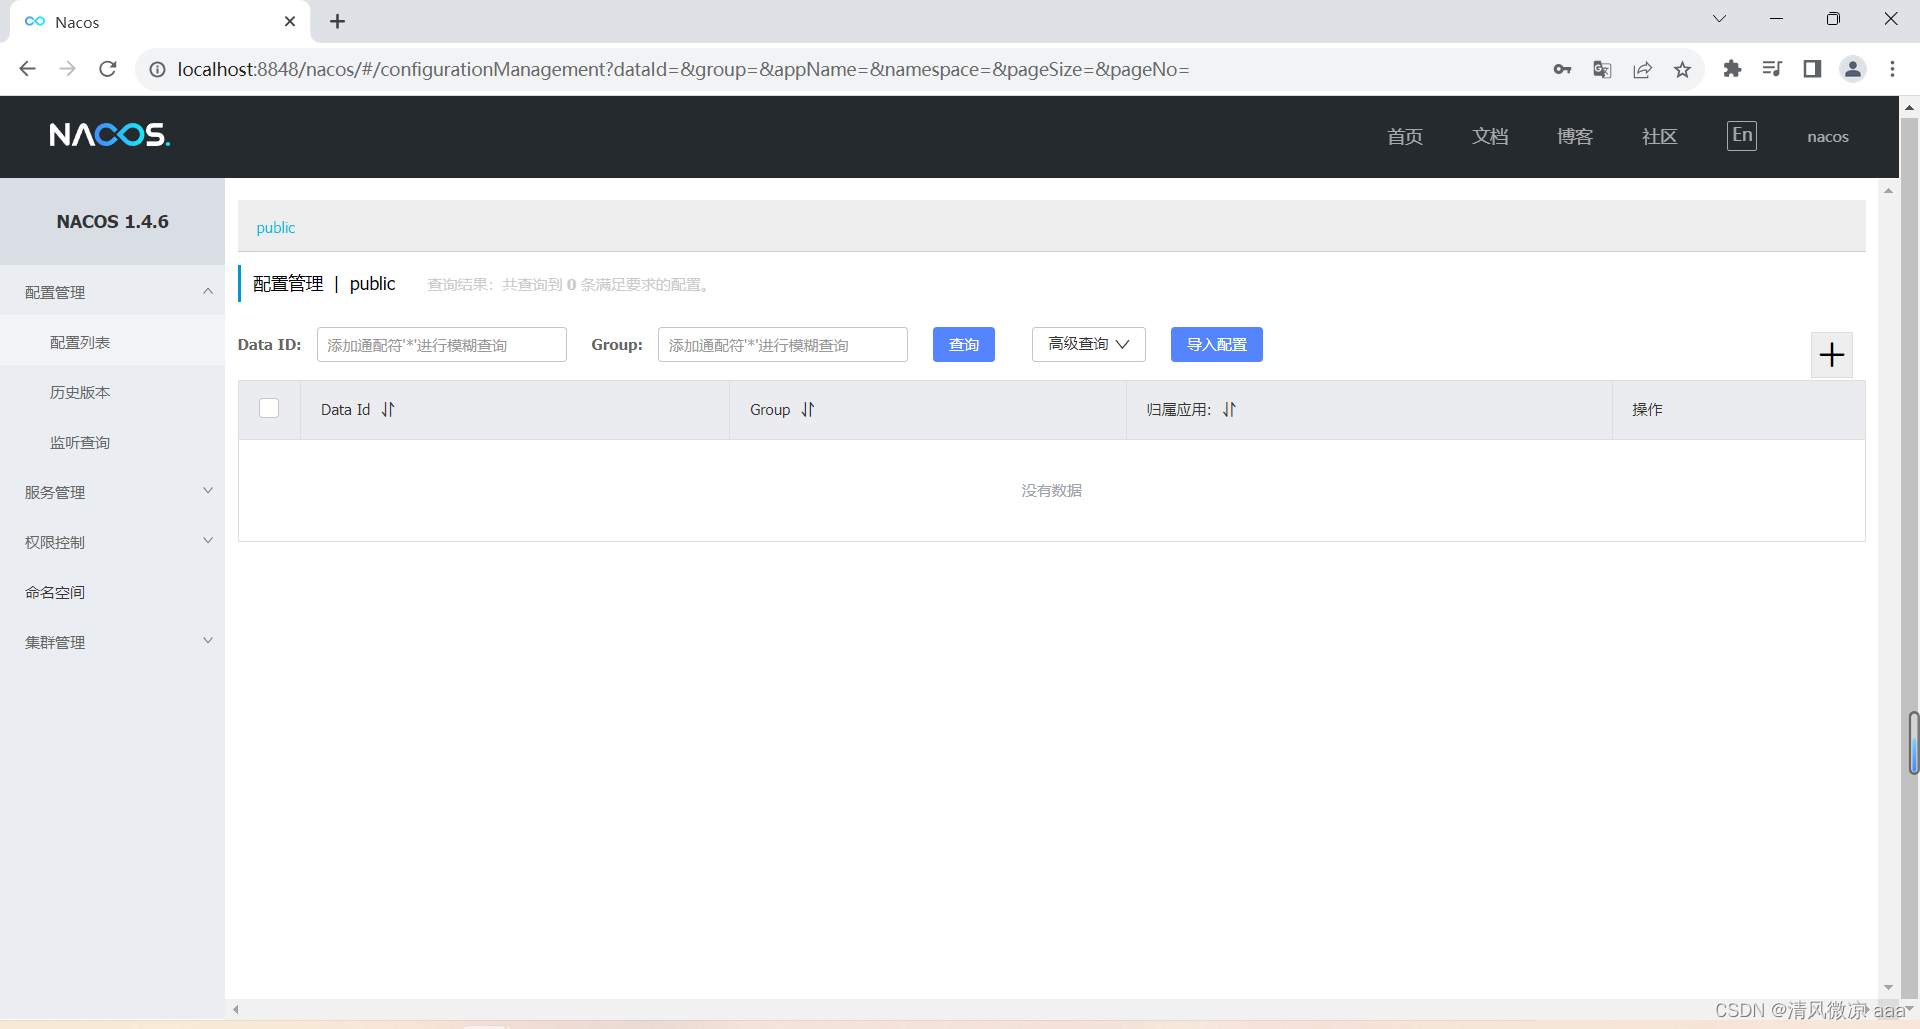
- 默认账号密码都是nacos
18.3 Nacos作为服务注册中心演示
18.3.1 官网文档
- https://spring.io/projects/spring-cloud-alibaba
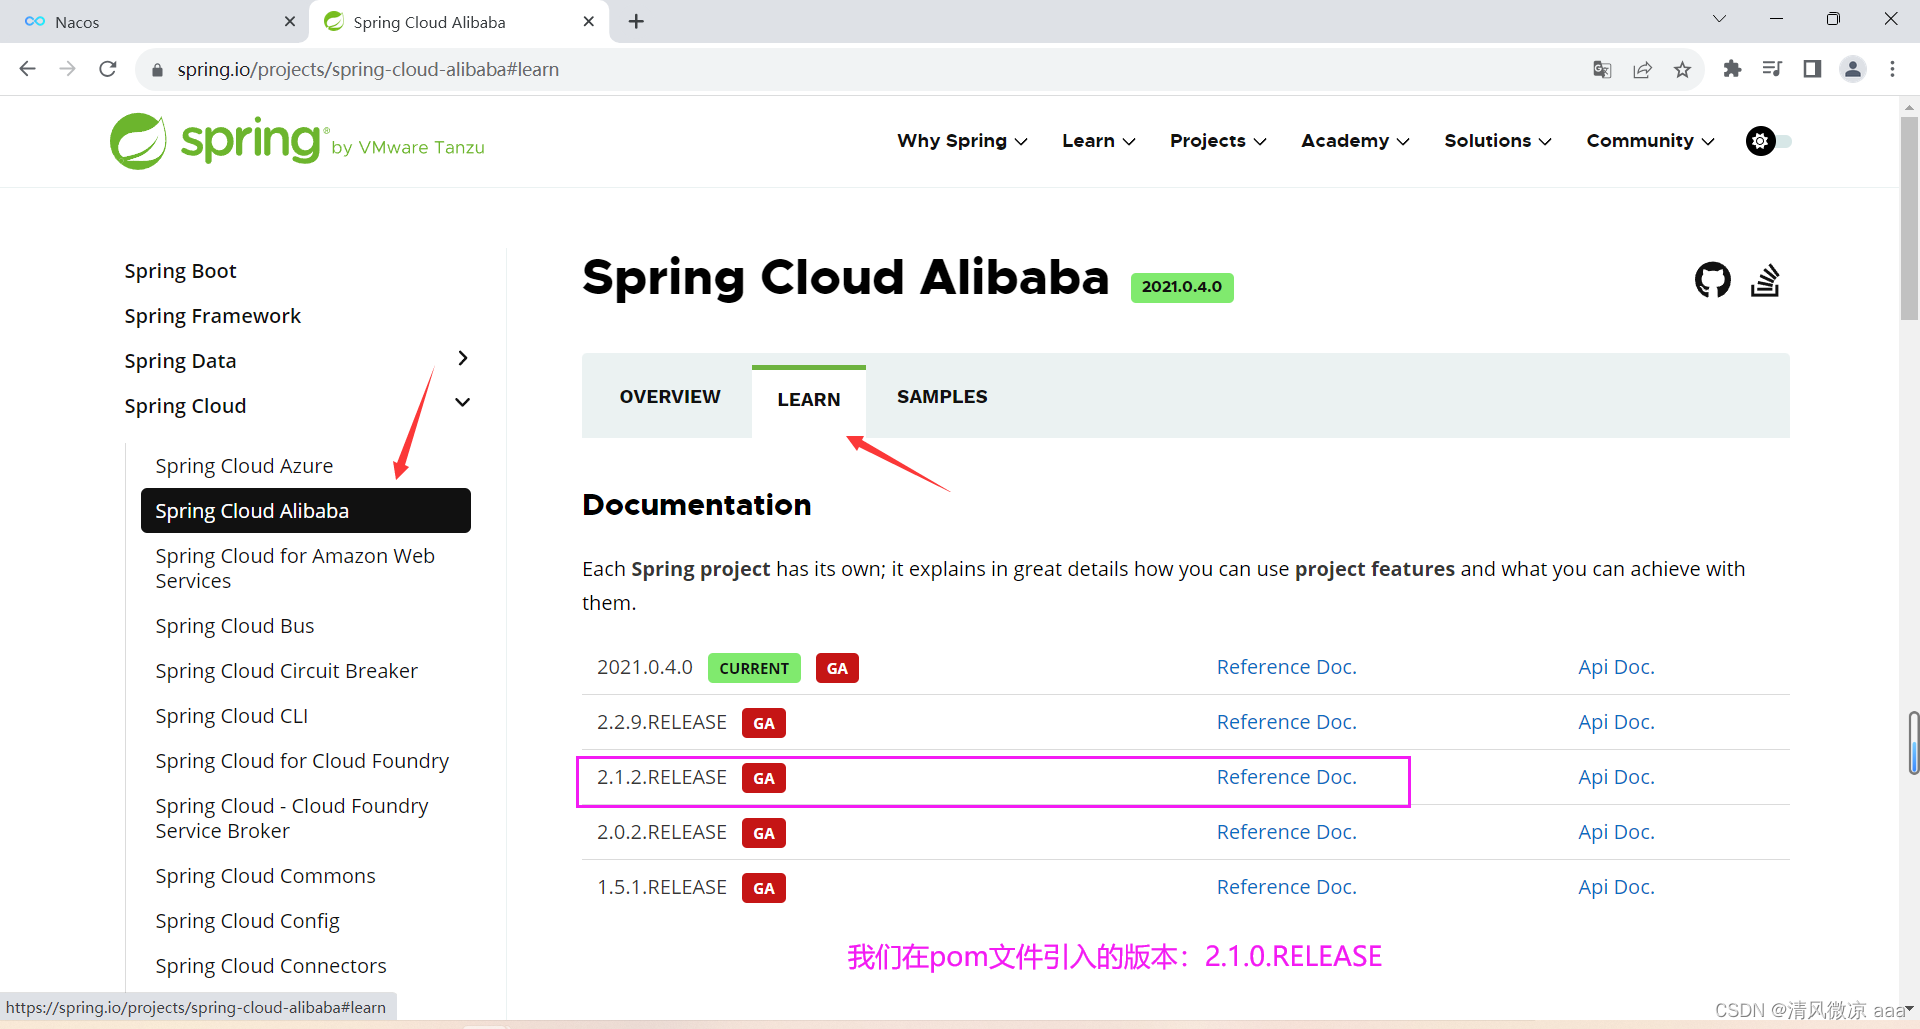
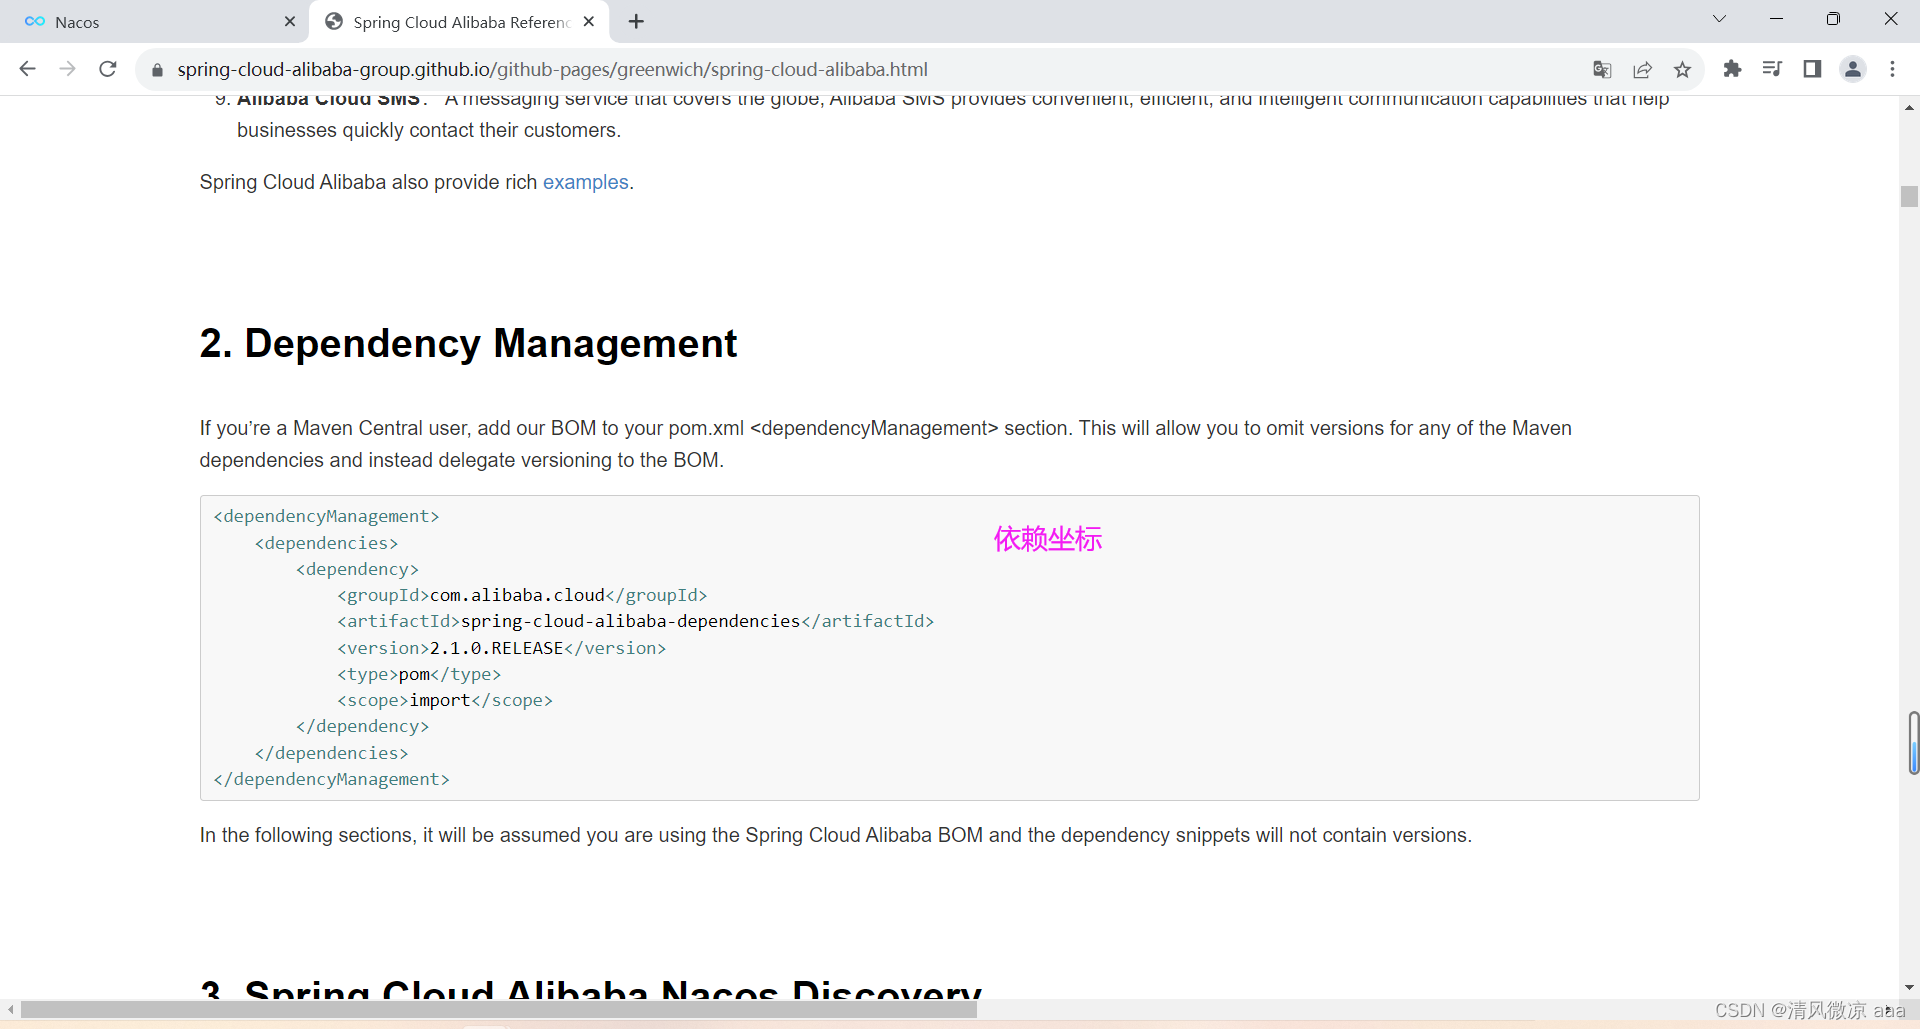
- 阿里巴巴指导手册:
18.3.2 基于Nacos的服务提供者
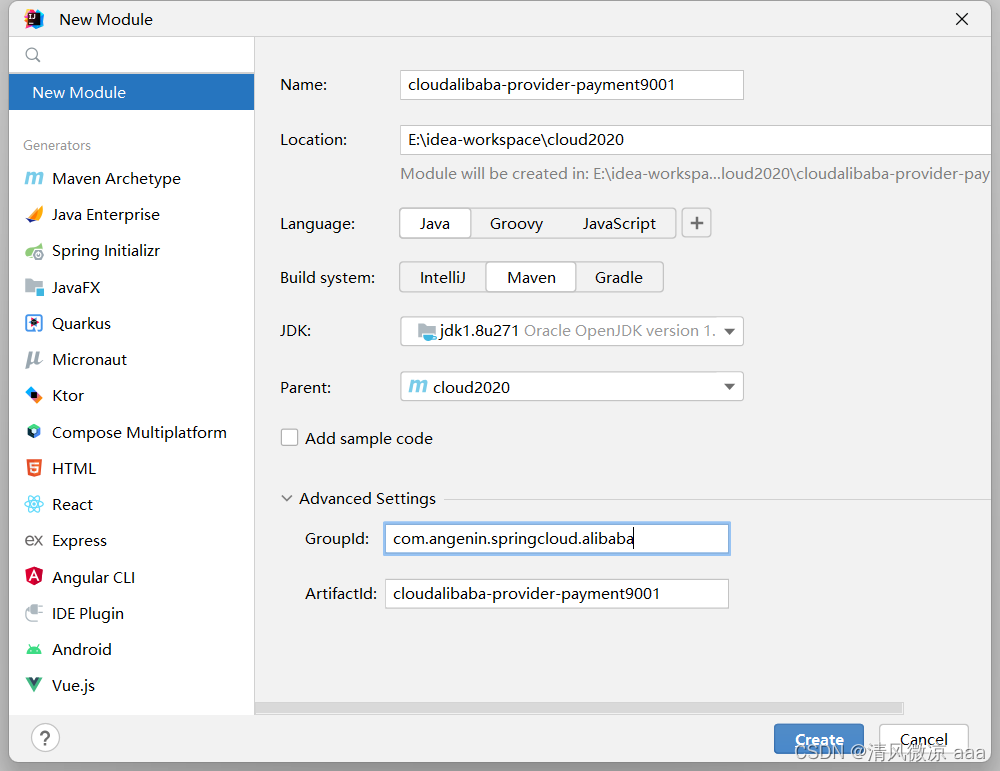
1)新建Module:cloudalibaba-provider-payment9001
2)POM
- 父POM:之前已经引入过,这样子工程不需要每次都引入了。
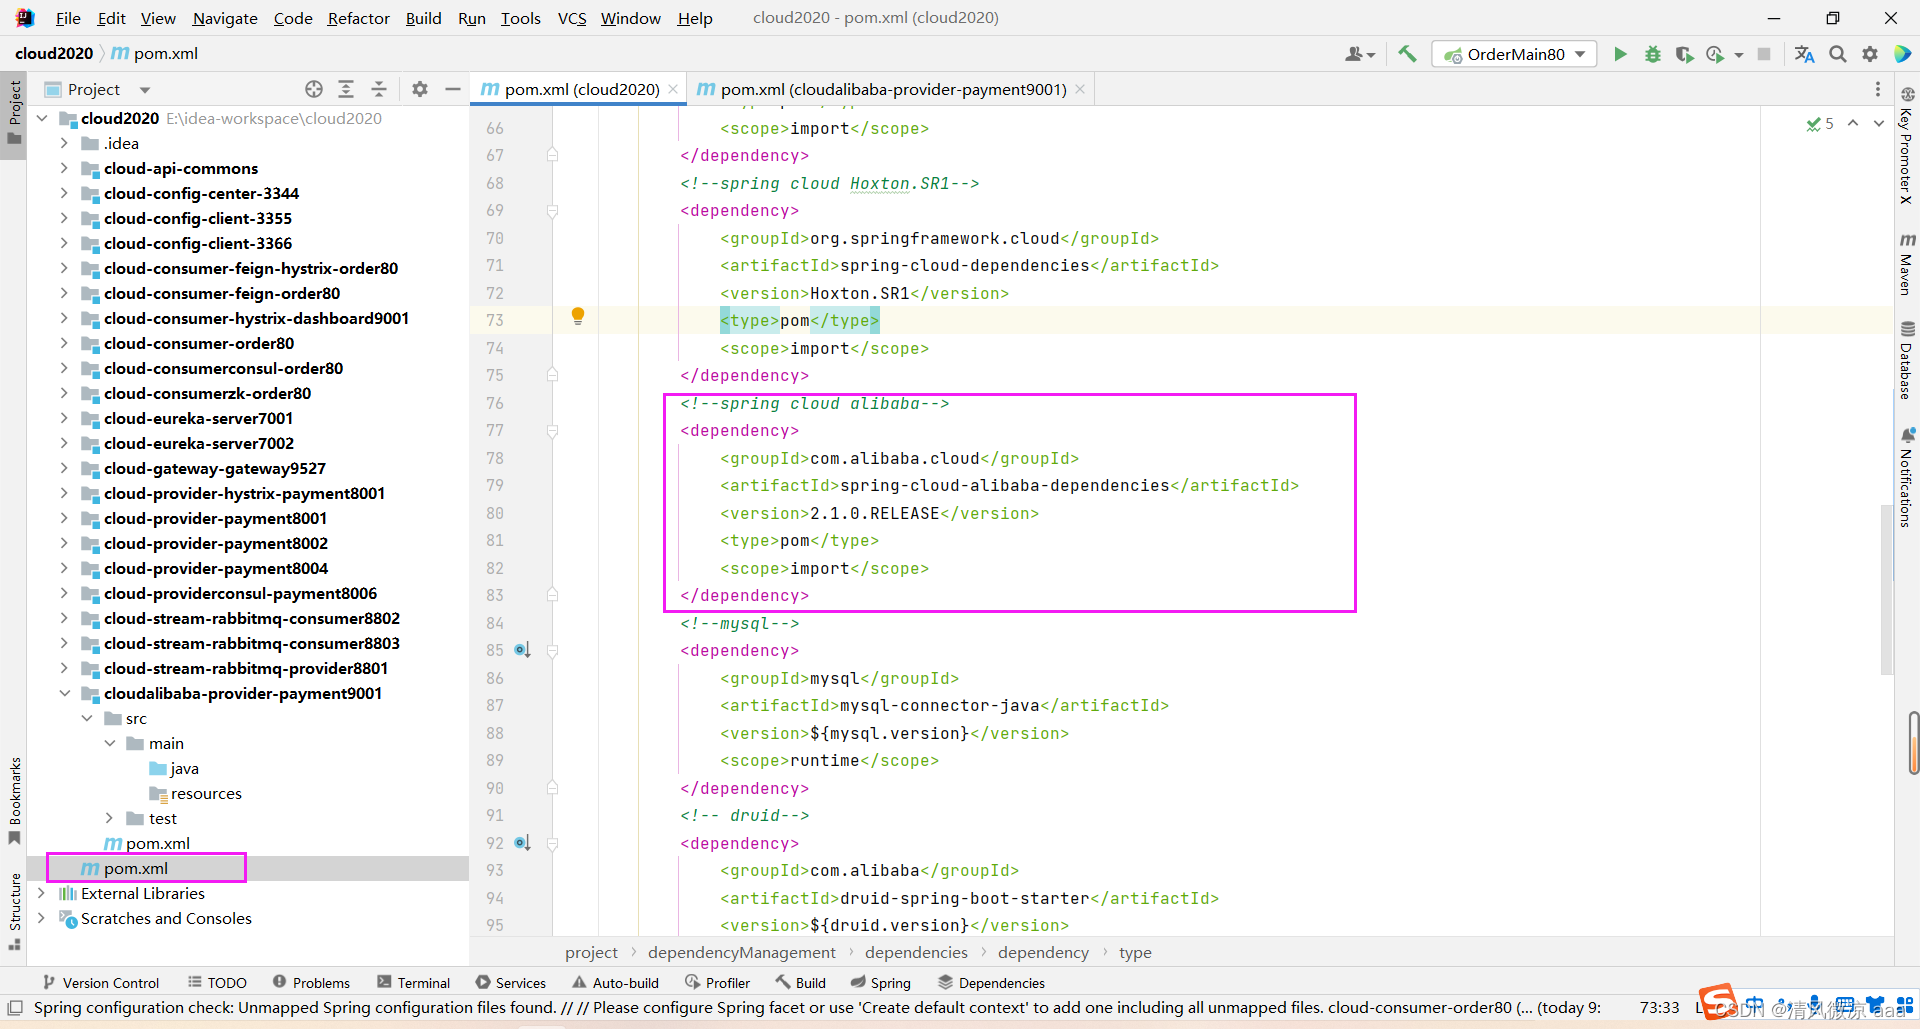
<!--spring cloud alibaba--><dependency><groupId>com.alibaba.cloud</groupId><artifactId>spring-cloud-alibaba-dependencies</artifactId><version>2.1.0.RELEASE</version><type>pom</type><scope>import</scope></dependency>
- 本模块POM
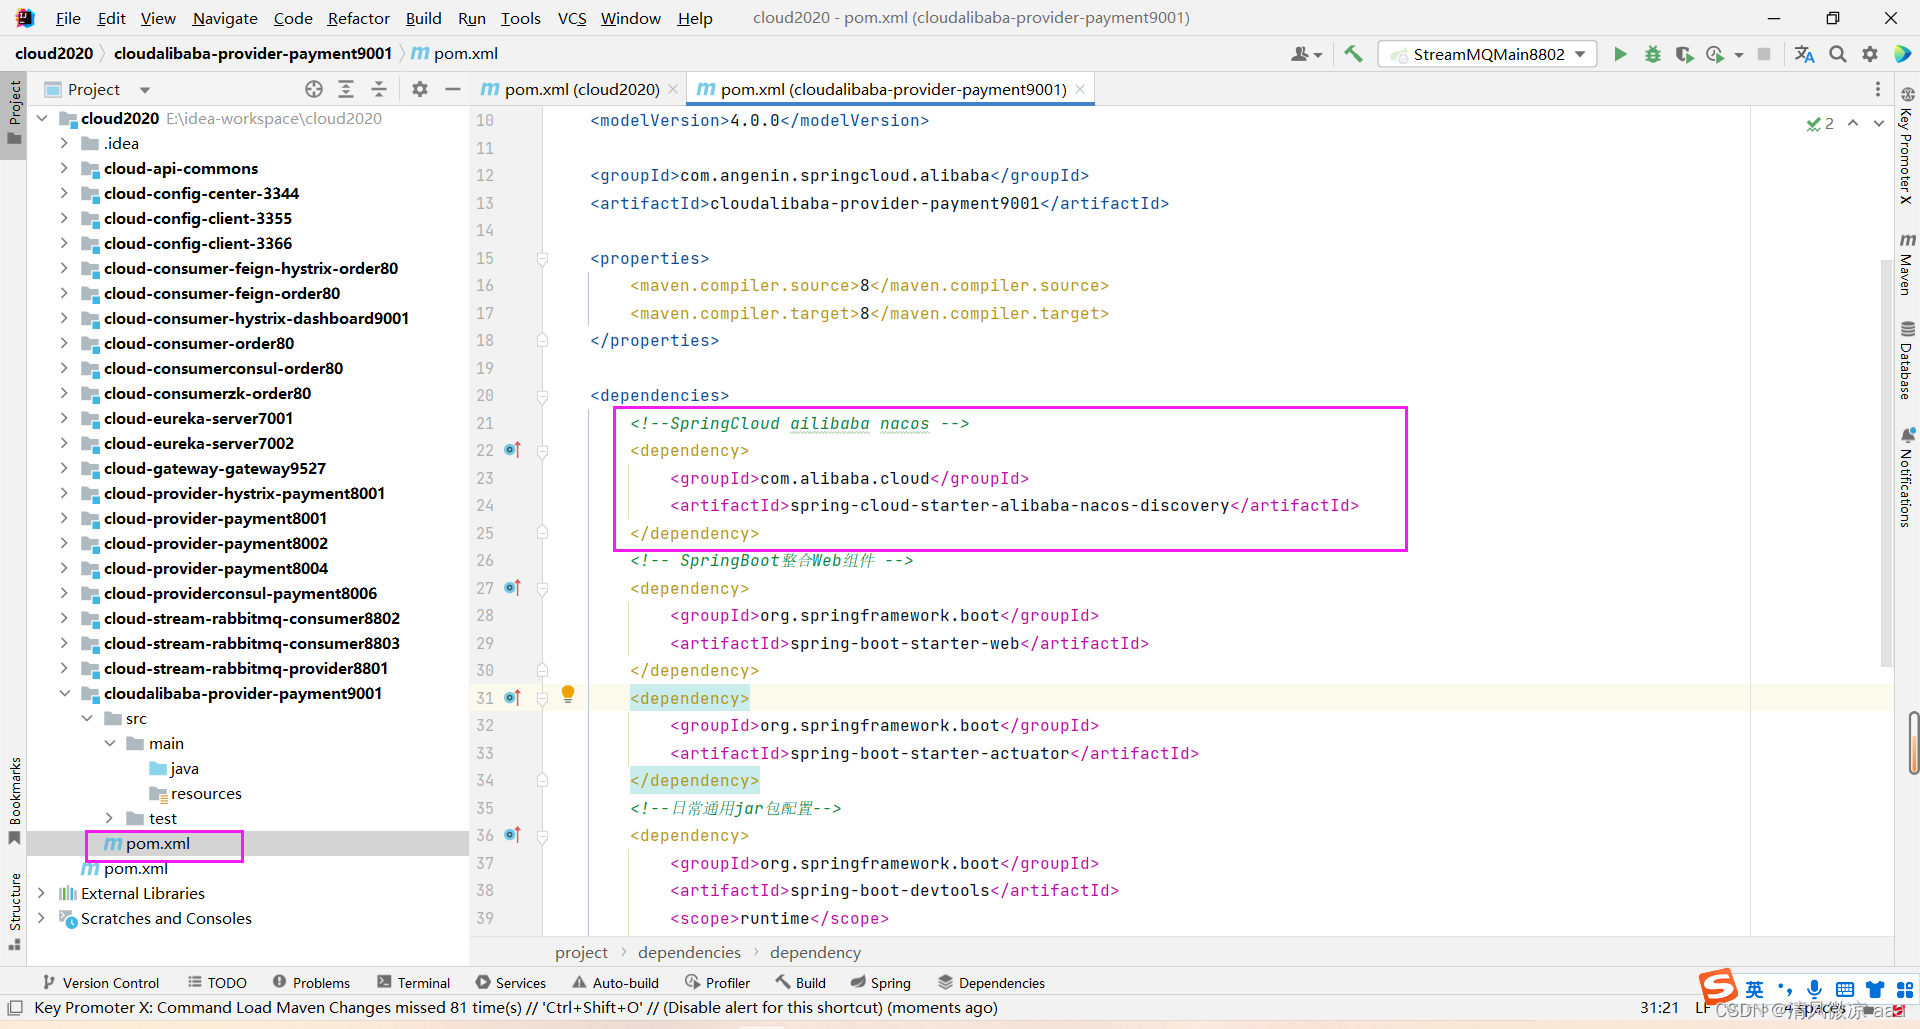
<?xml version="1.0" encoding="UTF-8"?>
<project xmlns="http://maven.apache.org/POM/4.0.0"xmlns:xsi="http://www.w3.org/2001/XMLSchema-instance"xsi:schemaLocation="http://maven.apache.org/POM/4.0.0 http://maven.apache.org/xsd/maven-4.0.0.xsd"><parent><artifactId>cloud2020</artifactId><groupId>com.angenin.springcloud</groupId><version>1.0-SNAPSHOT</version></parent><modelVersion>4.0.0</modelVersion><groupId>com.angenin.springcloud.alibaba</groupId><artifactId>cloudalibaba-provider-payment9001</artifactId><properties><maven.compiler.source>8</maven.compiler.source><maven.compiler.target>8</maven.compiler.target></properties><dependencies><!--SpringCloud ailibaba nacos --><dependency><groupId>com.alibaba.cloud</groupId><artifactId>spring-cloud-starter-alibaba-nacos-discovery</artifactId></dependency><!-- SpringBoot整合Web组件 --><dependency><groupId>org.springframework.boot</groupId><artifactId>spring-boot-starter-web</artifactId></dependency><dependency><groupId>org.springframework.boot</groupId><artifactId>spring-boot-starter-actuator</artifactId></dependency><!--日常通用jar包配置--><dependency><groupId>org.springframework.boot</groupId><artifactId>spring-boot-devtools</artifactId><scope>runtime</scope><optional>true</optional></dependency><dependency><groupId>org.projectlombok</groupId><artifactId>lombok</artifactId><optional>true</optional></dependency><dependency><groupId>org.springframework.boot</groupId><artifactId>spring-boot-starter-test</artifactId><scope>test</scope></dependency></dependencies></project>
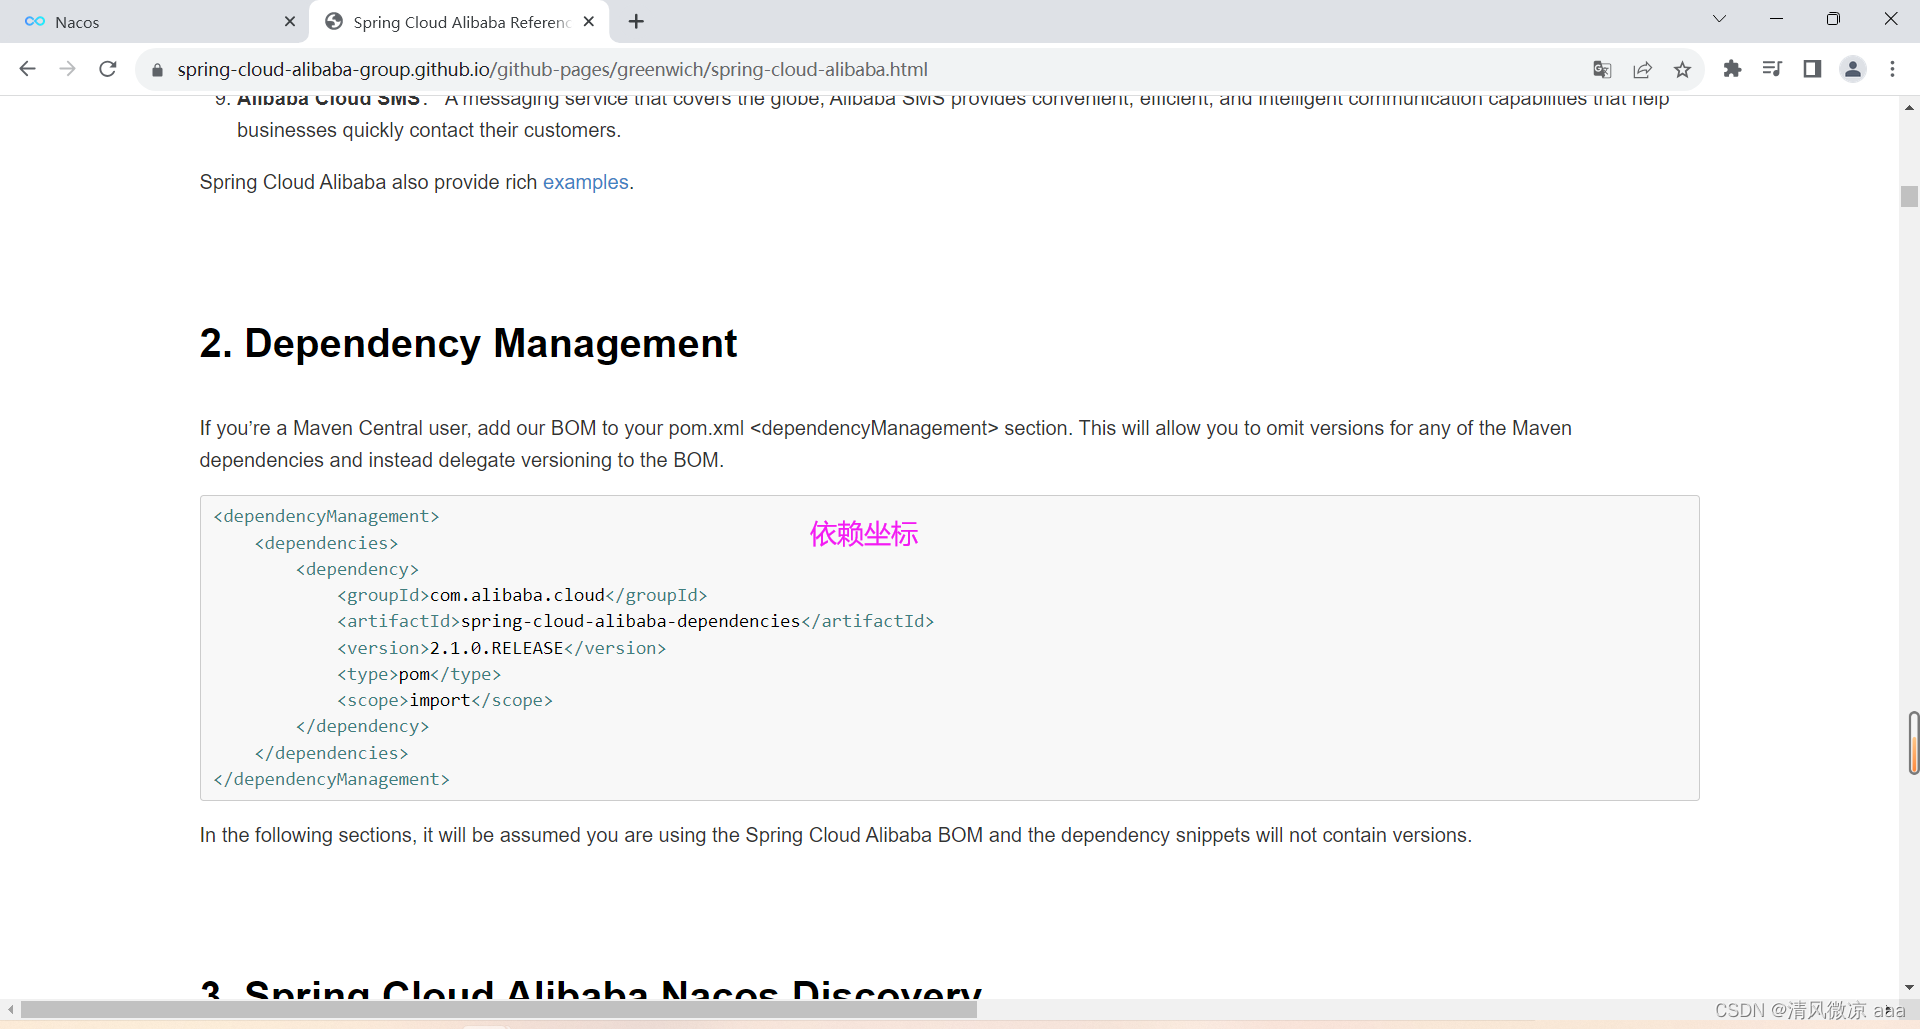
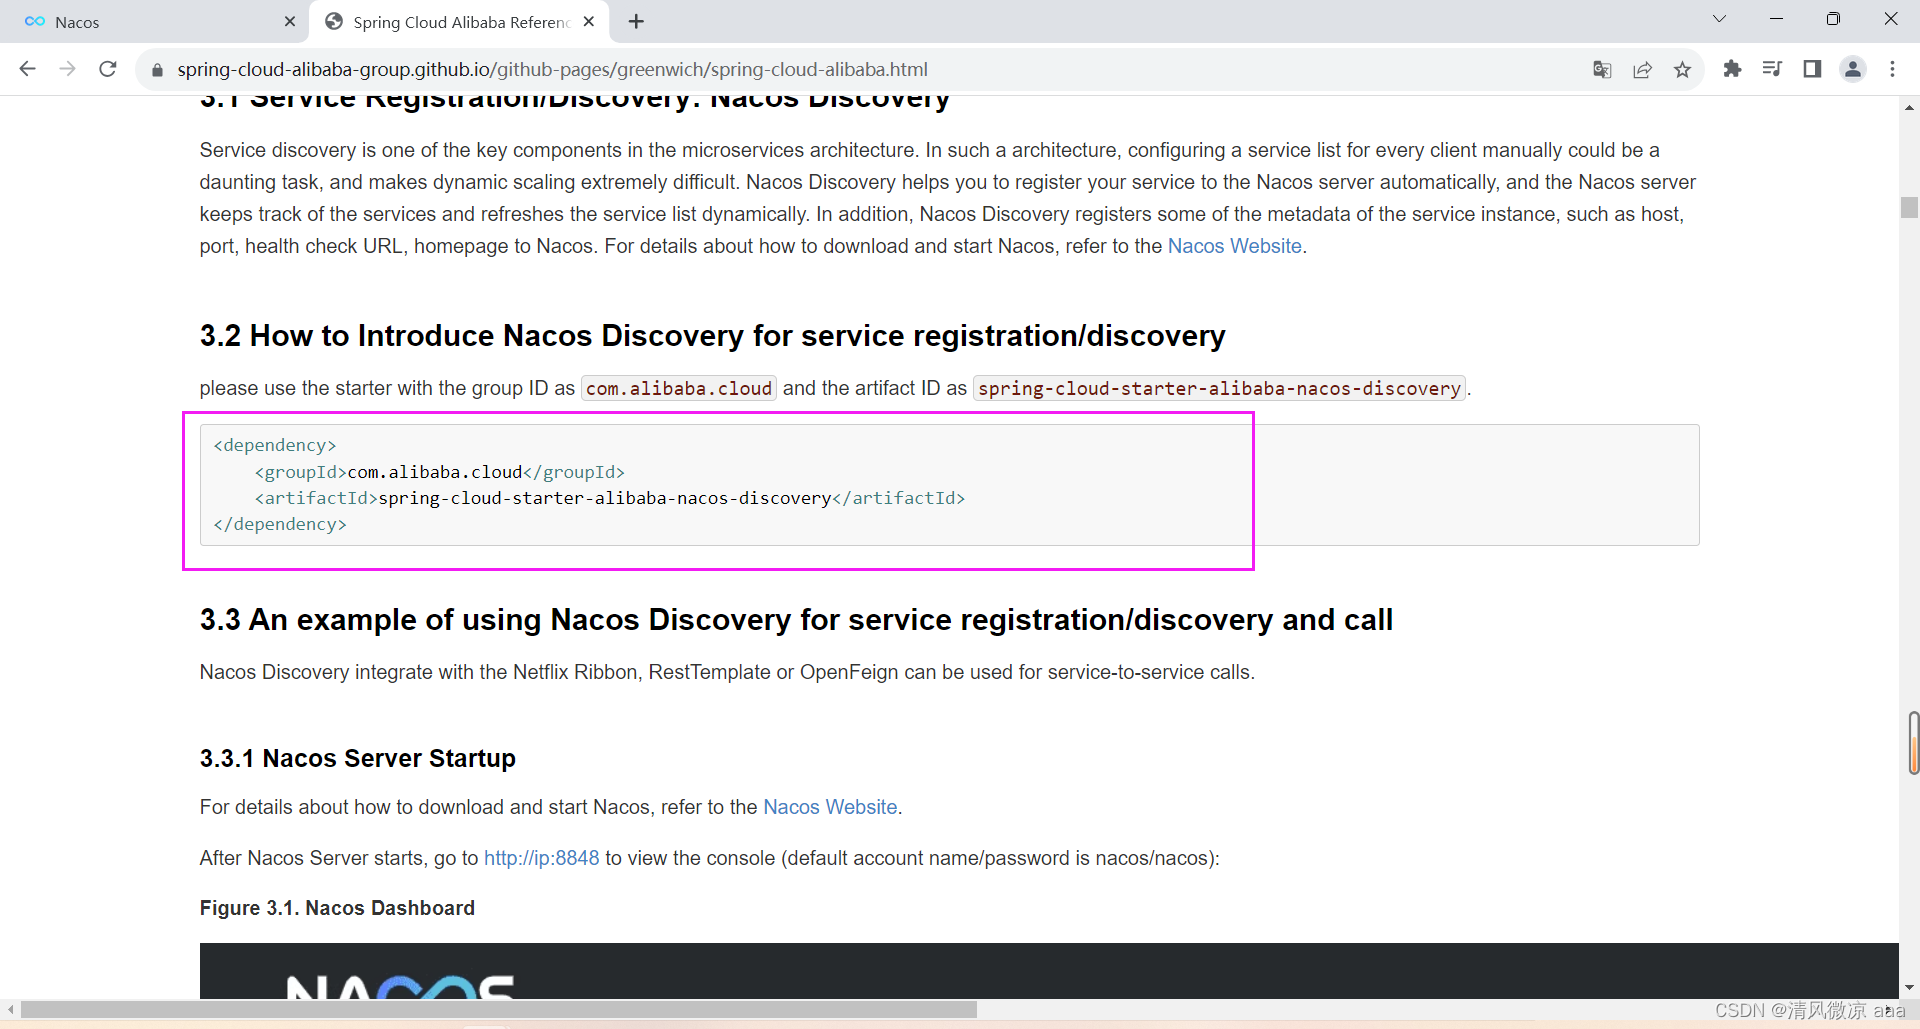
- 查看官网文档:
- spring cloud alibaba依赖坐标
- SpringCloud ailibaba nacos依赖坐标
- spring cloud alibaba依赖坐标
3)YML
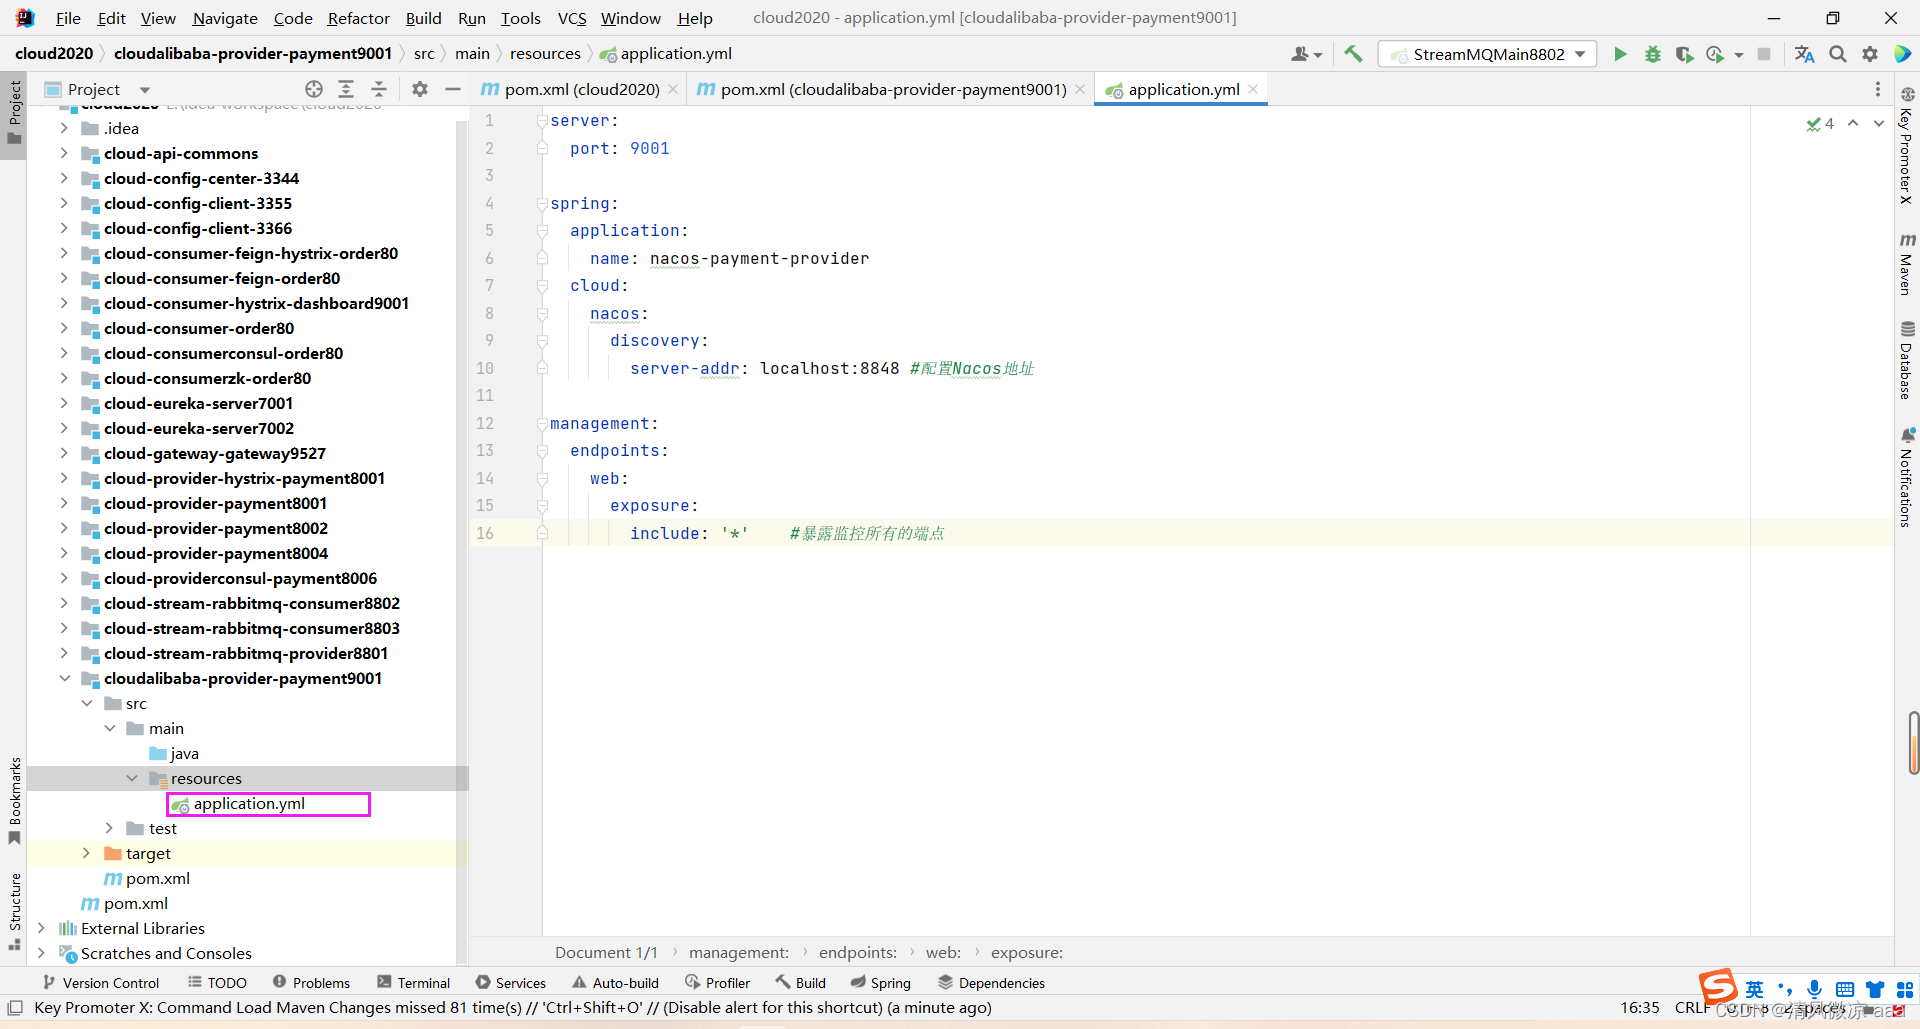
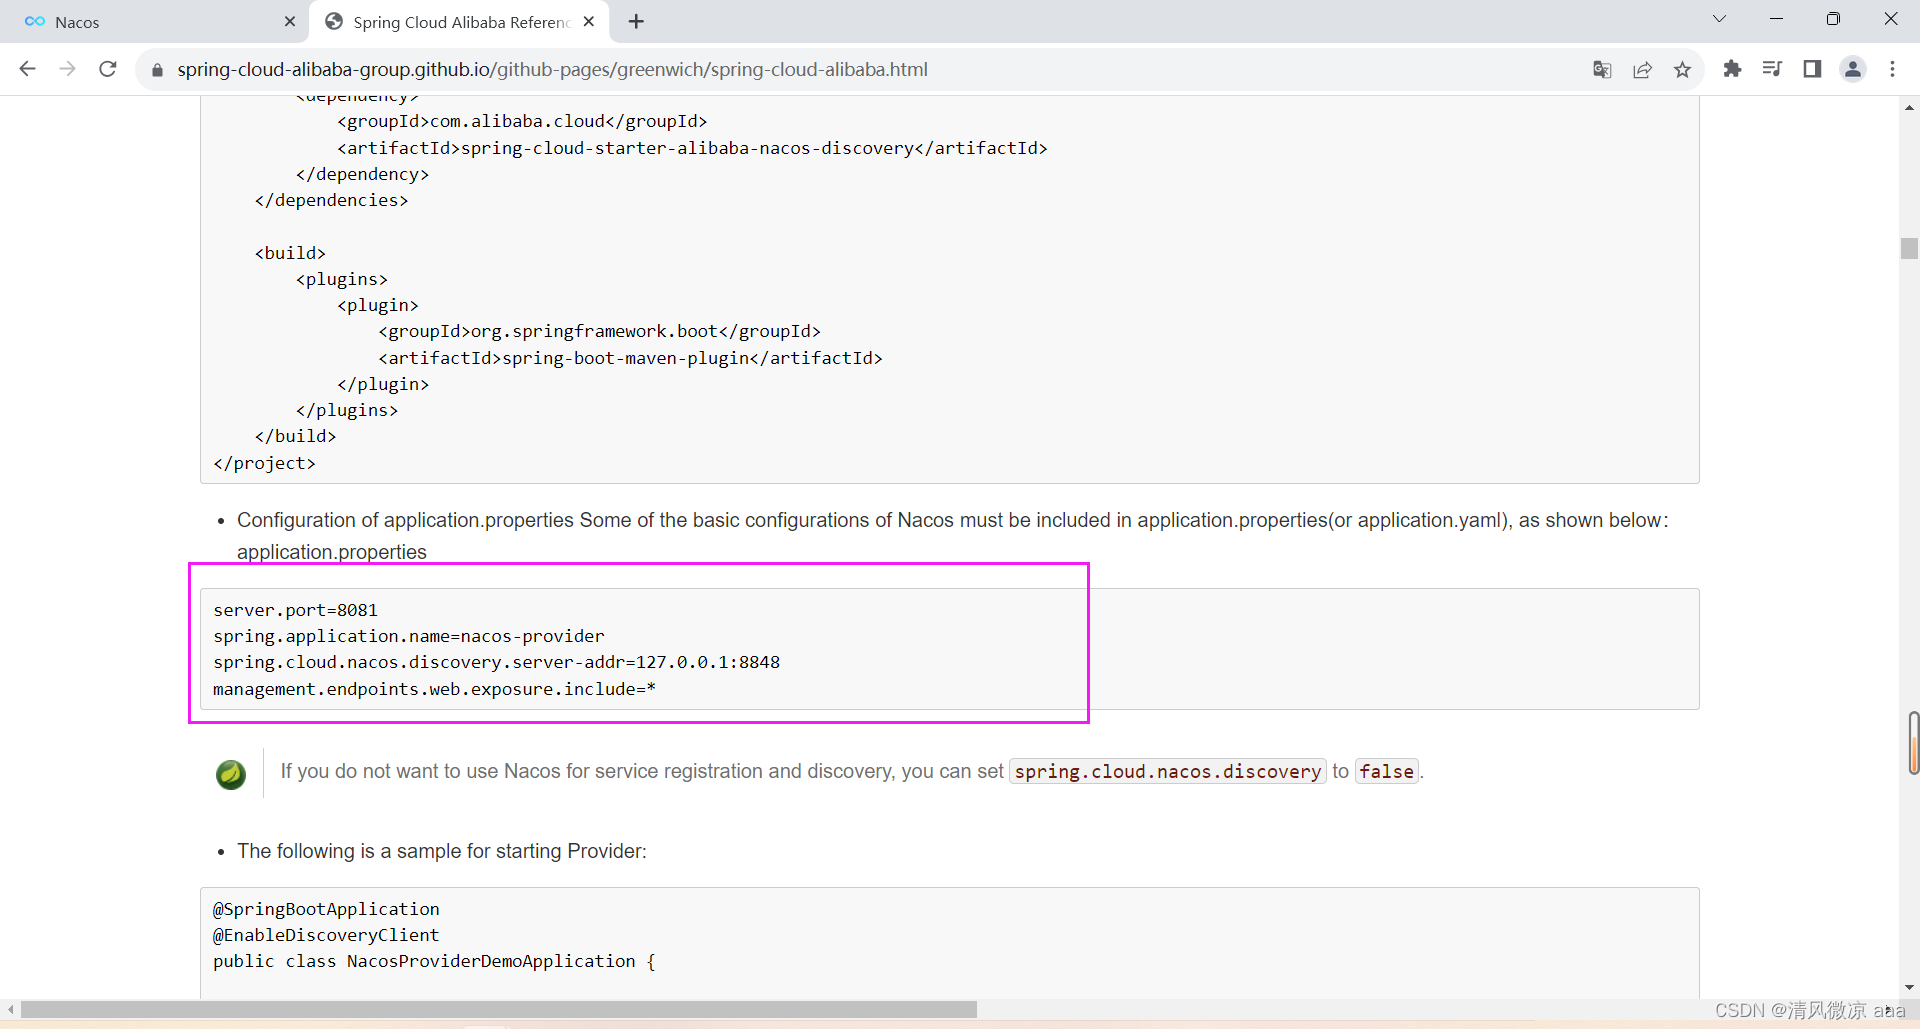
server:port: 9001spring:application:name: nacos-payment-providercloud:nacos:discovery:server-addr: localhost:8848 #配置Nacos地址management:endpoints:web:exposure:include: '*' #暴露监控所有的端点- 官方文档:
4)主启动
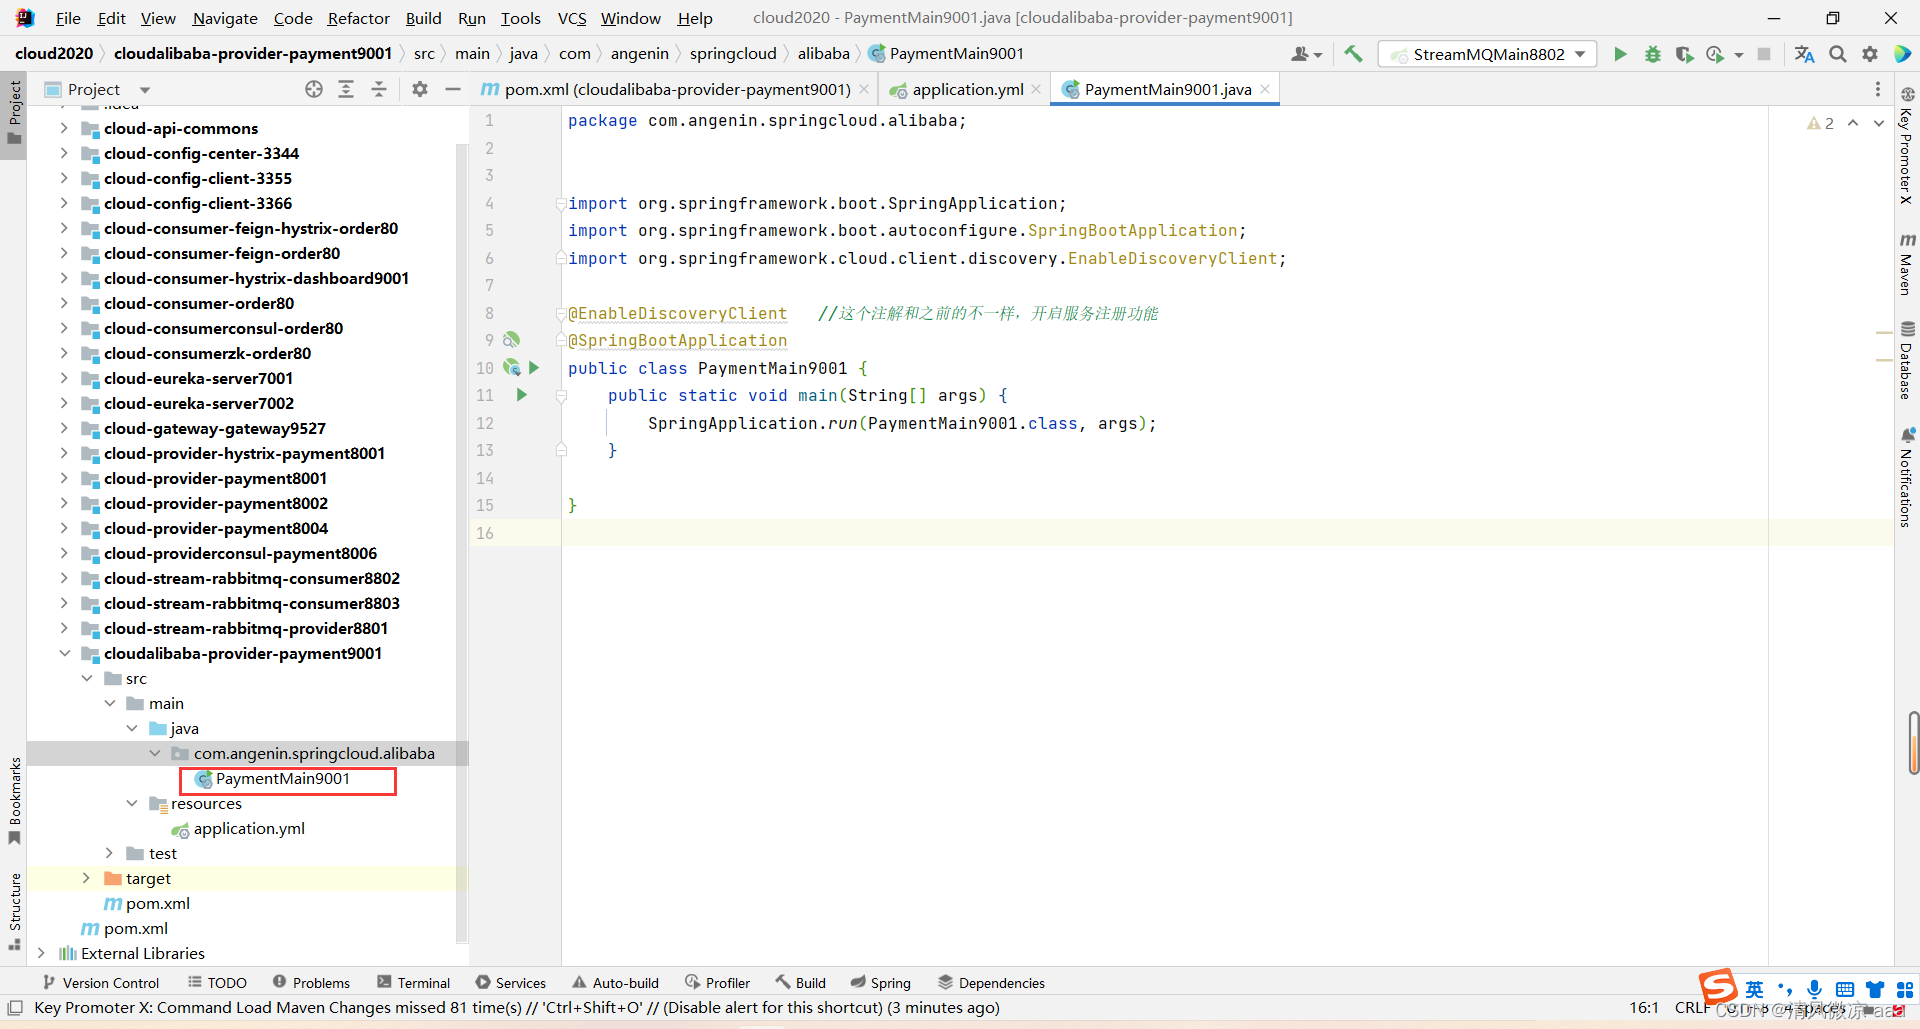
package com.angenin.springcloud.alibaba;import org.springframework.boot.SpringApplication;
import org.springframework.boot.autoconfigure.SpringBootApplication;
import org.springframework.cloud.client.discovery.EnableDiscoveryClient;@EnableDiscoveryClient   //这个注解和之前的不一样,开启服务注册功能
@SpringBootApplication
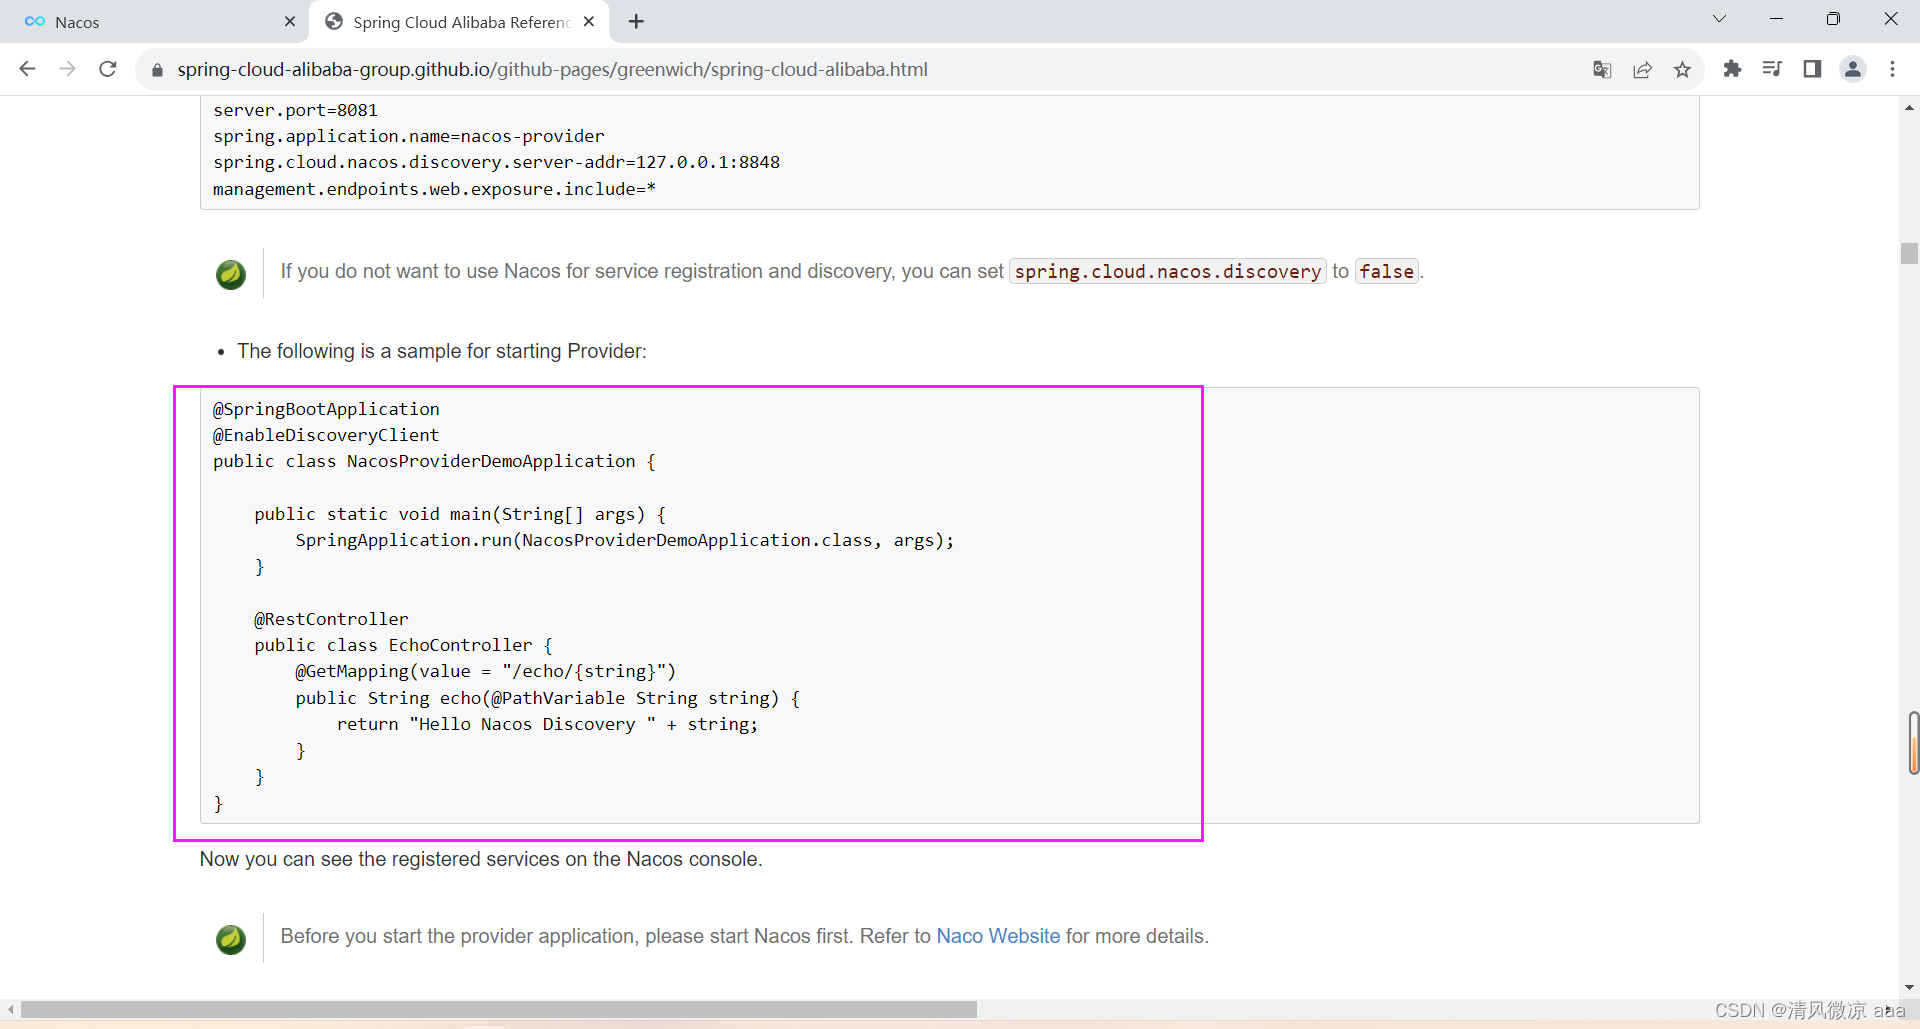
public class PaymentMain9001 {public static void main(String[] args) {SpringApplication.run(PaymentMain9001.class, args);}}- 官方文档
5)业务类
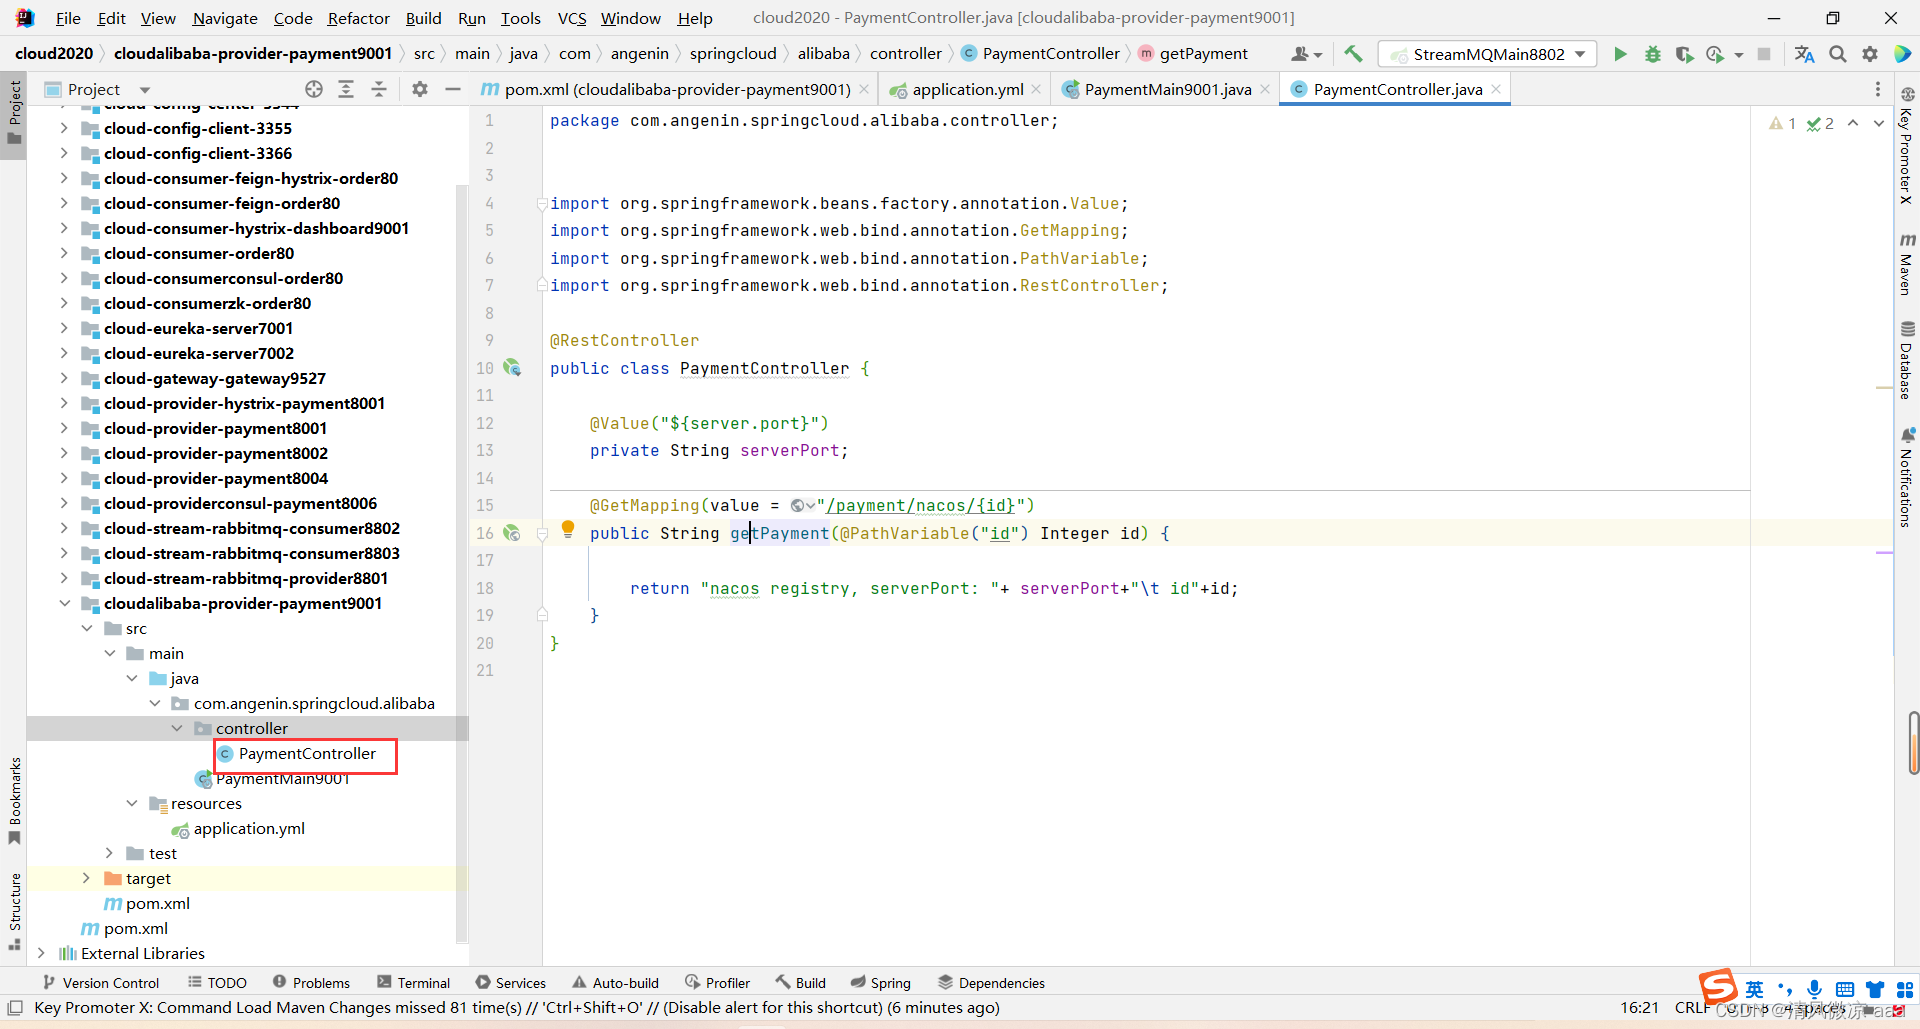
package com.angenin.springcloud.alibaba.controller;import org.springframework.beans.factory.annotation.Value;
import org.springframework.web.bind.annotation.GetMapping;
import org.springframework.web.bind.annotation.PathVariable;
import org.springframework.web.bind.annotation.RestController;@RestController
public class PaymentController {@Value("${server.port}")private String serverPort;@GetMapping(value = "/payment/nacos/{id}")public String getPayment(@PathVariable("id") Integer id) {return "nacos registry, serverPort: "+ serverPort+"\t id"+id;}
}
6)测试
-
启动Nacos8848注册中心,启动9001生产者
- 不像Eureka需要自己构建服务模块才能使用,这个只需要安装就可以用了。
-
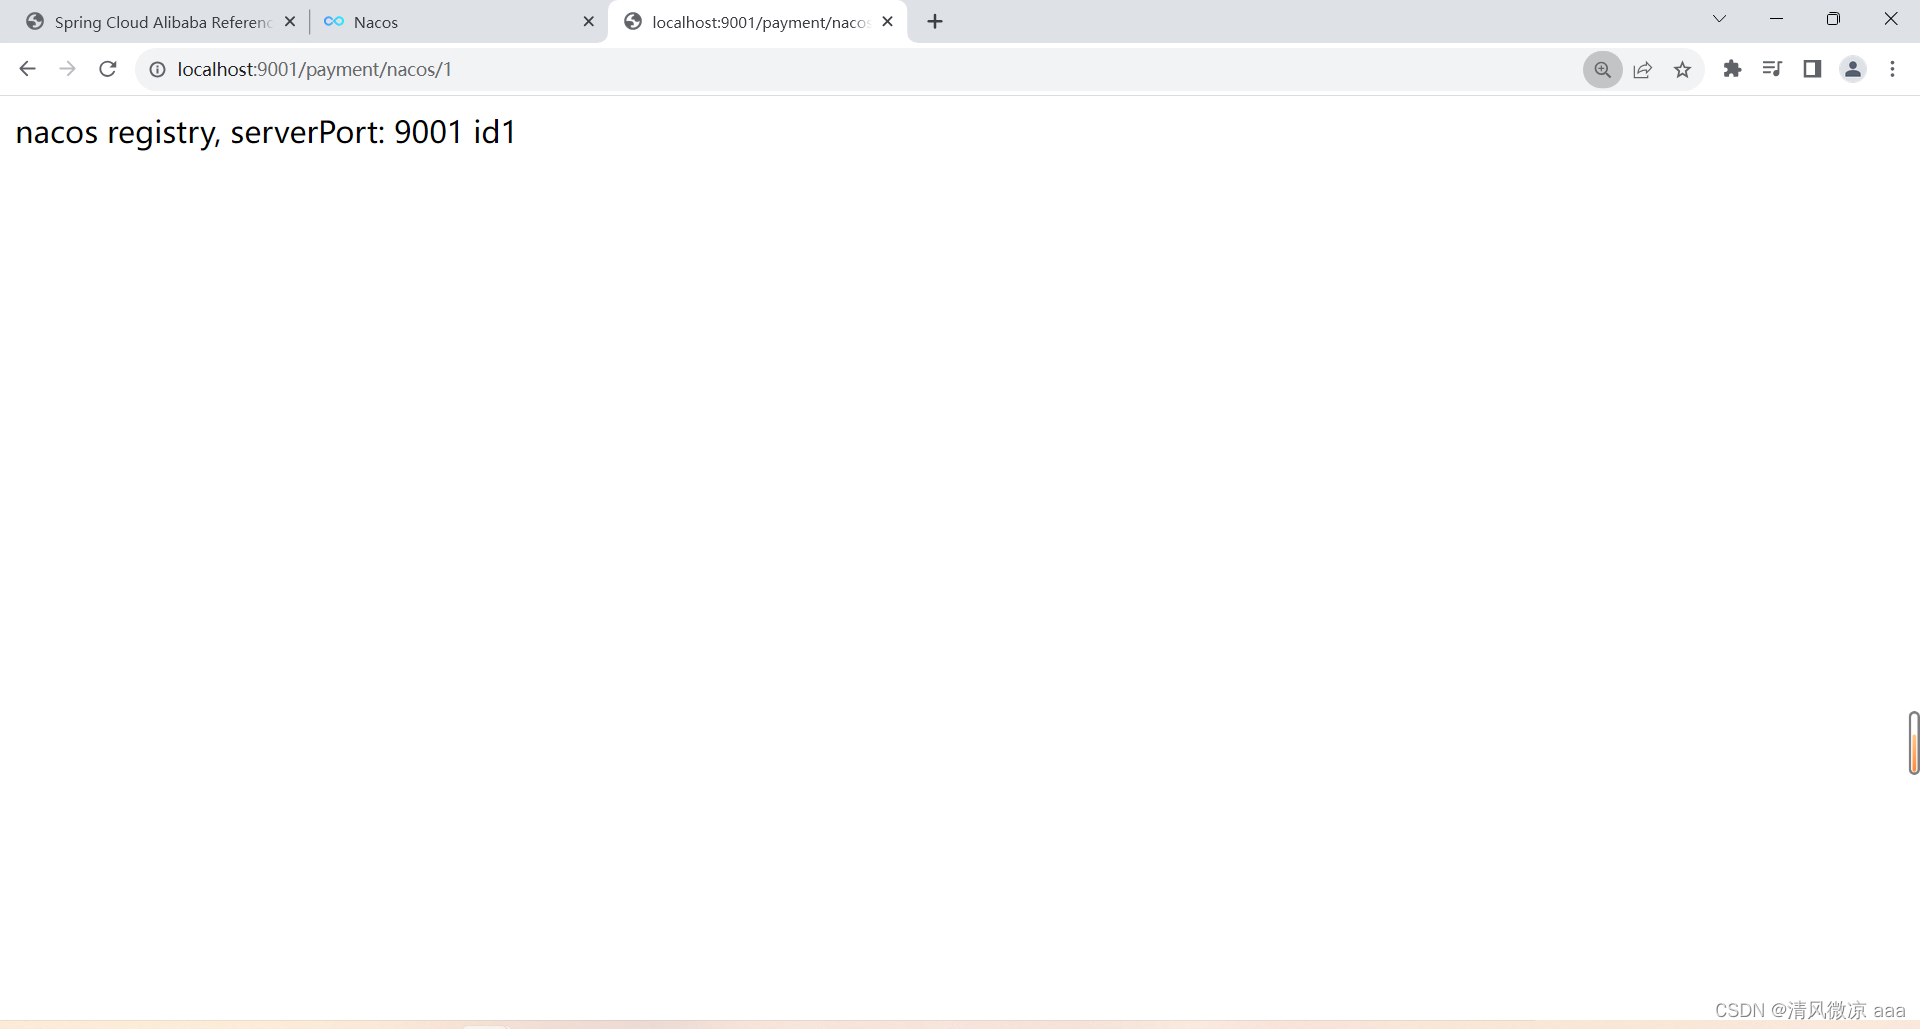
访问控制层方法:http://localhost:9001/payment/nacos/1
-
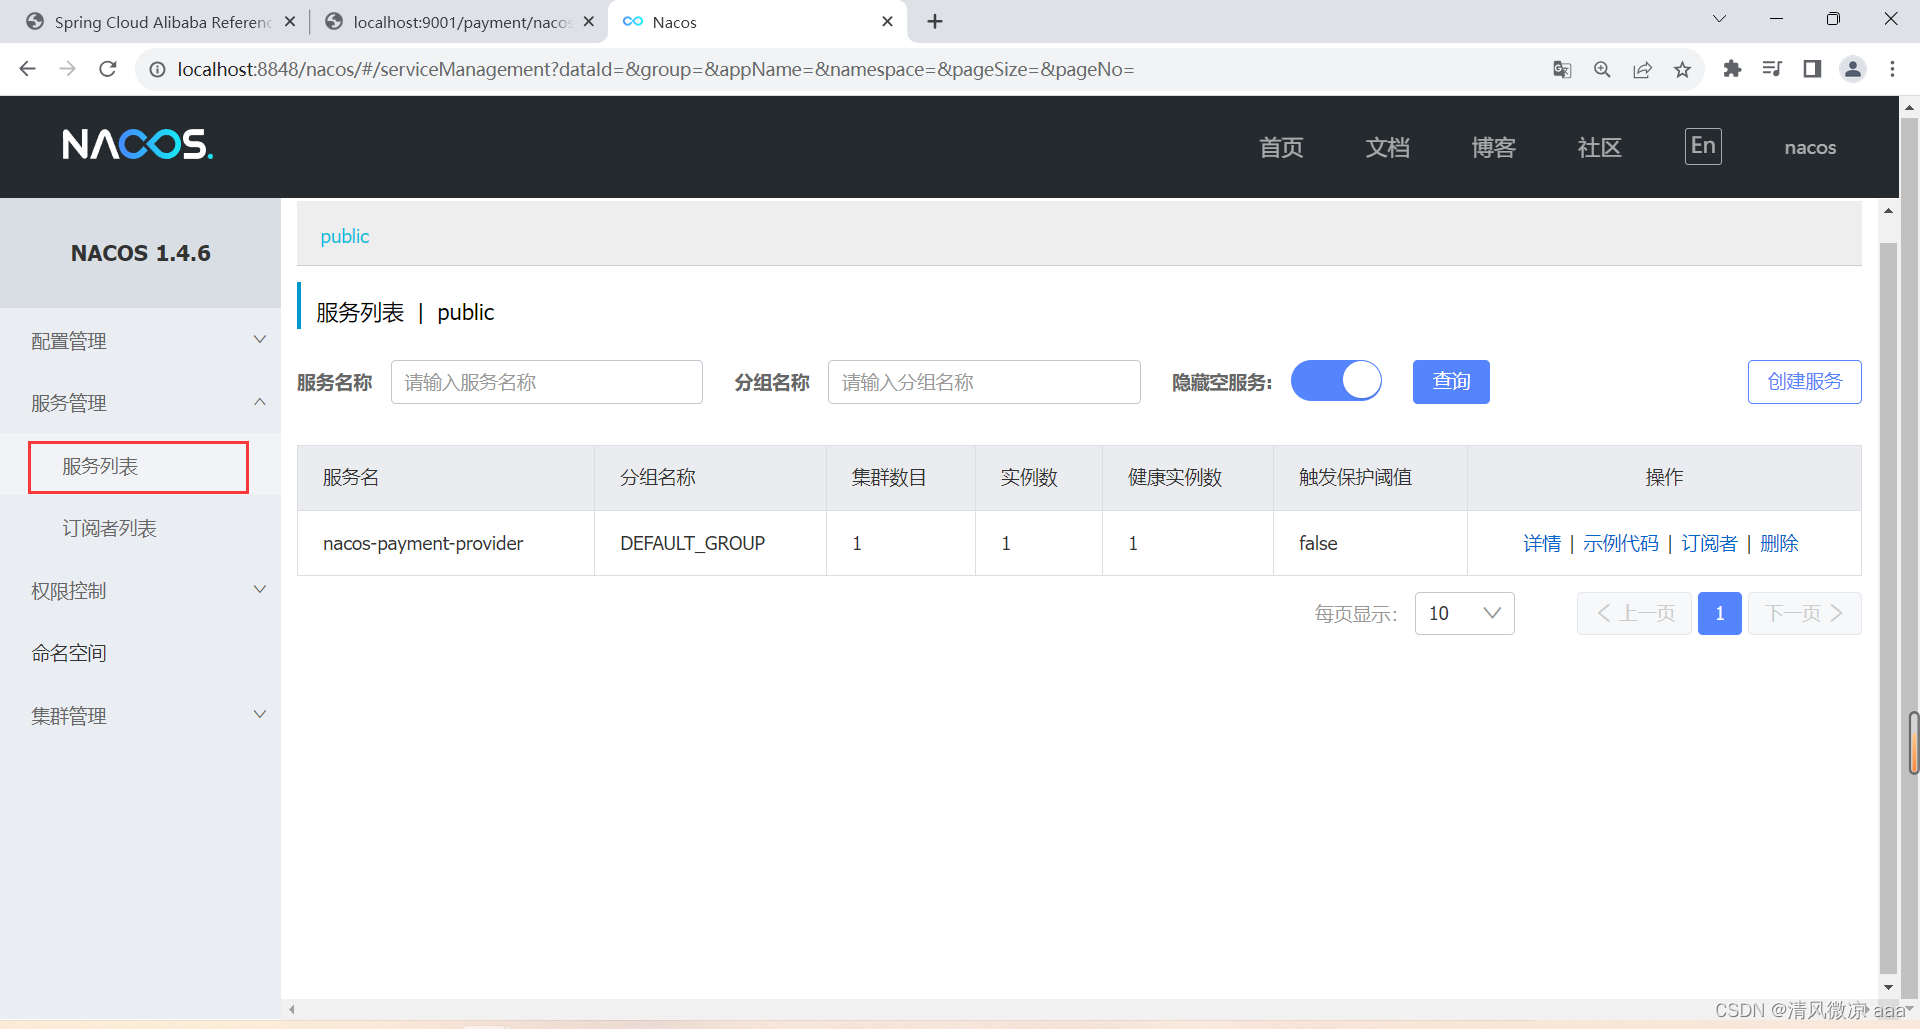
nacos控制台:http://localhost:8848/nacos
- 默认账号密码都是nacos
- 默认账号密码都是nacos
-
nacos服务注册中心+服务提供者9001都OK了
7)提前创建9002
-
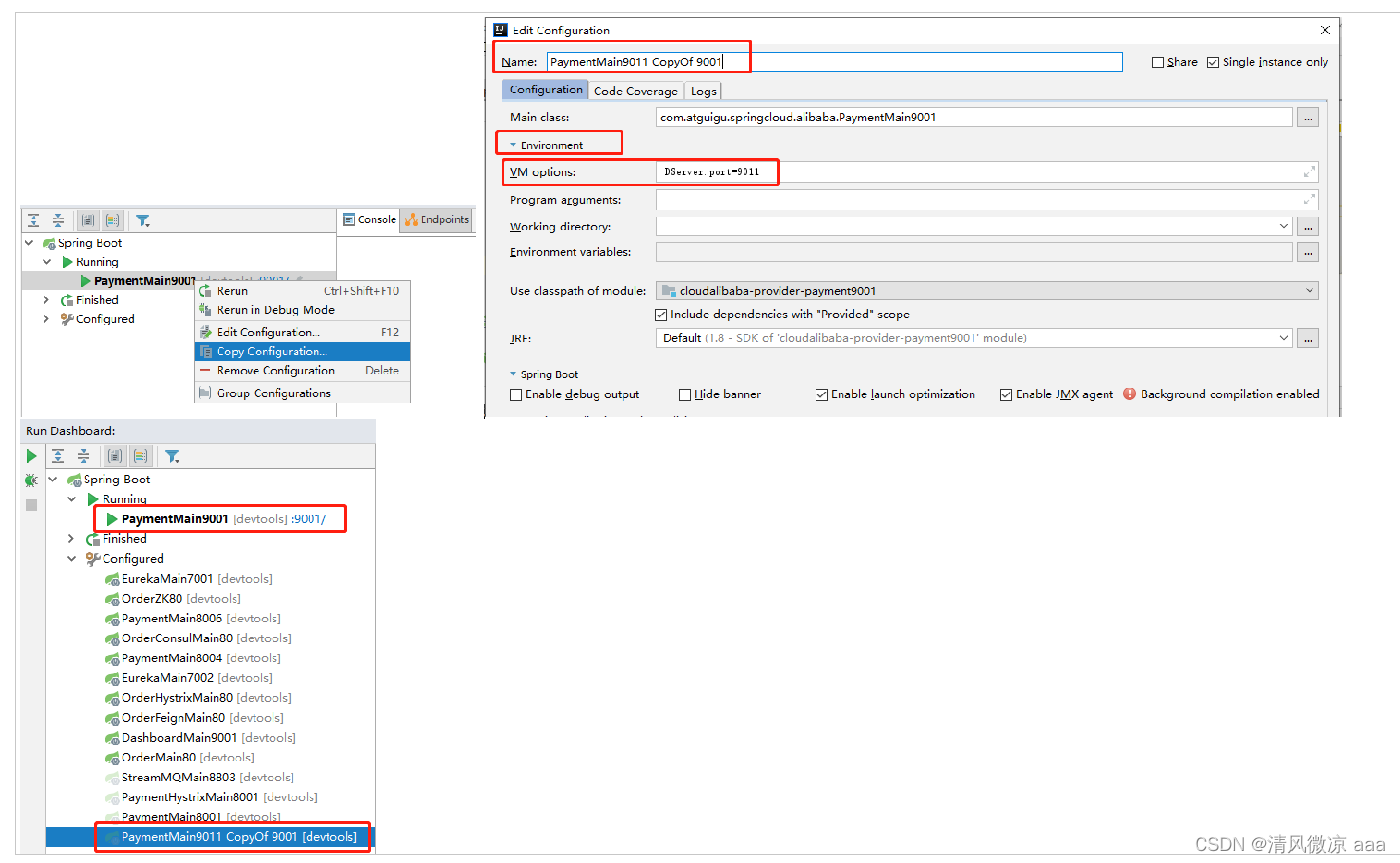
nacos自带负载均衡功能:为了下一章节演示nacos的负载均衡,参照9001新建9002
-
方式一:取巧不想新建重复体力劳动,直接拷贝虚拟端口映射
- 有时候可能会报错。
- 有时候可能会报错。
-
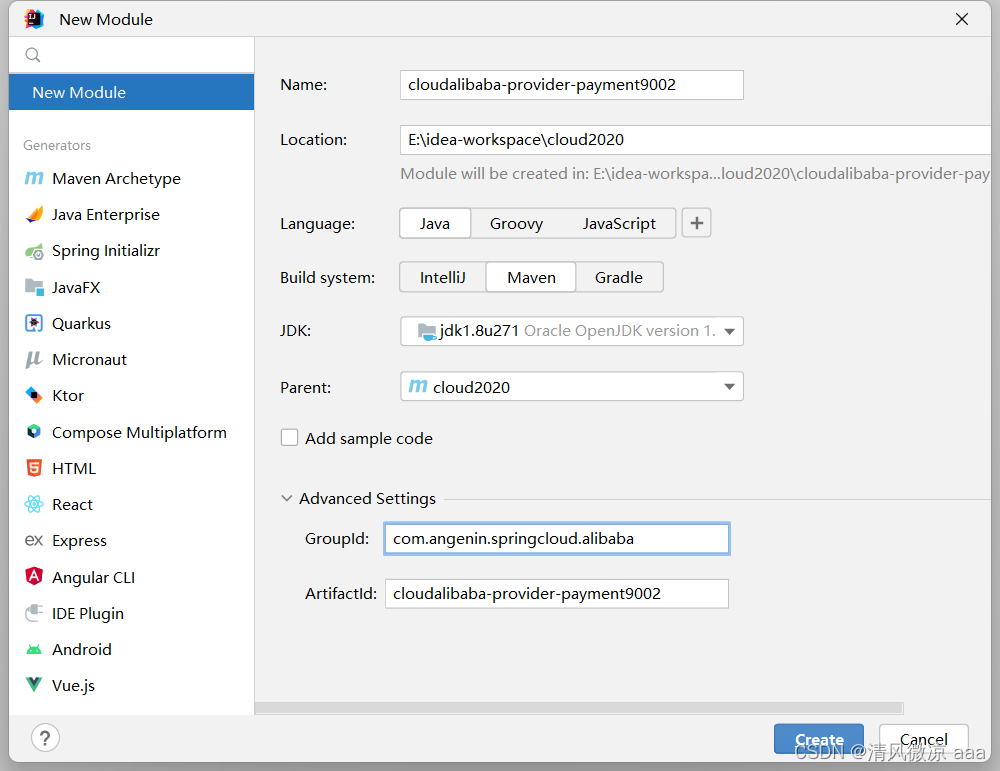
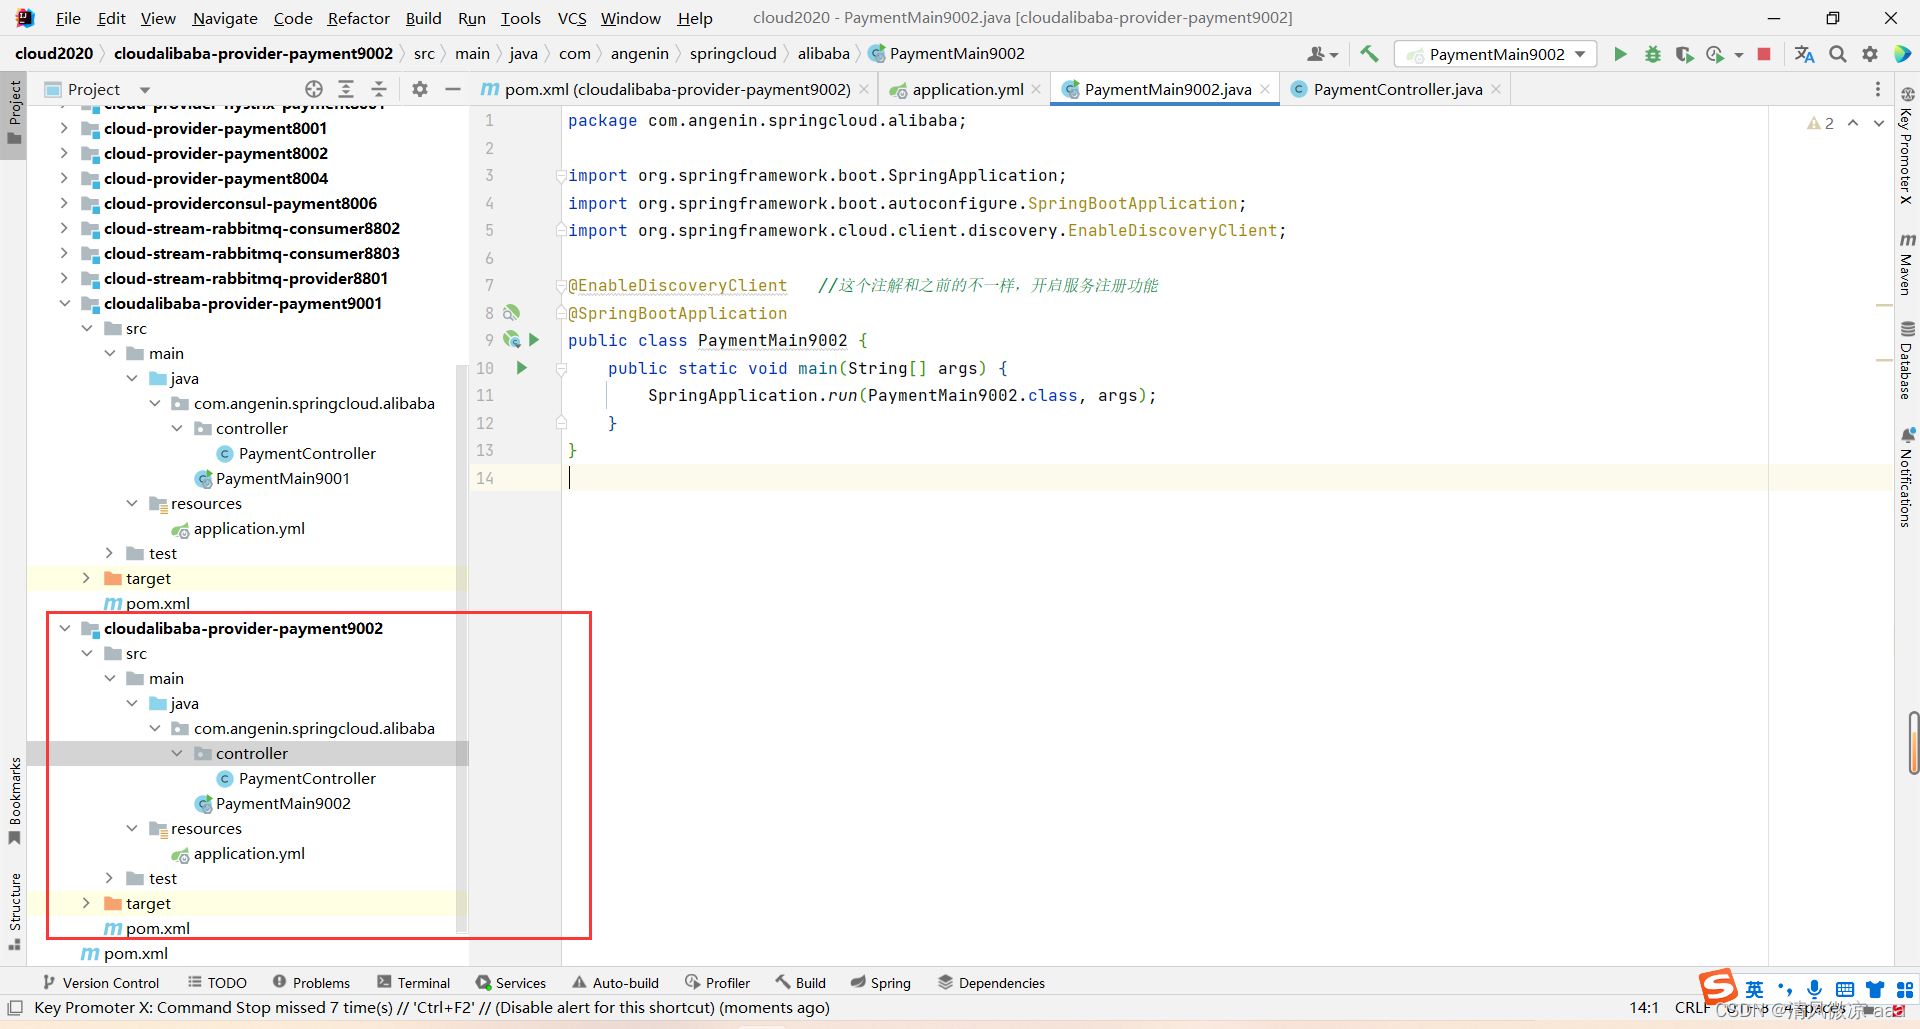
方式二:手动创建新建
cloudalibaba-provider-payment9002-
创建步骤:略
-
效果:
-
-
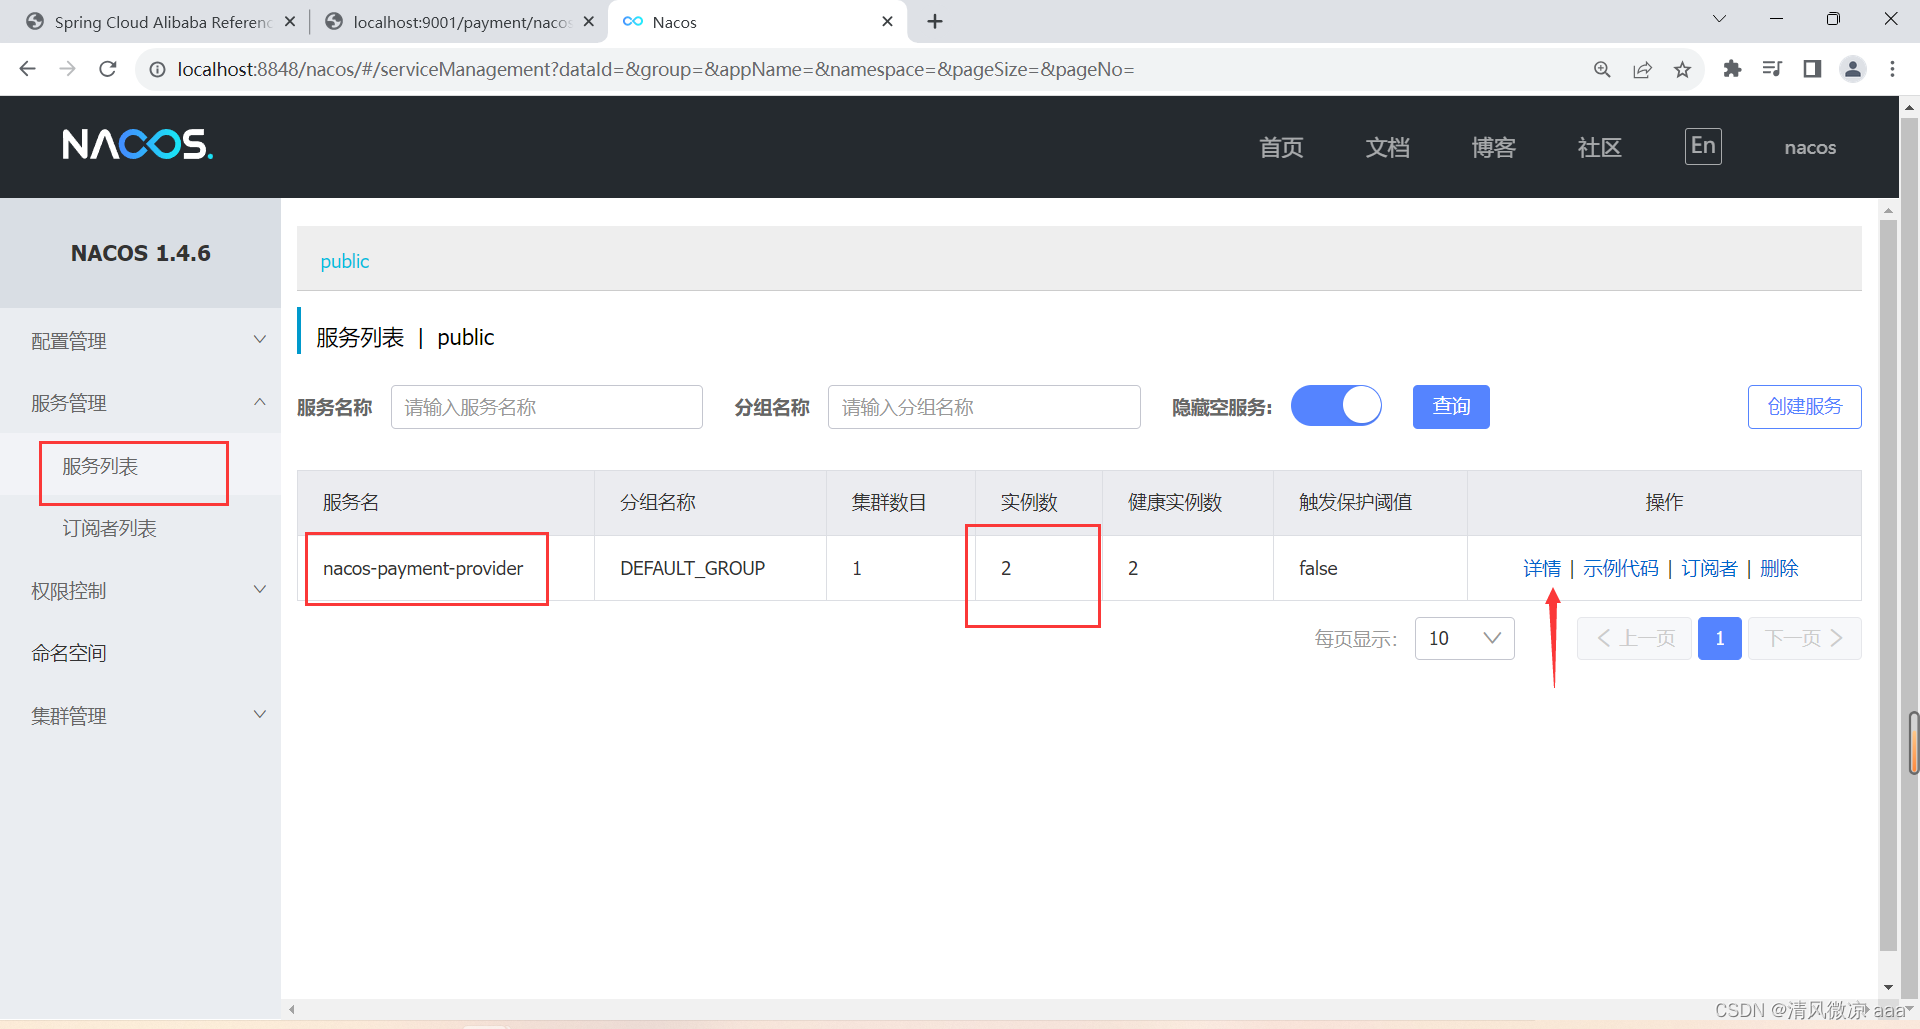
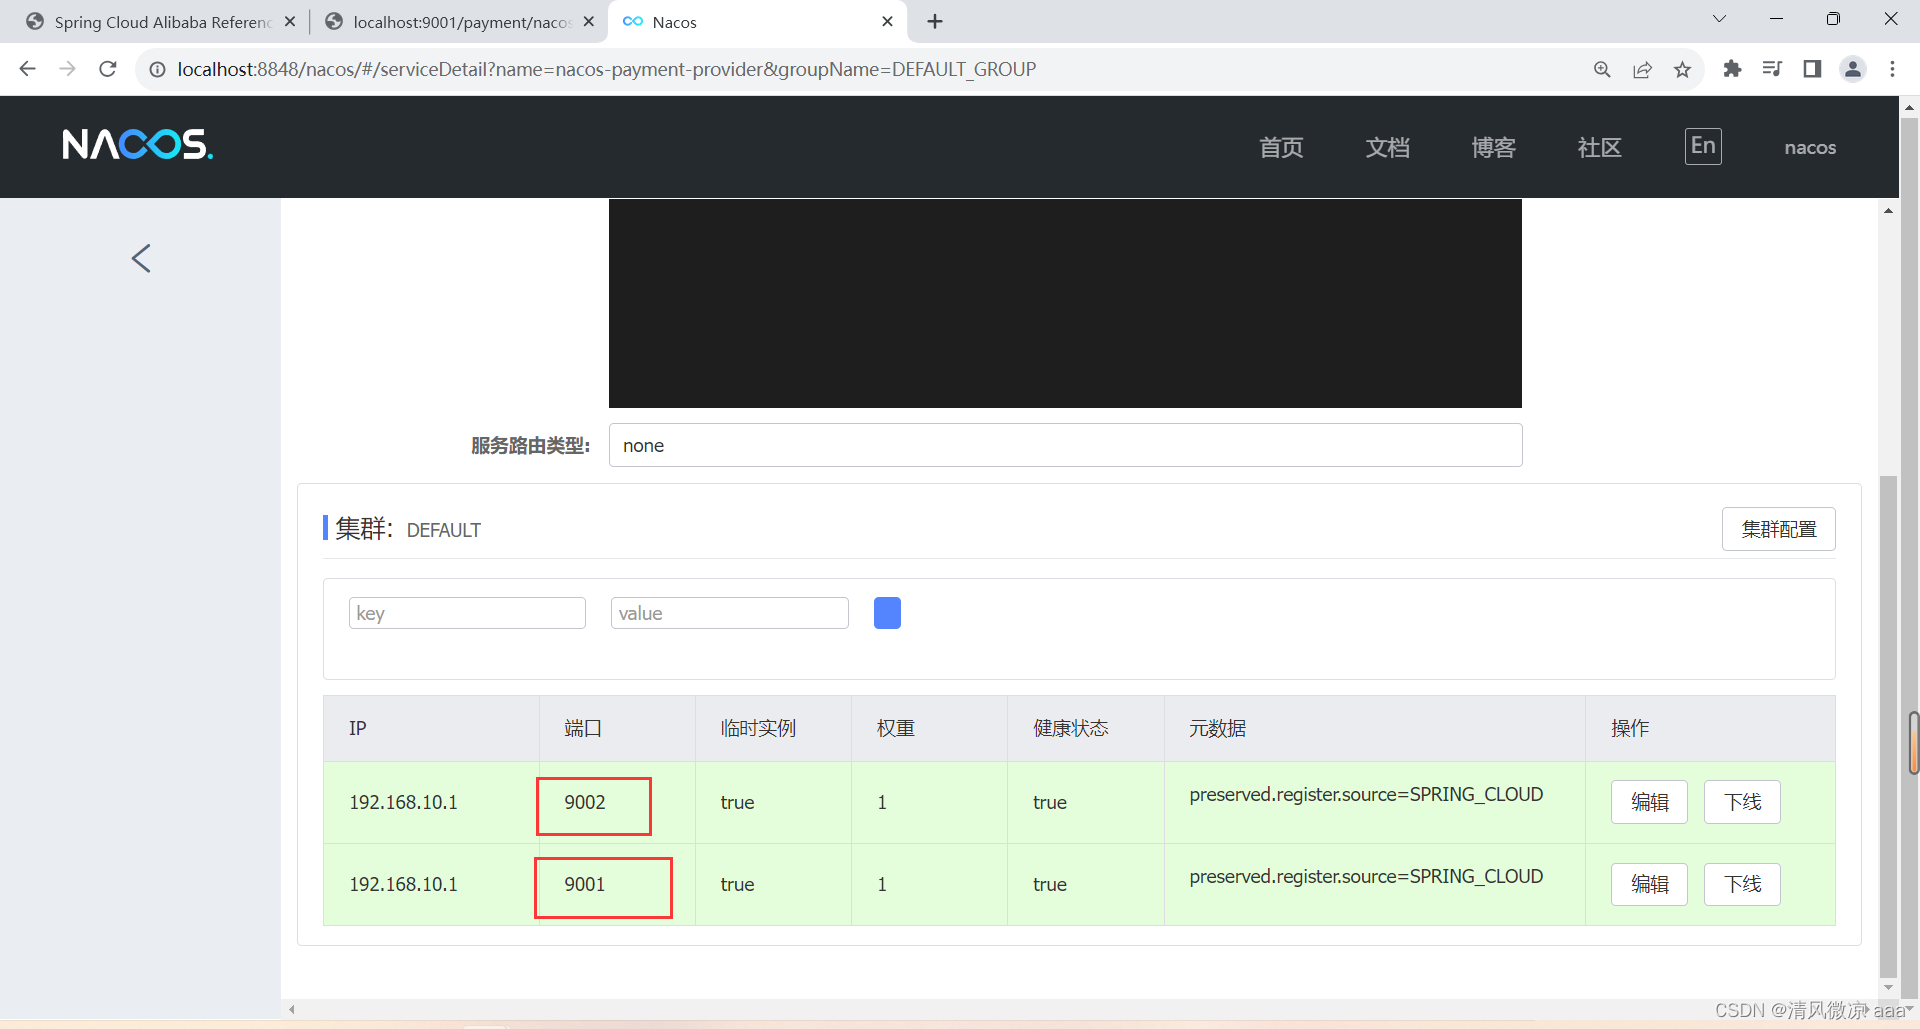
启动9001,9002查看后台管理界面:
18.3.3 基于Nacos的服务消费者
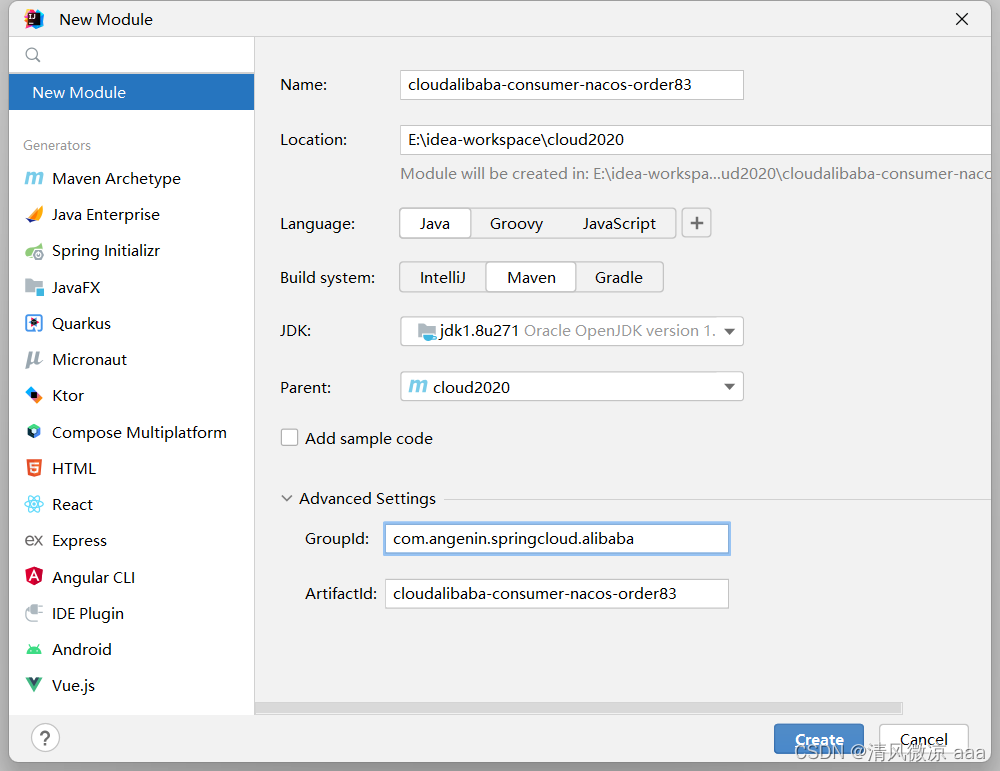
1)新建Module:cloudalibaba-consumer-nacos-order83
2)POM
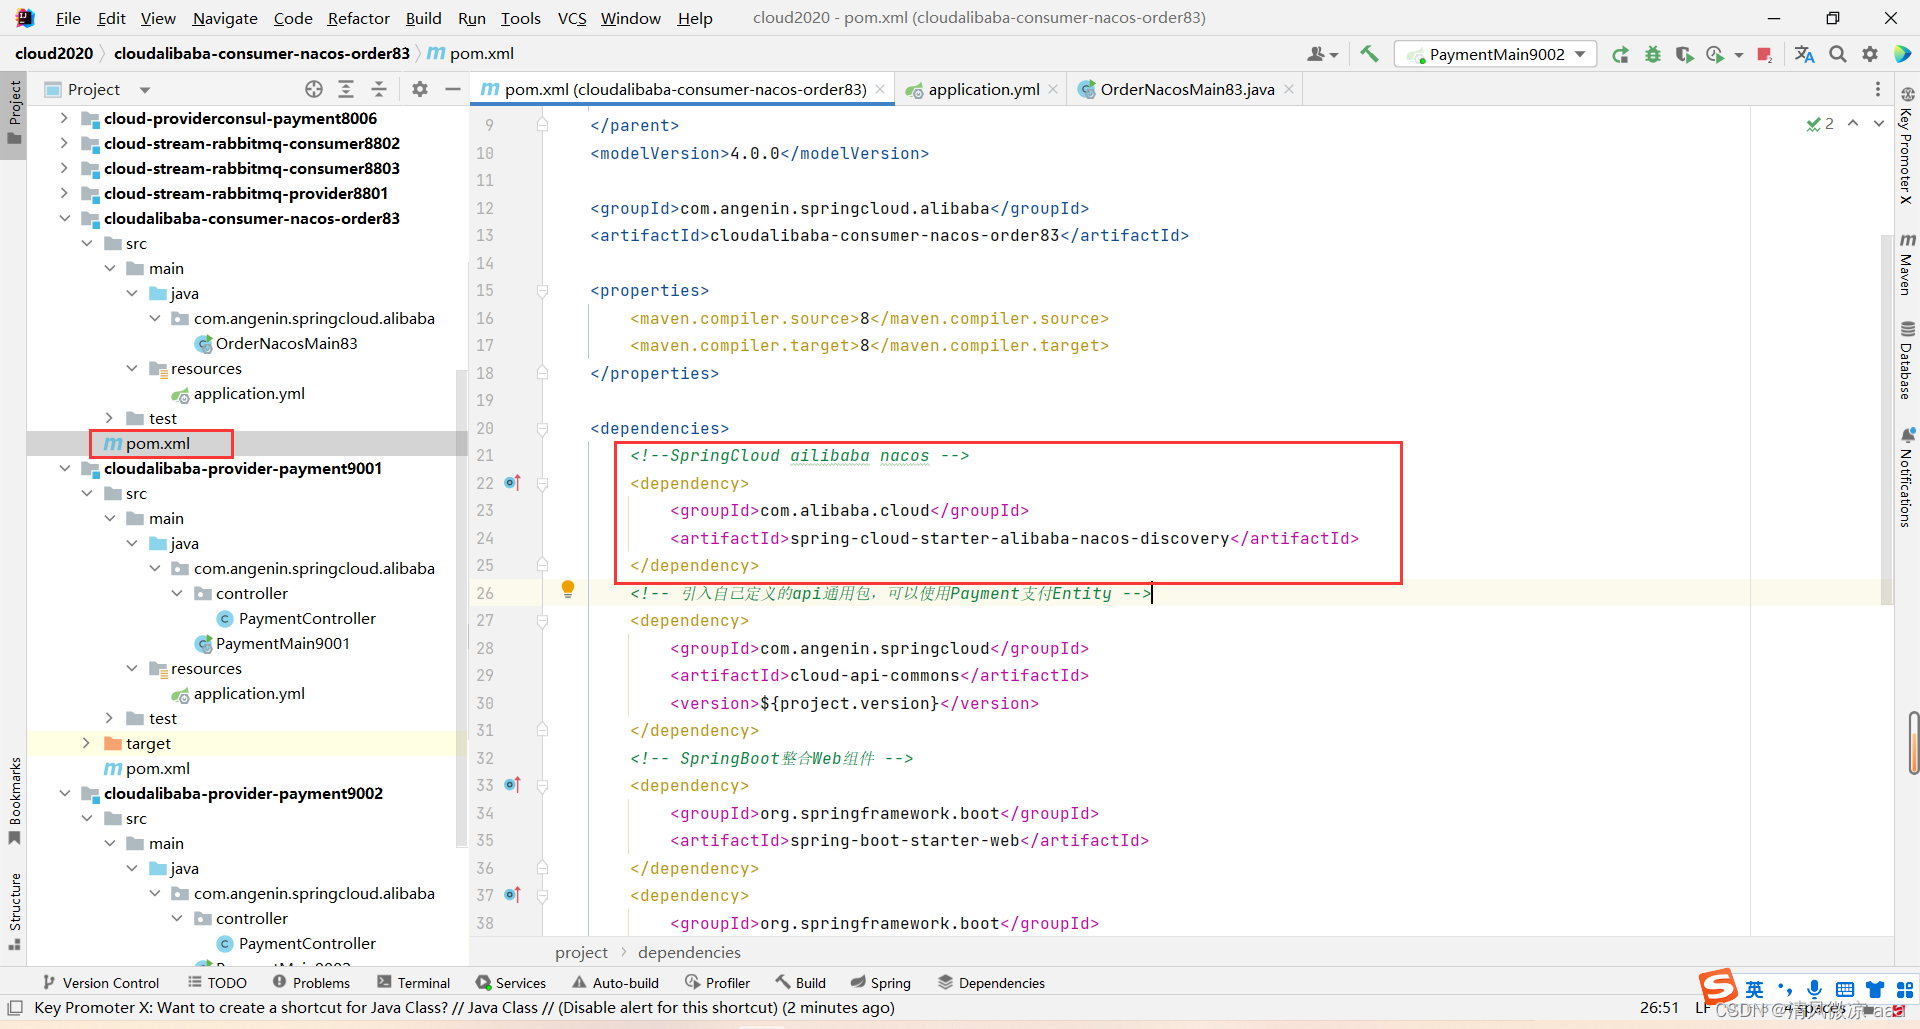
<?xml version="1.0" encoding="UTF-8"?>
<project xmlns="http://maven.apache.org/POM/4.0.0"xmlns:xsi="http://www.w3.org/2001/XMLSchema-instance"xsi:schemaLocation="http://maven.apache.org/POM/4.0.0 http://maven.apache.org/xsd/maven-4.0.0.xsd"><parent><artifactId>cloud2020</artifactId><groupId>com.angenin.springcloud</groupId><version>1.0-SNAPSHOT</version></parent><modelVersion>4.0.0</modelVersion><groupId>com.angenin.springcloud.alibaba</groupId><artifactId>cloudalibaba-consumer-nacos-order83</artifactId><properties><maven.compiler.source>8</maven.compiler.source><maven.compiler.target>8</maven.compiler.target></properties><dependencies><!--SpringCloud ailibaba nacos --><dependency><groupId>com.alibaba.cloud</groupId><artifactId>spring-cloud-starter-alibaba-nacos-discovery</artifactId></dependency><!-- 引入自己定义的api通用包,可以使用Payment支付Entity --><dependency><groupId>com.angenin.springcloud</groupId><artifactId>cloud-api-commons</artifactId><version>${project.version}</version></dependency><!-- SpringBoot整合Web组件 --><dependency><groupId>org.springframework.boot</groupId><artifactId>spring-boot-starter-web</artifactId></dependency><dependency><groupId>org.springframework.boot</groupId><artifactId>spring-boot-starter-actuator</artifactId></dependency><!--日常通用jar包配置--><dependency><groupId>org.springframework.boot</groupId><artifactId>spring-boot-devtools</artifactId><scope>runtime</scope><optional>true</optional></dependency><dependency><groupId>org.projectlombok</groupId><artifactId>lombok</artifactId><optional>true</optional></dependency><dependency><groupId>org.springframework.boot</groupId><artifactId>spring-boot-starter-test</artifactId><scope>test</scope></dependency></dependencies></project>
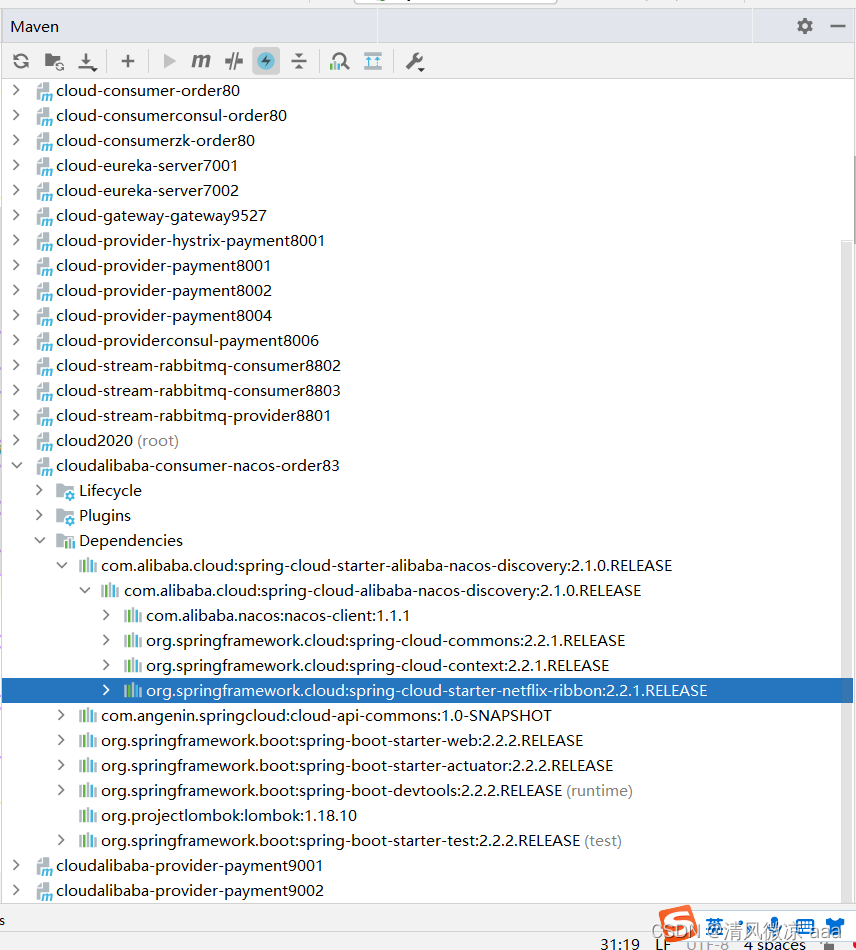
- 为什么nacos支持负载均衡:自动集成了Ribbon(新版本没有,已经被LoadBalancer代替了)
3)YML
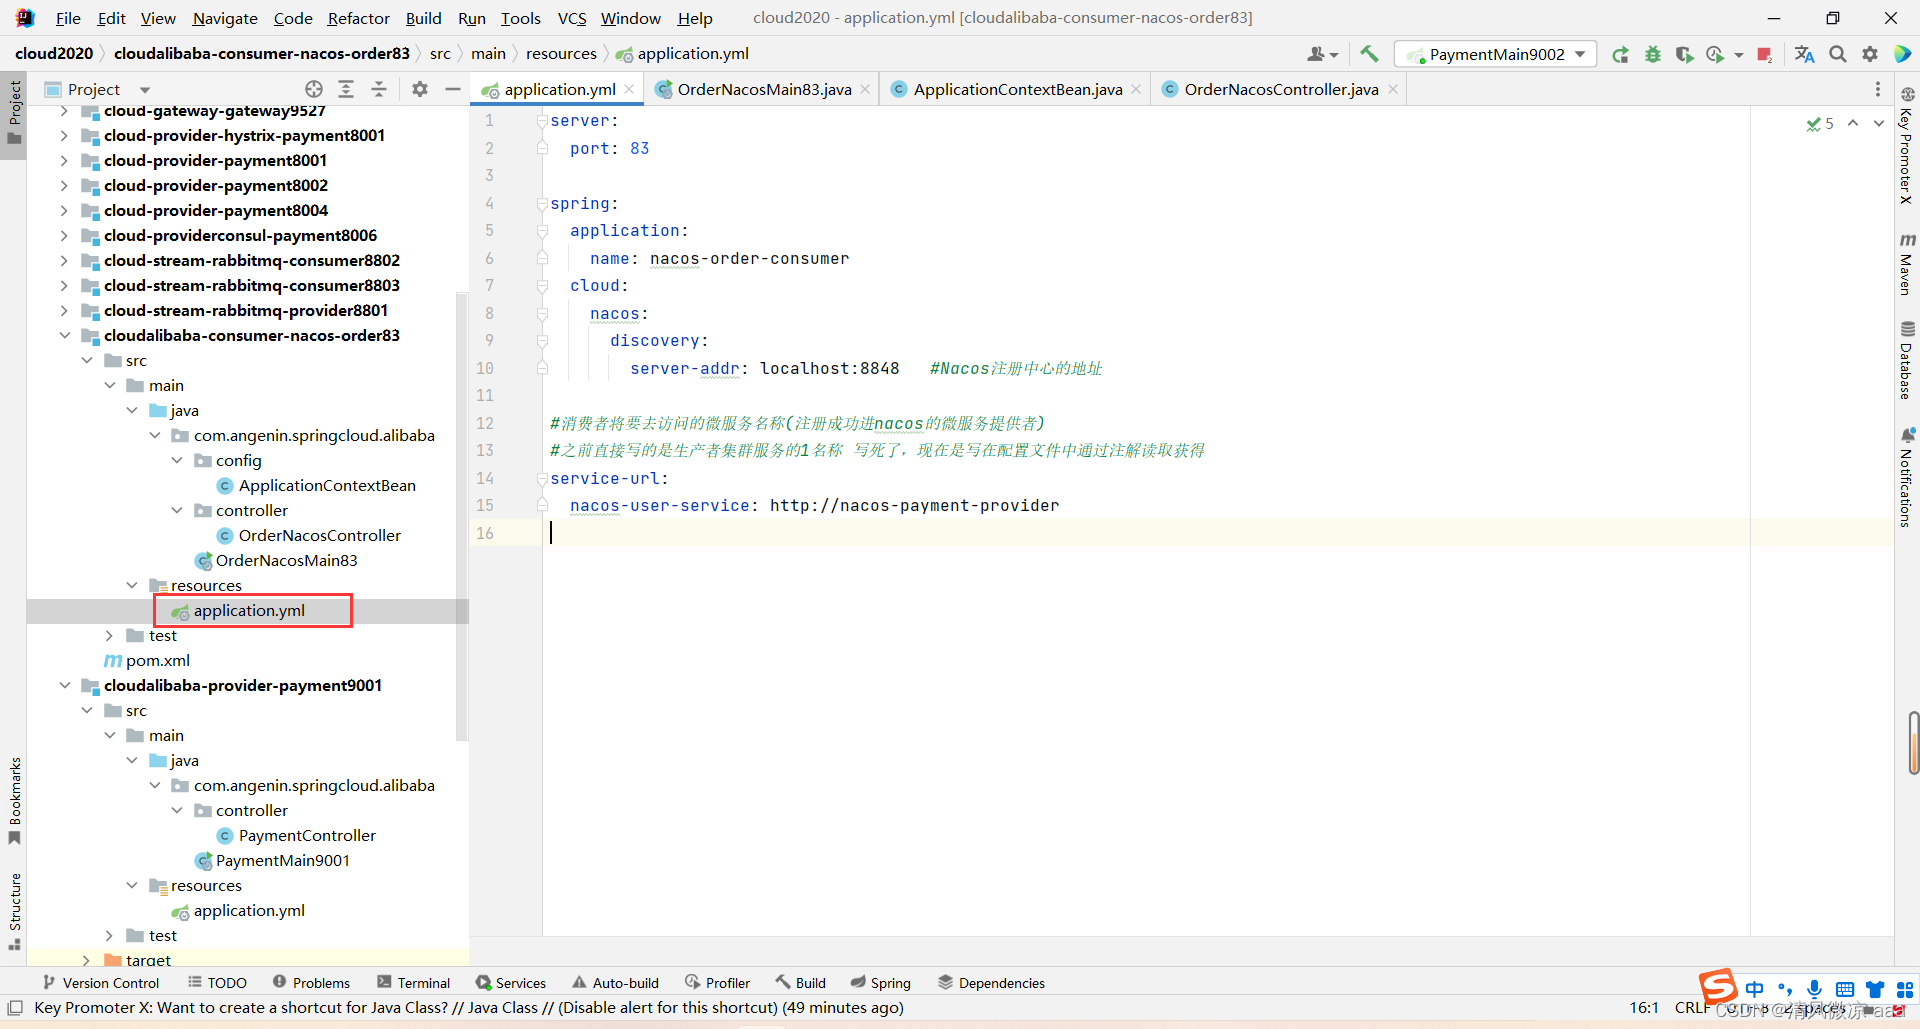
server:port: 83spring:application:name: nacos-order-consumercloud:nacos:discovery:server-addr: localhost:8848   #Nacos注册中心的地址#消费者将要去访问的微服务名称(注册成功进nacos的微服务提供者)
#之前直接写的是生产者集群服务的名称 写死了,现在是写在配置文件中通过注解@Value读取获得
service-url:nacos-user-service: http://nacos-payment-provider
4)主启动
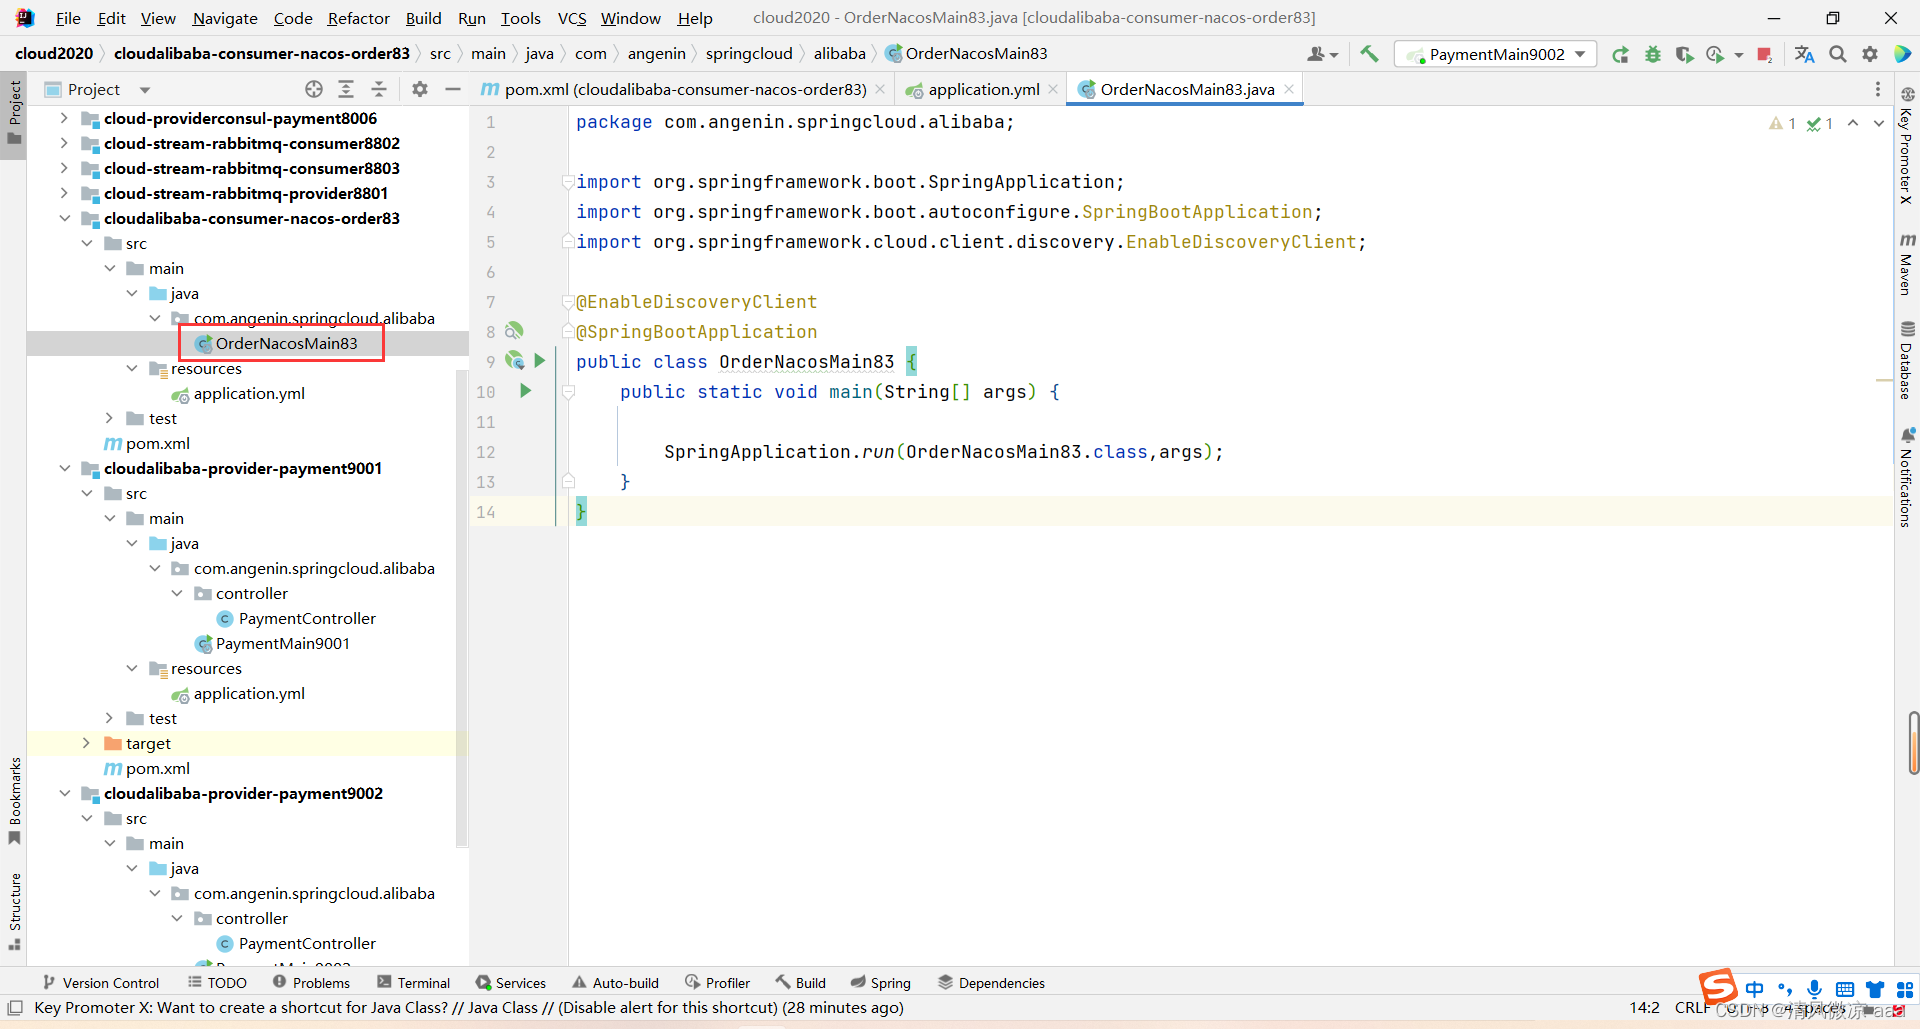
package com.angenin.springcloud.alibaba;import org.springframework.boot.SpringApplication;
import org.springframework.boot.autoconfigure.SpringBootApplication;
import org.springframework.cloud.client.discovery.EnableDiscoveryClient;@EnableDiscoveryClient
@SpringBootApplication
public class OrderNacosMain83 {public static void main(String[] args) {SpringApplication.run(OrderNacosMain83.class,args);}
}
5)配置类
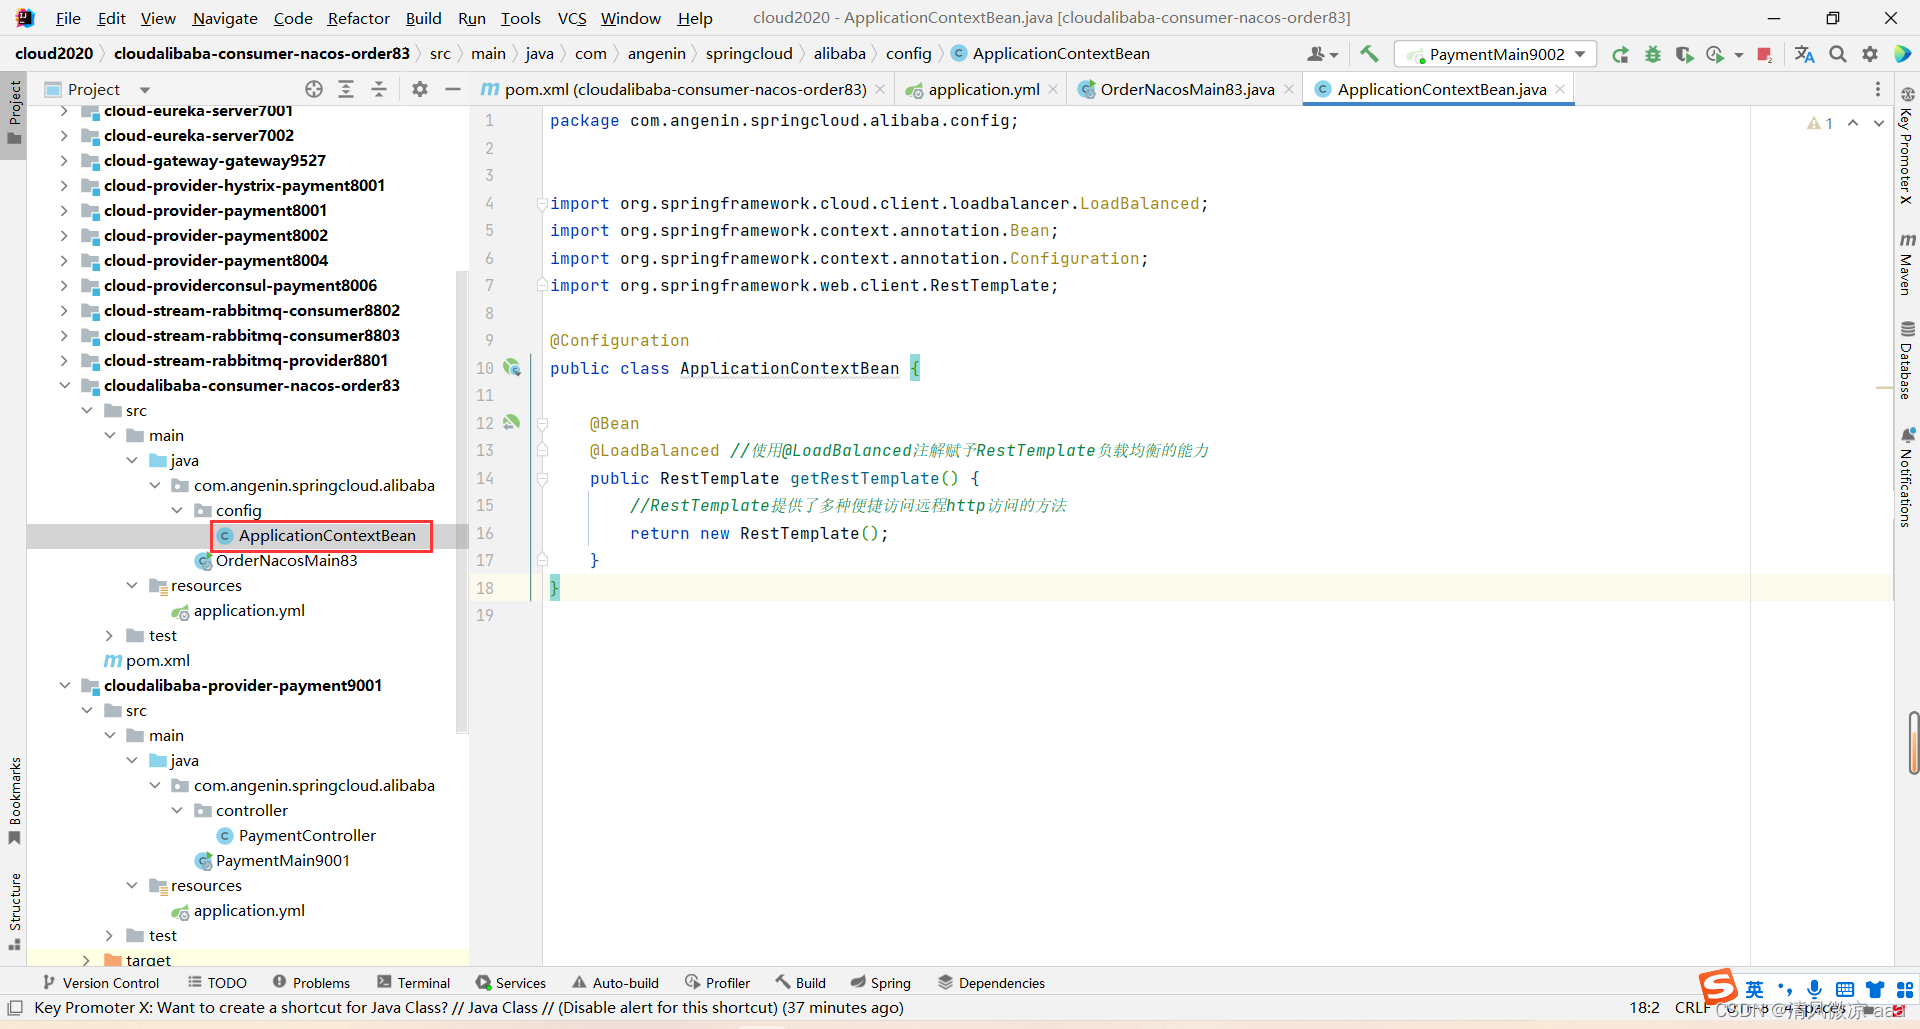
package com.angenin.springcloud.alibaba.config;import org.springframework.cloud.client.loadbalancer.LoadBalanced;
import org.springframework.context.annotation.Bean;
import org.springframework.context.annotation.Configuration;
import org.springframework.web.client.RestTemplate;@Configuration
public class ApplicationContextBean {@Bean@LoadBalanced //使用@LoadBalanced注解赋予RestTemplate负载均衡的能力public RestTemplate getRestTemplate() {//RestTemplate提供了多种便捷访问远程http访问的方法return new RestTemplate();}
}
6)业务类
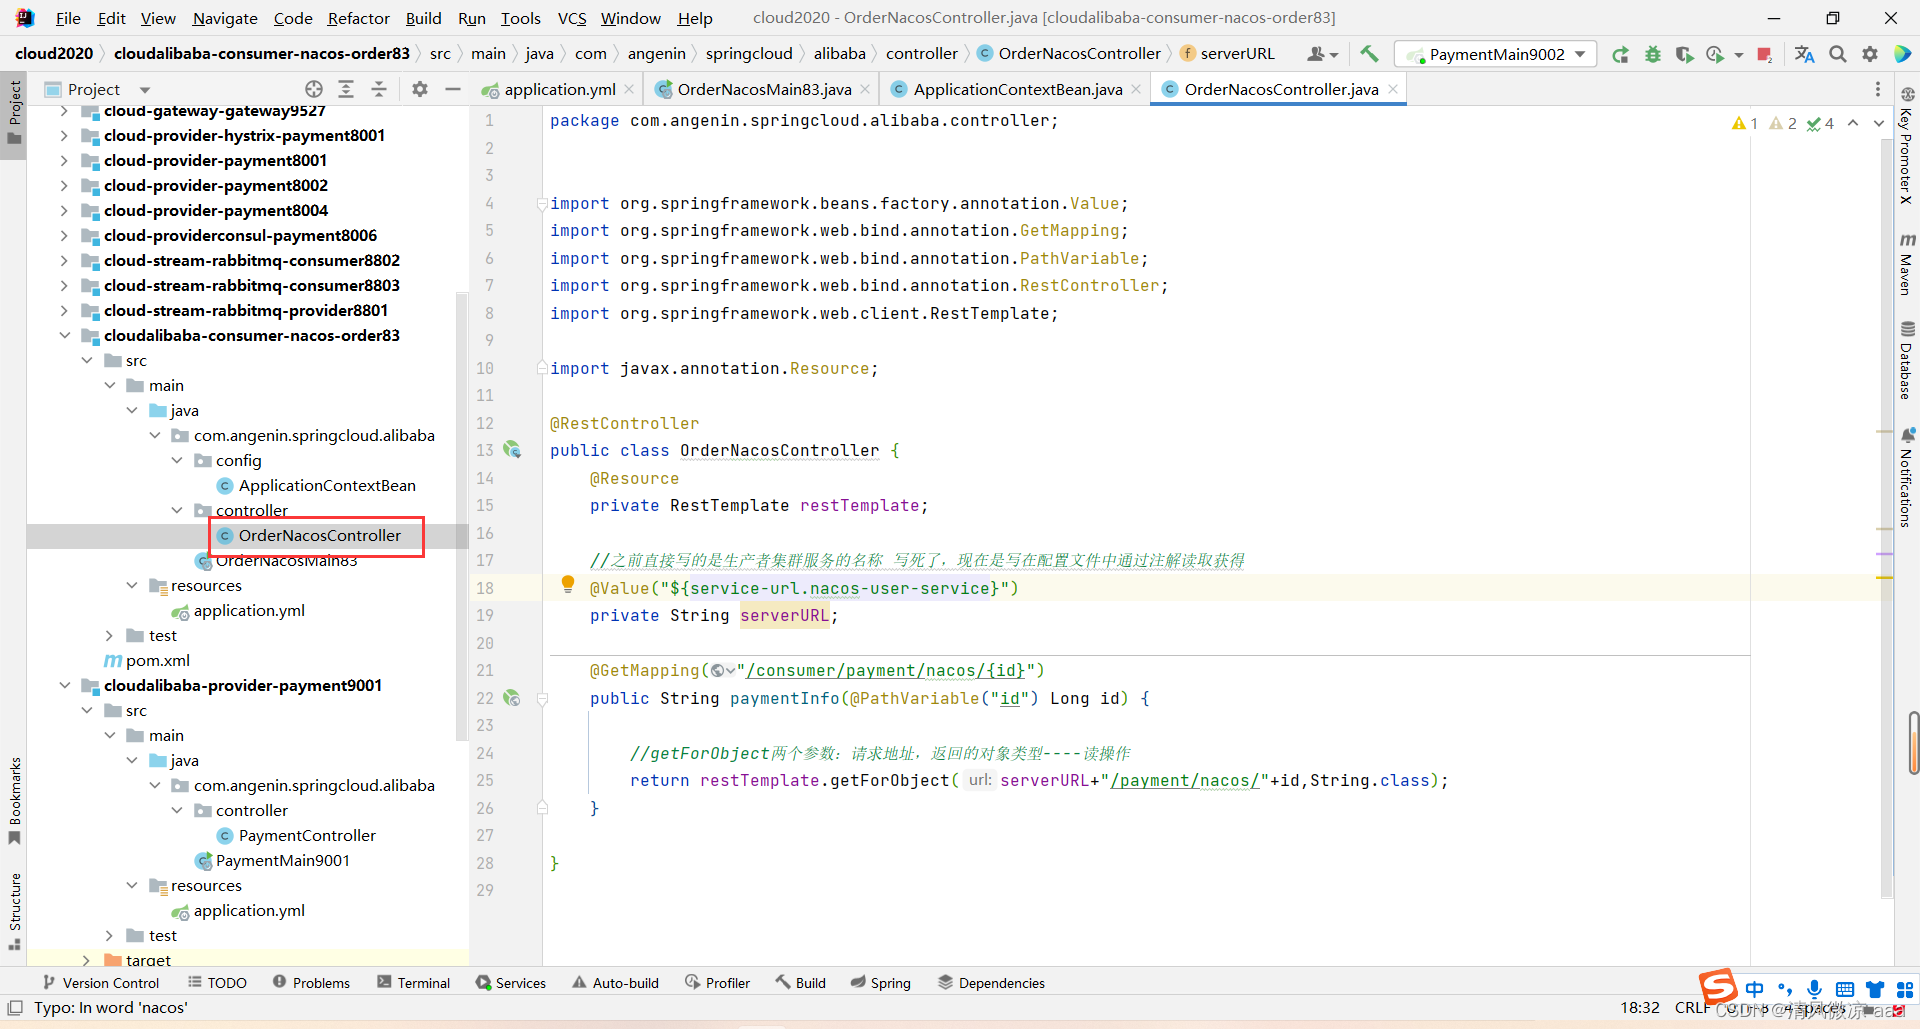
package com.angenin.springcloud.alibaba.controller;import org.springframework.beans.factory.annotation.Value;
import org.springframework.web.bind.annotation.GetMapping;
import org.springframework.web.bind.annotation.PathVariable;
import org.springframework.web.bind.annotation.RestController;
import org.springframework.web.client.RestTemplate;import javax.annotation.Resource;@RestController
public class OrderNacosController {@Resourceprivate RestTemplate restTemplate;//之前直接写的是生产者集群服务的名称 写死了,现在是写在配置文件中通过注解@Value读取获得@Value("${service-url.nacos-user-service}")private String serverURL;@GetMapping("/consumer/payment/nacos/{id}")public String paymentInfo(@PathVariable("id") Long id) {//getForObject两个参数:请求地址,返回的对象类型----读操作return restTemplate.getForObject(serverURL+"/payment/nacos/"+id,String.class);}}
7)测试
-
启动nacos,9001生产者,9002生产者,83消费者
-
nacos控制台
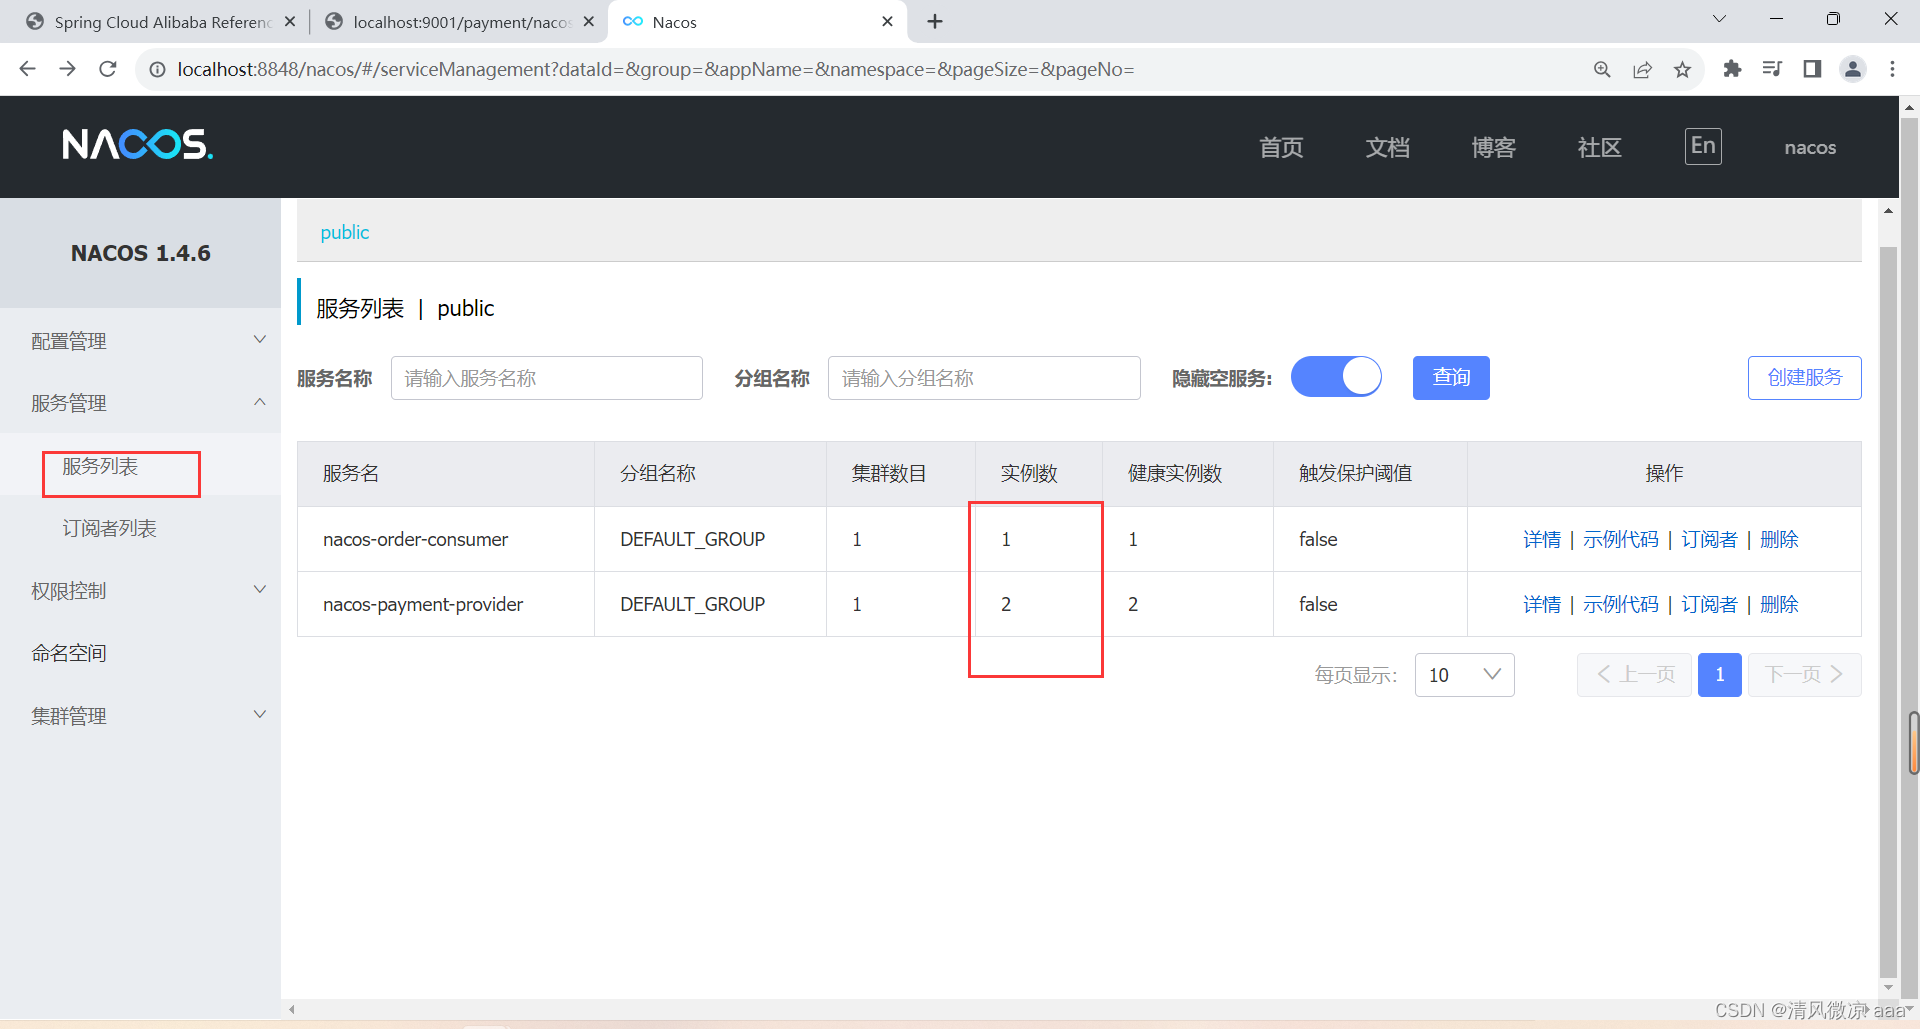
-
http://localhost:83/consumer/payment/nacos/13
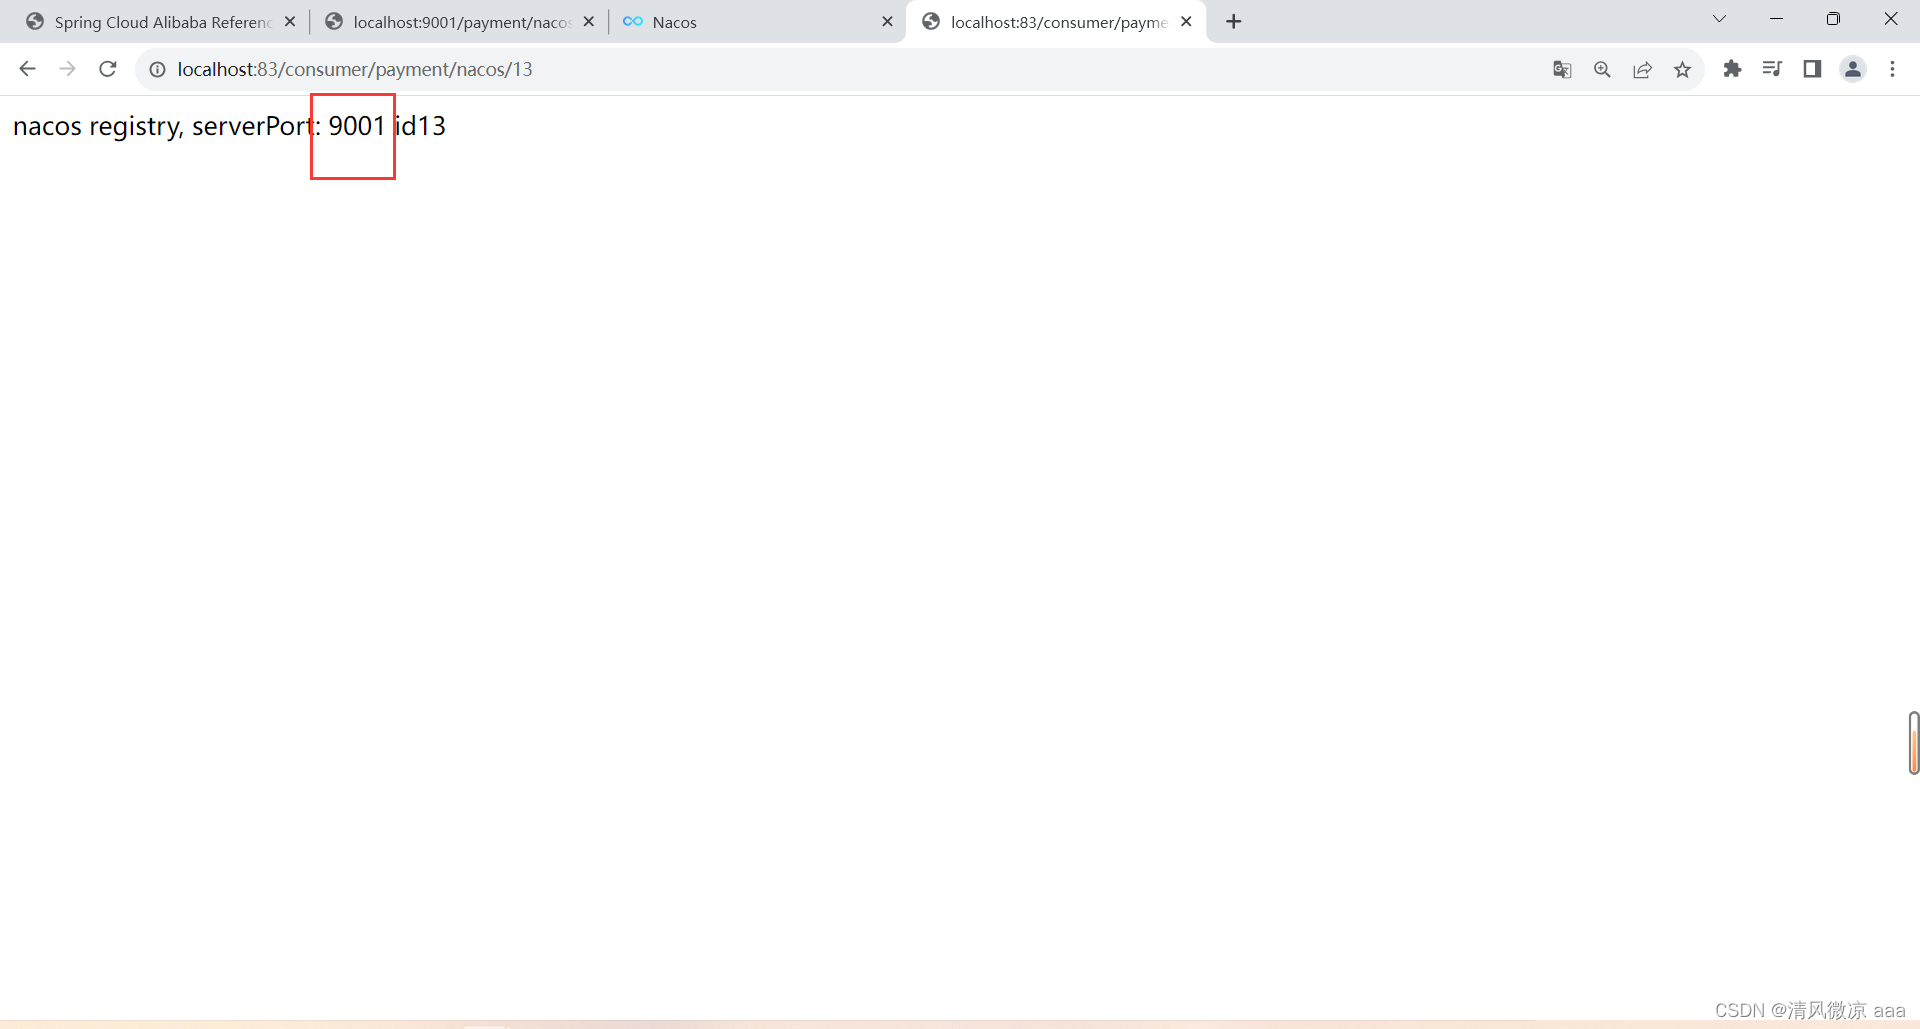
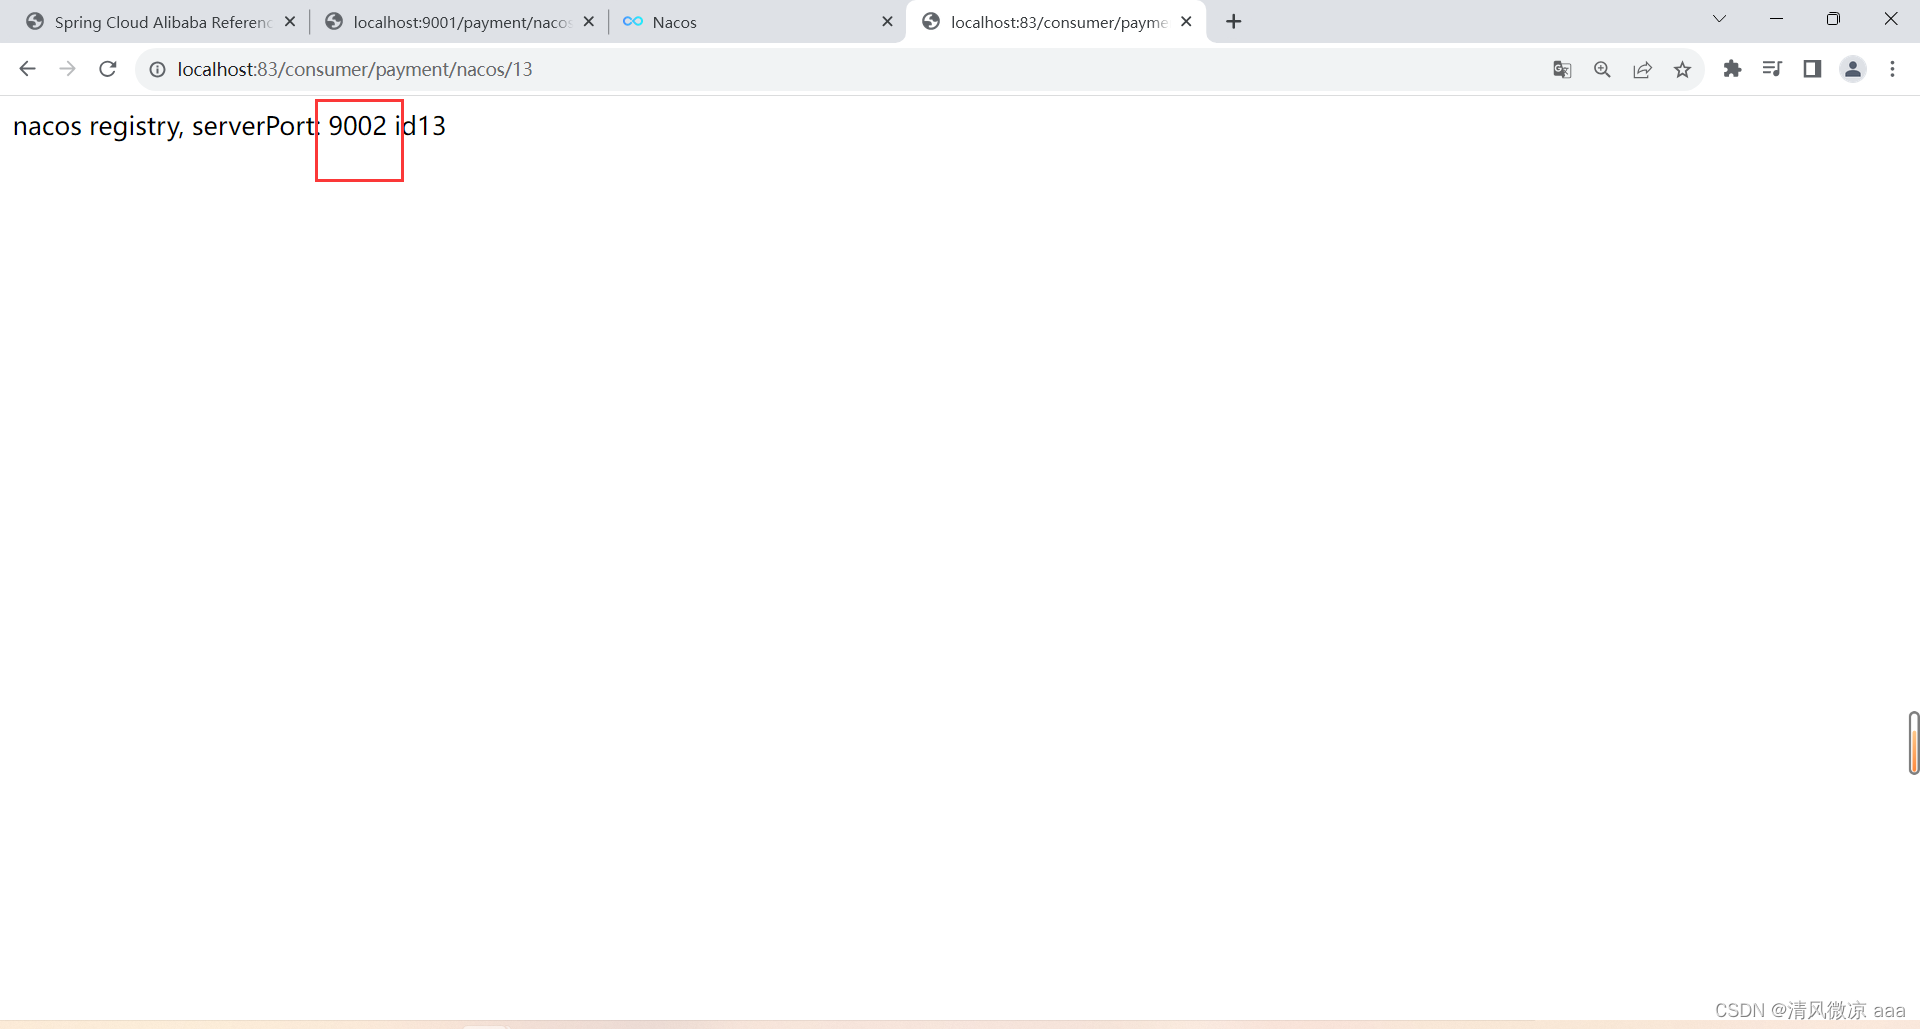
-
83访问9001/9002,轮询负载OK
18.3.4 服务注册中心对比(细节讲解)
-
Nacos全景图所示
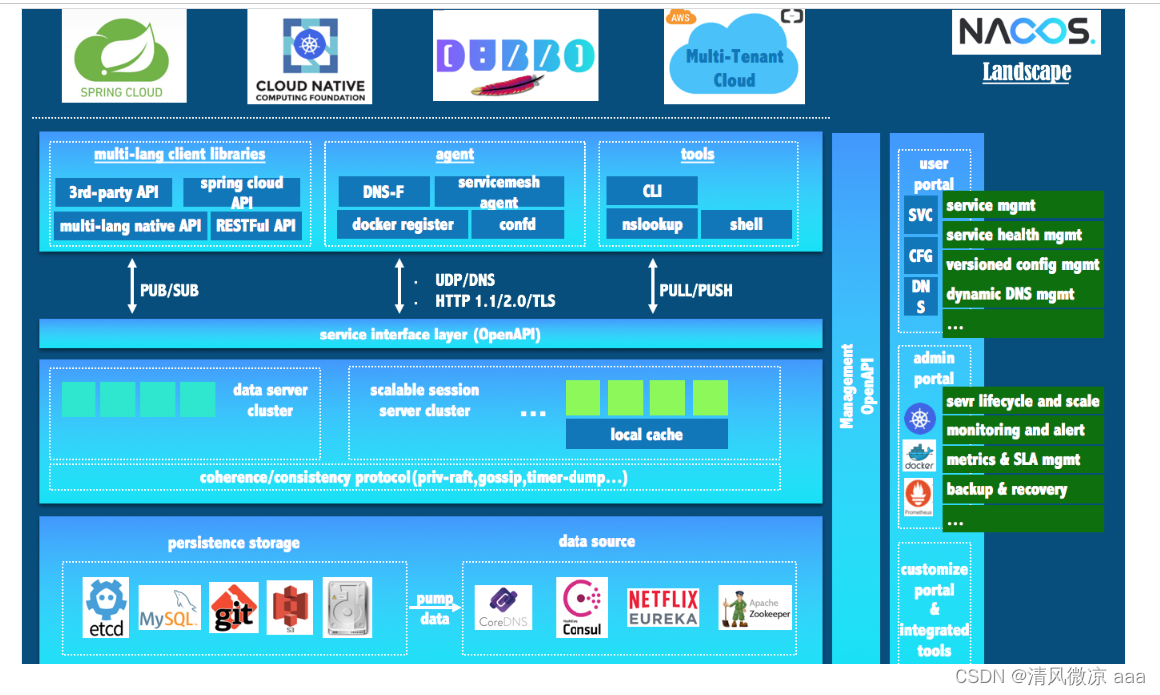
-
Nacos和CAP
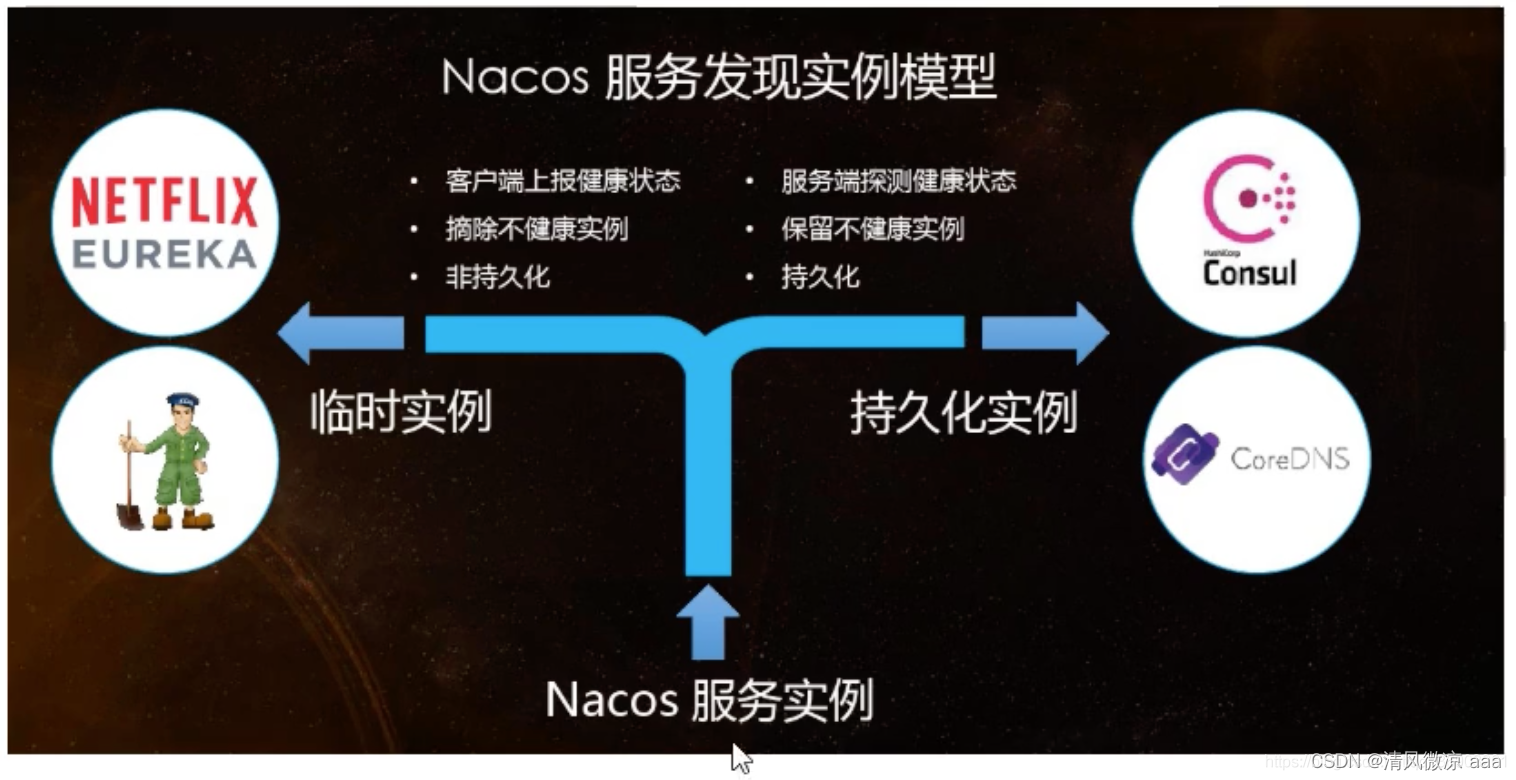
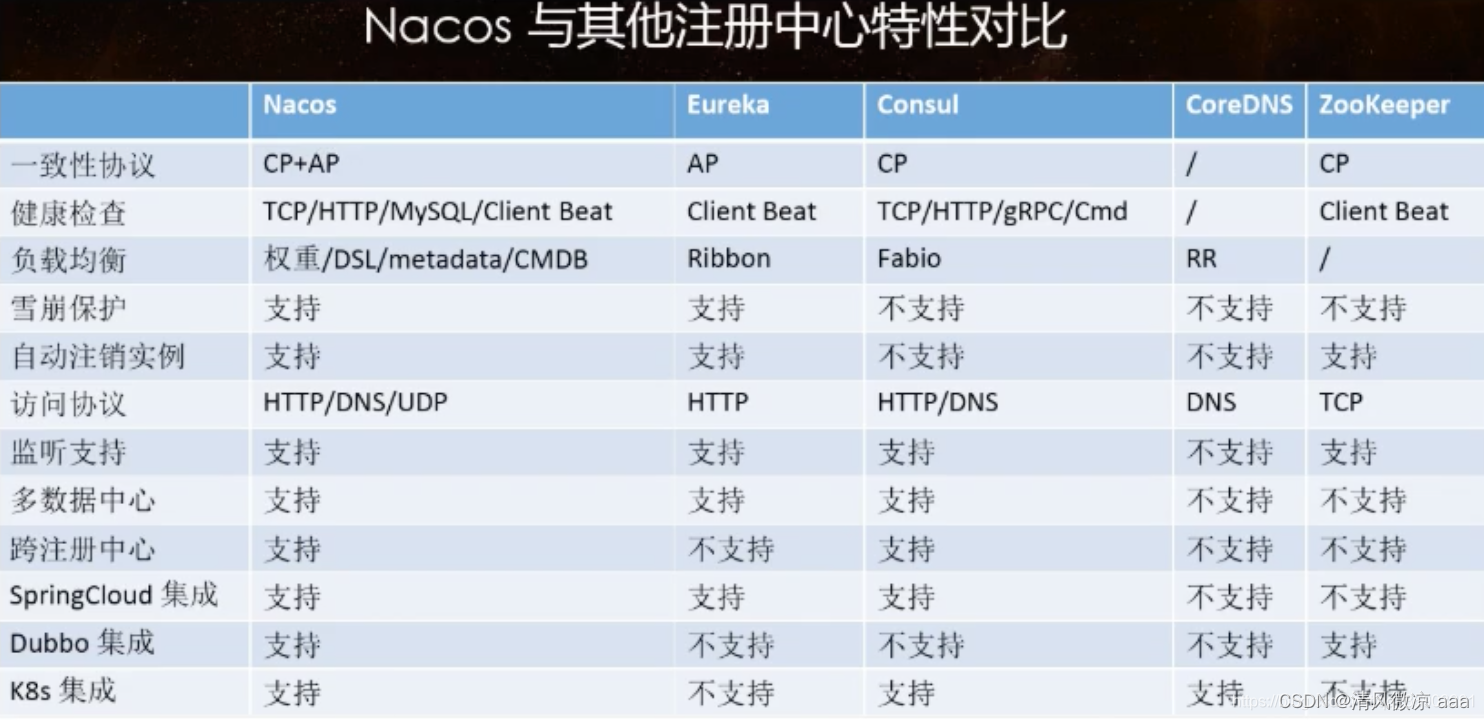
-
Nacos 支持AP和CP模式的切换
C是所有节点在同一时间看到的数据是一致的;而A的定义是所有的请求都会收到响应。何时选择使用何种模式?- 一般来说,如果不需要存储服务级别的信息且服务实例是通过nacos-client注册,并能够保持心跳上报,那么就可以选择AP模式。当前主流的服务如 Spring cloud 和 Dubbo 服务,都适用于AP模式,AP模式为了服务的可能性而减弱了一致性,因此AP模式下只支持注册临时实例。
- 如果需要在服务级别编辑或者存储配置信息,那么 CP 是必须,K8S服务和DNS服务则适用于CP模式。
- CP模式下则支持注册持久化实例,此时则是以 Raft 协议为集群运行模式,该模式下注册实例之前必须先注册服务,如果服务不存在,则会返回错误。
curl -X PUT '$NACOS_SERVER:8848/nacos/v1/ns/operator/switches?entry=serverMode&value=CP'
18.4 Nacos作为服务配置中心演示
18.4.1 Nacos作为配置中心-基础配置
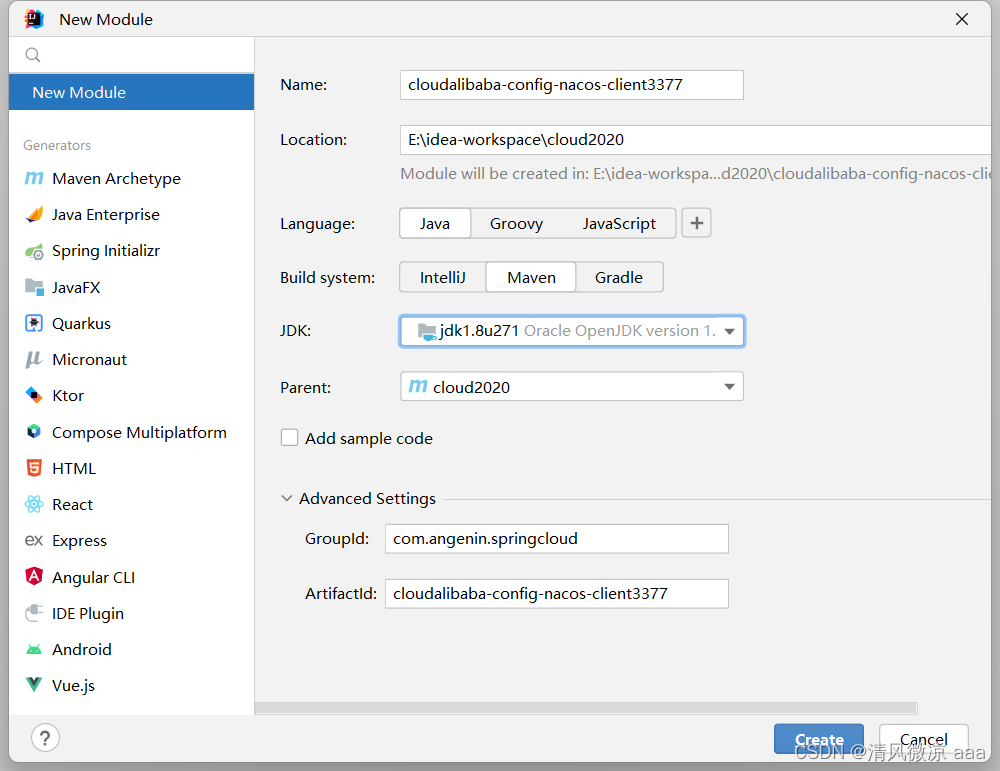
1)新建:cloudalibaba-config-nacos-client3377
2)POM
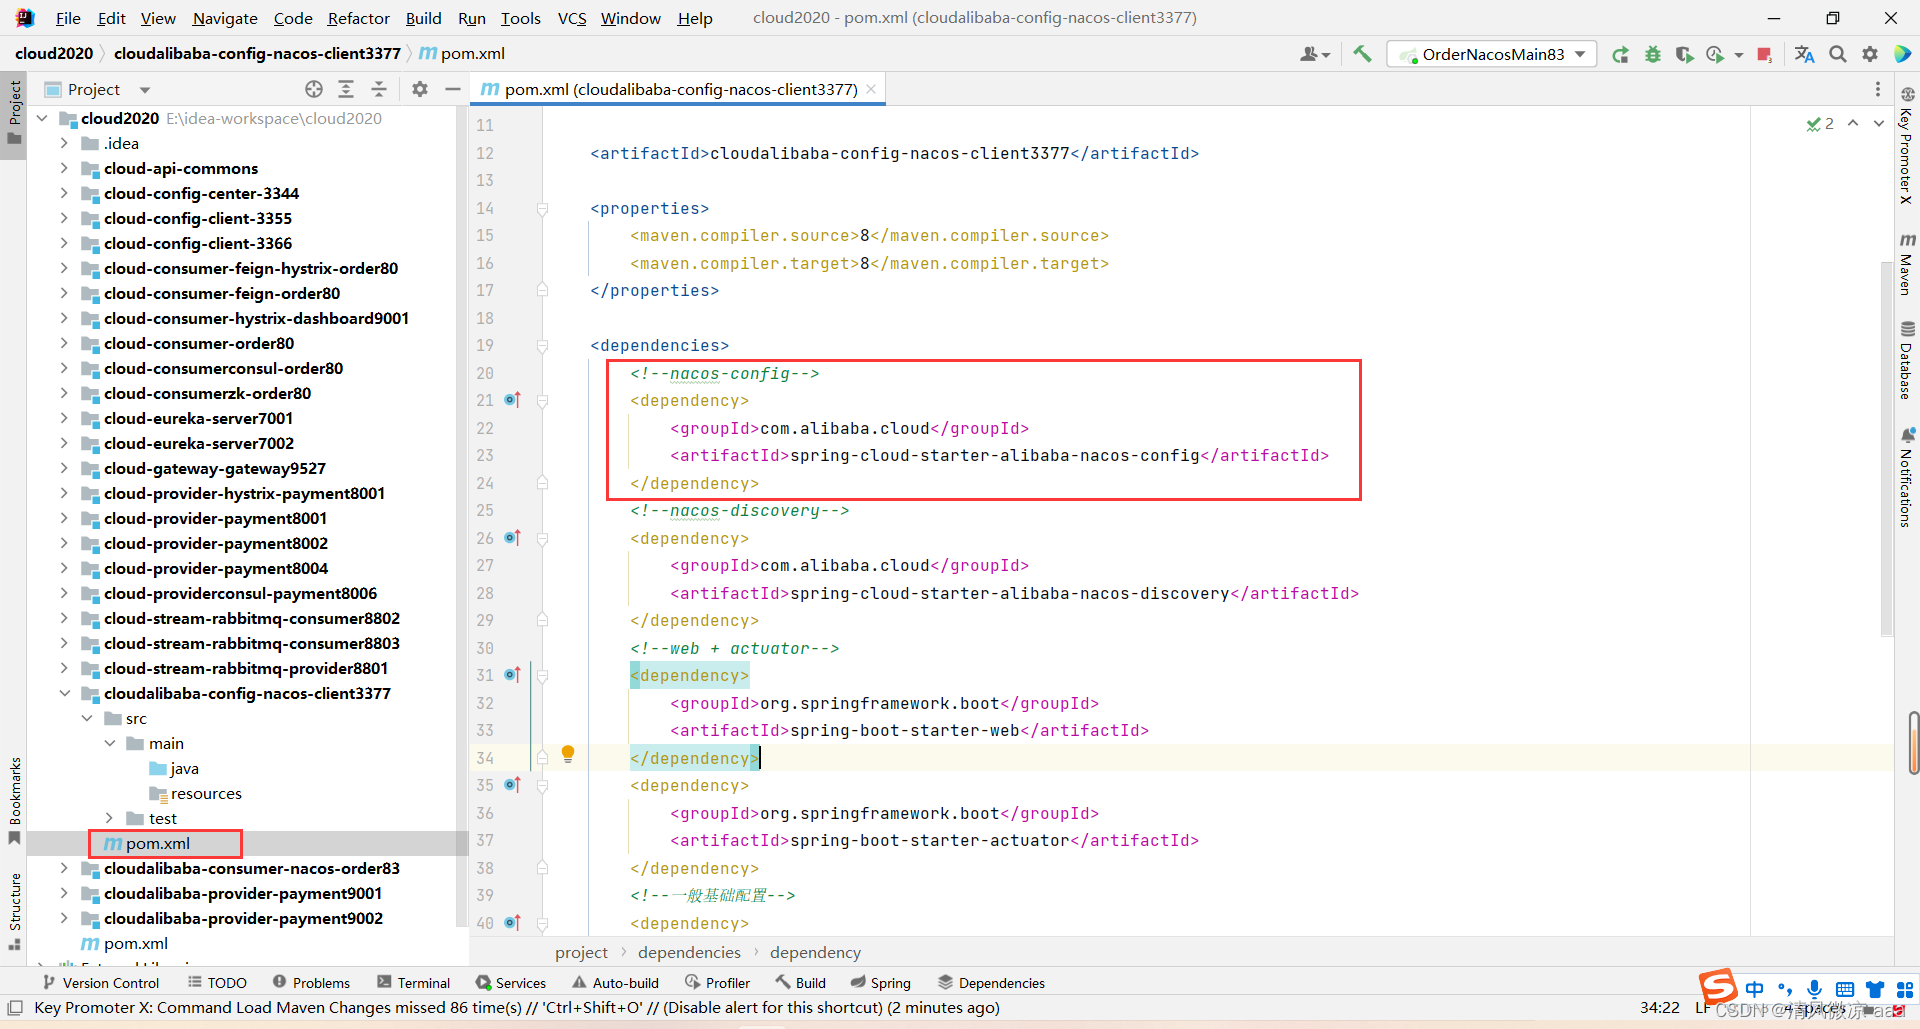
<?xml version="1.0" encoding="UTF-8"?>
<project xmlns="http://maven.apache.org/POM/4.0.0"xmlns:xsi="http://www.w3.org/2001/XMLSchema-instance"xsi:schemaLocation="http://maven.apache.org/POM/4.0.0 http://maven.apache.org/xsd/maven-4.0.0.xsd"><parent><artifactId>cloud2020</artifactId><groupId>com.angenin.springcloud</groupId><version>1.0-SNAPSHOT</version></parent><modelVersion>4.0.0</modelVersion><artifactId>cloudalibaba-config-nacos-client3377</artifactId><properties><maven.compiler.source>8</maven.compiler.source><maven.compiler.target>8</maven.compiler.target></properties><dependencies><!--nacos-config--><dependency><groupId>com.alibaba.cloud</groupId><artifactId>spring-cloud-starter-alibaba-nacos-config</artifactId></dependency><!--nacos-discovery--><dependency><groupId>com.alibaba.cloud</groupId><artifactId>spring-cloud-starter-alibaba-nacos-discovery</artifactId></dependency><!--web + actuator--><dependency><groupId>org.springframework.boot</groupId><artifactId>spring-boot-starter-web</artifactId></dependency><dependency><groupId>org.springframework.boot</groupId><artifactId>spring-boot-starter-actuator</artifactId></dependency><!--一般基础配置--><dependency><groupId>org.springframework.boot</groupId><artifactId>spring-boot-devtools</artifactId><scope>runtime</scope><optional>true</optional></dependency><dependency><groupId>org.projectlombok</groupId><artifactId>lombok</artifactId><optional>true</optional></dependency><dependency><groupId>org.springframework.boot</groupId><artifactId>spring-boot-starter-test</artifactId><scope>test</scope></dependency></dependencies></project>
3)YML
- why配置两个
- Nacos同springcloud-config一样,在项目初始化时,要保证先从配置中心进行配置拉取,拉取配置之后,才能保证项目的正常启动。
- springboot中配置文件的加载是存在优先级顺序的,
bootstrap优先级高于application - 即:bootstrap存放拉去配置中心共有的, application存放自己本地的

- bootstrap.yml
# nacos配置
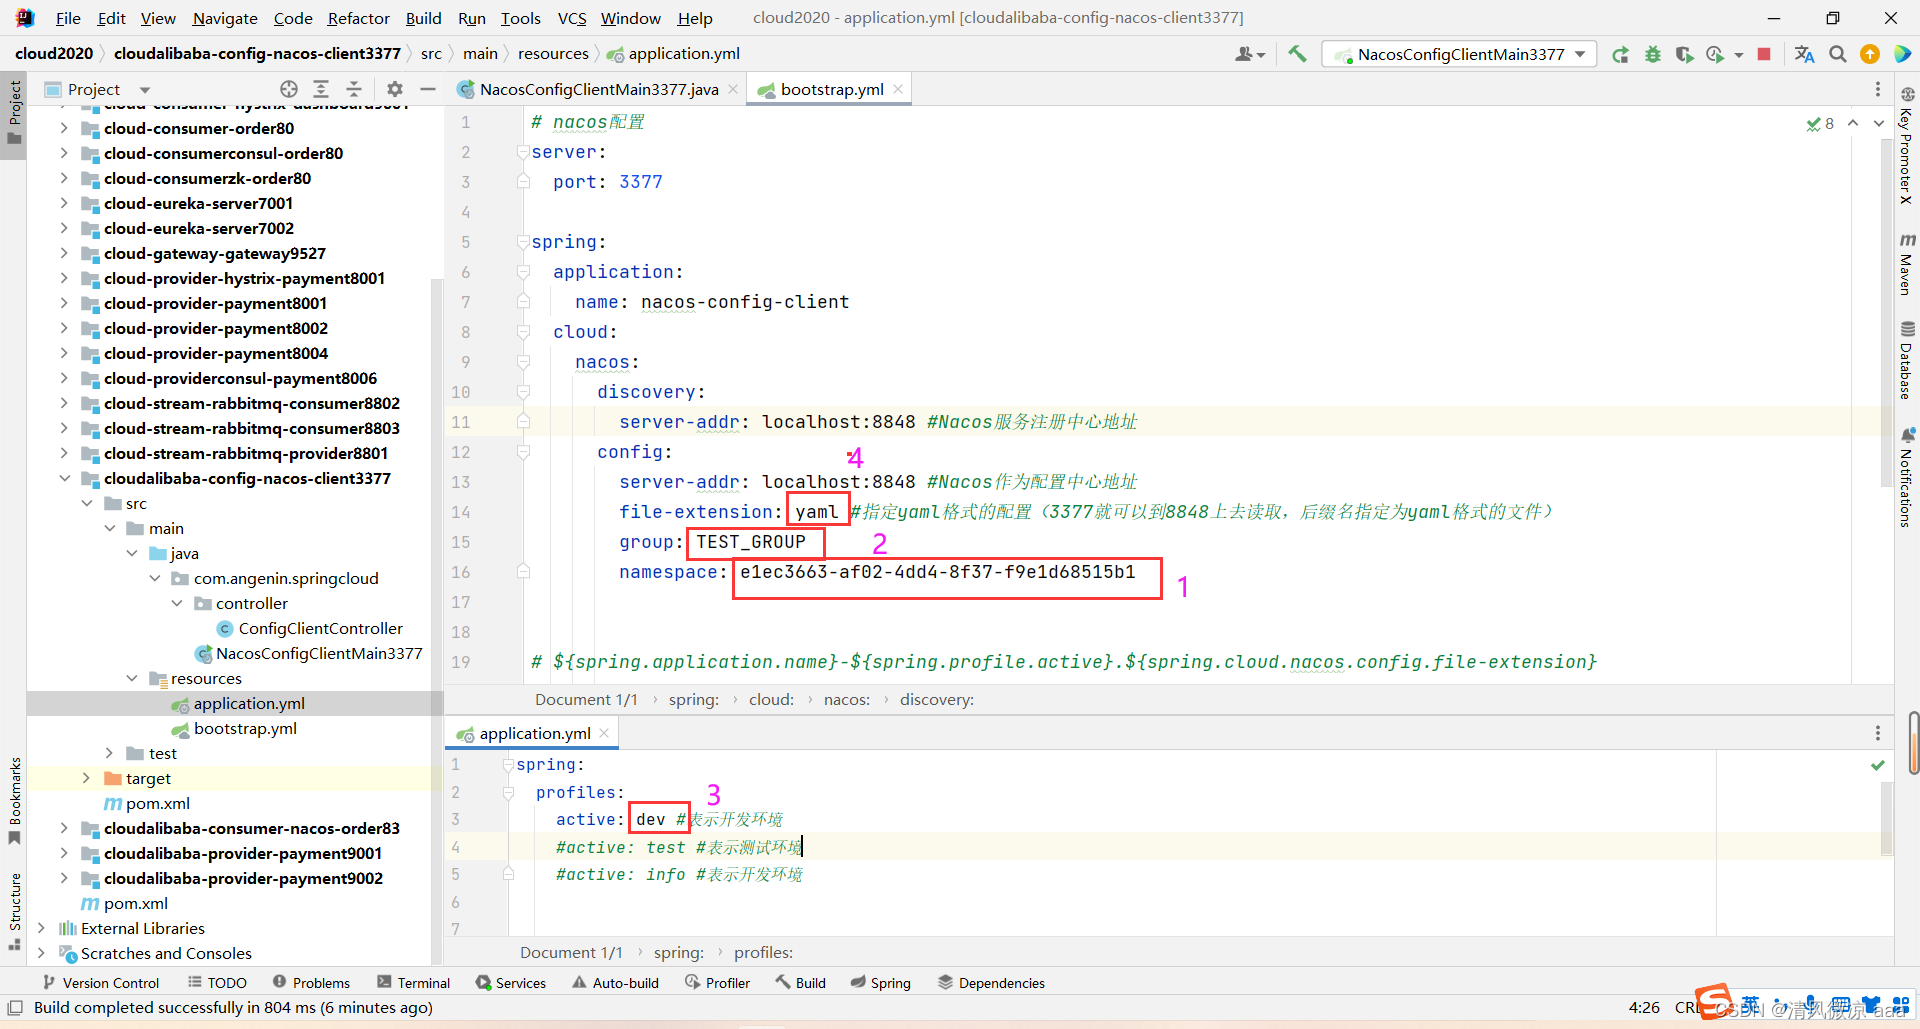
server:port: 3377spring:application:name: nacos-config-clientcloud:nacos:discovery:server-addr: localhost:8848 #Nacos服务注册中心地址config:server-addr: localhost:8848 #Nacos作为配置中心地址file-extension: yaml #指定yaml格式的配置(3377就可以到8848上去读取,后缀名指定为yaml格式的文件)# ${spring.application.name}-${spring.profile.active}.${spring.cloud.nacos.config.file-extension}# nacos-config-client-dev.yaml (不识别yml)- application.yml
spring:profiles:active: dev #表示开发环境# 这样bootstrap+application结合起来就相当于:3377到8848配置中心上去读取,一个什么样的yml文件4)主启动
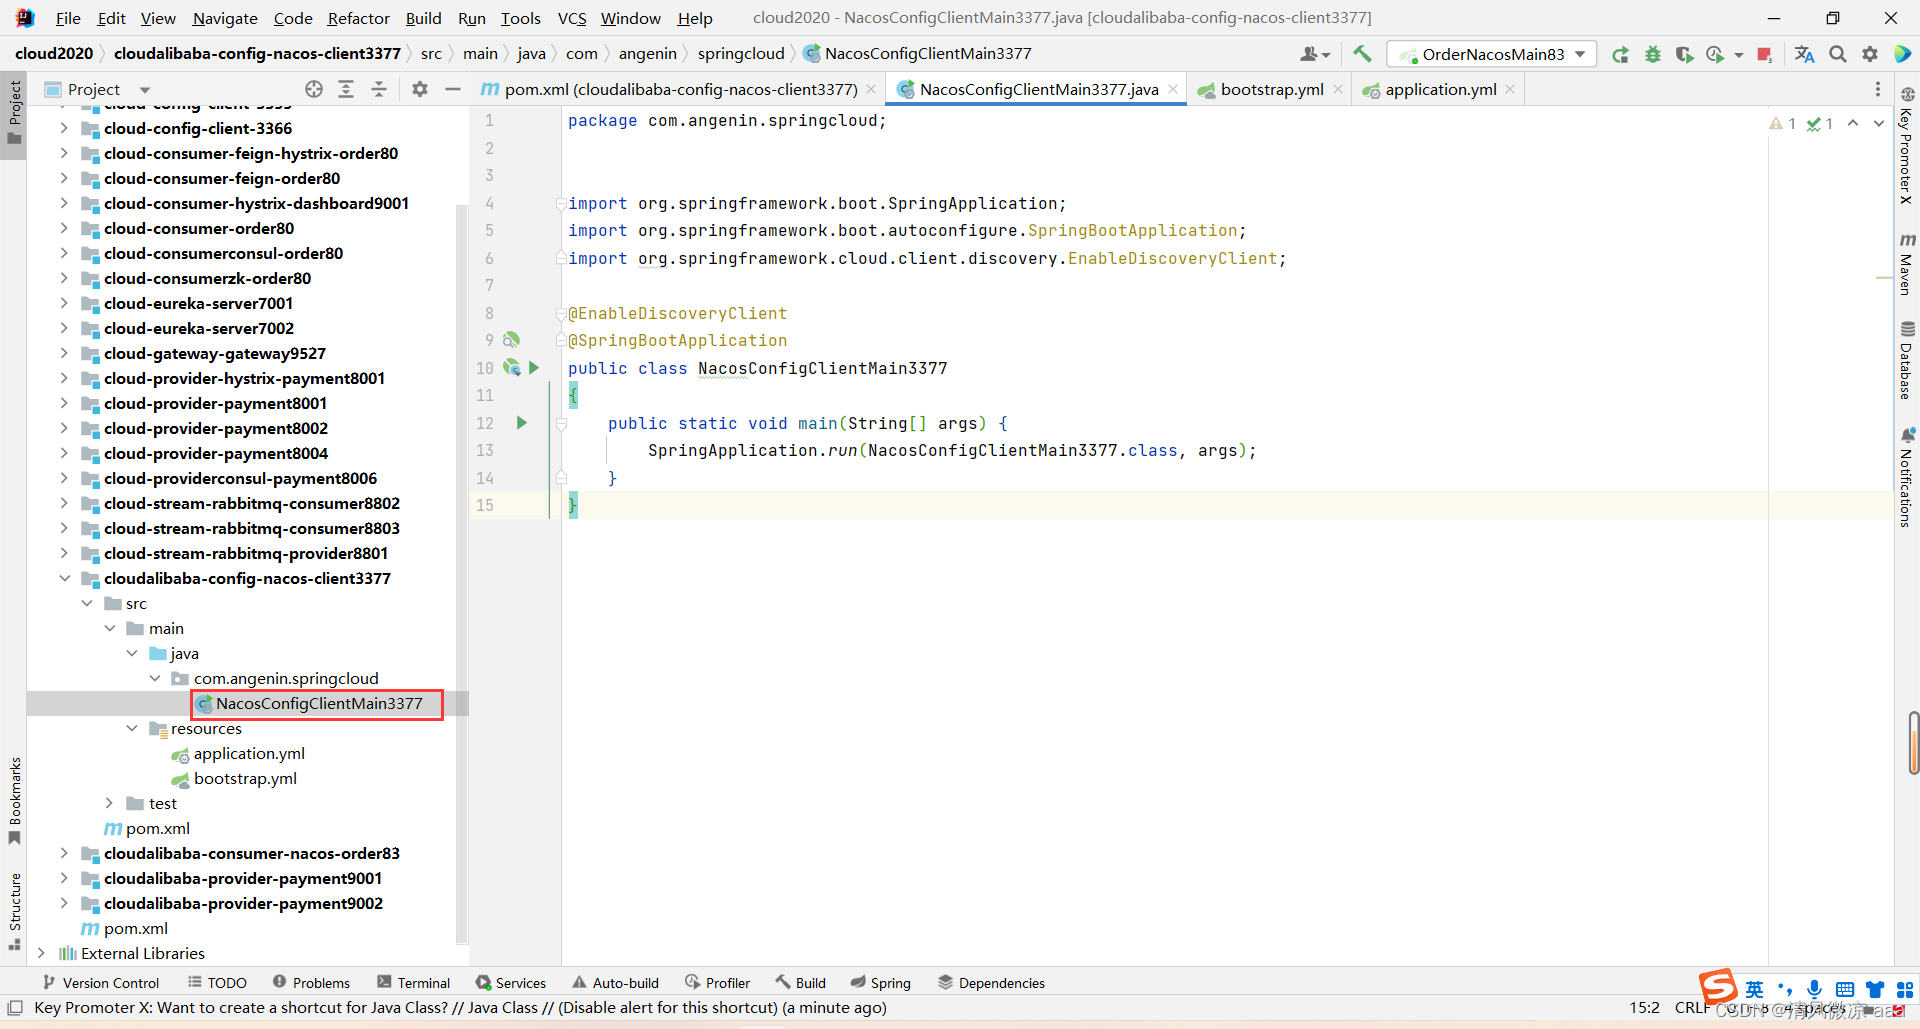
package com.angenin.springcloud;import org.springframework.boot.SpringApplication;
import org.springframework.boot.autoconfigure.SpringBootApplication;
import org.springframework.cloud.client.discovery.EnableDiscoveryClient;@EnableDiscoveryClient
@SpringBootApplication
public class NacosConfigClientMain3377
{public static void main(String[] args) {SpringApplication.run(NacosConfigClientMain3377.class, args);}
}
5)业务类
通过Spring Cloud 原生注解@RefreshScope实现配置自动更新:
- 之前是在SpringCloud Config分布式配置中心解决:不需要重启就可以手动刷新功能,之后还需要发送post请求生效。
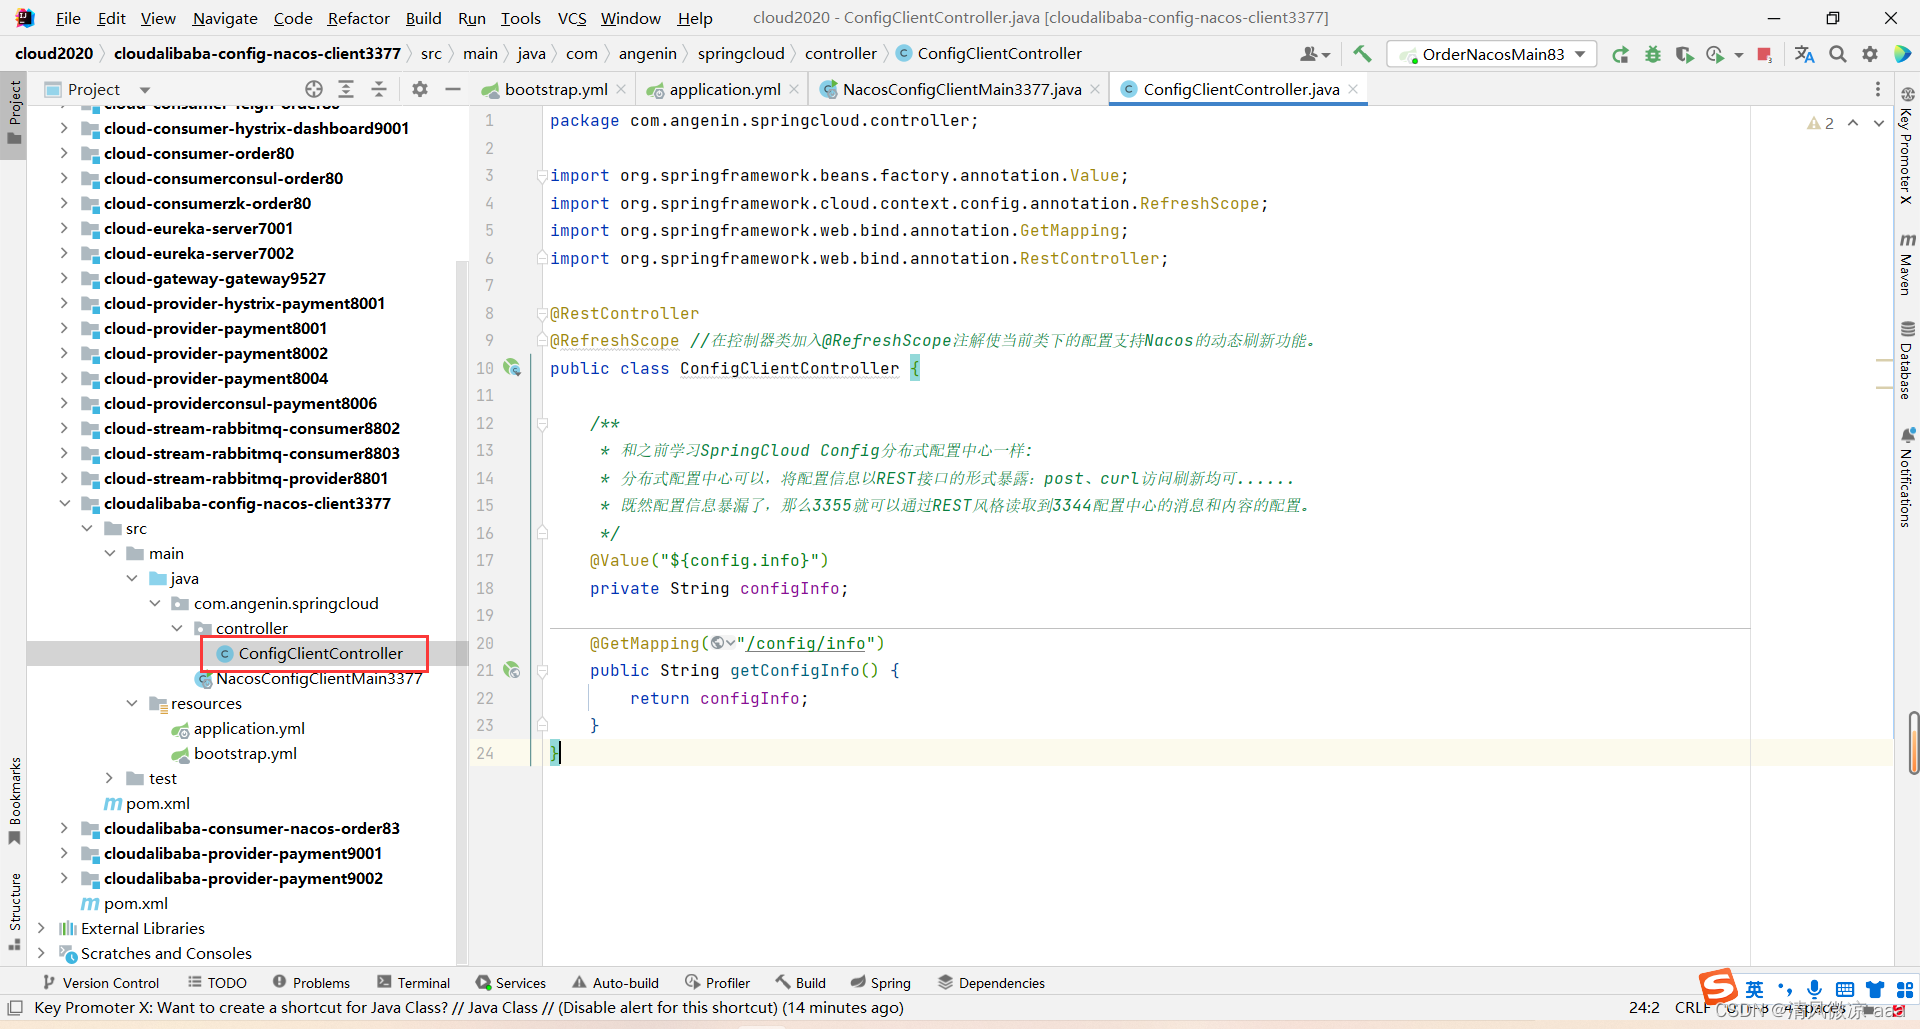
package com.angenin.springcloud.controller;import org.springframework.beans.factory.annotation.Value;
import org.springframework.cloud.context.config.annotation.RefreshScope;
import org.springframework.web.bind.annotation.GetMapping;
import org.springframework.web.bind.annotation.RestController;@RestController
@RefreshScope //在控制器类加入@RefreshScope注解使当前类下的配置支持Nacos的动态刷新功能。
public class ConfigClientController {/*** 和之前学习SpringCloud Config分布式配置中心一样:* 分布式配置中心可以,将配置信息以REST接口的形式暴露:post、curl访问刷新均可......* 既然配置信息暴漏了,那么3355就可以通过REST风格读取到3344配置中心的消息和内容的配置。*/@Value("${config.info}")private String configInfo;@GetMapping("/config/info")public String getConfigInfo() {return configInfo;}
}
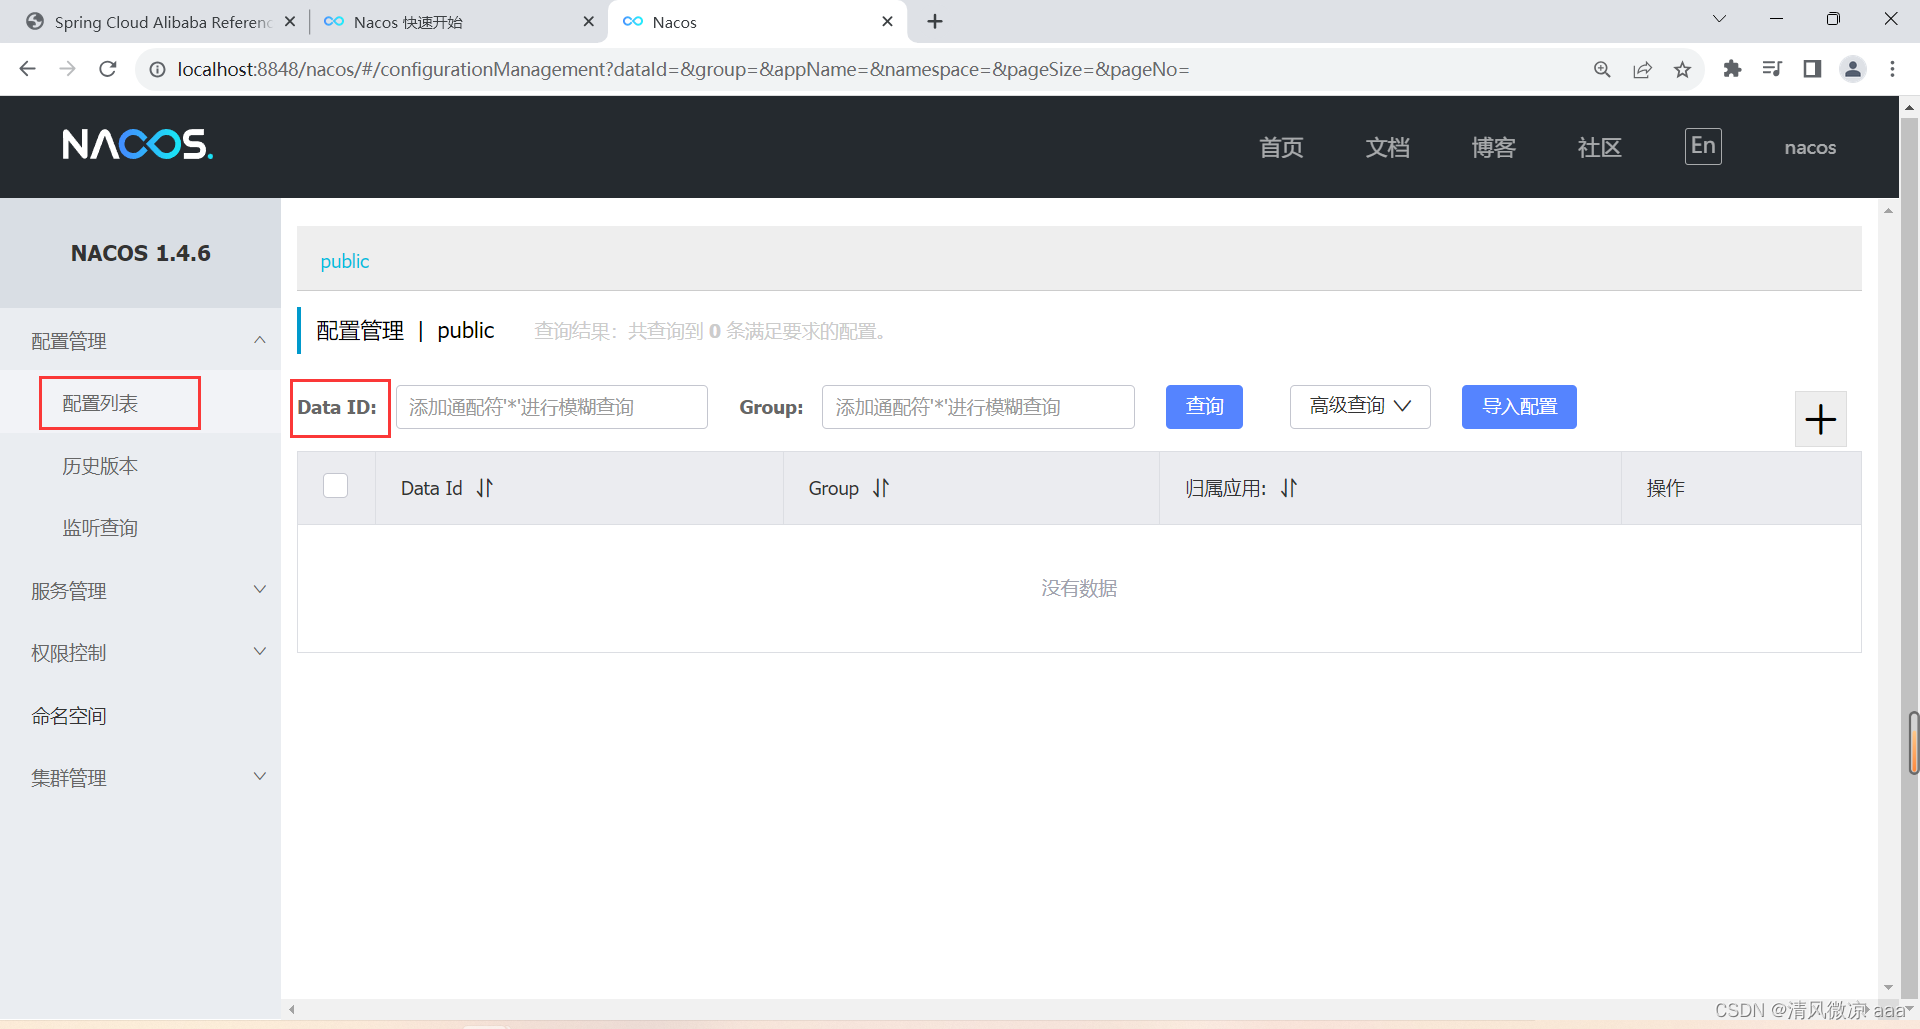
6)在Nacos中添加配置信息:Nacos中的匹配规则
理论:
-
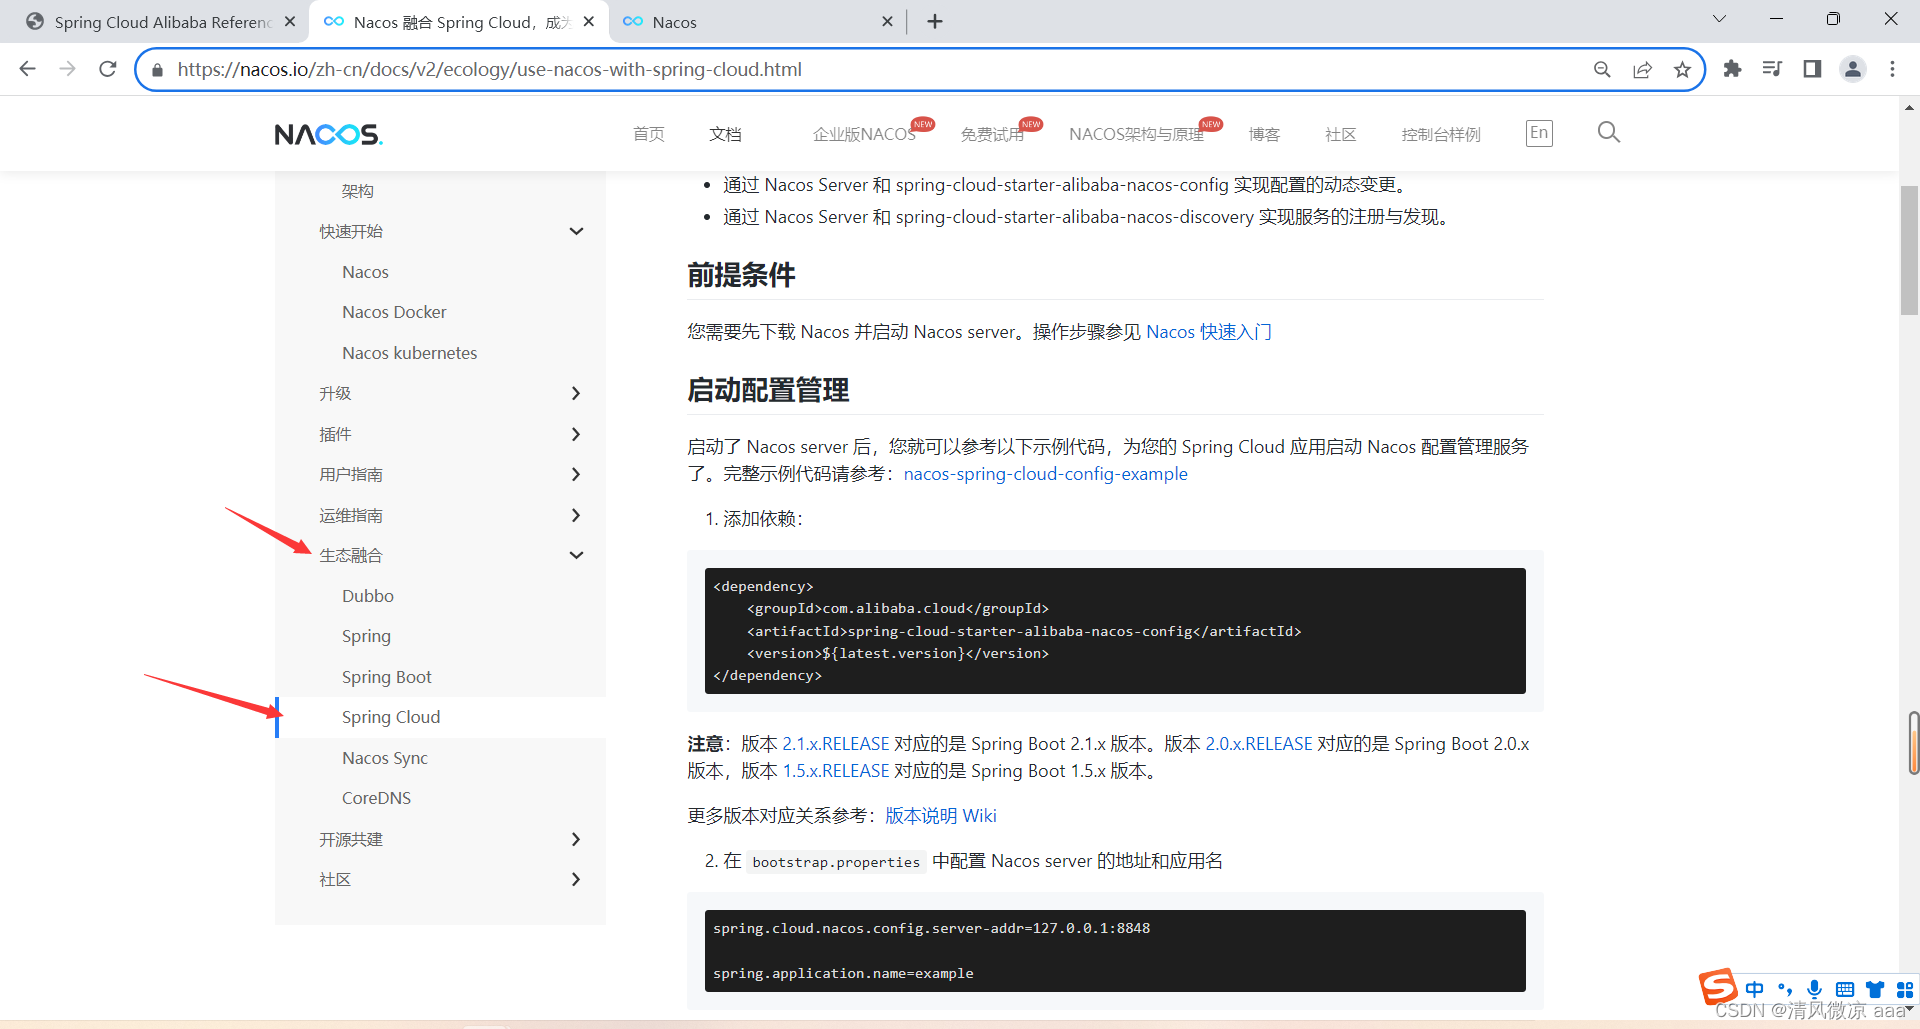
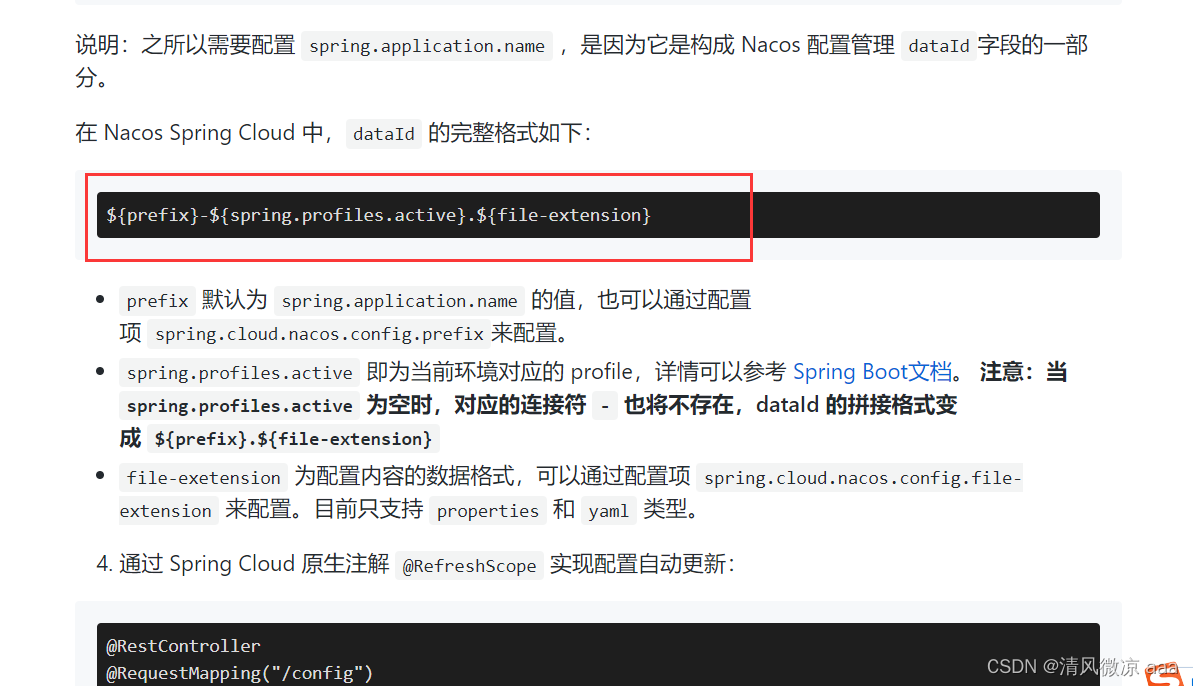
Nacos中的data id的组成格式及与SpringBoot配置文件中的匹配规则
-
官网:https://nacos.io/zh-cn/docs/v2/ecology/use-nacos-with-spring-cloud.html
-
最后公式:
${spring.application.name}-${spring.profiles.active}.${spring.cloud.nacos.config.file-extension}- 配置文件中对应的配置:
nacos-config-client-dev.yaml

实操:
-
配置新增:
nacos-config-client-dev
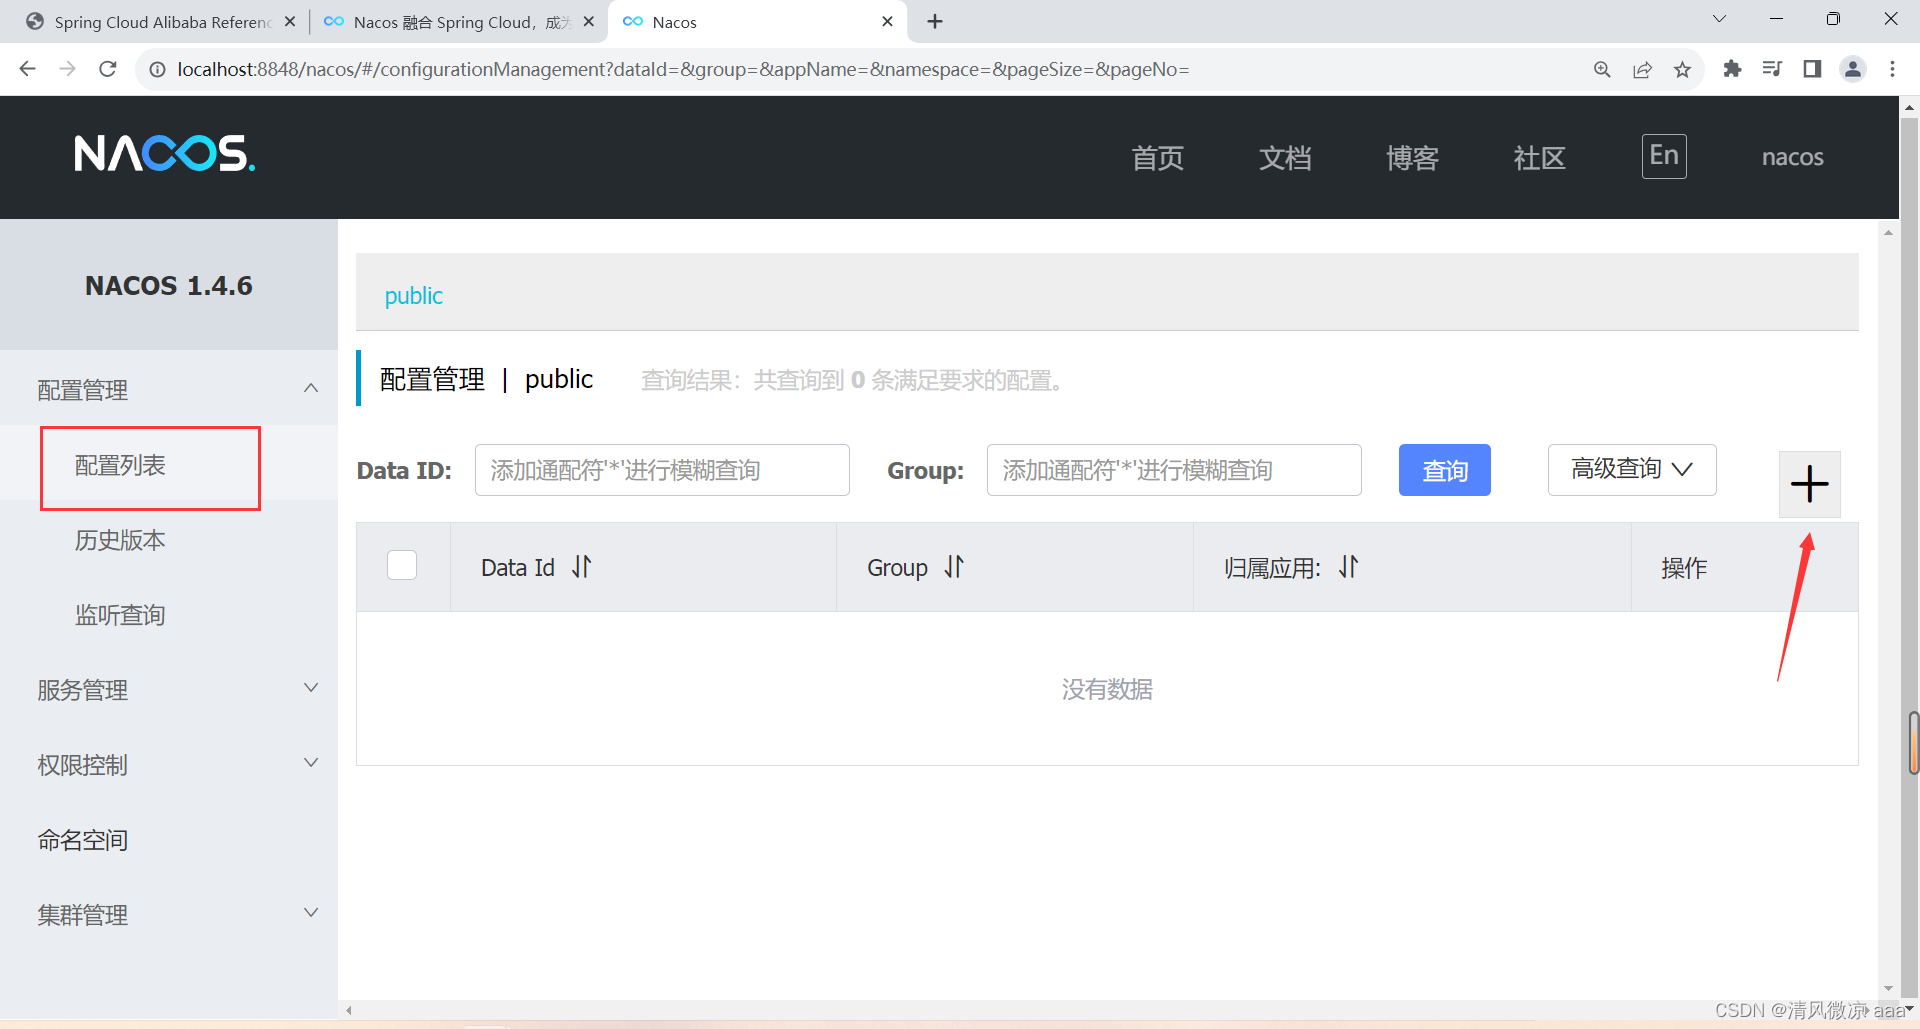
-
Nacos界面配置对应
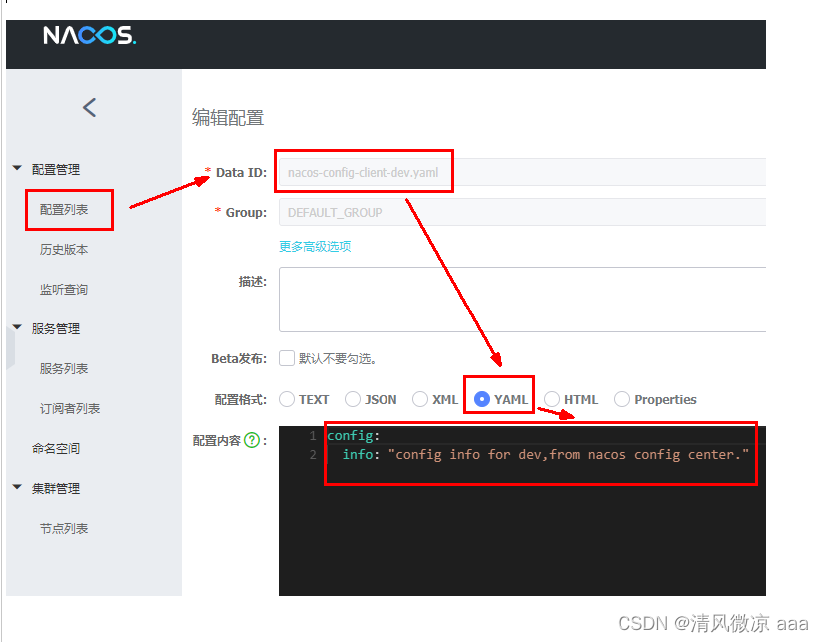
config:info: nacos config center,version = 1
-
点击发布:配置列表就多了一行配置信息
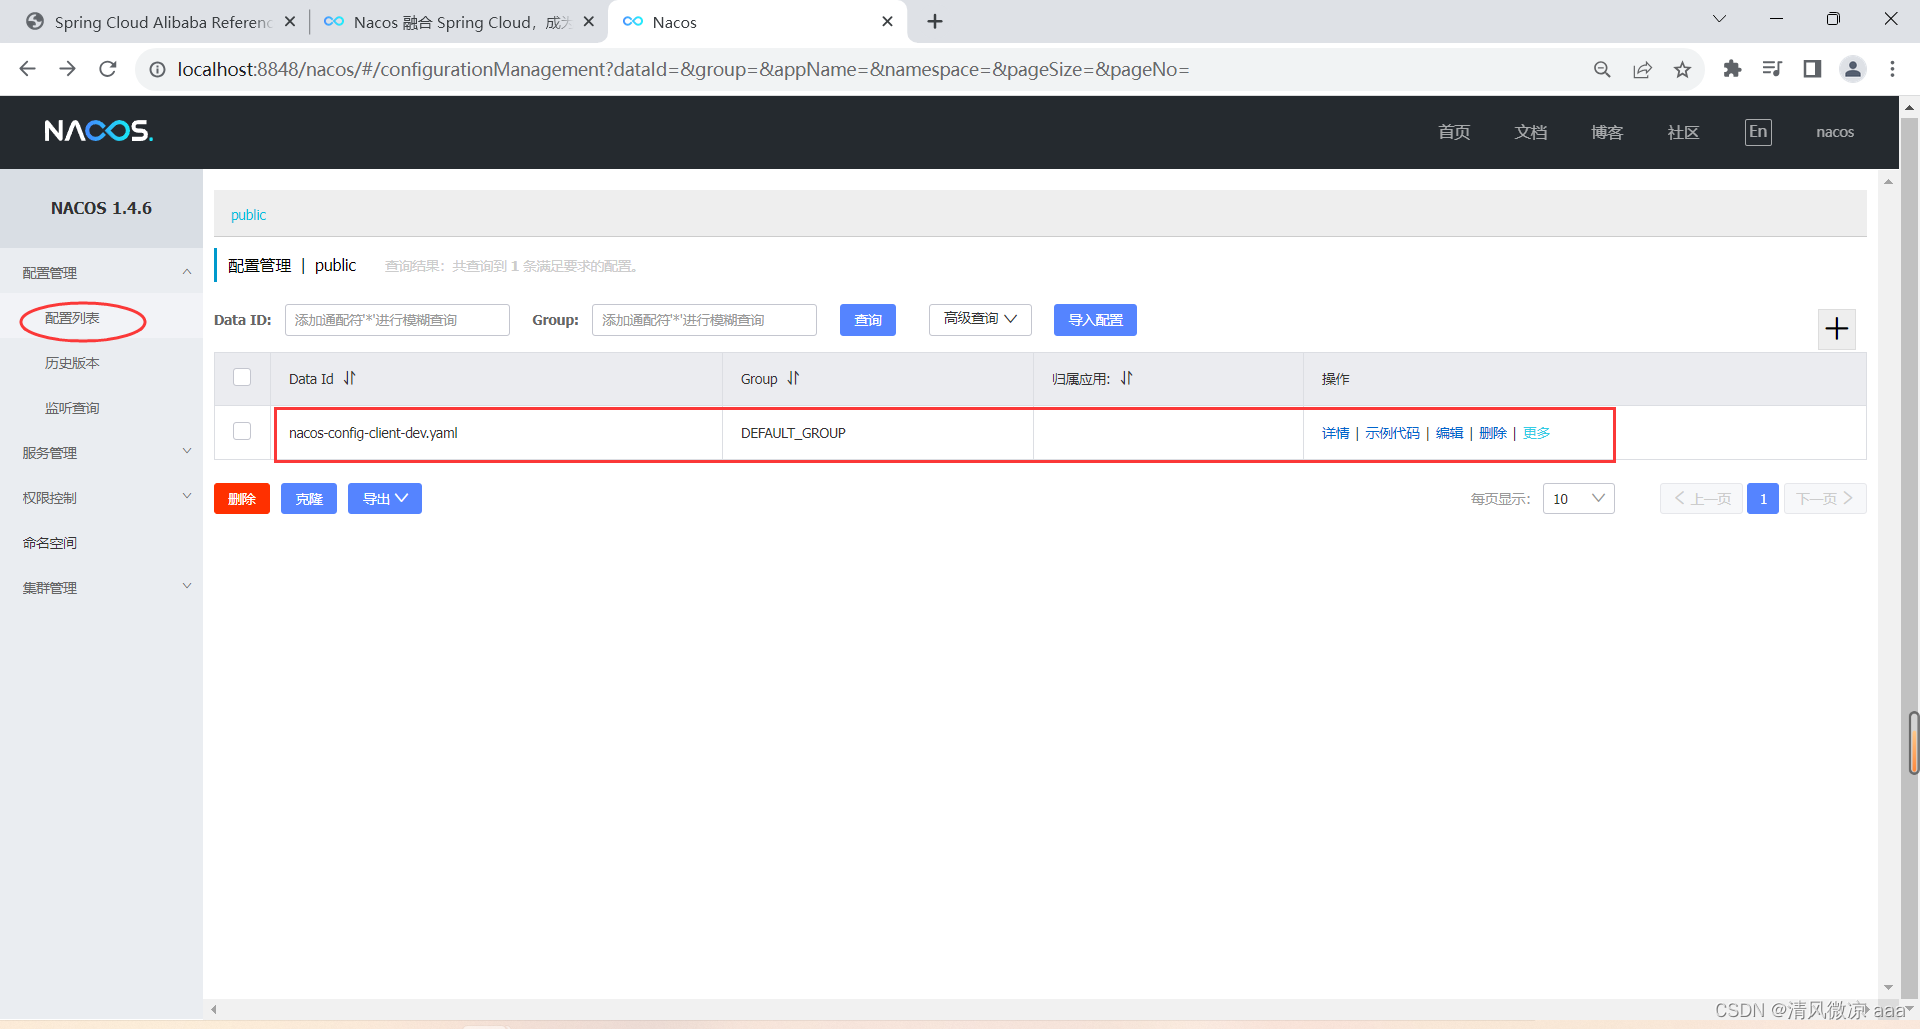
-
总结:设置DataId
- 公式:
${spring.application.name}-${spring.profiles.active}.${spring.cloud.nacos.config.file-extension} - prefix 默认为 spring.application.name 的值
- spring.profile.active 即为当前环境对应的 profile,可以通过配置项 spring.profile.active 来配置。
- file-exetension 为配置内容的数据格式,可以通过配置项 spring.cloud.nacos.config.file-extension 来配置
- 画图说明:
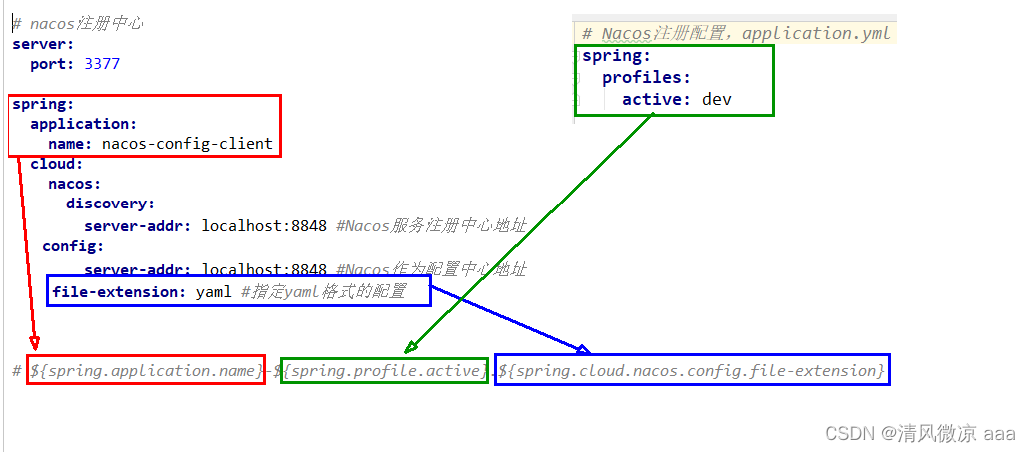
- 公式:
-
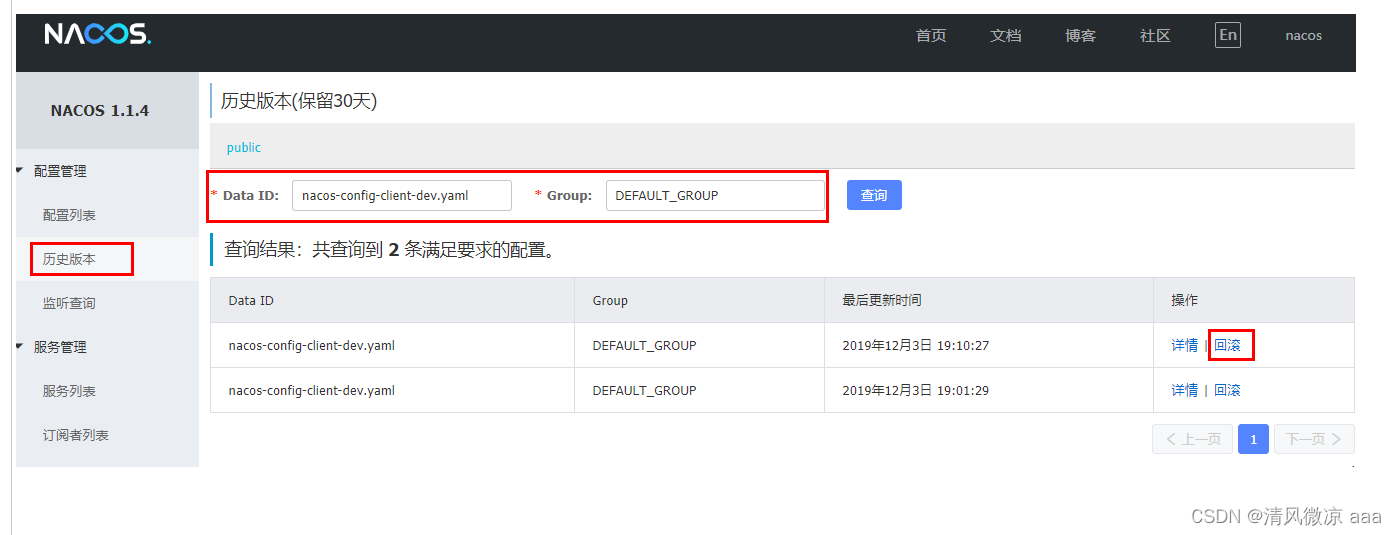
历史配置
- Nacos会记录配置文件的历史版本默认保留30天,此外还有一键回滚功能,回滚操作将会触发配置更新
- 回滚
7)测试
- 启动前需要在nacos客户端-配置管理-配置管理栏目下有对应的yaml配置文件
- 启动nacos
- 运行cloud-config-nacos-client3377的主启动类
- 调用接口查看配置信息:http://localhost:3377/config/info
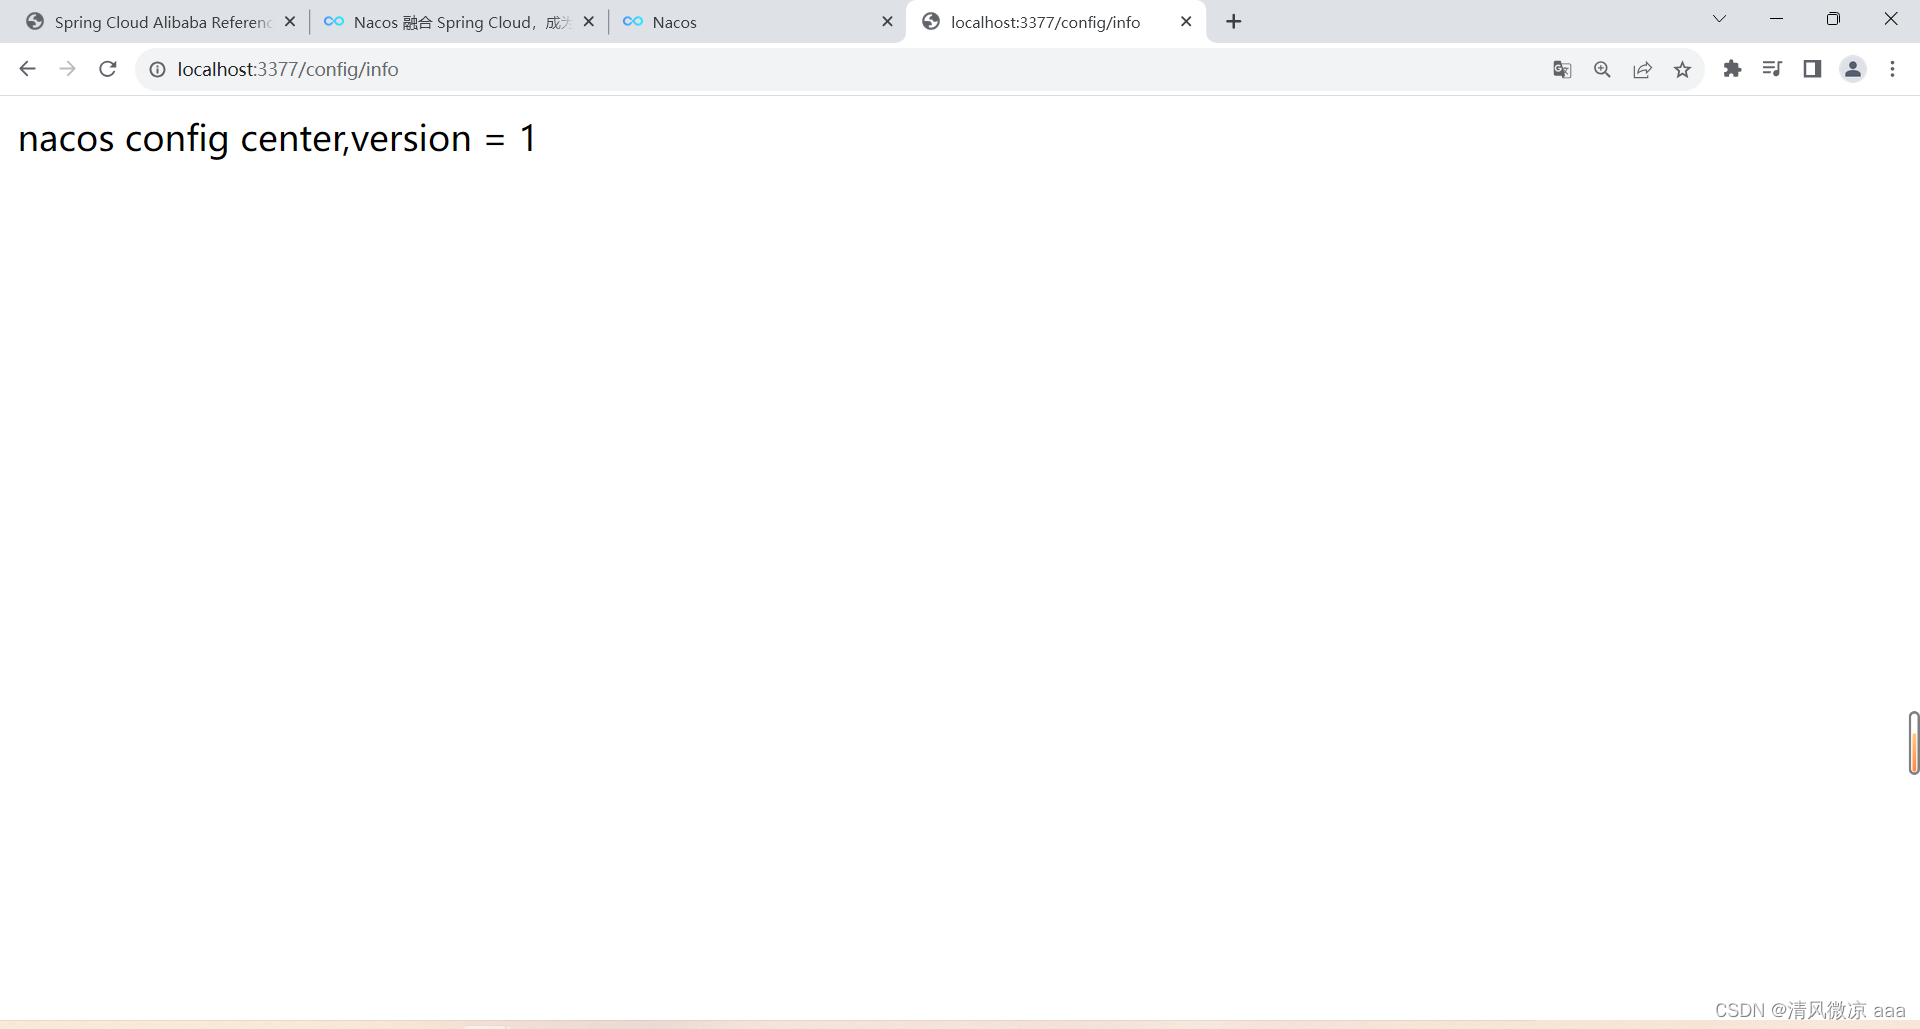
8)自带动态刷新
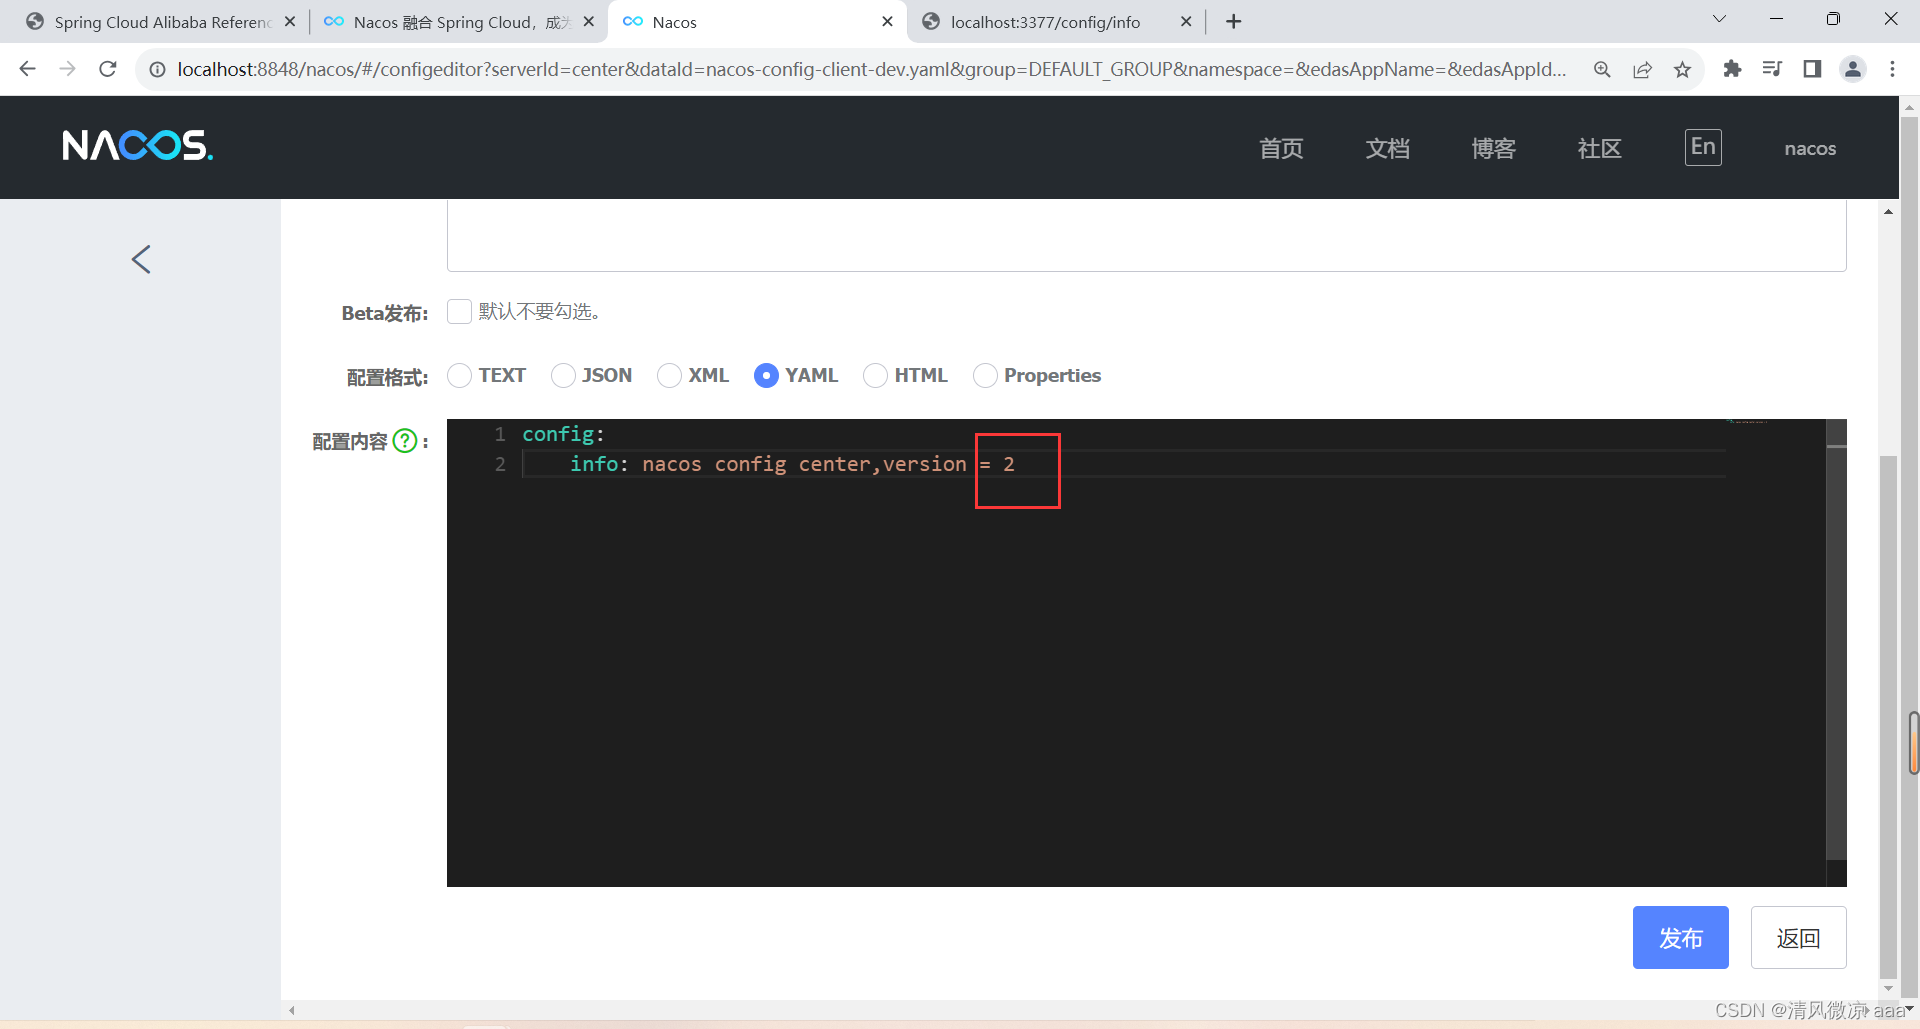
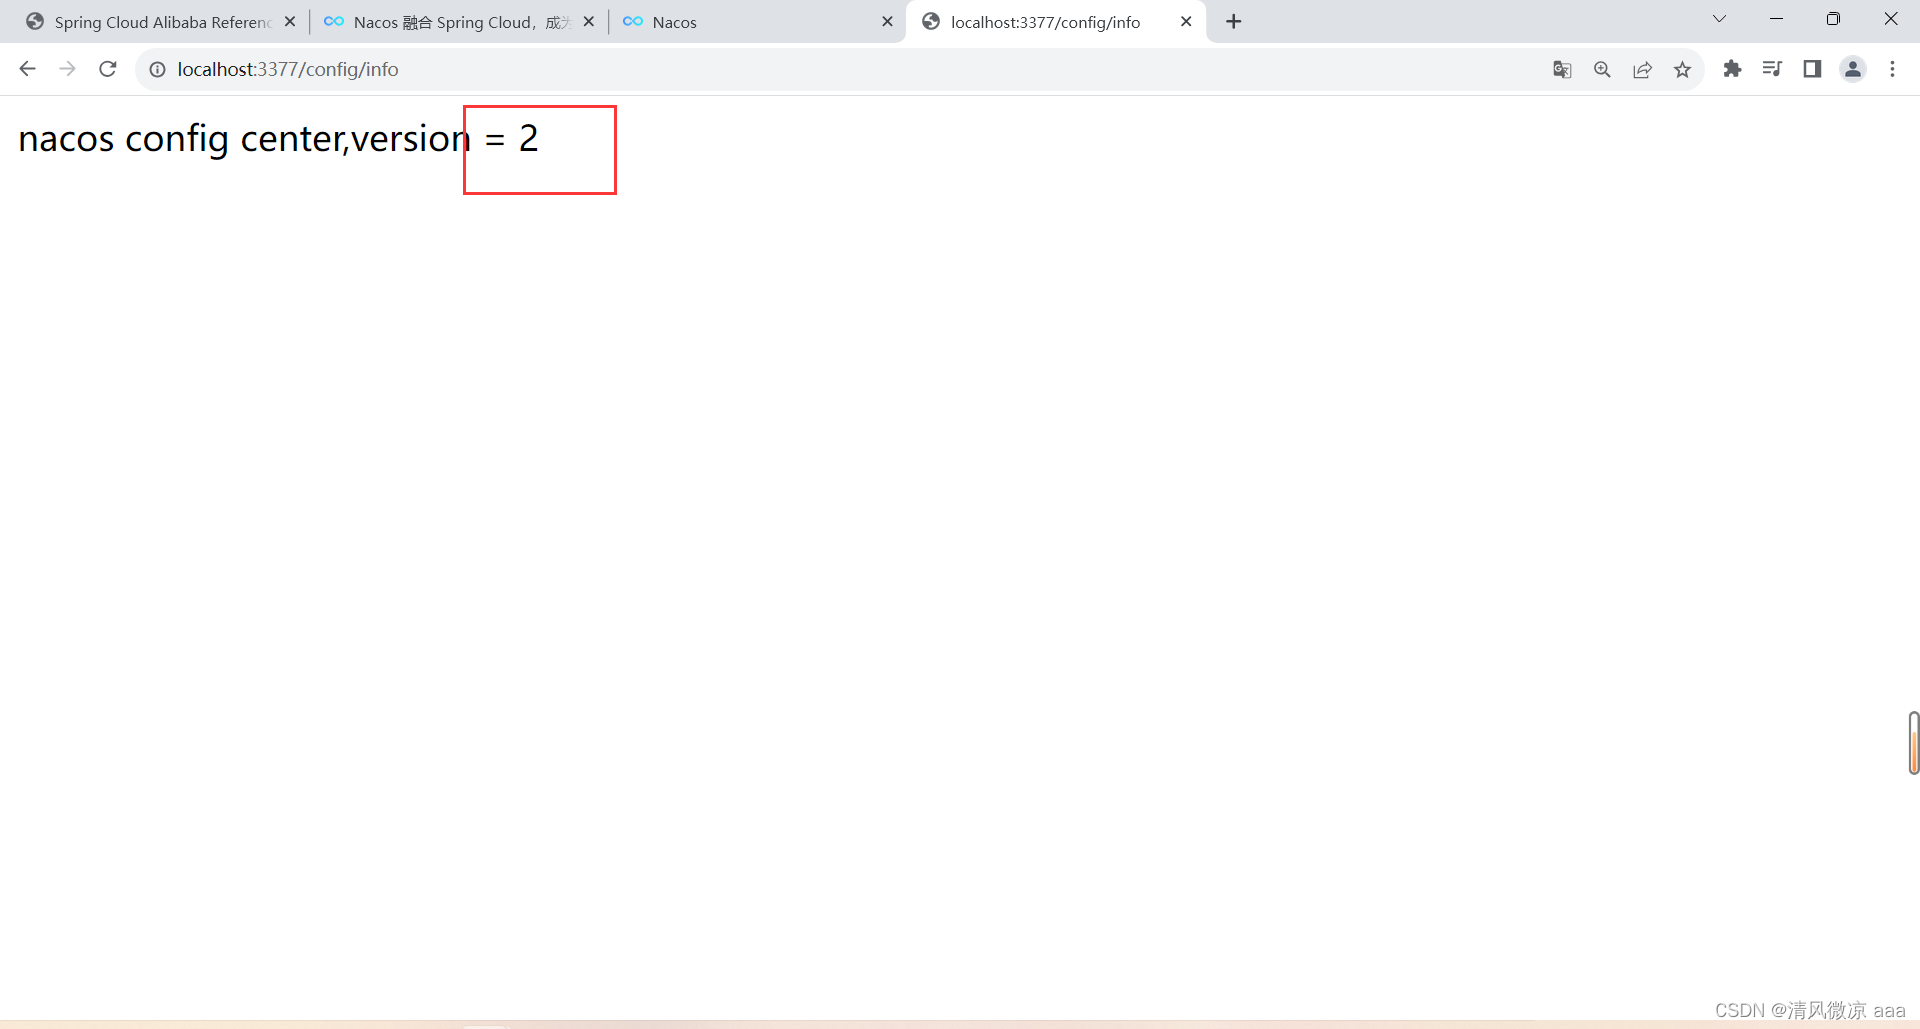
- 修改下Nacos中的yaml配置文件,再次调用查看配置的接口,就会发现配置已经刷新
18.4.2 Nacos作为配置中心-分类配置
1)问题:多环境多项目管理
- 问题1:
- 实际开发中,通常一个系统会准备
- dev开发环境
- test测试环境
- prod生产环境。
- 如何保证指定环境启动时服务能正确读取到Nacos上相应环境的配置文件呢?
- 实际开发中,通常一个系统会准备
- 问题2:
- 一个大型分布式微服务系统会有很多微服务子项目,每个微服务项目又都会有相应的开发环境、测试环境、预发环境、正式环境…
- 那怎么对这些微服务配置进行管理呢?
2)Nacos的图形化管理界面
-
配置管理
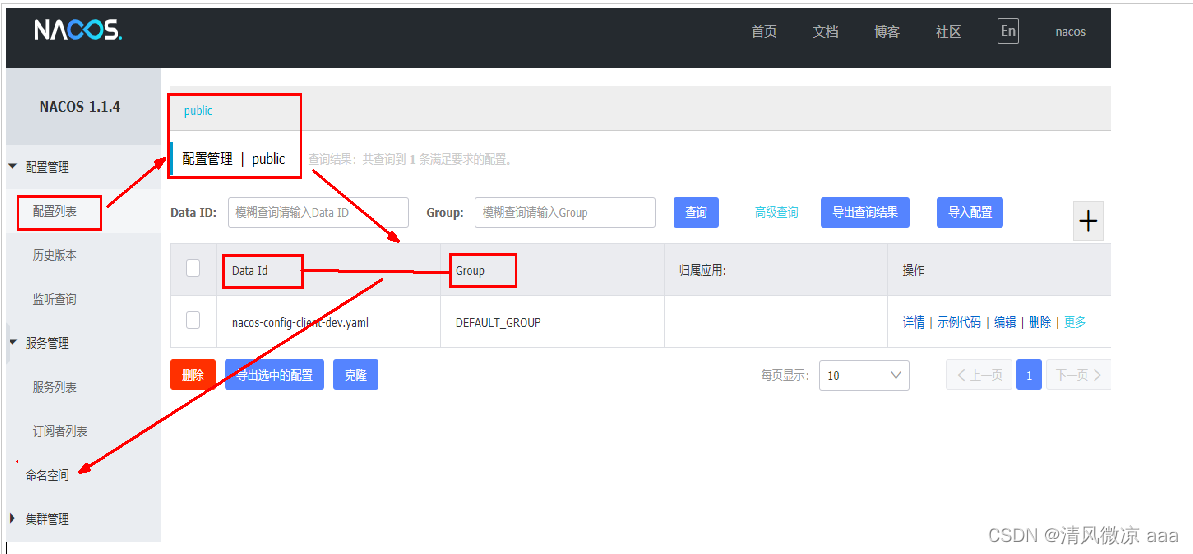
-
命名空间
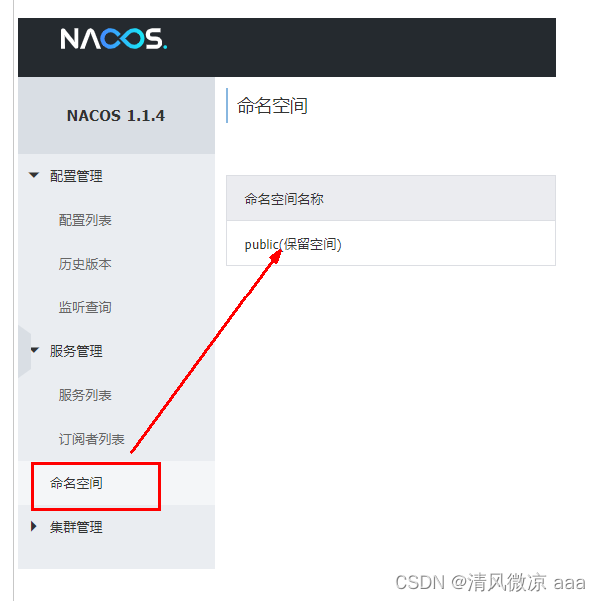
3)Namespace+Group+Data ID三者关系?为什么这么设计?
-
是什么
- 类似Java里面的package名和类名,最外层的namespace是可以用于区分部署环境的,Group和DataID逻辑上区分两个目标对象。
-
三者情况
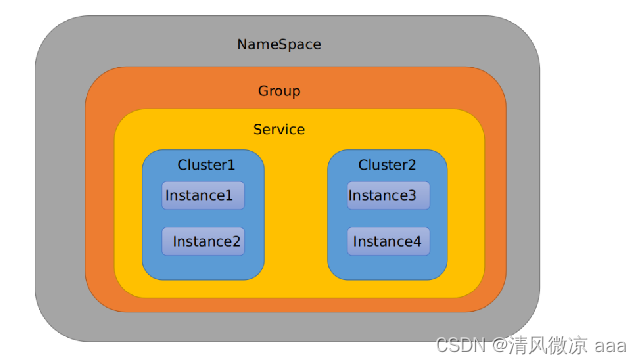
-
默认情况:
Namespace=public,Group=DEFAULT_GROUP, 默认Cluster是DEFAULT- Nacos默认的命名空间是public,Namespace主要用来实现隔离。
- 比方说我们现在有三个环境:开发、测试、生产环境,我们就可以创建三个Namespace,不同的Namespace之间是隔离的。
- Group默认是DEFAULT_GROUP,Group可以把不同的微服务划分到同一个分组里面去
- Service就是微服务;一个Service可以包含多个Cluster(集群),Nacos默认Cluster是DEFAULT,Cluster是对指定微服务的一个虚拟划分。
- 比方说为了容灾,将Service微服务分别部署在了杭州机房和广州机房,这时就可以给杭州机房的Service微服务起一个集群名称(HZ),给广州机房的Service微服务起一个集群名称(GZ),还可以尽量让同一个机房的微服务互相调用,以提升性能。
- 最后是Instance,就是微服务的实例。
18.4.3 案例:三种方案加载配置
1)DataID方案
-
指定spring.profile.active和配置文件的DataID来使不同环境下读取不同的配置
-
默认空间+默认分组+新建dev和test两个DataID
- 新建dev配置DataID:就是上面创建的哪个
- 新建test配置DataID
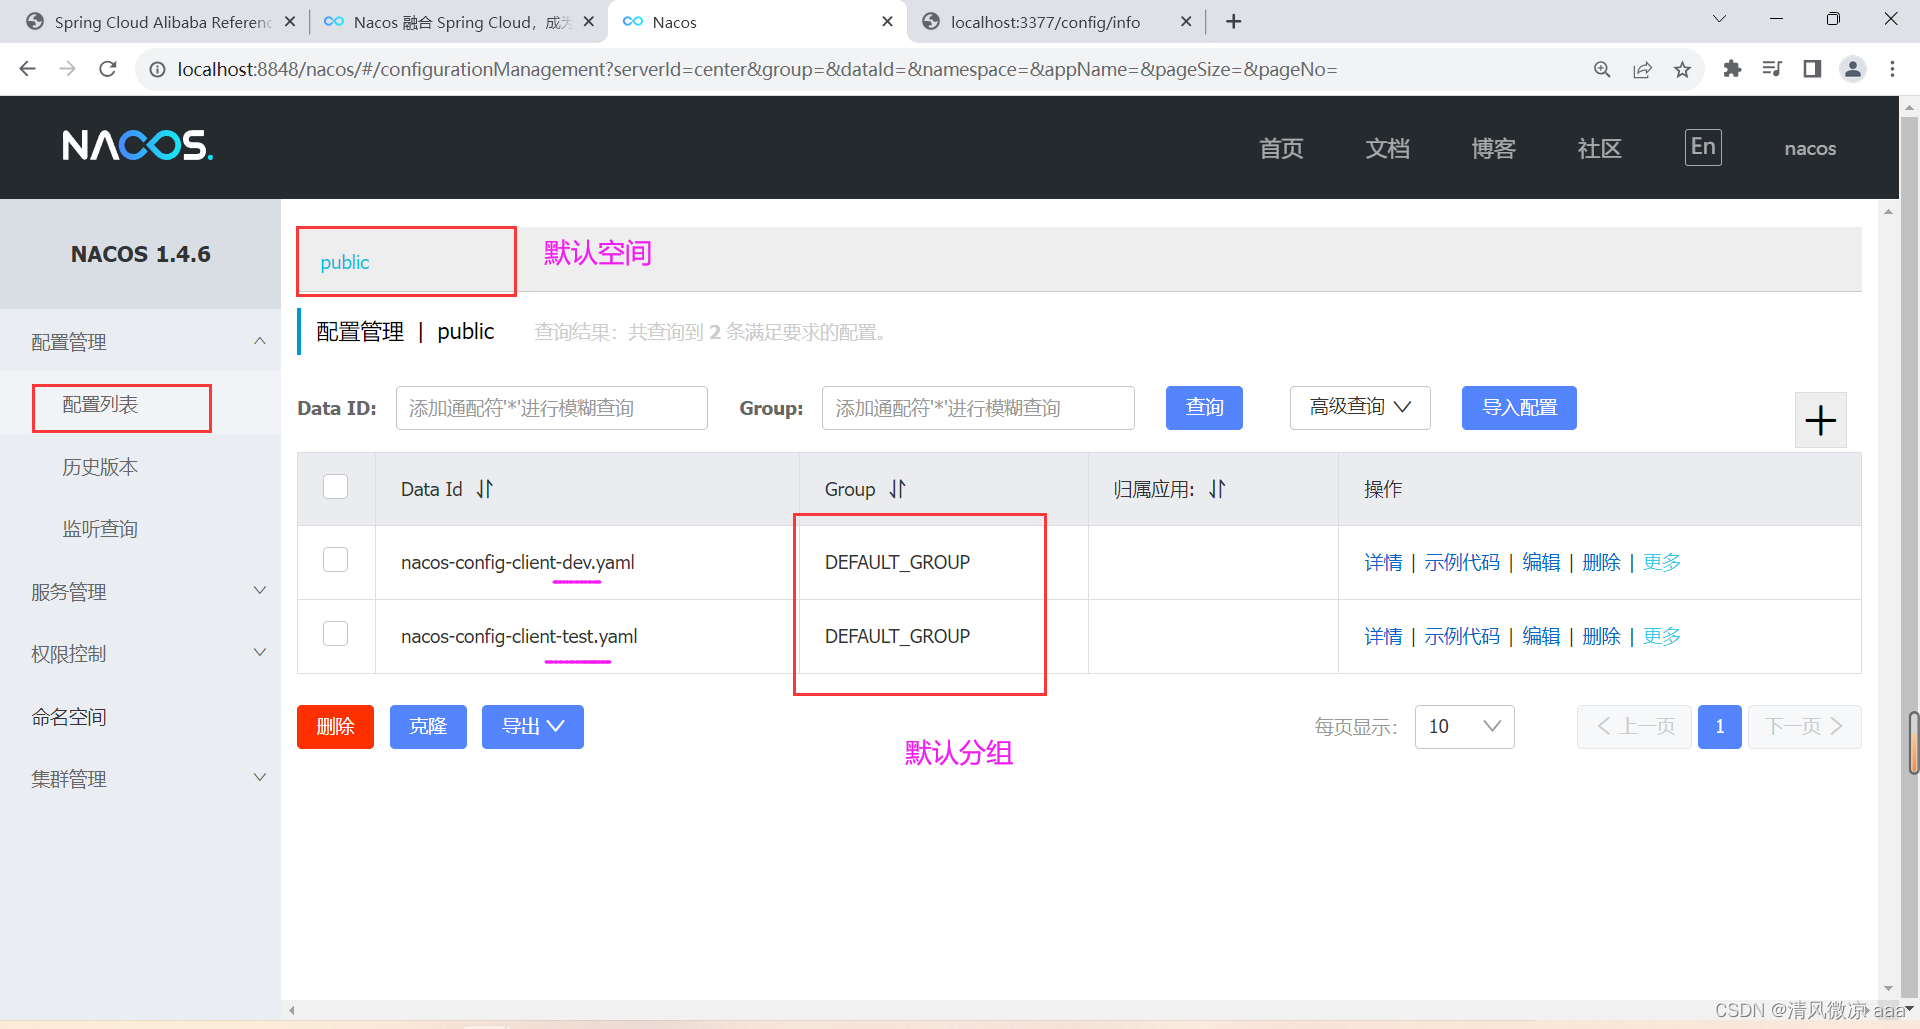
-
通过spring.profile.active属性就能进行多环境下配置文件的读取
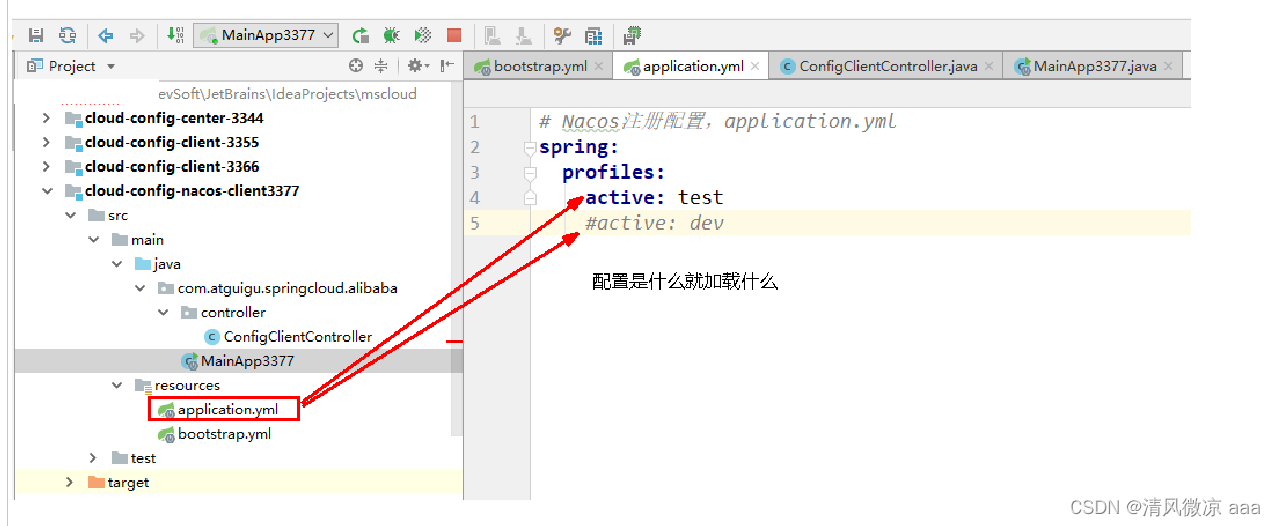
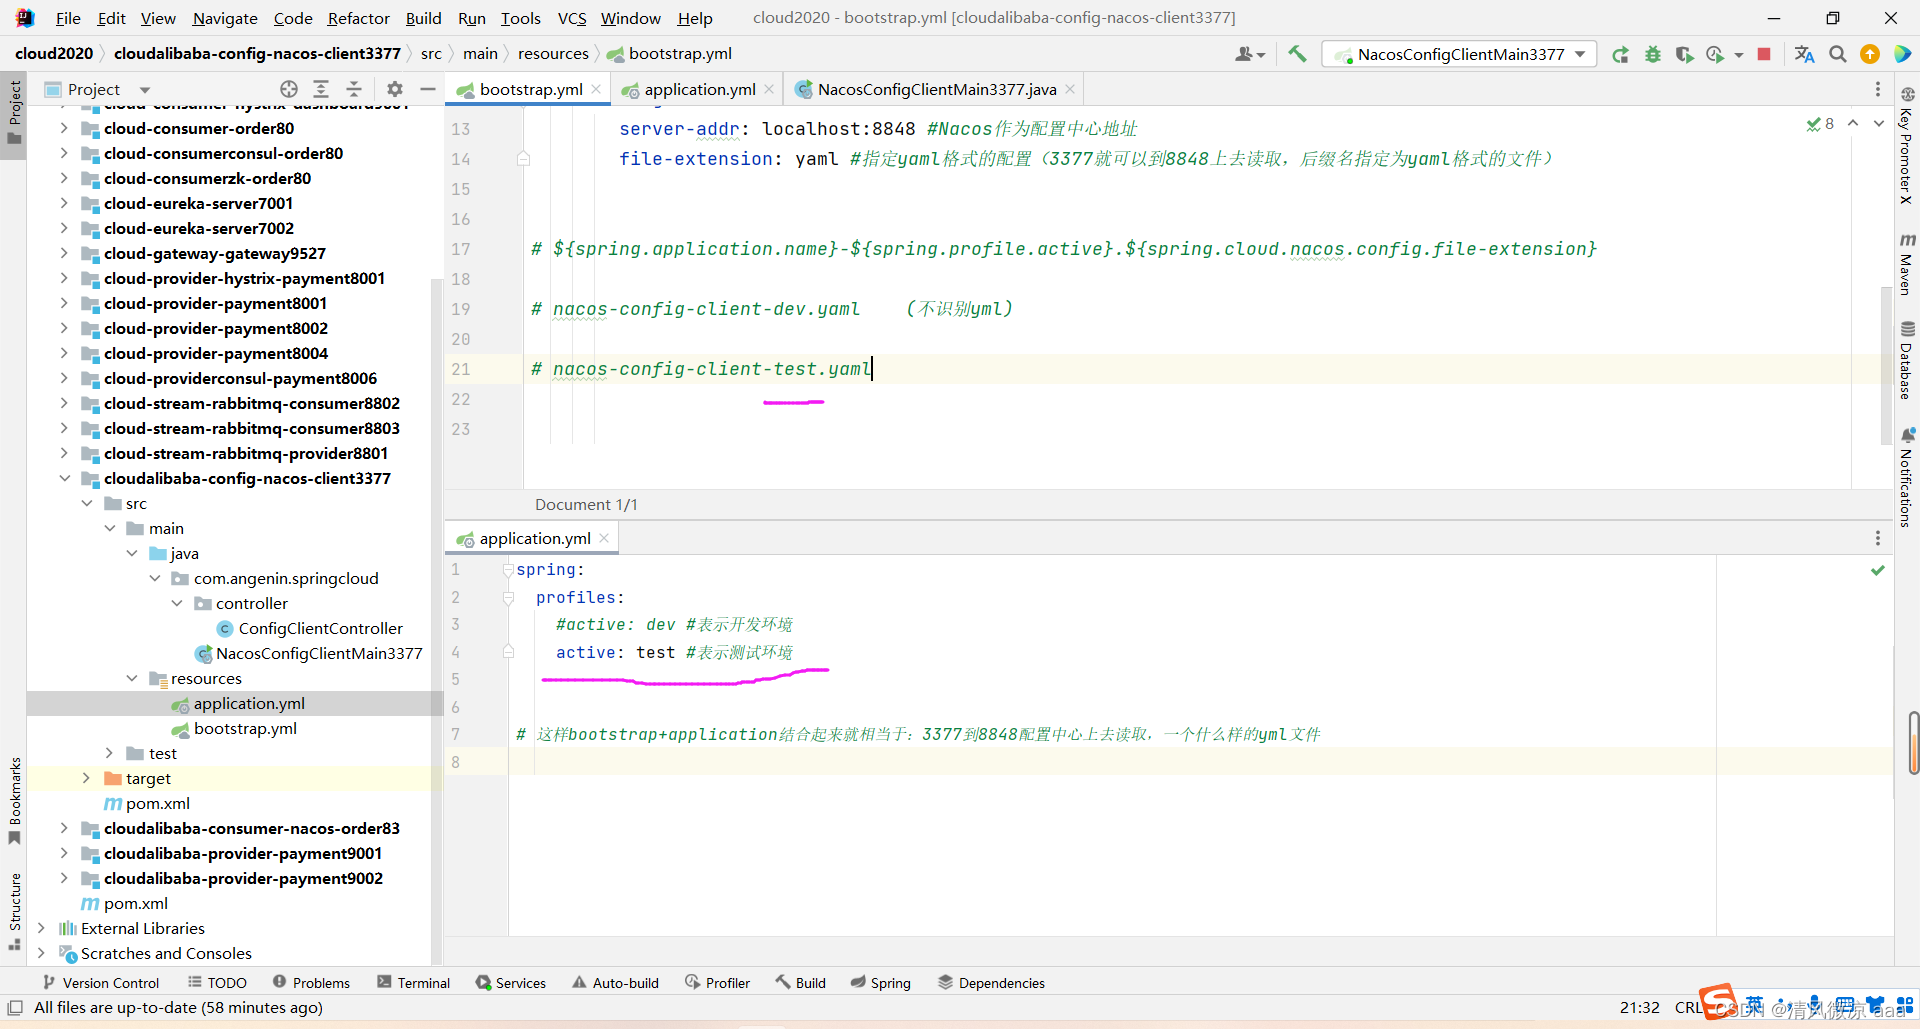
-
测试
-
重启3377
-
http://localhost:3377/config/info
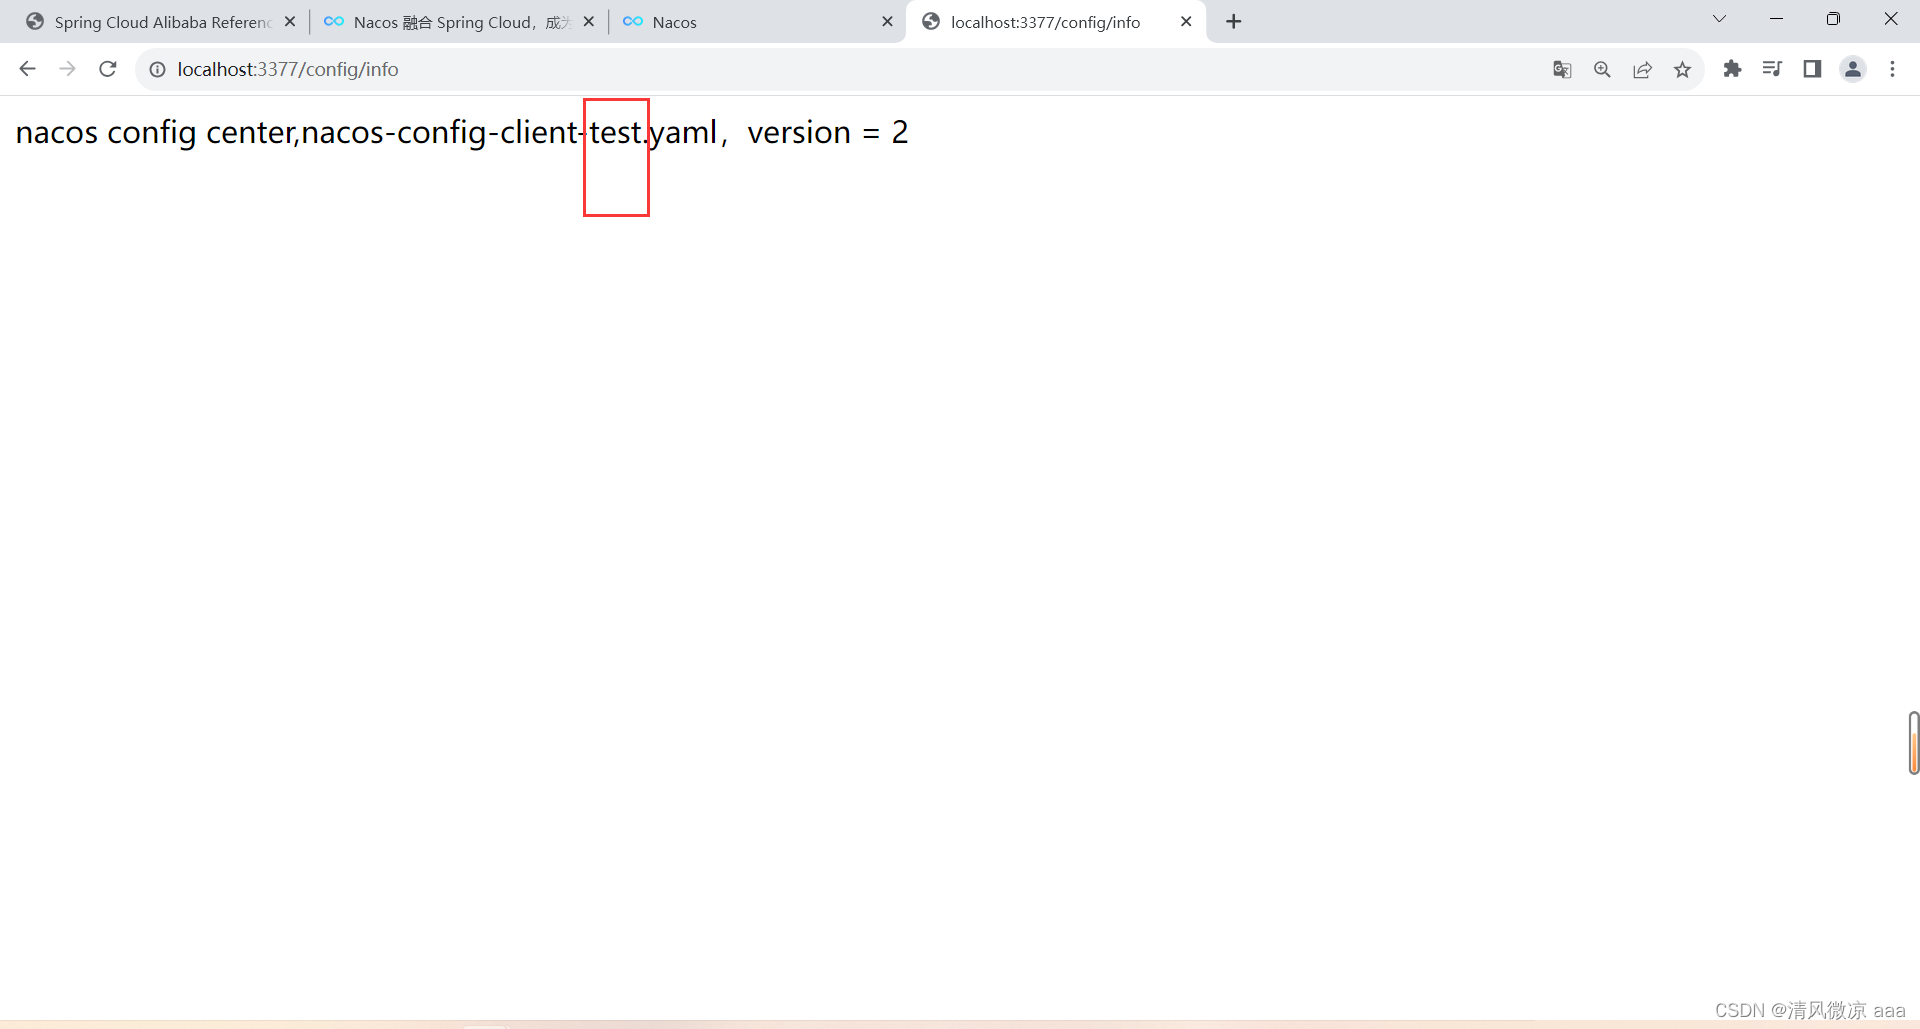
-
配置是什么就加载什么:test
-
2)Group方案
-
通过Group实现环境区分:新建Group
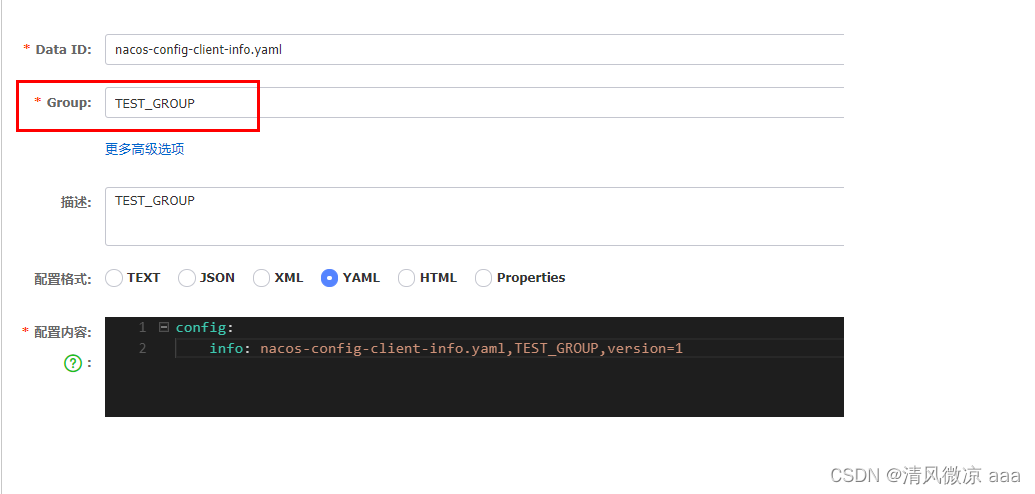
-
在nacos图形界面控制台上面新建配置文件DataID
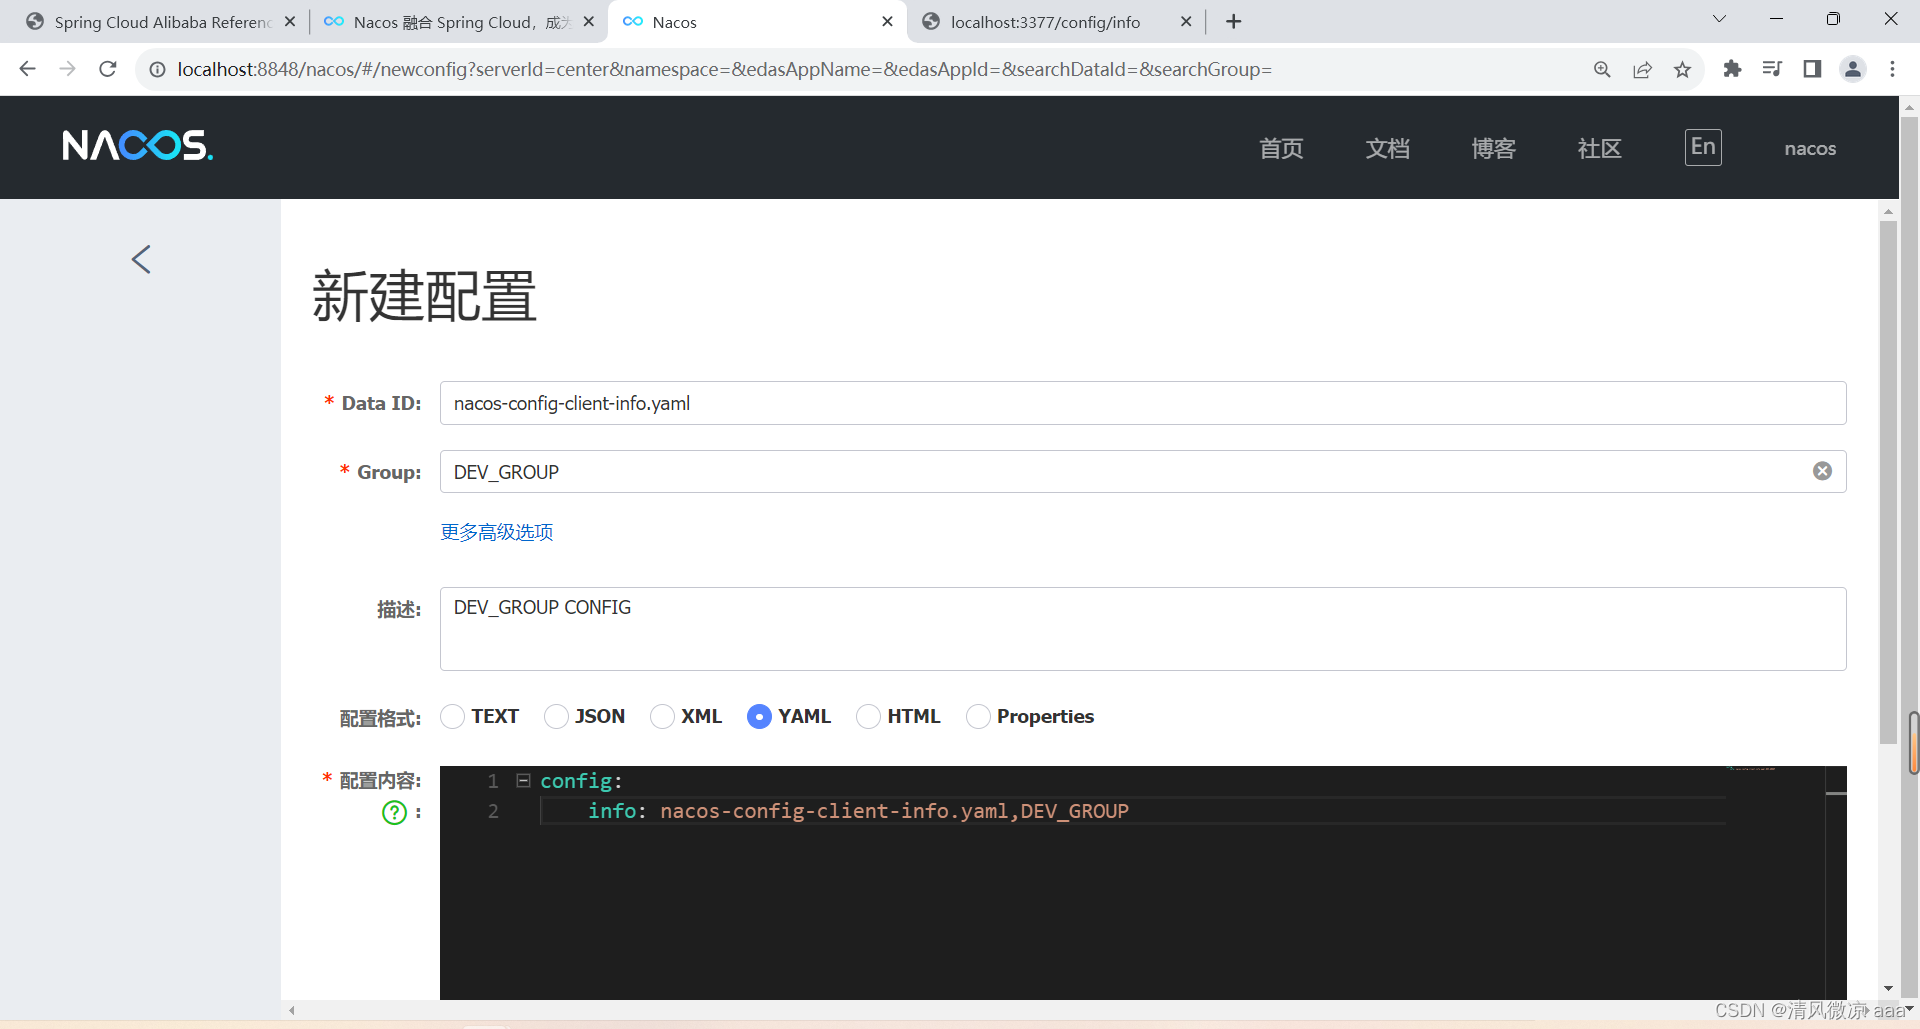
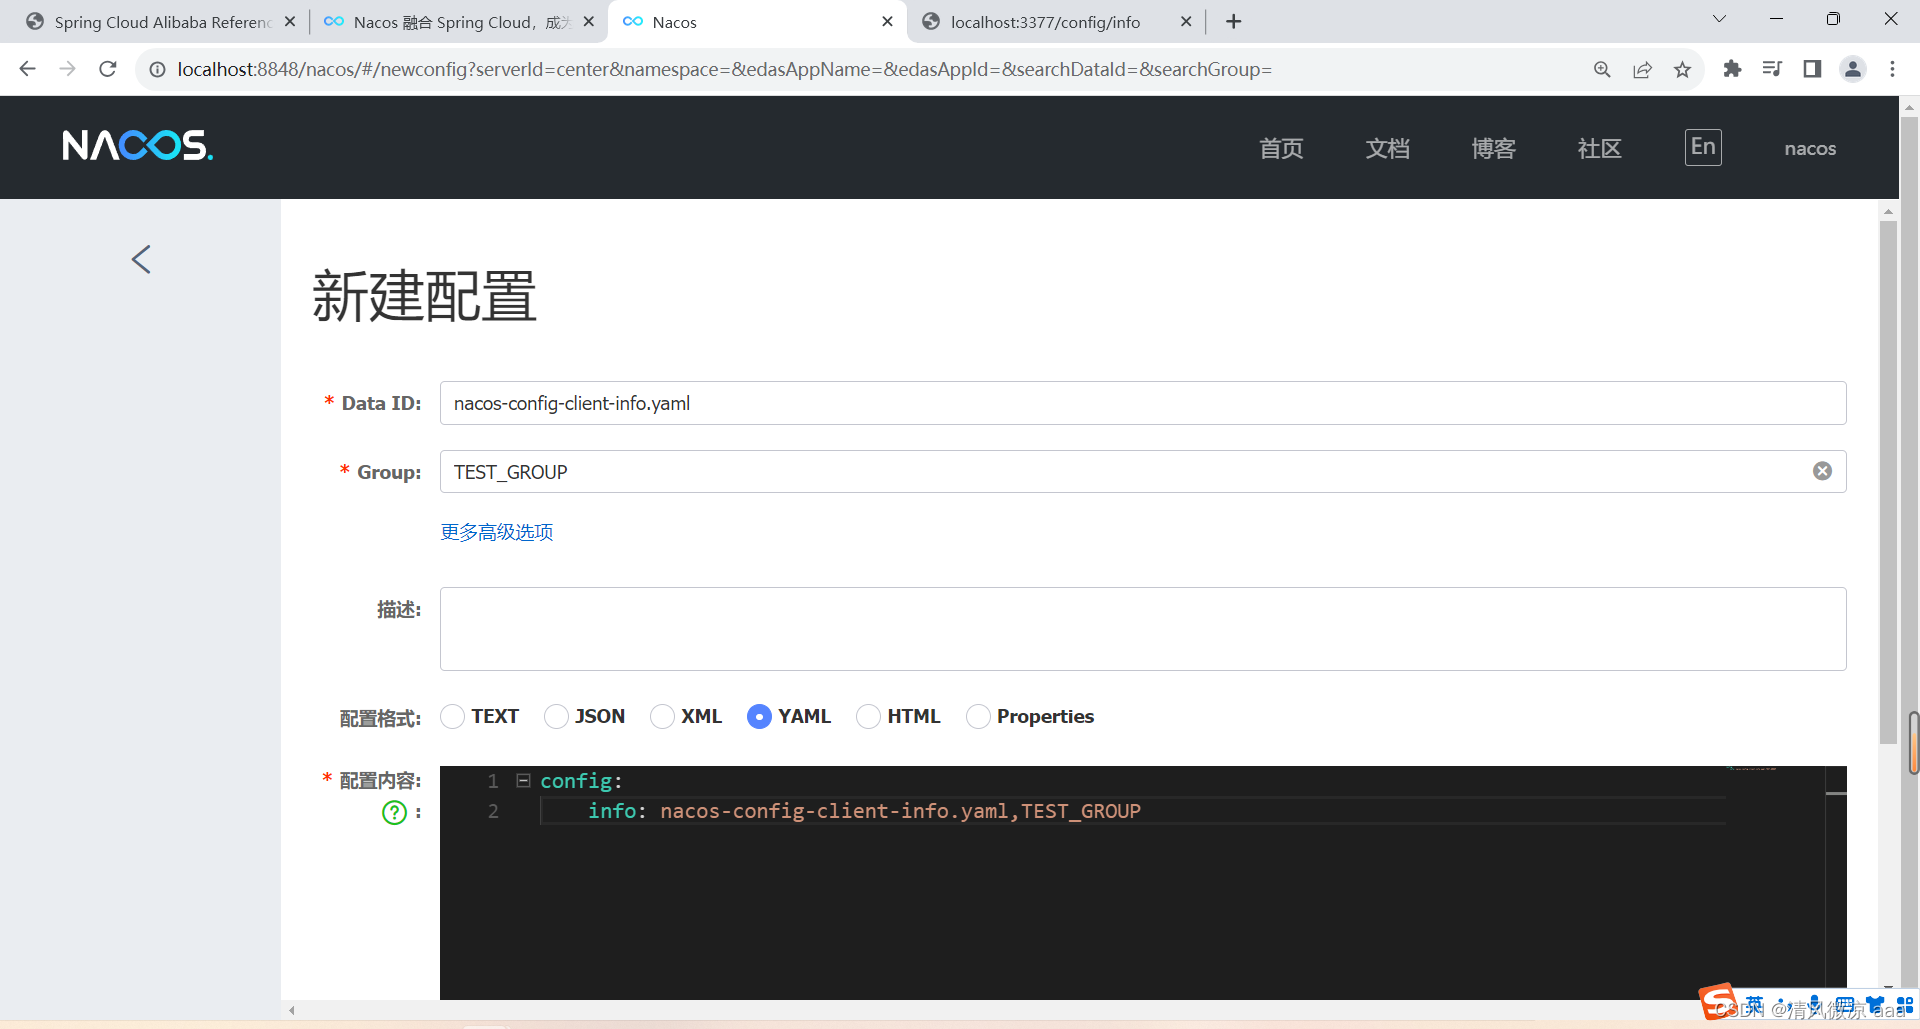
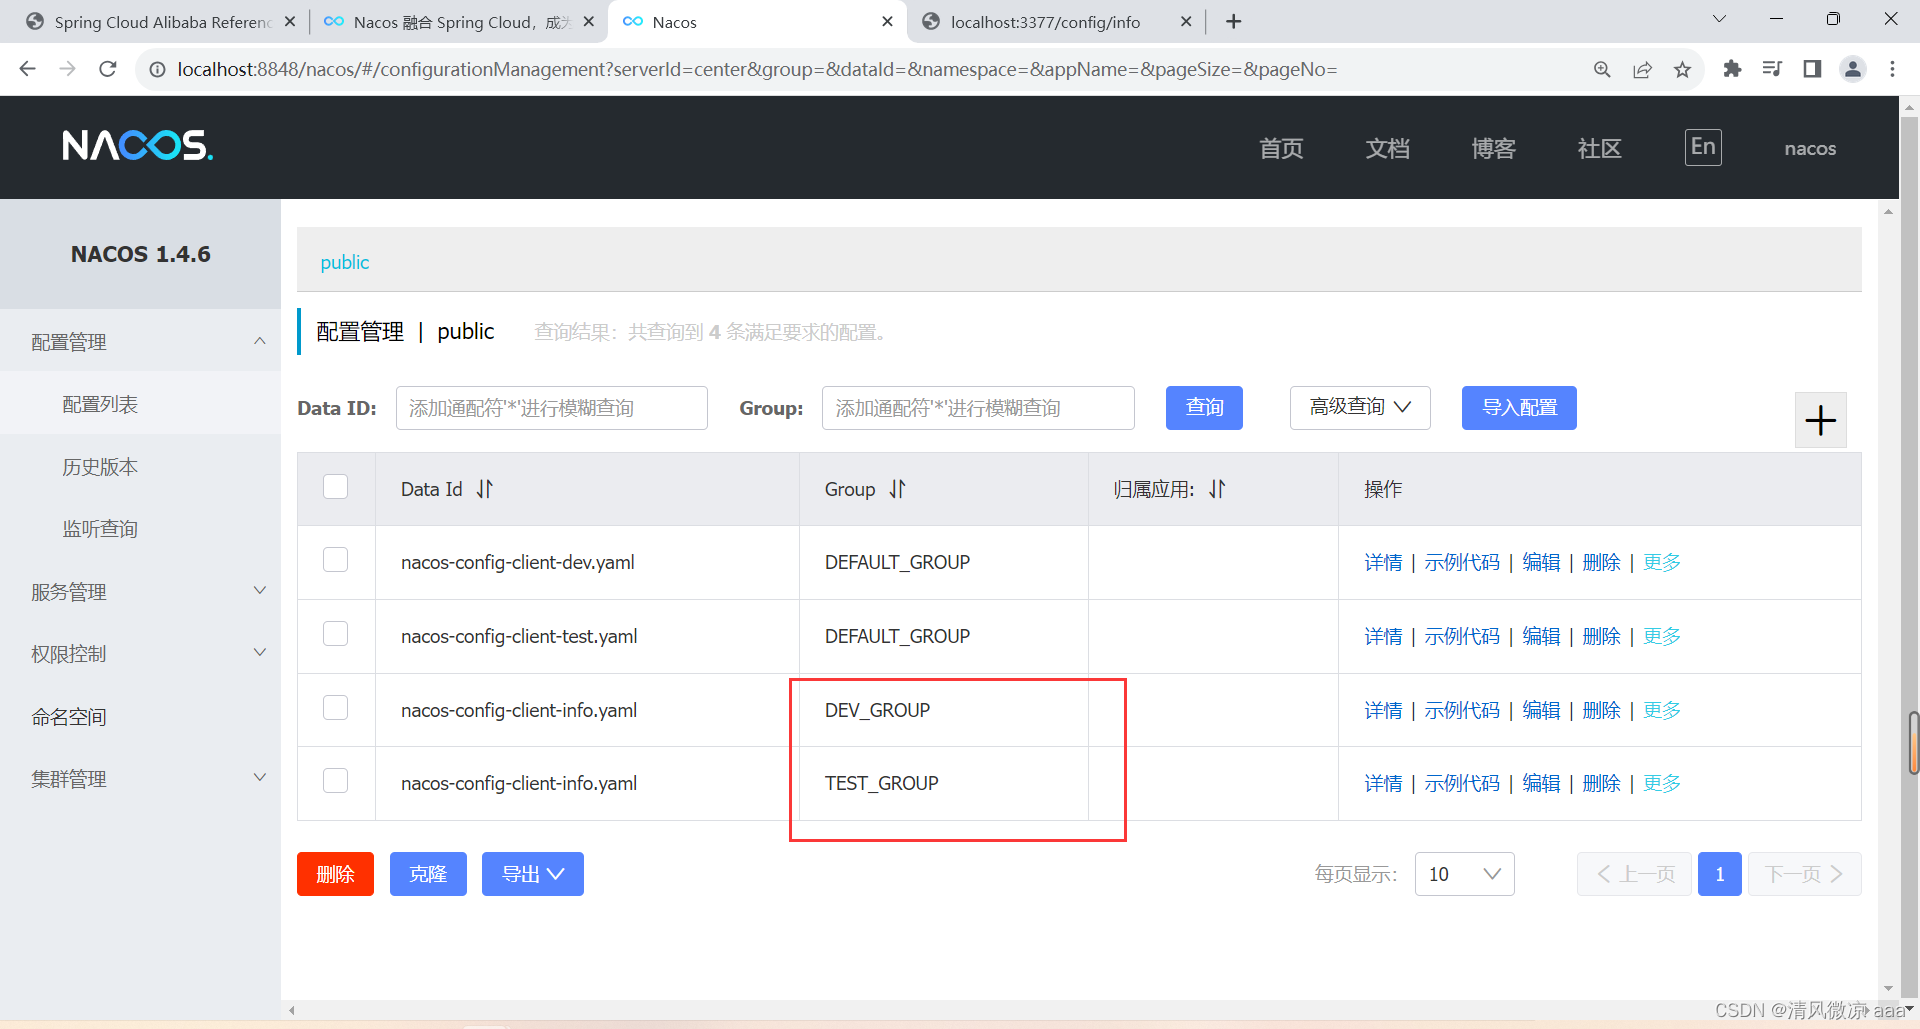
-
bootstrap+application
- 在config下增加一条group的配置即可。
可配置为DEV_GROUP或TEST_GROUP
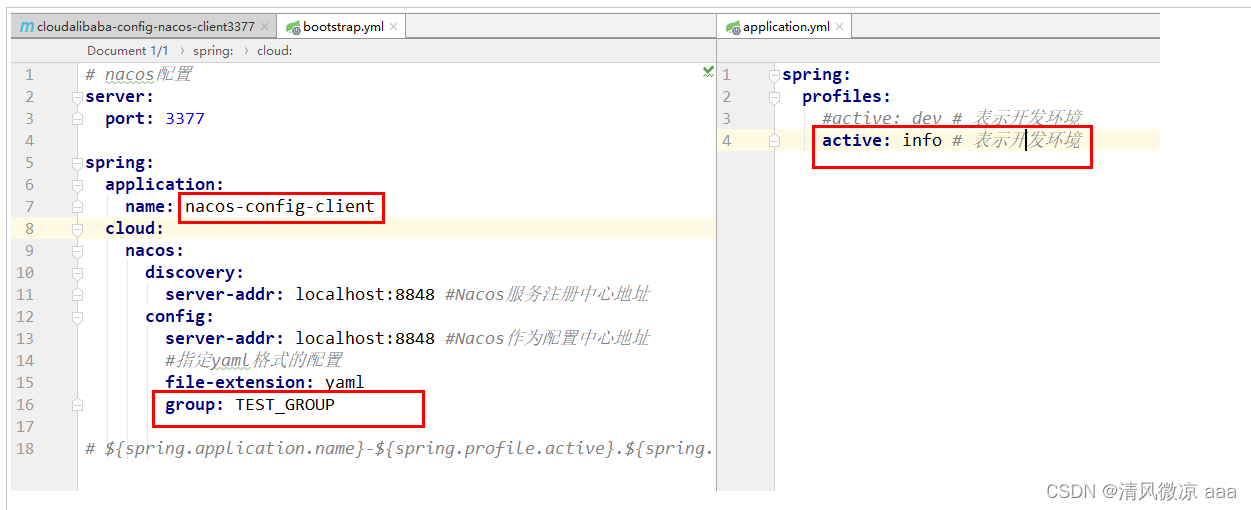
- 在config下增加一条group的配置即可。
-
测试
- 启动Nacos
- 重启3377
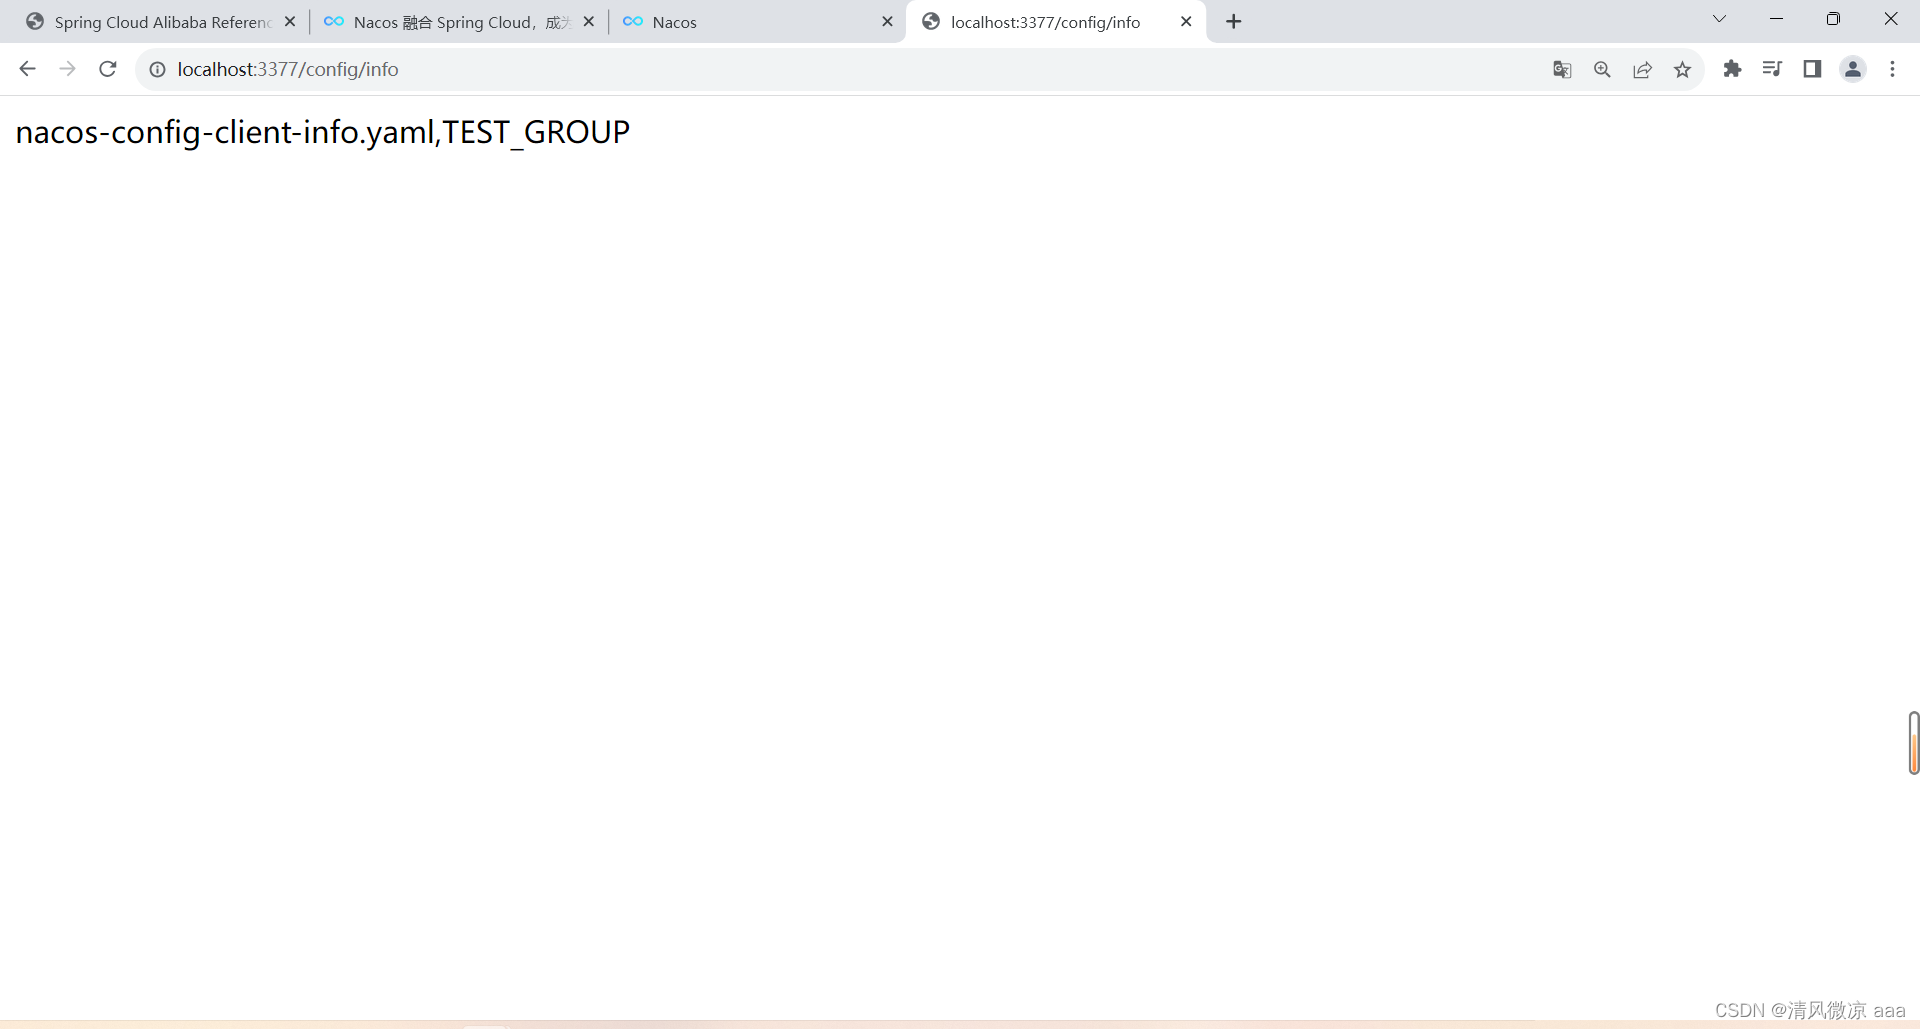
- http://localhost:3377/config/info
-
流程:
nacos-config-client + TEST_GROUP + info + yaml- 表示找的是nacos-config-client微服务下的TEST_GROUP分组下的,前缀为info ,后缀为yaml的文件
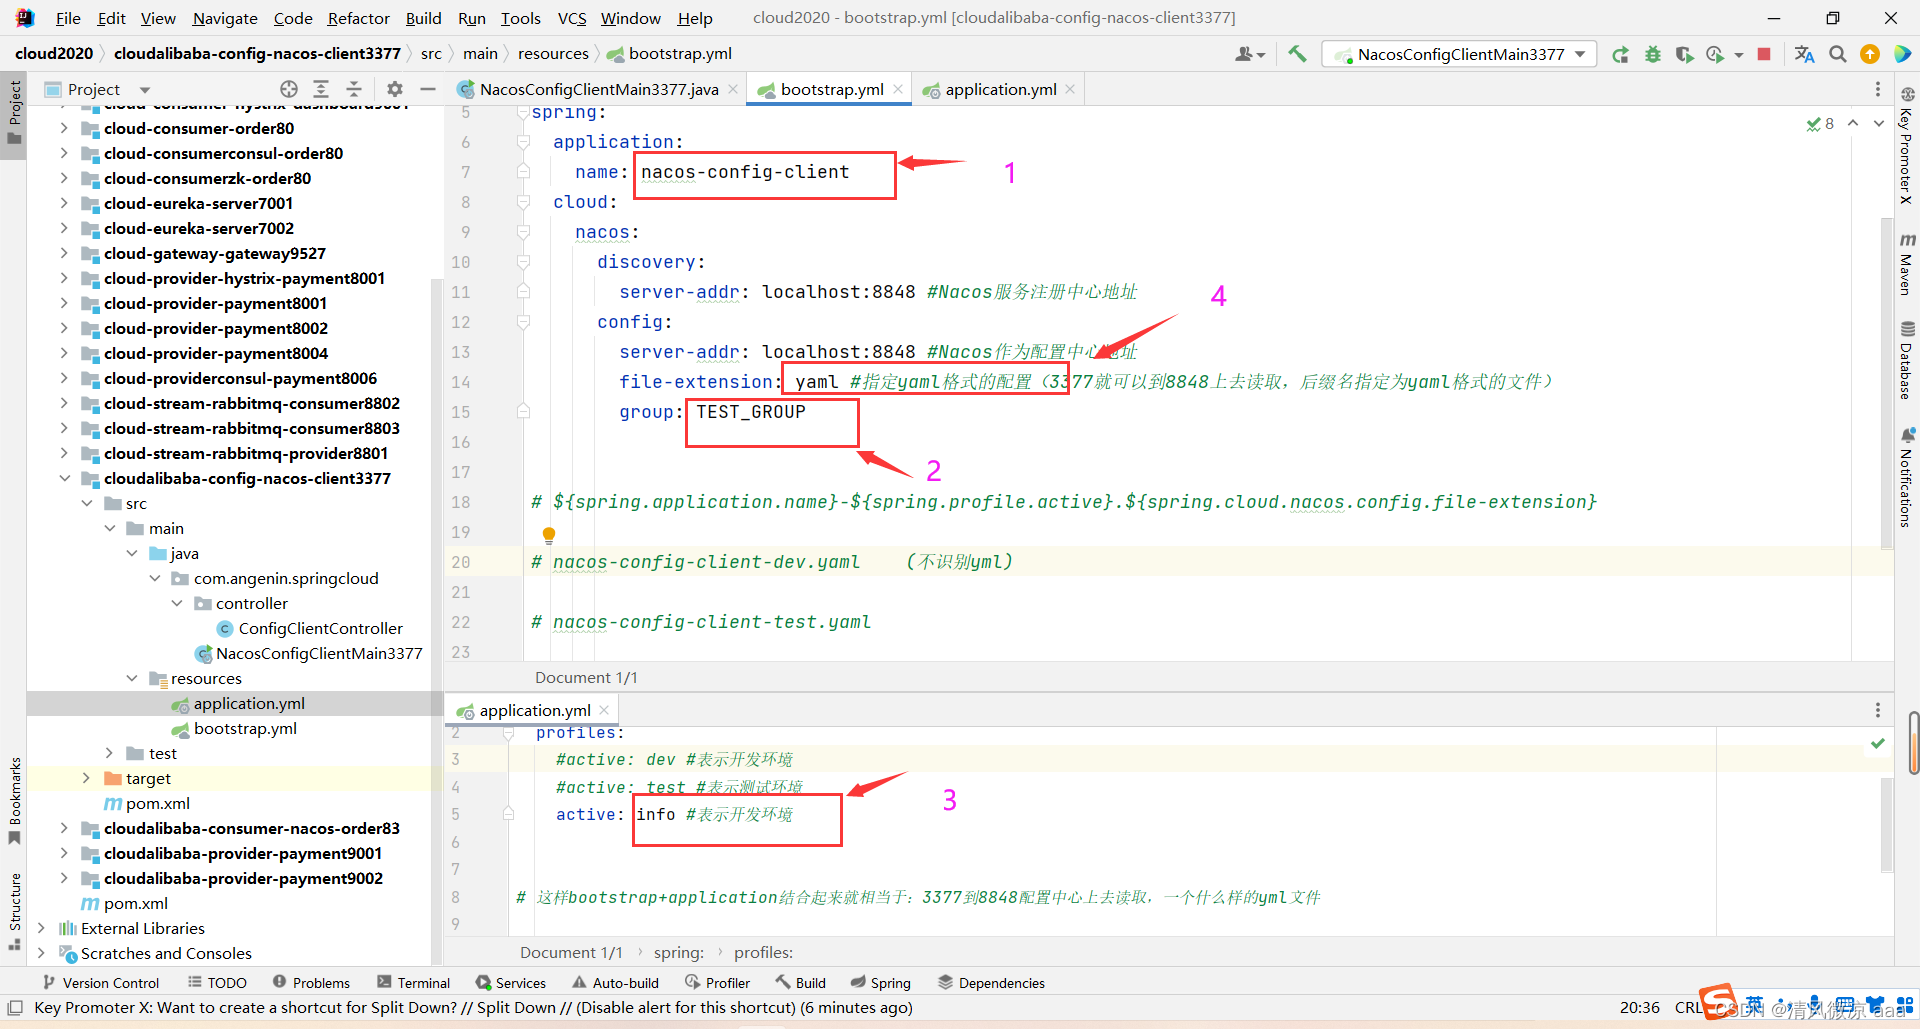
- 表示找的是nacos-config-client微服务下的TEST_GROUP分组下的,前缀为info ,后缀为yaml的文件
3)Namespace方案
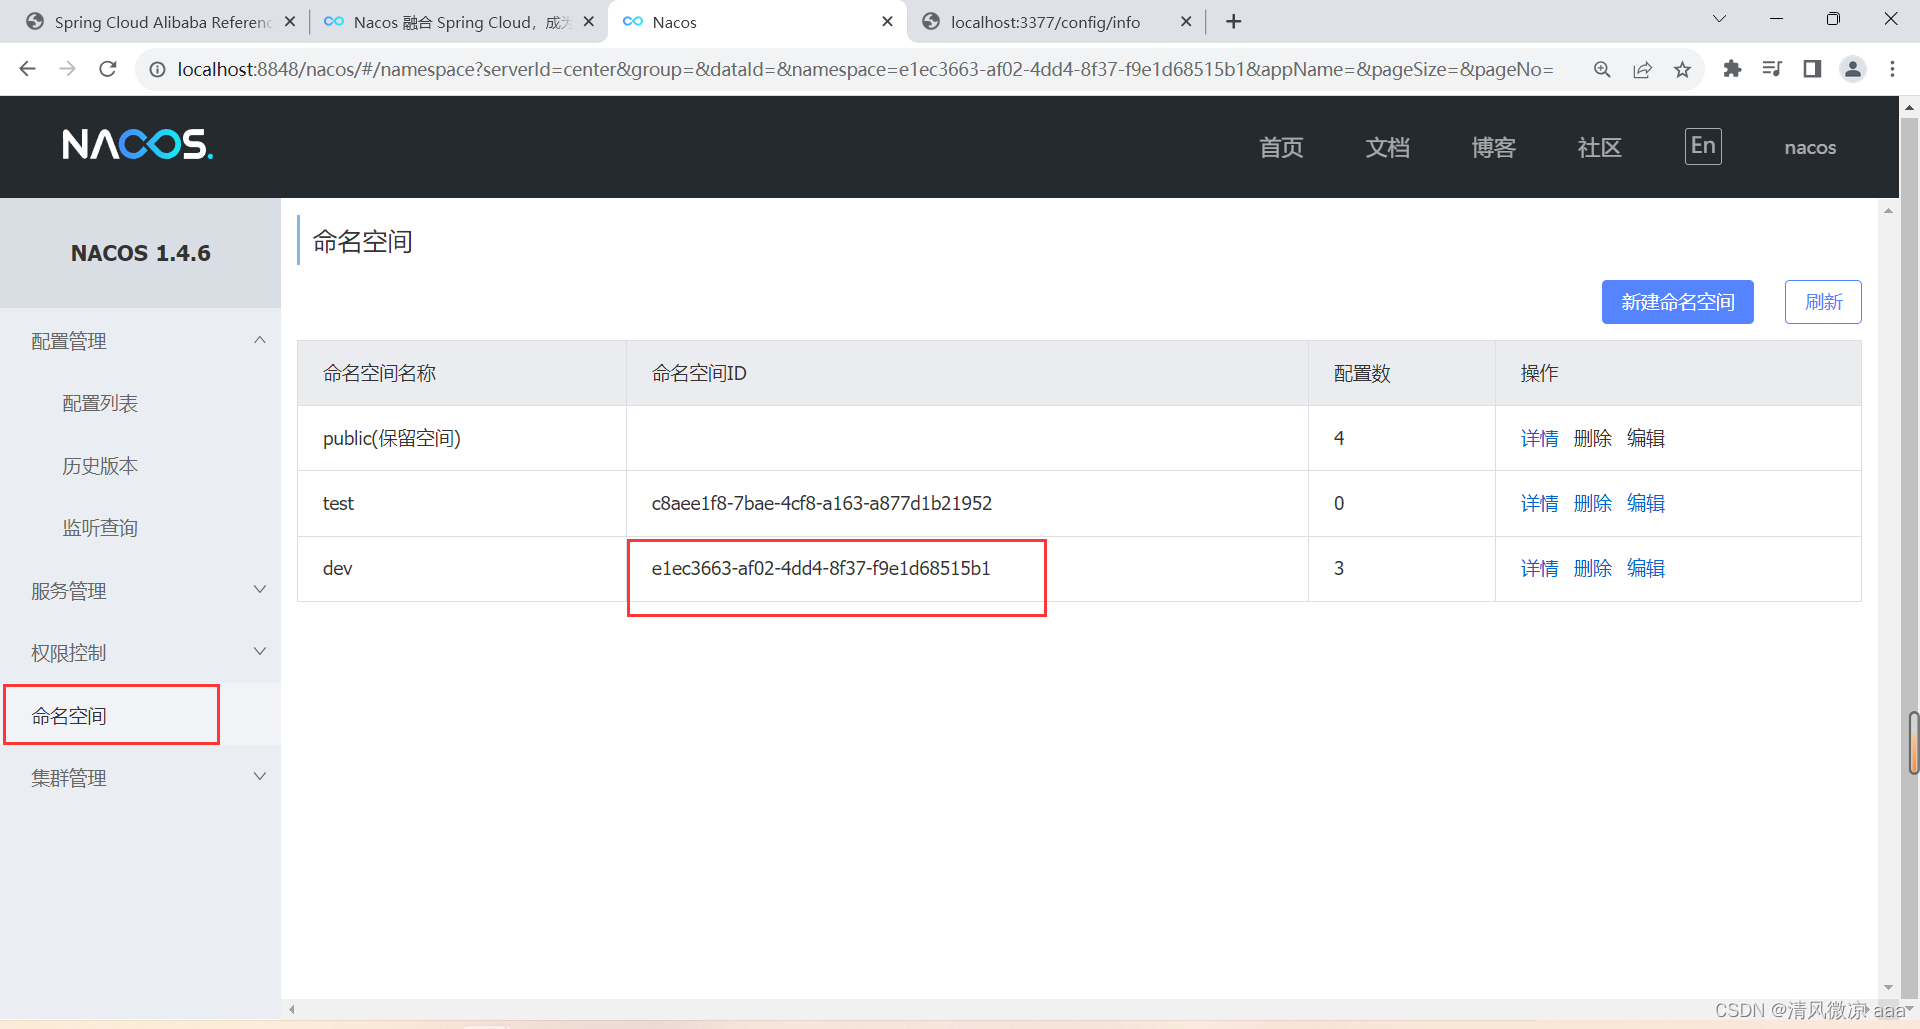
-
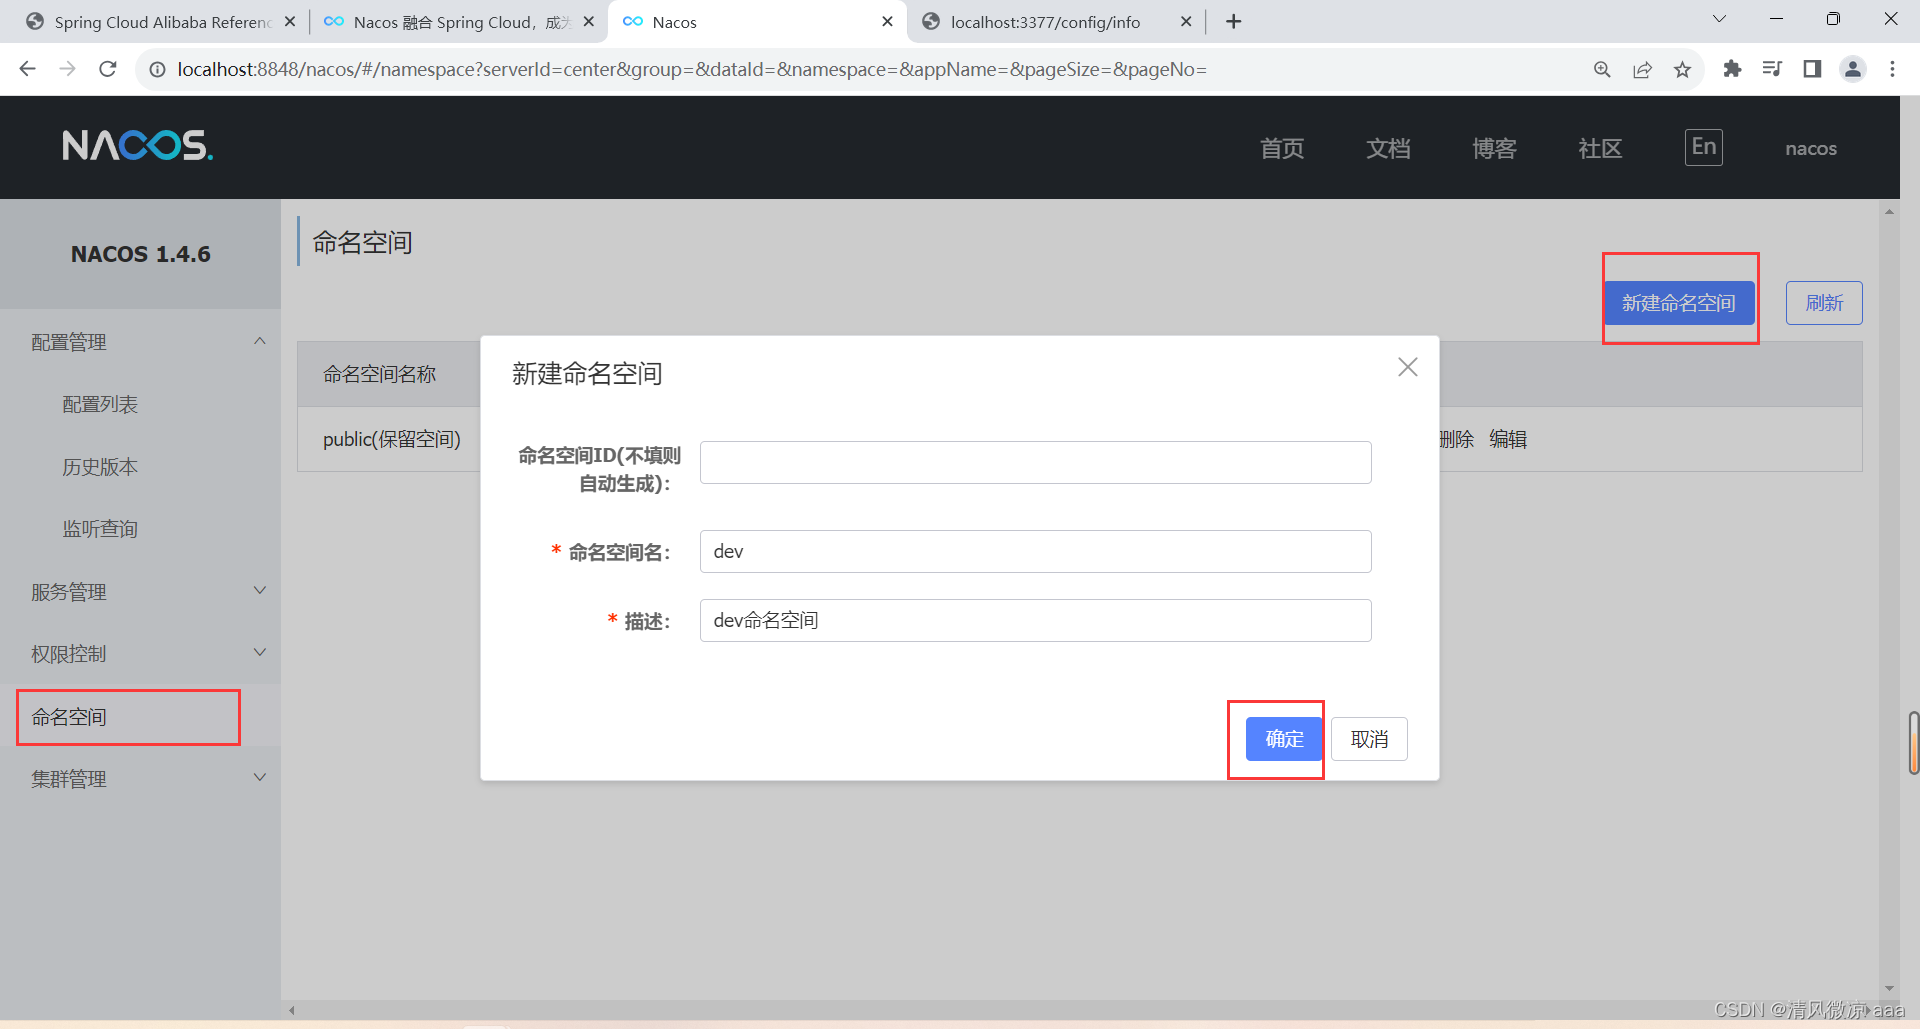
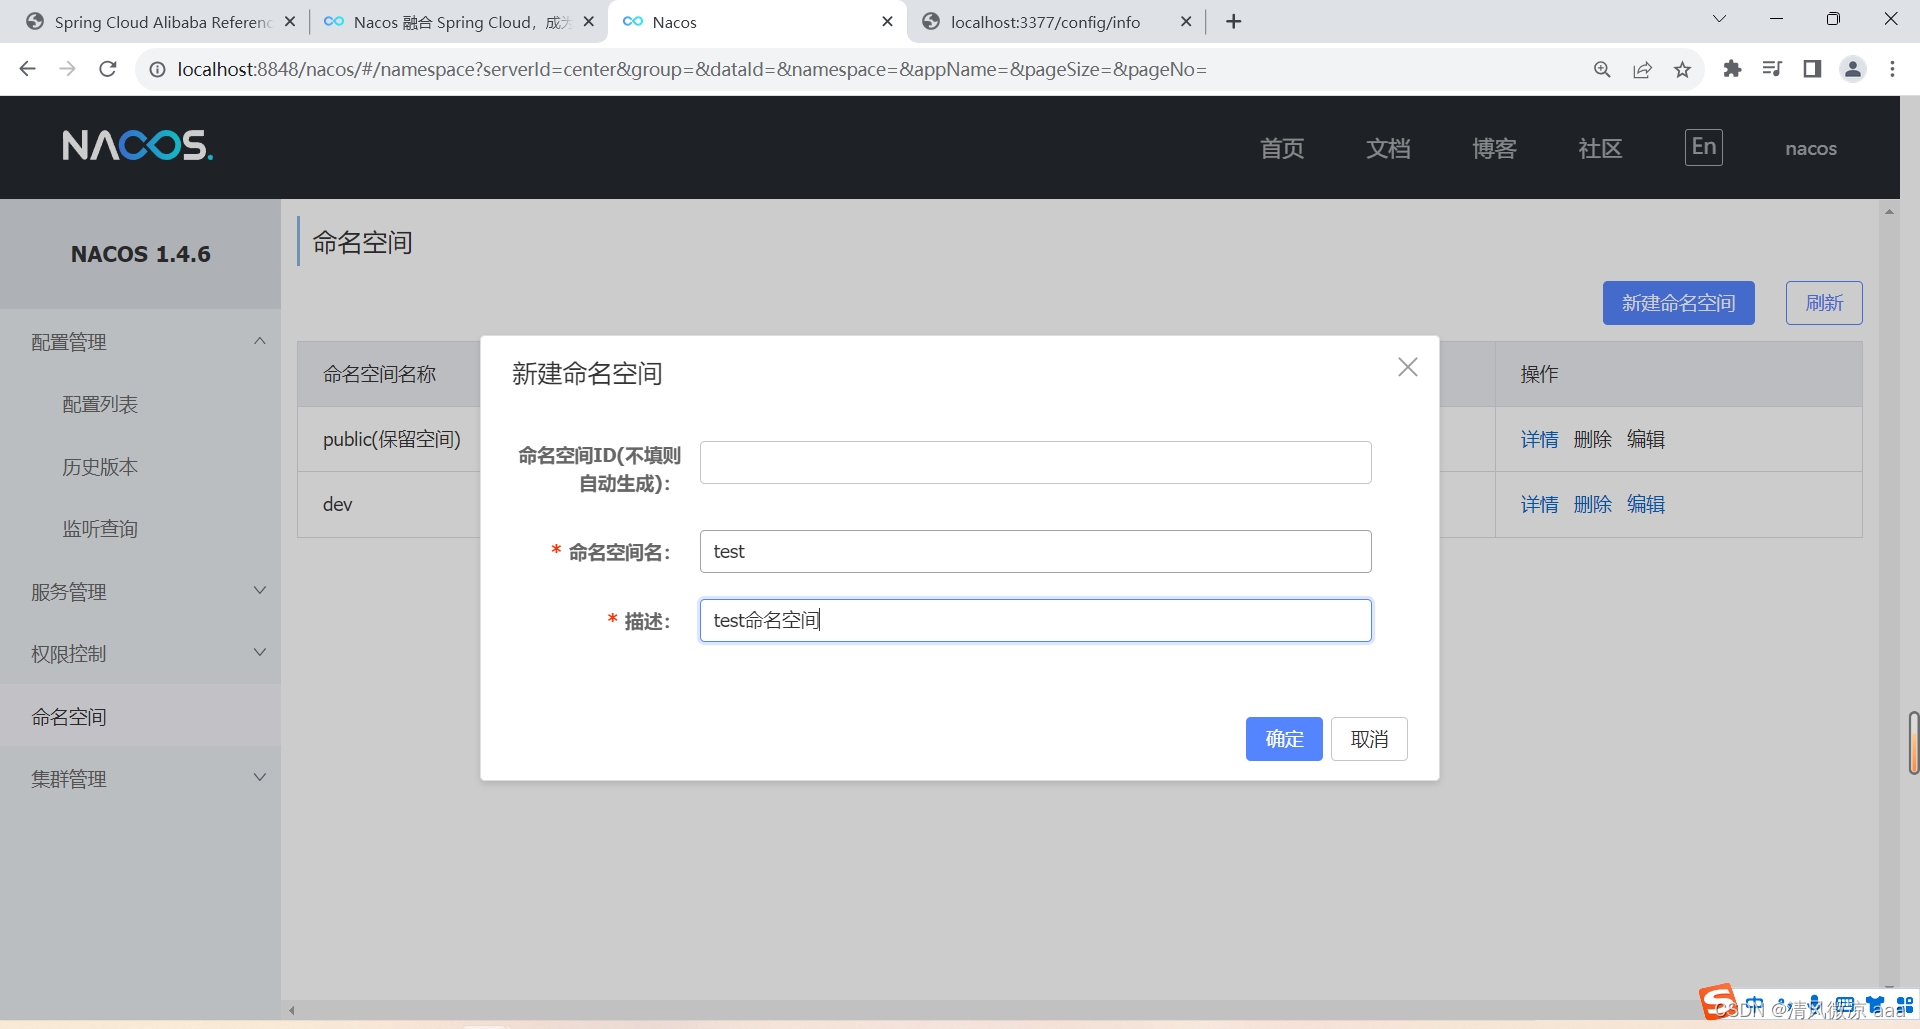
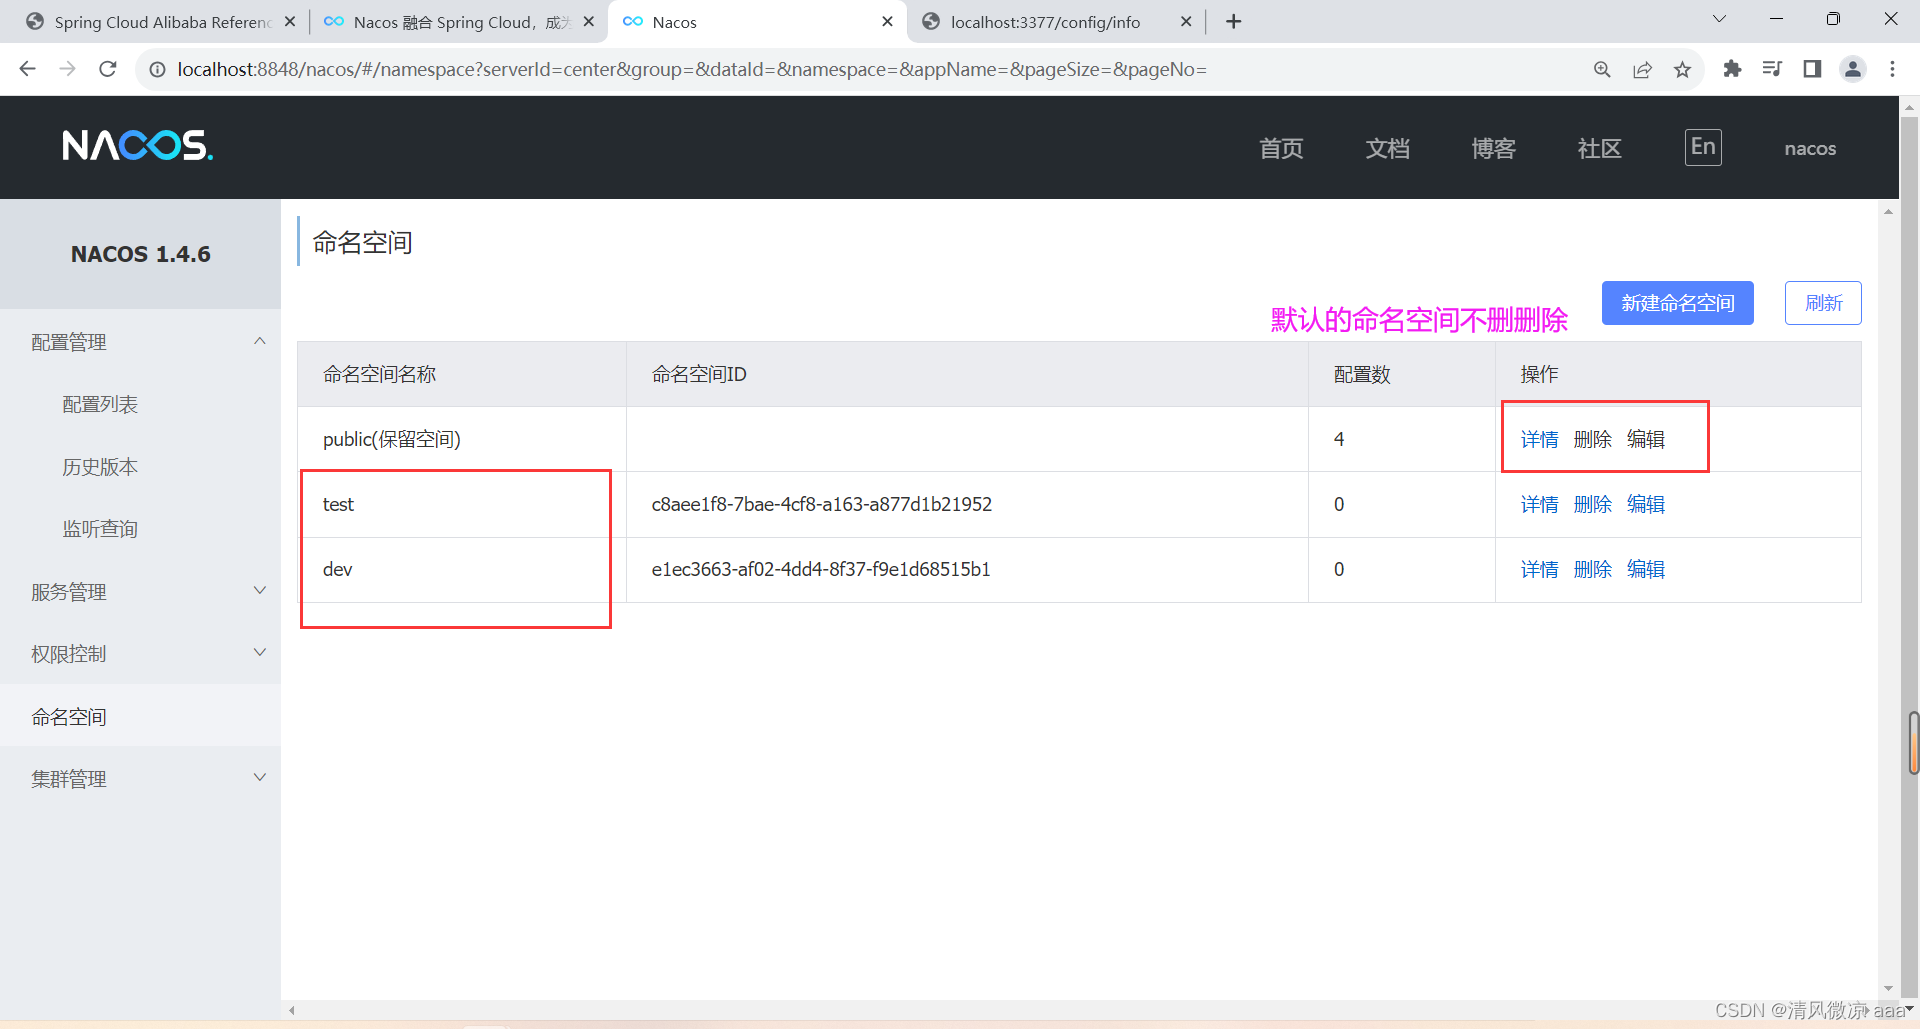
新建dev/test的Namespace
-
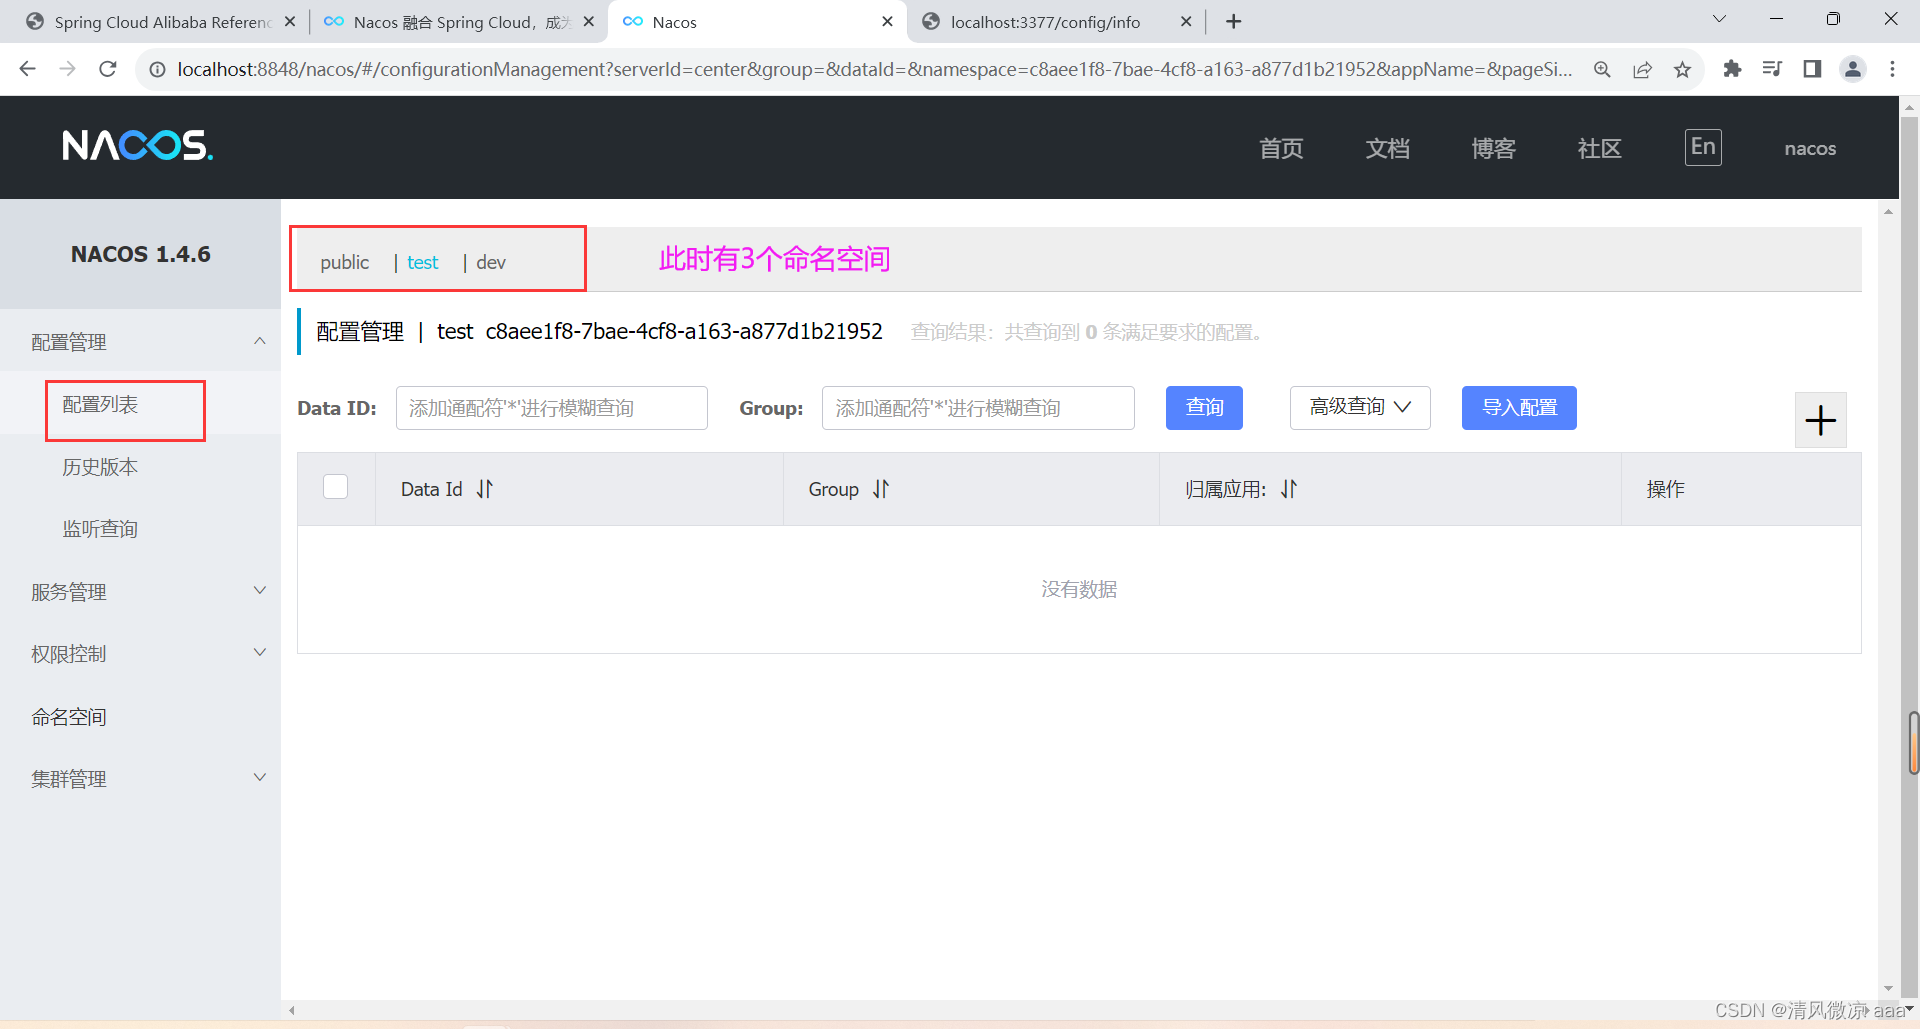
回到服务管理-服务列表查看
-
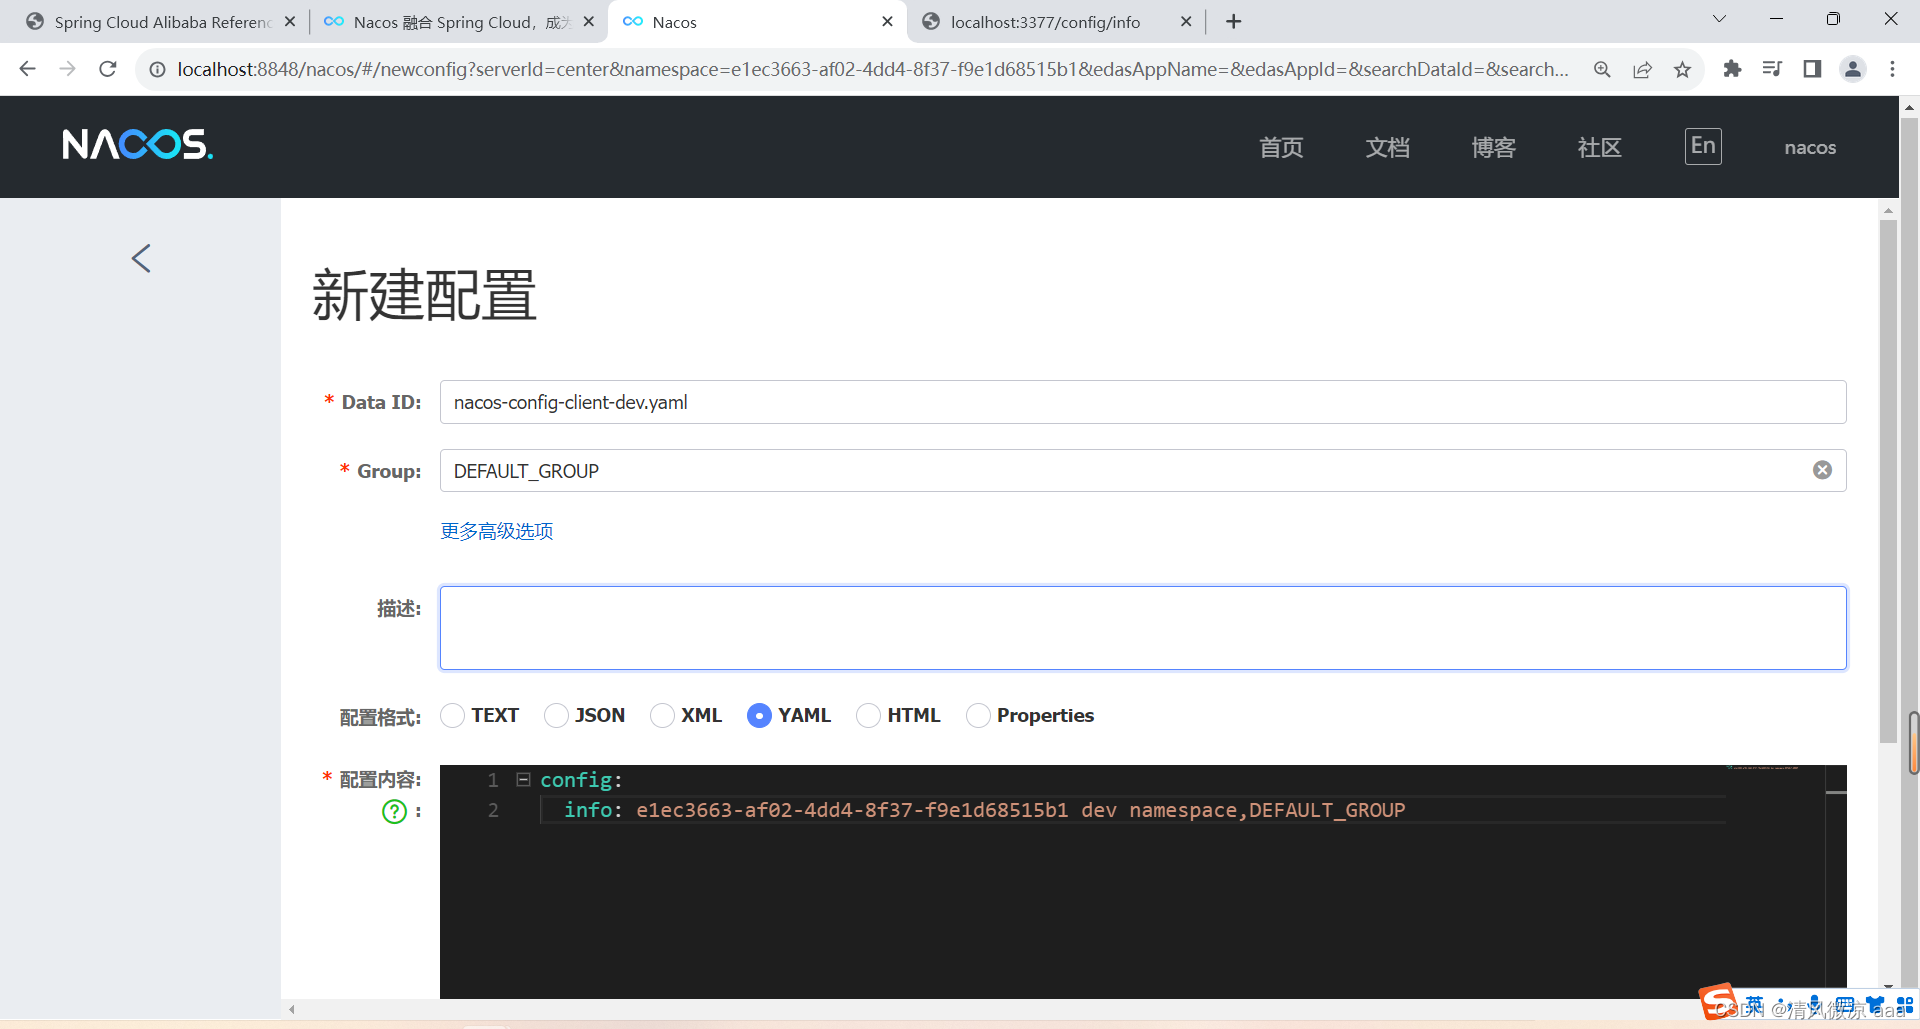
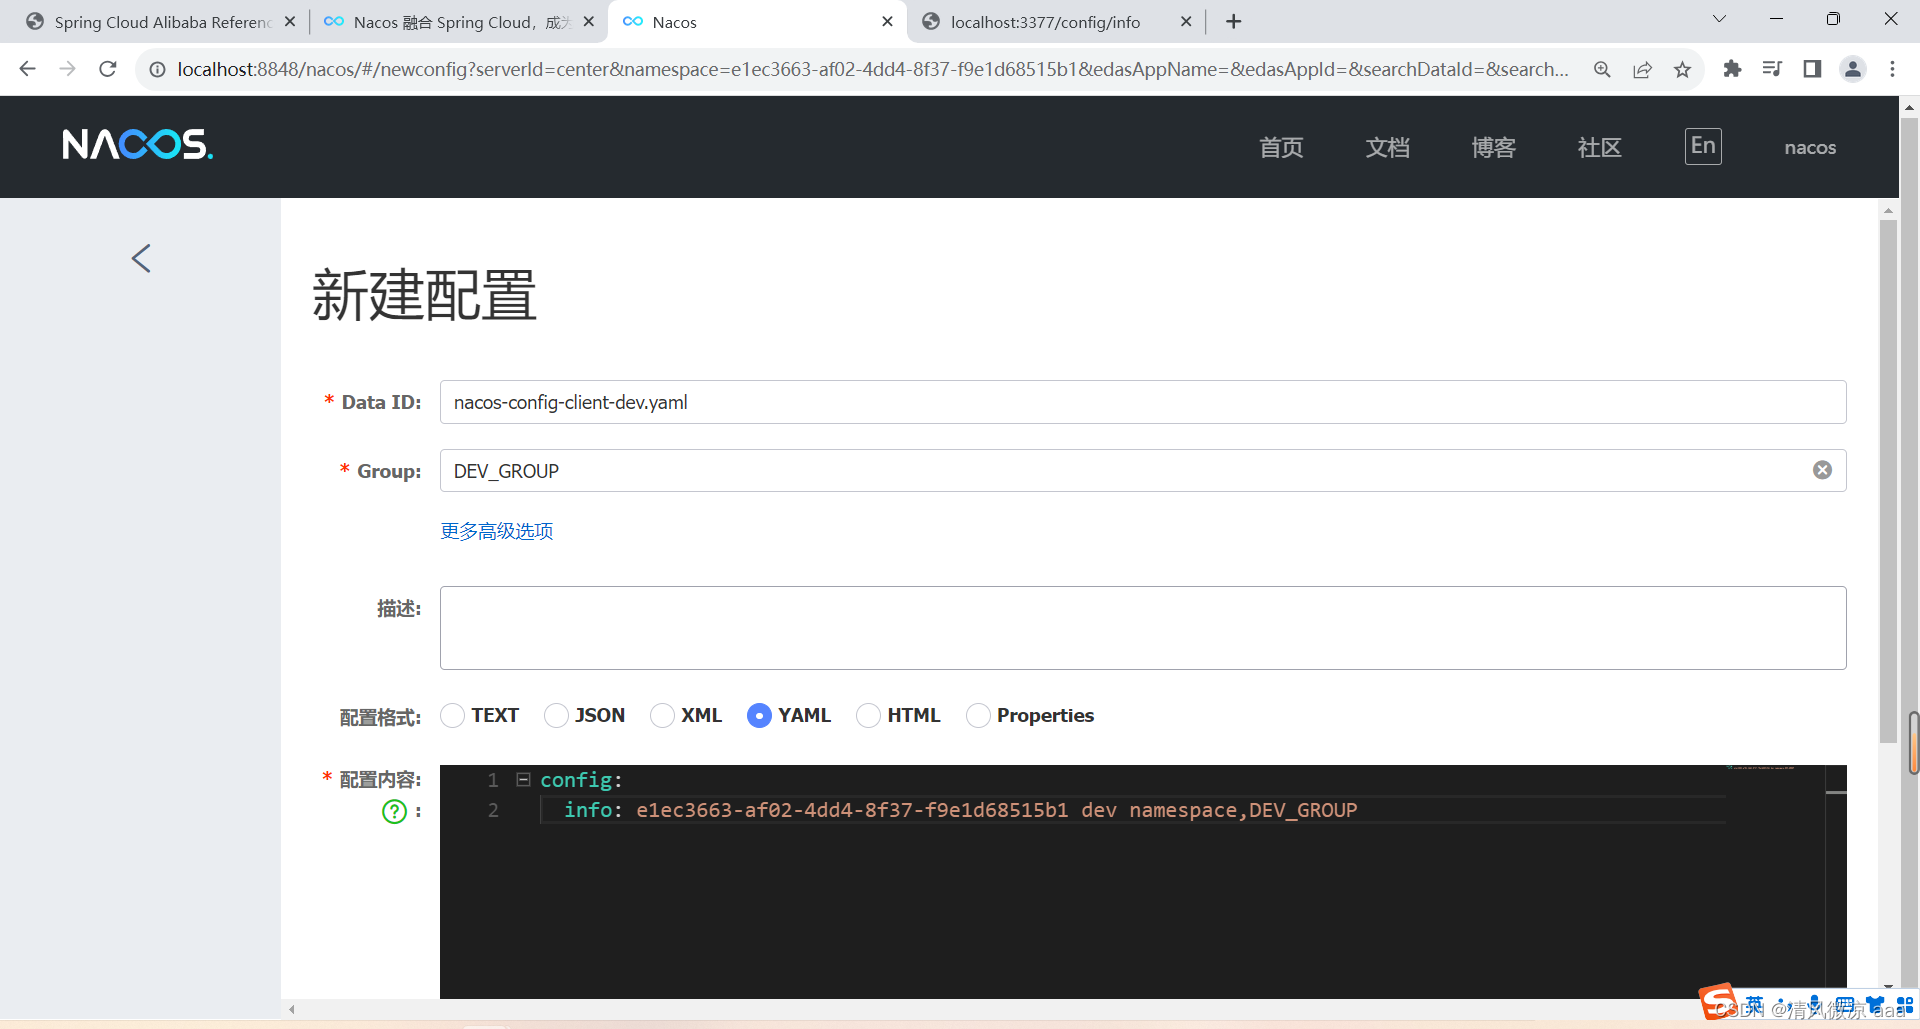
按照域名配置填写
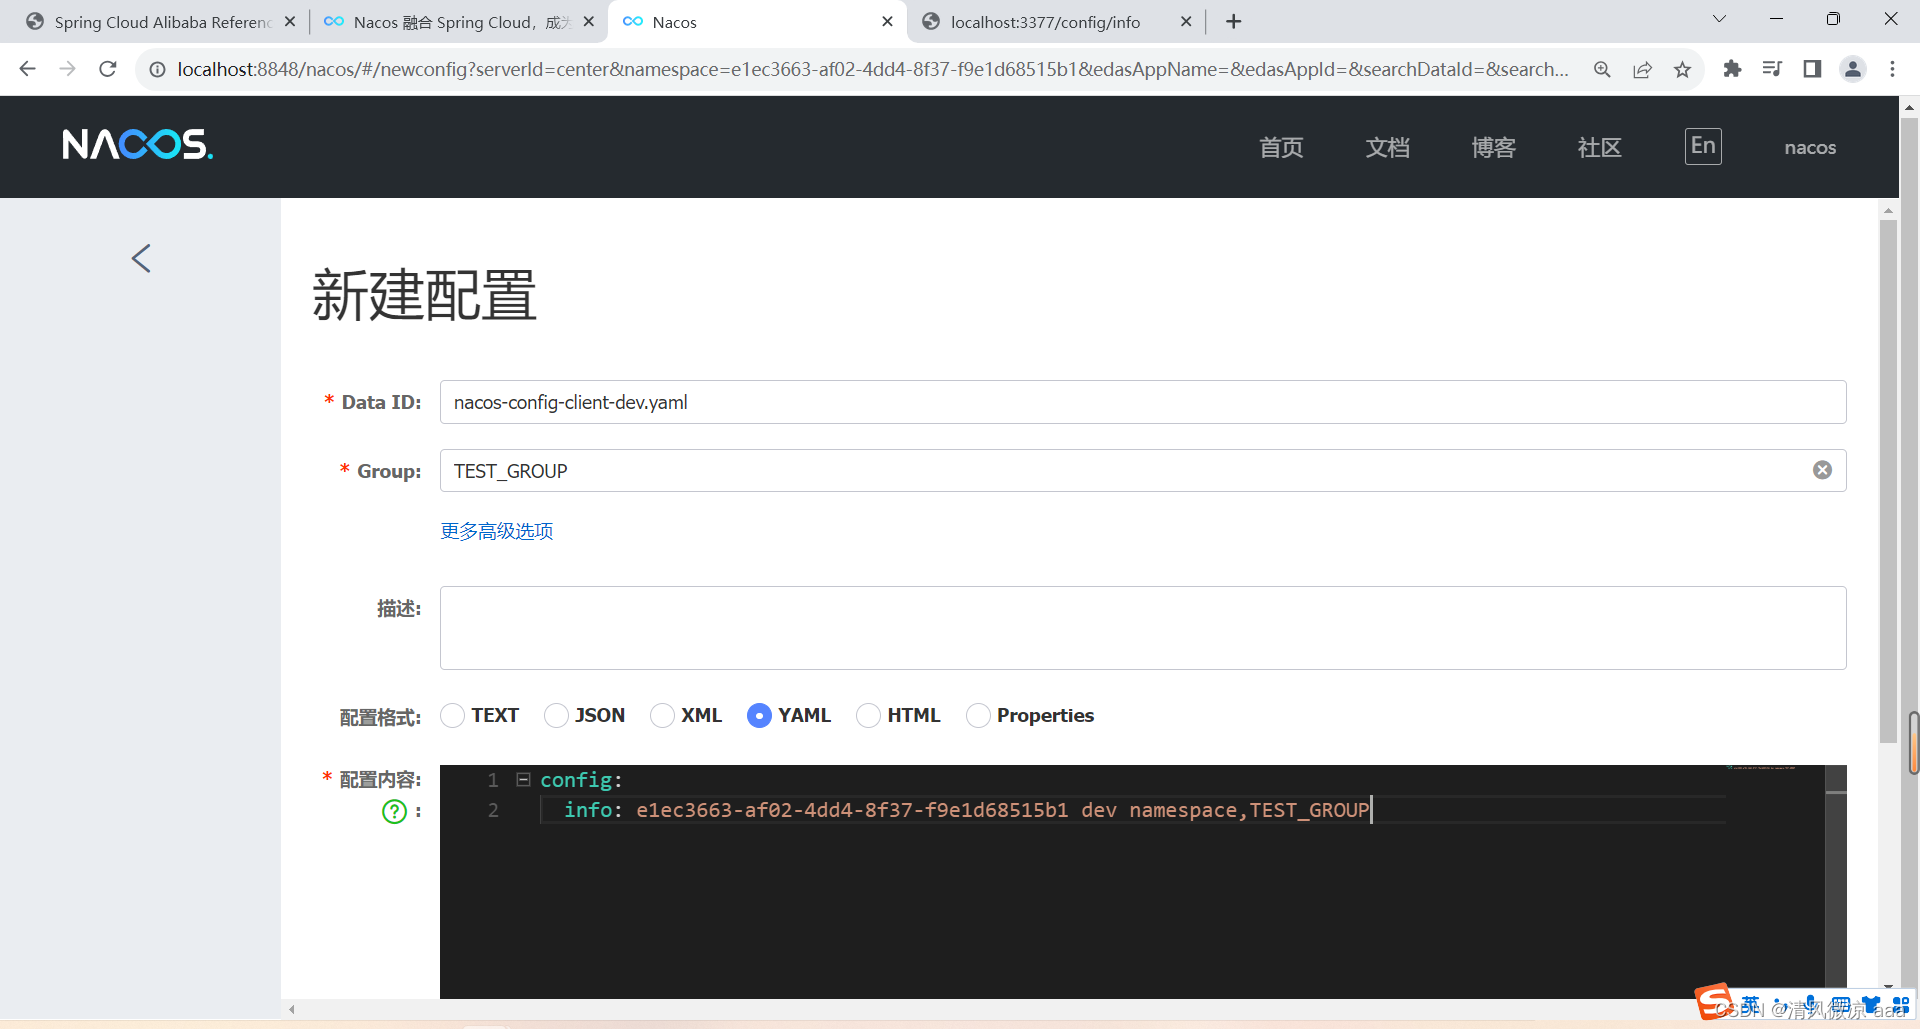
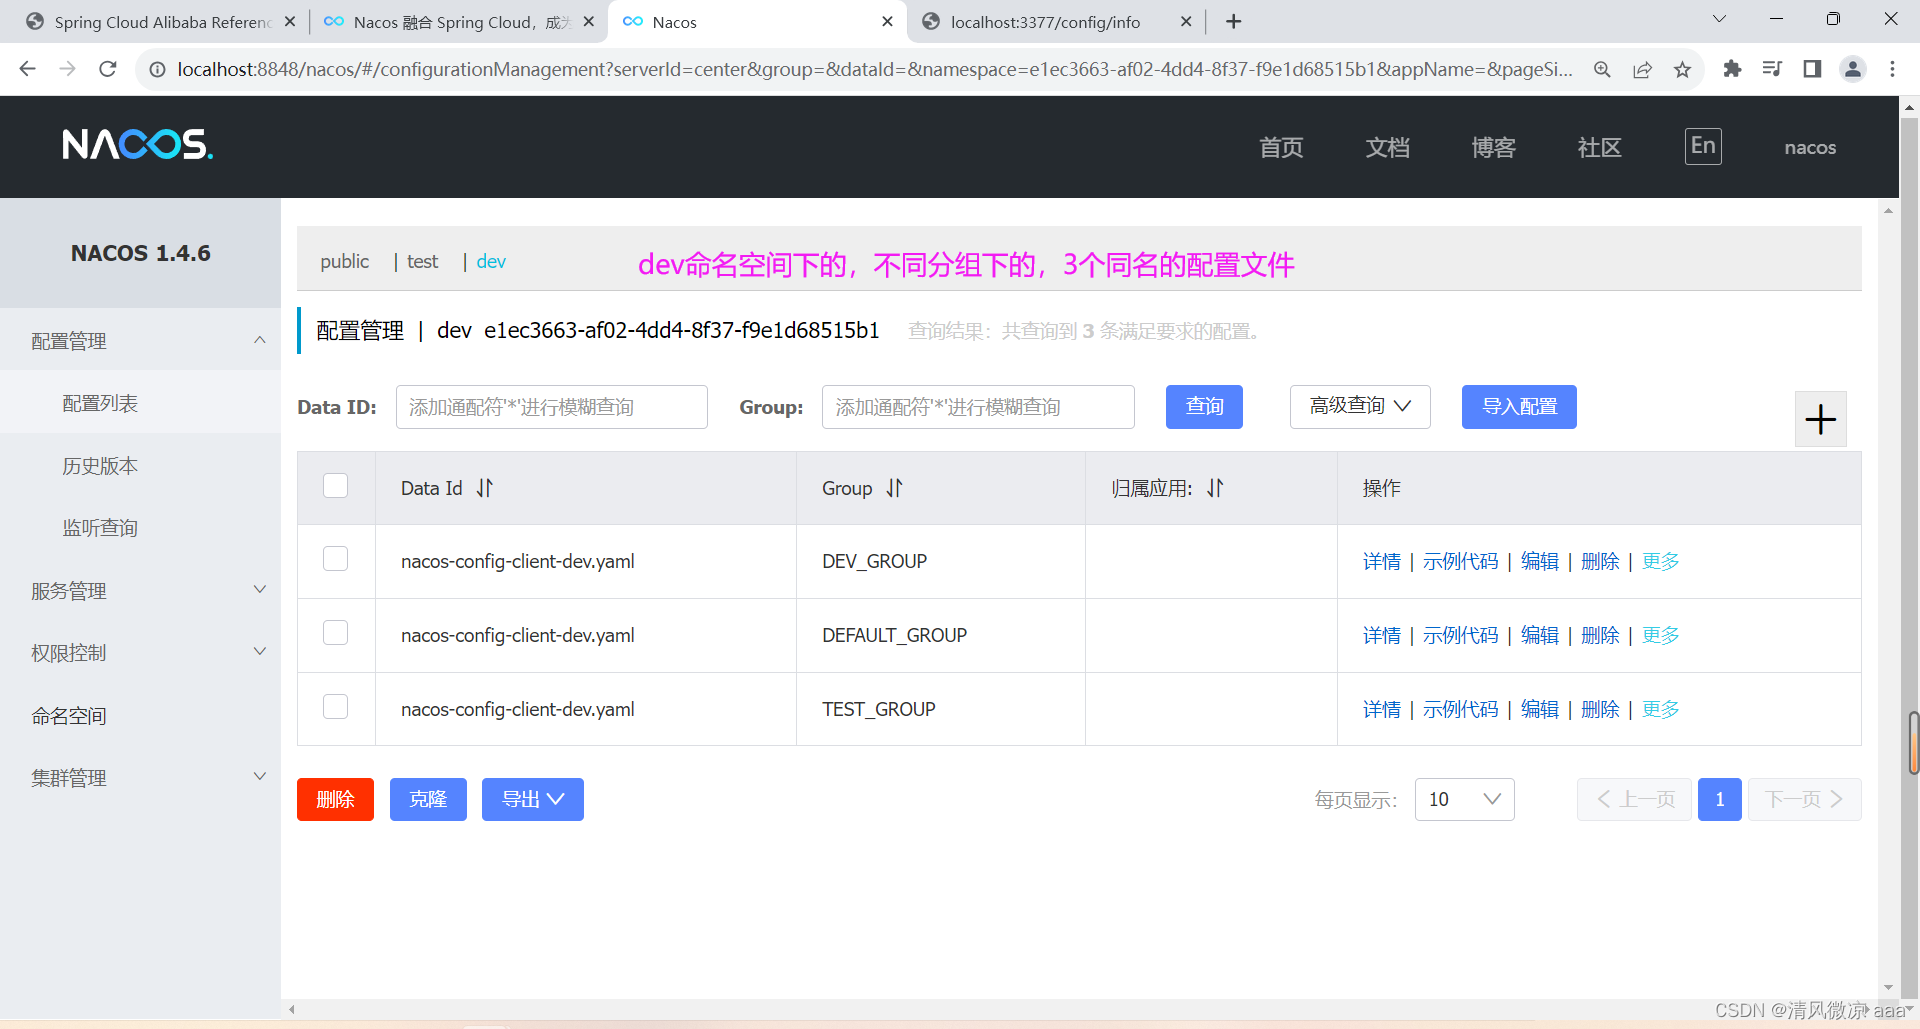
-
YML
-
bootstrap
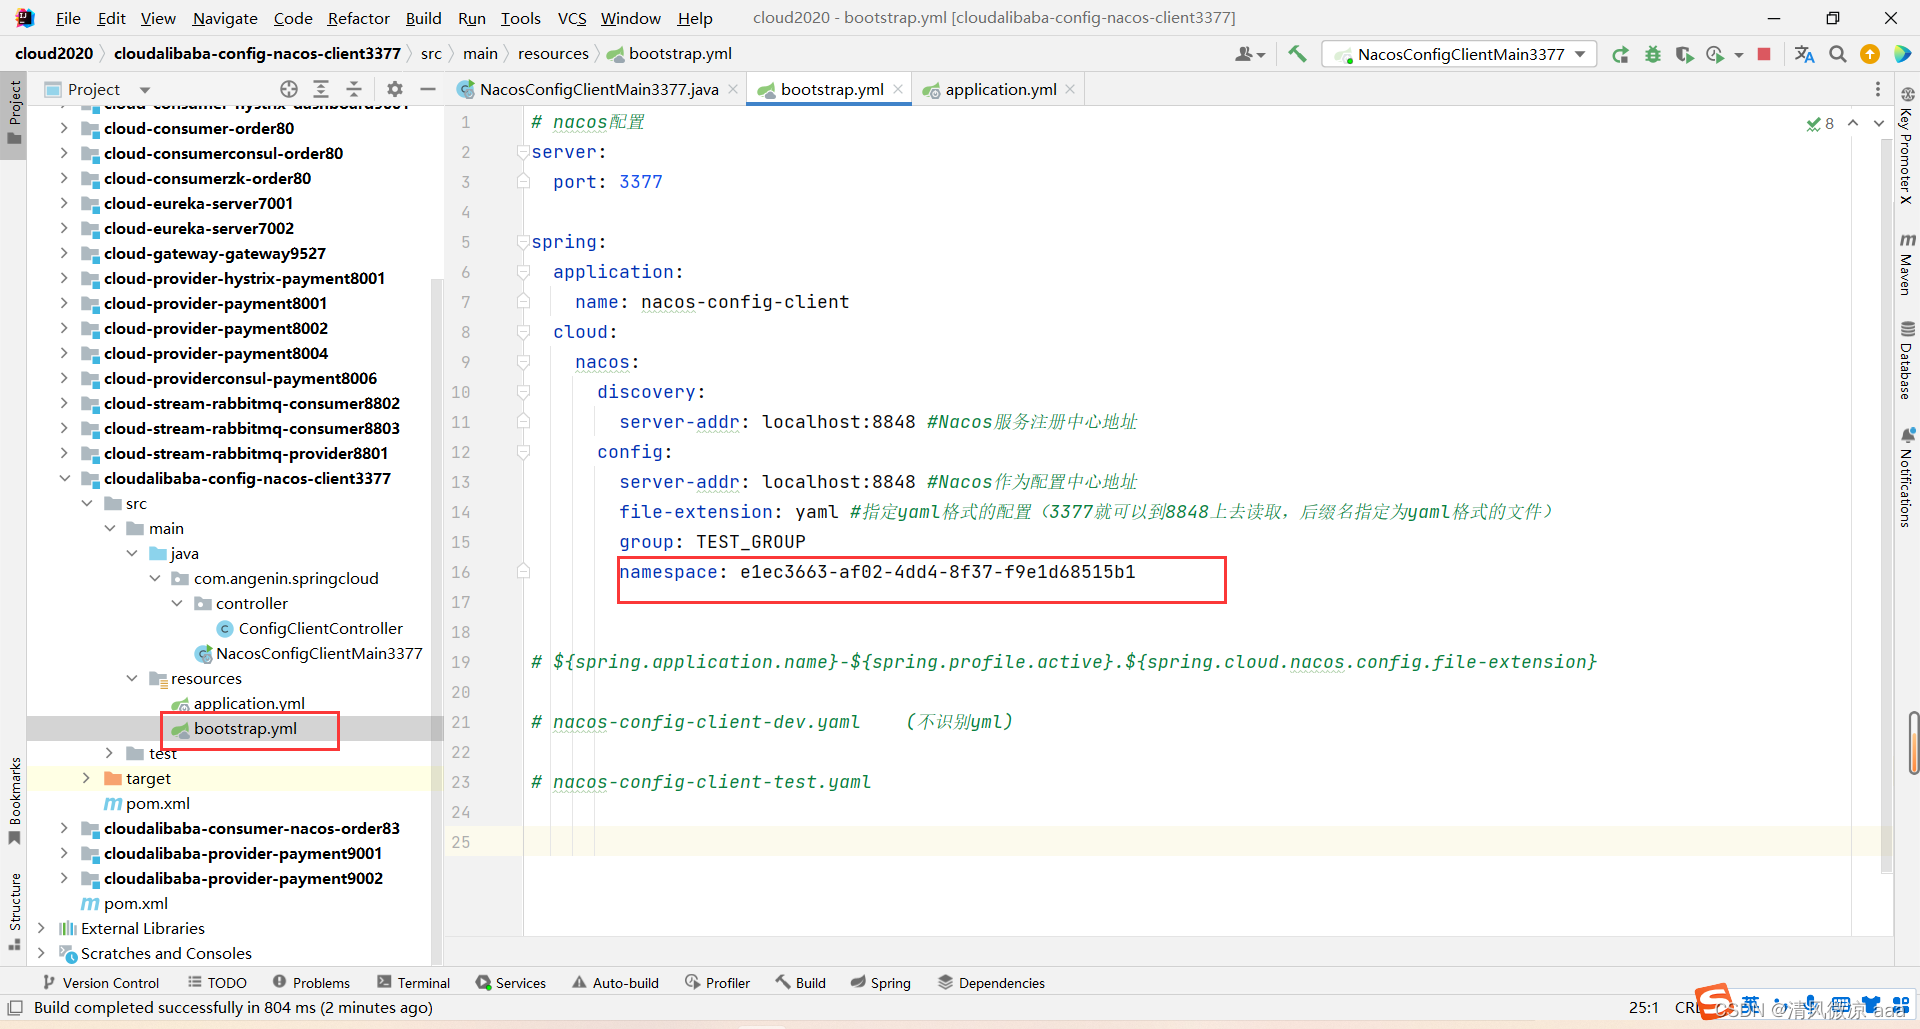
-
application
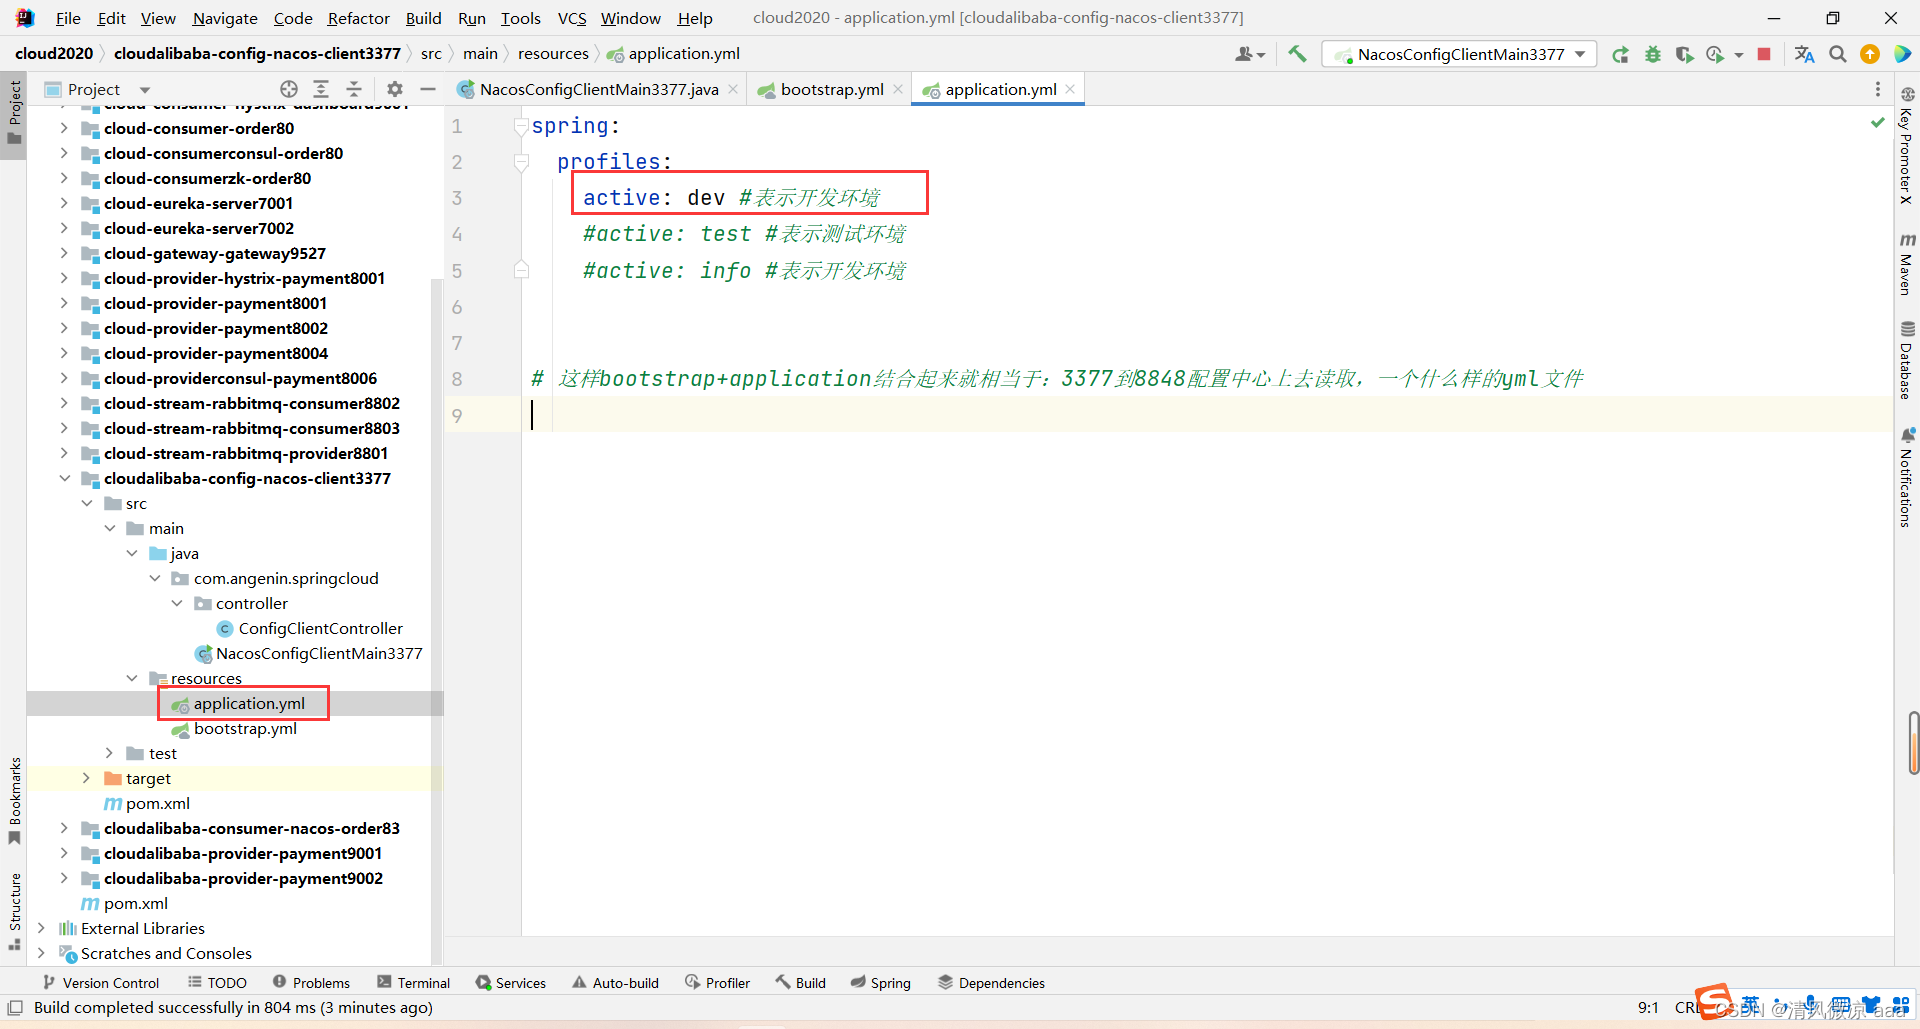
-
-
测试:
-
启动Nacos,3377
-
http://localhost:3377/config/info
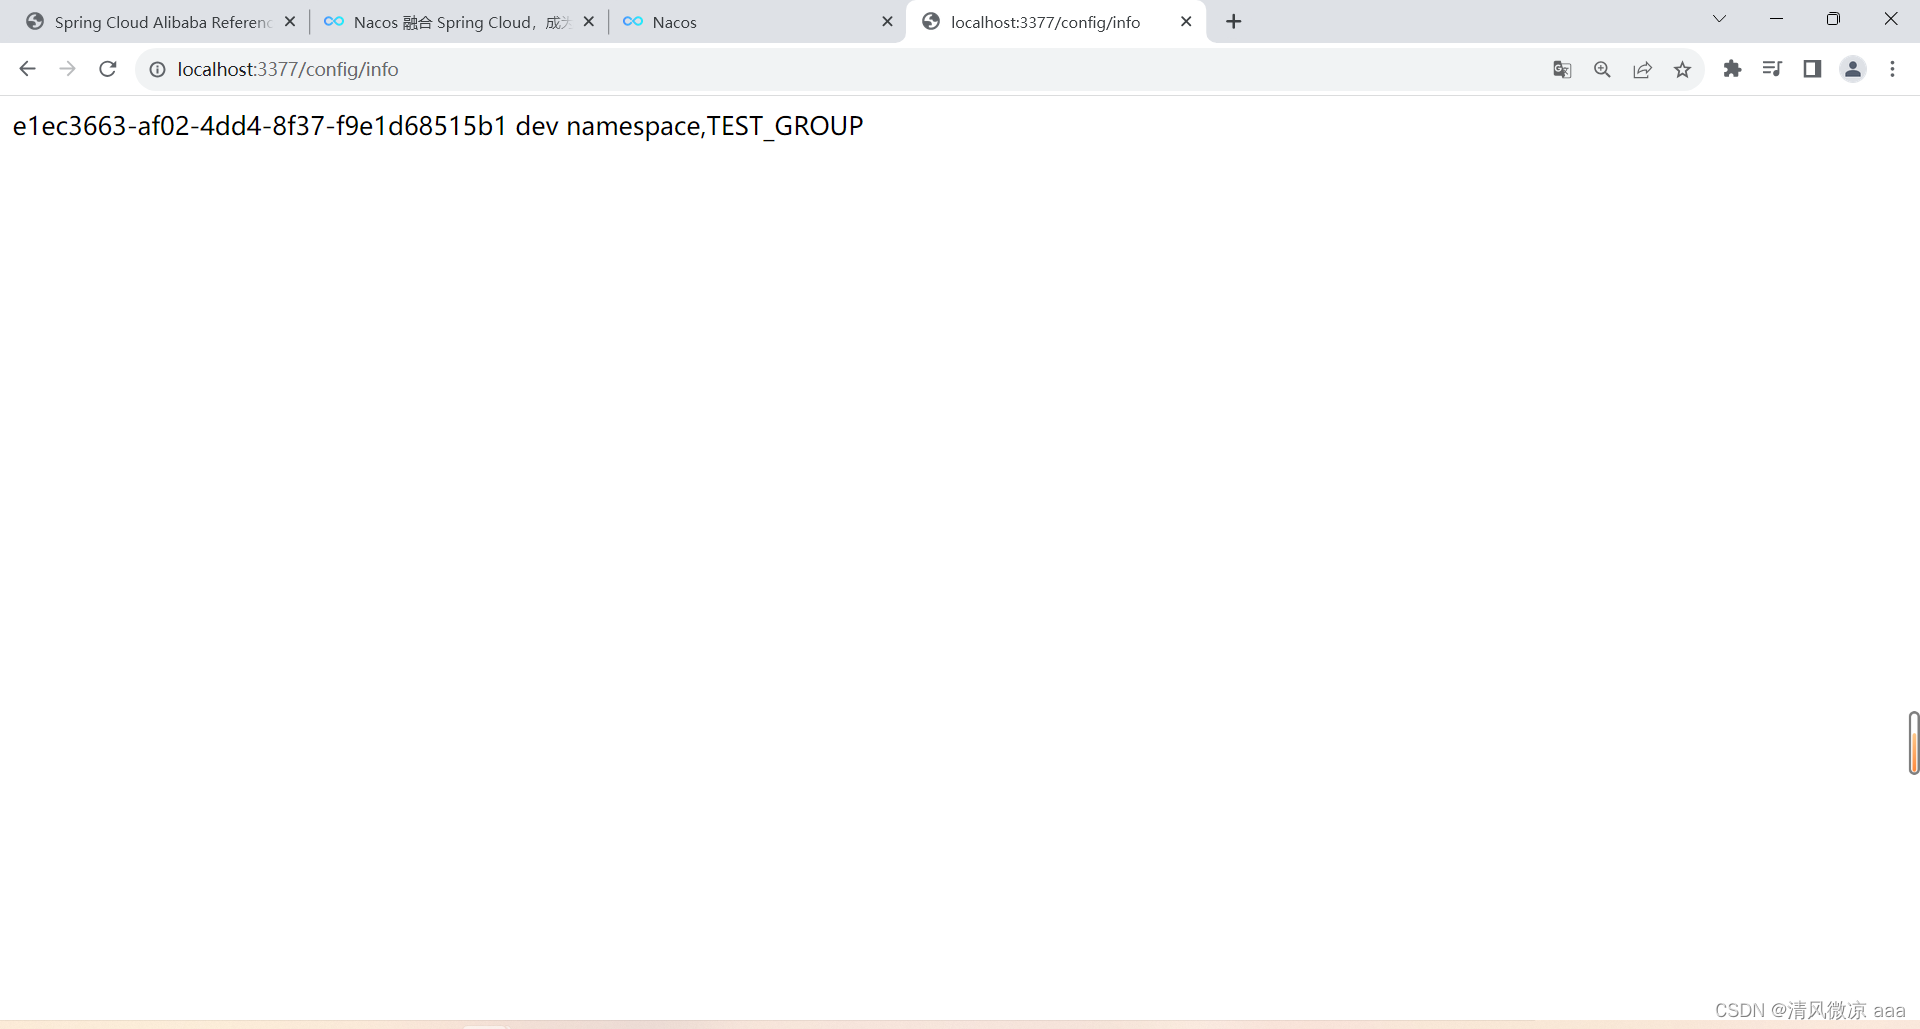
-
此时找的是:dev命名空间下的+TEST_GROUP分组下的+dev前缀+yaml后缀文件
18.5 Nacos集群和持久化配置(重要)
- 之前使用eureka注册中心需要手动创建模块,而Nacos不需要创建只需要解压使用即可
- eureka有自我保护机制问题,但是Nacos把他屏蔽了没有这些问题。
18.5.1 官网说明
-
官方文档2.x:https://nacos.io/zh-cn/docs/v2/guide/admin/cluster-mode-quick-start.html
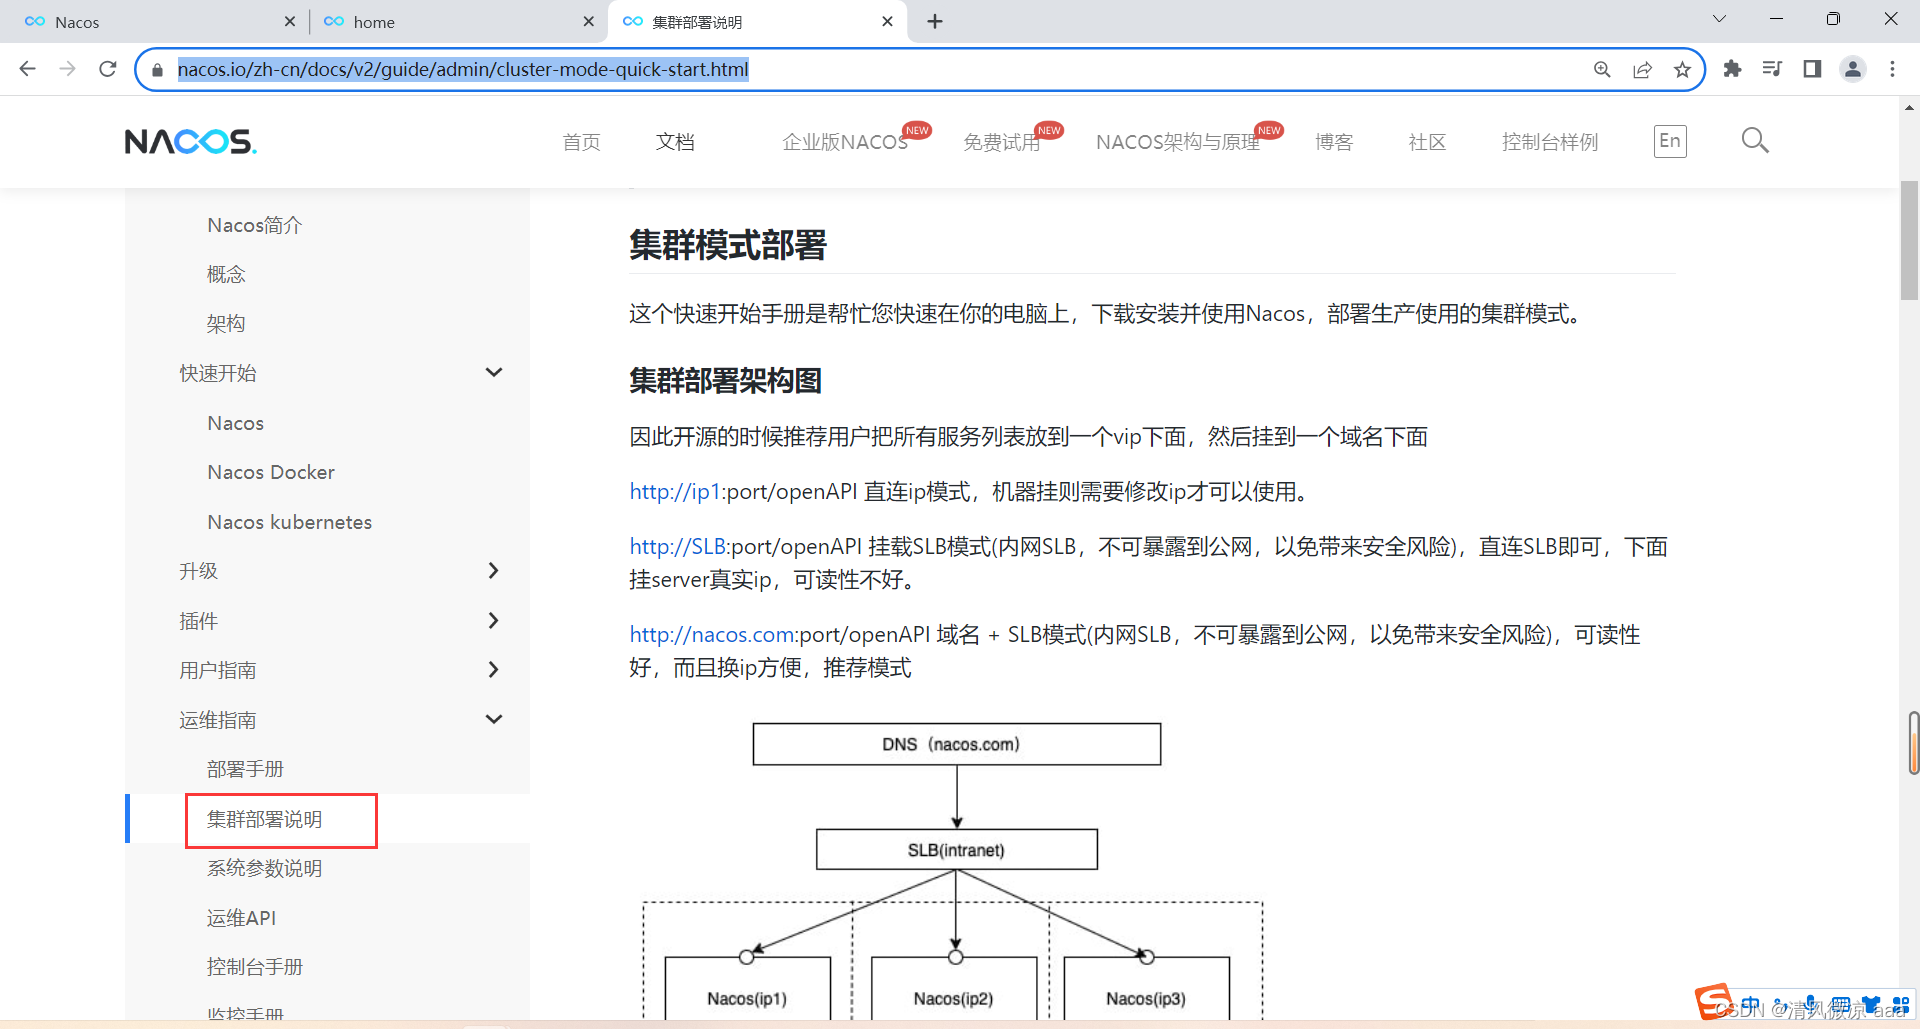
-
官网架构图(写的o(╥﹏╥)o)(vip:虚拟ip)
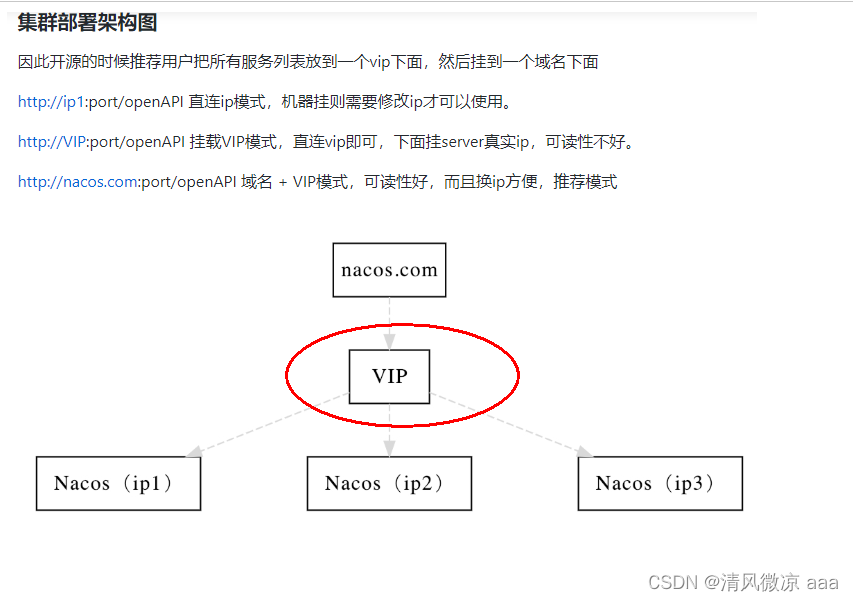
-
上图官网翻译,真实情况
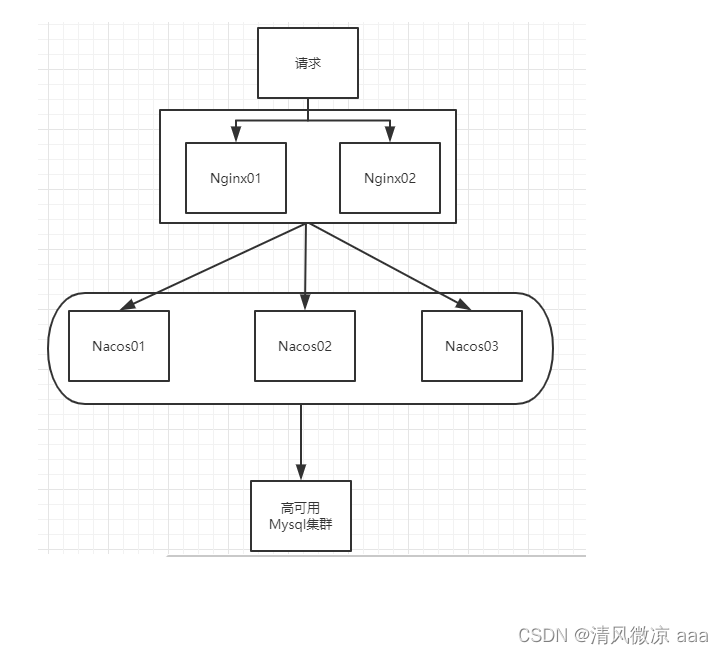
-
说明:
- 默认Nacos使用嵌入式数据库实现数据的存储。所以,如果启动多个默认配置下的Nacos节点,数据存储是存在一致性问题的。
为了解决这个问题,Nacos采用了集中式存储的方式来支持集群化部署,目前只支持MySQL的存储。- 即:内存的东西一般断电就没了,但是我们在nacos中配置的作为配置中心时的yml配置文件,在重启nacos后发现还存在。原因:是nacos自带了内嵌是的数据库derby。问题:这样如果是集群模式每个nacos都携带了一个derby,数据的一致性统一会出现问题。解决:把数据都存储在一个mysql数据库集群中。
- 按照上述,我们需要mysql数据库
- 官方文档2.x:
-
https://nacos.io/zh-cn/docs/v2/guide/admin/deployment.html
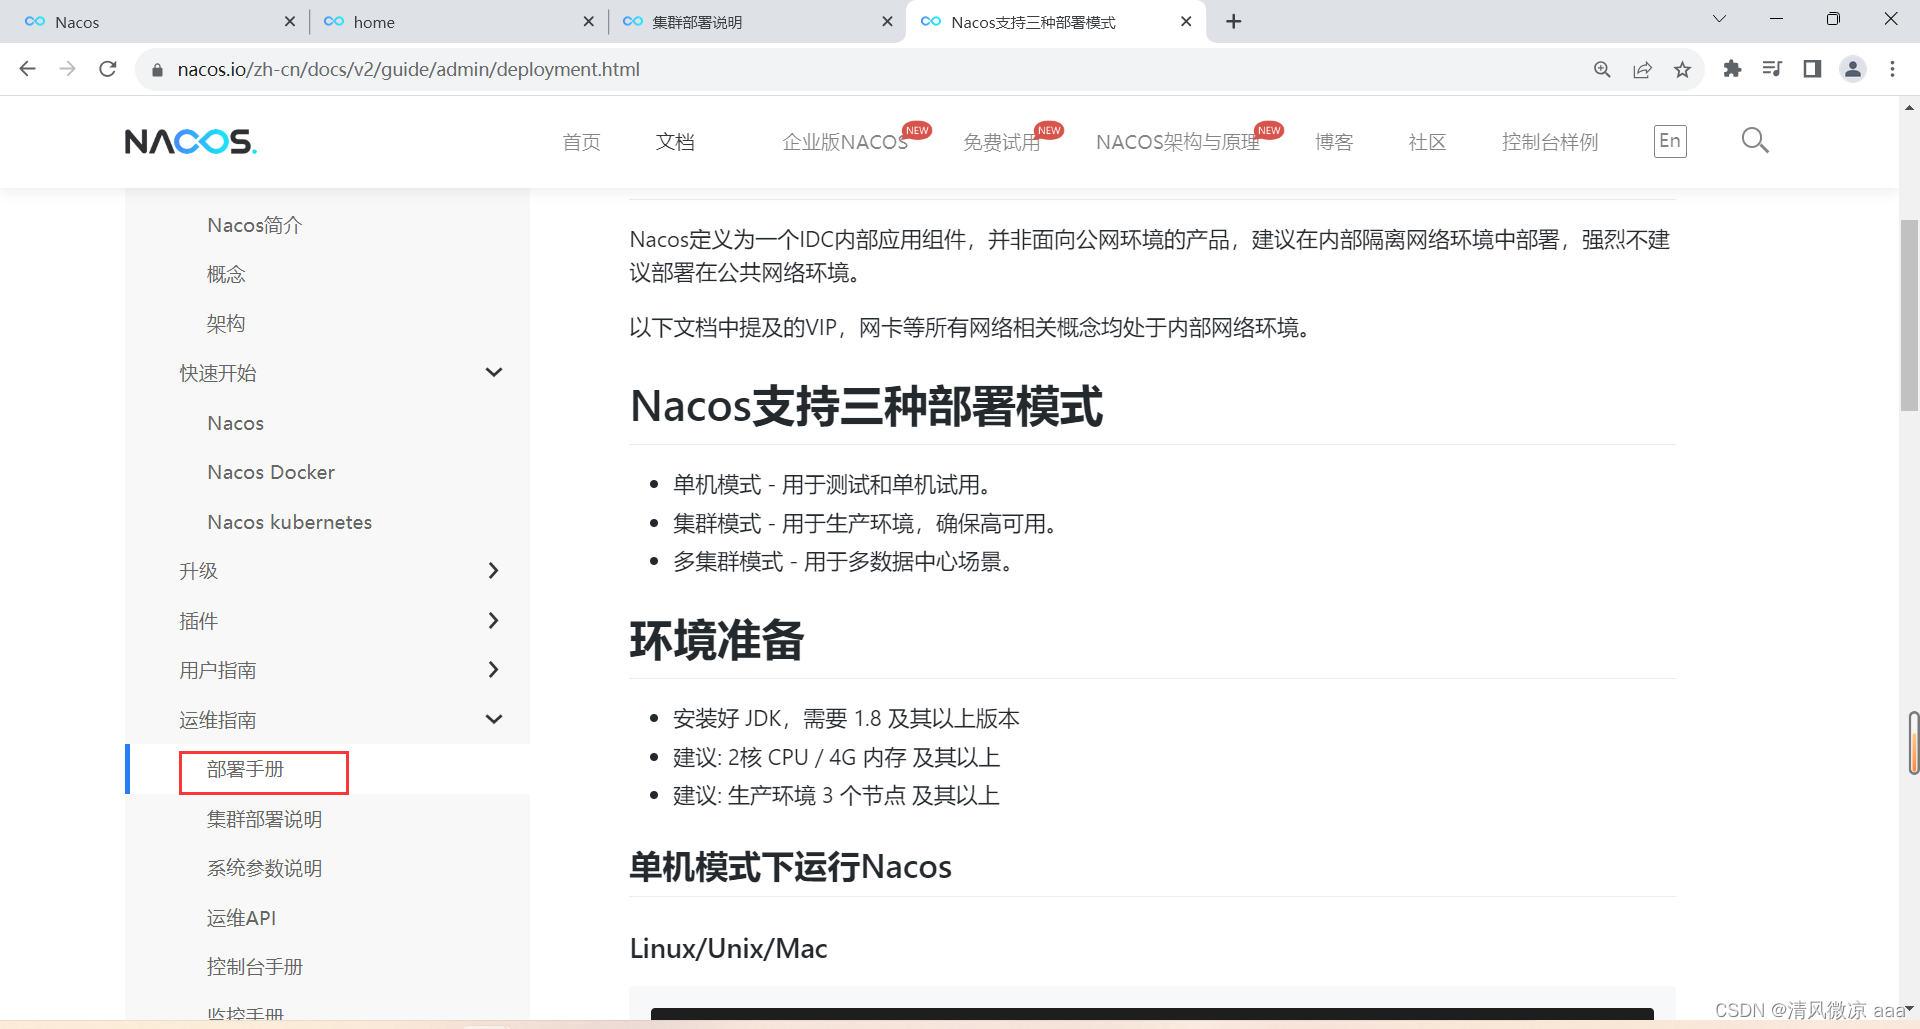
-
重点说明
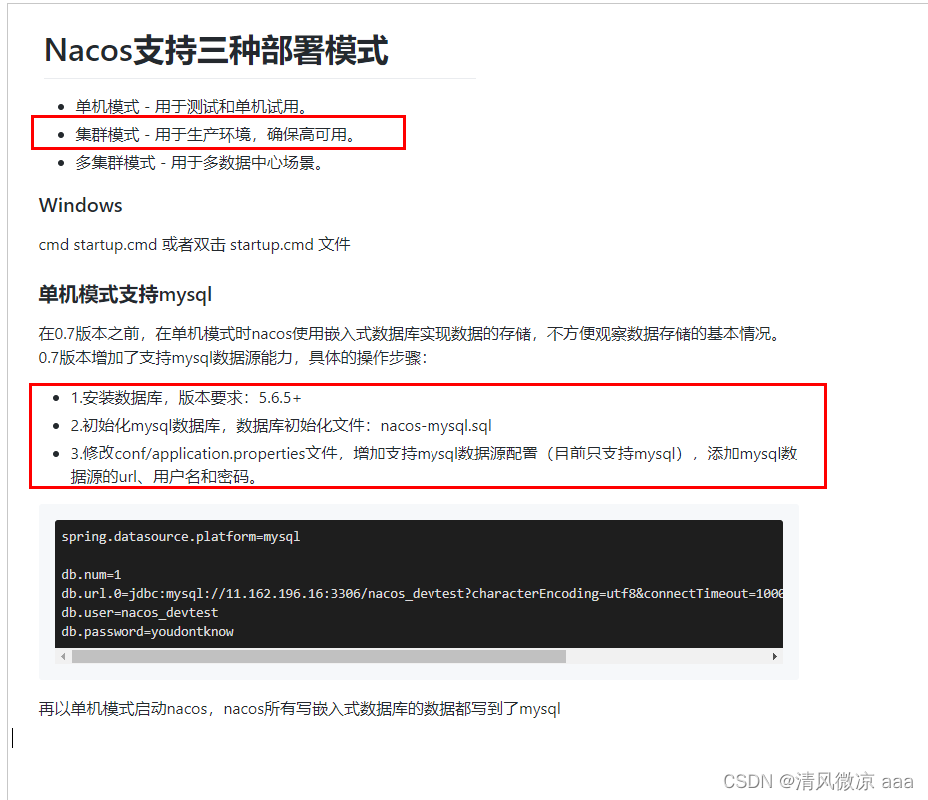
-
- 默认Nacos使用嵌入式数据库实现数据的存储。所以,如果启动多个默认配置下的Nacos节点,数据存储是存在一致性问题的。
18.5.2 Nacos持久化配置解释
1)Nacos自带数据库derby
- Nacos默认自带的是嵌入式数据库derby
- Nacos源码的pom文件:https://github.com/alibaba/nacos/blob/develop/config/pom.xml
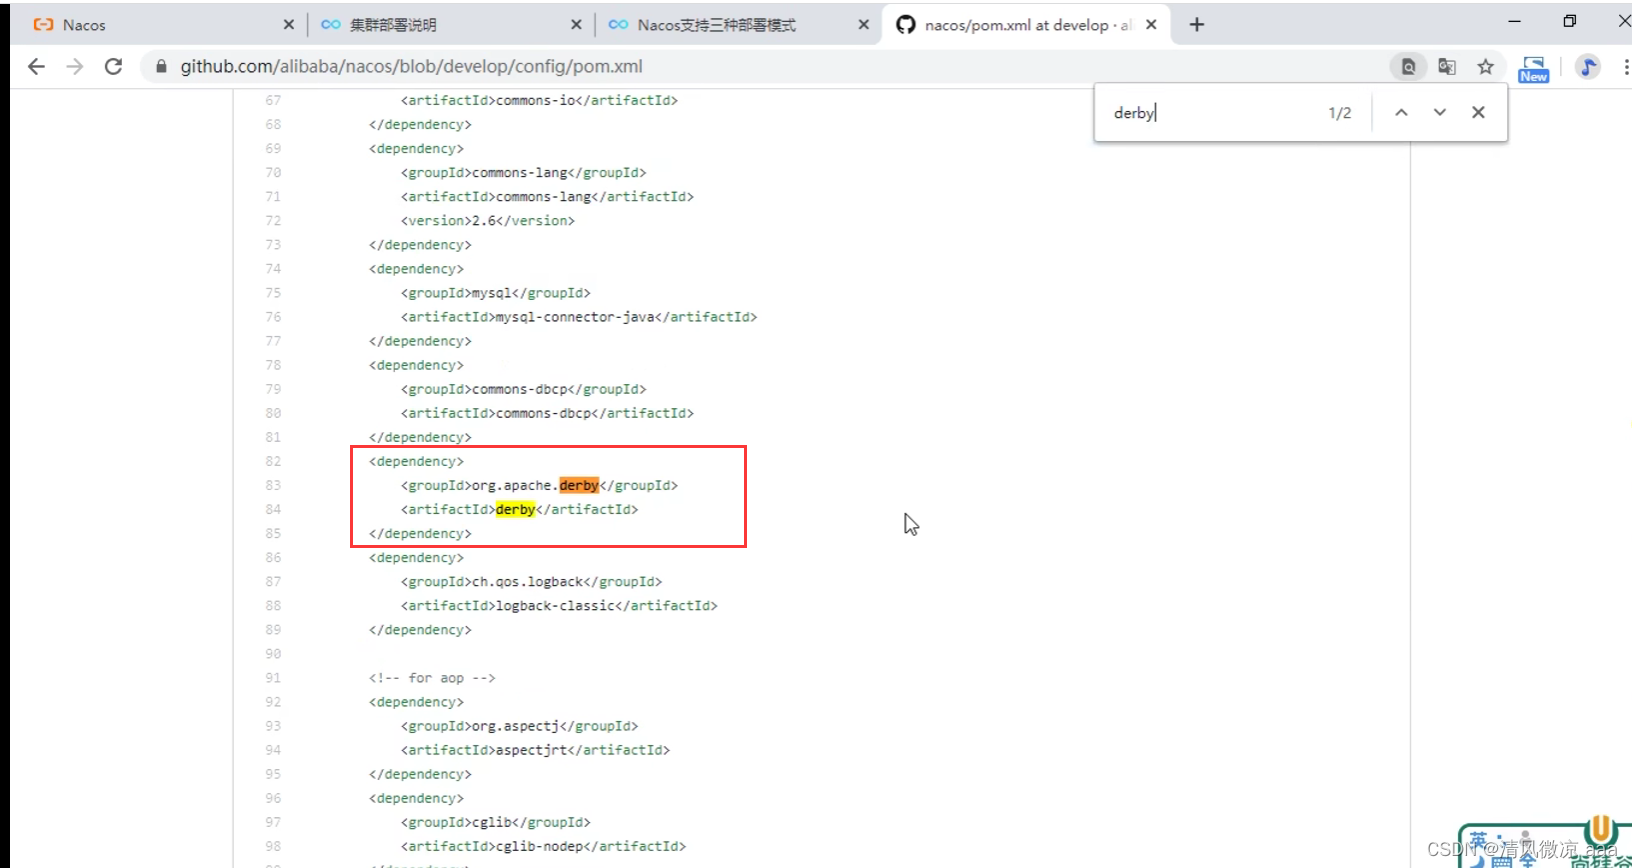
- Nacos源码的pom文件:https://github.com/alibaba/nacos/blob/develop/config/pom.xml
2)derby到mysql切换配置步骤
-
步骤1:nacos-server-1.1.4\nacos\conf目录下找到sql脚本
-
nacos-mysql.sql
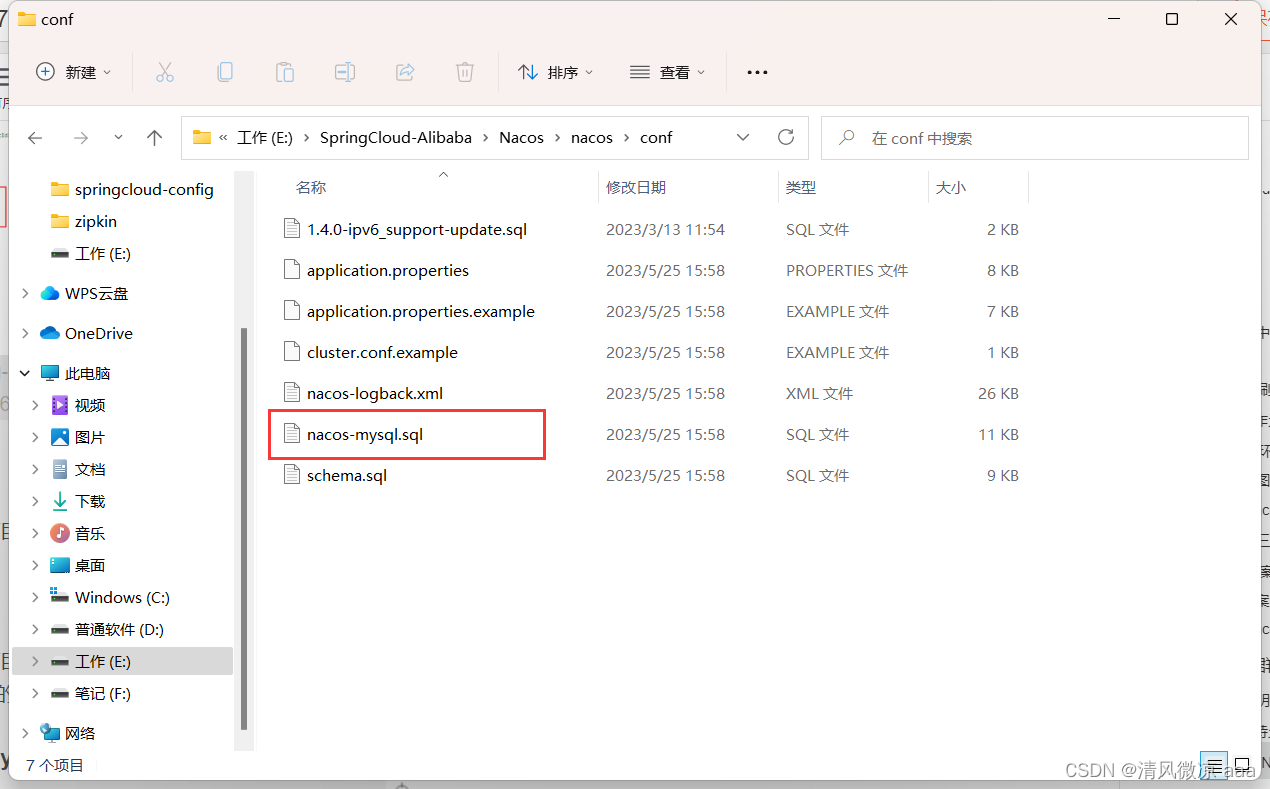
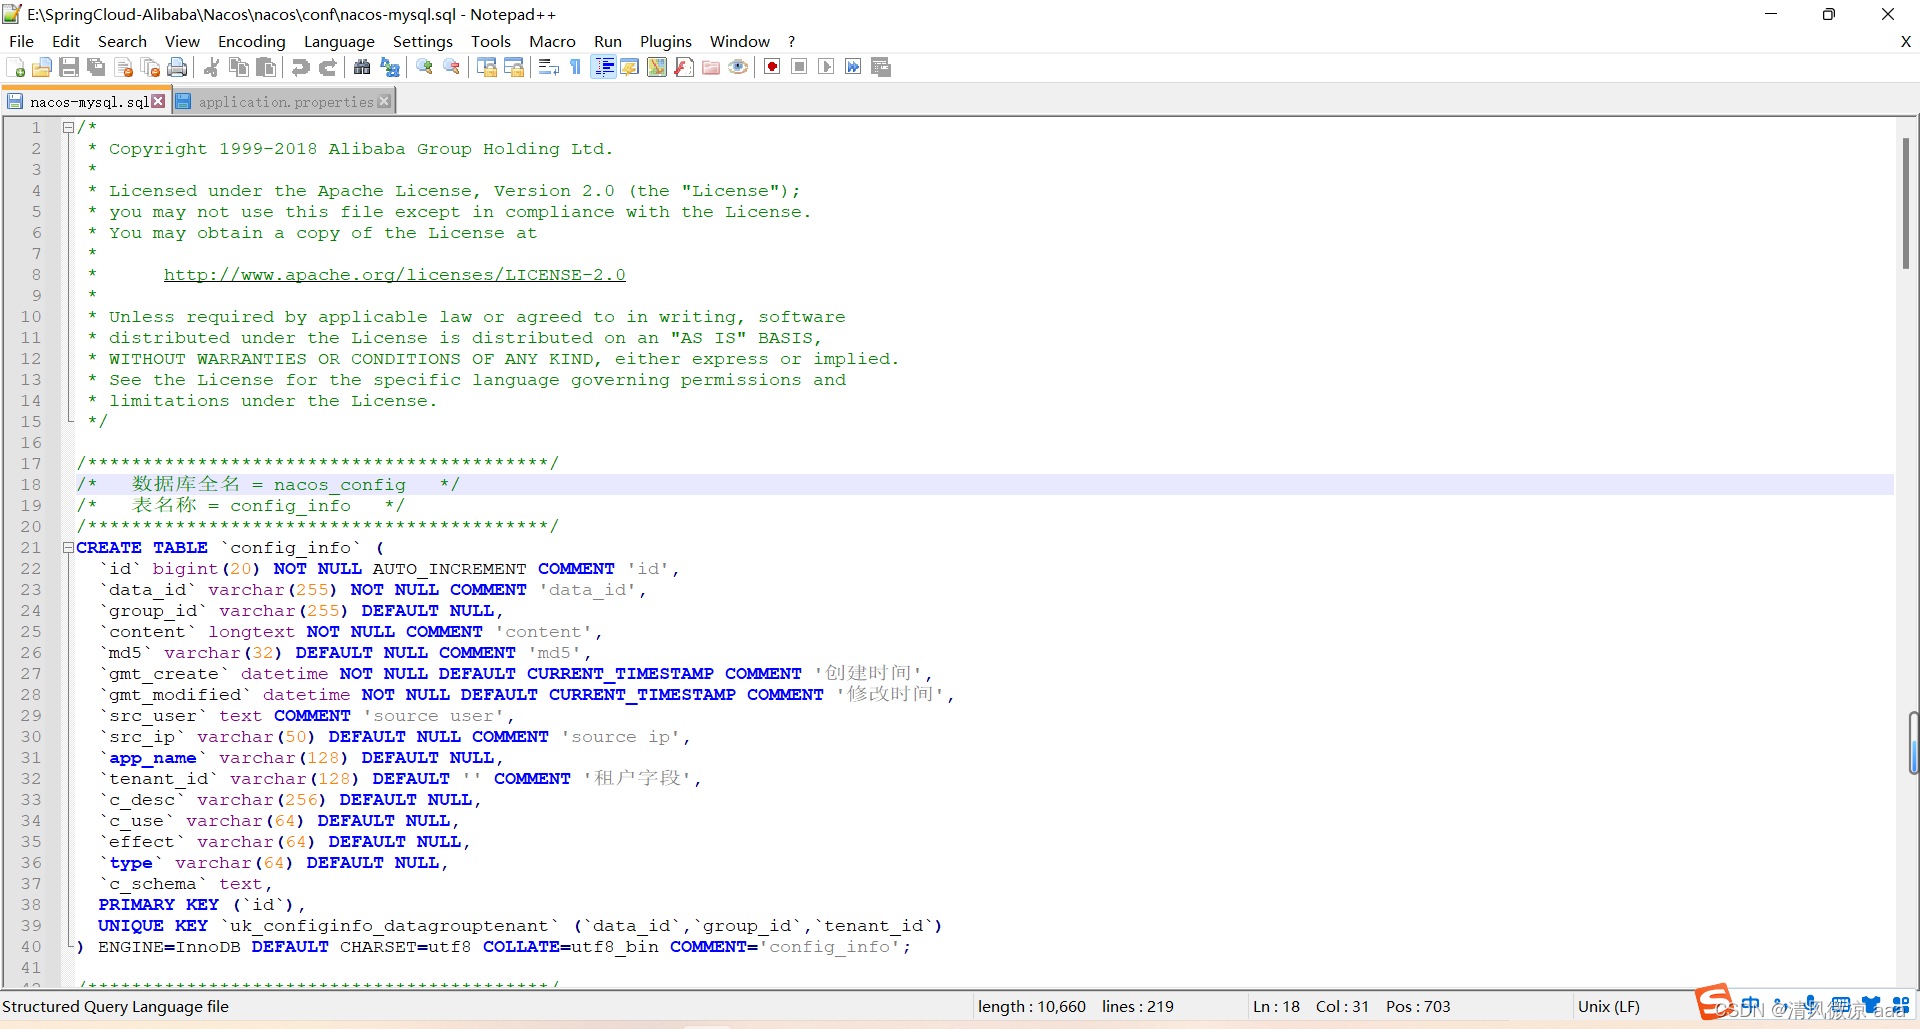
-
执行脚本:先创建一个数据库nacos_config(从脚本文件中查看,名字自己随便写一个也行)
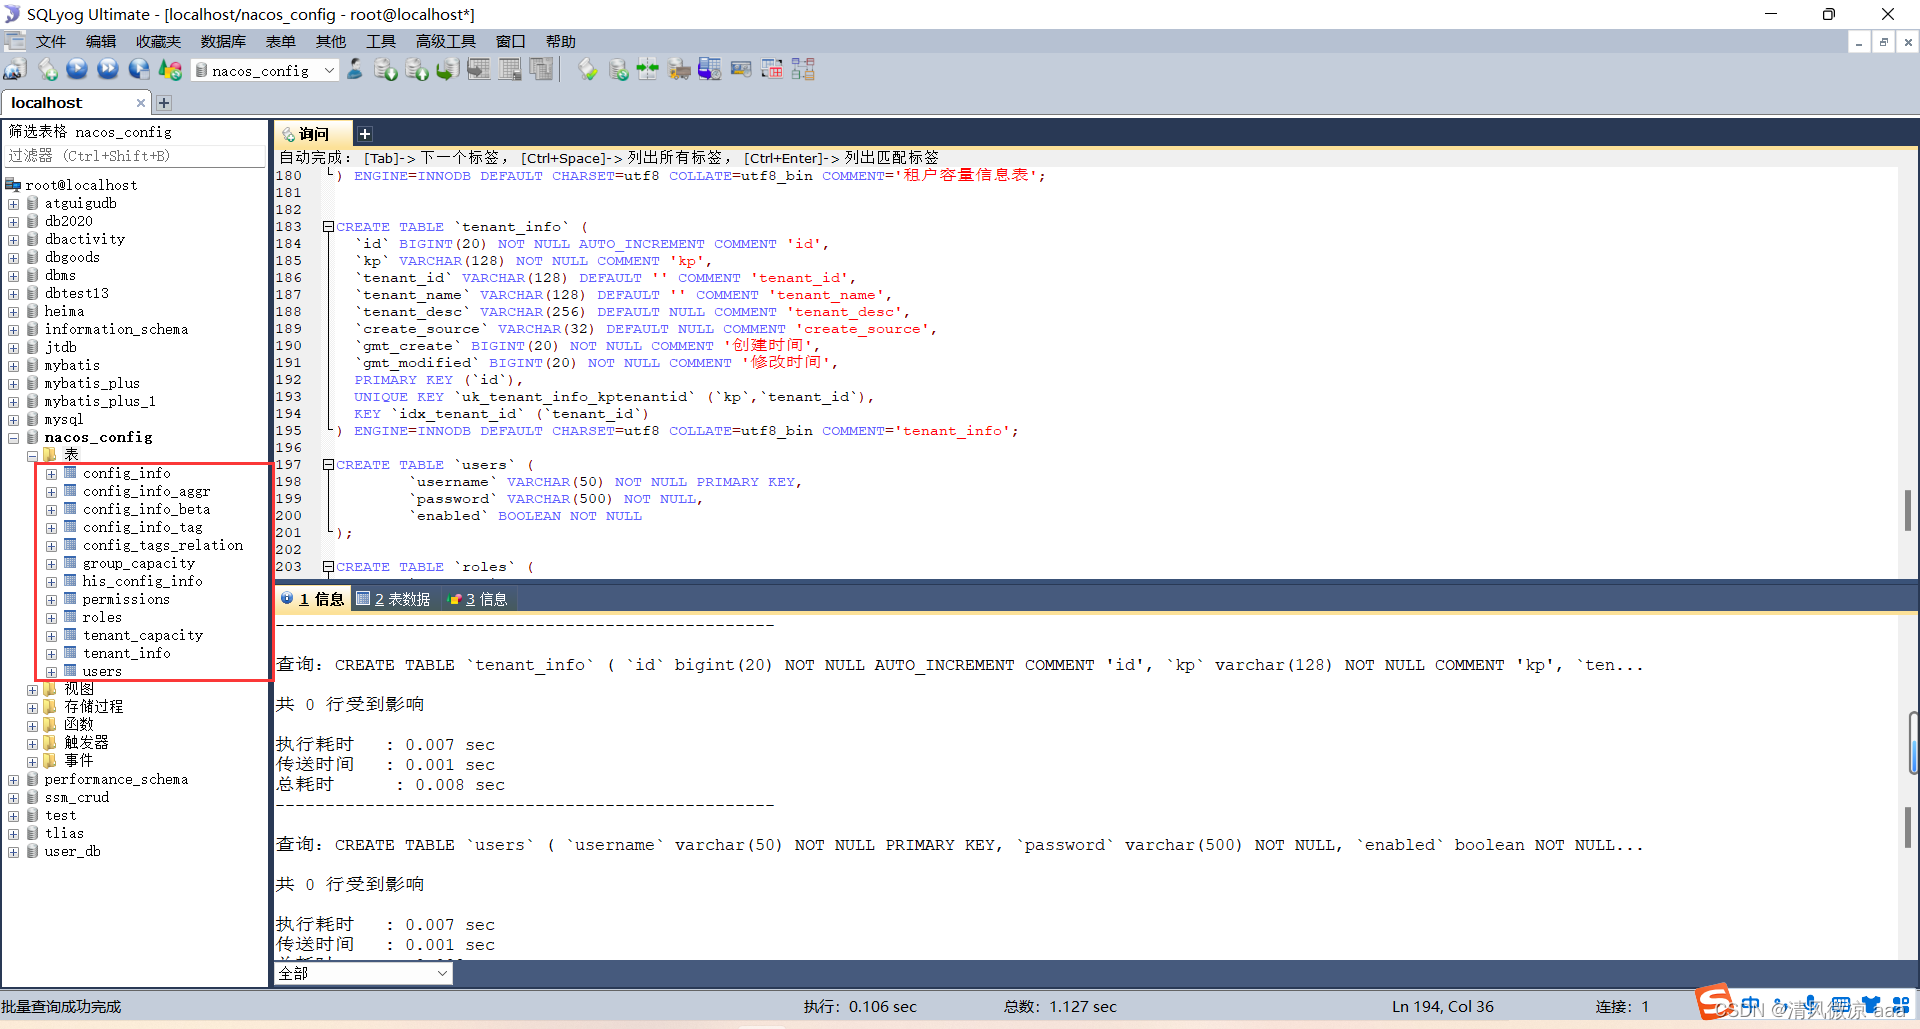
-
-
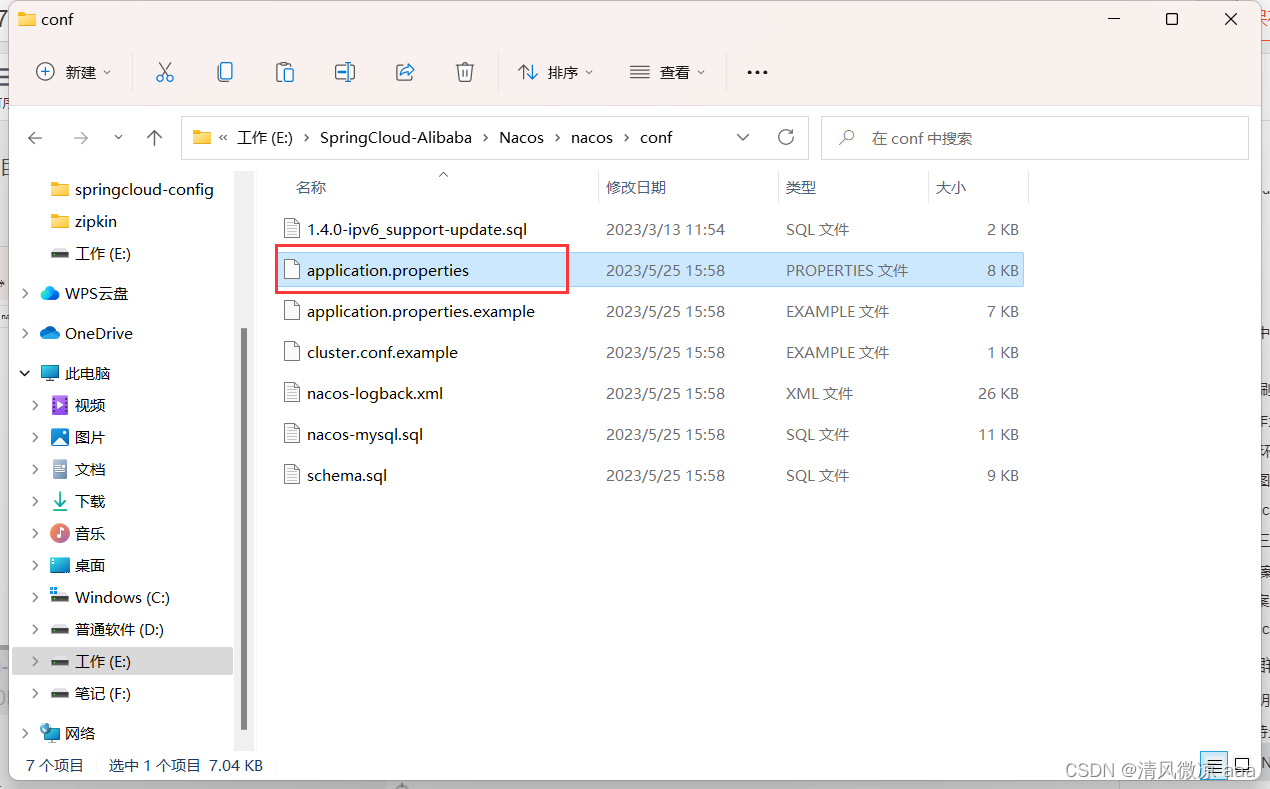
步骤2:nacos-server-1.1.4\nacos\conf目录下找到application.properties(需要多加个时区否则报错:
startup.cmd -m standalone)
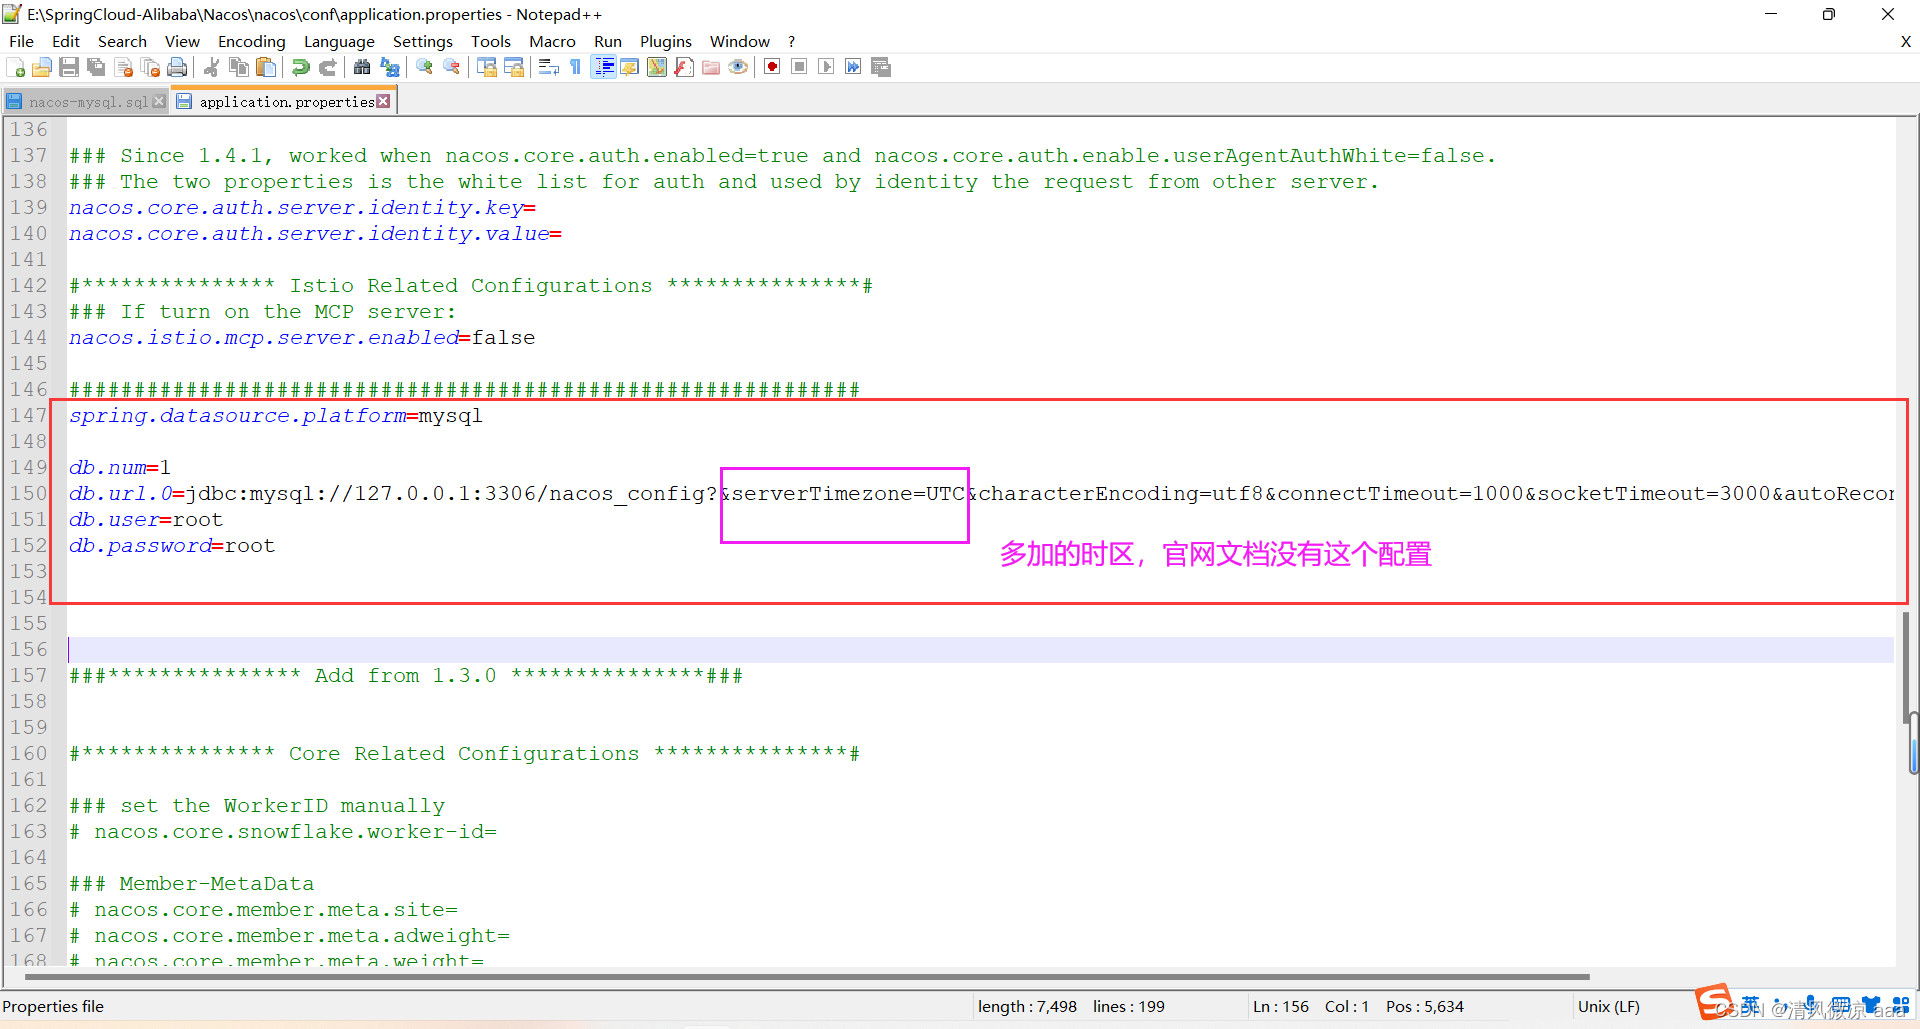
spring.datasource.platform=mysqldb.num=1
db.url.0=jdbc:mysql://127.0.0.1:3306/nacos_config?&serverTimezone=UTC&characterEncoding=utf8&connectTimeout=1000&socketTimeout=3000&autoReconnect=true
db.user=root
db.password=root
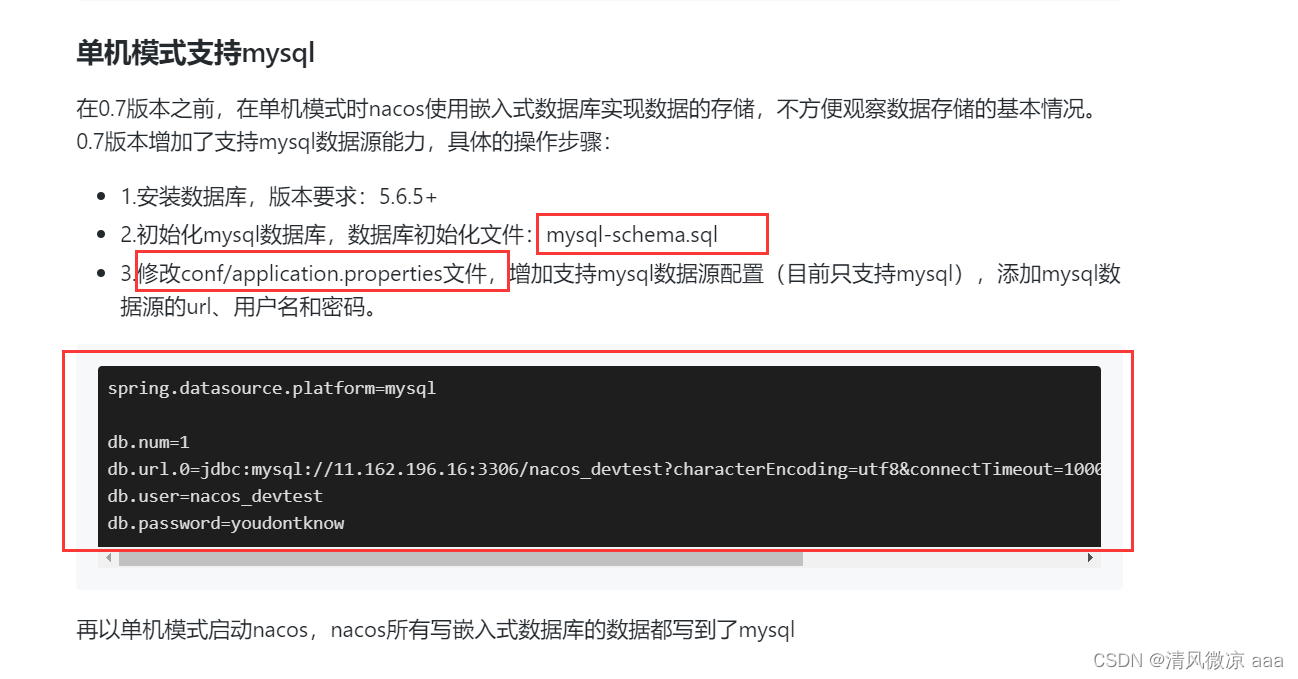
- 配置来源于官网文档:
2)重启Nacos进行测试
-
在bin目录中输入cmd,进入到命令行窗口

- 启动命令:
startup.cmd -m standalone - standalone代表着单机模式运行,非集群模式

- 启动命令:
-
命令运行成功后直接访问:
http://localhost:8848/nacos- 默认账号密码都是nacos

- 默认账号密码都是nacos
-
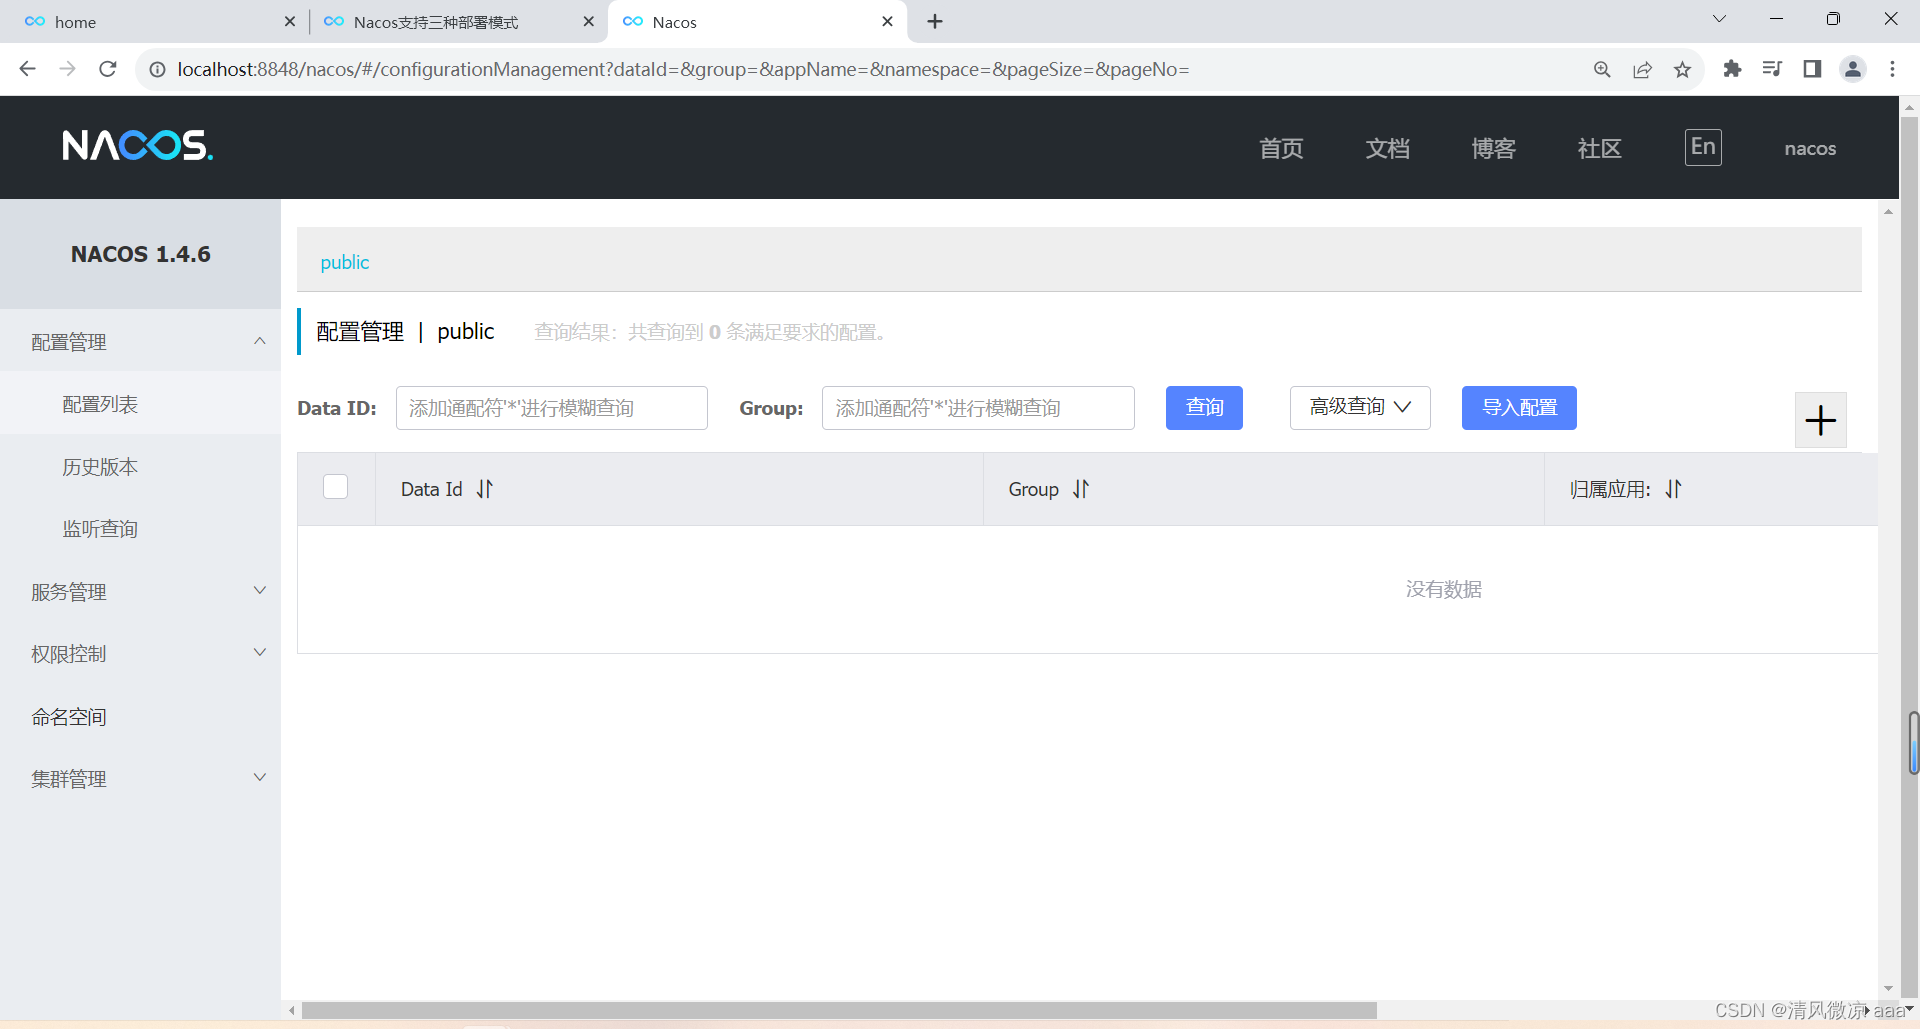
效果:重启Nacos,可以看到是个全新的空记录界面,以前是记录进derby
-
测试:
- 在配置;列表添加一个配置信息
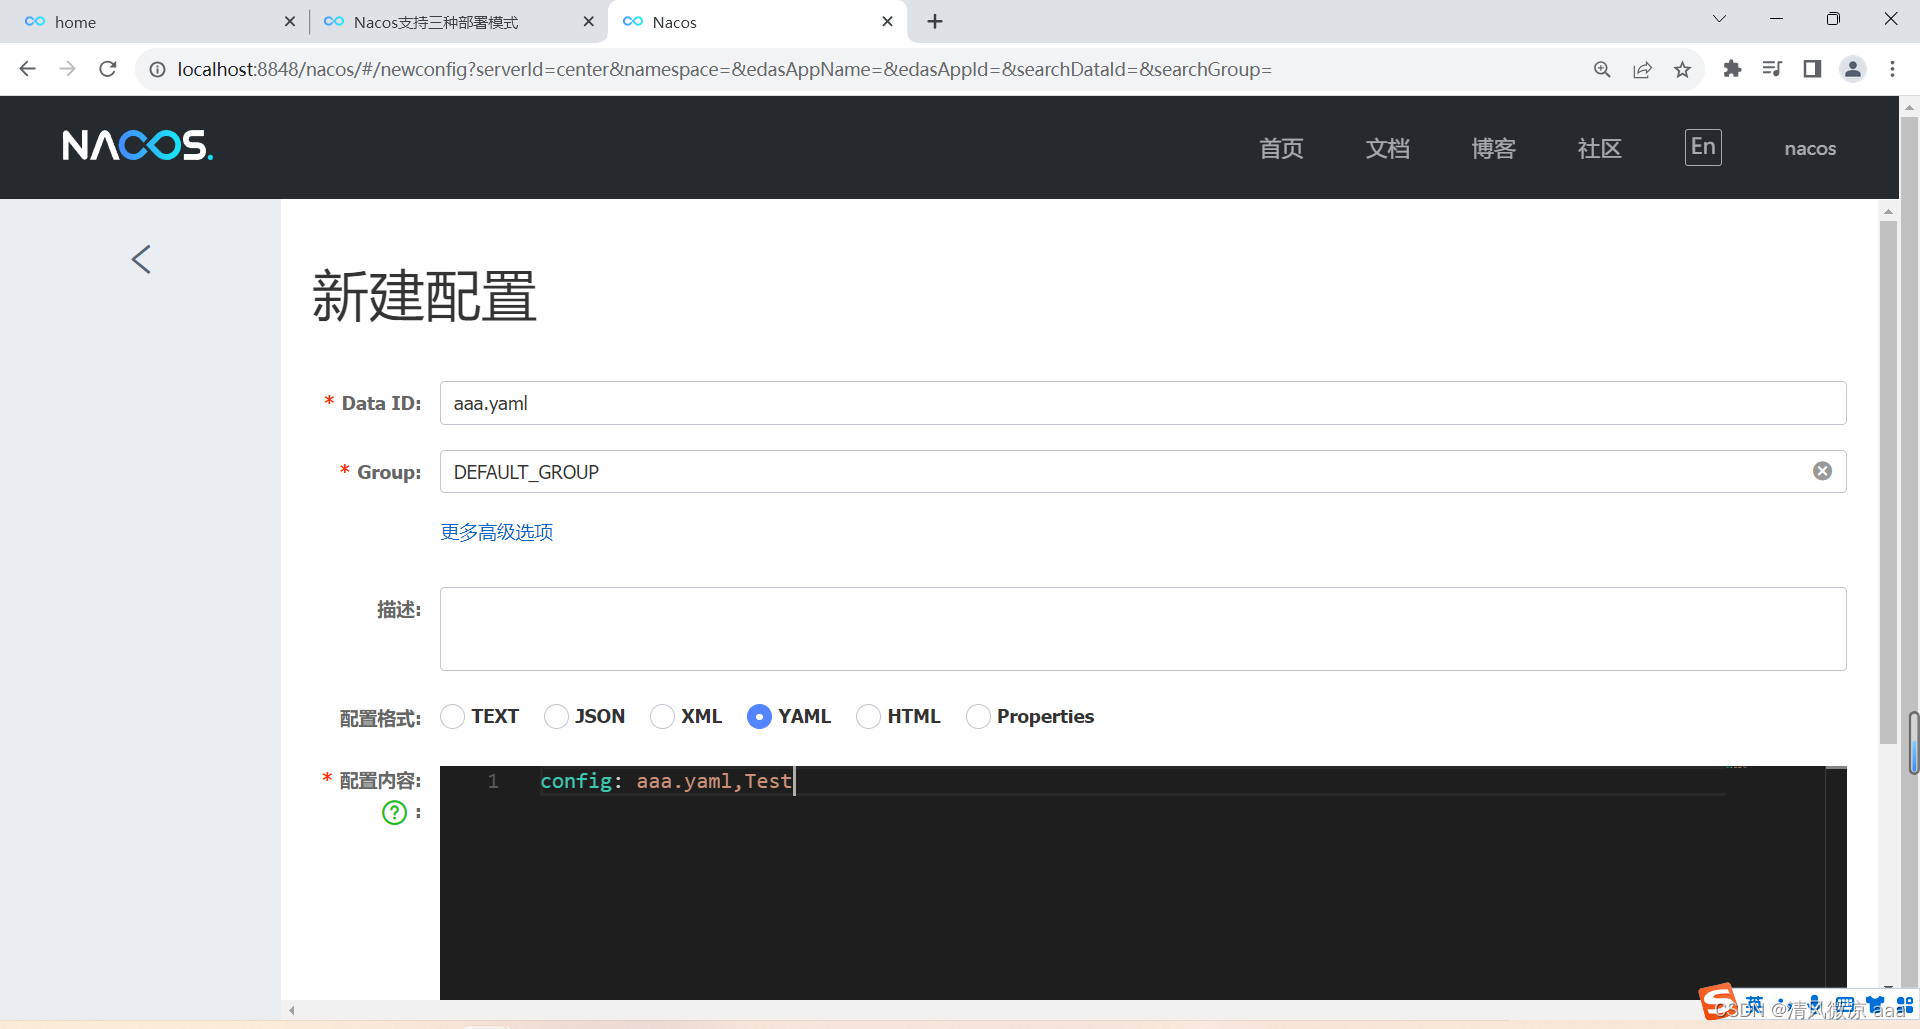
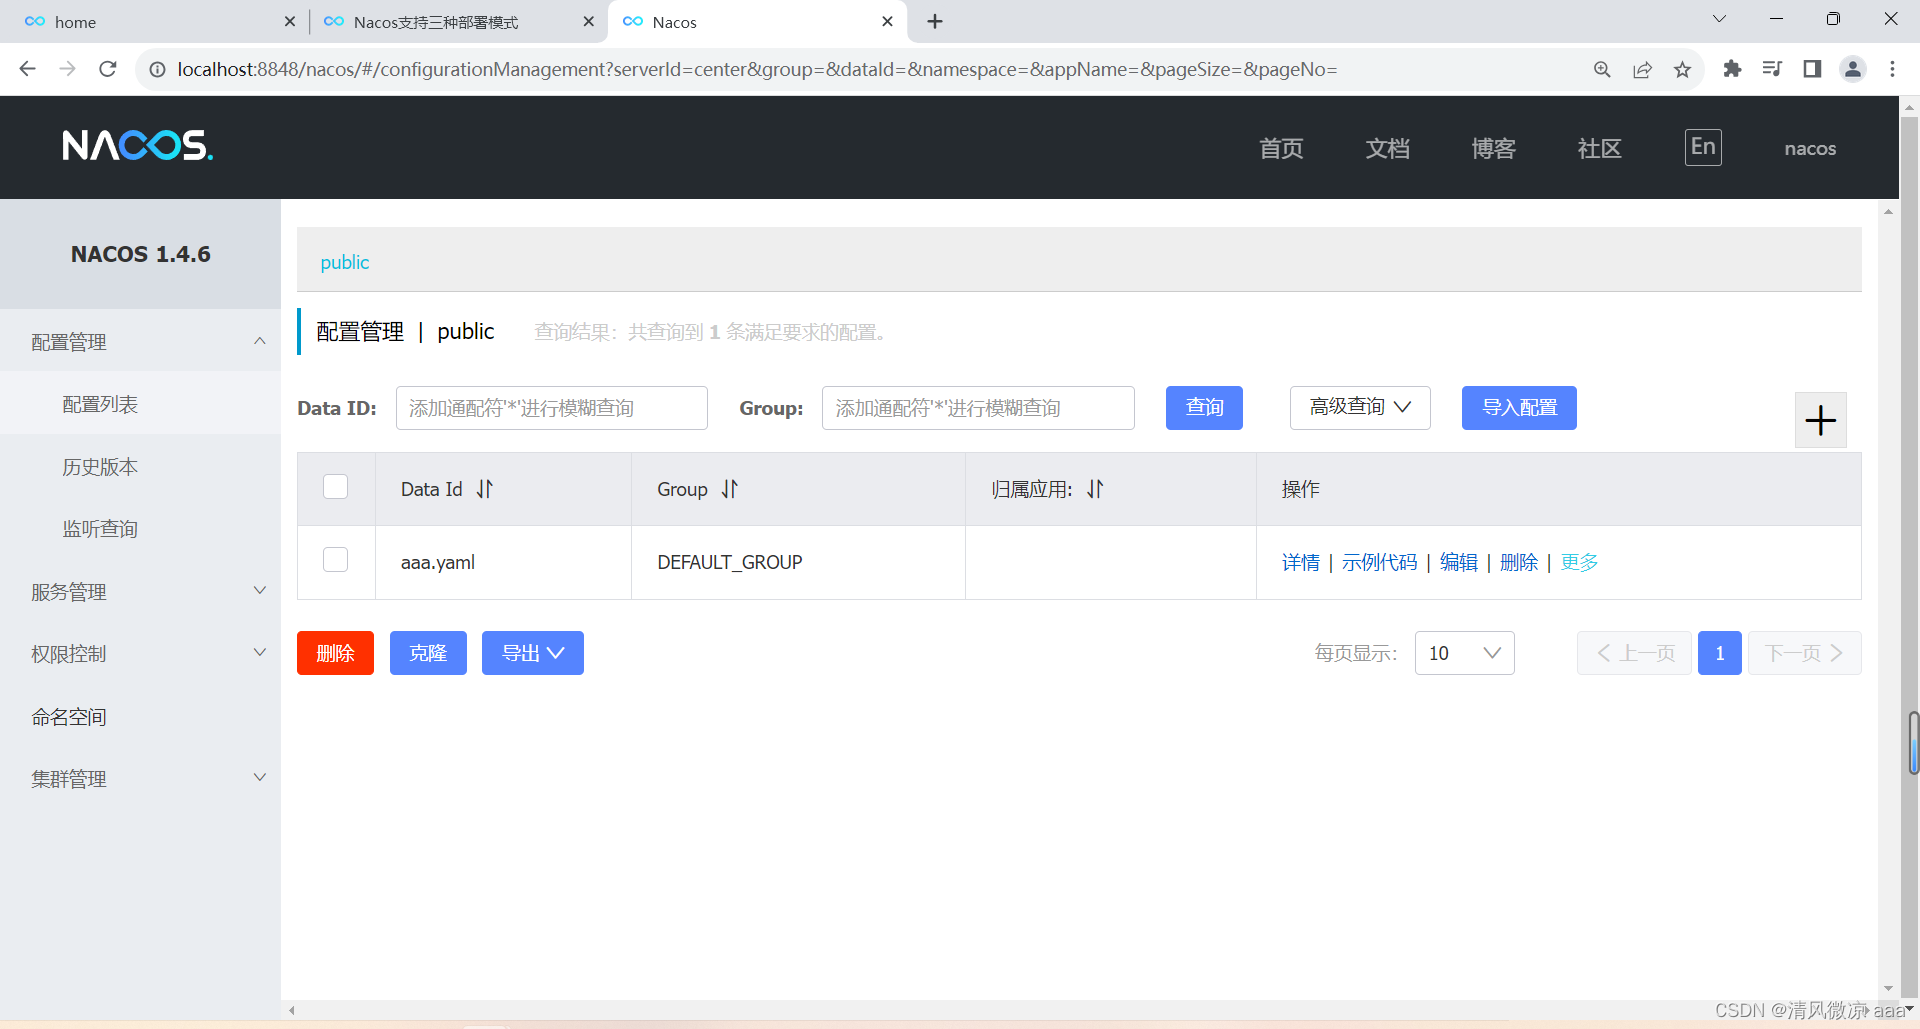
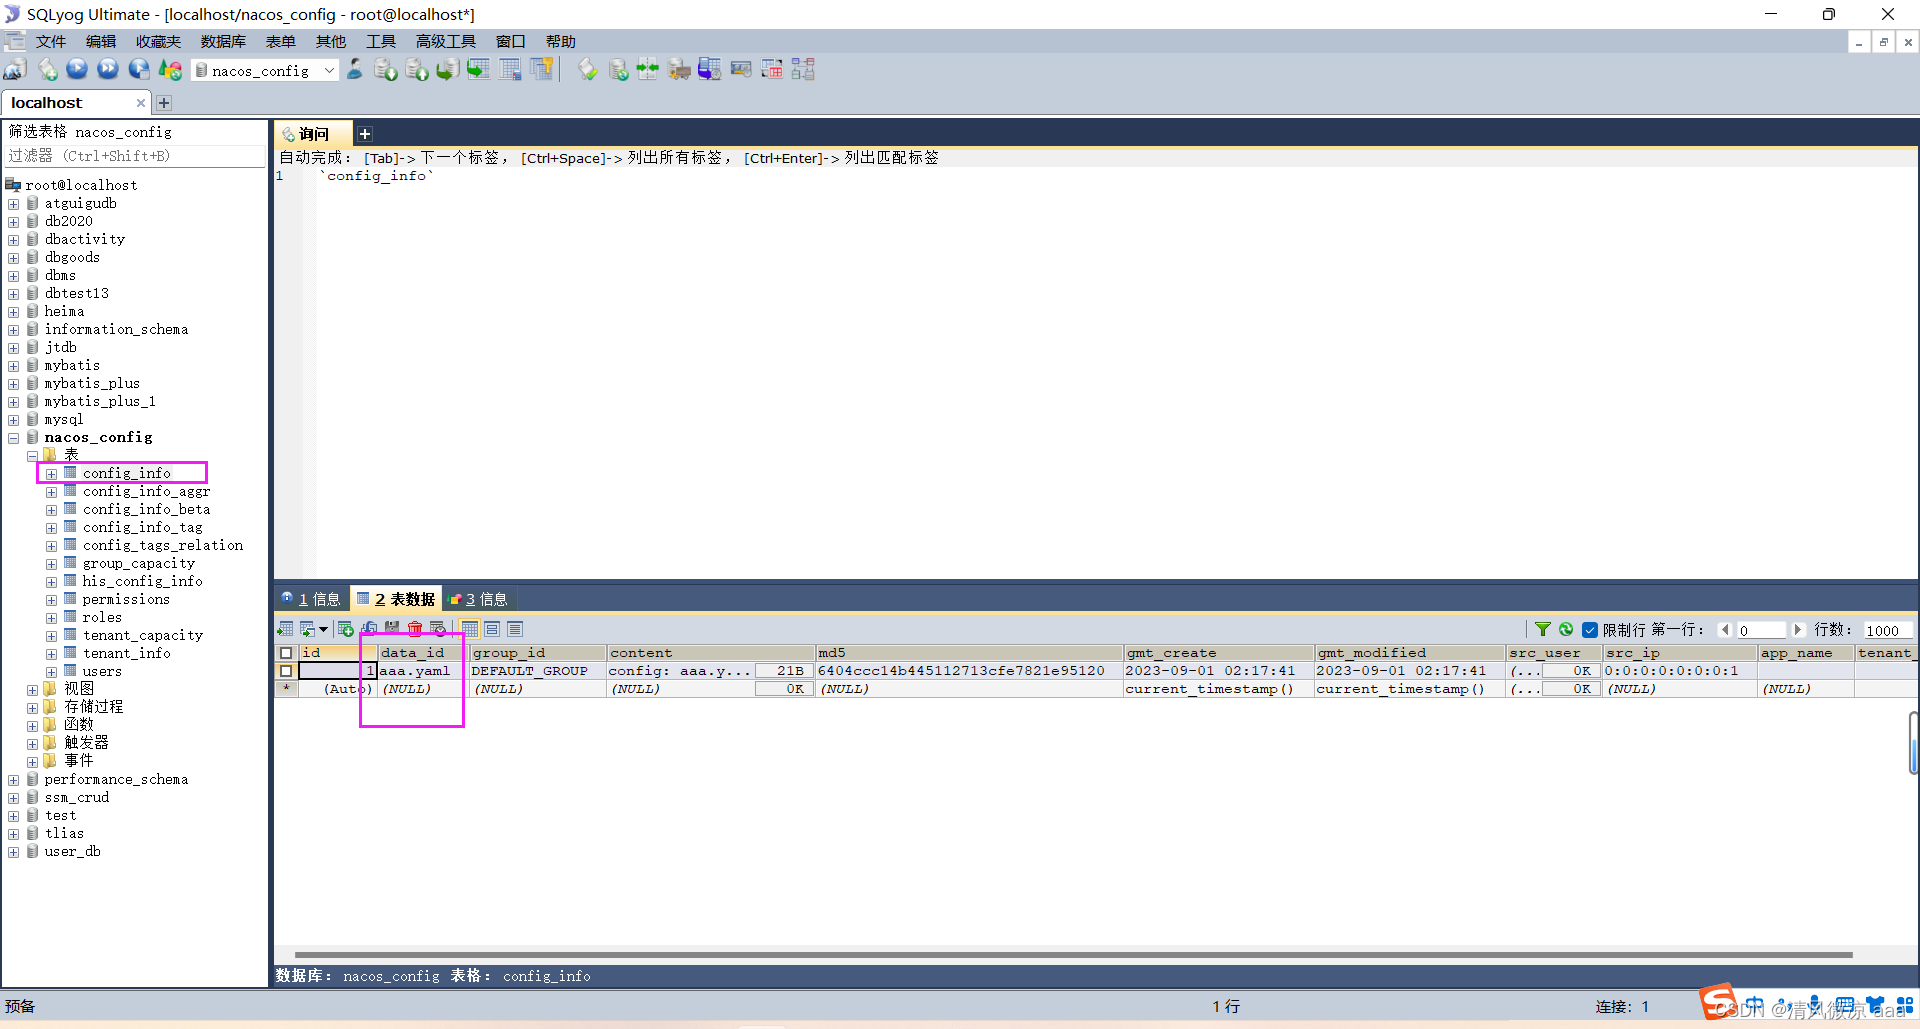
- 可以看到数据已经存储到了mysql数据库中
- 在配置;列表添加一个配置信息
18.5.3 Linux版Nacos+MySQL生产环境配置
这个虚拟机SpringCloud之前配置的有
- Zookeeper服务注册中心,运行环境依赖jdk,所以需要配置Zookeeper和jdk
- 学习SpringCloud Bus消息总线屏蔽不同的消息中间件差异时,配置了RabbitMQ,依赖于erlang环境
1)Nacos集群部署架构说明
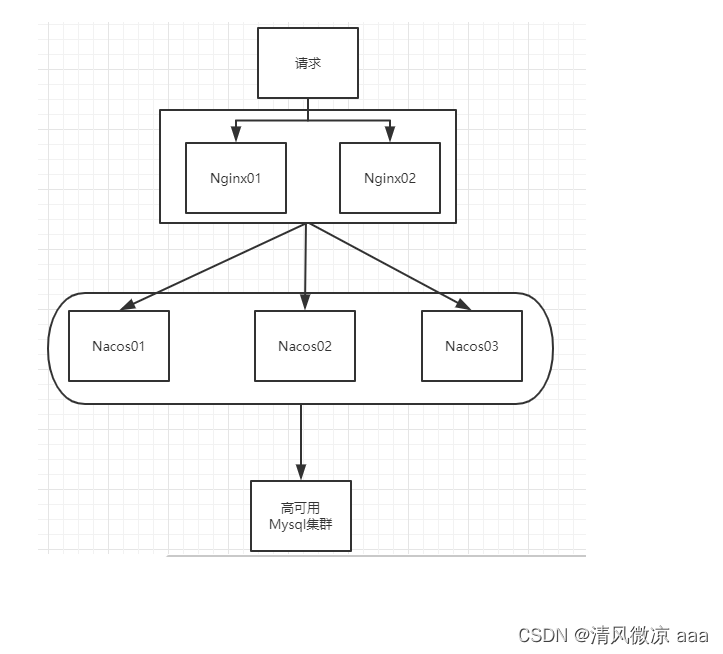
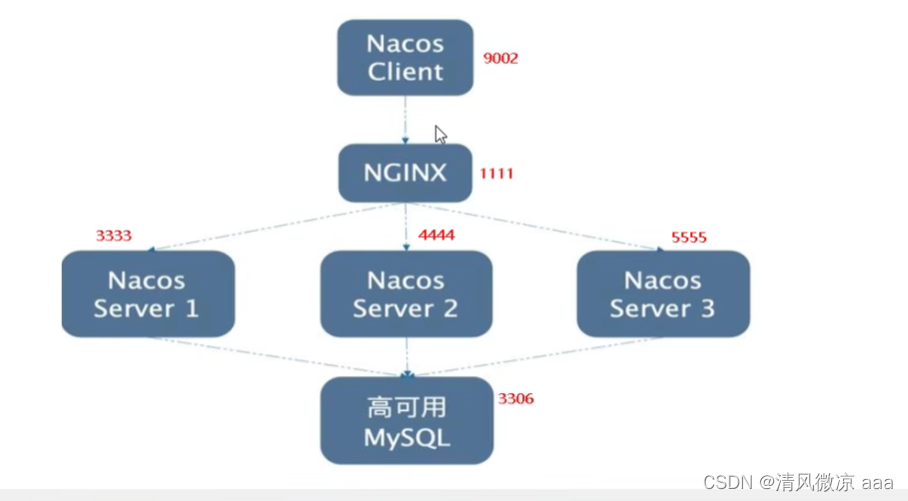
- 说明:按照Nacos官网配置集群的说明,nginx要配置成集群,Nacos配置成集群,MySQL配置成高可用。此时为了学习阶段方便测试配置成 1个Nginx+3个nacos注册中心+1个mysql
-
条件有限只有一台电脑,如果配置成3个虚拟机占用内存太大。所以我们配置成伪集群,在当前一台虚拟机上配置成3个Nacos节点。
-
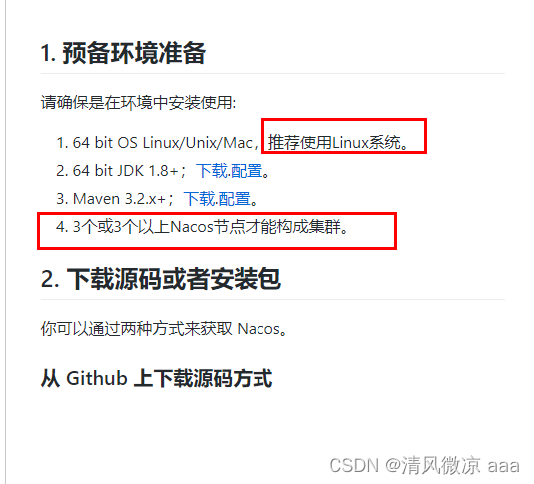
官网集群环境要求:
2)nginx下载 安装 配置(linux系统)
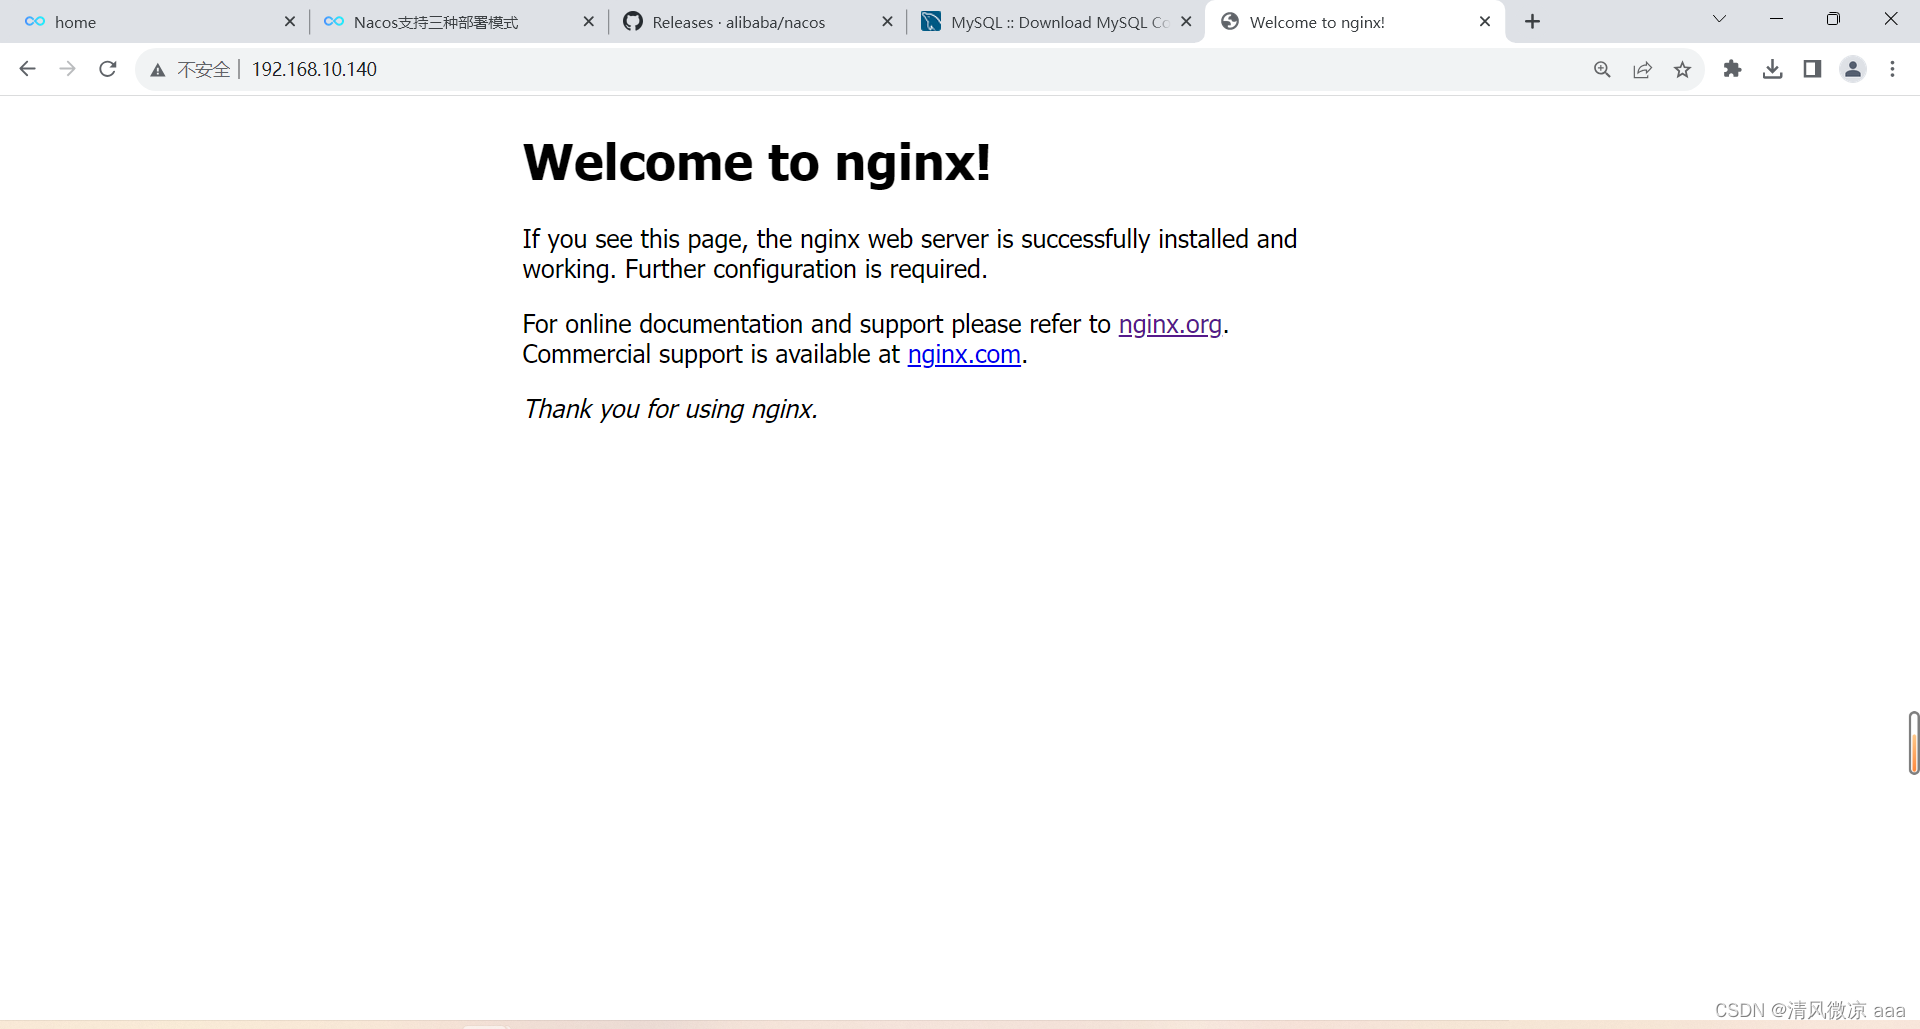
详情查看:我写的另一篇博客:https://blog.csdn.net/aa35434/article/details/124853852
- 安装完成后访问:http://192.168.10.140/
- 启动:
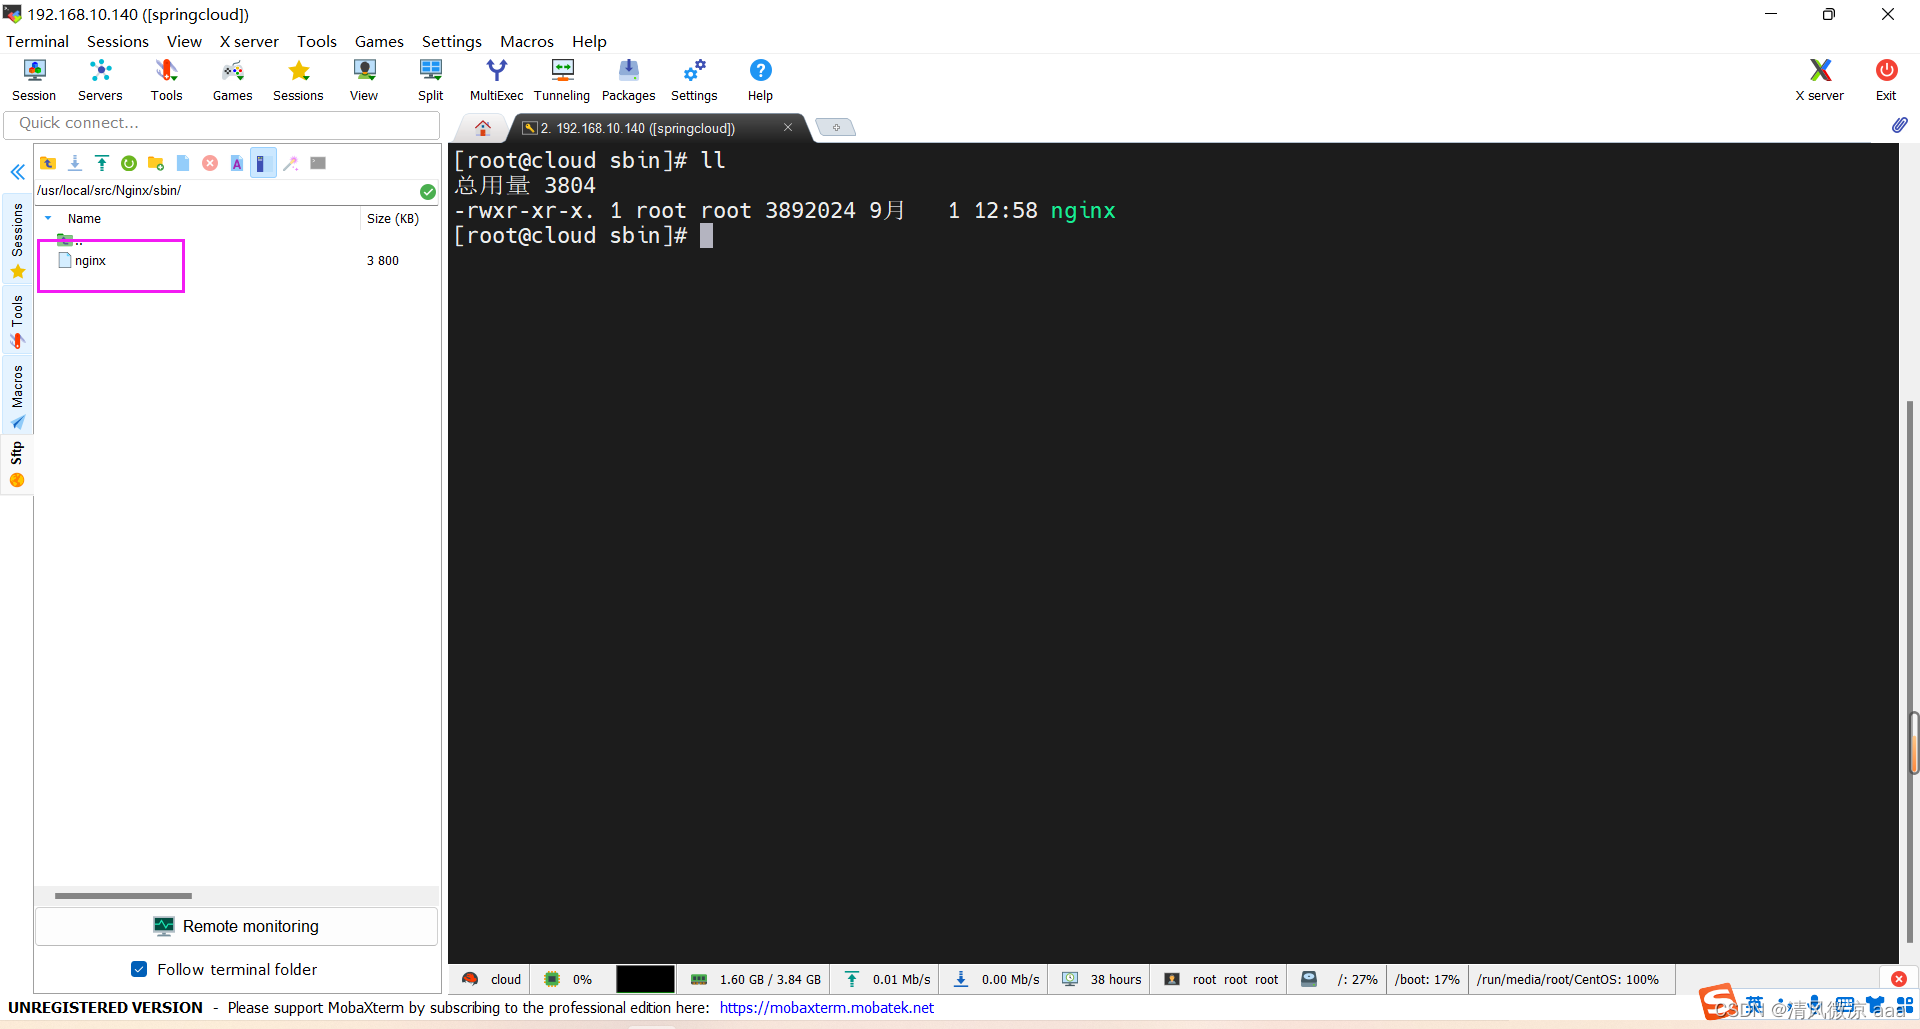
-
进入到安装后的sbin目录:
cd /usr/local/src/Nginx/sbin/
-
./nginx 启动
-
./nginx -s stop 快速停止
-
./nginx -v 查看 nginx 版本号
-
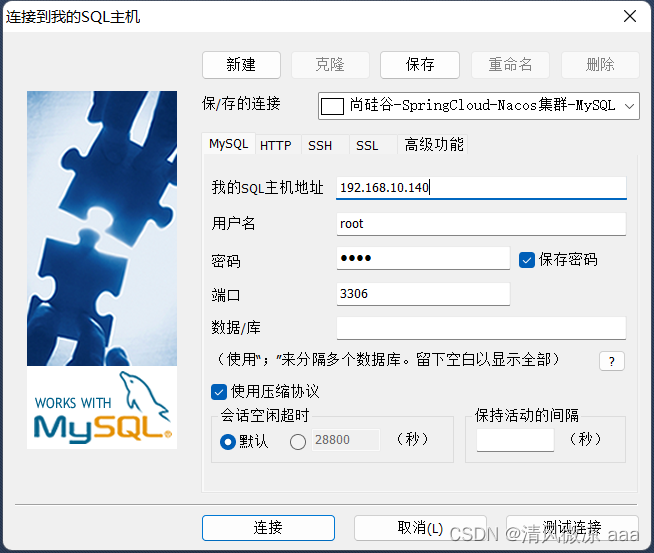
3)mysql下载 安装 配置(linux系统)
详情查看:我写的另一篇博客:https://blog.csdn.net/aa35434/article/details/124716035
-
设置的有开机自动启动
-
安装完成后使用sqlyog远程登录连接
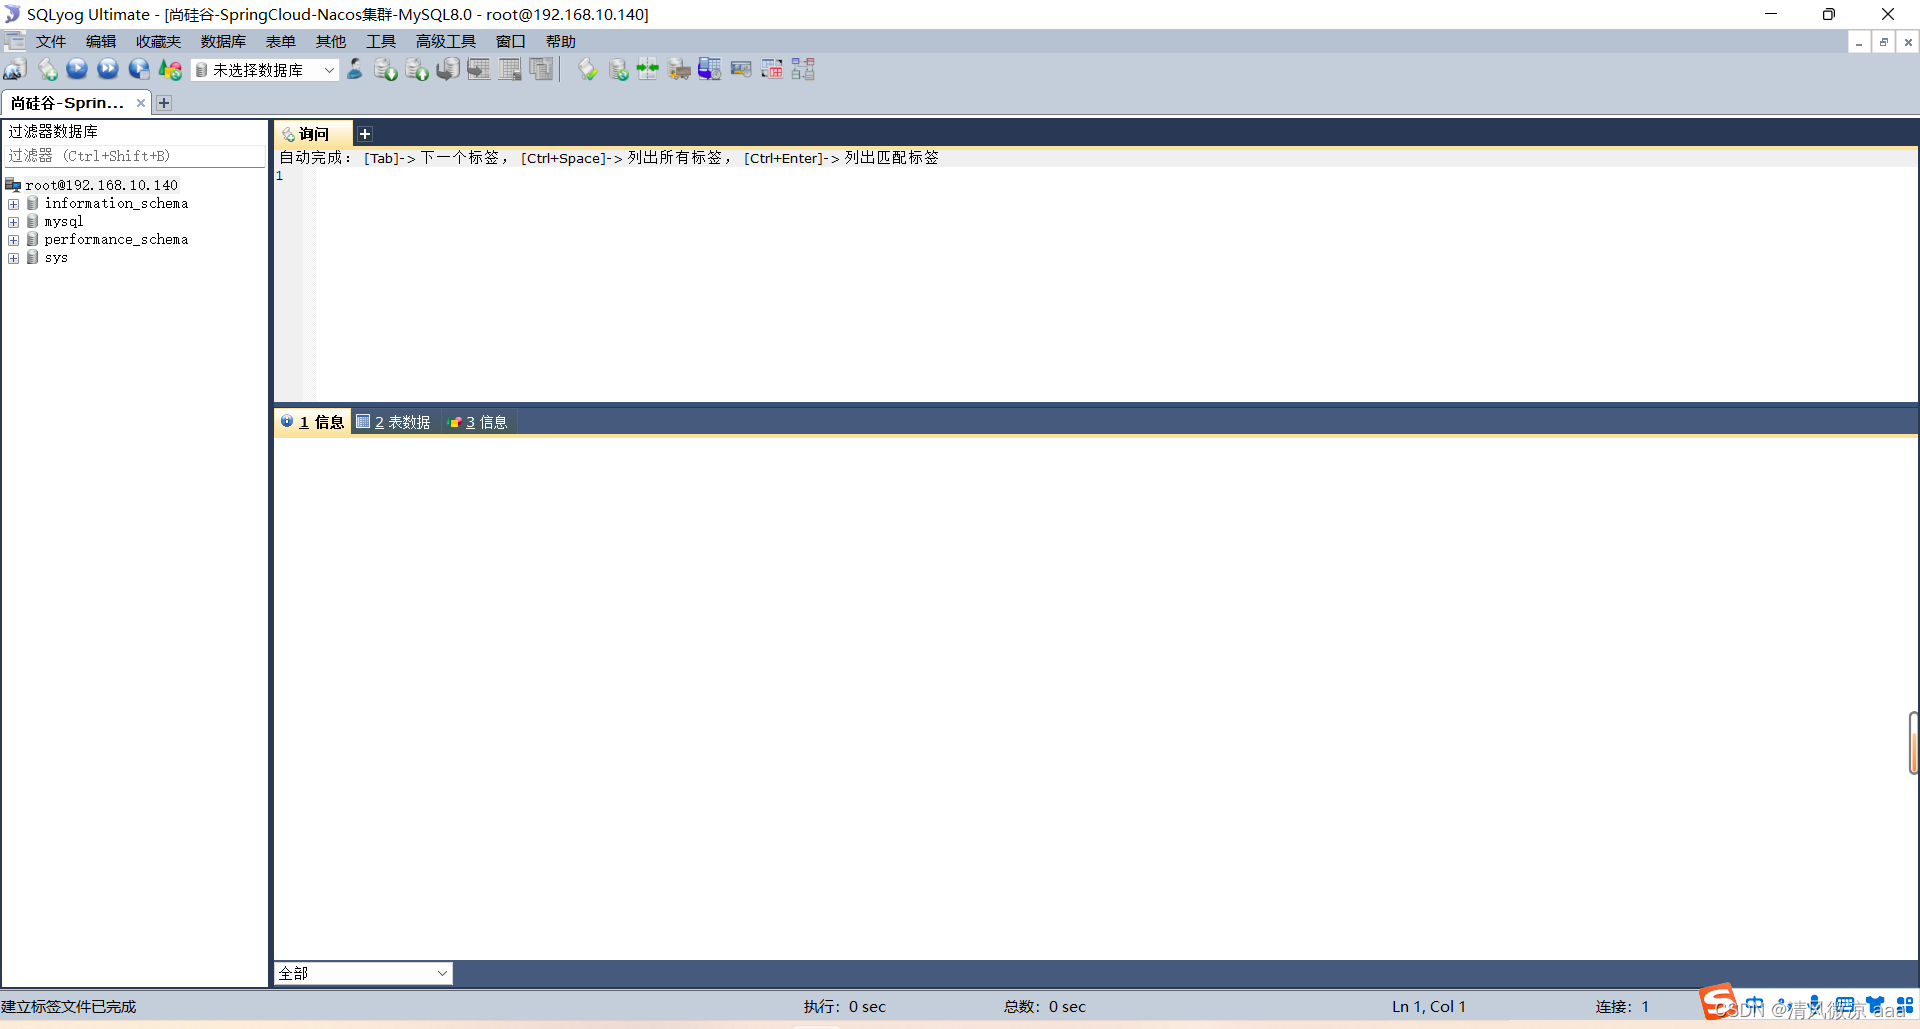
4)Nacos之Linux版本安装
-
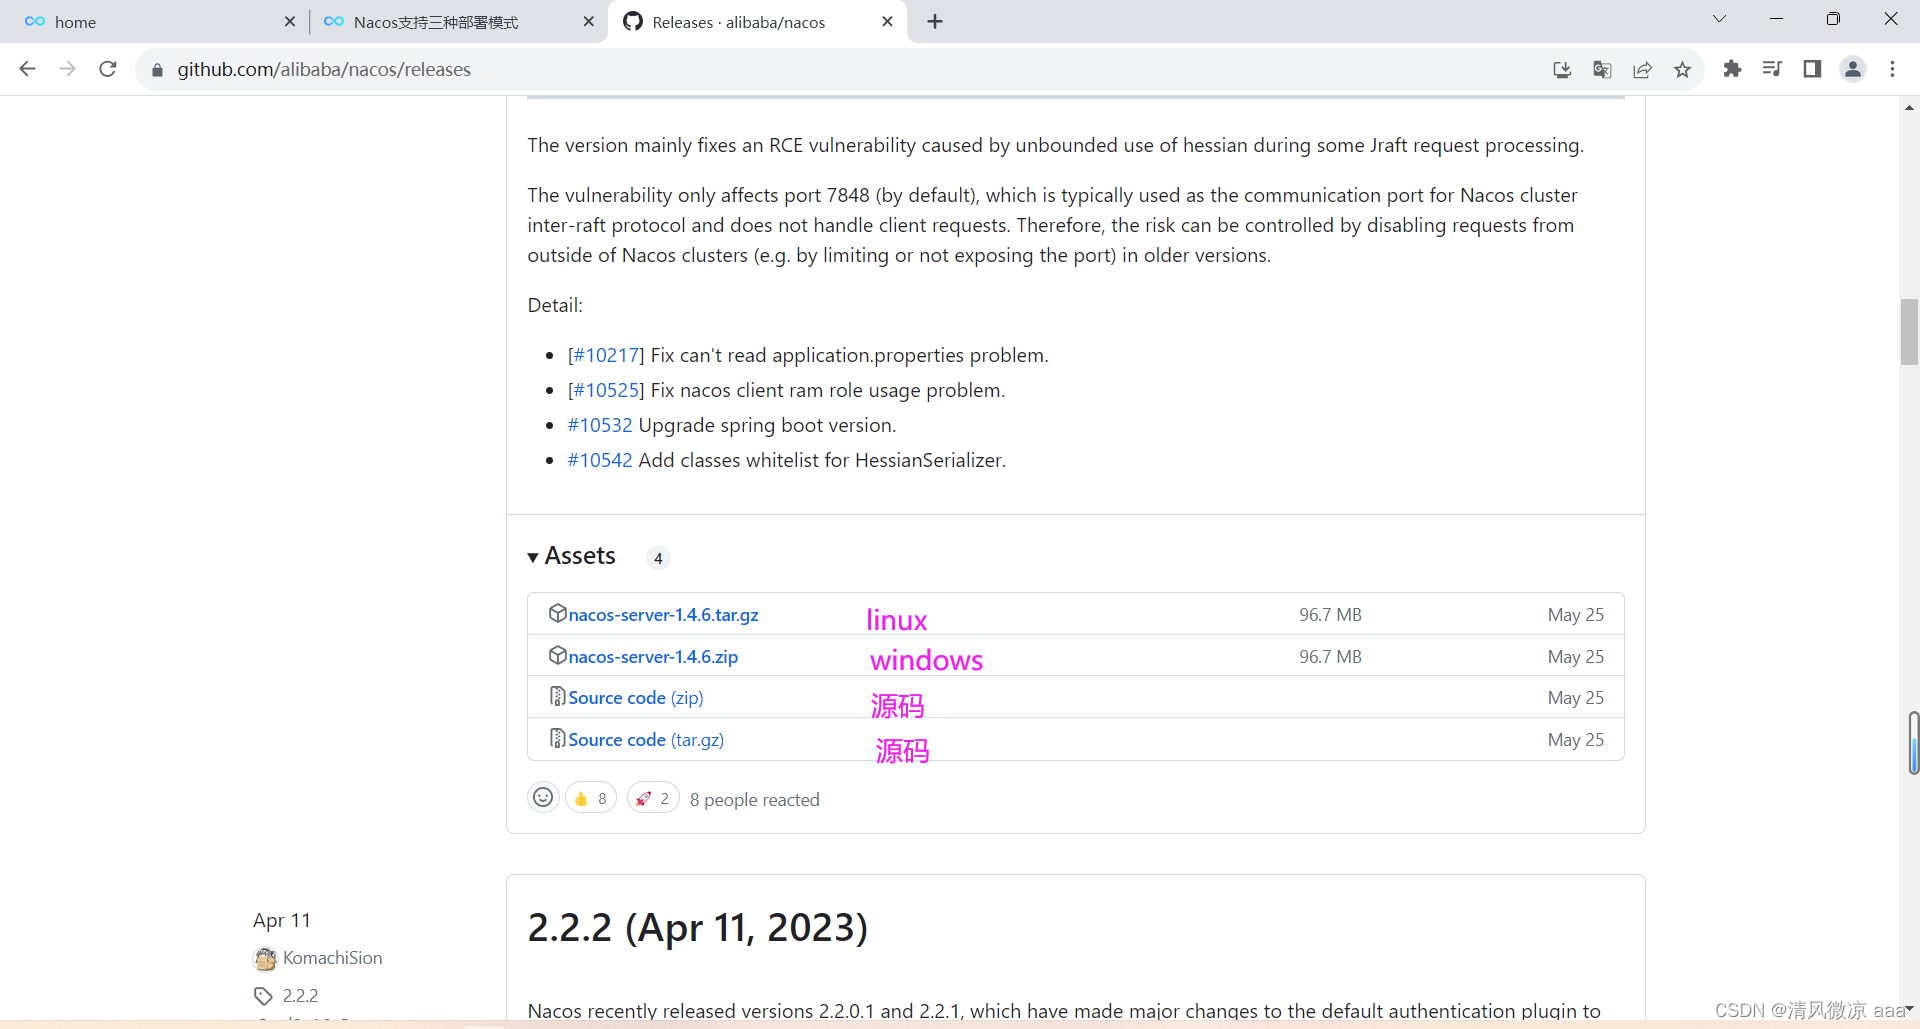
下载步骤
-
https://github.com/alibaba/nacos/releases
-
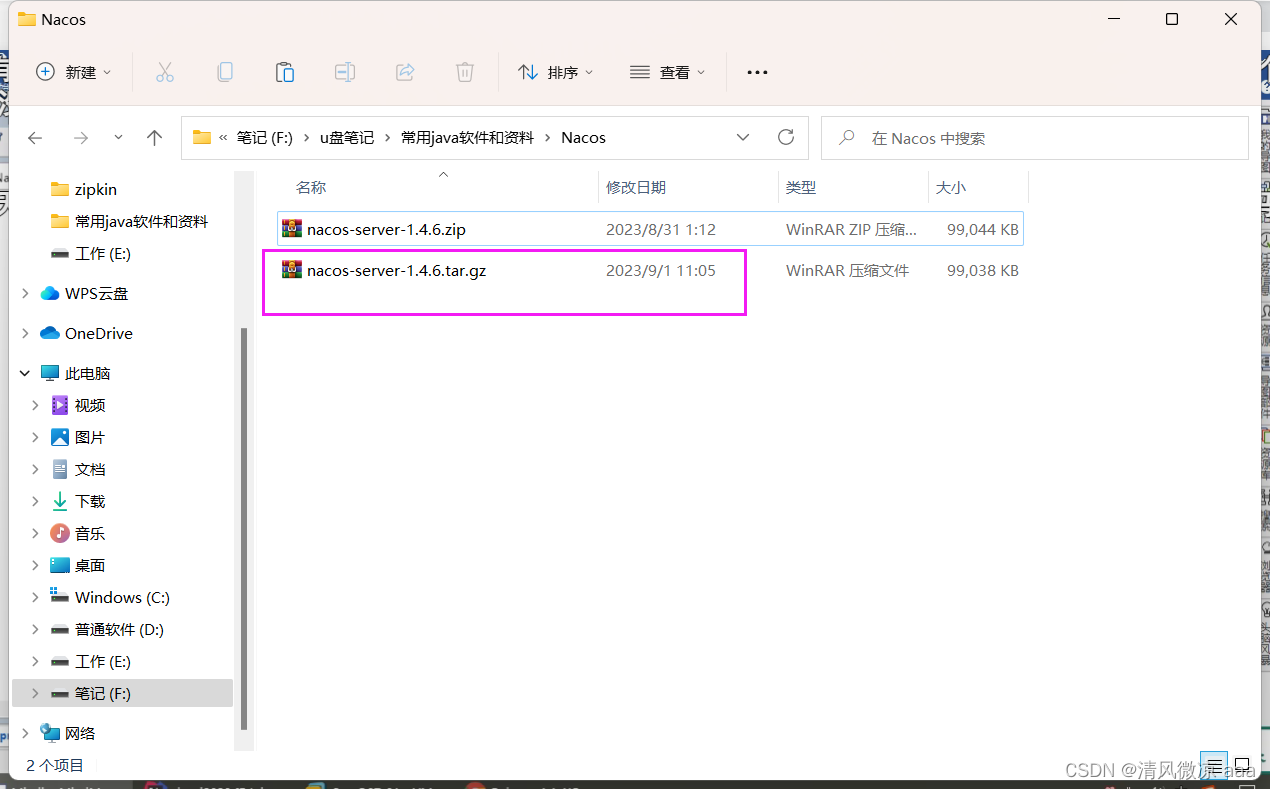
nacos-server-1.4.6.tar.gz
-
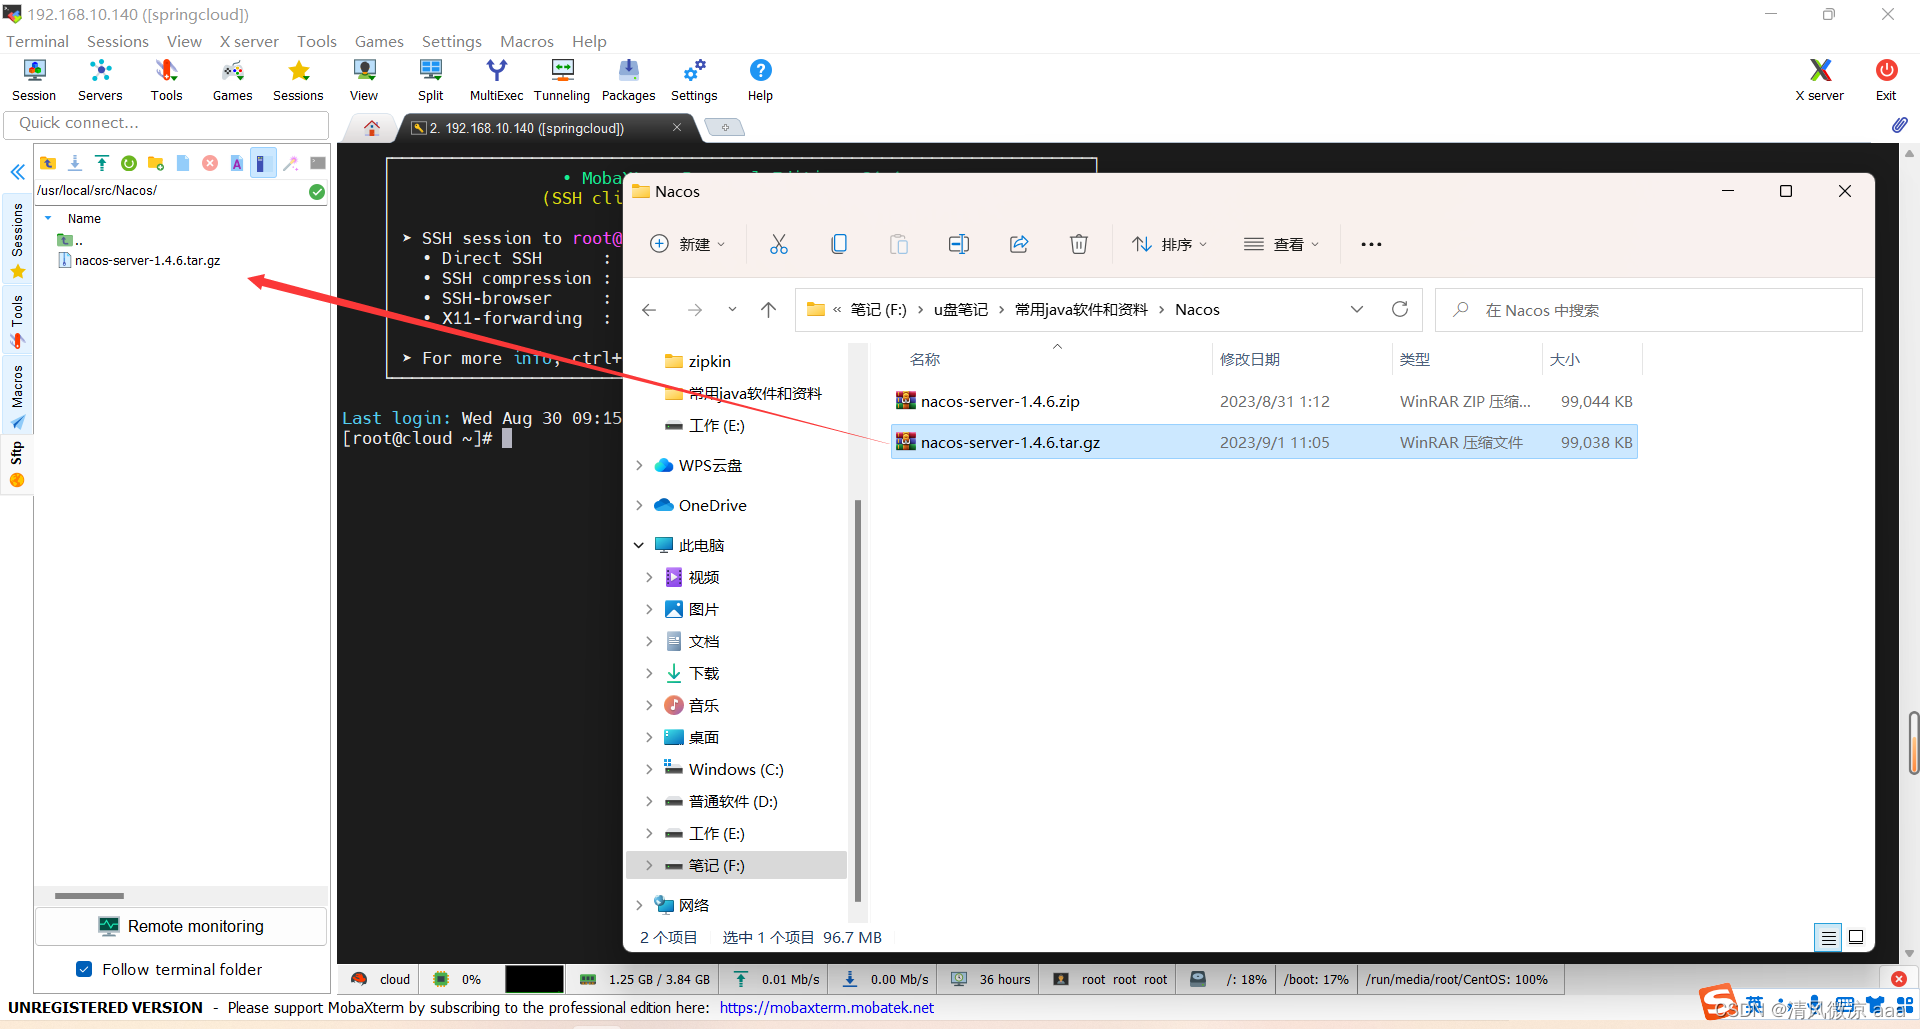
上传到目录:/usr/local/src/Nacos/
-
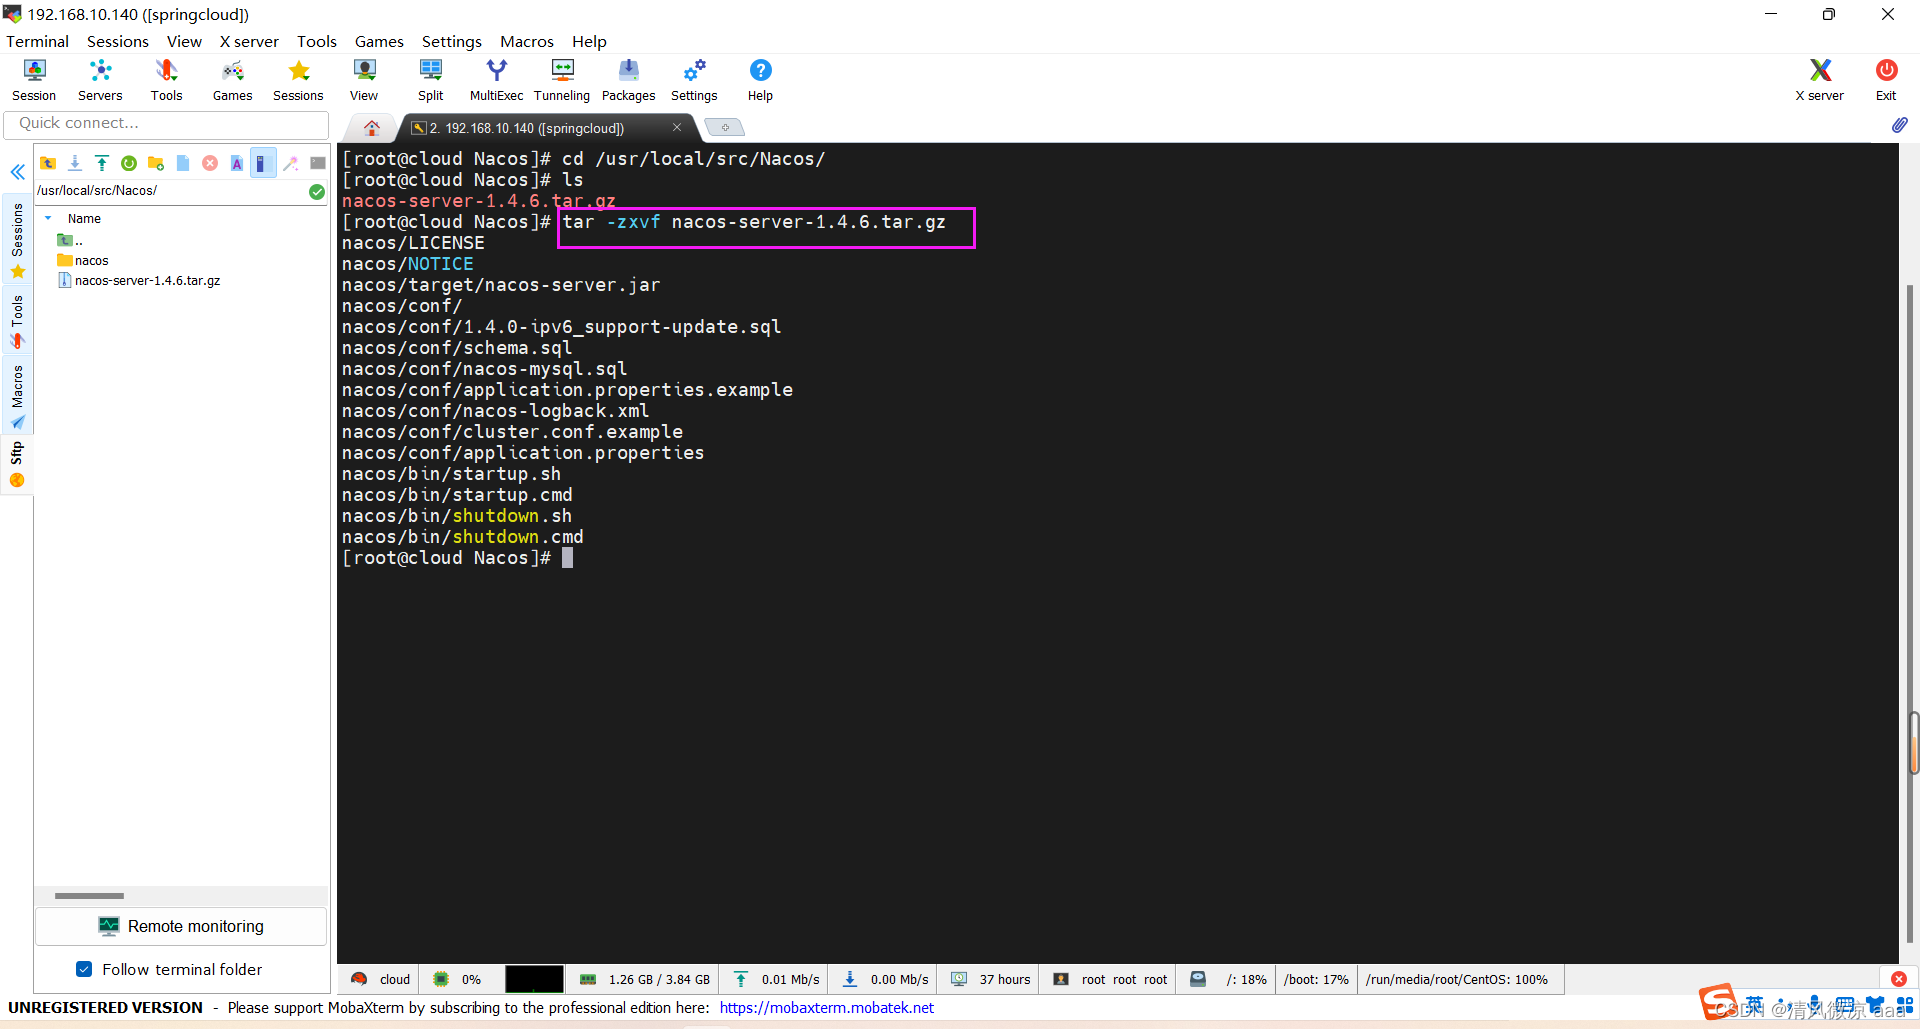
进入到此目录,解压后安装:
tar -zxvf nacos-server-1.4.6.tar.gz
-
-
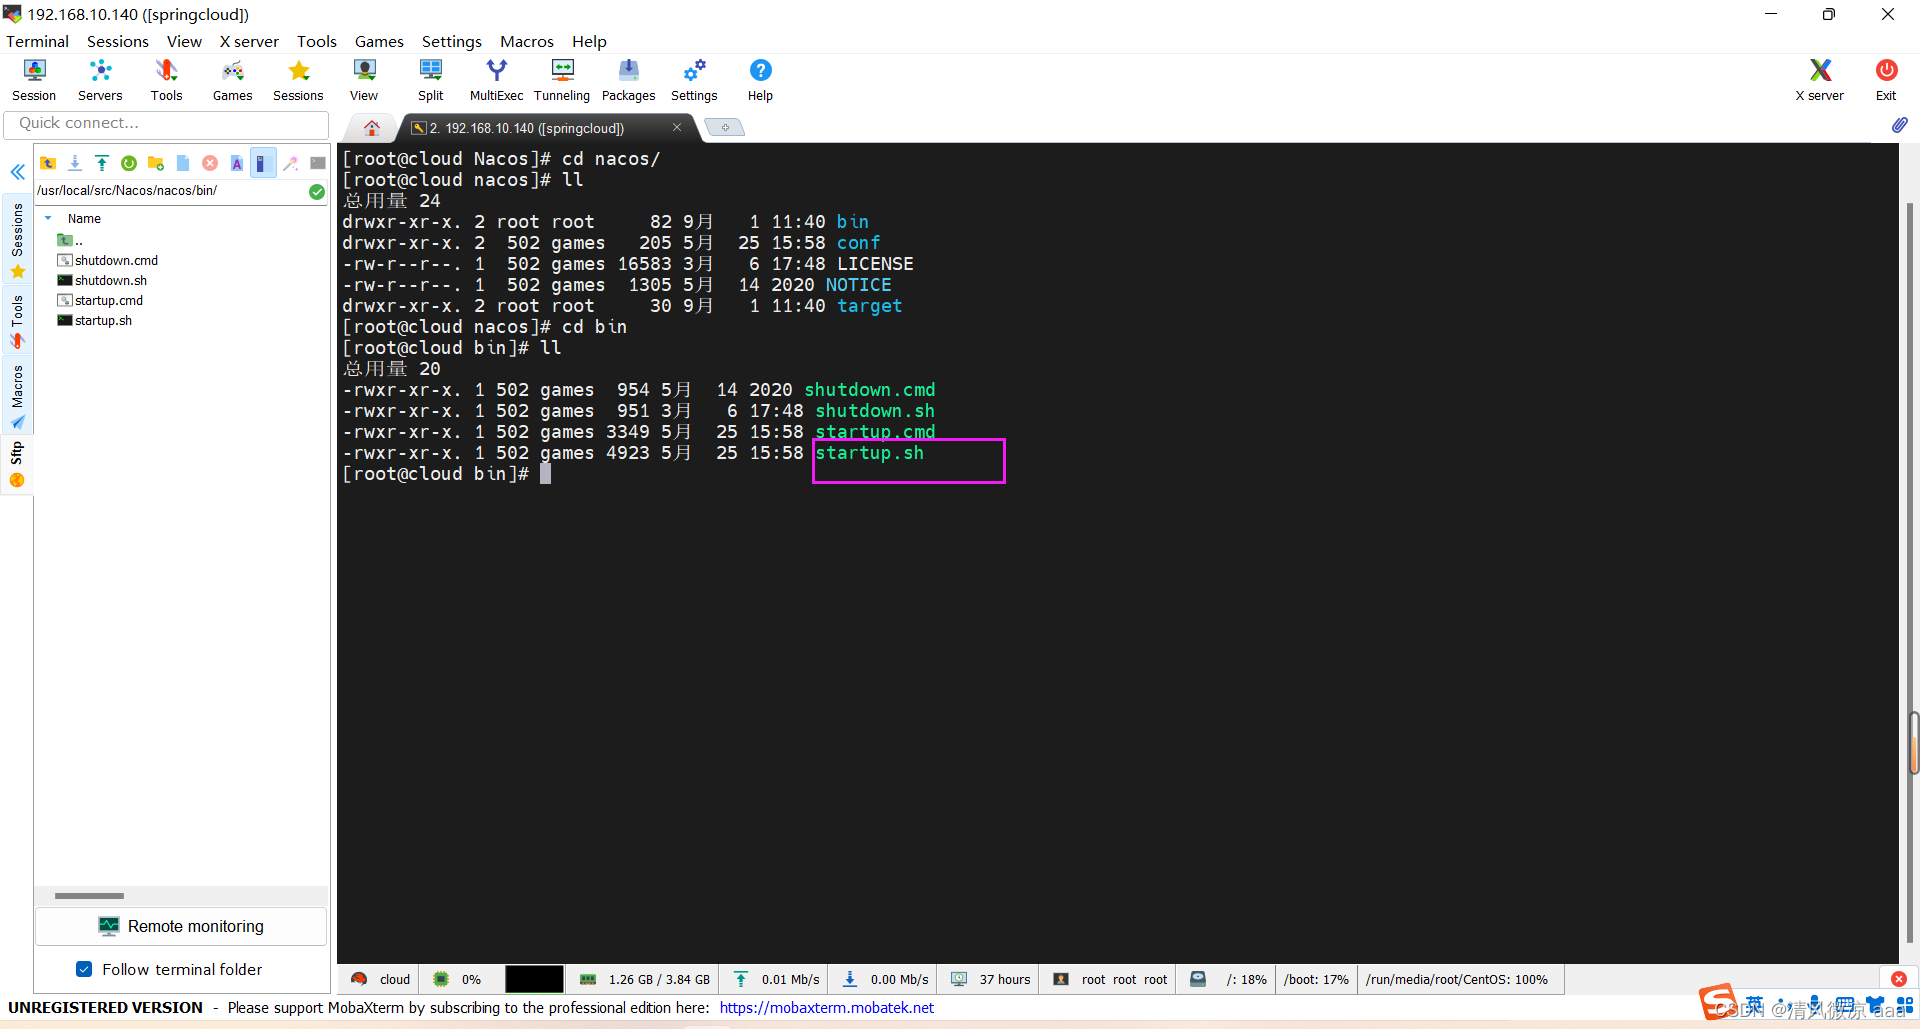
查看目录:windows启动使用的是startup.cmd,linux执行的是startup.sh
-
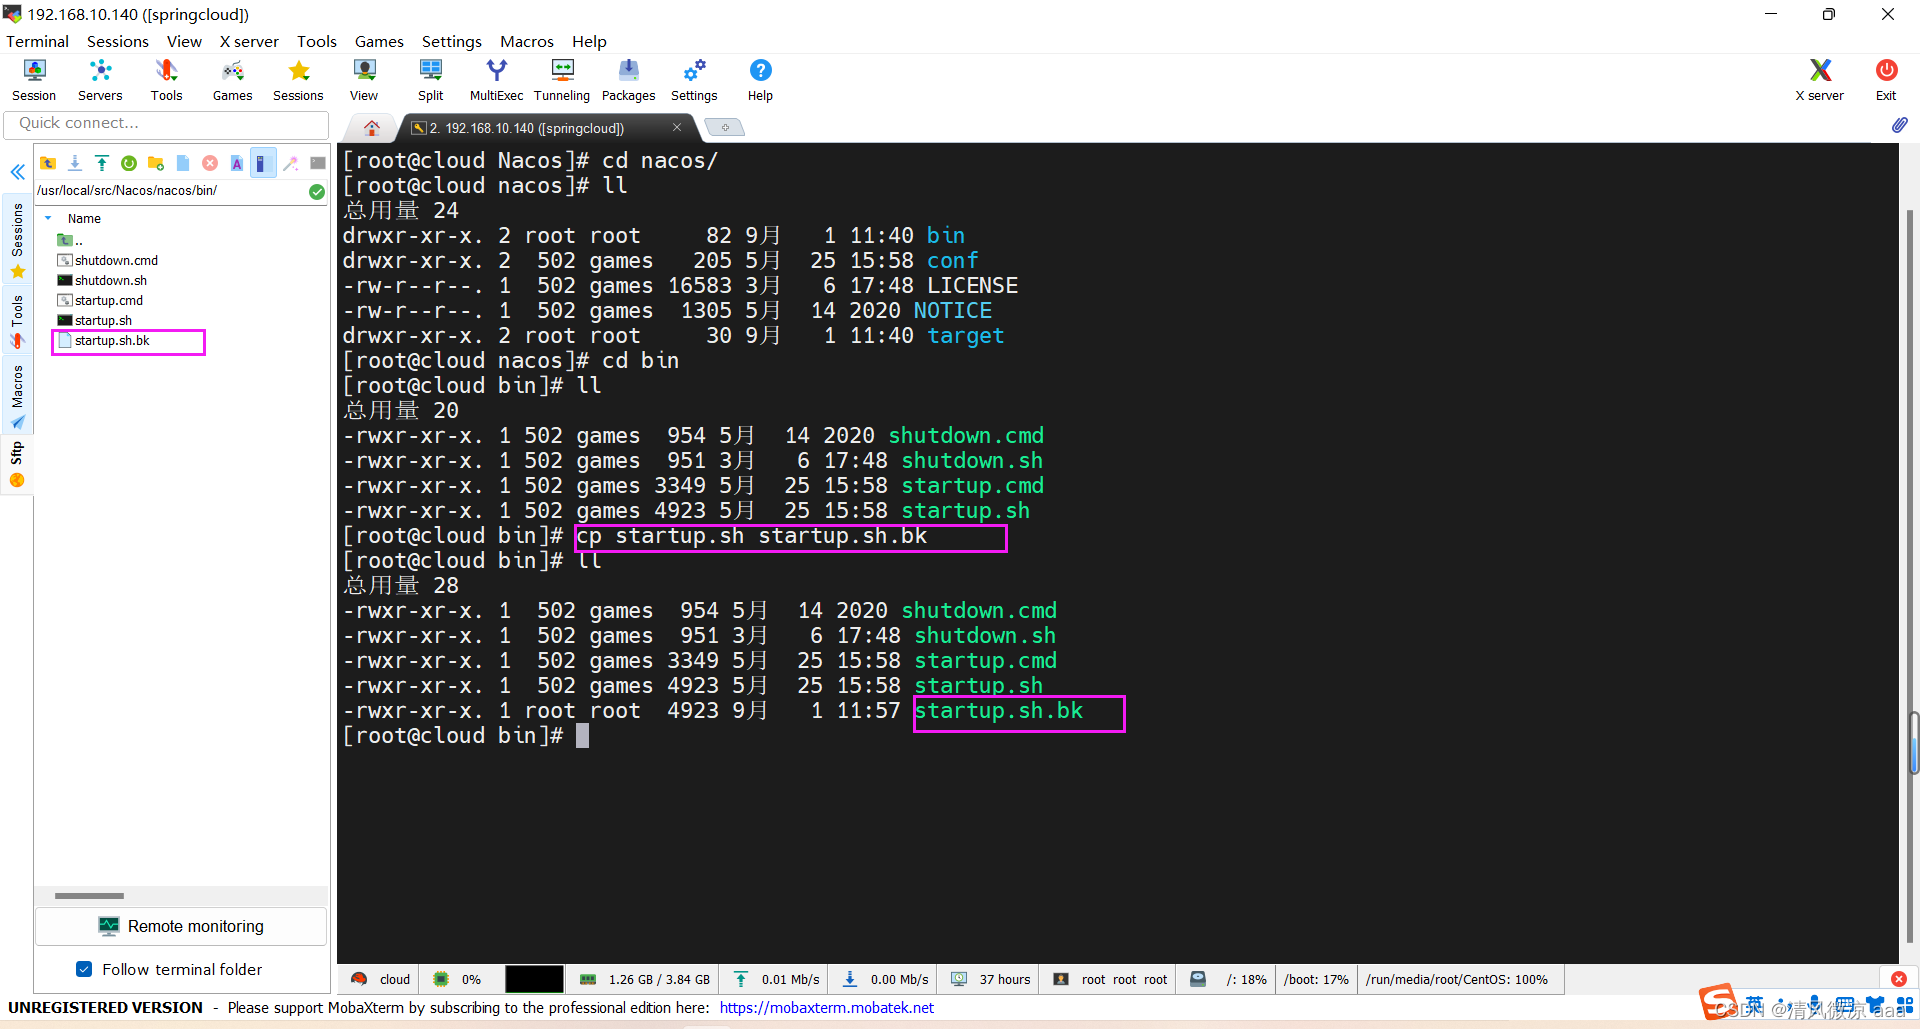
在配置之前,先保存一份原始的配置,以防以后改错恢复配置时麻烦。(要养成这个习惯)
-
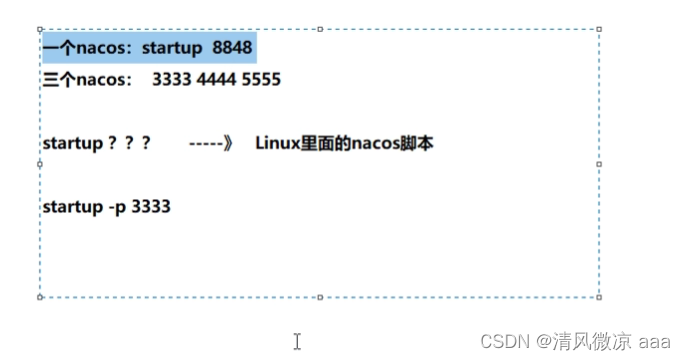
问题:原先只有一个Nacos,直接使用命令启动即可。现在有3个Nacos组成的集群,那么使用命令该如何区分启动的是集群中的哪一个Nacos呢???
-
解决:修改linux里面的nacos脚本,可以通过端口号进行区分。
5) Nacos集群配置(上)
第一个:和之前windows一样,在linux也需要进行Nacos持久化配置,目的是把数据由默认的derby迁移到MySQL。
-
查看linux下的Nacos中的SQL脚本:在安装后的conf目录下
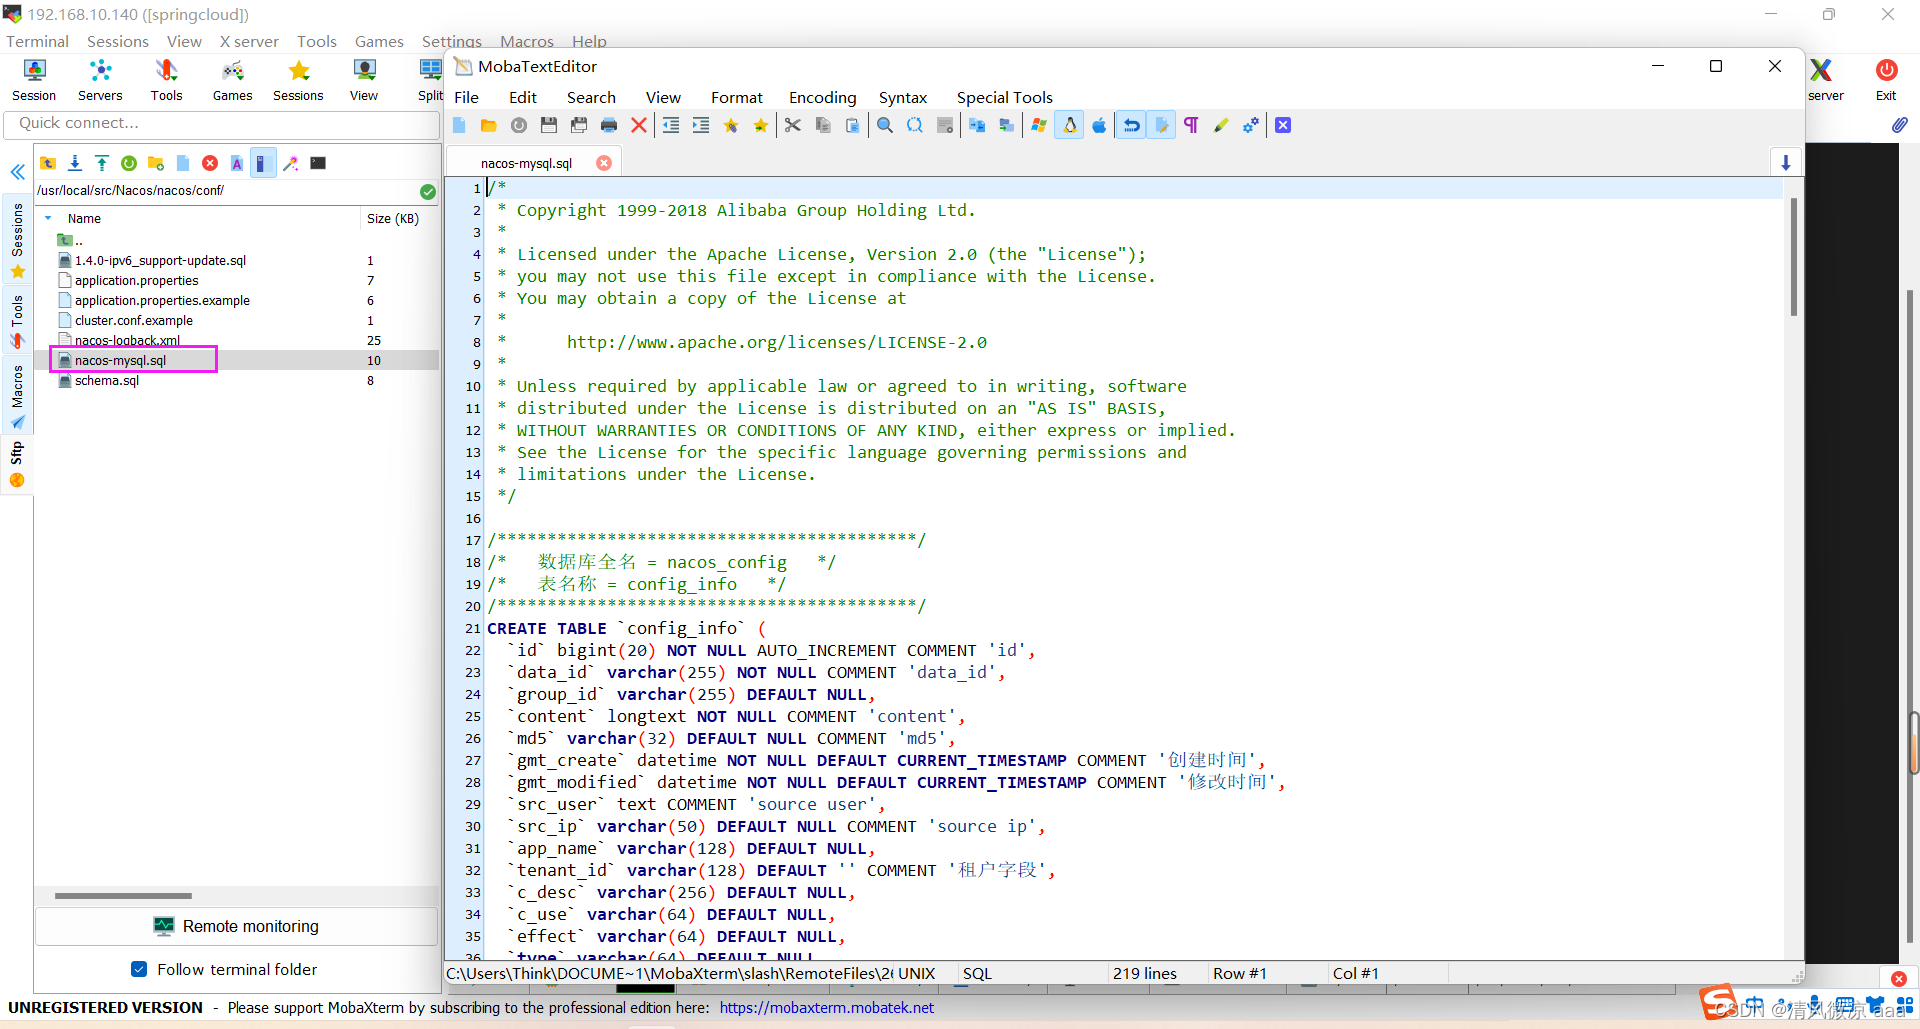
-
把此文件的内容复制到Mysql中,执行此脚本:先创建好数据库
我这个地方使用sqlyog远程工具连接的linux下的mysql8.0
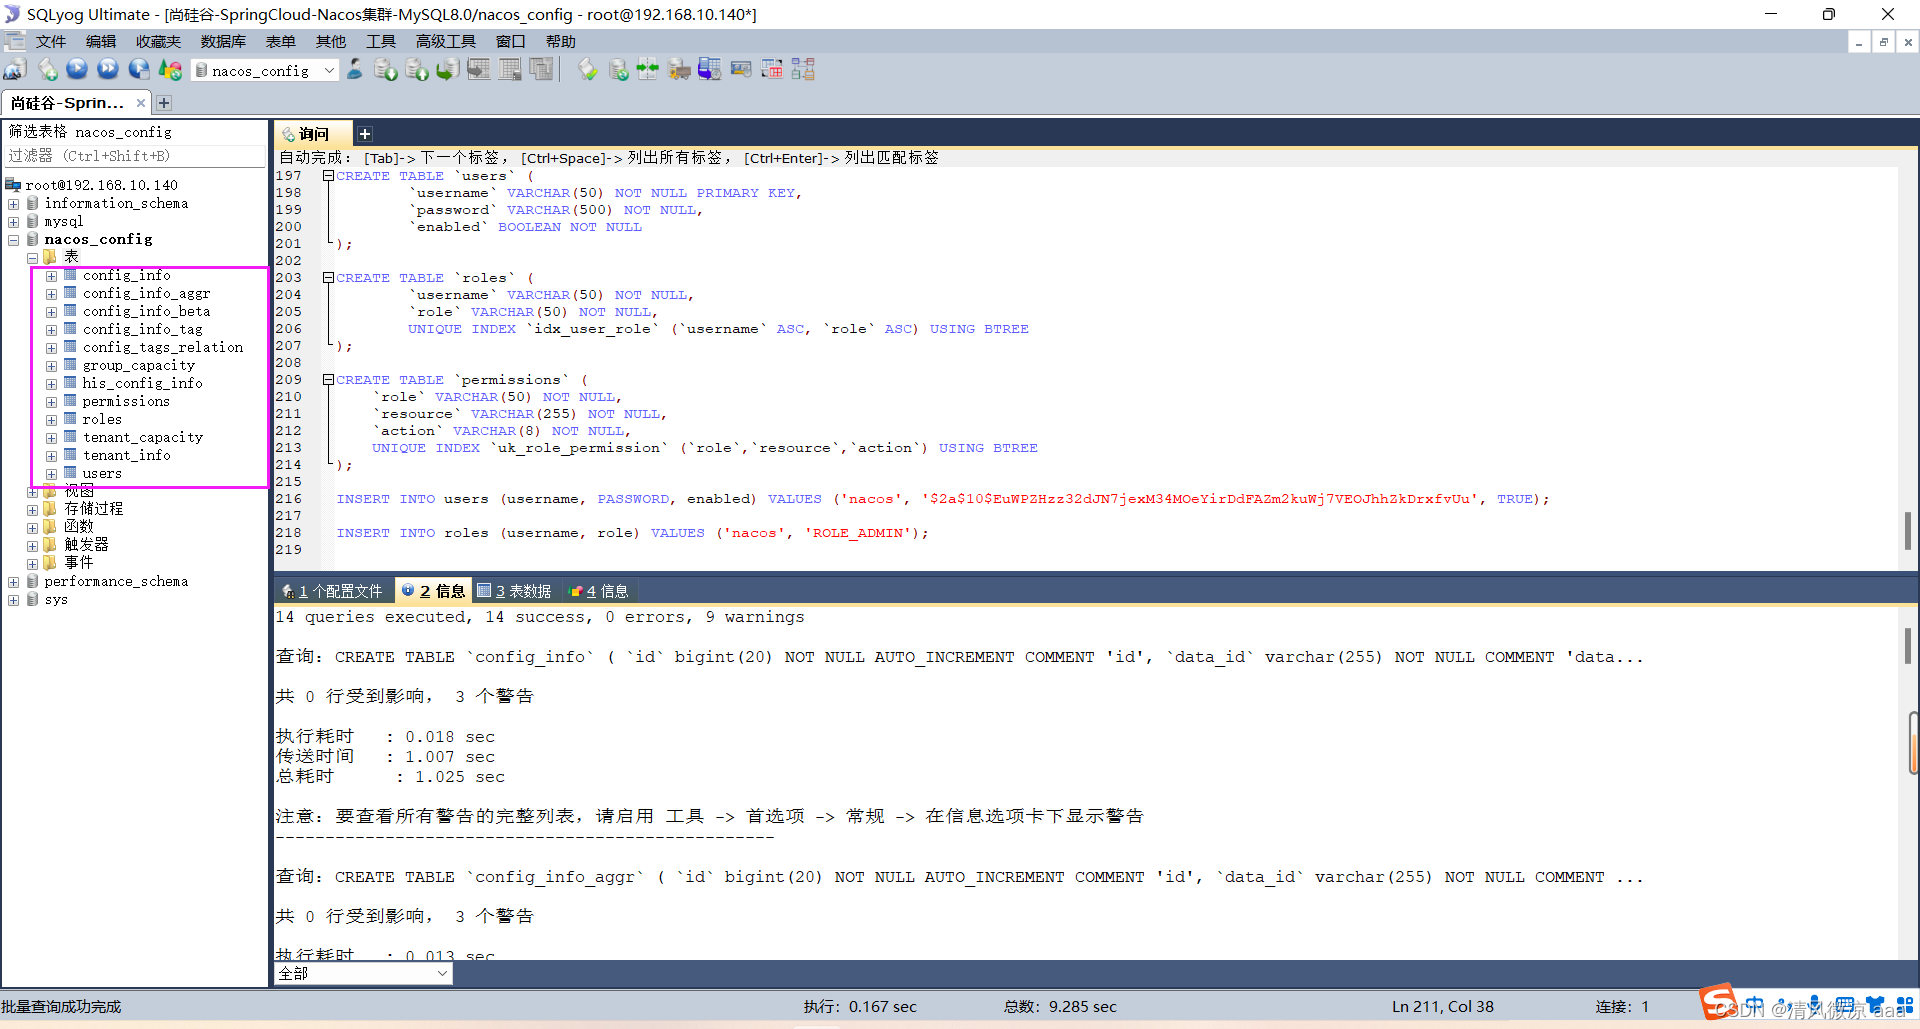
-
同样在conf目录下修改application.properties 配置
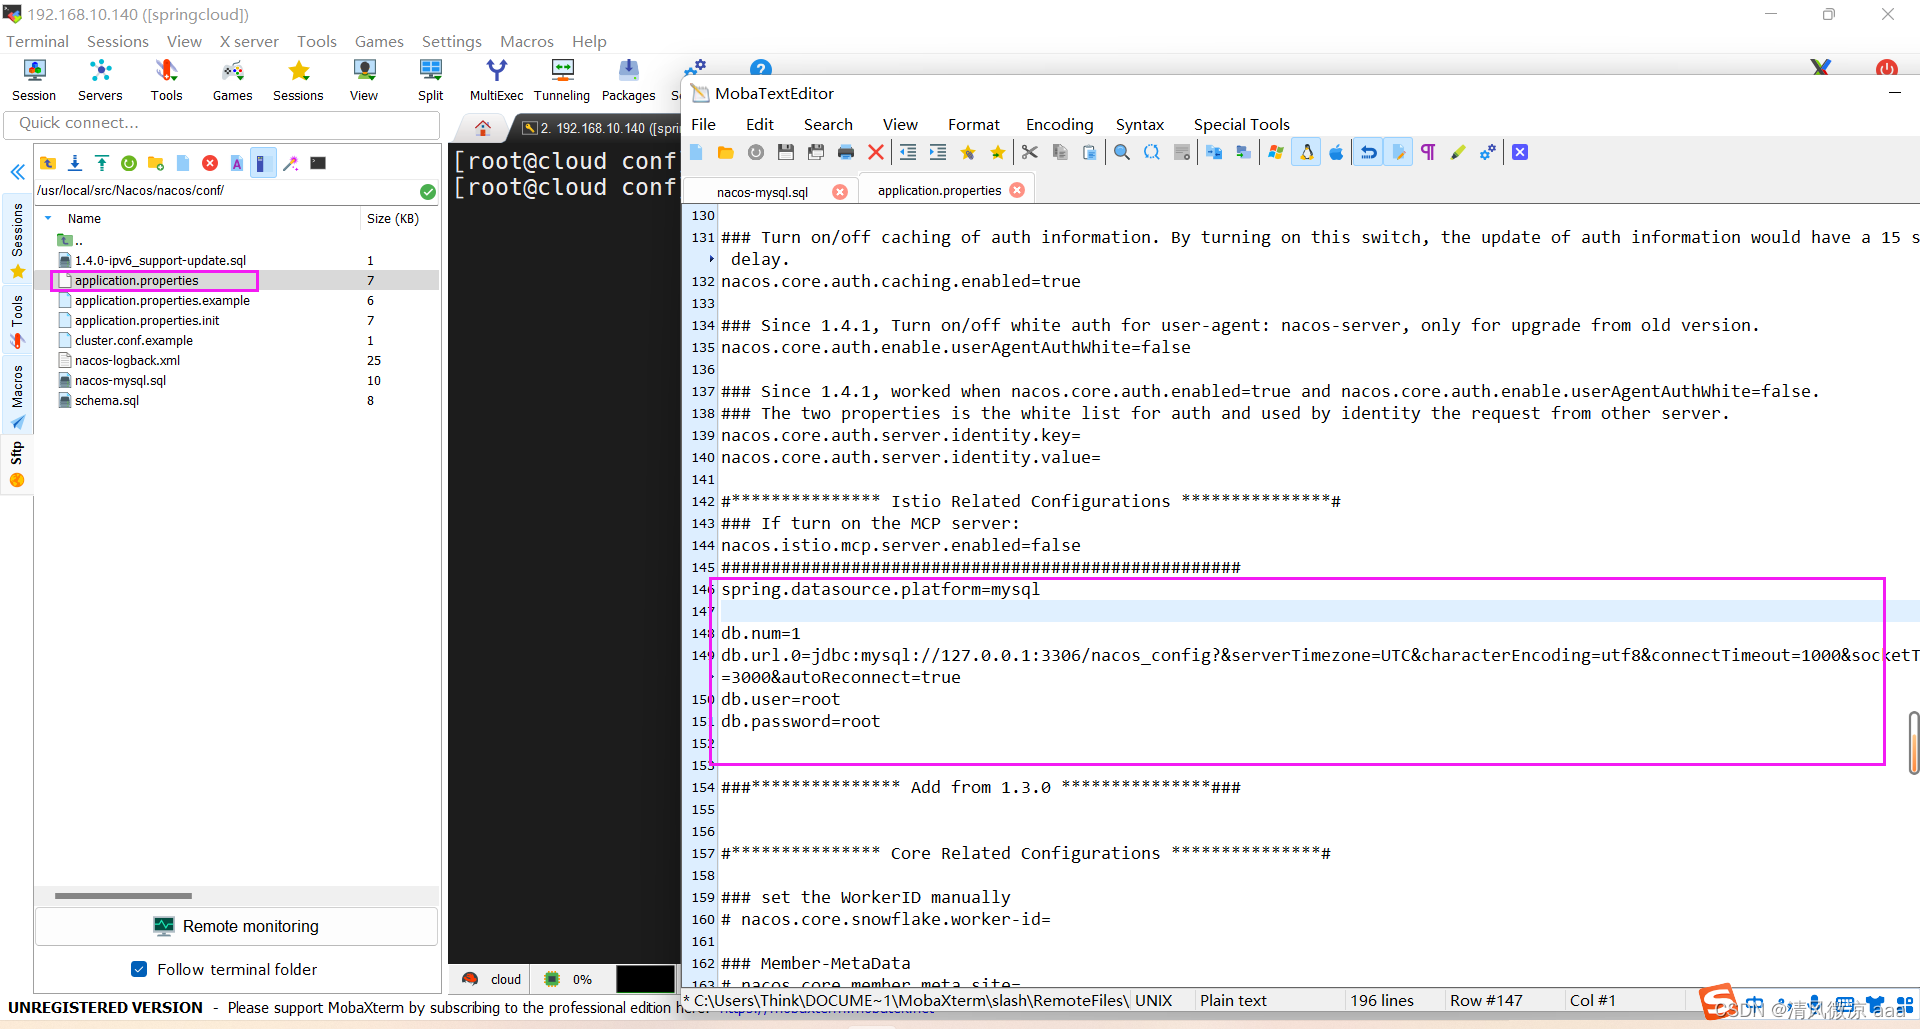
-
改之前先把这个文件备份下
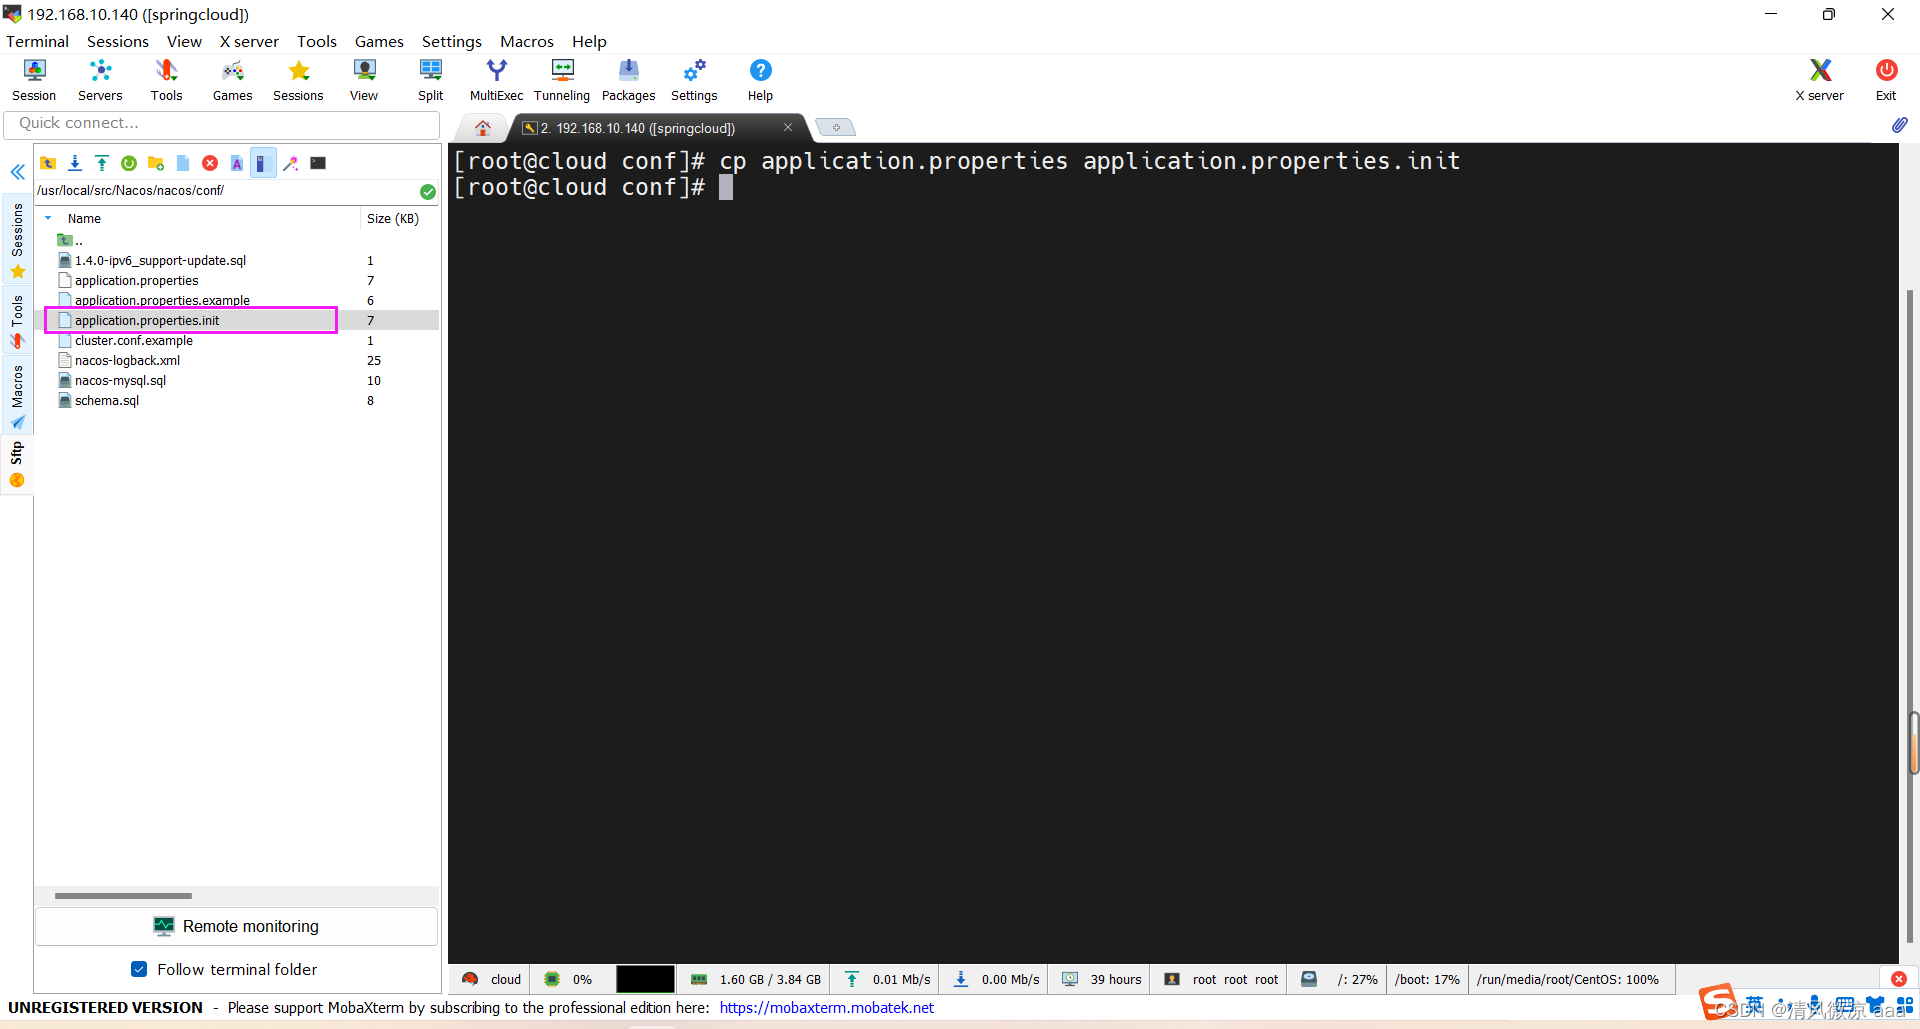
#127.0.0.1代表的是linux系统下的本机spring.datasource.platform=mysqldb.num=1
db.url.0=jdbc:mysql://127.0.0.1:3306/nacos_config?&serverTimezone=UTC&characterEncoding=utf8&connectTimeout=1000&socketTimeout=3000&autoReconnect=true
db.user=root
db.password=root
第二个:Linux服务器上nacos的集群配置cluster.conf
-
梳理出3台nacos集器的不同服务端口号
-
复制cluster.conf.example文件为cluster.conf:
cp cluster.conf.example cluster.conf
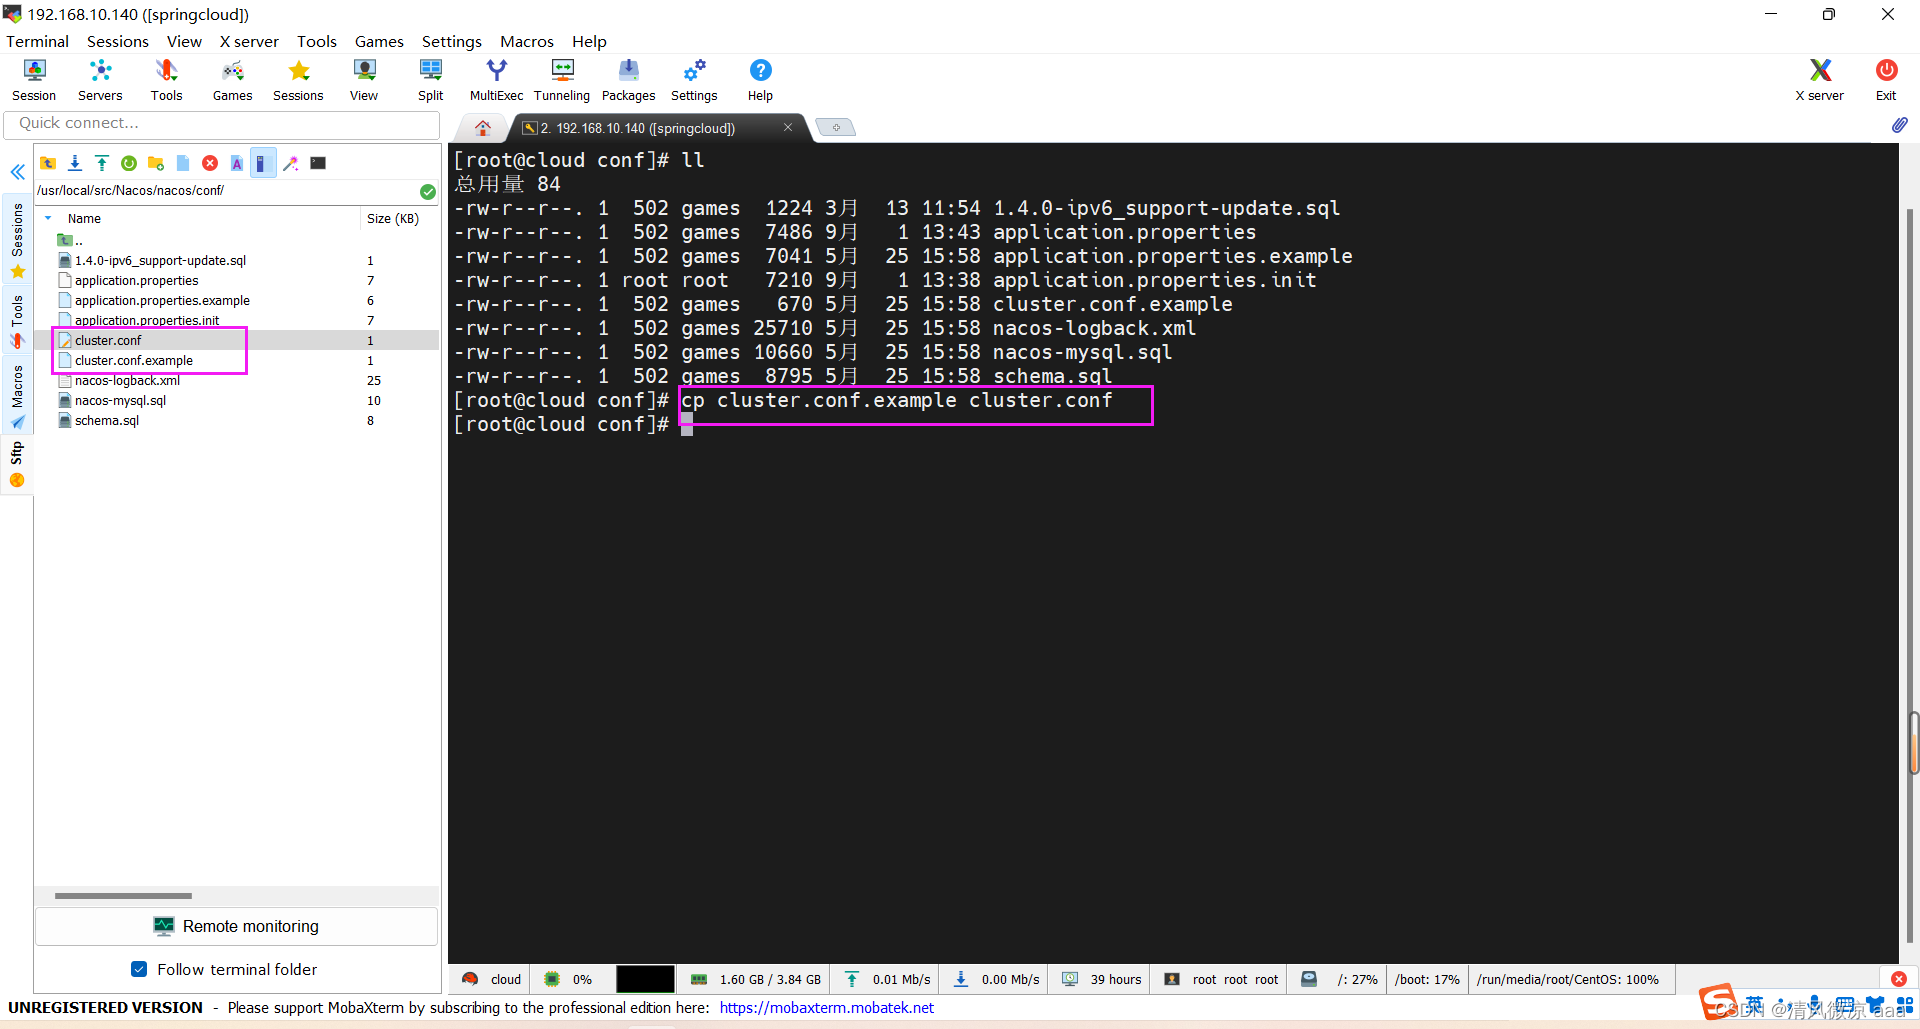
-
我们修改的是这个新复制的文件cluster.conf
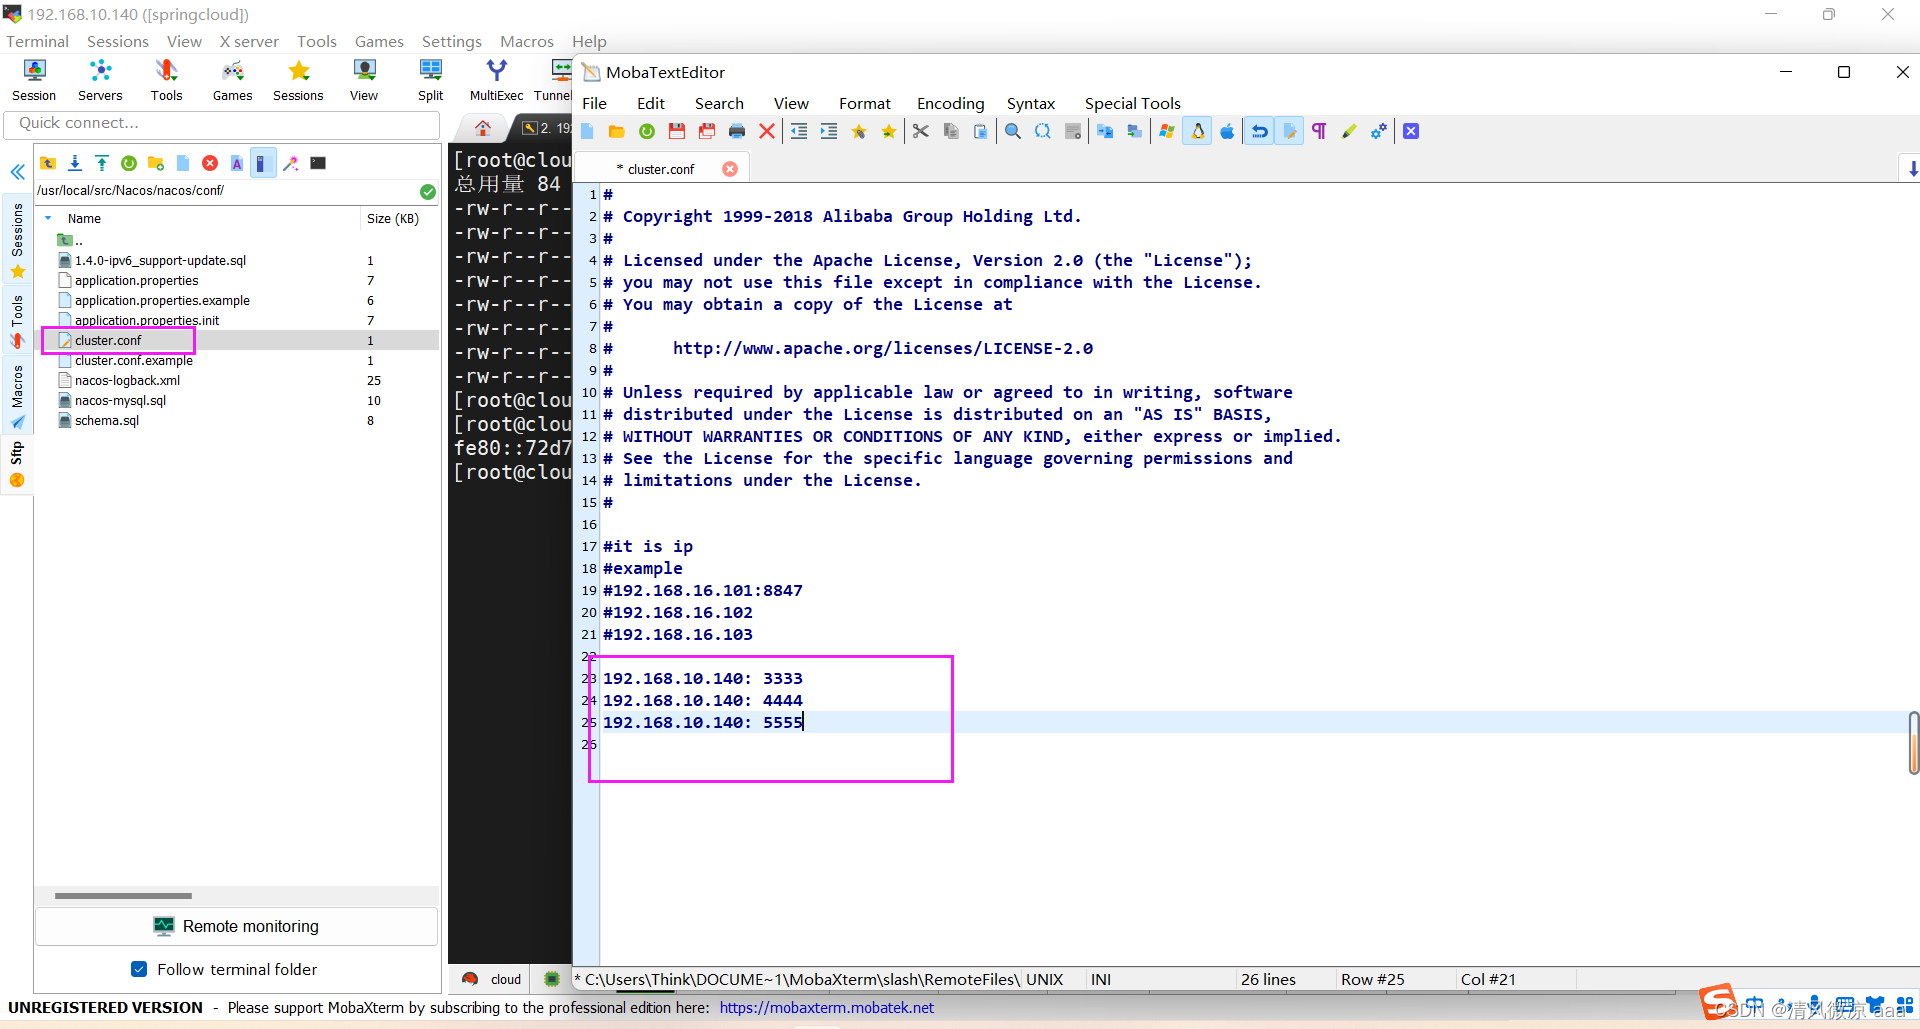
192.168.10.140: 3333
192.168.10.140: 4444
192.168.10.140: 5555
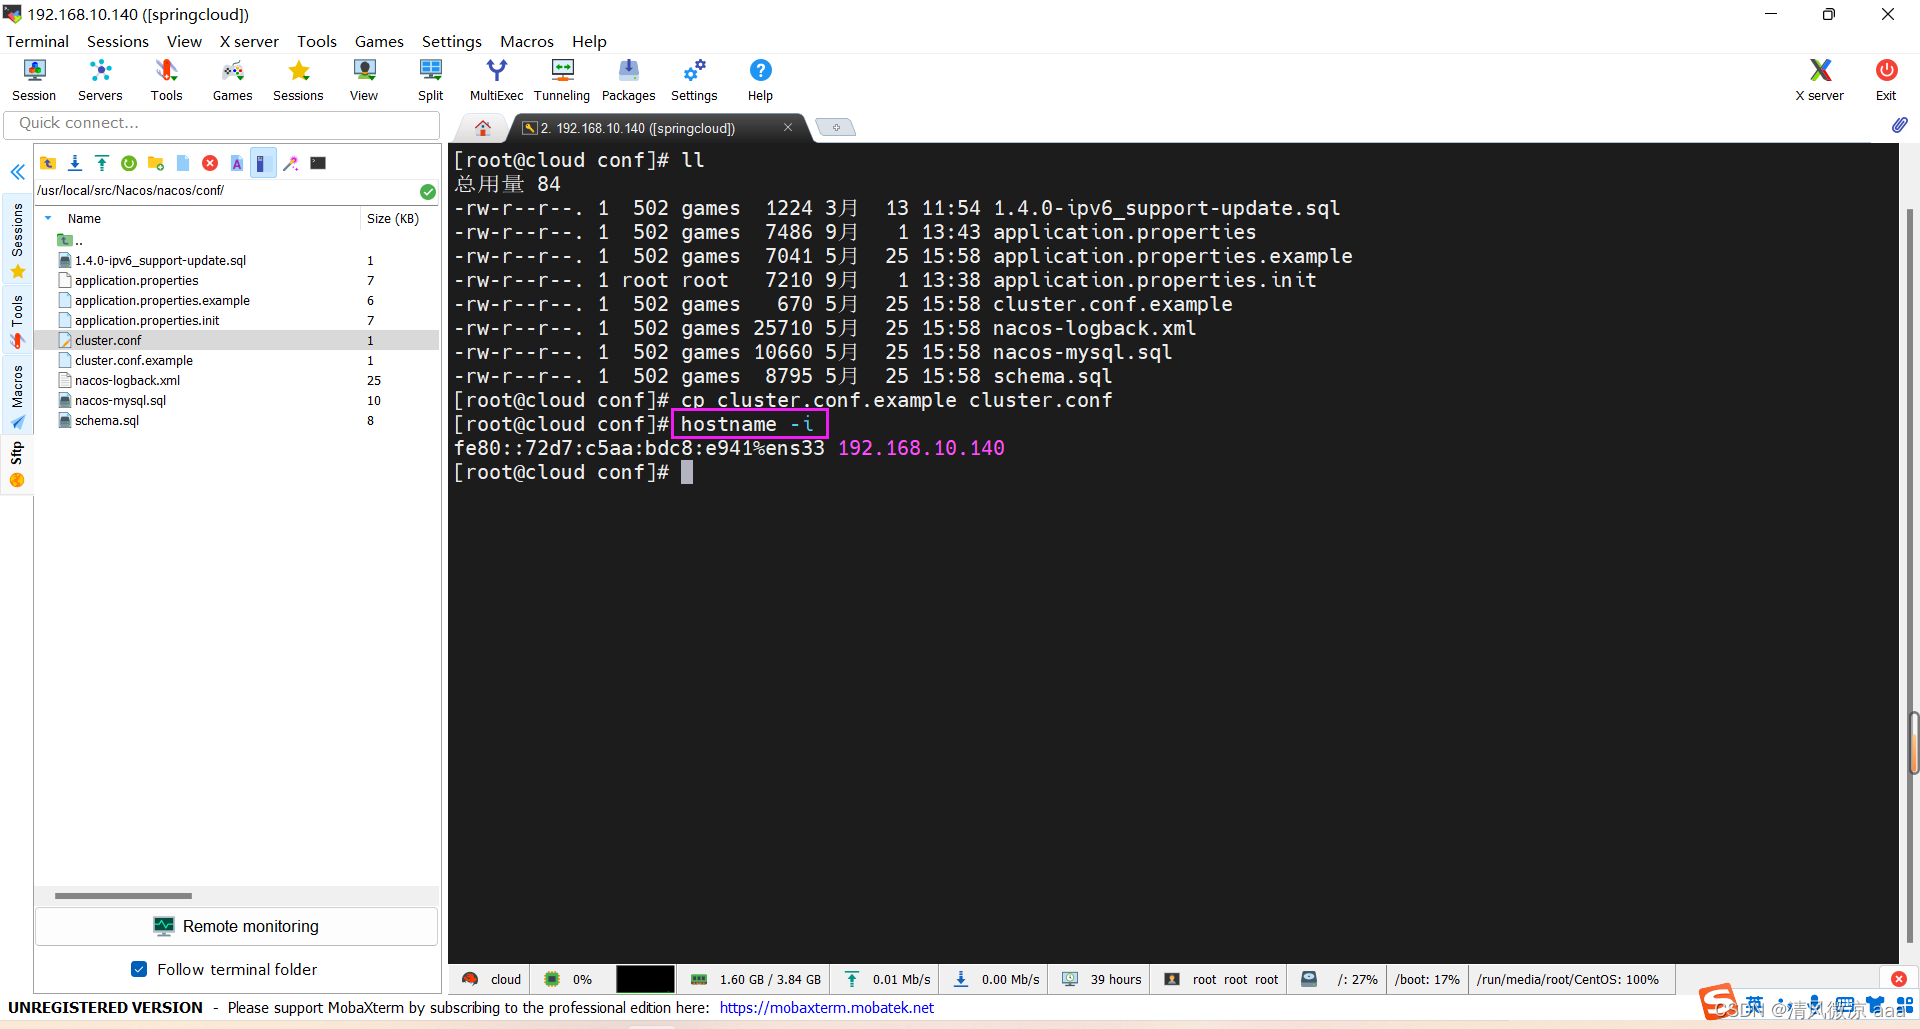
- 这个IP不能写127.0.0.1,必须是Linux命令
hostname -i能够识别的IP
第三个:编辑Nacos的启动脚本startup.sh,使它能够接受不同的启动端口
-
/mynacos/nacos/bin 目录下有startup.sh
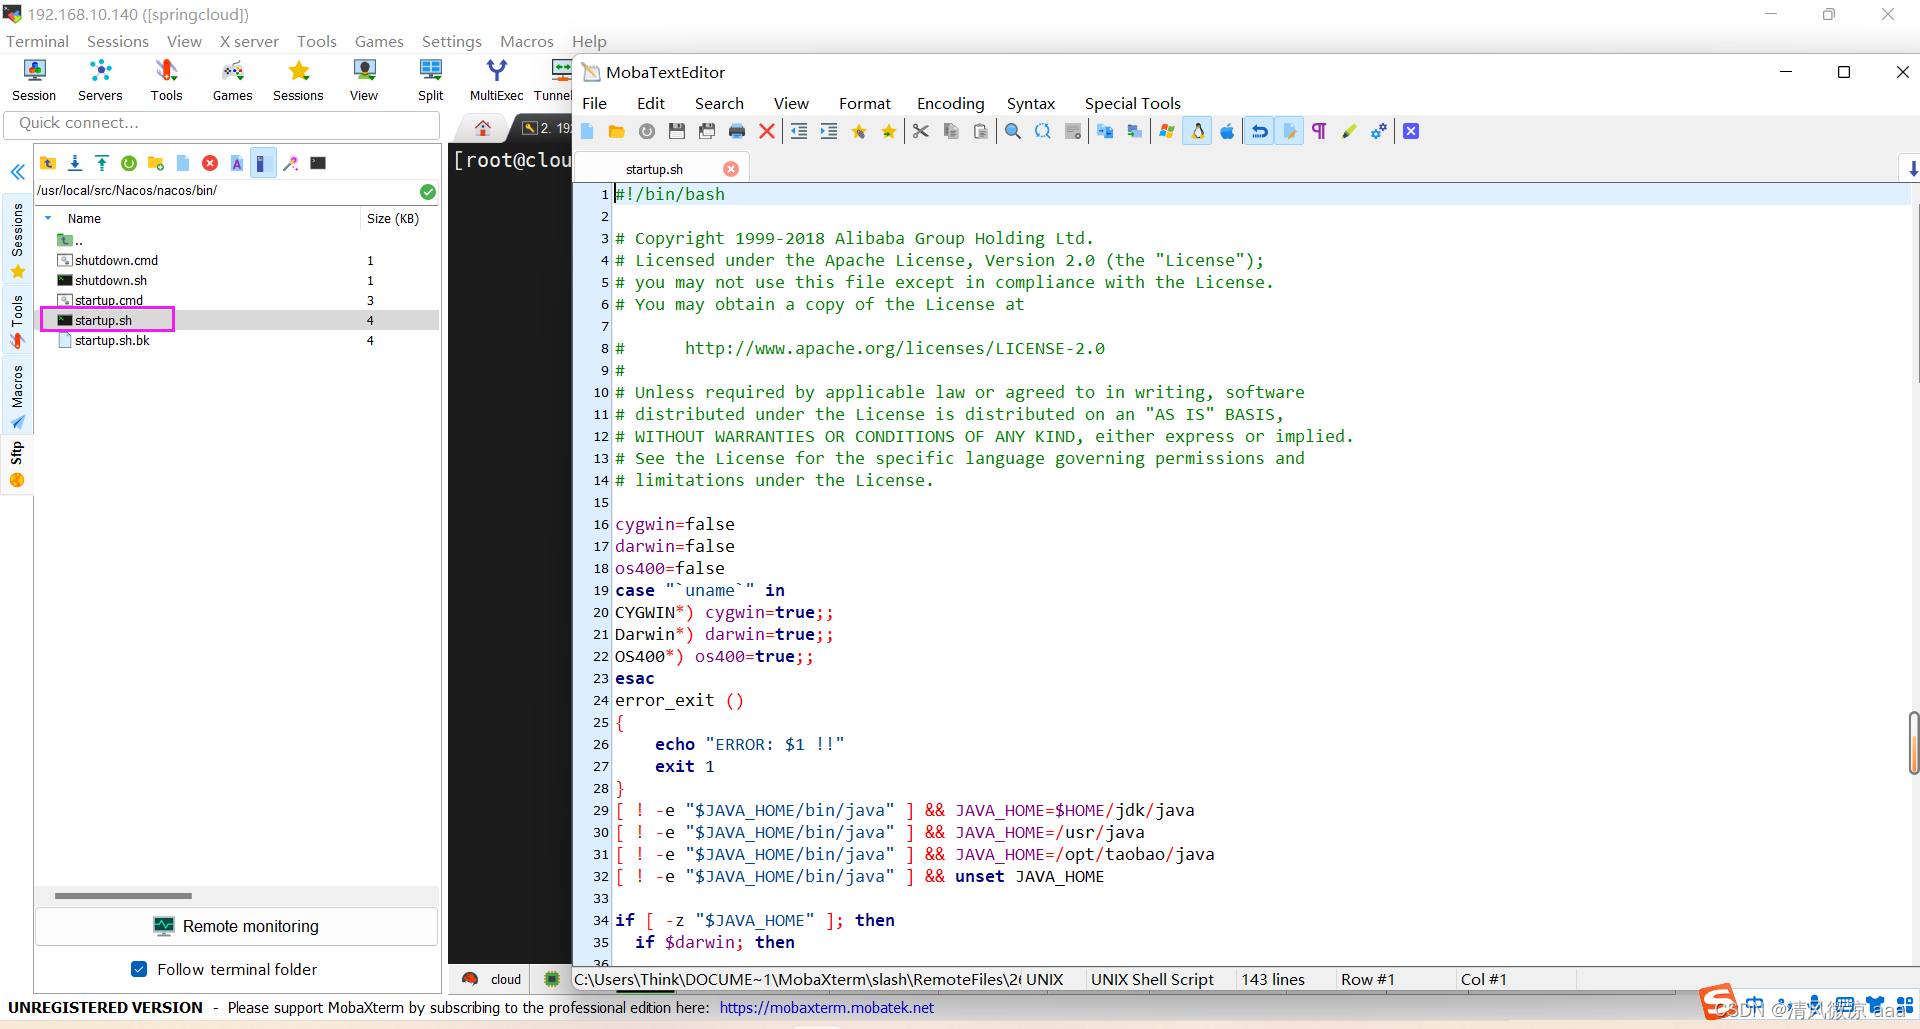
-
在什么地方,修改什么,怎么修改
-
思考

-
修改内容
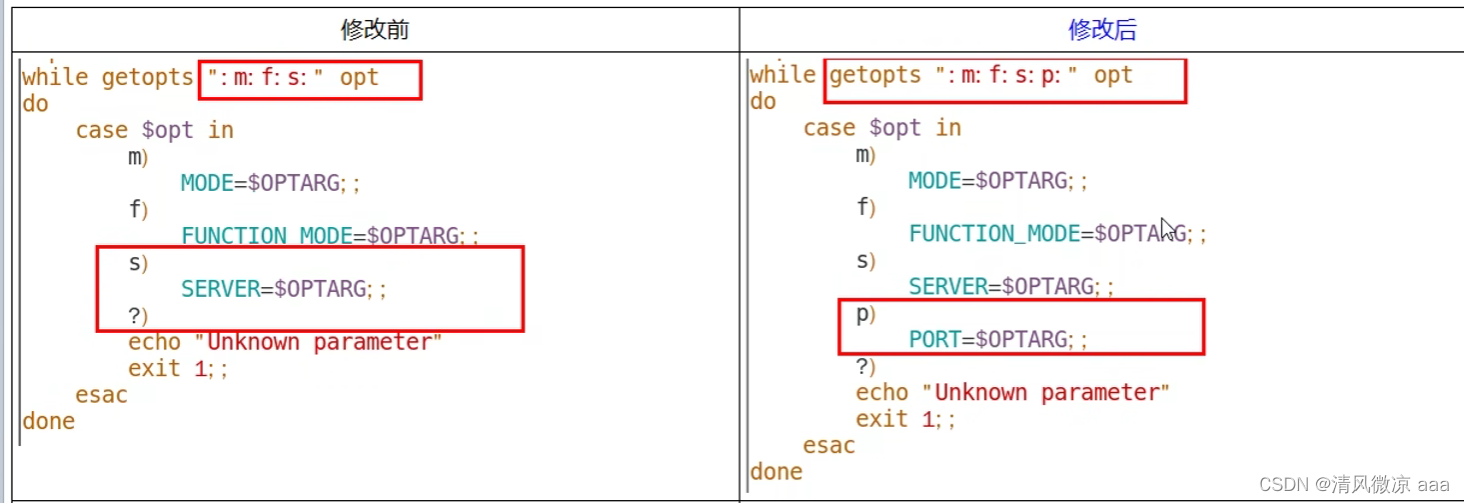
59行:添加参数p,表示会执行p)分支
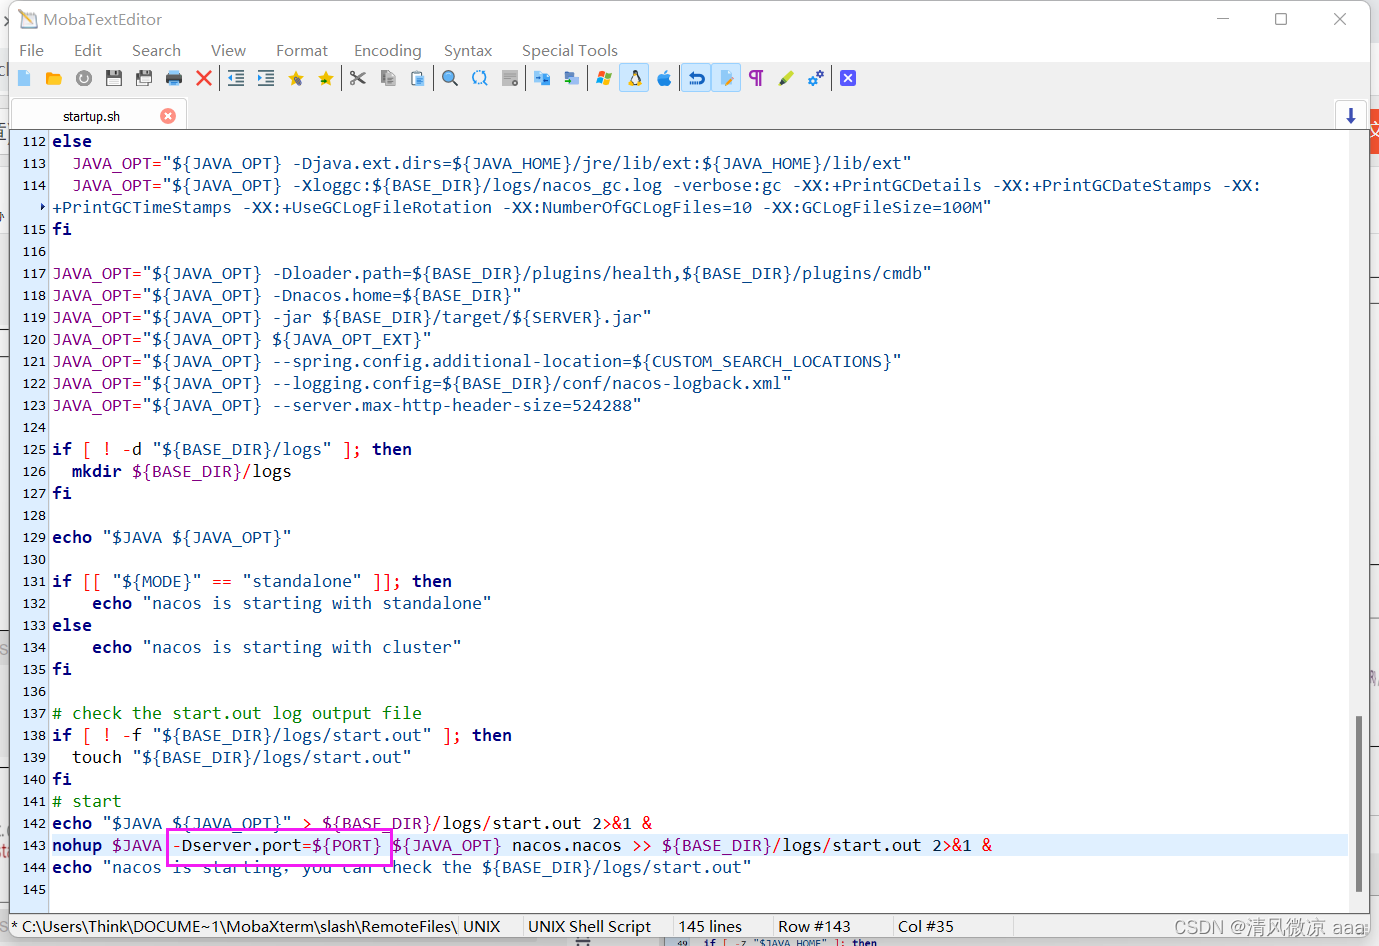
最后:明确告诉Nacos启动的是那台节点

-
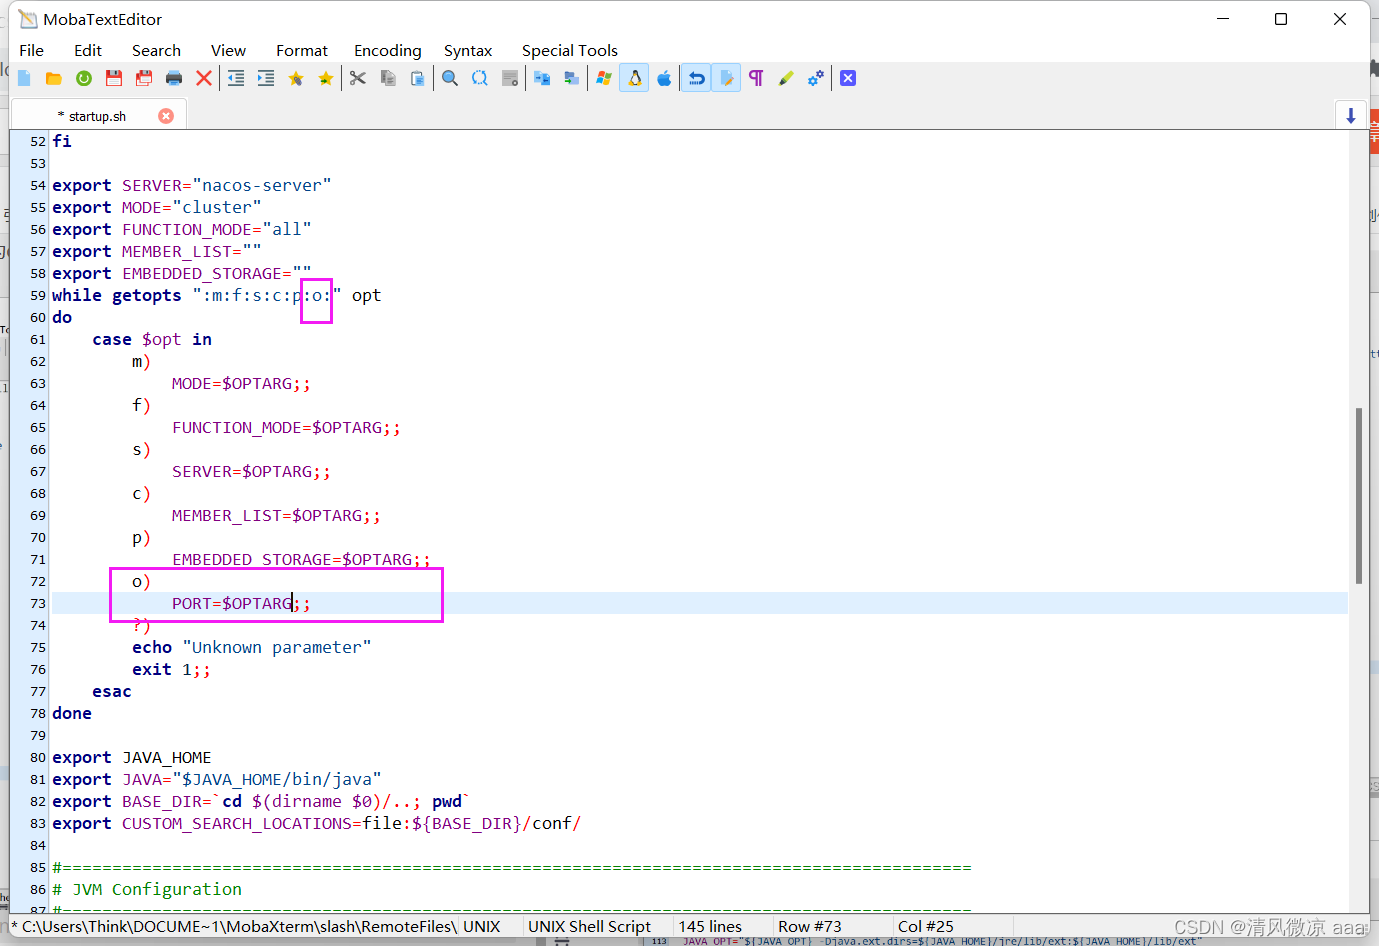
新版:p已经被占用了,随便改一个字母为o
PORT=$OPTARG;;
-Dserver.port=${PORT}
-
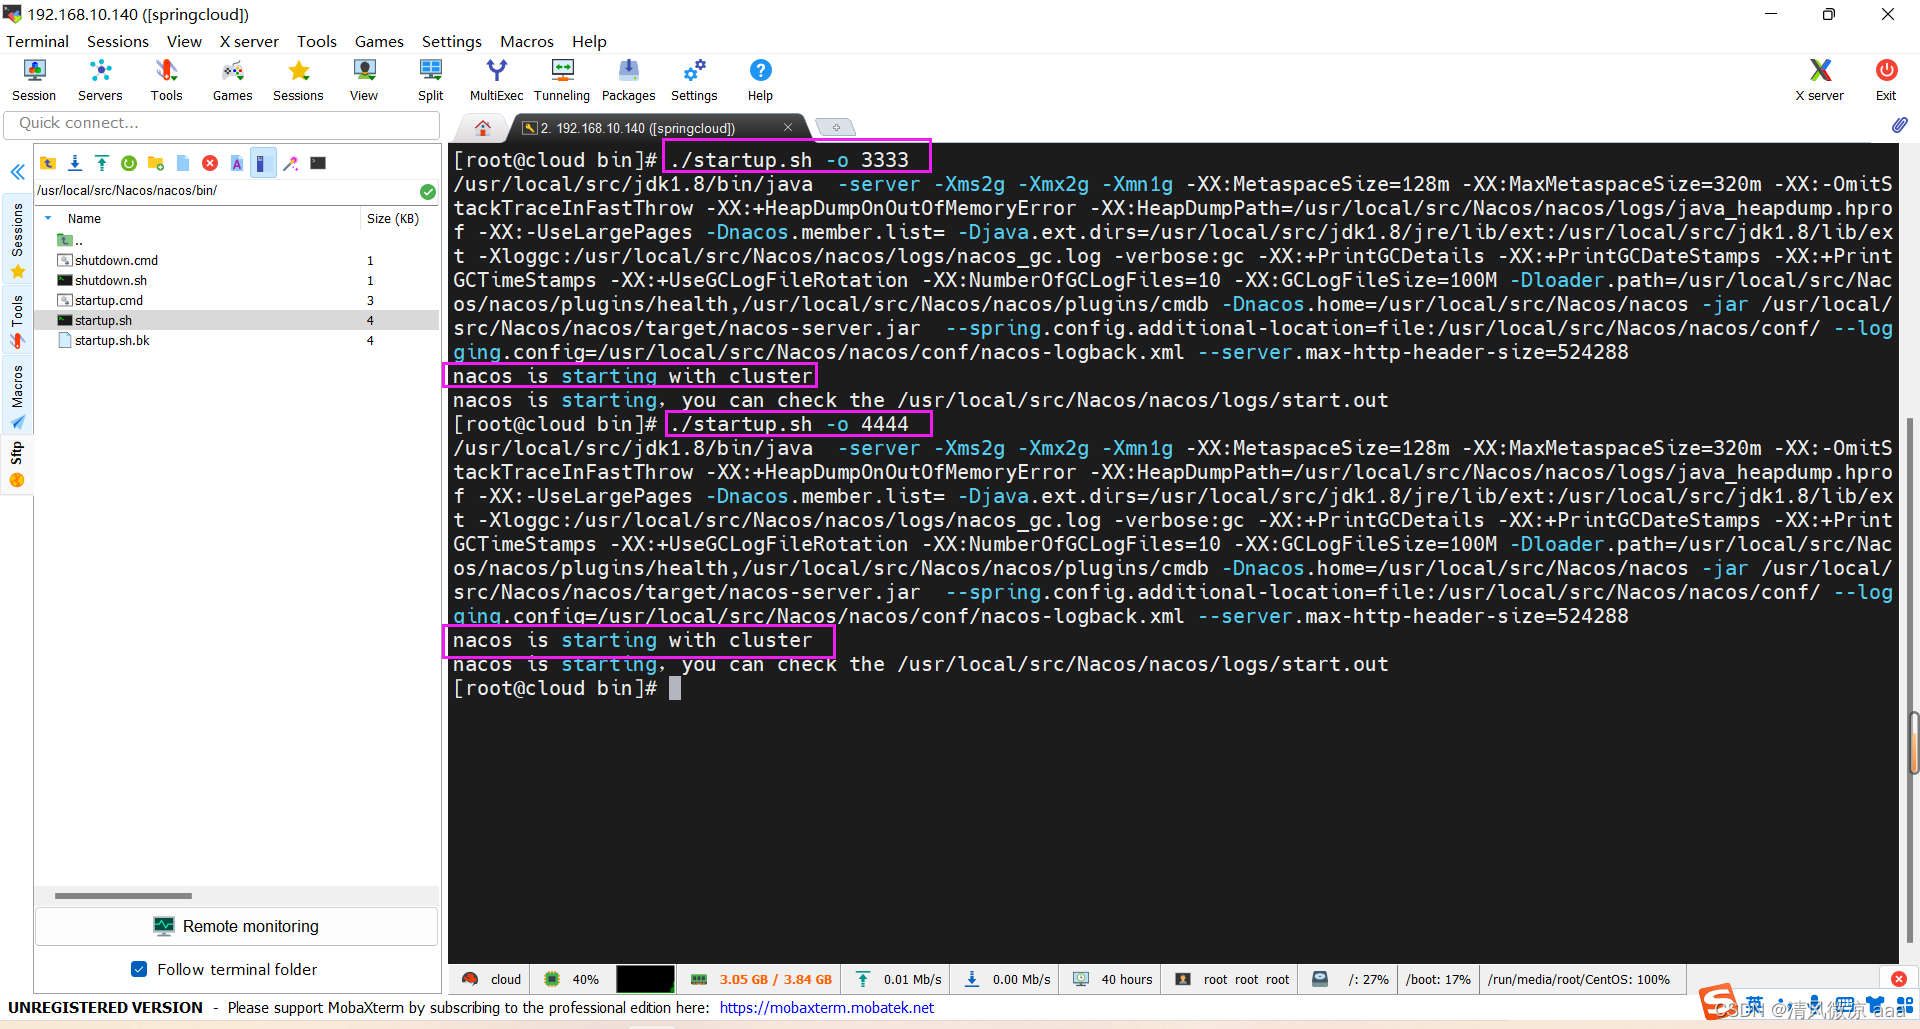
执行方式:bin目录下
./startup.sh -o 3333
6) Nacos集群配置(下)
第一个:Nginx的配置,由它作为负载均衡器
-
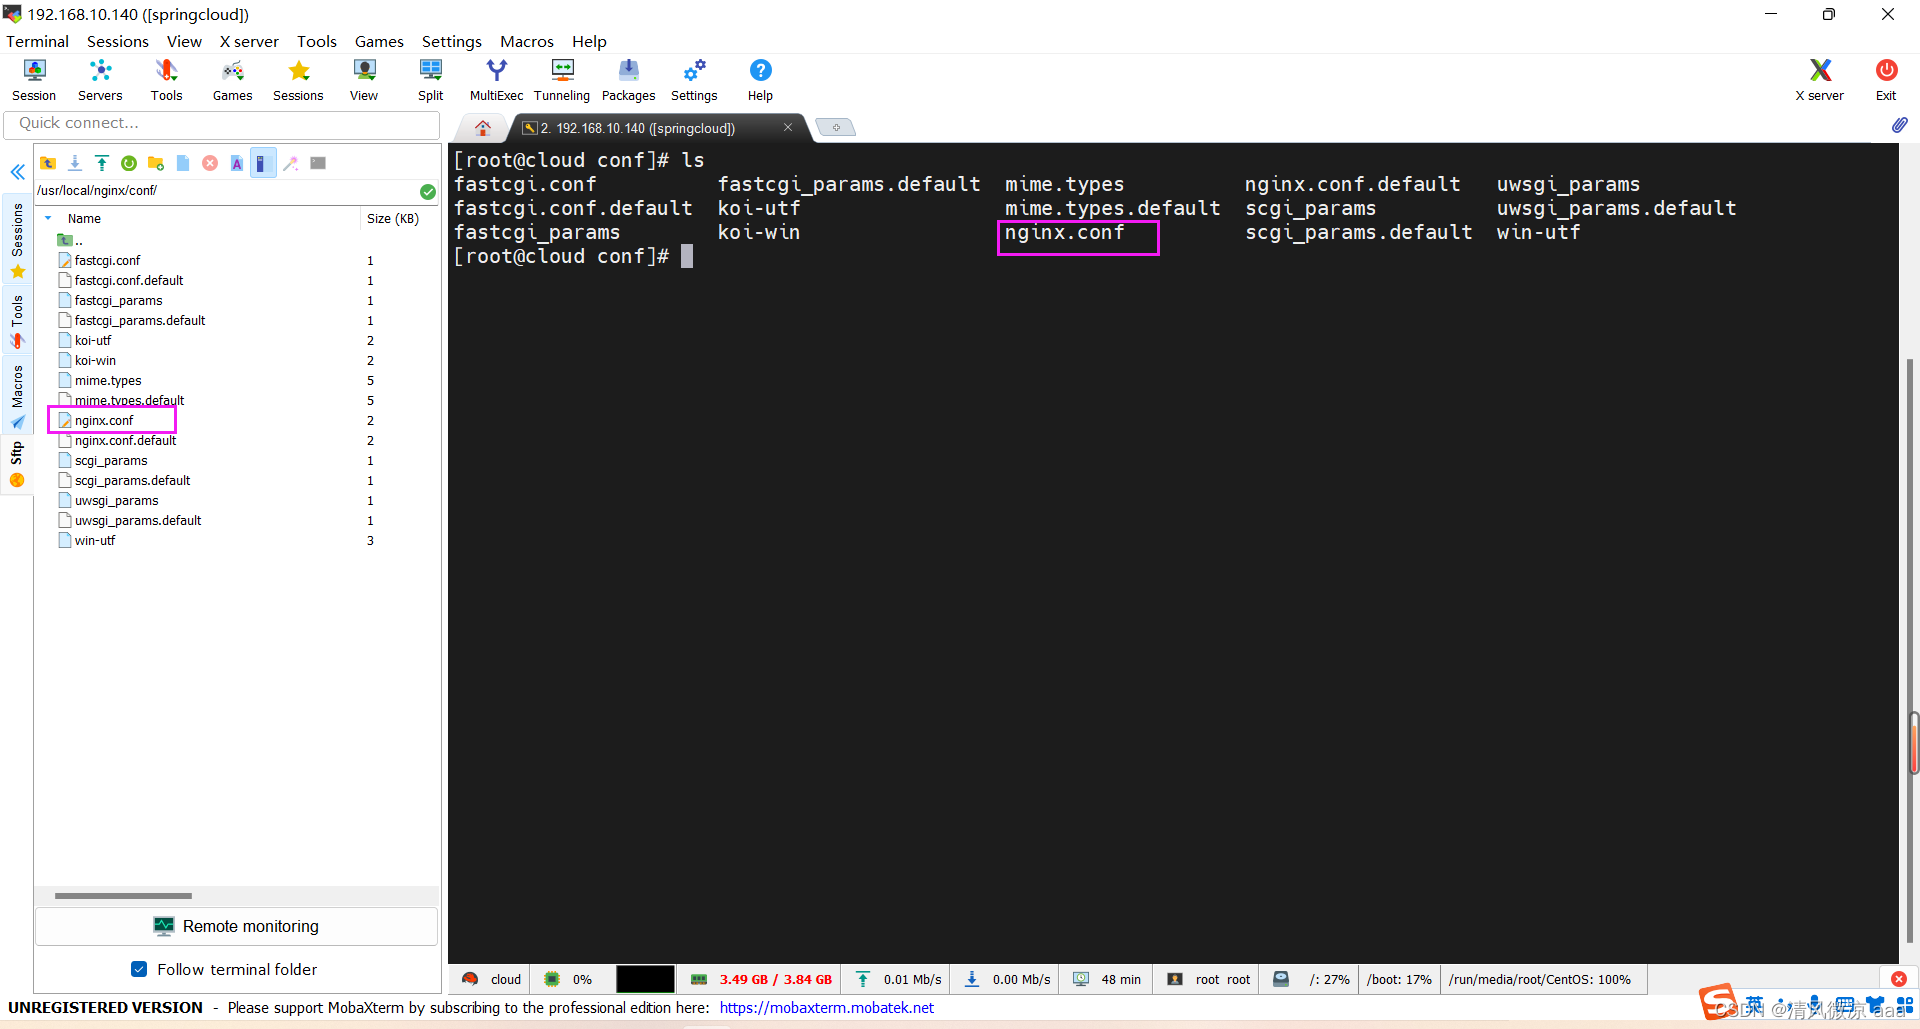
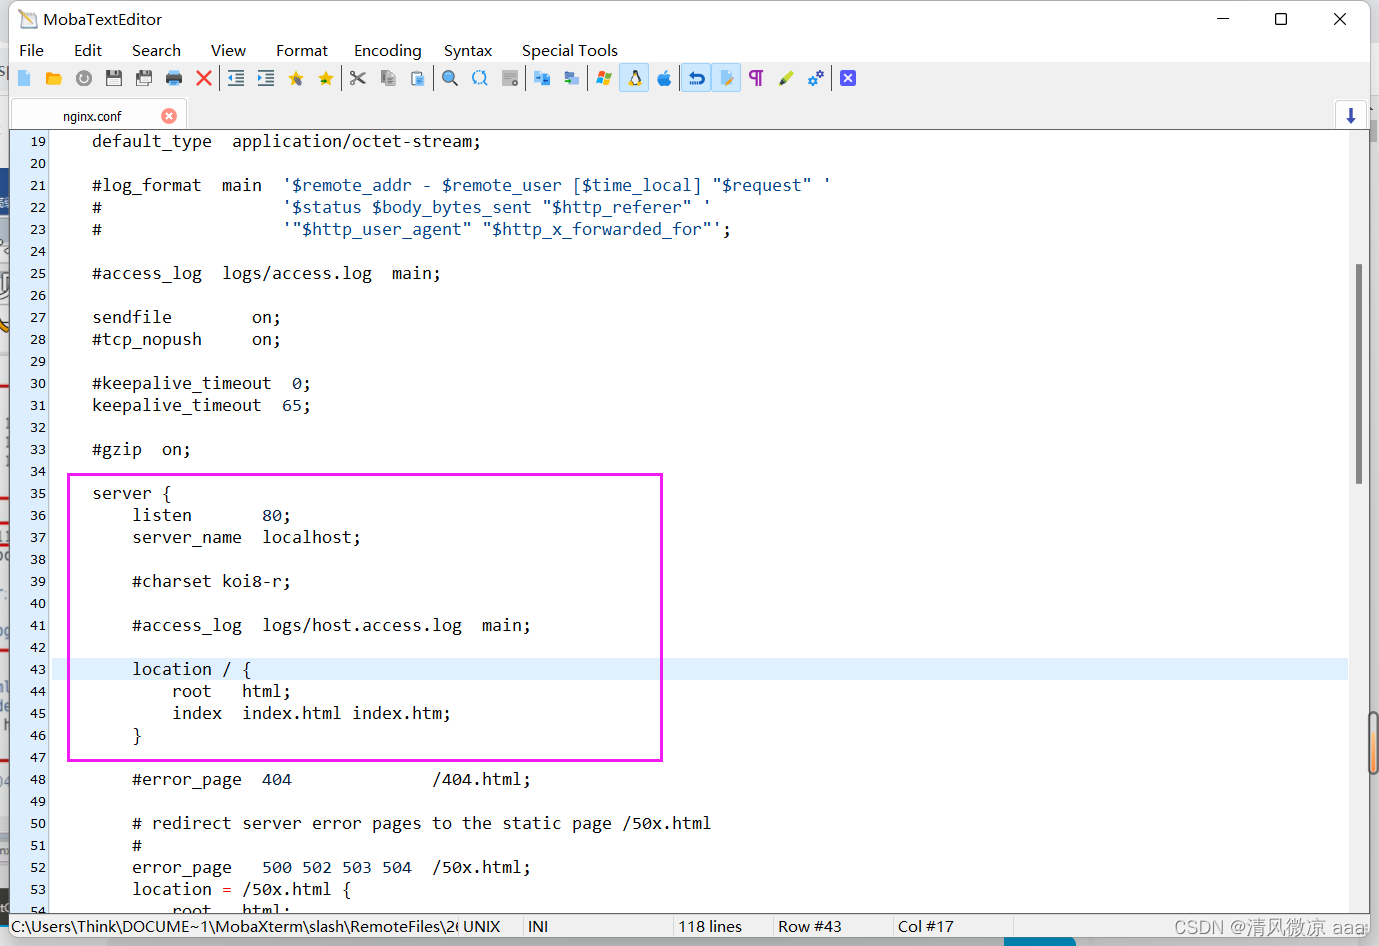
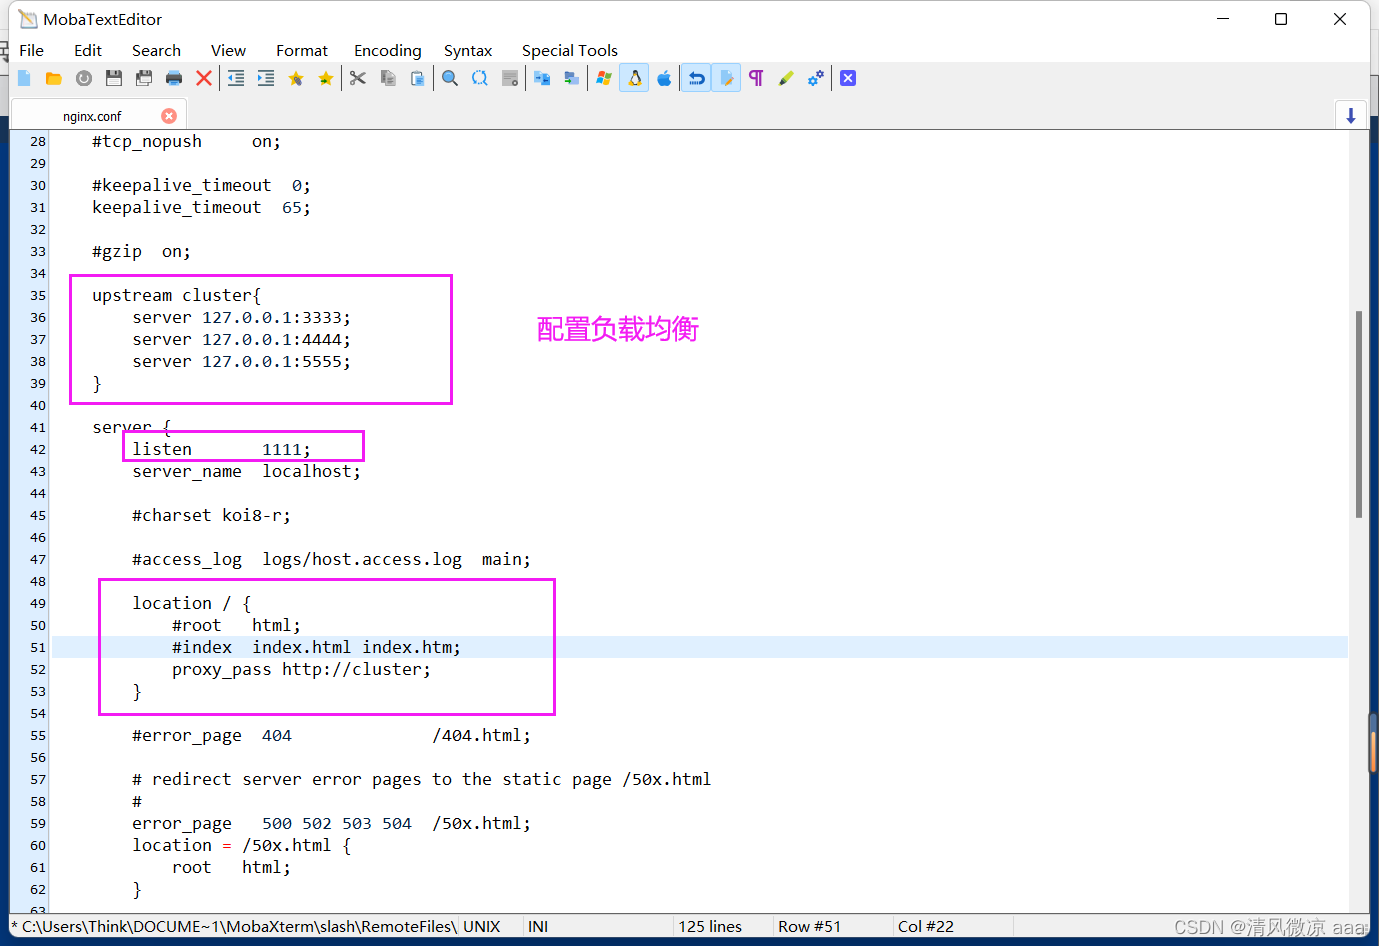
修改nginx的配置文件:nginx安装路径的conf目录下的
nginx.conf文件
-
nginx.conf:修改之前
-
nginx.conf:修改之后
-
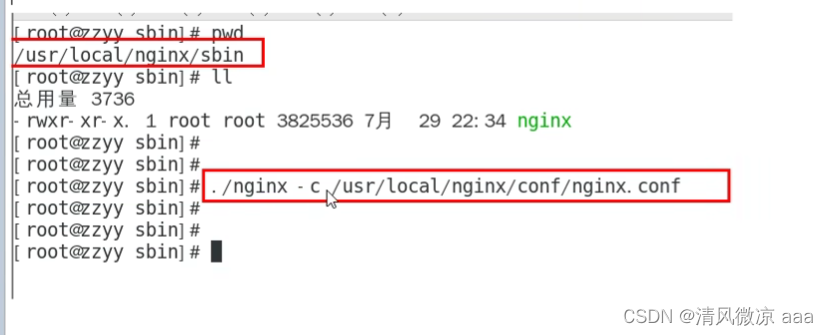
Nginx服务器指定启动配置文件命令:
7)测试1:集群是否搭建成功
截止到此处,1个Nginx+3个nacos注册中心+1个mysql
-
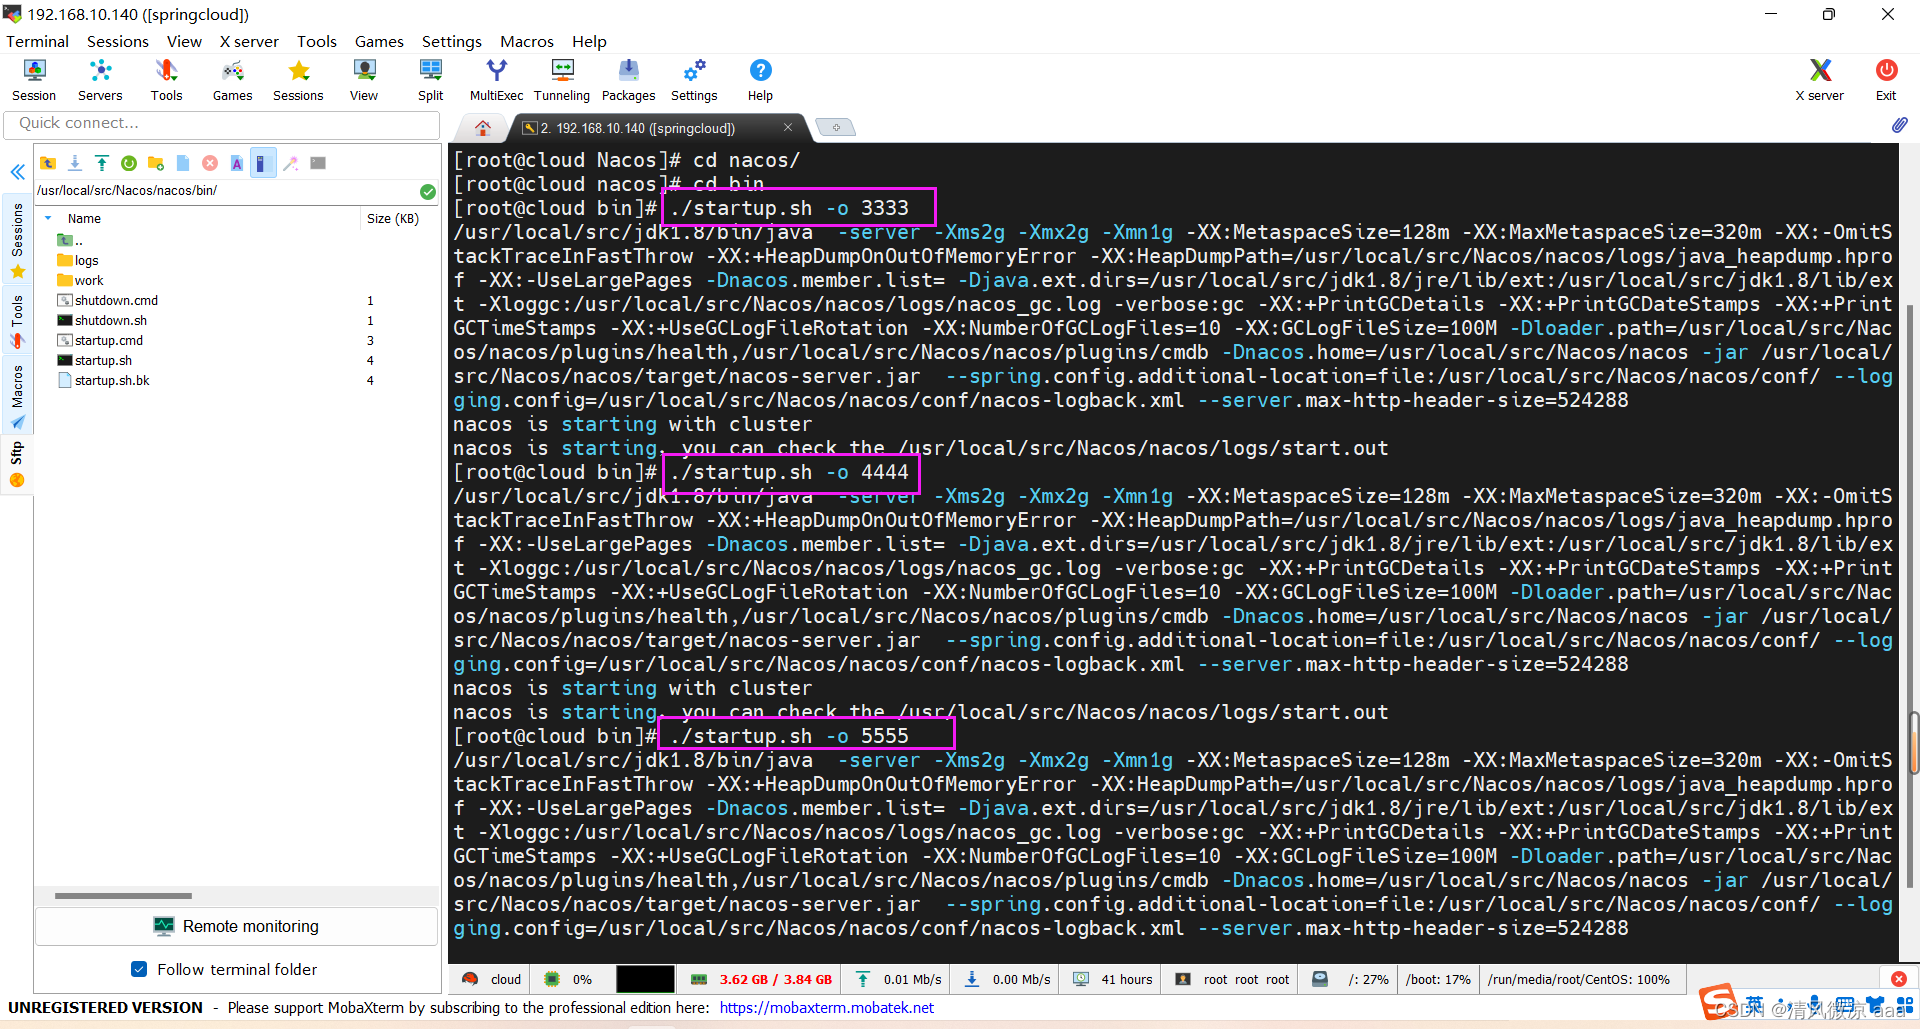
启动3台Nacos:/usr/local/src/Nacos/nacos/bin/
- ./startup.sh -o 3333
- ./startup.sh -o 4444
- ./startup.sh -o 5555
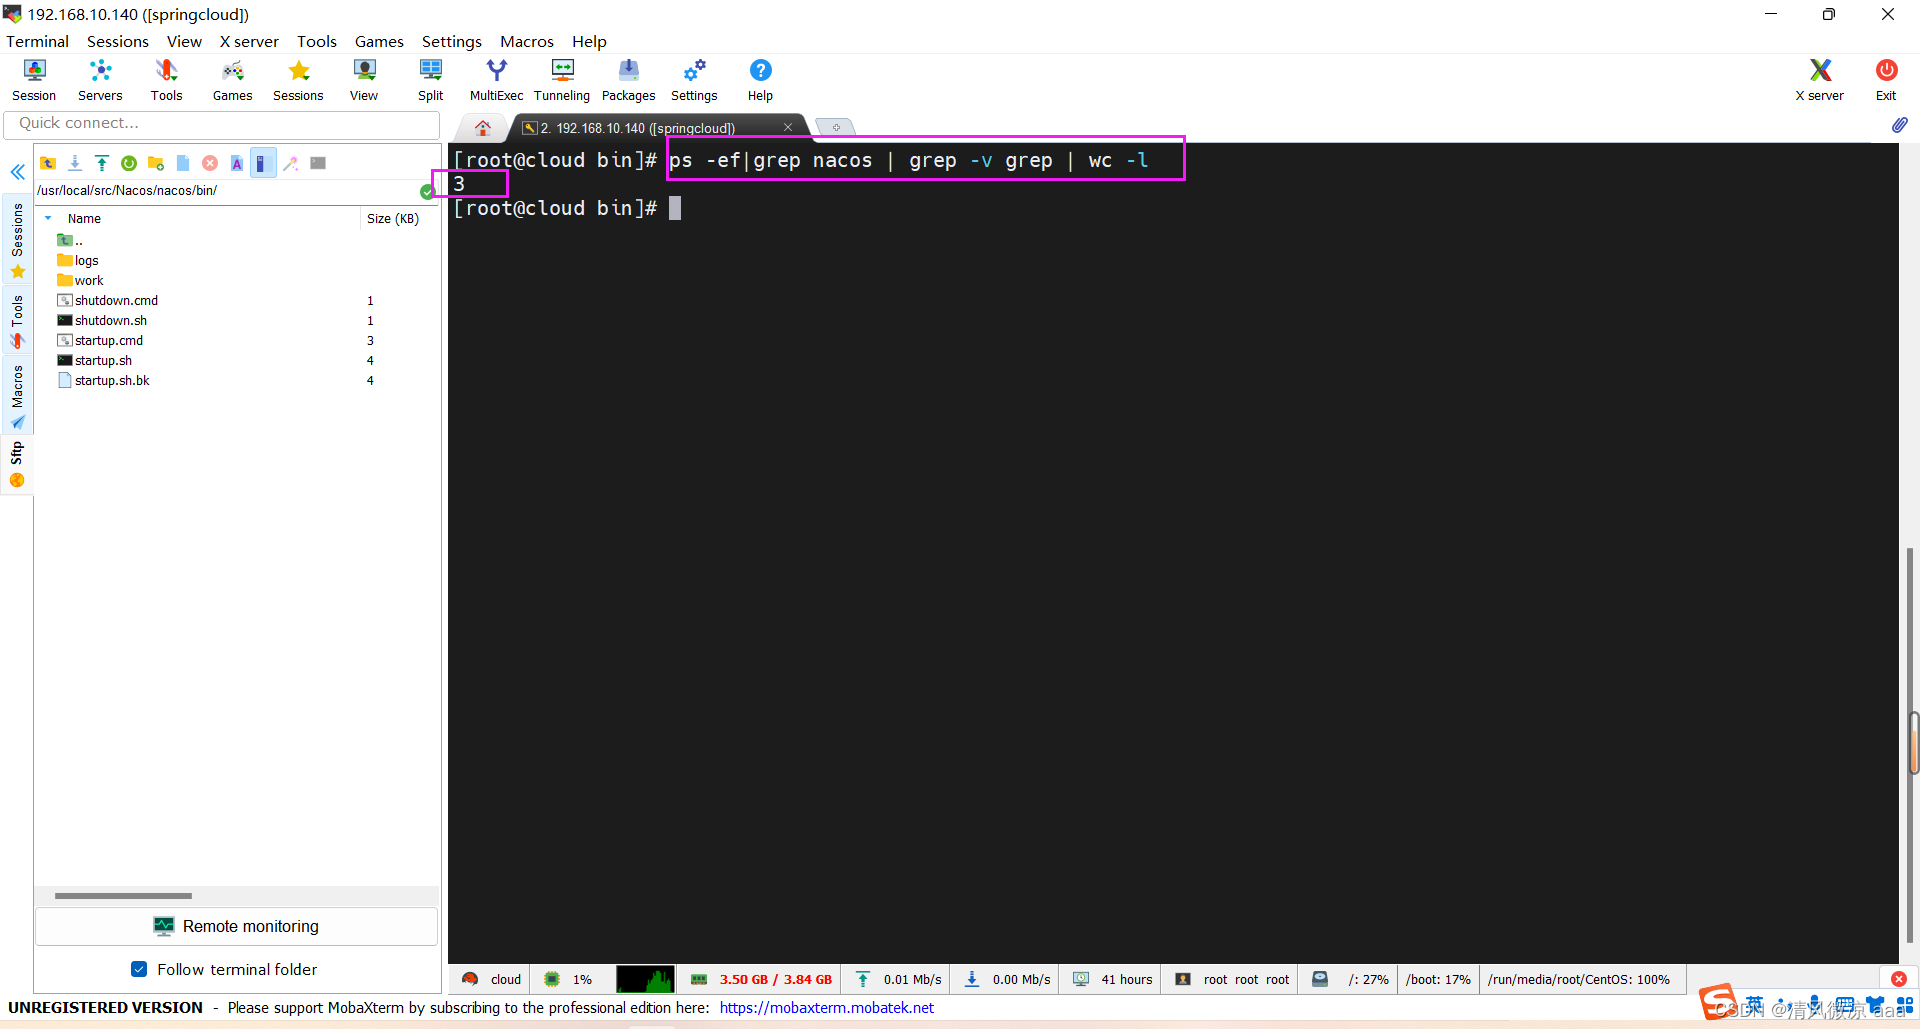
- 查看进程:
ps -ef|grep nacos | grep -v grep | wc -l
-
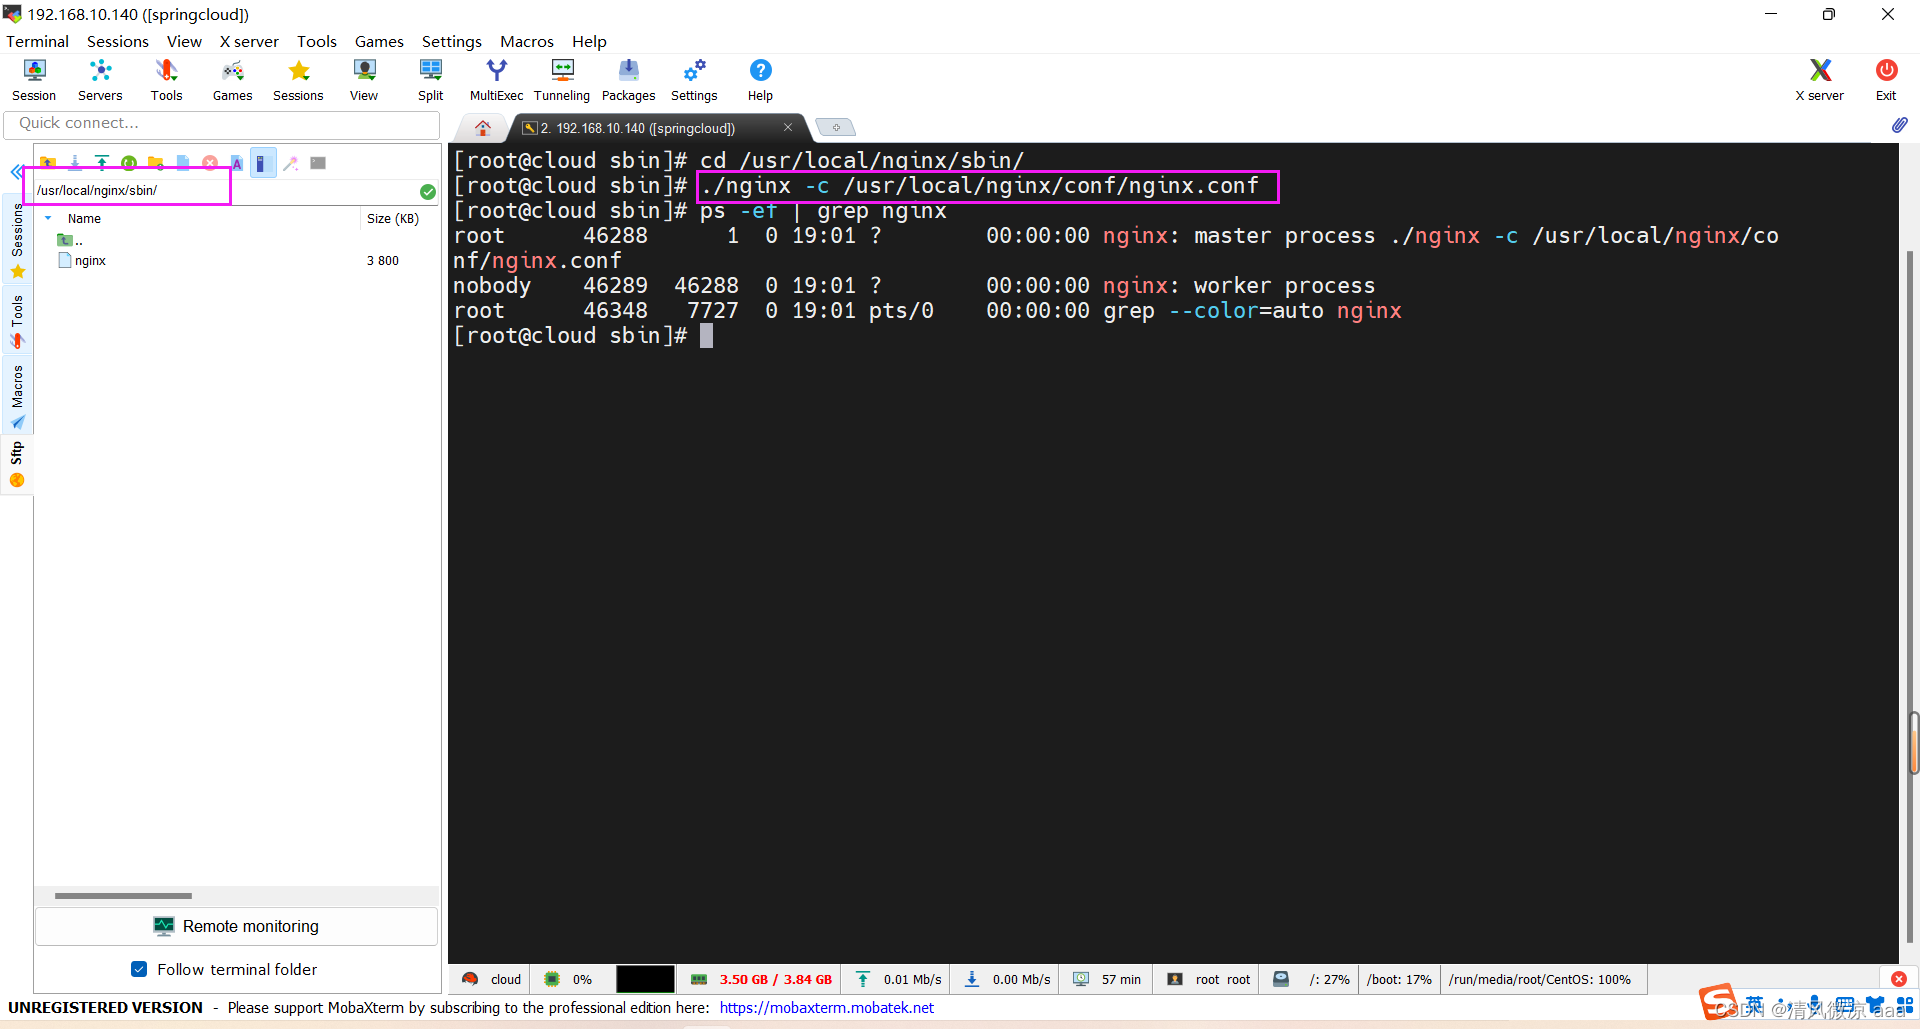
Nginx服务器指定启动配置文件命令:在/usr/local/nginx/sbin/目录下
./nginx -c /usr/local/nginx/conf/nginx.conf
查看进程:ps -ef | grep nginx
- 指向的文件
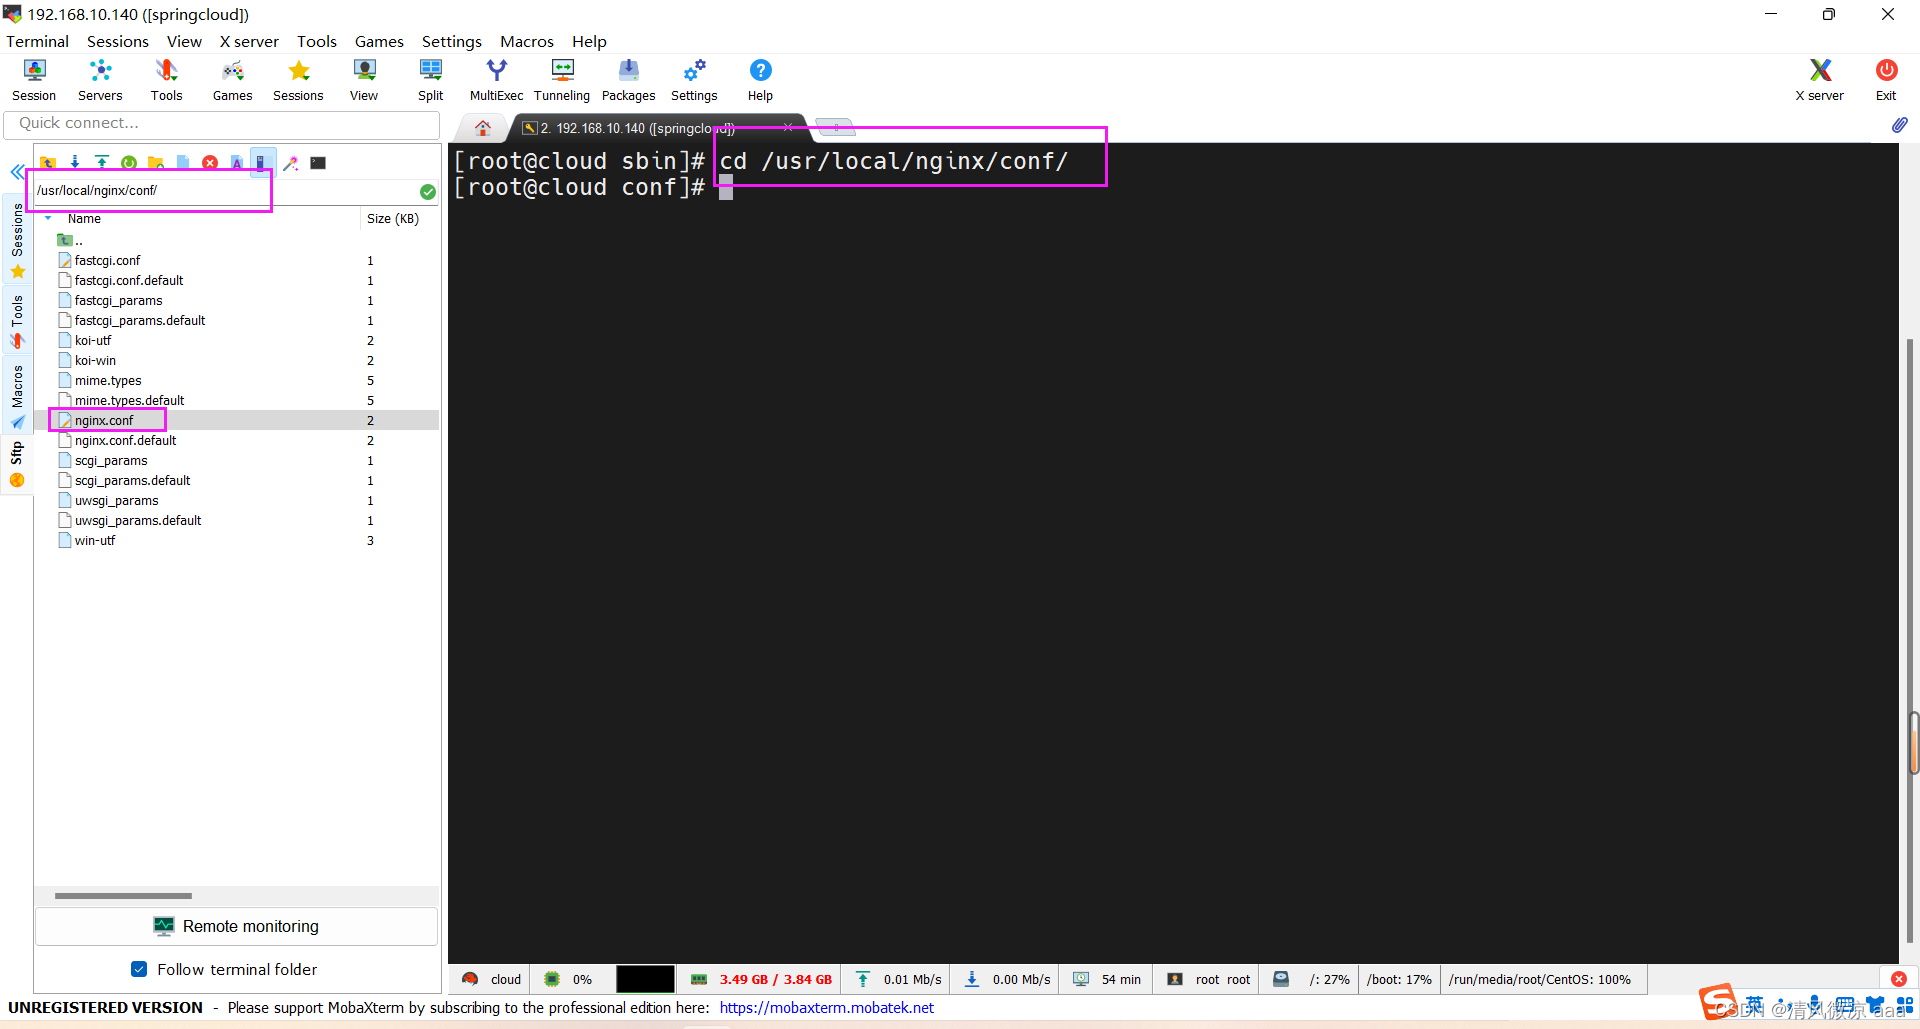
- 指向的文件
-
启动mysql:开机自动启动
-
测试通过nginx访问nacos:
http://192.168.10.140:1111/nacos/#/login
默认账号密码都是nacos
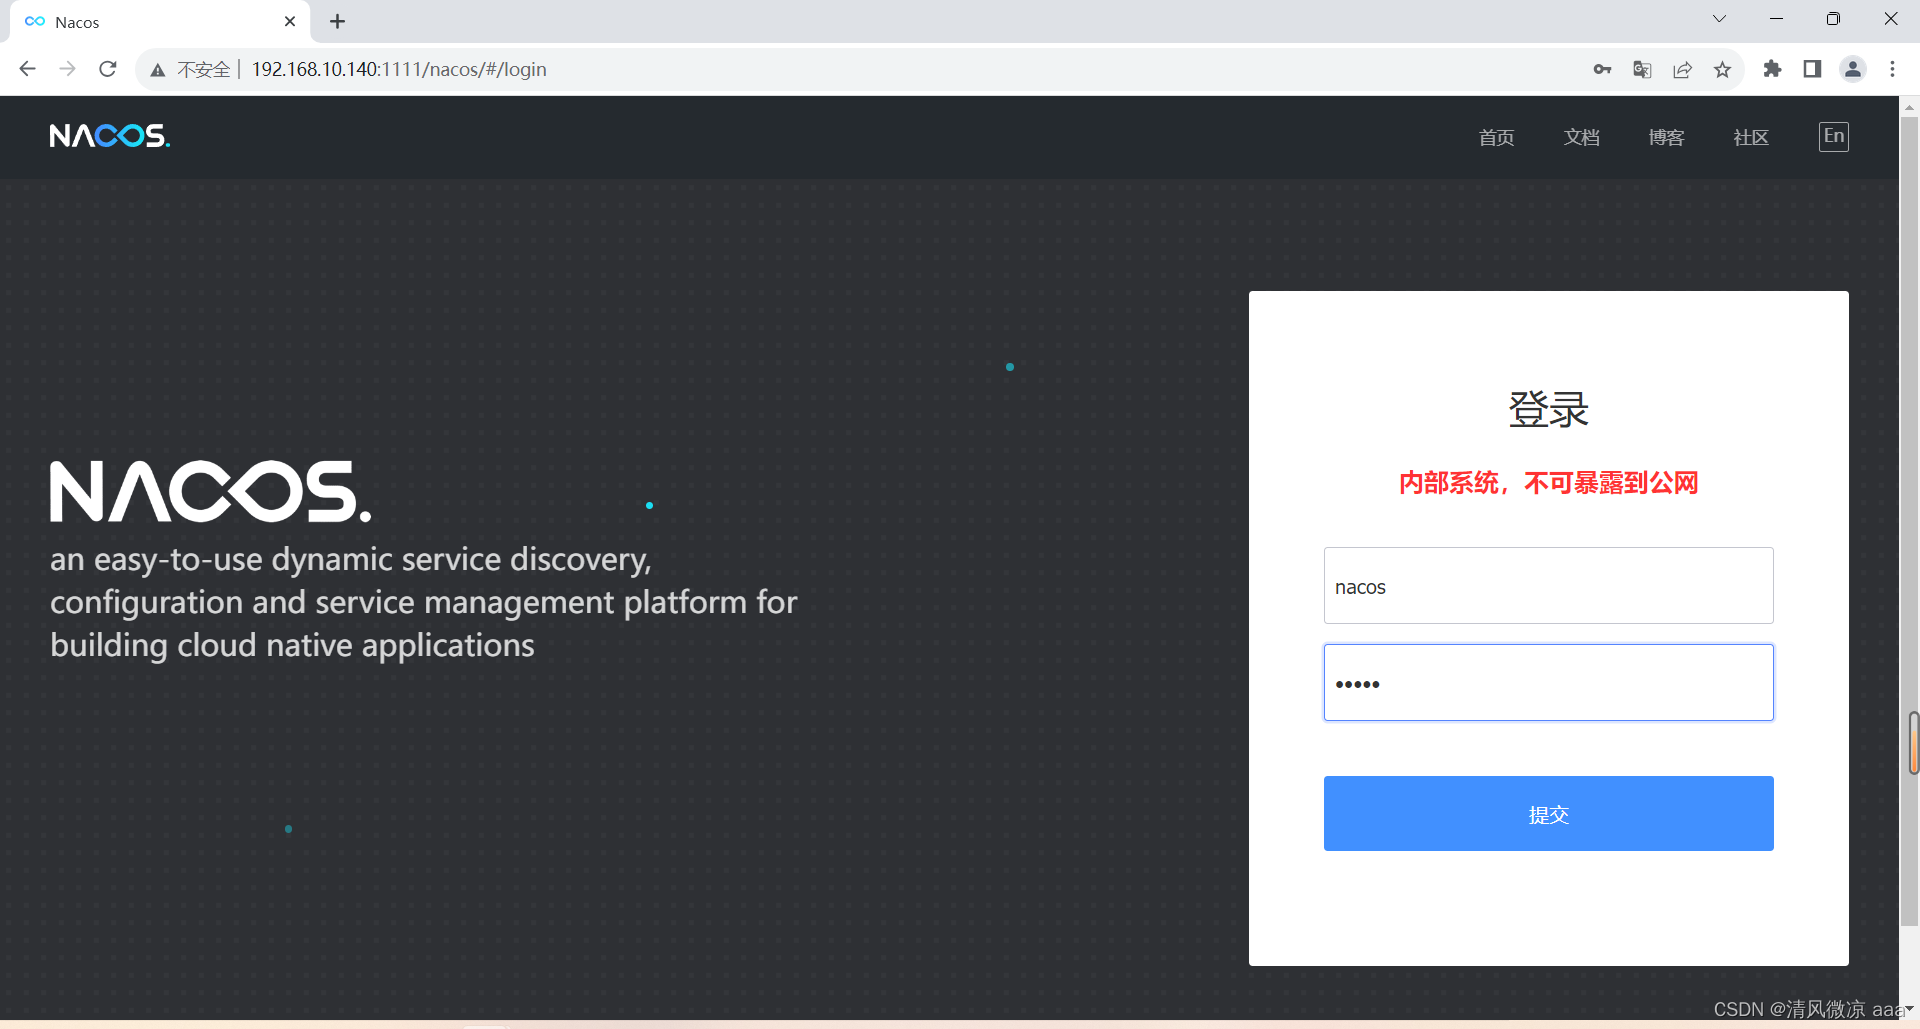
-
新建一个配置测试
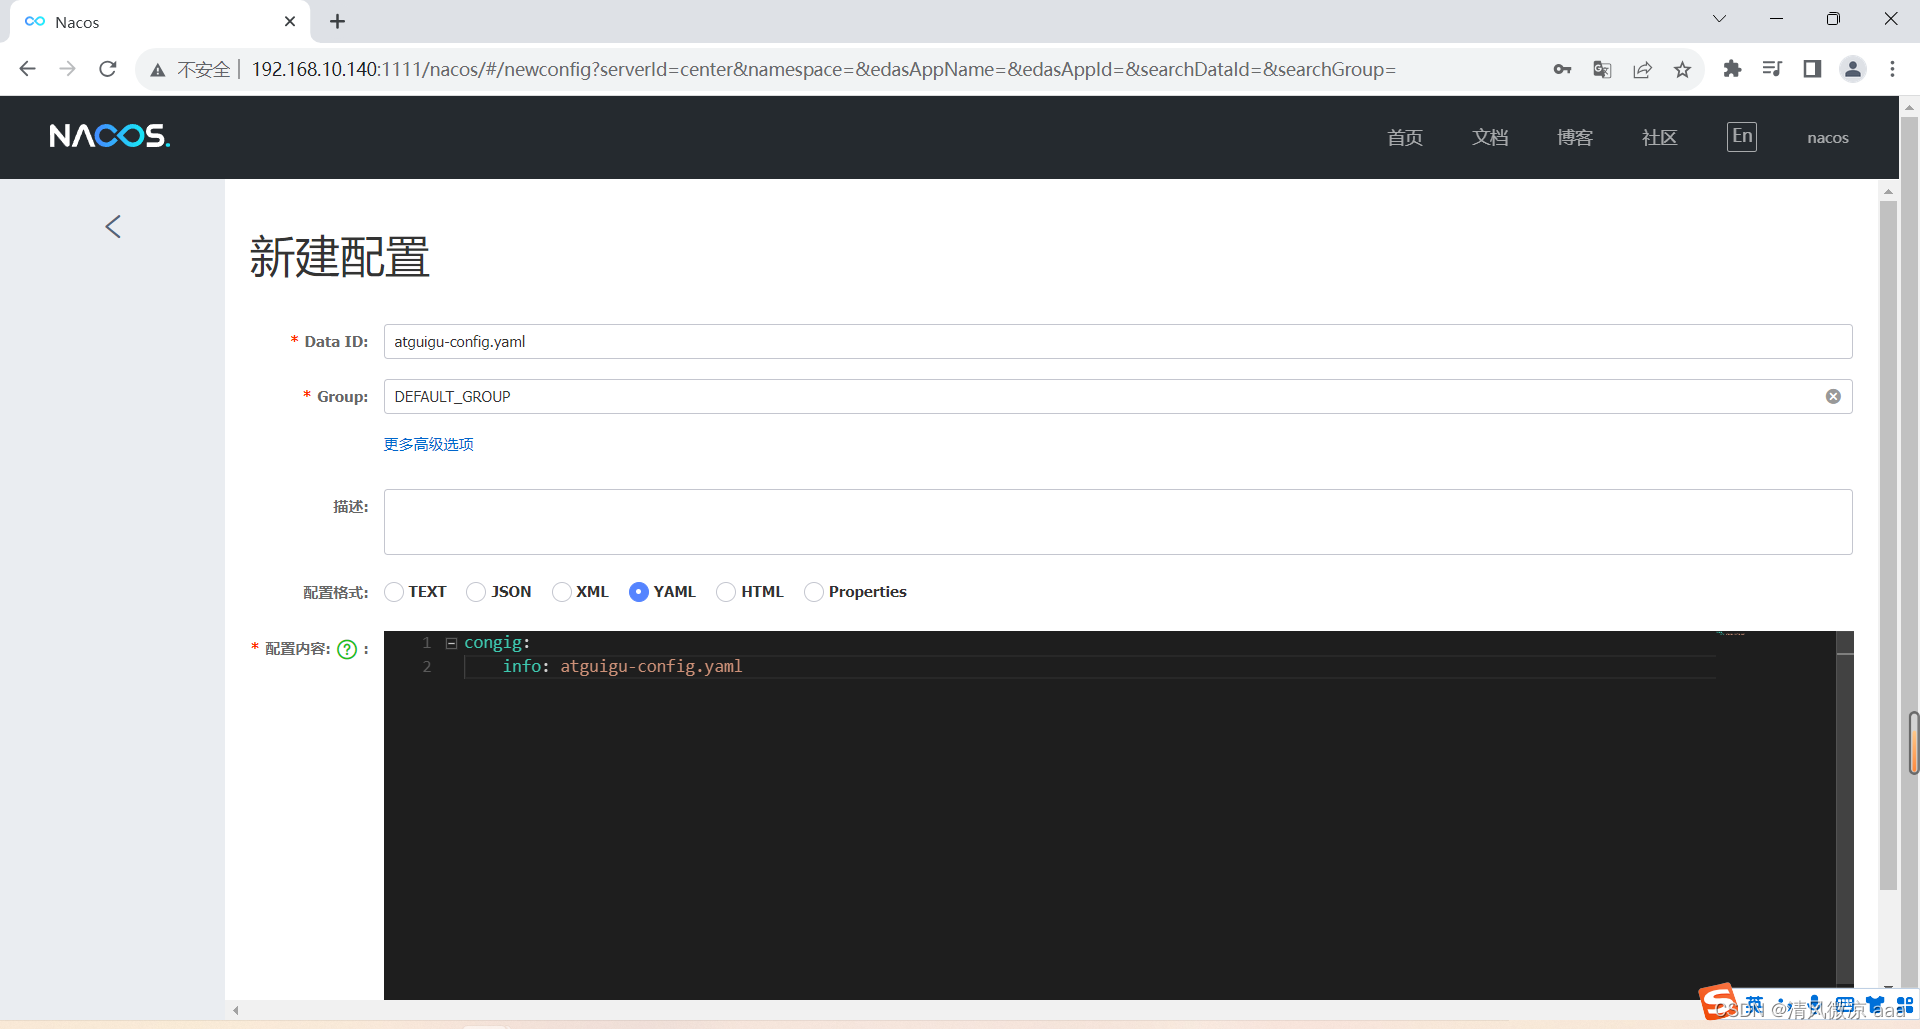
-
linux服务器的mysql插入一条记录
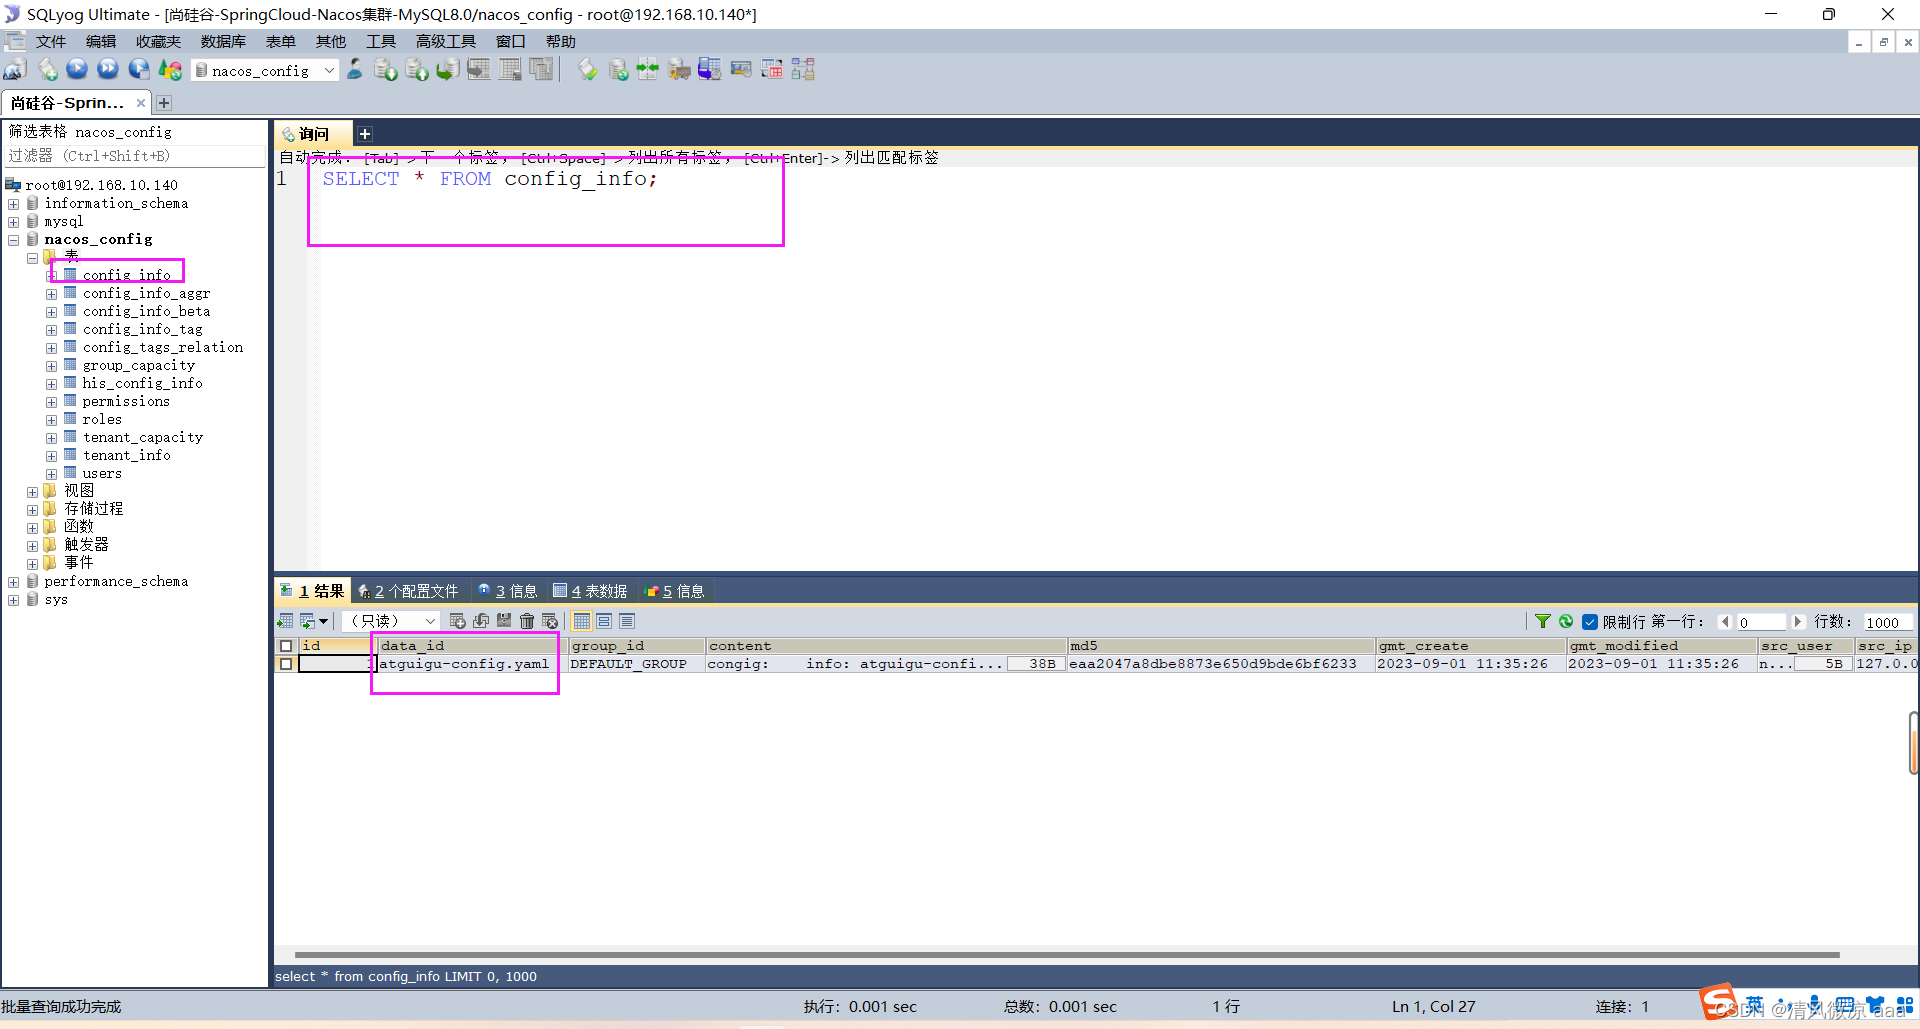
8)测试2:9002启动注册进nacos集群
微服务cloudalibaba-provider-payment9002启动注册进nacos集群
- yml
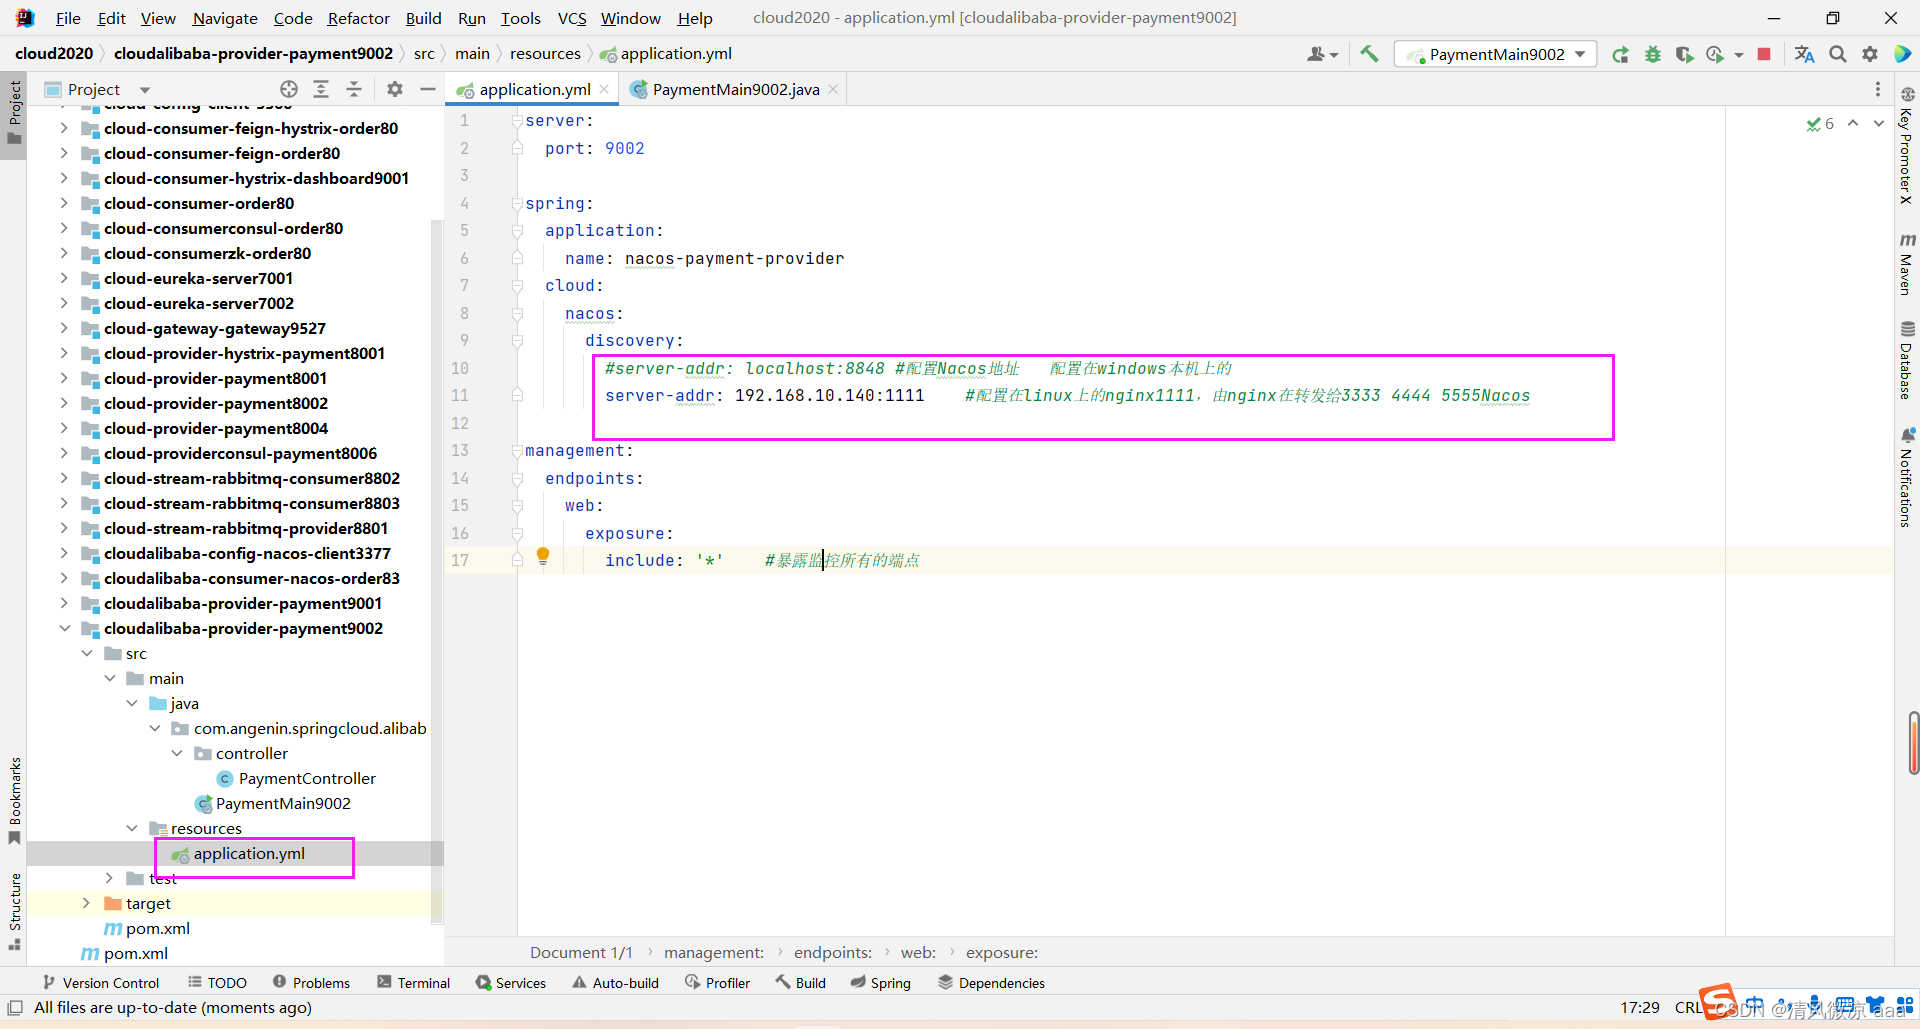
#server-addr: localhost:8848 #配置Nacos地址 配置在windows本机上的server-addr: 192.168.10.140:1111 #配置在linux上的nginx1111,由nginx在转发给3333 4444 5555Nacos
- 启动9001
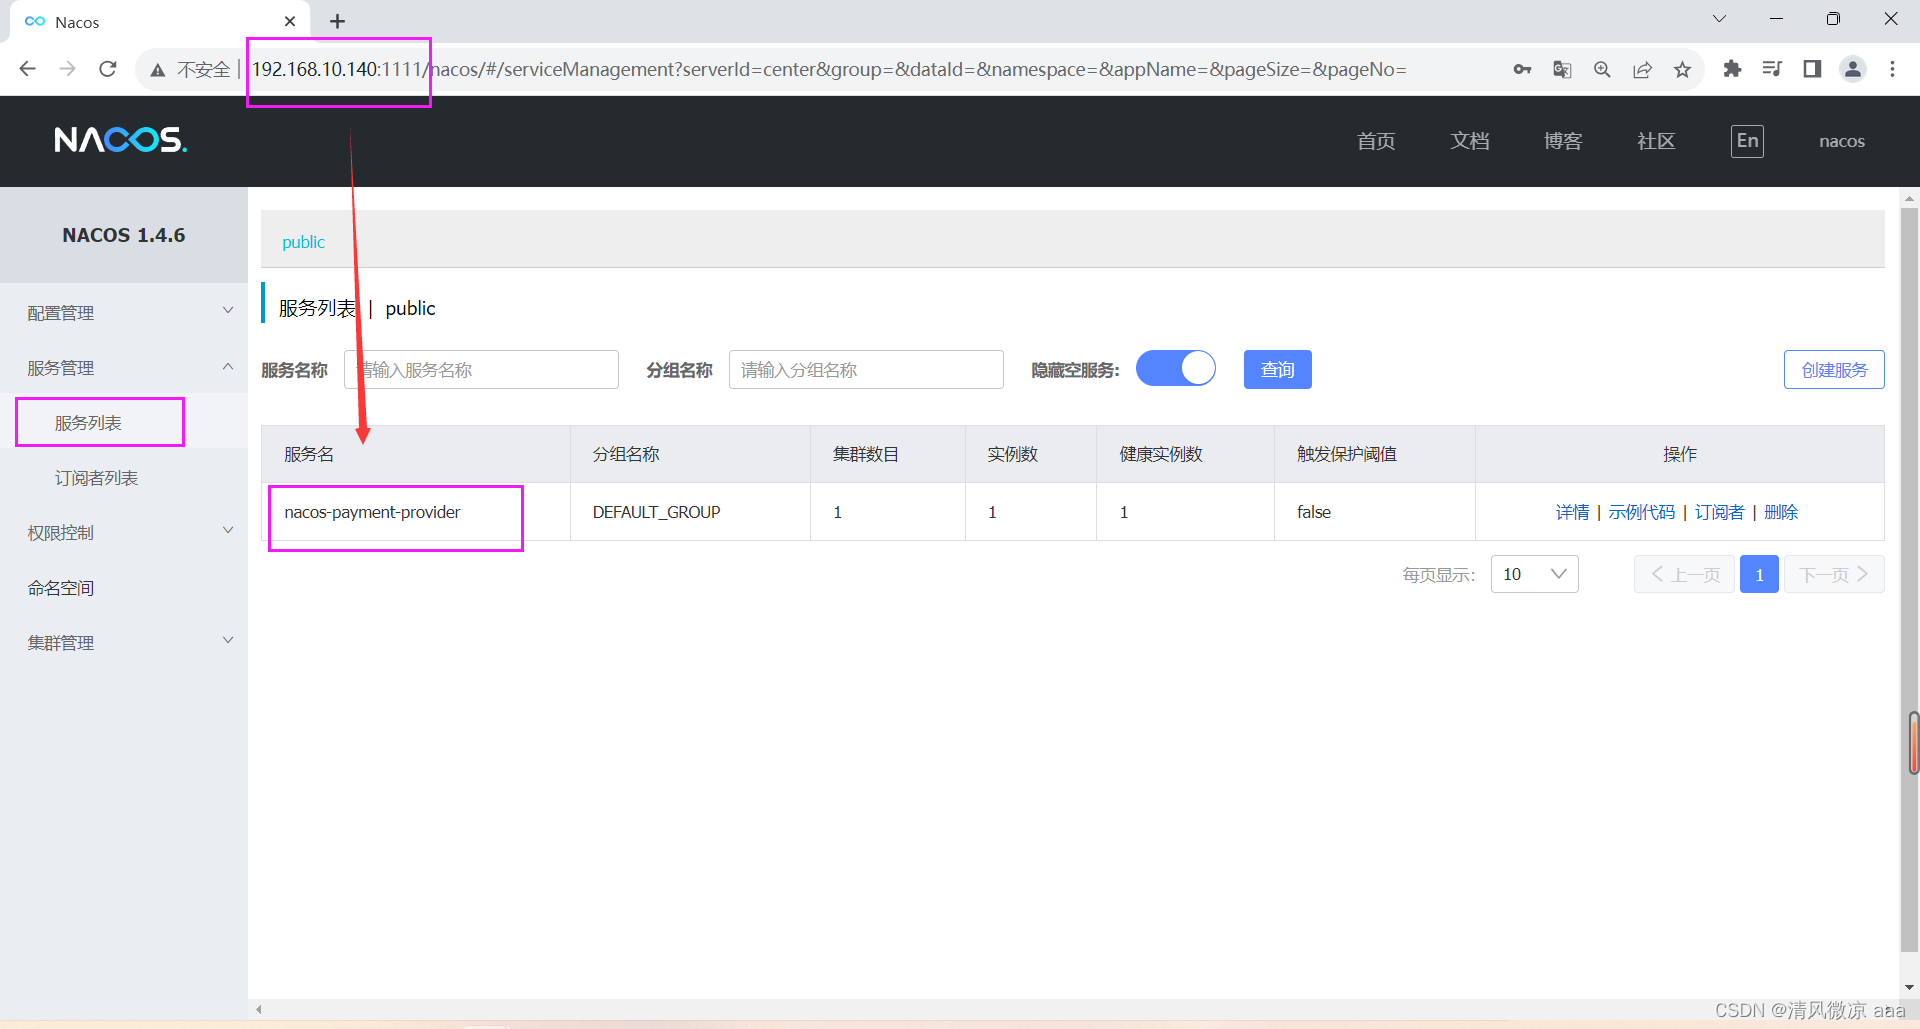
- 结果:查看服务列表发现9002成功注册到安装在linux系统上的Nacos注册中心
9)高可用小总结
19 Sentinel实现熔断与限流
- SpringCloud Alibaba Sentinel实现熔断与限流
19.1 Sentinel
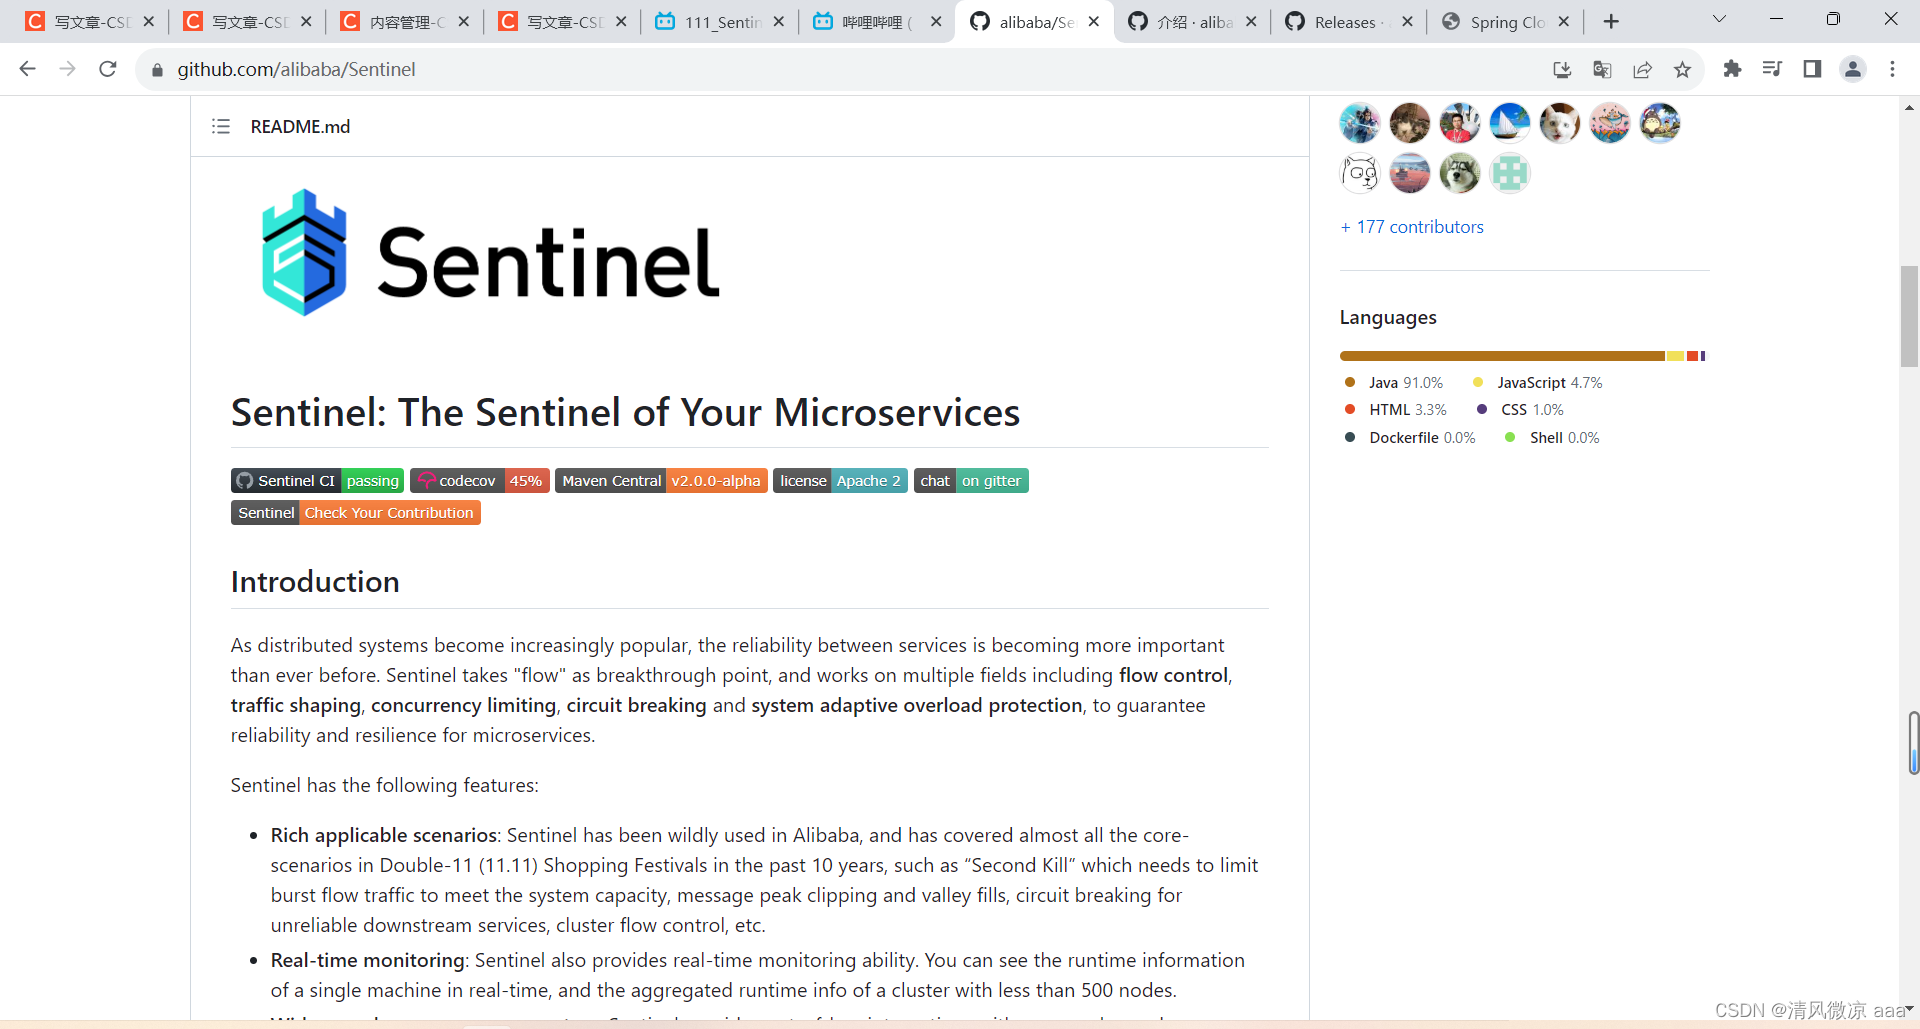
19.1.1 官网
-
https://github.com/alibaba/Sentinel
-
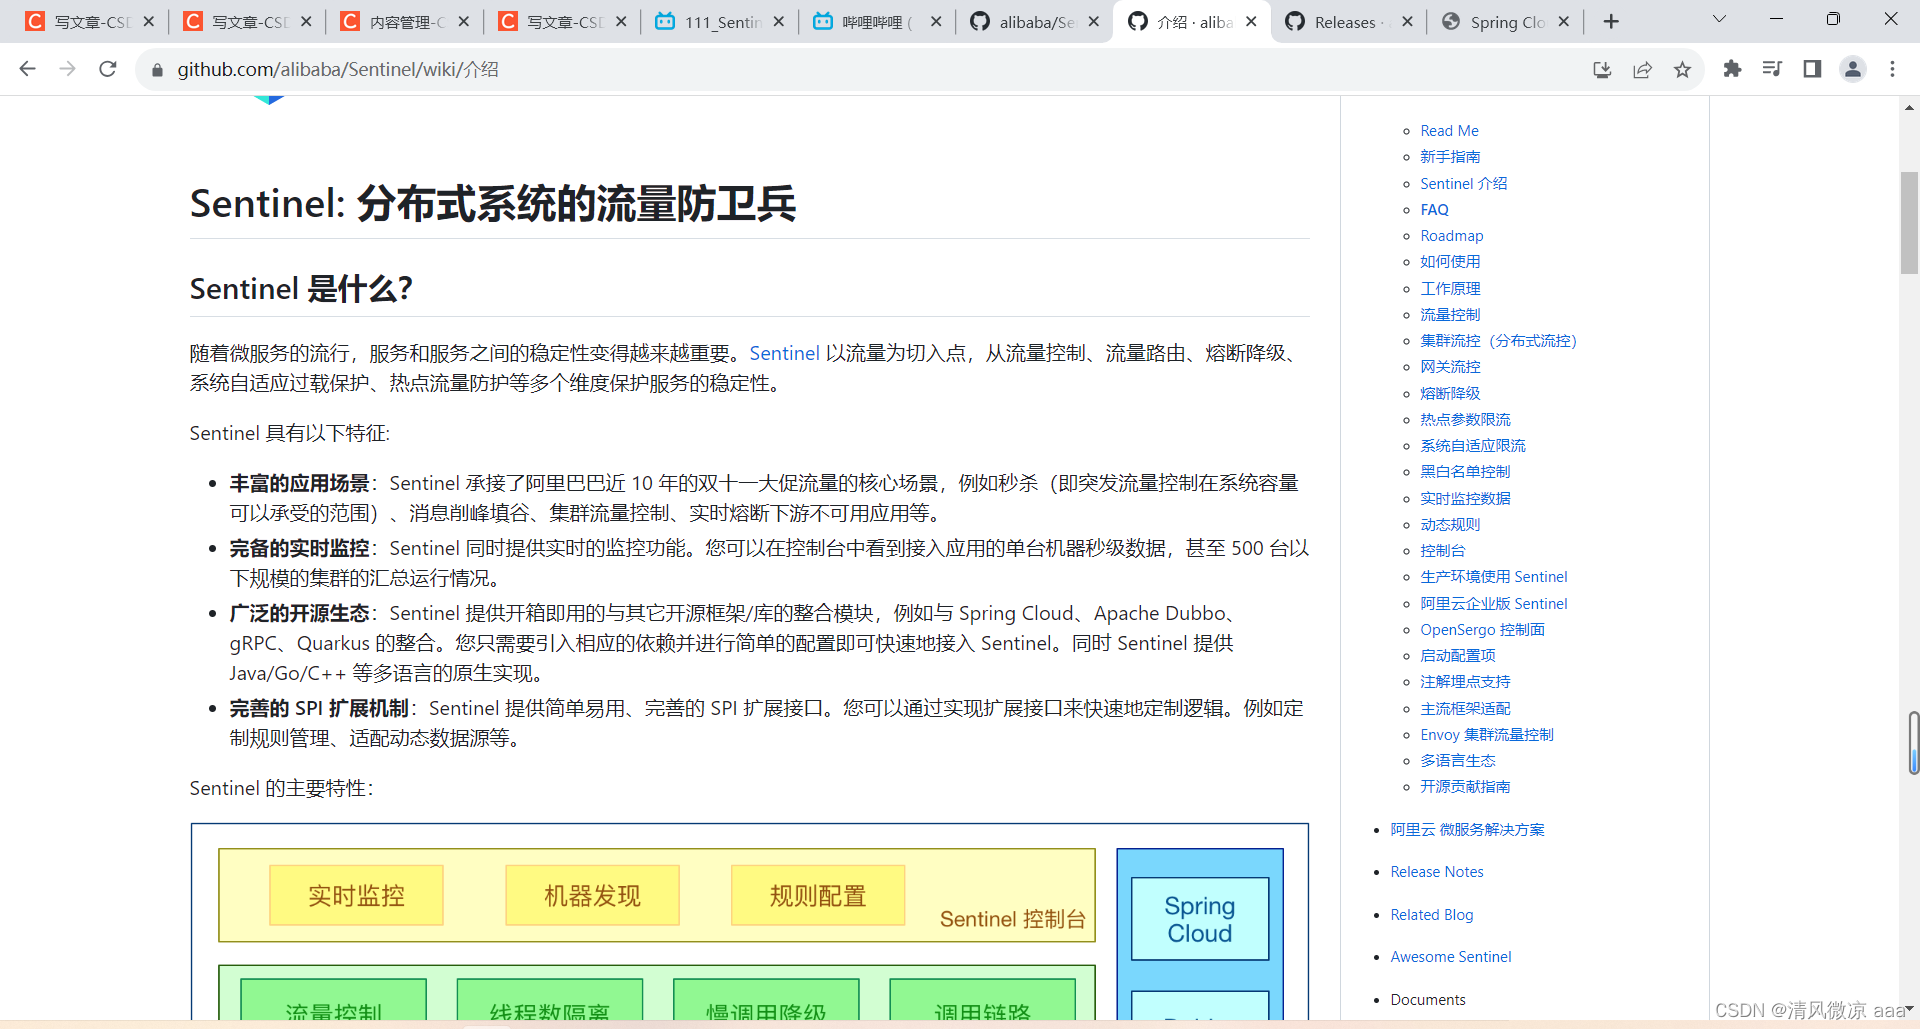
中文:https://github.com/alibaba/Sentinel/wiki/%E4%BB%8B%E7%BB%8D
19.1.2 是什么
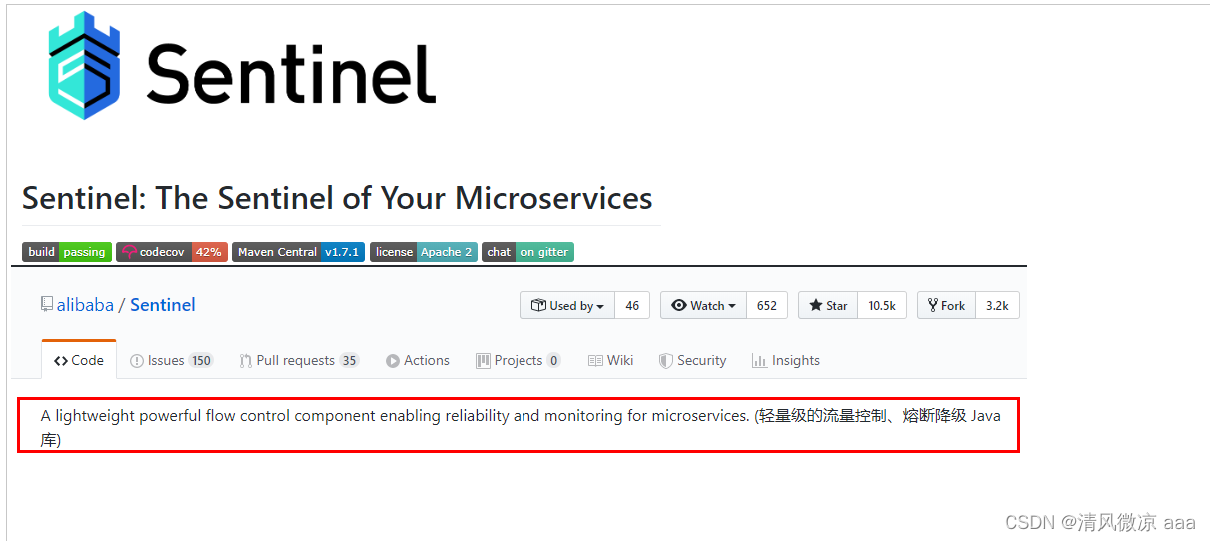
- 一句话解释,之前我们讲解过的Hystrix
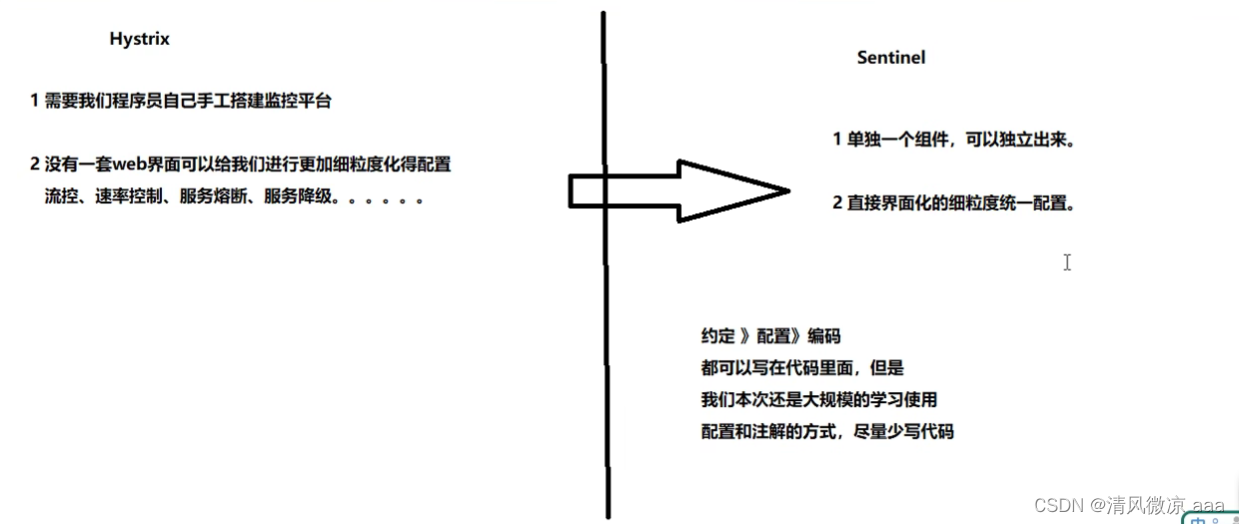
- 和Hystrix的对比
19.1.3 去哪下
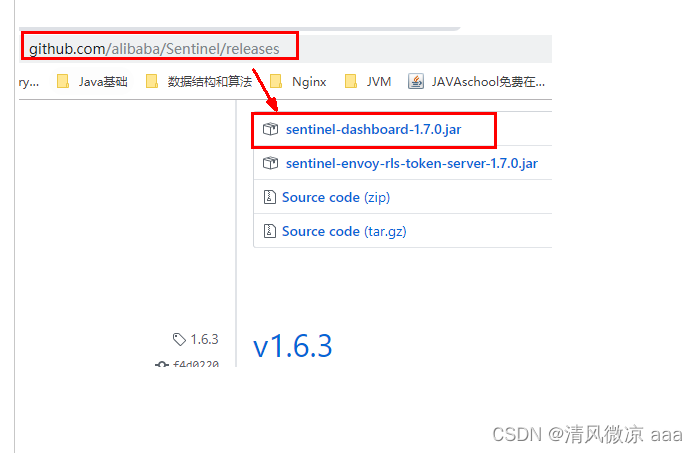
- https://github.com/alibaba/Sentinel/releases
- 视频学习时的版本:
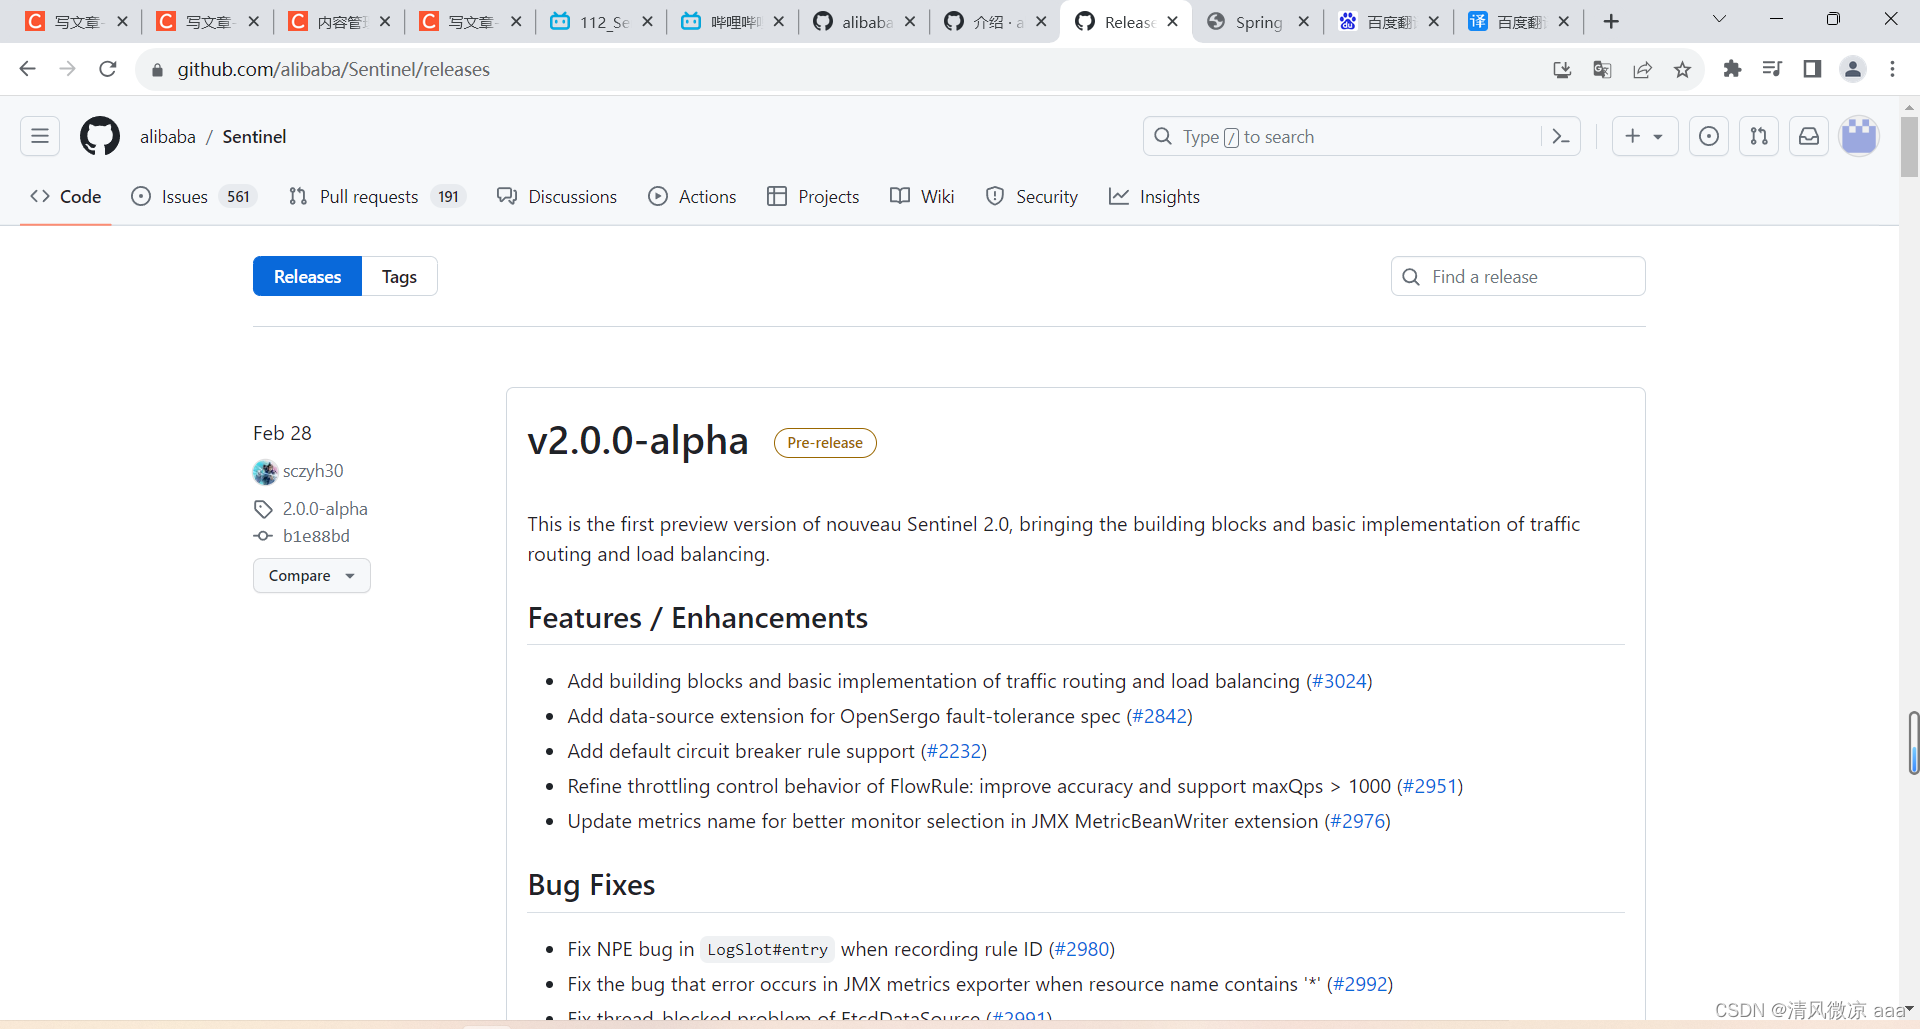
- 截止到:2323/9/2的版本(Pre-release:预发布版本为v2.0.0-alpha,Latest:最新版为v1.8.6 )
- 视频学习时的版本:
19.1.4 能干嘛
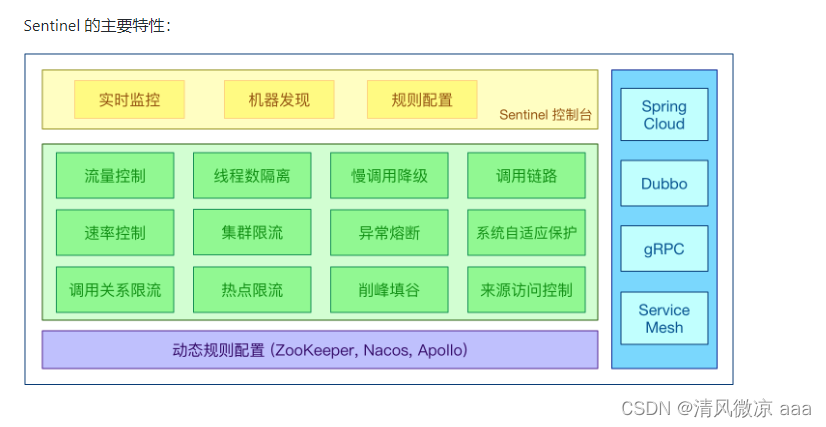
19.1.5 怎么玩
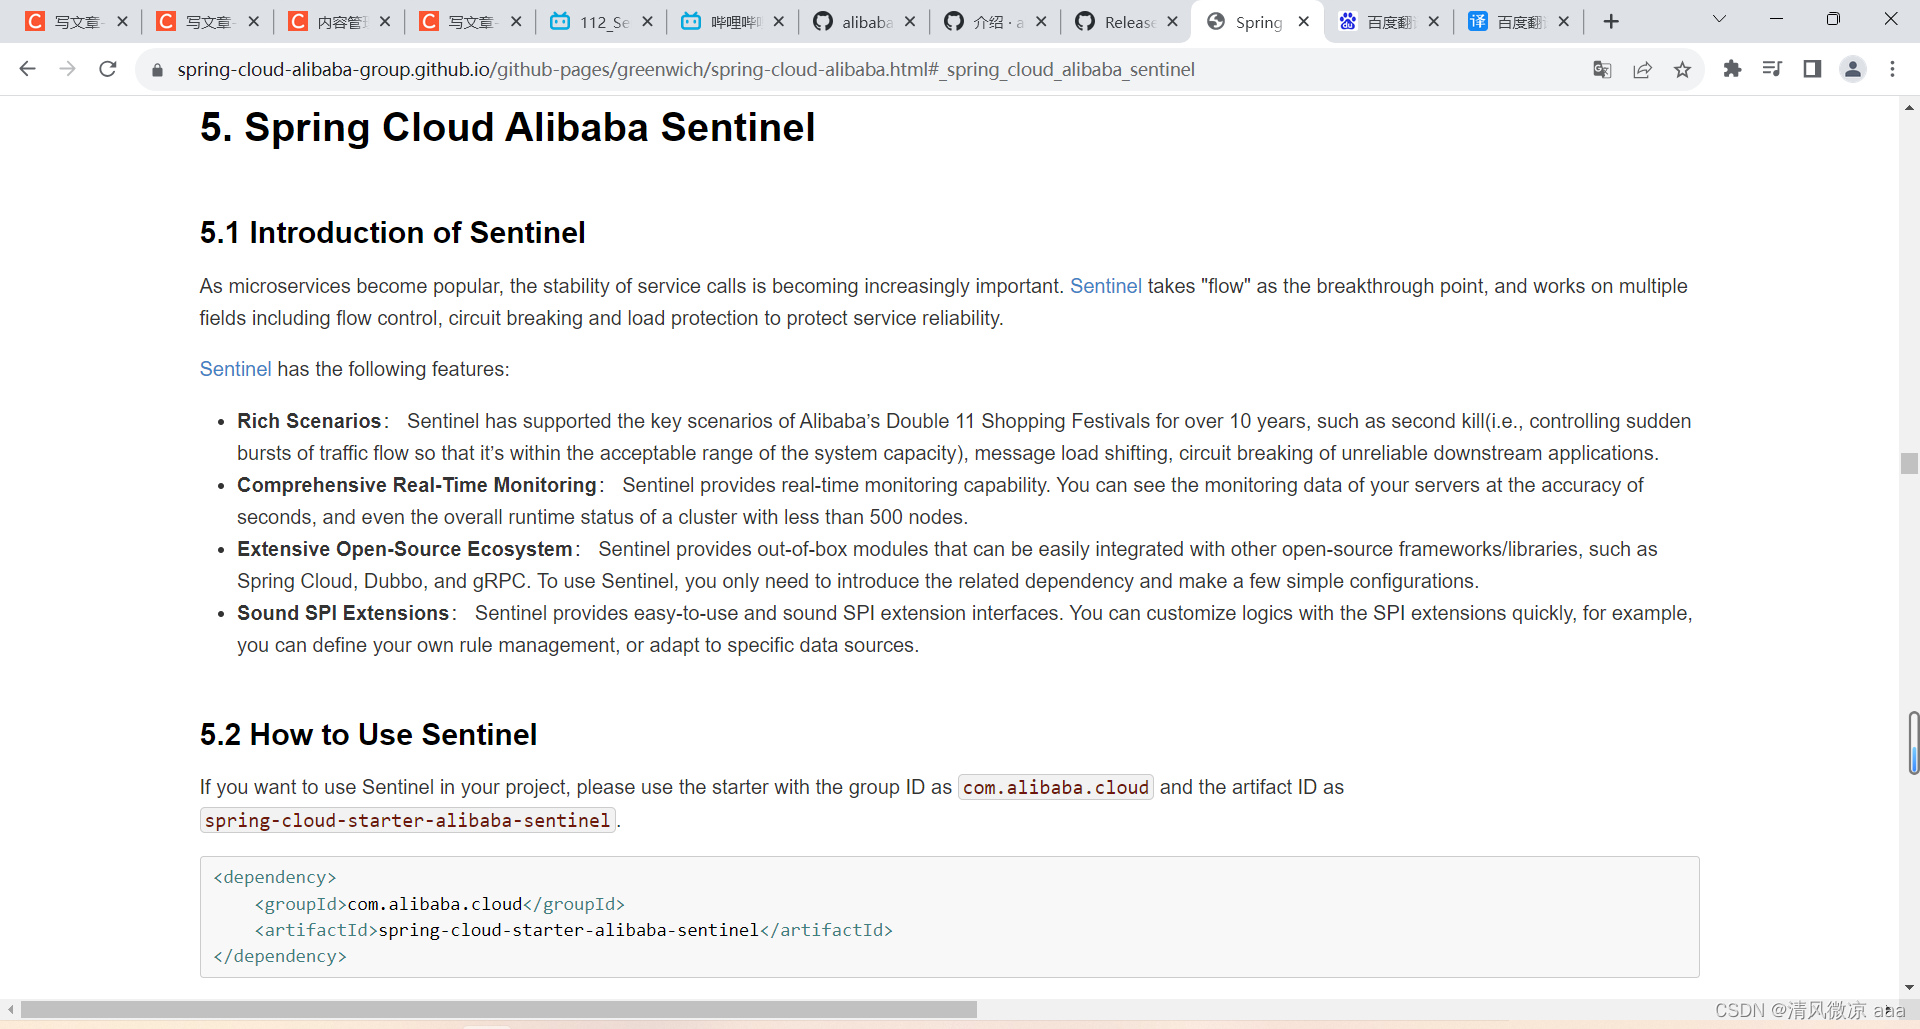
-
文档:
https://spring-cloud-alibaba-group.github.io/github-pages/greenwich/spring-cloud-alibaba.html#_spring_cloud_alibaba_sentinel
-
服务使用中的各种问题
- 服务雪崩
- 服务降级
- 服务熔断
- 服务限流
19.2 安装Sentinel控制台
19.2.1 sentinel组件由2部分构成
Sentinel 分为两个部分:
- 核心库(Java 客户端)不依赖任何框架/库,能够运行于所有 Java 运行时环境,同时对 Dubbo / Spring Cloud 等框架也有较好的支持。
- 控制台(Dashboard)基于 Spring Boot 开发,打包后可以直接运行,不需要额外的 Tomcat 等应用容器。
19.2.2 安装 启动-步骤
下载
- 本次以1.8.6版本为例
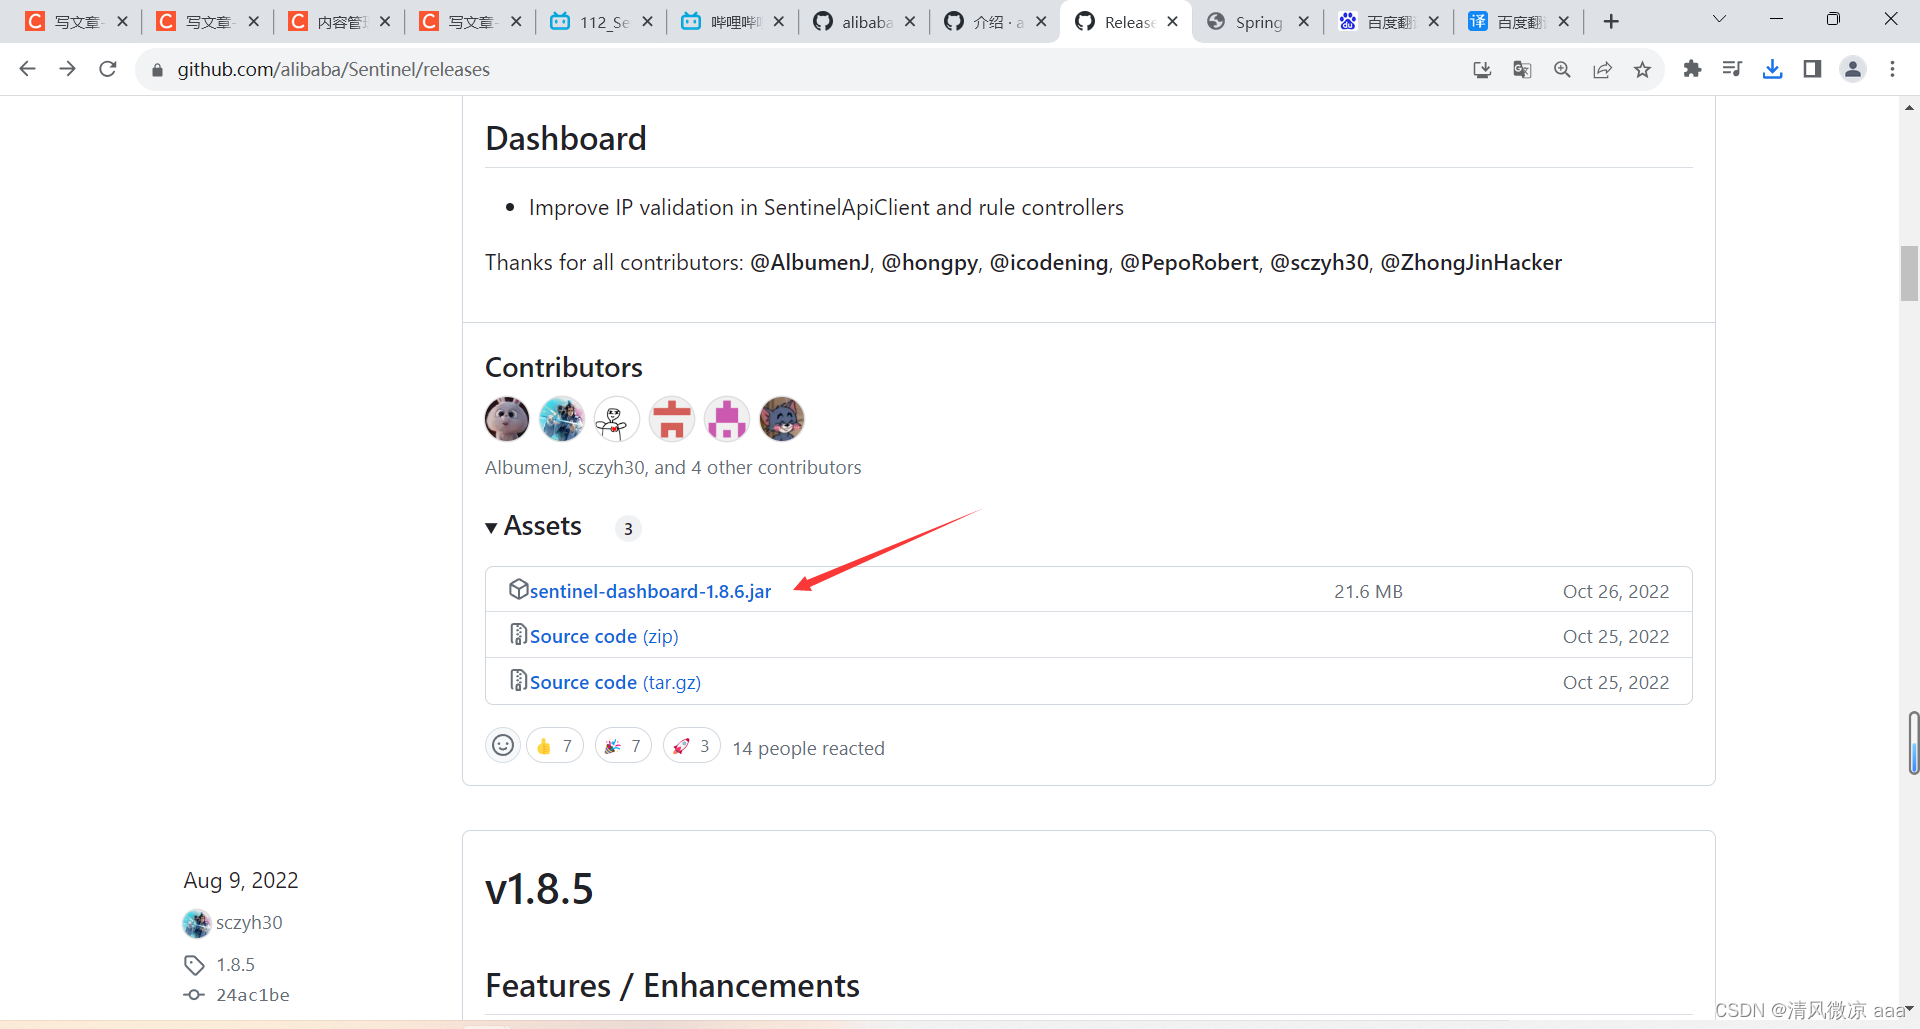
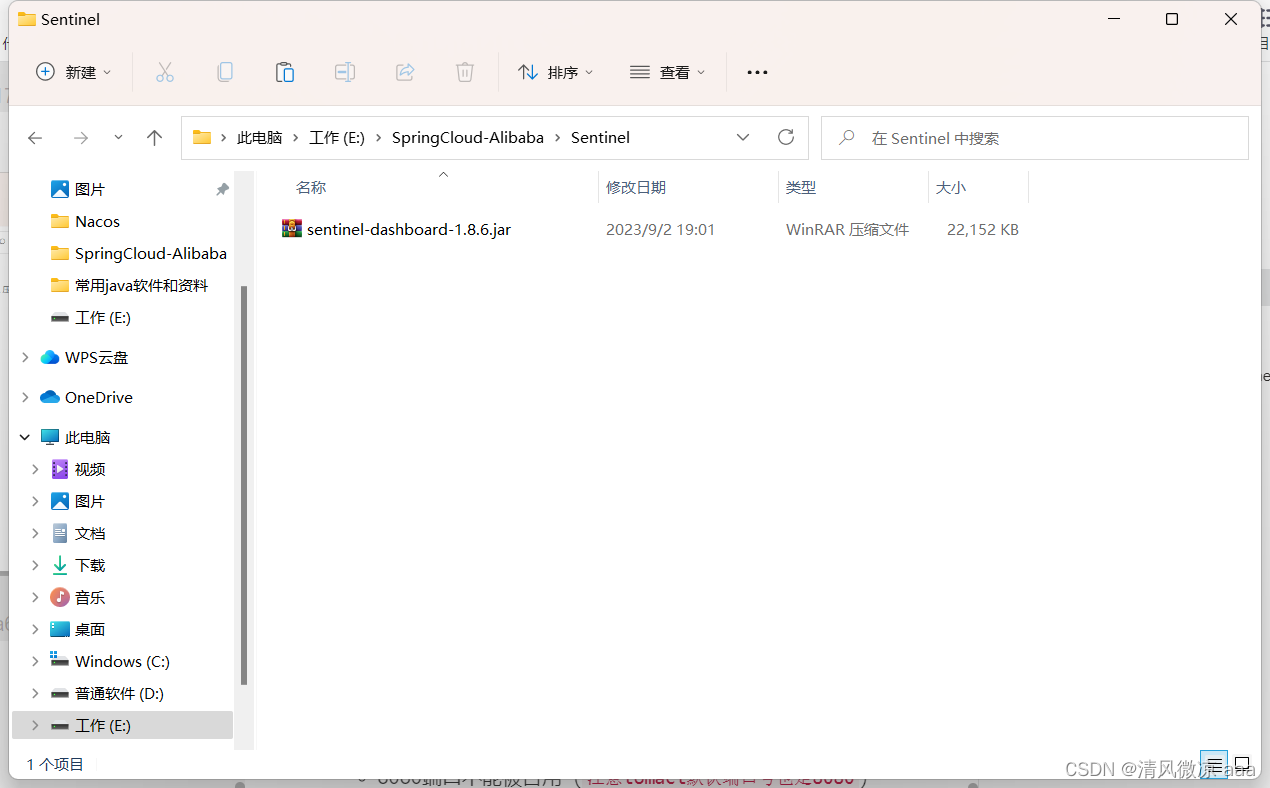
运行命令
- 前提
- java8环境OK
- 8080端口不能被占用(
注意tomact默认端口号也是8080) - 他是个jar包,不需要安装直接
java -jar运行即可。
- 命令:
java -jar sentinel-dashboard-1.8.6.jar
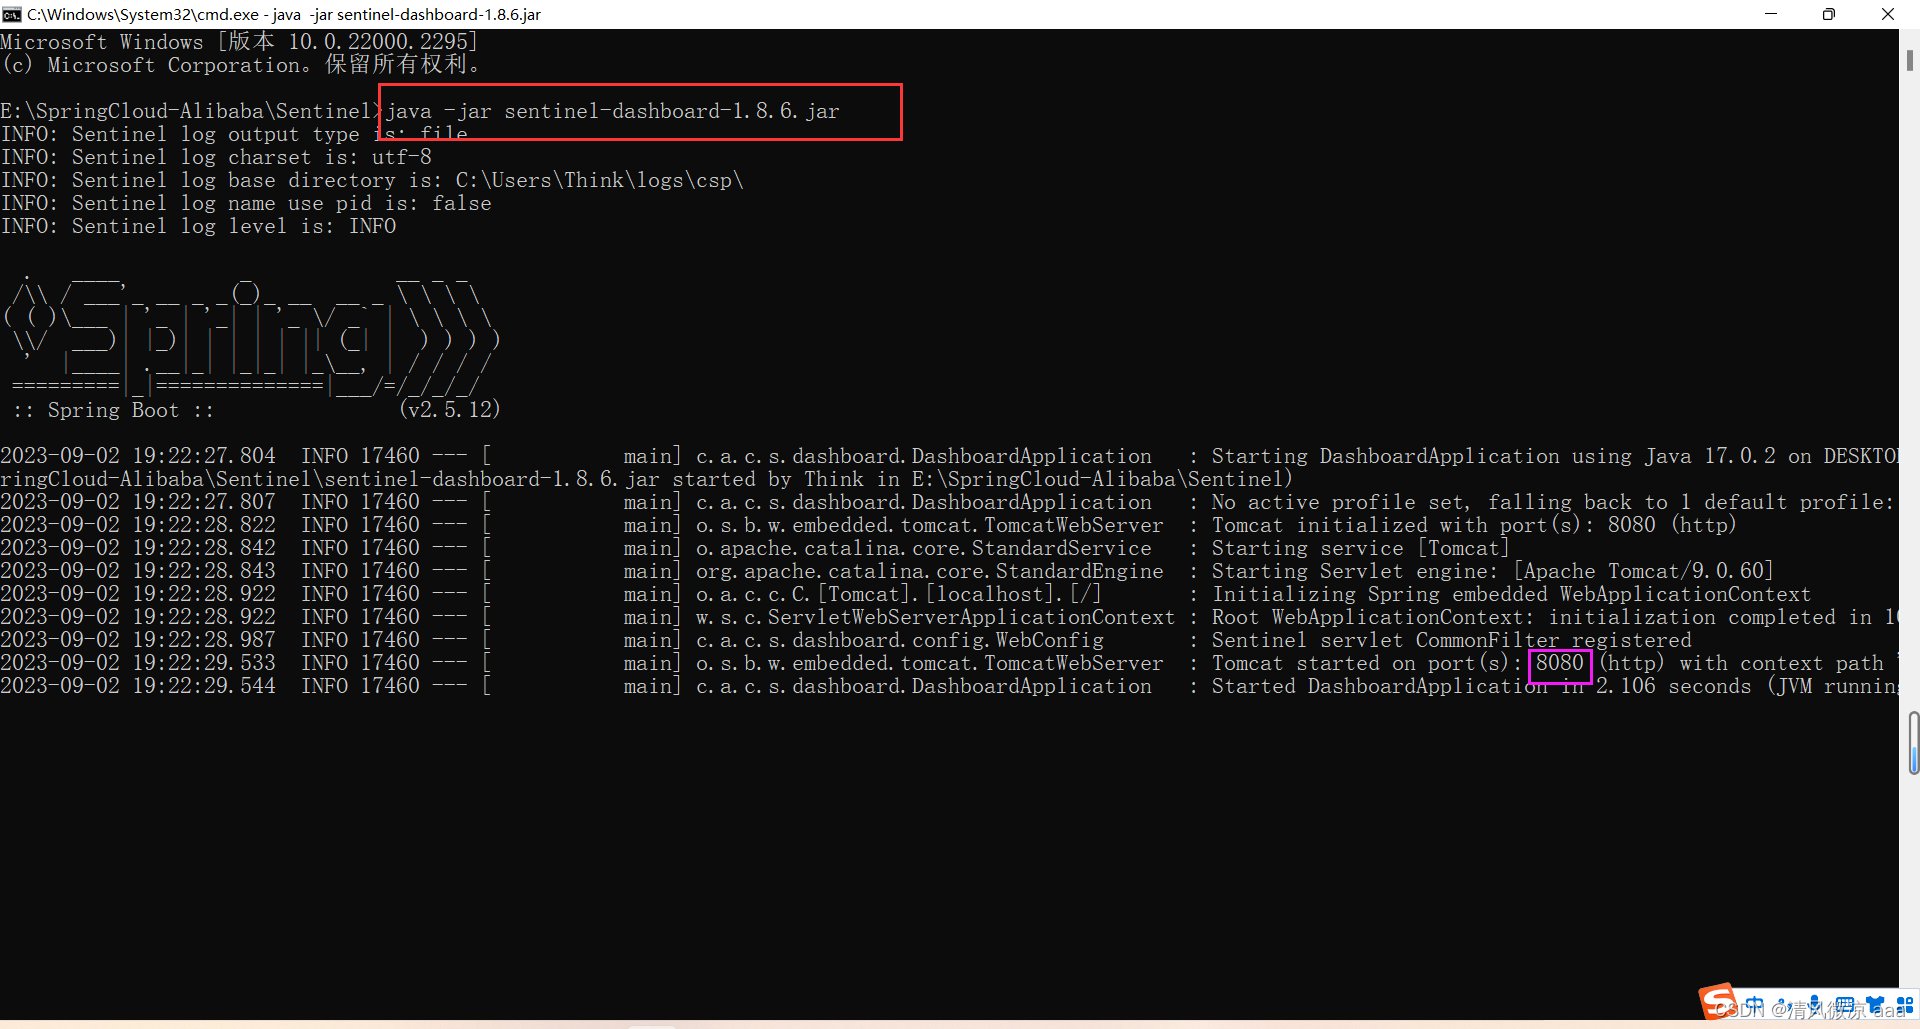
访问sentinel管理界面
-
http://localhost:8080
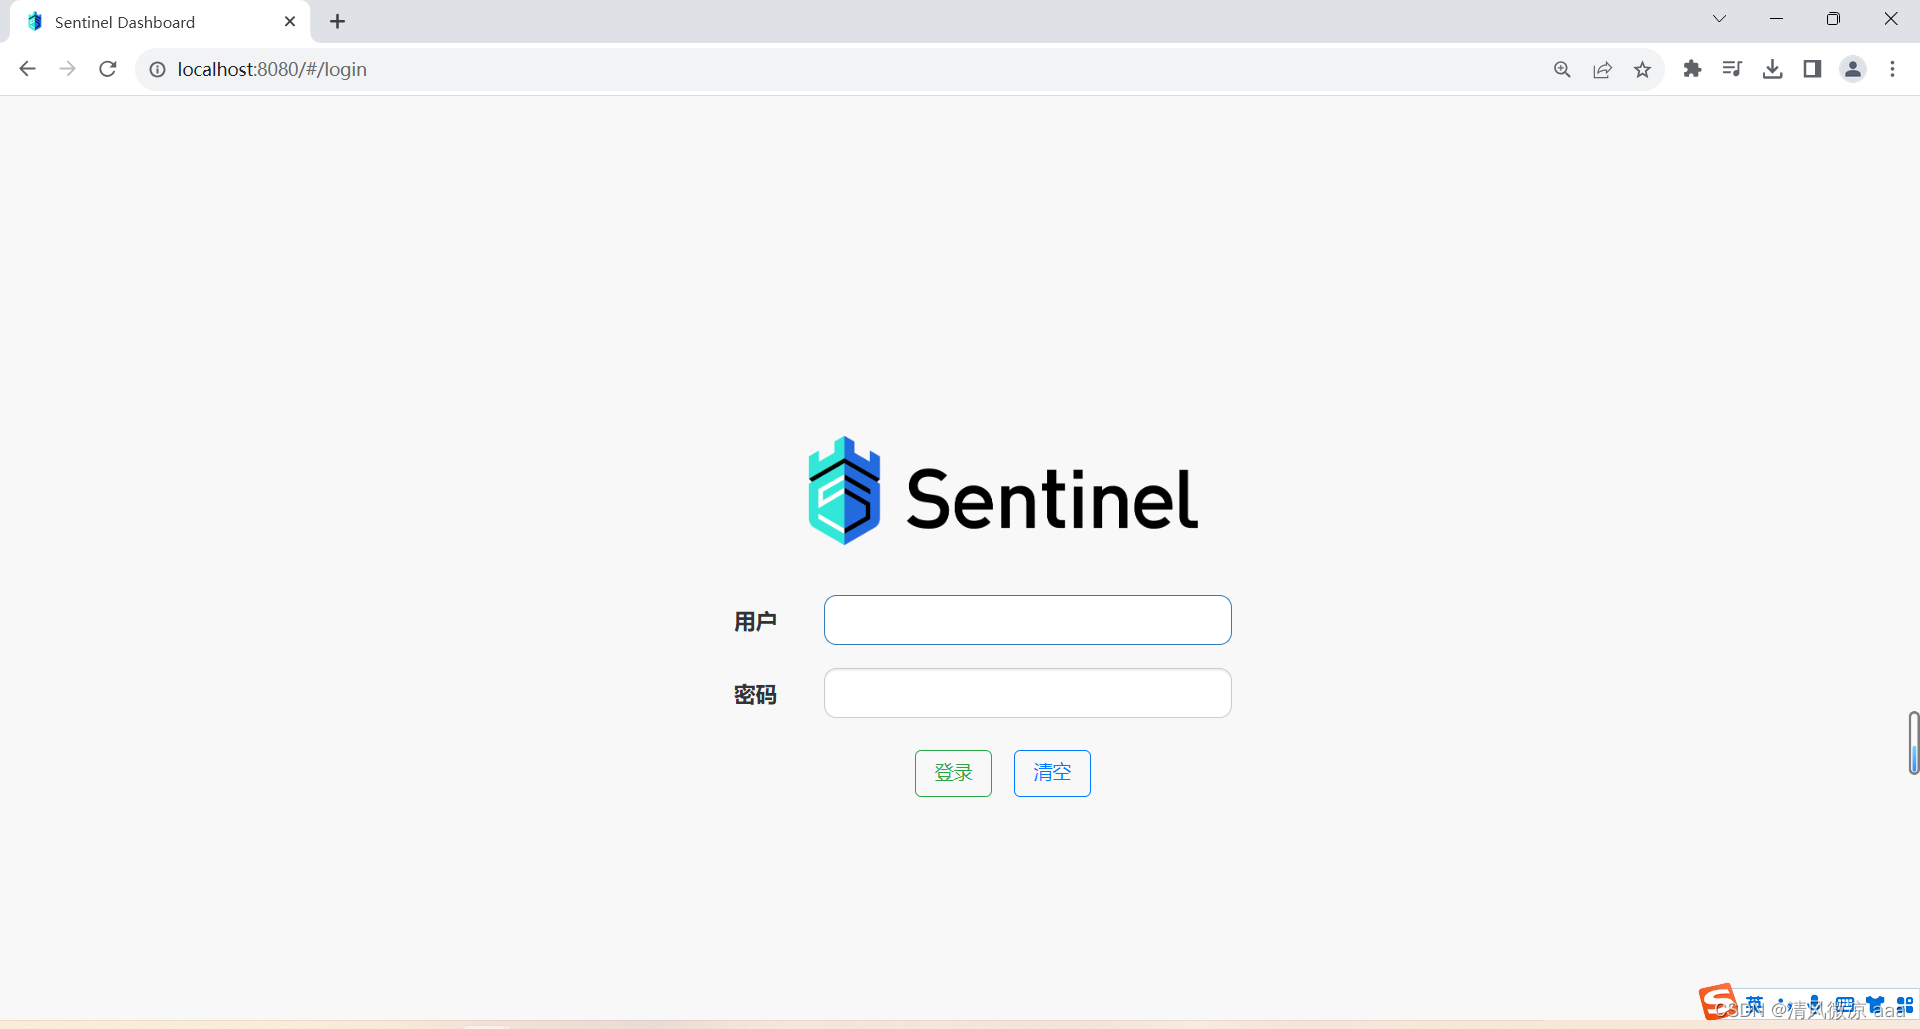
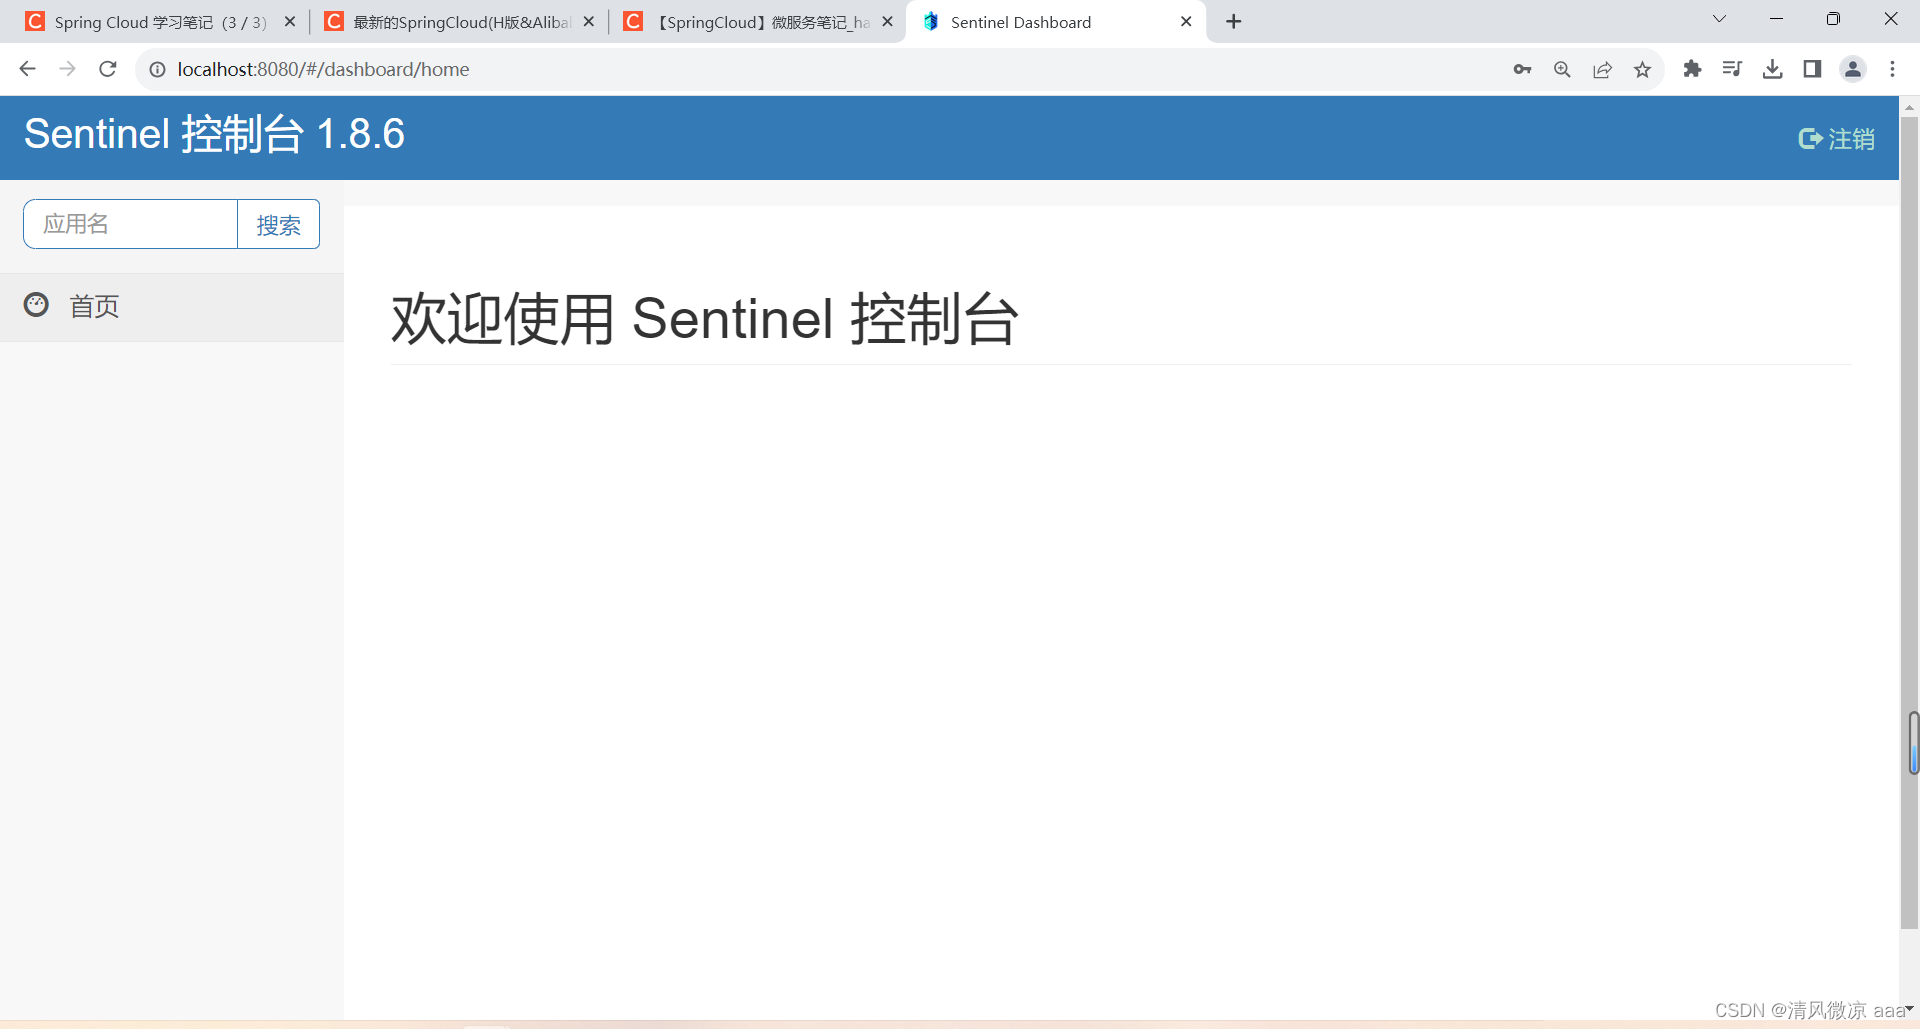
-
登录账号密码均为sentinel
19.3 初始化演示工程
19.3.1 启动Nacos8848成功
-
启动
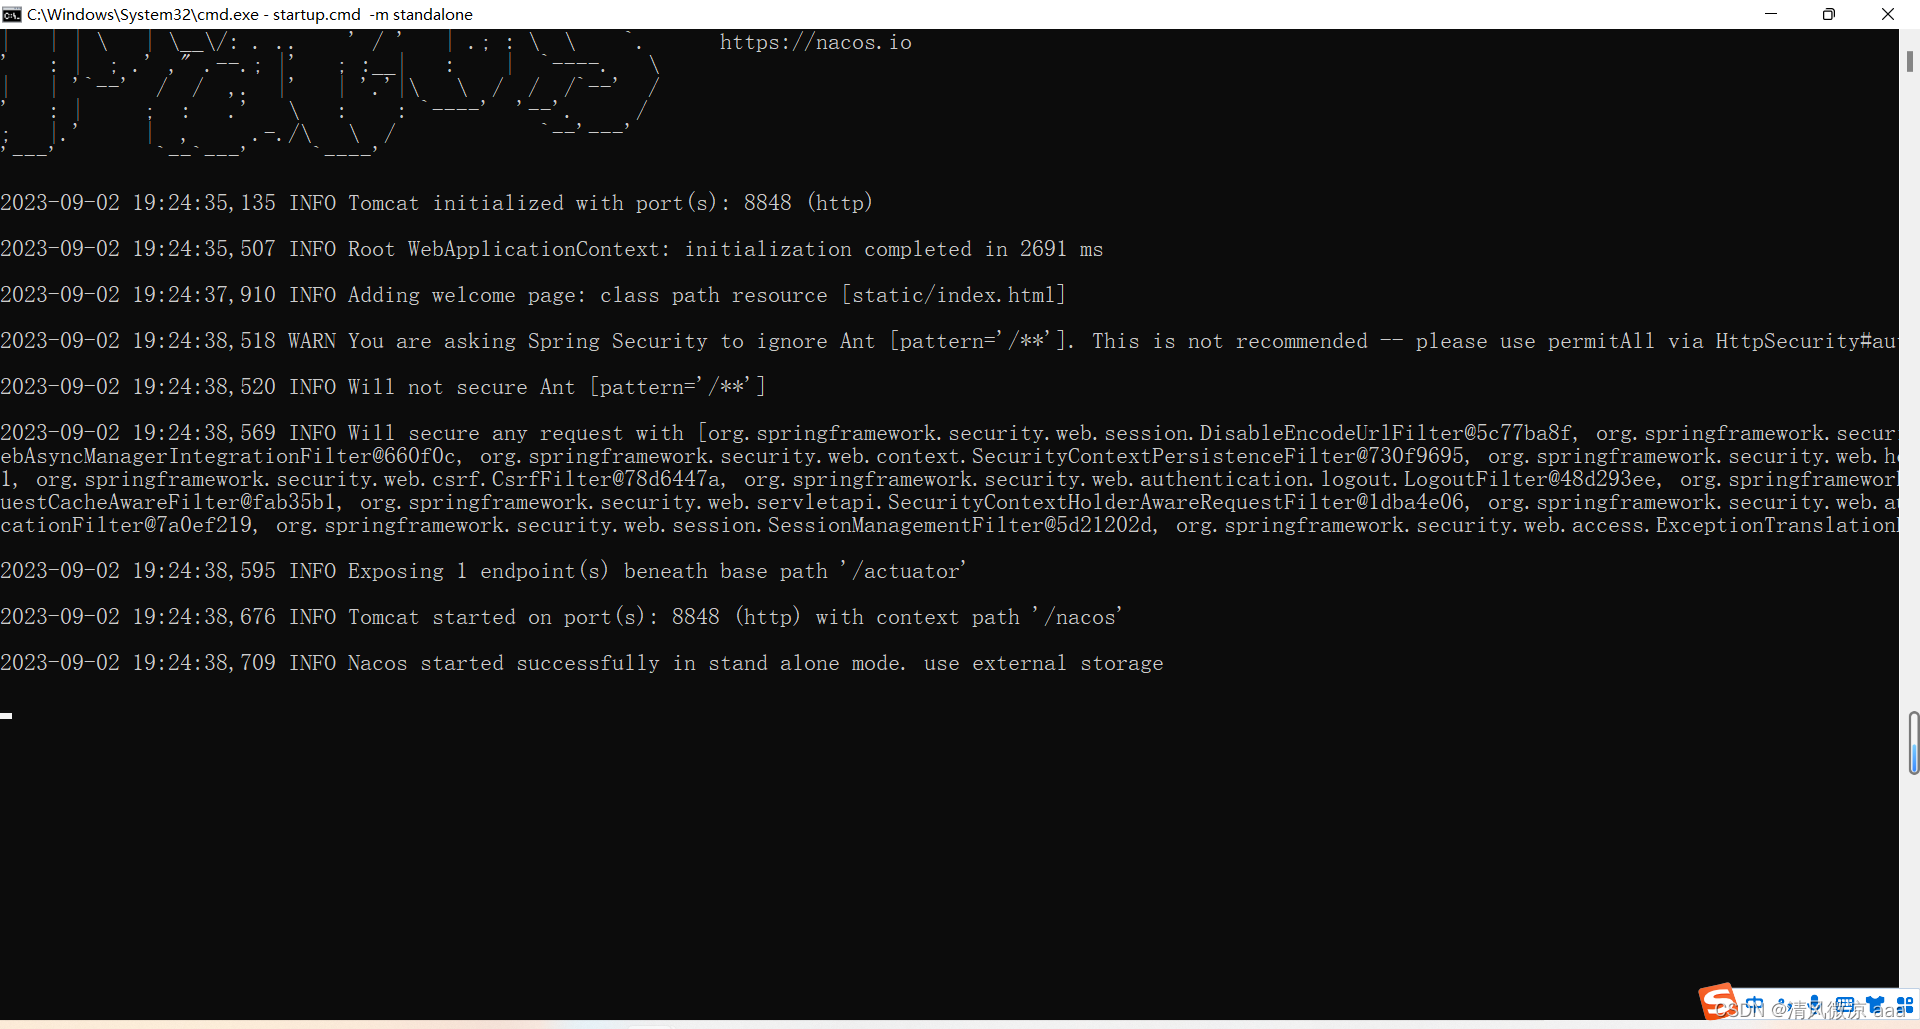
-
访问:http://localhost:8848/nacos/#/login
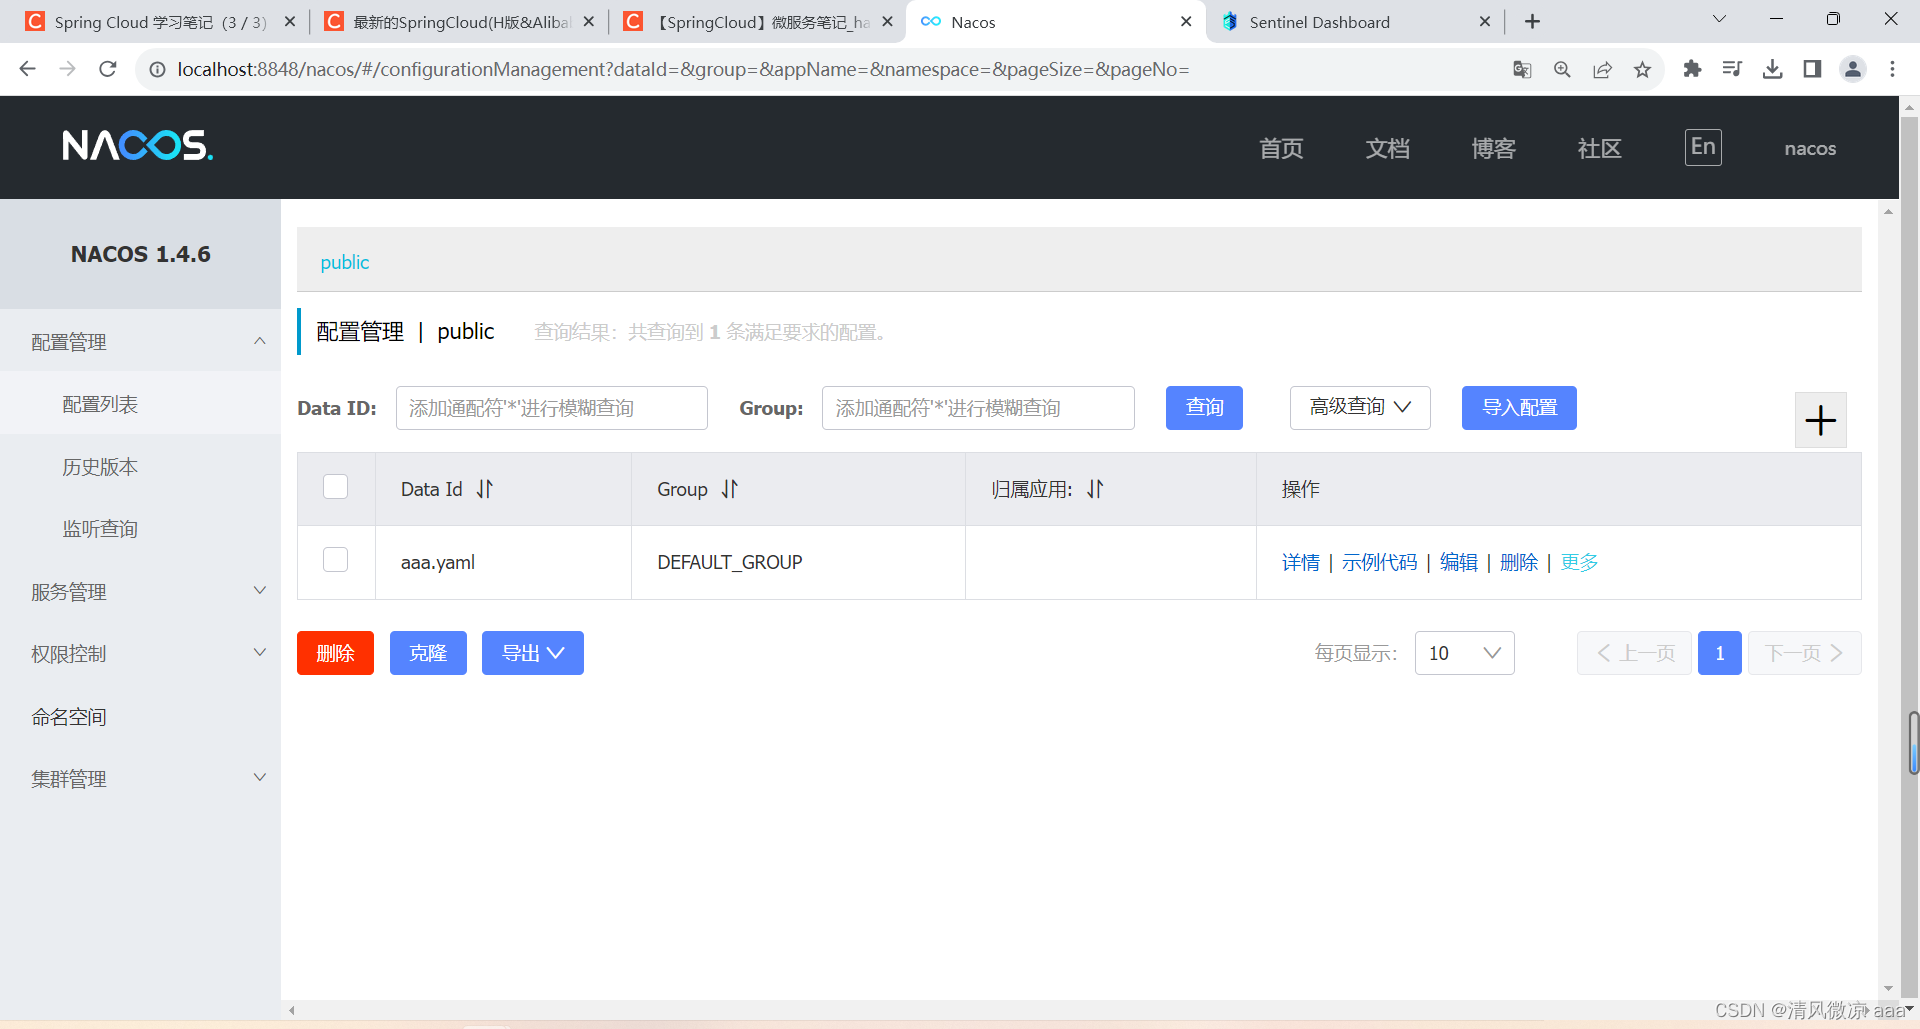
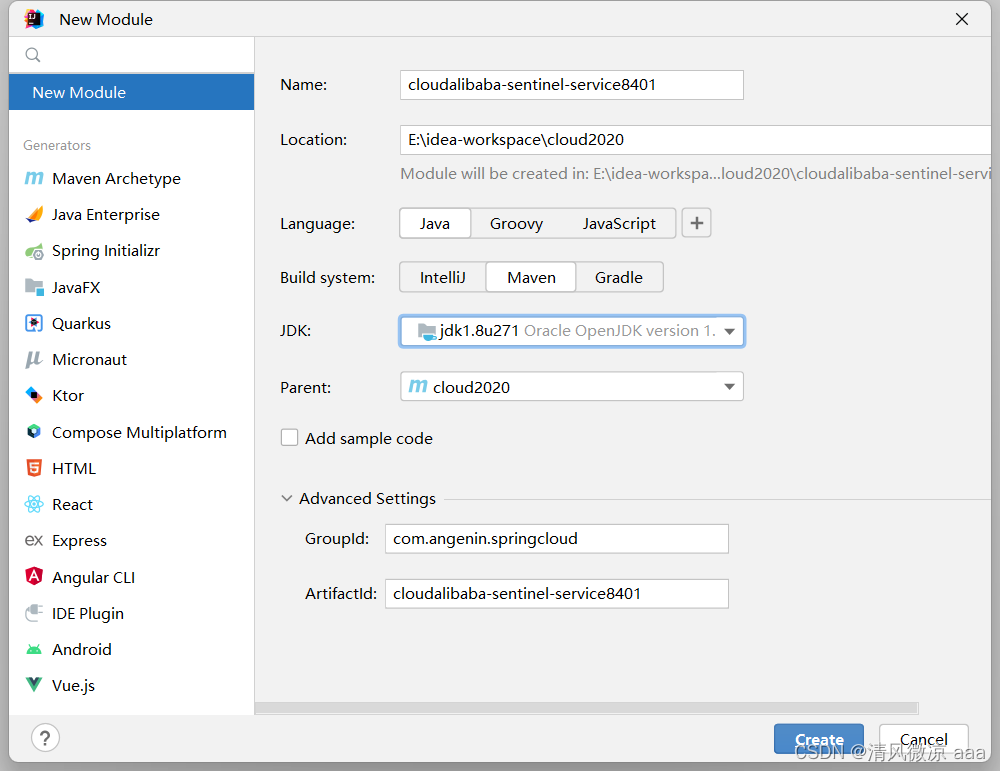
19.3.2 创建:Module
1)cloudalibaba-sentinel-service8401
2)POM
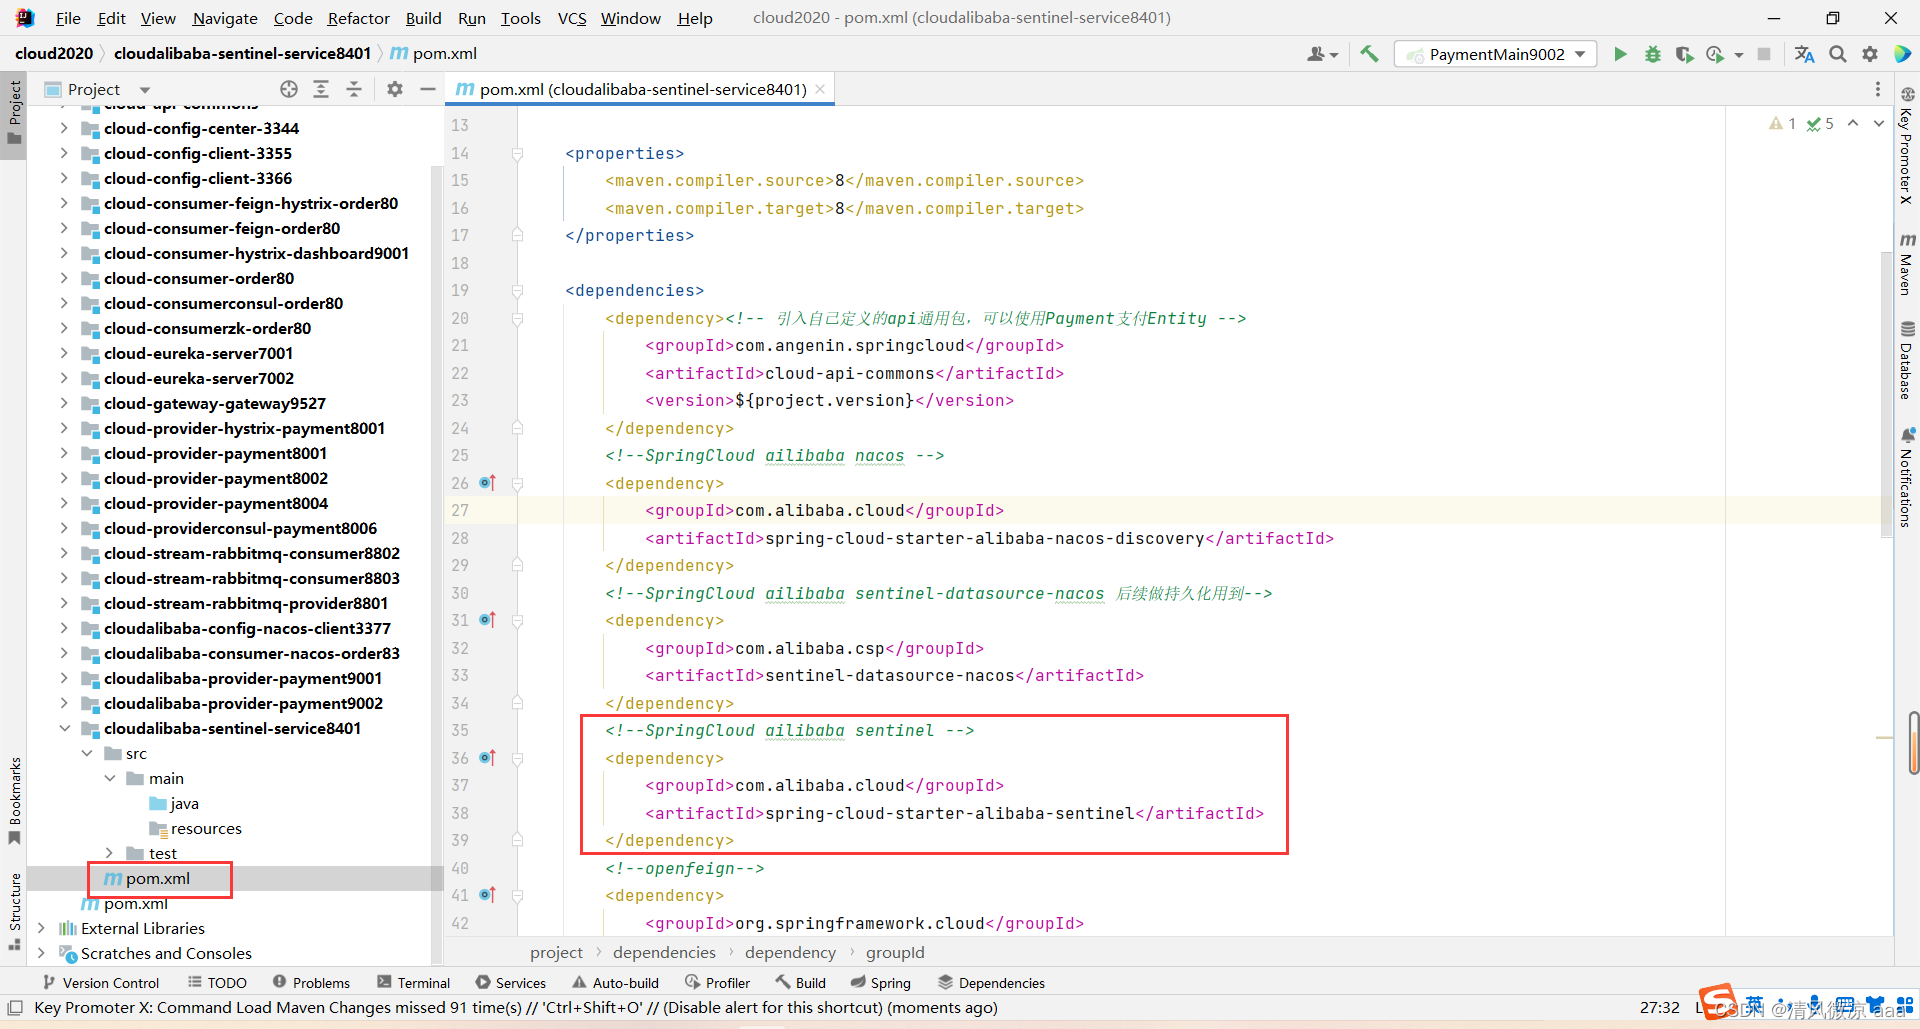
<?xml version="1.0" encoding="UTF-8"?>
<project xmlns="http://maven.apache.org/POM/4.0.0"xmlns:xsi="http://www.w3.org/2001/XMLSchema-instance"xsi:schemaLocation="http://maven.apache.org/POM/4.0.0 http://maven.apache.org/xsd/maven-4.0.0.xsd"><parent><artifactId>cloud2020</artifactId><groupId>com.angenin.springcloud</groupId><version>1.0-SNAPSHOT</version></parent><modelVersion>4.0.0</modelVersion><artifactId>cloudalibaba-sentinel-service8401</artifactId><properties><maven.compiler.source>8</maven.compiler.source><maven.compiler.target>8</maven.compiler.target></properties><dependencies><dependency><!-- 引入自己定义的api通用包,可以使用Payment支付Entity --><groupId>com.angenin.springcloud</groupId><artifactId>cloud-api-commons</artifactId><version>${project.version}</version></dependency><!--SpringCloud ailibaba nacos --><dependency><groupId>com.alibaba.cloud</groupId><artifactId>spring-cloud-starter-alibaba-nacos-discovery</artifactId></dependency><!--SpringCloud ailibaba sentinel-datasource-nacos 后续做持久化用到--><dependency><groupId>com.alibaba.csp</groupId><artifactId>sentinel-datasource-nacos</artifactId></dependency><!--SpringCloud ailibaba sentinel --><dependency><groupId>com.alibaba.cloud</groupId><artifactId>spring-cloud-starter-alibaba-sentinel</artifactId></dependency><!--openfeign--><dependency><groupId>org.springframework.cloud</groupId><artifactId>spring-cloud-starter-openfeign</artifactId></dependency><!-- SpringBoot整合Web组件+actuator --><dependency><groupId>org.springframework.boot</groupId><artifactId>spring-boot-starter-web</artifactId></dependency><dependency><groupId>org.springframework.boot</groupId><artifactId>spring-boot-starter-actuator</artifactId></dependency><!--日常通用jar包配置--><dependency><groupId>org.springframework.boot</groupId><artifactId>spring-boot-devtools</artifactId><scope>runtime</scope><optional>true</optional></dependency><dependency><groupId>cn.hutool</groupId><artifactId>hutool-all</artifactId><version>4.6.3</version></dependency><dependency><groupId>org.projectlombok</groupId><artifactId>lombok</artifactId><optional>true</optional></dependency><dependency><groupId>org.springframework.boot</groupId><artifactId>spring-boot-starter-test</artifactId><scope>test</scope></dependency></dependencies></project>
3)YML
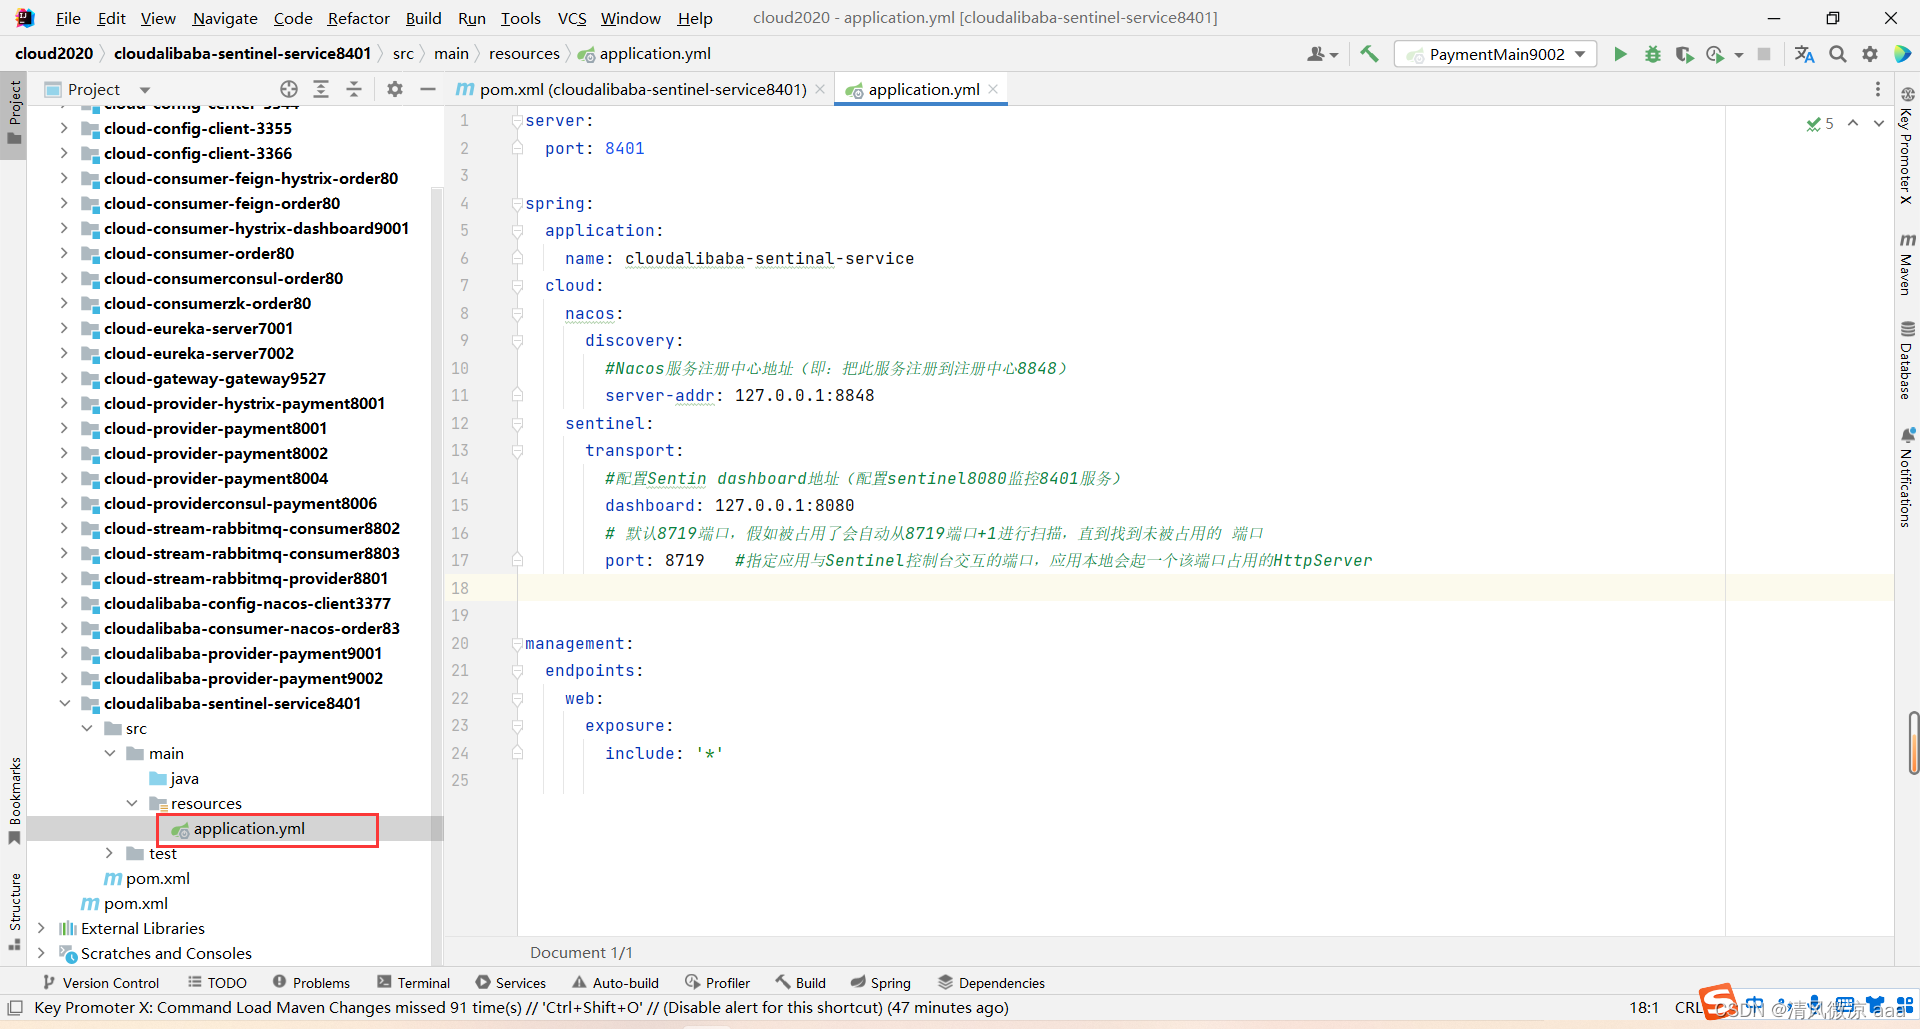
server:port: 8401spring:application:name: cloudalibaba-sentinal-servicecloud:nacos:discovery:#Nacos服务注册中心地址(即:把此服务注册到注册中心8848)server-addr: 127.0.0.1:8848sentinel:transport:#配置Sentin dashboard地址(配置sentinel8080监控8401服务)dashboard: 127.0.0.1:8080# 默认8719端口,假如被占用了会自动从8719端口+1进行扫描,直到找到未被占用的 端口port: 8719 #指定应用与Sentinel控制台交互的端口,应用本地会起一个该端口占用的HttpServermanagement:endpoints:web:exposure:include: '*'4)主启动
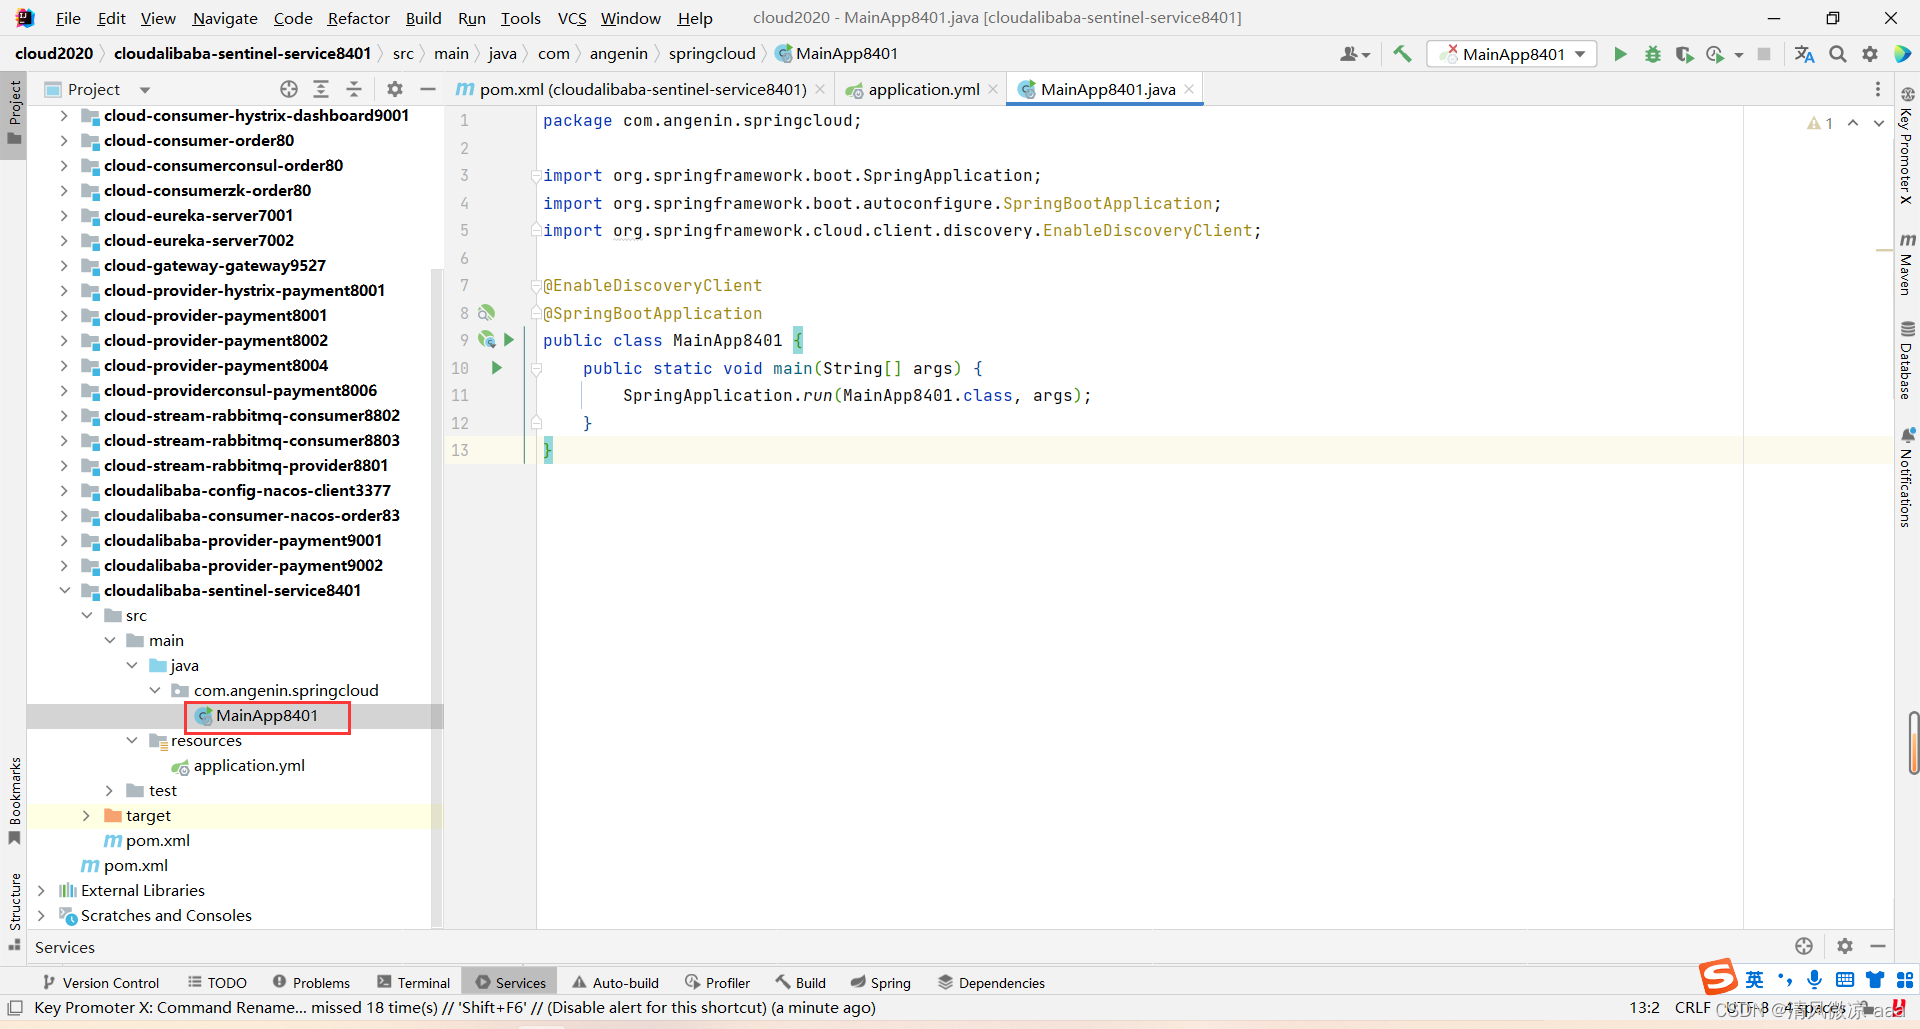
package com.angenin.springcloud;import org.springframework.boot.SpringApplication;
import org.springframework.boot.autoconfigure.SpringBootApplication;
import org.springframework.cloud.client.discovery.EnableDiscoveryClient;@EnableDiscoveryClient
@SpringBootApplication
public class MainApp8401 {public static void main(String[] args) {SpringApplication.run(MainApp8401.class, args);}
}
5)业务类FlowLimitController
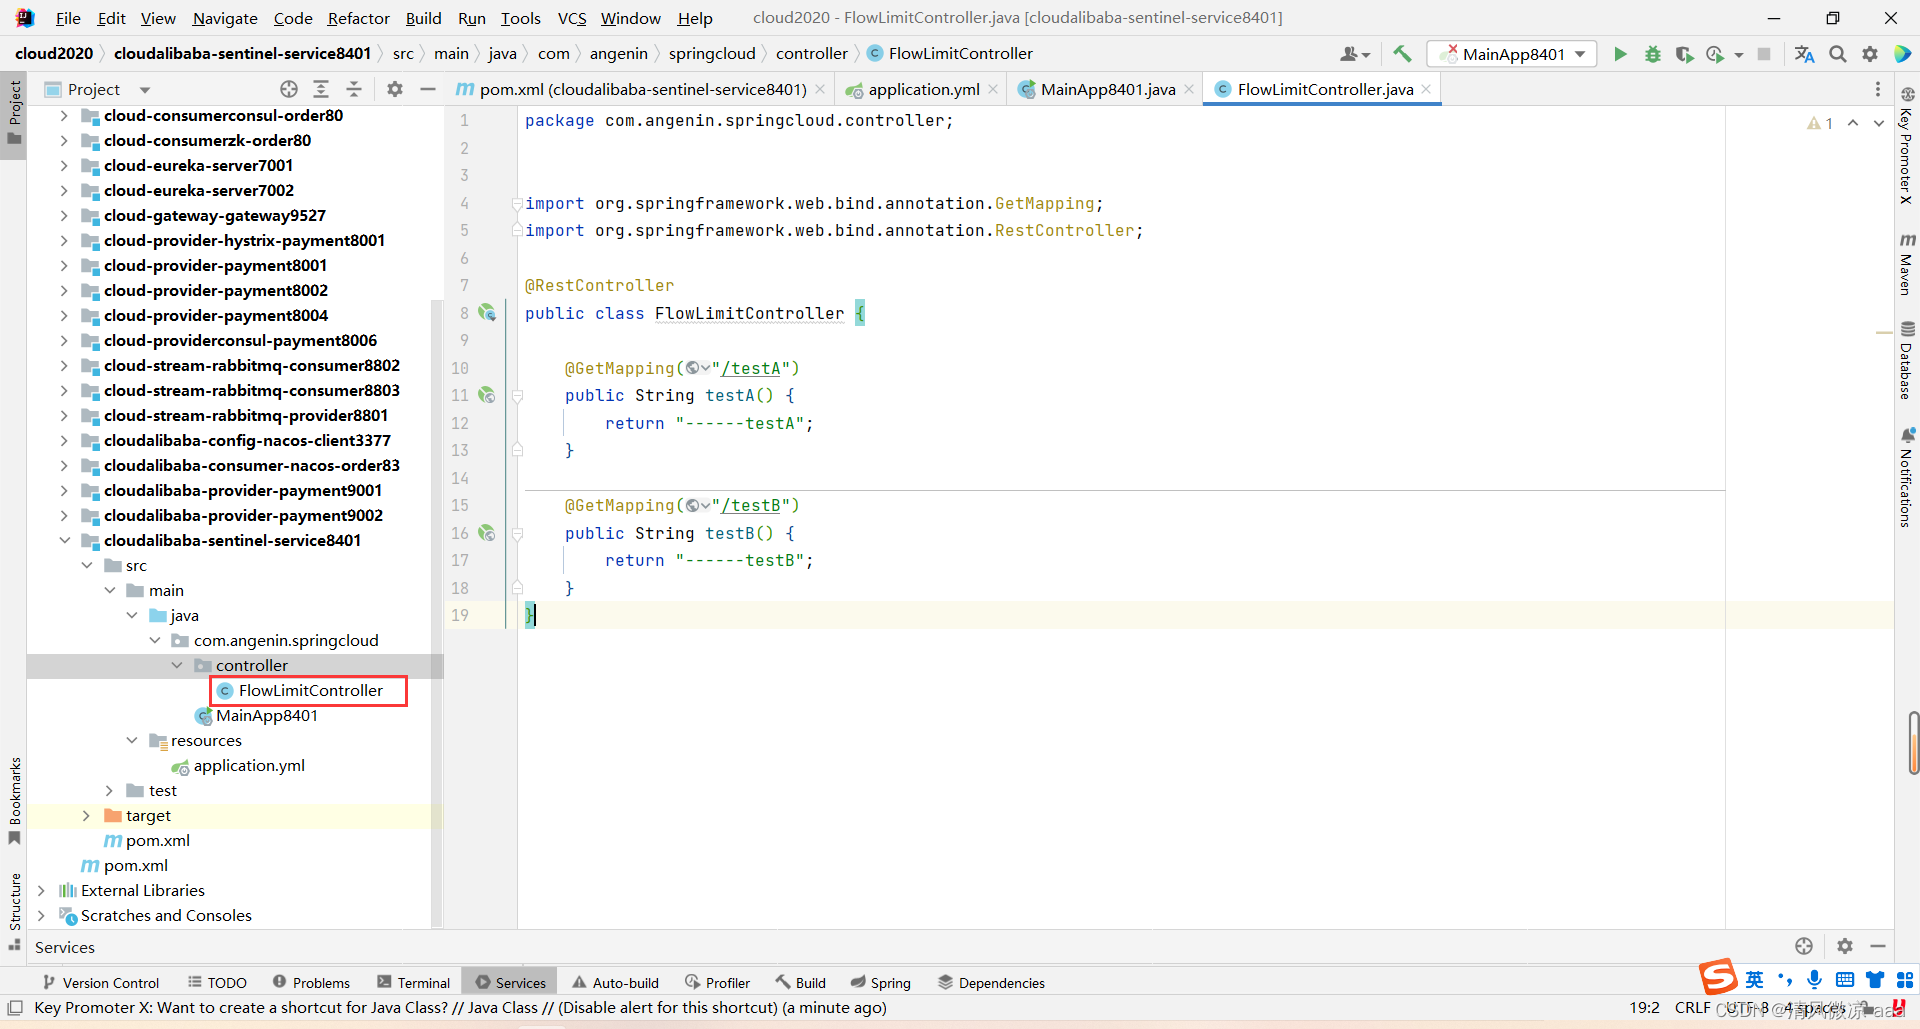
package com.angenin.springcloud.controller;import org.springframework.web.bind.annotation.GetMapping;
import org.springframework.web.bind.annotation.RestController;@RestController
public class FlowLimitController {@GetMapping("/testA")public String testA() {return "------testA";}@GetMapping("/testB")public String testB() {return "------testB";}
}
6)测试
-
nacos已启动
-
sentinel控制台已启动
-
启动8401微服务后查看sentienl控制台
-
空空如也,啥都没有
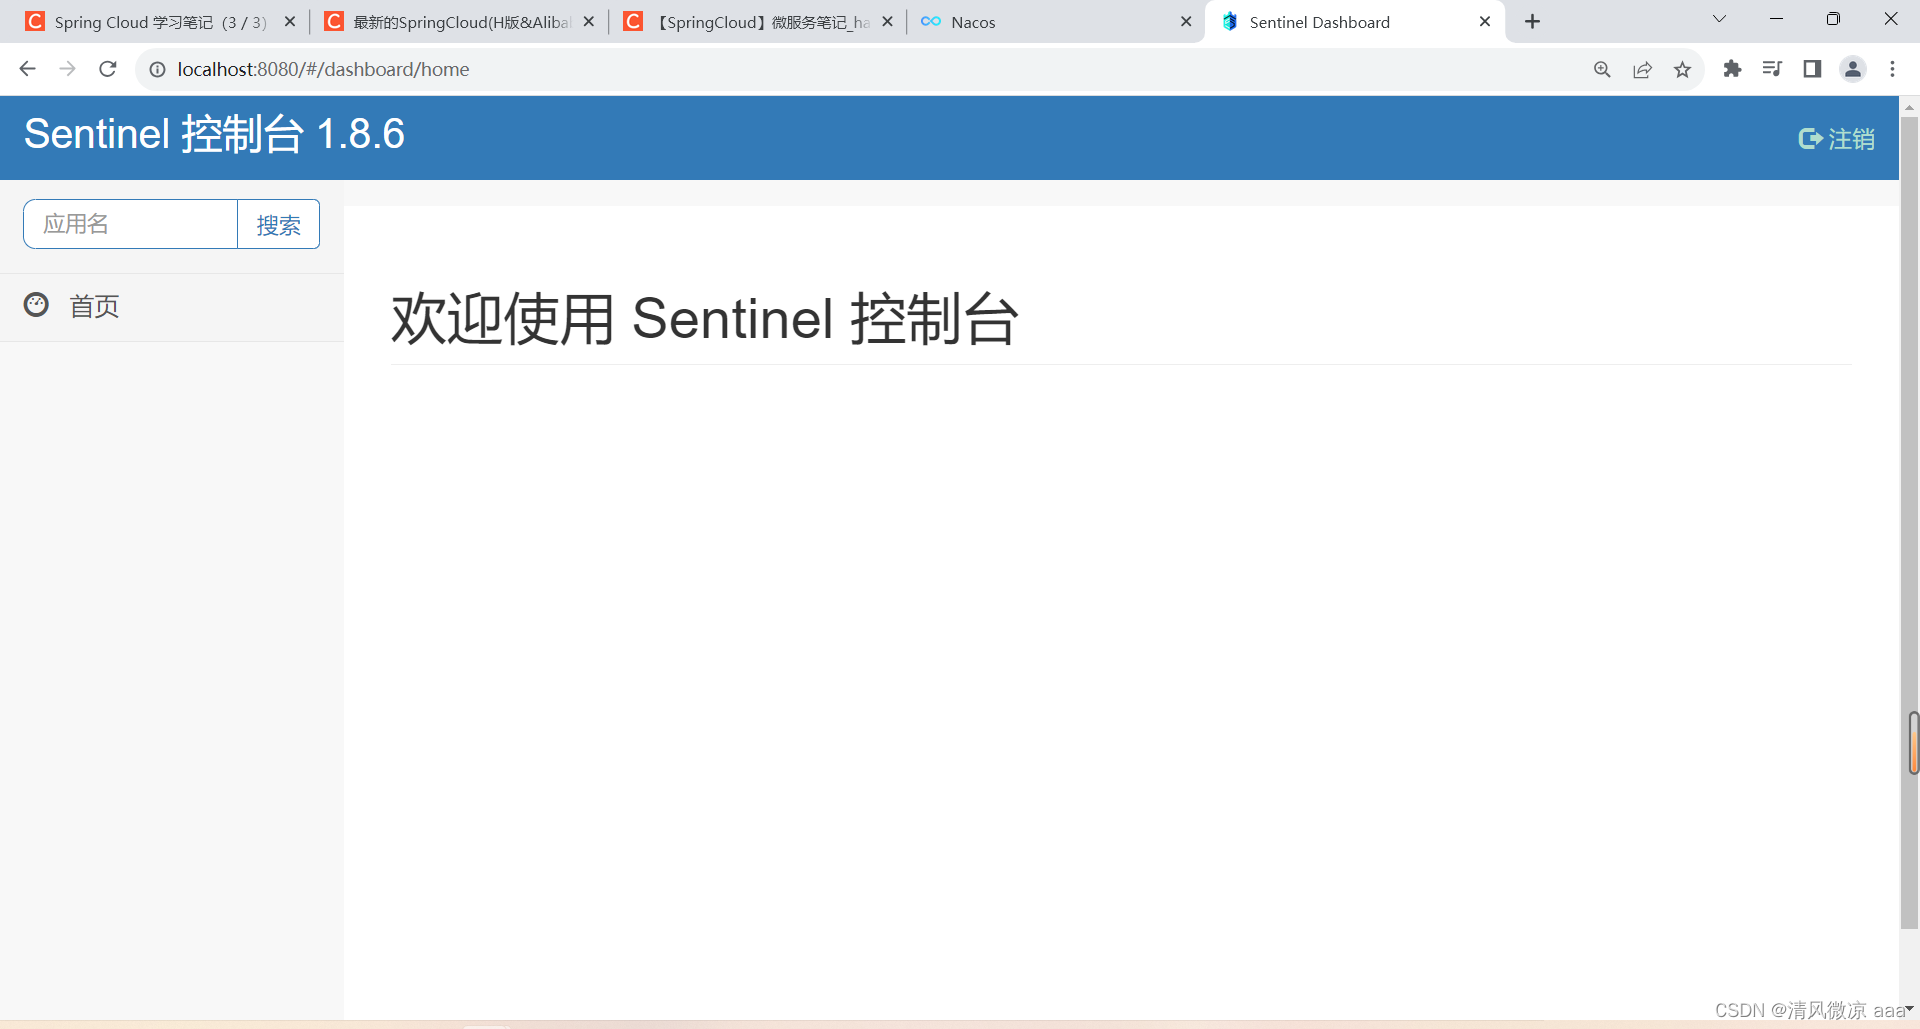
-
Sentinel采用的懒加载机制,需要执行一次访问才能监控到。
- 执行一次访问即可
- http://localhost:8401/testA
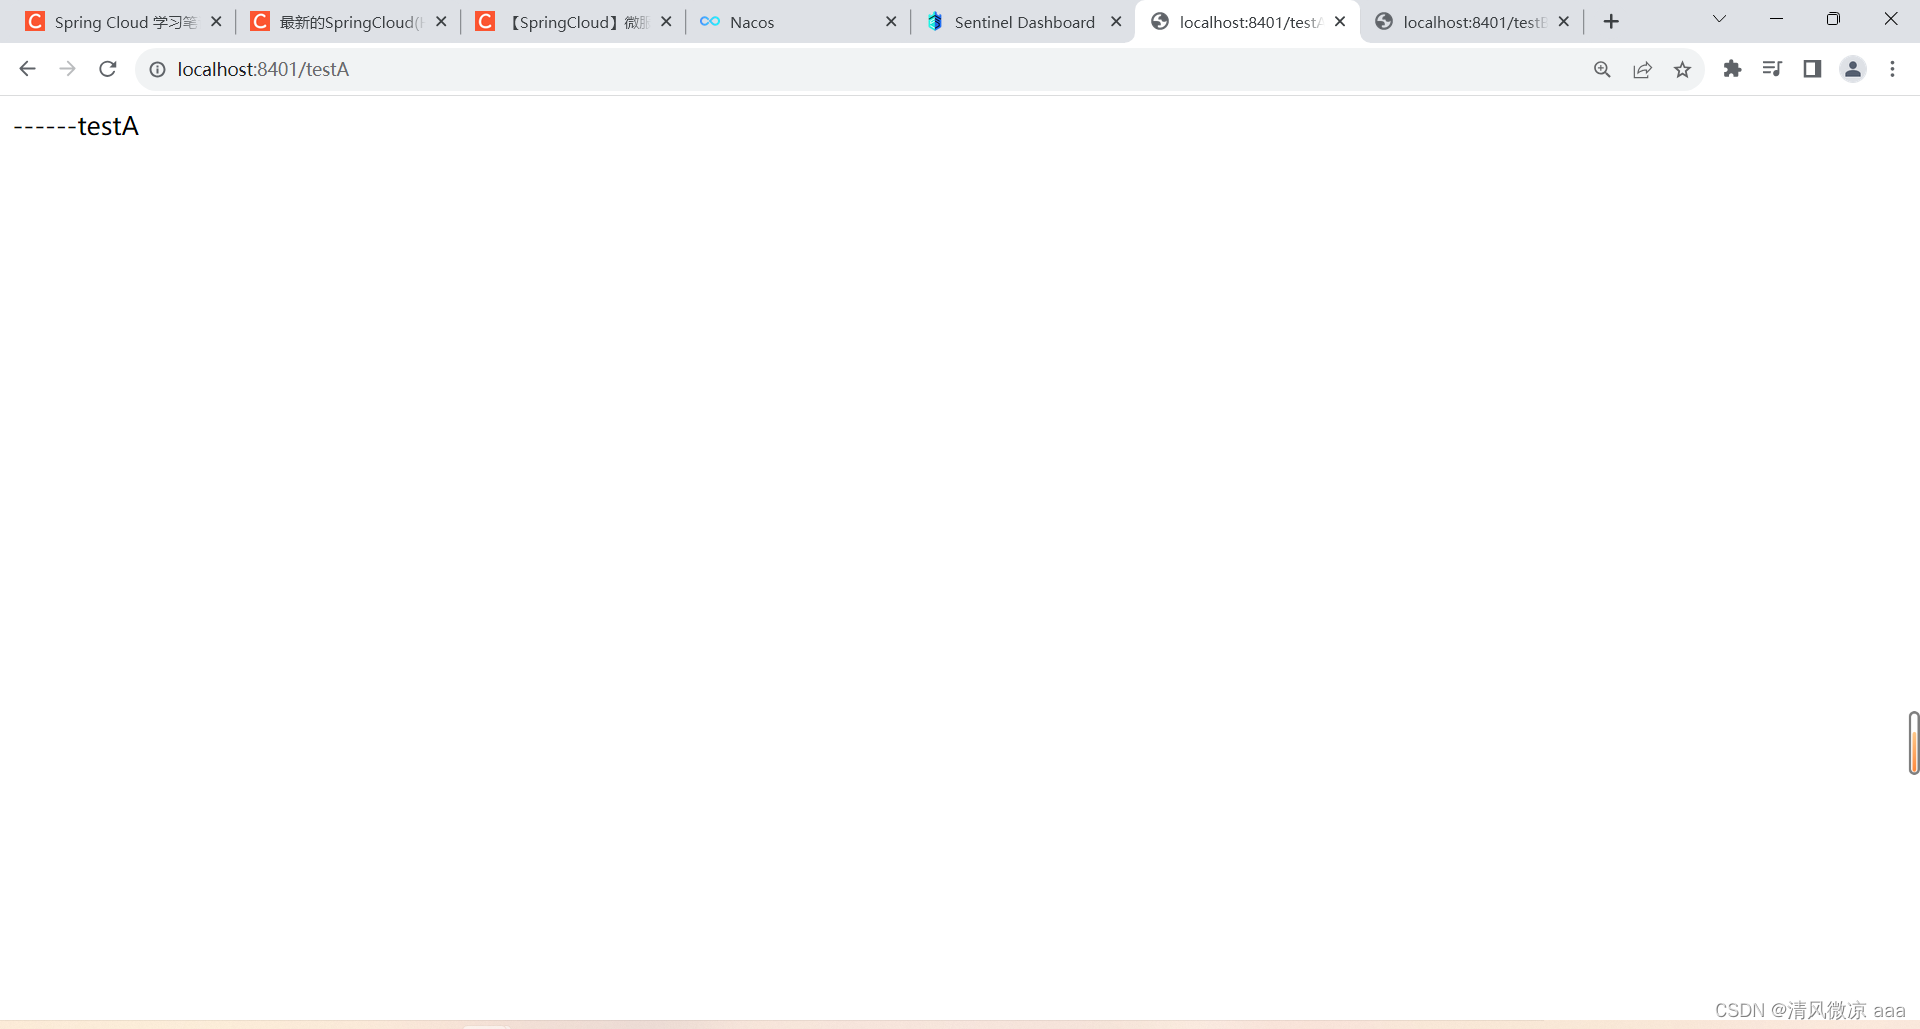
-
http://localhost:8401/testB

-
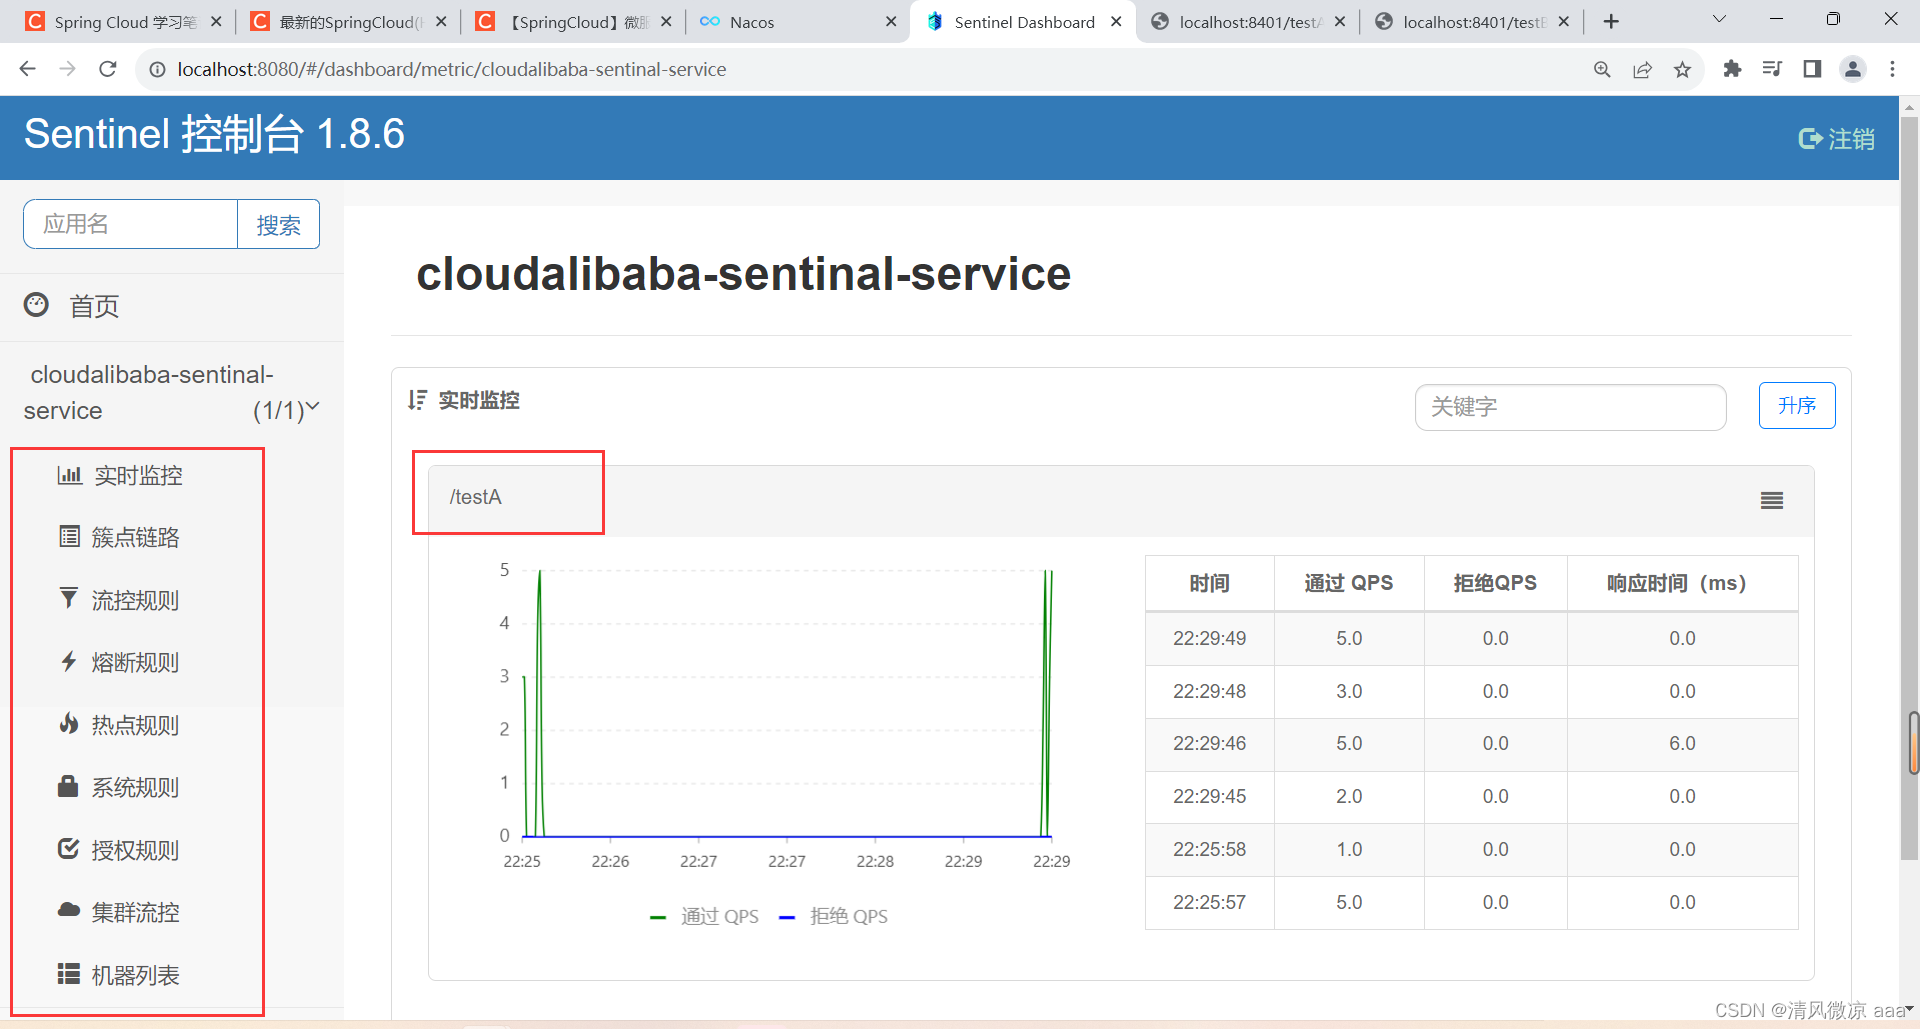
多点几次testA查看效果:
-
-
结论:sentinel8080正在监控微服务8401
-
在图形化界面可以看到每一个微服务的restful风格的接口调用的访问情况。
19.4 流控规则
属于流量限制控制规则,不是流程控制。
19.4.1 基本介绍
-
位置:
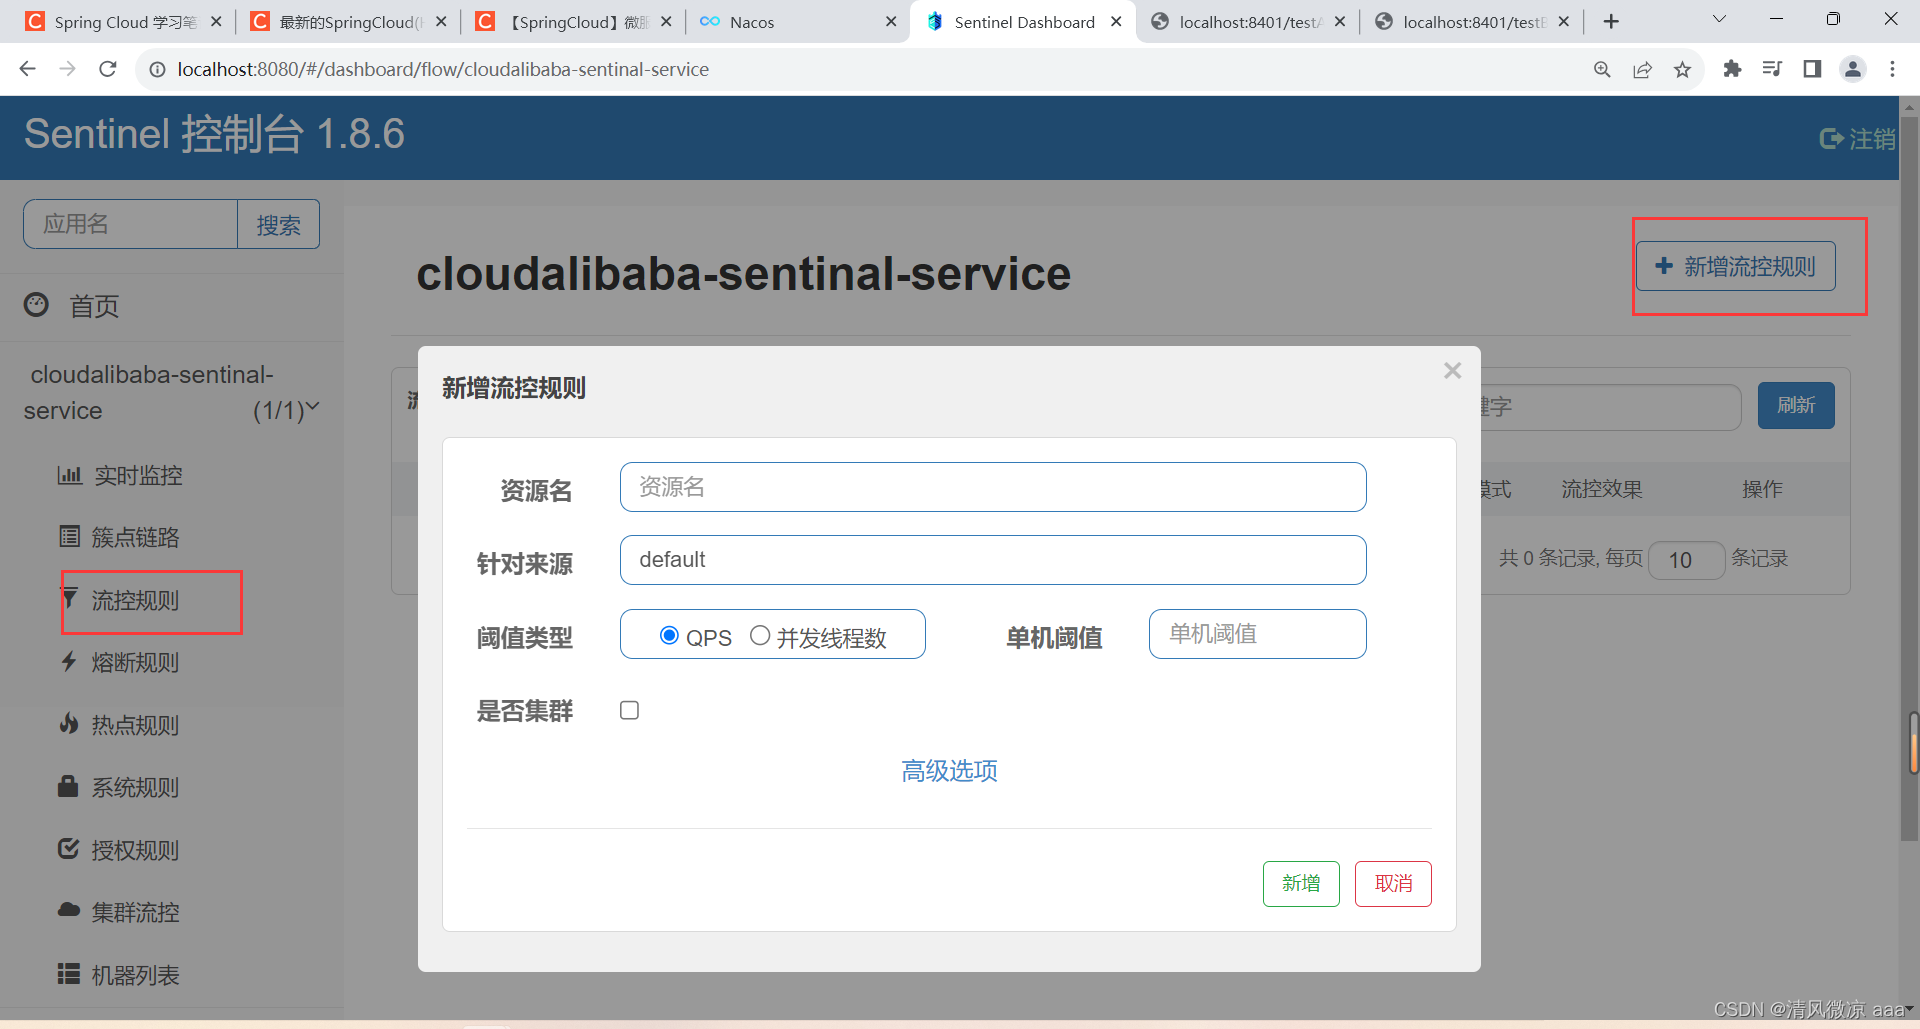
-
解释:
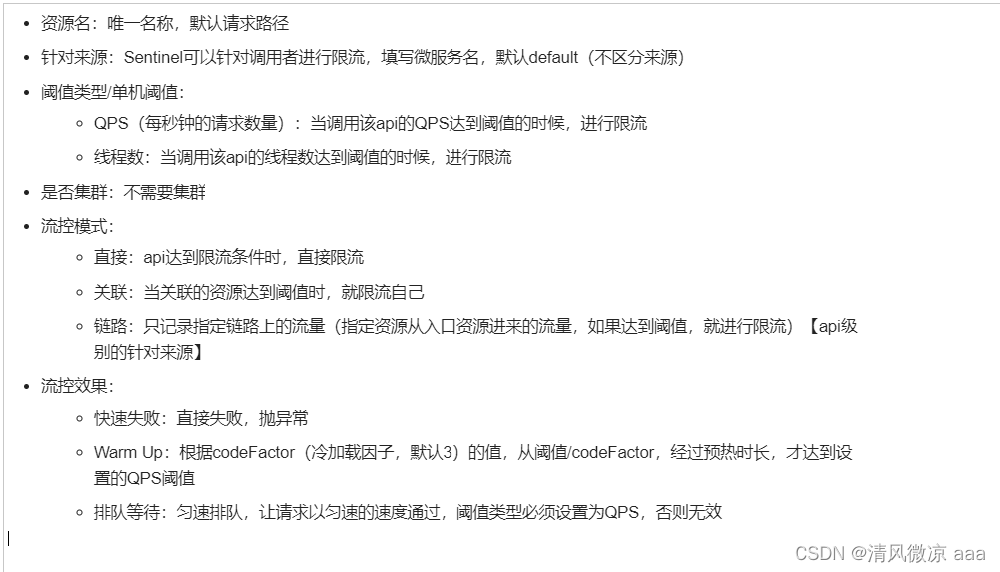
19.4.2 流控模式
1)直接(默认)
-
系统默认:直接->快速失败
-
即:那个资源触发了阈值,我就对那个资源进行限流。
-
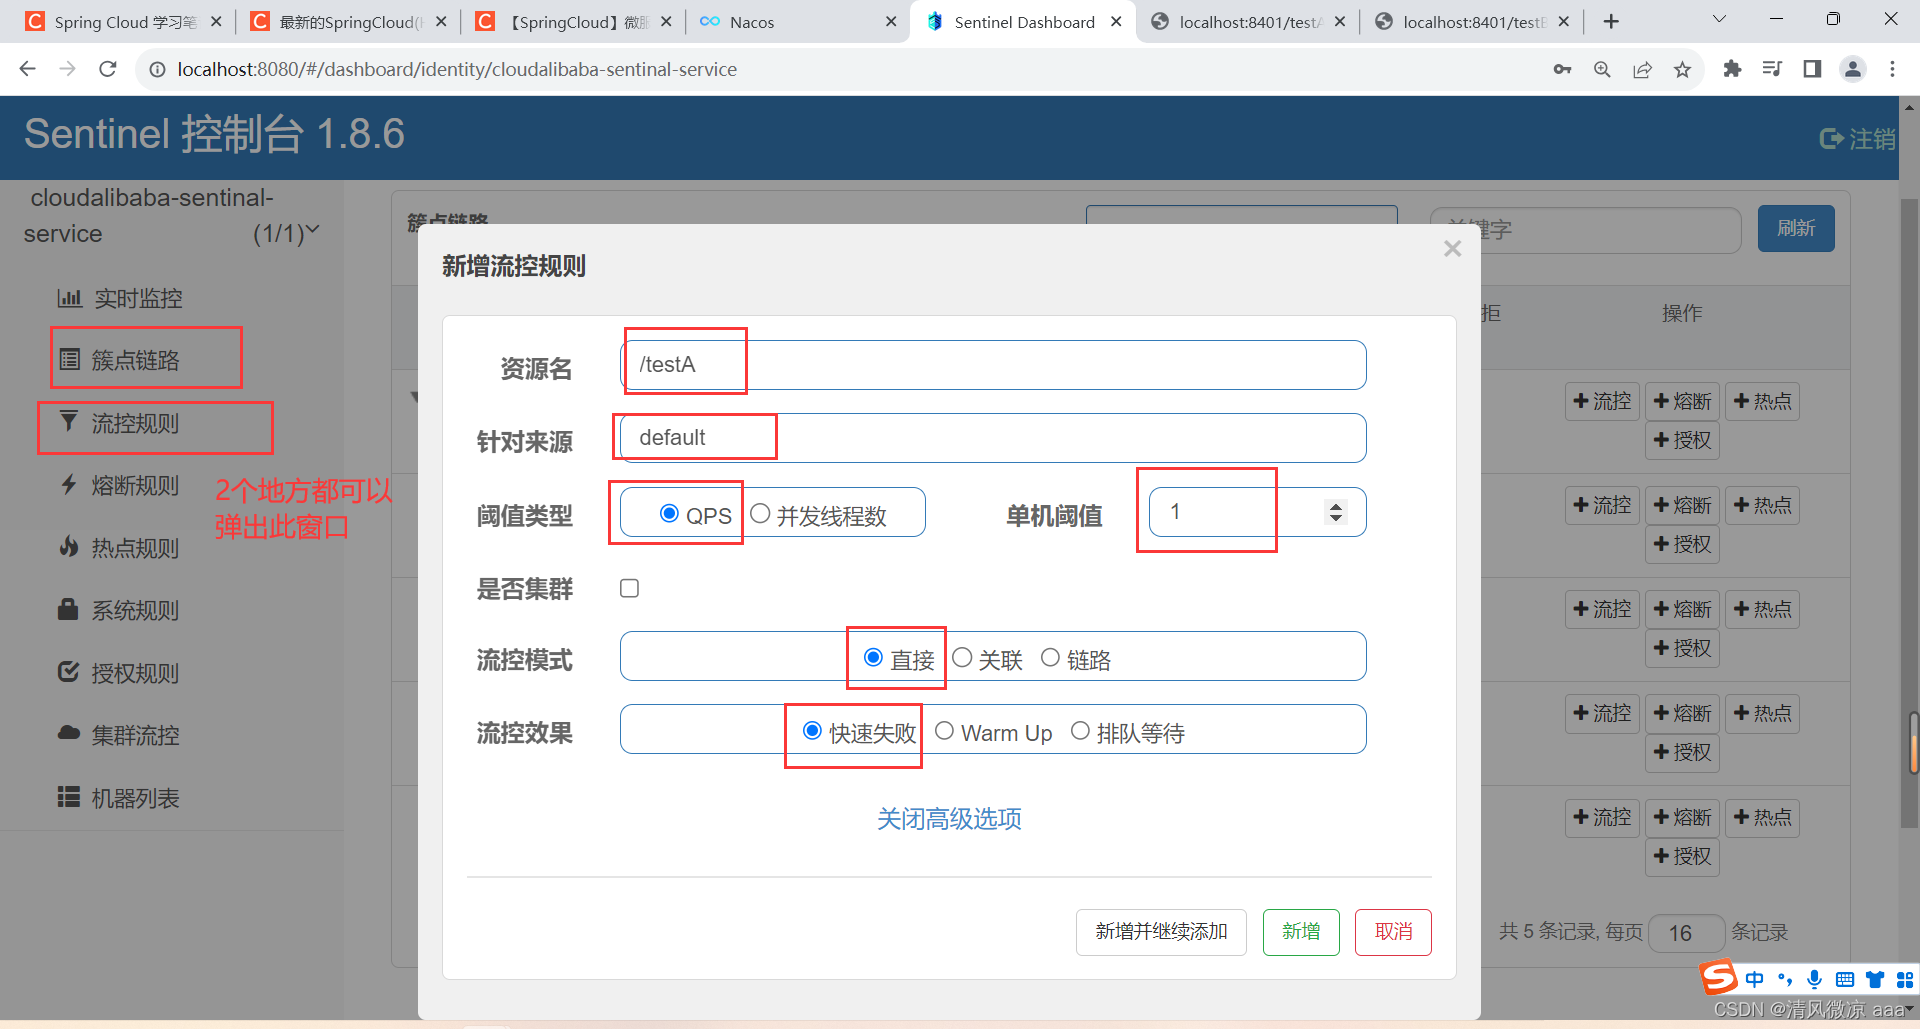
配置及说明:
表示1秒钟内查询1次就是OK,若超过次数1,就直接-快速失败,报默认错误
-
测试1:QPS
-
快速点击访问http://localhost:8401/testA
-
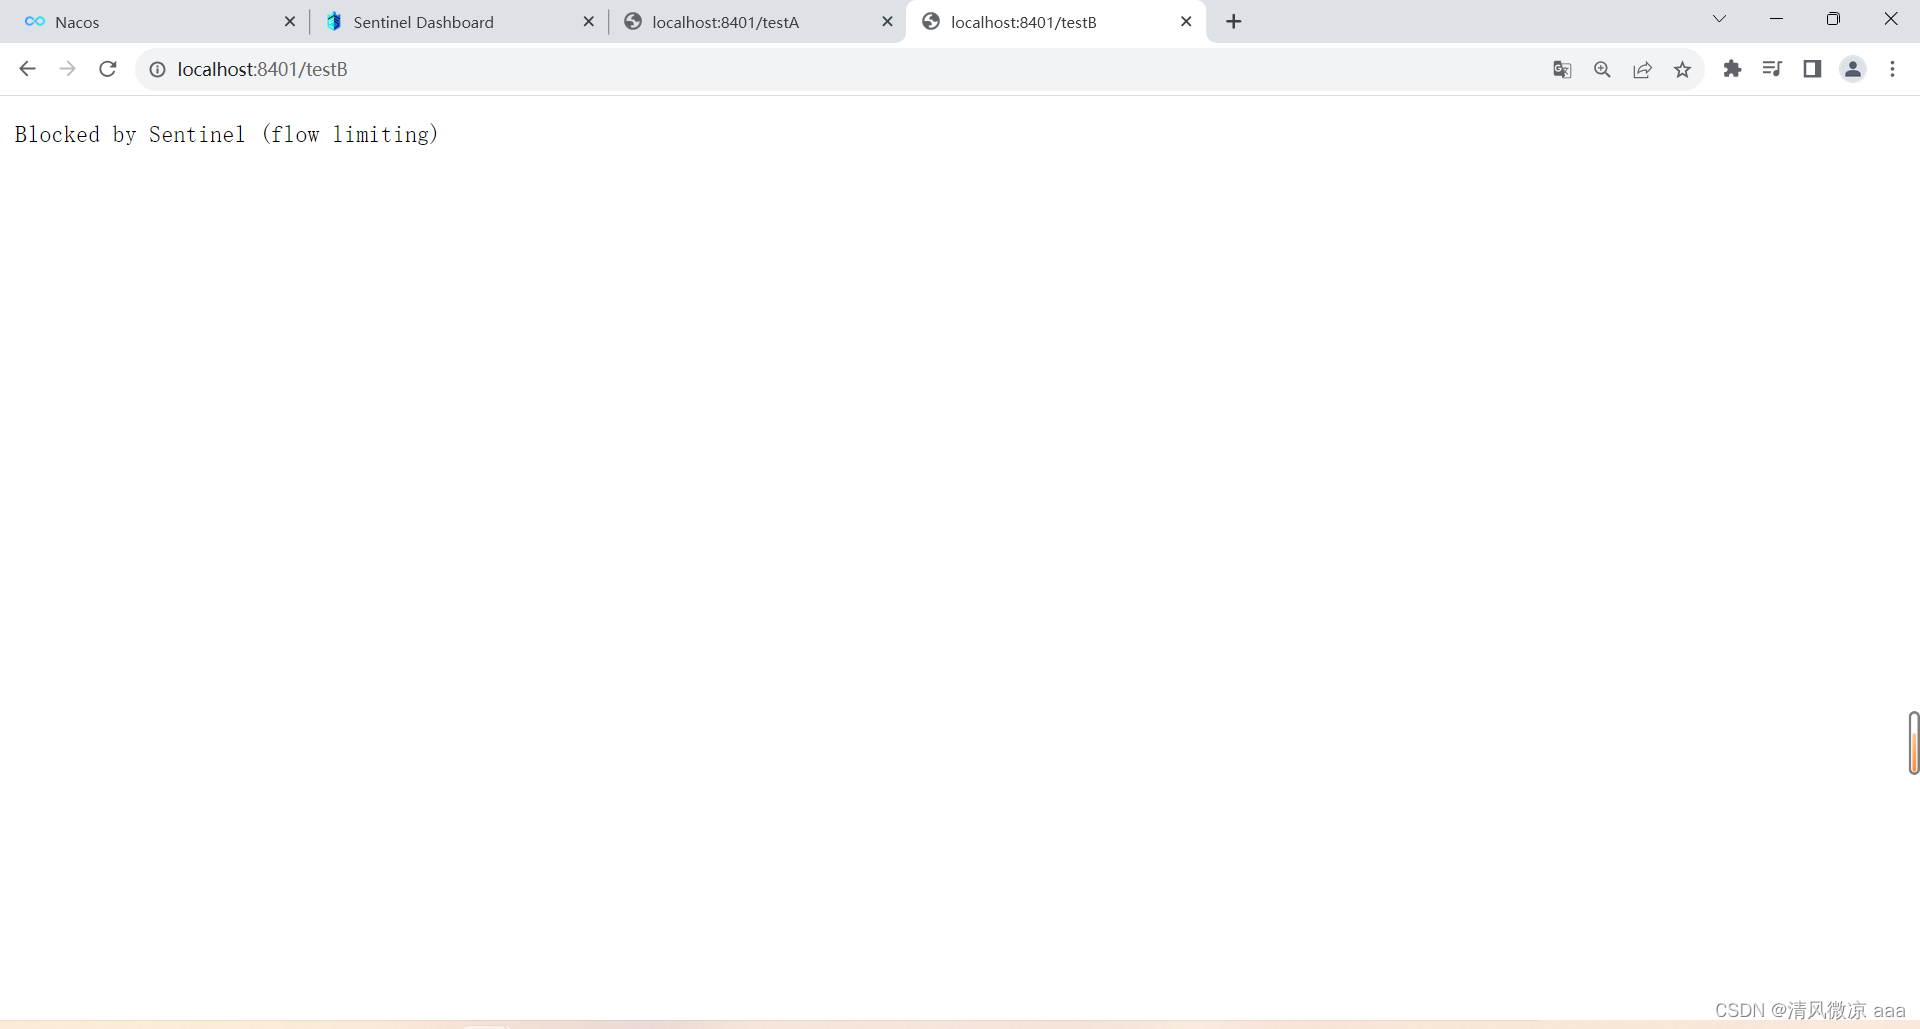
结果:Blocked by Sentinel (flow limiting)
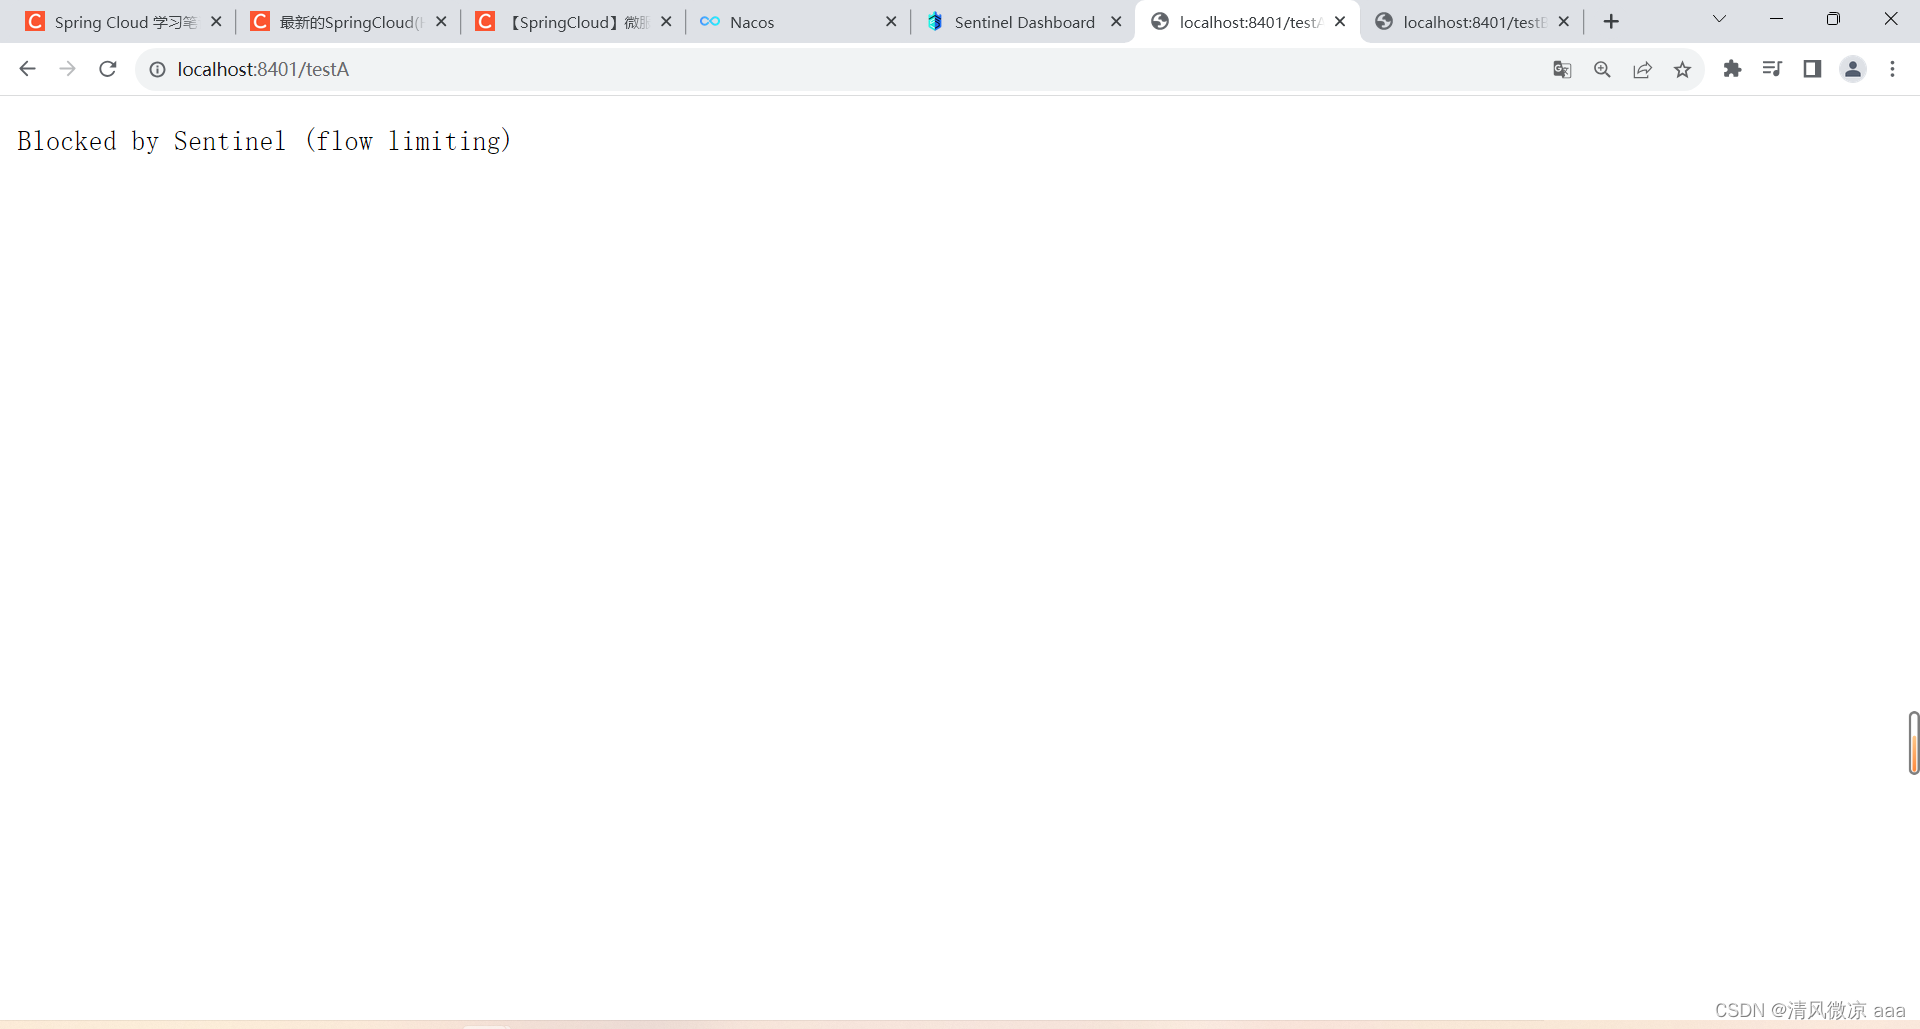
-
思考???
- 直接调用默认报错信息,技术方面OK
but,是否应该有我们自己的后续处理? - 类似有个fallback的兜底方法?(即:不使用默认的报错信息,而是使用自定义的报错信息。)
- 直接调用默认报错信息,技术方面OK
-
-
测试2:并发线程数
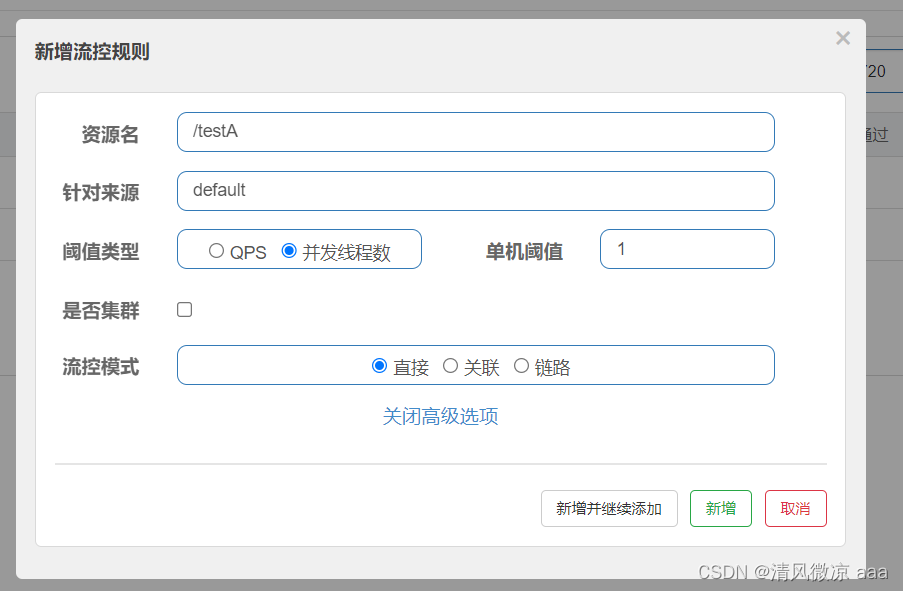
-
多次点击发现结果不变。
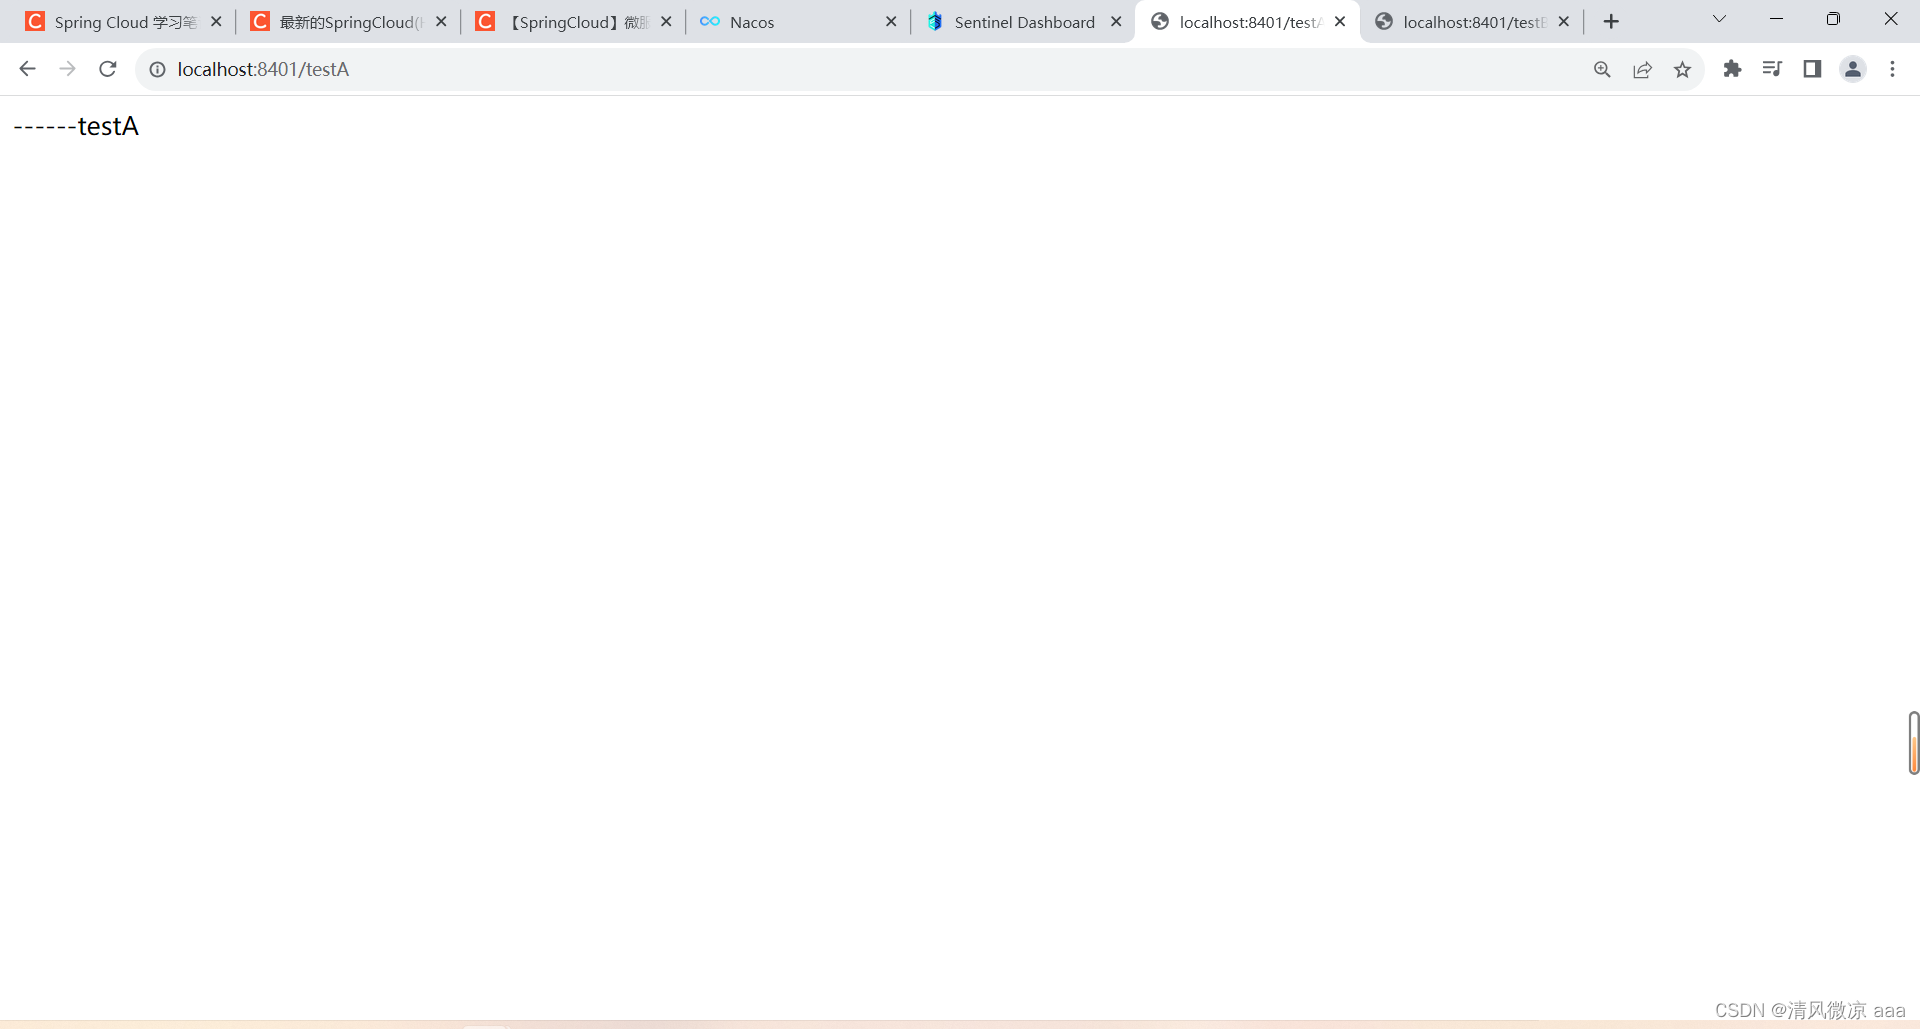
-
QPS和并发线程数的区别:QPS是请求没有进来之前就被阻挡了,并发线程数是随便进来但是里面能处理的只有一个线程。
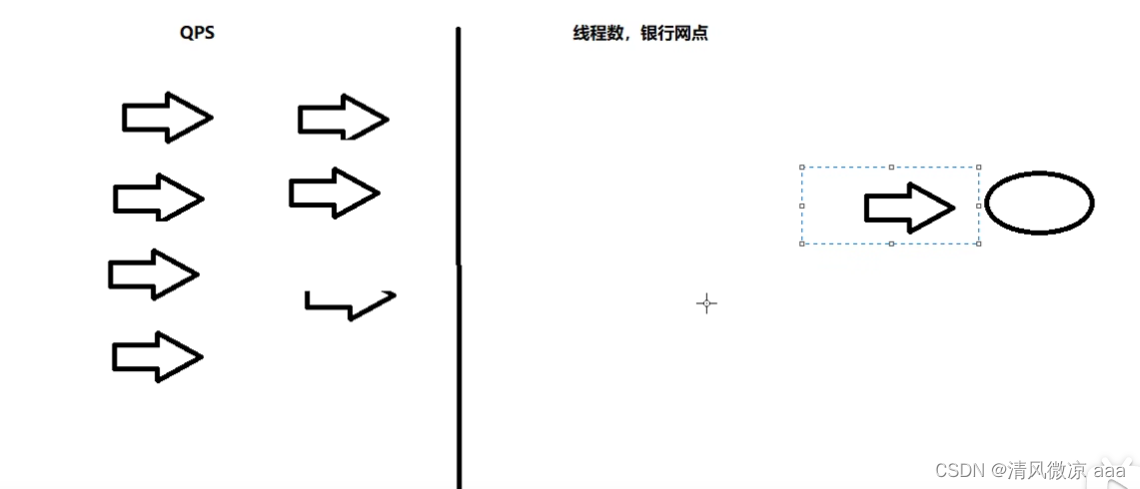
-
在A方法中加上暂停时间:
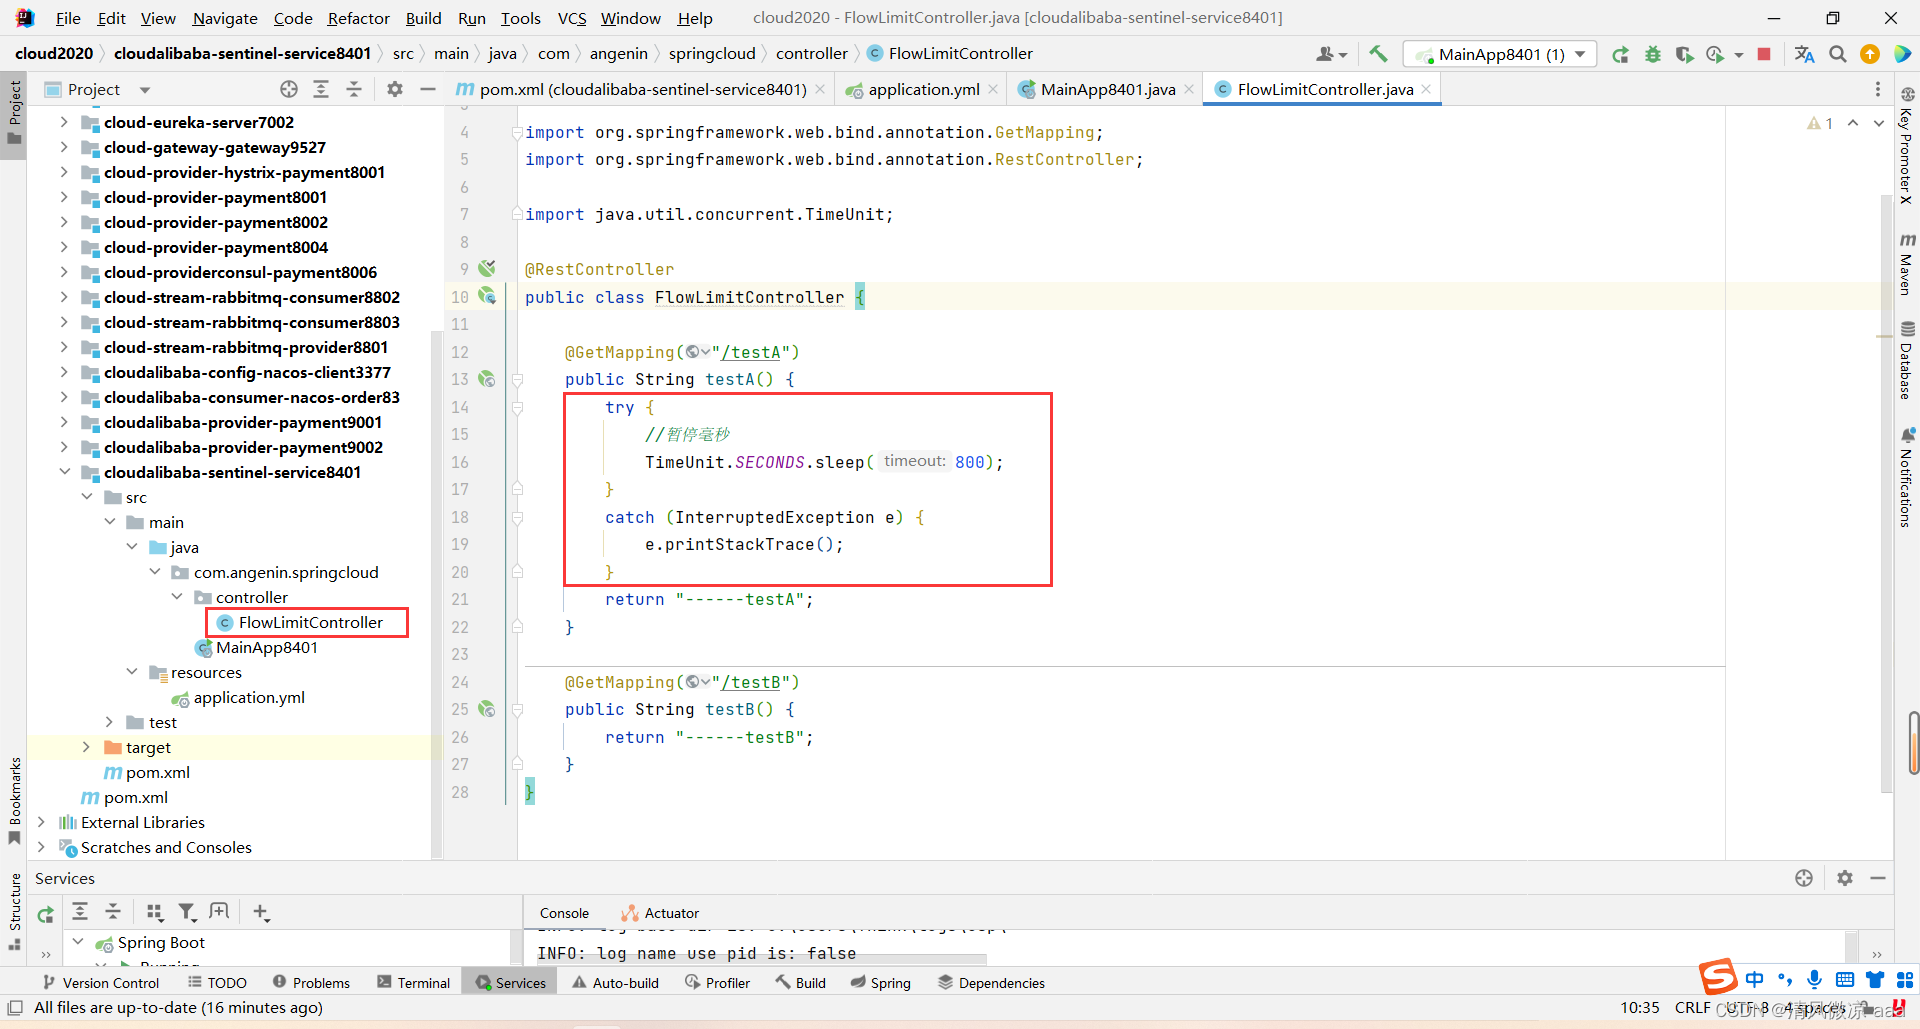
-
多次点击,会出现报错:1秒钟内只允许一个线程进来
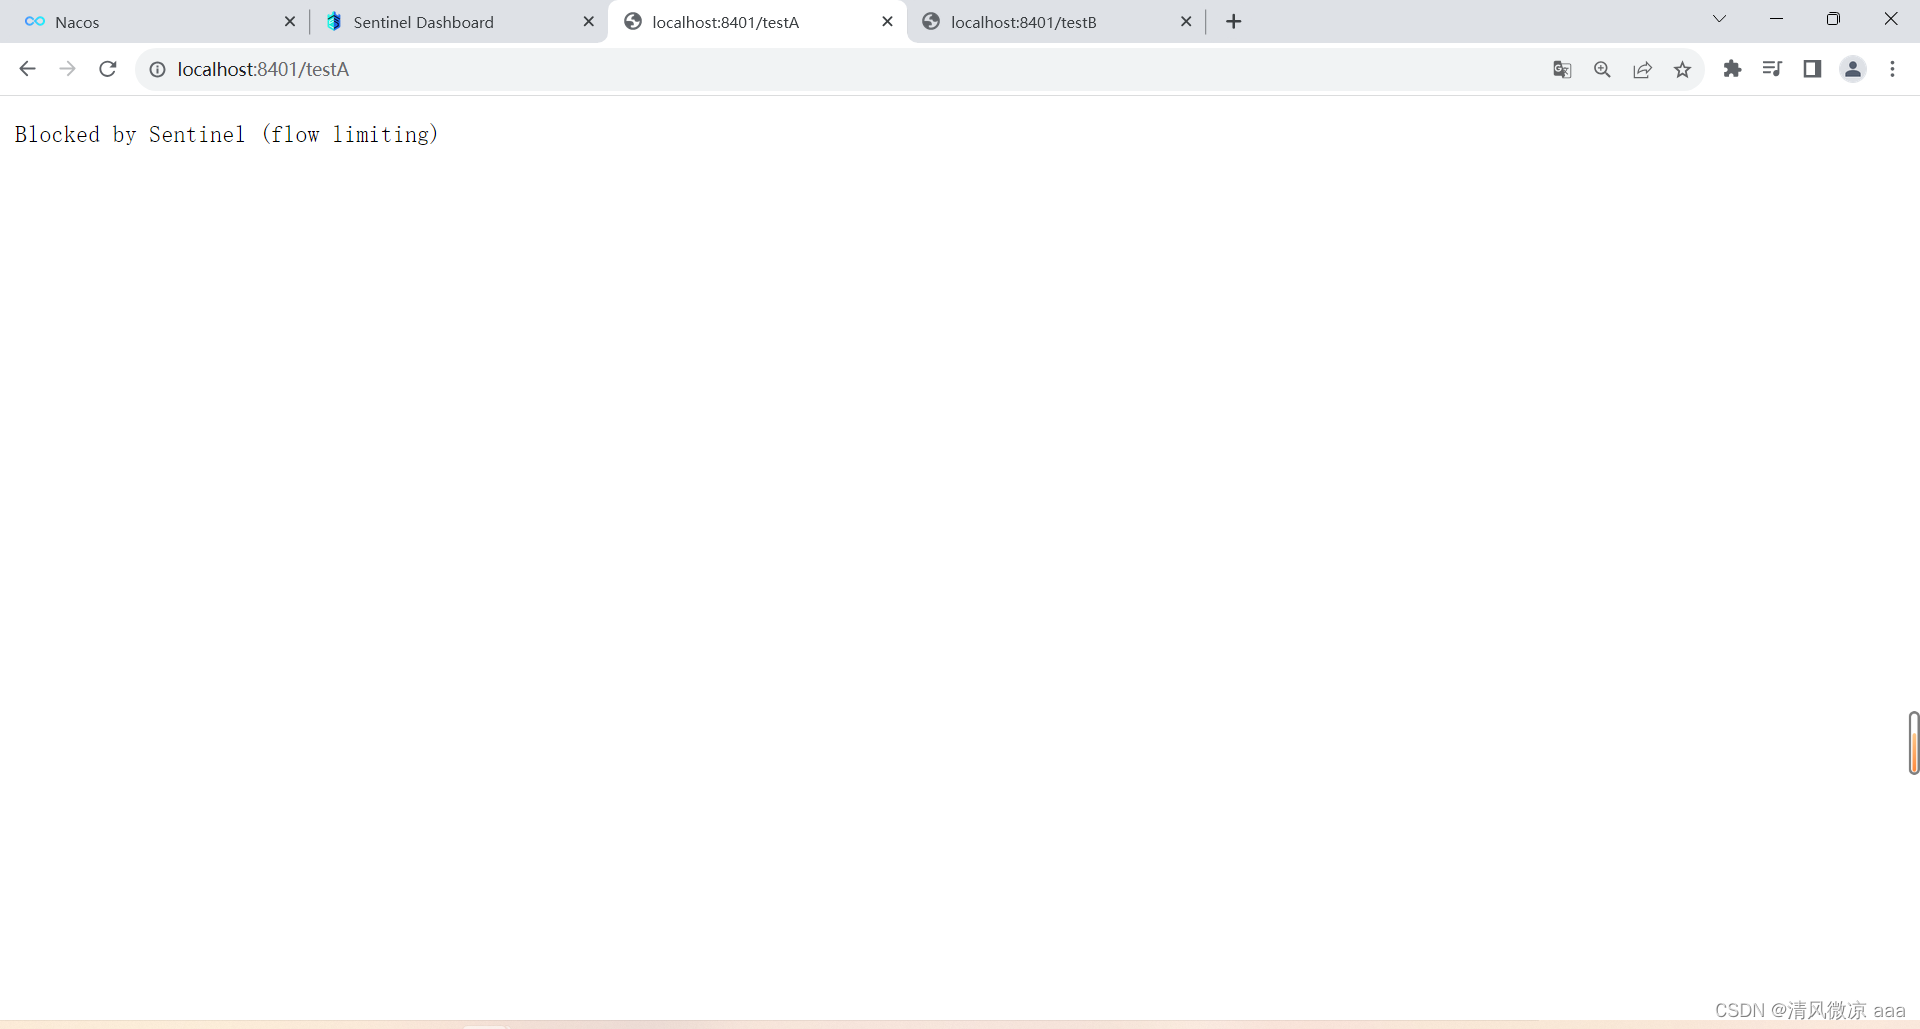
-
2)关联
-
是什么
- 当关联的资源达到阈值时,就限流自己
- 当与A关联的资源B达到阀值后,就限流A自己
- B惹事,A挂了
-
恢复代码:
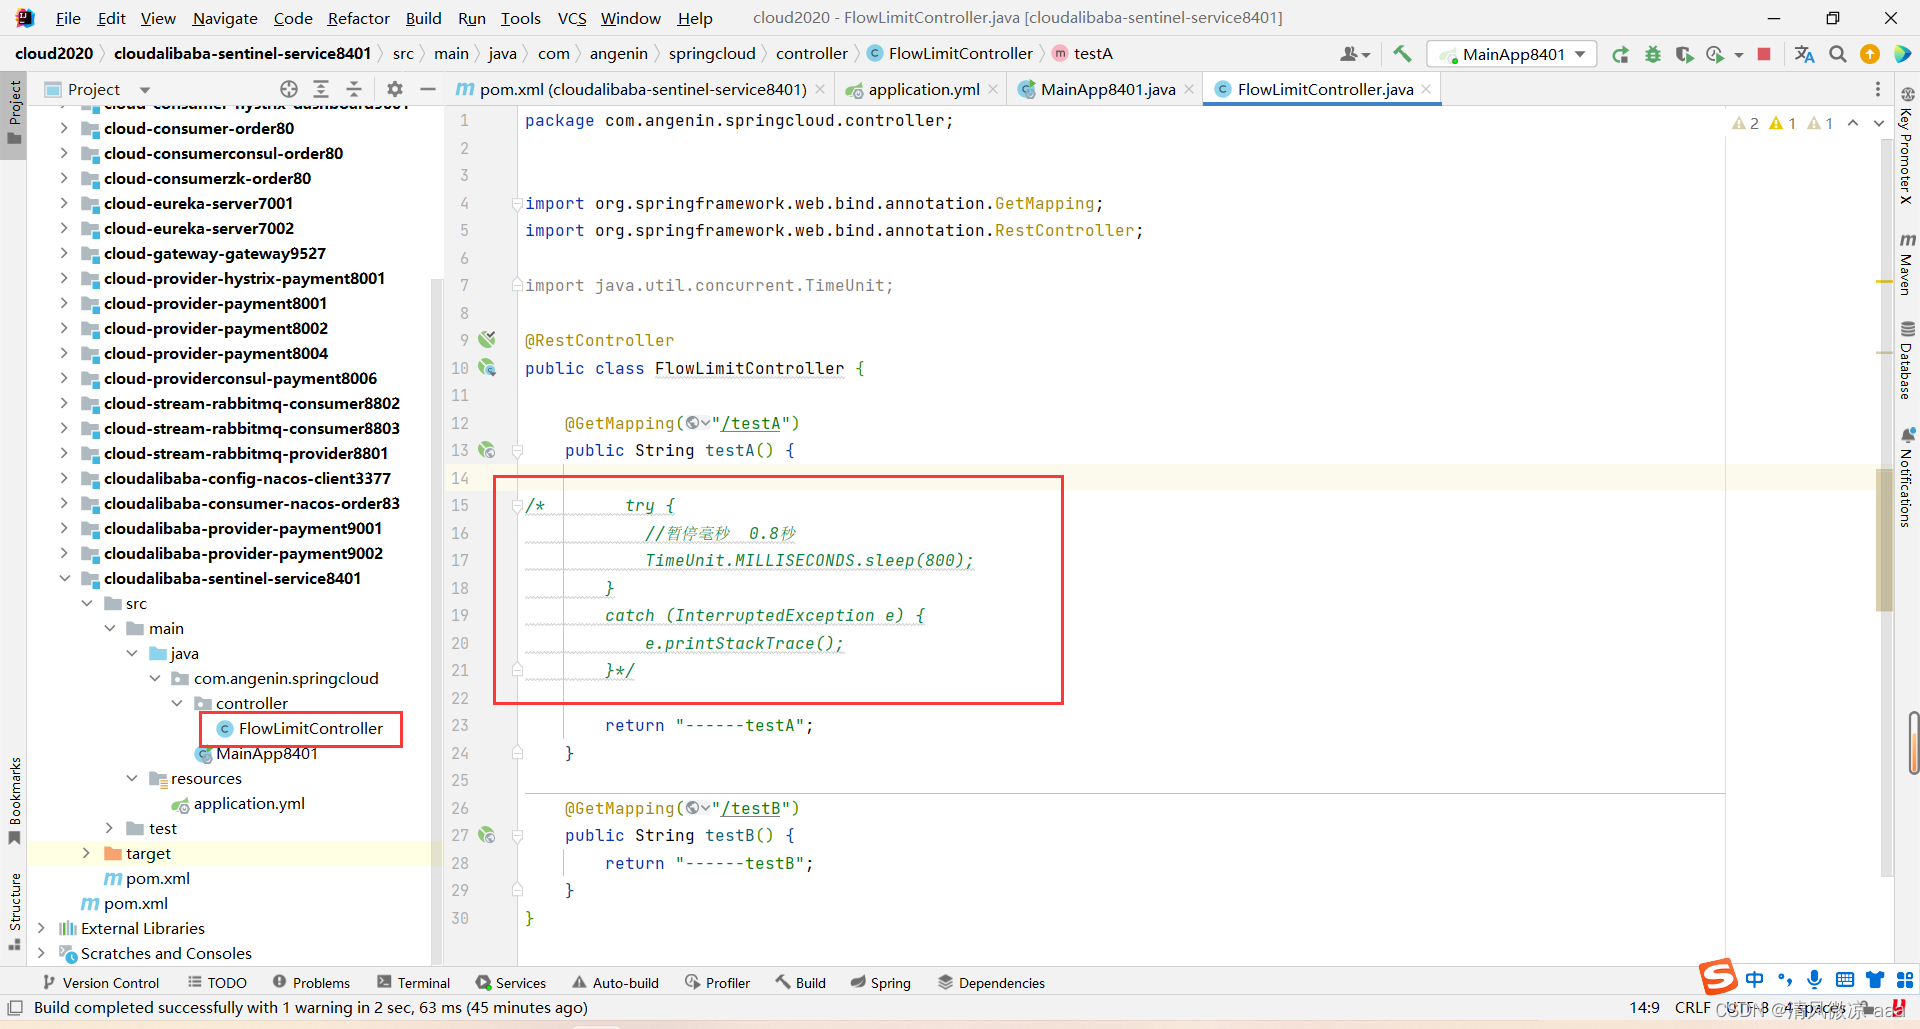
-
配置A
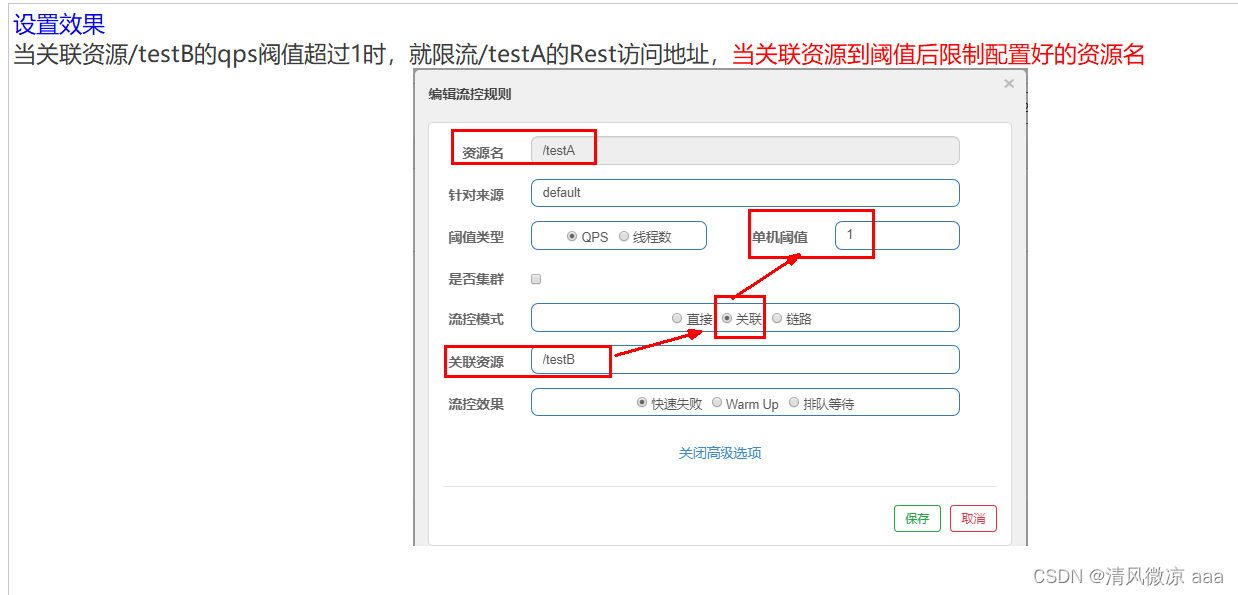
-
postman模拟并发密集访问testB
-
访问testB成功
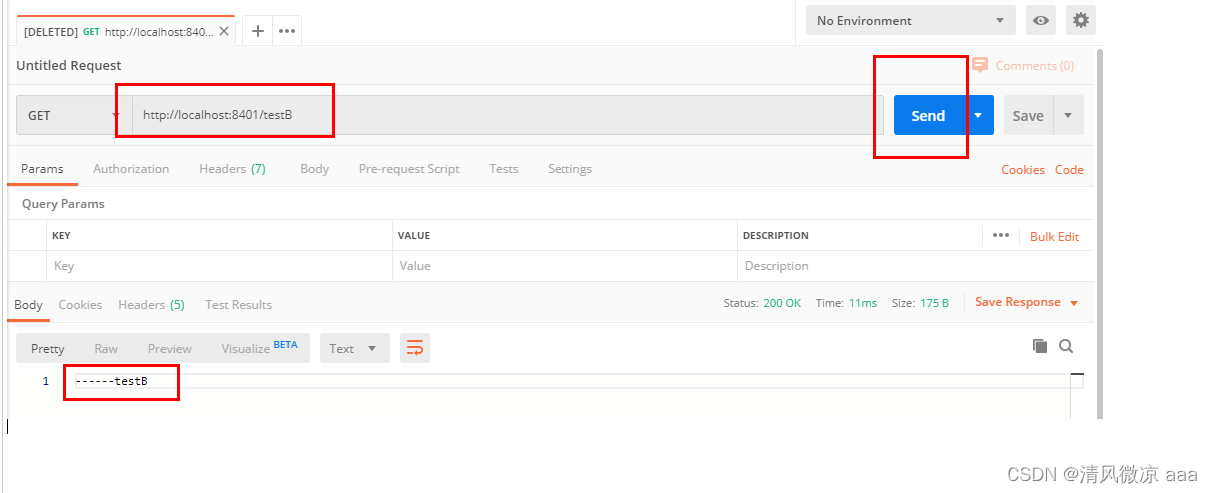
-
postman里新建多线程集合组
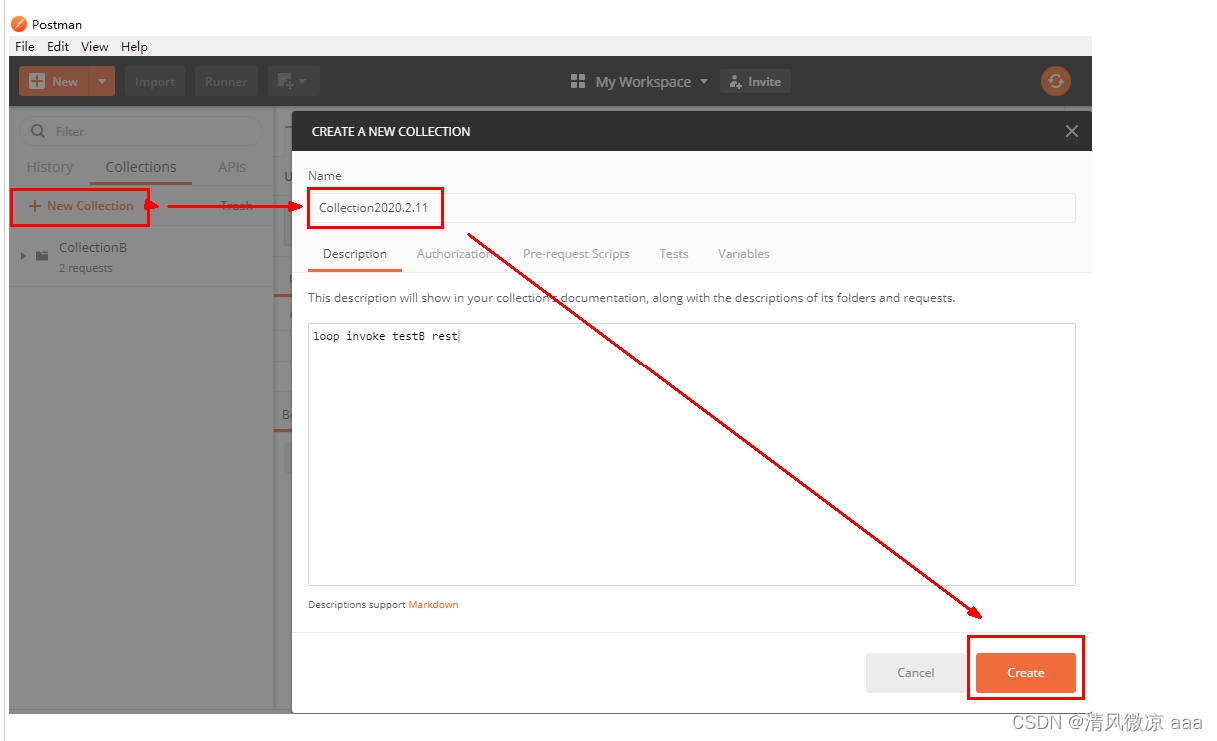
-
将访问地址添加进新新线程组
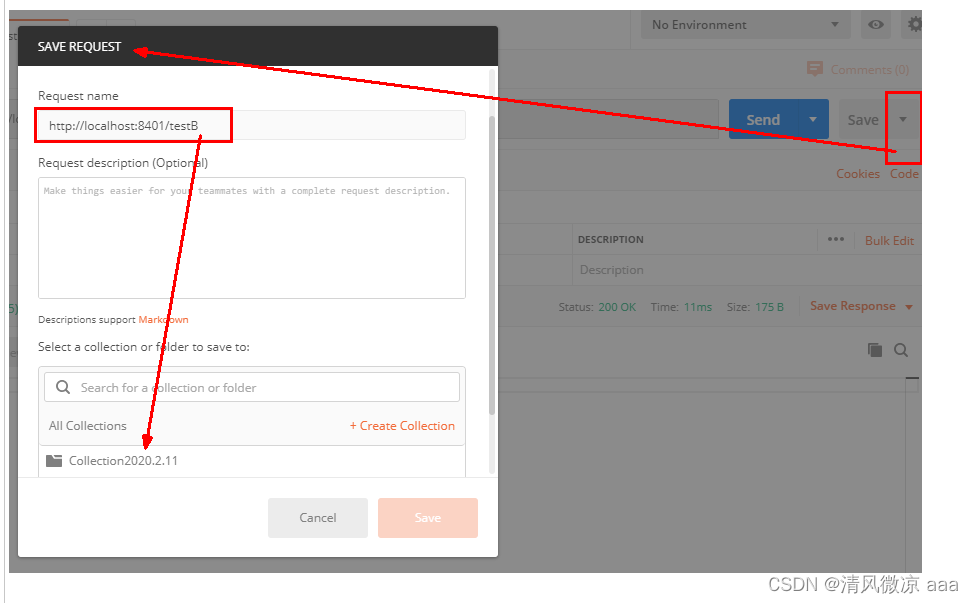
-
Run:大批量线程高并发访问B,导致A失效了
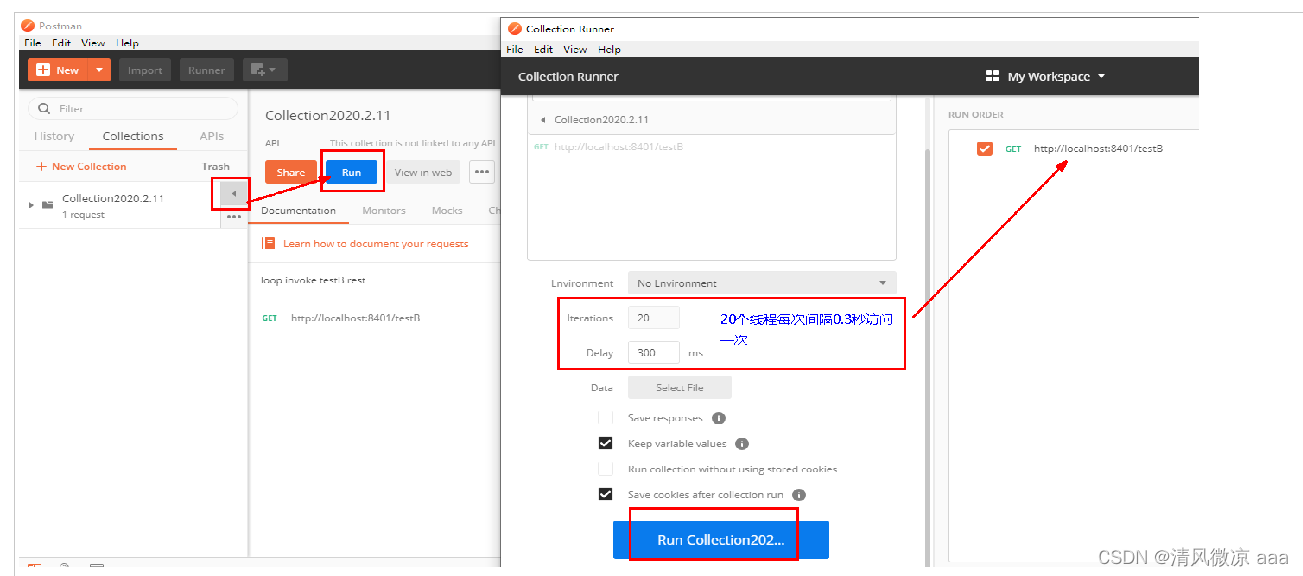
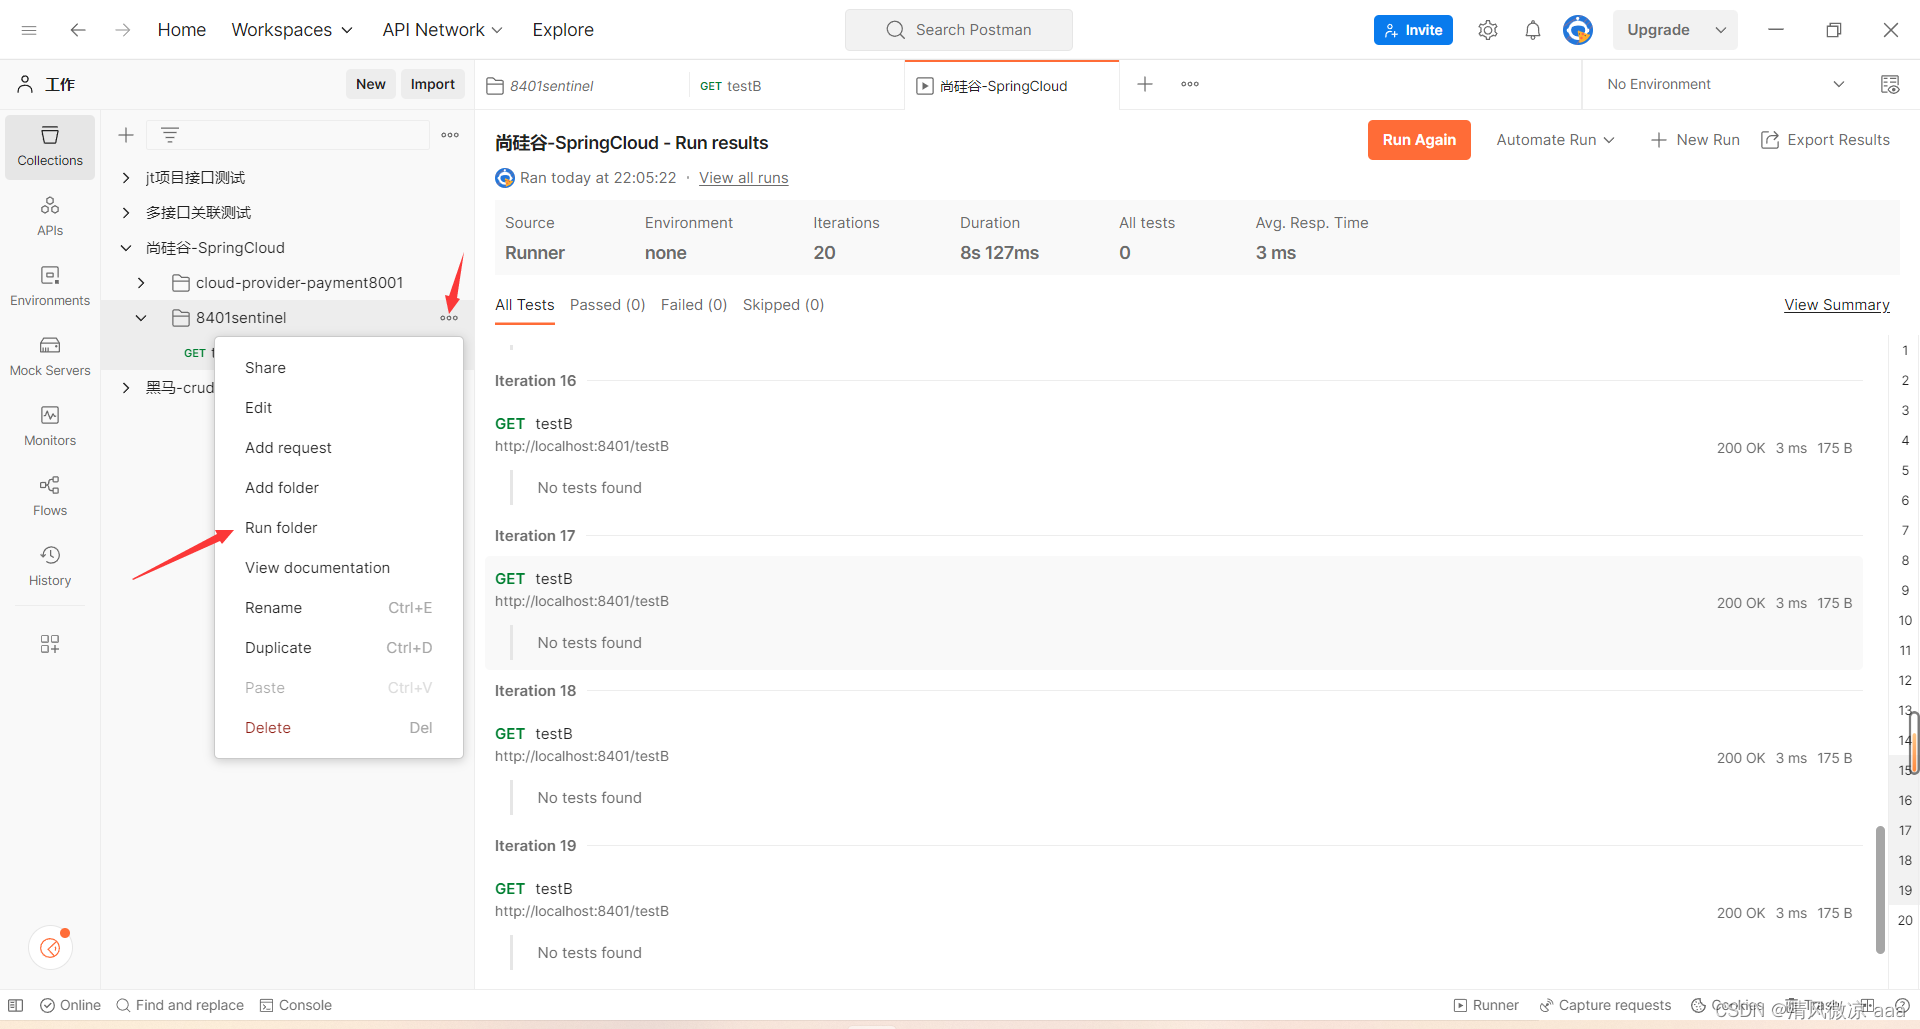
-
-
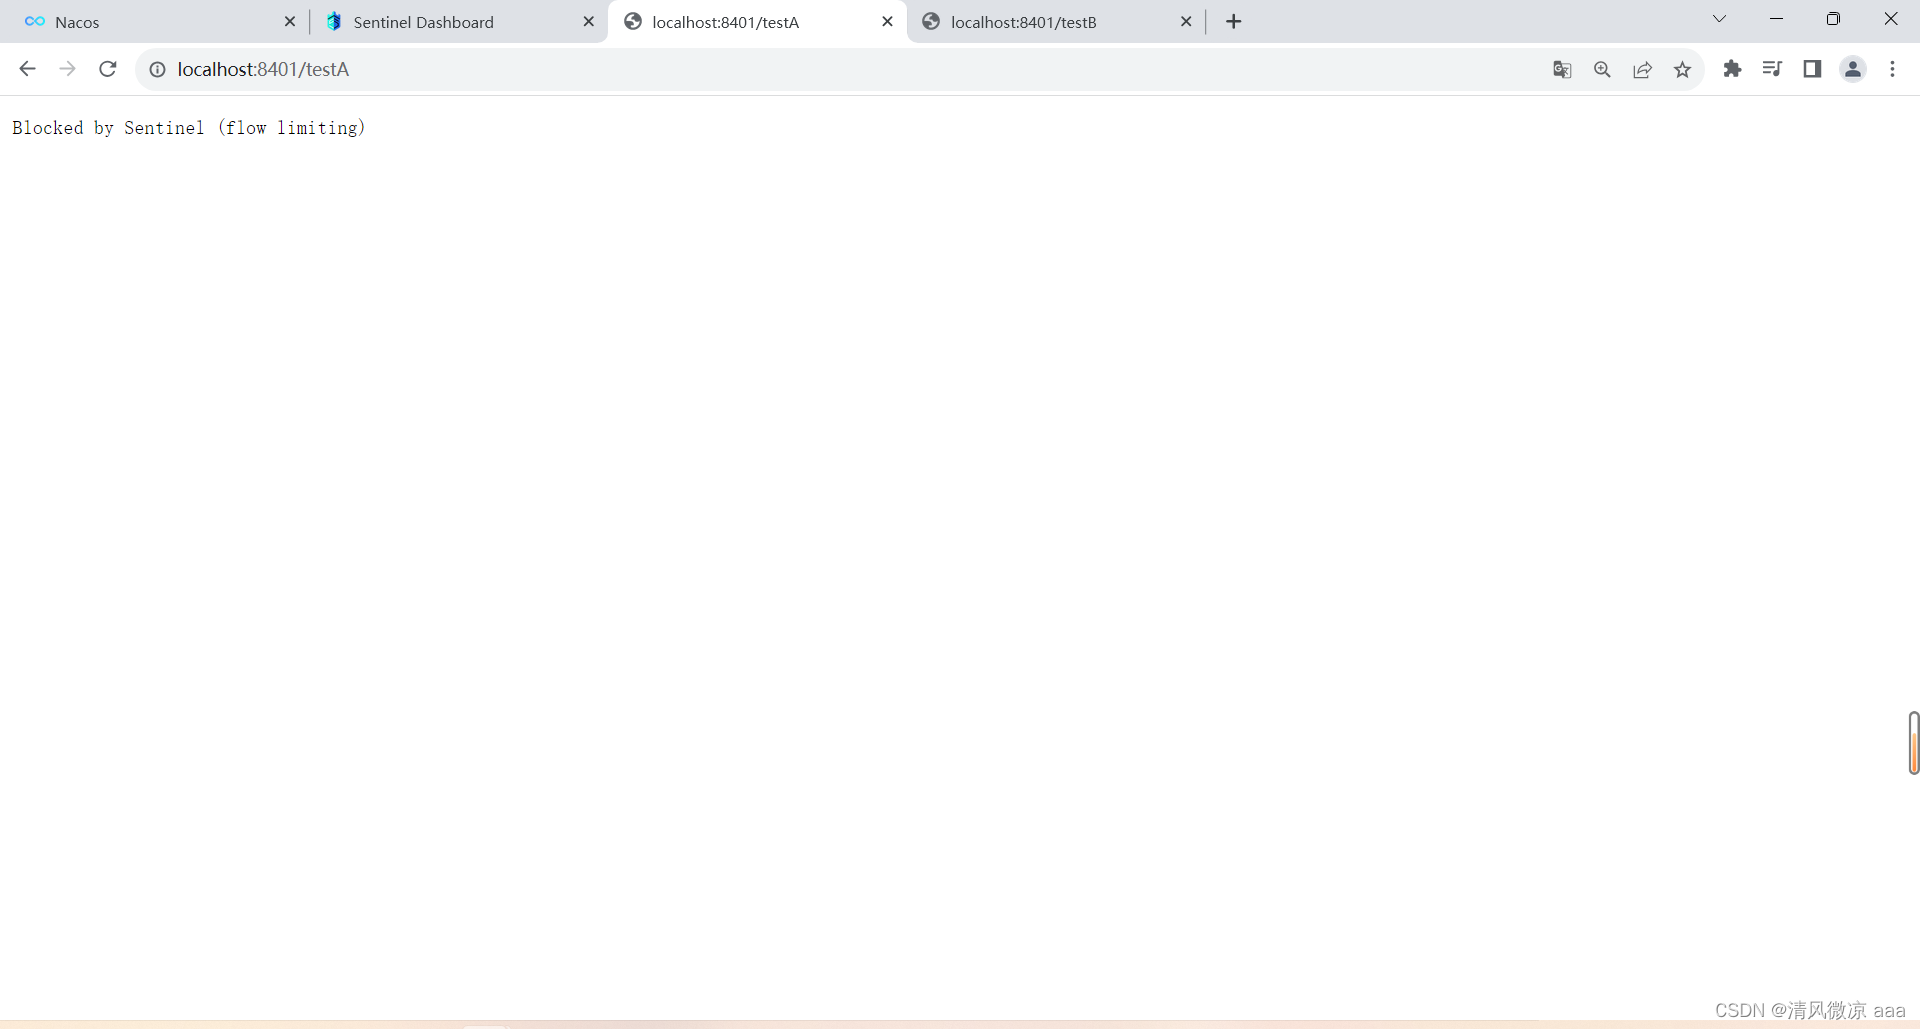
运行后发现testA挂了
- 点击访问http://localhost:8401/testA
- 结果:Blocked by Sentinel (flow limiting)
-
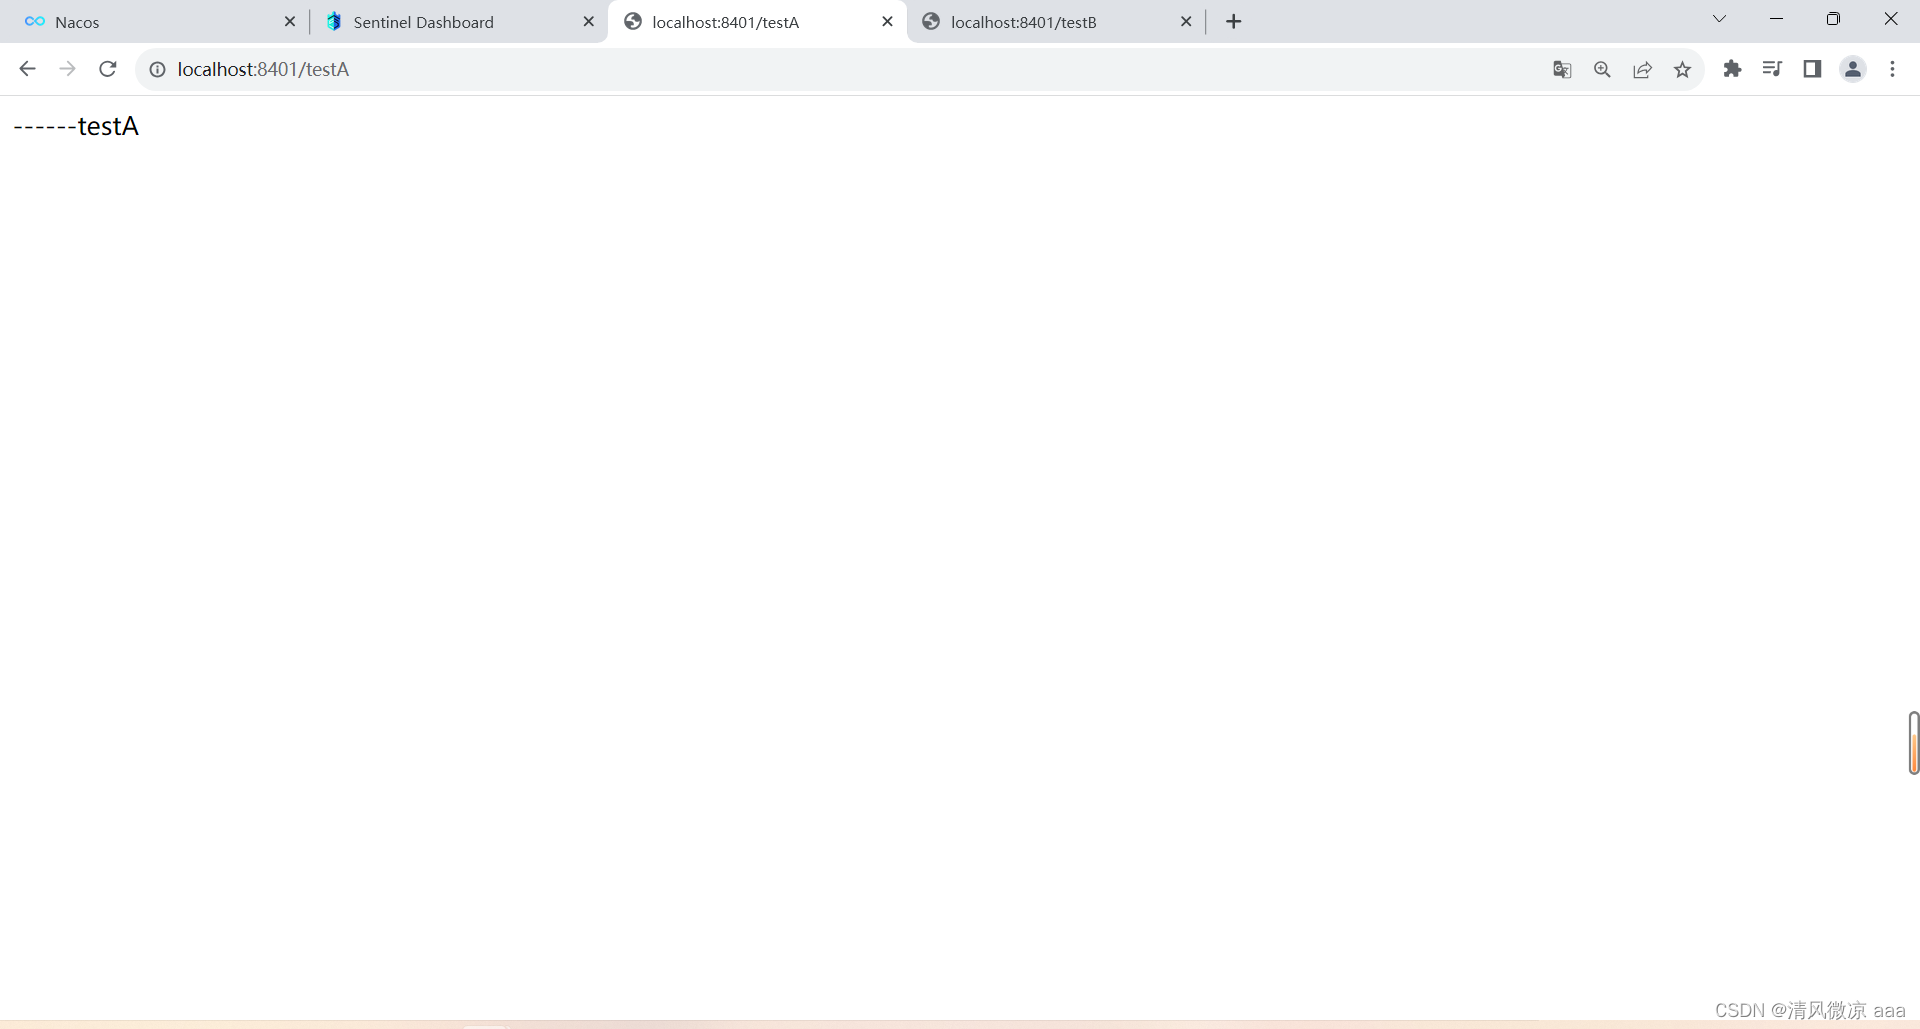
等这20个线程跑完,再次访问恢复正常。
3)链路
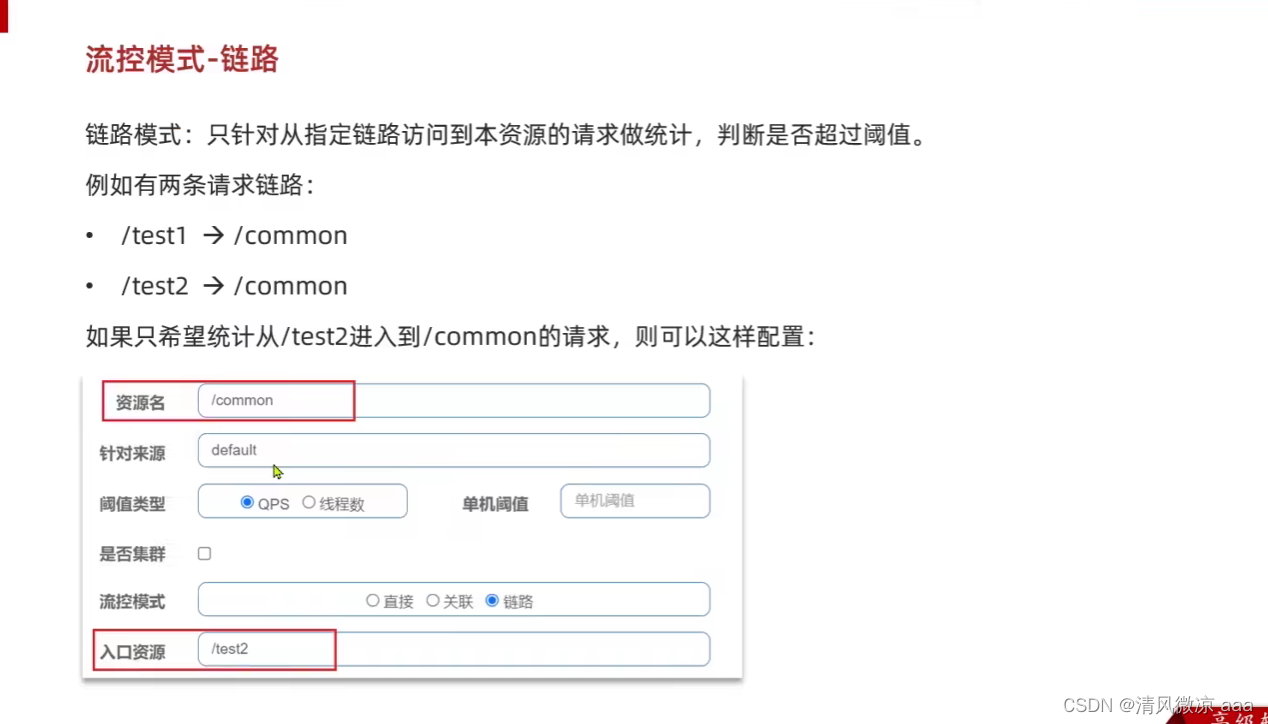
- 多个请求调用了同一个微服务
- eg:a、b、c三个资源,a、b都要访问c资源,但是我在统计资源c的时候我只统计从A过来的请求,b过来的不管。所以这种流控模式是对请求的来源来做判断和限流。
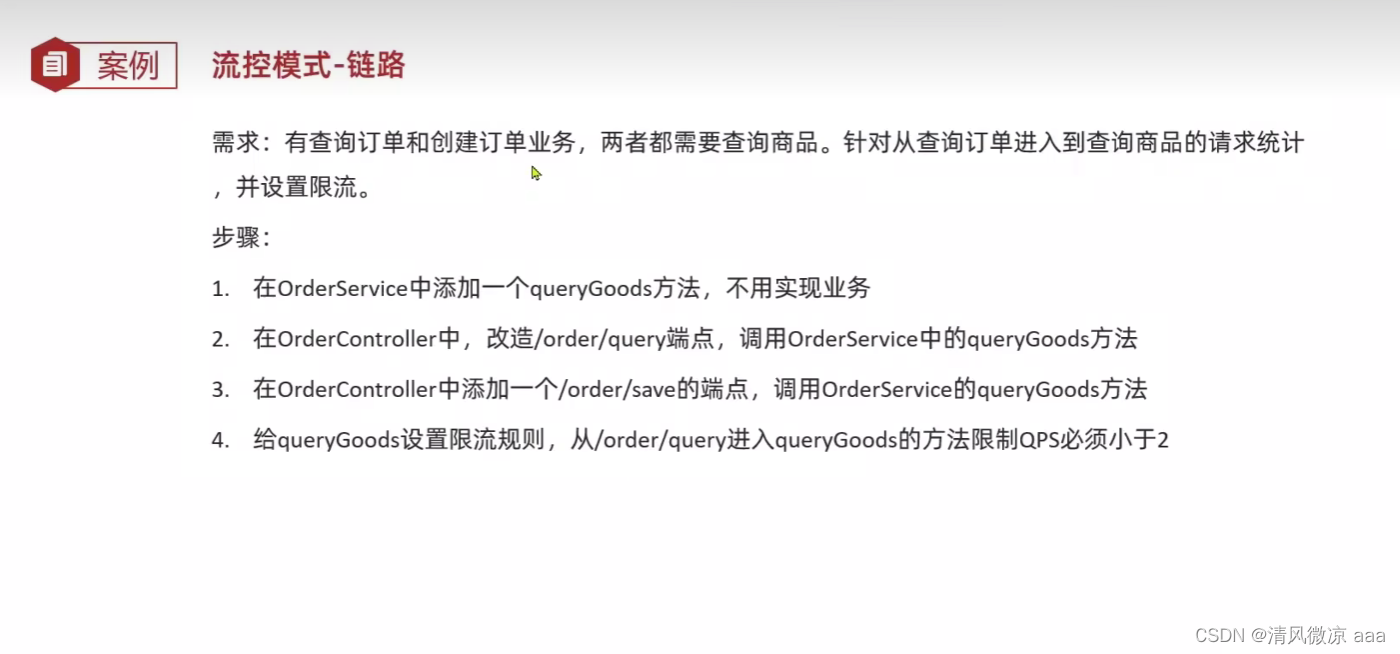
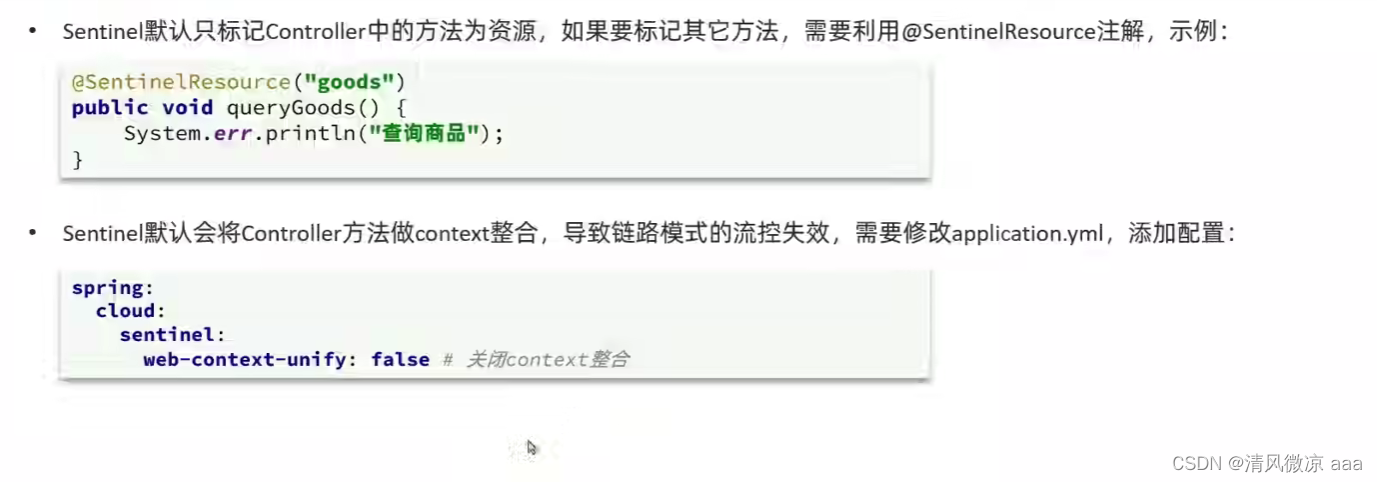
19.4.3 流控效果
1)直接->快速失败(默认的流控处理)
- 直接失败,抛出异常:Blocked by Sentinel (flow limiting)
- 源码:
- com.alibaba.csp.sentinel.slots.block.flow.controller.DefaultController
2)预热
-
说明
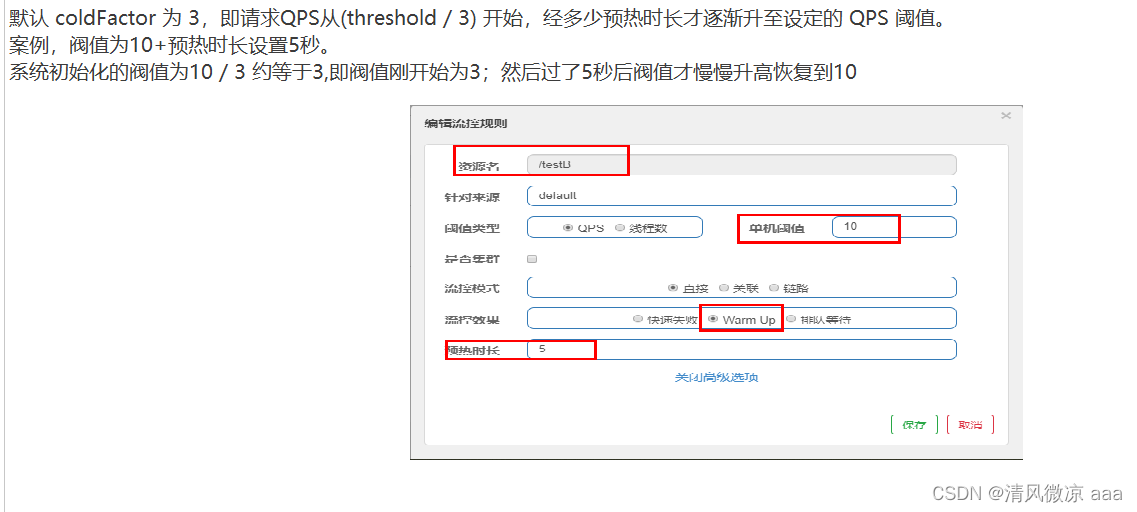
- 公式:阈值除以coldFactor(默认值为3),经过预热时长后才会达到阈值
-
官网:
https://github.com/alibaba/Sentinel/wiki/%E6%B5%81%E9%87%8F%E6%8E%A7%E5%88%B6
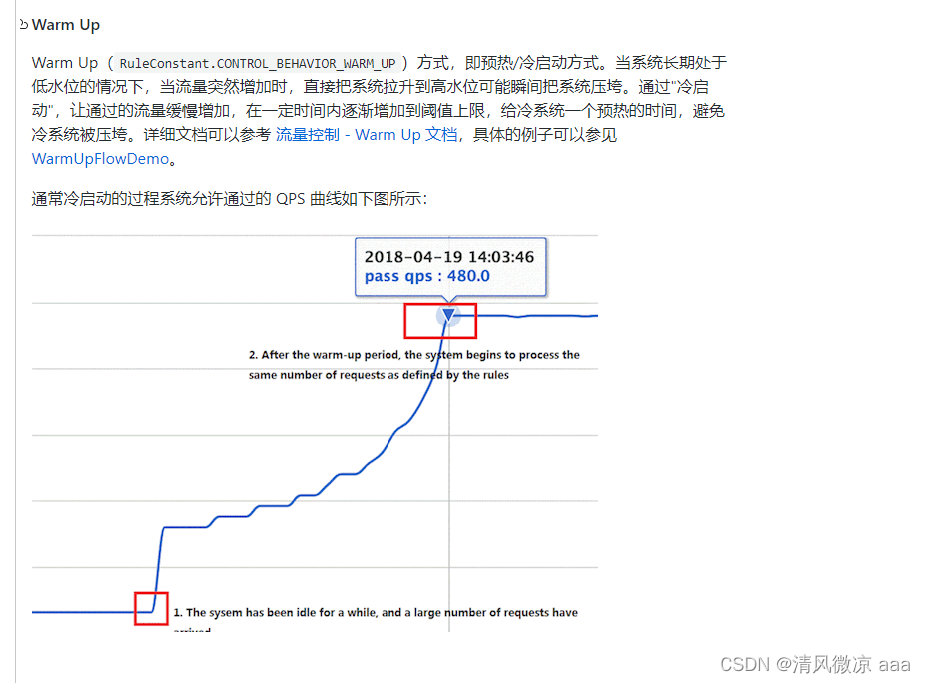
- 默认coldFactor为3,即请求 QPS 从 threshold / 3 开始,经预热时长逐渐升至设定的 QPS 阈值。
- 限流 冷启动:
https://github.com/alibaba/Sentinel/wiki/%E9%99%90%E6%B5%81---%E5%86%B7%E5%90%AF%E5%8A%A8
-
源码
- com.alibaba.csp.sentinel.slots.block.flow.controller.WarmUpController

- com.alibaba.csp.sentinel.slots.block.flow.controller.WarmUpController
-
WarmUp配置
-
多次点击http://localhost:8401/testB,刚开始不行,后续慢慢OK

-
应用场景:
- 如:秒杀系统在开启的瞬间,会有很多流量上来,很有可能把系统打死,预热方式就是把为了保护系统,可慢慢的把流量放进来,慢慢的把阀值增长到设置的阀值。
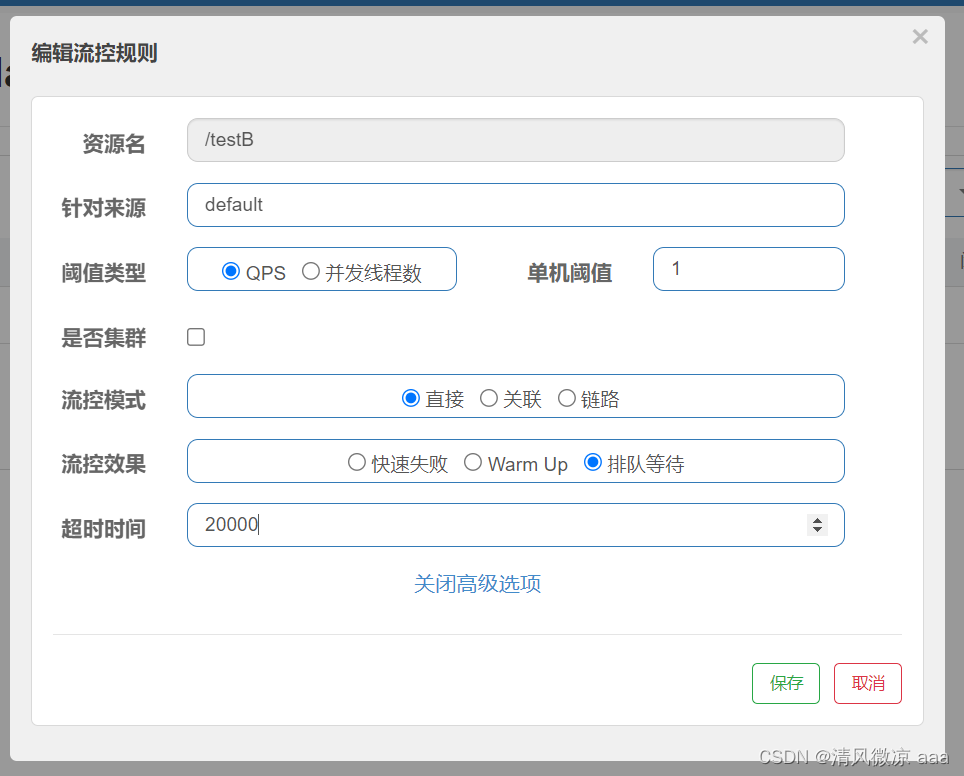
3)排队等待
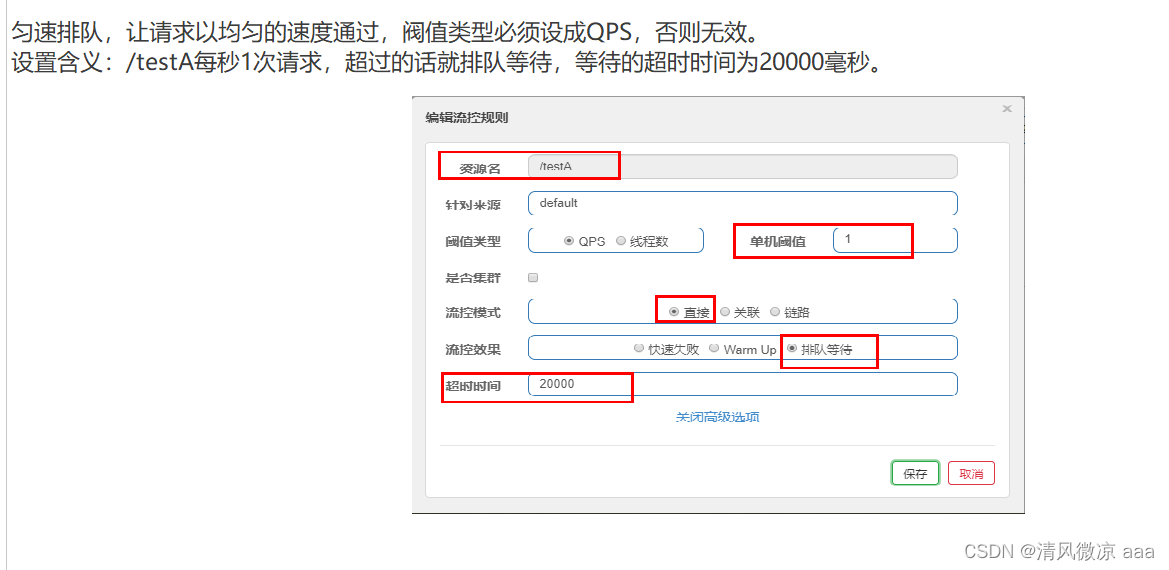
-
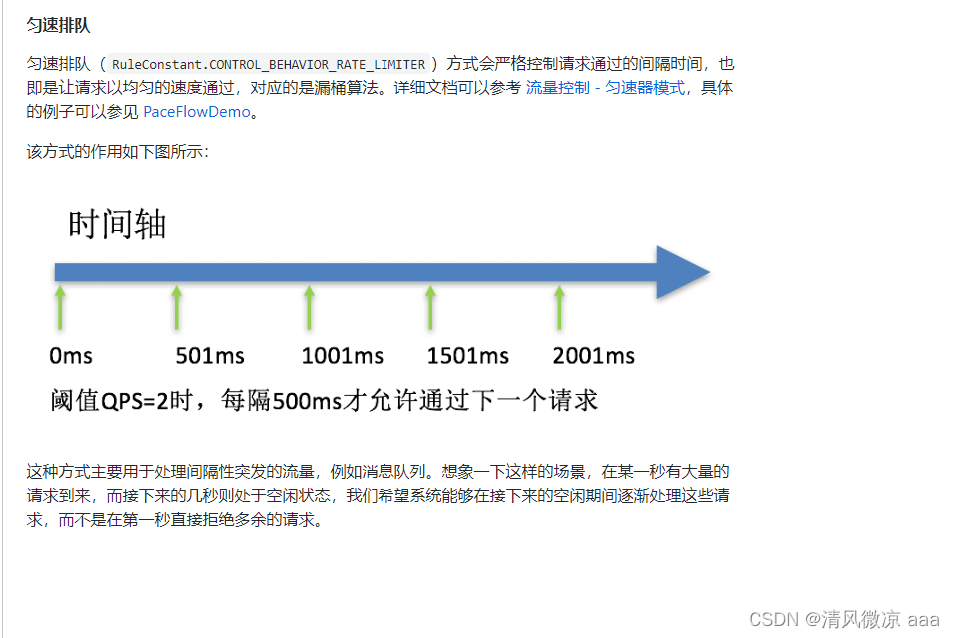
匀速排队,阈值必须设置为QPS
-
官网:
https://github.com/alibaba/Sentinel/wiki/%E6%B5%81%E9%87%8F%E6%8E%A7%E5%88%B6
-
源码:
com.alibaba.csp.sentinel.slots.block.flow.controller.RateLimiterController -
测试
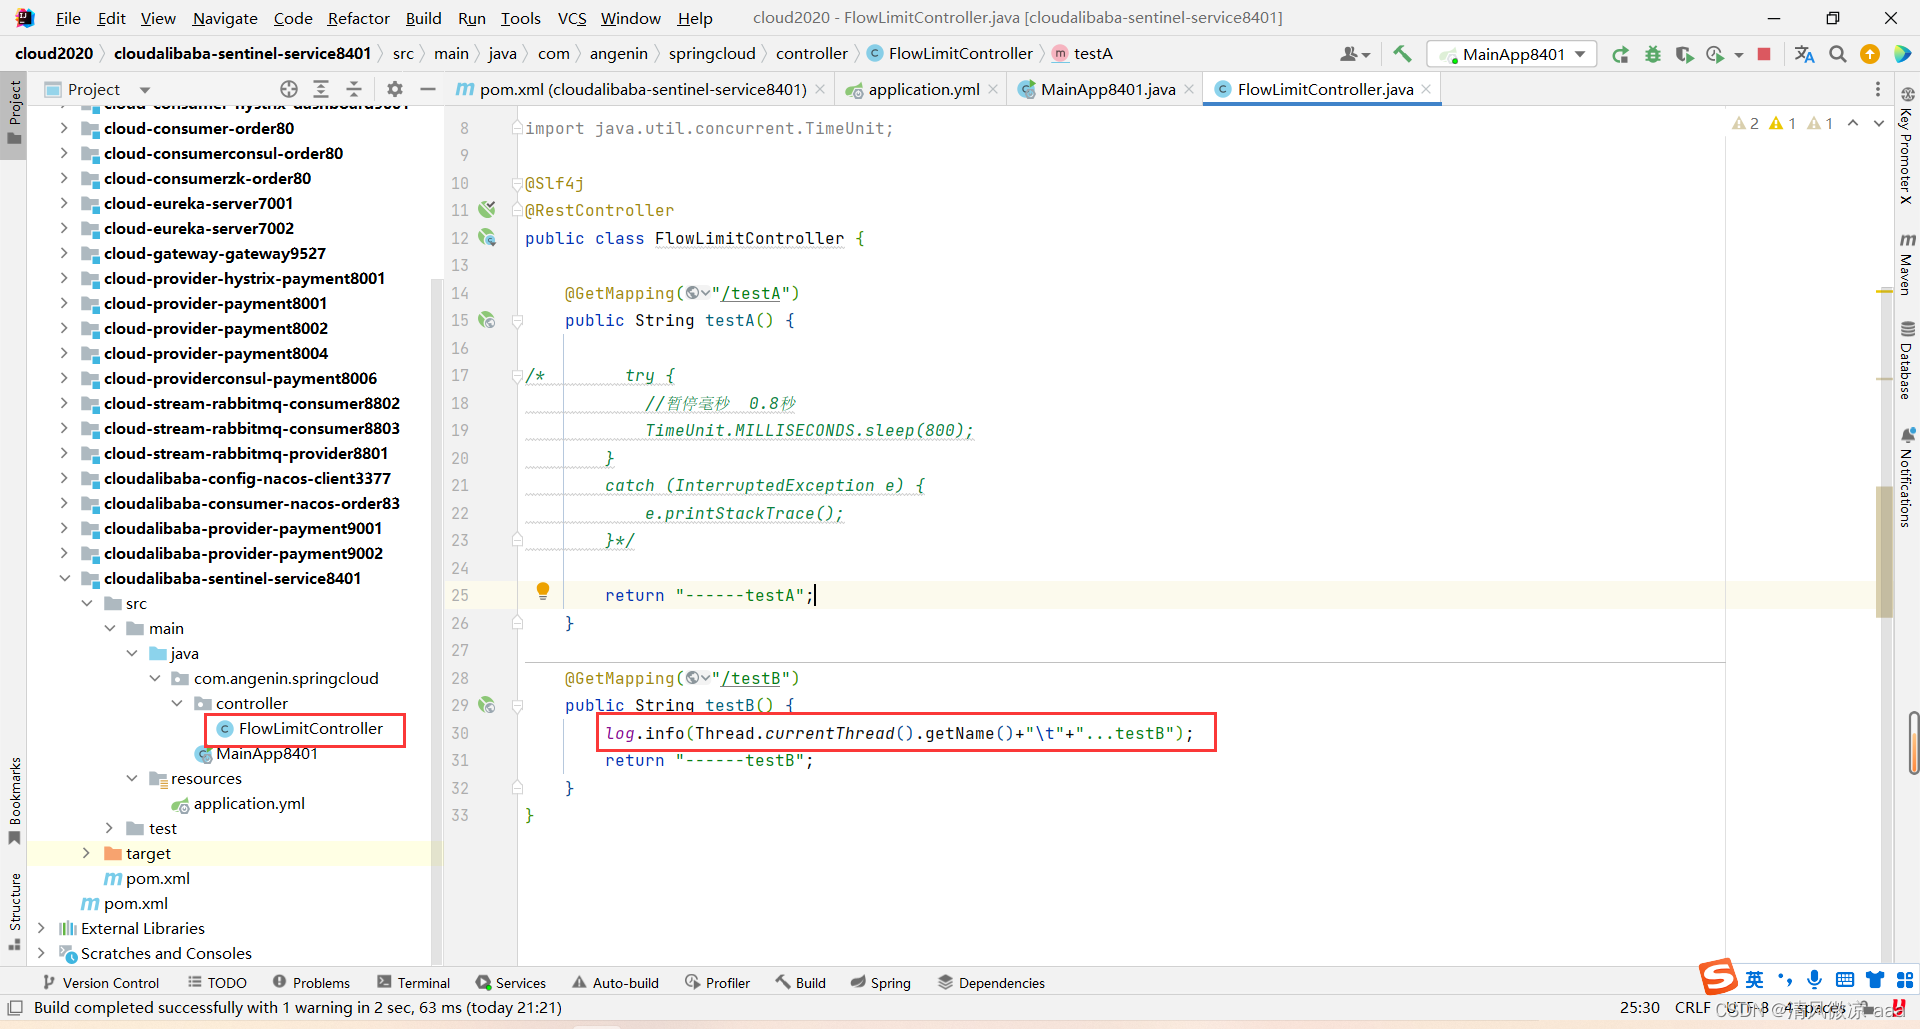
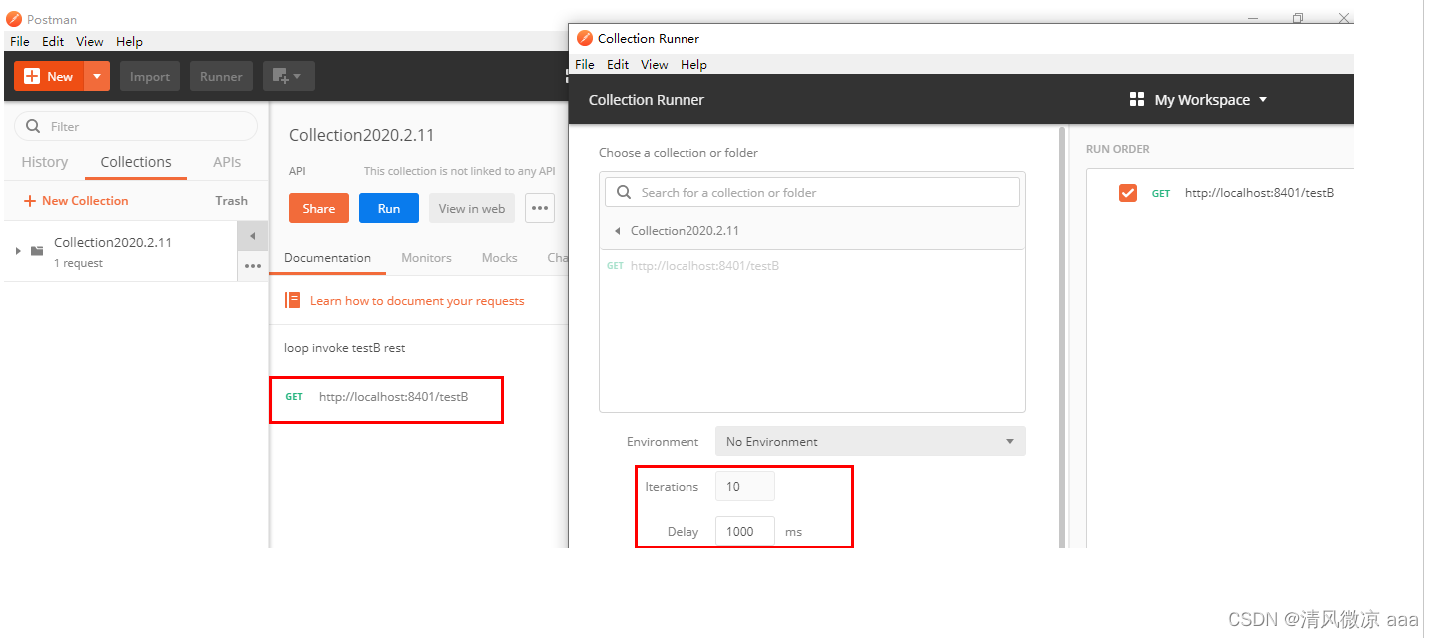
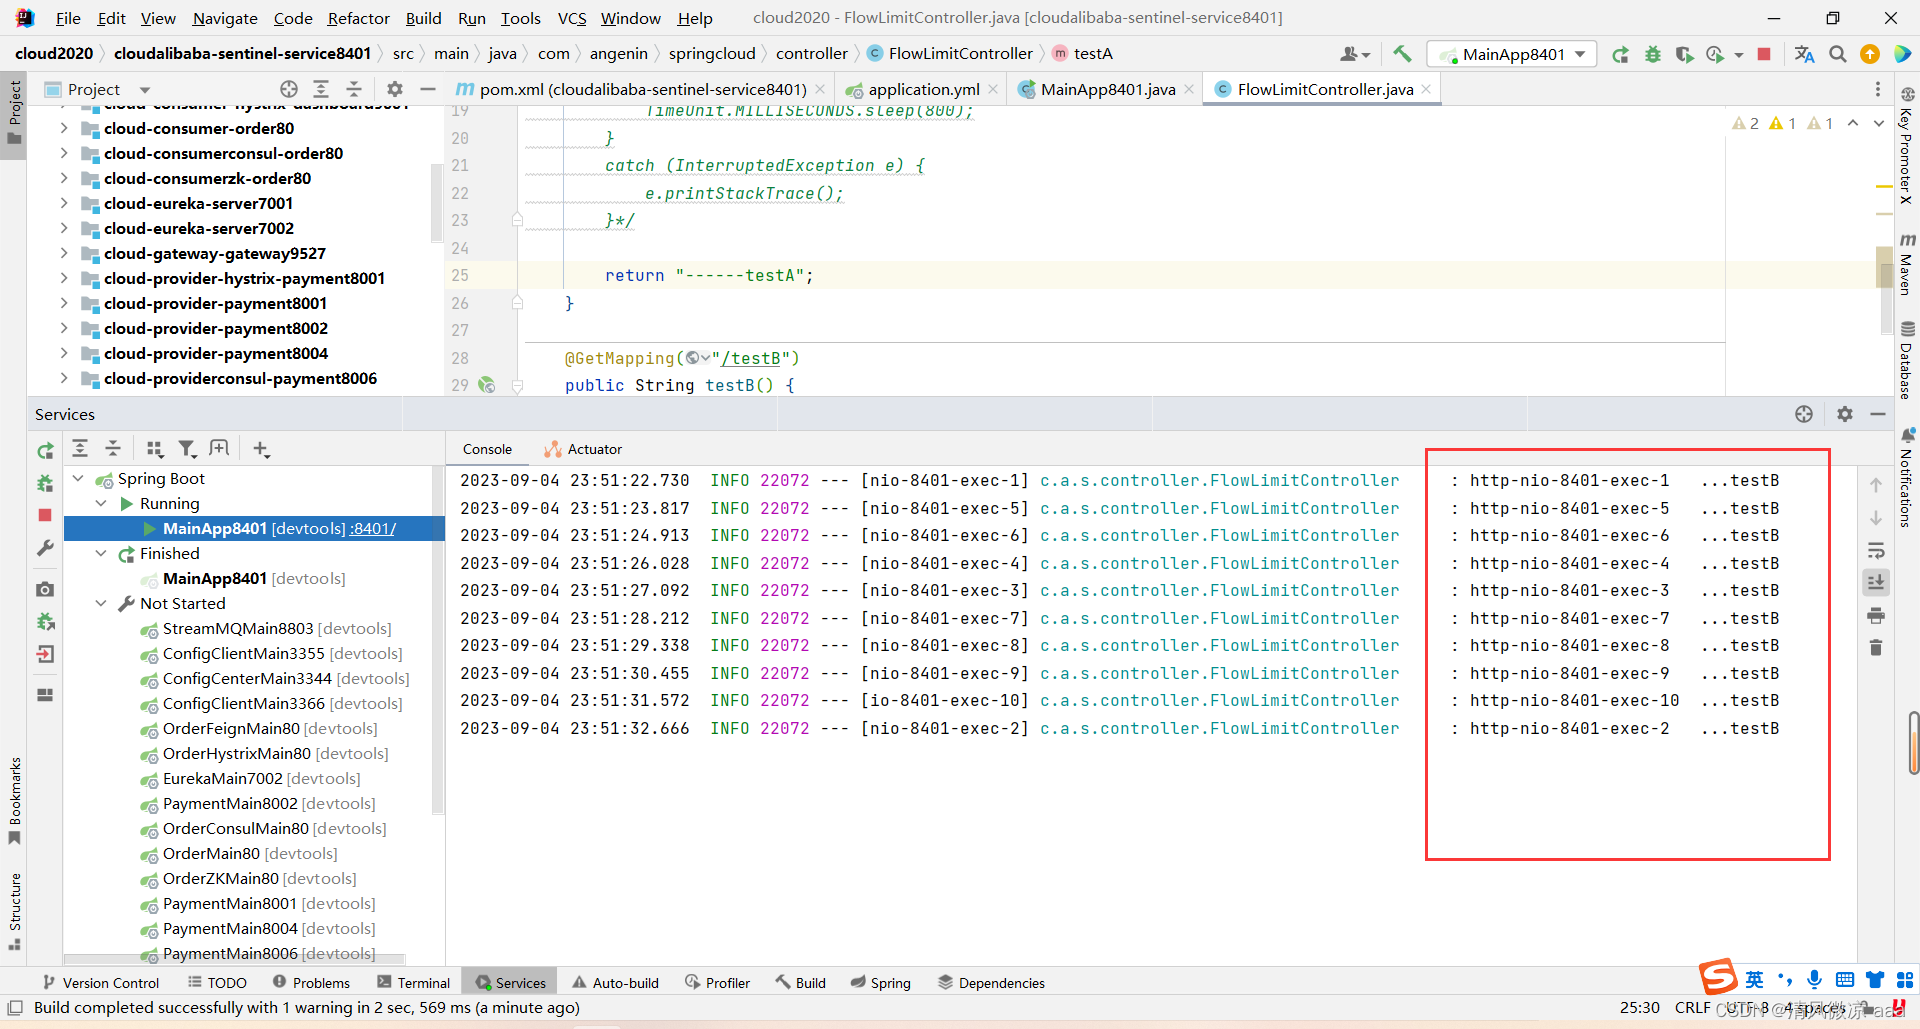
19.5 降级规则
19.5.1 官网
https://github.com/alibaba/Sentinel/wiki/%E7%86%94%E6%96%AD%E9%99%8D%E7%BA%A7
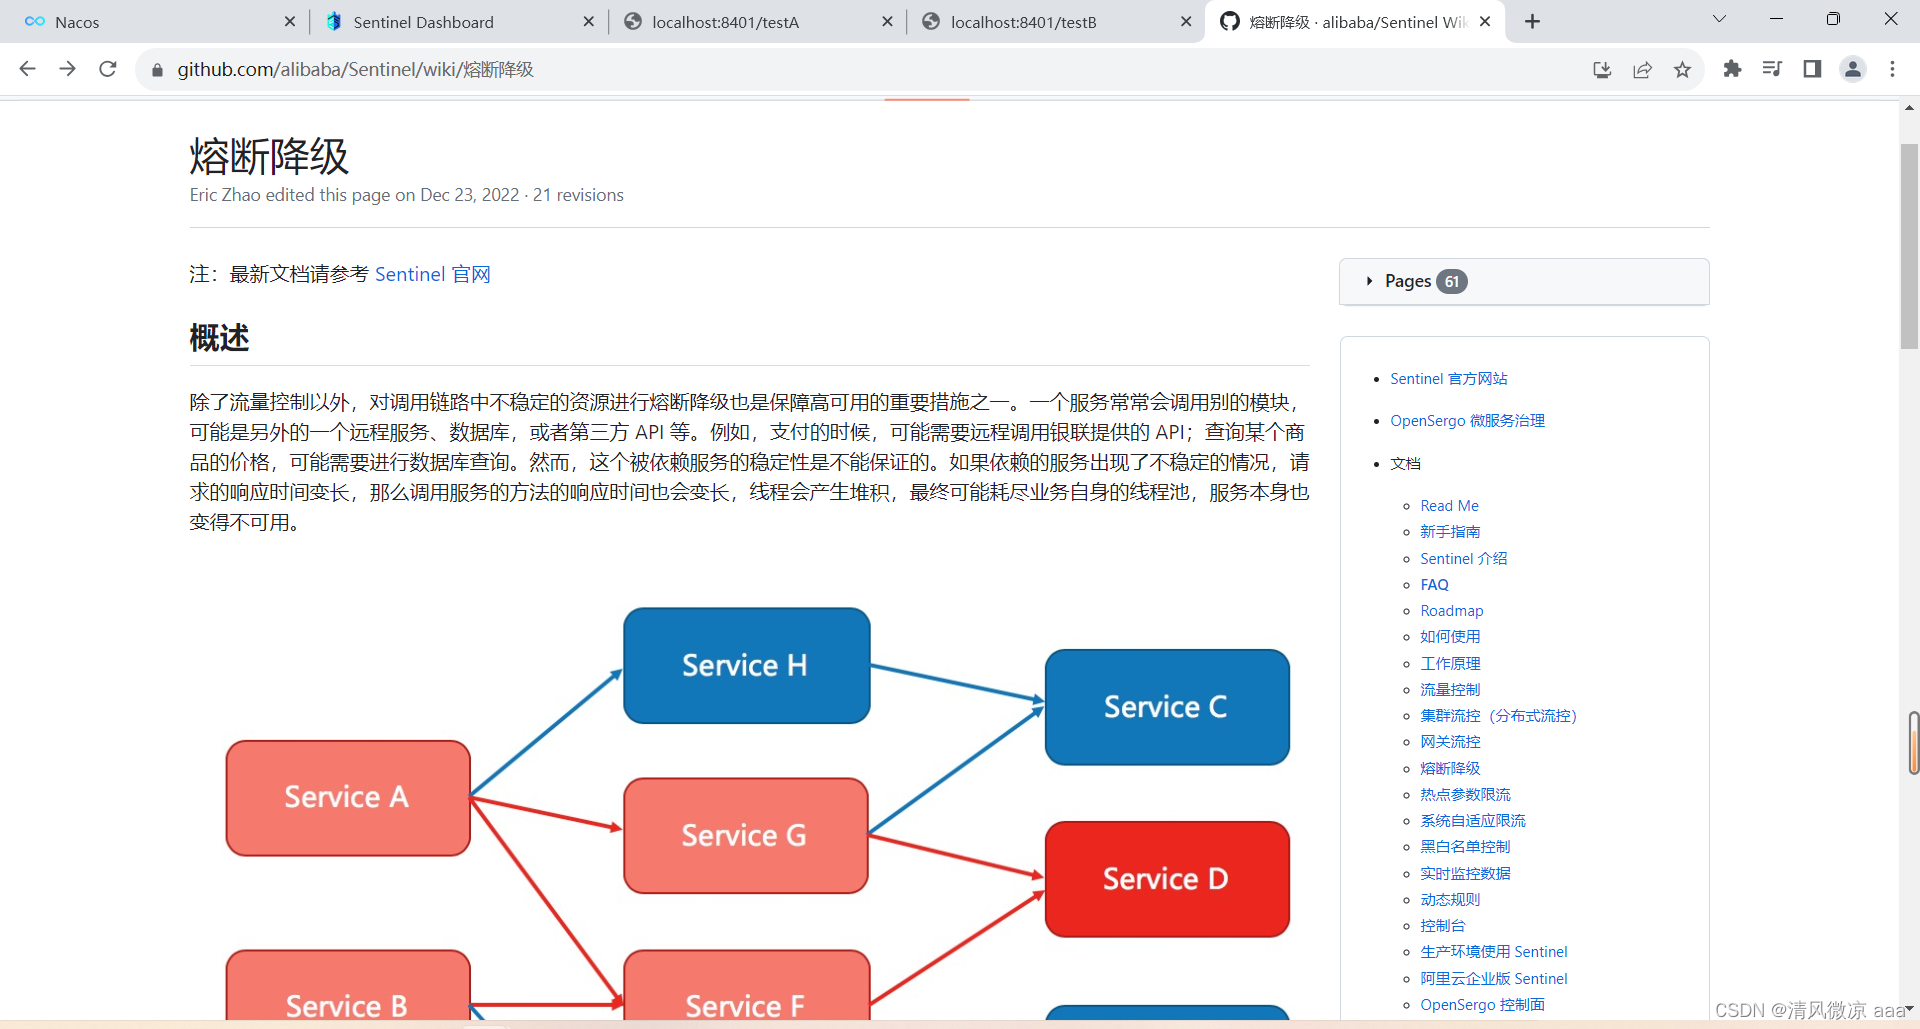
19.5.2 基本介绍
1) 老版本:
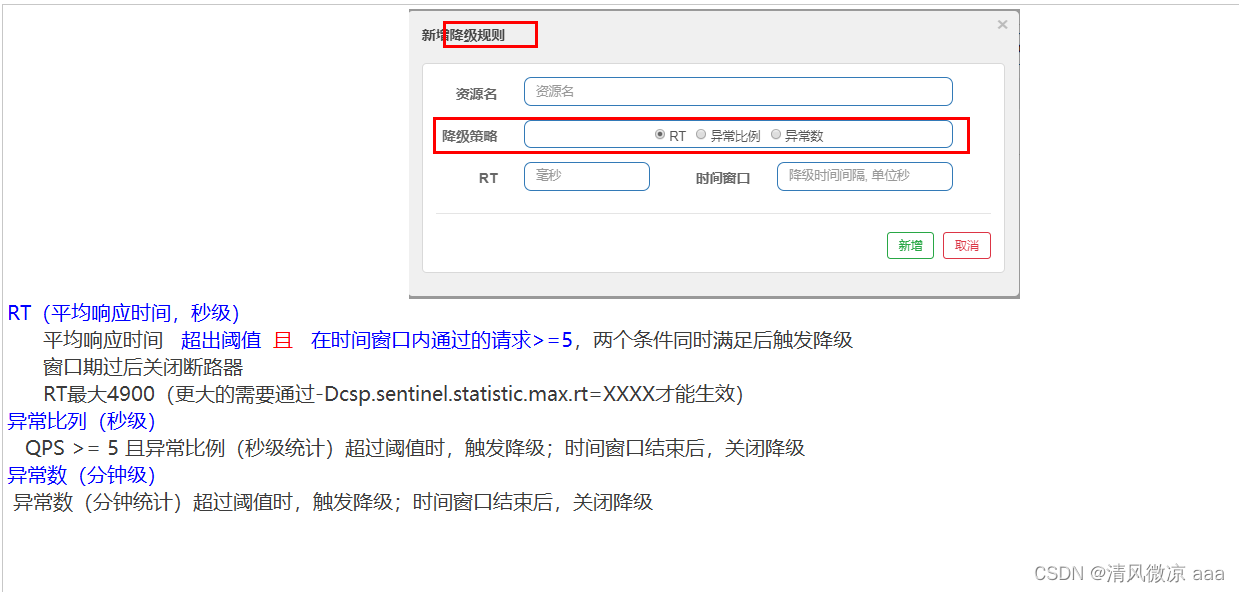
- 进一步说明
- Sentinel 熔断降级会在调用链路中某个资源出现不稳定状态时(例如调用超时或异常比例升高),对这个资源的调用进行限制,让请求快速失败,避免影响到其它的资源而导致级联错误。
- 当资源被降级后,在接下来的降级时间窗口之内,对该资源的调用都自动熔断(默认行为是抛出 DegradeException)。
- Sentinel的断路器是
没有半开状态的- 半开的状态系统自动去检测是否请求有异常,没有异常就关闭断路器恢复使用,有异常则继续打开断路器不可用。具体可以参考Hystrix
新版本1.8.0开始有半开状态了。- 复习Hystrix:有半开状态
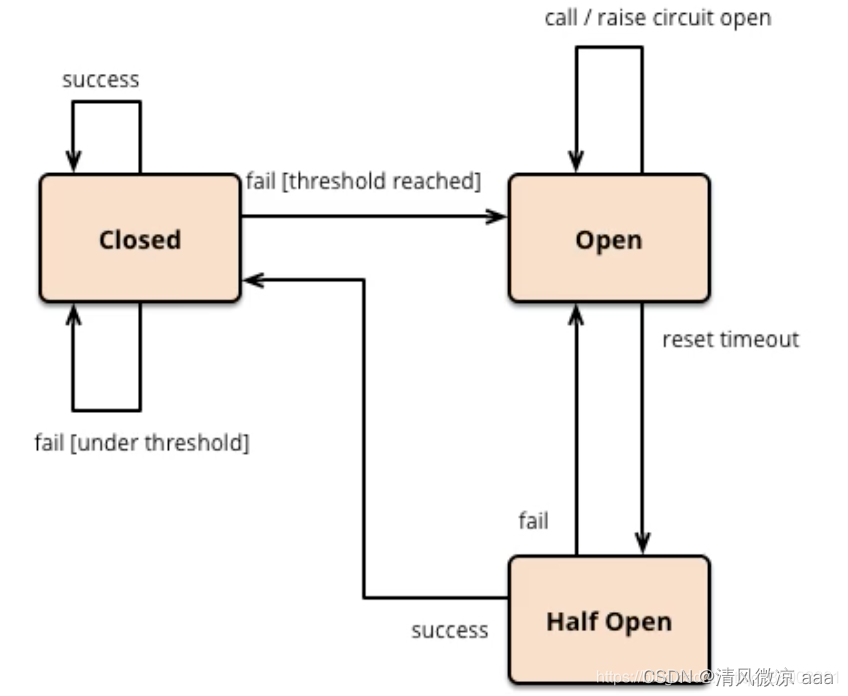
2) 新版本:
慢调用:
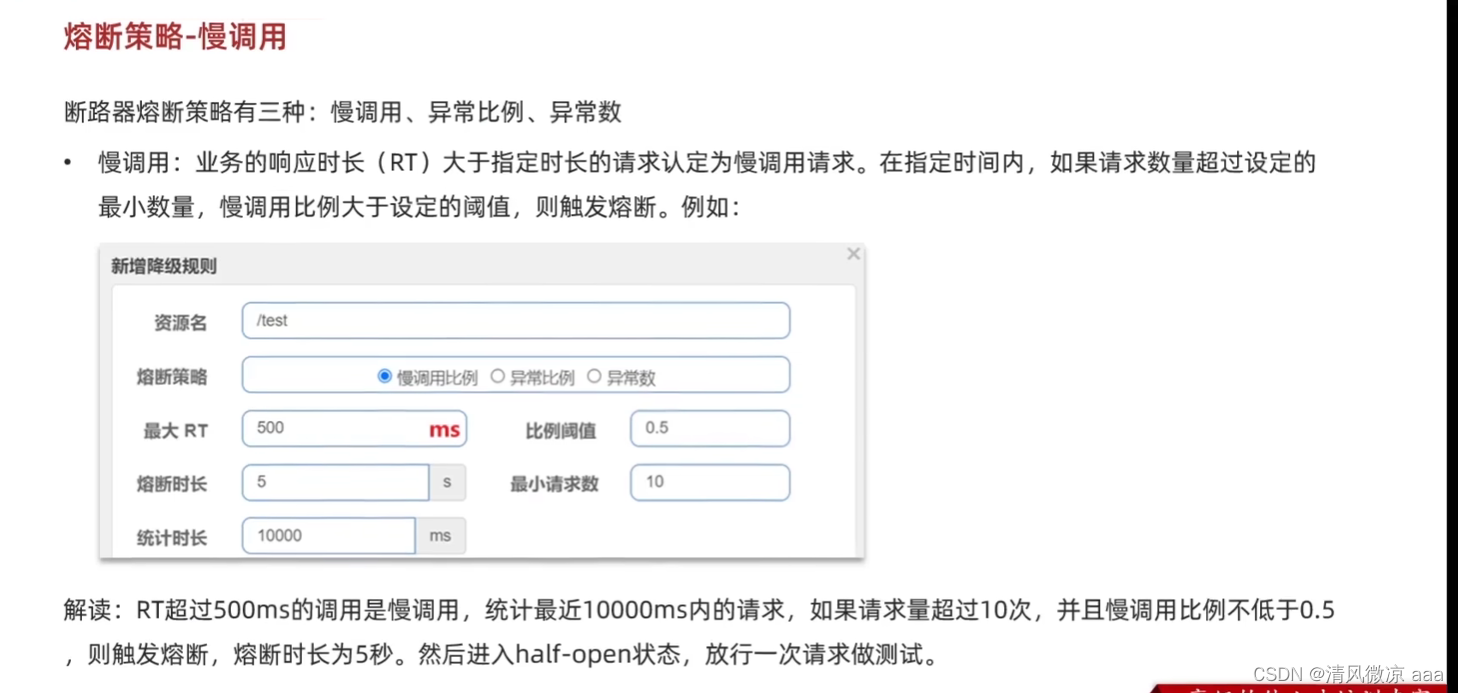
名词解释:
-
熔断降级:熔断降级是解决雪崩问题的重要手段。其思路是由
断路器统计服务调用的异常比例、慢请求比例如果超出阈值则会熔断该服务。即拦截访问该服务的一切请求;而当服务恢复时,断路器会放行访问该服务的请求。
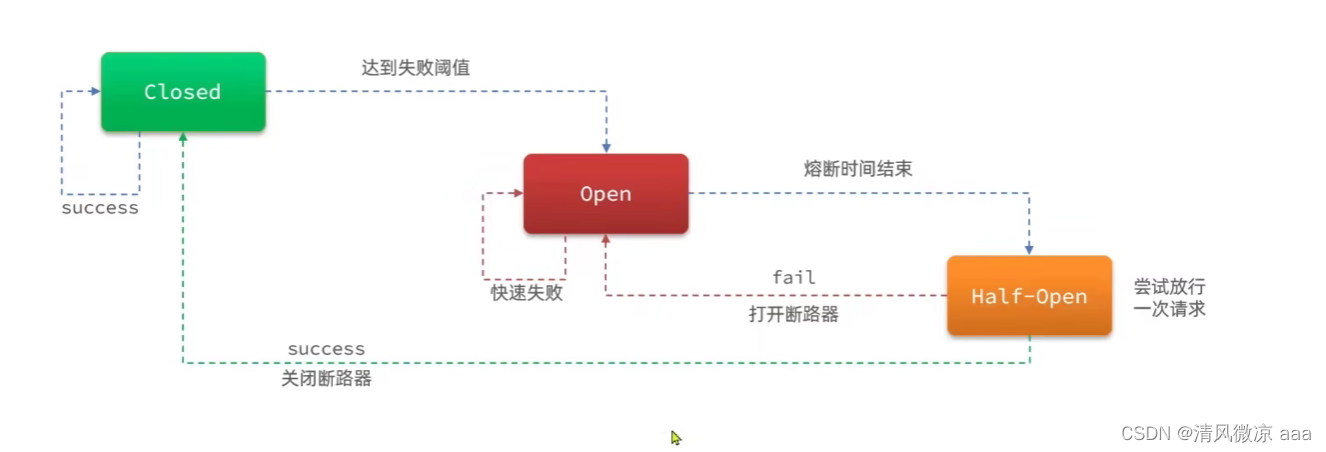
-
熔断策略:断路器想要从open变为close状态,需要判断服务有没有触发熔断的条件,而熔断条件的判断就是依据熔断策略完成的。
-
慢调用比例:看的是响应的时间,如果响应时间RT(response time)过长超过了指定时间,那么你这个调用就是慢调用,请求很慢就会调用额外的资源 会拖慢整个服务。
-
最大RT:响应时间,表示超过500毫秒的响应都算是慢调用。
-
比例阈值:慢调用的比超过了0.5达到一半以上就触发阈值了。
-
熔断时长:一旦熔断,熔断时长持续5秒,5秒后进入Half-Open半熔断状态。
-
最小请求数,统计时长:表示我会统计最近1秒内的至少10次请求,那么10次里面超过500ms的这种慢调用比例达到了一半以上,那么我就触发熔断,而熔断时间为5秒钟。
异常比例、异常数:
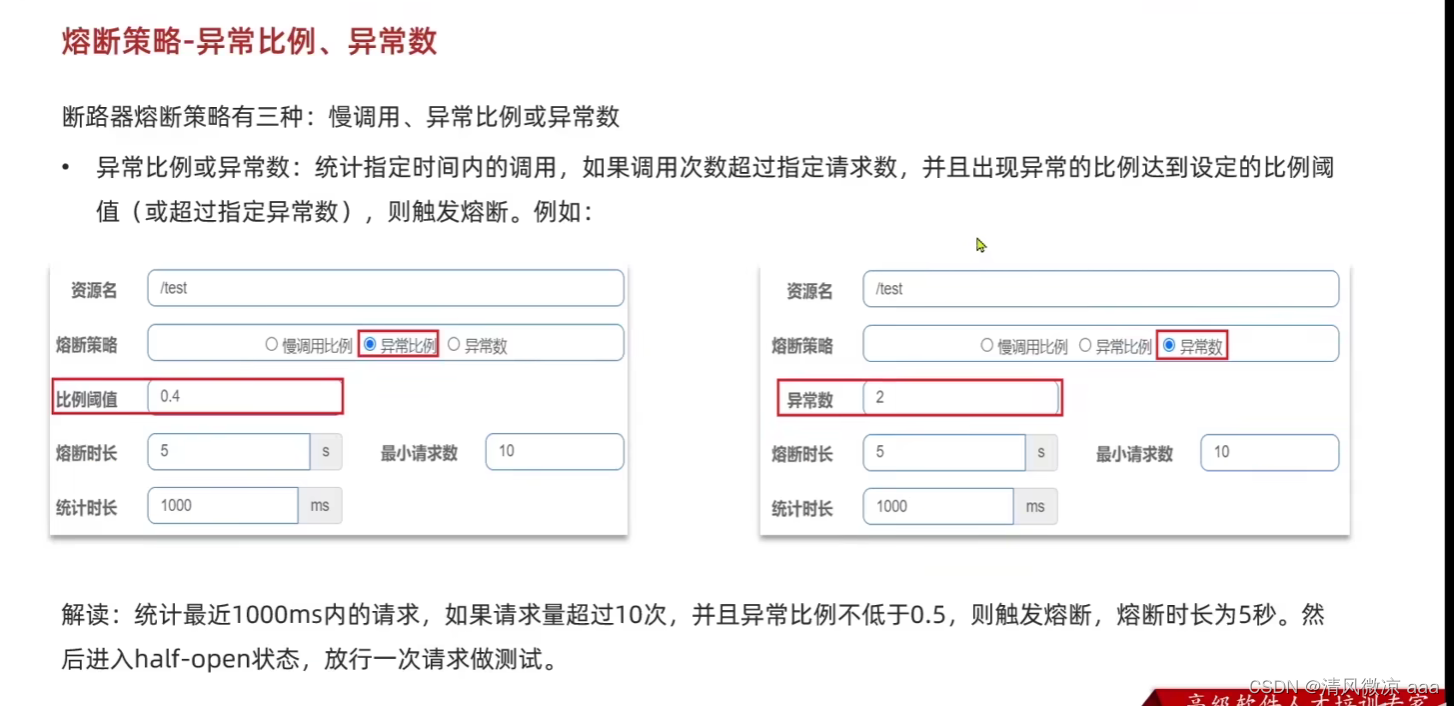
- 异常比例:不是看你调用的快和慢而是看你有没有抛出异常,按照异常的比例。
- 以上配置含义:1秒钟内统计10次请求,如果10次请求里有4次都抛了异常,那么就触发了熔断,熔断时长为5秒钟。
- 异常数:按异常的次数
- 以上配置含义:1秒钟内统计10次请求,如果10次请求里有2次都抛了异常,那么就触发了熔断,熔断时长为5秒钟。
19.5.3 降级策略实战
- 这里我是用的是Sentinel1.8.6版本,而老师使用的是1.7.0版本,所以配置方式会有些不一样。
1)RT
测试
- 代码
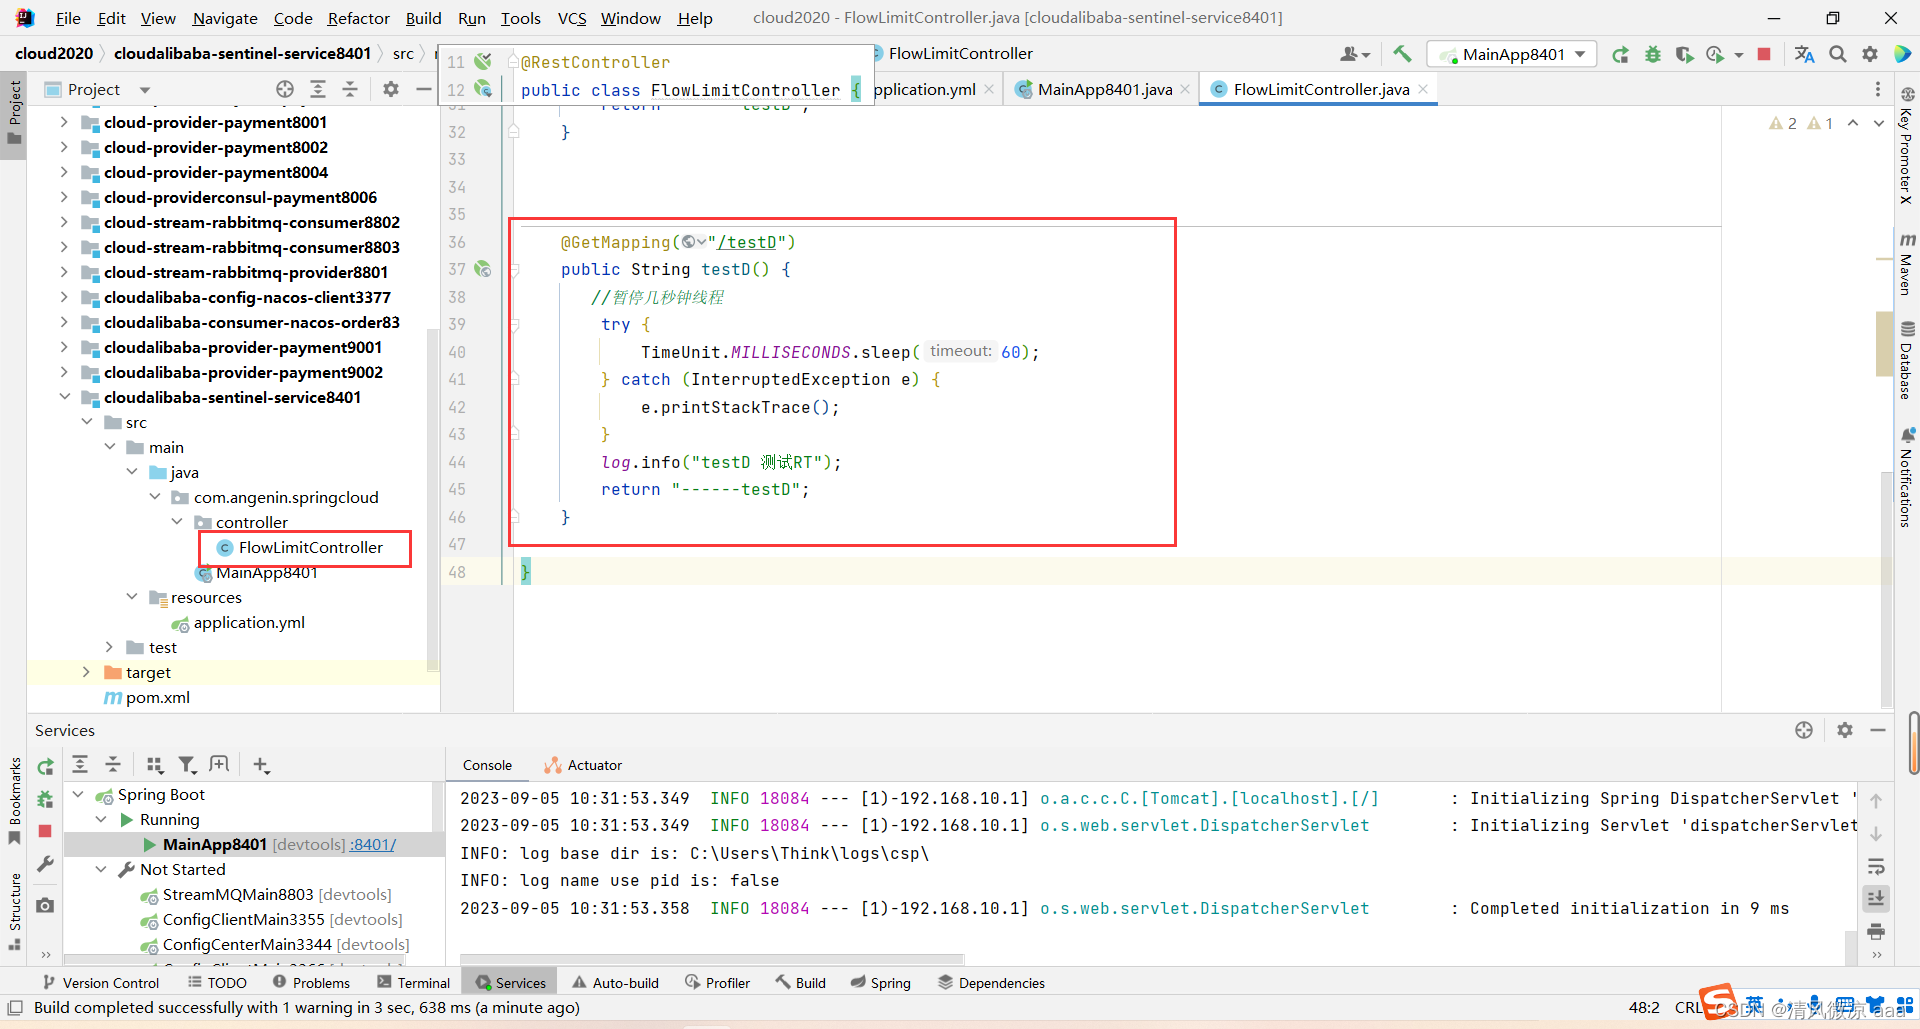
@GetMapping("/testD")public String testD() {//暂停几秒钟线程try {TimeUnit.MILLISECONDS.sleep(60);} catch (InterruptedException e) {e.printStackTrace();}log.info("testD 测试RT");return "------testD";}
-
配置:表示我会统计最近1秒内的至少5次请求,那么5次里面超过50ms的这种慢调用比例达到了2次以上,那么我就触发熔断,而熔断时间为5秒钟。

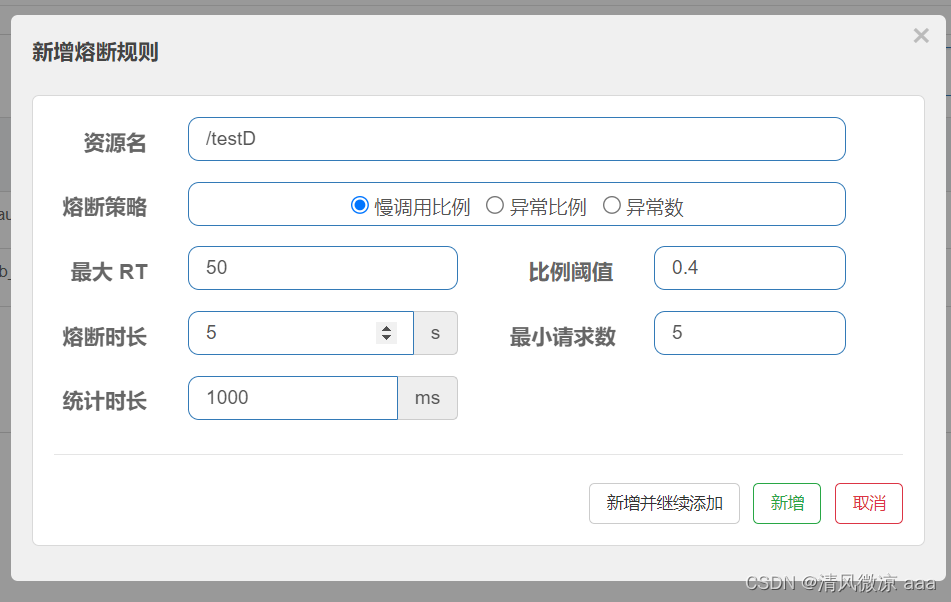
-
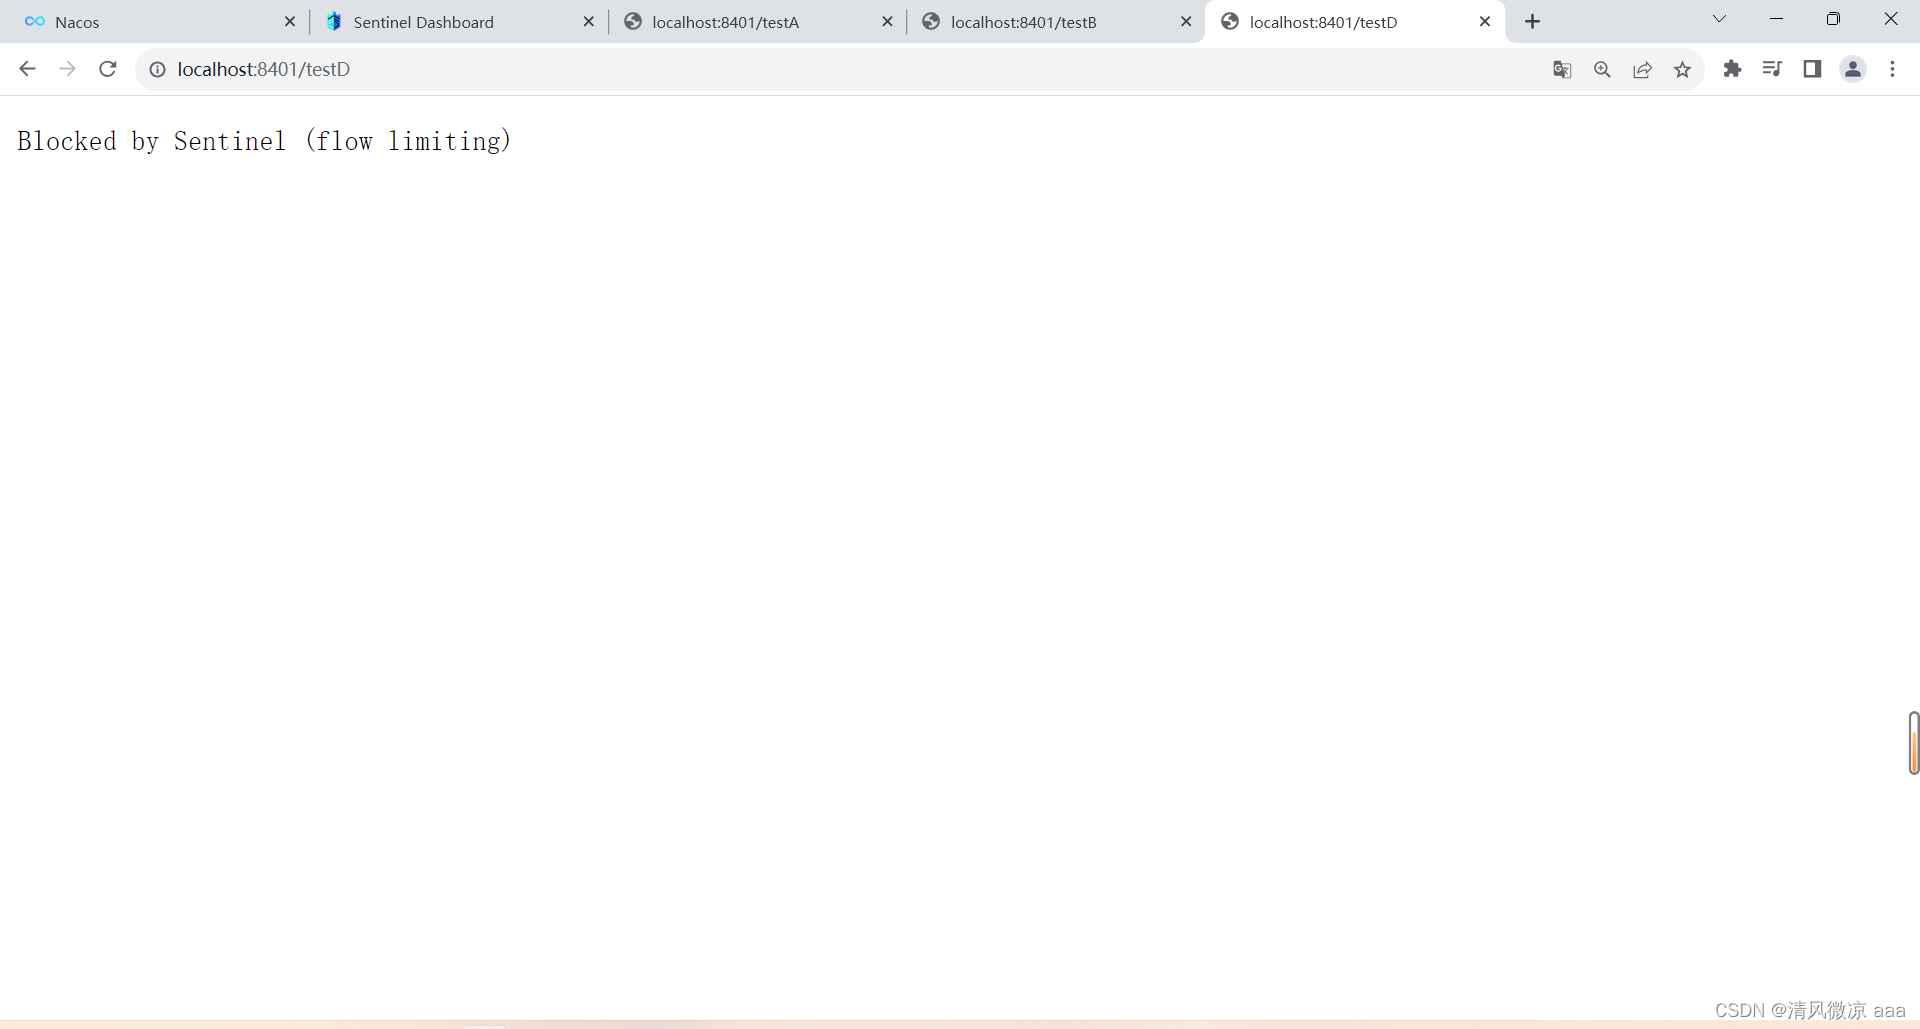
测试:不需要使用压测工具,自己点就可以,只要1秒钟5次请求只需要有2次触发就行了。
2)异常比例
测试
- 代码
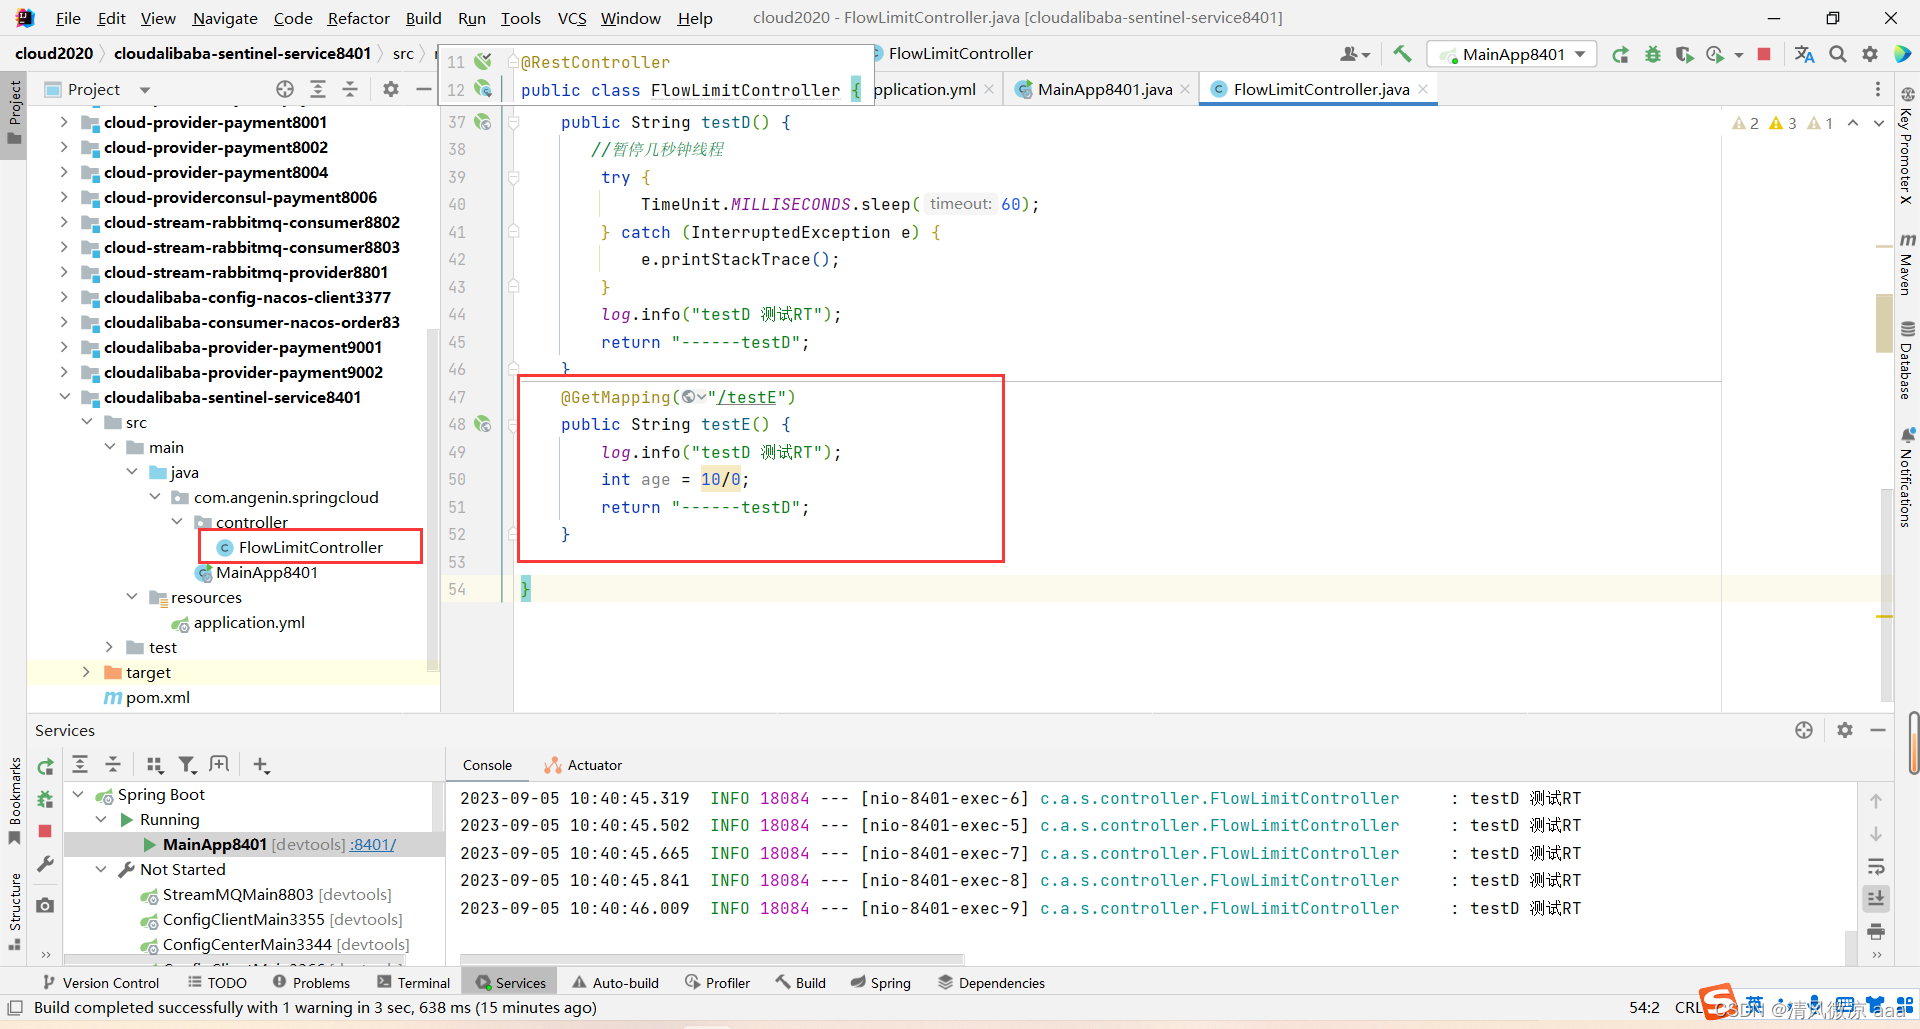
@GetMapping("/testE")public String testE() {log.info("testD 测试RT");int age = 10/0;return "------testD";}
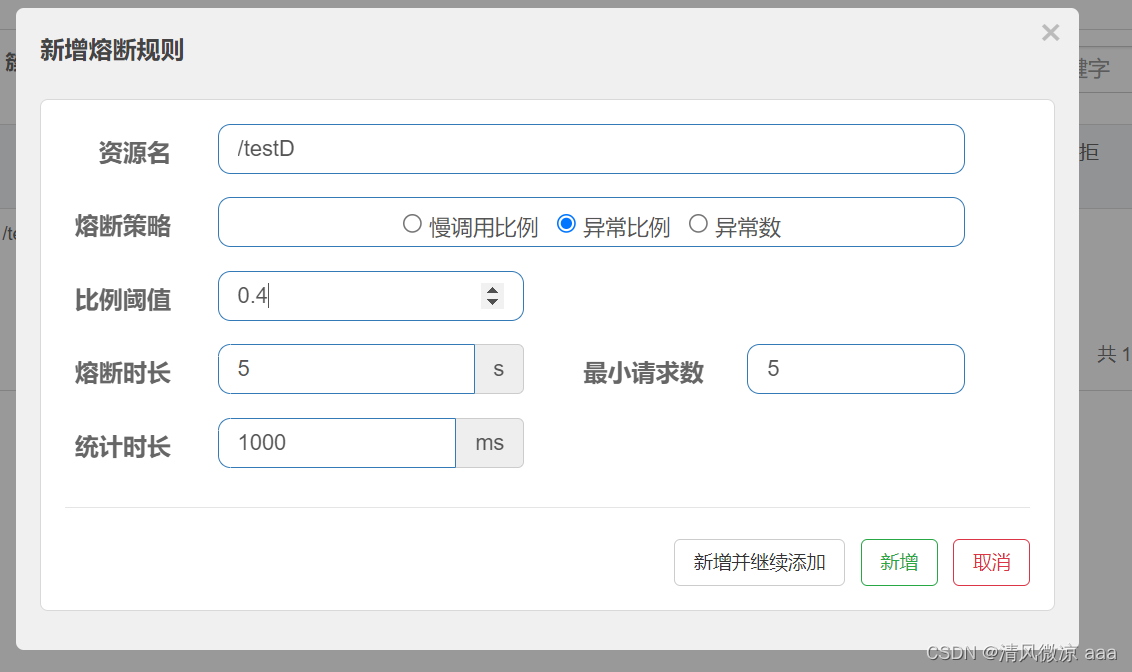
- 配置:1秒钟内统计5次请求,如果5次请求里有2次都抛了异常,那么就触发了熔断,熔断时长为5秒钟。

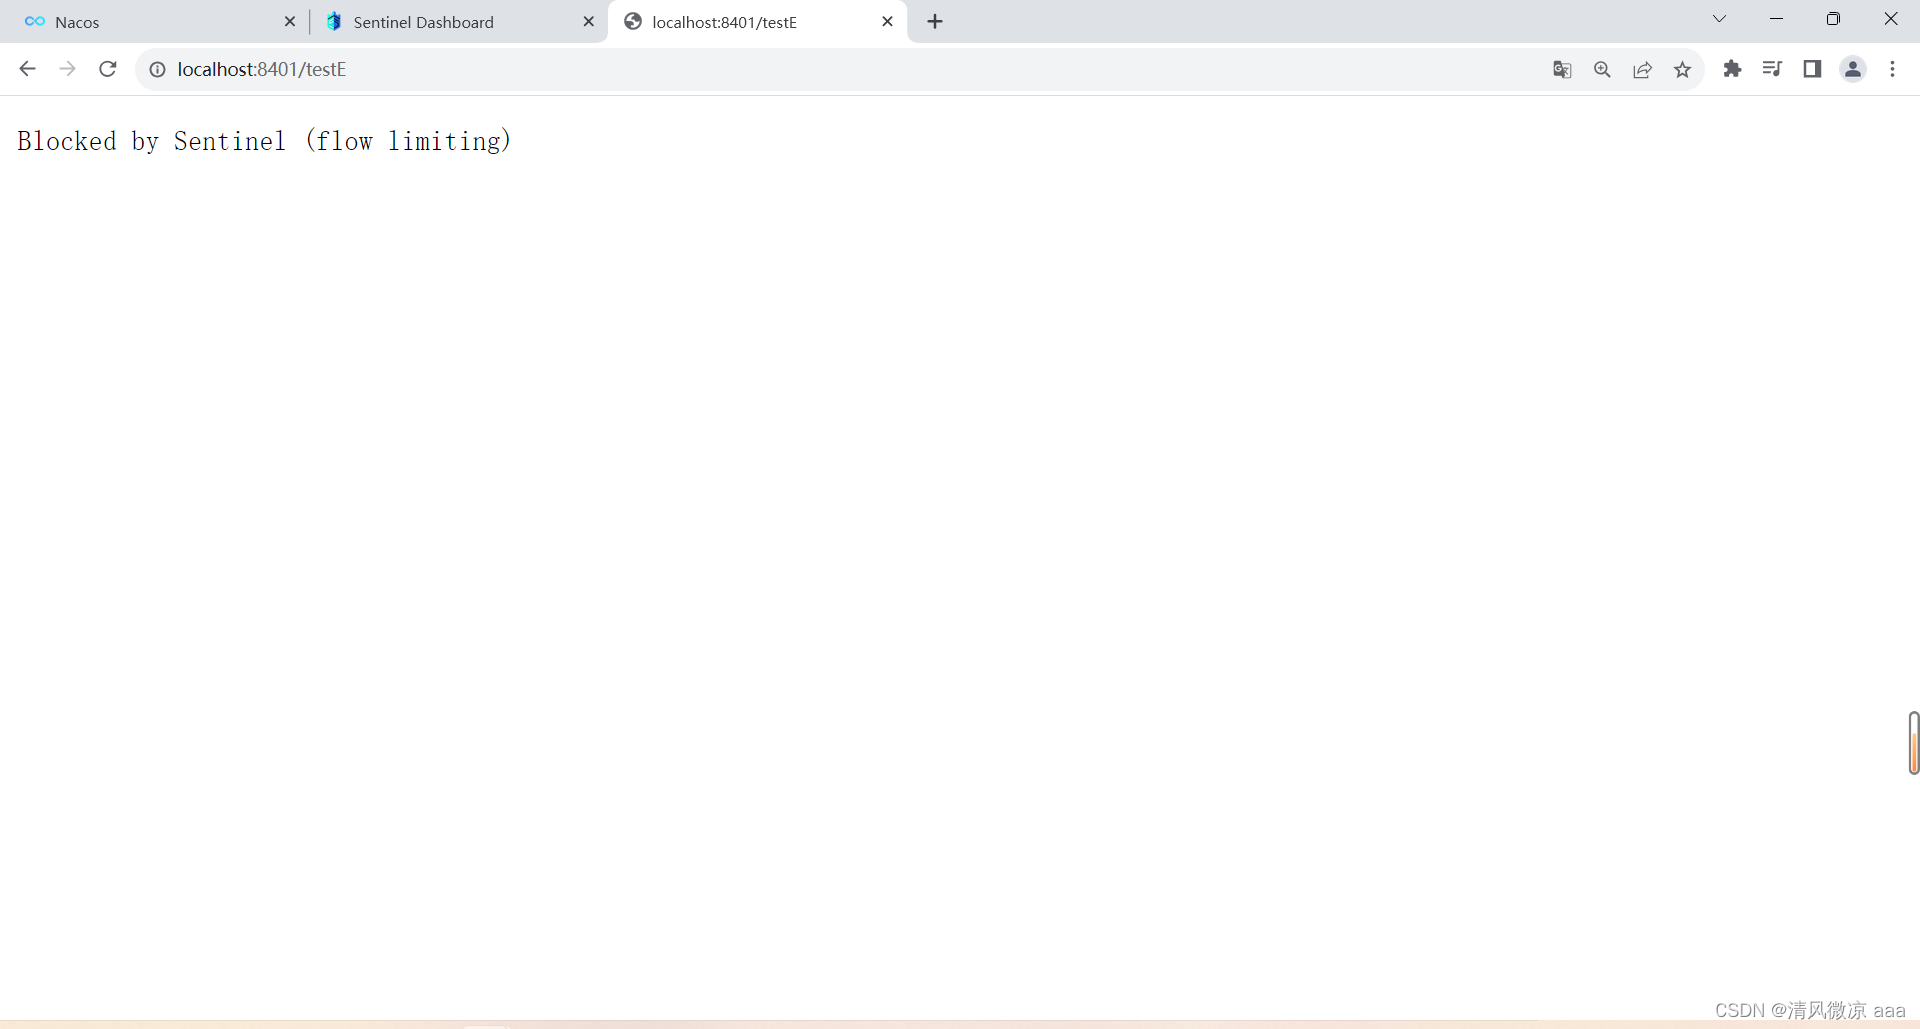
- 同样不需要jmeter,手动测试,只要1秒钟5次请求只需要有2次触发就行了。
3)异常数
- 按异常的次数
- 代码
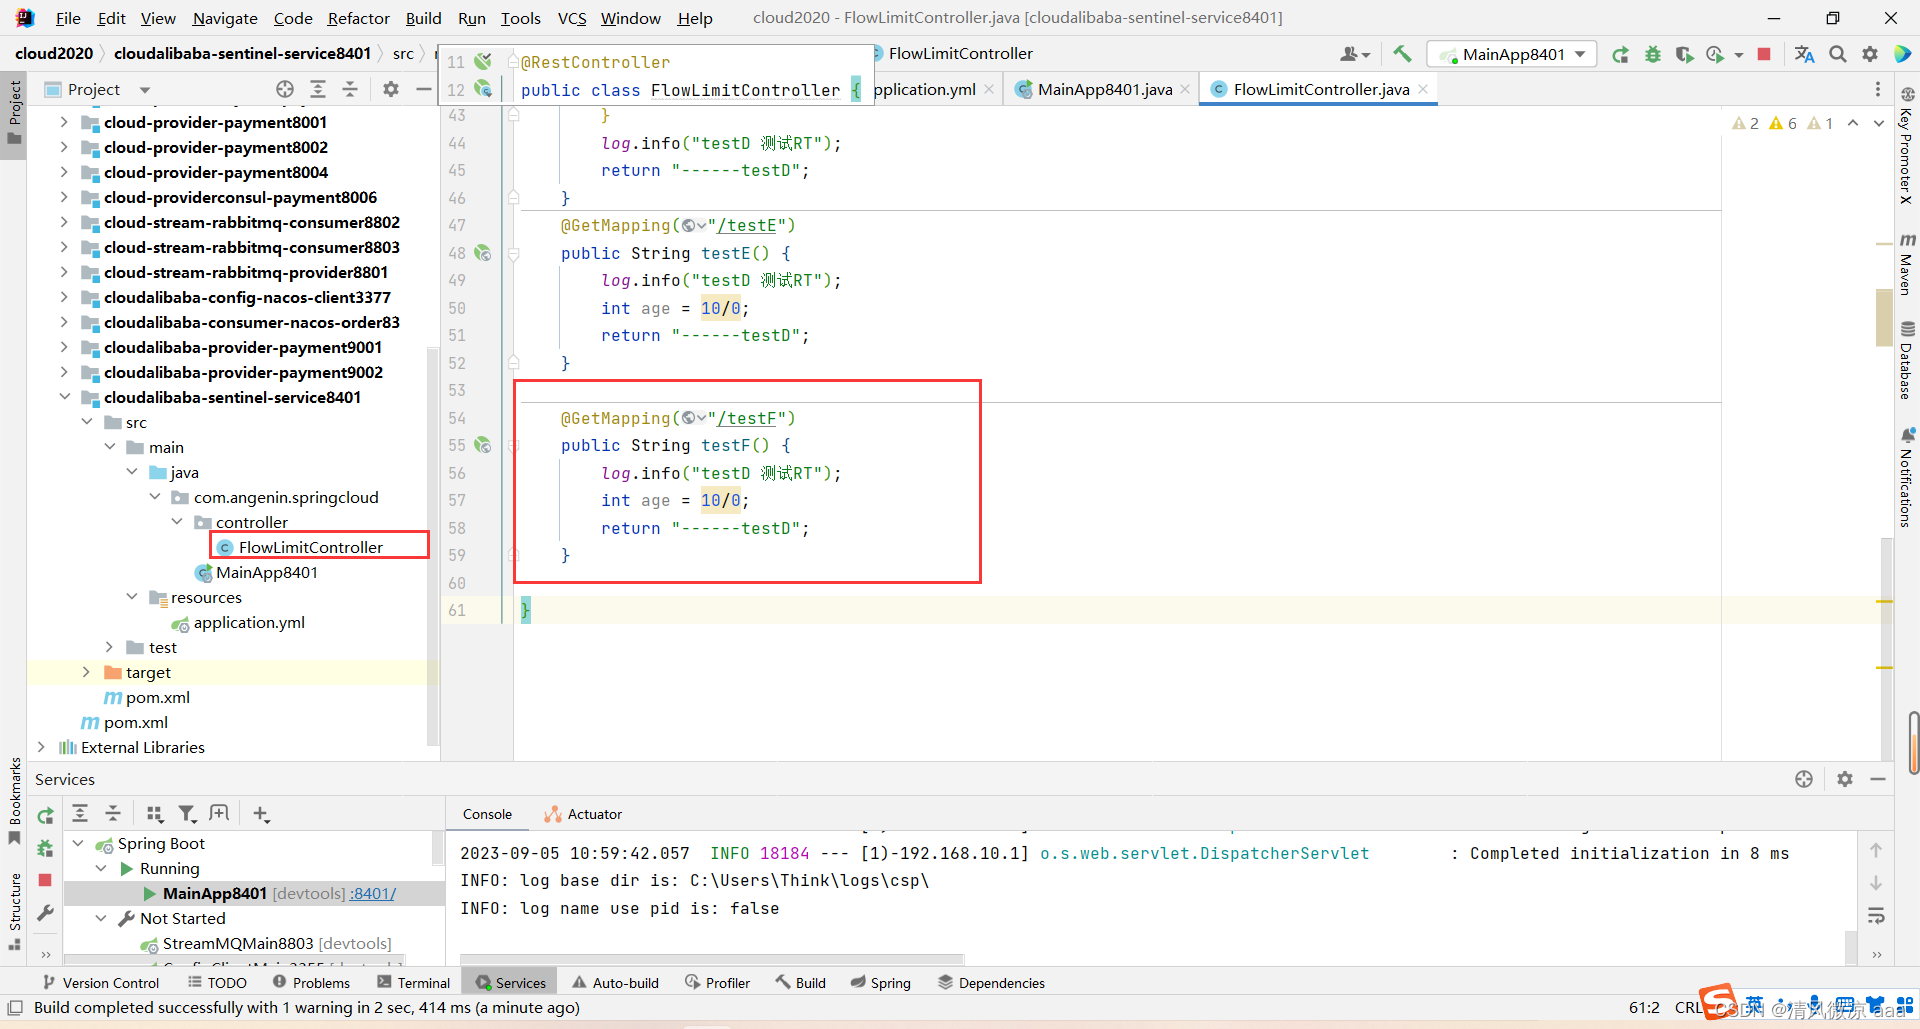
@GetMapping("/testF")public String testF() {log.info("testD 测试RT");int age = 10/0;return "------testD";}
- 配置:1秒钟内统计5次请求,如果5次请求里有2次都抛了异常,那么就触发了熔断,熔断时长为5秒钟。
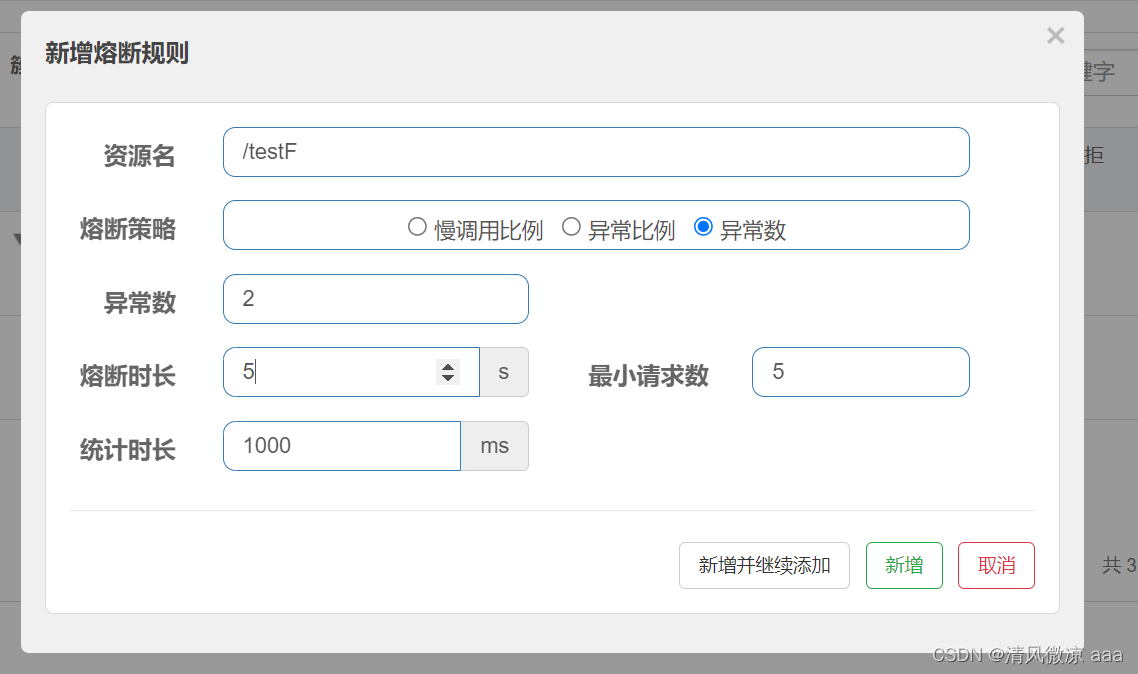
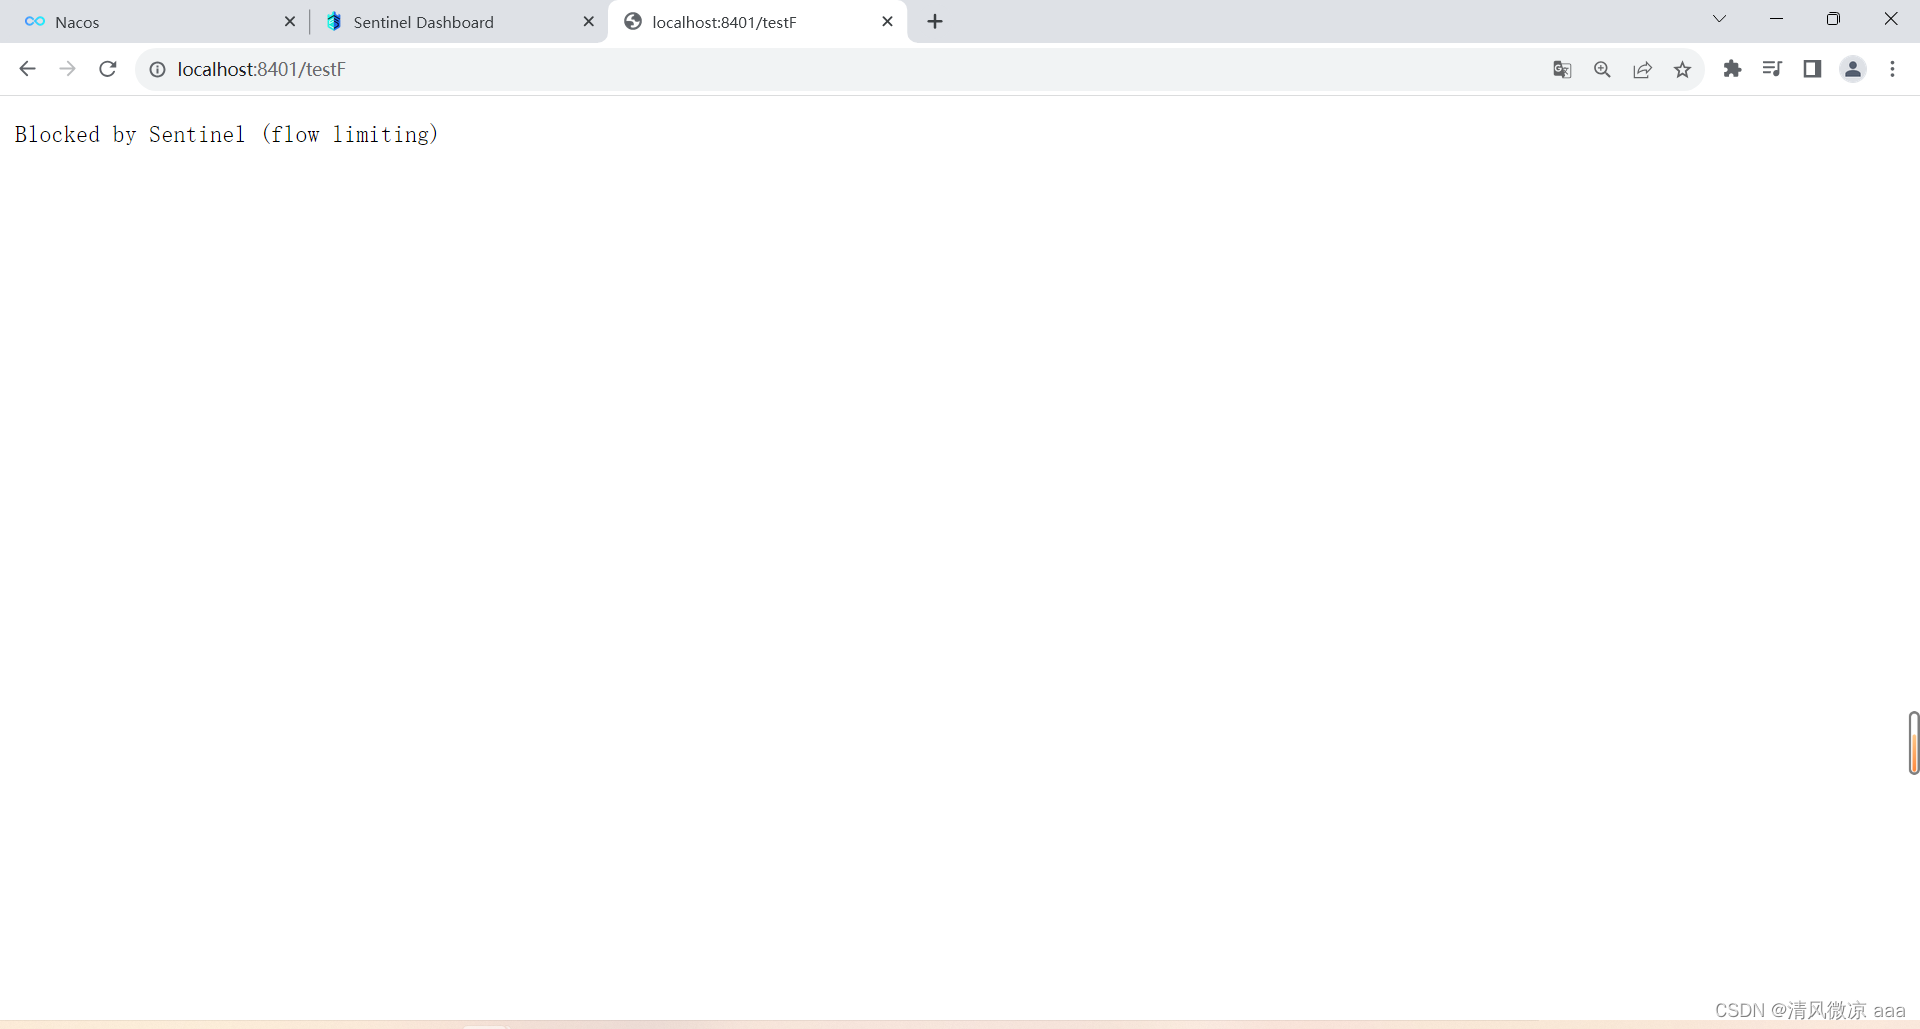
- 同样不需要jmeter,手动测试,只要1秒钟5次请求只需要有2次触发就行了。
19.6 热点key限流
19.6.1 基本介绍
- 何为热点
- 热点即经常访问的数据,很多时候我们希望统计或者限制某个热点数据中访问频次最高的TopN数据,并对其访问进行限流或者其它操作
- 热点即经常访问的数据,很多时候我们希望统计或者限制某个热点数据中访问频次最高的TopN数据,并对其访问进行限流或者其它操作
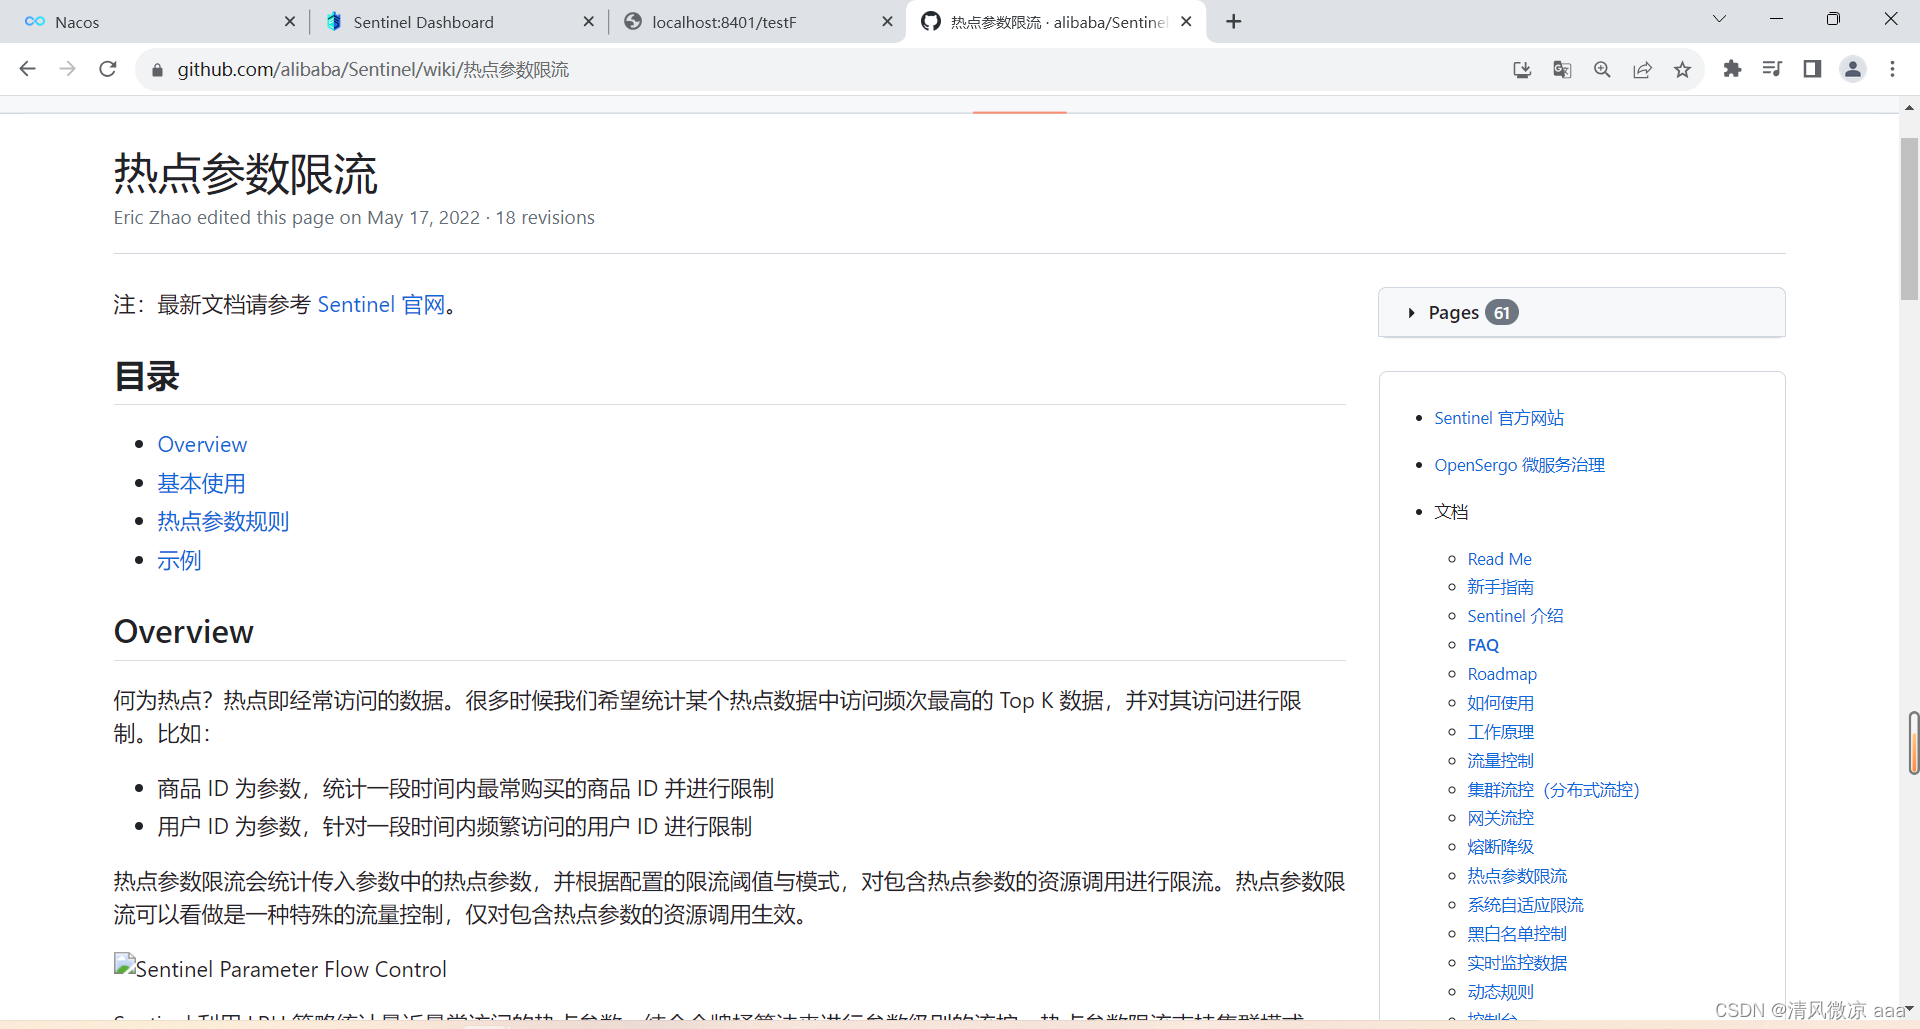
19.6.2 官网
https://github.com/alibaba/Sentinel/wiki/%E7%83%AD%E7%82%B9%E5%8F%82%E6%95%B0%E9%99%90%E6%B5%81
19.6.3 承上启下复习start
兜底方法:分为系统默认和客户自定义,两种
- 之前的case,限流出问题后,都是用sentinel系统默认的提示:Blocked by Sentinel (flow limiting)
我们能不能自定?类似hystrix,某个方法出问题了,就找对应的兜底降级方法? - 结论
- 从HystrixCommand 到@SentinelResource
19.6.4 代码
- 源码:com.alibaba.csp.sentinel.slots.block.BlockException
- 代码测试
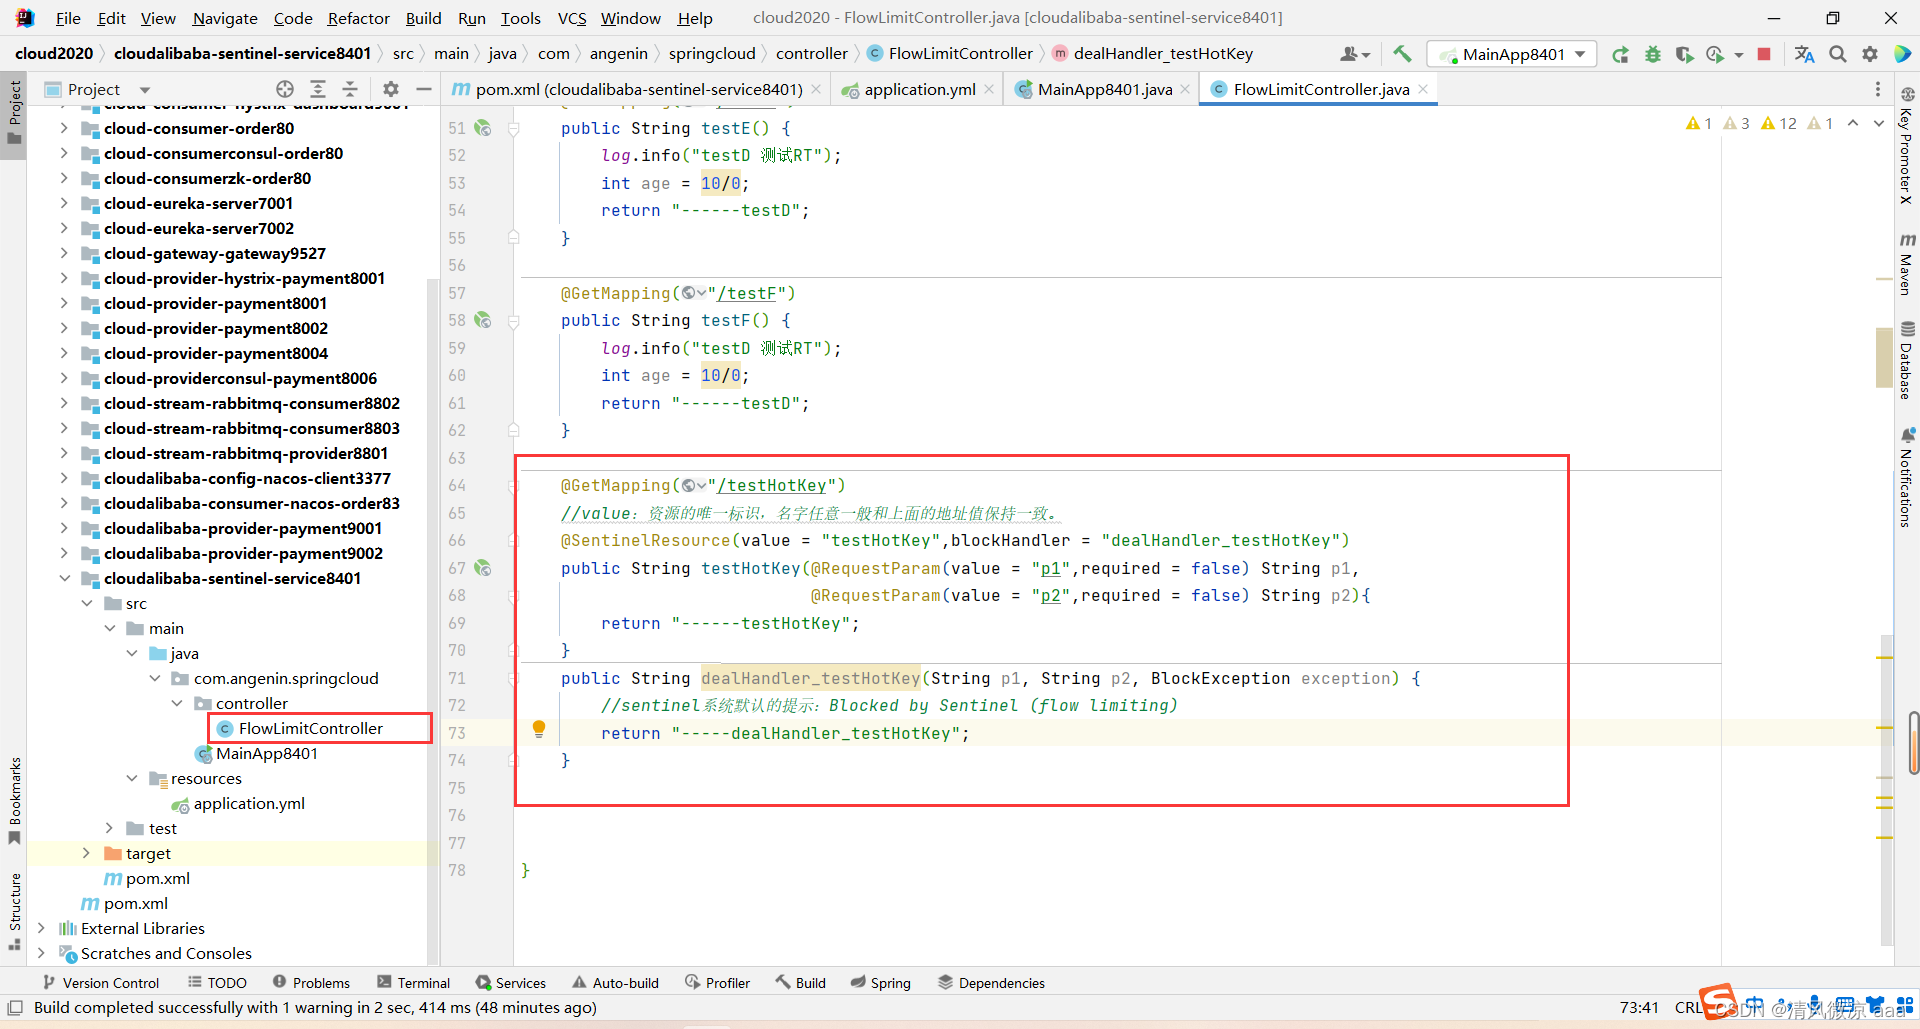
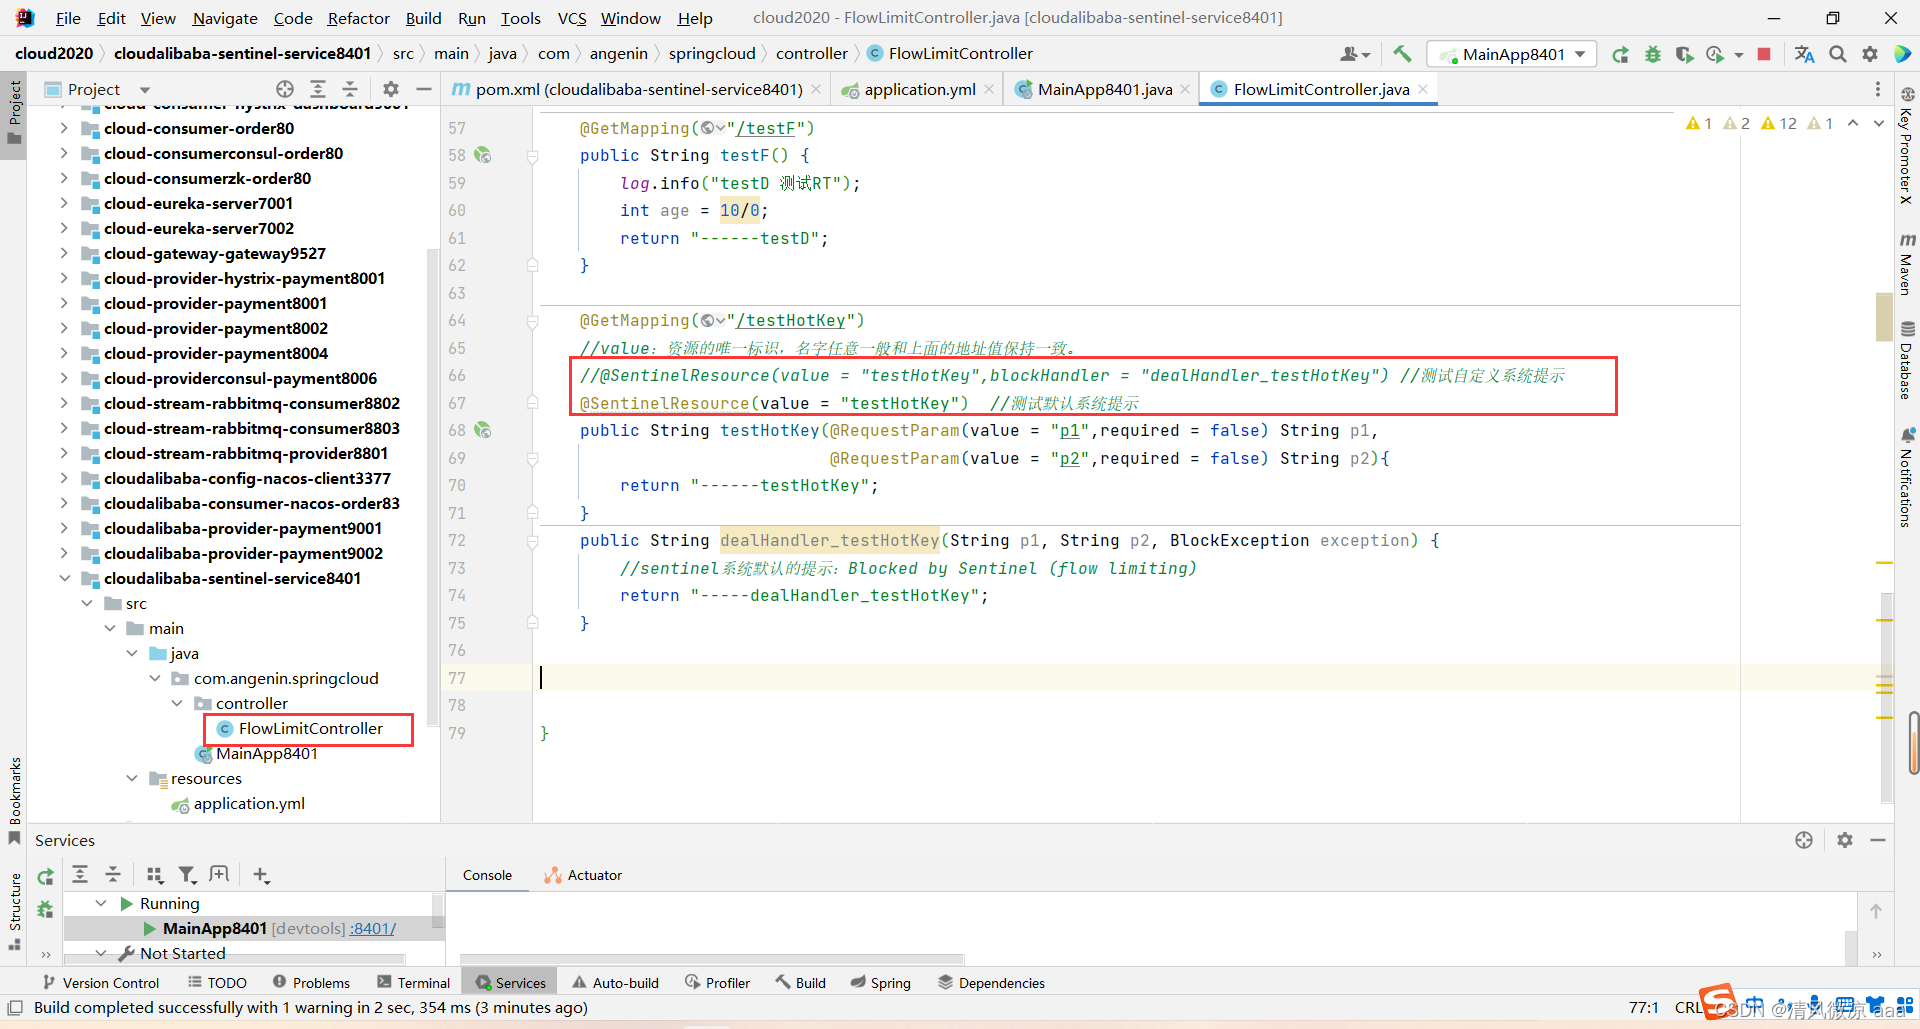
@GetMapping("/testHotKey")//value:资源的唯一标识,名字任意一般和上面的地址值保持一致。@SentinelResource(value = "testHotKey",blockHandler = "dealHandler_testHotKey")public String testHotKey(@RequestParam(value = "p1",required = false) String p1,@RequestParam(value = "p2",required = false) String p2){return "------testHotKey";}public String dealHandler_testHotKey(String p1, String p2, BlockException exception) {//sentinel系统默认的提示:Blocked by Sentinel (flow limiting)return "-----dealHandler_testHotKey";}
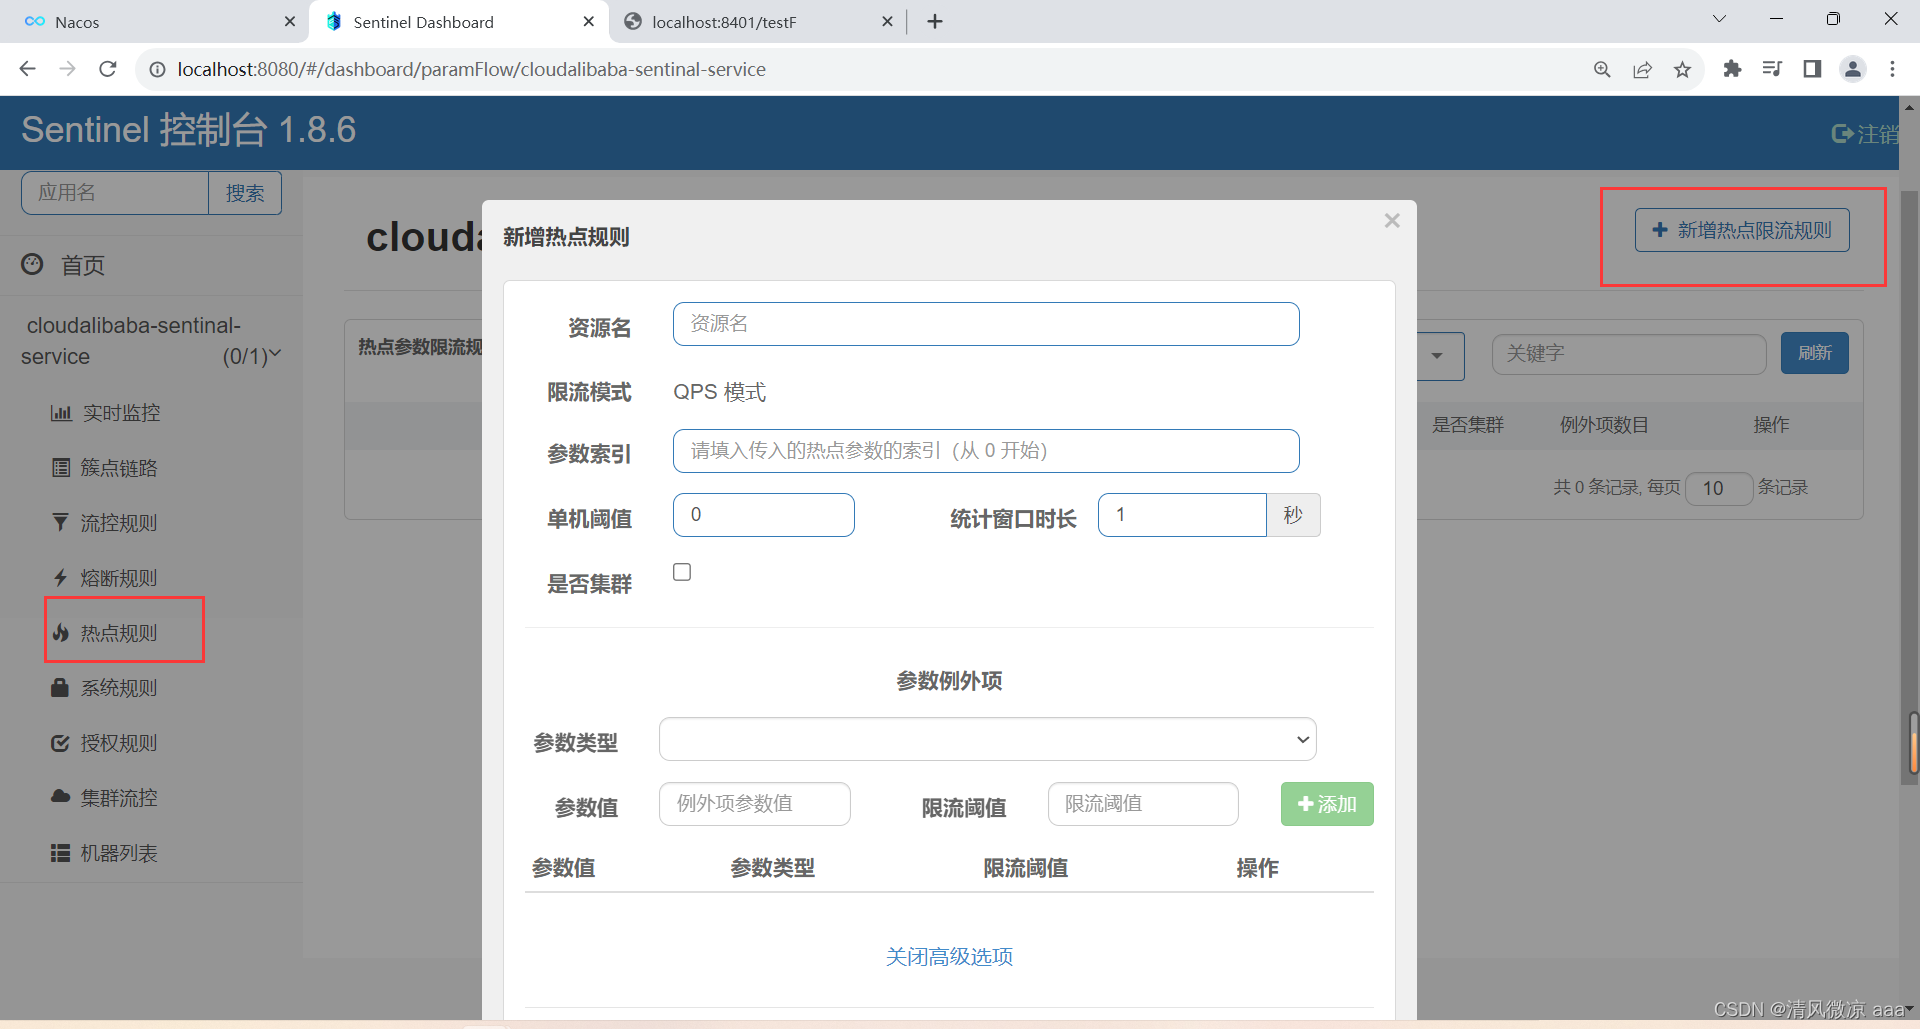
19.6.5 配置
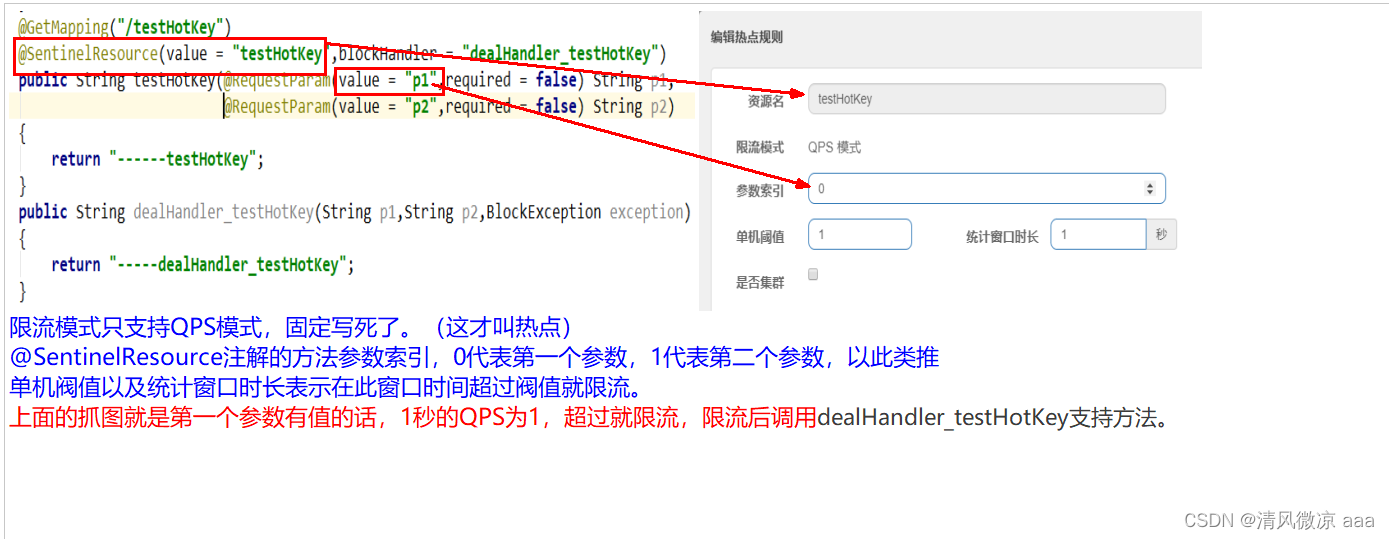
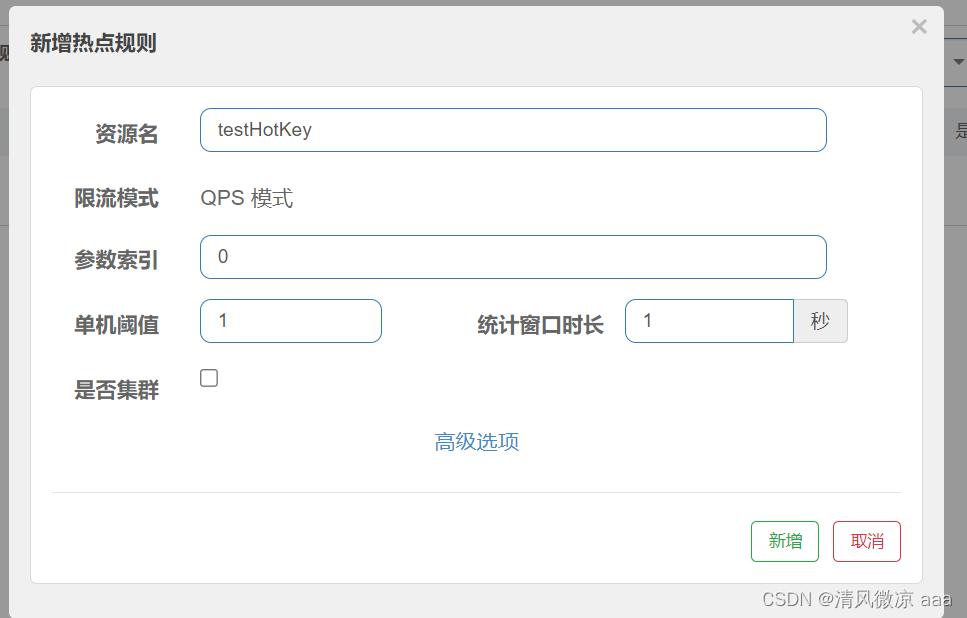
19.6.6 测试
多次点击测试:方法testHotKey里面第一个参数只要QPS超过每秒1次,马上降级处理。用了我们自己定义的
-
error:http://localhost:8401/testHotKey?p1=abc
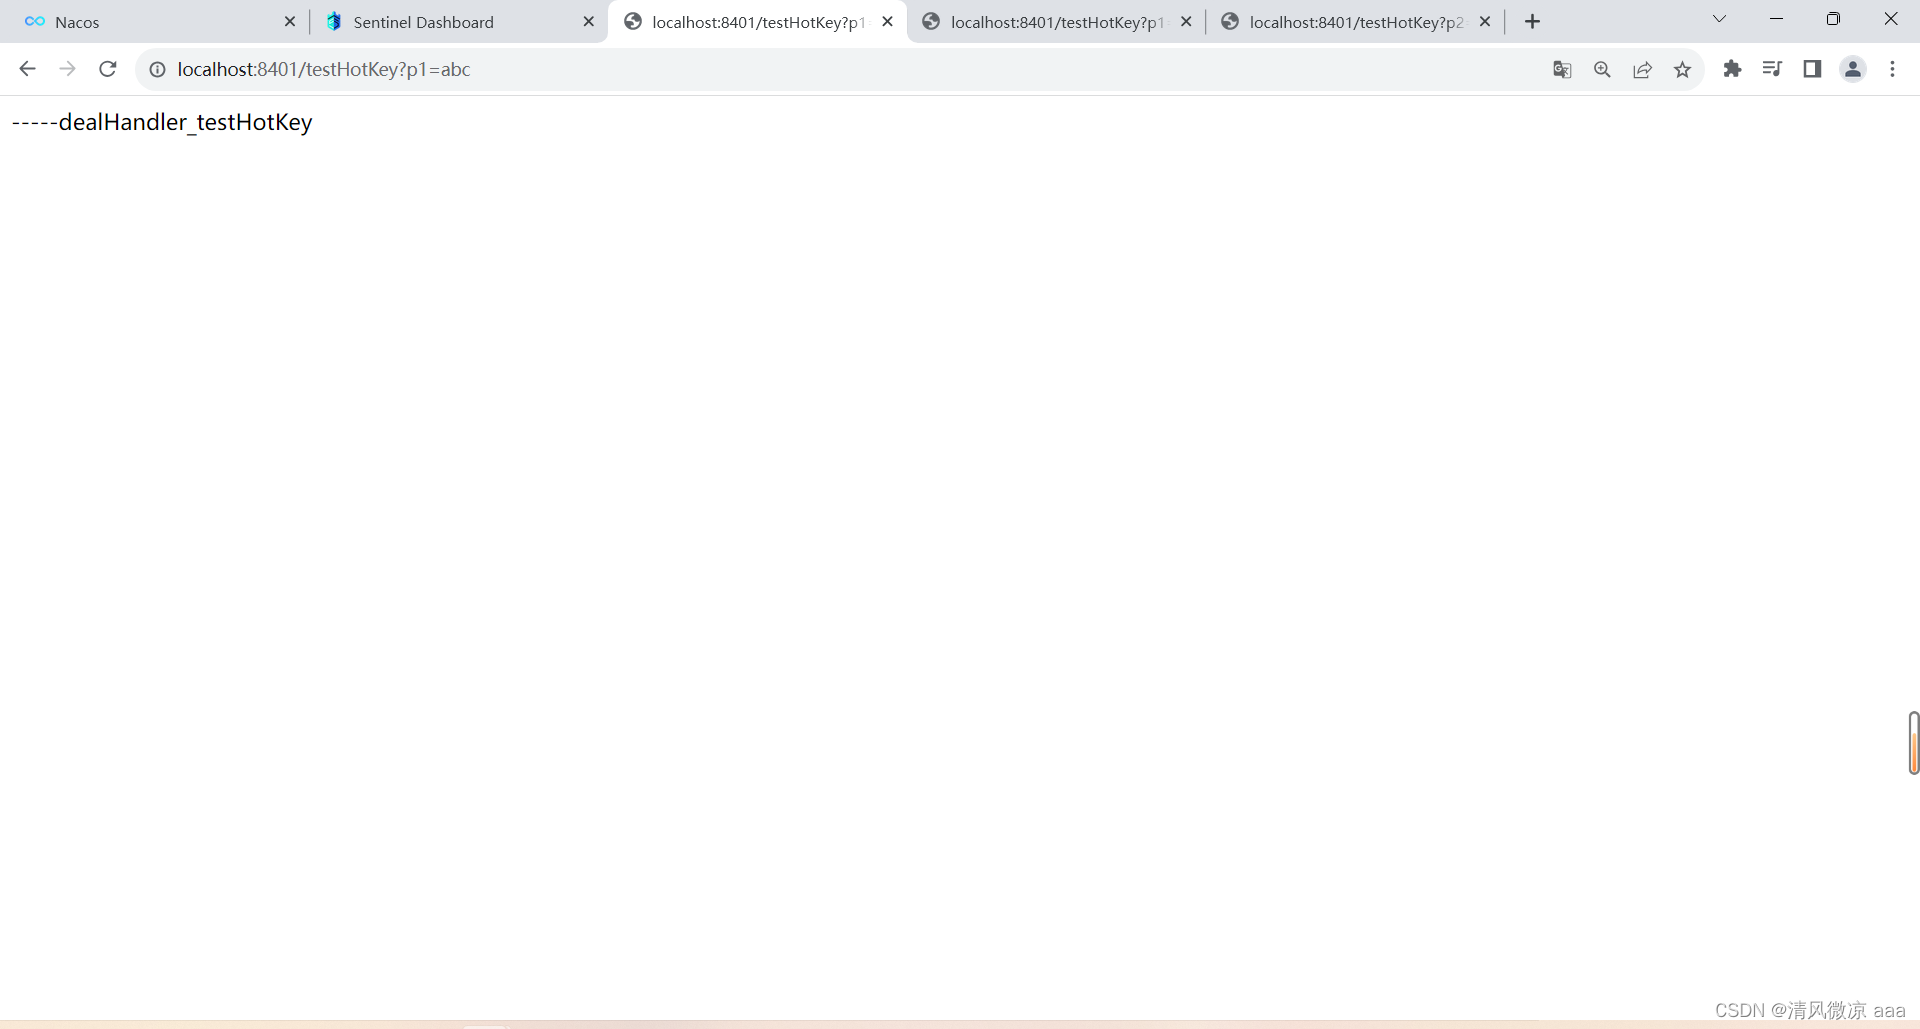
-
error:http://localhost:8401/testHotKey?p1=abc&p2=33
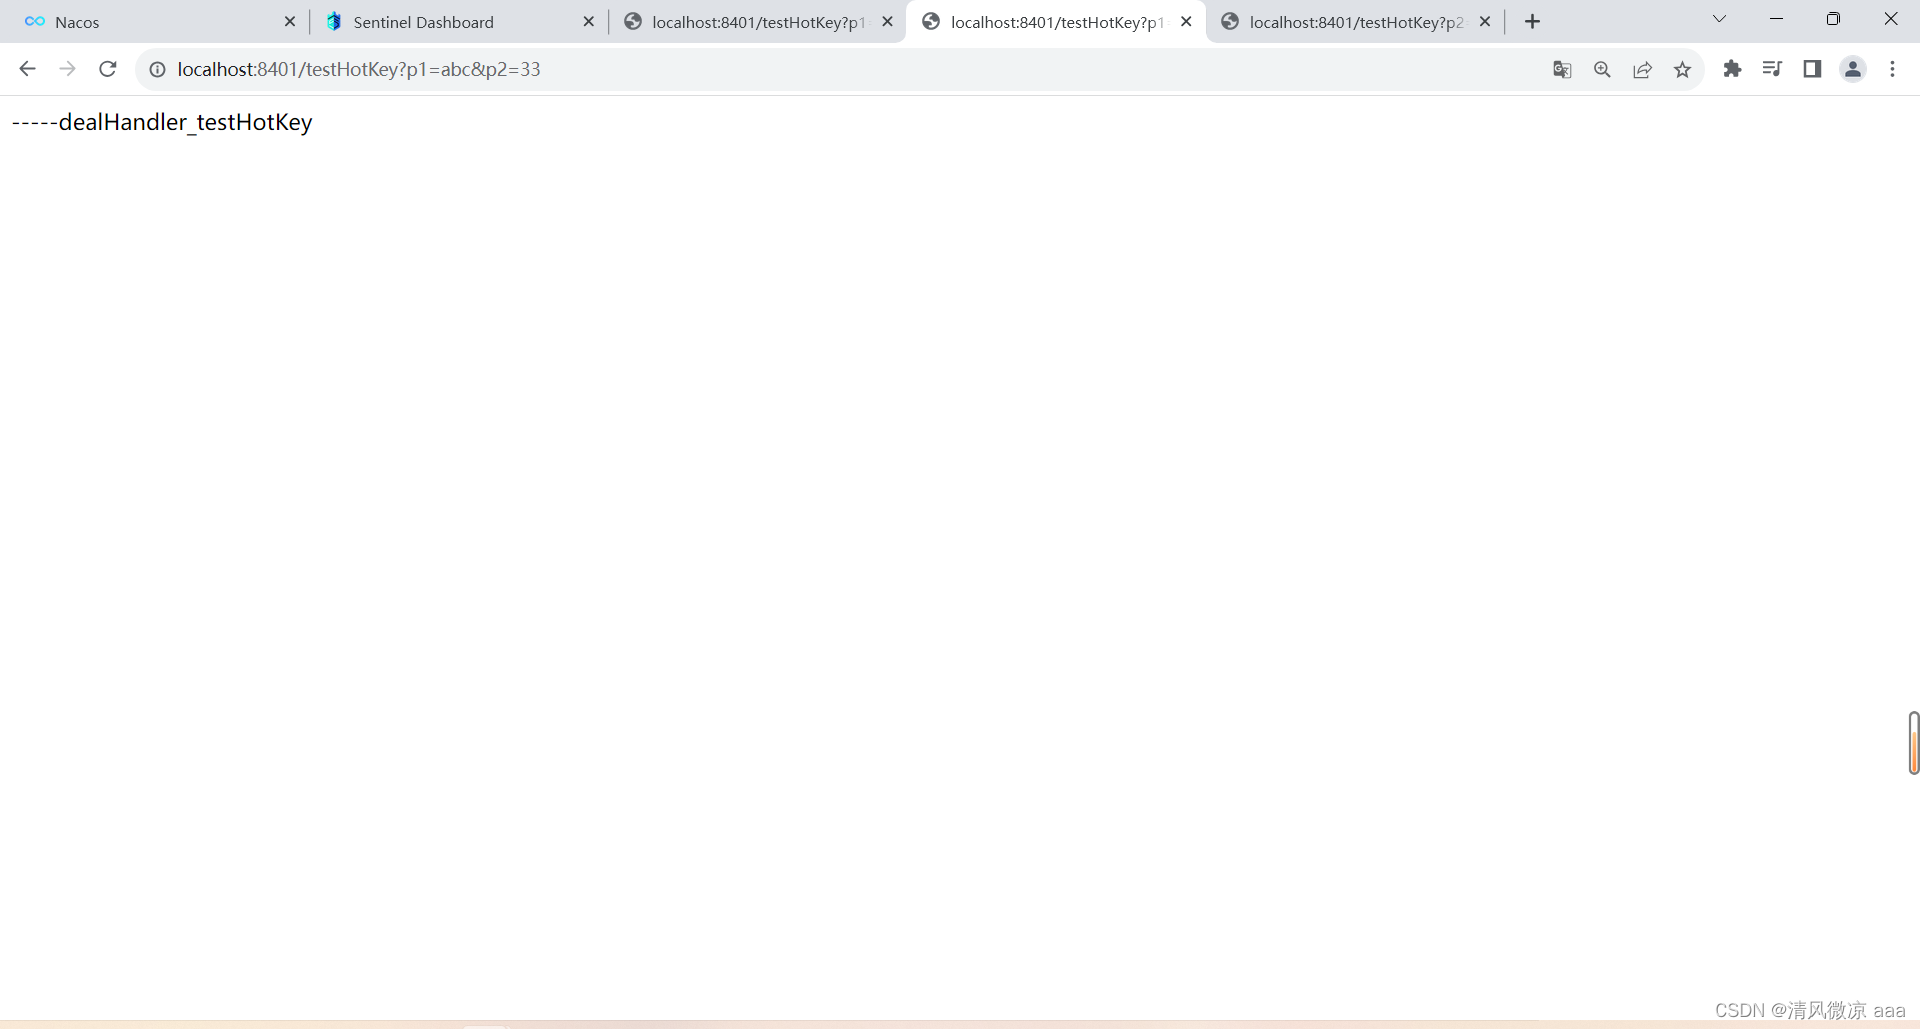
-
right:http://localhost:8401/testHotKey?p2=abc
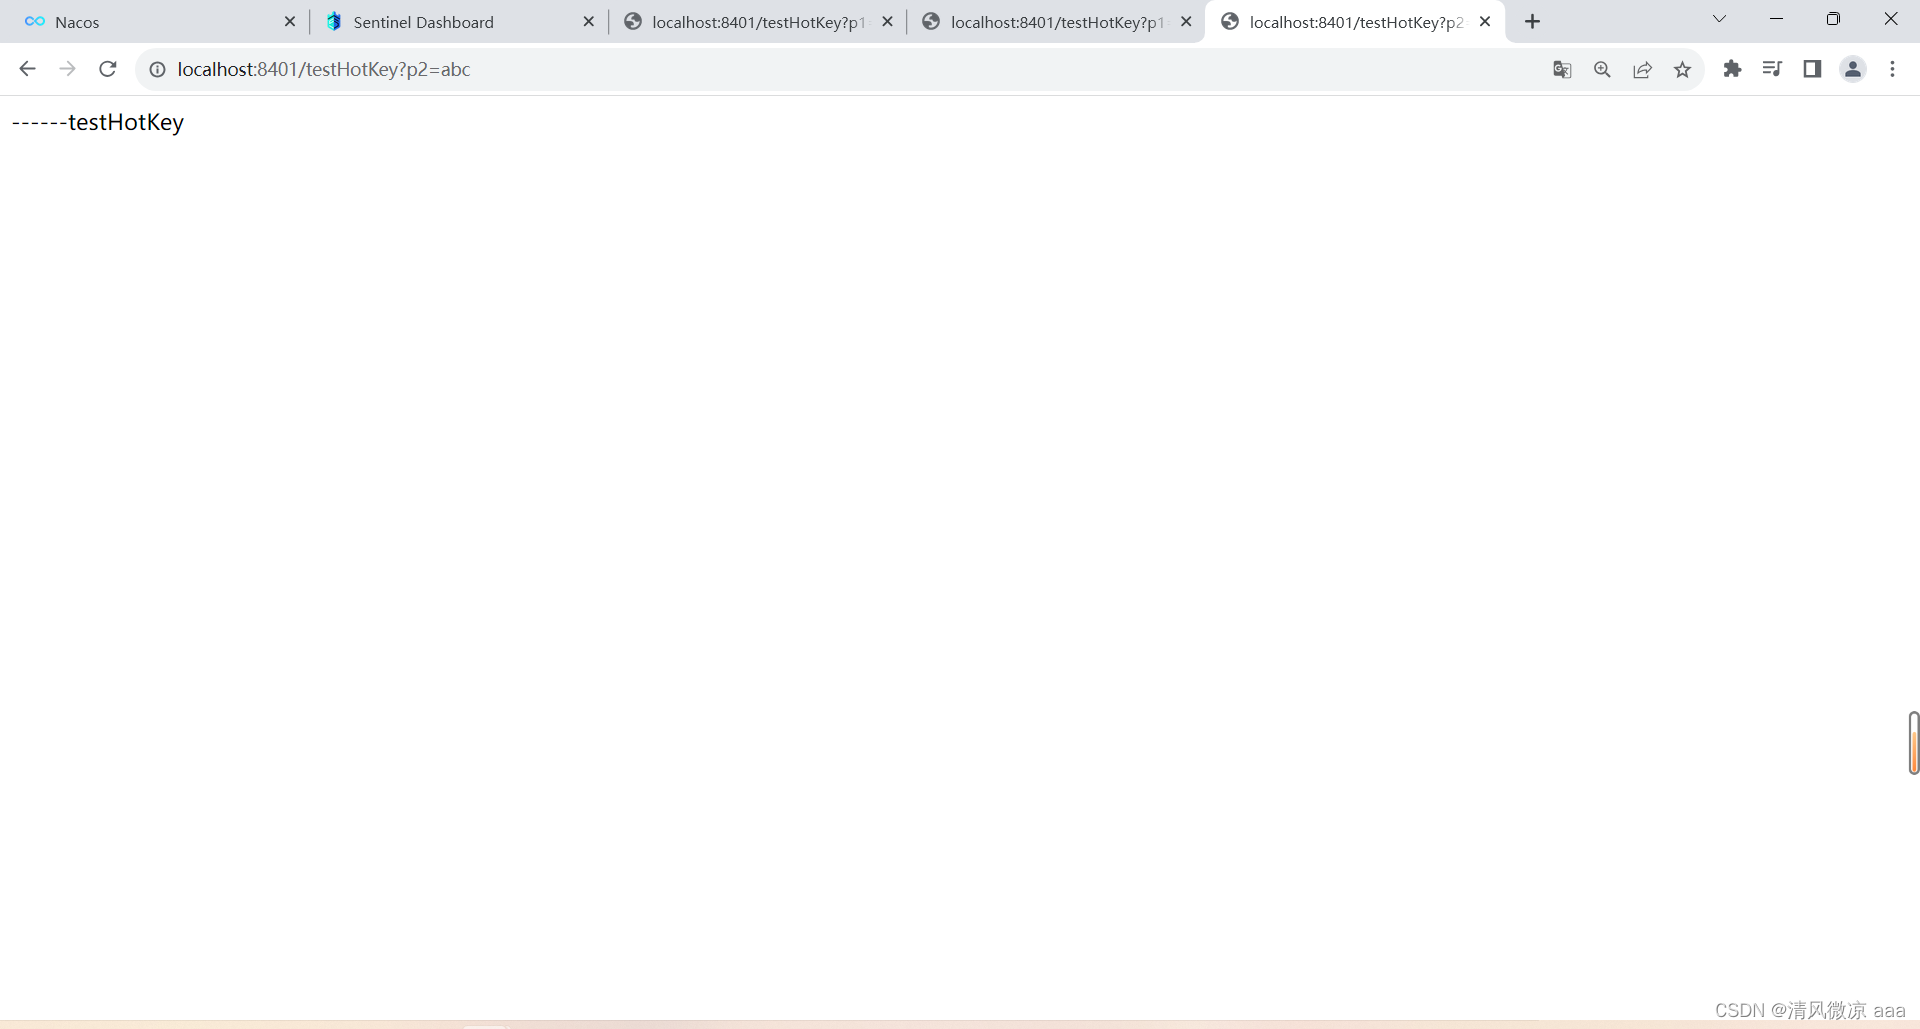
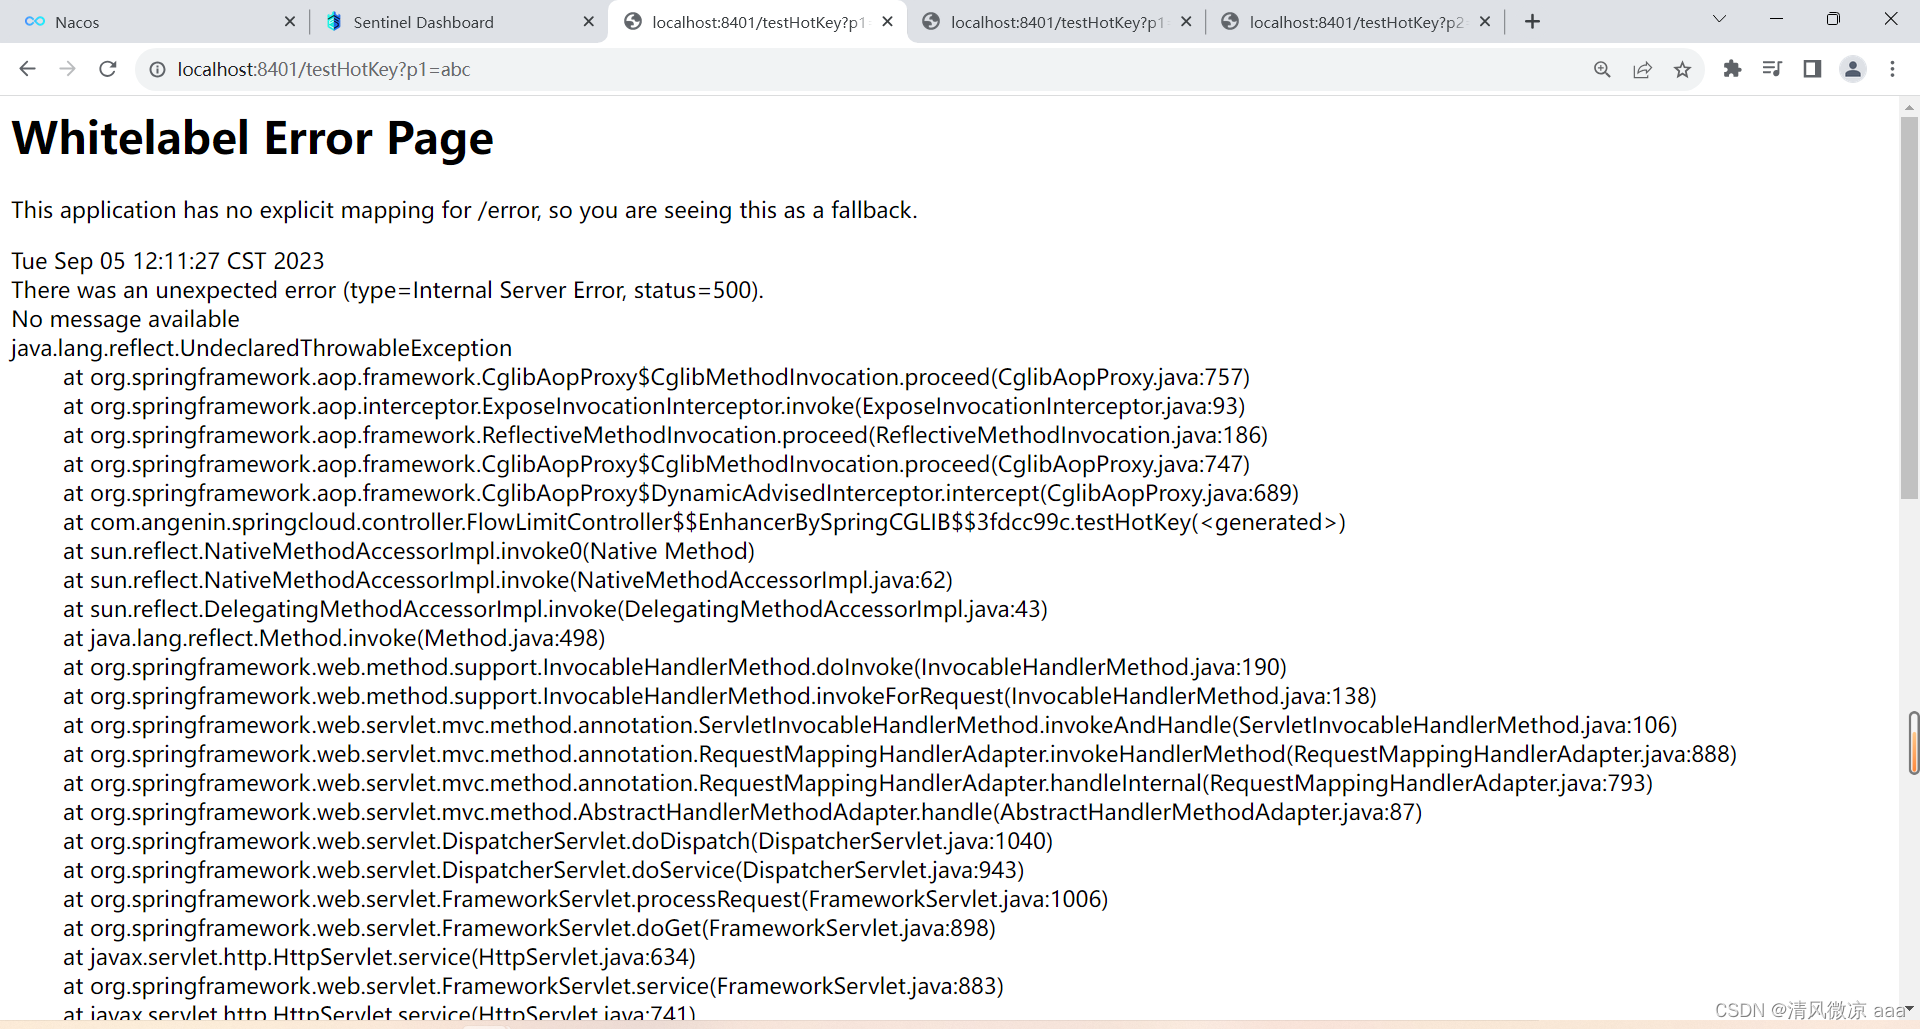
如果使用默认的提示:异常打到了前台用户界面看到,不友好
- 多次点击测试:http://localhost:8401/testHotKey?p1=abc
19.6.7 参数例外项
-
上述案例演示了第一个参数p1,当QPS超过1秒1次点击后马上被限流
-
特例情况
- 普通:超过1秒钟一个后,达到阈值1后马上被限流
- 我们期望p1参数当它是某个特殊值时,它的限流值和平时不一样
- 特例:假如当p1的值等于5时,它的阈值可以达到200
-
配置:添加按钮不能忘
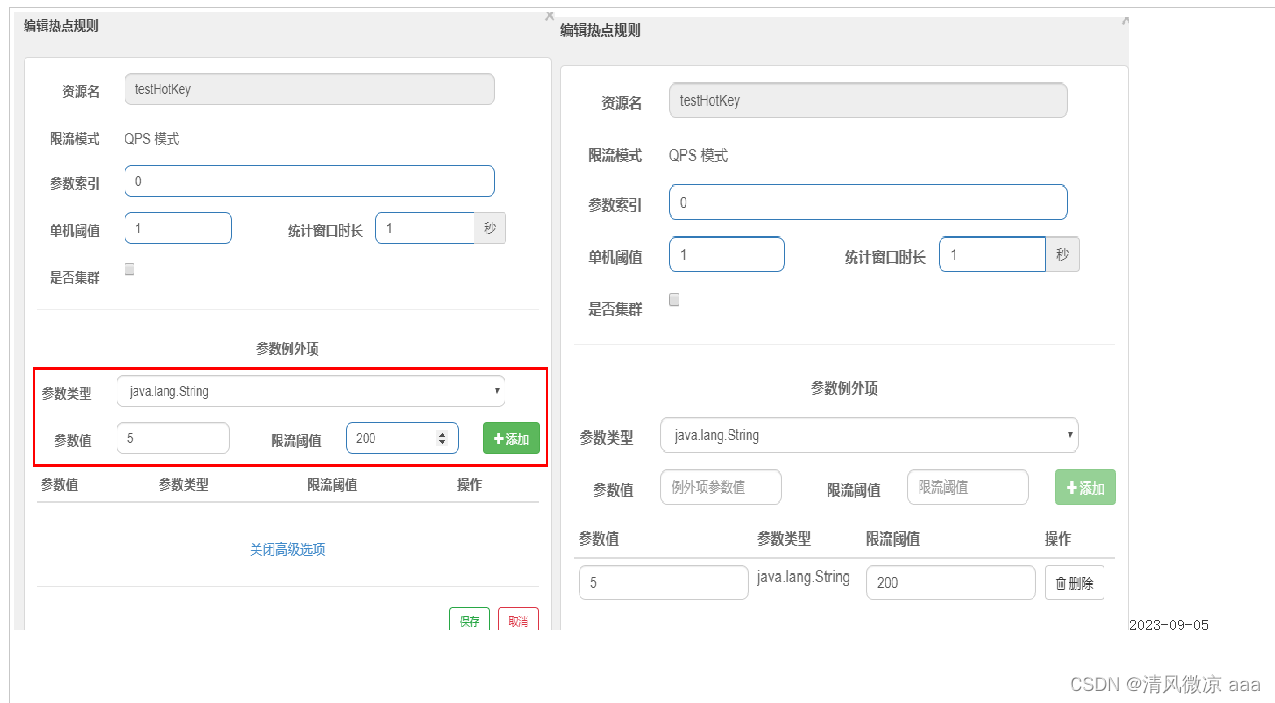
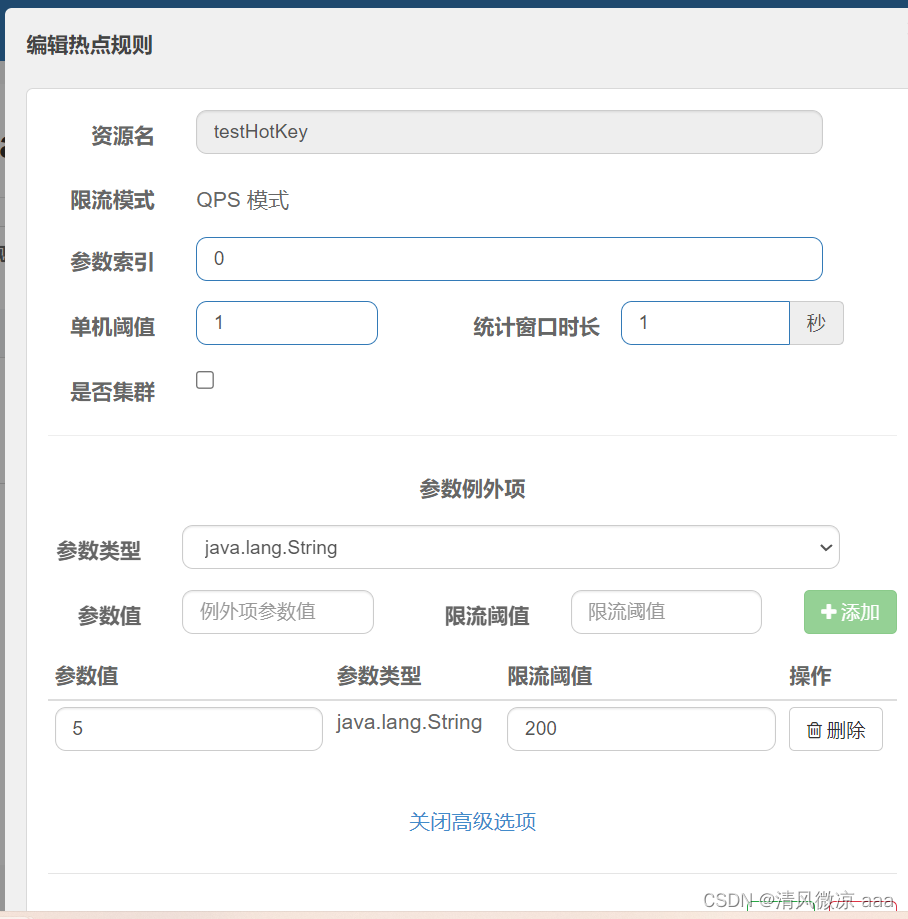
-
测试:多次点击
-
http://localhost:8401/testHotKey?p1=5

-
http://localhost:8401/testHotKey?p1=3
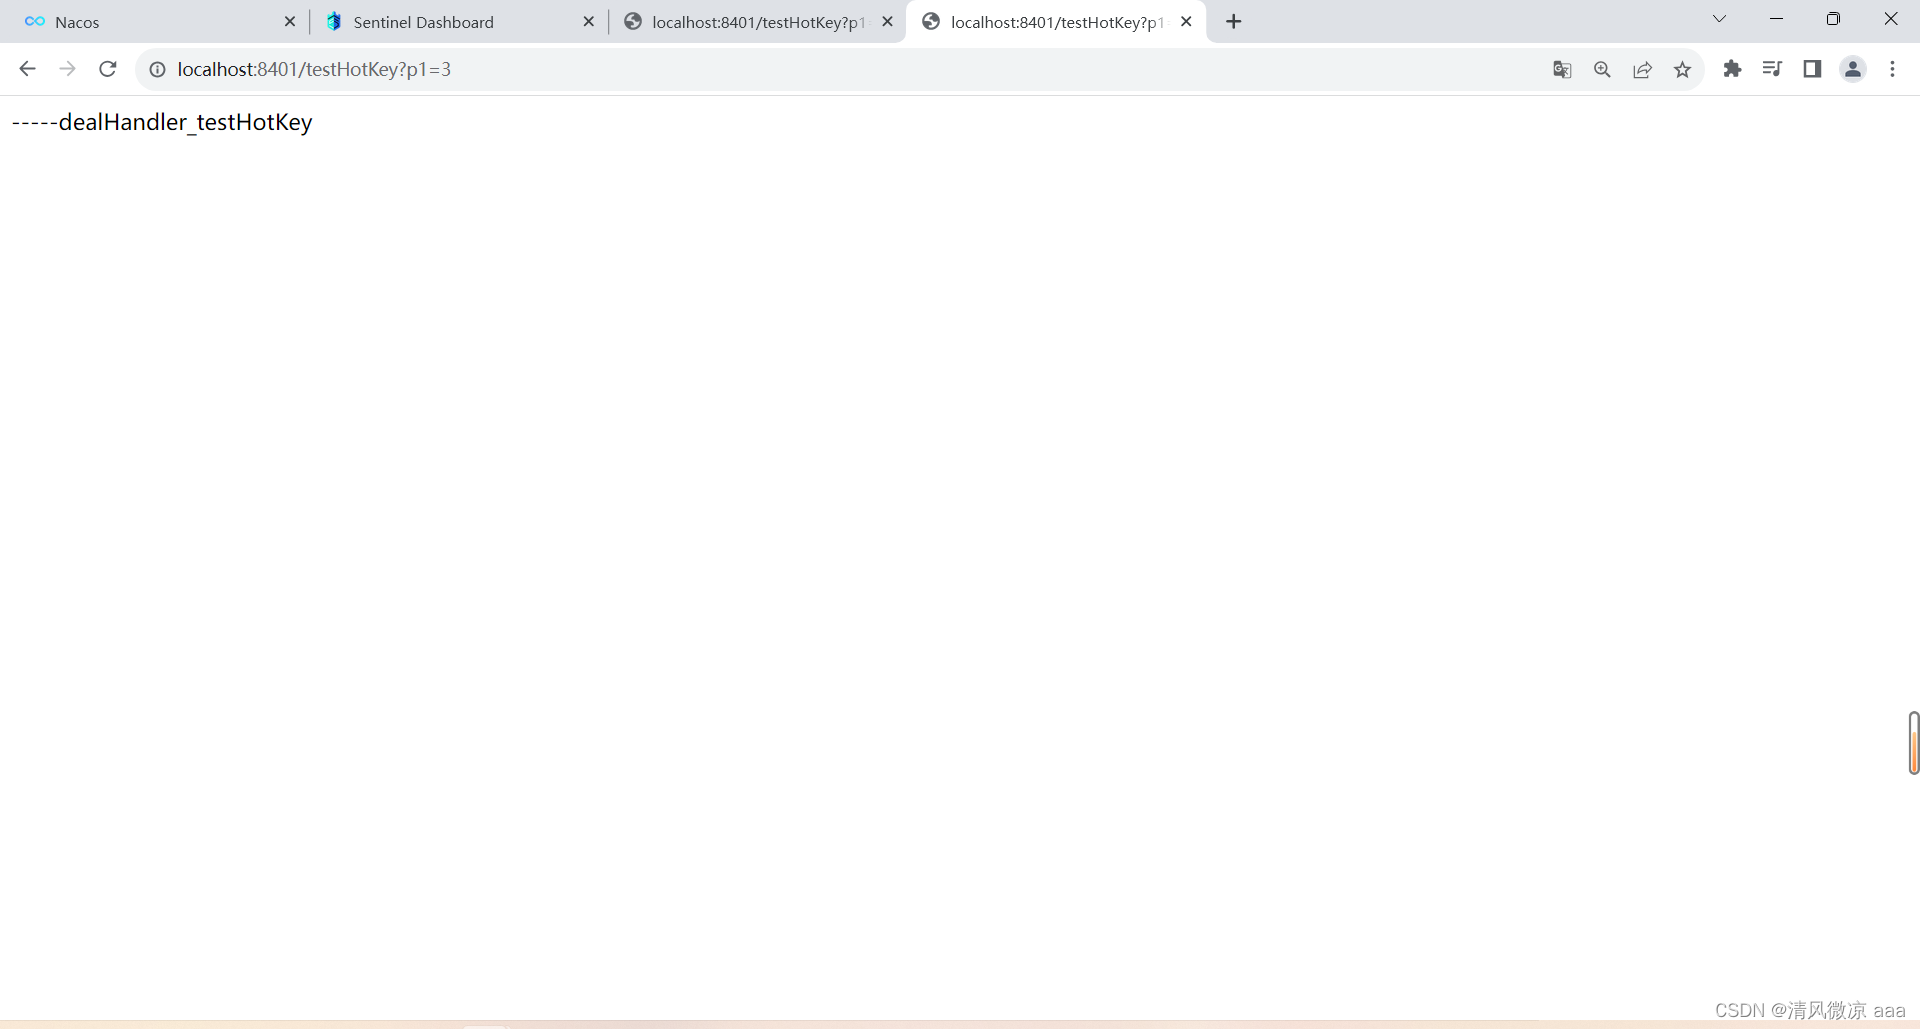
-
当p1等于5的时候,阈值变为200
-
当p1不等于5的时候,阈值就是平常的1
-
-
前提条件:热点参数的注意点,参数必须是基本类型或者String
19.6.8 其它
-
手贱添加异常看看…/(ㄒoㄒ)/~~
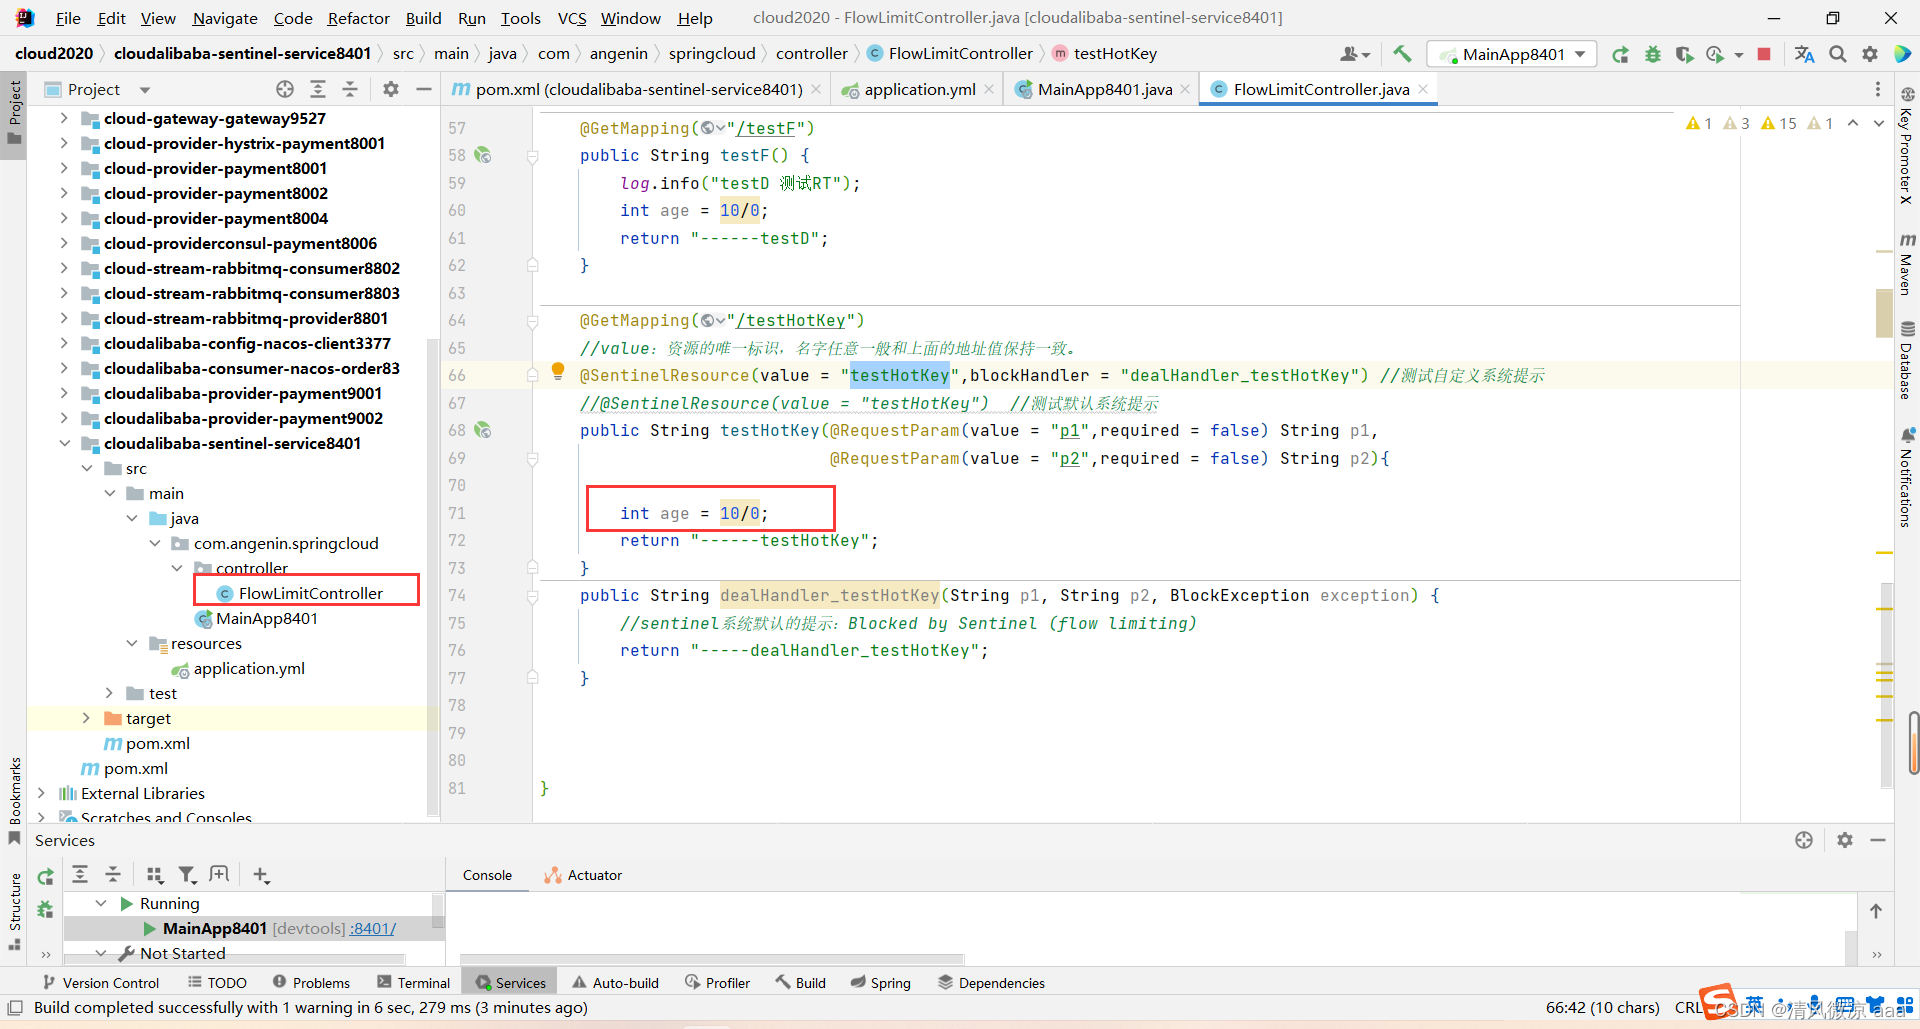
-
效果:发现并没有执行自定义的提示方法。
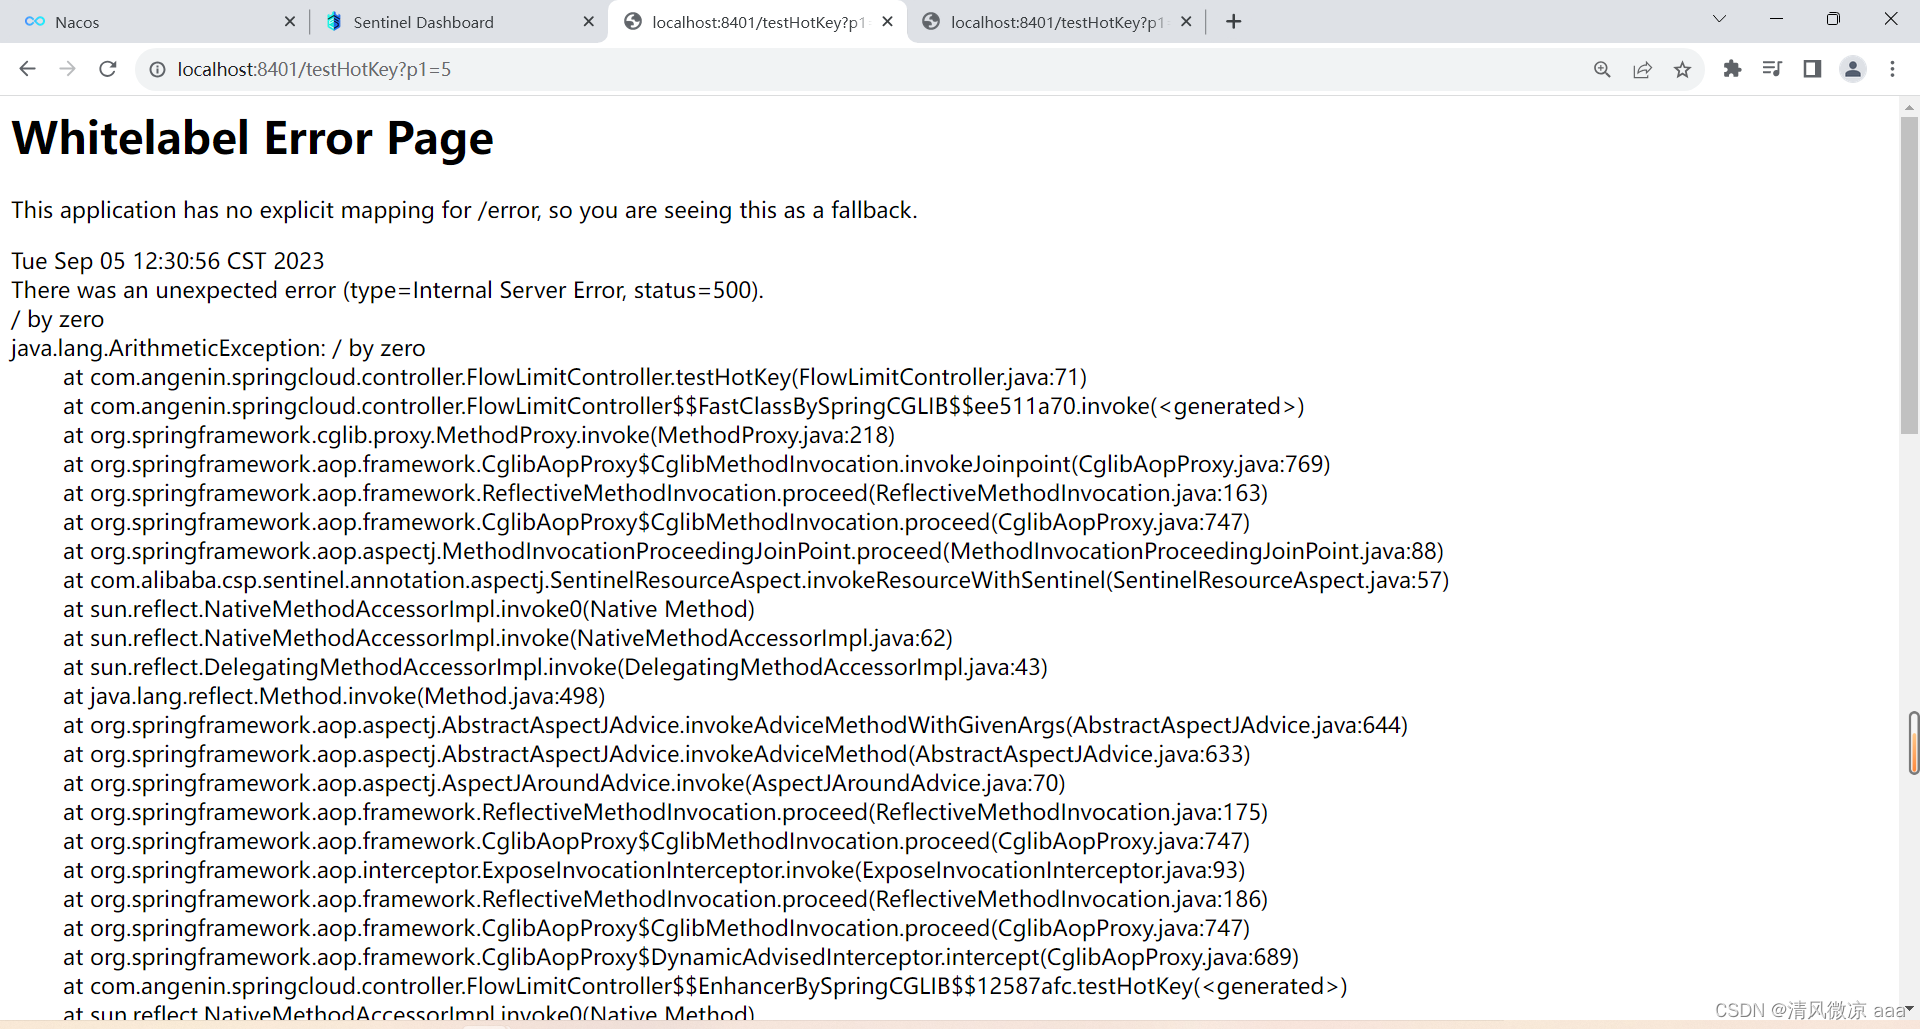
-
@SentinelResource
处理的是Sentinel控制台配置的违规情况,有blockHandler方法配置的兜底处理; -
RuntimeException
int age = 10/0,这个是java运行时报出的运行时异常RunTimeException,@SentinelResource不管 -
总结
@SentinelResource主管配置出错,运行出错该走异常走异常 -
后面讲:还有其它的配置来解决这个问题
19.7 系统规则
-
是什么:之前是细粒度的从控制层的方法进行限流,现在是粗粒度的进行限流。
https://github.com/alibaba/Sentinel/wiki/%E7%B3%BB%E7%BB%9F%E8%87%AA%E9%80%82%E5%BA%94%E9%99%90%E6%B5%81
-
各项配置参数说明
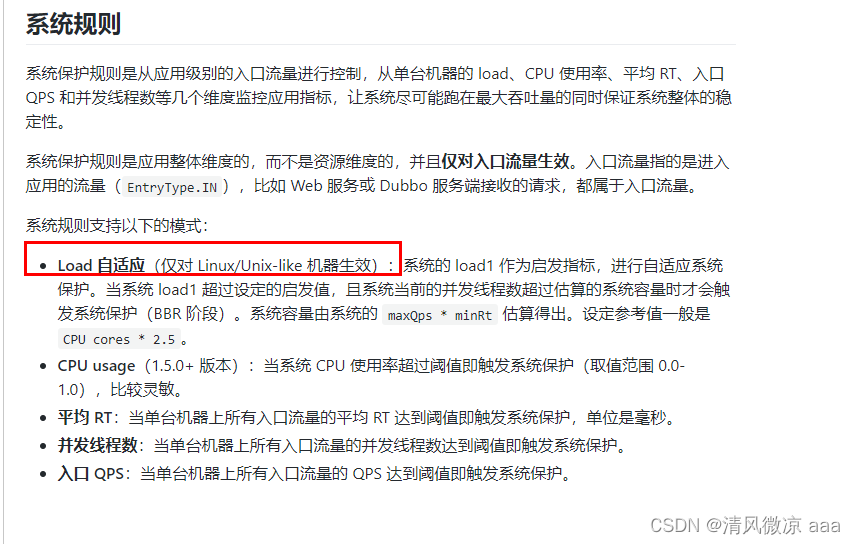
-
配置全局QPS
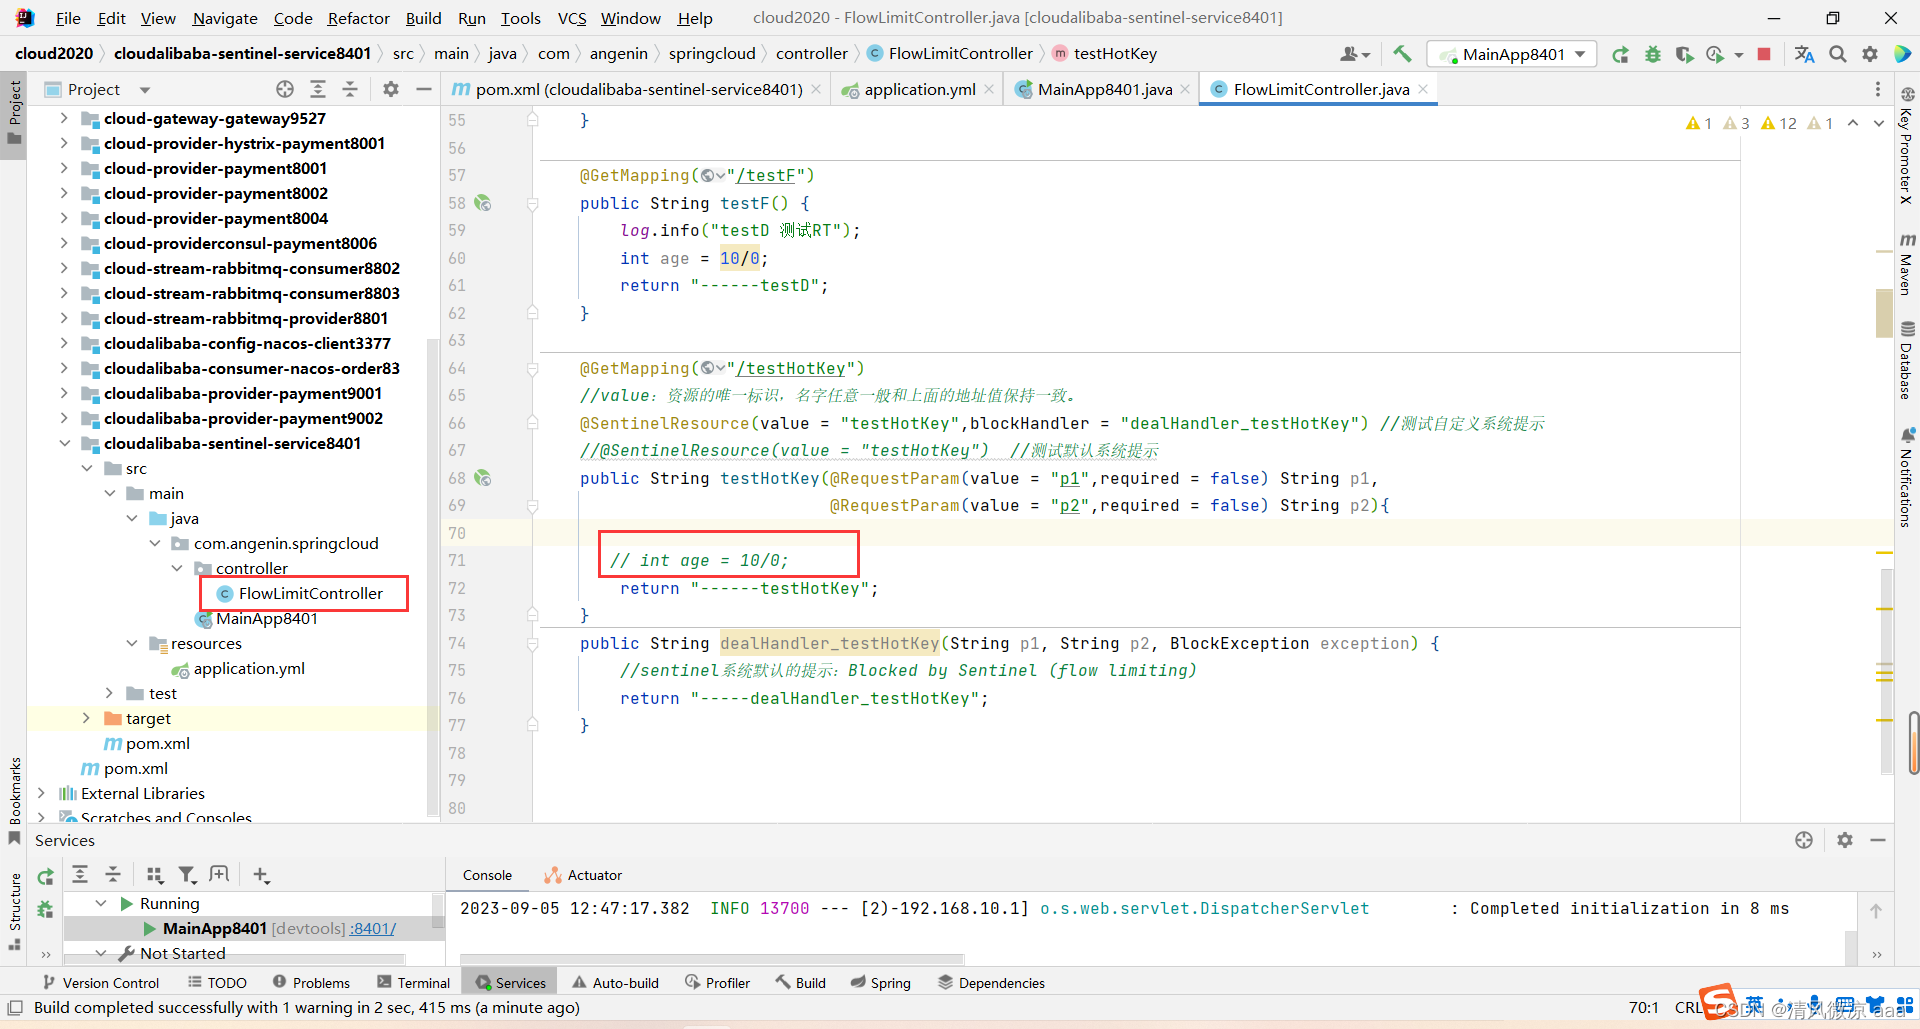

-
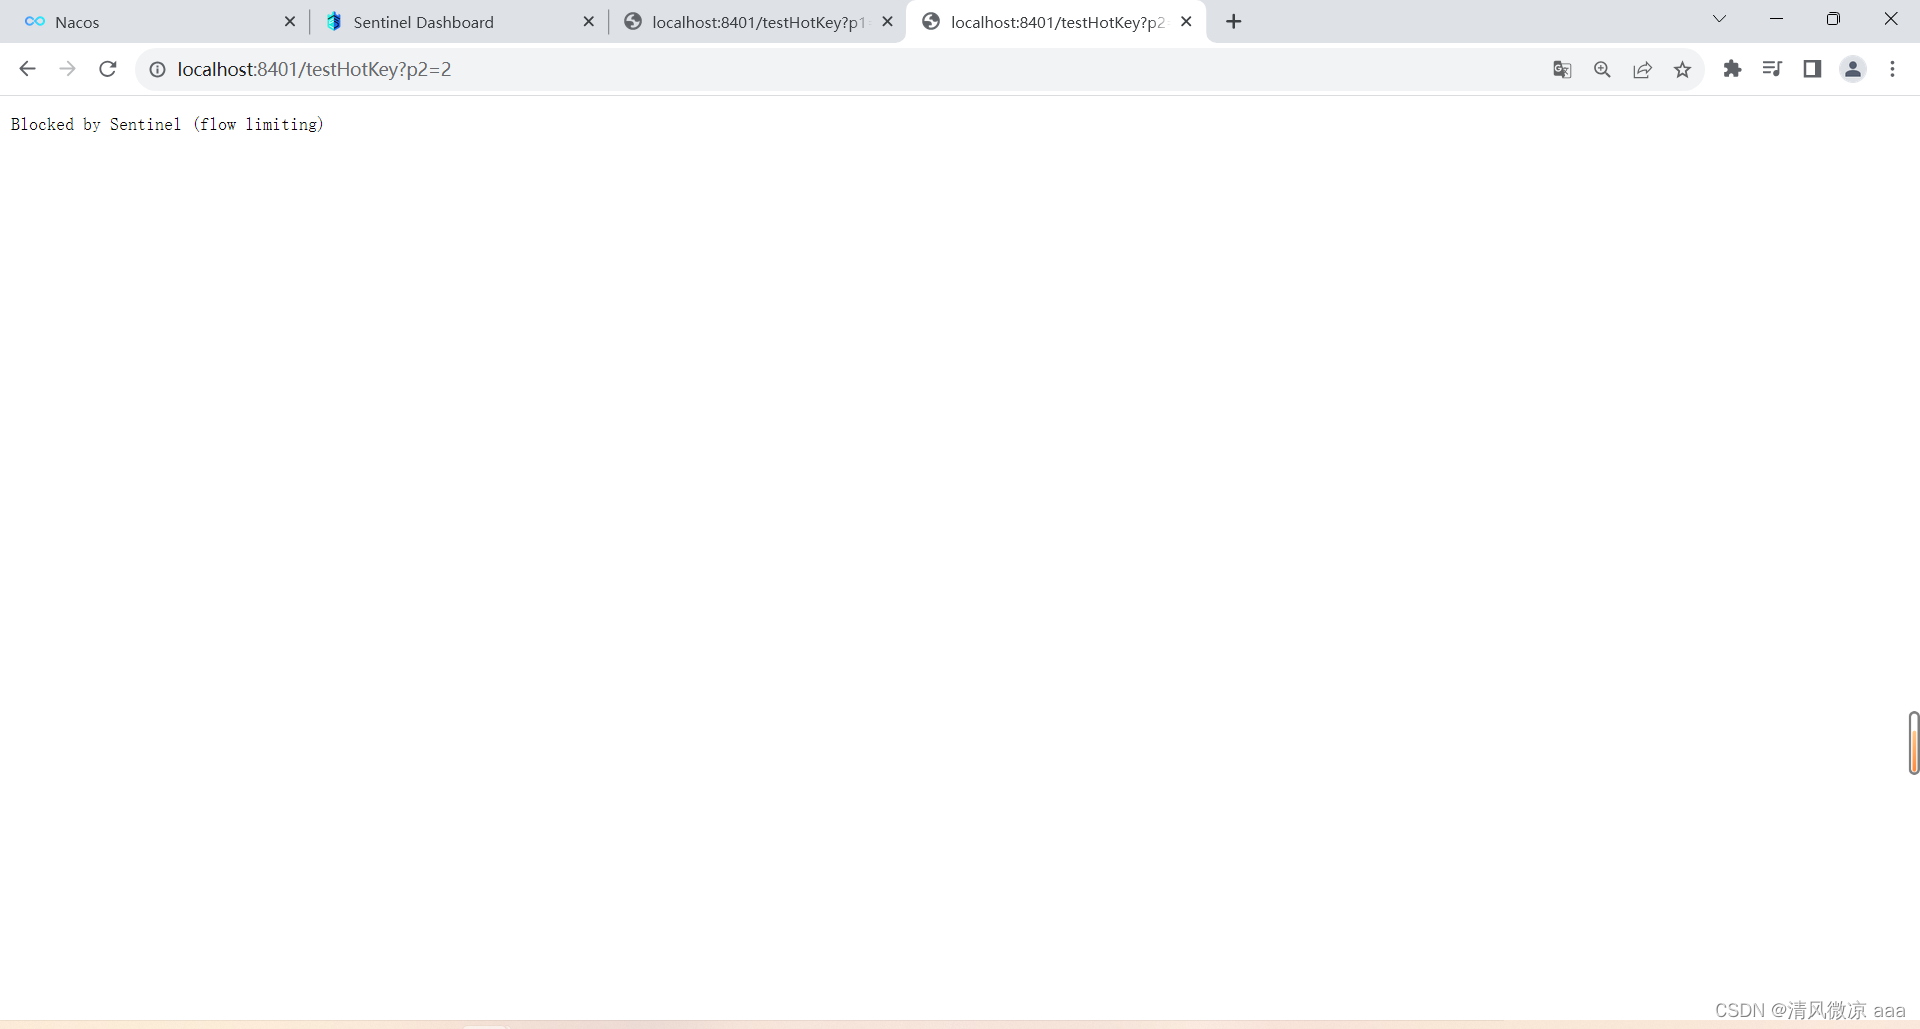
多次访问:不管是访问p1还是p2,都会报错。(之前配置的是只有p1会报错)
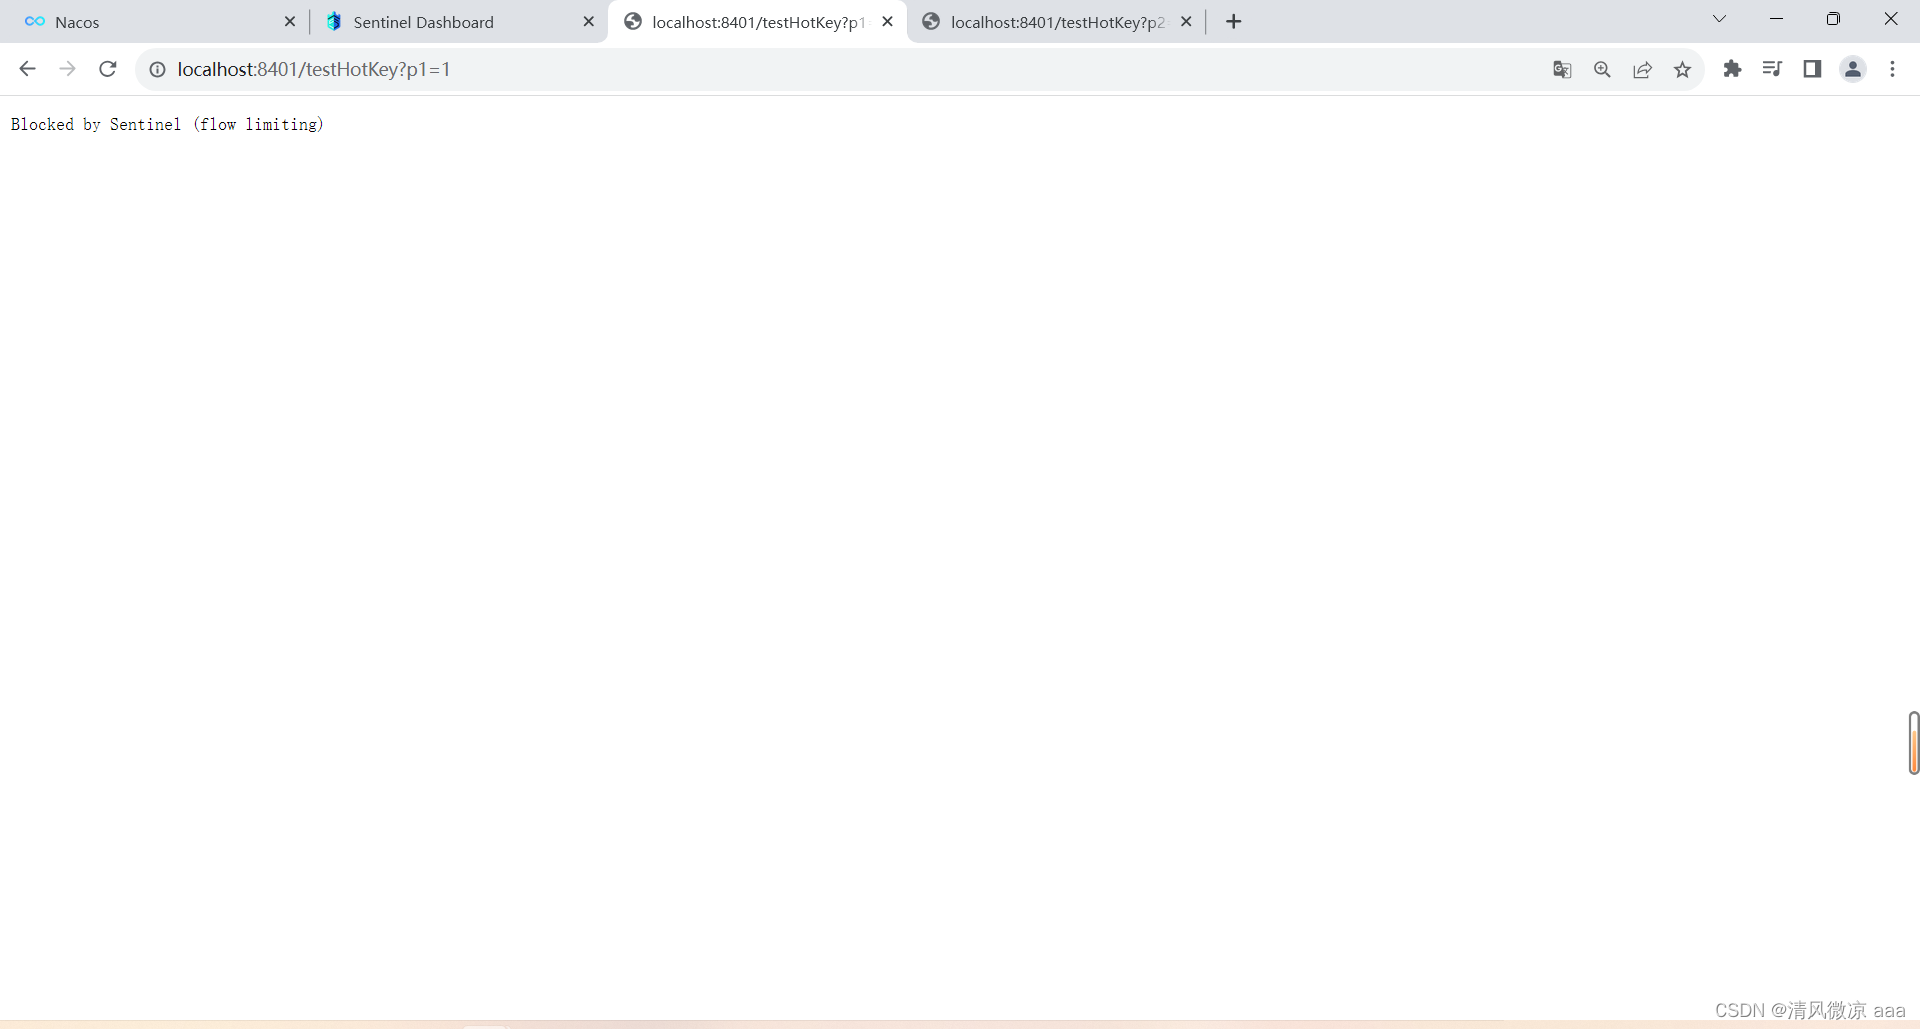
19.8 @SentinelResource
19.8.1 按资源名称限流+后续处理
1)启动
- 启动Nacos成功
- 启动Nacos成功
2)修改:cloudalibaba-sentinel-service8401
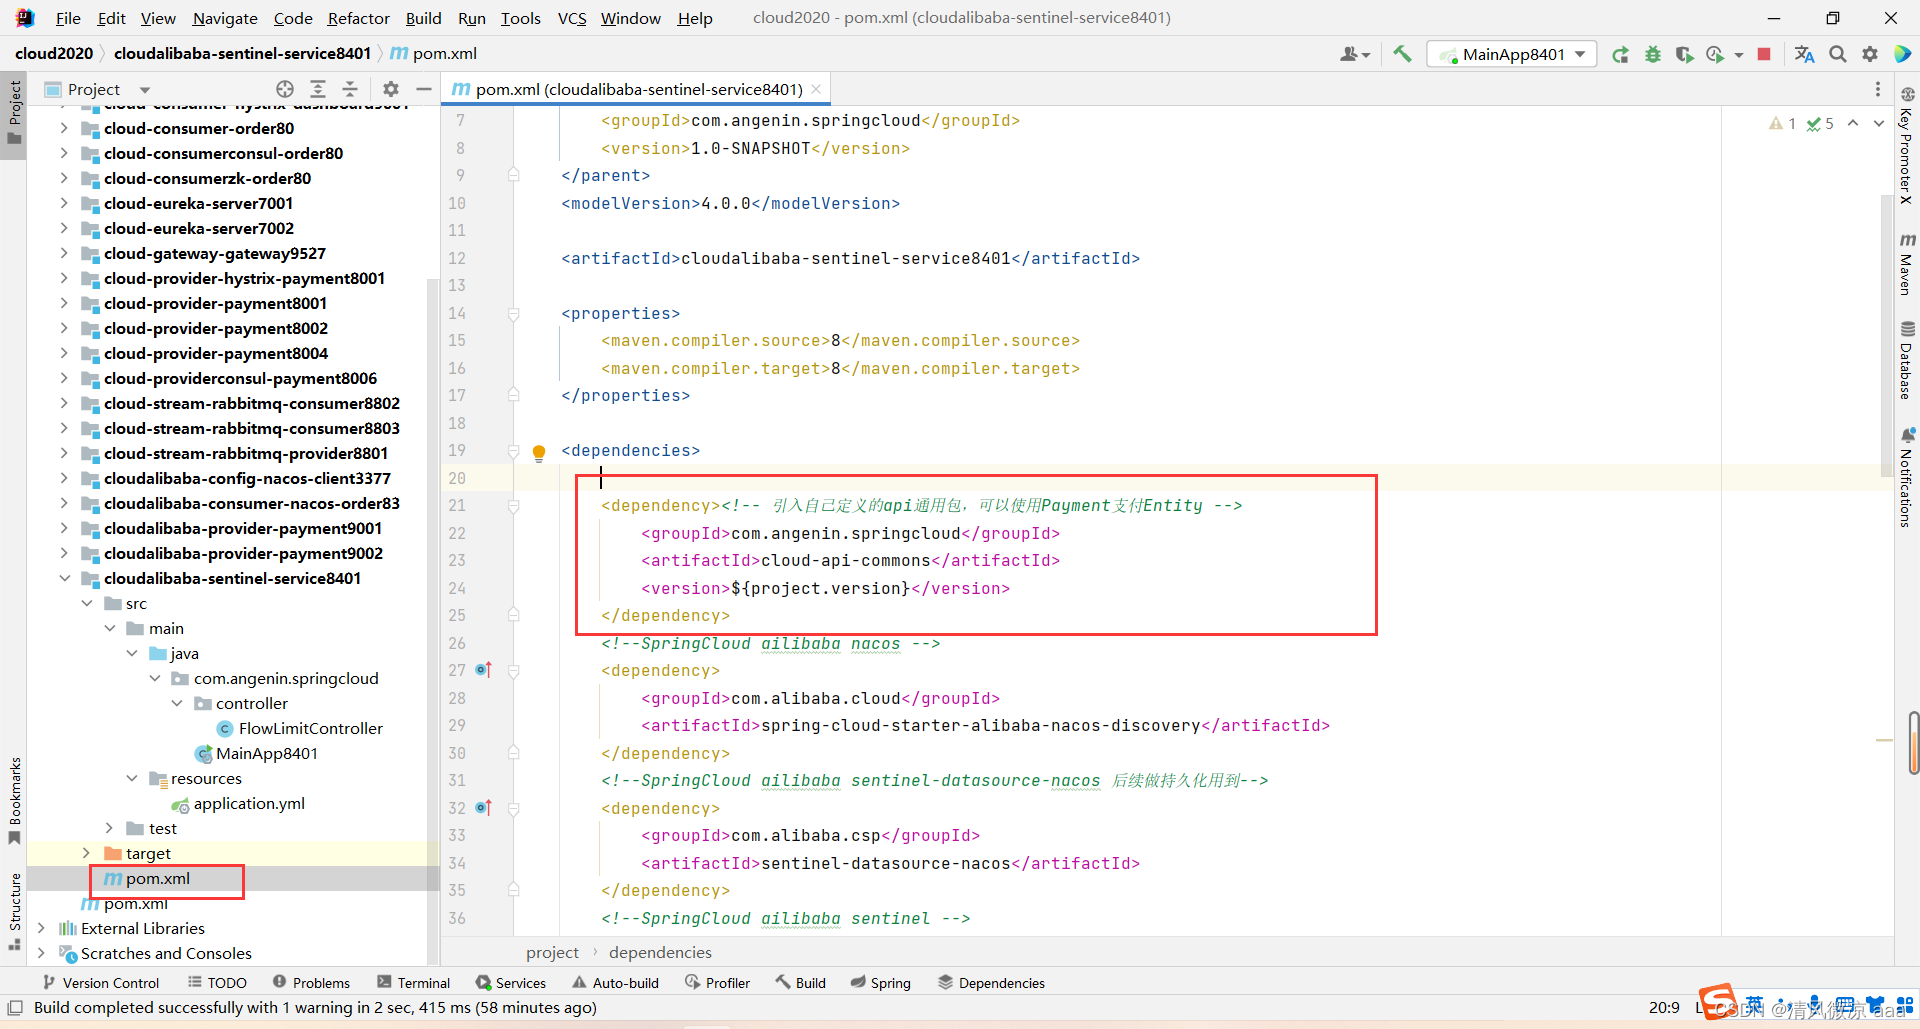
-
pom:之前已引入
-
yml:没有改变
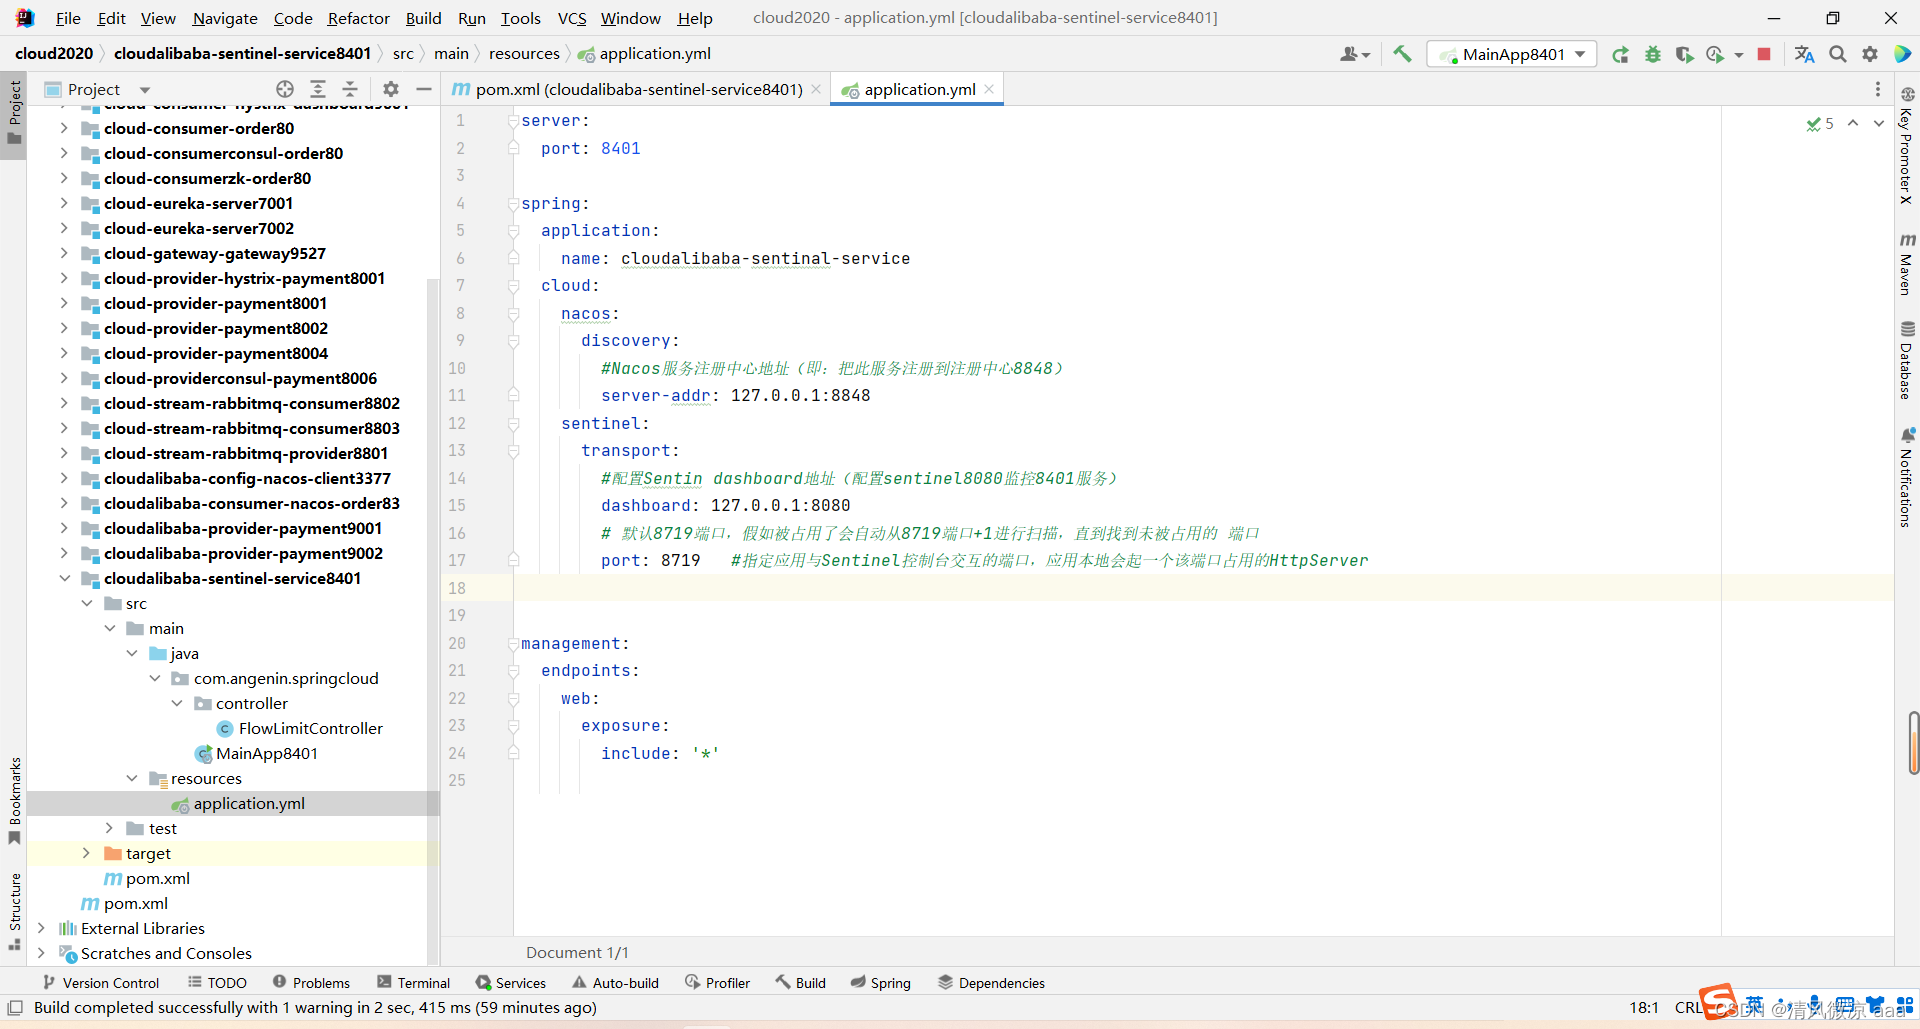
-
业务类RateLimitController
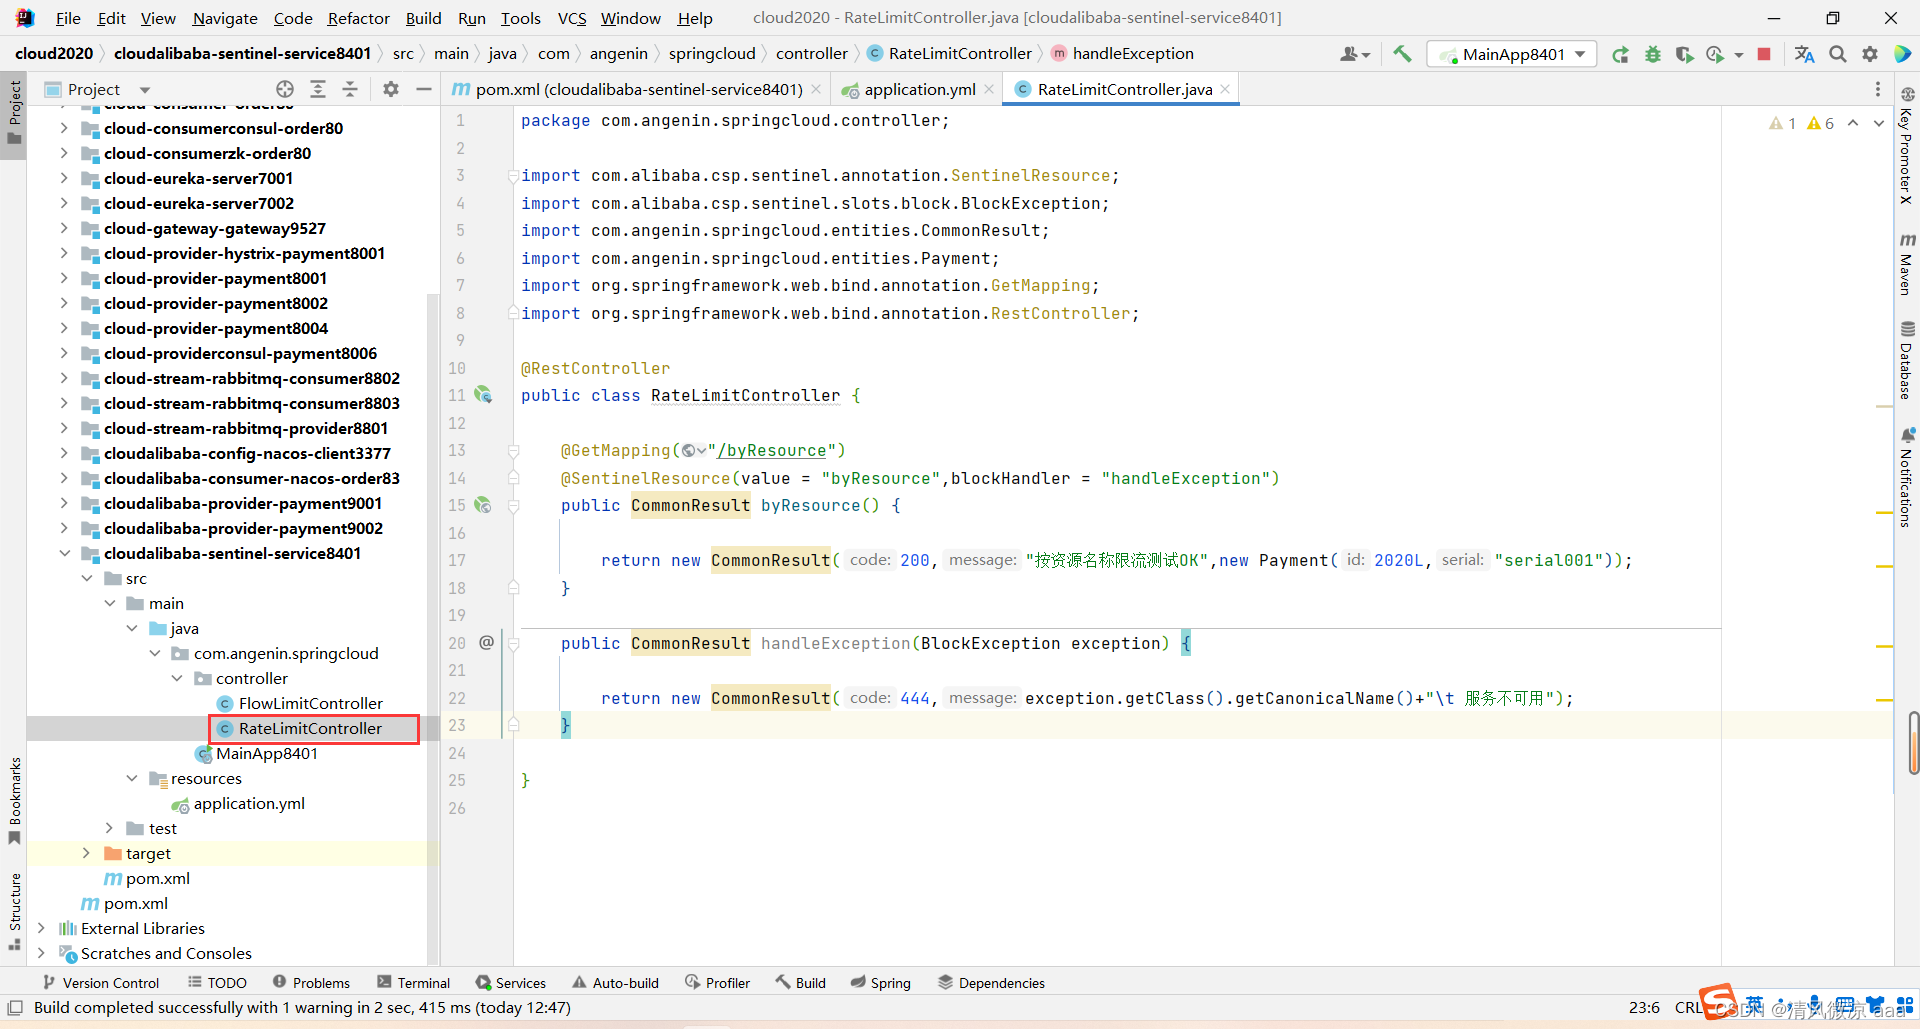
package com.angenin.springcloud.controller;import com.alibaba.csp.sentinel.annotation.SentinelResource;
import com.alibaba.csp.sentinel.slots.block.BlockException;
import com.angenin.springcloud.entities.CommonResult;
import com.angenin.springcloud.entities.Payment;
import org.springframework.web.bind.annotation.GetMapping;
import org.springframework.web.bind.annotation.RestController;@RestController
public class RateLimitController {
//既可以使用url地址来配置:/byResource
//也可以使用@SentinelResource注解中的value 属性来配置@GetMapping("/byResource")@SentinelResource(value = "byResource",blockHandler = "handleException")public CommonResult byResource() {return new CommonResult(200,"按资源名称限流测试OK",new Payment(2020L,"serial001"));}public CommonResult handleException(BlockException exception) {return new CommonResult(444,exception.getClass().getCanonicalName()+"\t 服务不可用");}}- 主启动:没有变化
3)配置流控规则
-
配置步骤
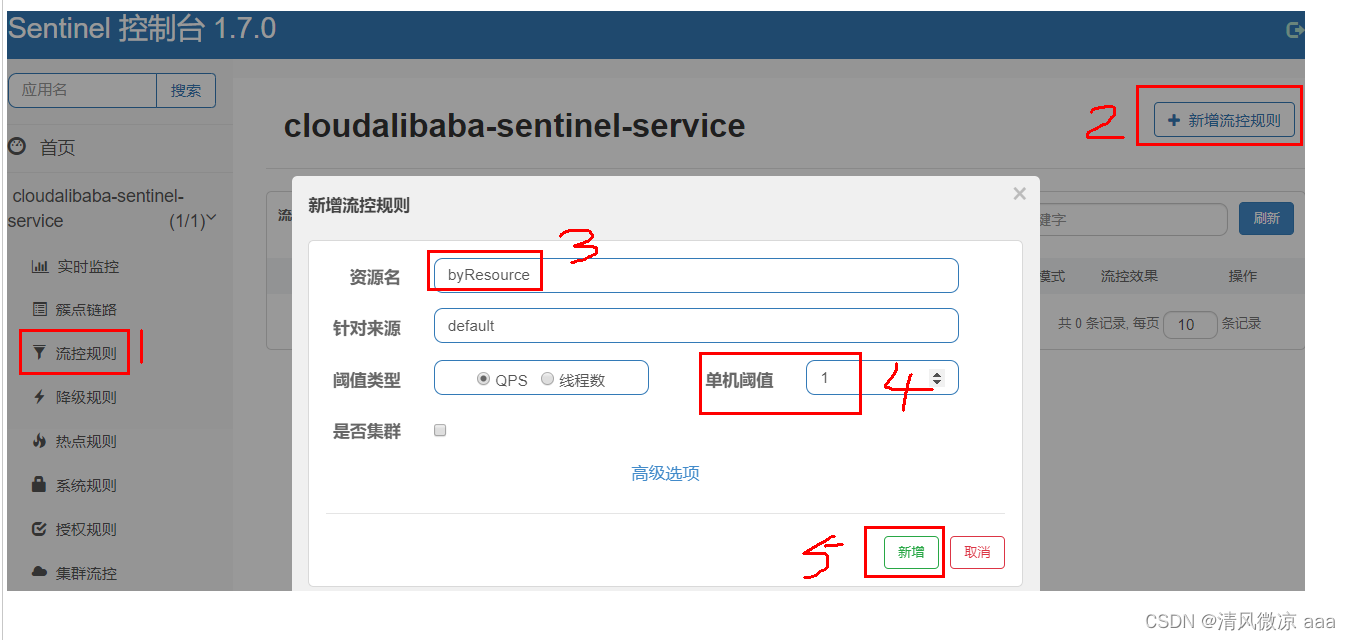
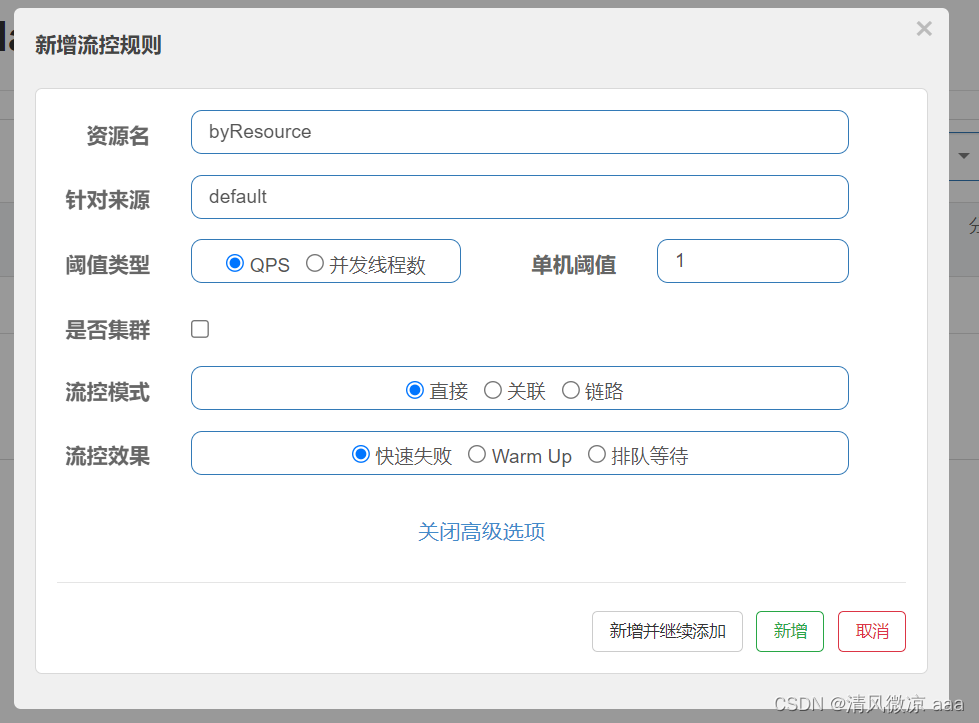
-
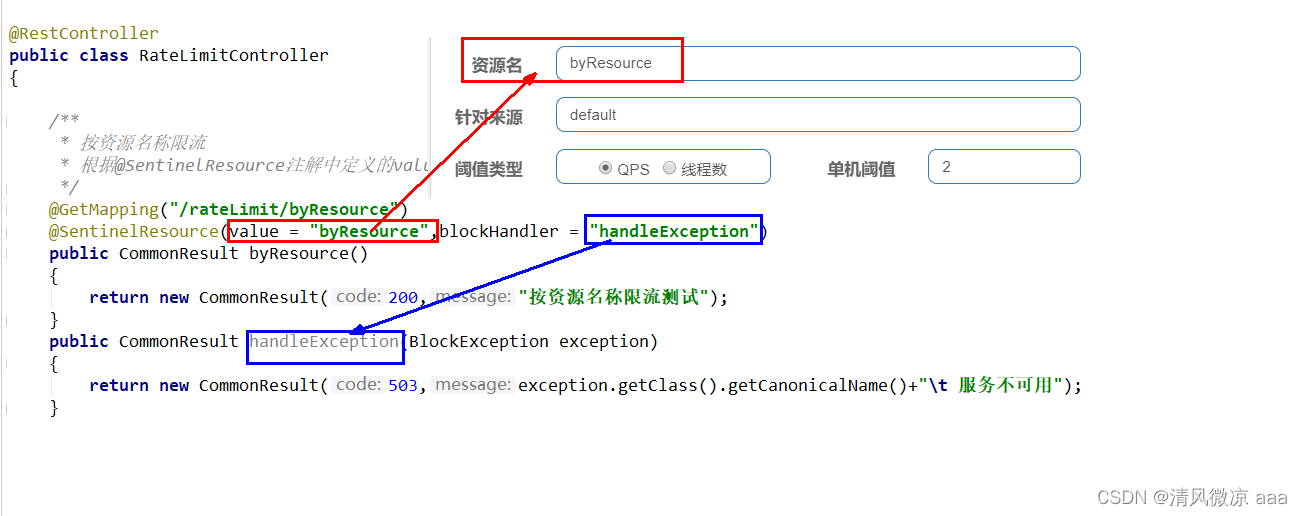
图形配置和代码关系
-
表示1秒钟内查询次数大于1,就跑到我们自定义的处流,限流
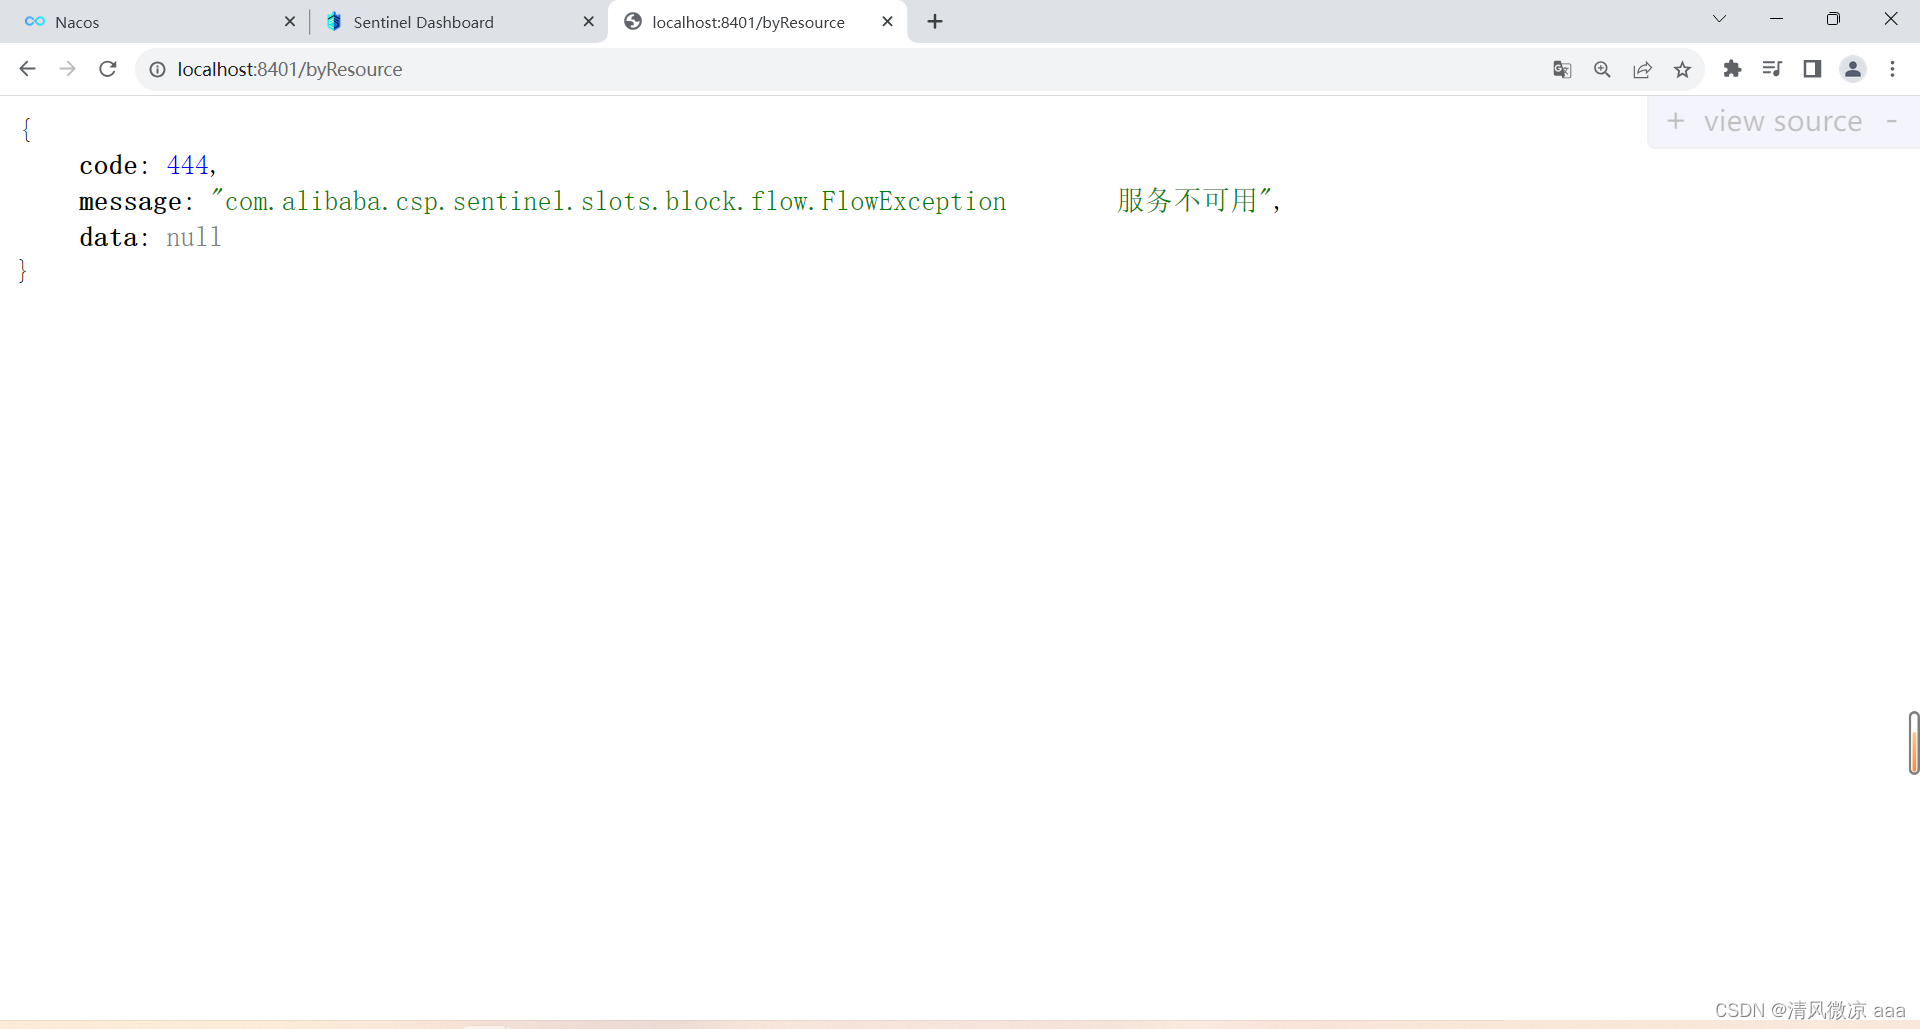
4)测试
- 1秒钟点击1下,OK
- 超过上述,疯狂点击,返回了自己定义的限流处理信息,限流发生
5)额外问题
- 此时关闭问服务8401看看
- Sentinel控制台,流控规则消失了?????
- 临时/持久?:说明是临时的
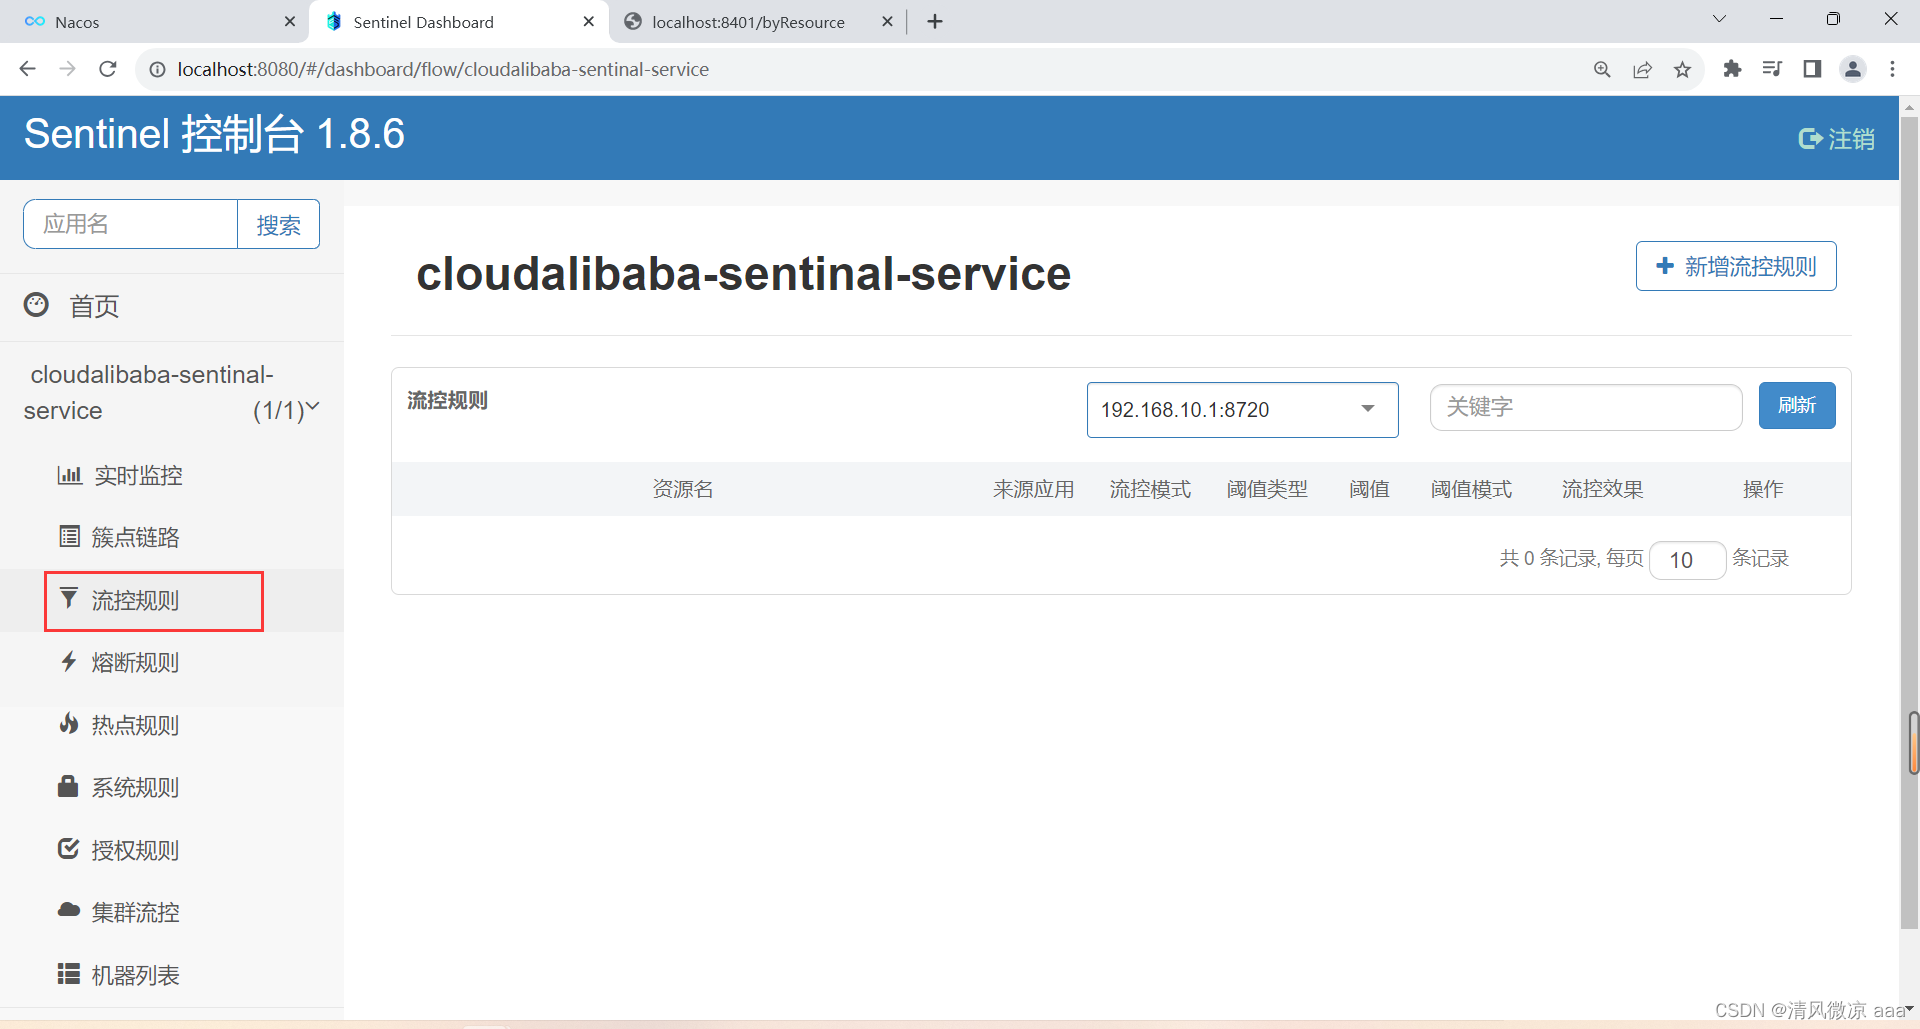
19.8.2 按照Url地址限流+后续处理
- 通过访问的URL来限流,会返回Sentinel自带默认的限流处理信息
- 业务类RateLimitController
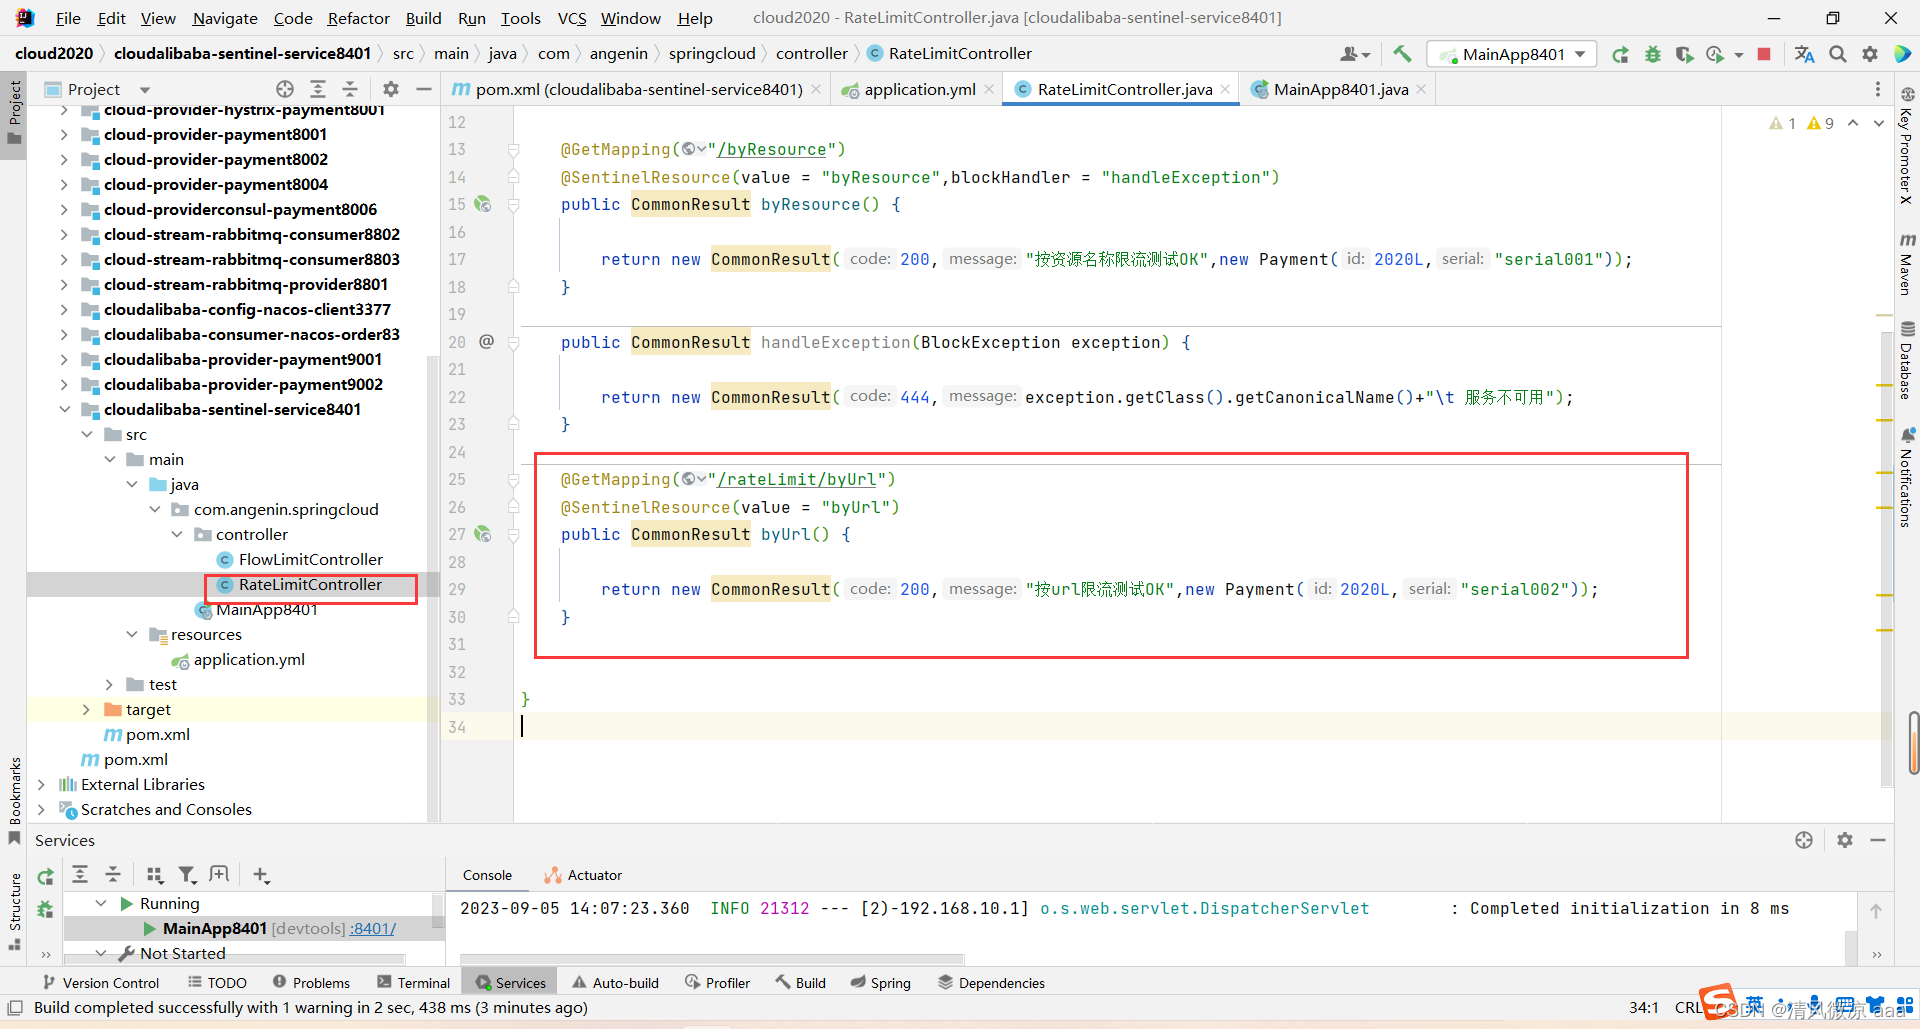
@GetMapping("/rateLimit/byUrl")@SentinelResource(value = "byUrl")public CommonResult byUrl() {return new CommonResult(200,"按url限流测试OK",new Payment(2020L,"serial002"));}
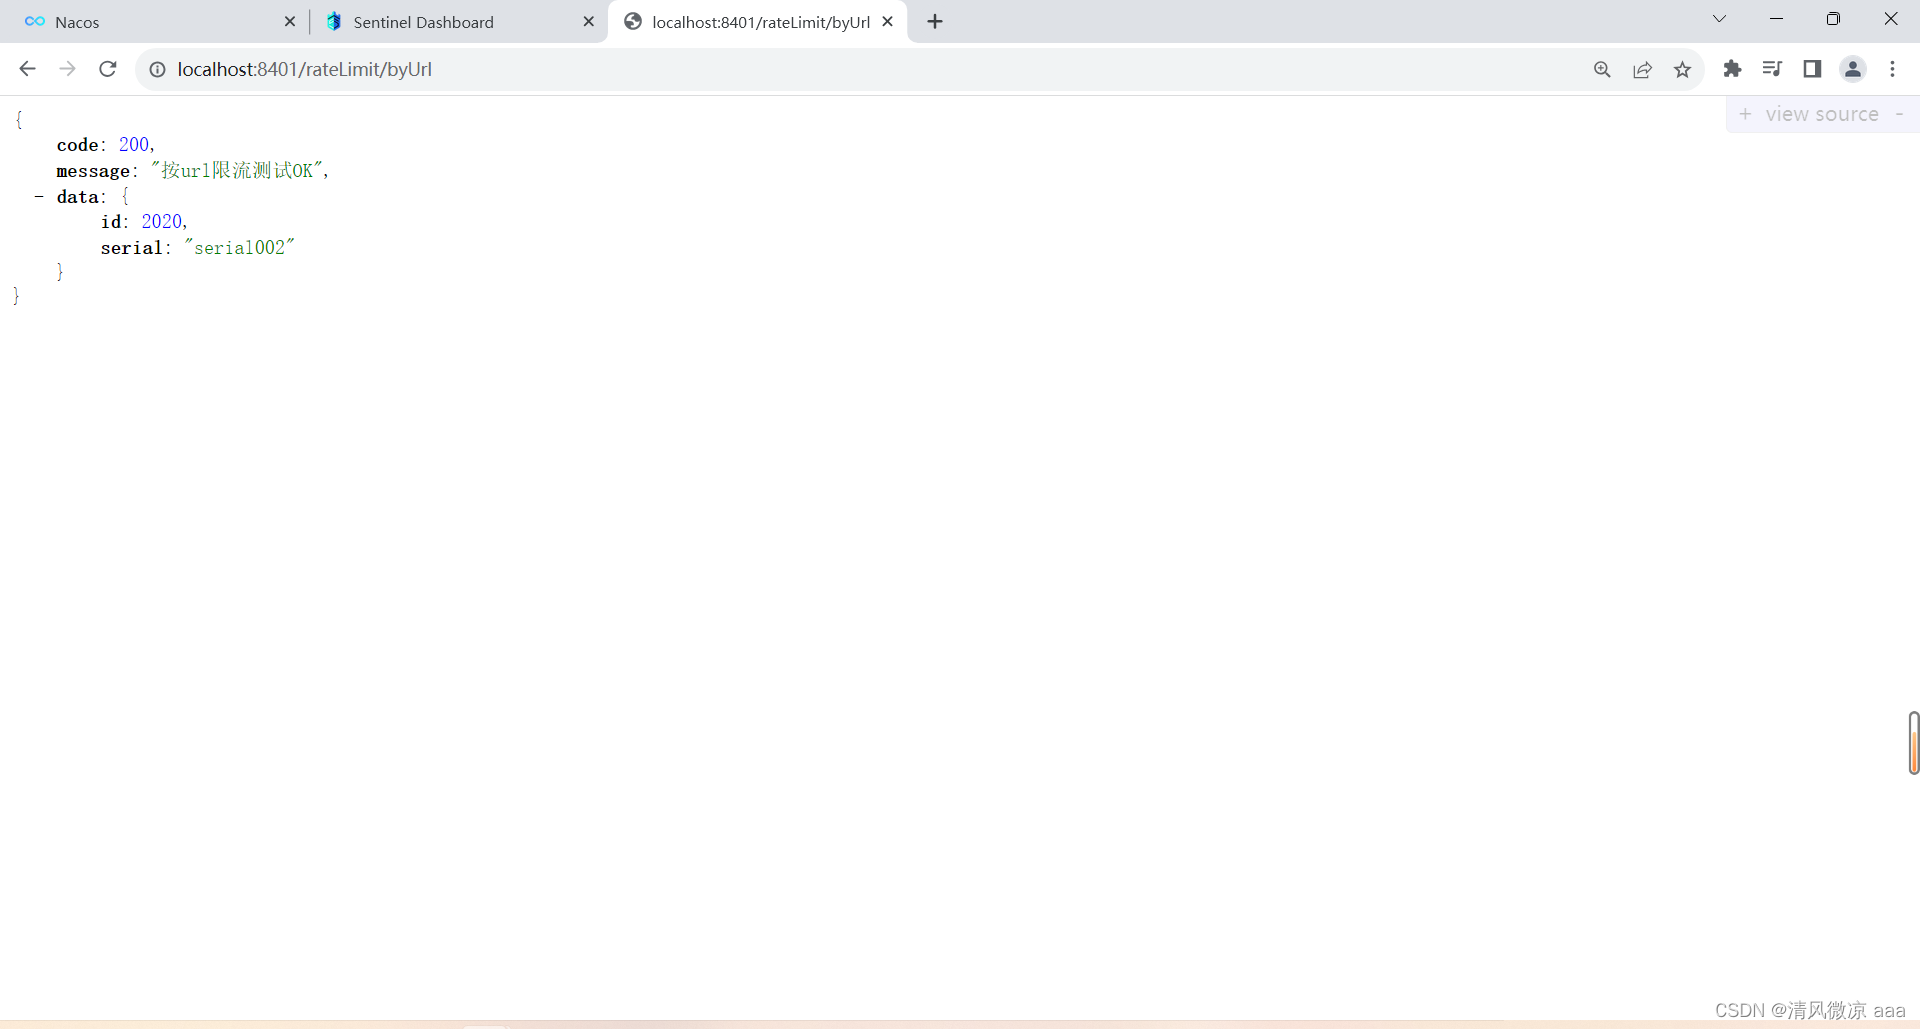
-
访问一次:http://localhost:8401/rateLimit/byUrl
-
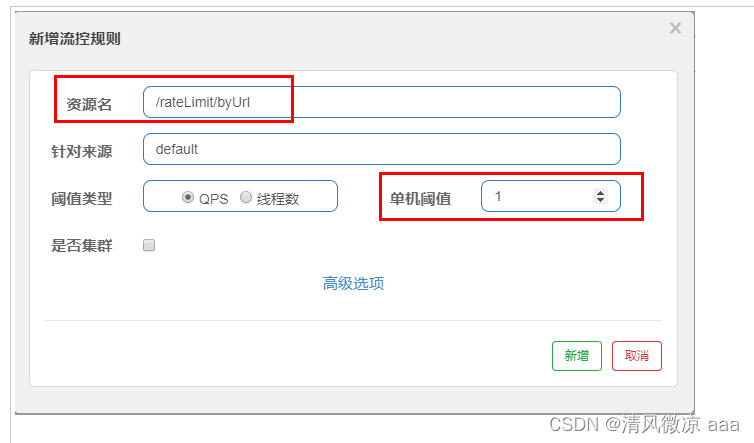
Sentinel控制台配置
-
测试
- 疯狂点击http://localhost:8401/rateLimit/byUrl
- 结果:没有配置自定义的提示,就使用系统自带的。
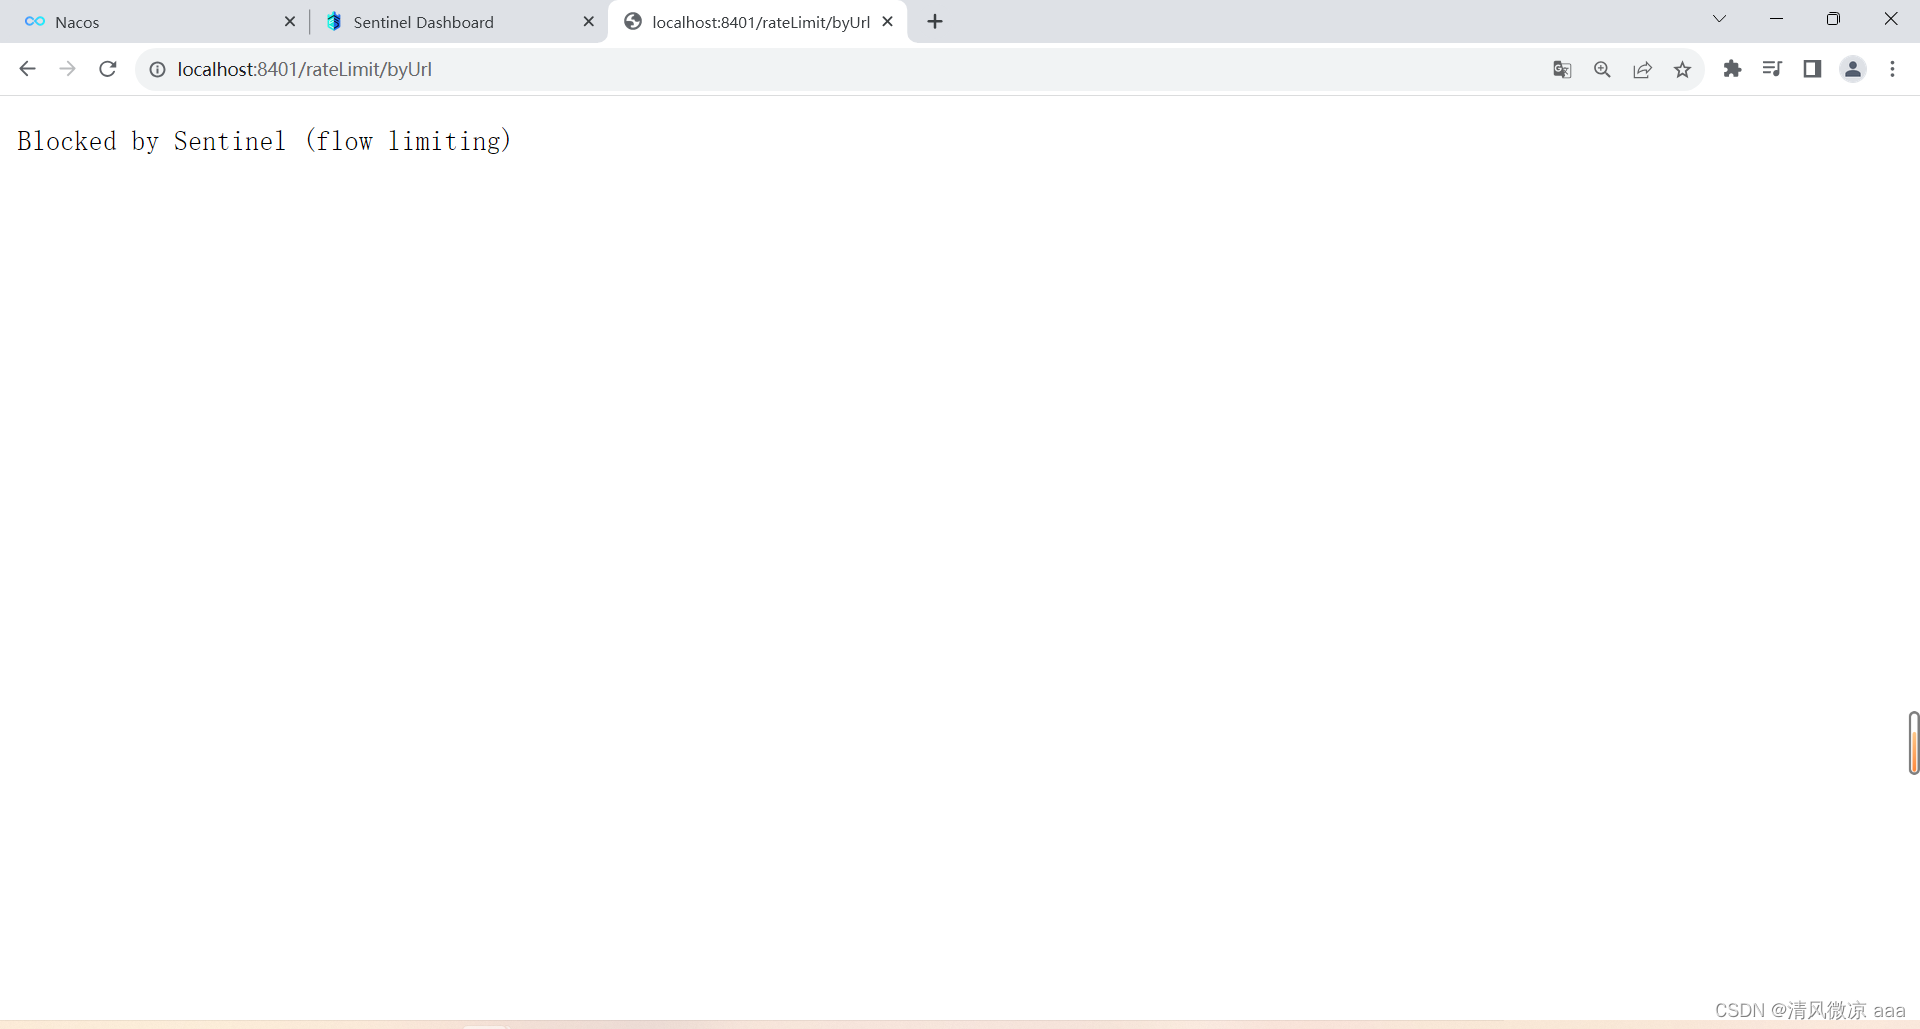
19.8.3 上面兜底方案带来的问题
- 系统默认的,没有体现我们自己的业务要求。
- 依照现有条件,我们自定义的处理方法又和业务代码耦合在一块,不直观。
- 每个业务方法都添加一个兜底的,那代码膨胀加剧。
- 全局统一的处理方法没有体现。
19.8.4 客户自定义限流处理逻辑
- 创建CustomerBlockHandler类用于自定义限流处理逻辑
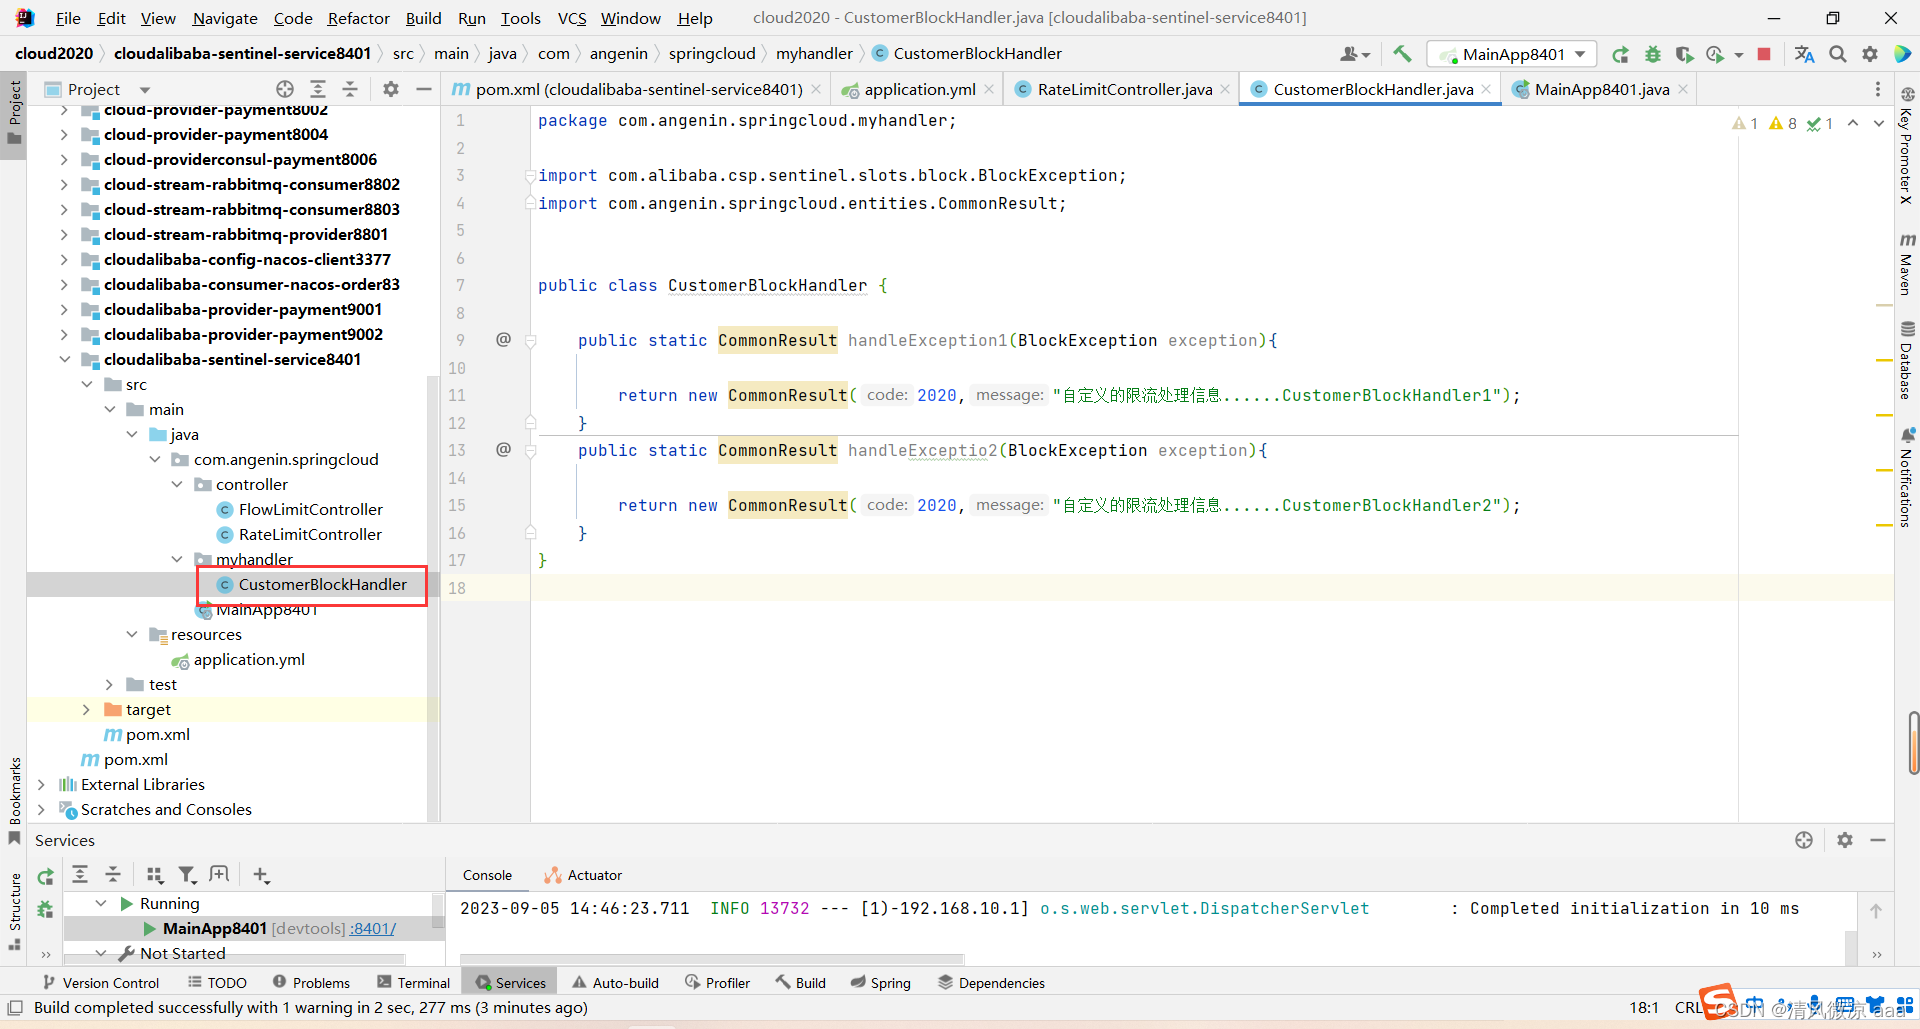
package com.angenin.springcloud.myhandler;import com.alibaba.csp.sentinel.slots.block.BlockException;
import com.angenin.springcloud.entities.CommonResult;public class CustomerBlockHandler {public static CommonResult handleException1(BlockException exception){return new CommonResult(2020,"自定义的限流处理信息......CustomerBlockHandler1");}public static CommonResult handleExceptio2(BlockException exception){return new CommonResult(2020,"自定义的限流处理信息......CustomerBlockHandler2");}
}- RateLimitController
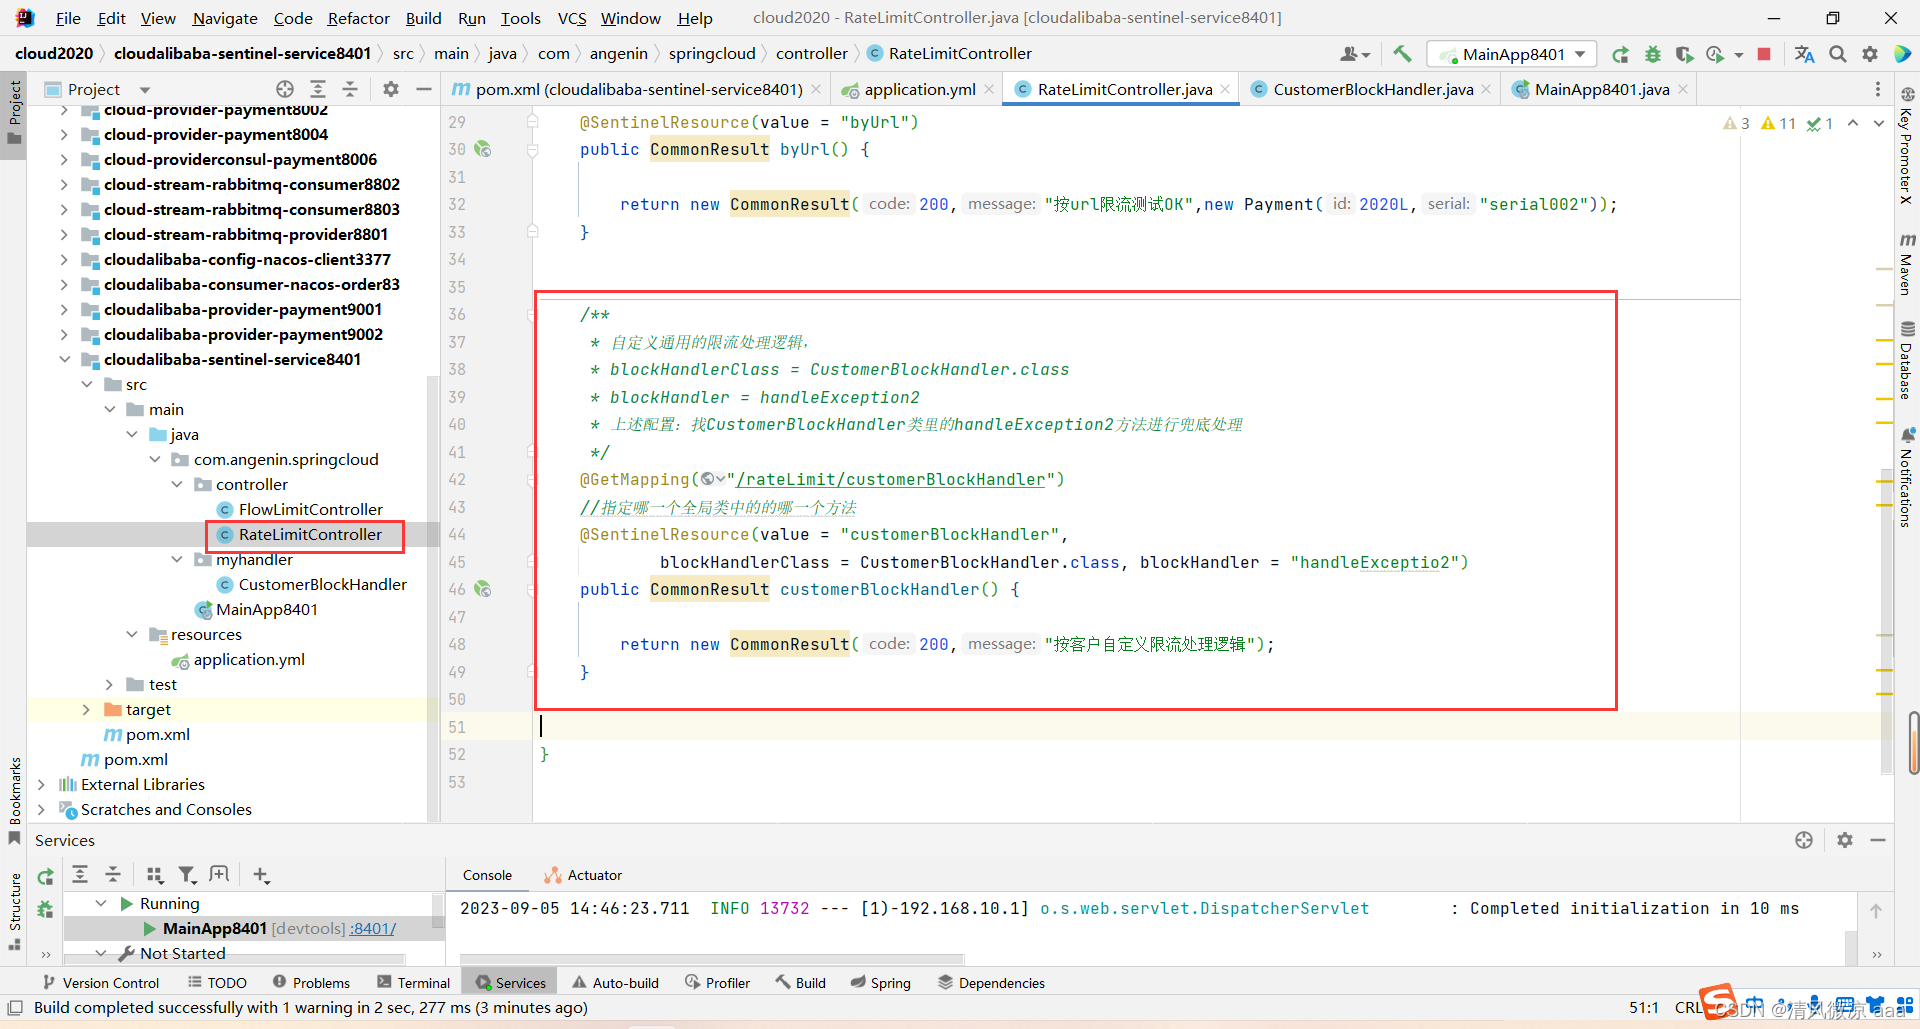
/*** 自定义通用的限流处理逻辑,* blockHandlerClass = CustomerBlockHandler.class* blockHandler = handleException2* 上述配置:找CustomerBlockHandler类里的handleException2方法进行兜底处理*/@GetMapping("/rateLimit/customerBlockHandler")//指定哪一个全局类中的的哪一个方法@SentinelResource(value = "customerBlockHandler",blockHandlerClass = CustomerBlockHandler.class, blockHandler = "handleExceptio2")public CommonResult customerBlockHandler() {return new CommonResult(200,"按客户自定义限流处理逻辑");}
-
启动微服务后先调用一次:http://localhost:8401/rateLimit/customerBlockHandler
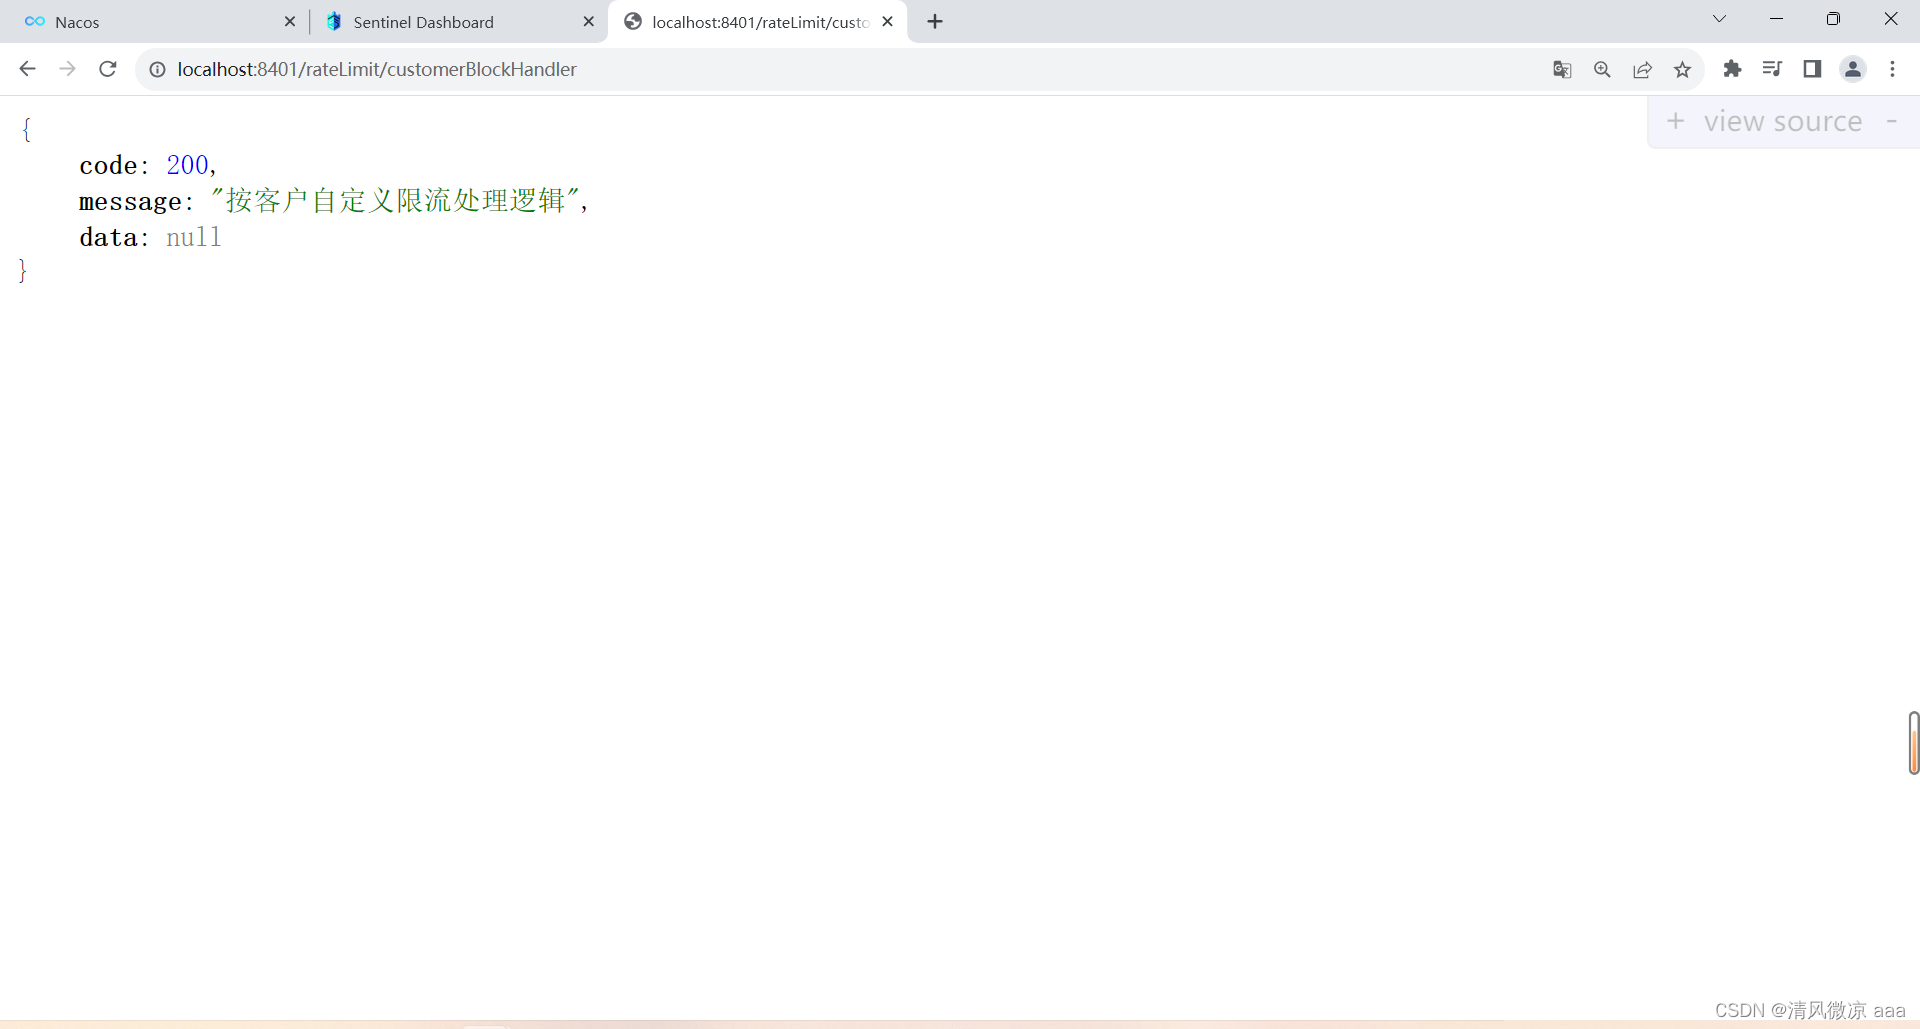
-
Sentinel控制台配置
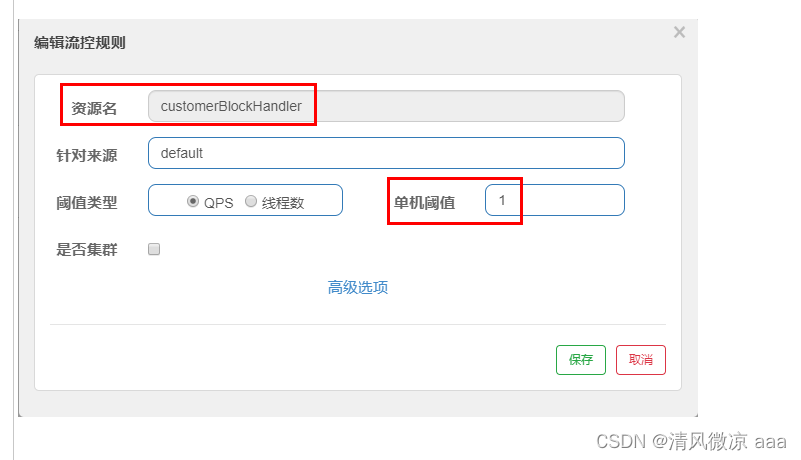
-
多次刷新后我们自定义的出来了
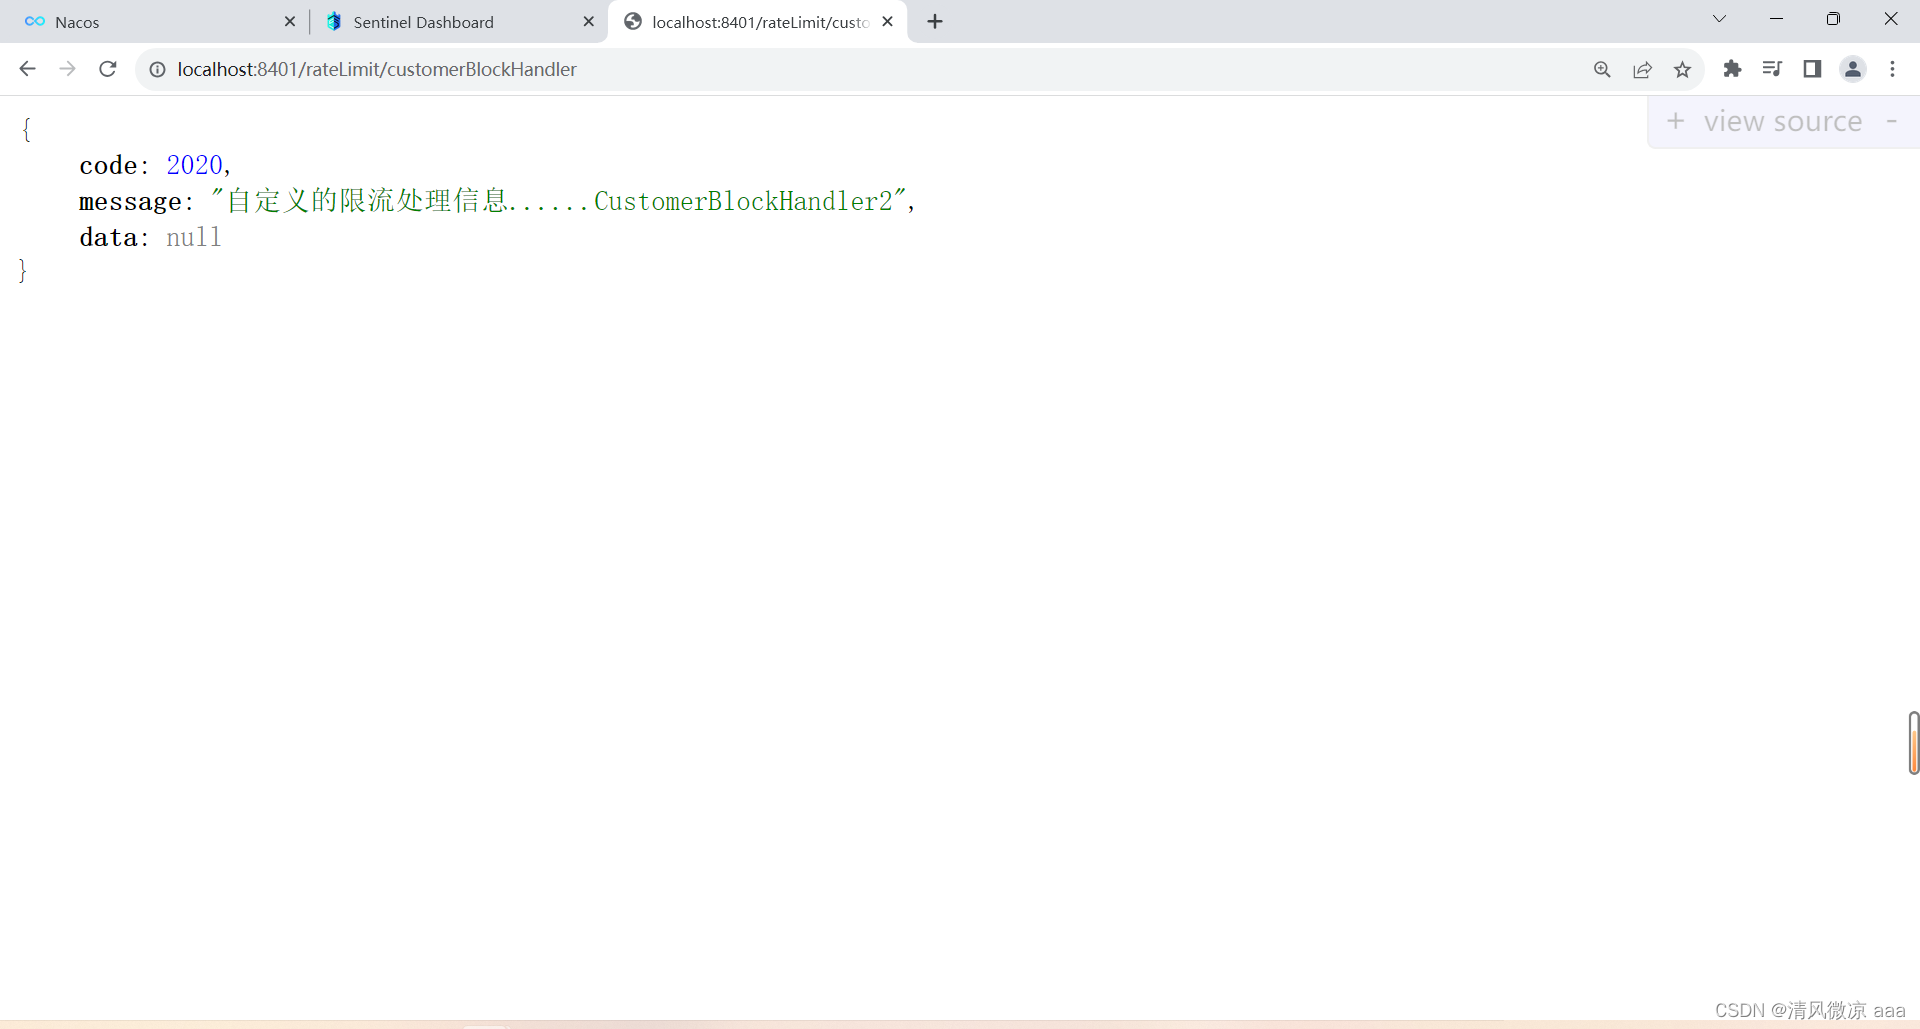
-
进一步说明
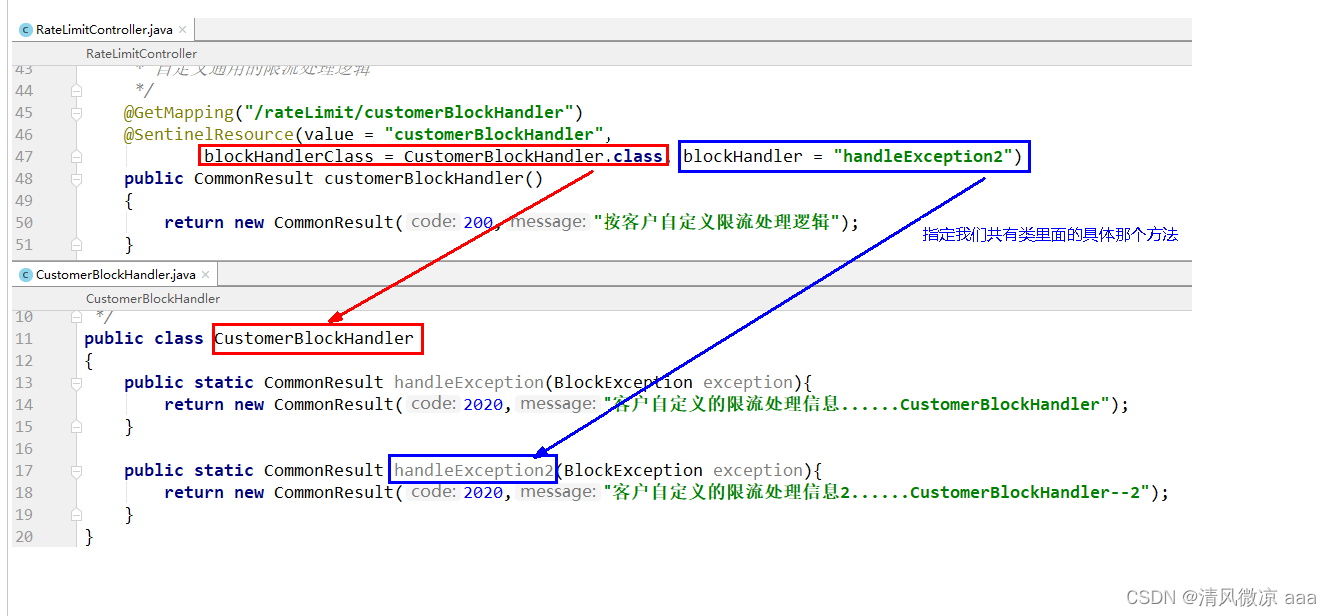
19.8.5 更多注解属性说明
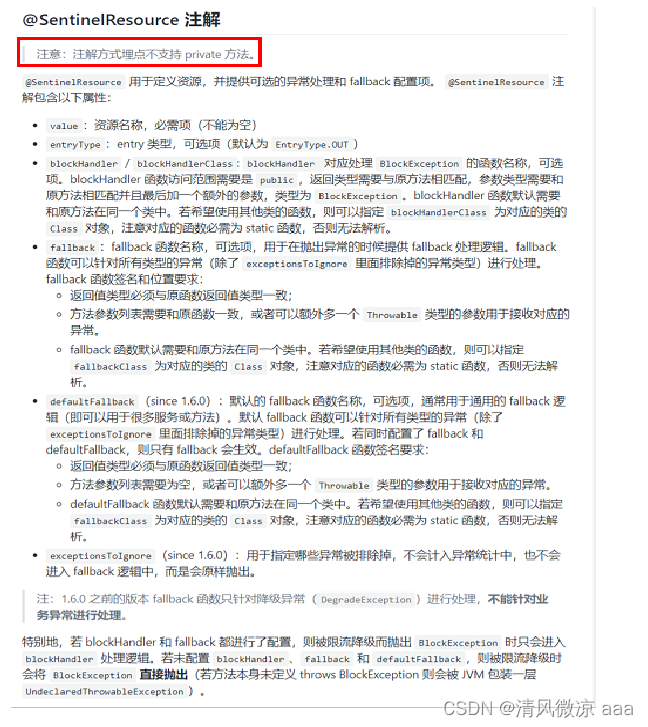
-
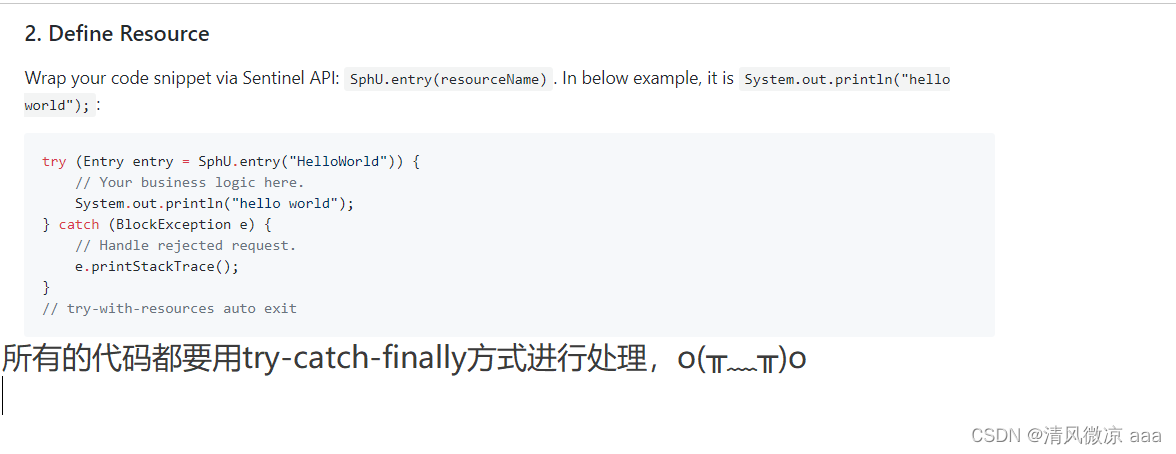
多说一句:除了默认的系统提示,和使用注解编写自定义提示外,他还支持使用代码的方式编写自定义提示规则。
-
Sentinel主要有三个核心Api
- SphU定义资源
- Tracer定义统计
- ContextUtil定义了上下文
19.9 服务熔断功能
- sentinel整合ribbon+openFeign+fallback
19.9.1 Ribbon系列
- 启动nacos和sentinel
- 结构

1)提供者9003/9004
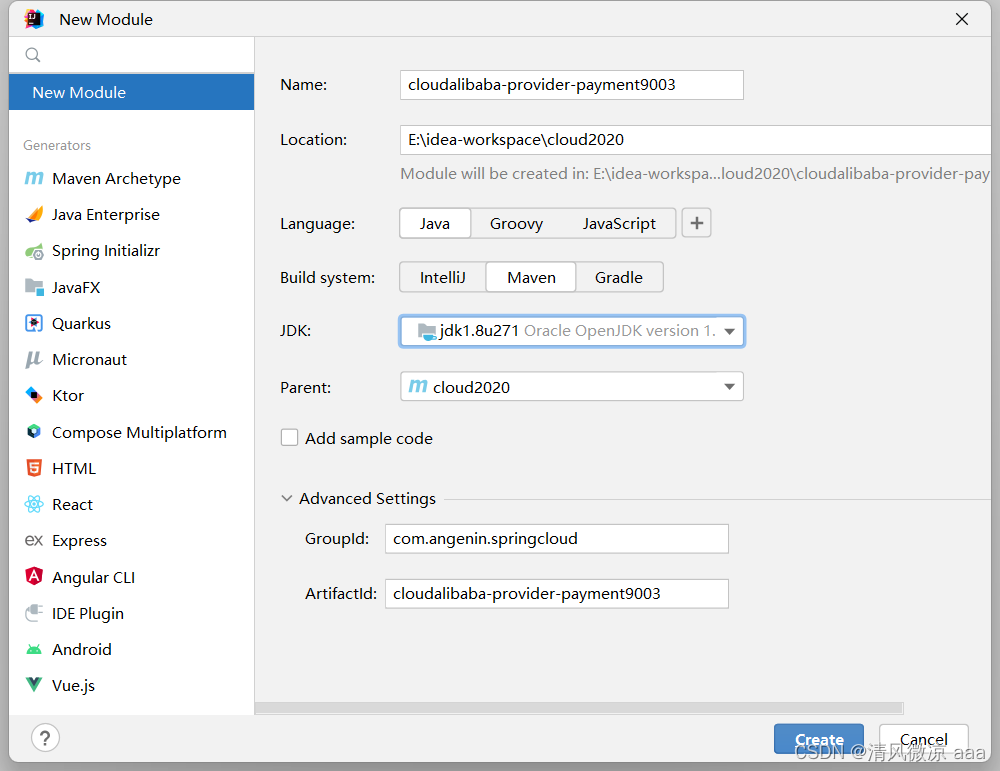
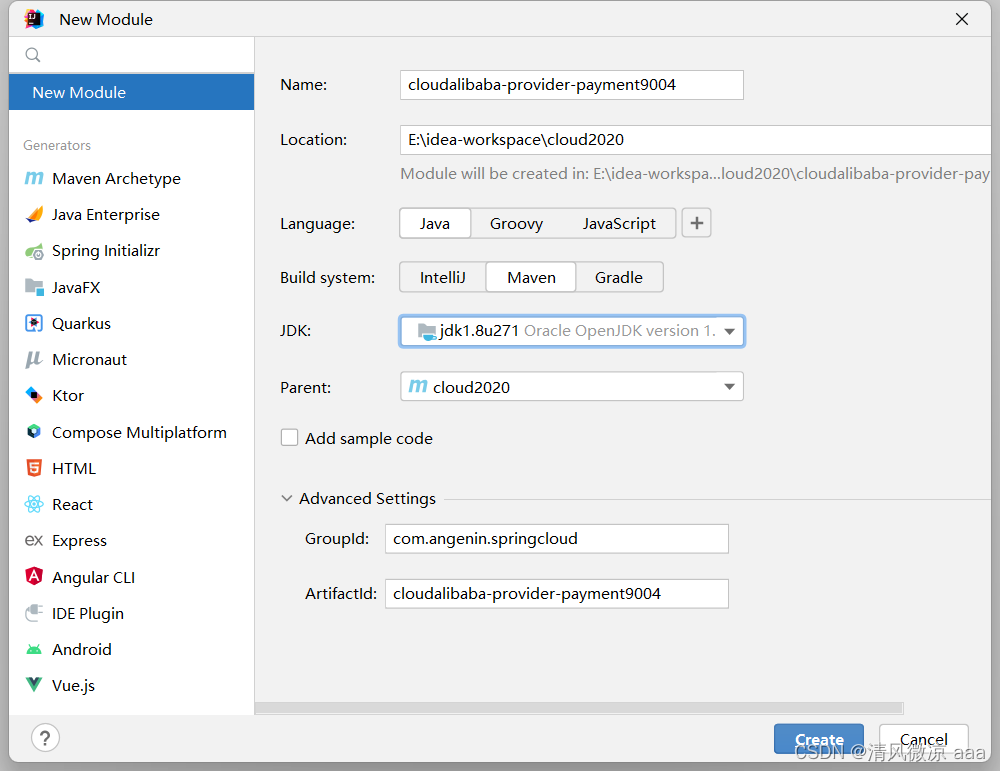
-
新建cloudalibaba-provider-payment9003/9004两个一样的做法
-
POM
<?xml version="1.0" encoding="UTF-8"?>
<project xmlns="http://maven.apache.org/POM/4.0.0"xmlns:xsi="http://www.w3.org/2001/XMLSchema-instance"xsi:schemaLocation="http://maven.apache.org/POM/4.0.0 http://maven.apache.org/xsd/maven-4.0.0.xsd"><parent><artifactId>cloud2020</artifactId><groupId>com.angenin.springcloud</groupId><version>1.0-SNAPSHOT</version></parent><modelVersion>4.0.0</modelVersion><artifactId>cloudalibaba-provider-payment9003</artifactId><properties><maven.compiler.source>8</maven.compiler.source><maven.compiler.target>8</maven.compiler.target></properties><dependencies><!--SpringCloud ailibaba nacos --><dependency><groupId>com.alibaba.cloud</groupId><artifactId>spring-cloud-starter-alibaba-nacos-discovery</artifactId></dependency><dependency><!-- 引入自己定义的api通用包,可以使用Payment支付Entity --><groupId>com.angenin.springcloud</groupId><artifactId>cloud-api-commons</artifactId><version>${project.version}</version></dependency><!-- SpringBoot整合Web组件 --><dependency><groupId>org.springframework.boot</groupId><artifactId>spring-boot-starter-web</artifactId></dependency><dependency><groupId>org.springframework.boot</groupId><artifactId>spring-boot-starter-actuator</artifactId></dependency><!--日常通用jar包配置--><dependency><groupId>org.springframework.boot</groupId><artifactId>spring-boot-devtools</artifactId><scope>runtime</scope><optional>true</optional></dependency><dependency><groupId>org.projectlombok</groupId><artifactId>lombok</artifactId><optional>true</optional></dependency><dependency><groupId>org.springframework.boot</groupId><artifactId>spring-boot-starter-test</artifactId><scope>test</scope></dependency></dependencies></project>
- YML:记得修改不同的端口号
server:port: 9003spring:application:name: nacos-payment-providercloud:nacos:discovery:server-addr: localhost:8848 #配置Nacos地址management:endpoints:web:exposure:include: '*'- 主启动
package com.angenin.springcloud;import org.springframework.boot.SpringApplication;
import org.springframework.boot.autoconfigure.SpringBootApplication;
import org.springframework.cloud.client.discovery.EnableDiscoveryClient;@SpringBootApplication
@EnableDiscoveryClient
public class PaymentMain9003
{public static void main(String[] args) {SpringApplication.run(PaymentMain9003.class, args);}
}
- 业务类
package com.angenin.springcloud.controller;import com.angenin.springcloud.entities.CommonResult;
import com.angenin.springcloud.entities.Payment;
import org.springframework.beans.factory.annotation.Value;
import org.springframework.web.bind.annotation.GetMapping;
import org.springframework.web.bind.annotation.PathVariable;
import org.springframework.web.bind.annotation.RestController;import java.util.HashMap;@RestController
public class PaymentController {@Value("${server.port}")private String serverPort;public static HashMap hashMap = new HashMap();//模拟连接一个数据库static {hashMap.put(1L,new Payment(1L,"28a8c1e3bc2742d8848569891fb42181"));hashMap.put(2L,new Payment(2L,"bba8c1e3bc2742d8848569891ac32182"));hashMap.put(3L,new Payment(3L,"6ua8c1e3bc2742d8848569891xt92183"));}@GetMapping(value = "/paymentSQL/{id}")public CommonResult paymentSQL(@PathVariable("id") Long id) {Payment payment = (Payment)hashMap.get(id);CommonResult result = new CommonResult(200,"from mysql,serverPort: "+serverPort,payment);return result;}}- 结构
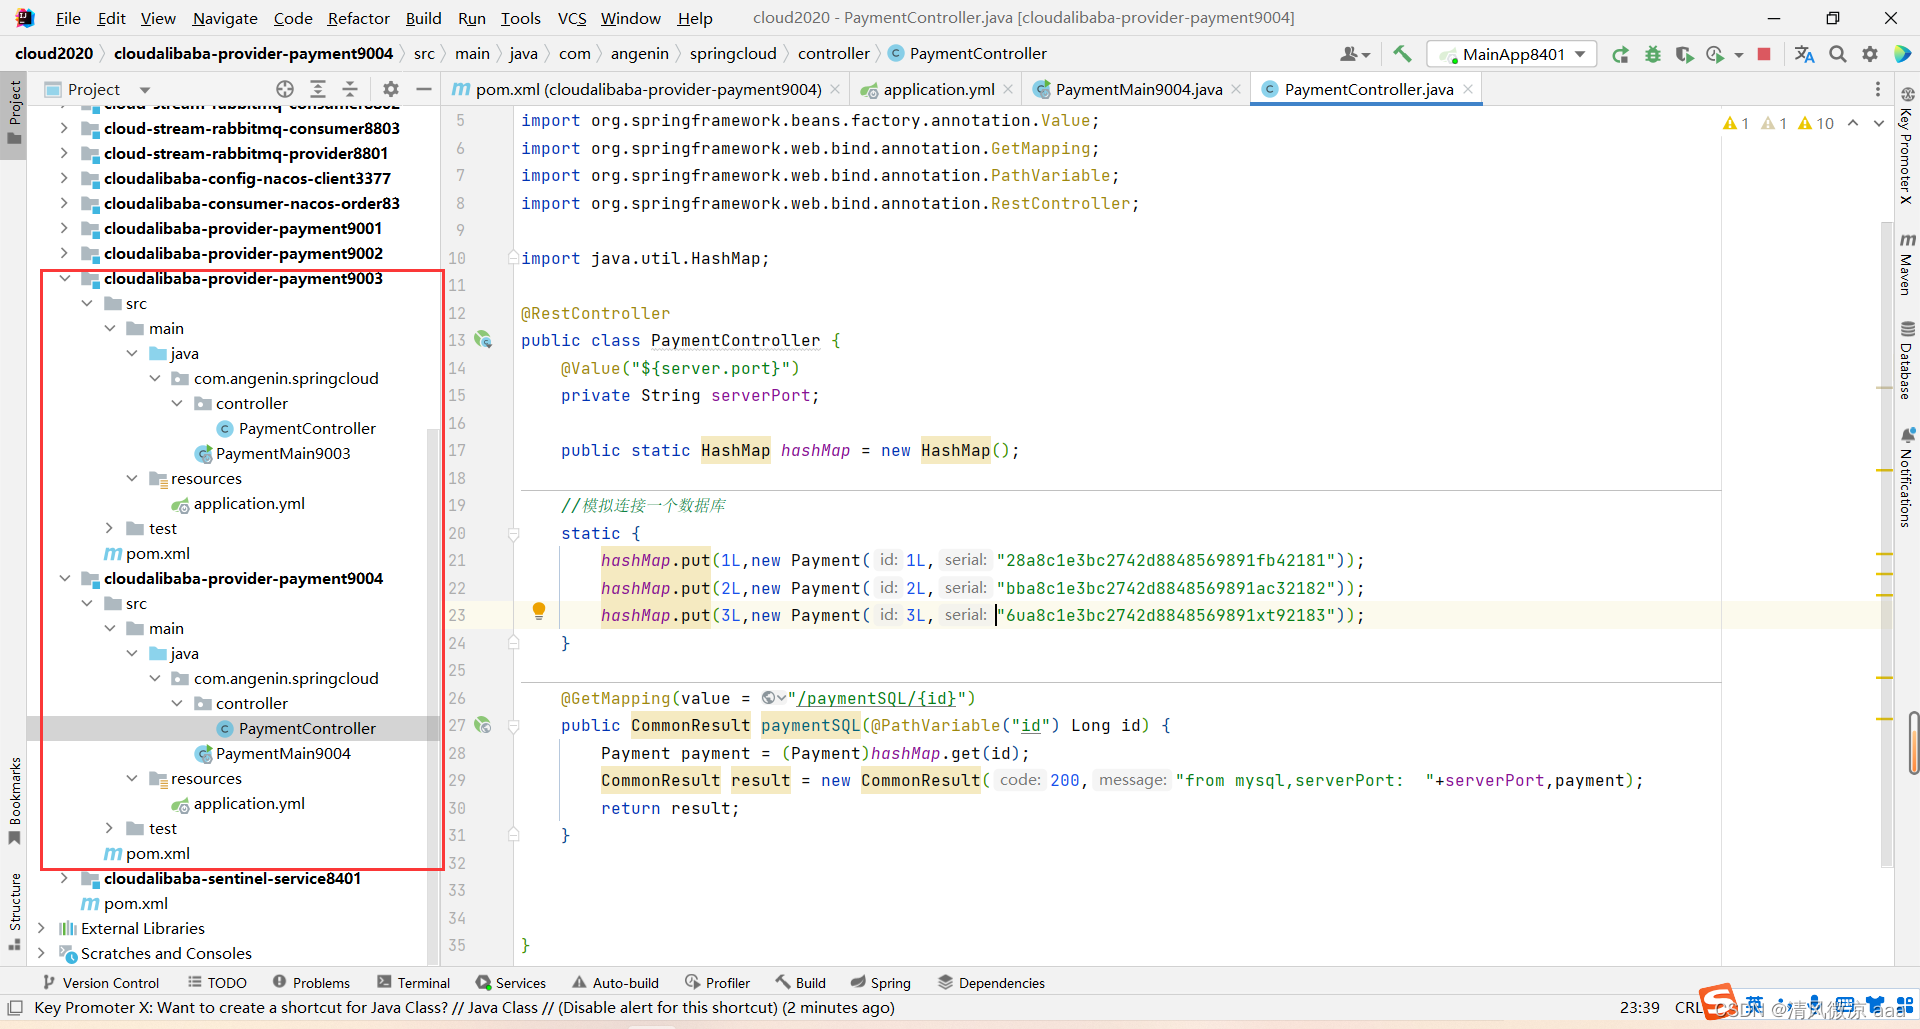
- 测试地址:http://localhost:9003/paymentSQL/1
- 测试地址:http://localhost:9004/paymentSQL/1
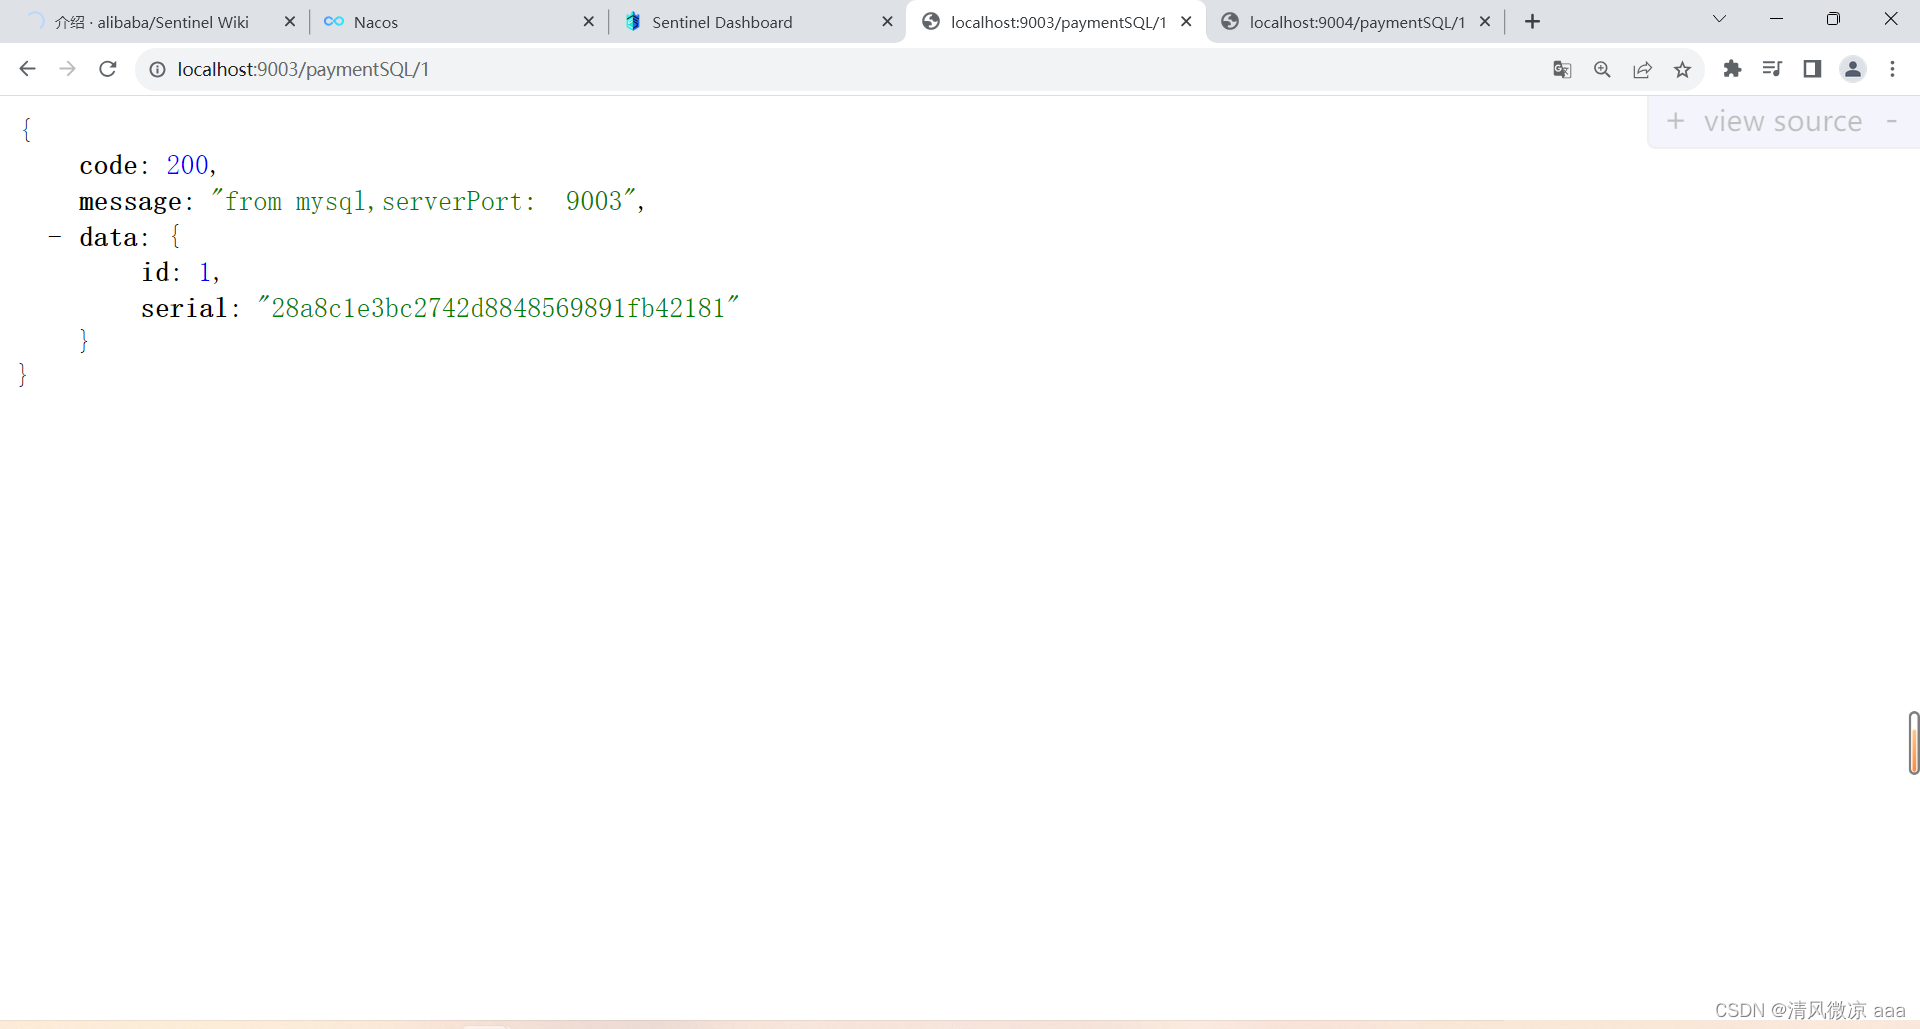
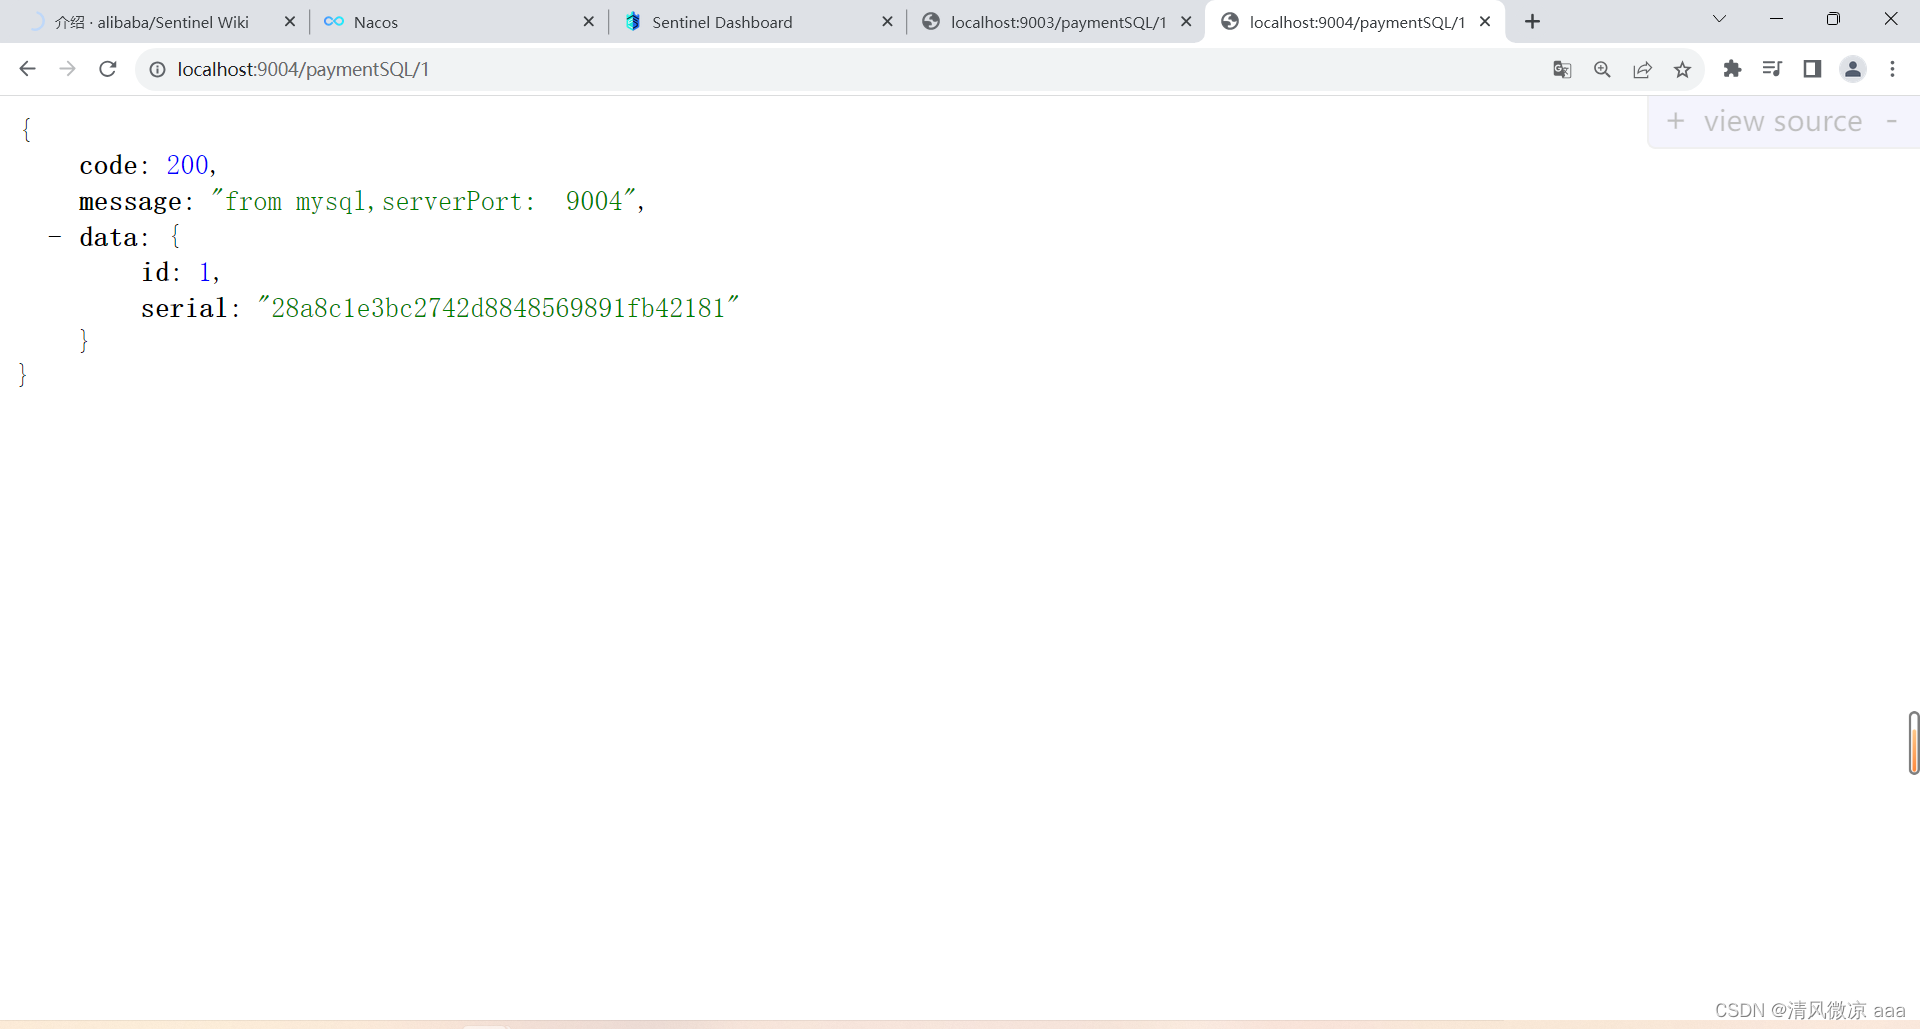
2)消费者84
-
新建cloudalibaba-consumer-nacos-order84
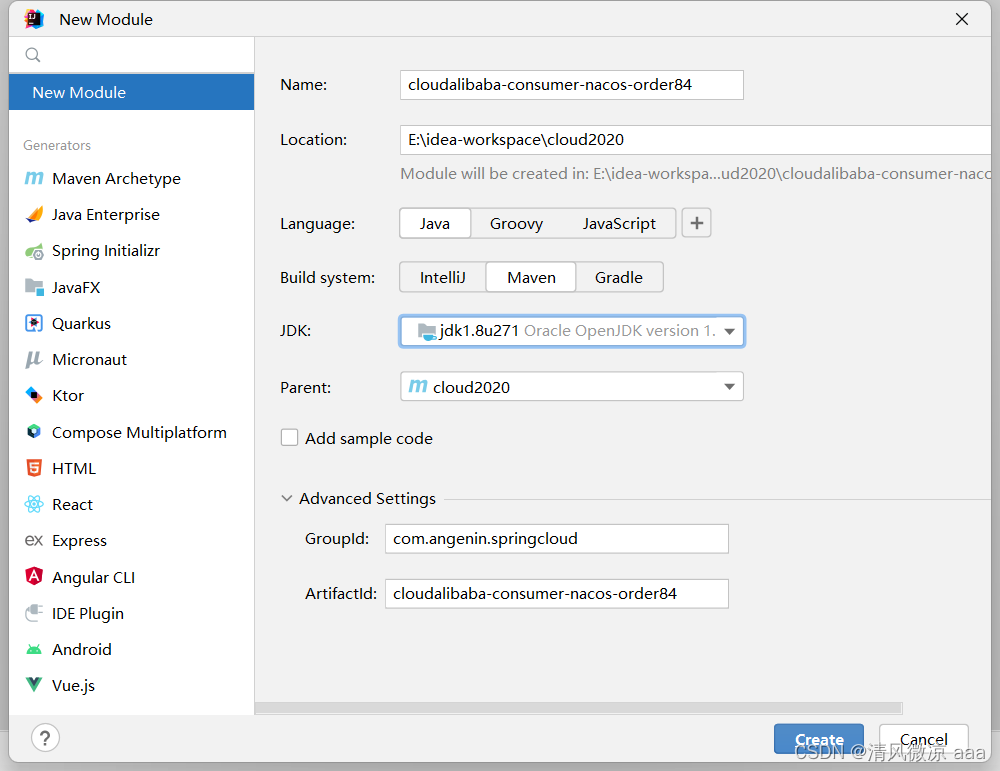
-
pom
<?xml version="1.0" encoding="UTF-8"?>
<project xmlns="http://maven.apache.org/POM/4.0.0"xmlns:xsi="http://www.w3.org/2001/XMLSchema-instance"xsi:schemaLocation="http://maven.apache.org/POM/4.0.0 http://maven.apache.org/xsd/maven-4.0.0.xsd"><parent><artifactId>cloud2020</artifactId><groupId>com.angenin.springcloud</groupId><version>1.0-SNAPSHOT</version></parent><modelVersion>4.0.0</modelVersion><artifactId>cloudalibaba-consumer-nacos-order84</artifactId><properties><maven.compiler.source>8</maven.compiler.source><maven.compiler.target>8</maven.compiler.target></properties><dependencies><!--SpringCloud ailibaba nacos --><dependency><groupId>com.alibaba.cloud</groupId><artifactId>spring-cloud-starter-alibaba-nacos-discovery</artifactId></dependency><!--SpringCloud ailibaba sentinel --><dependency><groupId>com.alibaba.cloud</groupId><artifactId>spring-cloud-starter-alibaba-sentinel</artifactId></dependency><!-- 引入自己定义的api通用包,可以使用Payment支付Entity --><dependency><groupId>com.angenin.springcloud</groupId><artifactId>cloud-api-commons</artifactId><version>1.0-SNAPSHOT</version></dependency><!-- SpringBoot整合Web组件 --><dependency><groupId>org.springframework.boot</groupId><artifactId>spring-boot-starter-web</artifactId></dependency><dependency><groupId>org.springframework.boot</groupId><artifactId>spring-boot-starter-actuator</artifactId></dependency><!--日常通用jar包配置--><dependency><groupId>org.springframework.boot</groupId><artifactId>spring-boot-devtools</artifactId><scope>runtime</scope><optional>true</optional></dependency><dependency><groupId>org.projectlombok</groupId><artifactId>lombok</artifactId><optional>true</optional></dependency><dependency><groupId>org.springframework.boot</groupId><artifactId>spring-boot-starter-test</artifactId><scope>test</scope></dependency></dependencies></project>
- yml
server:port: 84spring:application:name: nacos-order-consumercloud:nacos:discovery:server-addr: localhost:8848sentinel:transport:#配置Sentinel dashboard地址dashboard: localhost:8080#默认8719端口,假如被占用会自动从8719开始依次+1扫描,直至找到未被占用的端口port: 8719#消费者将要去访问的微服务名称(注册成功进nacos的微服务提供者)
service-url:nacos-user-service: http://nacos-payment-provider- 主启动
package com.angenin.springcloud;import org.springframework.boot.SpringApplication;
import org.springframework.boot.autoconfigure.SpringBootApplication;
import org.springframework.cloud.client.discovery.EnableDiscoveryClient;@EnableDiscoveryClient
@SpringBootApplication
public class OrderNacosMain84 {public static void main(String[] args) {SpringApplication.run(OrderNacosMain84.class, args);}
}- 结构
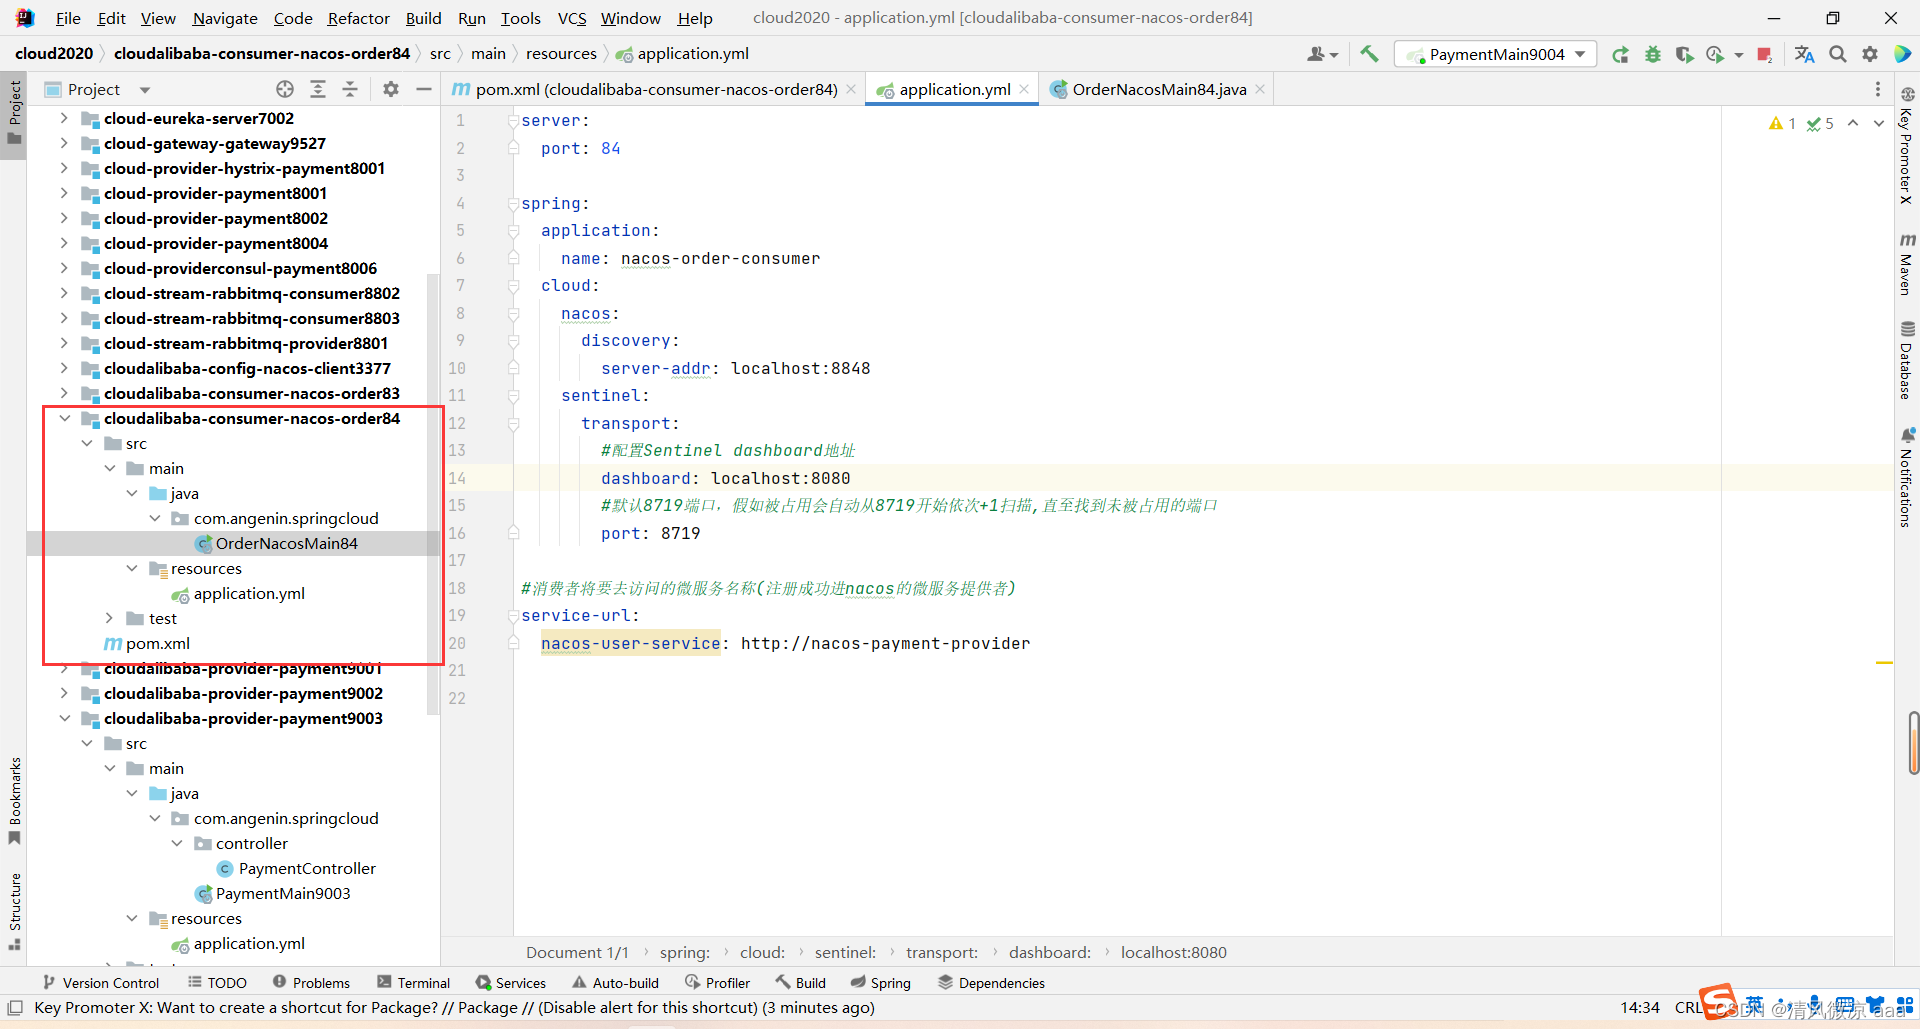
- 业务类详情查看下面
- 修改后请重启微服务
- 热部署对java代码级生效及时
- 对@SentinelResource注解内属性,有时效果不好
- 目的
- fallback管运行异常
- blockHandler管配置违规
3)配置类:ApplicationContextConfig
- ApplicationContextConfig
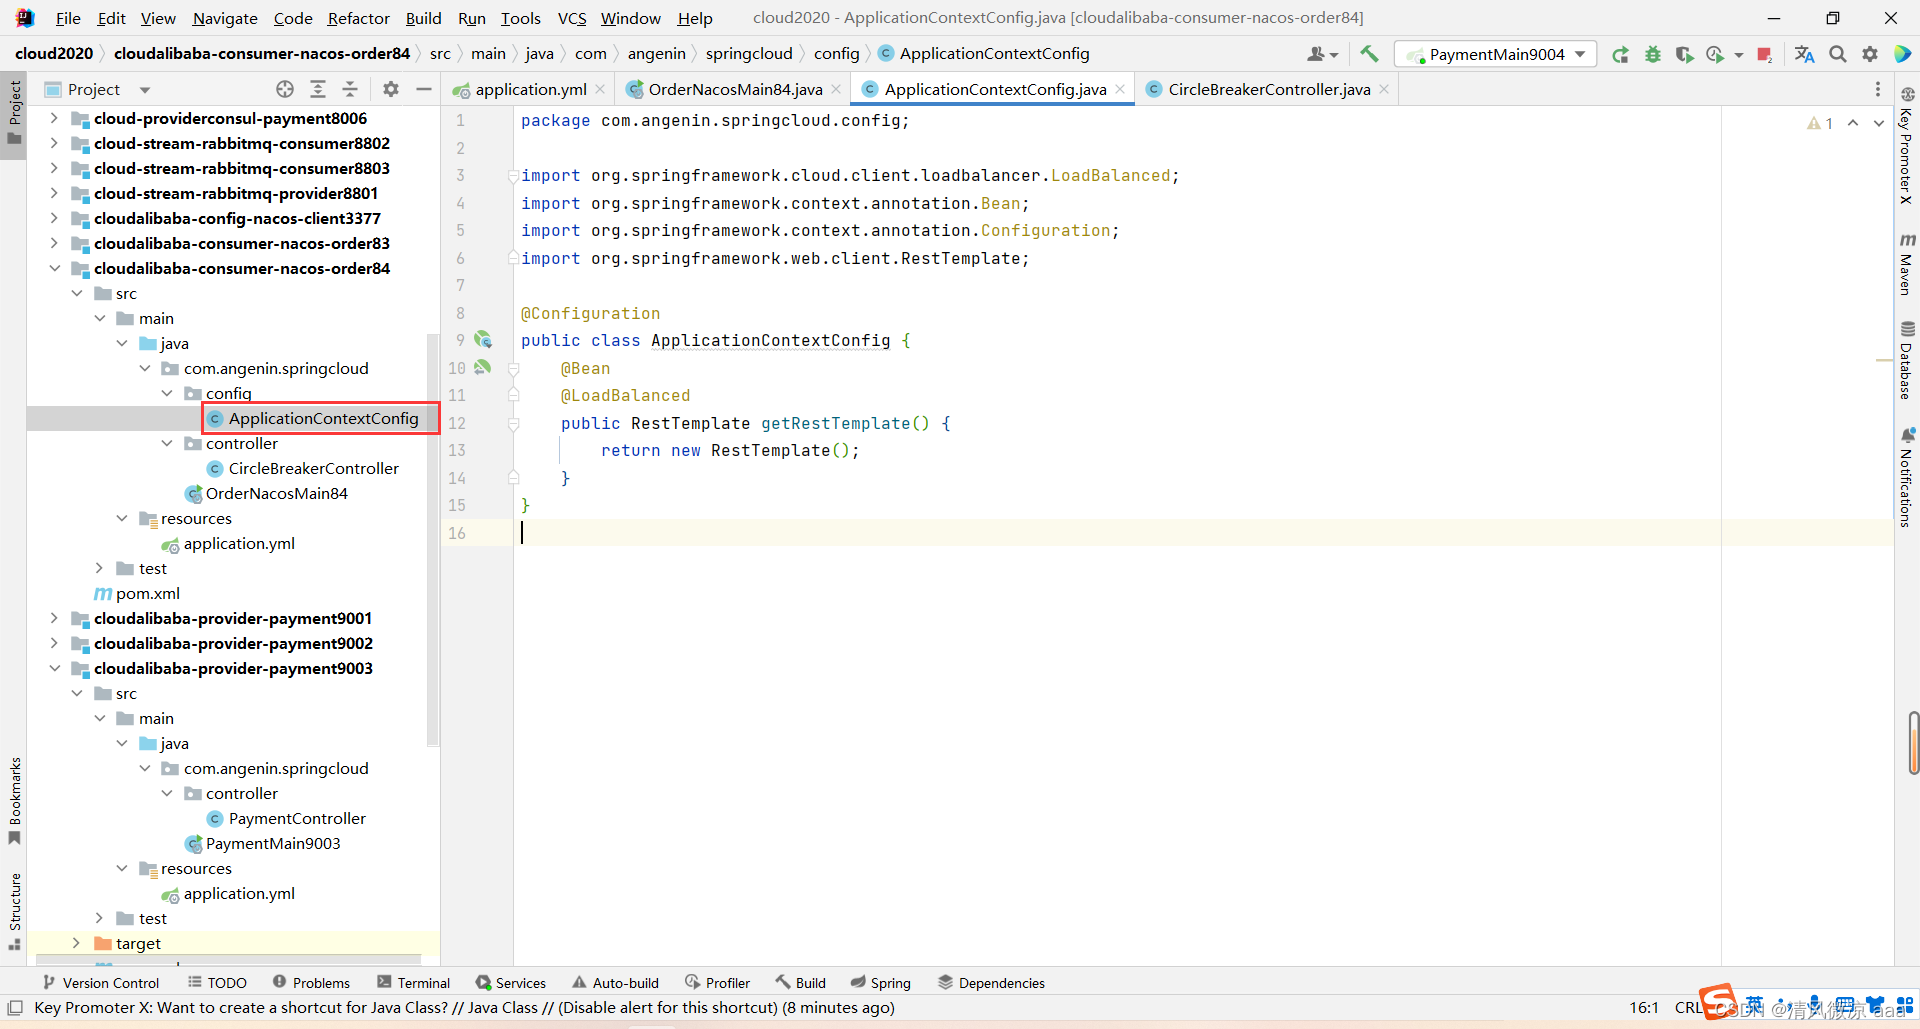
package com.angenin.springcloud.config;import org.springframework.cloud.client.loadbalancer.LoadBalanced;
import org.springframework.context.annotation.Bean;
import org.springframework.context.annotation.Configuration;
import org.springframework.web.client.RestTemplate;@Configuration
public class ApplicationContextConfig {@Bean@LoadBalancedpublic RestTemplate getRestTemplate() {return new RestTemplate();}
}
4)业务类 CircleBreakerController :没有任何配置
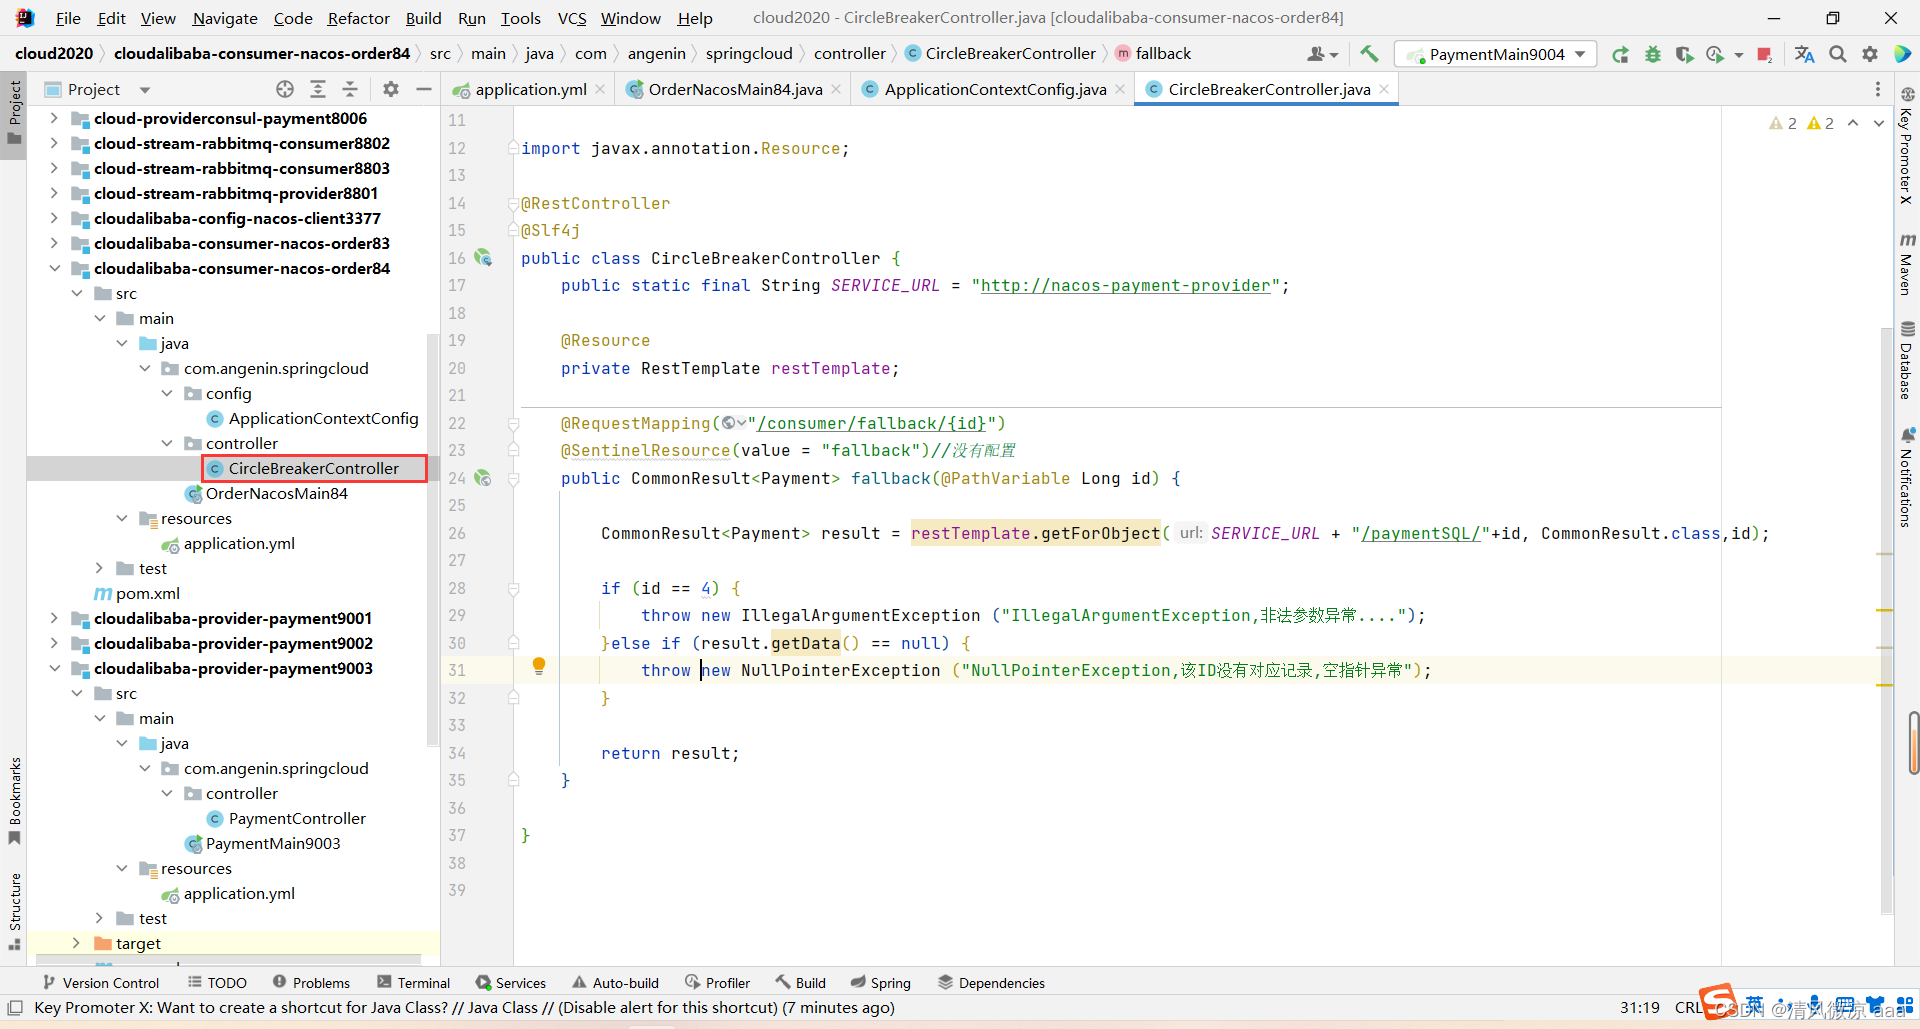
package com.angenin.springcloud.controller;import com.alibaba.csp.sentinel.annotation.SentinelResource;
import com.angenin.springcloud.entities.CommonResult;
import com.angenin.springcloud.entities.Payment;
import lombok.extern.slf4j.Slf4j;
import org.springframework.web.bind.annotation.PathVariable;
import org.springframework.web.bind.annotation.RequestMapping;
import org.springframework.web.bind.annotation.RestController;
import org.springframework.web.client.RestTemplate;import javax.annotation.Resource;@RestController
@Slf4j
public class CircleBreakerController {public static final String SERVICE_URL = "http://nacos-payment-provider";@Resourceprivate RestTemplate restTemplate;@RequestMapping("/consumer/fallback/{id}")@SentinelResource(value = "fallback")//没有配置public CommonResult<Payment> fallback(@PathVariable Long id) {CommonResult<Payment> result = restTemplate.getForObject(SERVICE_URL + "/paymentSQL/"+id, CommonResult.class,id);if (id == 4) {throw new IllegalArgumentException ("IllegalArgumentException,非法参数异常....");}else if (result.getData() == null) {throw new NullPointerException ("NullPointerException,该ID没有对应记录,空指针异常");}return result;}}- 测试
-
测试地址:http://localhost:84/consumer/fallback/1
通过84消费者可以以负载均衡轮训的方式,访问9003/9004
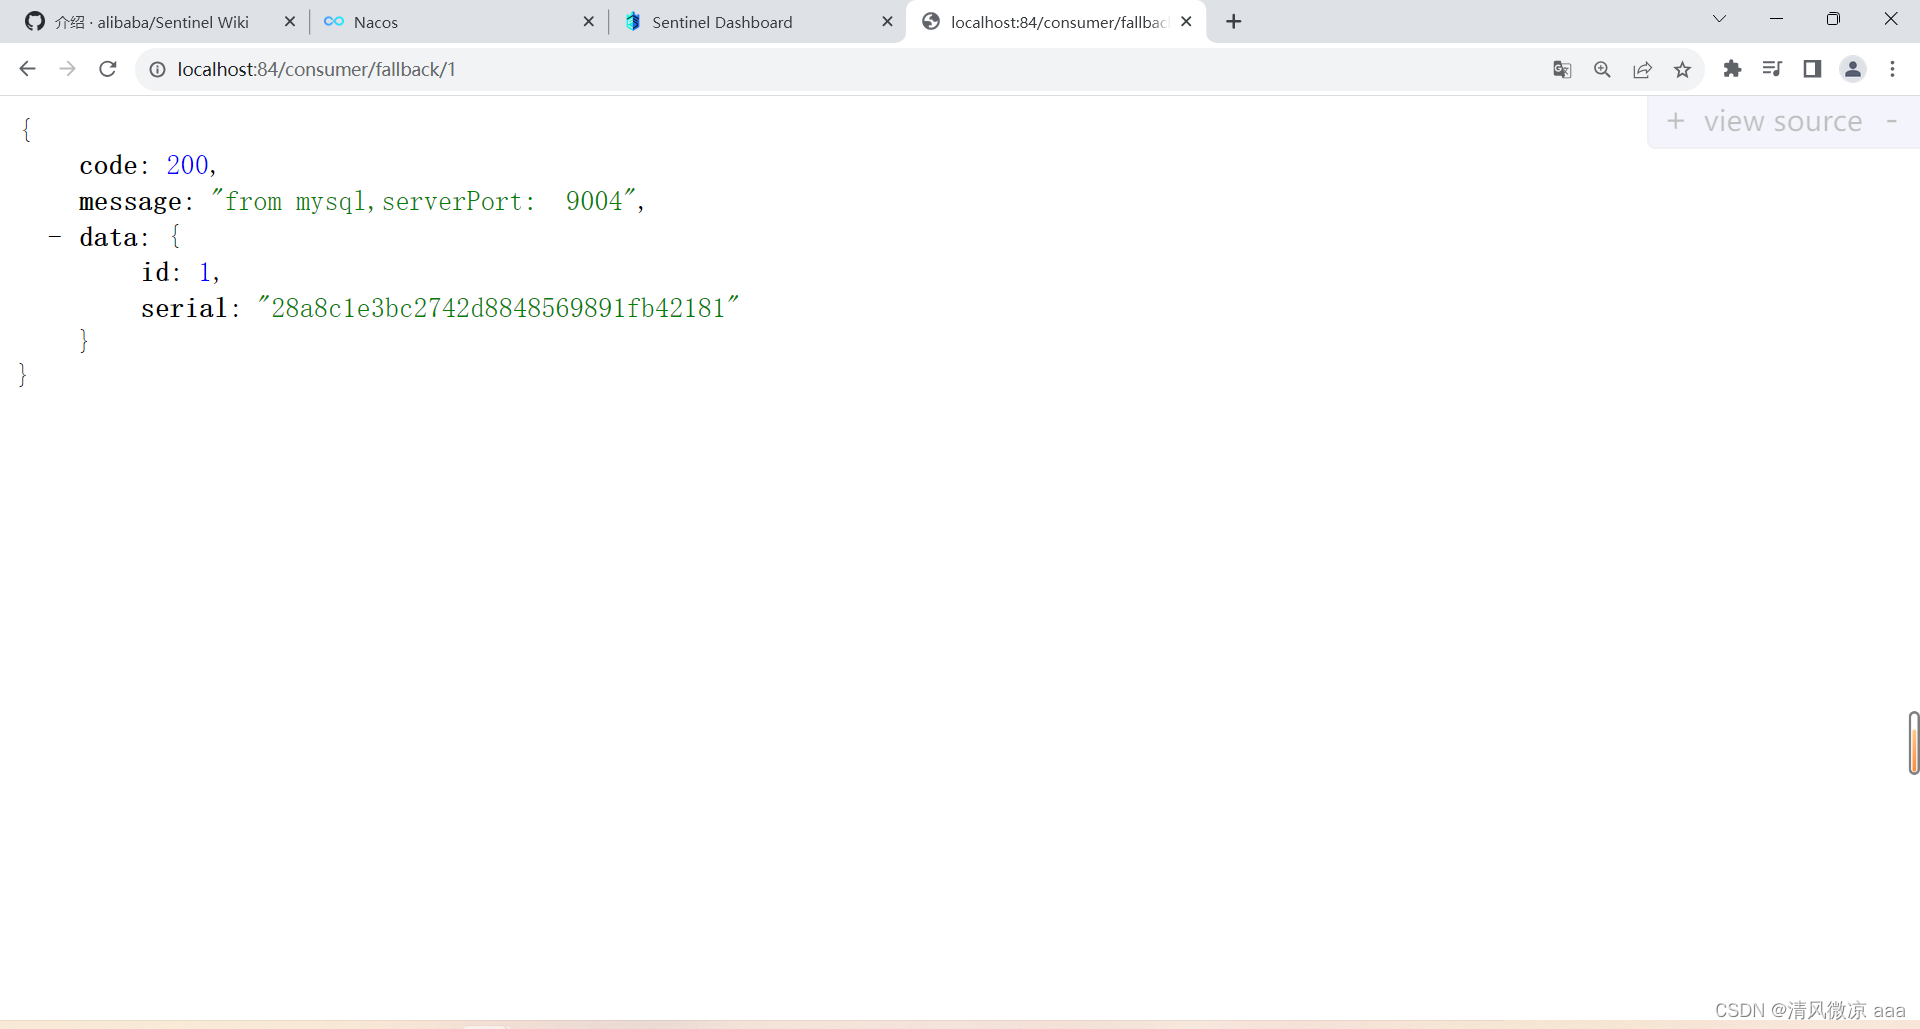
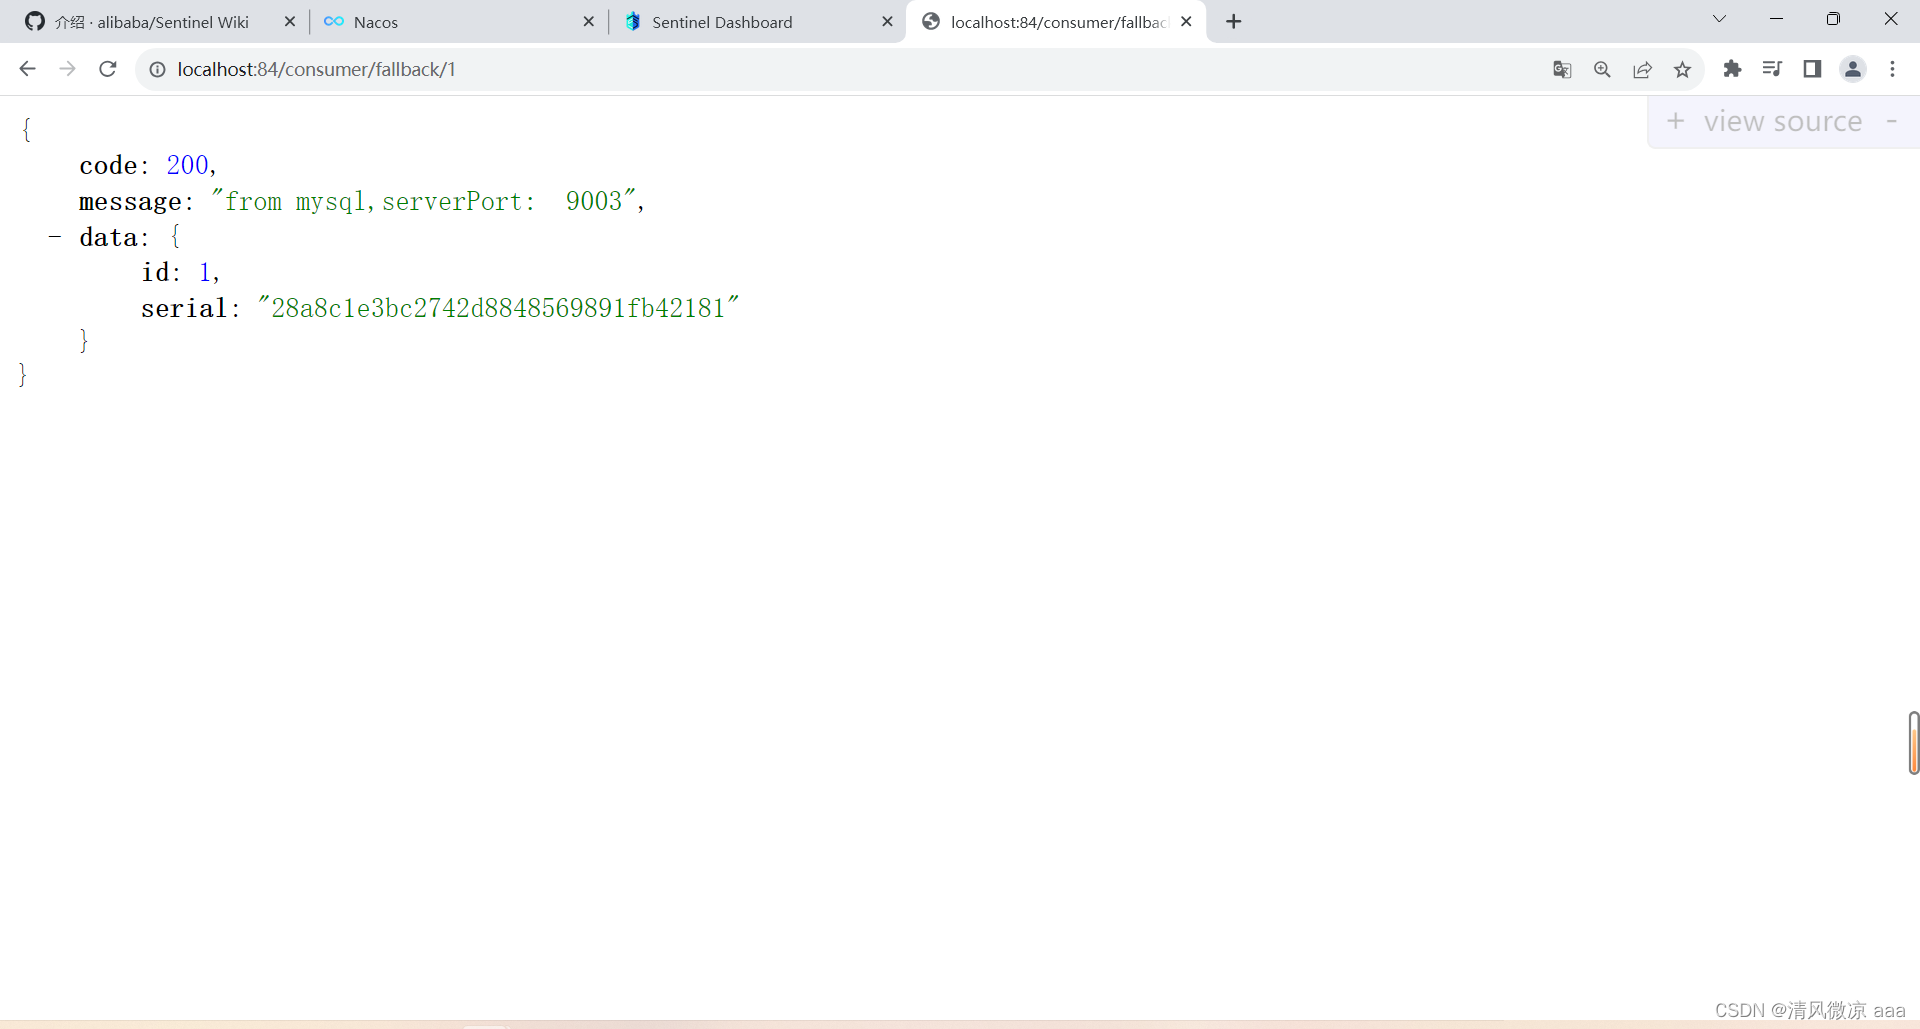
-
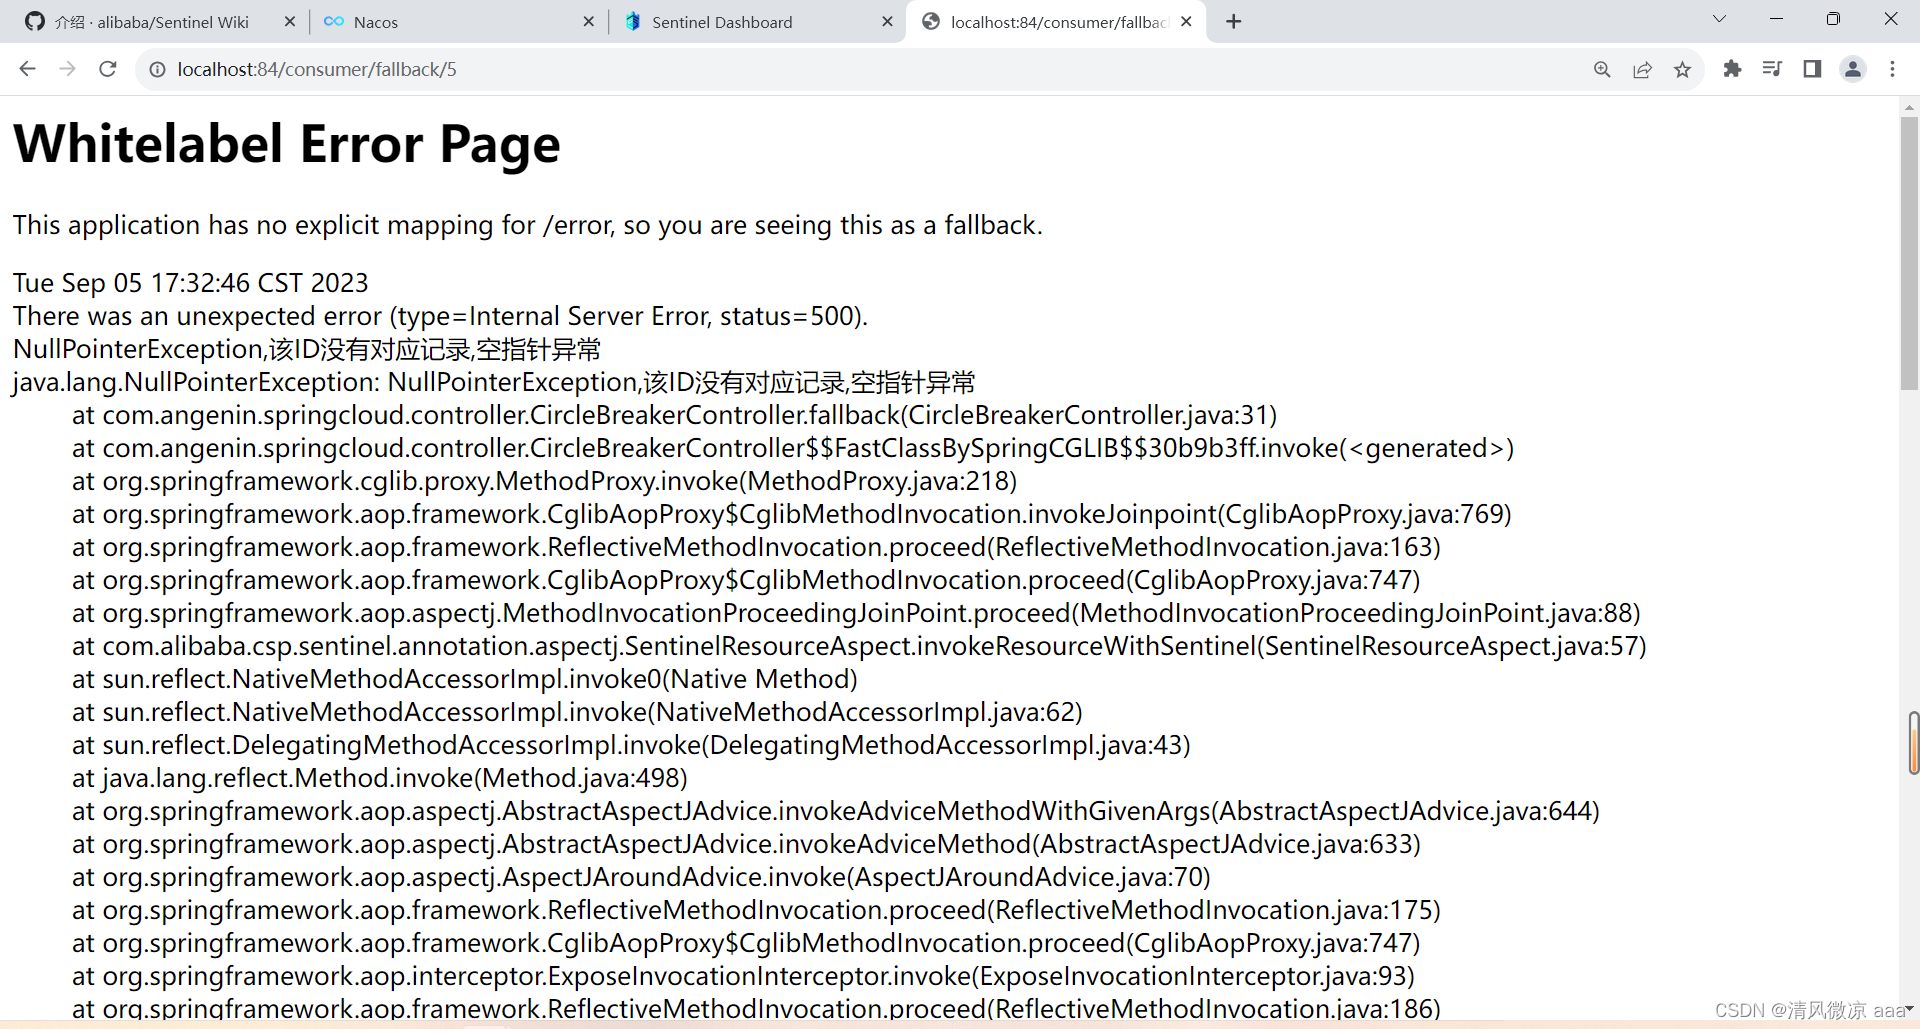
没有任何配置:给客户error页面,不友好(在控制层方法中设置的访问1、2、3正常,4、5异常)
-
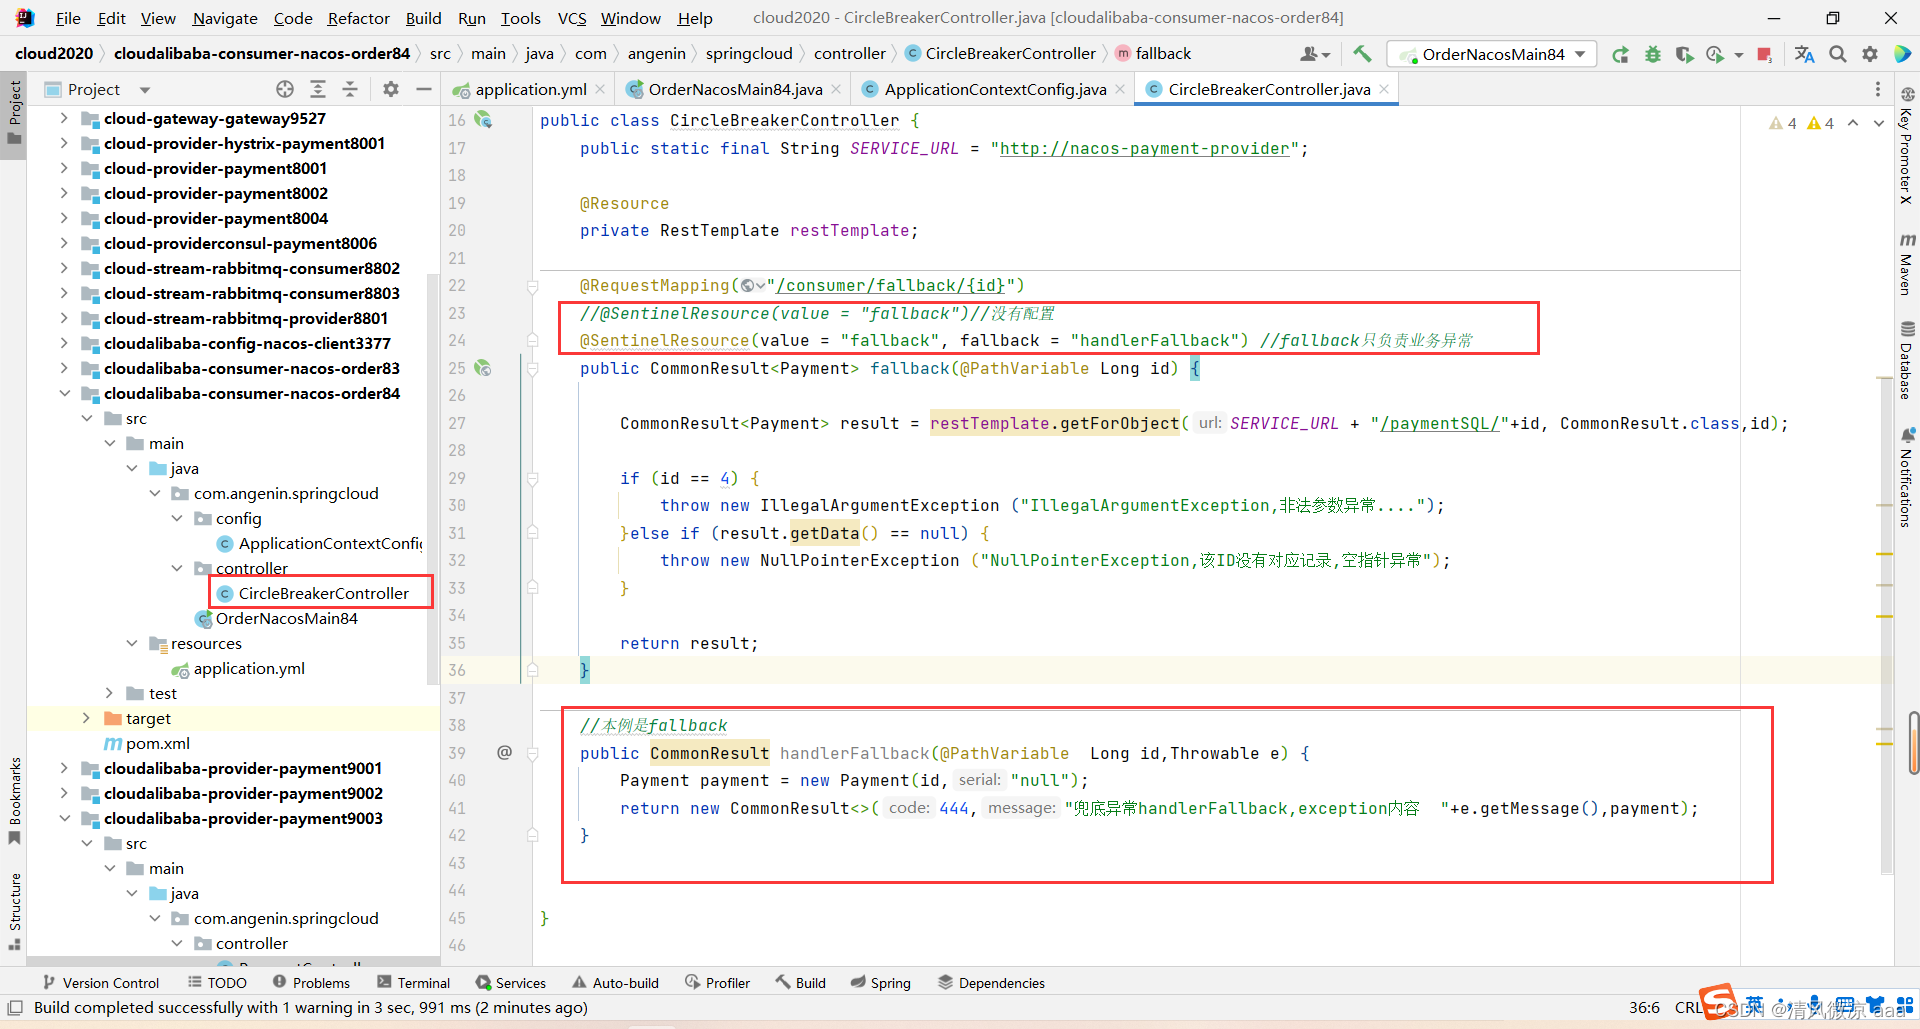
5)业务类 CircleBreakerController :只配置fallback
- 代码
package com.angenin.springcloud.controller;import com.alibaba.csp.sentinel.annotation.SentinelResource;
import com.angenin.springcloud.entities.CommonResult;
import com.angenin.springcloud.entities.Payment;
import lombok.extern.slf4j.Slf4j;
import org.springframework.web.bind.annotation.PathVariable;
import org.springframework.web.bind.annotation.RequestMapping;
import org.springframework.web.bind.annotation.RestController;
import org.springframework.web.client.RestTemplate;import javax.annotation.Resource;@RestController
@Slf4j
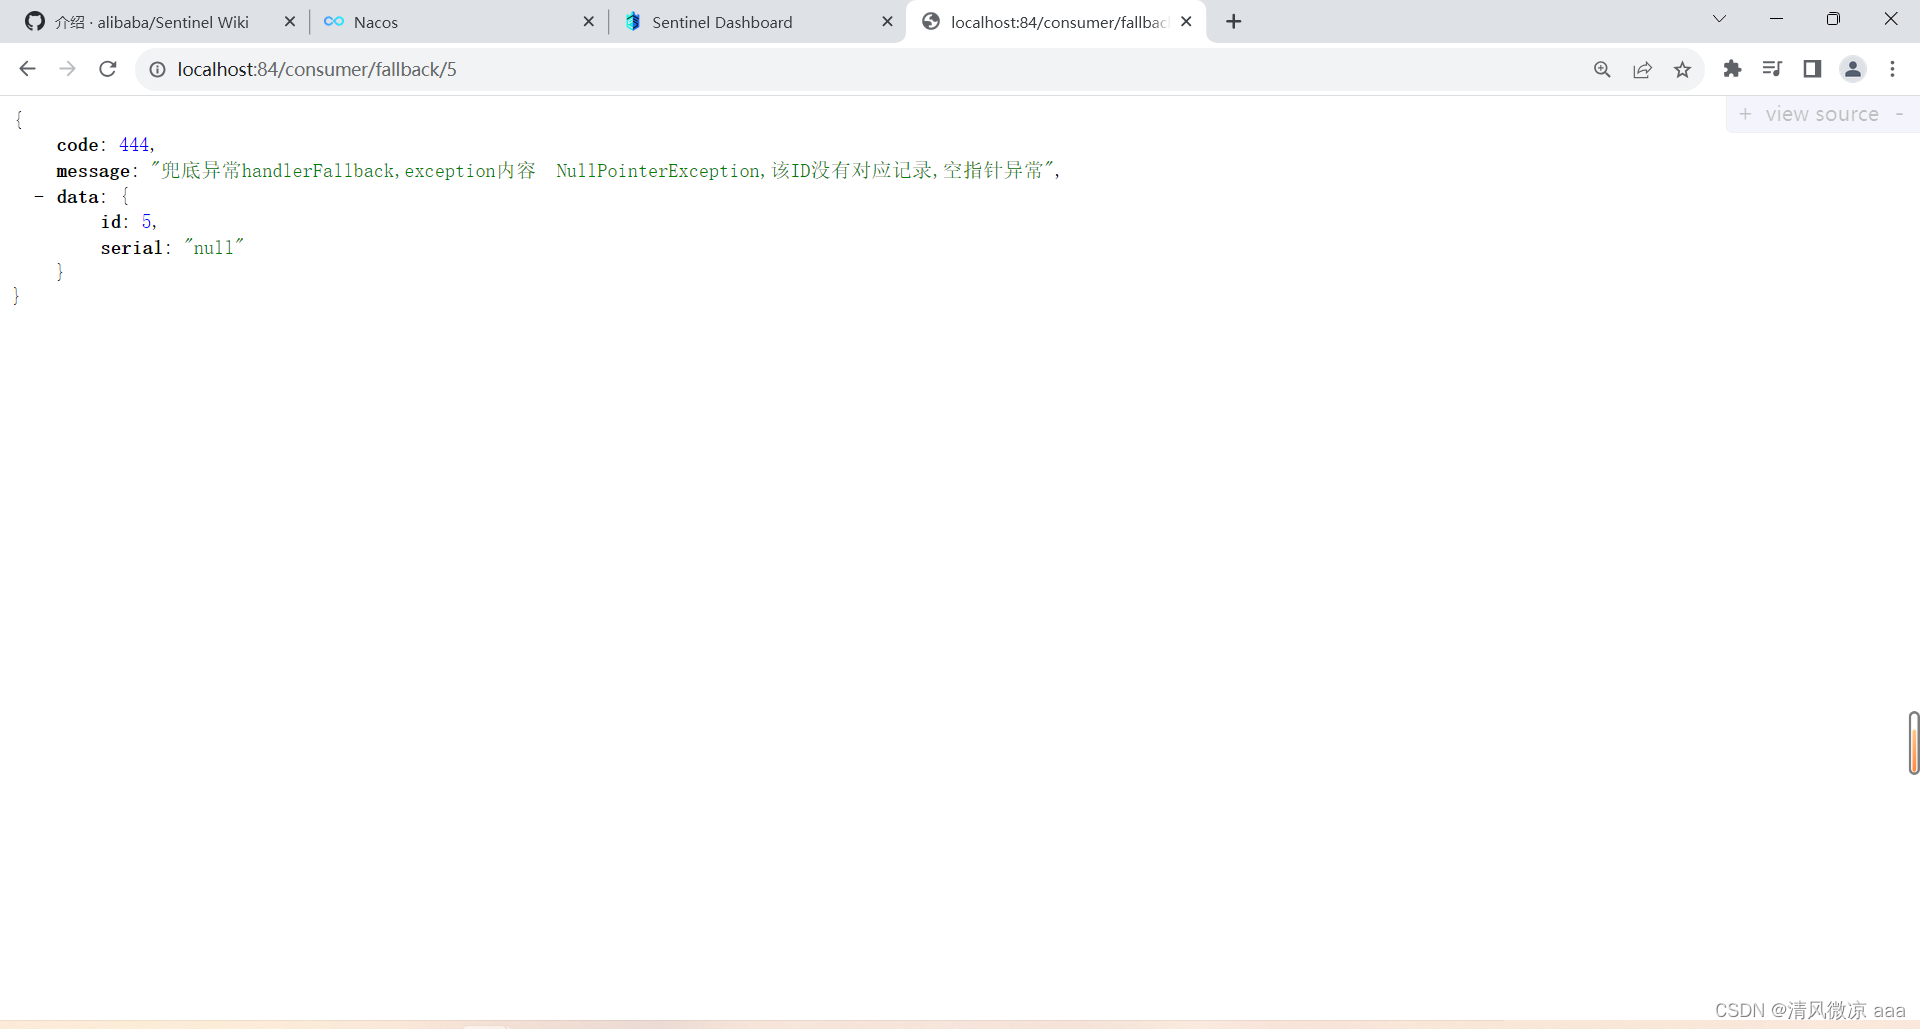
public class CircleBreakerController {public static final String SERVICE_URL = "http://nacos-payment-provider";@Resourceprivate RestTemplate restTemplate;@RequestMapping("/consumer/fallback/{id}")//@SentinelResource(value = "fallback")//没有配置@SentinelResource(value = "fallback", fallback = "handlerFallback") //fallback只负责业务异常public CommonResult<Payment> fallback(@PathVariable Long id) {CommonResult<Payment> result = restTemplate.getForObject(SERVICE_URL + "/paymentSQL/"+id, CommonResult.class,id);if (id == 4) {throw new IllegalArgumentException ("IllegalArgumentException,非法参数异常....");}else if (result.getData() == null) {throw new NullPointerException ("NullPointerException,该ID没有对应记录,空指针异常");}return result;}//本例是fallbackpublic CommonResult handlerFallback(@PathVariable Long id,Throwable e) {Payment payment = new Payment(id,"null");return new CommonResult<>(444,"兜底异常handlerFallback,exception内容 "+e.getMessage(),payment);}}- 测试:http://localhost:84/consumer/fallback/5(错误页面变为自定义的兜底方法)
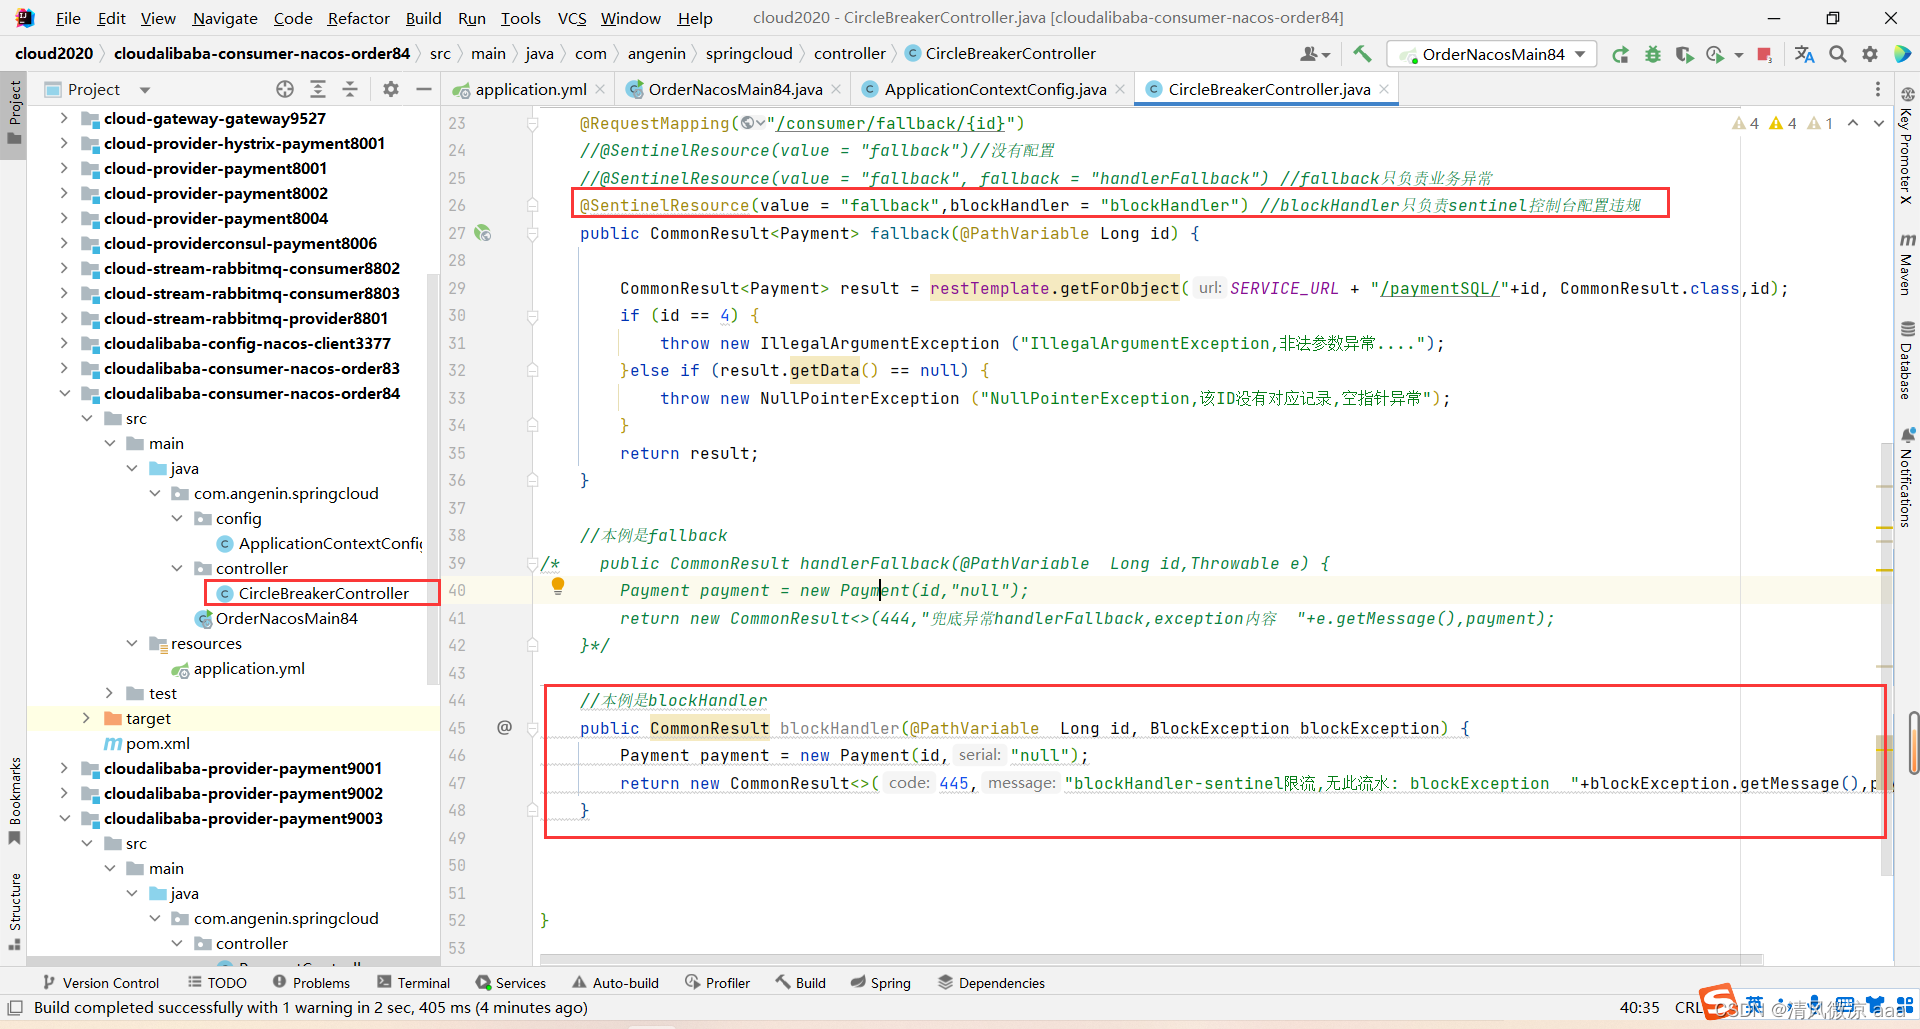
6)业务类 CircleBreakerController :只配置blockHandler
- 代码
package com.angenin.springcloud.controller;import com.alibaba.csp.sentinel.annotation.SentinelResource;
import com.alibaba.csp.sentinel.slots.block.BlockException;
import com.angenin.springcloud.entities.CommonResult;
import com.angenin.springcloud.entities.Payment;
import lombok.extern.slf4j.Slf4j;
import org.springframework.web.bind.annotation.PathVariable;
import org.springframework.web.bind.annotation.RequestMapping;
import org.springframework.web.bind.annotation.RestController;
import org.springframework.web.client.RestTemplate;import javax.annotation.Resource;@RestController
@Slf4j
public class CircleBreakerController {public static final String SERVICE_URL = "http://nacos-payment-provider";@Resourceprivate RestTemplate restTemplate;@RequestMapping("/consumer/fallback/{id}")//@SentinelResource(value = "fallback")//没有配置//@SentinelResource(value = "fallback", fallback = "handlerFallback") //fallback只负责业务异常@SentinelResource(value = "fallback",blockHandler = "blockHandler") //blockHandler只负责sentinel控制台配置违规public CommonResult<Payment> fallback(@PathVariable Long id) {CommonResult<Payment> result = restTemplate.getForObject(SERVICE_URL + "/paymentSQL/"+id, CommonResult.class,id);if (id == 4) {throw new IllegalArgumentException ("IllegalArgumentException,非法参数异常....");}else if (result.getData() == null) {throw new NullPointerException ("NullPointerException,该ID没有对应记录,空指针异常");}return result;}//本例是fallback
/* public CommonResult handlerFallback(@PathVariable Long id,Throwable e) {Payment payment = new Payment(id,"null");return new CommonResult<>(444,"兜底异常handlerFallback,exception内容 "+e.getMessage(),payment);}*///本例是blockHandlerpublic CommonResult blockHandler(@PathVariable Long id, BlockException blockException) {Payment payment = new Payment(id,"null");return new CommonResult<>(445,"blockHandler-sentinel限流,无此流水: blockException "+blockException.getMessage(),payment);}}-
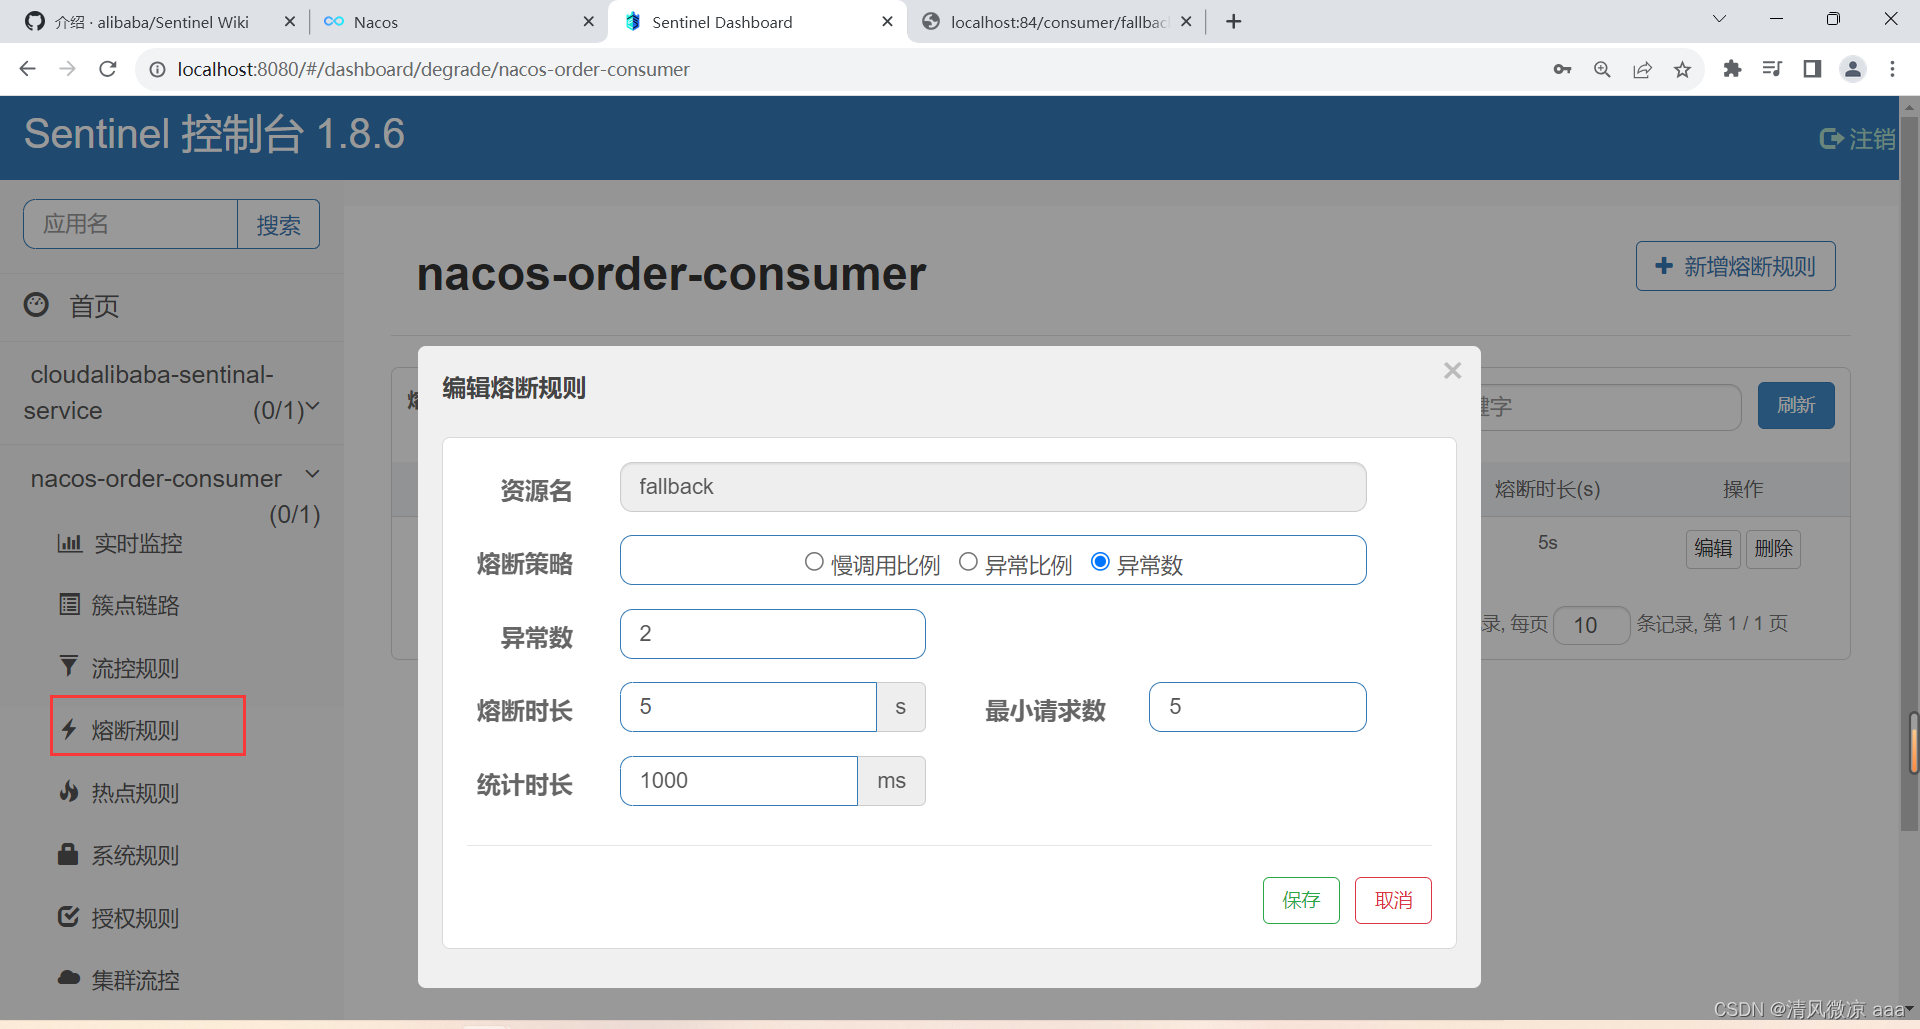
配置
-
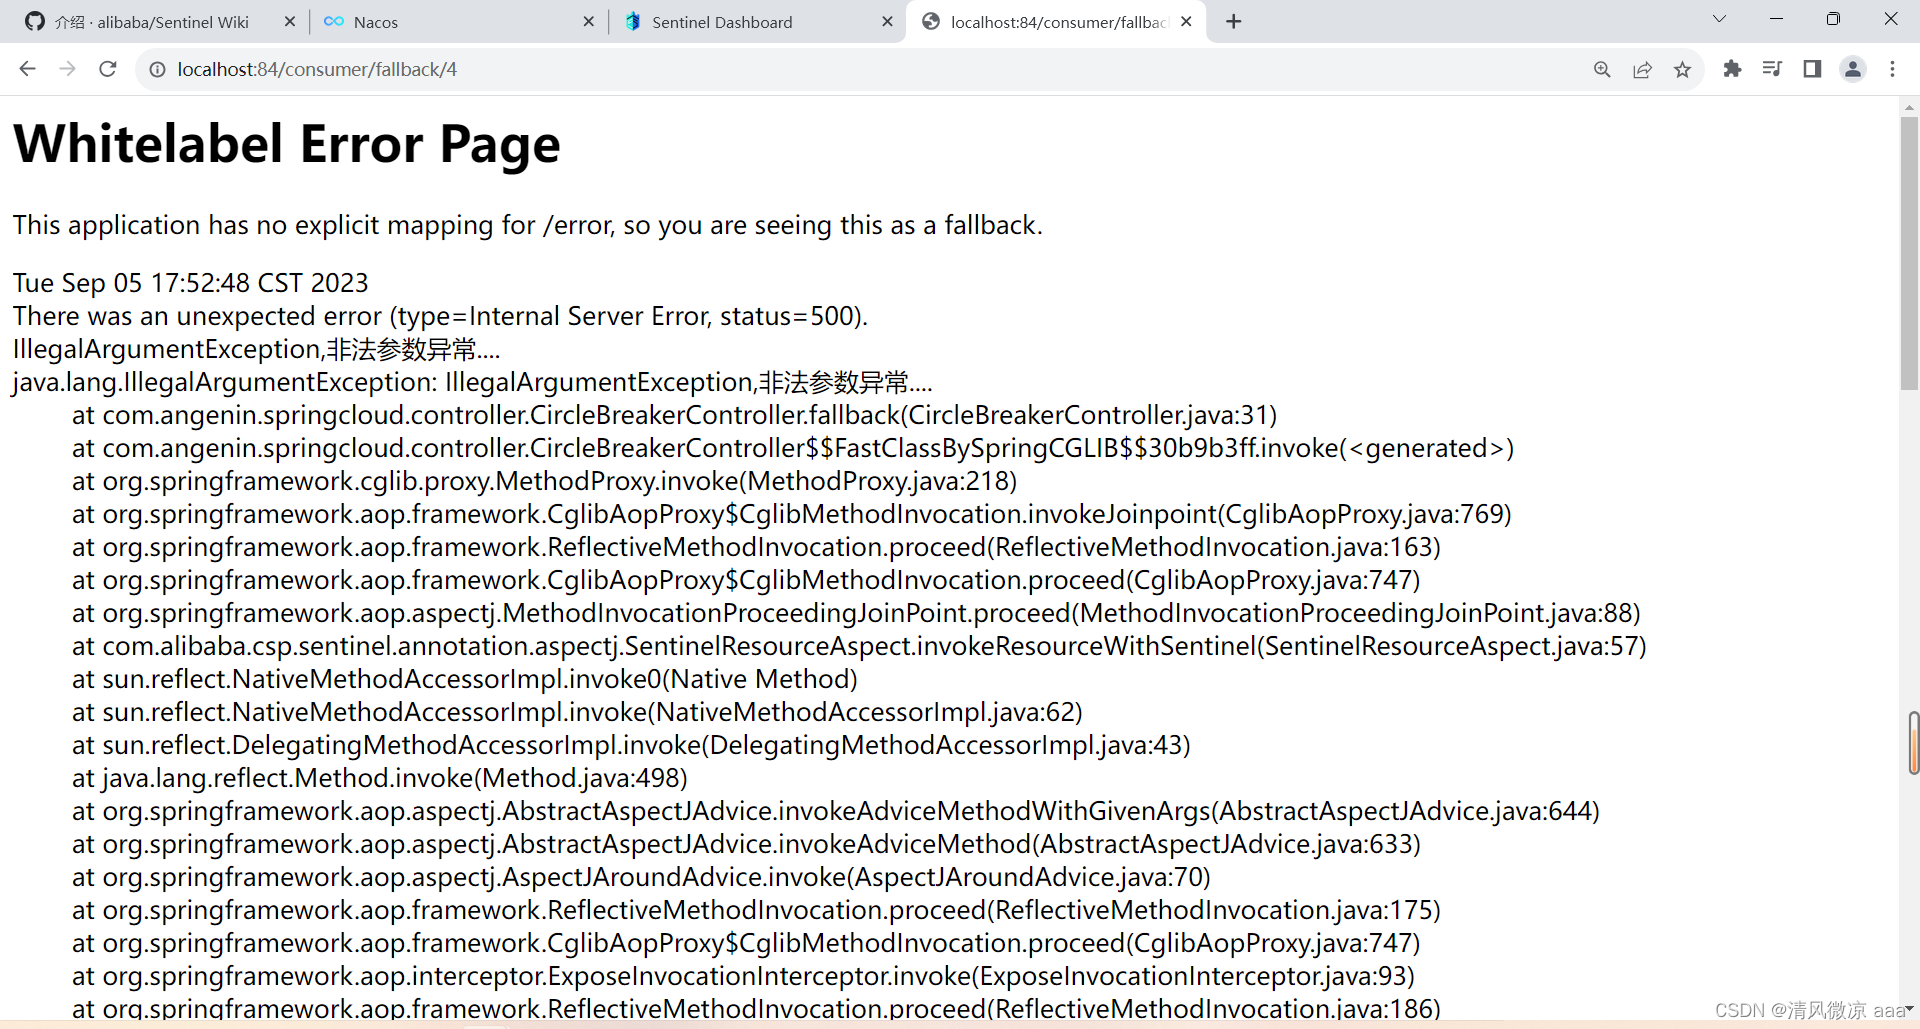
测试:http://localhost:84/consumer/fallback/4
- 第一次点击
- 快速点击
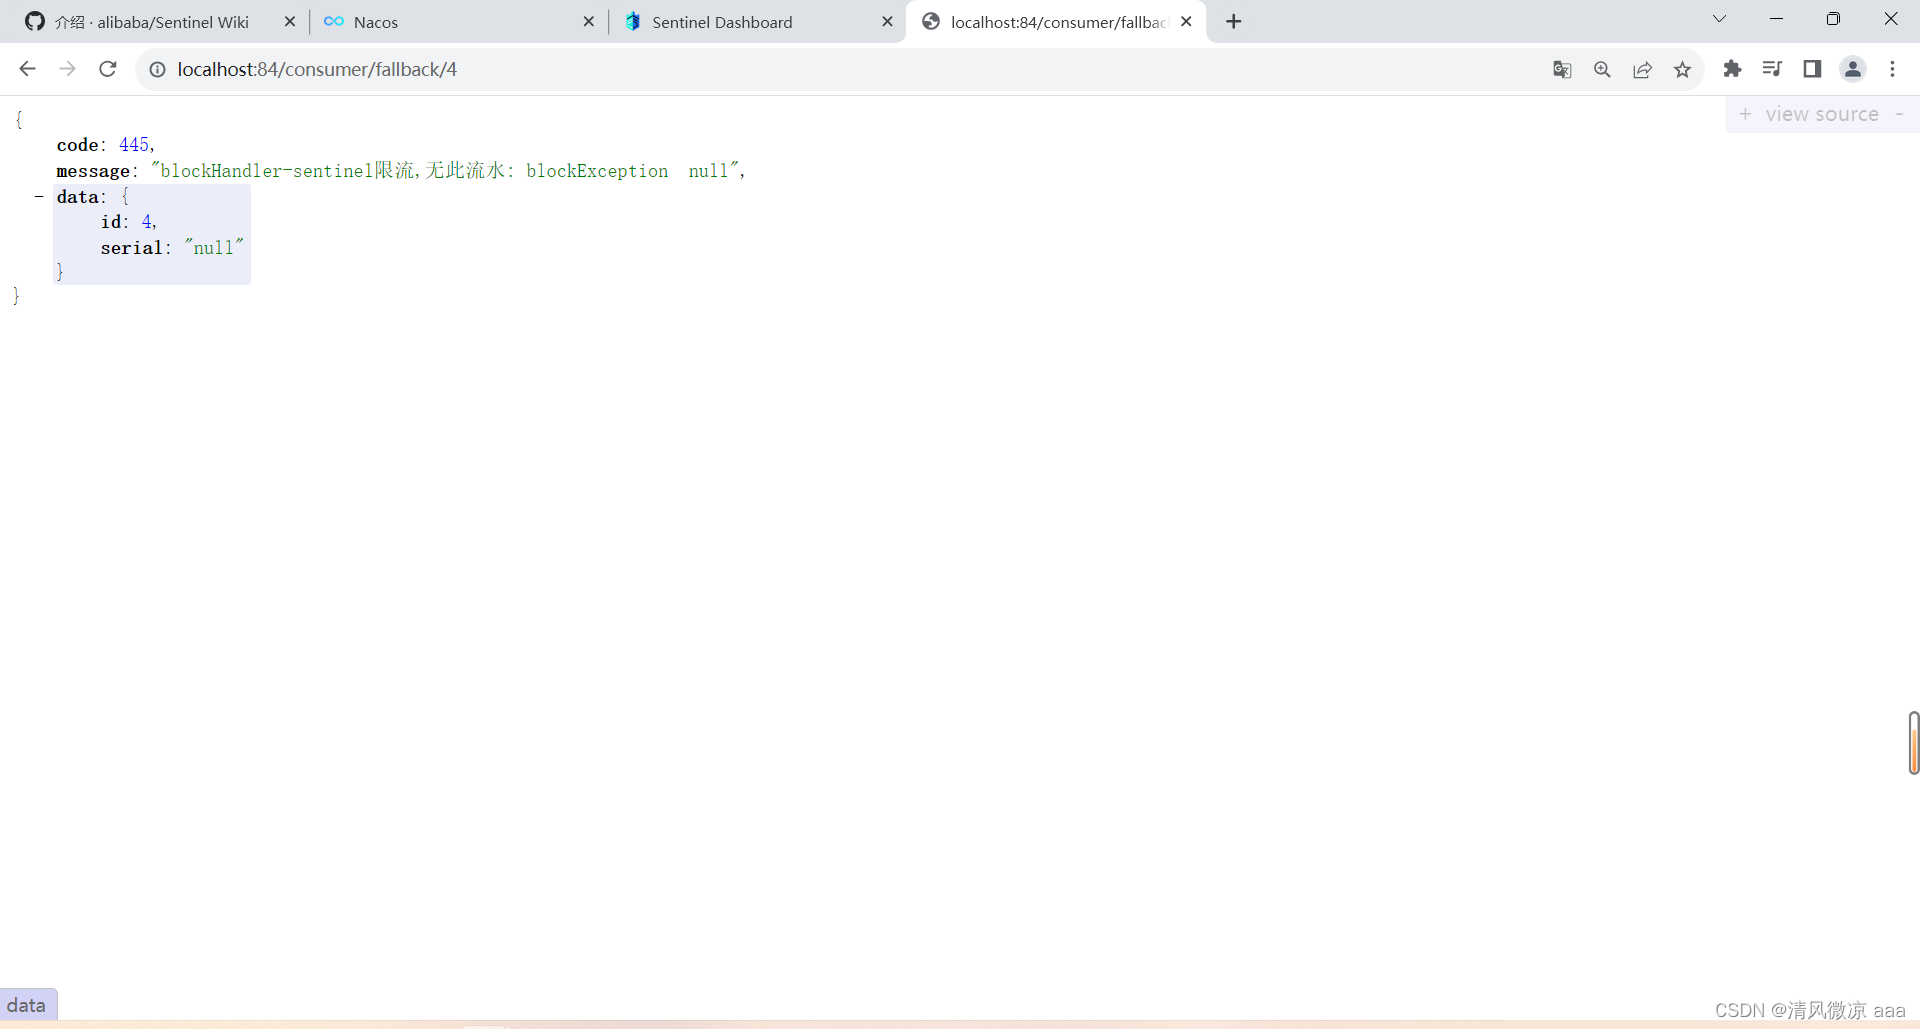
- 说明:fallback只负责业务异常,blockHandler只负责sentinel控制台配置违规
- 第一次点击
7)业务类 CircleBreakerController :fallback和blockHandler都配置
- 代码
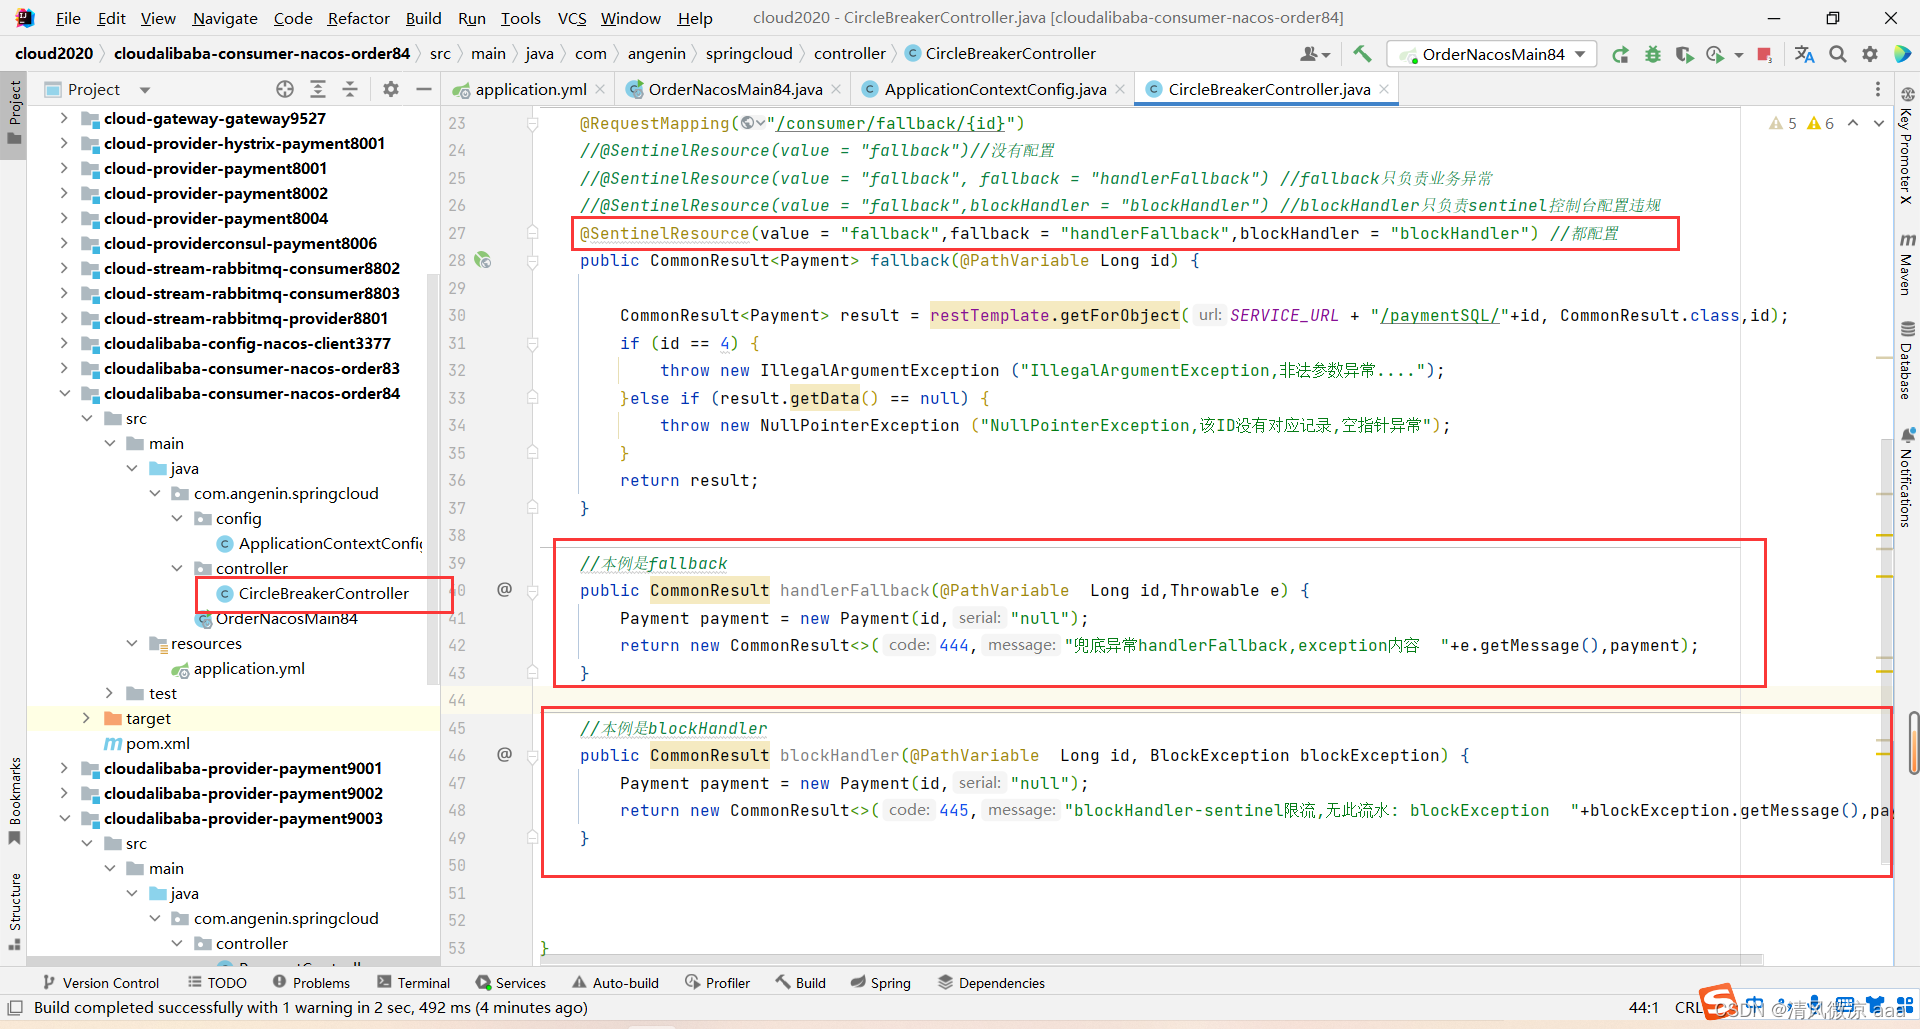
package com.angenin.springcloud.controller;import com.alibaba.csp.sentinel.annotation.SentinelResource;
import com.alibaba.csp.sentinel.slots.block.BlockException;
import com.angenin.springcloud.entities.CommonResult;
import com.angenin.springcloud.entities.Payment;
import lombok.extern.slf4j.Slf4j;
import org.springframework.web.bind.annotation.PathVariable;
import org.springframework.web.bind.annotation.RequestMapping;
import org.springframework.web.bind.annotation.RestController;
import org.springframework.web.client.RestTemplate;import javax.annotation.Resource;@RestController
@Slf4j
public class CircleBreakerController {public static final String SERVICE_URL = "http://nacos-payment-provider";@Resourceprivate RestTemplate restTemplate;@RequestMapping("/consumer/fallback/{id}")//@SentinelResource(value = "fallback")//没有配置//@SentinelResource(value = "fallback", fallback = "handlerFallback") //fallback只负责业务异常//@SentinelResource(value = "fallback",blockHandler = "blockHandler") //blockHandler只负责sentinel控制台配置违规@SentinelResource(value = "fallback",fallback = "handlerFallback",blockHandler = "blockHandler") //都配置public CommonResult<Payment> fallback(@PathVariable Long id) {CommonResult<Payment> result = restTemplate.getForObject(SERVICE_URL + "/paymentSQL/"+id, CommonResult.class,id);if (id == 4) {throw new IllegalArgumentException ("IllegalArgumentException,非法参数异常....");}else if (result.getData() == null) {throw new NullPointerException ("NullPointerException,该ID没有对应记录,空指针异常");}return result;}//本例是fallbackpublic CommonResult handlerFallback(@PathVariable Long id,Throwable e) {Payment payment = new Payment(id,"null");return new CommonResult<>(444,"兜底异常handlerFallback,exception内容 "+e.getMessage(),payment);}//本例是blockHandlerpublic CommonResult blockHandler(@PathVariable Long id, BlockException blockException) {Payment payment = new Payment(id,"null");return new CommonResult<>(445,"blockHandler-sentinel限流,无此流水: blockException "+blockException.getMessage(),payment);}}-
配置
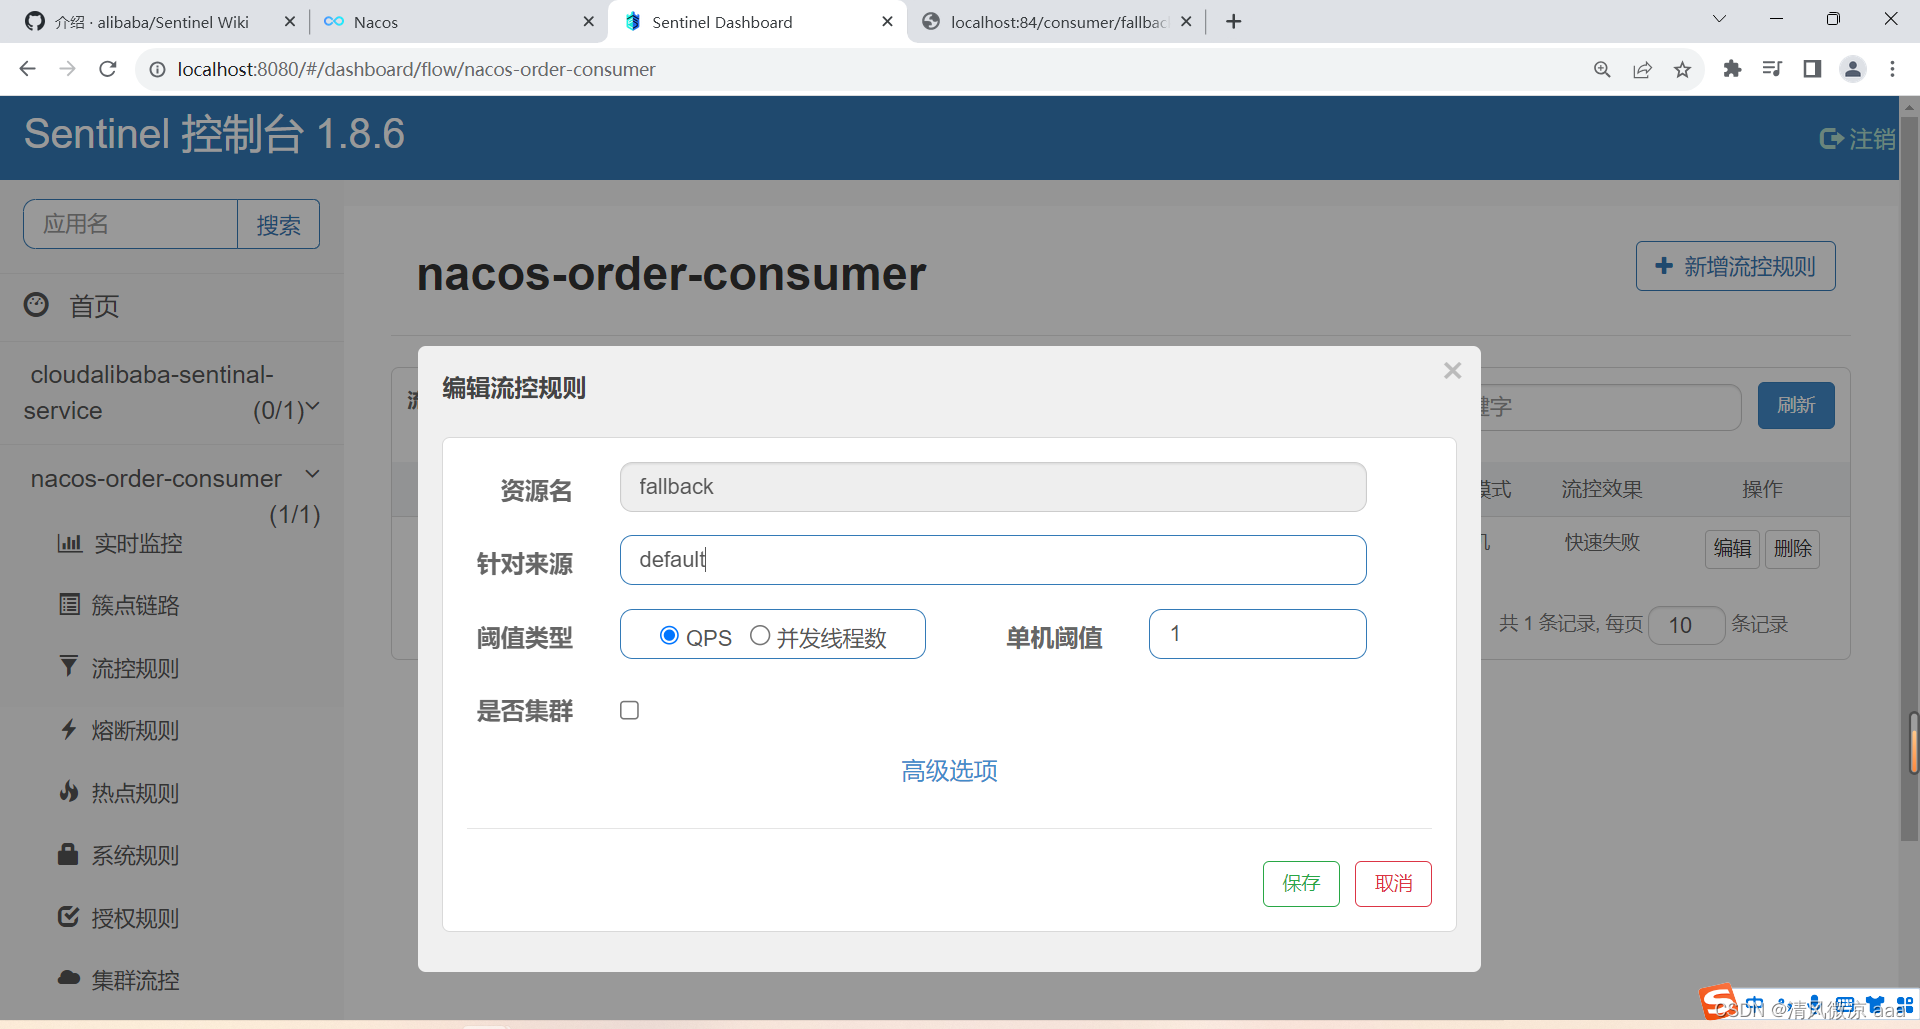
-
测试1:
http://localhost:84/consumer/fallback/1(访问正常)-
第一次点击:正常访问
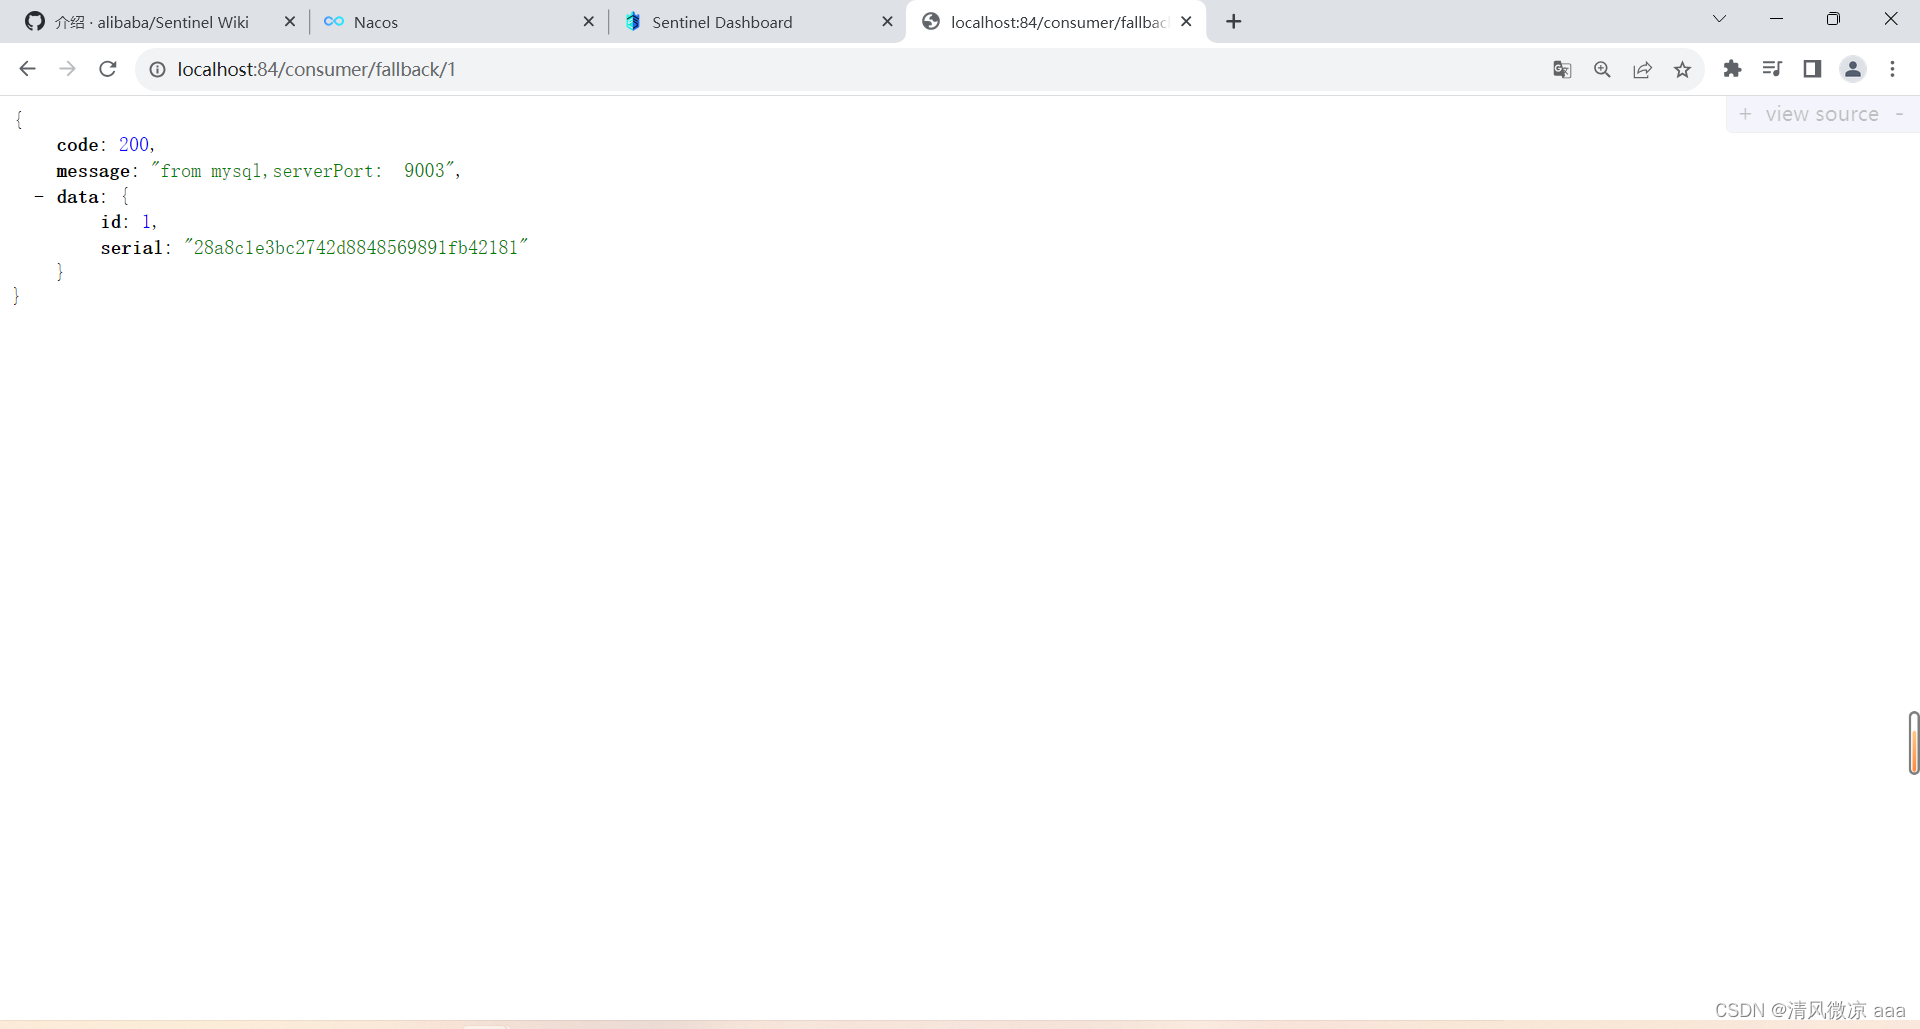
-
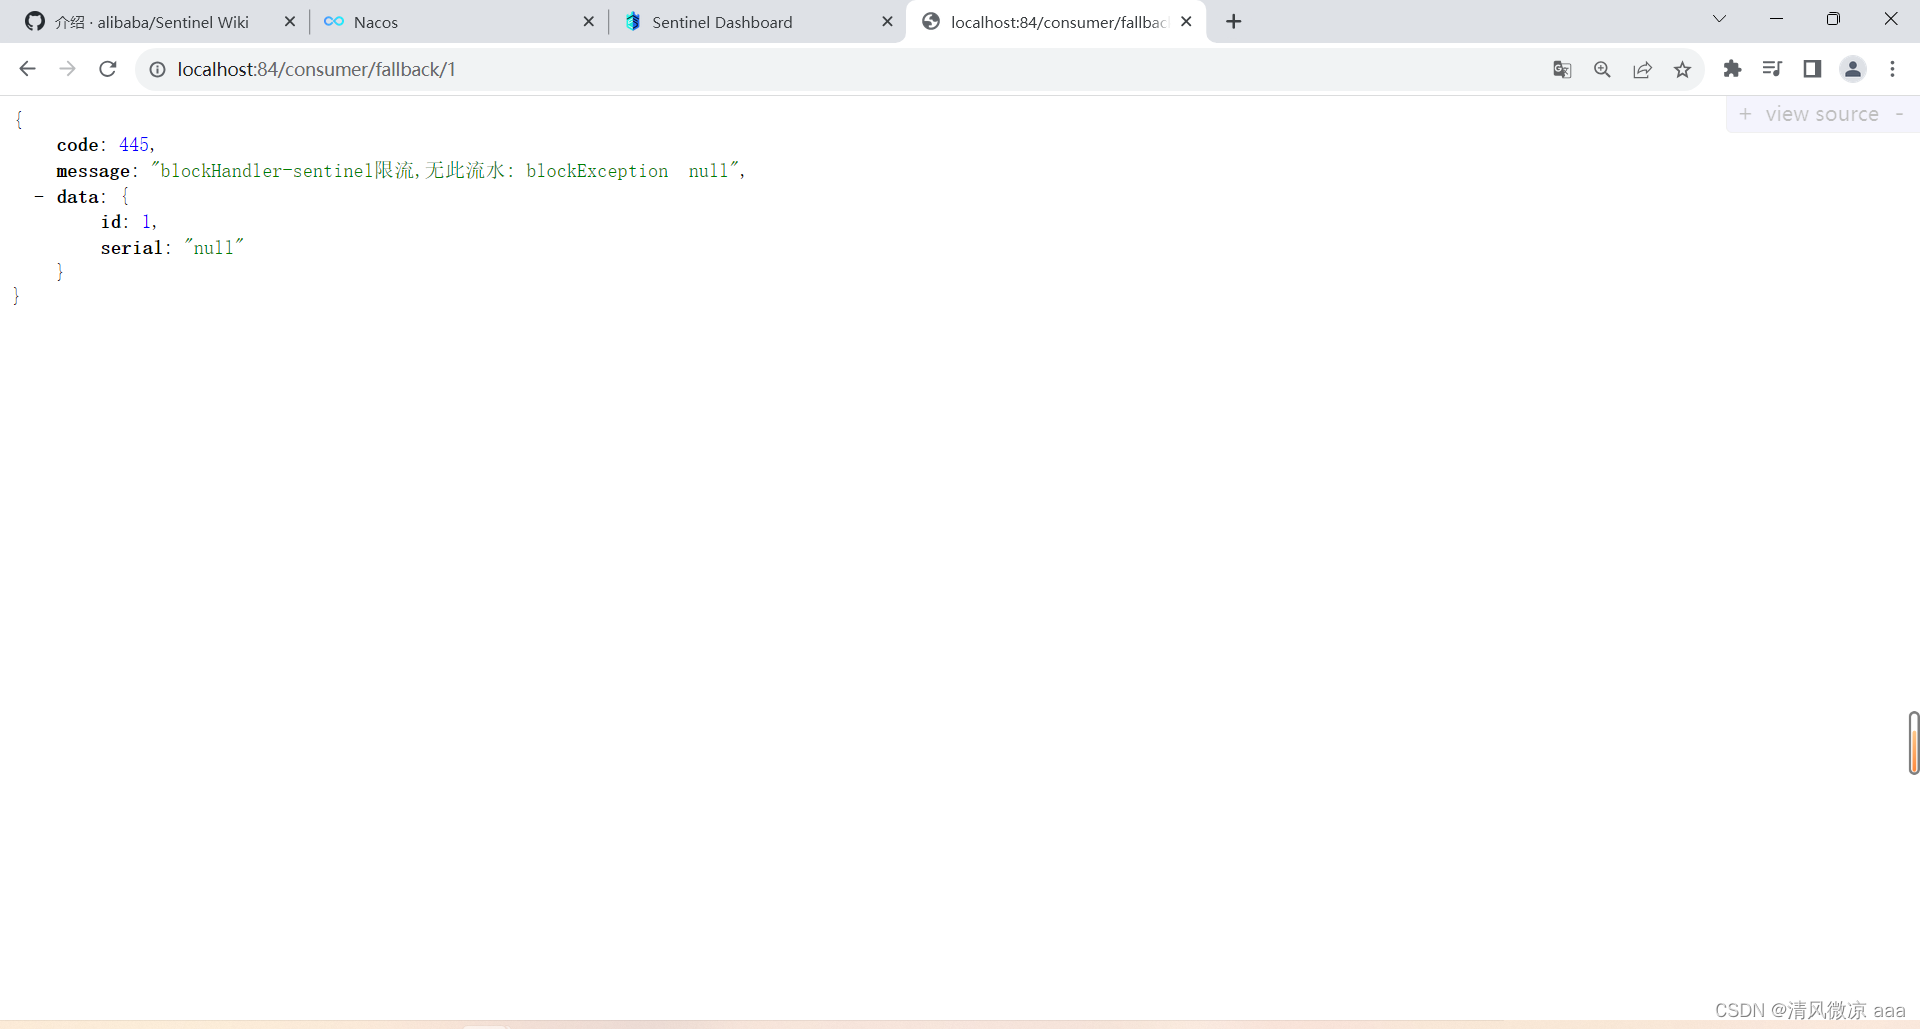
快速点击:超过阈值,会访问自定义的blockHandler方法
-
-
测试2:
http://localhost:84/consumer/fallback/4(访问异常)-
第一次点击:返回fallback属性标注的自定义方法
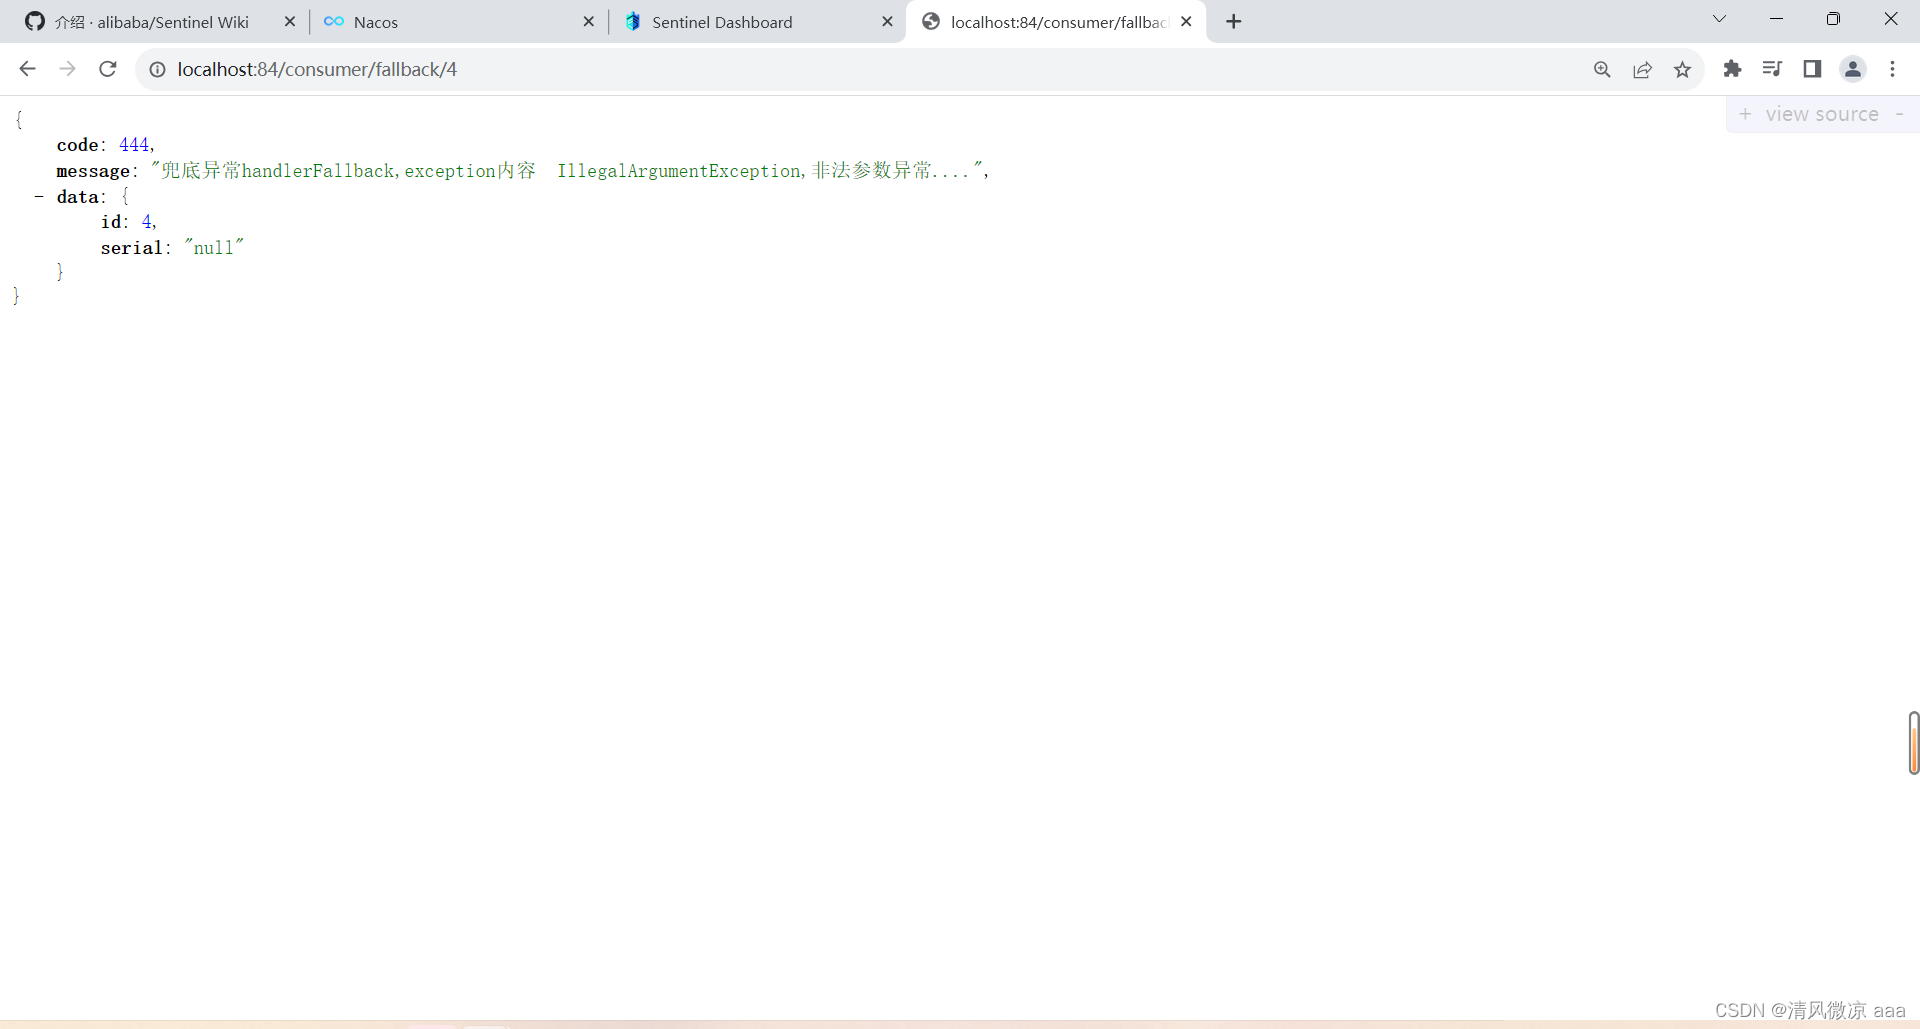
-
快速点击:超过阈值,此时既满足fallback业务异常又满足blockHandler控制台配置违规,那么此时返回的结果是blockHandler属性指定的方法。
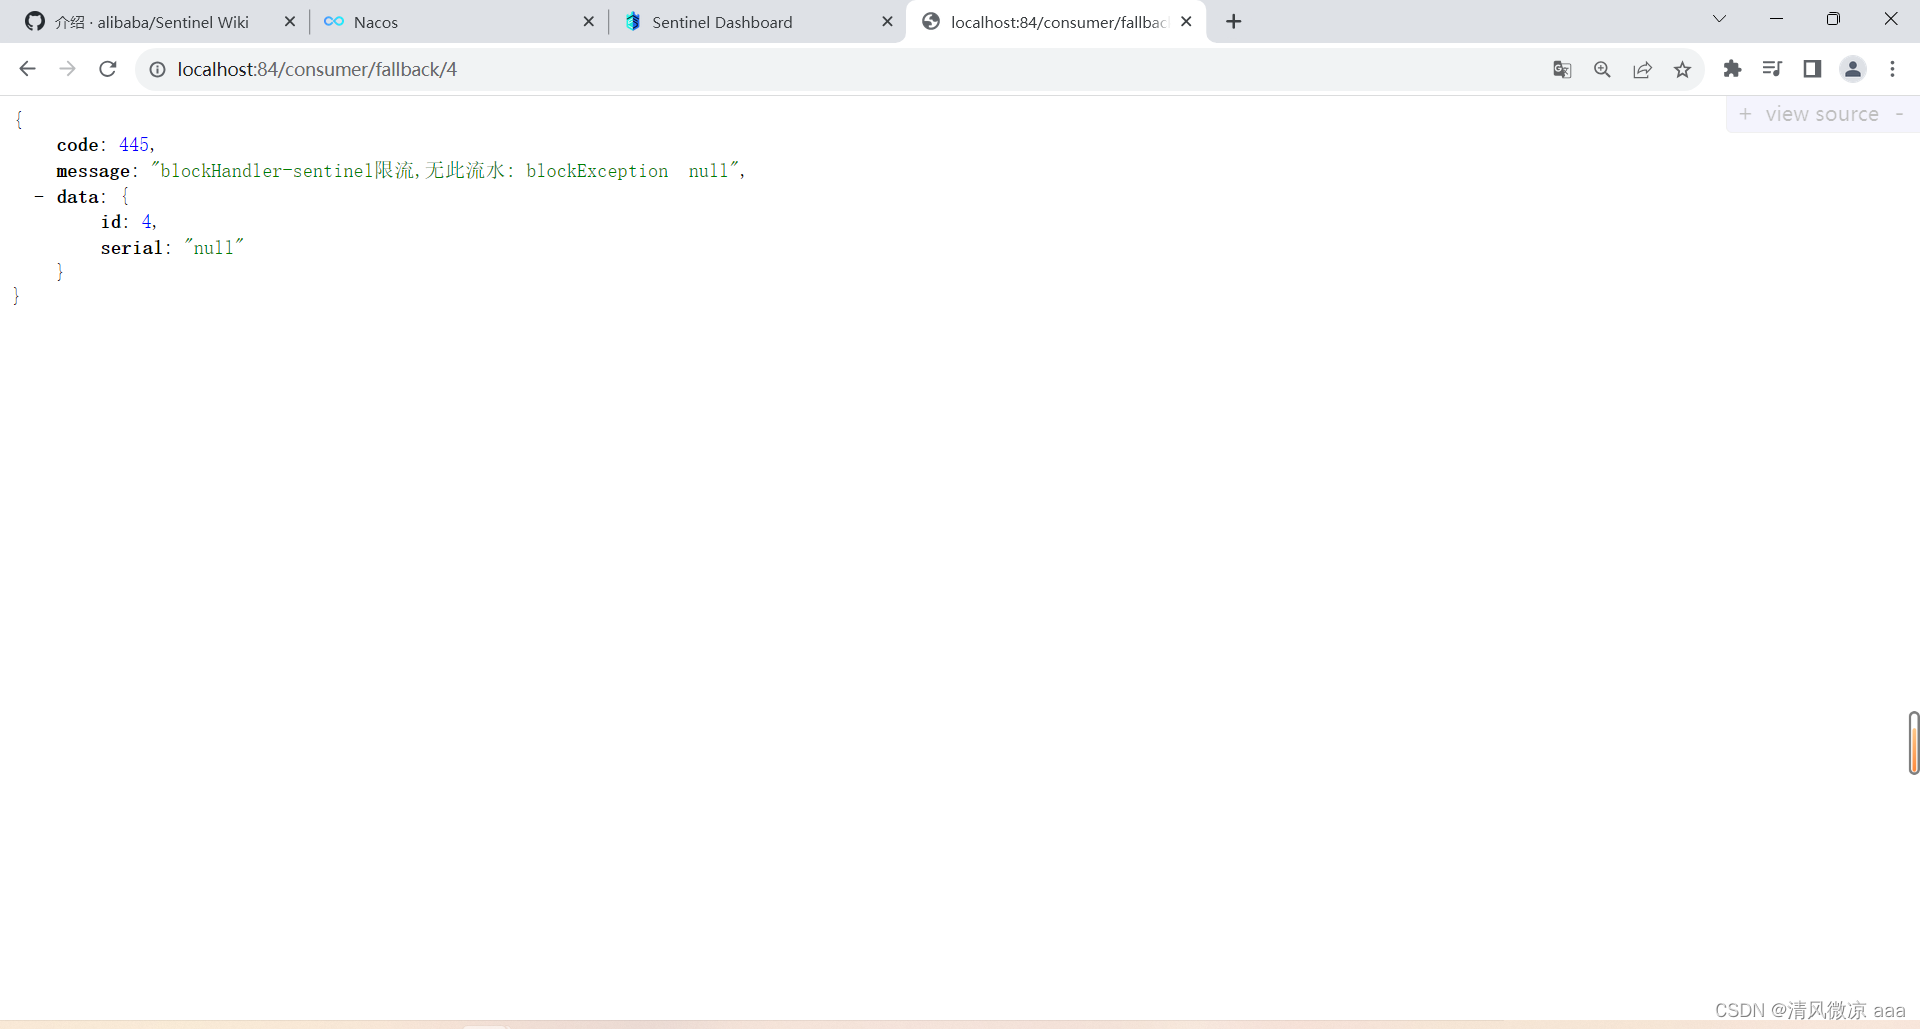
-
-
结论:若 blockHandler 和 fallback 都进行了配置,则被限流降级而抛出 BlockException 时只会进入 blockHandler 处理逻辑。
8)业务类 CircleBreakerController :忽略属性…
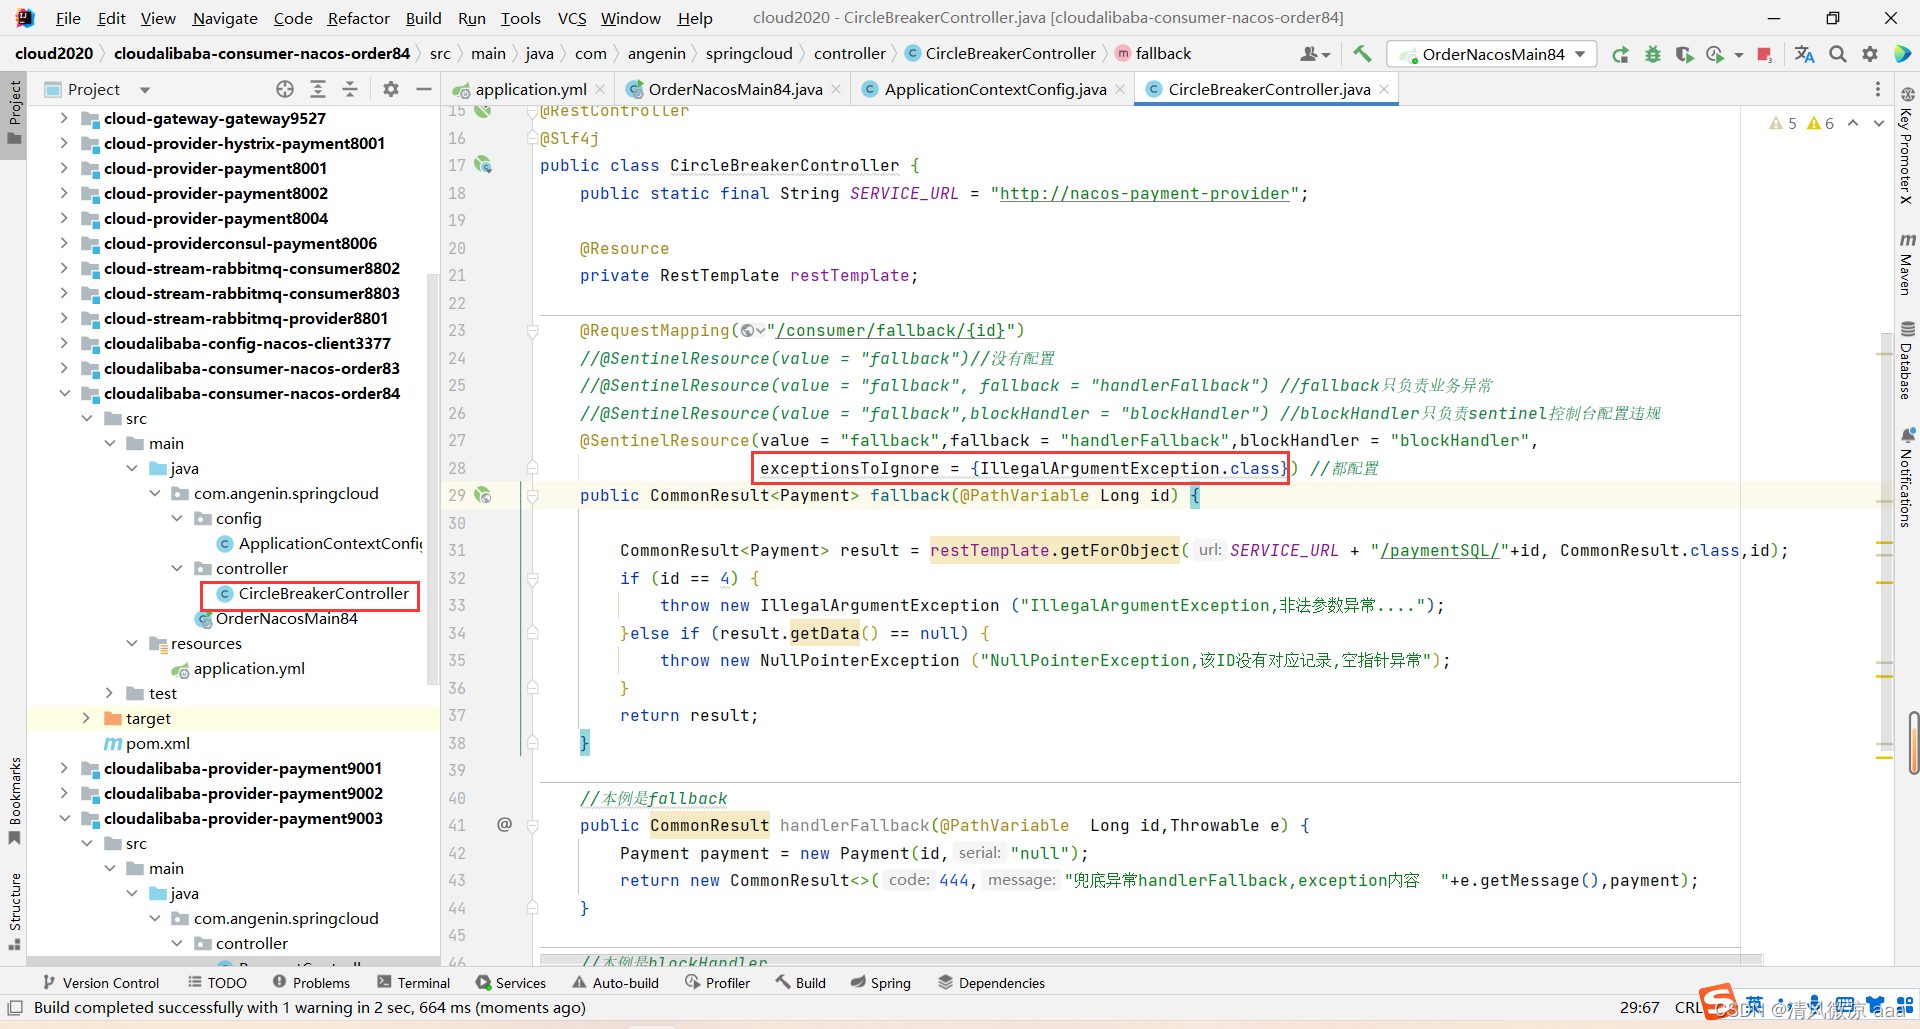
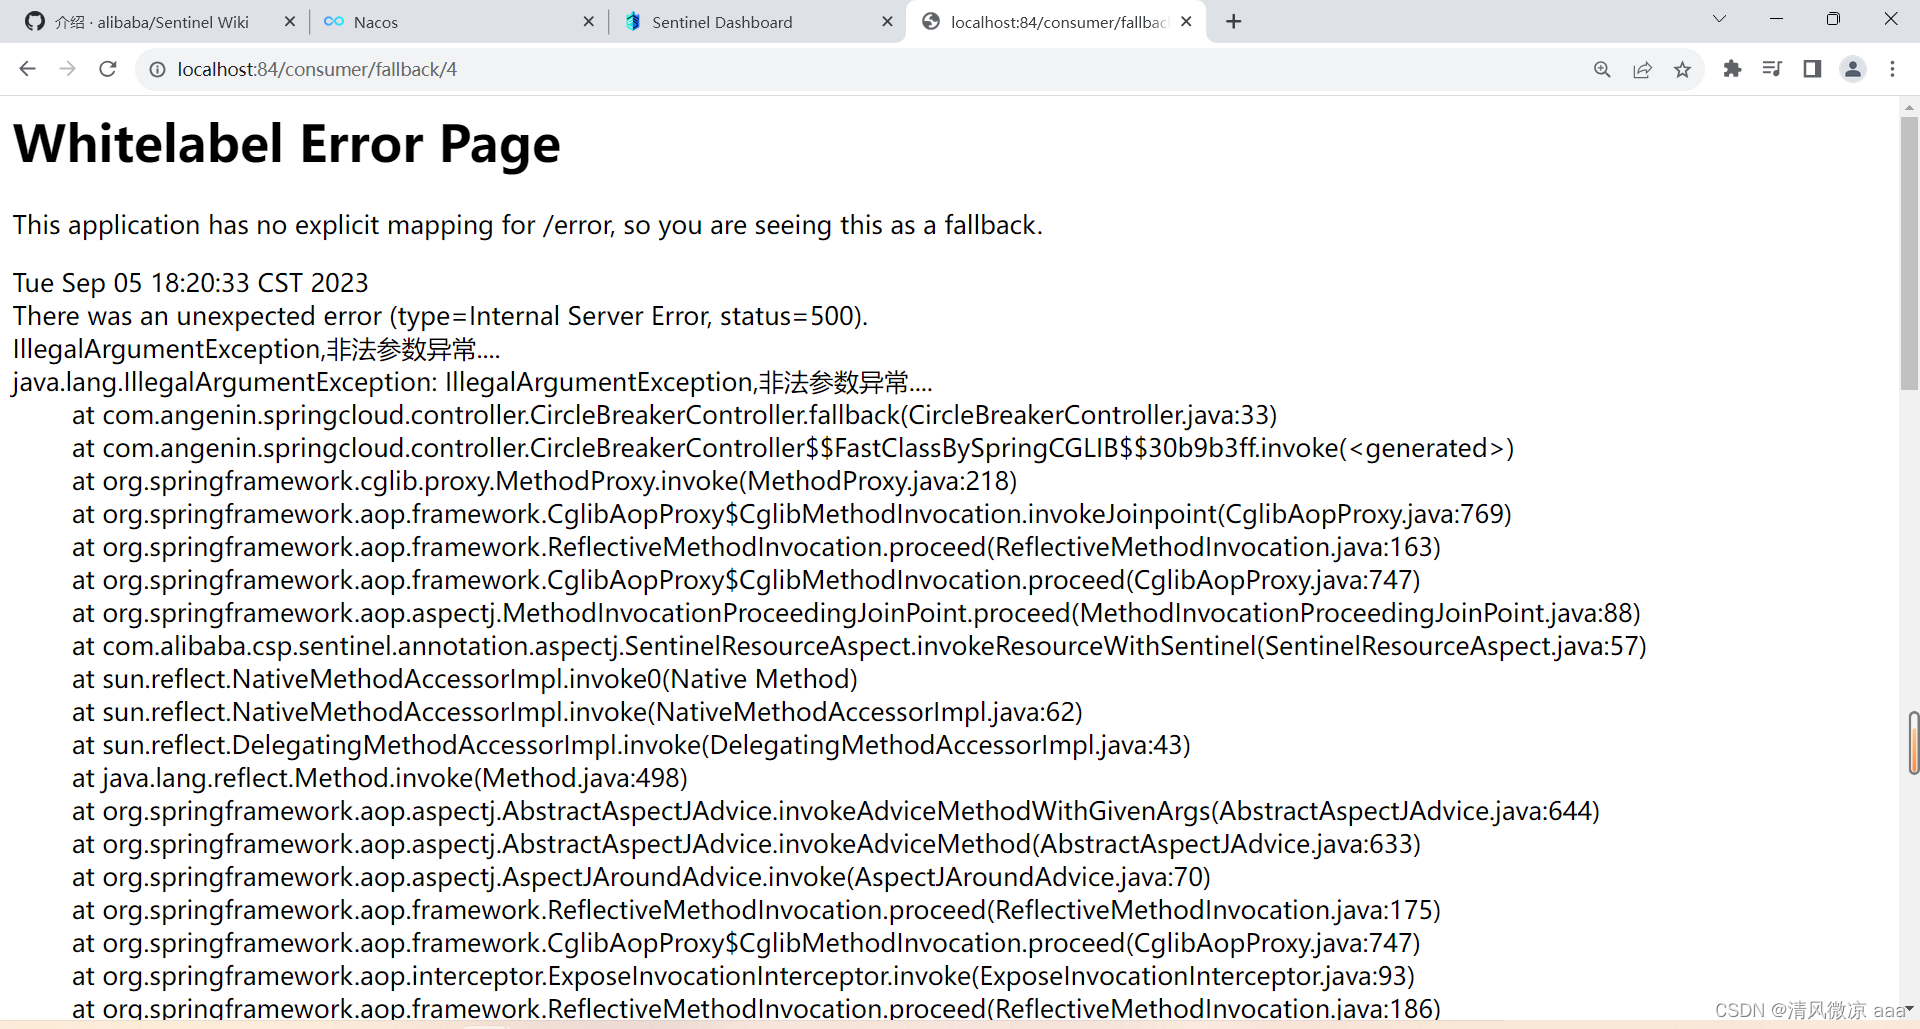
- 即:排除指定的异常,即便配置了出现异常后执行自定义的方法提示,但是加上此属性后出现此异常执行的仍然是系统自带的提示信息。
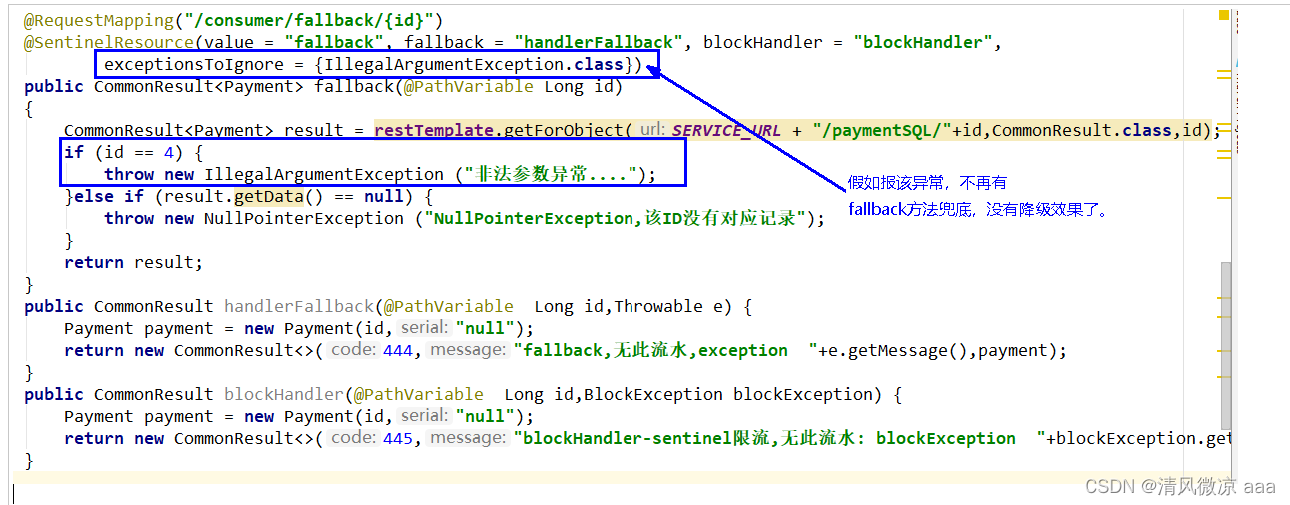
exceptionsToIgnore = {IllegalArgumentException.class}
http://localhost:84/consumer/fallback/4
19.9.2 Feign系列
1)修改84模块
-
84消费者调用提供者9003
-
Feign组件一般是消费侧
2)POM
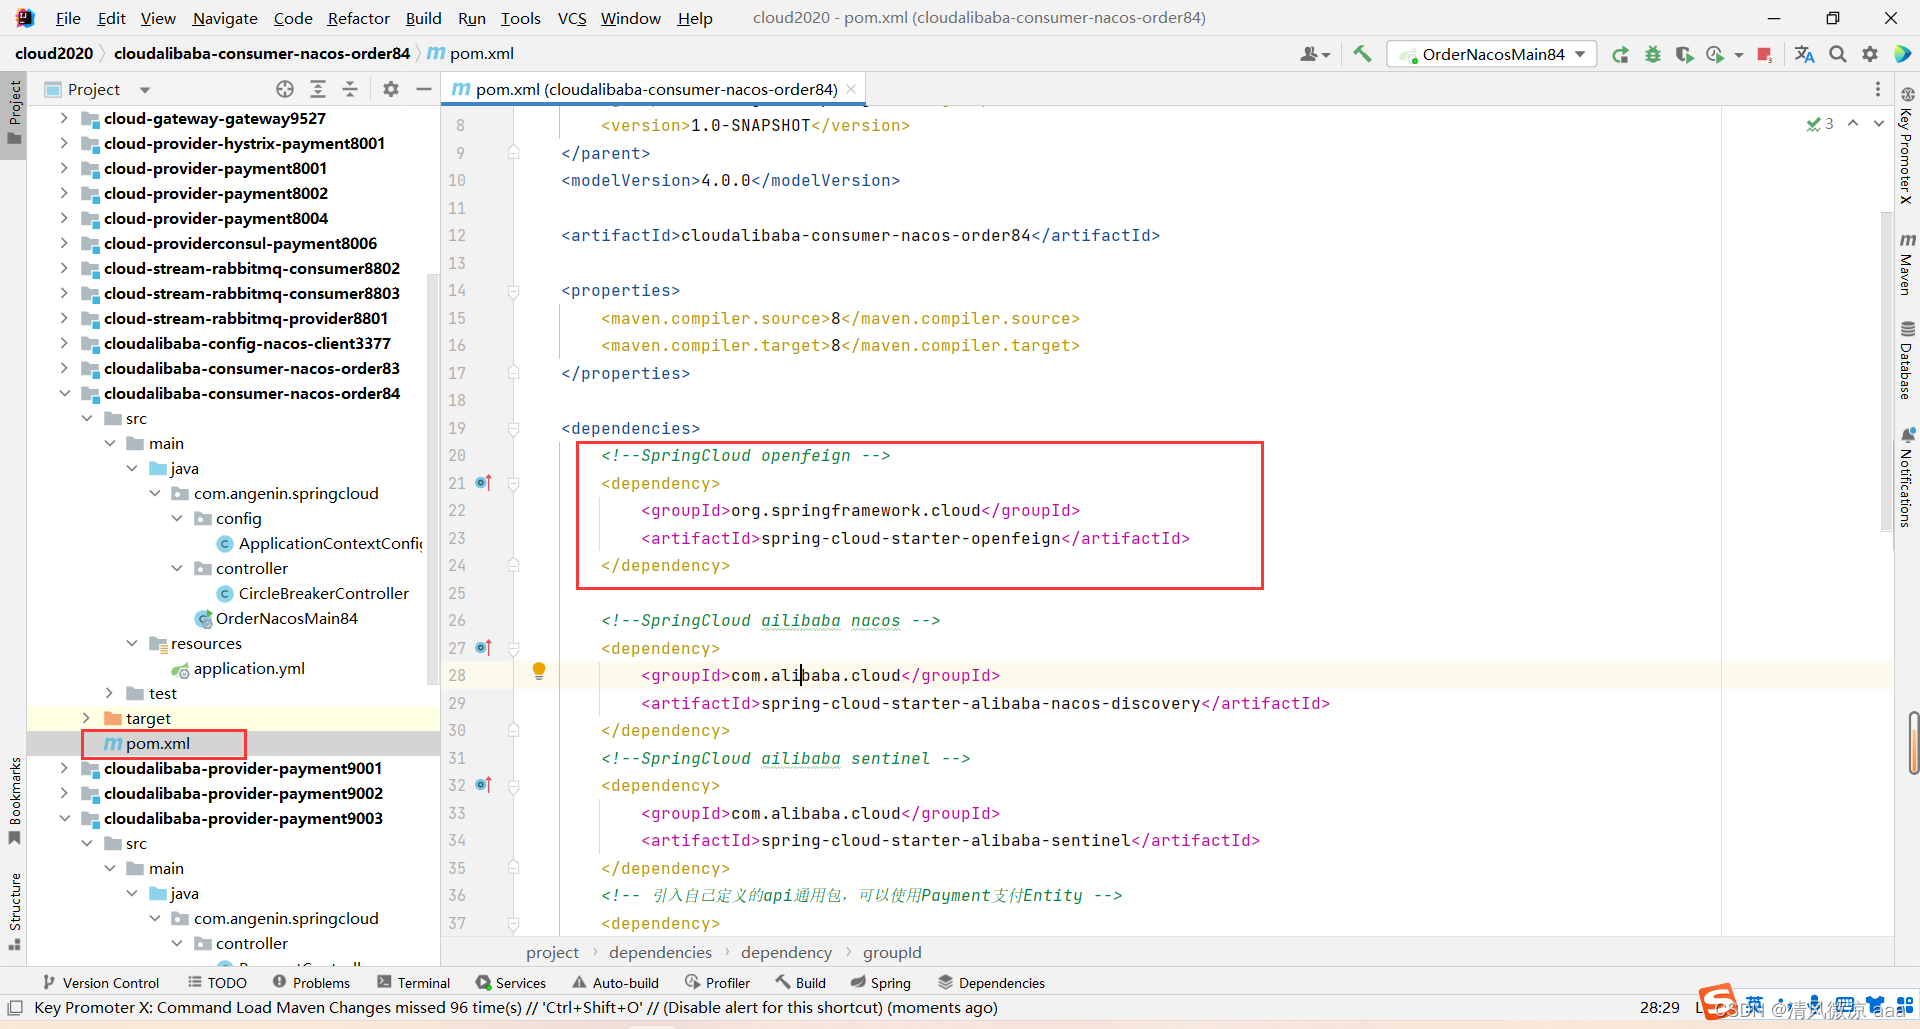
<!--SpringCloud openfeign --><dependency><groupId>org.springframework.cloud</groupId><artifactId>spring-cloud-starter-openfeign</artifactId></dependency>
3)YML
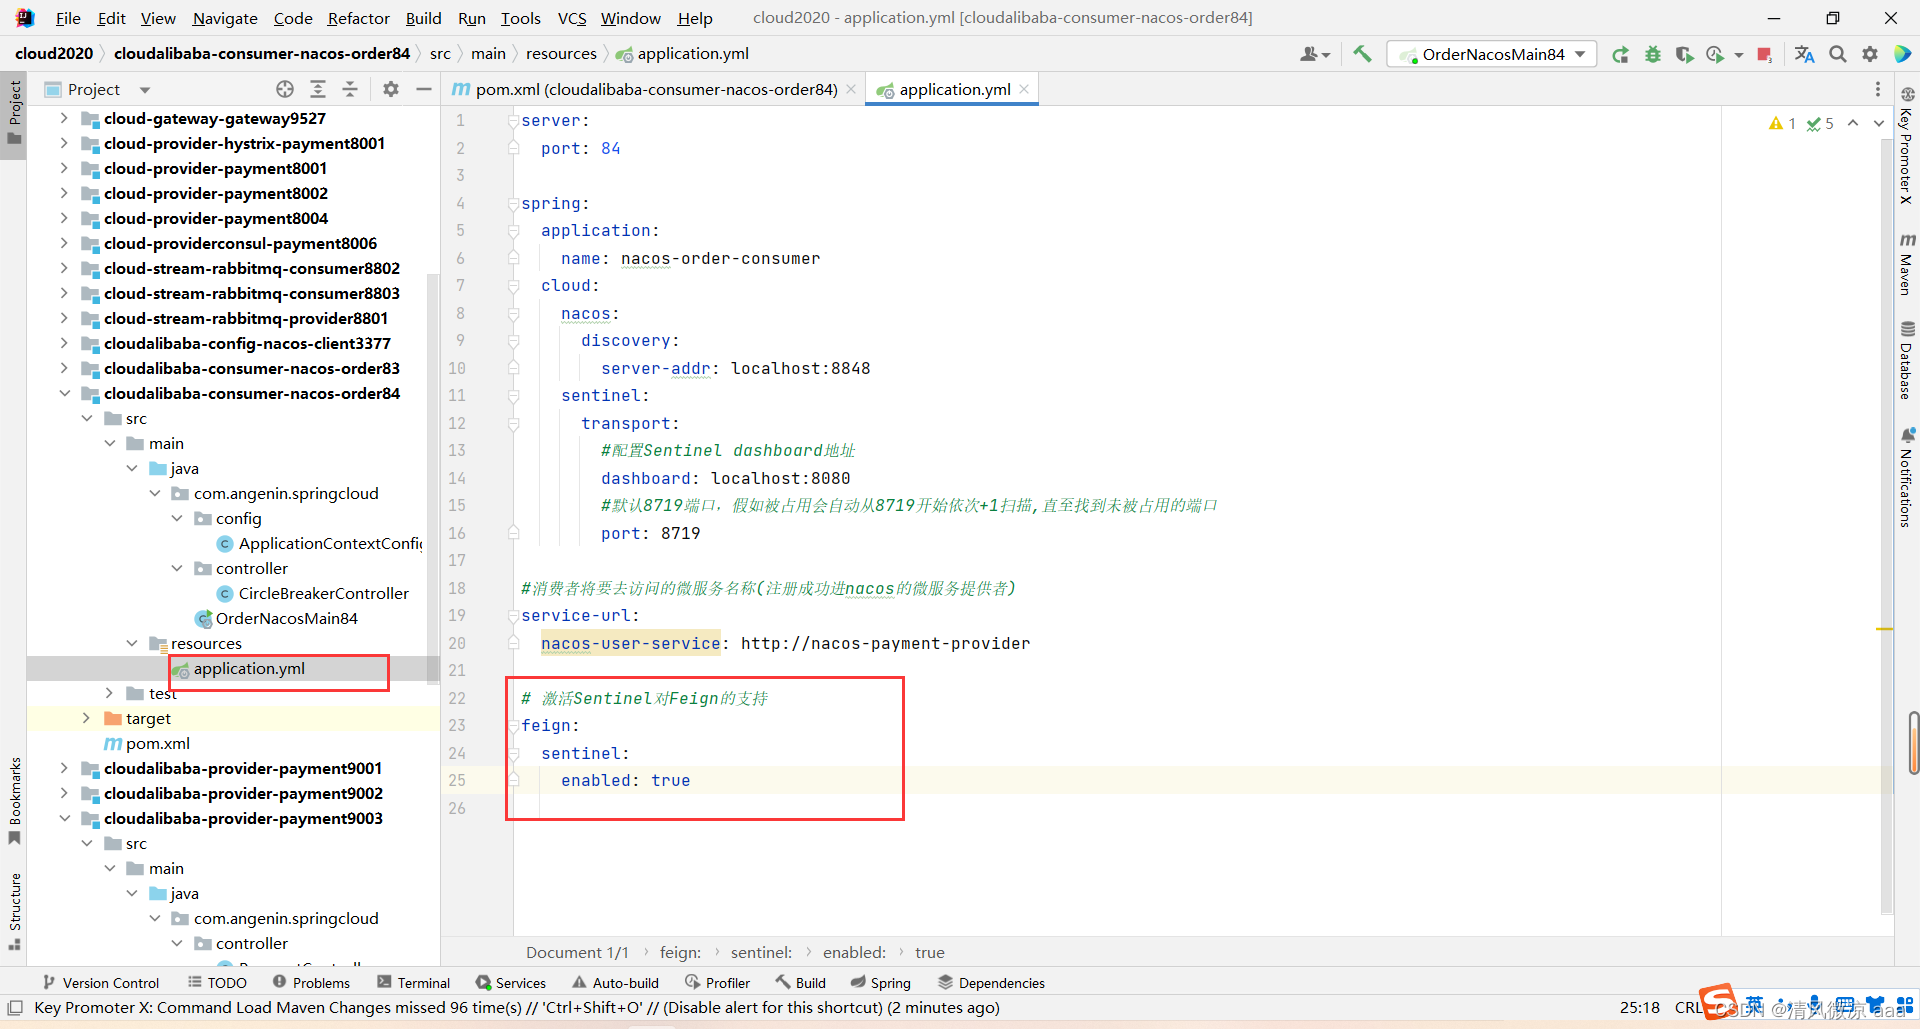
server:port: 84spring:application:name: nacos-order-consumercloud:nacos:discovery:server-addr: localhost:8848sentinel:transport:#配置Sentinel dashboard地址dashboard: localhost:8080#默认8719端口,假如被占用会自动从8719开始依次+1扫描,直至找到未被占用的端口port: 8719#消费者将要去访问的微服务名称(注册成功进nacos的微服务提供者)
service-url:nacos-user-service: http://nacos-payment-provider# 激活Sentinel对Feign的支持
feign:sentinel:enabled: true
4)业务类
- 接口
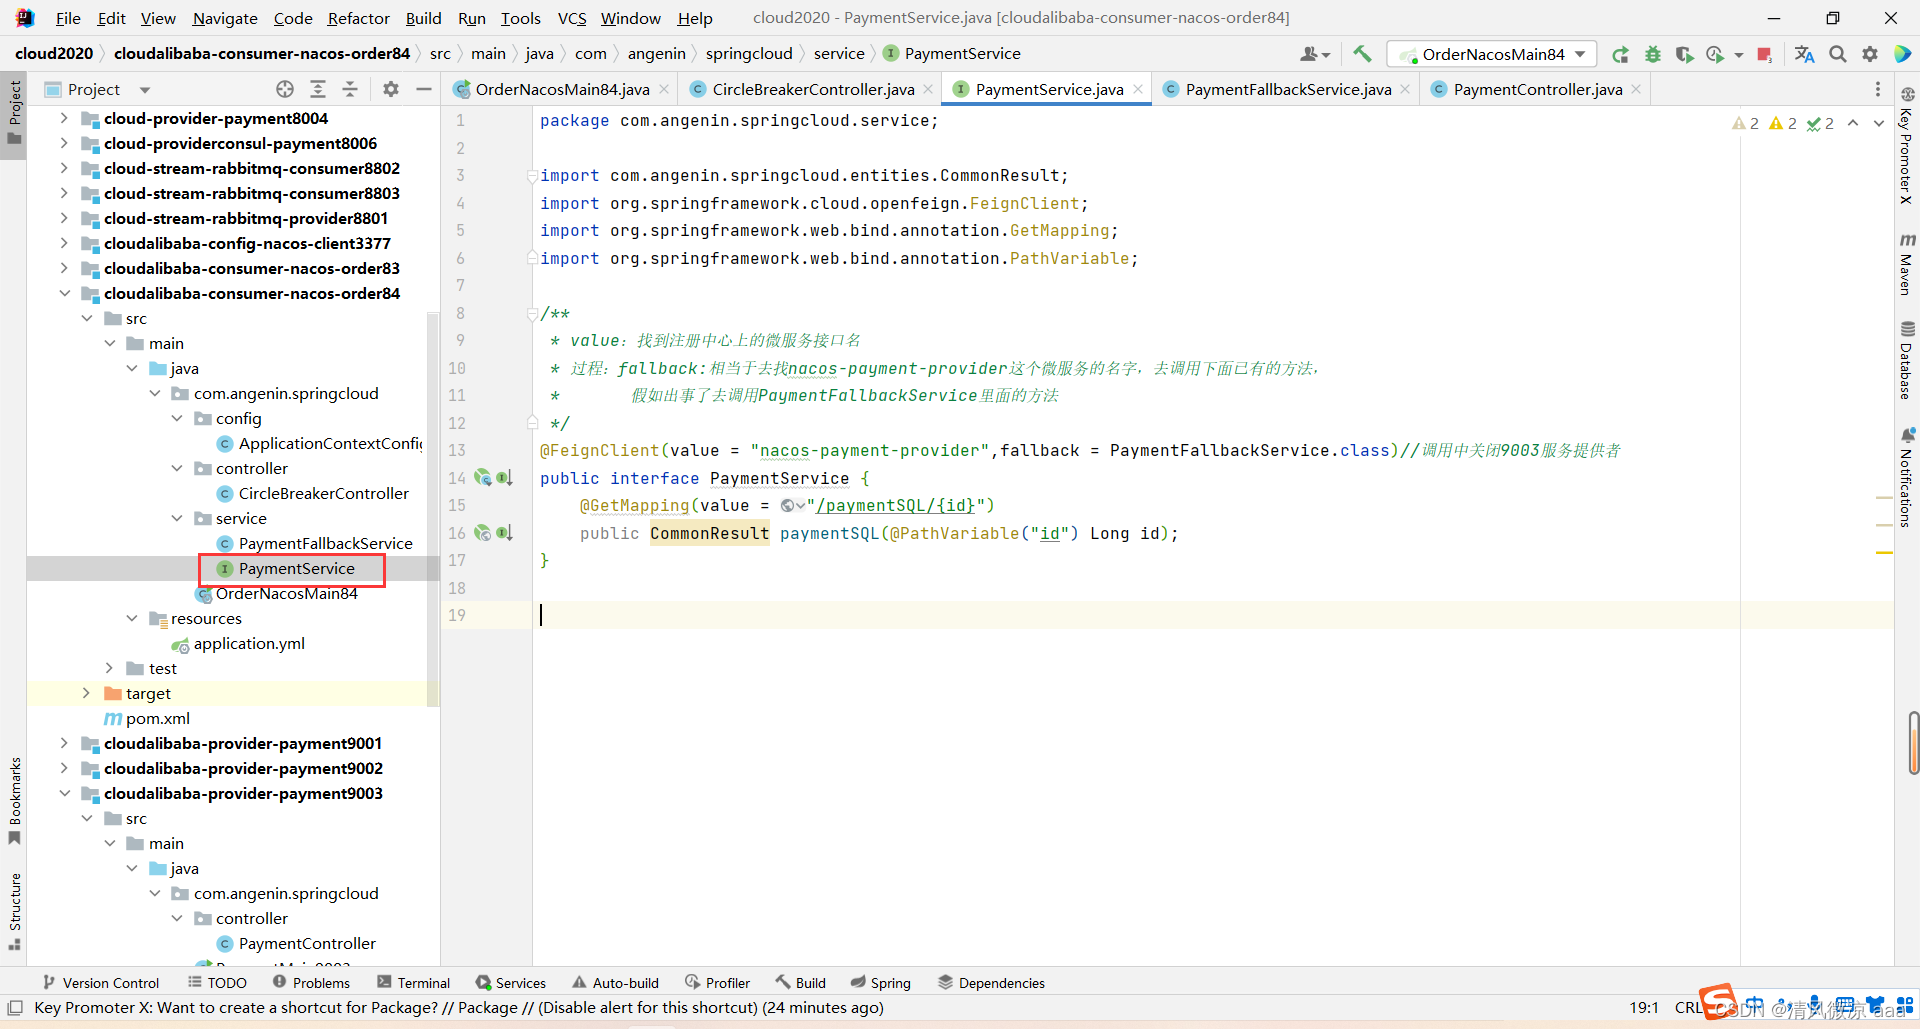
package com.angenin.springcloud.service;import com.angenin.springcloud.entities.CommonResult;
import org.springframework.cloud.openfeign.FeignClient;
import org.springframework.web.bind.annotation.GetMapping;
import org.springframework.web.bind.annotation.PathVariable;/*** value:找到注册中心上的微服务接口名* 过程:fallback:相当于去找nacos-payment-provider这个微服务的名字,去调用下面已有的方法,*       假如出事了去调用PaymentFallbackService里面的方法*/
@FeignClient(value = "nacos-payment-provider",fallback = PaymentFallbackService.class)//调用中关闭9003服务提供者
public interface PaymentService {@GetMapping(value = "/paymentSQL/{id}")public CommonResult paymentSQL(@PathVariable("id") Long id);
}- 接口实现类:解决和业务逻辑混一起???混乱
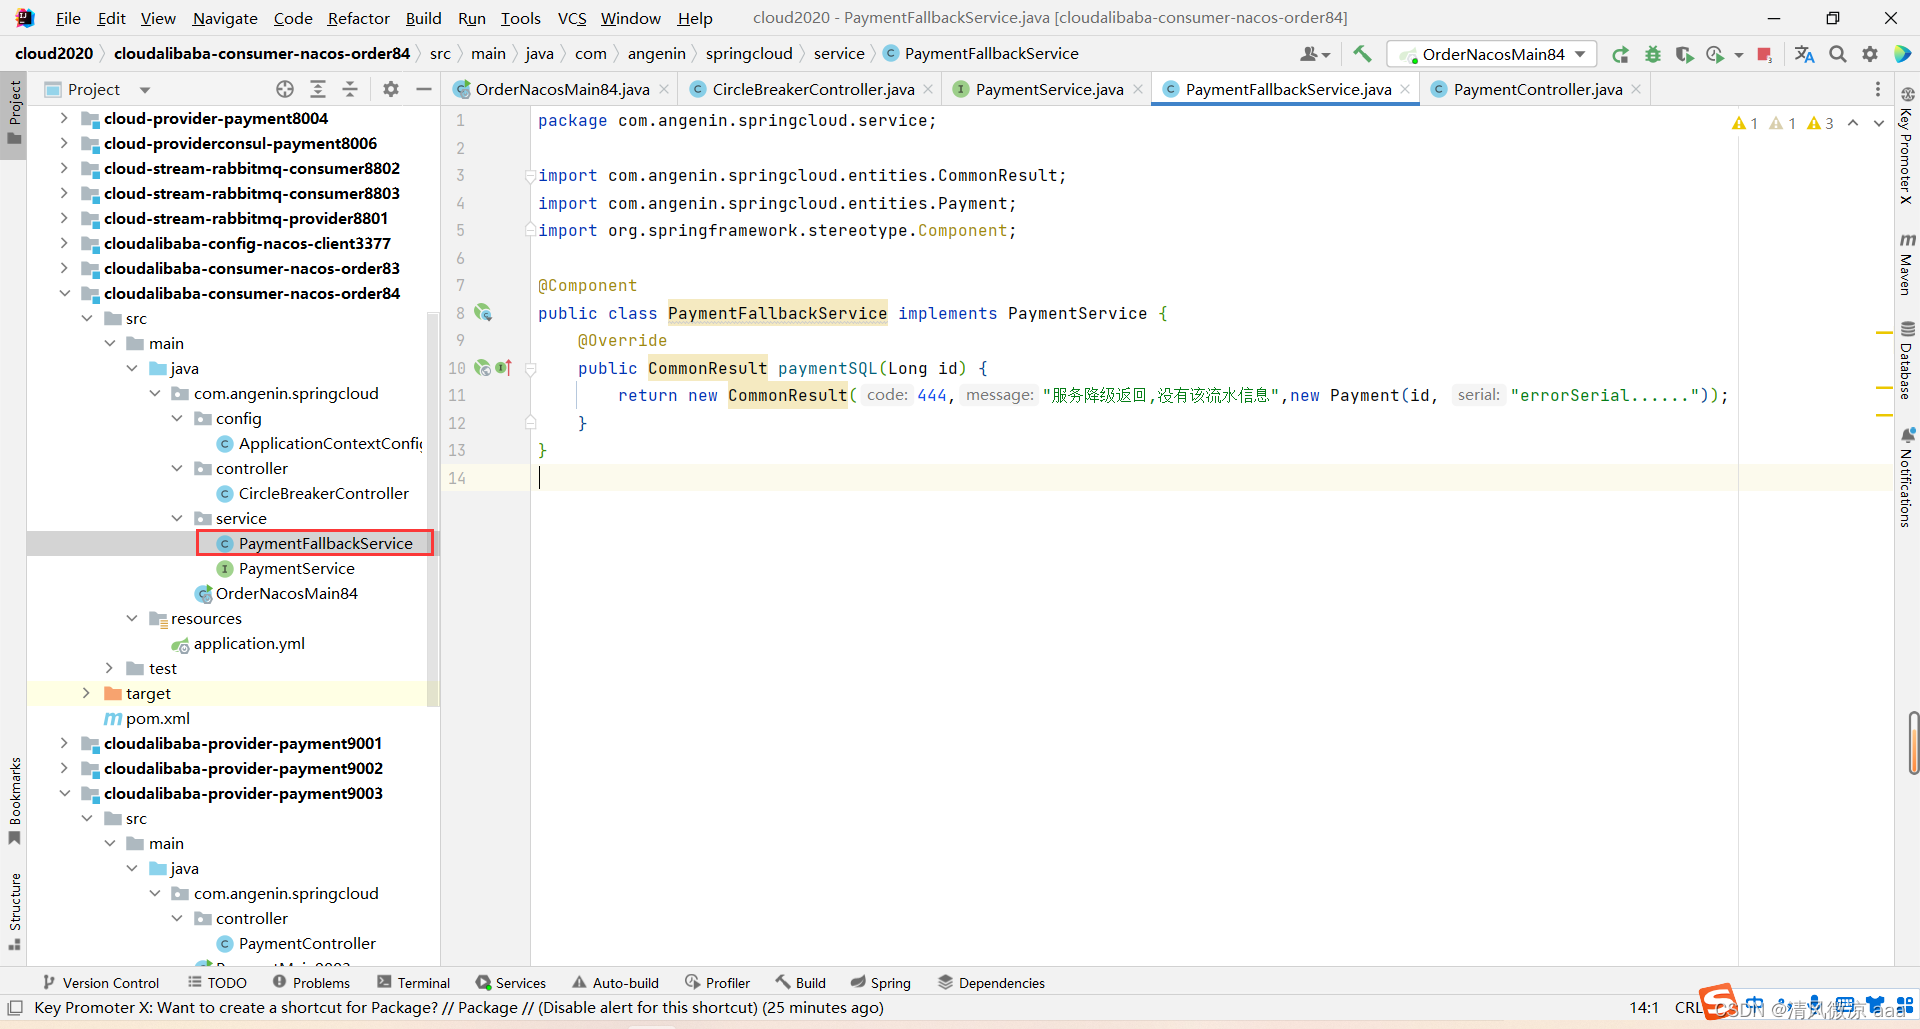
package com.angenin.springcloud.service;import com.angenin.springcloud.entities.CommonResult;
import com.angenin.springcloud.entities.Payment;
import org.springframework.stereotype.Component;@Component
public class PaymentFallbackService implements PaymentService {@Overridepublic CommonResult paymentSQL(Long id) {return new CommonResult(444,"服务降级返回,没有该流水信息",new Payment(id, "errorSerial......"));}
}- Controller
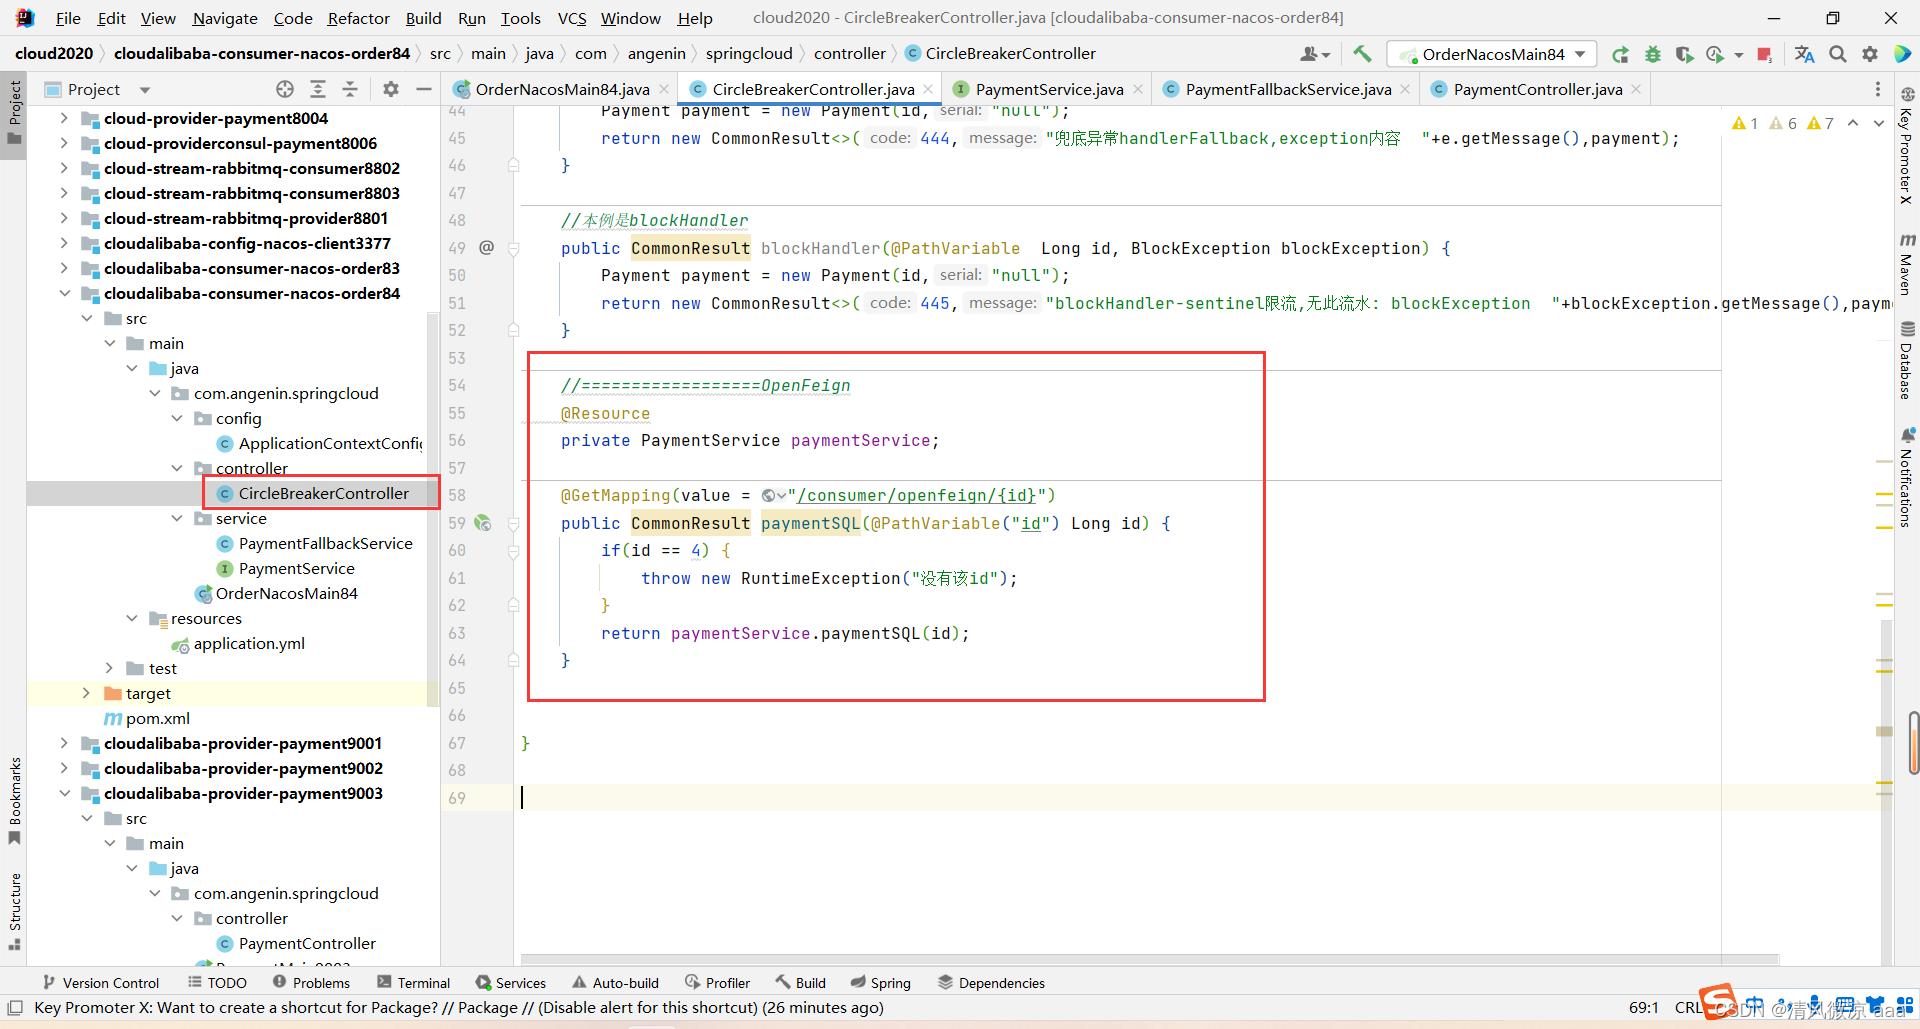
//==================OpenFeign@Resourceprivate PaymentService paymentService;@GetMapping(value = "/consumer/openfeign/{id}")public CommonResult paymentSQL(@PathVariable("id") Long id) {if(id == 4) {throw new RuntimeException("没有该id");}return paymentService.paymentSQL(id);}
5)主启动
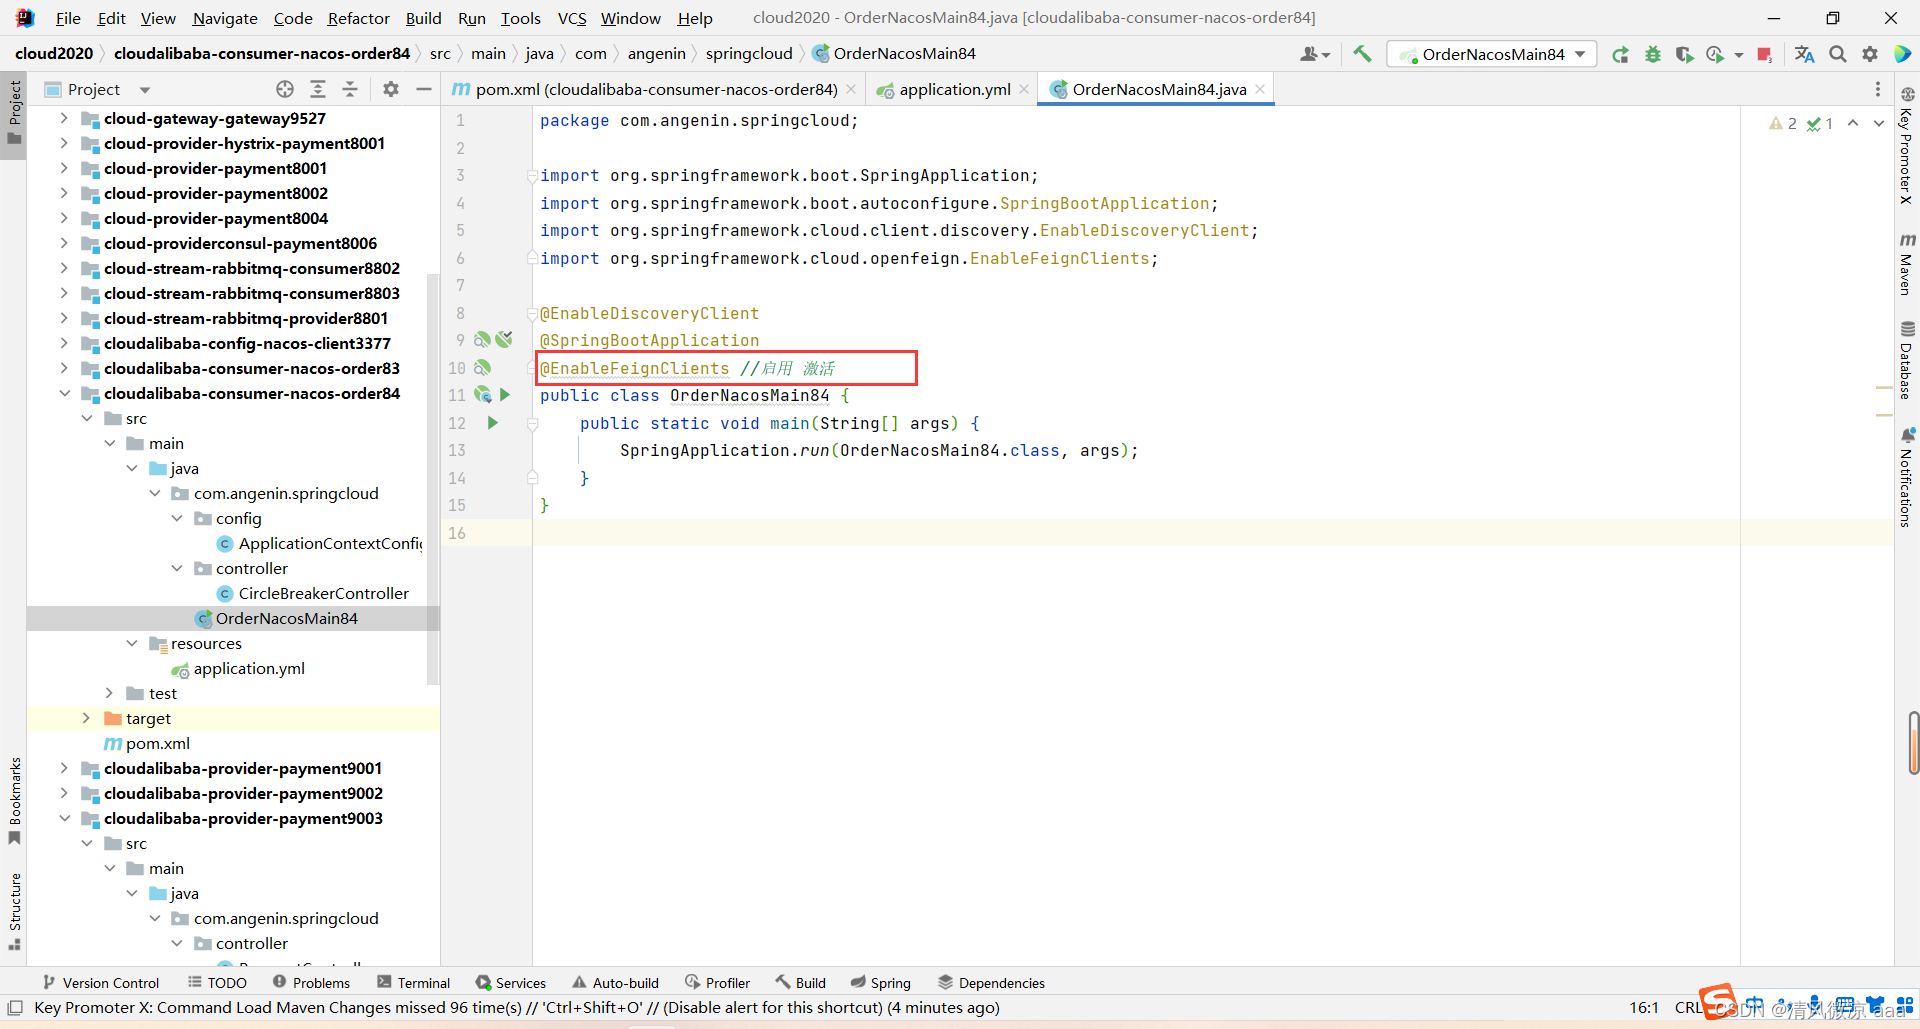
package com.angenin.springcloud;import org.springframework.boot.SpringApplication;
import org.springframework.boot.autoconfigure.SpringBootApplication;
import org.springframework.cloud.client.discovery.EnableDiscoveryClient;
import org.springframework.cloud.openfeign.EnableFeignClients;@EnableDiscoveryClient
@SpringBootApplication
@EnableFeignClients //启用 激活
public class OrderNacosMain84 {public static void main(String[] args) {SpringApplication.run(OrderNacosMain84.class, args);}
}
6)测试
-
启动消费者84,启动生产者9003
-
http://localhost:84/consumer/openfeign/1(正确访问)
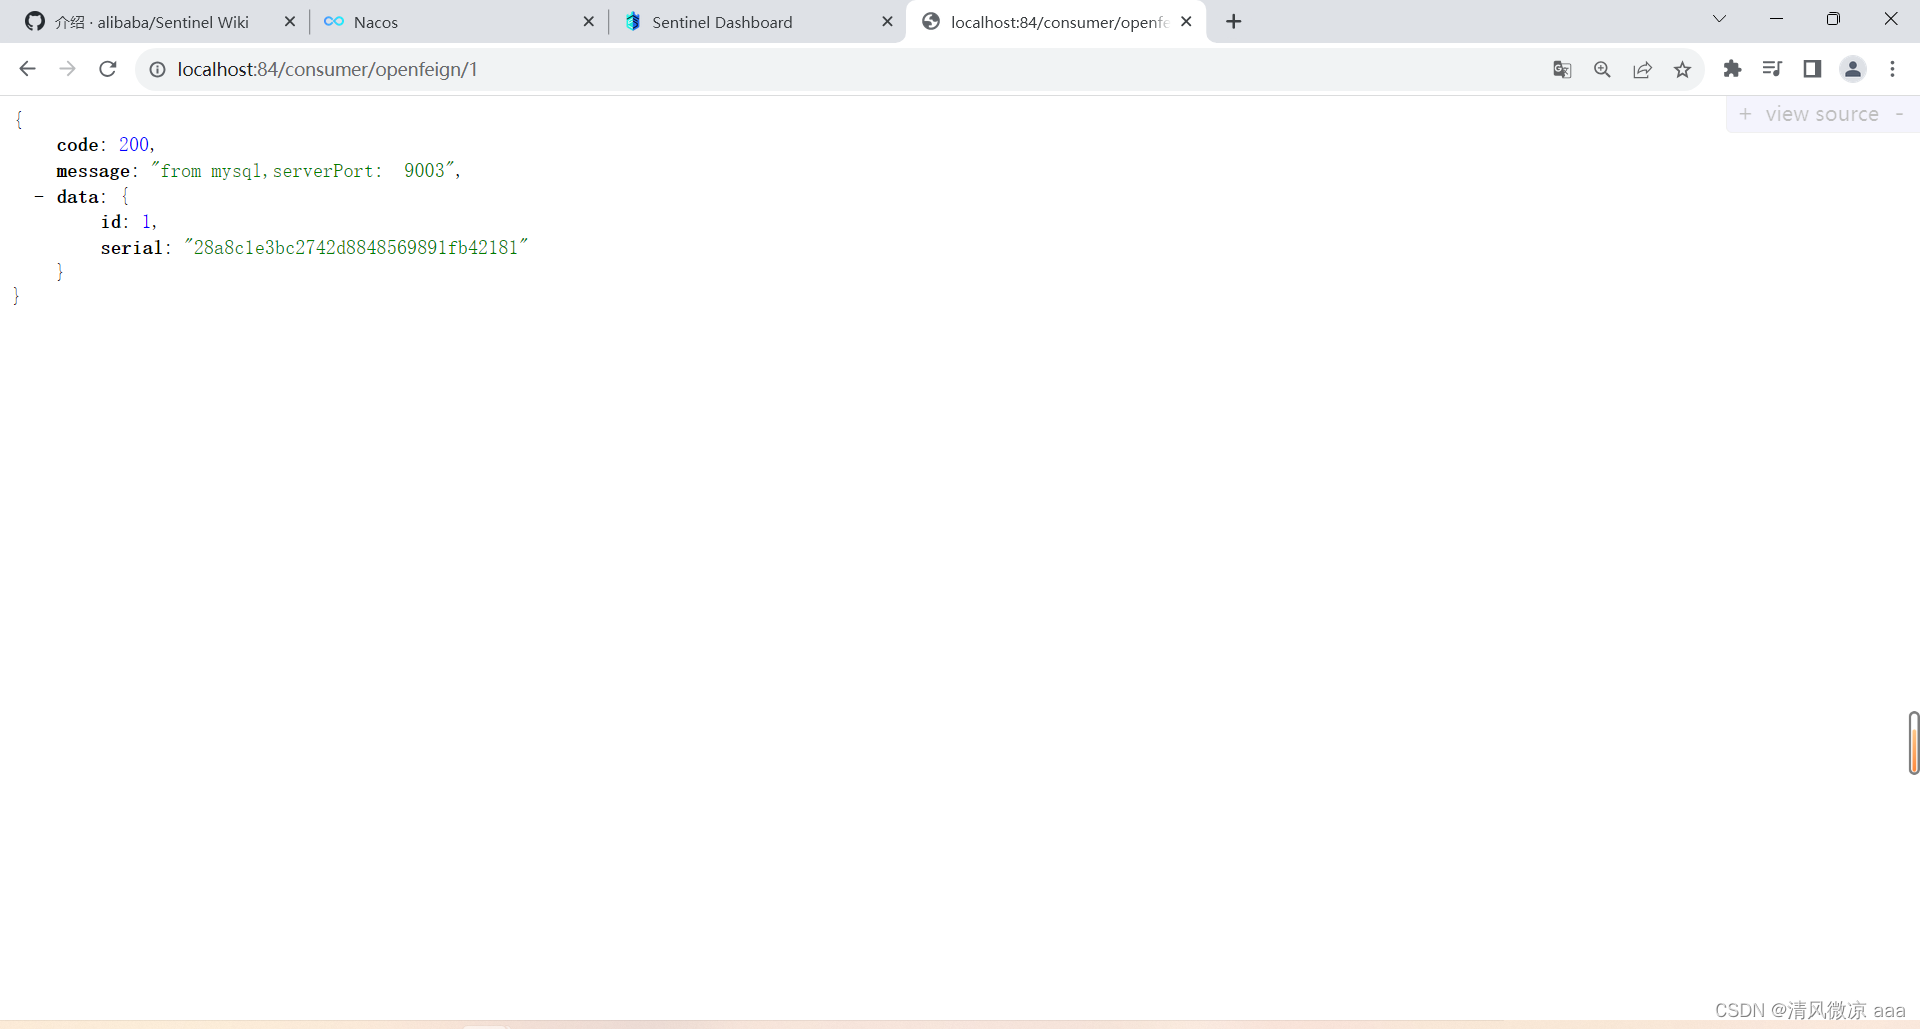
-
测试84调用9003,此时
故意关闭9003微服务提供者,看84消费侧自动降级,不会被耗死
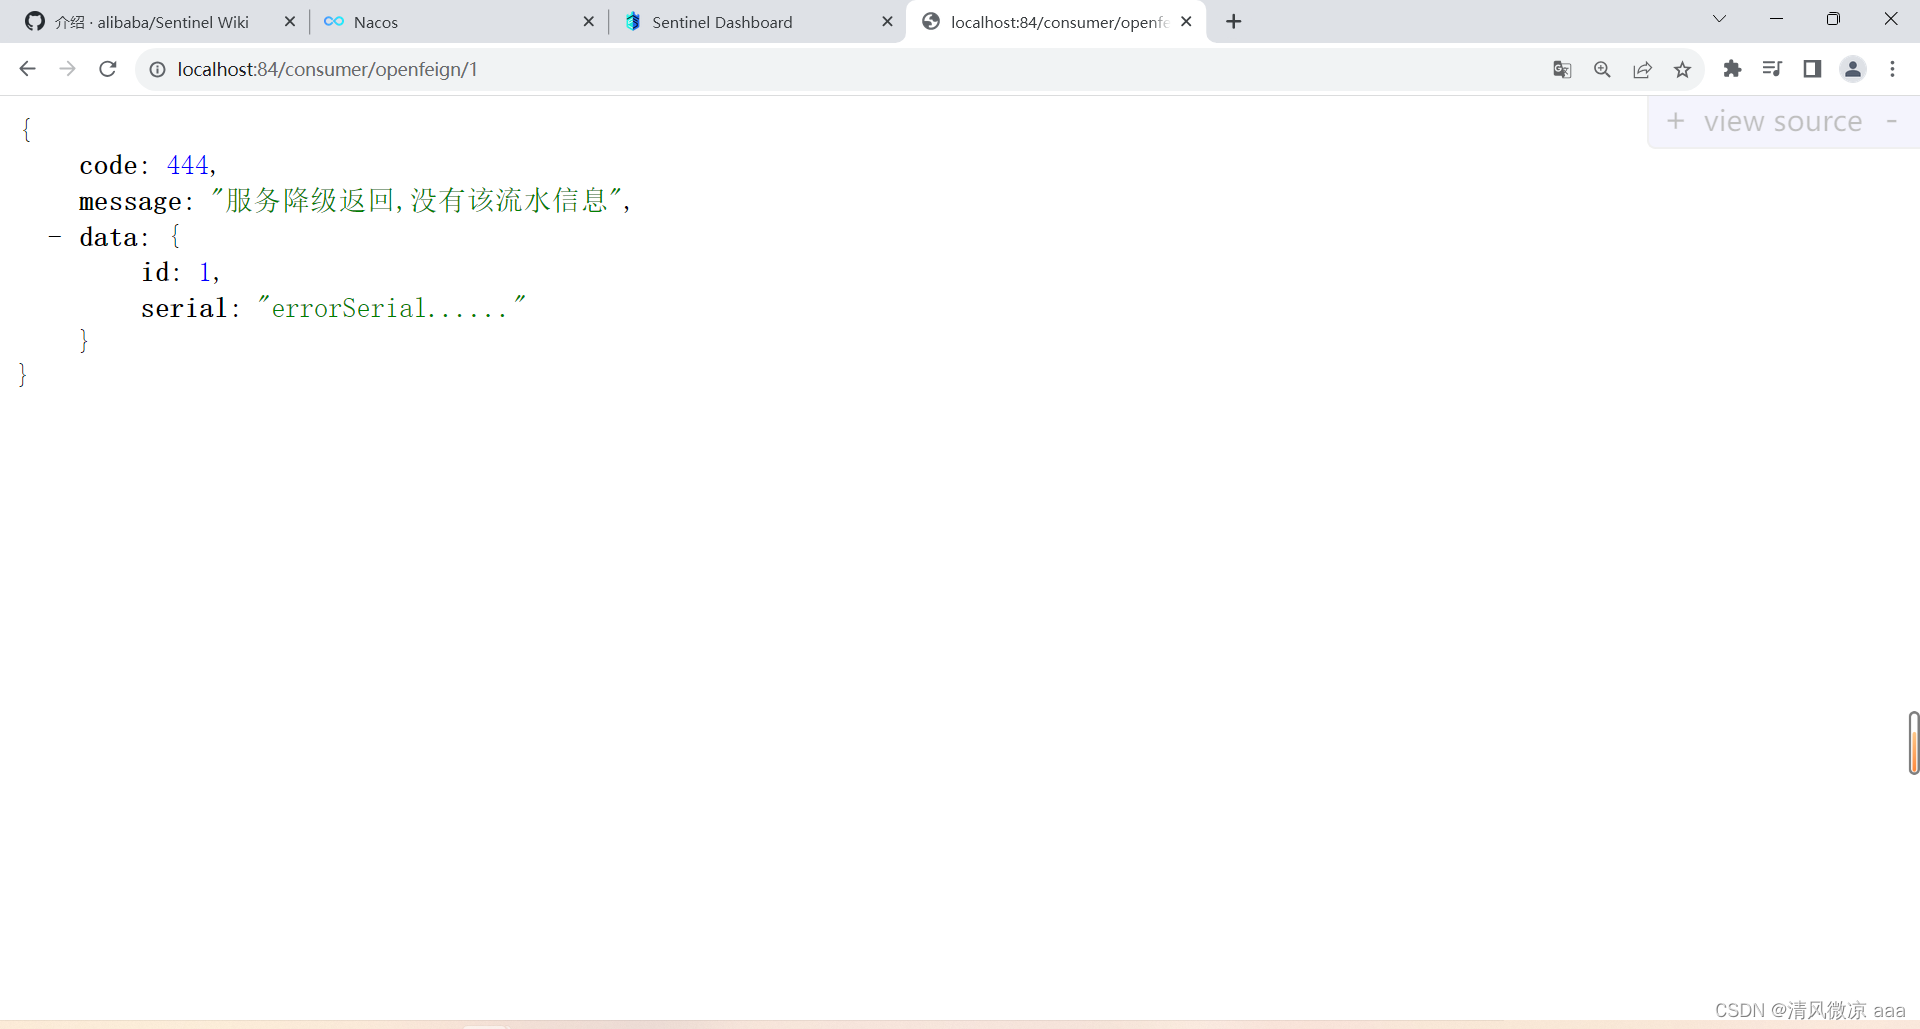
19.9.3 熔断框架比较
| Sentinel | Hystrix | resilience4j | |
|---|---|---|---|
| 隔离策略 | 信号量隔离(并发线程数限流) | 线程池隔商/信号量隔离 | 信号量隔离 |
| 熔断降级策略 | 基于响应时间、异常比率、异常数 | 基于异常比率 | 基于异常比率、响应时间 |
| 实时统计实现 | 滑动窗口(LeapArray) | 滑动窗口(基于RxJava) | Ring Bit Buffer |
| 动态规则配置 | 支持多种数据源 | 支持多种数据源 | 有限支持 |
| 扩展性 | 多个扩展点 | 插件的形式 | 接口的形式 |
| 基于注解的支持 | 支持 | 支持 | 支持 |
| 限流 | 基于QPS,支持基于调用关系的限流 | 有限的支持 | Rate Limiter |
| 流量整形 | 支持预热模式匀速器模式、预热排队模式 | 不支持 | 简单的Rate Limiter模式 |
| 系统自适应保护 | 支持 | 不支持 | 不支持 |
| 控制台 | 提供开箱即用的控制台,可配置规则、查看秒级监控,机器发观等 | 简单的监控查看 | 不提供控制台,可对接其它监控系统 |
19.10 规则持久化
19.10.1 是什么
一旦我们重启应用,sentinel规则将消失,生产环境需要将配置规则进行持久化
19.10.2 怎么玩
将限流配置规则持久化进Nacos保存,只要刷新8401某个rest地址,sentinel控制台的流控规则就能看到,只要Nacos里面的配置不删除,针对8401上sentinel上的流控规则持续有效
19.10.3 步骤:修改cloudalibaba-sentinel-service8401
1)POM
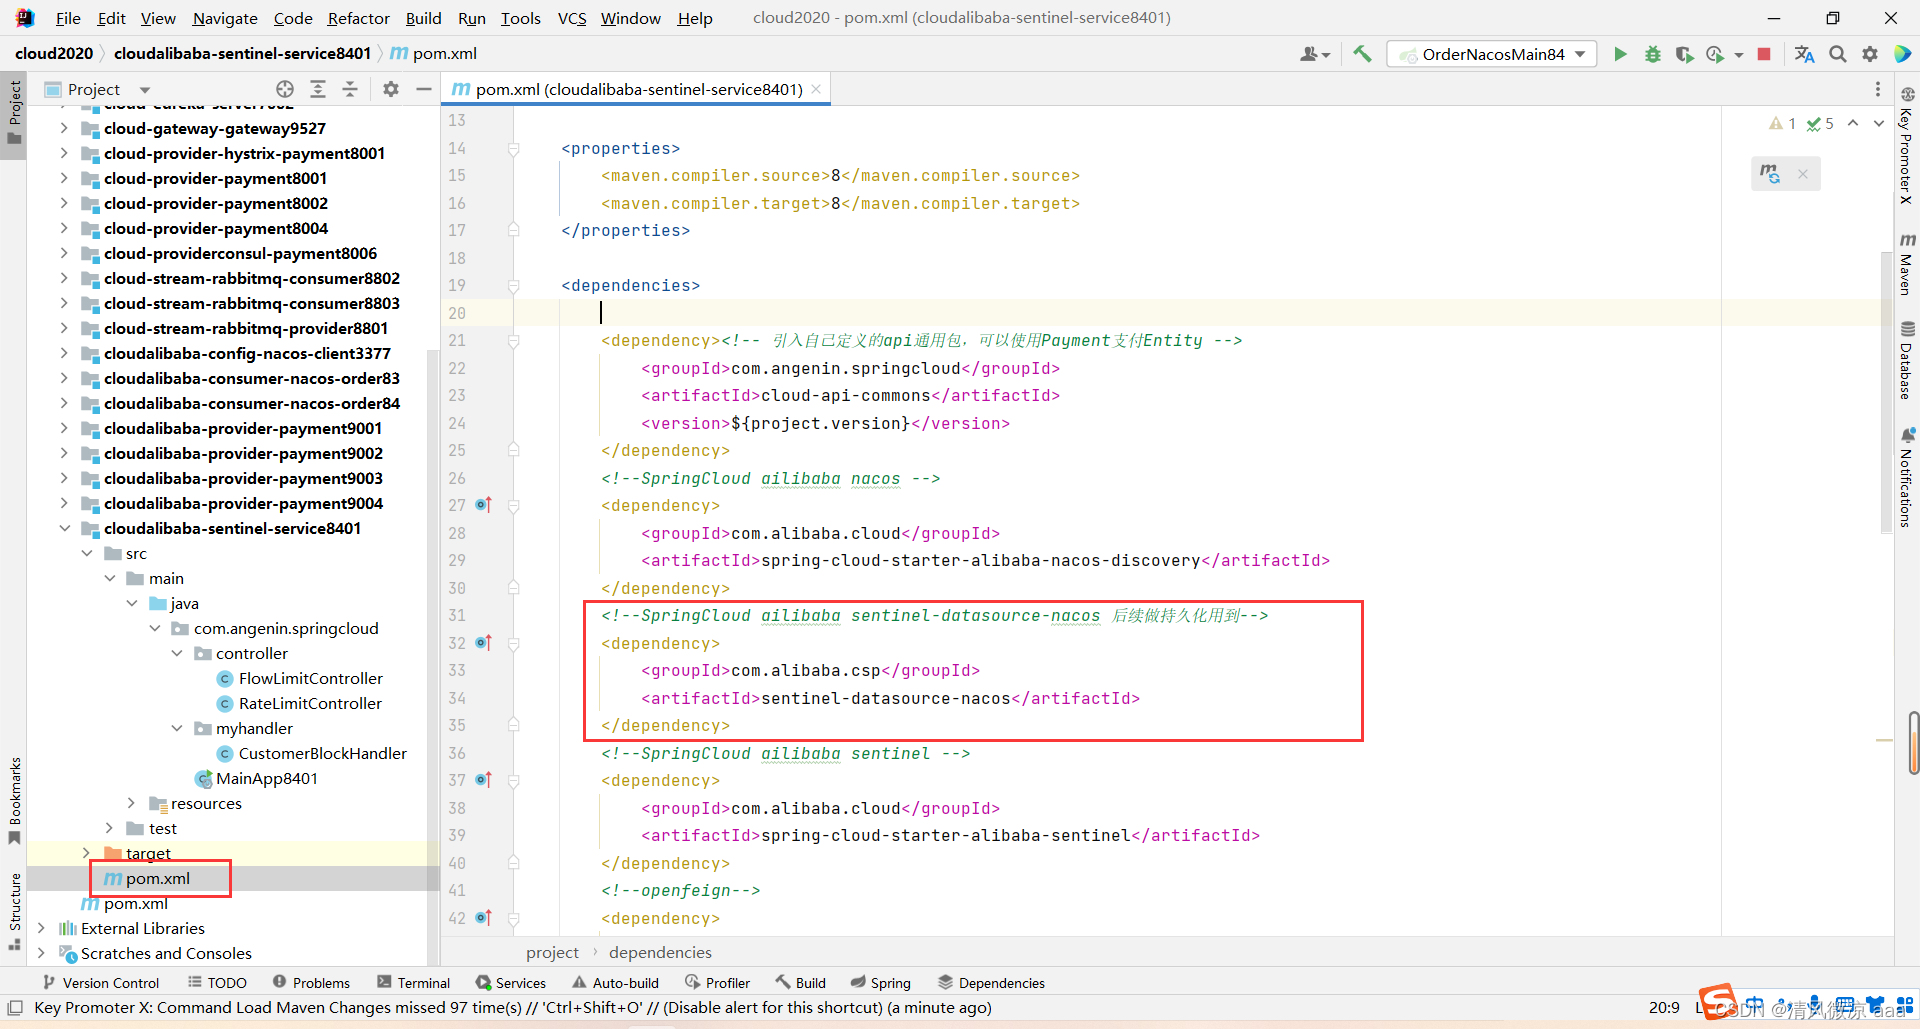
<!--SpringCloud ailibaba sentinel-datasource-nacos 后续做持久化用到-->
<dependency><groupId>com.alibaba.csp</groupId><artifactId>sentinel-datasource-nacos</artifactId>
</dependency>
2)YML
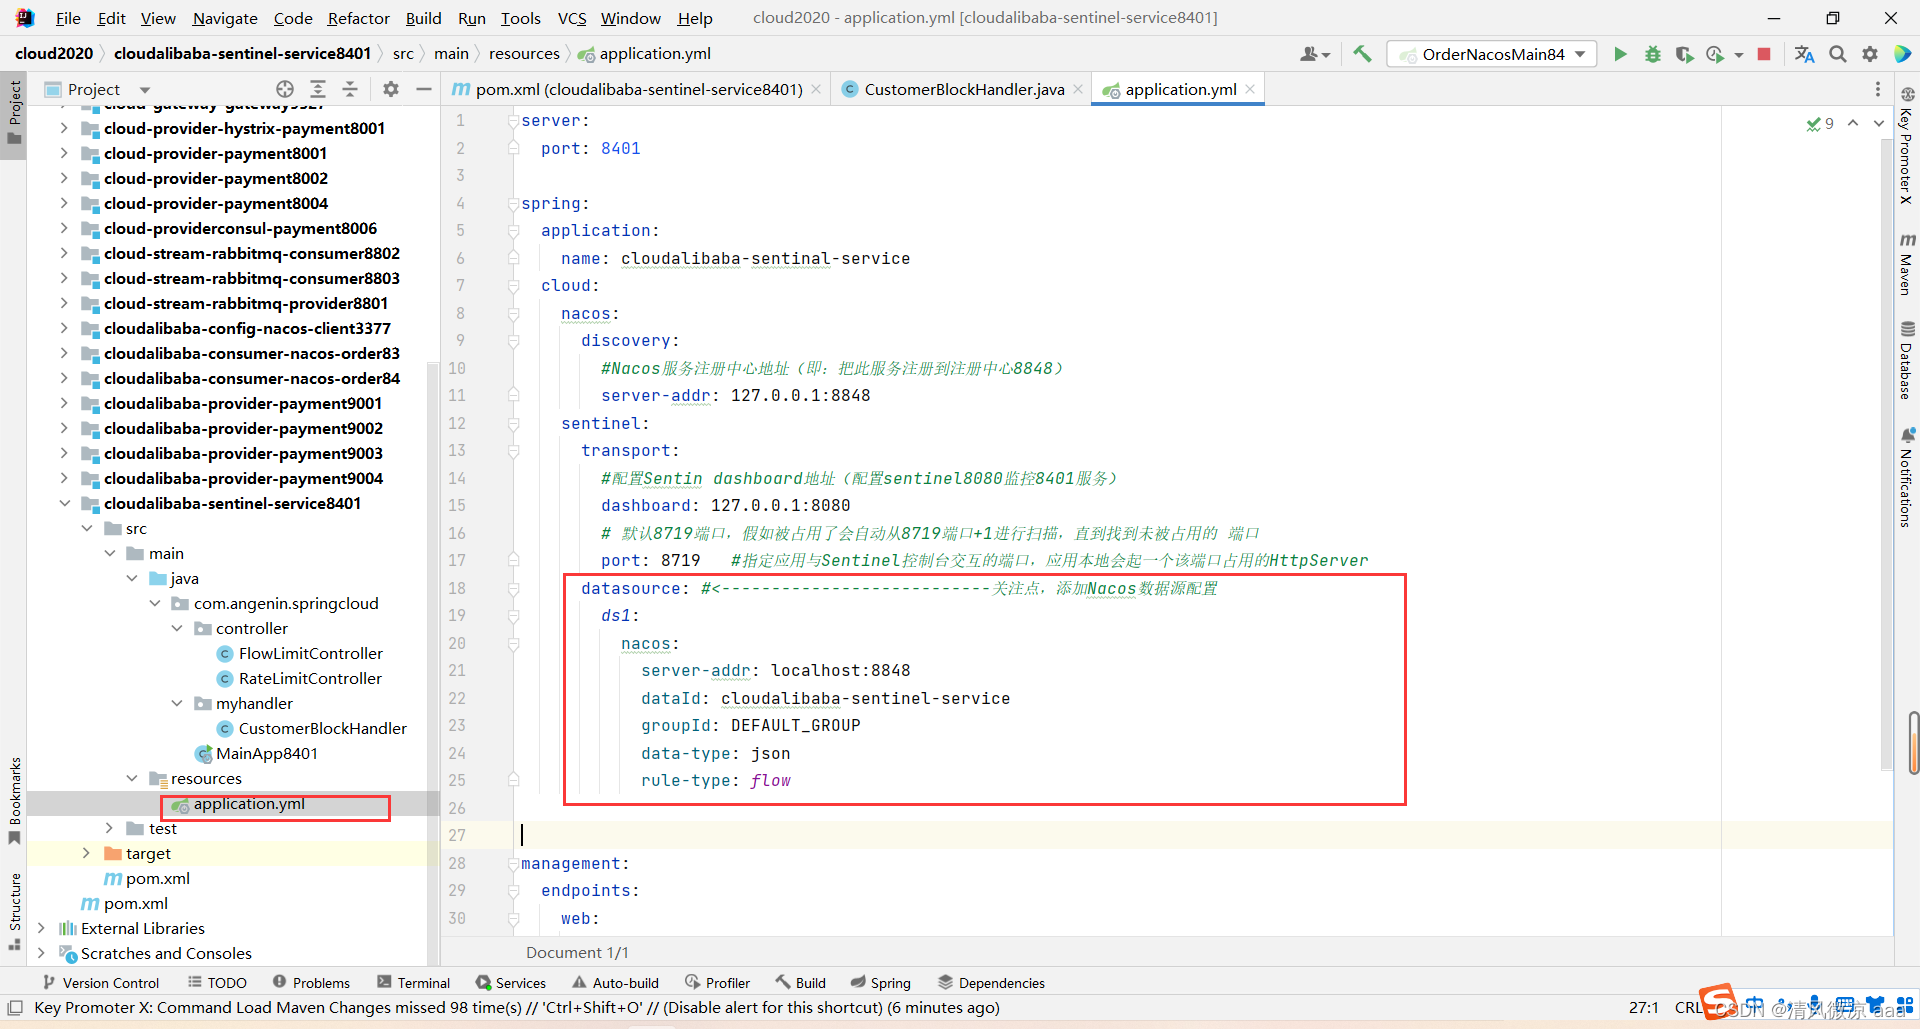
server:port: 8401spring:application:name: cloudalibaba-sentinal-servicecloud:nacos:discovery:#Nacos服务注册中心地址(即:把此服务注册到注册中心8848)server-addr: 127.0.0.1:8848sentinel:transport:#配置Sentin dashboard地址(配置sentinel8080监控8401服务)dashboard: 127.0.0.1:8080# 默认8719端口,假如被占用了会自动从8719端口+1进行扫描,直到找到未被占用的 端口port: 8719 #指定应用与Sentinel控制台交互的端口,应用本地会起一个该端口占用的HttpServerdatasource: #<---------------------------关注点,添加Nacos数据源配置ds1:nacos:server-addr: localhost:8848dataId: cloudalibaba-sentinel-servicegroupId: DEFAULT_GROUPdata-type: jsonrule-type: flowmanagement:endpoints:web:exposure:include: '*'3)添加Nacos业务规则配置
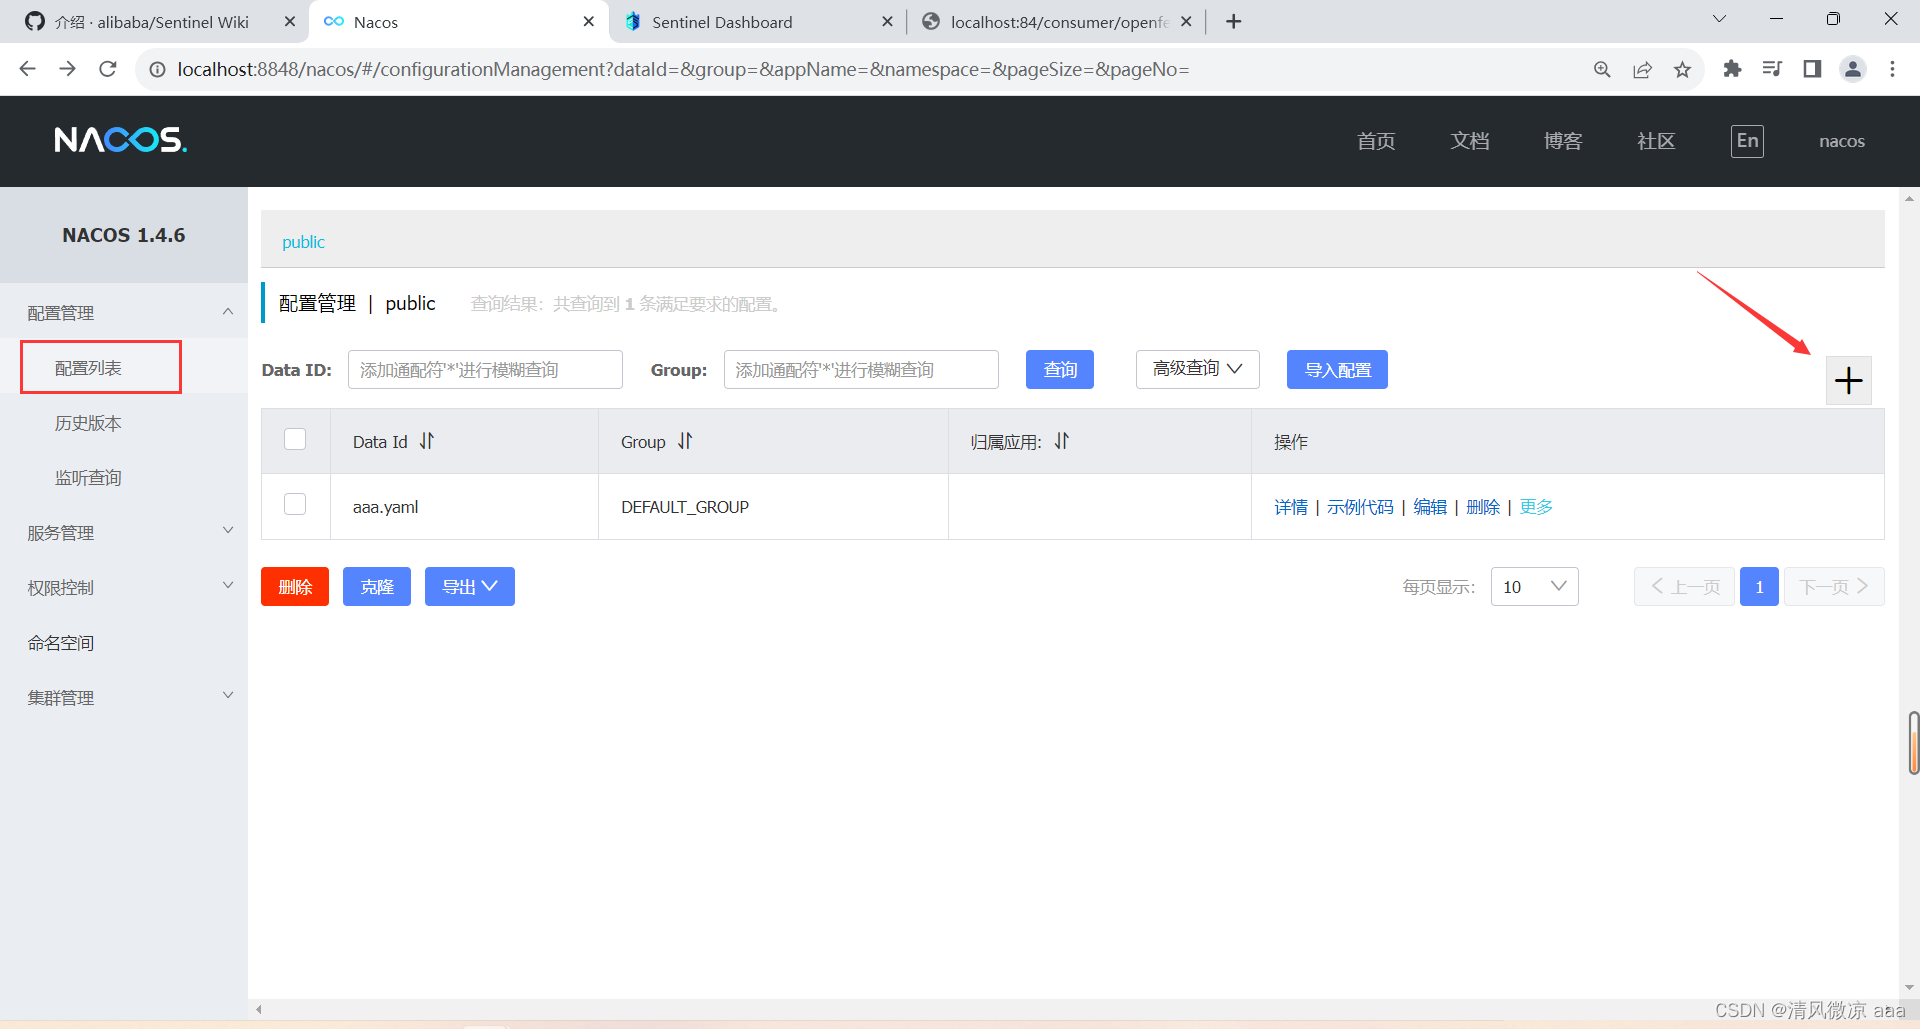
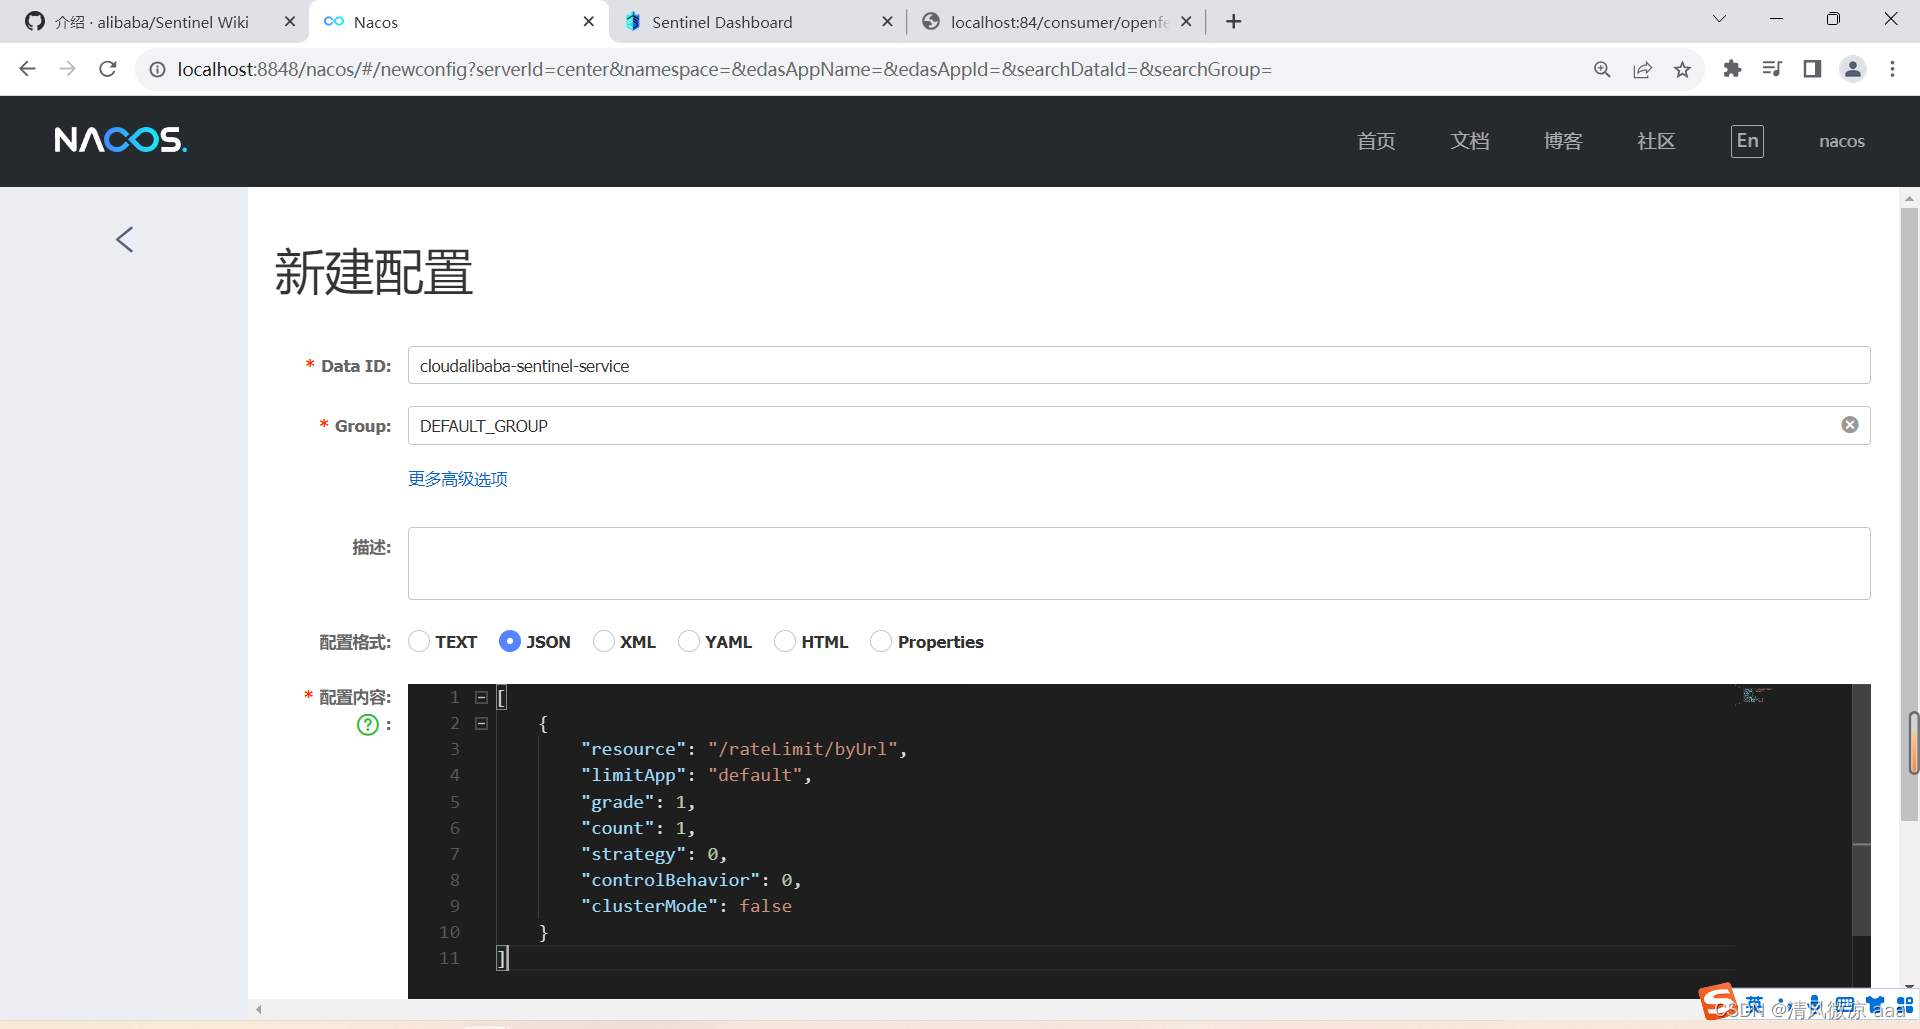
- 内容解析
- resource:资源名称;
- limitApp:来源应用;
- grade:阈值类型,0表示线程数,1表示QPS;
- count:单机阈值;
- strategy:流控模式,0表示直接,1表示关联,2表示链路;
- controlBehavior:流控效果,0表示快速失败,1表示Warm Up,2表示排队等待;
- clusterMode:是否集群。
[{"resource": "/rateLimit/byUrl","limitApp": "default","grade": 1,"count": 1,"strategy": 0,"controlBehavior": 0,"clusterMode": false}
]
4)添加配置,启动8401
-
控制层方法:之前的方法
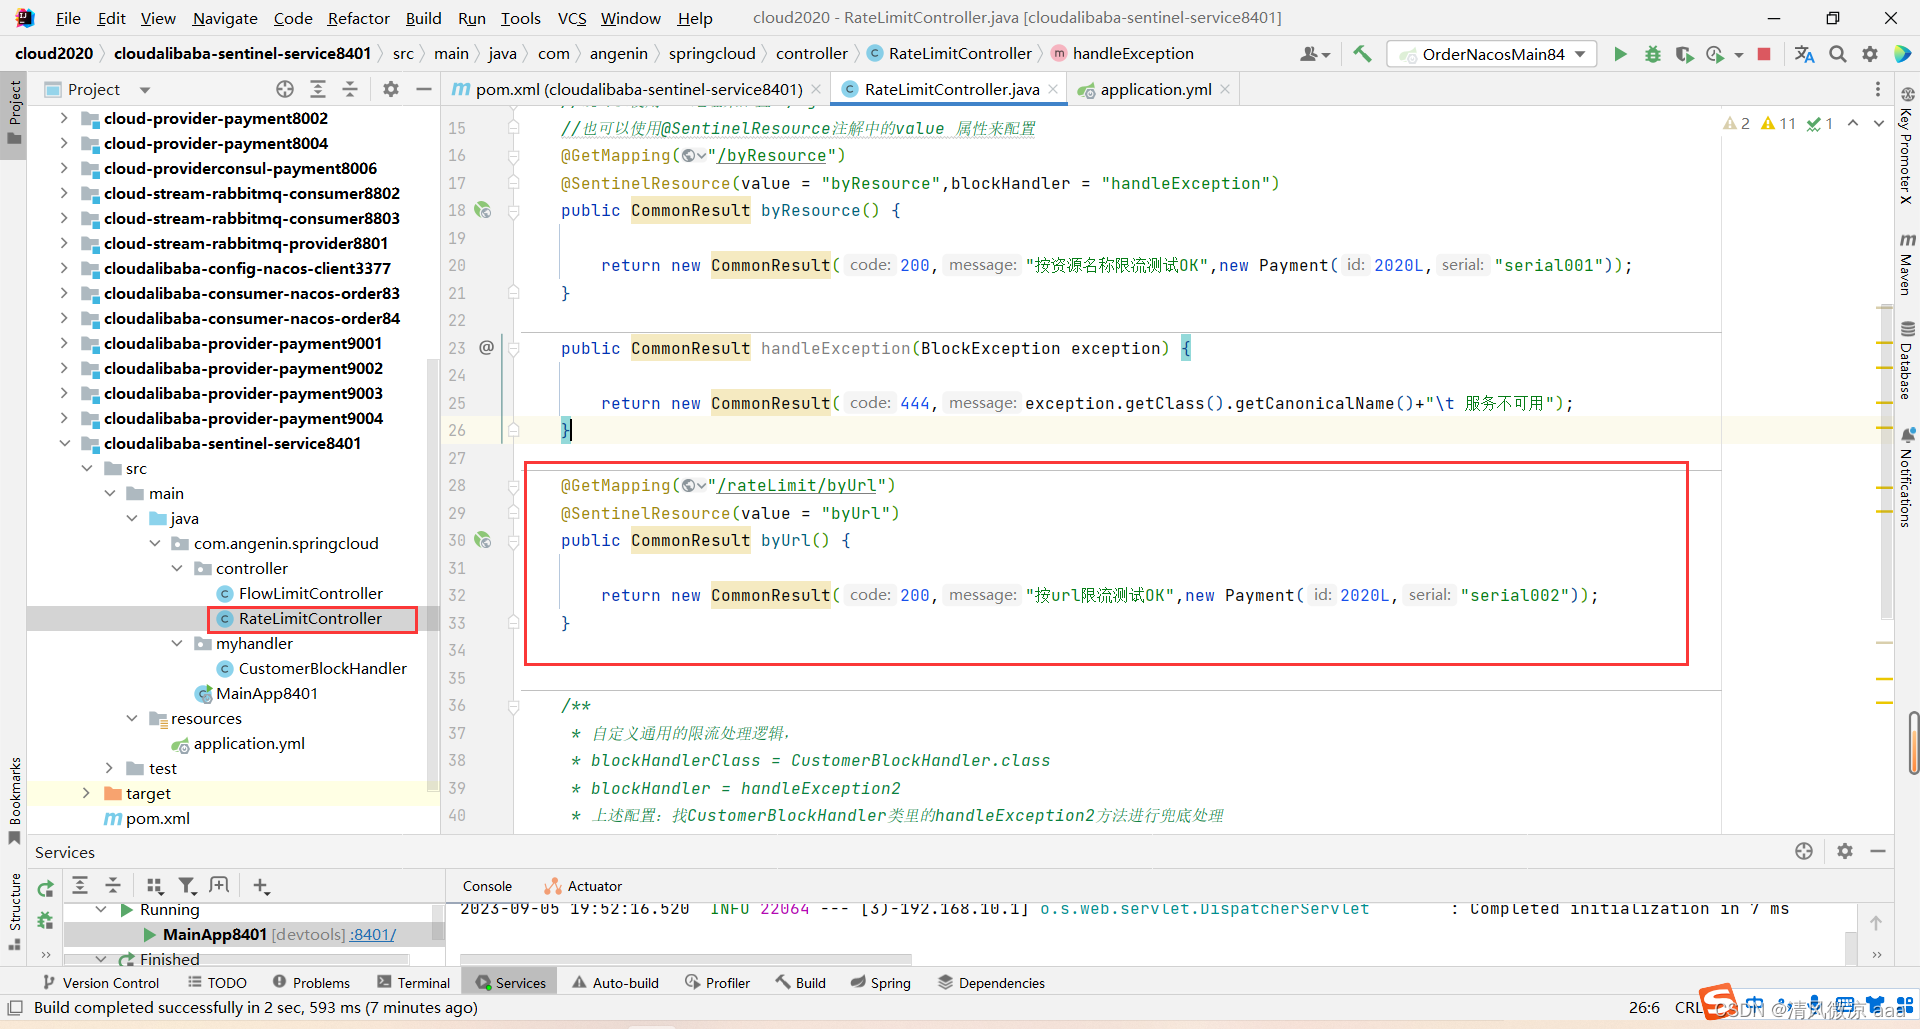
-
配置流控规则
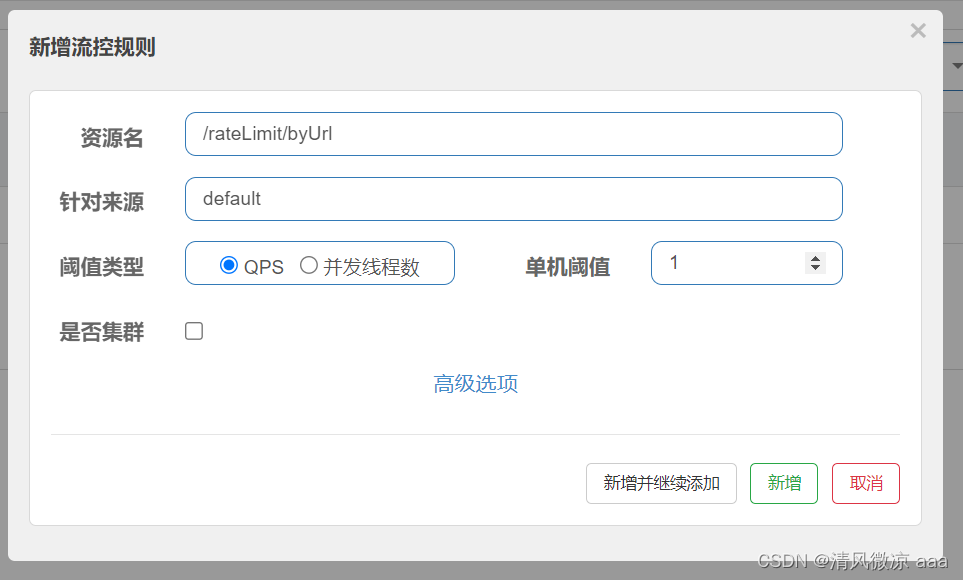
-
启动8401
5)快速访问测试接口
- http://localhost:8401/rateLimit/byUrl
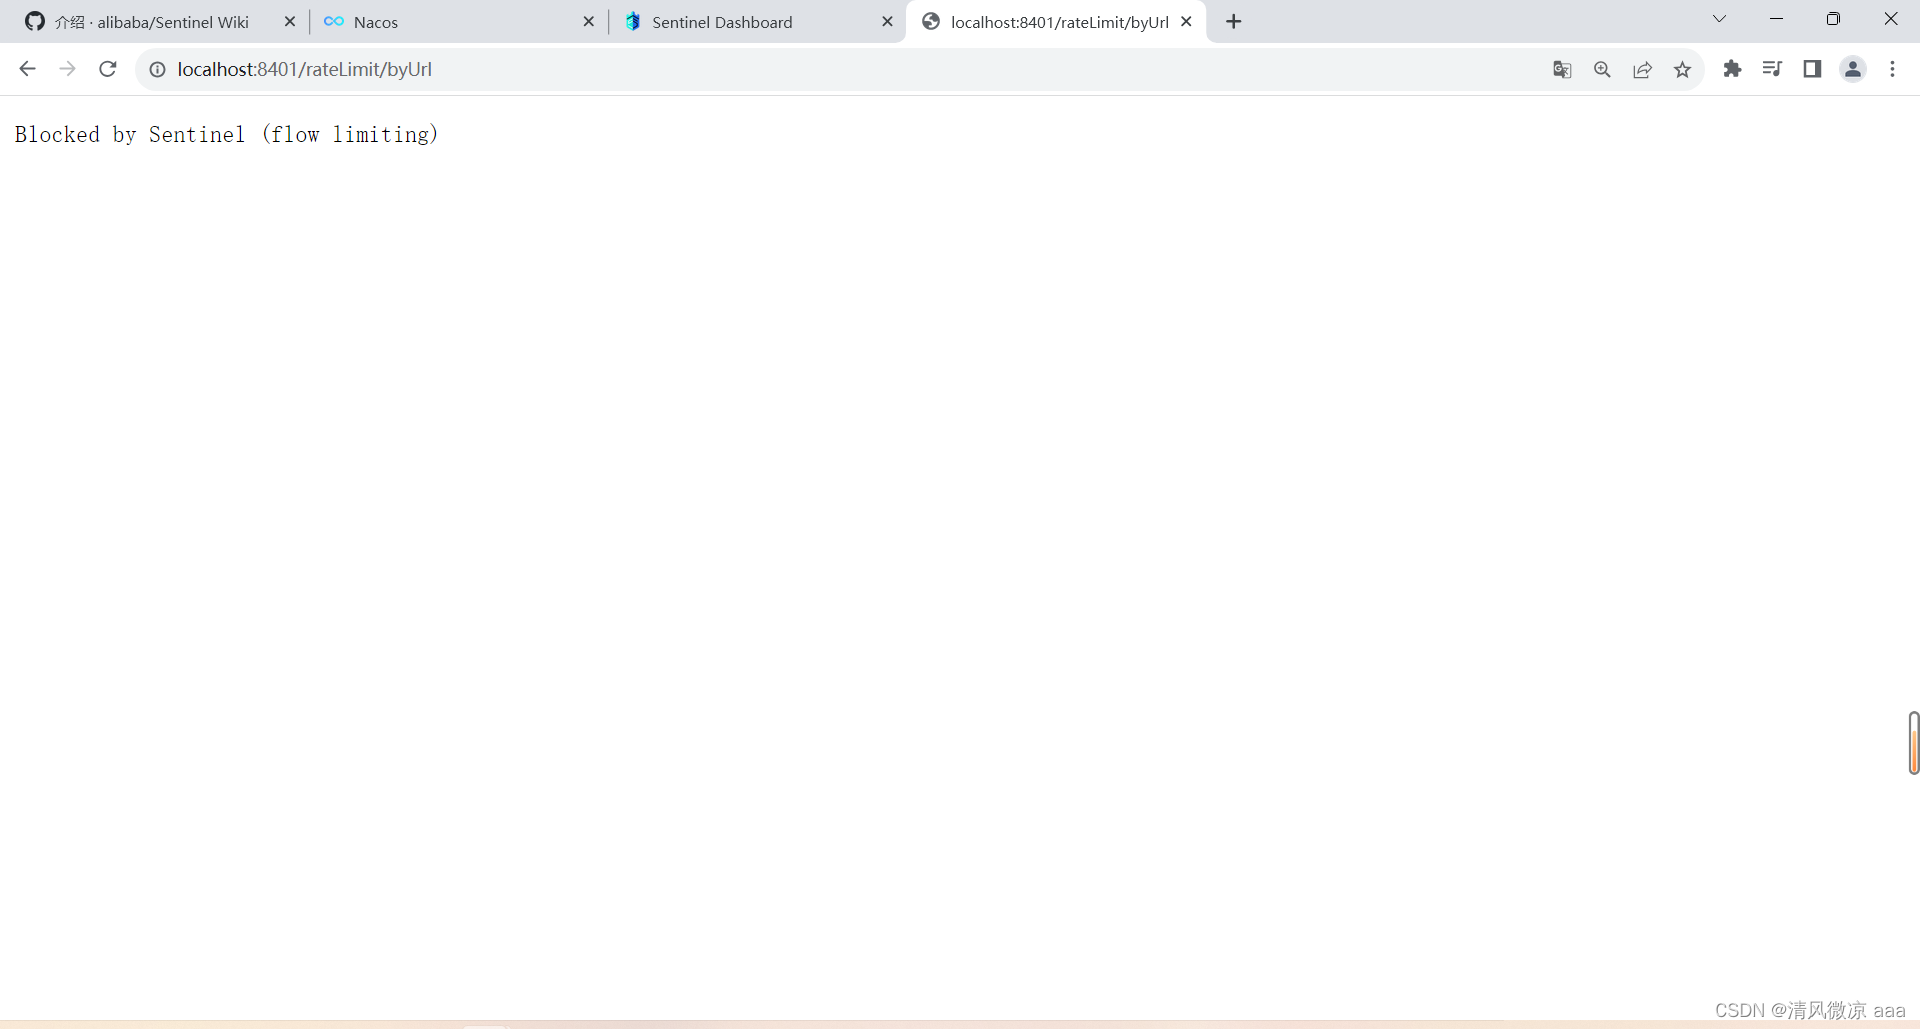
6)停止8401再看sentinel
- 停机后发现流控规则没有了
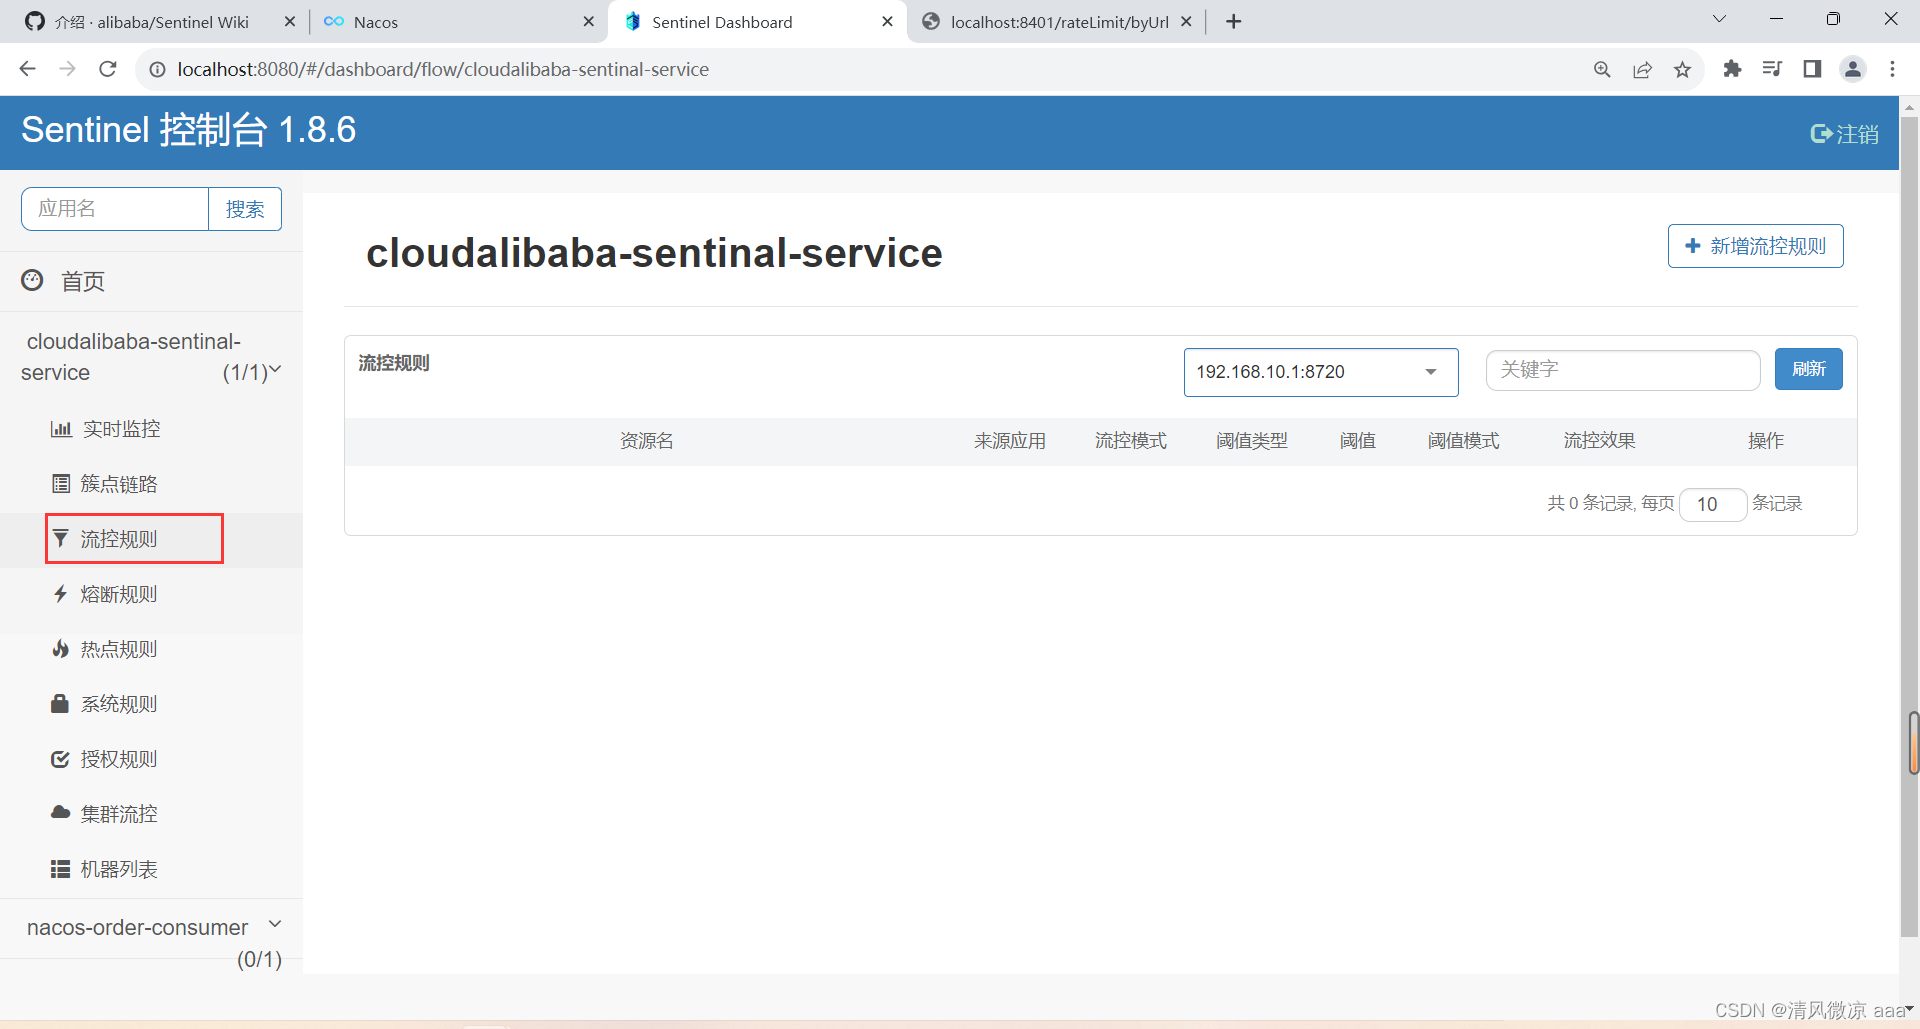
7)重新启动8401再看sentinel
-
乍一看还是没有,稍等一会儿
-
多次调用:http://localhost:8401/rateLimit/byUrl
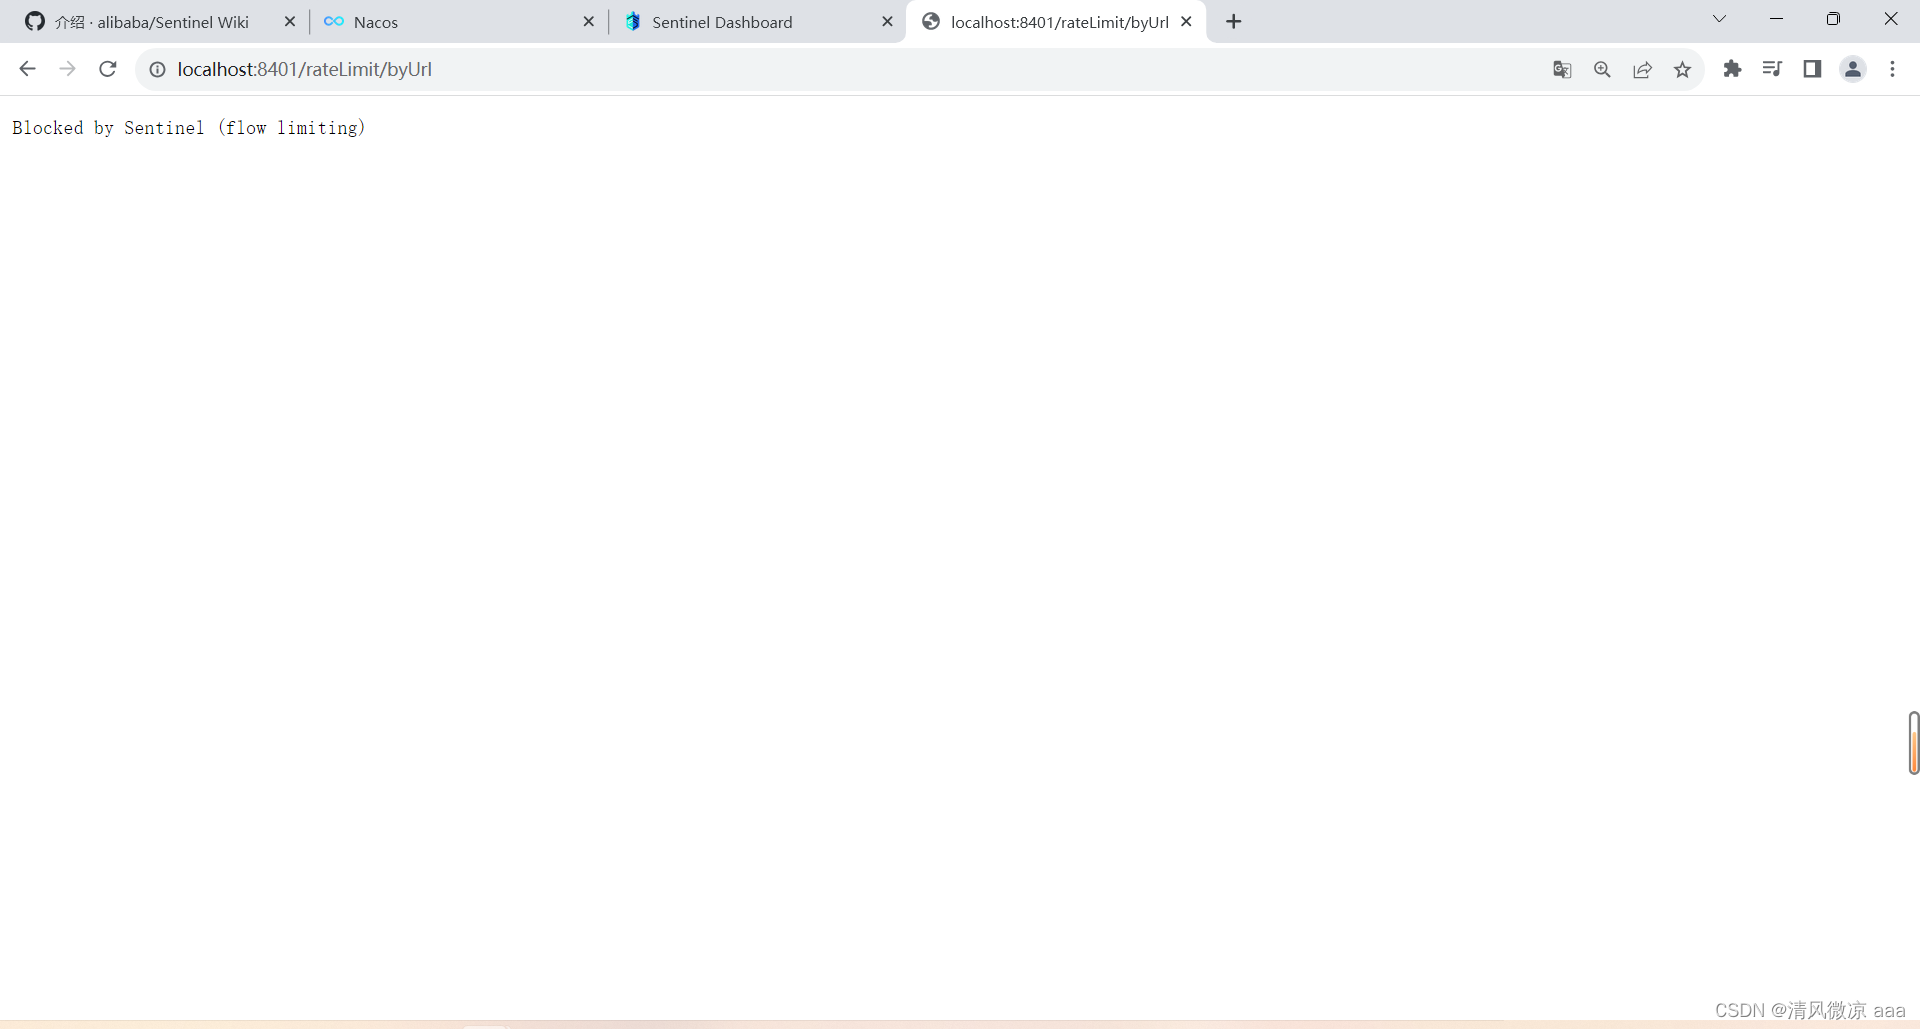
-
刷新sentinel页面:重新配置出现了,持久化验证通过
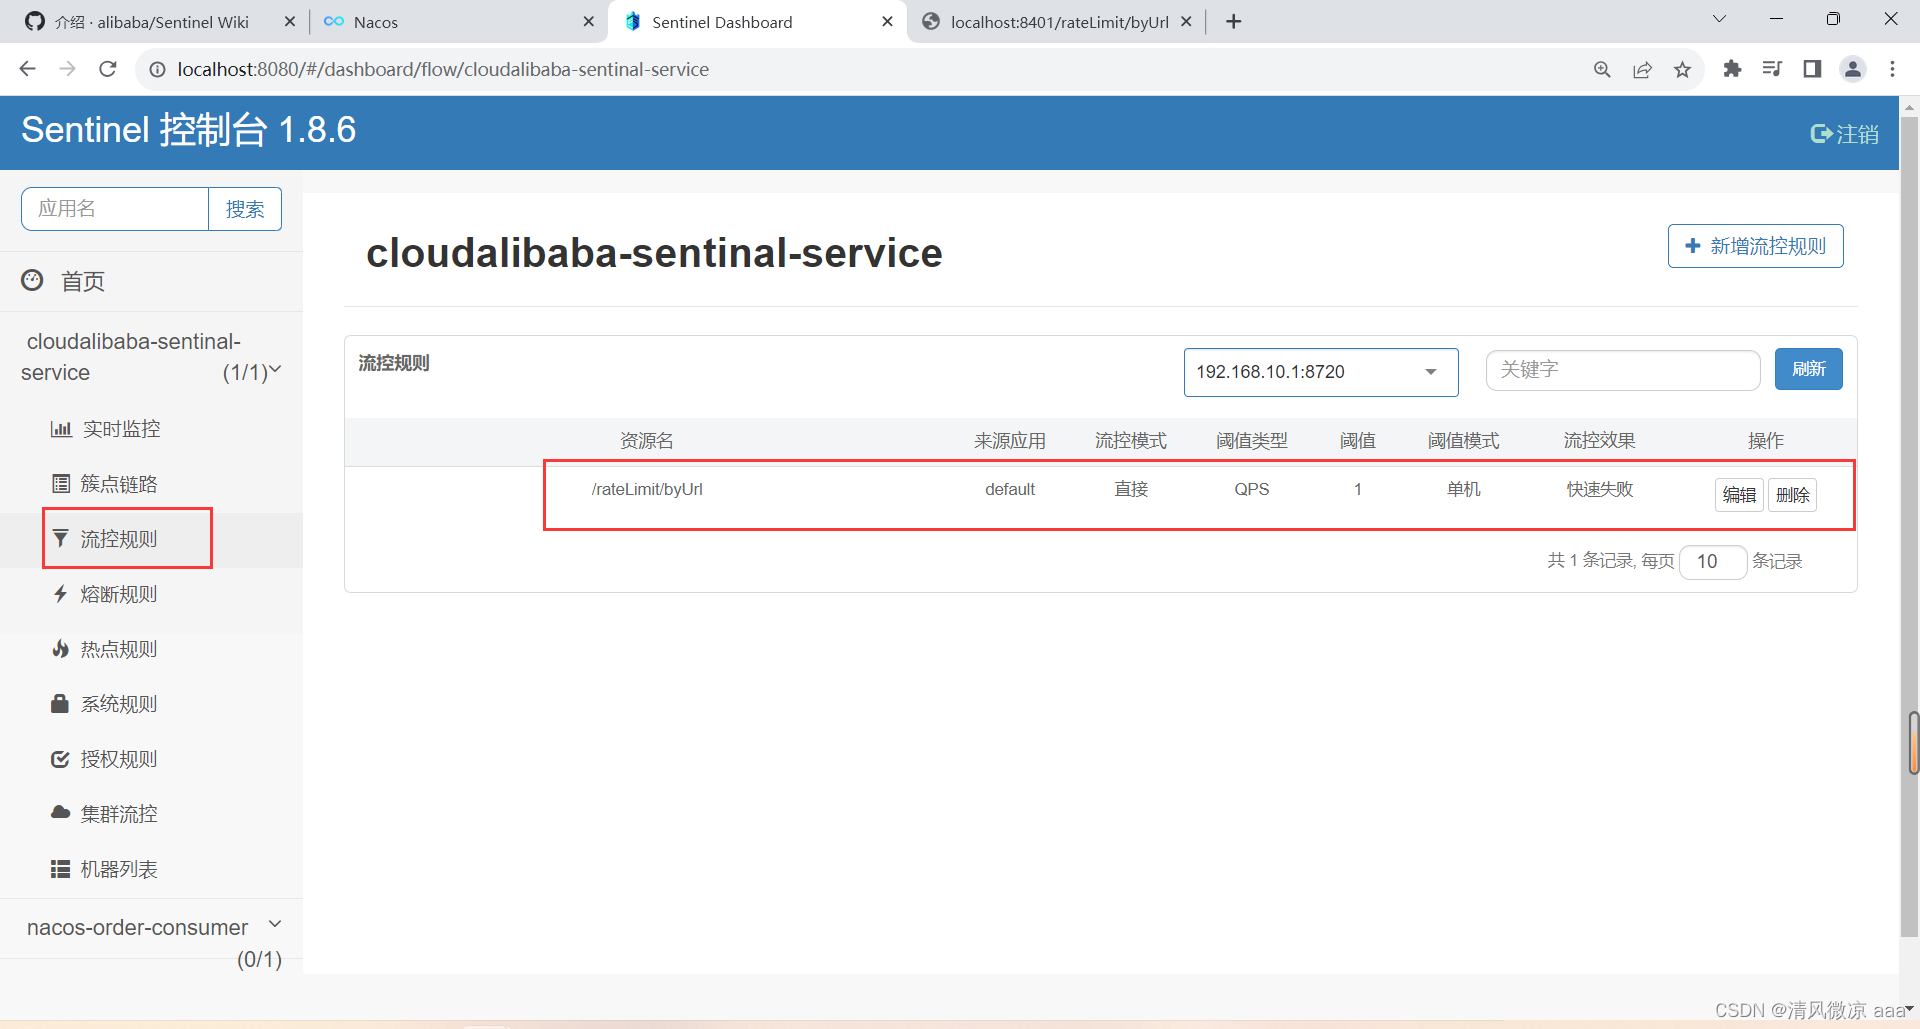
20 Seata处理分布式事务
- SpringCloud Alibaba Seata处理分布式事务
阳哥讲的版本太老了,这里我已黑马的版本为例进行学习。- 博客查看:
待发布
- 博客查看:
20.1 Seata-Server安装(1.7.0)
20.3.1 版本说明
- 说明:Seata不同版本的配置有很大的不同,1.4.2之前conf下需要修改2个配置文件,到现在都整合为了一个application.yml文件,下面讲解使用1.7.0版本如何进行安装配置(2023-9-5)
20.1.2 Seata Server存储模式(3种)
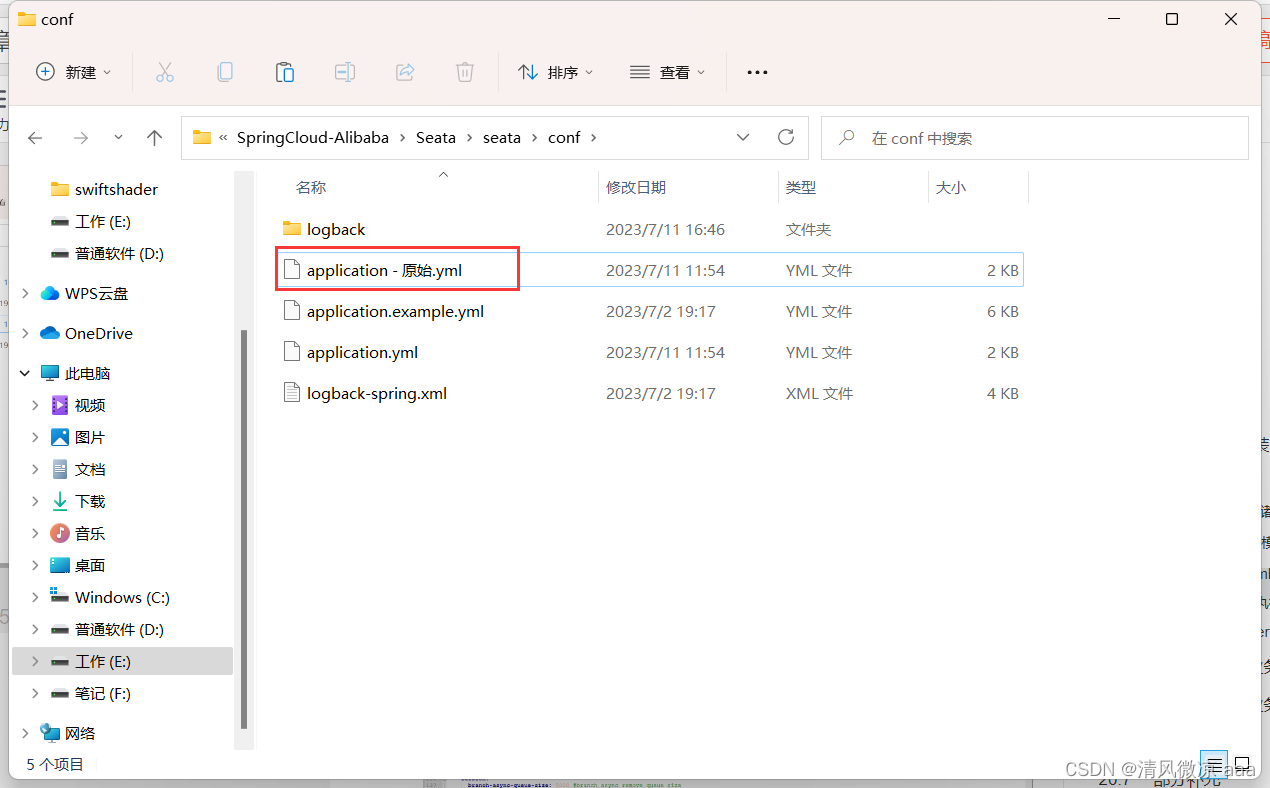
- seata-server-1.7.0.zip解压到指定目录并修改conf目录下的application.yml配置文件,先备份原始application.yml文件
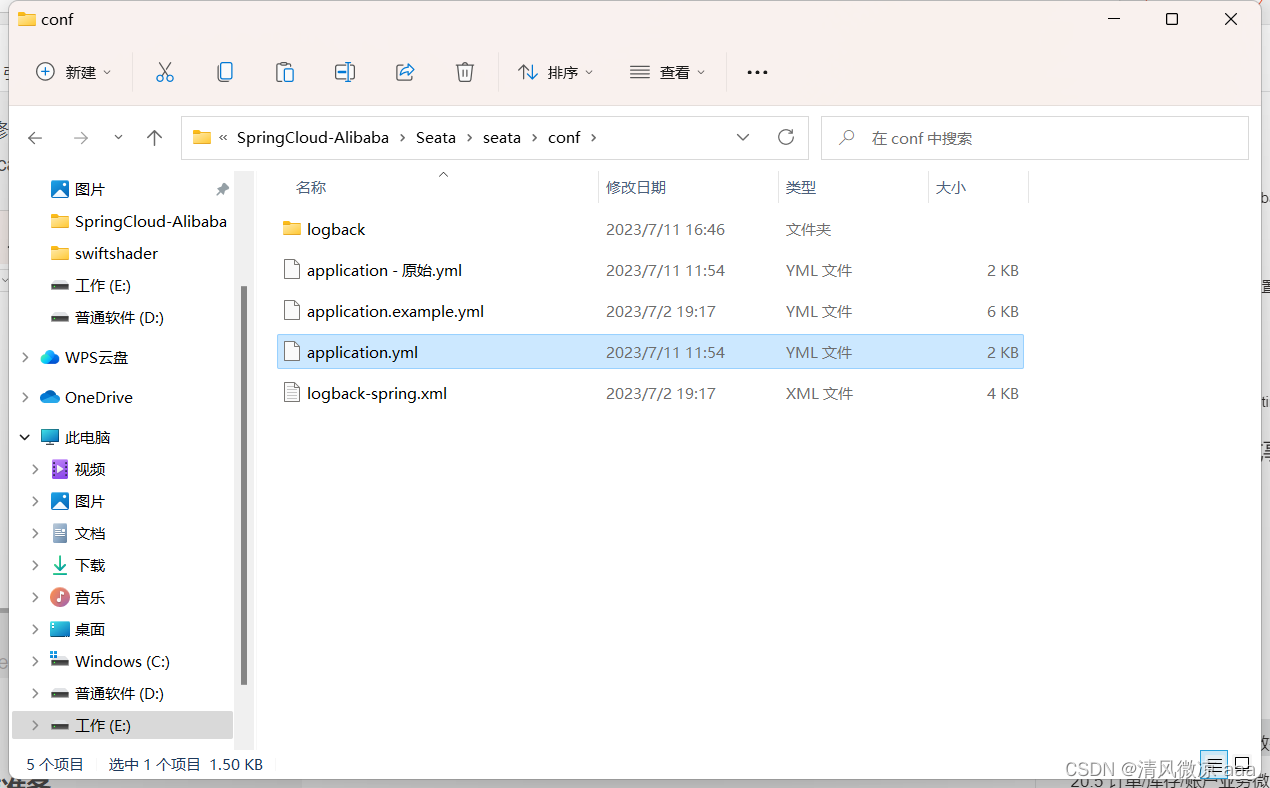
- 查看application.yml文件
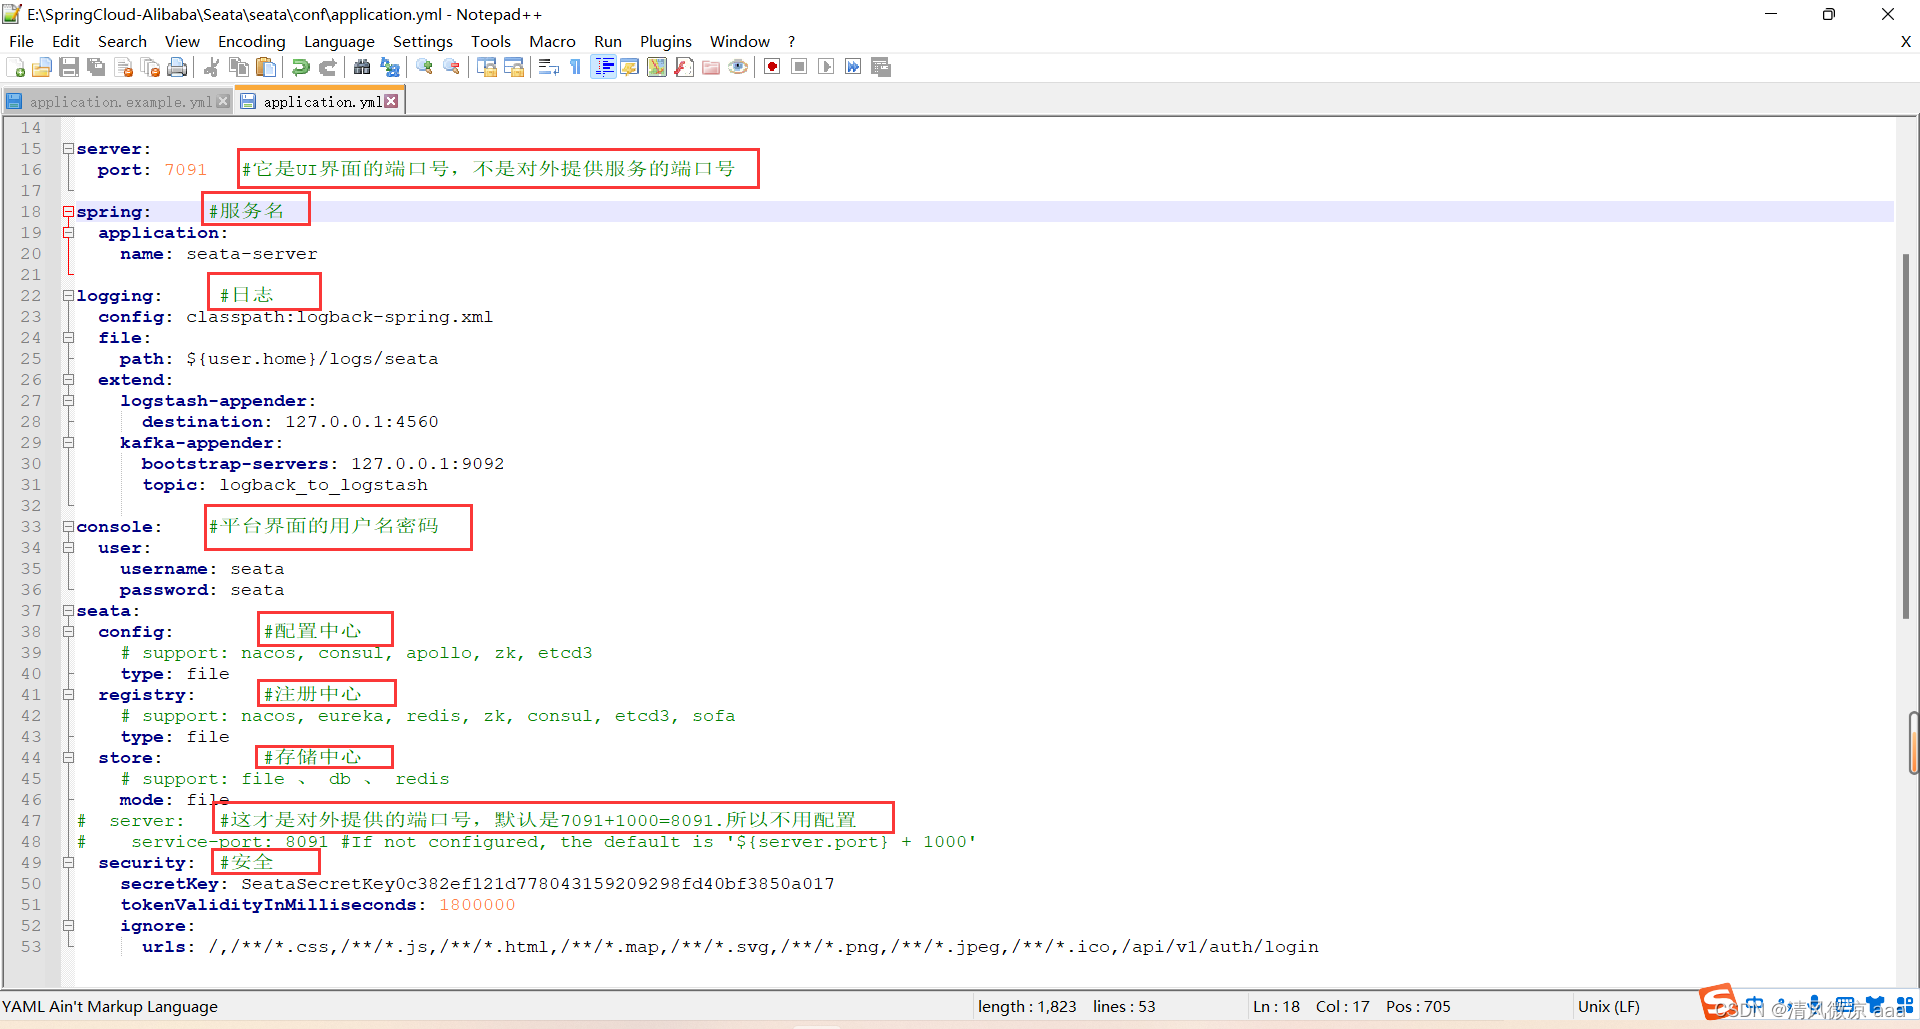
#  Copyright 1999-2019 Seata.io Group.
#
#  Licensed under the Apache License, Version 2.0 (the "License");
#  you may not use this file except in compliance with the License.
#  You may obtain a copy of the License at
#
#  http://www.apache.org/licenses/LICENSE-2.0
#
#  Unless required by applicable law or agreed to in writing, software
#  distributed under the License is distributed on an "AS IS" BASIS,
#  WITHOUT WARRANTIES OR CONDITIONS OF ANY KIND, either express or implied.
#  See the License for the specific language governing permissions and
#  limitations under the License.server:port: 7091   #它是UI界面的端口号,不是对外提供服务的端口号spring:     #服务名application:name: seata-serverlogging:     #日志config: classpath:logback-spring.xmlfile:path: ${user.home}/logs/seataextend:logstash-appender:destination: 127.0.0.1:4560kafka-appender:bootstrap-servers: 127.0.0.1:9092topic: logback_to_logstashconsole:    #平台界面的用户名密码user:username: seatapassword: seata
seata:config:        #配置中心# support: nacos, consul, apollo, zk, etcd3type: fileregistry:      #注册中心# support: nacos, eureka, redis, zk, consul, etcd3, sofatype: filestore:         #存储中心# support: file 、 db 、 redismode: file
#  server:   #这才是对外提供的端口号,默认是7091+1000=8091.所以不用配置
#    service-port: 8091 #If not configured, the default is '${server.port} + 1000'security:  #安全secretKey: SeataSecretKey0c382ef121d778043159209298fd40bf3850a017tokenValidityInMilliseconds: 1800000ignore:urls: /,/**/*.css,/**/*.js,/**/*.html,/**/*.map,/**/*.svg,/**/*.png,/**/*.jpeg,/**/*.ico,/api/v1/auth/login
- 3种存储模式:Seata Server需要对全局事务与分支事务进行存储,以便对它们进行管理。共存储模式目前支持三种:file、 db 与redis(后续将引入raft,mongodb)。
- file模式:会将相关数据存储在本地文件中,一般用于Seata Server的中机测试。
- db模式:会将相关数据存储在数据库中,一般用于生产环境下的Seata Server集群部著。生产环境下使用最多的模式。
- redis模式:会将相关数据存储在redis 中,一般用于生产环境下的Seata Server集群部署。性能略高于db模式,如果对性能要求较高,可选择redis模式。
20.1.3 配置步骤:以db模式为例
1)修改application.yml配置文件
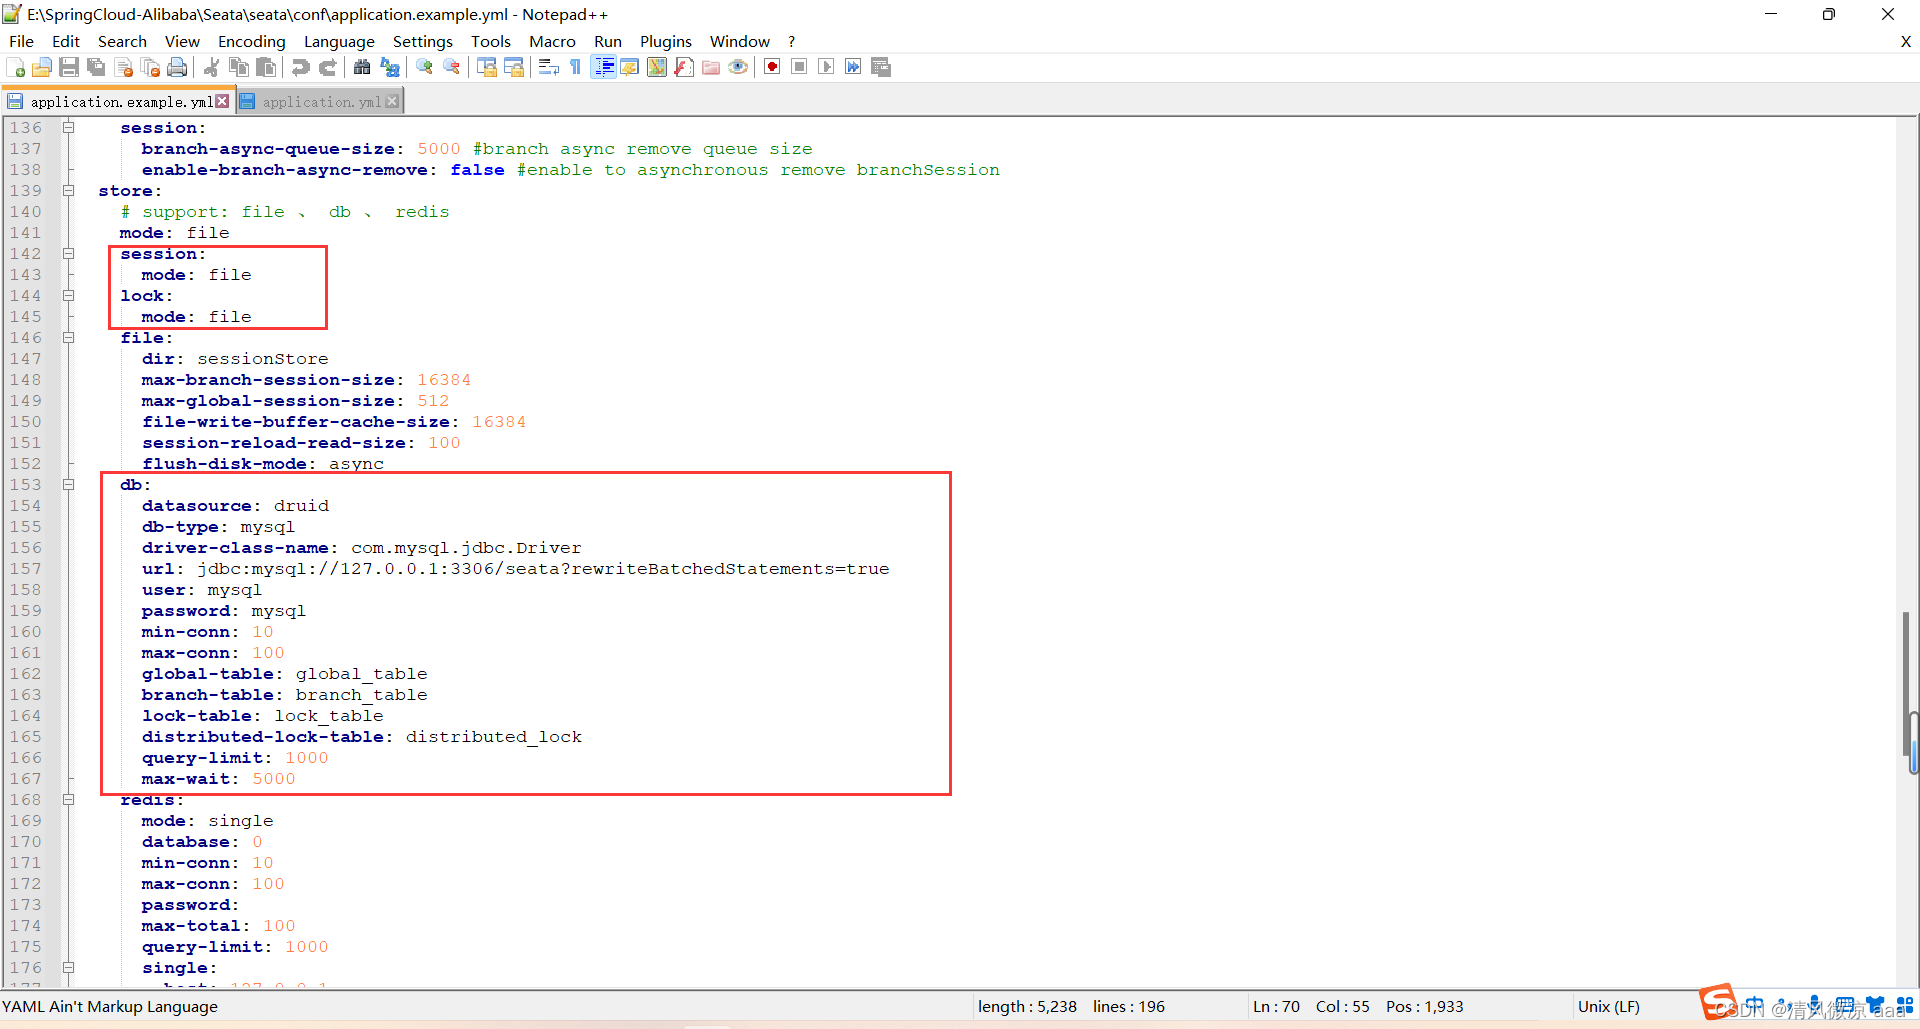
说明:此文件的修改都可以参考示例文件的内容。
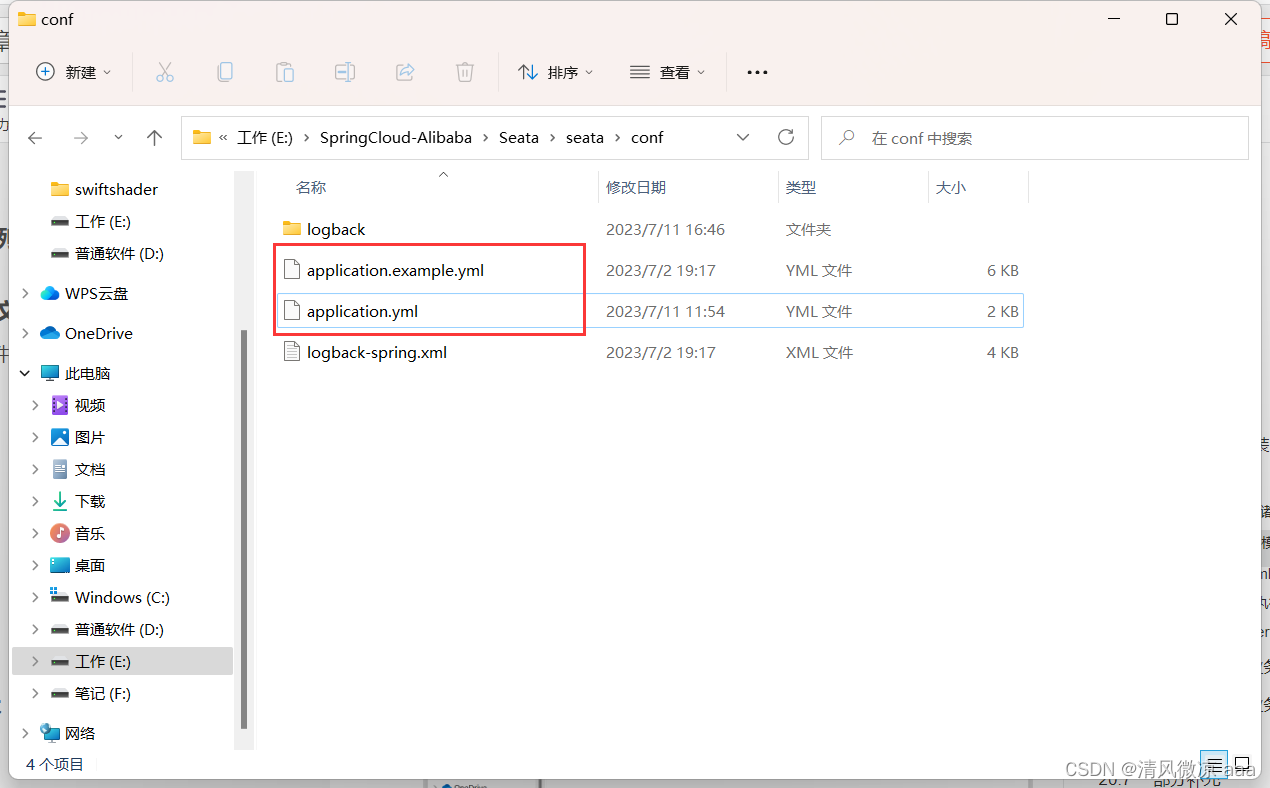
修改之前先复制一份原始文件
修改存储中心
- 拷贝示例文件内容
- 修改application.yml
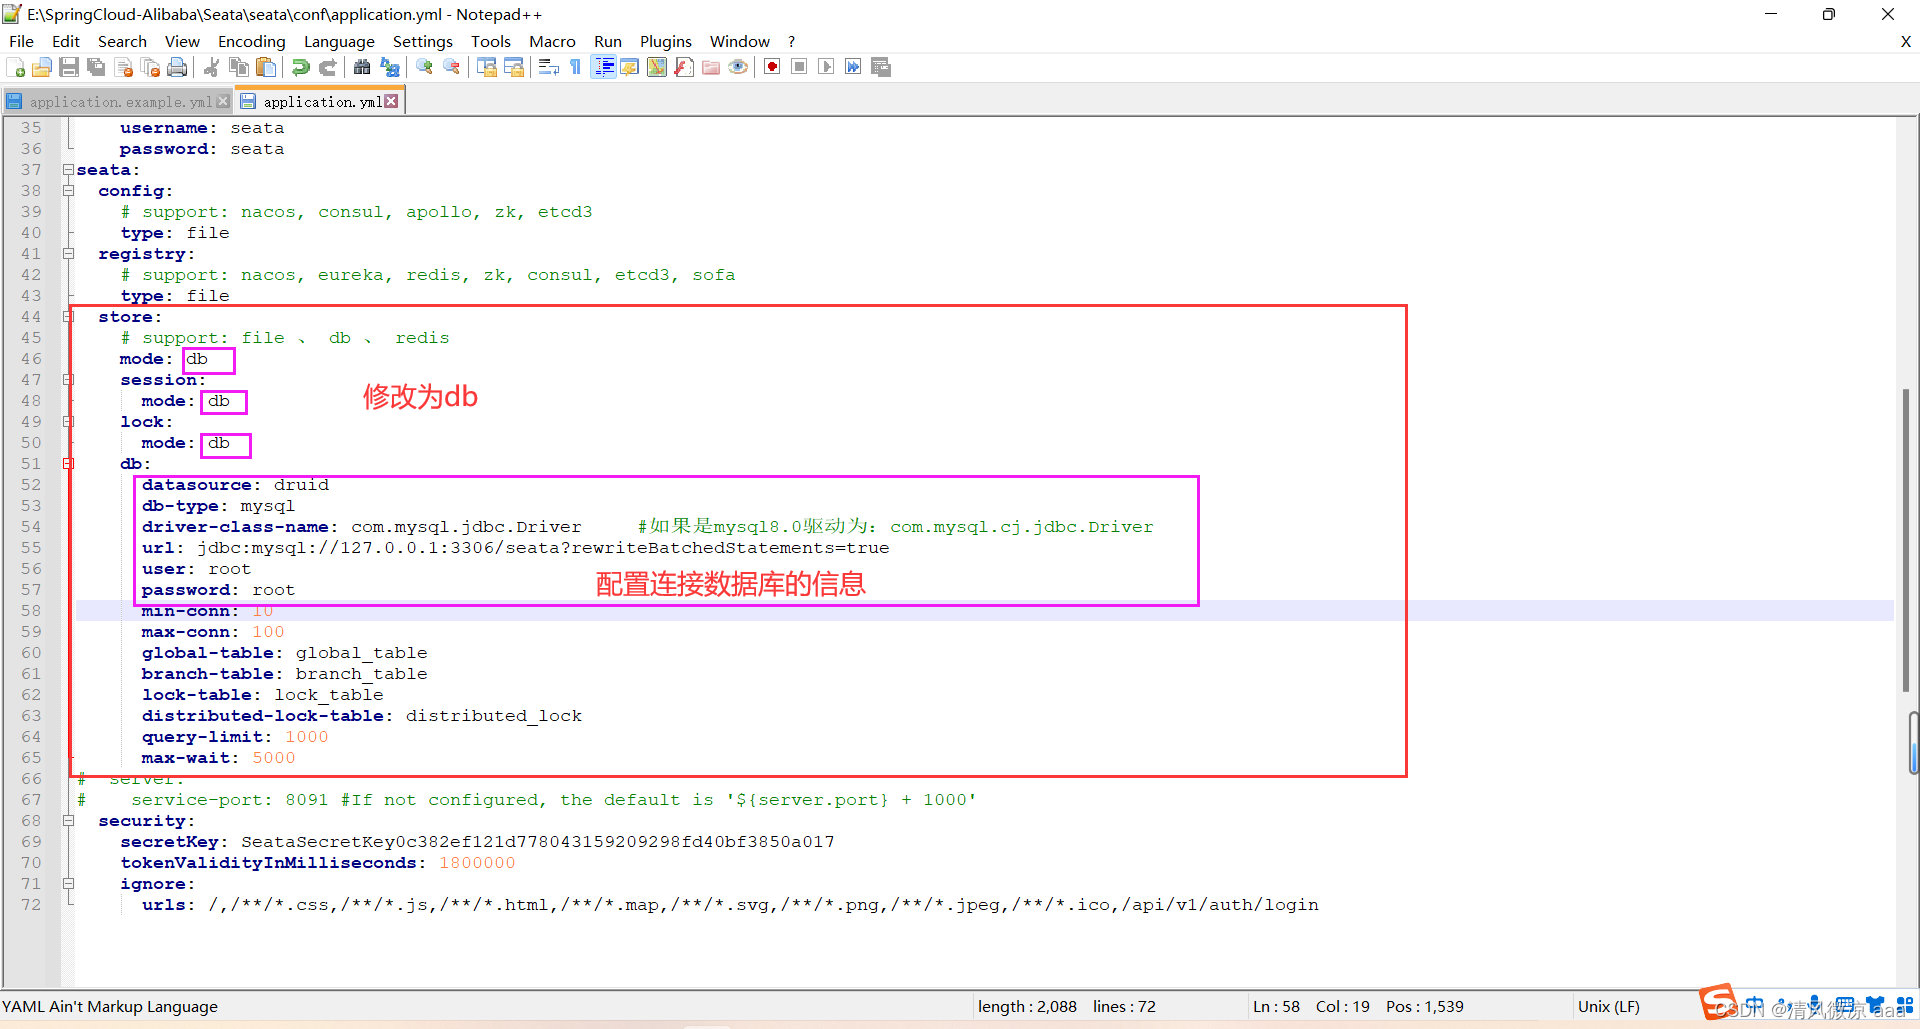
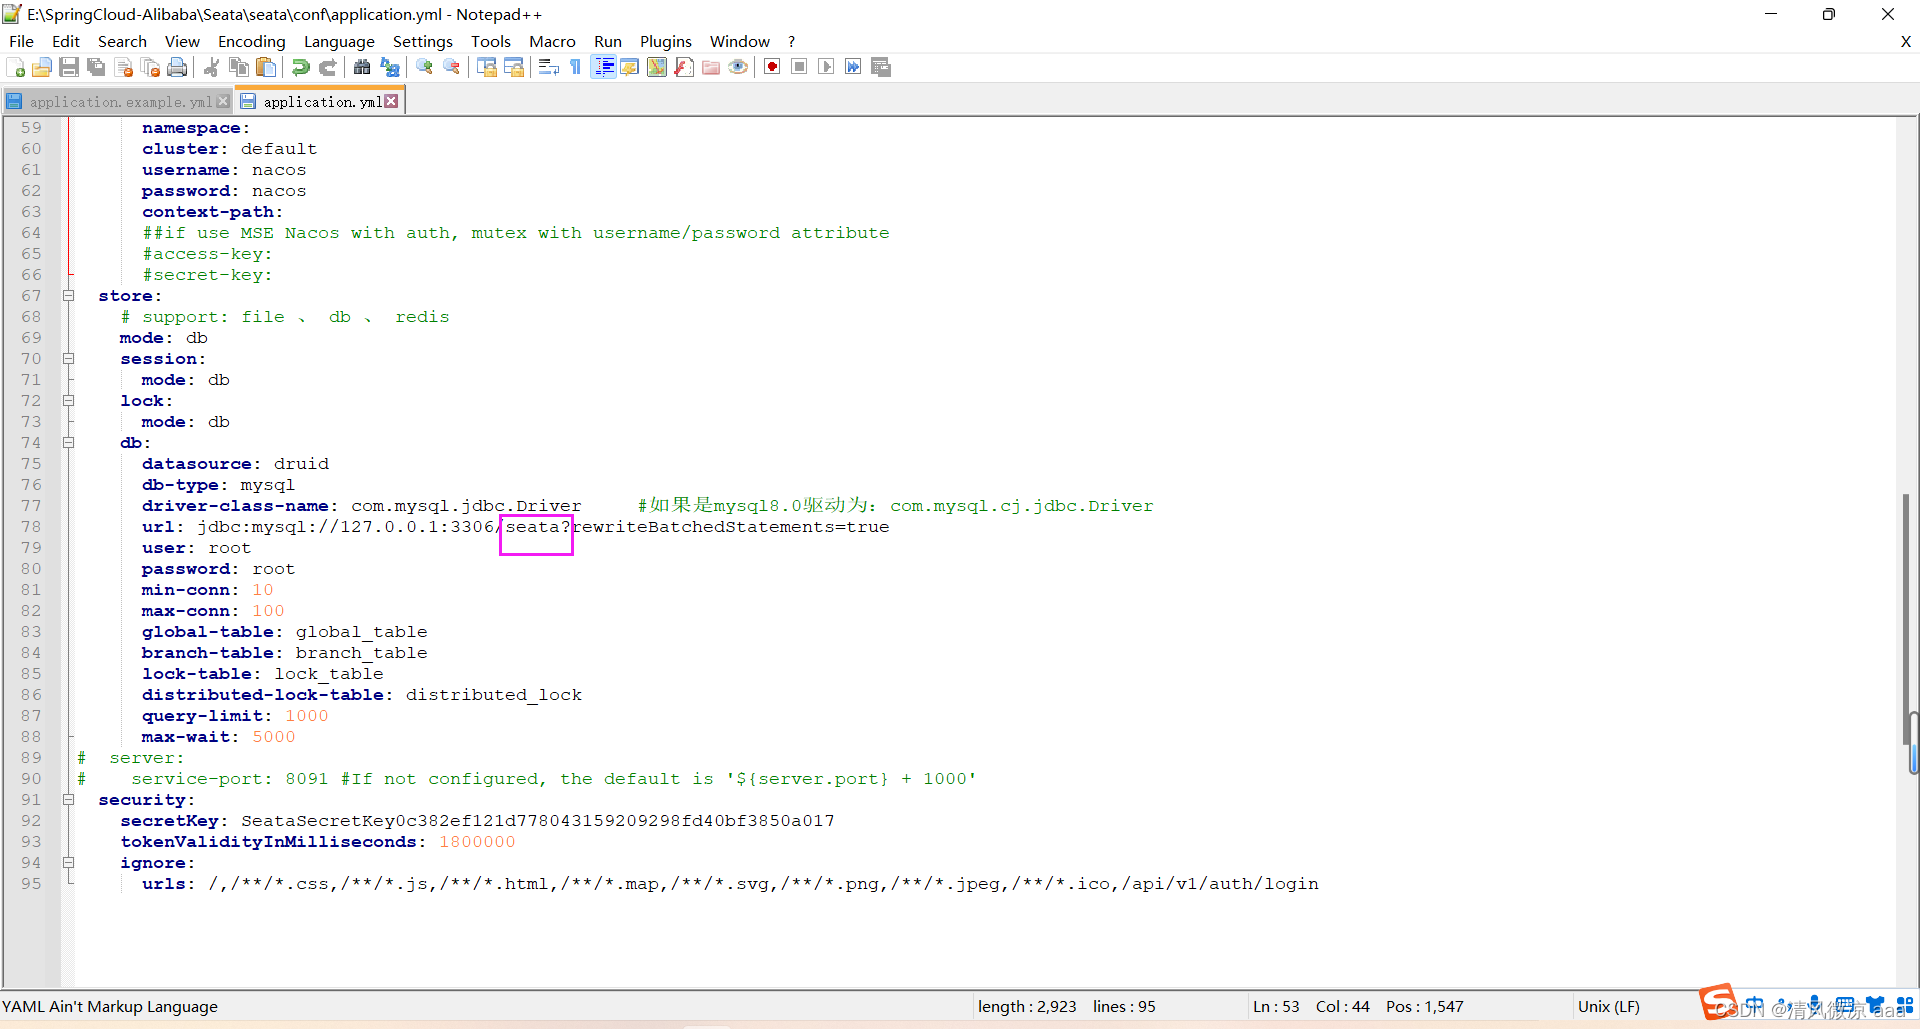
store:# support: file 、 db 、 redismode: dbsession:mode: dblock:mode: dbdb:datasource: druiddb-type: mysqldriver-class-name: com.mysql.jdbc.Driver #如果是mysql8.0驱动为:com.mysql.cj.jdbc.Driverurl: jdbc:mysql://127.0.0.1:3306/seata?rewriteBatchedStatements=trueuser: rootpassword: rootmin-conn: 10max-conn: 100global-table: global_tablebranch-table: branch_tablelock-table: lock_tabledistributed-lock-table: distributed_lockquery-limit: 1000max-wait: 5000
修改配置中心
-
拷贝示例文件内容
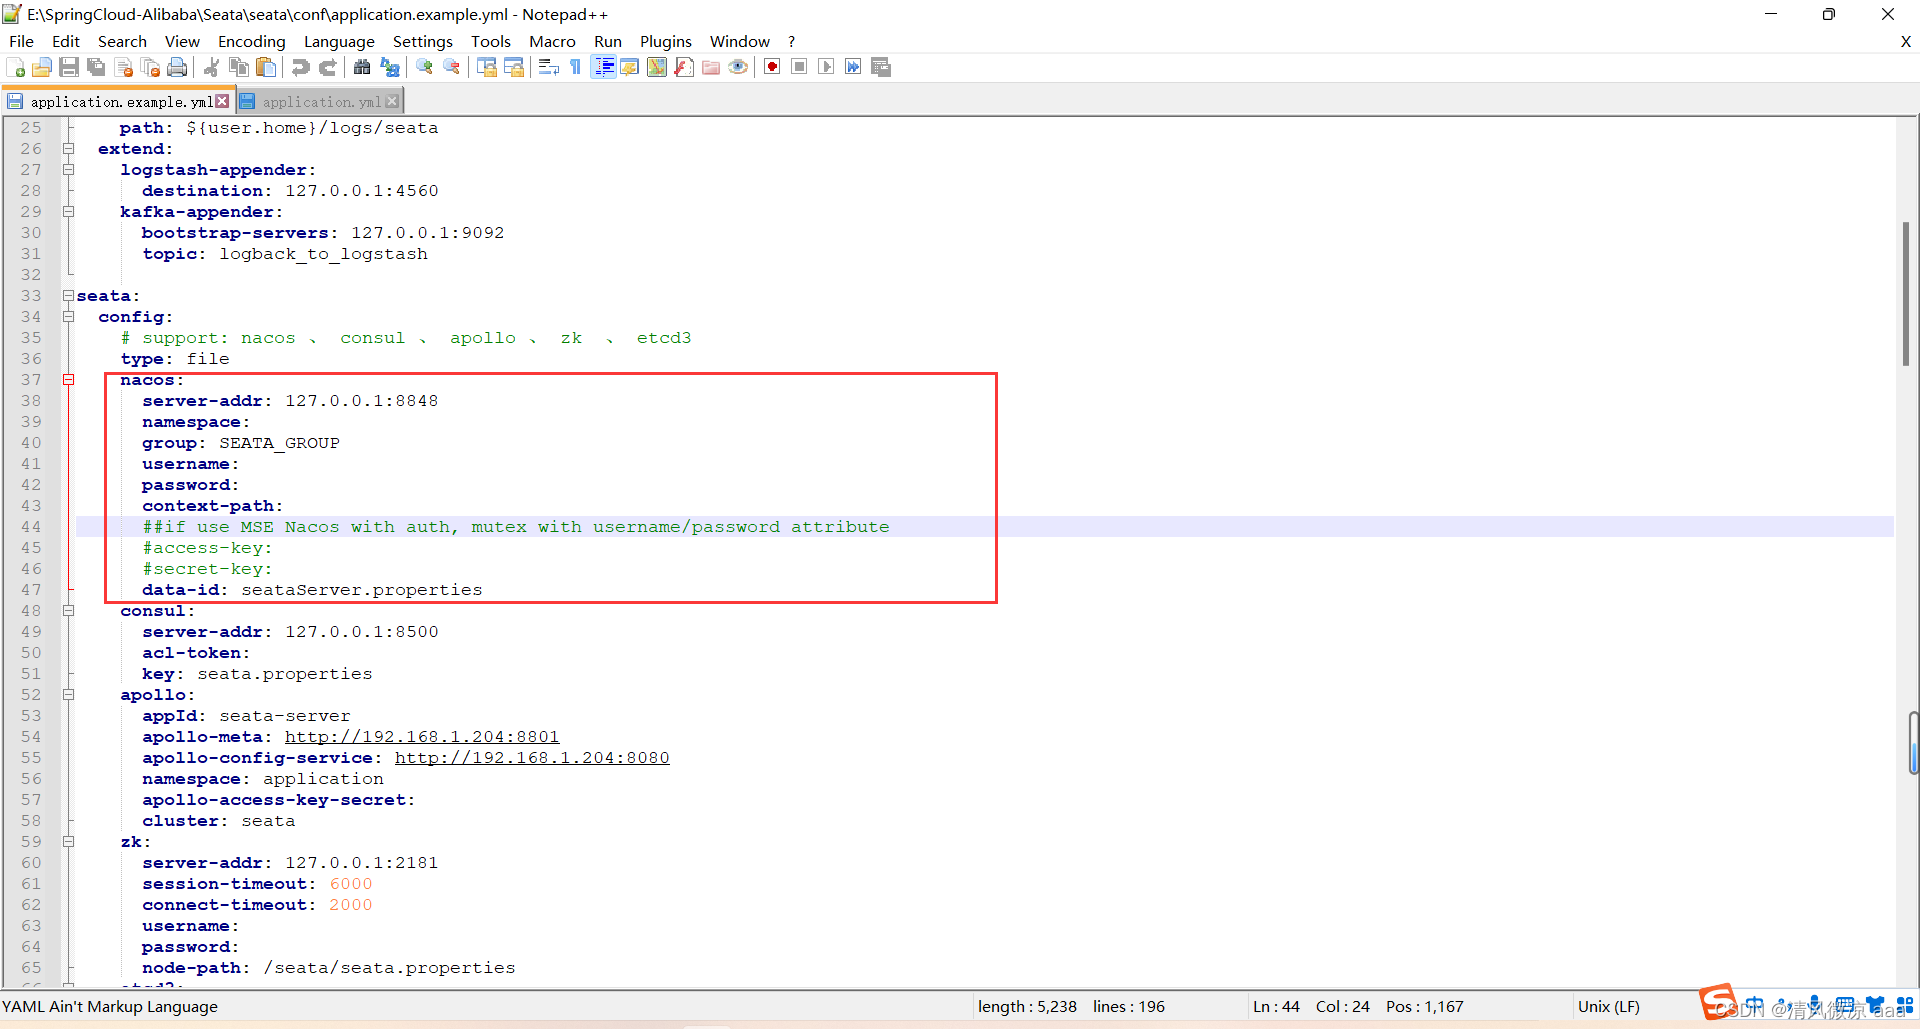
-
修改application.yml
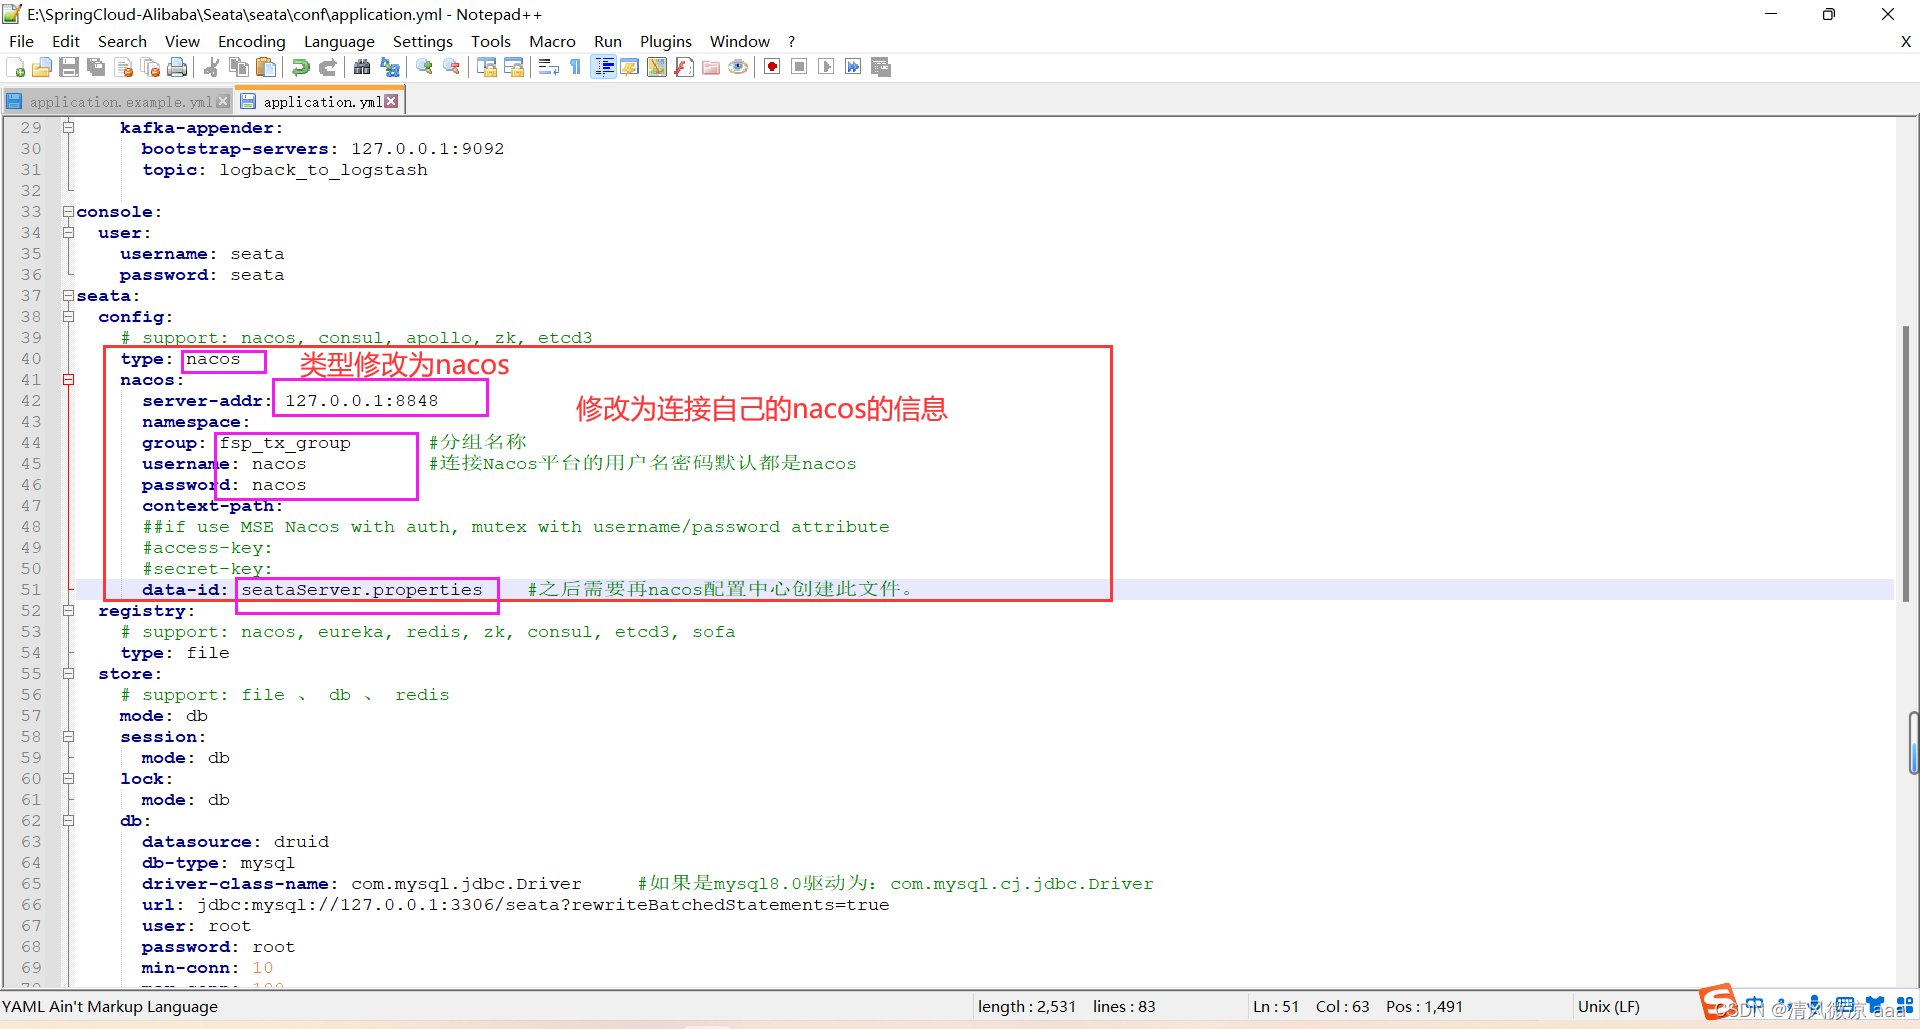
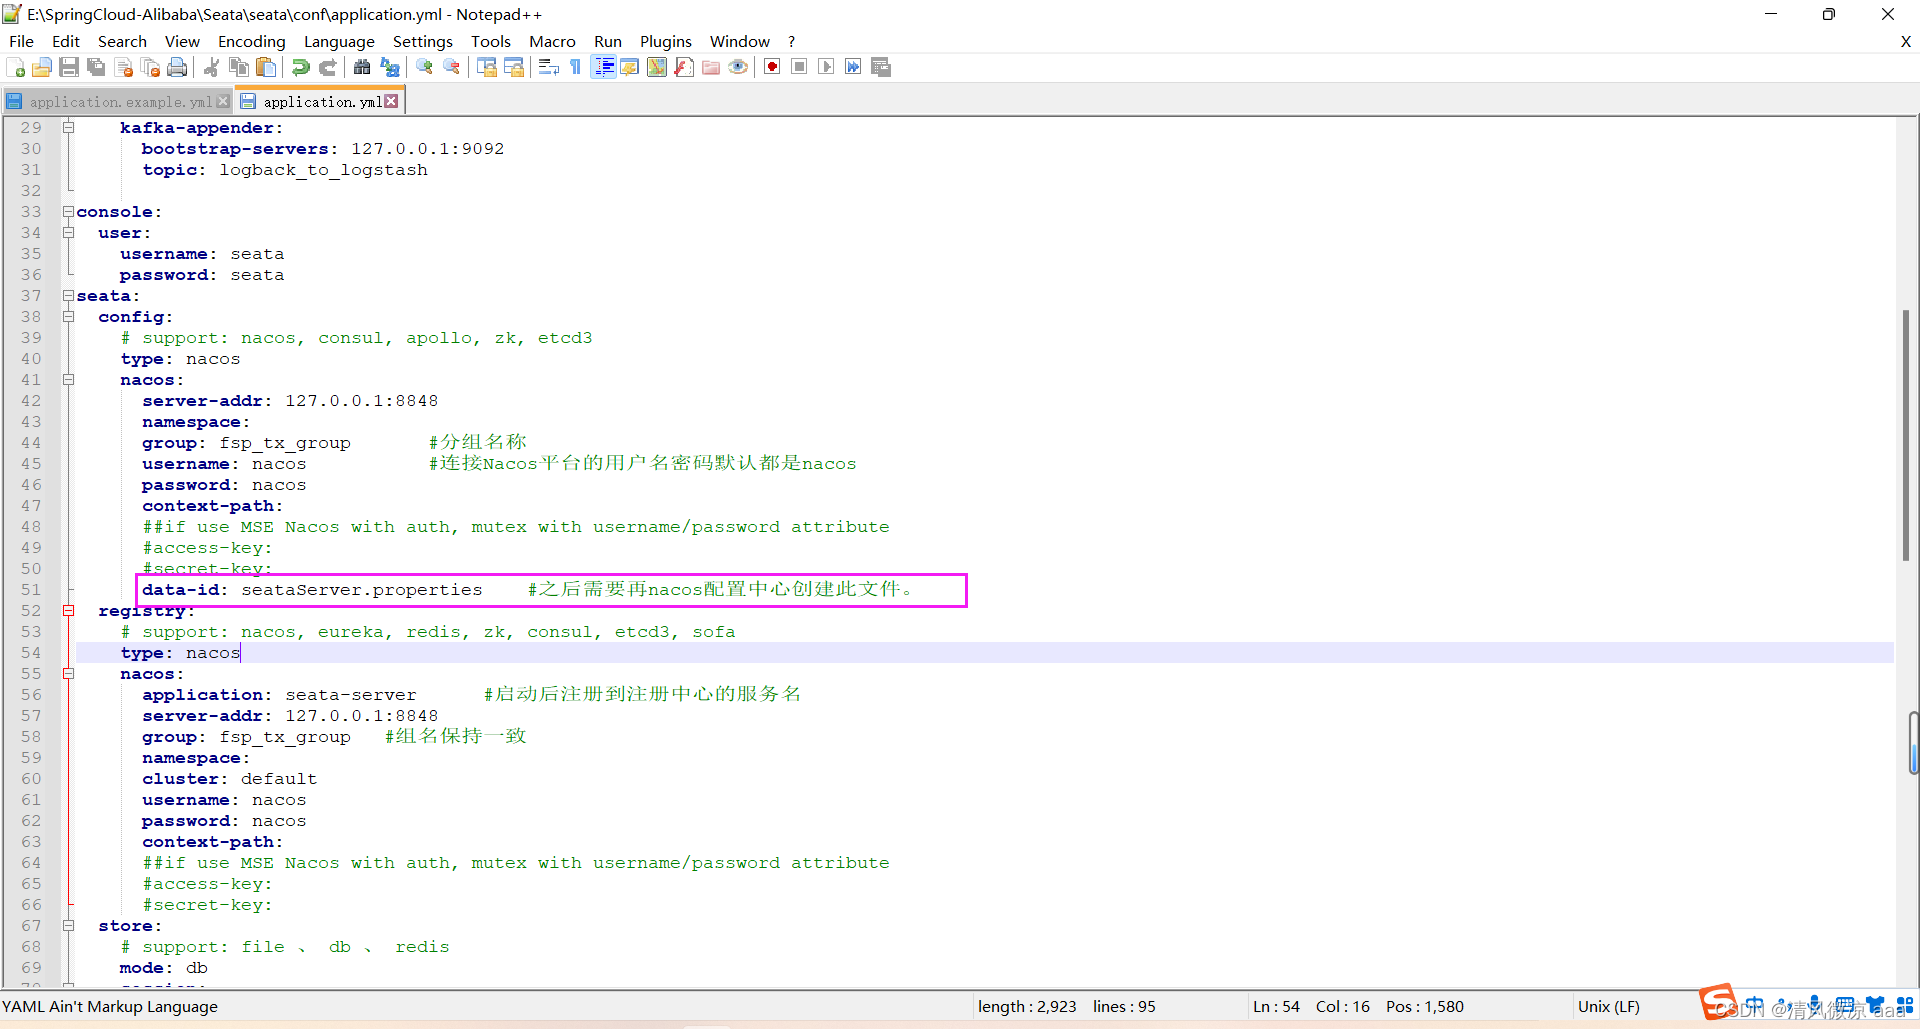
seata:config:# support: nacos, consul, apollo, zk, etcd3type: nacosnacos:server-addr: 127.0.0.1:8848namespace:group: fsp_tx_group #分组名称username: nacos #连接Nacos平台的用户名密码默认都是nacospassword: nacoscontext-path:##if use MSE Nacos with auth, mutex with username/password attribute#access-key:#secret-key:data-id: seataServer.properties #之后需要再nacos配置中心创建此文件。
修改注册中心
-
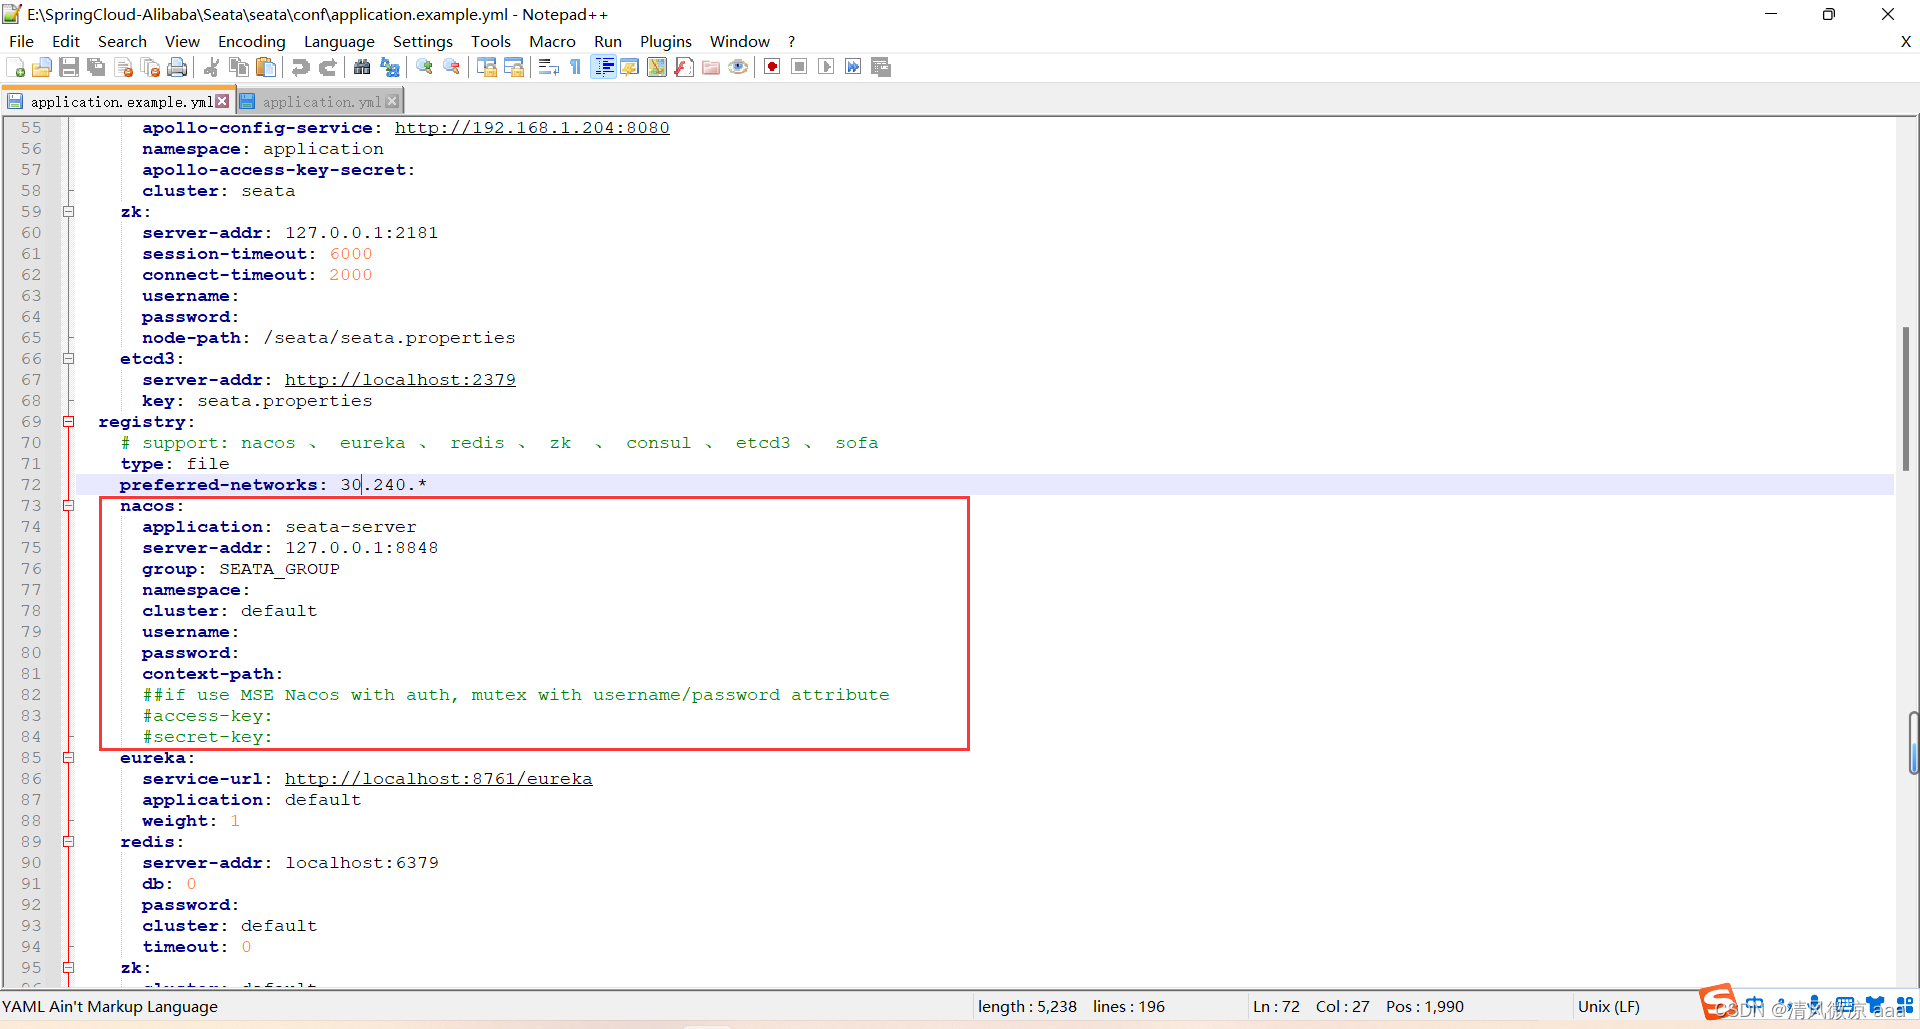
拷贝示例文件内容
-
修改application.yml
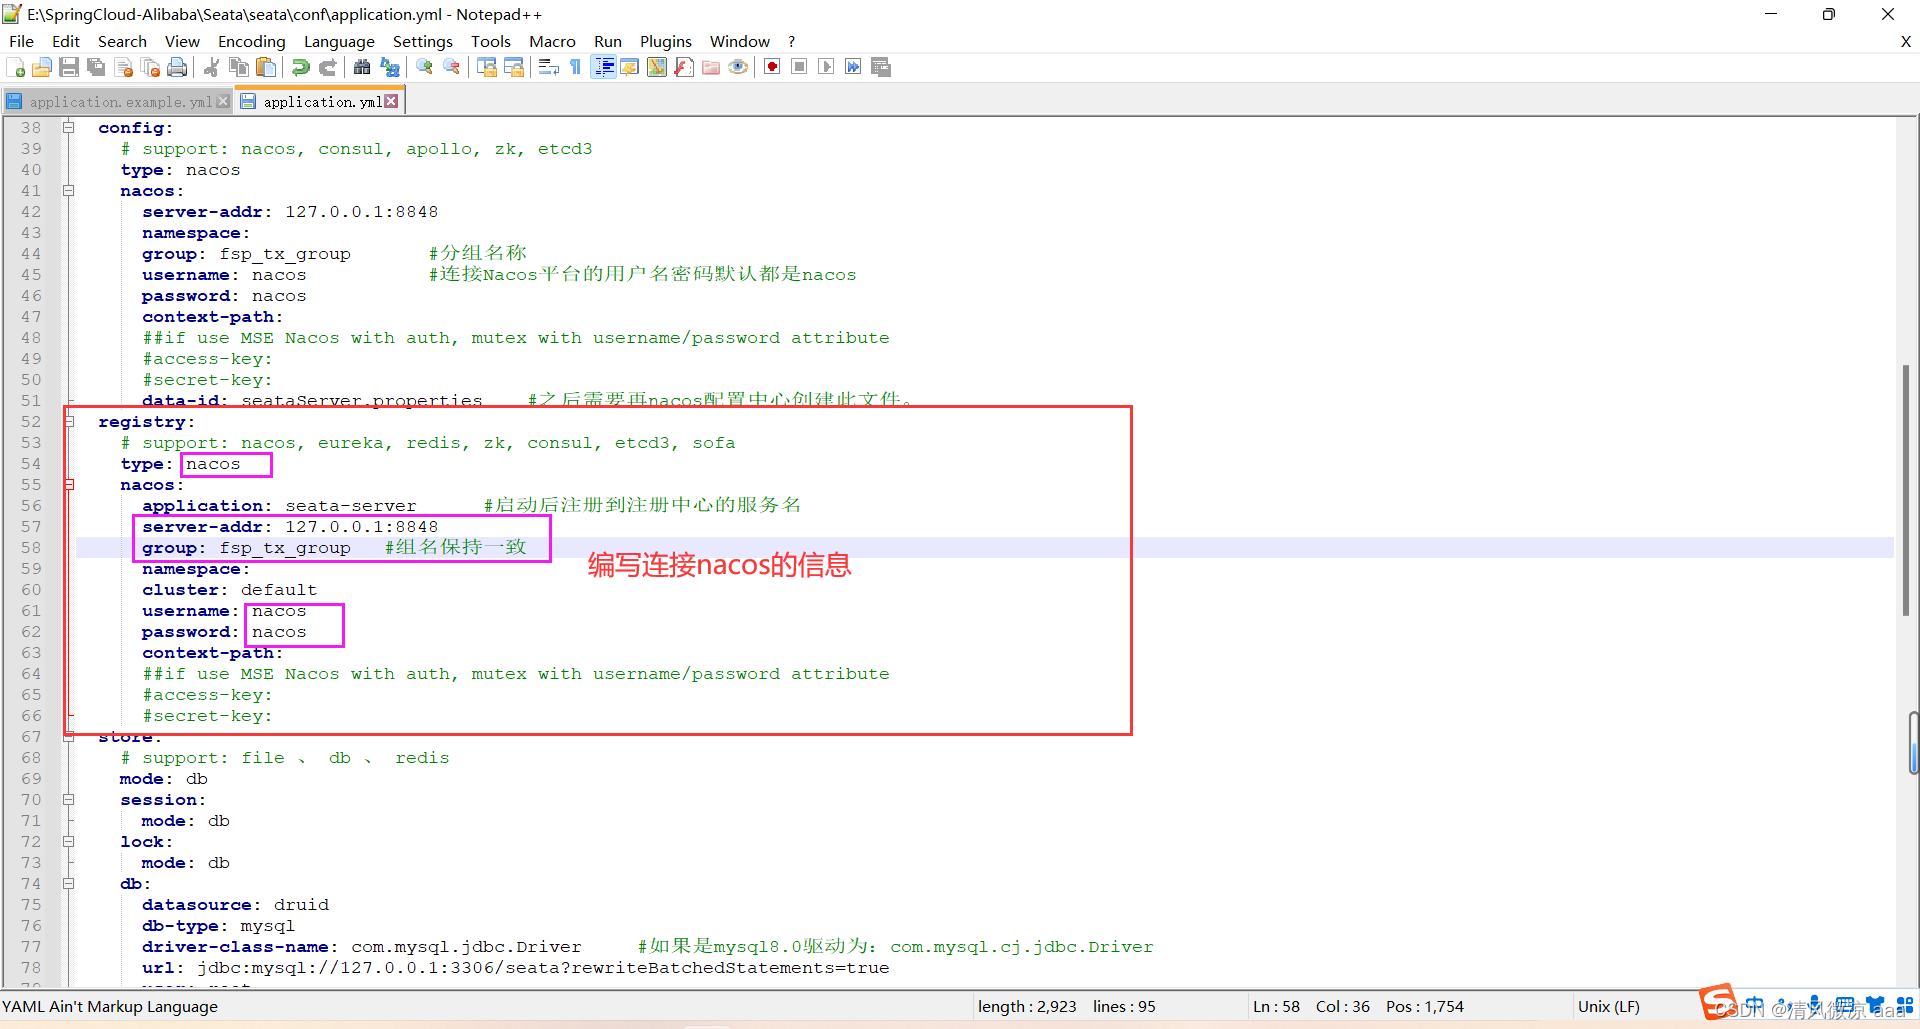
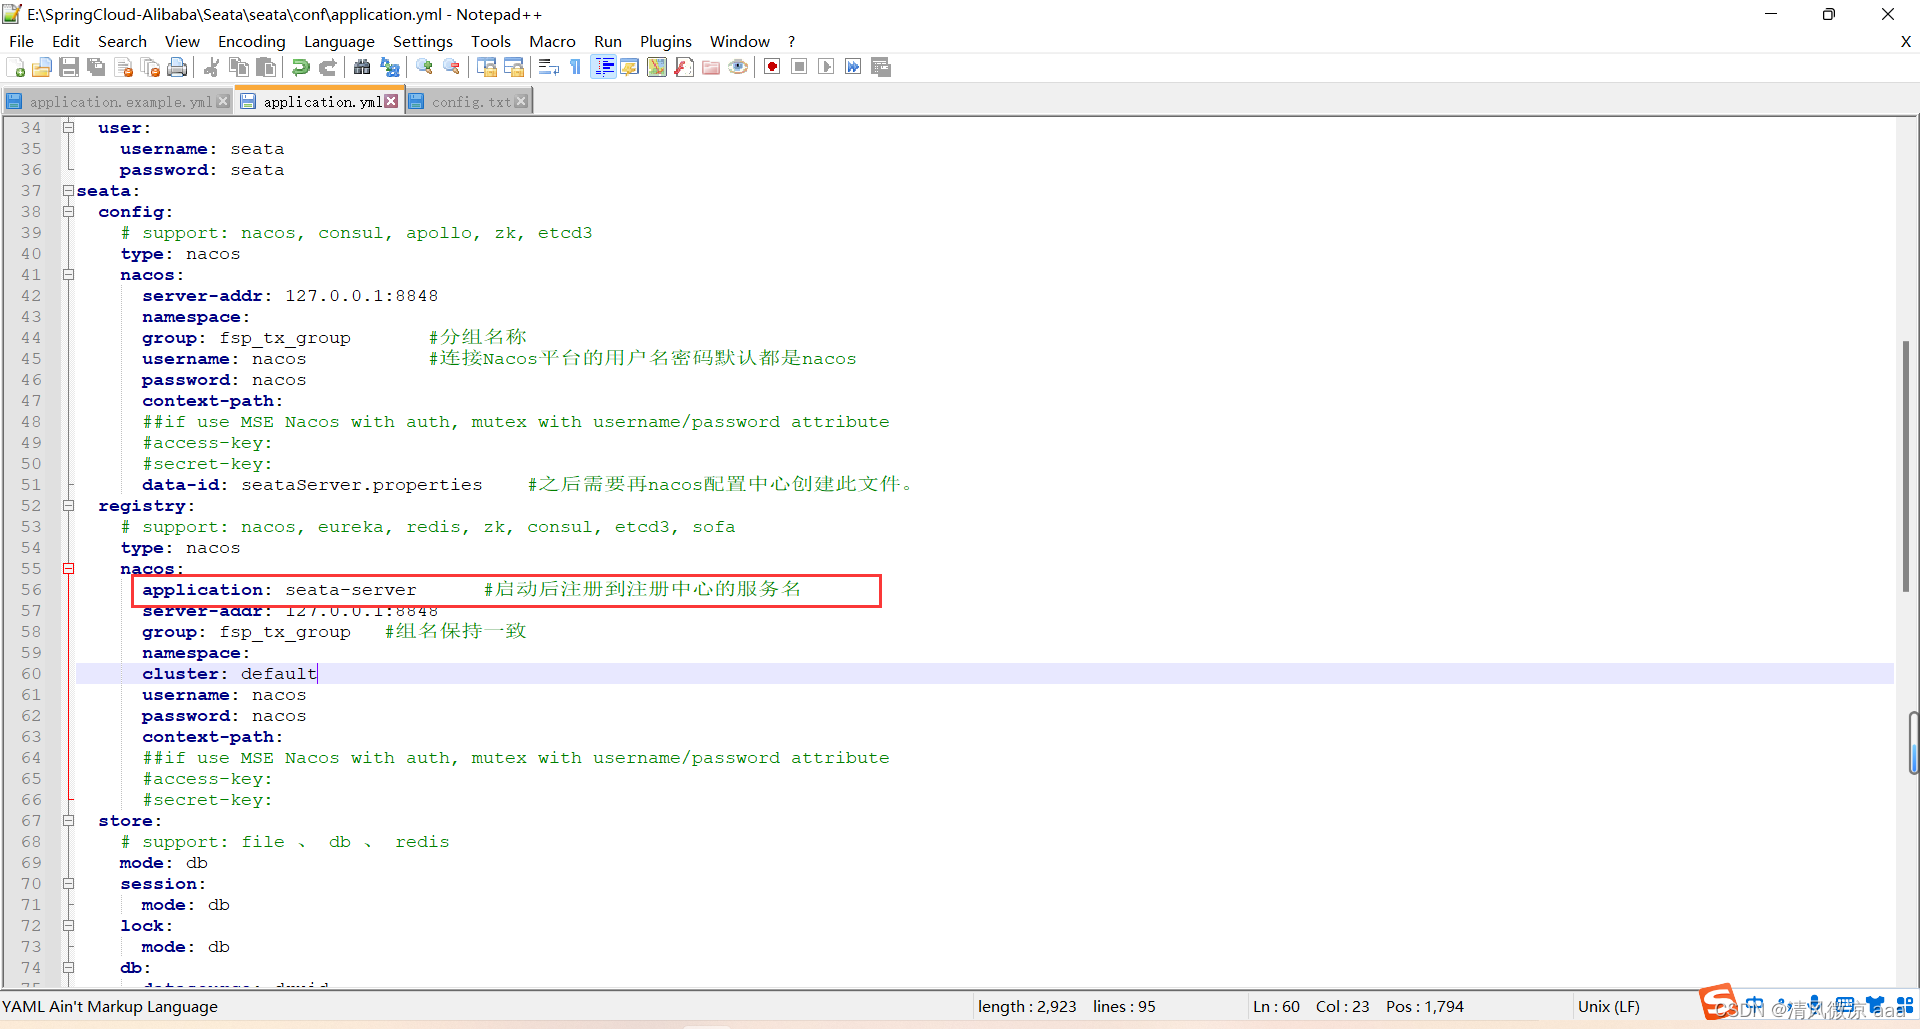
registry:# support: nacos, eureka, redis, zk, consul, etcd3, sofatype: nacosnacos:application: seata-server #启动后注册到注册中心的服务名server-addr: 127.0.0.1:8848group: fsp_tx_group #组名保持一致namespace:cluster: defaultusername: nacospassword: nacoscontext-path:##if use MSE Nacos with auth, mutex with username/password attribute#access-key:#secret-key:
2)新建库seata,并执行脚本
-
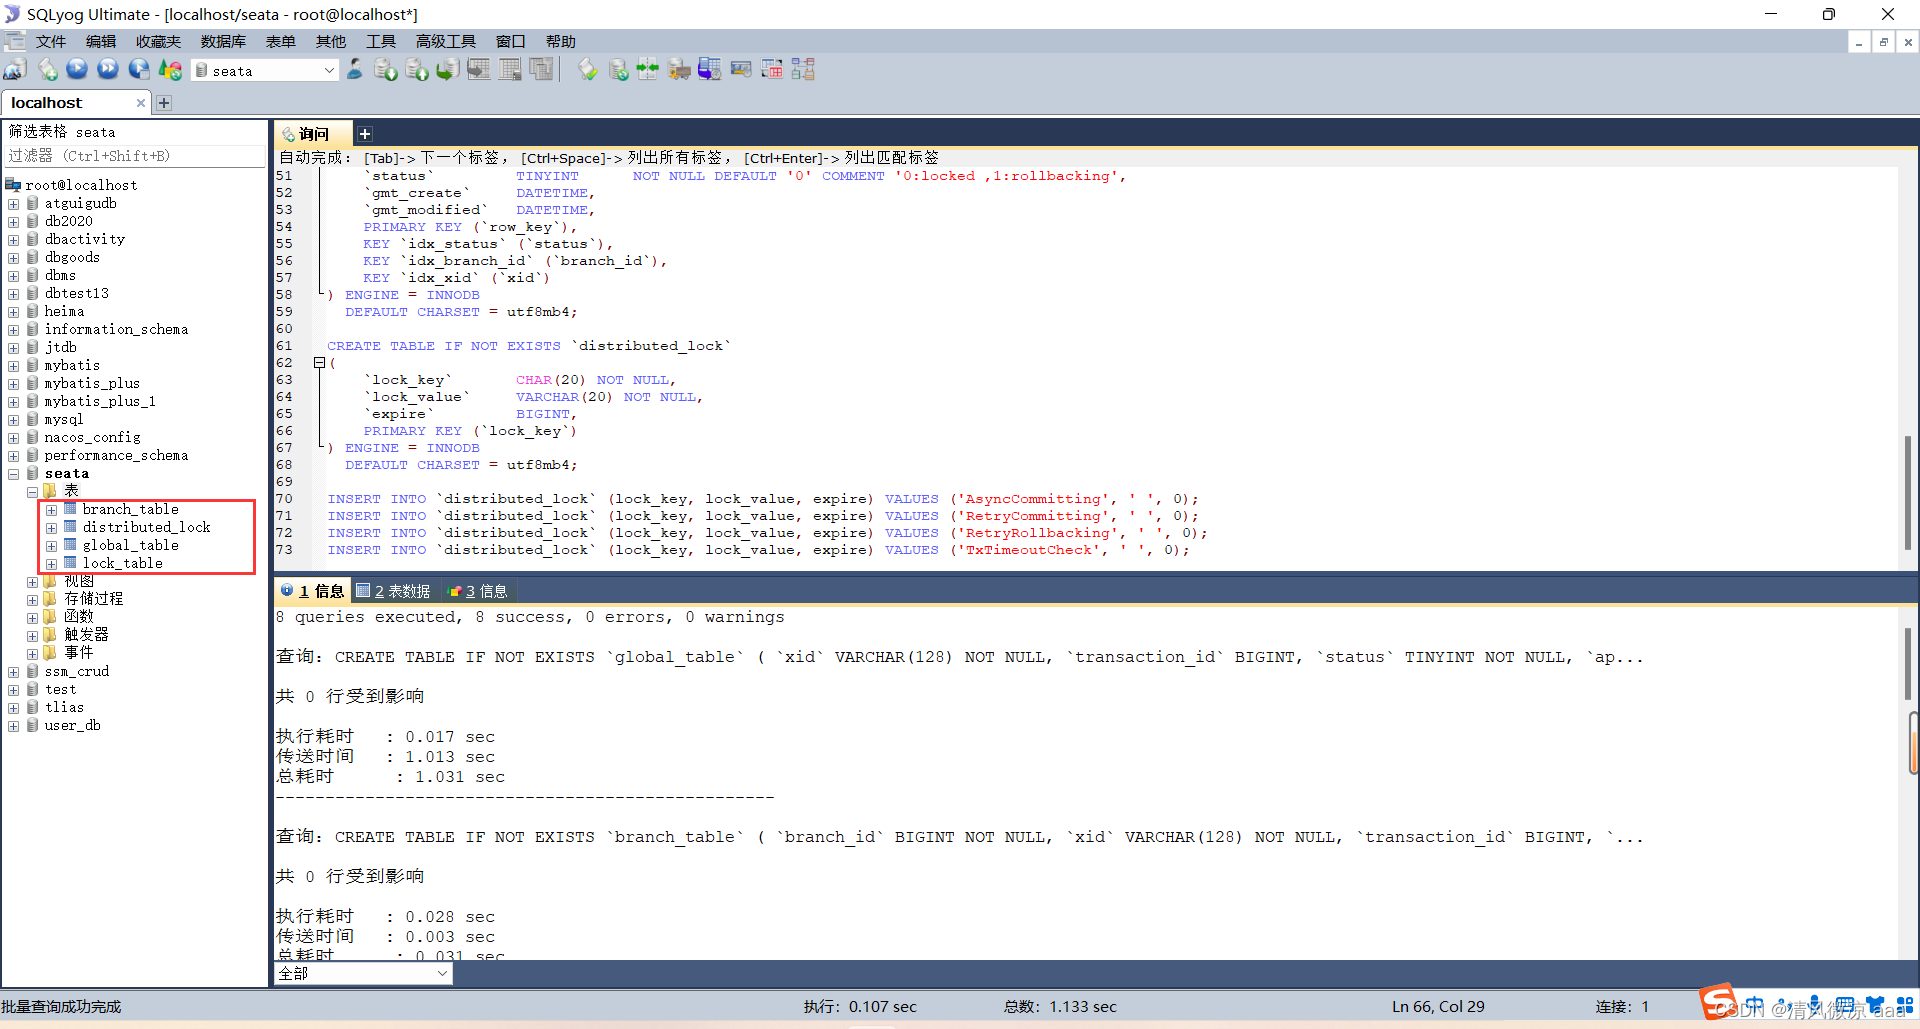
之前在application.yml文件中配置的是使用数据库来管理全局事务与分支事务,所以要创建库,在库中新建表。
-
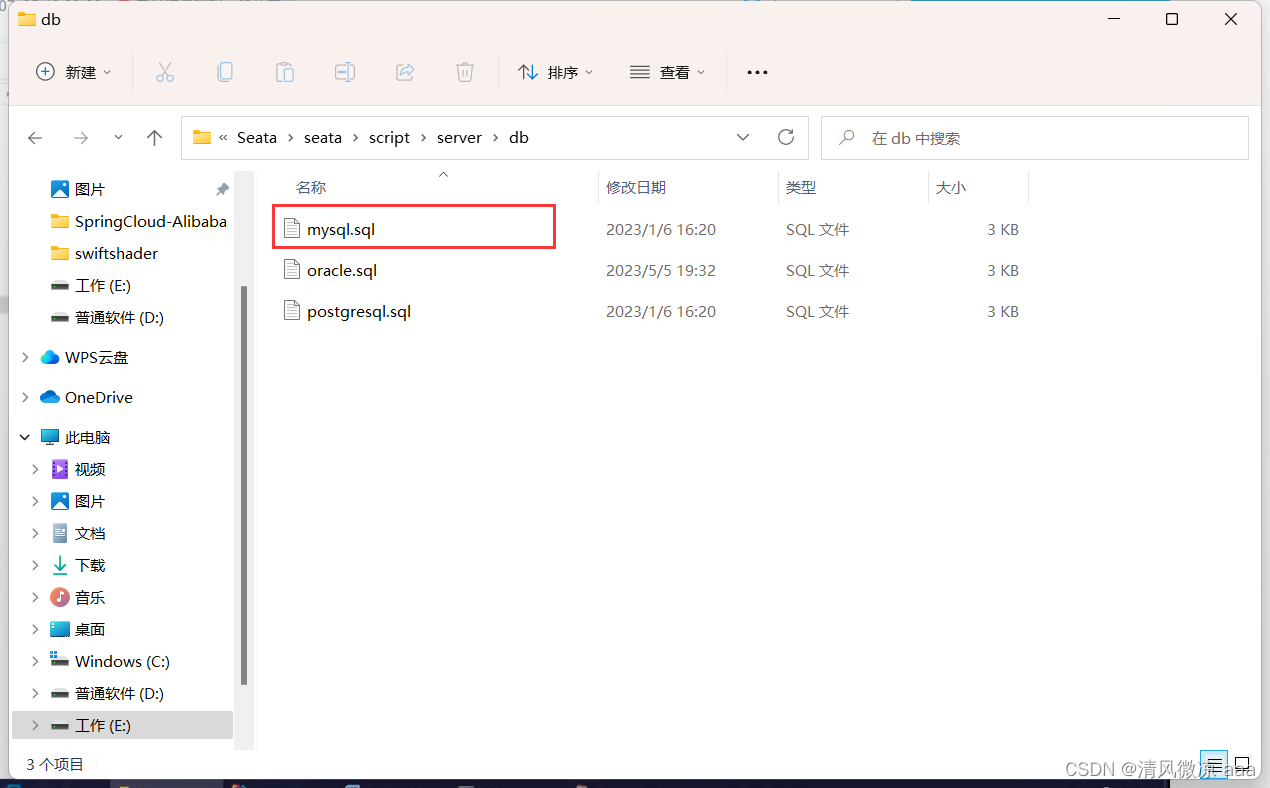
脚本位置:注意不推荐从官网上找脚本,因为官网上更新的速度比较慢可能会导致版本不一致。推荐从下载的安装包查找。
-
创建seata数据库,并执行脚本
3)seataServer.properties
-
需要在nacos平台,配置此文件
-
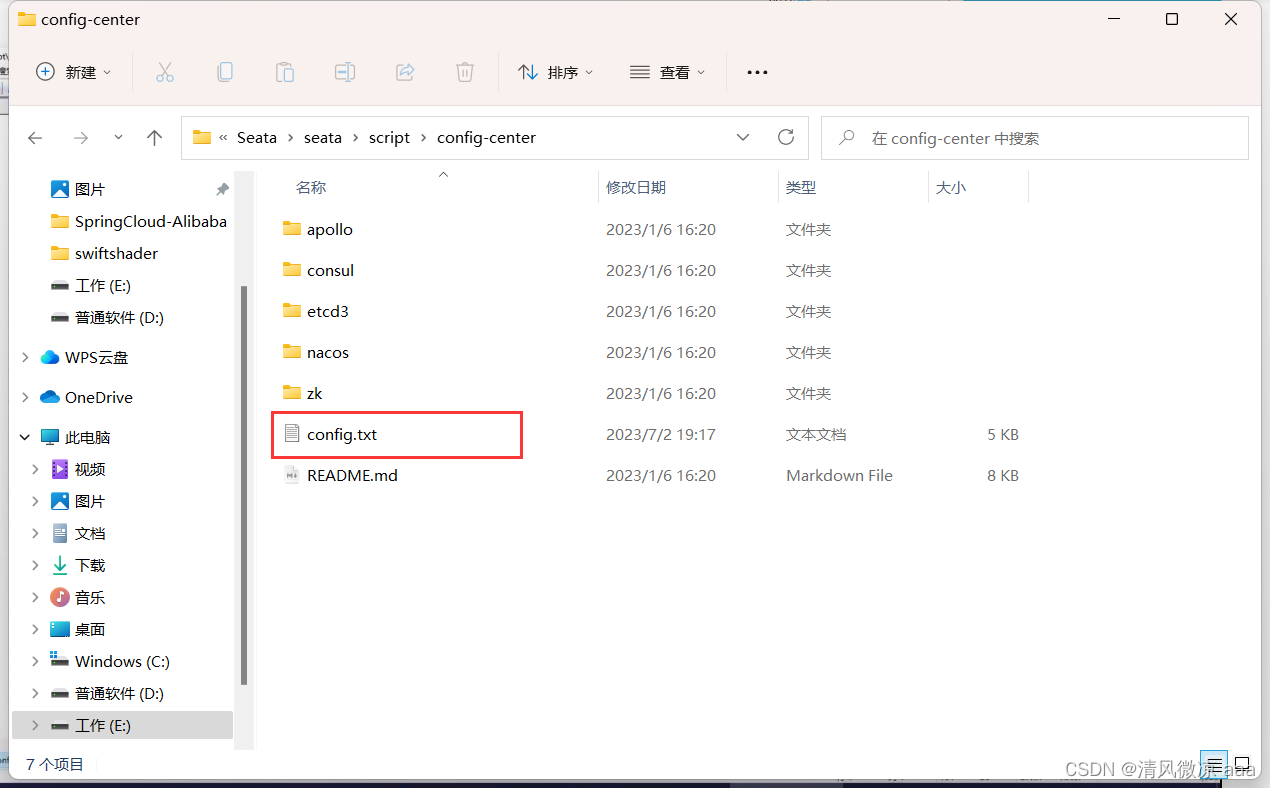
配置内容来源:
-
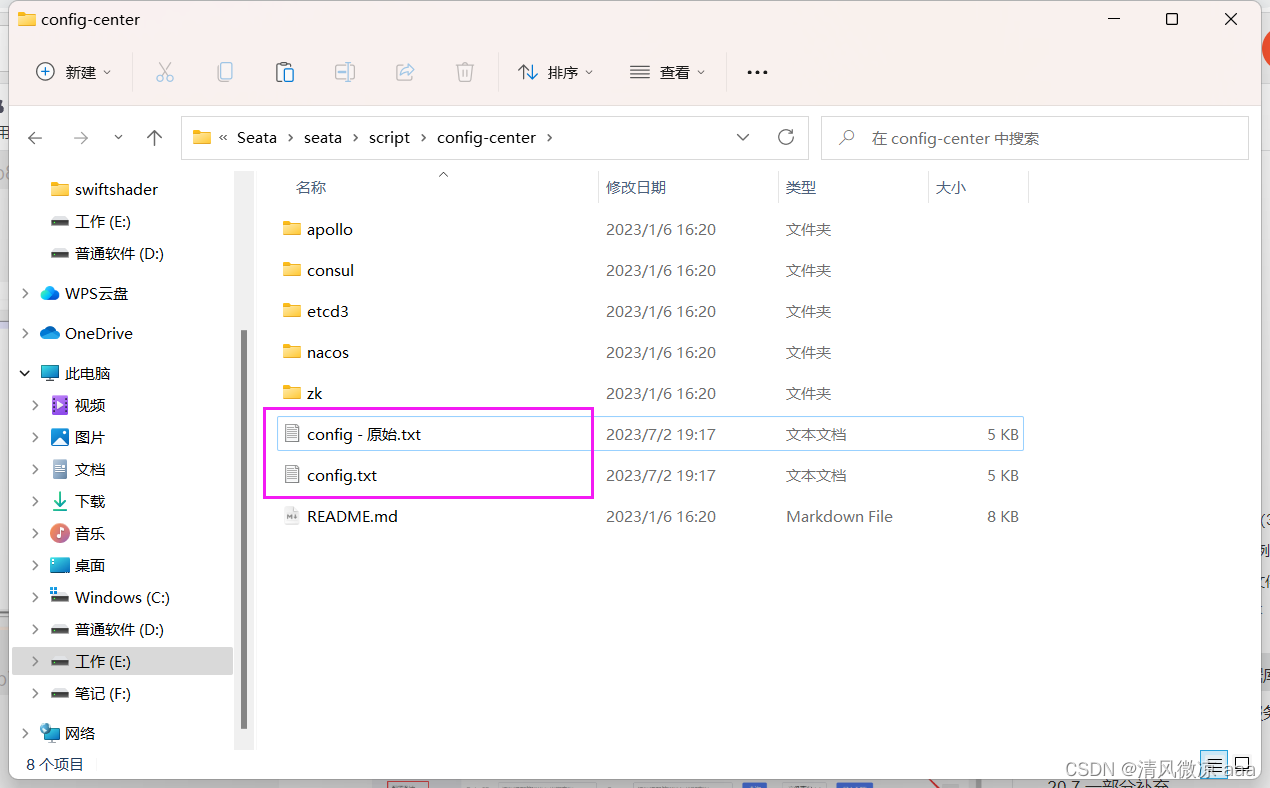
复制一份原始文件,修改config.txt文件内容。
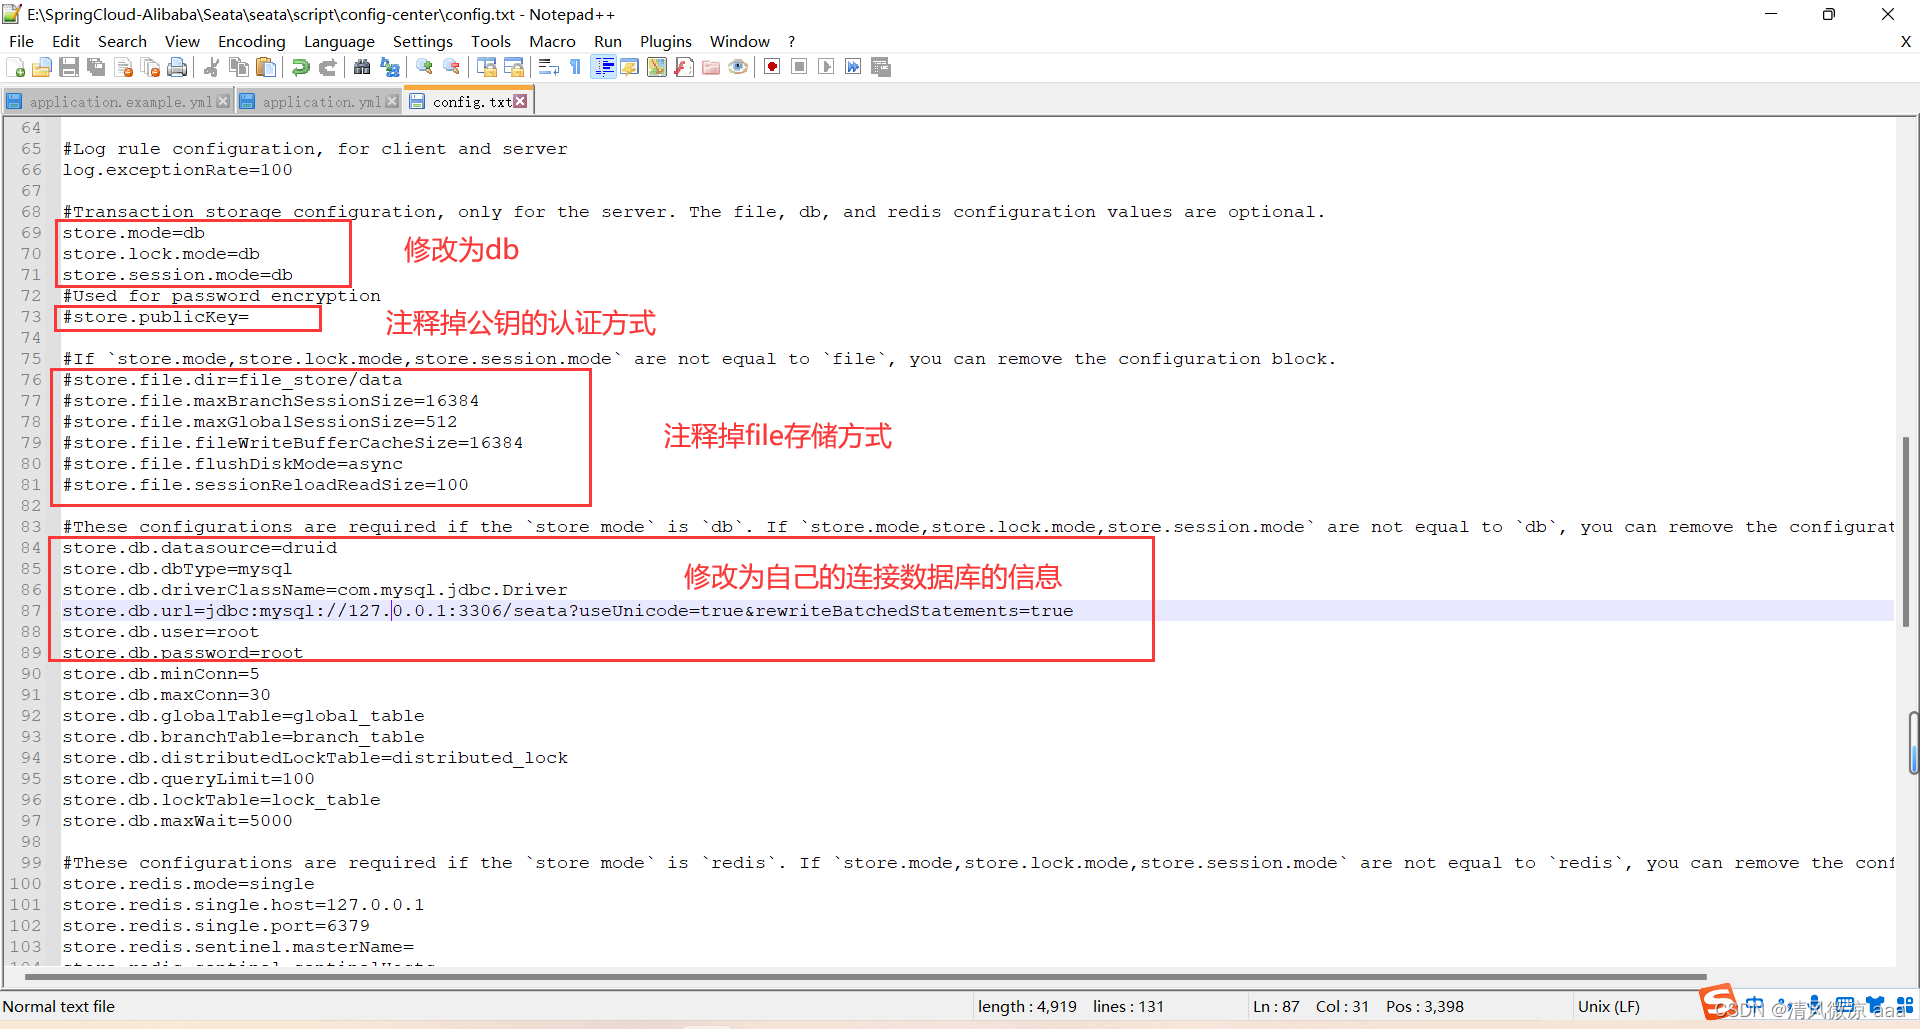
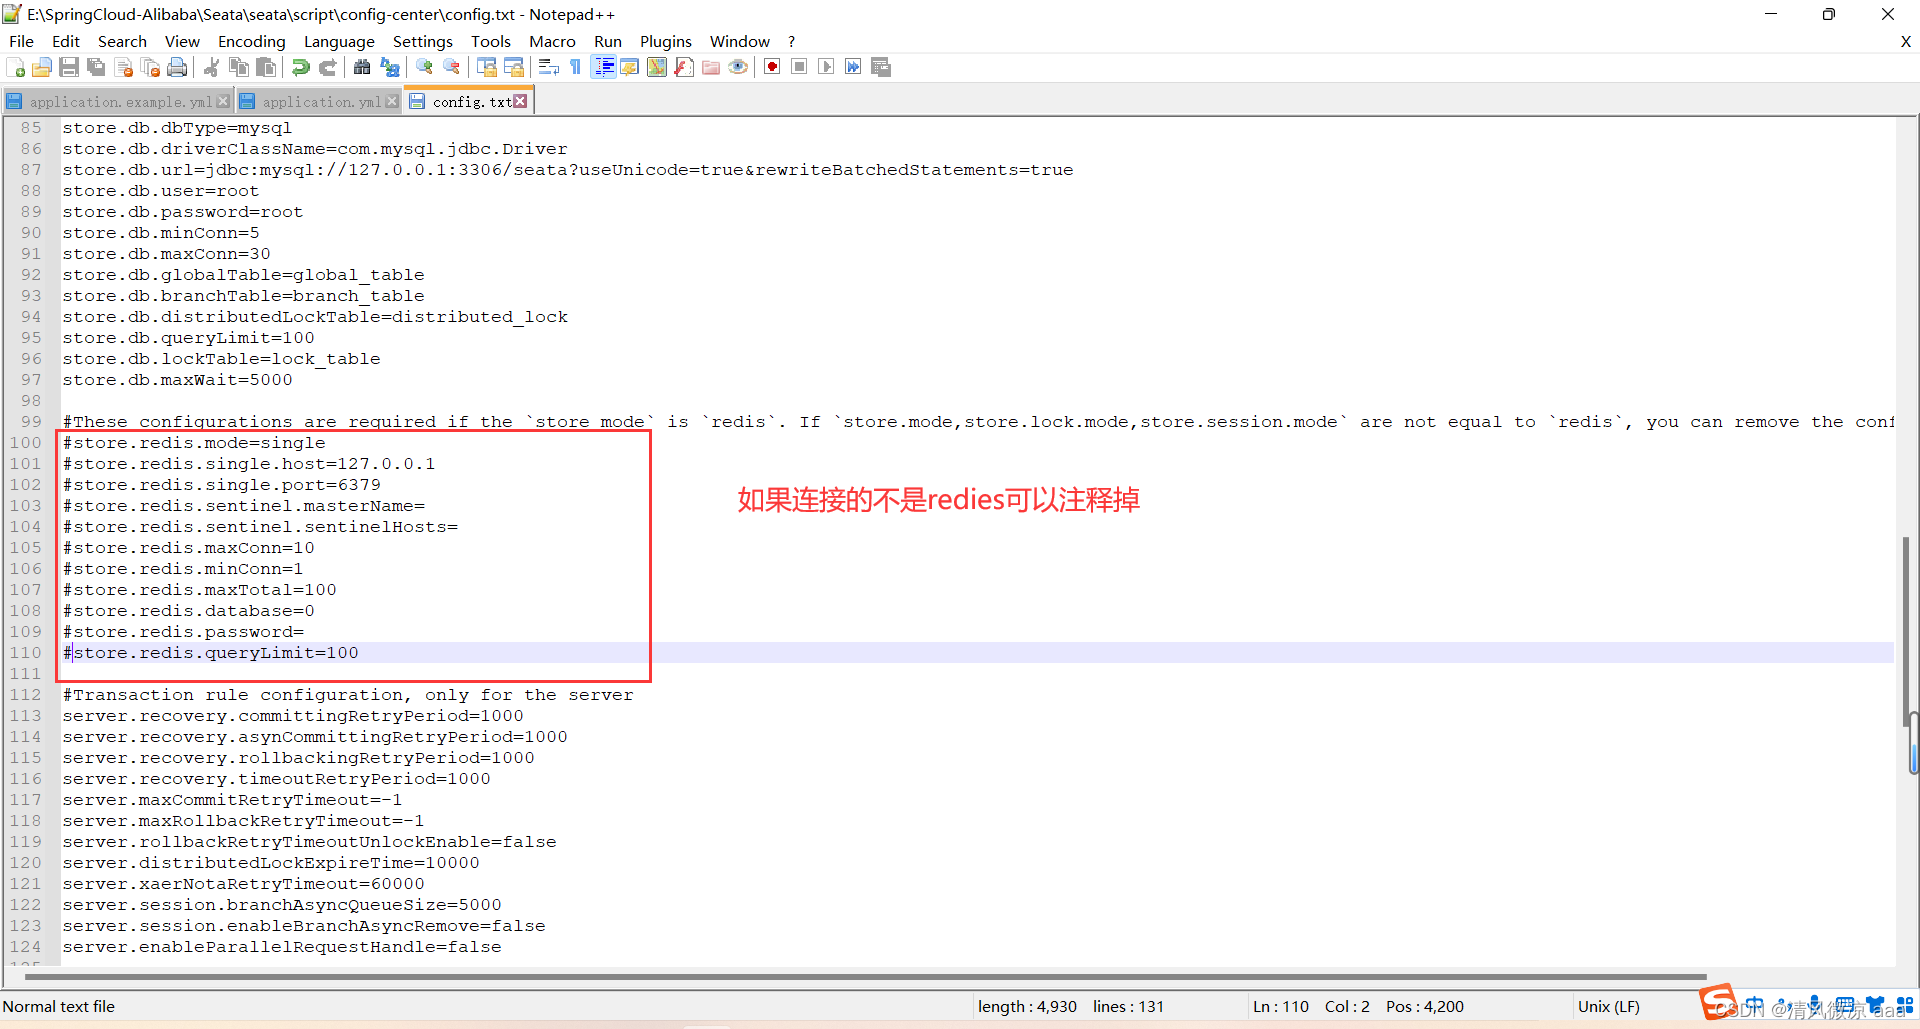
#For details about configuration items, see https://seata.io/zh-cn/docs/user/configurations.html
#Transport configuration, for client and server
transport.type=TCP
transport.server=NIO
transport.heartbeat=true
transport.enableTmClientBatchSendRequest=false
transport.enableRmClientBatchSendRequest=true
transport.enableTcServerBatchSendResponse=false
transport.rpcRmRequestTimeout=30000
transport.rpcTmRequestTimeout=30000
transport.rpcTcRequestTimeout=30000
transport.threadFactory.bossThreadPrefix=NettyBoss
transport.threadFactory.workerThreadPrefix=NettyServerNIOWorker
transport.threadFactory.serverExecutorThreadPrefix=NettyServerBizHandler
transport.threadFactory.shareBossWorker=false
transport.threadFactory.clientSelectorThreadPrefix=NettyClientSelector
transport.threadFactory.clientSelectorThreadSize=1
transport.threadFactory.clientWorkerThreadPrefix=NettyClientWorkerThread
transport.threadFactory.bossThreadSize=1
transport.threadFactory.workerThreadSize=default
transport.shutdown.wait=3
transport.serialization=seata
transport.compressor=none#Transaction routing rules configuration, only for the client
service.vgroupMapping.default_tx_group=default
#If you use a registry, you can ignore it
service.default.grouplist=127.0.0.1:8091
service.enableDegrade=false
service.disableGlobalTransaction=false#Transaction rule configuration, only for the client
client.rm.asyncCommitBufferLimit=10000
client.rm.lock.retryInterval=10
client.rm.lock.retryTimes=30
client.rm.lock.retryPolicyBranchRollbackOnConflict=true
client.rm.reportRetryCount=5
client.rm.tableMetaCheckEnable=true
client.rm.tableMetaCheckerInterval=60000
client.rm.sqlParserType=druid
client.rm.reportSuccessEnable=false
client.rm.sagaBranchRegisterEnable=false
client.rm.sagaJsonParser=fastjson
client.rm.tccActionInterceptorOrder=-2147482648
client.tm.commitRetryCount=5
client.tm.rollbackRetryCount=5
client.tm.defaultGlobalTransactionTimeout=60000
client.tm.degradeCheck=false
client.tm.degradeCheckAllowTimes=10
client.tm.degradeCheckPeriod=2000
client.tm.interceptorOrder=-2147482648
client.undo.dataValidation=true
client.undo.logSerialization=jackson
client.undo.onlyCareUpdateColumns=true
server.undo.logSaveDays=7
server.undo.logDeletePeriod=86400000
client.undo.logTable=undo_log
client.undo.compress.enable=true
client.undo.compress.type=zip
client.undo.compress.threshold=64k
#For TCC transaction mode
tcc.fence.logTableName=tcc_fence_log
tcc.fence.cleanPeriod=1h#Log rule configuration, for client and server
log.exceptionRate=100#Transaction storage configuration, only for the server. The file, db, and redis configuration values are optional.
store.mode=db
store.lock.mode=db
store.session.mode=db
#Used for password encryption
#store.publicKey=      #If `store.mode,store.lock.mode,store.session.mode` are not equal to `file`, you can remove the configuration block.
#store.file.dir=file_store/data
#store.file.maxBranchSessionSize=16384
#store.file.maxGlobalSessionSize=512
#store.file.fileWriteBufferCacheSize=16384
#store.file.flushDiskMode=async
#store.file.sessionReloadReadSize=100#These configurations are required if the `store mode` is `db`. If `store.mode,store.lock.mode,store.session.mode` are not equal to `db`, you can remove the configuration block.
store.db.datasource=druid
store.db.dbType=mysql
store.db.driverClassName=com.mysql.jdbc.Driver
store.db.url=jdbc:mysql://127.0.0.1:3306/seata?useUnicode=true&rewriteBatchedStatements=true
store.db.user=root
store.db.password=root
store.db.minConn=5
store.db.maxConn=30
store.db.globalTable=global_table
store.db.branchTable=branch_table
store.db.distributedLockTable=distributed_lock
store.db.queryLimit=100
store.db.lockTable=lock_table
store.db.maxWait=5000#These configurations are required if the `store mode` is `redis`. If `store.mode,store.lock.mode,store.session.mode` are not equal to `redis`, you can remove the configuration block.
#store.redis.mode=single
#store.redis.single.host=127.0.0.1
#store.redis.single.port=6379
#store.redis.sentinel.masterName=
#store.redis.sentinel.sentinelHosts=
#store.redis.maxConn=10
#store.redis.minConn=1
#store.redis.maxTotal=100
#store.redis.database=0
#store.redis.password=
#store.redis.queryLimit=100#Transaction rule configuration, only for the server
server.recovery.committingRetryPeriod=1000
server.recovery.asynCommittingRetryPeriod=1000
server.recovery.rollbackingRetryPeriod=1000
server.recovery.timeoutRetryPeriod=1000
server.maxCommitRetryTimeout=-1
server.maxRollbackRetryTimeout=-1
server.rollbackRetryTimeoutUnlockEnable=false
server.distributedLockExpireTime=10000
server.xaerNotaRetryTimeout=60000
server.session.branchAsyncQueueSize=5000
server.session.enableBranchAsyncRemove=false
server.enableParallelRequestHandle=false#Metrics configuration, only for the server
metrics.enabled=false
metrics.registryType=compact
metrics.exporterList=prometheus
metrics.exporterPrometheusPort=9898- 以上这些配置参数信息所代表的含义,可以查看官网:
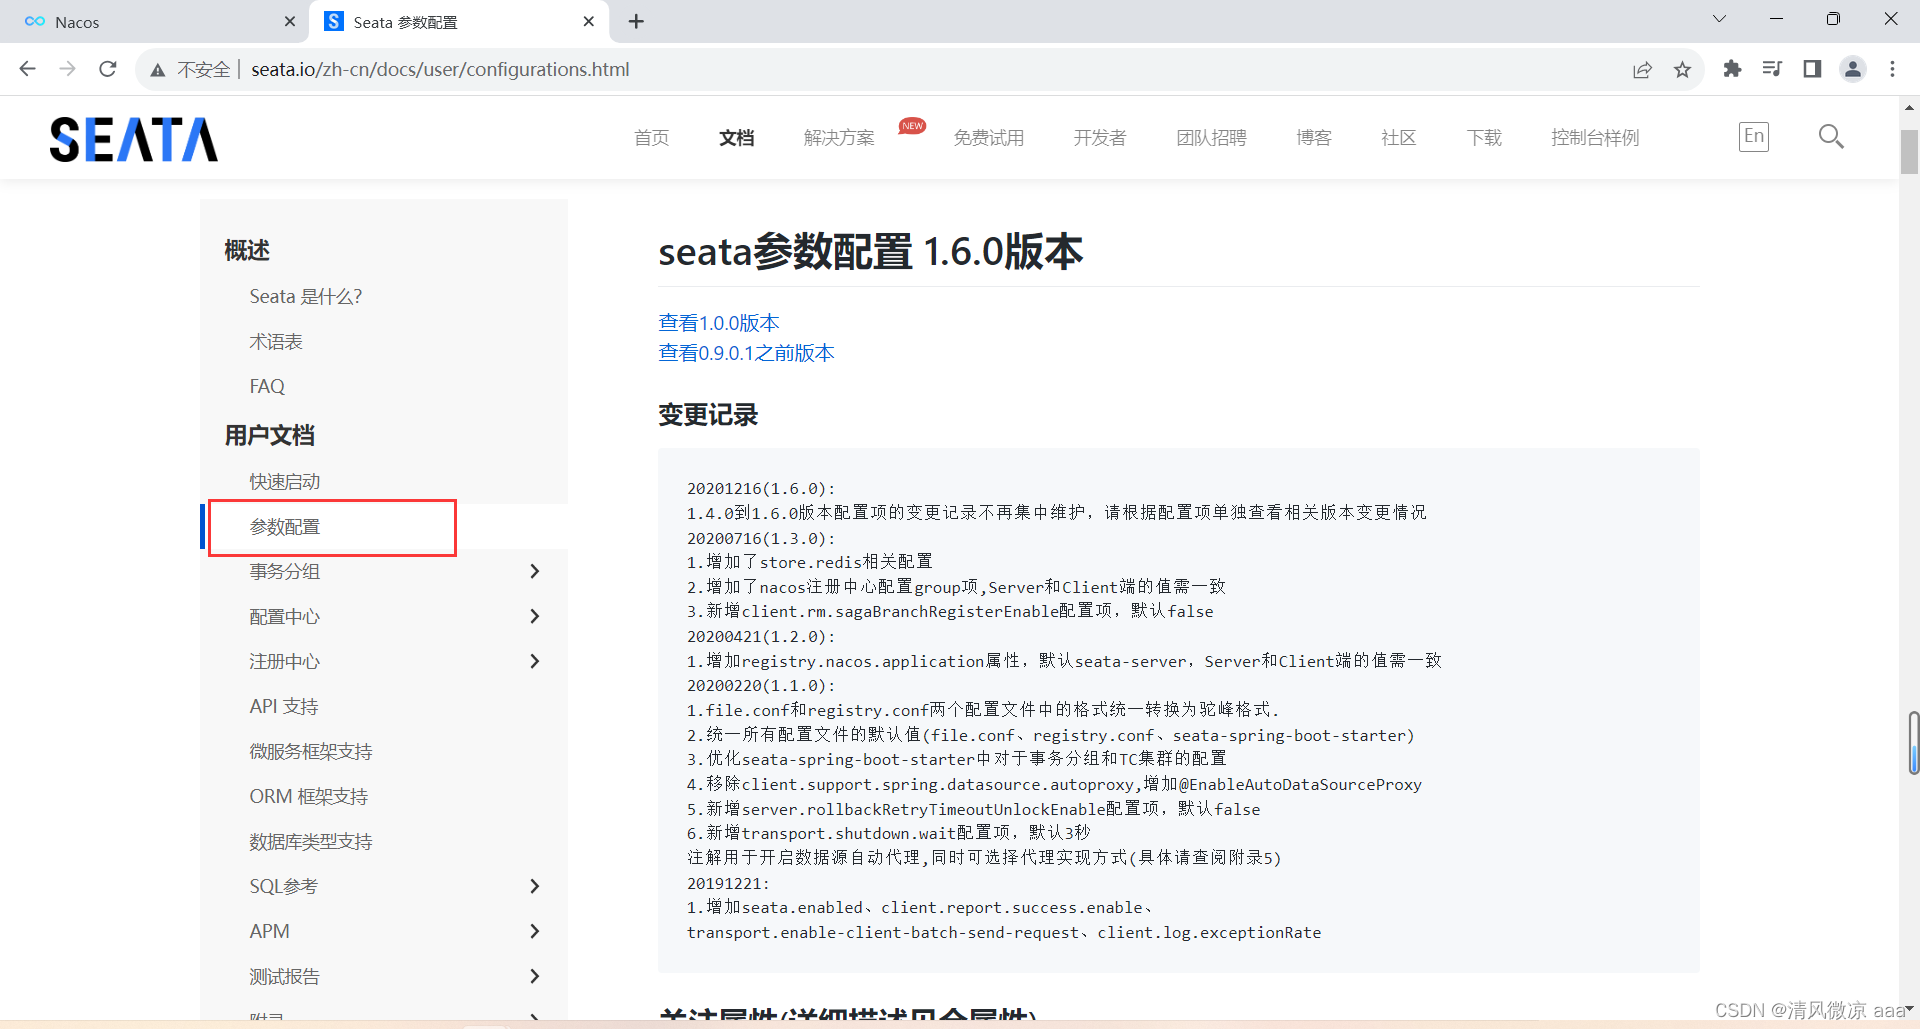
- 启动Nacos,并登录管理页面
- 在配置列表新建:seataServer.properties,配置内容为刚刚修改的config.txt文件,注意类型为properties。
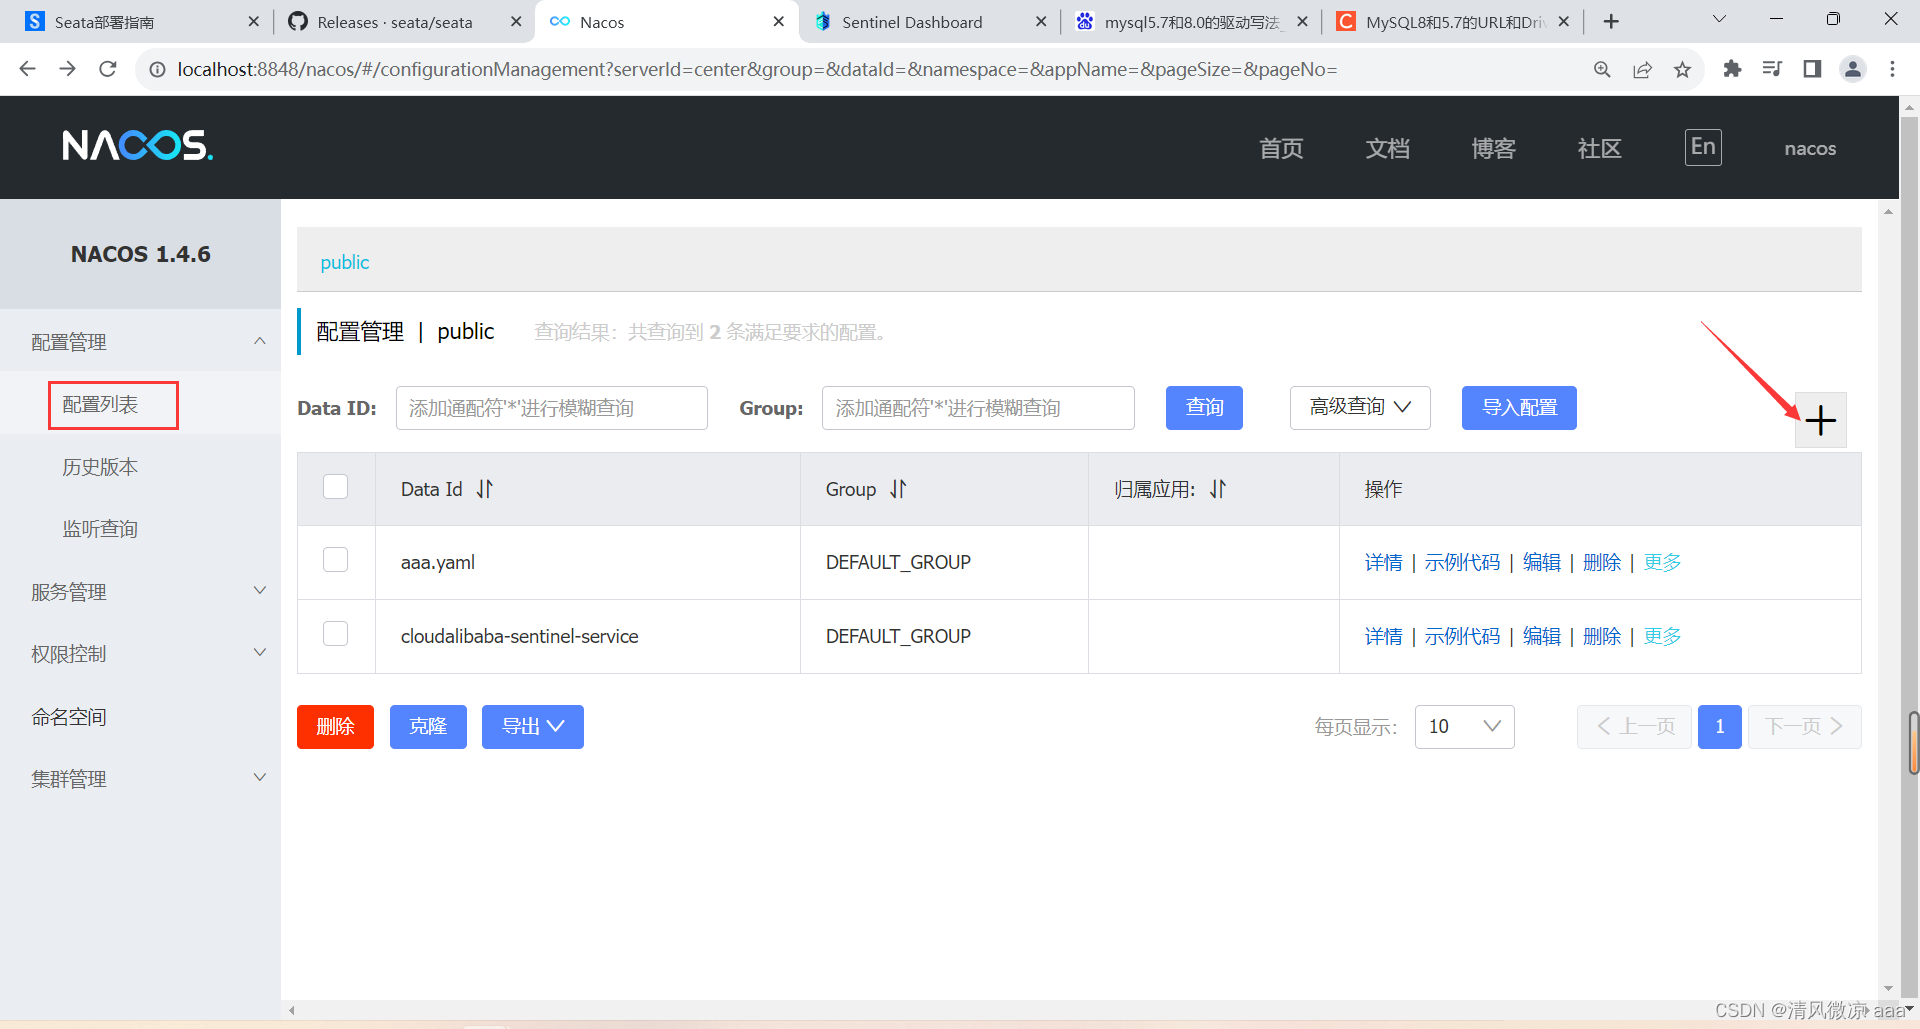
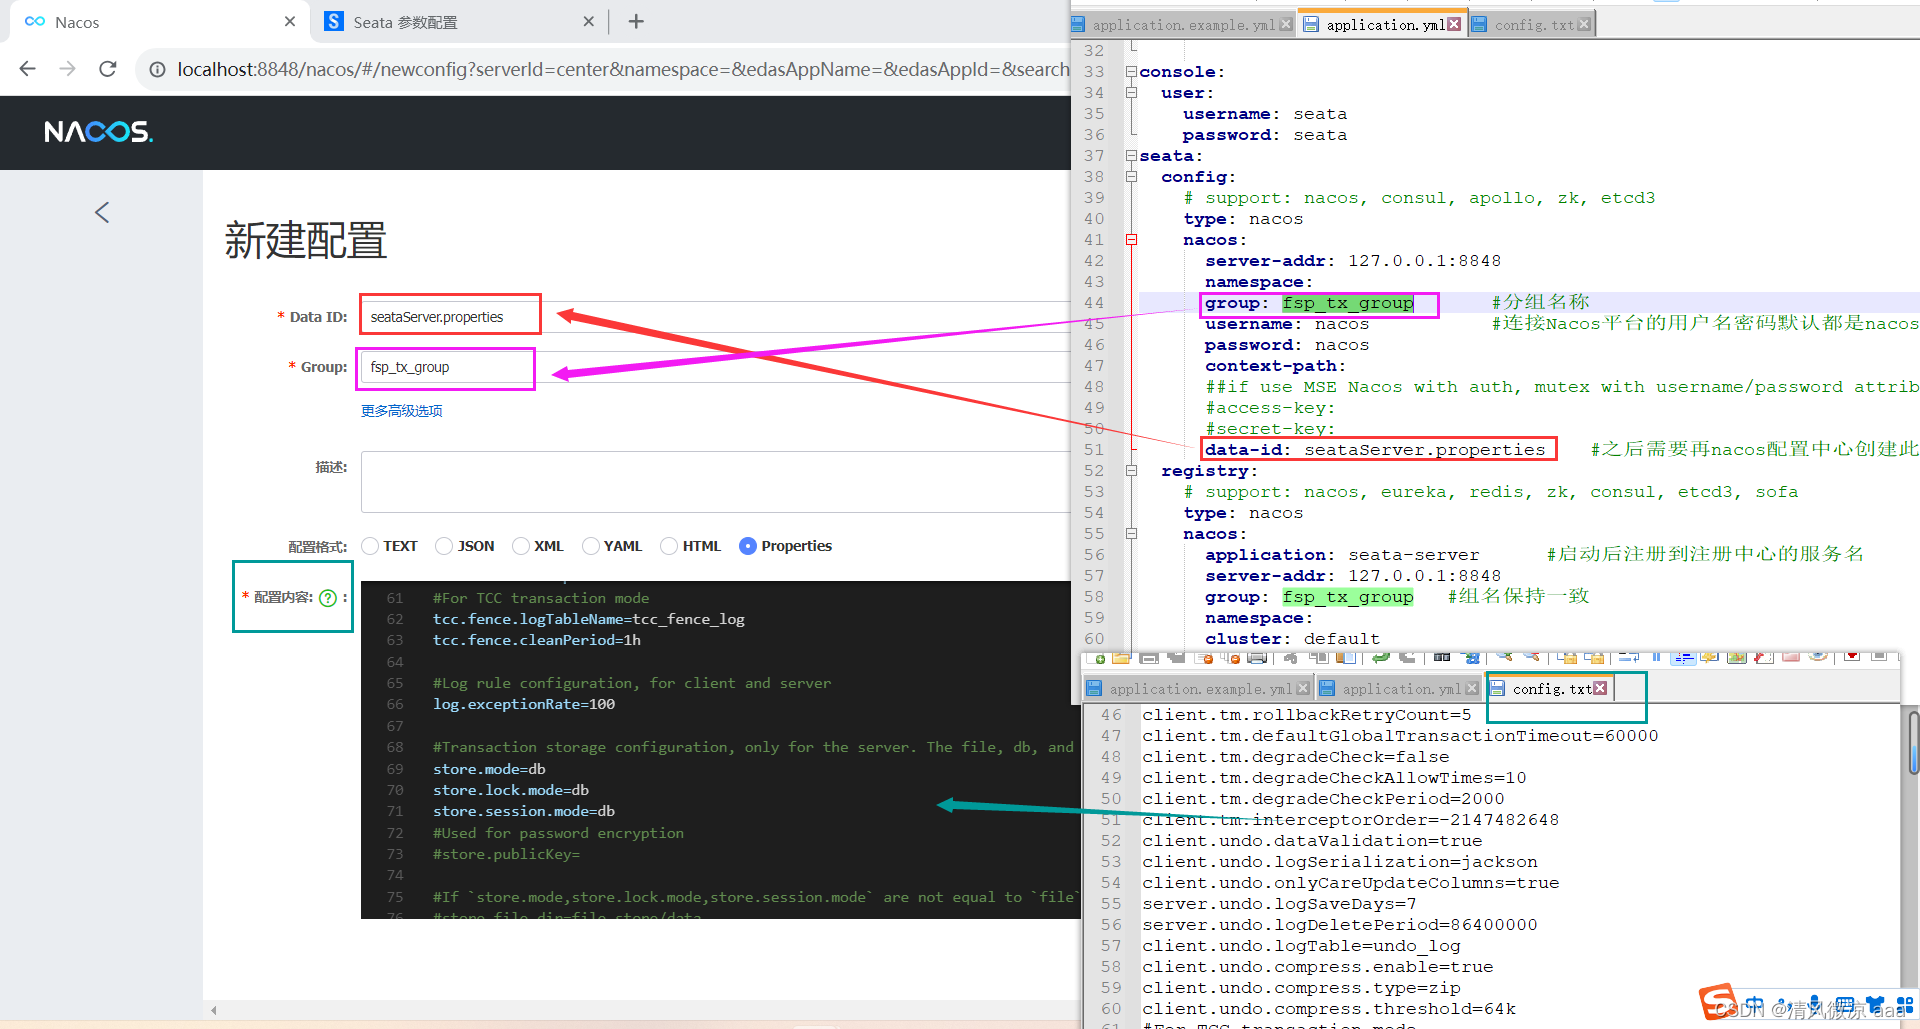
4)启动
先启动Nacos端口号8848,再启动seata-server
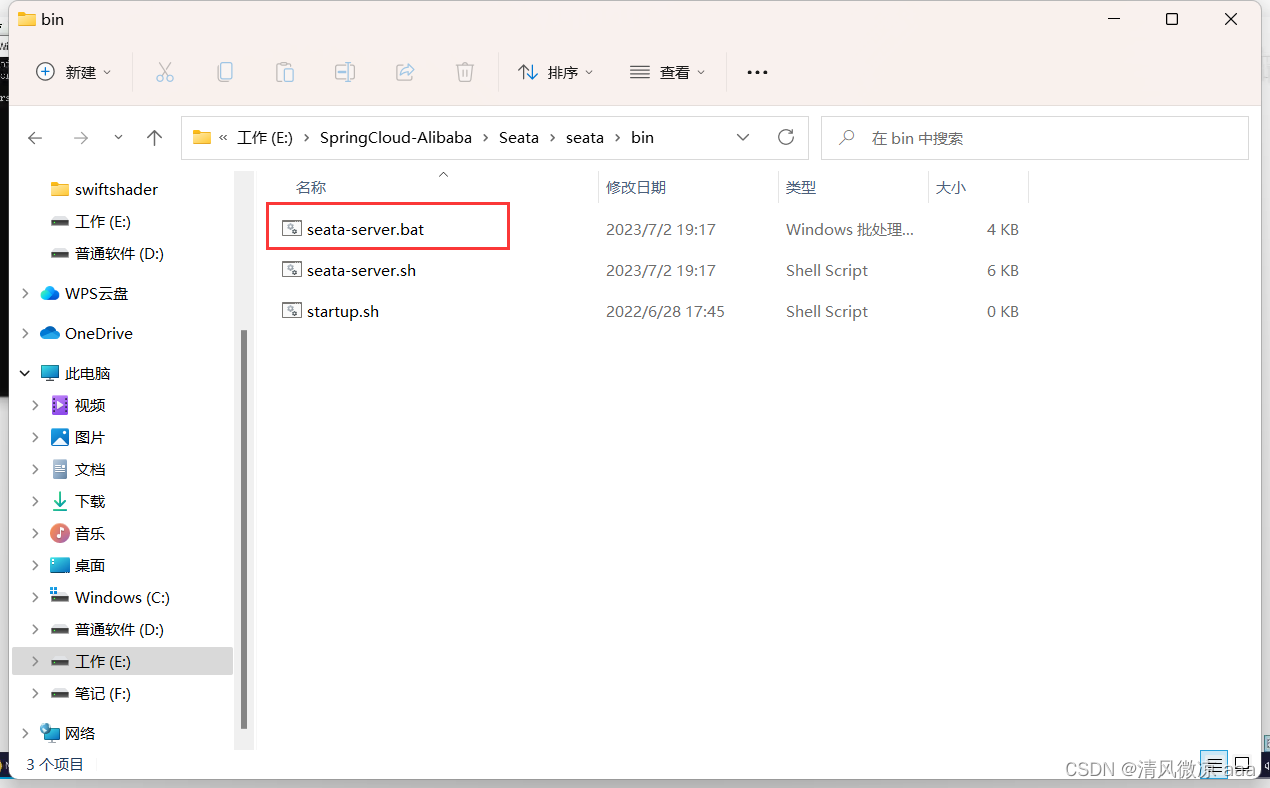
- 位置
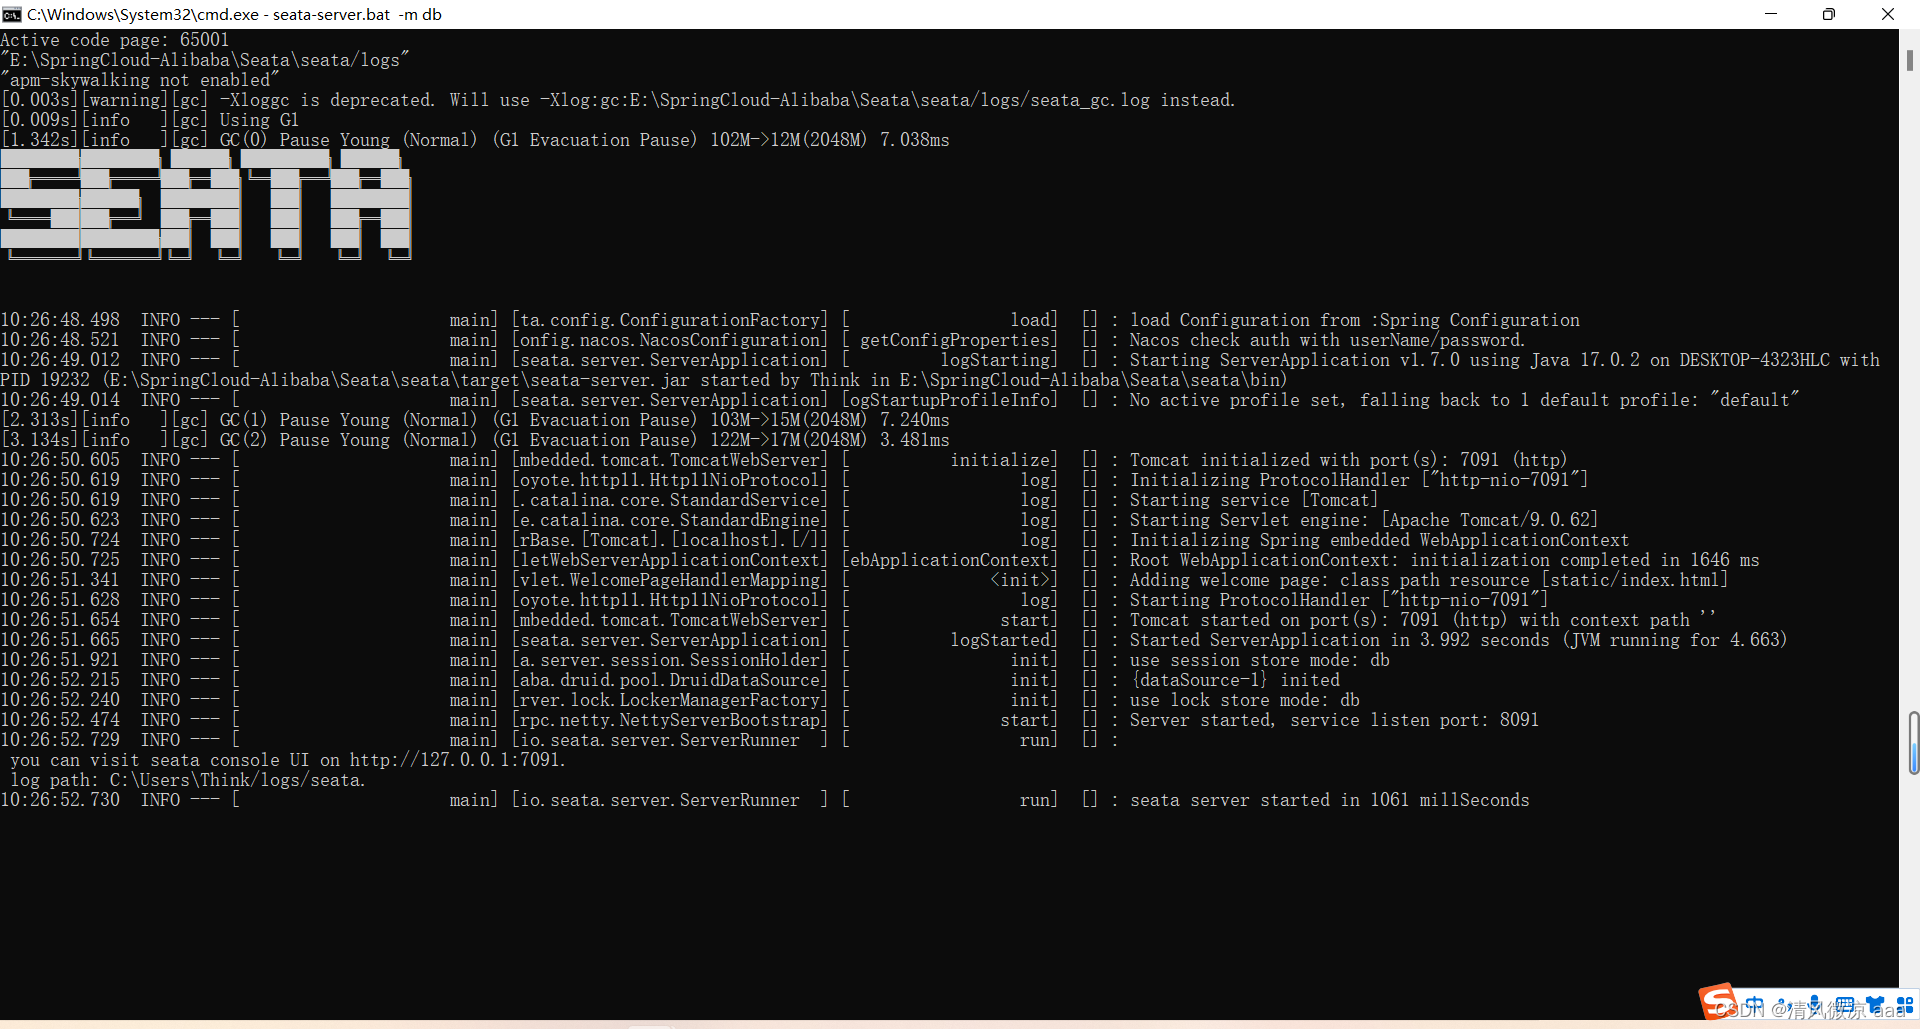
- cmd,输入命令:
seata-server.bat -m db,默认是file所以要指定db。如果不是本机还要指定ip和端口号。
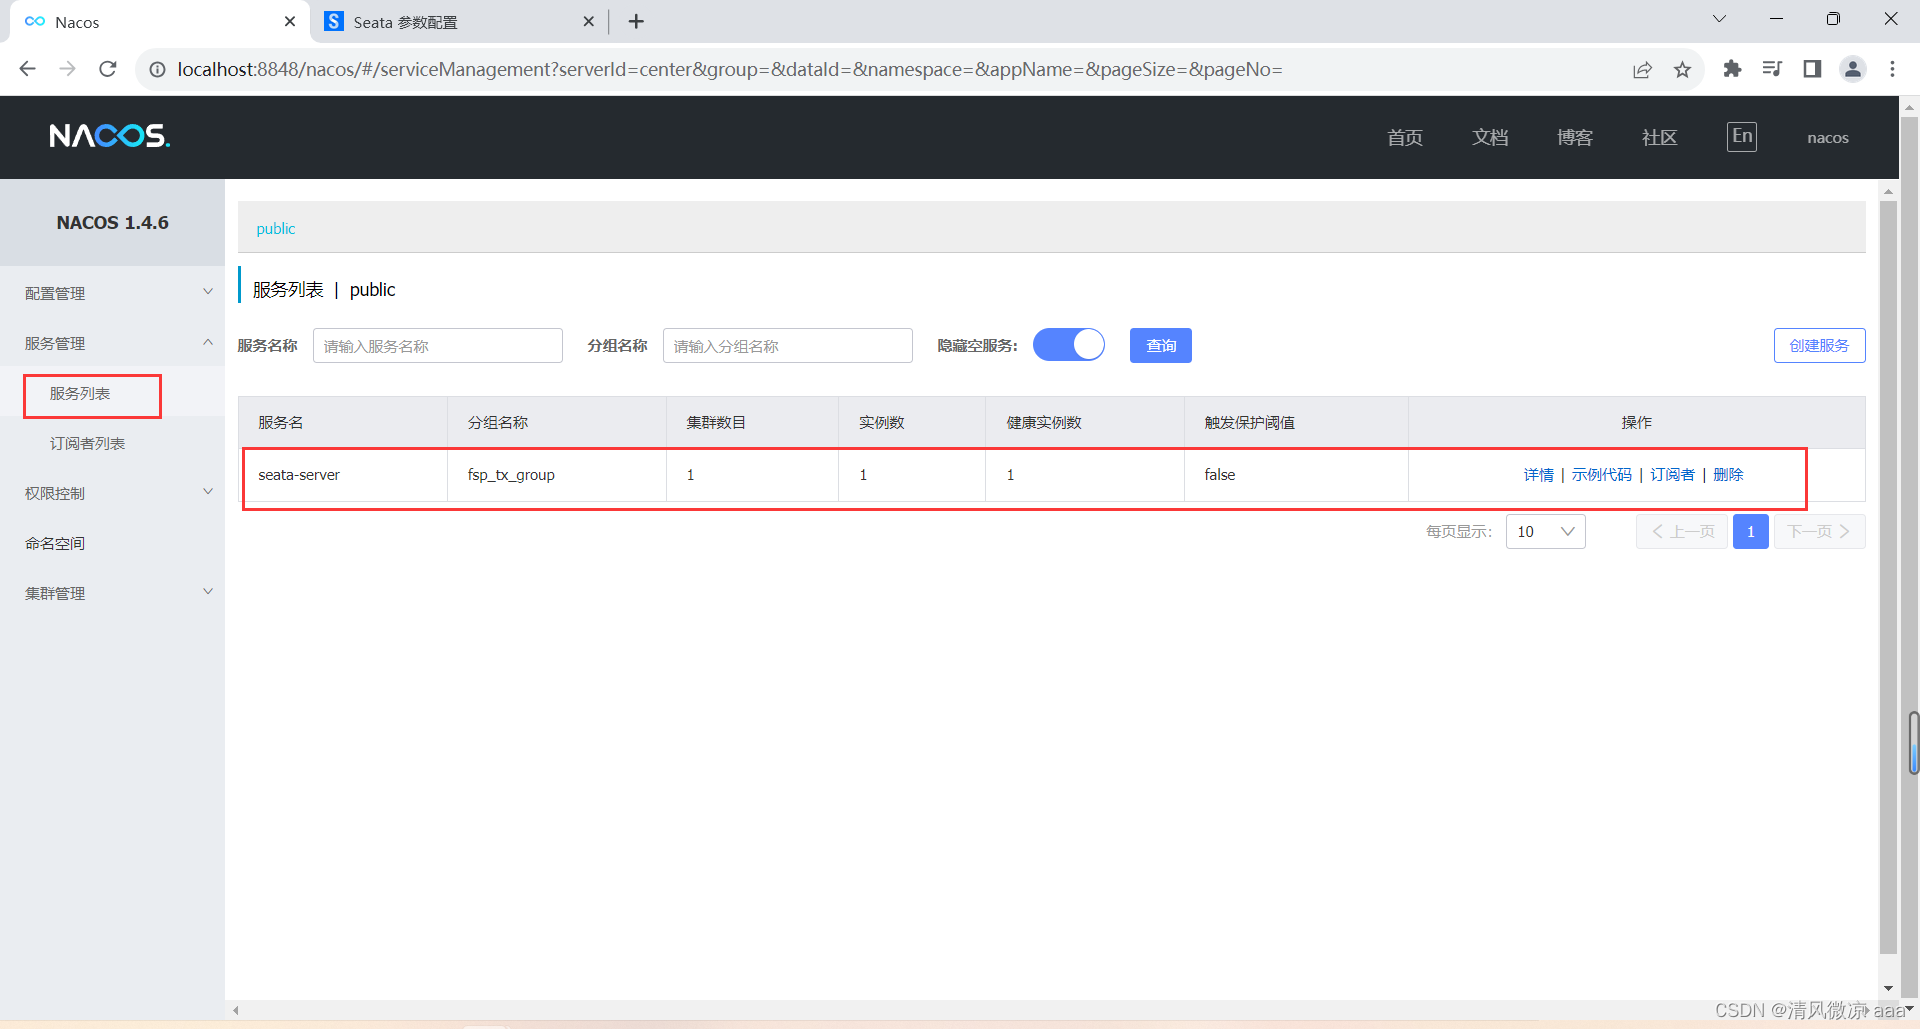
- 查看服务列表:
20.2 domain实体类
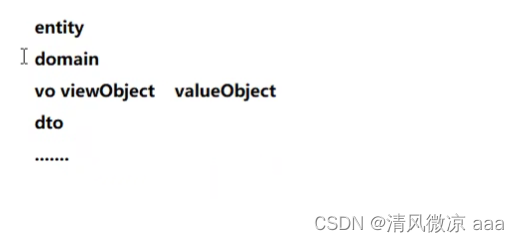
- 不同的公司,实体类的叫法可能不同。
- 封装数据库的实体类。与前端页面交互的实体类。
