上一节实现 express 的优化处理,这一节来实现 express 的中间件
中间件的特点:
- 可以决定是否向下执行
- 可以拓展属性和方法
- 可以权限校验
- 中间件的放置顺序在路由之前
中间件基于路由,只针对路径拦截,下面是中间件的匹配规则:
- 路径为
/表示任何路径都能匹配到 - 如果以这个路径开头,则匹配
- 和路由的路径一样,也可以匹配
先看 express 的中间件 demo
const express = require("express");
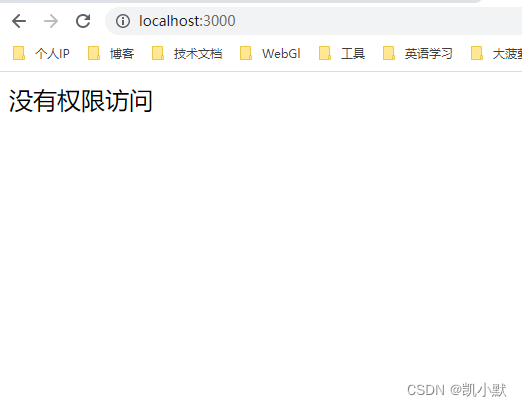
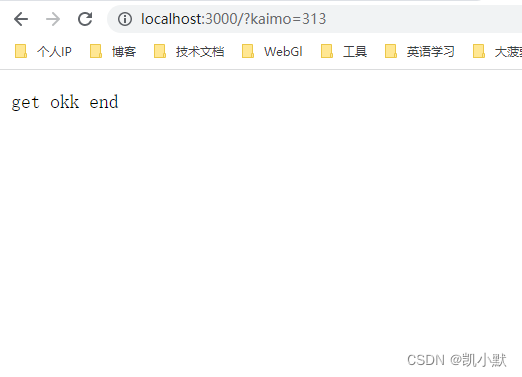
const app = express();app.use("/", (req, res, next) => {if (req.query.kaimo == "313") {next();} else {res.send("没有权限访问");}
});app.get("/", (req, res, next) => {res.end("get okk end");
});
app.post("/", (req, res, next) => {res.end("post okk end");
});app.listen(3000, () => {console.log(`server start 3000`);console.log(`在线访问地址:http://localhost:3000/`);
});
控制台执行下面命令:
curl -v -X POST http://localhost:3000/
然后去访问:http://localhost:3000/
下面实现 express 中间件如图:我们需要在 Router 的前面添加中间件,它没有 route 属性,有路径跟 handler

application.js
const http = require("http");
const Router = require("./router");
const methods = require("methods");
console.log("methods----->", methods);function Application() {}// 调用此方法才开始创建,不是创建应用时直接装载路由
Application.prototype.lazy_route = function () {if (!this._router) {this._router = new Router();}
};methods.forEach((method) => {Application.prototype[method] = function (path, ...handlers) {this.lazy_route();this._router[method](path, handlers);};
});Application.prototype.use = function () {this.lazy_route();this._router.use(...arguments);
};Application.prototype.listen = function () {const server = http.createServer((req, res) => {function done() {res.end(`kaimo-express Cannot ${req.method} ${req.url}`);}this.lazy_route();this._router.handle(req, res, done);});server.listen(...arguments);
};module.exports = Application;
router/index.js
const url = require("url");
const Route = require("./route");
const Layer = require("./layer");
const methods = require("methods");function Router() {// 维护所有的路由this.stack = [];
}Router.prototype.route = function (path) {// 产生 routelet route = new Route();// 产生 layer 让 layer 跟 route 进行关联let layer = new Layer(path, route.dispatch.bind(route));// 每个路由都具备一个 route 属性,稍后路径匹配到后会调用 route 中的每一层layer.route = route;// 把 layer 放到路由的栈中this.stack.push(layer);return route;
};methods.forEach((method) => {Router.prototype[method] = function (path, handlers) {// 1.用户调用 method 时,需要保存成一个 layer 当道栈中// 2.产生一个 Route 实例和当前的 layer 创造关系// 3.要将 route 的 dispatch 方法存到 layer 上let route = this.route(path);// 让 route 记录用户传入的 handler 并且标记这个 handler 是什么方法route[method](handlers);};
});Router.prototype.use = function (path, ...handlers) {// 默认第一个是路径,后面是一个个的方法,路径可以不传if (typeof path === "function") {handlers.unshift(path);path = "/";}// 如果是多个函数需要循环添加层for (let i = 0; i < handlers.length; i++) {let layer = new Layer(path, handlers[i]);// 中间件不需要 route 属性layer.route = undefined;this.stack.push(layer);}
};Router.prototype.handle = function (req, res, out) {console.log("请求到了");// 需要取出路由系统中 Router 存放的 layer 依次执行const { pathname } = url.parse(req.url);let idx = 0;let next = () => {// 遍历完后没有找到就直接走出路由系统if (idx >= this.stack.length) return out();let layer = this.stack[idx++];// 需要判断 layer 上的 path 和当前请求路由是否一致,一致就执行 dispatch 方法if (layer.match(pathname)) {// 中间件没有方法可以匹配if (!layer.route) {layer.handle_request(req, res, next);} else {// 将遍历路由系统中下一层的方法传入// 加速匹配,如果用户注册过这个类型的方法在去执行if (layer.route.methods[req.method.toLowerCase()]) {layer.handle_request(req, res, next);} else {next();}}} else {next();}};next();
};module.exports = Router;
layer.js
function Layer(path, handler) {this.path = path;this.handler = handler;
}Layer.prototype.match = function (pathname) {if (this.path === pathname) {return true;}// 如果是中间件,进行中间件的匹配规则if (!this.route) {if (this.path == "/") {return true;}// /aaaa/b 需要 /aaaa/ 才能匹配上return pathname.startsWith(this.path + "/");}return false;
};
Layer.prototype.handle_request = function (req, res, next) {this.handler(req, res, next);
};
module.exports = Layer;
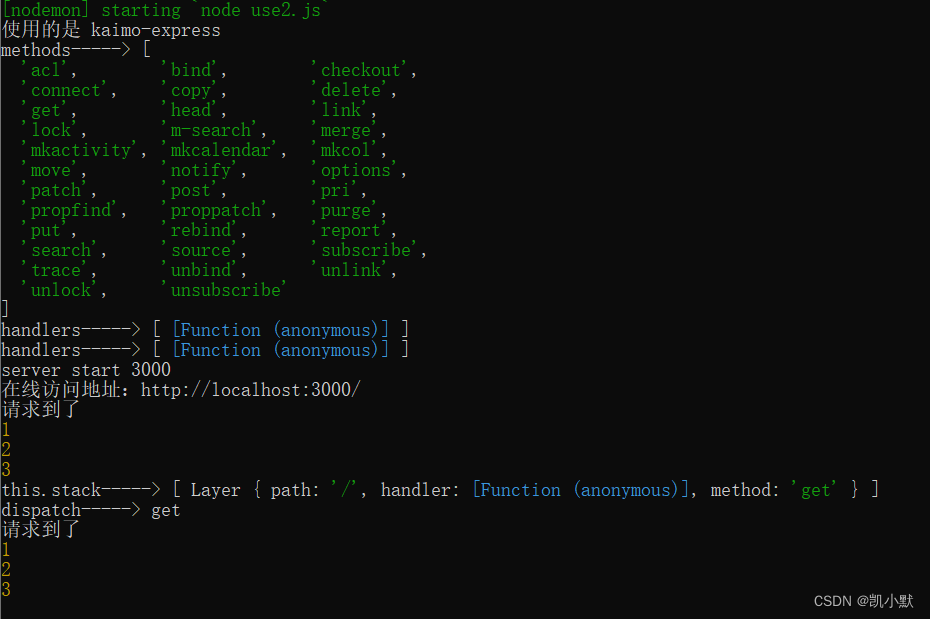
测试demo
const express = require("./kaimo-express");
const app = express();app.use((req, res, next) => {console.log(1);next();
});
app.use((req, res, next) => {console.log(2);next();
});
app.use((req, res, next) => {console.log(3);next();
});app.get("/", (req, res, next) => {res.end("get okk end");
});
app.post("/", (req, res, next) => {res.end("post okk end");
});app.listen(3000, () => {console.log(`server start 3000`);console.log(`在线访问地址:http://localhost:3000/`);
});