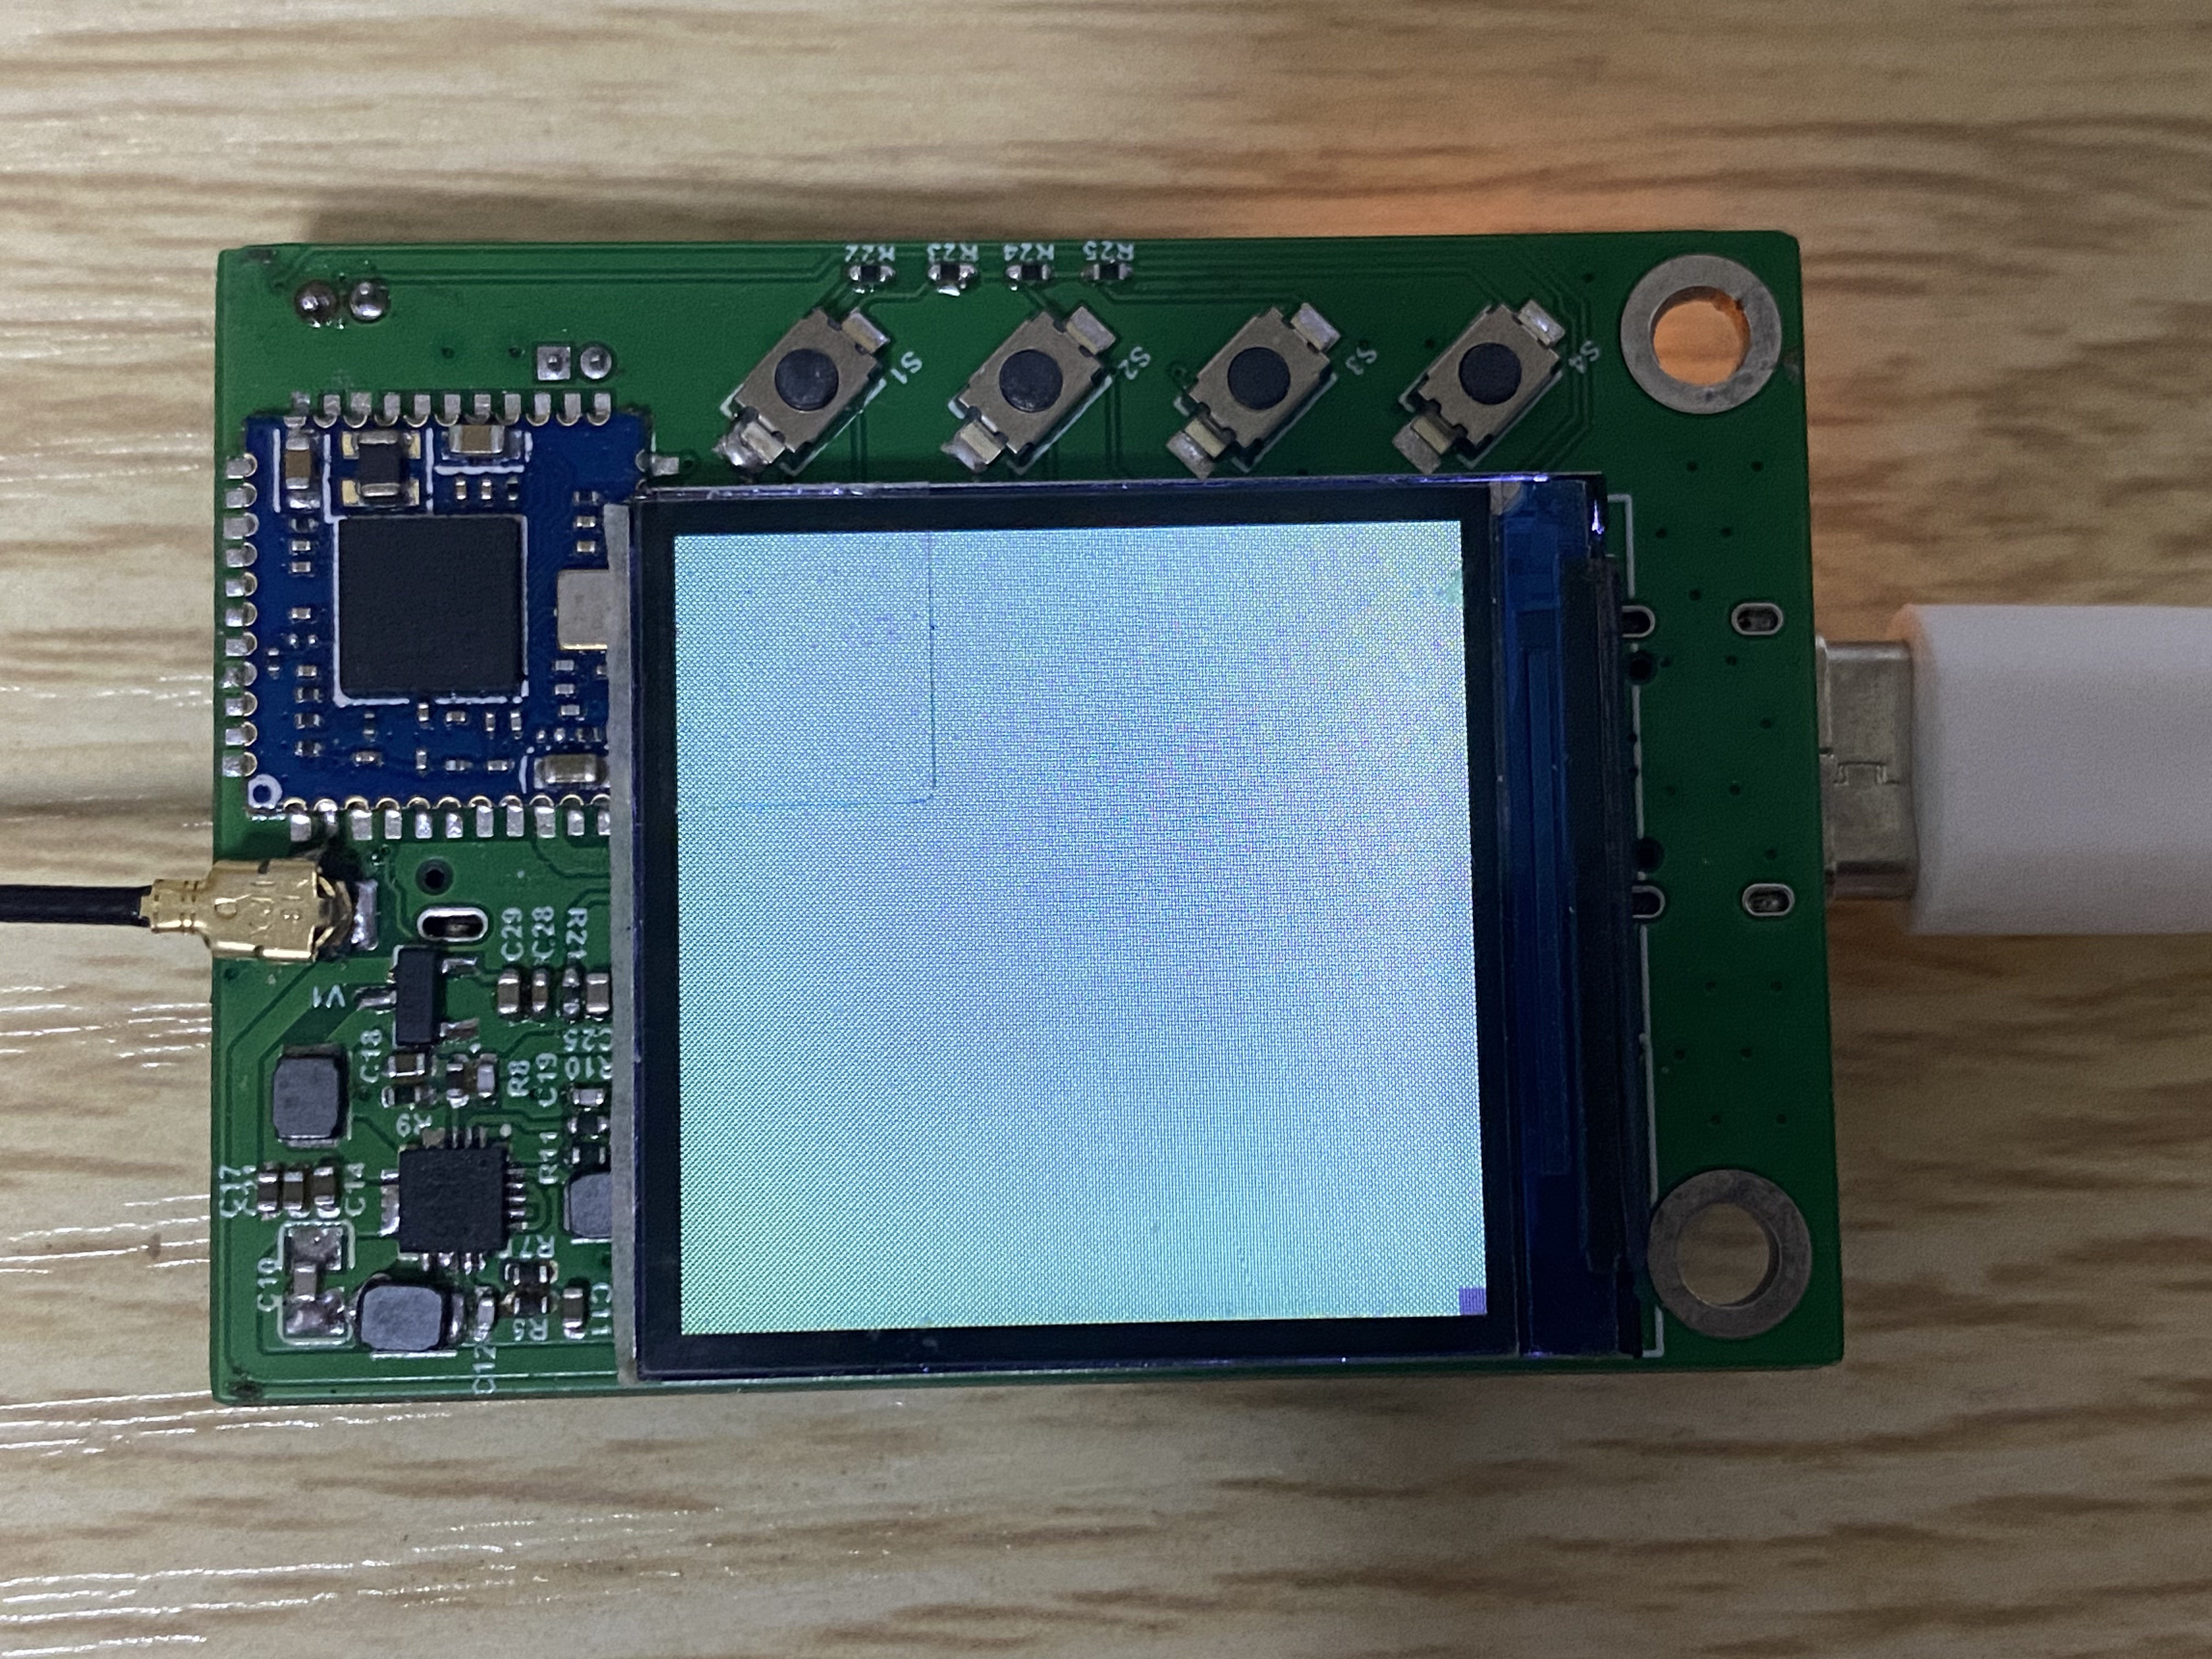
前言
前期已经调试好了摄像头和屏幕,今天我们将摄像头捕获的画面显示到屏幕上。
原理
摄像头对应 /dev/video0,屏幕对应 /dev/fb0,所以我们只要写一个应用程序,读取 video0 写入到 fb0 就可以了。
应用程序代码实例
camera_display.c
#include <stdio.h>
#include <string.h>
#include <stdlib.h>
#include <fcntl.h>
#include <unistd.h>
#include <ctype.h>
#include <errno.h>
#include <sys/mman.h>
#include <sys/time.h>
#include <asm/types.h>
#include <linux/videodev2.h>
#include <linux/fb.h>
#include <sys/stat.h>
#include <sys/ioctl.h>
#include <poll.h>
#include <math.h>
#include <wchar.h>
#include <time.h>
#include <stdbool.h>#define CAM_WIDTH 800
#define CAM_HEIGHT 600
#define YUVToRGB(Y) ((u16)((((u8)(Y) >> 3) << 11) | (((u8)(Y) >> 2) << 5) | ((u8)(Y) >> 3)))static char *dev_video;
static char *dev_fb0;static char *yuv_buffer;
static char *rgb_buffer;
typedef unsigned int u32;
typedef unsigned short u16;
typedef unsigned char u8;
struct v4l2_buffer video_buffer;
int lcd_fd;
int video_fd;
unsigned char *lcd_mem_p = NULL; //保存LCD屏映射到进程空间的首地址
struct fb_var_screeninfo vinfo;
struct fb_fix_screeninfo finfo;
char *video_buff_buff[4]; /*保存摄像头缓冲区的地址*/
int video_height = 0;
int video_width = 0;
unsigned char *lcd_display_buff; //LCD显存空间
unsigned char *lcd_display_buff2; //LCD显存空间static void errno_exit(const char *s)
{fprintf(stderr, "%s error %d, %s\n", s, errno, strerror(errno));exit(EXIT_FAILURE);
}static int video_init(void)
{struct v4l2_capability cap;struct v4l2_fmtdesc dis_fmtdesc;struct v4l2_format video_format;struct v4l2_requestbuffers video_requestbuffers;struct v4l2_buffer video_buffer;ioctl(video_fd, VIDIOC_QUERYCAP, &cap);dis_fmtdesc.index = 0;dis_fmtdesc.type = V4L2_BUF_TYPE_VIDEO_CAPTURE;// printf("-----------------------支持格式---------------------\n");// while (ioctl(video_fd, VIDIOC_ENUM_FMT, &dis_fmtdesc) != -1) {// 	printf("\t%d.%s\n", dis_fmtdesc.index + 1, dis_fmtdesc.description);// 	dis_fmtdesc.index++;// }video_format.type = V4L2_BUF_TYPE_VIDEO_CAPTURE;video_format.fmt.pix.width = CAM_WIDTH;video_format.fmt.pix.height = CAM_HEIGHT;video_format.fmt.pix.pixelformat = V4L2_PIX_FMT_YUYV; //使用JPEG格式帧,用于静态图像采集ioctl(video_fd, VIDIOC_S_FMT, &video_format);printf("当前摄像头支持的分辨率:%dx%d\n", video_format.fmt.pix.width, video_format.fmt.pix.height);if (video_format.fmt.pix.pixelformat != V4L2_PIX_FMT_YUYV) {printf("当前摄像头不支持YUYV格式输出.\n");video_height = video_format.fmt.pix.height;video_width = video_format.fmt.pix.width;//return -3;} else {video_height = video_format.fmt.pix.height;video_width = video_format.fmt.pix.width;printf("当前摄像头支持YUYV格式输出.width %d height %d\n", video_height, video_height);}/*3. 申请缓冲区*/memset(&video_requestbuffers, 0, sizeof(struct v4l2_requestbuffers));video_requestbuffers.type = V4L2_BUF_TYPE_VIDEO_CAPTURE;video_requestbuffers.count = 4;video_requestbuffers.memory = V4L2_MEMORY_MMAP;if (ioctl(video_fd, VIDIOC_REQBUFS, &video_requestbuffers))return -4;printf("成功申请的缓冲区数量:%d\n", video_requestbuffers.count);/*4. 得到每个缓冲区的地址: 将申请的缓冲区映射到进程空间*/memset(&video_buffer, 0, sizeof(struct v4l2_buffer));int i;for (i = 0; i < video_requestbuffers.count; i++) {video_buffer.type = V4L2_BUF_TYPE_VIDEO_CAPTURE;video_buffer.index = i;video_buffer.memory = V4L2_MEMORY_MMAP;if (ioctl(video_fd, VIDIOC_QUERYBUF, &video_buffer))return -5;/*映射缓冲区的地址到进程空间*/video_buff_buff[i] =mmap(NULL, video_buffer.length, PROT_READ | PROT_WRITE, MAP_SHARED, video_fd, video_buffer.m.offset);printf("第%d个缓冲区地址:%#X\n", i, video_buff_buff[i]);}/*5. 将缓冲区放入到采集队列*/memset(&video_buffer, 0, sizeof(struct v4l2_buffer));for (i = 0; i < video_requestbuffers.count; i++) {video_buffer.type = V4L2_BUF_TYPE_VIDEO_CAPTURE;video_buffer.index = i;video_buffer.memory = V4L2_MEMORY_MMAP;if (ioctl(video_fd, VIDIOC_QBUF, &video_buffer)) {printf("VIDIOC_QBUF error\n");return -6;}}/*6. 启动摄像头采集*/printf("启动摄像头采集\n");int opt_type = V4L2_BUF_TYPE_VIDEO_CAPTURE;if (ioctl(video_fd, VIDIOC_STREAMON, &opt_type)) {printf("VIDIOC_STREAMON error\n");return -7;}return 0;
}int lcd_init(void)
{/*2. 获取可变参数*/if (ioctl(lcd_fd, FBIOGET_VSCREENINFO, &vinfo))return -2;printf("屏幕X:%d   屏幕Y:%d  像素位数:%d\n", vinfo.xres, vinfo.yres, vinfo.bits_per_pixel);//分配显存空间,完成图像显示lcd_display_buff = malloc(vinfo.xres * vinfo.yres * vinfo.bits_per_pixel / 8);/*3. 获取固定参数*/if (ioctl(lcd_fd, FBIOGET_FSCREENINFO, &finfo))return -3;finfo.smem_len = 115200;finfo.line_length = 480;printf("smem_len=%d Byte,line_length=%d Byte\n", finfo.smem_len, finfo.line_length);/*4. 映射LCD屏物理地址到进程空间*/lcd_mem_p =(unsigned char *)mmap(0, finfo.smem_len, PROT_READ | PROT_WRITE, MAP_SHARED, lcd_fd, 0); //从文件的那个地方开始映射memset(lcd_mem_p, 0xFFFFFFFF, finfo.smem_len);printf("映射LCD屏物理地址到进程空间\n");return 0;
}static void close_device(void)
{if (-1 == close(video_fd))errno_exit("close");video_fd = -1;if (-1 == close(lcd_fd))errno_exit("close");lcd_fd = -1;
}static void open_device(void)
{video_fd = open(dev_video, O_RDWR /* required */ | O_NONBLOCK, 0);if (-1 == video_fd) {fprintf(stderr, "Cannot open '%s': %d, %s\n", dev_video, errno, strerror(errno));exit(EXIT_FAILURE);}lcd_fd = open(dev_fb0, O_RDWR, 0);if (-1 == lcd_fd) {fprintf(stderr, "Cannot open '%s': %d, %s\n", dev_fb0, errno, strerror(errno));exit(EXIT_FAILURE);}
}/* 将YUV格式数据转为RGB */
void yuv_to_rgb(unsigned char *yuv_buffer, unsigned char *rgb_buffer, int iWidth, int iHeight)
{int x;int z = 0;unsigned char *ptr = rgb_buffer;unsigned char *yuyv = yuv_buffer;int r, g, b;int y, u, v;for (x = 0; x < iWidth * iHeight; x++) {if (!z)y = yuyv[0] << 8;elsey = yuyv[2] << 8;u = yuyv[1] - 128;v = yuyv[3] - 128;r = (y + (359 * v)) >> 8;g = (y - (88 * u) - (183 * v)) >> 8;b = (y + (454 * u)) >> 8;*(ptr++) = (b > 255) ? 255 : ((b < 0) ? 0 : b);*(ptr++) = (g > 255) ? 255 : ((g < 0) ? 0 : g);*(ptr++) = (r > 255) ? 255 : ((r < 0) ? 0 : r);if (z++) {z = 0;yuyv += 4;}}
}void rgb24_to_rgb565(char *rgb24, char *rgb16)
{int i = 0, j = 0;for (i = 0; i < 240 * 240 * 3; i += 3) {rgb16[j] = rgb24[i] >> 3; // Brgb16[j] |= ((rgb24[i + 1] & 0x1C) << 3); // Grgb16[j + 1] = rgb24[i + 2] & 0xF8; // Rrgb16[j + 1] |= (rgb24[i + 1] >> 5); // Gj += 2;}
}int main(int argc, char **argv)
{struct pollfd video_fds;dev_video = "/dev/video0";dev_fb0 = "/dev/fb0";open_device();video_init();lcd_init();/* 读取摄像头的数据*/video_fds.events = POLLIN;video_fds.fd = video_fd;memset(&video_buffer, 0, sizeof(struct v4l2_buffer));rgb_buffer = malloc(CAM_WIDTH * CAM_HEIGHT * 3);yuv_buffer = malloc(CAM_WIDTH * CAM_HEIGHT * 3);while (1) {/*等待摄像头采集数据*/poll(&video_fds, 1, -1);/*得到缓冲区的编号*/video_buffer.type = V4L2_BUF_TYPE_VIDEO_CAPTURE;video_buffer.memory = V4L2_MEMORY_MMAP;ioctl(video_fd, VIDIOC_DQBUF, &video_buffer);printf("当前采集OK的缓冲区编号:%d,地址:%#X num:%d\n", video_buffer.index, video_buff_buff[video_buffer.index],strlen(video_buff_buff[video_buffer.index]));/*对缓冲区数据进行处理*/yuv_to_rgb(video_buff_buff[video_buffer.index], yuv_buffer, video_height, video_width);rgb24_to_rgb565(yuv_buffer, rgb_buffer);printf("显示屏进行显示\n");//显示屏进行显示: 将显存空间的数据拷贝到LCD屏进行显示memcpy(lcd_mem_p, rgb_buffer, vinfo.xres * vinfo.yres * vinfo.bits_per_pixel / 8);/*将缓冲区放入采集队列*/ioctl(video_fd, VIDIOC_QBUF, &video_buffer);printf("将缓冲区放入采集队列\n");}/* 关闭设备*/close_device();return 0;
}
调试
# ./camera_display2.out
当前摄像头支持的分辨率:800x600
当前摄像头支持YUYV格式输出.width 600 height 600
[   52.859327] sun6i-csi 1cb4000.csi: Unsupported pixformat: 0x56595559 with mbus code: 0x2006!
成功申请的缓冲区数量:4
第0个缓冲区地址:0XB6D6A000
第1个缓冲区地址:0XB6C7F000
第2个缓冲区地址:0XB6B94000
第3个缓冲区地址:0XB6AA9000
启动摄像头采集
VIDIOC_STREAMON error
屏幕X:240   屏幕Y:240  像素位数:16
smem_len=115200 Byte,line_length=480 Byte
映射LCD屏物理地址到进程空间
当前采集OK的缓冲区编号:0,地址:0XB6D6A000 num:0
显示屏进行显示
将缓冲区放入采集队列
当前采集OK的缓冲区编号:0,地址:0XB6D6A000 num:0
运行报错 sun6i-csi 1cb4000.csi: Unsupported pixformat: 0x56595559 with mbus code: 0x2006!,
并且屏幕显示一片绿
猜测 1:会不会是设备树配置不对
仔细检查设备树参数,还真发现了一处错误
&i2c1 {pinctrl-0 = <&i2c1_pins>;pinctrl-names = "default";clock-frequency = <400000>;status = "okay";ov2640: camera@30 {compatible = "ovti,ov2640";reg = <0x30>;pinctrl-names = "default";pinctrl-0 = <&csi1_mclk_pin>;clocks = <&ccu CLK_CSI1_MCLK>;clock-names = "xvclk";assigned-clocks = <&ccu CLK_CSI1_MCLK>;assigned-clock-rates = <26000000>;port {ov2640_0: endpoint {remote-endpoint = <&csi1_ep>;bus-width = <10>;};};};
};
时钟频率 26000000 是我之前使用 26MHz 晶振时改的,后来由于 USB 问题,晶振换成了 24MHz 的,这里没有同步修改,那就改成 24000000
运行,还是报同样的错误。
猜测 2:是不是应用程序中摄像头分辨率设置的是 800x600,而屏幕是 240x240 导致的
应用程序摄像头分辨率改成 240x240
#define CAM_WIDTH 240
#define CAM_HEIGHT 240
运行,结果还是报同样的错误
方案 3:上网搜索
并没有找到类似问题。
方案 4:看代码
没办法只能看代码了
根据内核报错信息 Unsupported pixformat 找到
drivers/media/platform/sunxi/sun6i-csi/sun6i_video.c
static int sun6i_video_link_validate(struct media_link *link)
{struct video_device *vdev = container_of(link->sink->entity,struct video_device, entity);struct sun6i_video *video = video_get_drvdata(vdev);struct v4l2_subdev_format source_fmt;int ret;video->mbus_code = 0;if (!media_entity_remote_pad(link->sink->entity->pads)) {dev_info(video->csi->dev,"video node %s pad not connected\n", vdev->name);return -ENOLINK;}ret = sun6i_video_link_validate_get_format(link->source, &source_fmt);if (ret < 0)return ret;if (!sun6i_csi_is_format_supported(video->csi,video->fmt.fmt.pix.pixelformat,source_fmt.format.code)) {dev_err(video->csi->dev,"Unsupported pixformat: 0x%x with mbus code: 0x%x!\n",video->fmt.fmt.pix.pixelformat,source_fmt.format.code);return -EPIPE;}if (source_fmt.format.width != video->fmt.fmt.pix.width ||source_fmt.format.height != video->fmt.fmt.pix.height) {dev_err(video->csi->dev,"Wrong width or height %ux%u (%ux%u expected)\n",video->fmt.fmt.pix.width, video->fmt.fmt.pix.height,source_fmt.format.width, source_fmt.format.height);return -EPIPE;}video->mbus_code = source_fmt.format.code;return 0;
}
在判断 sun6i_csi_is_format_supported() 处出问题了,追了下代码,发现最后是个宏函数就不想追了,索性将这段注释掉,
运行,
# ./camera_display2.out
当前摄像头支持的分辨率:240x240[   64.538654] sun6i-csi 1cb4000.csi: Wrong width or height 240x240 (800x600 expected)
结果又报 Wrong width or height 240x240 (800x600 expected) 错误,和上面一样,注释掉先让代码跑通,
运行,不报错了,屏幕也开始显示图像了
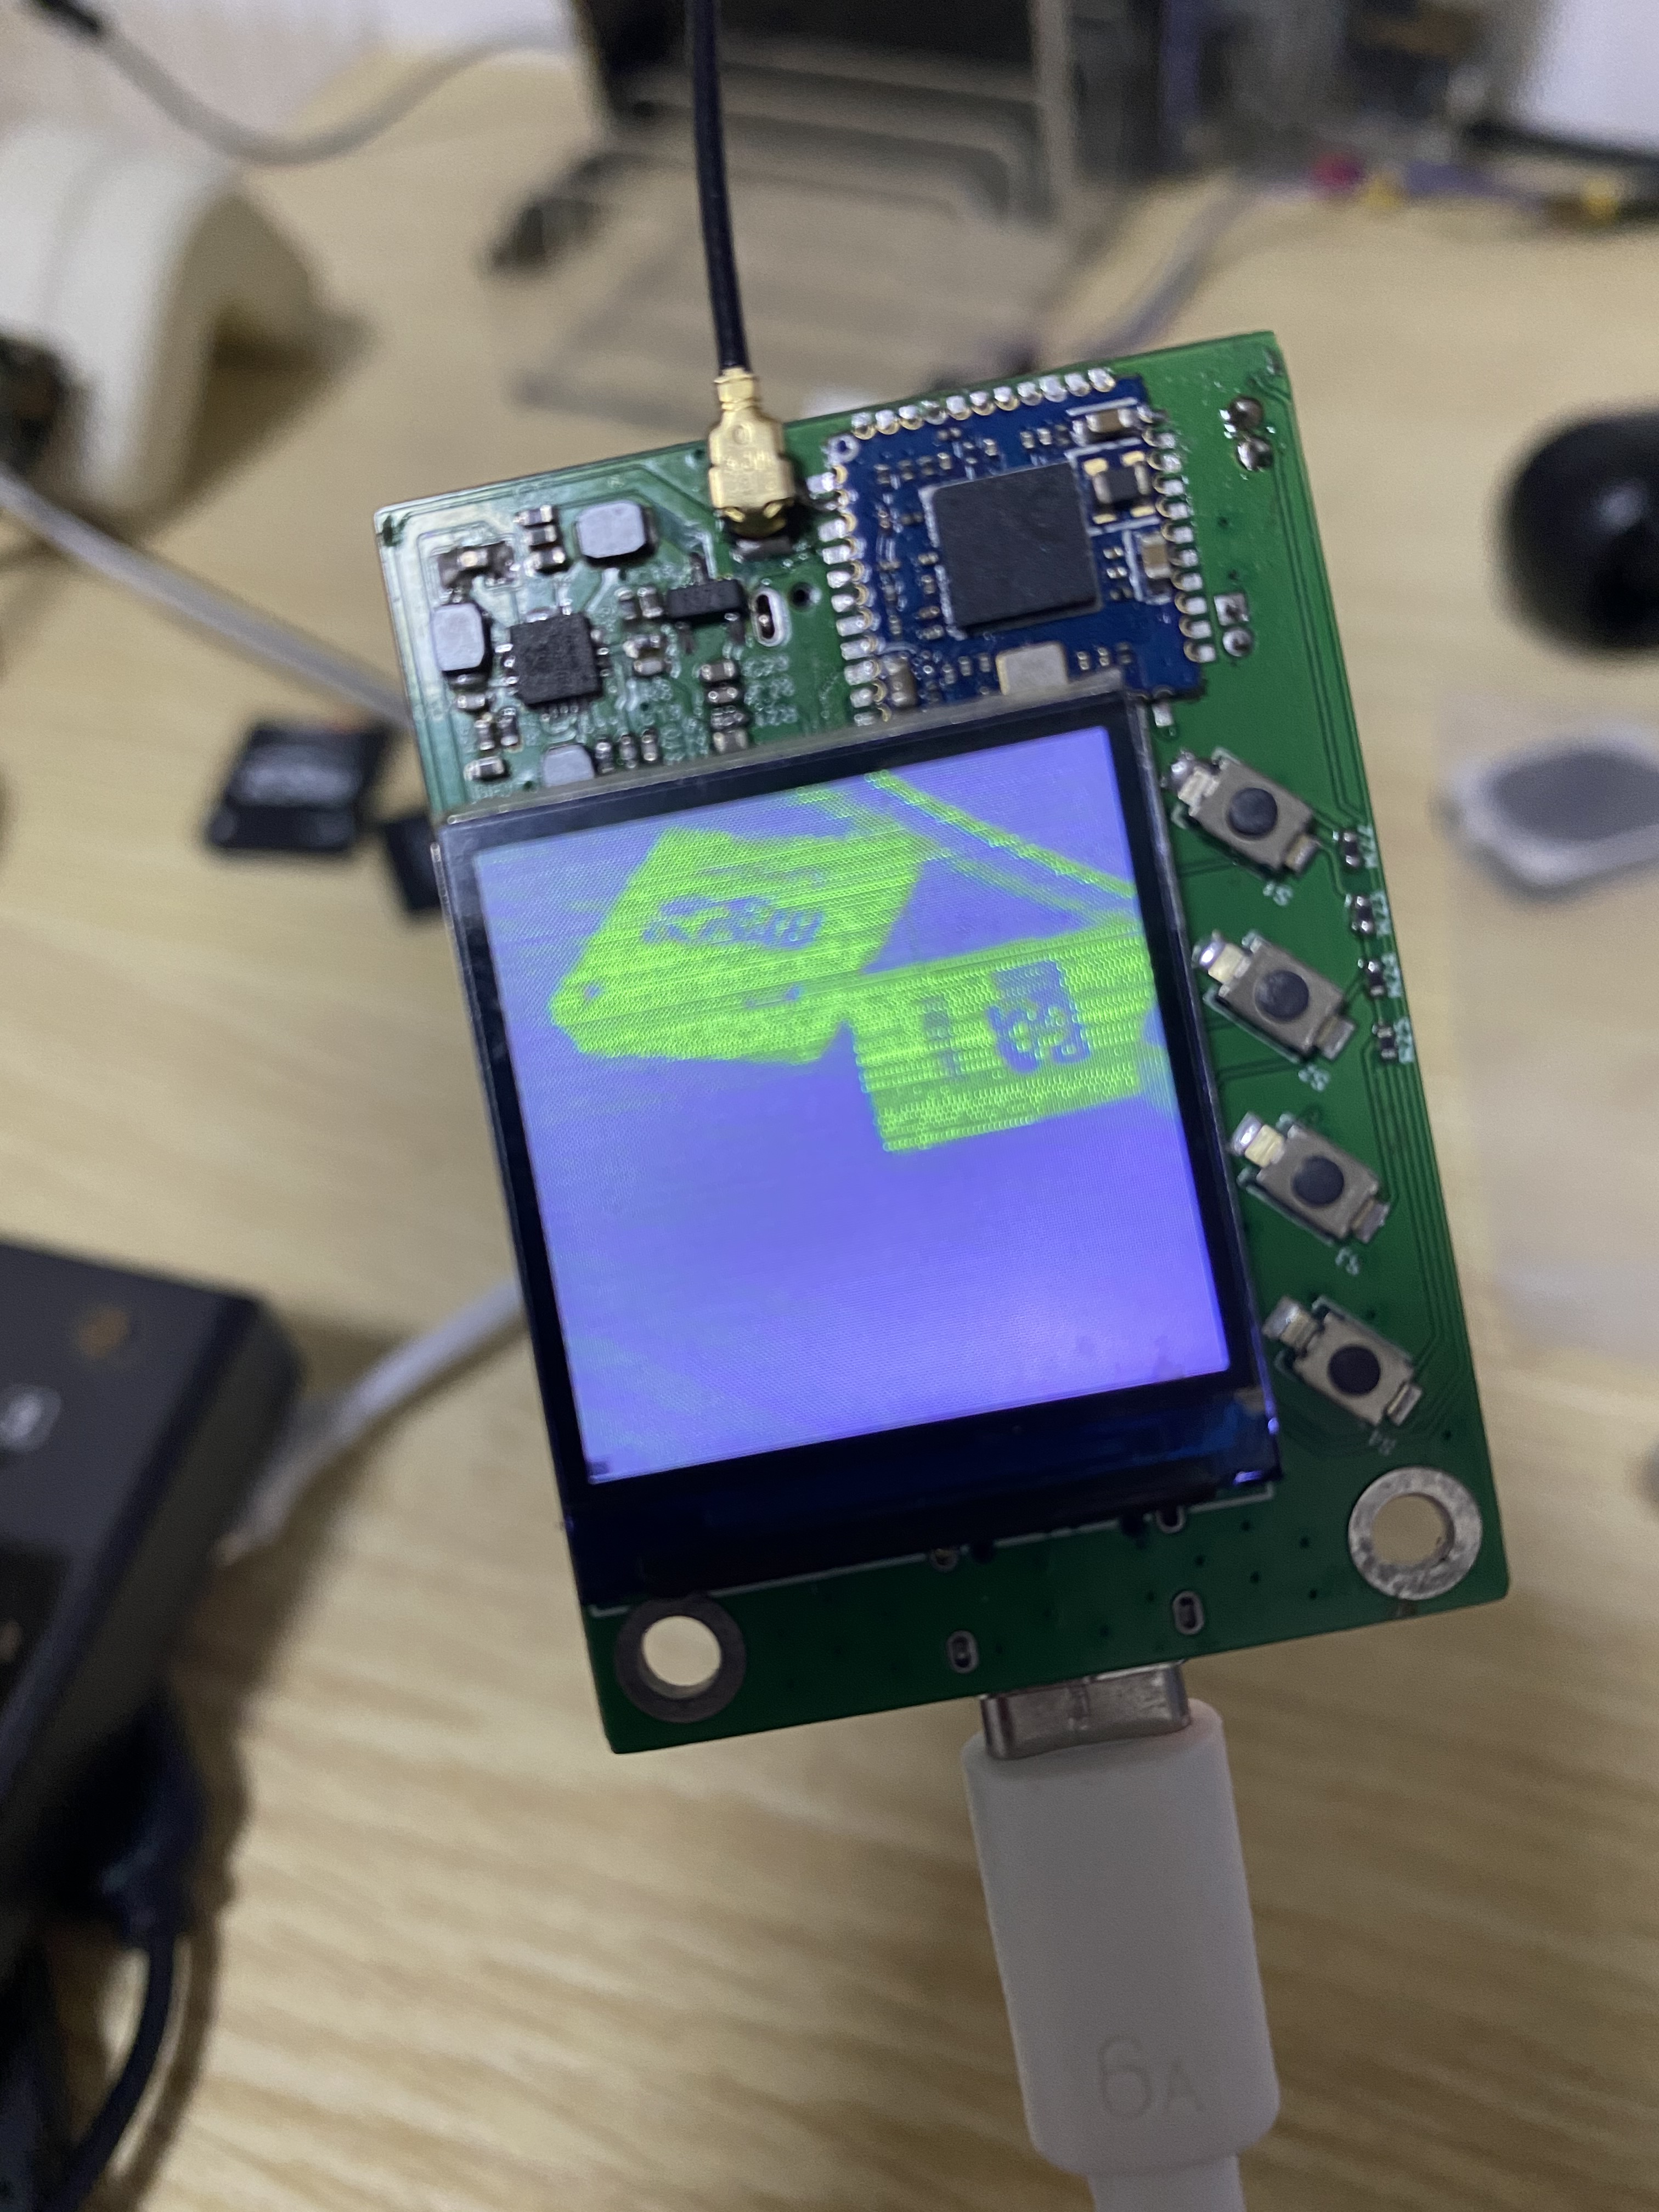
但是这图像明显不对啊,不过至少有进步了
那就继续追代码,先将那两处判断恢复。
跟着代码,一路追到获取摄像头参数的地方
drivers/media/i2c/ov2640.c
static int ov2640_get_fmt(struct v4l2_subdev *sd,struct v4l2_subdev_pad_config *cfg,struct v4l2_subdev_format *format)
{struct v4l2_mbus_framefmt *mf = &format->format;struct i2c_client  *client = v4l2_get_subdevdata(sd);struct ov2640_priv *priv = to_ov2640(client);if (format->pad)return -EINVAL;if (format->which == V4L2_SUBDEV_FORMAT_TRY) {
#ifdef CONFIG_VIDEO_V4L2_SUBDEV_APImf = v4l2_subdev_get_try_format(sd, cfg, 0);format->format = *mf;return 0;
#elsereturn -ENOTTY;
#endif}mf->width	= priv->win->width;mf->height	= priv->win->height;mf->code	= priv->cfmt_code; // 这行mf->colorspace	= V4L2_COLORSPACE_SRGB;mf->field	= V4L2_FIELD_NONE;mf->ycbcr_enc	= V4L2_YCBCR_ENC_DEFAULT;mf->quantization = V4L2_QUANTIZATION_DEFAULT;mf->xfer_func	= V4L2_XFER_FUNC_DEFAULT;return 0;
}
重点是 mf->code = priv->cfmt_code; 这行,报错信息 with mbus code: 0x2006 中的 0x2006 应该就是该值,
继续追
/** i2c_driver functions*/
static int ov2640_probe(struct i2c_client *client,const struct i2c_device_id *did)
{struct ov2640_priv	*priv;struct i2c_adapter	*adapter = client->adapter;int			ret;if (!i2c_check_functionality(adapter, I2C_FUNC_SMBUS_BYTE_DATA)) {dev_err(&adapter->dev,"OV2640: I2C-Adapter doesn't support SMBUS\n");return -EIO;}priv = devm_kzalloc(&client->dev, sizeof(*priv), GFP_KERNEL);if (!priv)return -ENOMEM;if (client->dev.of_node) {priv->clk = devm_clk_get(&client->dev, "xvclk");if (IS_ERR(priv->clk))return PTR_ERR(priv->clk);ret = clk_prepare_enable(priv->clk);if (ret)return ret;}ret = ov2640_probe_dt(client, priv);if (ret)goto err_clk;priv->win = ov2640_select_win(SVGA_WIDTH, SVGA_HEIGHT);priv->cfmt_code = MEDIA_BUS_FMT_UYVY8_2X8; // 这行
cfmt_code 是在这里被赋值的,其中 MEDIA_BUS_FMT_UYVY8_2X8 值是 0x2006
#define MEDIA_BUS_FMT_UYVY8_2X8 0x2006
而我们要使用的是 YUYV 格式,那就将这里改掉,改成 YUYV
// priv->cfmt_code = MEDIA_BUS_FMT_UYVY8_2X8;
priv->cfmt_code = MEDIA_BUS_FMT_YUYV8_2X8;
运行,
/root # ./camera_display2.out
当前摄像头支持的分辨率:240x240[   55.298859] sun6i-csi 1cb4000.csi: Wrong width or height 240x240 (800x600 expected)
格式问题看起来解了,那就继续解分辨率的问题
drivers/media/i2c/ov2640.c
// mf->width = win->width;// mf->height = win->height;mf->width = 240;mf->height = 240;
将 ov2640.c 文件中关于分辨率的设置,都硬编码为 240x240,
运行
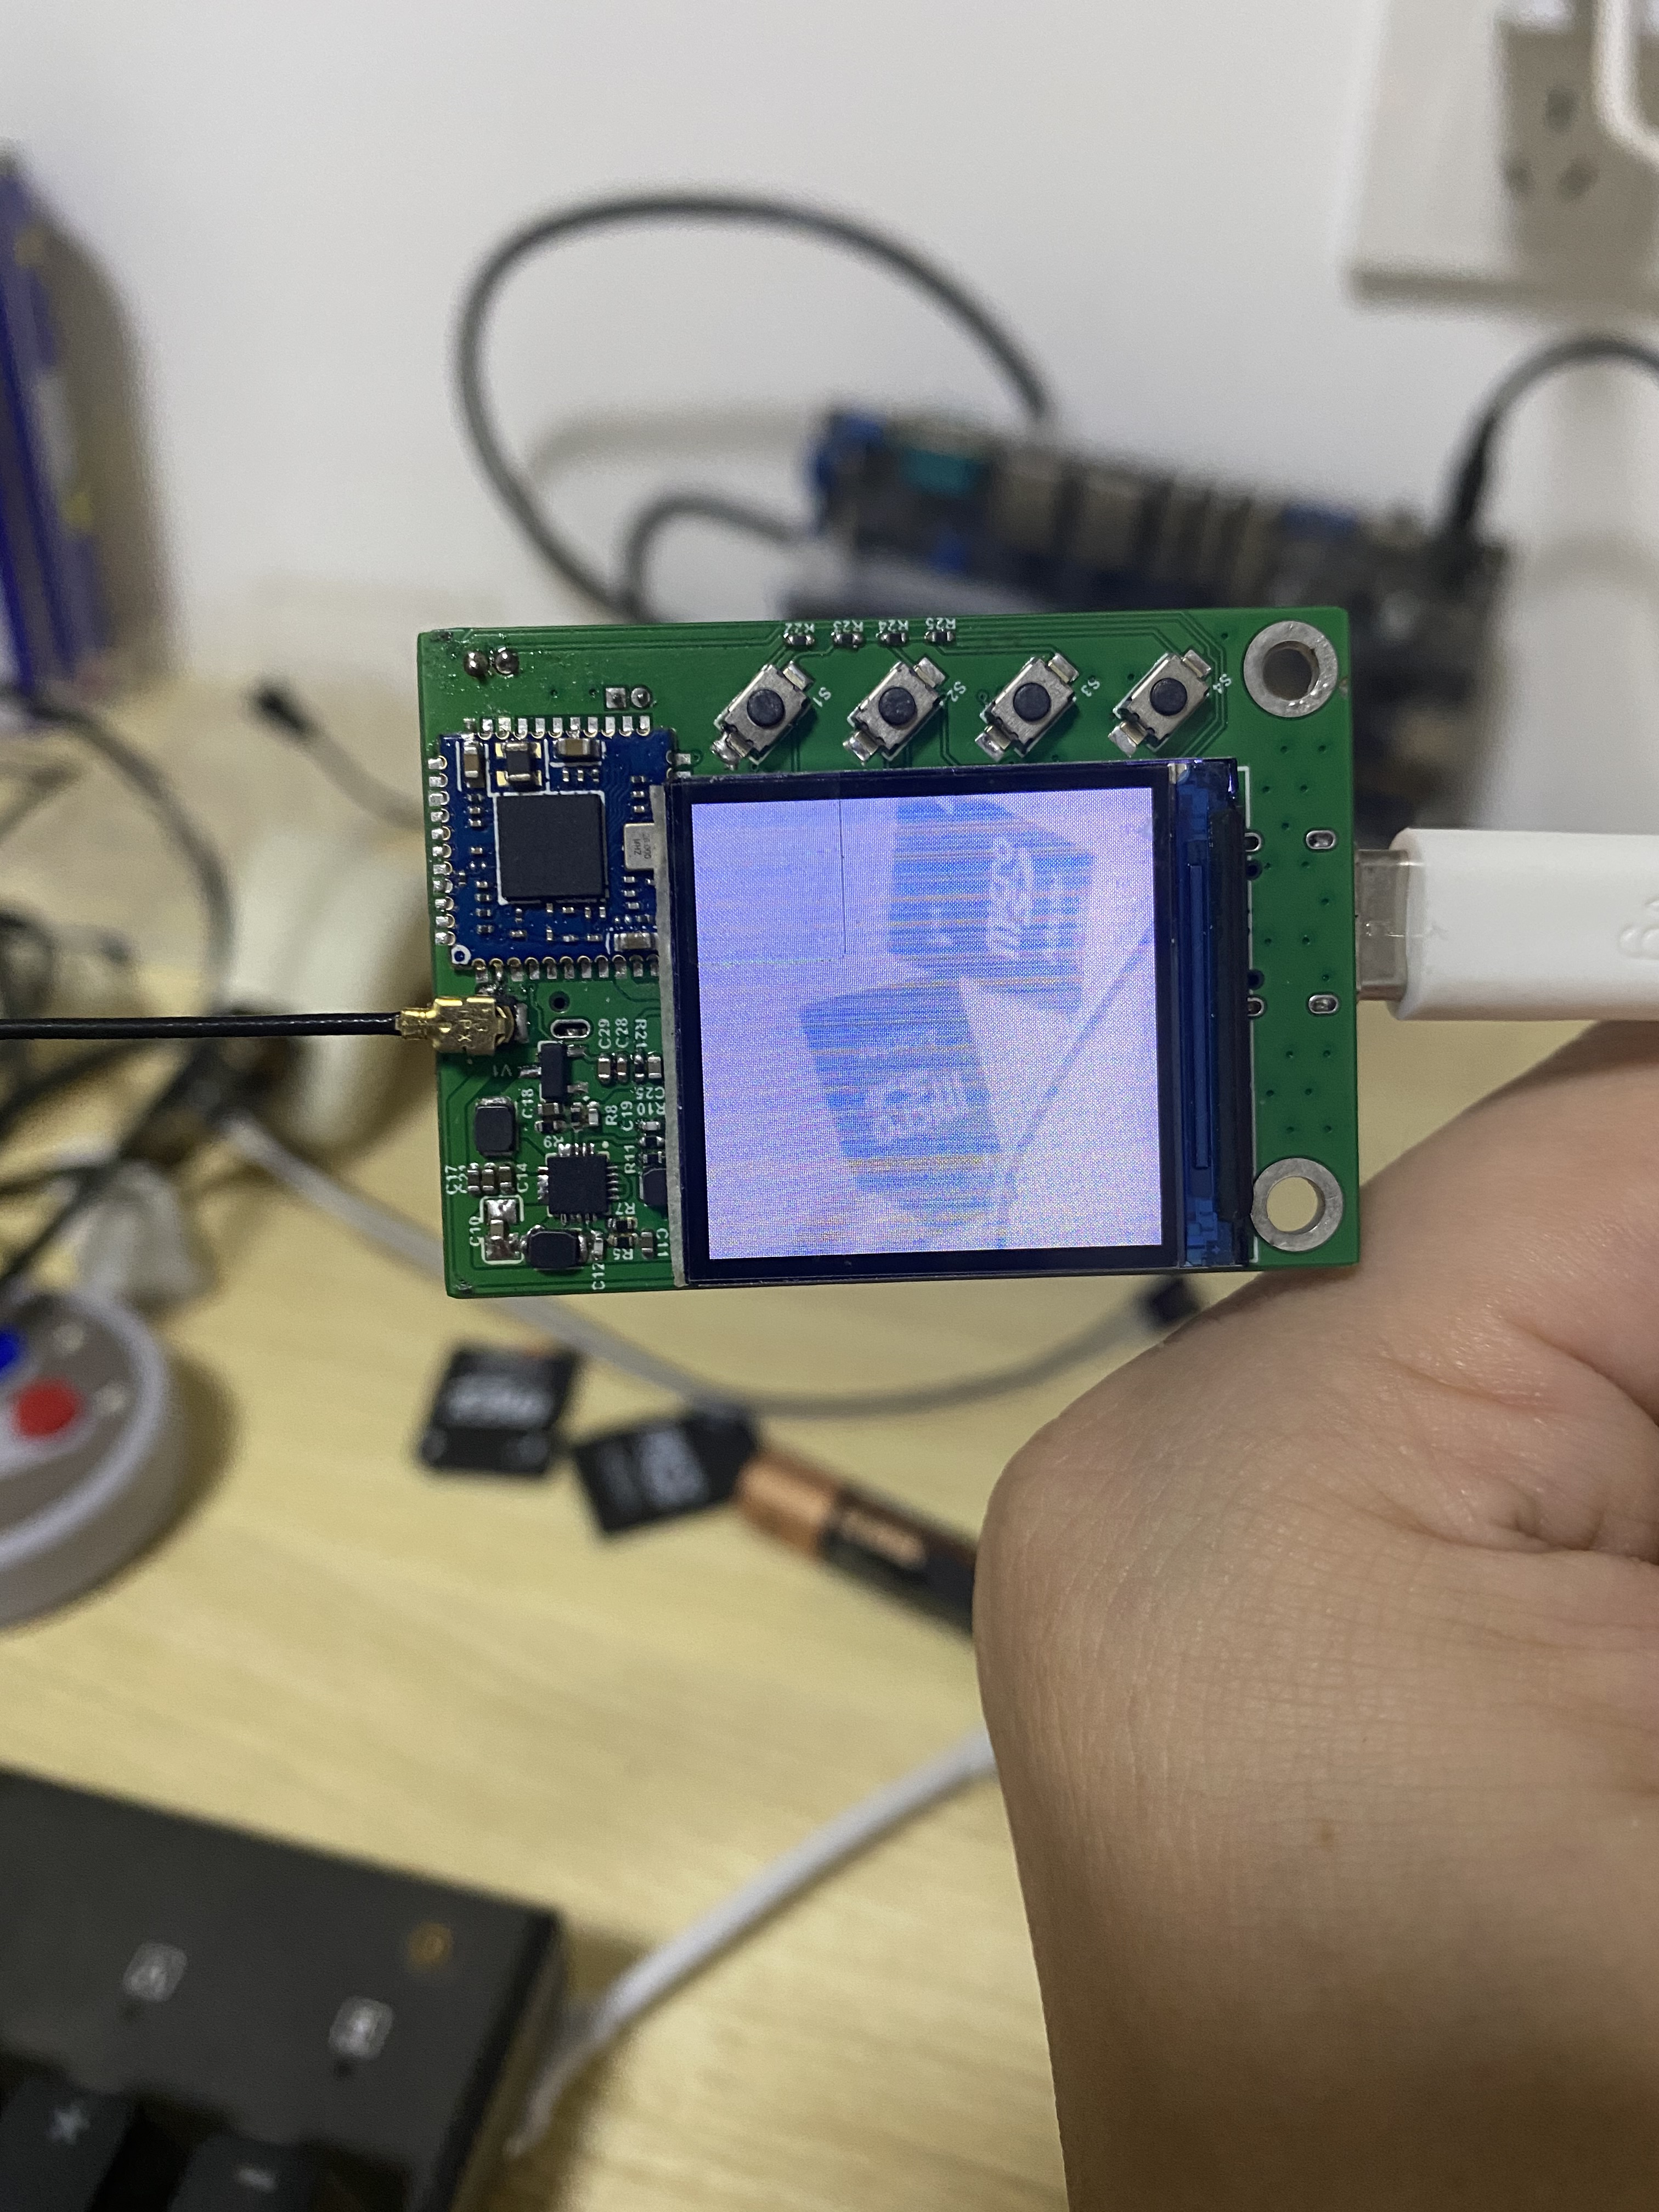
成功了,不过发现图像方向和屏幕方向不一致,
没找到摄像头旋转的方法,最终旋转屏幕实现了方向一致
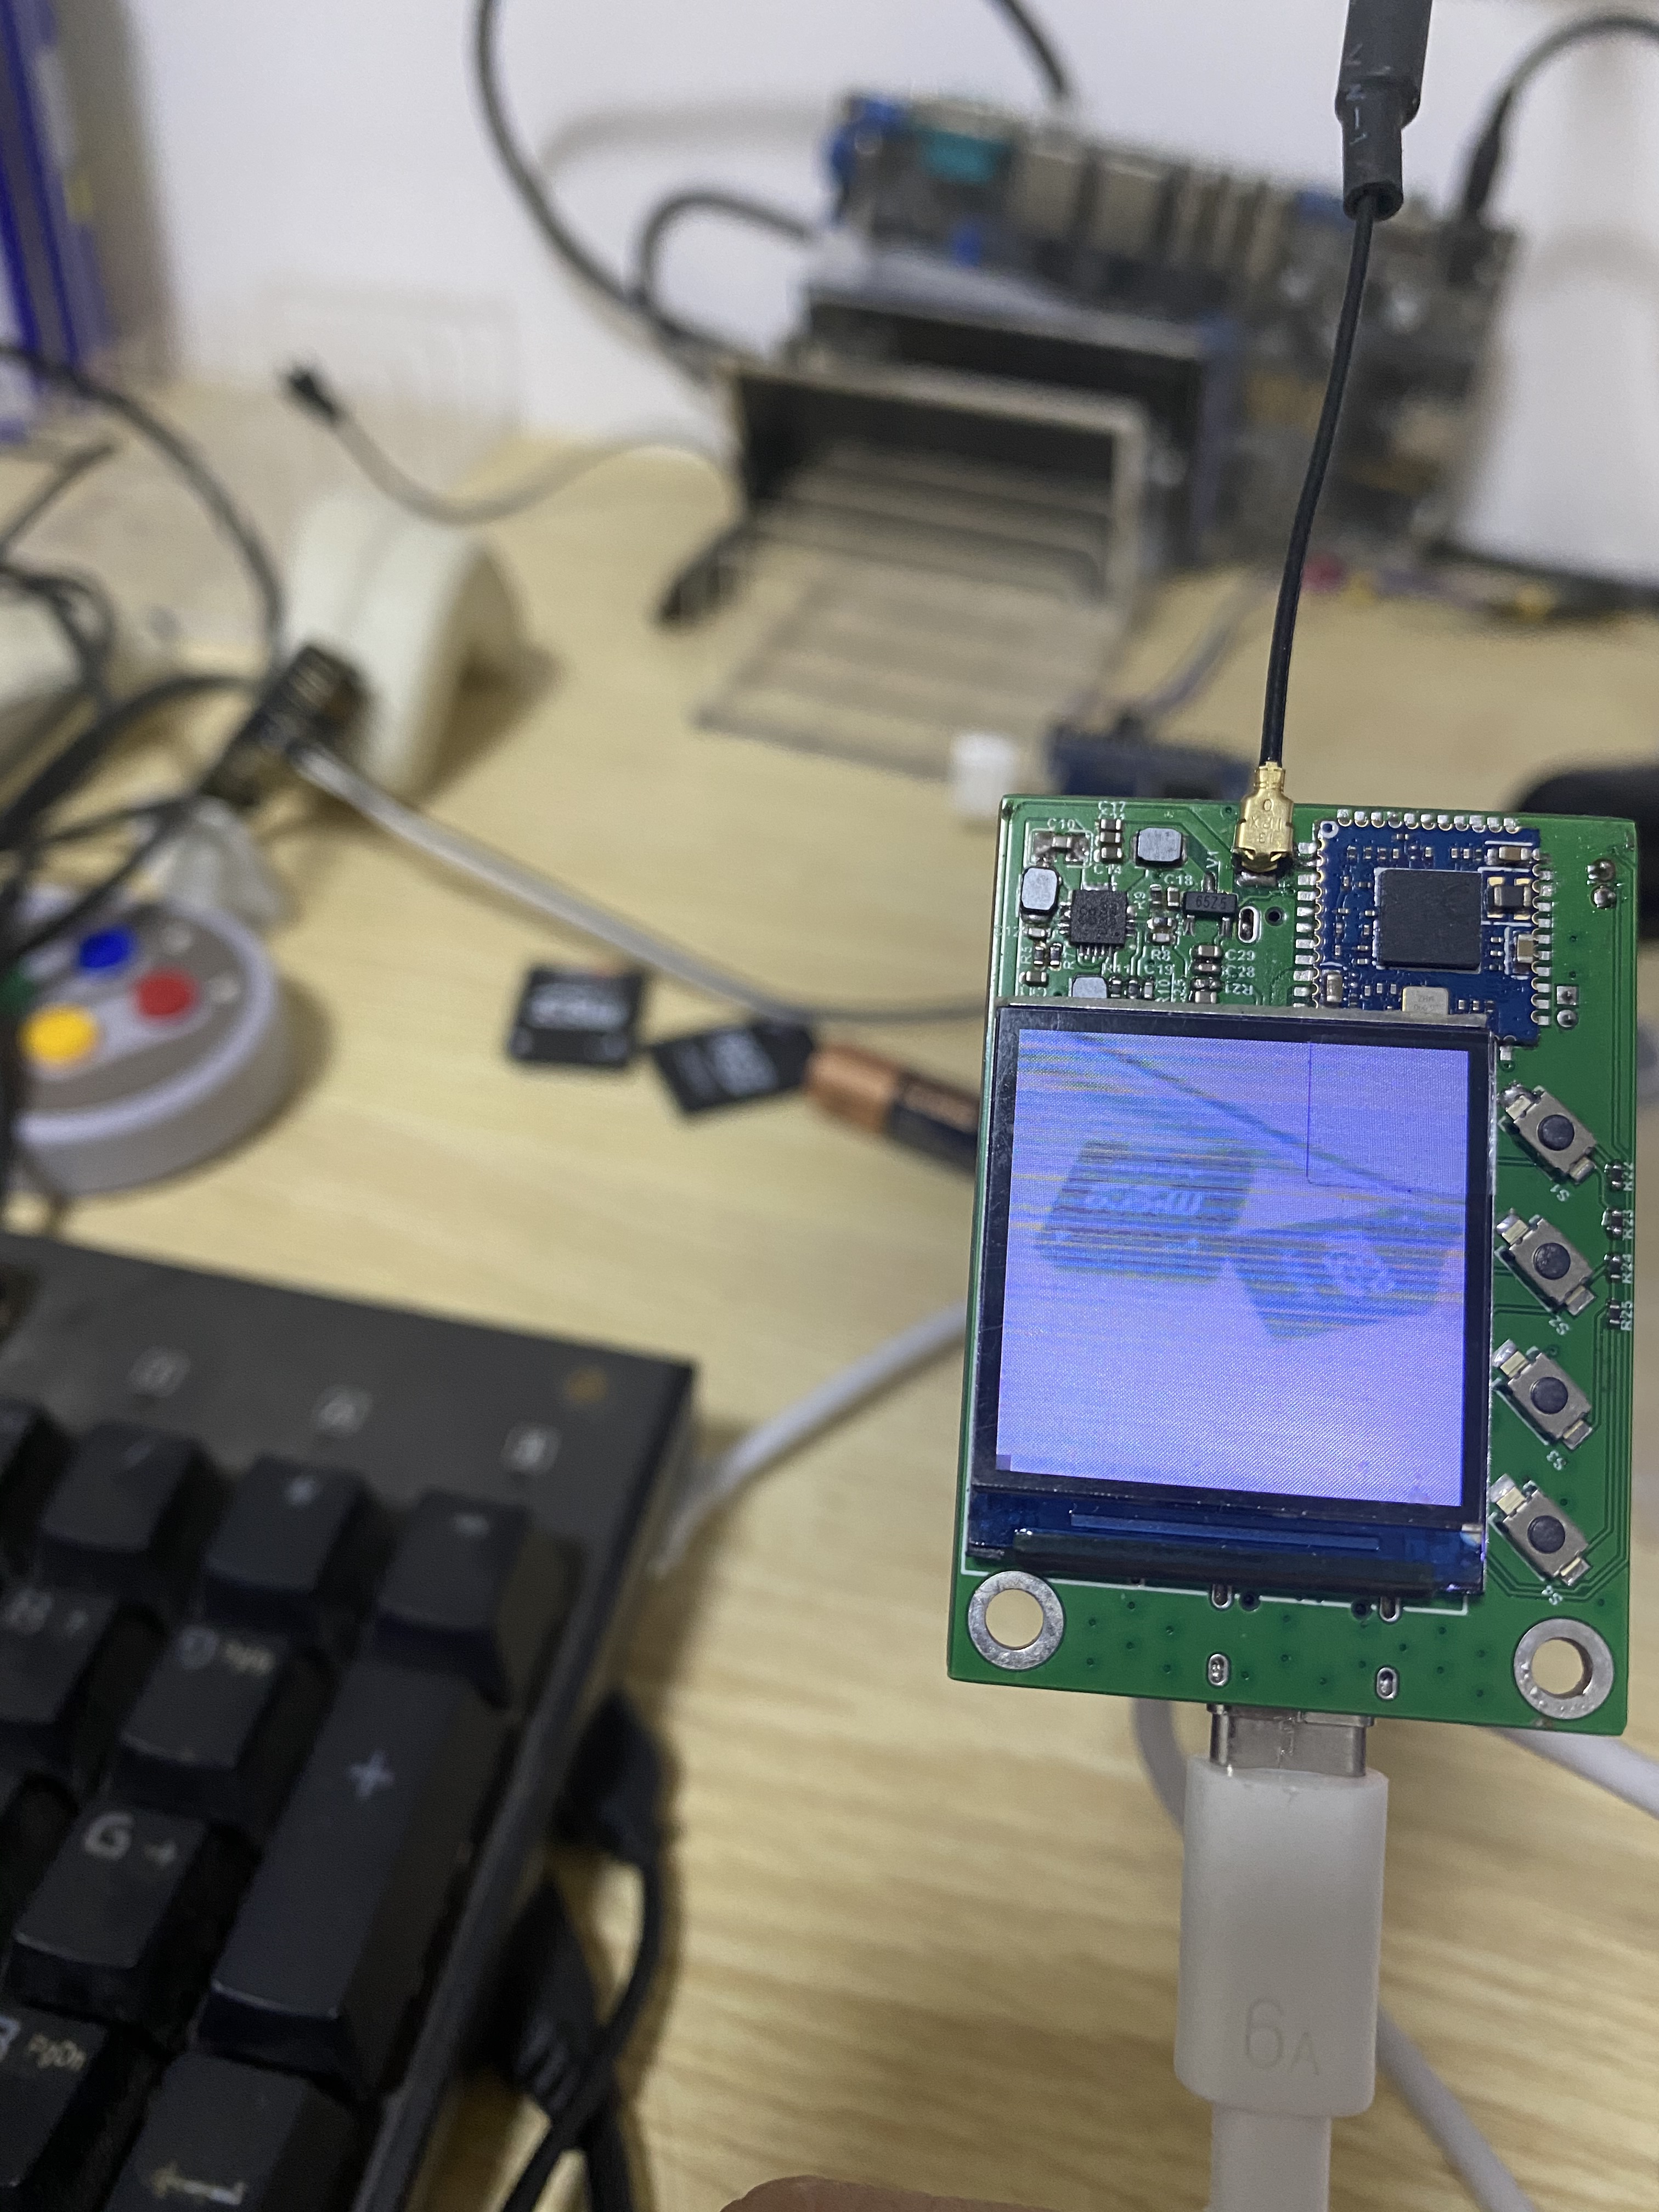
至此,摄像头捕获的画面可以实时显示到屏幕了。