目录
五、优化
1、拓展序列化算法
序列化接口
枚举实现类
修改原编解码器
2、参数调优
CONNECT_TIMEOUT_MILLIS
使用
源码分析
SO_BACKLOG
三次握手与连接队列
作用
默认值
TCP_NODELAY
SO_SNDBUF & SO_RCVBUF
ALLOCATOR
使用
ByteBufAllocator类型
RCVBUF_ALLOCATOR
3、RPC框架
准备工作
RpcRequestMessageHandler
RpcResponseMessageHandler
客户端发送消息
改进客户端
改进RpcResponseMessageHandler
五、优化
1、拓展序列化算法
序列化,反序列化主要用在消息正文的转换上
-
序列化时,需要将 Java 对象变为要传输的数据(可以是 byte[],或 json 等,最终都需要变成 byte[])
-
反序列化时,需要将传入的正文数据还原成 Java 对象,便于处理
序列化接口
public interface Serializer {/*** 序列化* @param object 被序列化的对象* @param <T> 被序列化对象类型* @return 序列化后的字节数组*/<T> byte[] serialize(T object);/*** 反序列化* @param clazz 反序列化的目标类的Class对象* @param bytes 被反序列化的字节数组* @param <T> 反序列化目标类* @return 反序列化后的对象*/<T> T deserialize(Class<T> clazz, byte[] bytes);
}
枚举实现类
积累一下这种枚举的运用方式
public enum SerializerAlgorithm implements Serializer {// Java的序列化和反序列化Java {@Overridepublic <T> byte[] serialize(T object) {// 序列化后的字节数组byte[] bytes = null;try (ByteArrayOutputStream bos = new ByteArrayOutputStream();ObjectOutputStream oos = new ObjectOutputStream(bos)) {oos.writeObject(object);bytes = bos.toByteArray();} catch (IOException e) {e.printStackTrace();}return bytes;}@Overridepublic <T> T deserialize(Class<T> clazz, byte[] bytes) {T target = null;System.out.println(Arrays.toString(bytes));try (ByteArrayInputStream bis = new ByteArrayInputStream(bytes);ObjectInputStream ois = new ObjectInputStream(bis)) {target = (T) ois.readObject();} catch (IOException | ClassNotFoundException e) {e.printStackTrace();}// 返回反序列化后的对象return target;}}// Json的序列化和反序列化Json {@Overridepublic <T> byte[] serialize(T object) {String s = new Gson().toJson(object);System.out.println(s);// 指定字符集,获得字节数组return s.getBytes(StandardCharsets.UTF_8);}@Overridepublic <T> T deserialize(Class<T> clazz, byte[] bytes) {String s = new String(bytes, StandardCharsets.UTF_8);System.out.println(s);// 此处的clazz为具体类型的Class对象,而不是父类Message的return new Gson().fromJson(s, clazz);}}
}
修改原编解码器
编码
// 获得序列化后的msg
/* 使用指定的序列化方式 SerializerAlgorithm.values();是获取一个枚举类中
的对象下标,如上的枚举中,Java对象的获取可以为SerializerAlgorithm.values()[0];
*/
SerializerAlgorithm[] values = SerializerAlgorithm.values();
// 获得序列化后的对象
byte[] bytes = values[out.getByte(5)-1].serialize(msg);
解码
// 获得反序列化方式
SerializerAlgorithm[] values = SerializerAlgorithm.values();
// 通过指定方式进行反序列化
// 需要通过Message的方法获得具体的消息类型
Message message = values[seqType-1].deserialize(Message.getMessageClass(messageType), bytes);
2、参数调优
CONNECT_TIMEOUT_MILLIS
- 属于 SocketChannal 的参数
- 用在客户端建立连接时,如果在指定毫秒内无法连接,会抛出 timeout 异常
- 注意:Netty 中不要用成了SO_TIMEOUT 主要用在阻塞 IO,而 Netty 是非阻塞 IO
使用
public class TestParam {public static void main(String[] args) {// SocketChannel 5s内未建立连接就抛出异常new Bootstrap().option(ChannelOption.CONNECT_TIMEOUT_MILLIS, 5000);// ServerSocketChannel 5s内未建立连接就抛出异常new ServerBootstrap().option(ChannelOption.CONNECT_TIMEOUT_MILLIS,5000);// SocketChannel 5s内未建立连接就抛出异常new ServerBootstrap().childOption(ChannelOption.CONNECT_TIMEOUT_MILLIS, 5000);}
}注意SocketChannel 和 ServerSocketChannel 的区别
- 客户端通过
Bootstrap.option函数来配置参数,配置参数作用于 SocketChannel - 服务器通过
ServerBootstrap来配置参数,但是对于不同的 Channel 需要选择不同的方法- 通过
option来配置 ServerSocketChannel 上的参数 - 通过
childOption来配置 SocketChannel 上的参数
- 通过
源码分析
客户端中连接服务器的线程是 NIO 线程,抛出异常的是主线程。这是如何做到超时判断以及线程通信的呢
AbstractNioChannel.AbstractNioUnsafe.connect方法中
public final void connect(final SocketAddress remoteAddress, final SocketAddress localAddress, final ChannelPromise promise) {...// Schedule connect timeout.// 设置超时时间,通过option方法传入的CONNECT_TIMEOUT_MILLIS参数进行设置int connectTimeoutMillis = config().getConnectTimeoutMillis();// 如果超时时间大于0if (connectTimeoutMillis > 0) {// 创建一个定时任务,延时connectTimeoutMillis(设置的超时时间时间)后执行// schedule(Runnable command, long delay, TimeUnit unit)connectTimeoutFuture = eventLoop().schedule(new Runnable() {@Overridepublic void run() {// 判断是否建立连接,Promise进行NIO线程与主线程之间的通信// 如果超时,则通过tryFailure方法将异常放入Promise中// 在主线程中抛出ChannelPromise connectPromise = AbstractNioChannel.this.connectPromise;ConnectTimeoutException cause = new ConnectTimeoutException("connection timed out: " + remoteAddress);if (connectPromise != null && connectPromise.tryFailure(cause)) {close(voidPromise());}}}, connectTimeoutMillis, TimeUnit.MILLISECONDS);}...}超时的判断主要是通过 Eventloop 的 schedule 方法 + Promise 共同实现的
- schedule 设置了一个定时任务,延迟
connectTimeoutMillis秒后执行该方法 - 如果指定时间内没有建立连接,则会执行其中的任务
- 任务负责创建
ConnectTimeoutException异常,并将异常通过 Pormise 传给主线程并抛
- 任务负责创建
SO_BACKLOG
该参数是 ServerSocketChannel 的参数
三次握手与连接队列
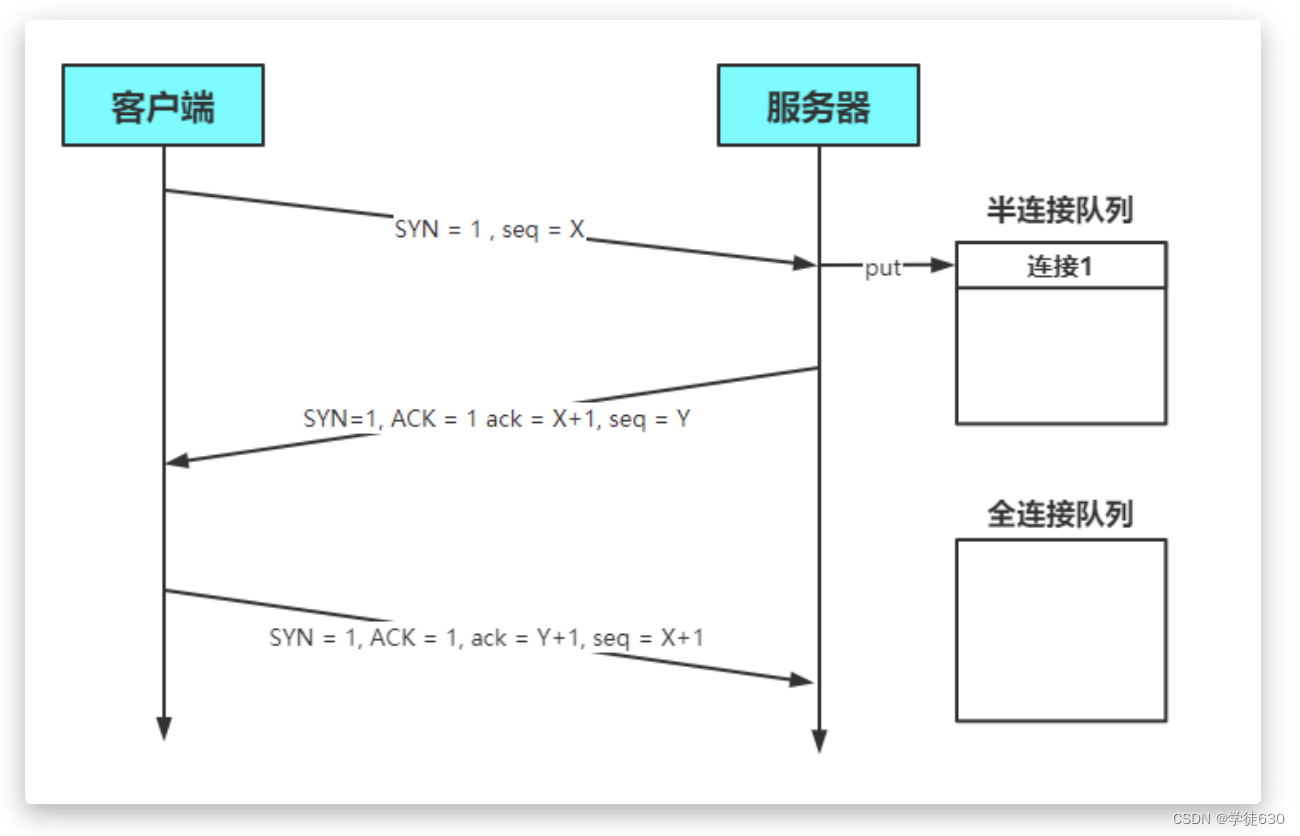
第一次握手时,因为客户端与服务器之间的连接还未完全建立,连接会被放入半连接队列中
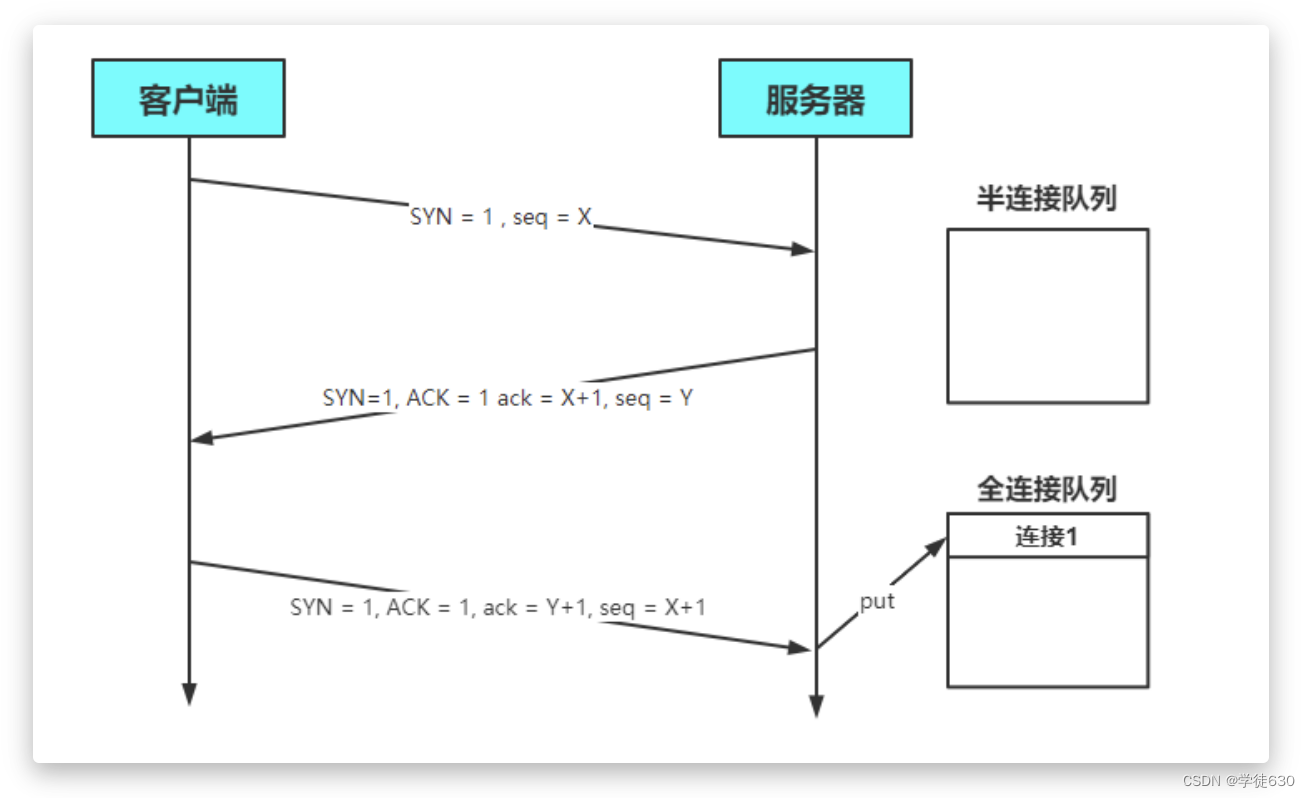
当完成三次握手以后,连接会被放入全连接队列中
服务器处理Accept事件是在TCP三次握手,也就是建立连接之后。服务器会从全连接队列中获取连接并进行处理
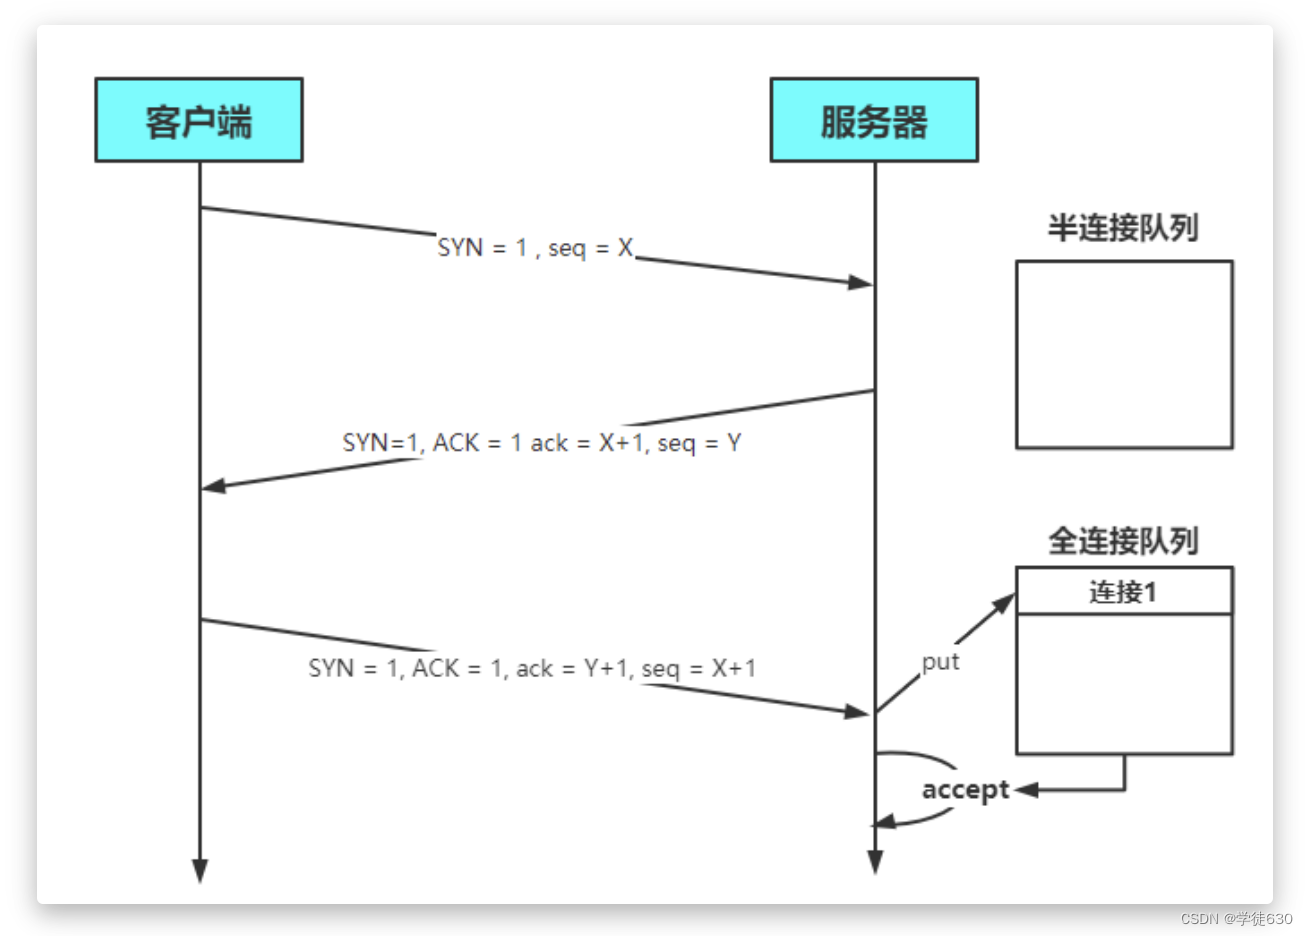
在 linux 2.2 之前,backlog 大小包括了两个队列的大小,在 linux 2.2 之后,分别用下面两个参数来控制
- 半连接队列 - sync queue
- 大小通过 /proc/sys/net/ipv4/tcp_max_syn_backlog 指定,在
syncookies启用的情况下,逻辑上没有最大值限制,这个设置便被忽略
- 大小通过 /proc/sys/net/ipv4/tcp_max_syn_backlog 指定,在
- 全连接队列 - accept queue
- 其大小通过 /proc/sys/net/core/somaxconn 指定,在使用 listen 函数时,内核会根据传入的 backlog 参数与系统参数,取二者的较小值
- 如果 accpet queue 队列满了,server 将发送一个拒绝连接的错误信息到 client
作用
在Netty中,SO_BACKLOG主要用于设置全连接队列的大小。当处理Accept的速率小于连接建立的速率时,全连接队列中堆积的连接数大于SO_BACKLOG设置的值时,便会抛出异常
设置方式如下
// 设置全连接队列,大小为2
new ServerBootstrap().option(ChannelOption.SO_BACKLOG, 2);
默认值
backlog参数在NioSocketChannel.doBind方法被使用
@Override
protected void doBind(SocketAddress localAddress) throws Exception {if (PlatformDependent.javaVersion() >= 7) {javaChannel().bind(localAddress, config.getBacklog());} else {javaChannel().socket().bind(localAddress, config.getBacklog());}
}其中backlog被保存在了DefaultServerSocketChannelConfig配置类中
private volatile int backlog = NetUtil.SOMAXCONN;具体的赋值操作如下
SOMAXCONN = AccessController.doPrivileged(new PrivilegedAction<Integer>() {@Overridepublic Integer run() {// Determine the default somaxconn (server socket backlog) value of the platform.// The known defaults:// - Windows NT Server 4.0+: 200// - Linux and Mac OS X: 128int somaxconn = PlatformDependent.isWindows() ? 200 : 128;File file = new File("/proc/sys/net/core/somaxconn");BufferedReader in = null;try {// file.exists() may throw a SecurityException if a SecurityManager is used, so execute it in the// try / catch block.// See https://github.com/netty/netty/issues/4936if (file.exists()) {in = new BufferedReader(new FileReader(file));// 将somaxconn设置为Linux配置文件中设置的值somaxconn = Integer.parseInt(in.readLine());if (logger.isDebugEnabled()) {logger.debug("{}: {}", file, somaxconn);}} else {...}...}  // 返回backlog的值return somaxconn;}
}- backlog的值会根据操作系统的不同,来选择不同的默认值
- Windows 200
- Linux/Mac OS 128
- 如果配置文件
/proc/sys/net/core/somaxconn存在,会读取配置文件中的值,并将backlog的值设置为配置文件中指定的
TCP_NODELAY
- 属于 SocketChannal 参数
- 因为 Nagle 算法,数据包会堆积到一定的数量后一起发送,这就可能导致数据的发送存在一定的延时
- 该参数默认为false,如果不希望的发送被延时,则需要将该值设置为true
SO_SNDBUF & SO_RCVBUF
- SO_SNDBUF 属于 SocketChannal 参数
- SO_RCVBUF 既可用于 SocketChannal 参数,也可以用于 ServerSocketChannal 参数(建议设置到 ServerSocketChannal 上)
- 该参数用于指定接收方与发送方的滑动窗口大小
ALLOCATOR
- 属于 SocketChannal 参数
- 用来配置 ByteBuf 是池化还是非池化,是直接内存还是堆内存
使用
// 选择ALLOCATOR参数,设置SocketChannel中分配的ByteBuf类型
// 第二个参数需要传入一个ByteBufAllocator,用于指定生成的 ByteBuf 的类型
new ServerBootstrap().childOption(ChannelOption.ALLOCATOR, new PooledByteBufAllocator());
ByteBufAllocator类型
-
池化并使用直接内存
// true表示使用直接内存 new PooledByteBufAllocator(true); -
池化并使用堆内存
// false表示使用堆内存 new PooledByteBufAllocator(false); -
非池化并使用直接内存
// ture表示使用直接内存 new UnpooledByteBufAllocator(true); -
非池化并使用堆内存
// false表示使用堆内存
new UnpooledByteBufAllocator(false);
RCVBUF_ALLOCATOR
- 属于 SocketChannal 参数
- 控制 Netty 接收缓冲区大小
- 负责入站数据的分配,决定入站缓冲区的大小(并可动态调整),统一采用 direct 直接内存,具体池化还是非池化由 allocator 决定
在 Netty 中,RCVBUF_ALLOCATOR 参数的作用是设置接收缓冲区分配
器。该参数决定了网络通道接收数据时的缓冲区分配策略。Netty 为了优化网络通信性能,使用了可扩展的缓冲区分配策略来处理
接收到的数据。而 RCVBUF_ALLOCATOR 参数就是用于配置这种缓冲区分配策略的。
3、RPC框架
准备工作
在聊天室代码的基础上进行一定的改进
Message中添加如下代码
public abstract class Message implements Serializable {...// 添加RPC消息类型public static final int RPC_MESSAGE_TYPE_REQUEST = 101;public static final int RPC_MESSAGE_TYPE_RESPONSE = 102;static {// 将消息类型放入消息类对象Map中messageClasses.put(RPC_MESSAGE_TYPE_REQUEST, RpcRequestMessage.class);messageClasses.put(RPC_MESSAGE_TYPE_RESPONSE, RpcResponseMessage.class);}}RPC请求消息
@Data
@AllControductor
public class RpcRequestMessage extends Message {/*** 调用的接口全限定名,服务端根据它找到实现*/private String interfaceName;/*** 调用接口中的方法名*/private String methodName;/*** 方法返回类型*/private Class<?> returnType;/*** 方法参数类型数组*/private Class[] parameterTypes;/*** 方法参数值数组*/private Object[] parameterValue;
}想要远程调用一个方法,必须知道以下五个信息
- 方法所在的全限定类名
- 方法名
- 方法返回值类型
- 方法参数类型
- 方法参数值
RPC响应消息
@Data
public class RpcResponseMessage extends Message {/*** 返回值*/private Object returnValue;/*** 异常值*/private Exception exceptionValue;
}响应消息中只需要获取返回结果和异常值
服务器
public class RPCServer {public static void main(String[] args) {NioEventLoopGroup boss = new NioEventLoopGroup();NioEventLoopGroup worker = new NioEventLoopGroup();LoggingHandler loggingHandler = new LoggingHandler(LogLevel.DEBUG);MessageSharableCodec messageSharableCodec = new MessageSharableCodec();// PRC 请求消息处理器RpcRequestMessageHandler rpcRequestMessageHandler = new RpcRequestMessageHandler();try {ServerBootstrap serverBootstrap = new ServerBootstrap();serverBootstrap.channel(NioServerSocketChannel.class);serverBootstrap.group(boss, worker);serverBootstrap.childHandler(new ChannelInitializer<SocketChannel>() {@Overrideprotected void initChannel(SocketChannel ch) throws Exception {// 自定义协议粘半包处理器ch.pipeline().addLast(new ProtocolFrameDecoder());// 日志ch.pipeline().addLast(loggingHandler);// 协议编解码器ch.pipeline().addLast(messageSharableCodec);// rpc处理工人ch.pipeline().addLast(rpcRequestMessageHandler);}});Channel channel = serverBootstrap.bind(8080).sync().channel();channel.closeFuture().sync();} catch (InterruptedException e) {e.printStackTrace();} finally {boss.shutdownGracefully();worker.shutdownGracefully();}}
}服务器中添加了处理RPCRequest消息的handler
客户端
public class RPCClient {public static void main(String[] args) {NioEventLoopGroup group = new NioEventLoopGroup();LoggingHandler loggingHandler = new LoggingHandler(LogLevel.DEBUG);MessageSharableCodec messageSharableCodec = new MessageSharableCodec();// PRC 请求消息处理器RpcResponseMessageHandler rpcResponseMessageHandler = new RpcResponseMessageHandler();try {Bootstrap bootstrap = new Bootstrap();bootstrap.channel(NioSocketChannel.class);bootstrap.group(group);bootstrap.handler(new ChannelInitializer<SocketChannel>() {@Overrideprotected void initChannel(SocketChannel ch) throws Exception {ch.pipeline().addLast(new ProtocolFrameDecoder());ch.pipeline().addLast(loggingHandler);ch.pipeline().addLast(messageSharableCodec);// rpc处理工人ch.pipeline().addLast(rpcResponseMessageHandler);}});Channel channel = bootstrap.connect(new InetSocketAddress("localhost", 8080)).sync().channel();channel.closeFuture().sync();} catch (InterruptedException e) {e.printStackTrace();} finally {group.shutdownGracefully();}}
}通过接口Class获取实例对象的Factory
public class ServicesFactory {static HashMap<Class<?>, Object> map = new HashMap<>(16);public static Object getInstance(Class<?> interfaceClass) throws ClassNotFoundException, IllegalAccessException, InstantiationException {// 根据Class创建实例try {Class<?> clazz = Class.forName("cn.nyimac.study.day8.server.service.HelloService");Object instance = Class.forName("cn.nyimac.study.day8.server.service.HelloServiceImpl").newInstance();// 放入 InterfaceClass -> InstanceObject 的映射map.put(clazz, instance);} catch (ClassNotFoundException | InstantiationException | IllegalAccessException e) {e.printStackTrace();}  return map.get(interfaceClass);}
}
RpcRequestMessageHandler
@ChannelHandler.Sharable
public class RpcRequestMessageHandler extends SimpleChannelInboundHandler<RpcRequestMessage> {@Overrideprotected void channelRead0(ChannelHandlerContext ctx, RpcRequestMessage rpcMessage) {RpcResponseMessage rpcResponseMessage = new RpcResponseMessage();try {// 设置返回值的属性rpcResponseMessage.setSequenceId(rpcMessage.getSequenceId());// 返回一个实例HelloService service = (HelloService) ServicesFactory.getInstance(Class.forName(rpcMessage.getInterfaceName()));// 通过反射调用方法,并获取返回值Method method = service.getClass().getMethod(rpcMessage.getMethodName(), rpcMessage.getParameterTypes());// 获得返回值Object invoke = method.invoke(service, rpcMessage.getParameterValue());// 设置返回值rpcResponseMessage.setReturnValue(invoke);} catch (Exception e) {e.printStackTrace();// 设置异常rpcResponseMessage.setExceptionValue(e);}}// 向channel中写入Messagectx.writeAndFlush(rpcResponseMessage);
}
远程调用方法主要是通过反射实现的,大致步骤如下
- 通过请求消息传入被调入方法的各个参数
- 通过全限定接口名,在map中查询到对应的类并实例化对象
- 通过反射获取Method,将请求消息的参数传入并调用其invoke方法,返回值放入响应消息中
- 若有异常需要捕获,并放入响应消息中
RpcResponseMessageHandler
@ChannelHandler.Sharable
public class RpcResponseMessageHandler extends SimpleChannelInboundHandler<RpcResponseMessage> {static final Logger log = LoggerFactory.getLogger(ChatServer.class);@Overrideprotected void channelRead0(ChannelHandlerContext ctx, RpcResponseMessage msg) throws Exception {log.debug("{}", msg);System.out.println((String)msg.getReturnValue());}
}
客户端发送消息
public class RPCClient {public static void main(String[] args) {...// 创建请求并发送RpcRequestMessage message = new RpcRequestMessage(1,"cn.nyimac.study.day8.server.service.HelloService","sayHello",String.class,new Class[]{String.class},new Object[]{"Nyima"});channel.writeAndFlush(message);   ...    }
}
运行结果
客户端
1606 [nioEventLoopGroup-2-1] DEBUG cn.nyimac.study.day8.server.ChatServer - RpcResponseMessage{returnValue=你好,Nyima, exceptionValue=null}改进客户端
public class RPCClientManager {/*** 产生SequenceId*/private static AtomicInteger sequenceId = new AtomicInteger(0);private static volatile Channel channel = null;private static final Object lock = new Object();public static void main(String[] args) {// 创建代理对象HelloService service = (HelloService) getProxy(HelloService.class);// 通过代理对象执行方法System.out.println(service.sayHello("Nyima"));System.out.println(service.sayHello("Hulu"));}/*** 单例模式创建Channel*/public static Channel getChannel() {if (channel == null) {synchronized (lock) {if (channel == null) {init();}}}return channel;}/*** 使用代理模式,帮助我们创建请求消息并发送*/public static Object getProxy(Class<?> serviceClass) {Class<?>[] classes = new Class<?>[]{serviceClass};// 使用JDK代理,创建代理对象Object o = Proxy.newProxyInstance(serviceClass.getClassLoader(), classes, new InvocationHandler() {@Overridepublic Object invoke(Object proxy, Method method, Object[] args) throws Throwable {// 创建请求消息int id = sequenceId.getAndIncrement();RpcRequestMessage message = new RpcRequestMessage(id, serviceClass.getName(),method.getName(), method.getReturnType(),method.getParameterTypes(),args);// 发送消息getChannel().writeAndFlush(message);// 创建Promise,用于获取NIO线程中的返回结果,获取的过程是异步的DefaultPromise<Object> promise = new DefaultPromise<>(getChannel().eventLoop());// 将Promise放入Map中RpcResponseMessageHandler.promiseMap.put(id, promise);// 等待被放入Promise中结果promise.await();if (promise.isSuccess()) {// 调用方法成功,返回方法执行结果return promise.getNow();} else {// 调用方法失败,抛出异常throw new RuntimeException(promise.cause());}}});return o;}private static void init() {NioEventLoopGroup group = new NioEventLoopGroup();LoggingHandler loggingHandler = new LoggingHandler(LogLevel.DEBUG);MessageSharableCodec messageSharableCodec = new MessageSharableCodec();// PRC 请求消息处理器RpcResponseMessageHandler rpcResponseMessageHandler = new RpcResponseMessageHandler();Bootstrap bootstrap = new Bootstrap();bootstrap.channel(NioSocketChannel.class);bootstrap.group(group);bootstrap.handler(new ChannelInitializer<SocketChannel>() {@Overrideprotected void initChannel(SocketChannel ch) throws Exception {ch.pipeline().addLast(new ProtocolFrameDecoder());ch.pipeline().addLast(loggingHandler);ch.pipeline().addLast(messageSharableCodec);ch.pipeline().addLast(rpcResponseMessageHandler);}});try {channel = bootstrap.connect(new InetSocketAddress("localhost", 8080)).sync().channel();// 异步关闭 group,避免Channel被阻塞channel.closeFuture().addListener(future -> {group.shutdownGracefully();});} catch (InterruptedException e) {e.printStackTrace();}}
}
获得Channel
-
建立连接,获取Channel的操作被封装到了
init方法中,当连接断开时,通过addListener方法异步关闭group -
通过单例模式创建与获取Channel
远程调用方法
- 为了让方法的调用变得简洁明了,将
RpcRequestMessage的创建与发送过程通过JDK的动态代理来完成 - 通过返回的代理对象调用方法即可,方法参数为被调用方法接口的Class类
远程调用方法返回值获取
-
调用方法的是主线程,处理返回结果的是NIO线程(RpcResponseMessageHandler)。要在不同线程中进行返回值的传递,需要用到Promise
-
在
RpcResponseMessageHandler中创建一个Map- Key为SequenceId
- Value为对应的Promise
-
主线程的代理类将RpcResponseMessage发送给服务器后,需要创建Promise对象,并将其放入到RpcResponseMessageHandler的Map中。需要使用await等待结果被放入Promise中。获取结果后,根据结果类型(判断是否成功)来返回结果或抛出异常
// 创建Promise,用于获取NIO线程中的返回结果,获取的过程是异步的
DefaultPromise<Object> promise = new DefaultPromise<>(getChannel().eventLoop());
// 将Promise放入Map中
RpcResponseMessageHandler.promiseMap.put(id, promise);
// 等待被放入Promise中结果
promise.await();
if (promise.isSuccess()) {// 调用方法成功,返回方法执行结果return promise.getNow();
} else {// 调用方法失败,抛出异常throw new RuntimeException(promise.cause());
}NIO线程负责通过SequenceId获取并移除(remove)对应的Promise,然后根据RpcResponseMessage中的结果,向Promise中放入不同的值
- 如果没有异常信息(ExceptionValue),就调用
promise.setSuccess(returnValue)放入方法返回值 - 如果有异常信息,就调用
promise.setFailure(exception)放入异常信息
// 将返回结果放入对应的Promise中,并移除Map中的Promise
Promise<Object> promise = promiseMap.remove(msg.getSequenceId());
Object returnValue = msg.getReturnValue();
Exception exception = msg.getExceptionValue();
if (promise != null) {if (exception != null) {// 返回结果中有异常信息promise.setFailure(exception);} else {// 方法正常执行,没有异常promise.setSuccess(returnValue);}
}
改进RpcResponseMessageHandler
@ChannelHandler.Sharable
public class RpcResponseMessageHandler extends SimpleChannelInboundHandler<RpcResponseMessage> {static final Logger log = LoggerFactory.getLogger(ChatServer.class);/*** 用于存放Promise的集合,Promise用于主线程与NIO线程之间传递返回值*/public static Map<Integer, Promise<Object>> promiseMap = new ConcurrentHashMap<>(16);@Overrideprotected void channelRead0(ChannelHandlerContext ctx, RpcResponseMessage msg) throws Exception {// 将返回结果放入对应的Promise中,并移除Map中的PromisePromise<Object> promise = promiseMap.remove(msg.getSequenceId());Object returnValue = msg.getReturnValue();Exception exception = msg.getExceptionValue();if (promise != null) {if (exception != null) {// 返回结果中有异常信息promise.setFailure(exception);} else {// 方法正常执行,没有异常promise.setSuccess(returnValue);}}// 拿到返回结果并打印log.debug("{}", msg);}
}


![web:[MRCTF2020]你传你呢](https://img-blog.csdnimg.cn/77af0d7581df42f495d71654f1a6ae64.png)

