因为想要用c++刷题,但是之前的vs被重装的时候删除了,DEVc++实在是不好看的界面,于是就想起了之前写html的vscode,没想到配置环境花了一整天,还总是报错,也许是电脑配置不一样,所以就出了问题吧,记录一下~
一、下载vscode
这个步骤很简单,去下载一个软件,附上下载链接
https://code.visualstudio.com/
二、装上一些插件
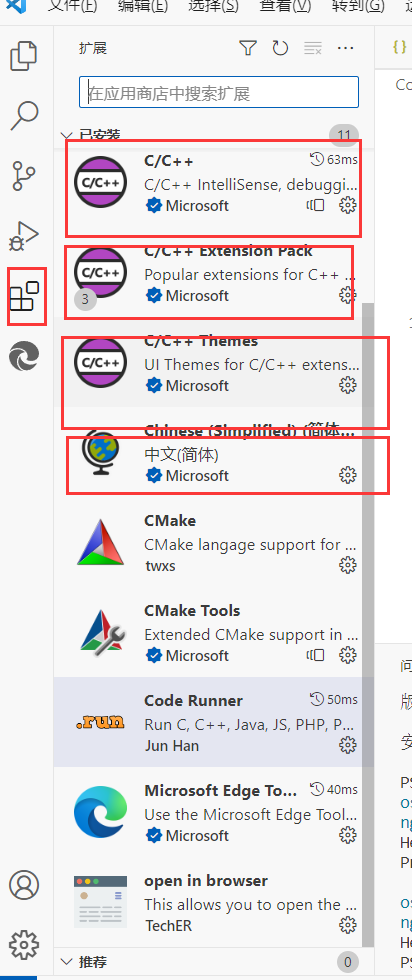
也就是下载这四个,其中的Chinese需要重启一次vscode
三、配置MinGW
3.1首先去官网下载
https://sourceforge.net/projects/mingw-w64/files/mingw-w64/mingw-w64-release/
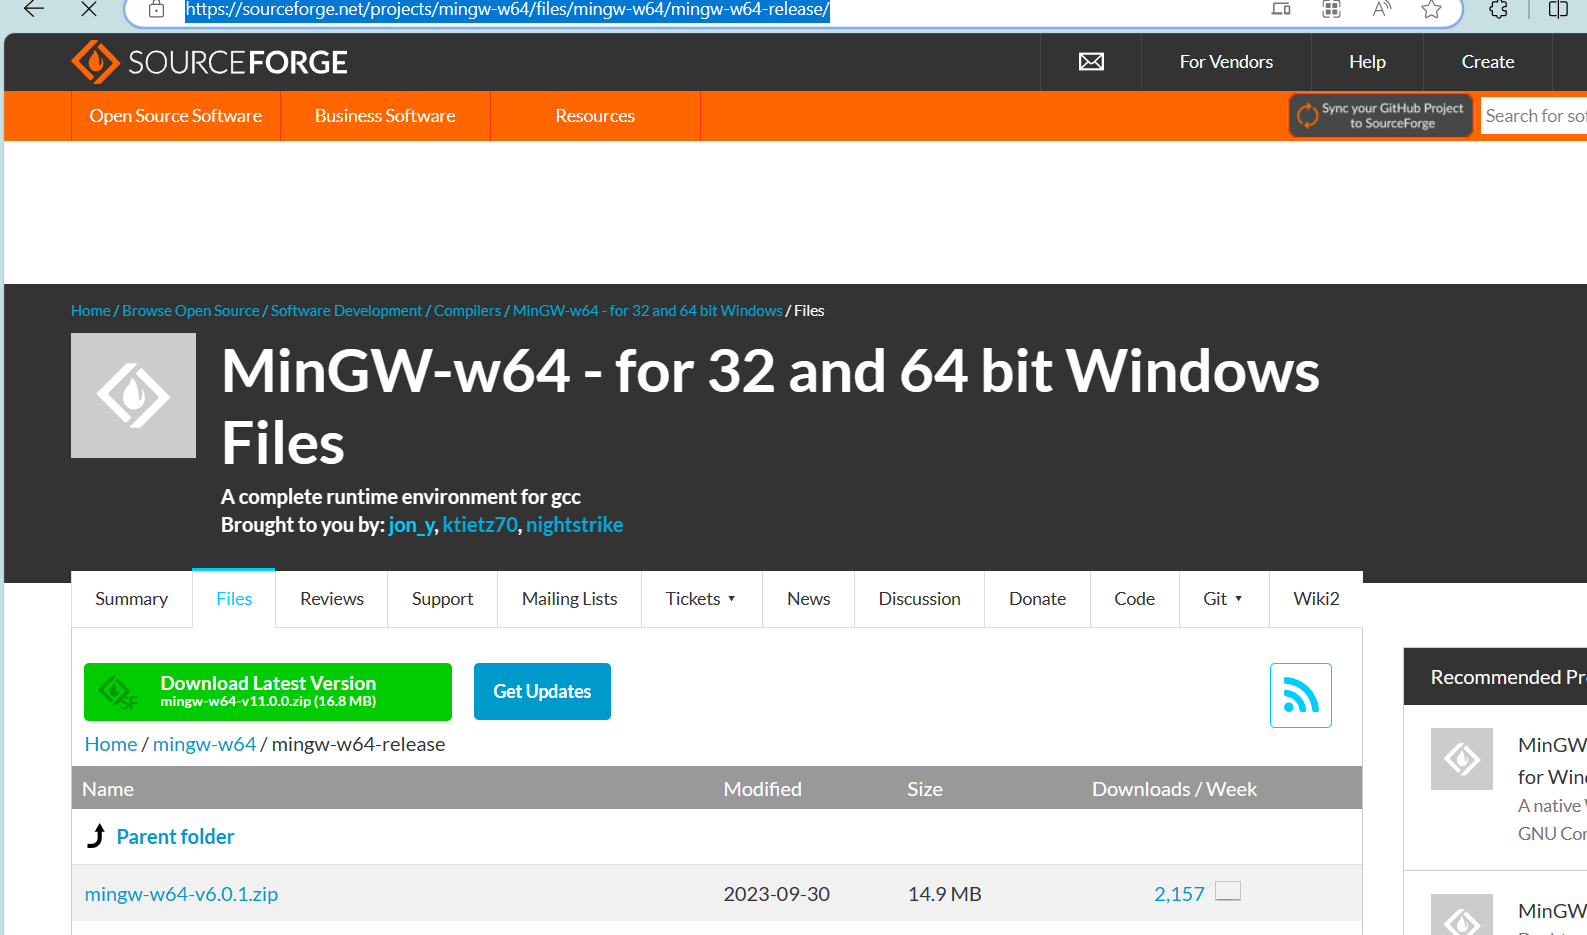
因为在线下载非常考验网速,经常失败(至少我失败了三次)
所以直接下载压缩包
一直翻到最下面
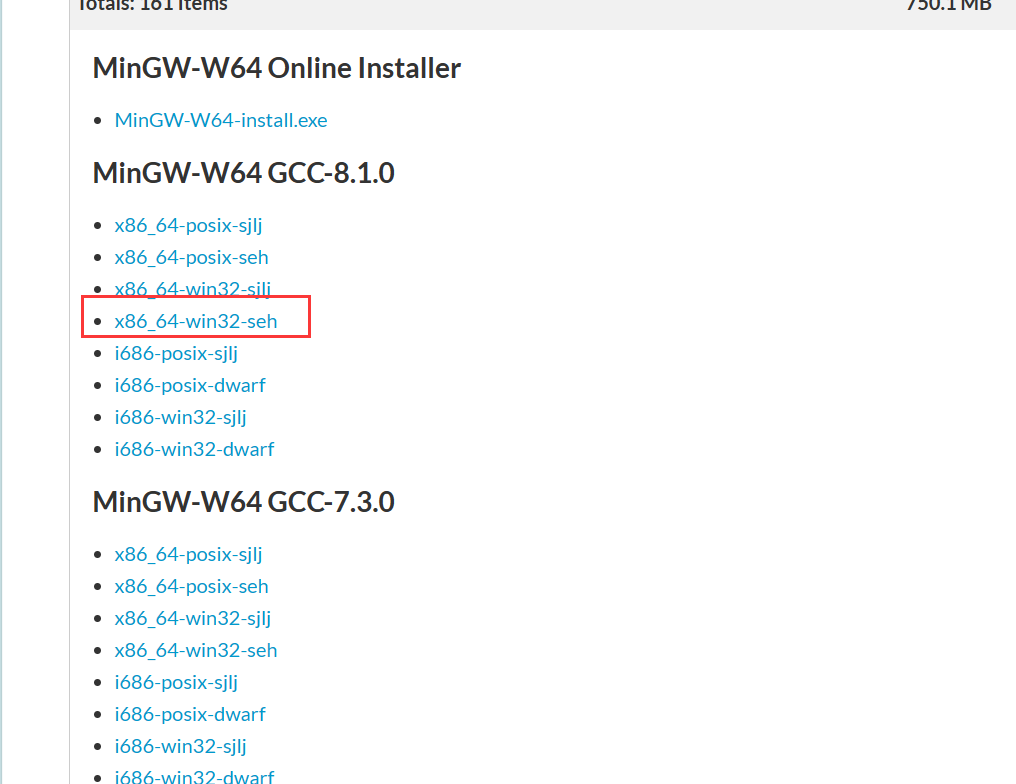
x8664是64位系统用的版本
i686是32版本
seh结尾是纯64位编泽
sj结尾是3264两种编译,需加-m32或-m64参数
posix进常用于跨平台。
posix比win32兼容性好一些
不懂的可以安装×86_64-posix-sjj
3.2 环境配置
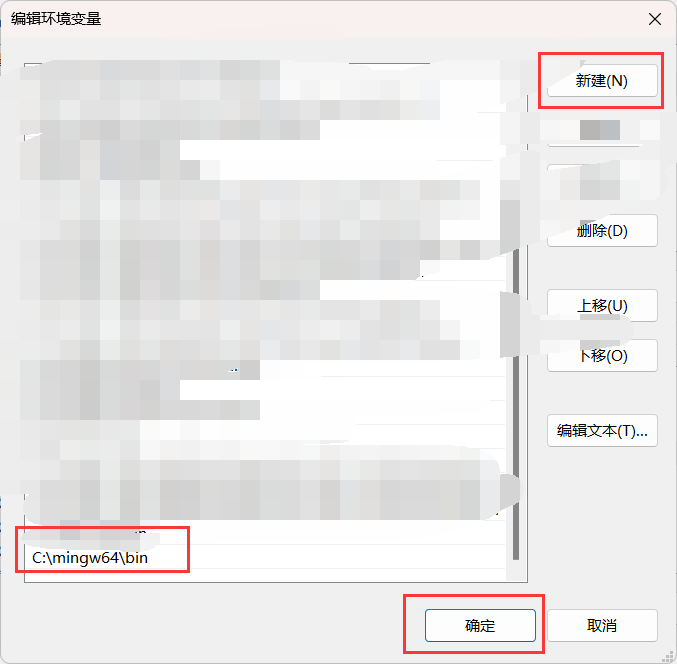
记下这时候的路径,比如我的是
C:\mingw64\bin
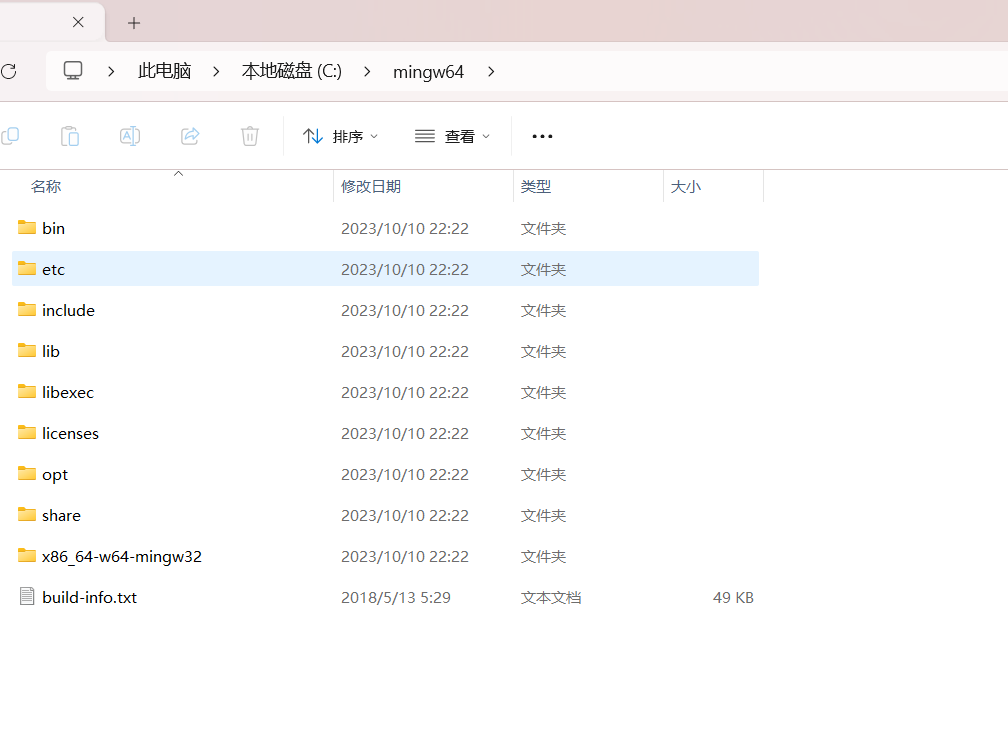
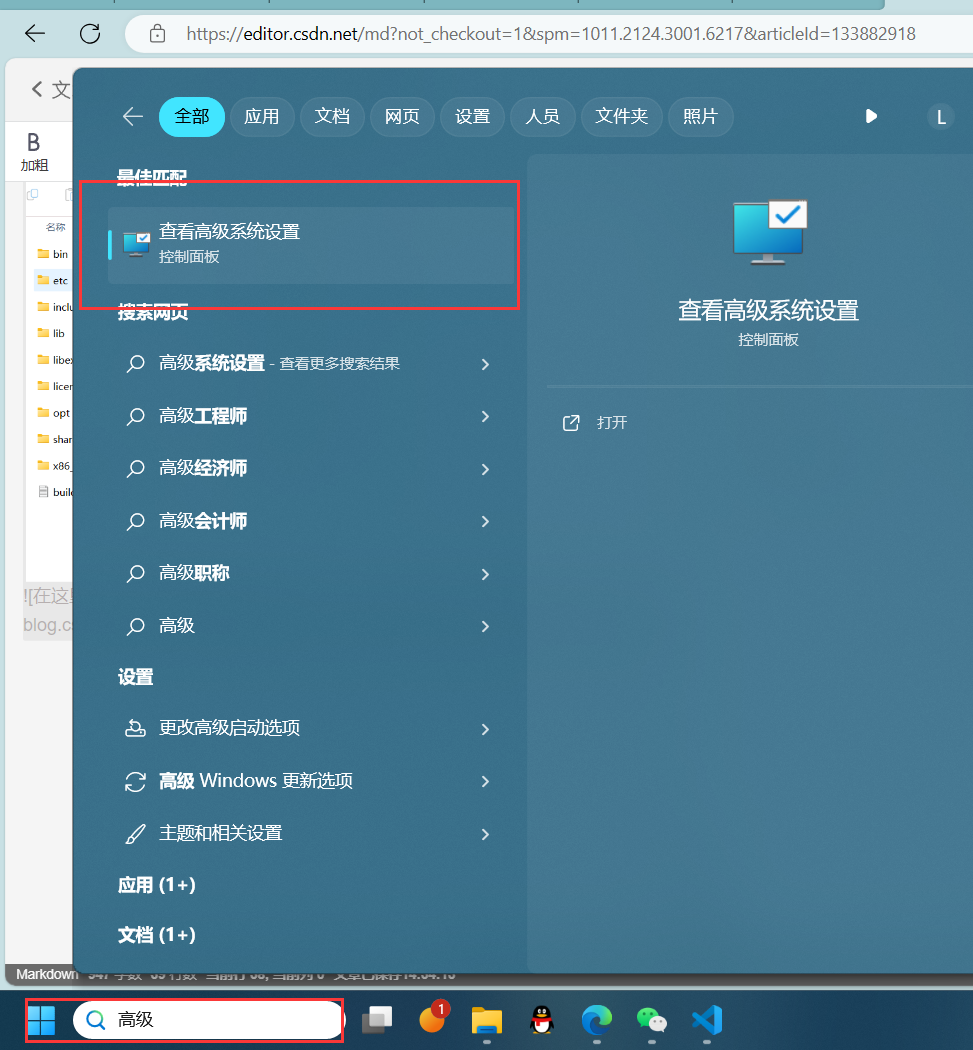
在下方搜索栏里面搜索高级,点击这个[查看高级系统设置]
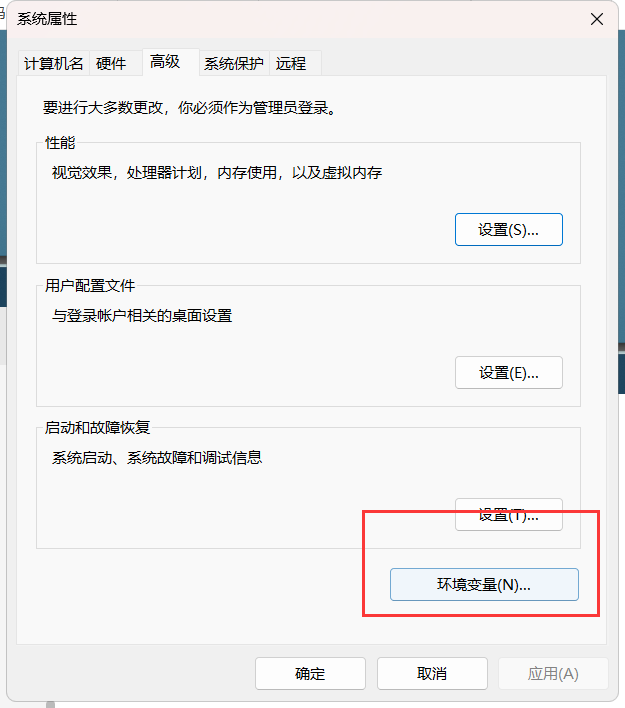
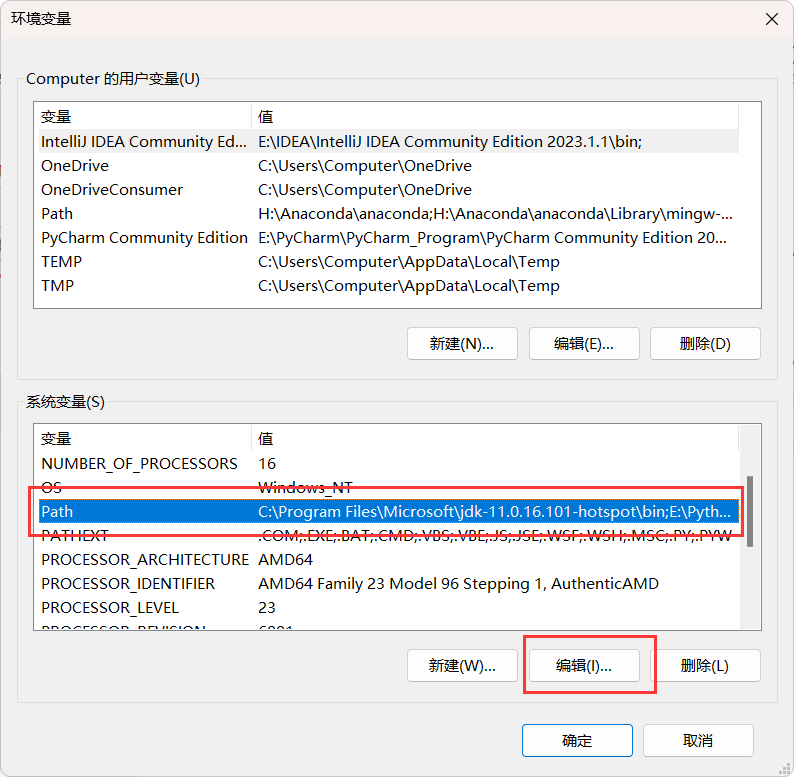
点击环境变量
找到[path],点击编辑
点击[新建],输入刚才的路径,最后点击确定
3.3 测试
点击win+r,输入cmd打开终端
在终端中输入
gcc -v
g++ -v
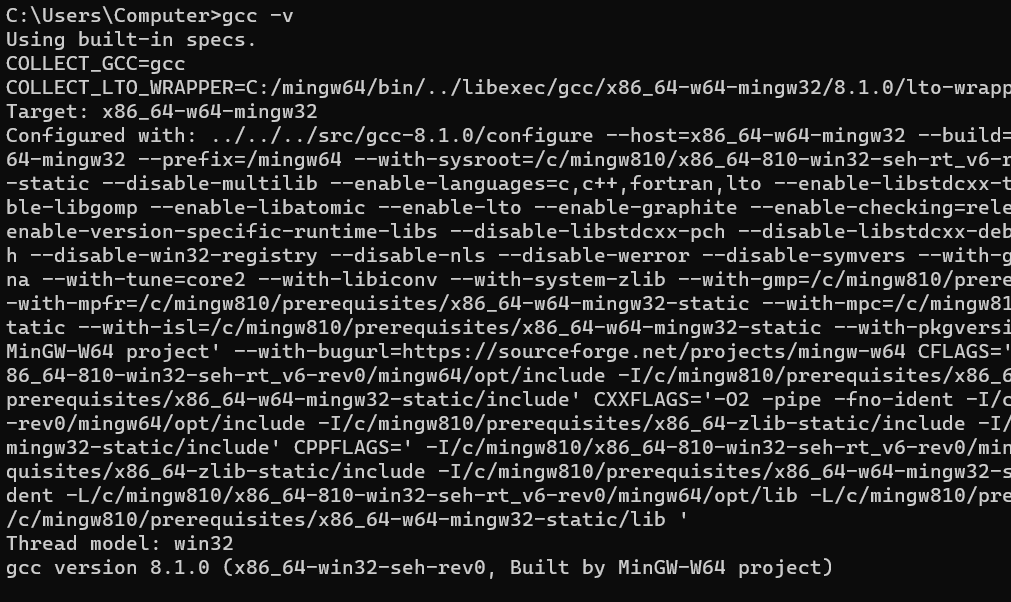
这样就成功了
四、开始配置C++项目
新建一个文件夹里面放置一个叫[.vsode]的文件夹,里面放三个文件,如下图
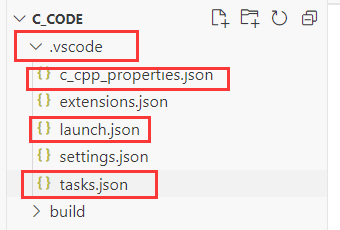
其中,c_cpp_properties.json的内容如下
{"configurations": [{"name": "Win32","includePath": ["${workspaceFolder}/**"],"defines": ["_DEBUG", "UNICODE", "_UNICODE"],"windowsSdkVersion": "10.0.17763.0","compilerPath": "F:\\codeConfiguration\\minGW\\bin\\g++.exe",   /*修改成自己bin目录下的g++.exe,这里的路径和电脑里复制的文件目录有一点不一样,这里是两个反斜杠\\*/"cStandard": "c11","cppStandard": "c++17","intelliSenseMode": "${default}"}],"version": 4
}
launch.json
{// 使用 IntelliSense 了解相关属性。 // 悬停以查看现有属性的描述。// 欲了解更多信息,请访问: https://go.microsoft.com/fwlink/?linkid=830387"version": "0.2.0","configurations": [{"name": "g++.exe build and debug active file","type": "cppdbg","request": "launch","program": "${fileDirname}\\${fileBasenameNoExtension}.exe","args": [],"stopAtEntry": false,"cwd": "${workspaceFolder}","environment": [],"externalConsole": true,"MIMode": "gdb","miDebuggerPath": "F:\\codeConfiguration\\MinGW\\bin\\gdb.exe",		/*修改成自己bin目录下的gdb.exe,这里的路径和电脑里复制的文件目录有一点不一样,这里是两个反斜杠\\*/"setupCommands": [{"description": "为 gdb 启用整齐打印","text": "-enable-pretty-printing","ignoreFailures": true}],"preLaunchTask": "task g++"}]
}
task.json
{// See https://go.microsoft.com/fwlink/?LinkId=733558 // for the documentation about the tasks.json format"version": "2.0.0","tasks": [{"type": "shell","label": "task g++","command": "F:\\codeConfiguration\\MinGW\\bin\\g++.exe",	/*修改成自己bin目录下的g++.exe,这里的路径和电脑里复制的文件目录有一点不一样,这里是两个反斜杠\\*/"args": ["-g","${file}","-o","${fileDirname}\\${fileBasenameNoExtension}.exe","-I","F:\\codeProject\\vsCode",      /*修改成自己放c/c++项目的文件夹,这里的路径和电脑里复制的文件目录有一点不一样,这里是两个反斜杠\\*/"-std=c++17"],"options": {"cwd": "F:\\codeConfiguration\\MinGW\\bin"	/*修改成自己bin目录,这里的路径和电脑里复制的文件目录有一点不一样,这里是两个反斜杠\\*/},"problemMatcher":["$gcc"],"group": "build",}]
}
最后测试一下,创建一个helloworld.cpp
#include <stdio.h>
#include <windows.h>
int main()
{printf("Hello World\n");system("pause");return 0;
}
这样就基本成功了,但是作为一个强迫症,看着我的exe文件到处生成,就很烦,想把他们都放到一个build文件夹里面去
五、修改exe文件生成的位置
把task.json文件里面的的命令
"cwd": "${fileDirname}"
替换为
"cwd": "C:\\Program Files\\mingw64\\bin"
把代码
"${fileDirname}\\${fileBasenameNoExtension}.exe"
替换为
"${workspaceFolder}\\build\\${fileBasenameNoExtension}.exe"
launch.json
{// See https://go.microsoft.com/fwlink/?LinkId=733558 // for the documentation about the tasks.json format"version": "2.0.0","tasks": [{"type": "shell","label": "task g++","command": "C:\\mingw64\\bin\\g++.exe",	/*修改成自己bin目录下的g++.exe,这里的路径和电脑里复制的文件目录有一点不一样,这里是两个反斜杠\\*/"args": ["-g","${file}","-o","${workspaceFolder}\\build\\${fileBasenameNoExtension}.exe","-I","I:\\C_Code\\Code",      /*修改成自己放c/c++项目的文件夹,这里的路径和电脑里复制的文件目录有一点不一样,这里是两个反斜杠\\*/"-std=c++17"],"options": {"cwd": "C:\\mingw64\\bin"	/*修改成自己bin目录,这里的路径和电脑里复制的文件目录有一点不一样,这里是两个反斜杠\\*/},"problemMatcher":["$gcc"],"group": "build","presentation": {"panel": "shared"}}]
}
把launch.json里面的命令
"program": "${fileDirname}\\${fileBasenameNoExtension}.exe",
替换成
"program": "${workspaceFolder}\\build\\${fileBasenameNoExtension}.exe",
launch.json
{// 使用 IntelliSense 了解相关属性。 // 悬停以查看现有属性的描述。// 欲了解更多信息,请访问: https://go.microsoft.com/fwlink/?linkid=830387"version": "0.2.0","configurations": [{"name": "g++.exe build and debug active file","type": "cppdbg","request": "launch","program": "${workspaceFolder}\\build\\${fileBasenameNoExtension}.exe","args": [],"stopAtEntry": false,"cwd": "${workspaceFolder}","environment": [],"externalConsole": false,"MIMode": "gdb","miDebuggerPath": "C:\\mingw64\\bin\\gdb.exe",		/*修改成自己bin目录下的gdb.exe,这里的路径和电脑里复制的文件目录有一点不一样,这里是两个反斜杠\\*/"setupCommands": [{"description": "为 gdb 启用整齐打印","text": "-enable-pretty-printing","ignoreFailures": true}],"preLaunchTask": "task g++"}]
}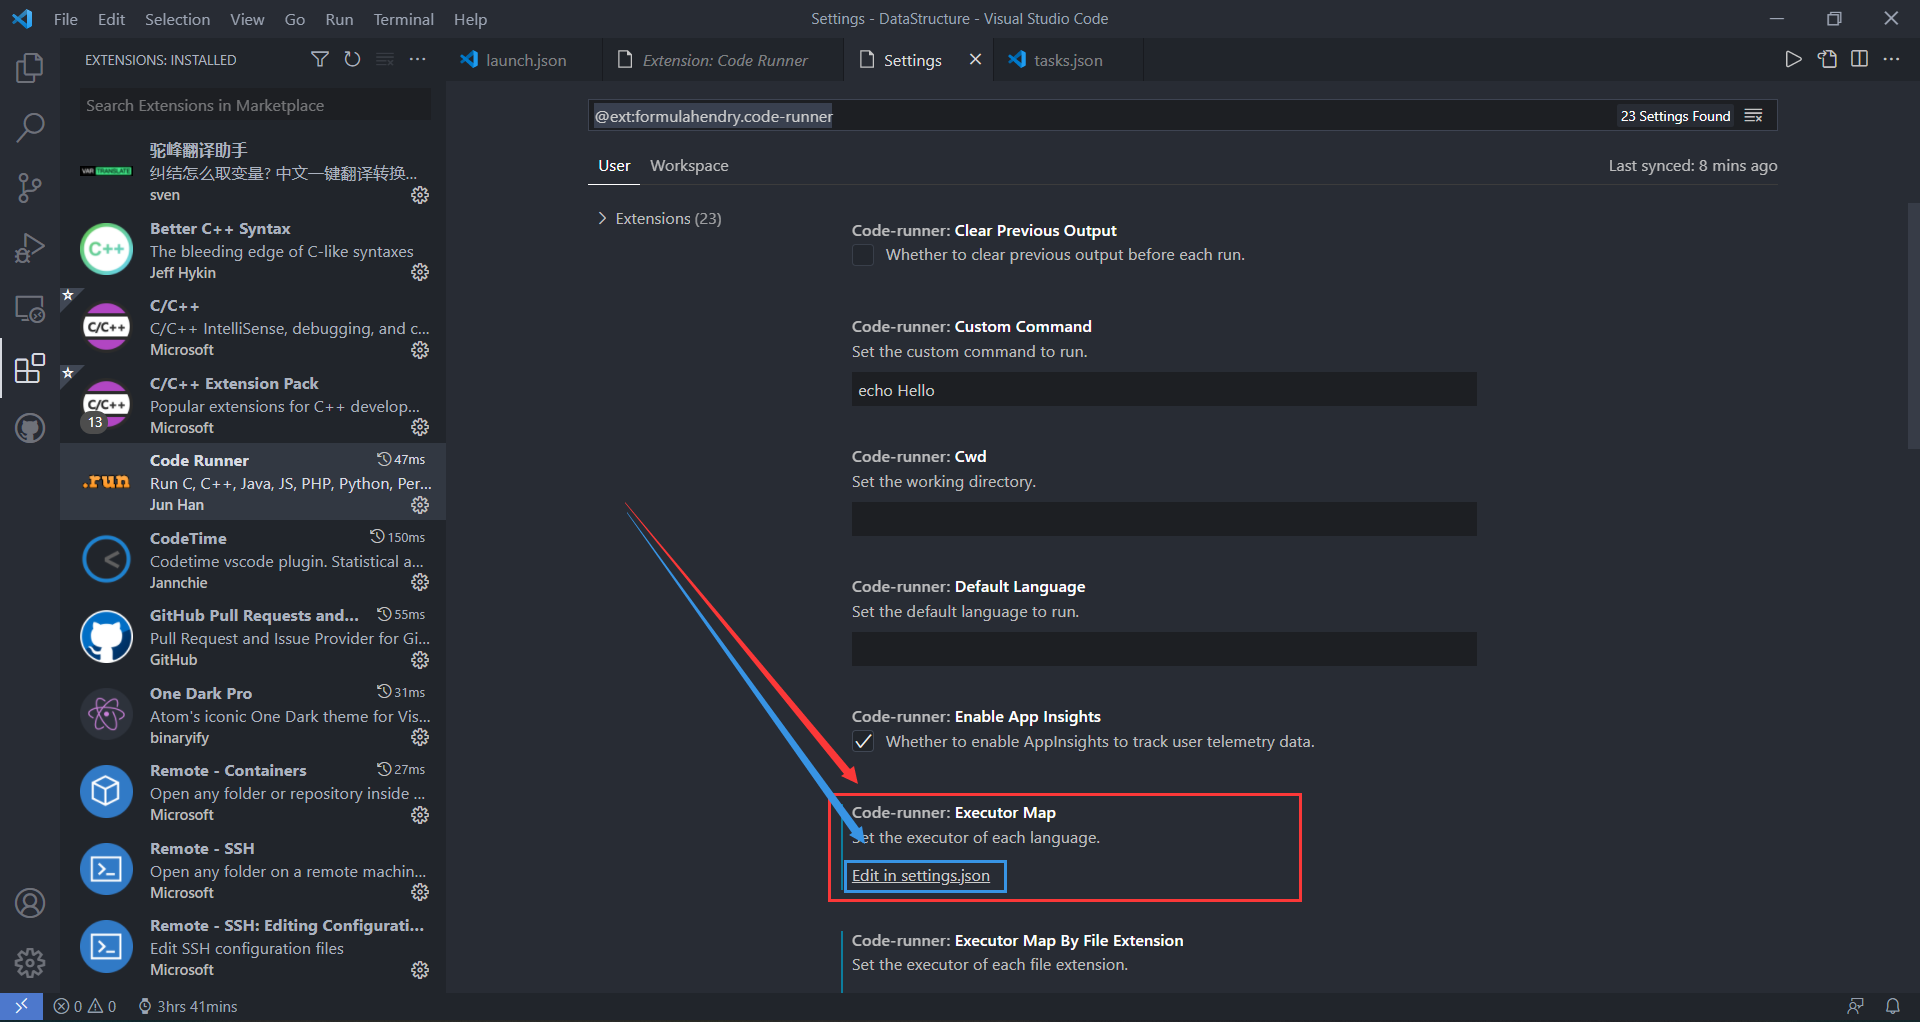
1)将命令
"c": "cd $dir && gcc $fileName -o $fileNameWithoutExt && $dir$fileNameWithoutExt",
替换为
"c": "cd $dir && gcc $fileName -o $workspaceRoot/build/$fileNameWithoutExt && $workspaceRoot/build/$fileNameWithoutExt",
(2)将命令
"cpp": "cd $dir && g++ $fileName -o $fileNameWithoutExt && $dir$fileNameWithoutExt",
替换为
"cpp": "cd $dir && g++ $fileName -o $workspaceRoot/build/$fileNameWithoutExt && $workspaceRoot/build/$fileNameWithoutExt",
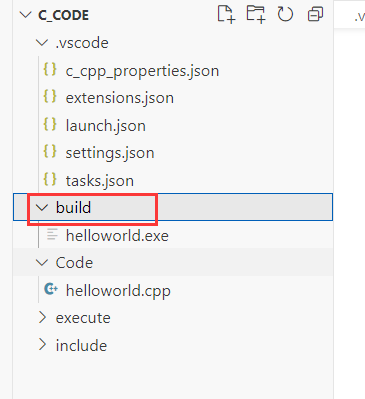
记得建一个build文件,最后就成功了、

