使用 Service 把前端连接到后端
如何创建前端(Frontend)微服务和后端(Backend)微服务。后端微服务是一个 hello 欢迎程序。 前端通过 nginx 和一个 Kubernetes 服务暴露后端所提供的服务。
- 使用部署对象(Deployment object)创建并运行一个
hello后端微服务 - 使用一个 Service 对象将请求流量发送到后端微服务的多个副本
- 同样使用一个 Deployment 对象创建并运行一个
nginx前端微服务 - 配置前端微服务将请求流量发送到后端微服务
- 使用
type=NodePort的 Service 对象将前端微服务暴露到集群外部
使用Depolyment创建后端
backend-deploy.yml
---
apiVersion: apps/v1
kind: Deployment
metadata:name: backend
spec:selector:matchLabels:app: hellotier: backendtrack: stablereplicas: 3template:metadata:labels:app: hellotier: backendtrack: stablespec:containers:- name: helloimage: "gcr.io/google-samples/hello-go-gke:1.0"ports:- name: httpcontainerPort: 80
...
查看后端deployment信息
kubectl describe deployment backend
Name:                   backend
Namespace:              default
CreationTimestamp:      Wed, 18 Oct 2023 21:55:25 +0800
Labels:                 <none>
Annotations:            deployment.kubernetes.io/revision: 1
Selector:               app=hello,tier=backend,track=stable
Replicas:               3 desired | 3 updated | 3 total | 3 available | 0 unavailable
StrategyType:           RollingUpdate
MinReadySeconds:        0
RollingUpdateStrategy:  25% max unavailable, 25% max surge
Pod Template:Labels:  app=hellotier=backendtrack=stableContainers:hello:Image:        gcr.io/google-samples/hello-go-gke:1.0Port:         80/TCPHost Port:    0/TCPEnvironment:  <none>Mounts:       <none>Volumes:        <none>
Conditions:Type           Status  Reason----           ------  ------Available      True    MinimumReplicasAvailableProgressing    True    NewReplicaSetAvailable
OldReplicaSets:  <none>
NewReplicaSet:   backend-685445b9db (3/3 replicas created)
Events:Type    Reason             Age   From                   Message----    ------             ----  ----                   -------Normal  ScalingReplicaSet  85s   deployment-controller  Scaled up replica set backend-685445b9db to 3
创建Service对象
将请求从前端发送到后端的关键是后端 Service。Service 创建一个固定 IP 和 DNS 解析名入口, 使得后端微服务总是可达。Service 使用 选择算符来寻找目标 Pod。
backend-svc.yml
---
apiVersion: v1
kind: Service
metadata:name: hello
spec:selector:app: hellotier: backendports:- protocol: TCPport: 80targetPort: http
...
这里的targetPort就是容器开放的80端口(http就是80端口)
配置文件中,你可以看到名为 hello 的 Service 将流量路由到包含 app: hello 和 tier: backend 标签的 Pod。
查看Service信息:
root@k8s-master:~# kubectl describe svc helloName: hello
Namespace: default
Labels: <none>
Annotations: <none>
Selector: app=hello,tier=backend
Type: ClusterIP
IP Family Policy: SingleStack
IP Families: IPv4
IP: 10.110.113.146
IPs: 10.110.113.146
Port: <unset> 80/TCP
TargetPort: http/TCP
Endpoints: 10.244.169.168:80,10.244.169.169:80,10.244.169.170:80
Session Affinity: None
Events: <none>
此时,你已经有了一个运行着
hello应用的三个副本的backendDeployment,你也有了 一个 Service 用于路由网络流量。不过,这个服务在集群外部无法访问也无法解析。
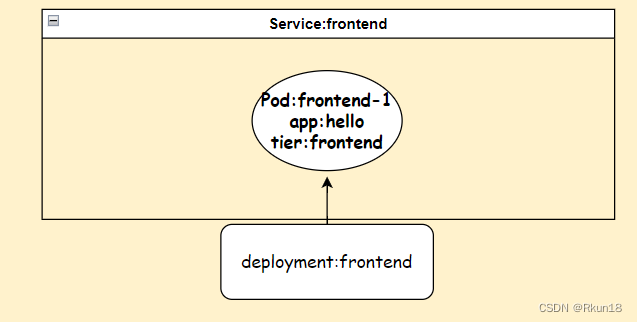
创建前端
现在你已经有了运行中的后端应用,你可以创建一个可在集群外部访问的前端,并通过代理 前端的请求连接到后端。
前端使用被赋予后端 Service 的 DNS 名称将请求发送到后端工作 Pods。这一 DNS 名称为
hello,就是Service的yml文件中name字段的取值。
前端 Deployment 中的 Pods 运行一个 nginx 镜像,这个已经配置好的镜像会将请求转发 给后端的
helloService。
frontend-nginx.conf (这个配置文件在前端镜像里存在)
# Backend 是 nginx 的内部标识符,用于命名以下特定的 upstream
upstream Backend {# hello 是 Kubernetes 中的后端服务所使用的内部 DNS 名称server hello;
}
server {
listen 80;
location / {# 以下语句将流量通过代理方式转发到名为 Backend 的上游proxy_pass http://Backend;
}
}
与后端类似,前端用包含一个 Deployment 和一个 Service。后端与前端服务之间的一个 重要区别是前端 Service 的配置文件包含了
type:NodePort(这里官方文档使用的是LoadBalancer,需要使用外部设备)
frontend-deploy.yml
---
apiVersion: apps/v1
kind: Deployment
metadata:name: frontend
spec:selector:matchLabels:app: hellotier: frontendtrack: stablereplicas: 1template:metadata:labels:app: hellotier: frontendtrack: stablespec:containers:- name: nginximage: "gcr.io/google-samples/hello-frontend:1.0"lifecycle:preStop:exec:command: ["/usr/sbin/nginx","-s","quit"]
...
frontend-svc.yml
---
apiVersion: v1
kind: Service
metadata:name: frontend
spec:selector:app: hellotier: frontendports:- protocol: "TCP"port: 80targetPort: 80type: NodePort
...
通过前端发送流量
查看前端Service信息:
root@k8s-master:~# kubectl describe svc frontendName: frontend
Namespace: default
Labels: <none>
Annotations: <none>
Selector: app=hello,tier=frontend
Type: NodePort
IP Family Policy: SingleStack
IP Families: IPv4
IP: 10.104.187.207
IPs: 10.104.187.207
Port: <unset> 80/TCP
TargetPort: 80/TCP
NodePort: <unset> 31649/TCP #这里31649就是集群外暴露的端口号
Endpoints: 10.244.169.171:80
Session Affinity: None
External Traffic Policy: Cluster
Events: <none>查看集群节点IP:
root@k8s-master:~# kubectl get node -o wide
NAME         STATUS   ROLES                  AGE    VERSION   INTERNAL-IP       EXTERNAL-IP   OS-IMAGE             KERNEL-VERSION       CONTAINER-RUNTIME
k8s-master   Ready    control-plane,master   679d   v1.22.0   192.168.123.150   <none>        Ubuntu 18.04.5 LTS   4.15.0-213-generic   docker://20.10.0
k8s-node1    Ready    <none>                 679d   v1.22.0   192.168.123.151   <none>        Ubuntu 18.04.5 LTS   4.15.0-213-generic   docker://20.10.0
k8s-node2    Ready    <none>                 679d   v1.22.0   192.168.123.152   <none>        Ubuntu 18.04.5 LTS   4.15.0-213-generic   docker://20.10.0
任意选择集群IP进行访问:
root@k8s-master:~# curl  192.168.123.150:31649
{"message":"Hello"}
root@k8s-master:~# curl  192.168.123.151:31649
{"message":"Hello"}
root@k8s-master:~# curl  192.168.123.152:31649
{"message":"Hello"}
就可以看到这样的信息,同时外部也可以通过IP对集群进行访问