前些天写了视频去噪网络BSVD论文的理解,详情请点击这里,这两个星期动手实践了一下,本篇就来记录一下这个模型的实现。
这个网络的独特之处在于,它的训练和推理在实现上有所差别。在训练阶段,其使用了TSM(Time Shift Module)结构,而在推理时则使用了BBB(Bidirectional Buffer Block)结构。训练时,网络是一个MIMO(多输入多输出)形式,而在推理时,则将其设计成了单输入、单输出的流式形式。推理时,由于网络中存在16个双向buffer,即BBB,因此,前16帧会输出空数据,16帧之后开始正常输出去噪视频帧,到视频序列结束后,还会继续输出16帧的去噪视频帧,也就是,流式推理整体存在16帧的延迟。这在一些对实时性要求不太高的应用中可以推广,但对于实时性要求严格,并且存储资源有限的应用中,就无法有效应用了。
下面,我们就通过对官方代码的理解,来聊一聊BSVD的实现。
官方代码地址:GitHub - ChenyangQiQi/BSVD: [ACM MM 2022] Real-time Streaming Video Denoising with Bidirectional Buffers
BSVD网络采用了两个UNet级联的方式。
1. 训练阶段的网络实现
在训练阶段,网络的实现如下:
class WNet(nn.Module):def __init__(self, chns=[32, 64, 128], mid_ch=3, shift_input=False, stage_num=2, in_ch=4, out_ch=3, norm='bn', act='relu', interm_ch=30, blind=False):# def __init__(self, chns=[32, 64, 128], mid_ch=3, shift_input=False, stage_num=2, in_ch=4, out_ch=3, norm='bn', act='relu', blind=False):super(WNet, self).__init__()self.stage_num = stage_numself.nets_list = nn.ModuleList()for i in np.arange(stage_num):if i == 0:stage_in_ch = in_chelse:stage_in_ch = mid_chif i == (stage_num-1):stage_out_ch = out_chelse:stage_out_ch = mid_ch# self.nets_list.append(DenBlock(chns=chns, out_ch=stage_out_ch, in_ch=stage_in_ch, shift_input=shift_input, norm=norm, act=act, interm_ch=interm_ch))if i == 0:self.nets_list.append(DenBlock(chns=chns, out_ch=stage_out_ch, in_ch=stage_in_ch, shift_input=shift_input, norm=norm, act=act, blind=blind, interm_ch=interm_ch))else:self.nets_list.append(DenBlock(chns=chns, out_ch=stage_out_ch,in_ch=stage_in_ch, shift_input=shift_input, norm=norm, act=act, interm_ch=interm_ch))# self.temp2 = DenBlock(chns=chns, in_ch=mid_ch, shift_input=shift_input)# Init weightsself.reset_params()@staticmethoddef weight_init(m):if isinstance(m, nn.Conv2d):nn.init.kaiming_normal_(m.weight, nonlinearity='relu')def reset_params(self):for _, m in enumerate(self.modules()):self.weight_init(m)def forward(self, x, debug=False):# if debug: x_in = x# x = self.temp1(x)for i in np.arange(self.stage_num):if debug: x_temp1 = xx = self.nets_list[i](x)# if debug: x_temp2 = xreturn x
网络由两个DenBlock组成,每个DenBlock是一个UNet结构:
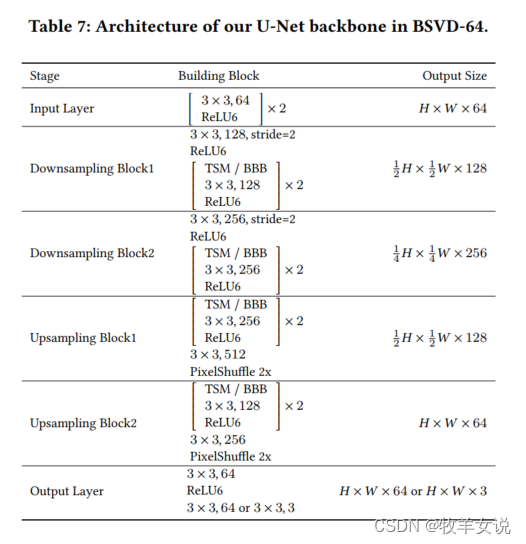
class DenBlock(nn.Module):""" Definition of the denosing block of FastDVDnet.Inputs of constructor:num_input_frames: int. number of input framesInputs of forward():xn: input frames of dim [N, C, H, W], (C=3 RGB)noise_map: array with noise map of dim [N, 1, H, W]"""def __init__(self, chns=[32, 64, 128], out_ch=3, in_ch=4, shift_input=False, norm='bn', bias=True, act='relu', interm_ch=30, blind=False):# def __init__(self, chns=[32, 64, 128], out_ch=3, in_ch=4, shift_input=False, norm='bn', bias=True, act='relu', blind=False):super(DenBlock, self).__init__()self.chs_lyr0, self.chs_lyr1, self.chs_lyr2 = chns# if stage2: in_ch=3if shift_input:self.inc = CvBlock(in_ch=in_ch, out_ch=self.chs_lyr0, norm=norm, bias=bias, act=act)else:self.inc = InputCvBlock(num_in_frames=1, out_ch=self.chs_lyr0, in_ch=in_ch, norm=norm, bias=bias, act=act, interm_ch=interm_ch, blind=blind)# num_in_frames=1, out_ch=self.chs_lyr0, in_ch=in_ch, norm=norm, bias=bias, act=act, blind=blind)self.downc0 = DownBlock(in_ch=self.chs_lyr0, out_ch=self.chs_lyr1, norm=norm, bias=bias, act=act)self.downc1 = DownBlock(in_ch=self.chs_lyr1, out_ch=self.chs_lyr2, norm=norm, bias=bias, act=act)self.upc2 = UpBlock(in_ch=self.chs_lyr2, out_ch=self.chs_lyr1, norm=norm, bias=bias, act=act)self.upc1 = UpBlock(in_ch=self.chs_lyr1, out_ch=self.chs_lyr0, norm=norm, bias=bias, act=act)self.outc = OutputCvBlock(in_ch=self.chs_lyr0, out_ch=out_ch, norm=norm, bias=bias, act=act)self.reset_params()@staticmethoddef weight_init(m):if isinstance(m, nn.Conv2d):nn.init.kaiming_normal_(m.weight, nonlinearity='relu')def reset_params(self):for _, m in enumerate(self.modules()):self.weight_init(m)def forward(self, in1):'''Args:inX: Tensor, [N, C, H, W] in the [0., 1.] rangenoise_map: Tensor [N, 1, H, W] in the [0., 1.] range'''# Input convolution blockx0 = self.inc(in1)# Downsamplingx1 = self.downc0(x0)x2 = self.downc1(x1)# Upsamplingx2 = self.upc2(x2)x1 = self.upc1(x1+x2)# Estimationx = self.outc(x0+x1)# Residualx[:, :3, :, :] = in1[:, :3, :, :] - x[:, :3, :, :]return x这段代码与论文中的UNet结构相对应(见下图),包含一个输入层,两个下采样层,两个上采样层,一个输出层。
输入层没什么特别可说的,主要是两个Conv2d=>BN=>ReLU的组合;输出层也是常规实现,Con2d=>BN=>ReLU=>Con2d,需要注意的是,作者在实现过程中,BN层是没有使用的,是透传通过。
需要花心思理解的是下采样层和上采样层的实现,因为这两个模块在训练和推理过程中,是有所不同的。
两个模块的初始实现很简单,定义如下:
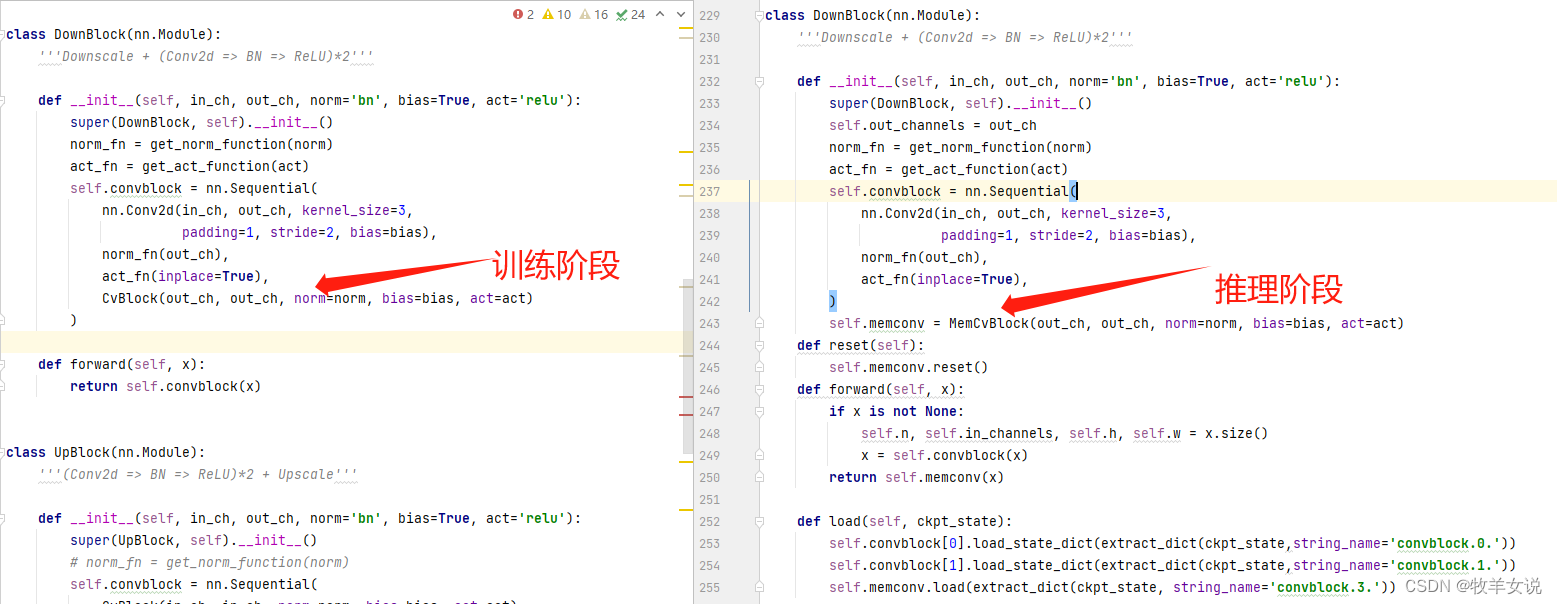
class DownBlock(nn.Module):'''Downscale + (Conv2d => BN => ReLU)*2'''def __init__(self, in_ch, out_ch, norm='bn', bias=True, act='relu'):super(DownBlock, self).__init__()norm_fn = get_norm_function(norm)act_fn = get_act_function(act)self.convblock = nn.Sequential(nn.Conv2d(in_ch, out_ch, kernel_size=3,padding=1, stride=2, bias=bias),norm_fn(out_ch),act_fn(inplace=True),CvBlock(out_ch, out_ch, norm=norm, bias=bias, act=act))def forward(self, x):return self.convblock(x)class UpBlock(nn.Module):'''(Conv2d => BN => ReLU)*2 + Upscale'''def __init__(self, in_ch, out_ch, norm='bn', bias=True, act='relu'):super(UpBlock, self).__init__()# norm_fn = get_norm_function(norm)self.convblock = nn.Sequential(CvBlock(in_ch, in_ch, norm=norm, bias=bias, act=act),nn.Conv2d(in_ch, out_ch*4, kernel_size=3, padding=1, bias=bias),nn.PixelShuffle(2))return self.convblock(x)关键在于两者共同调用的子模块CvBlock的实现,在定义时,CvBlock被常规定义为:
class CvBlock(nn.Module):'''(Conv2d => BN => ReLU) x 2'''def __init__(self, in_ch, out_ch, norm='bn', bias=True, act='relu'):super(CvBlock, self).__init__()norm_fn = get_norm_function(norm)act_fn = get_act_function(act)self.c1 = nn.Conv2d(in_ch, out_ch, kernel_size=3,padding=1, bias=bias)self.b1 = norm_fn(out_ch)self.relu1 = act_fn(inplace=True)self.c2 = nn.Conv2d(out_ch, out_ch, kernel_size=3,padding=1, bias=bias)self.b2 = norm_fn(out_ch)self.relu2 = act_fn(inplace=True)def forward(self, x):x = self.c1(x)x = self.b1(x)x = self.relu1(x)x = self.c2(x)x = self.b2(x)x = self.relu2(x)return x但接下来,上述定义中的c1和c2则被替换成了TSM实现: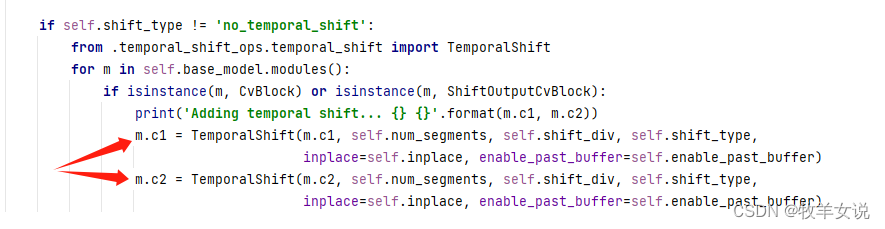
其中,shift模块的核心实现代码如下,对输入的channels分别向左和向右移动了一定单位(fold)。
def shift(x, n_segment, shift_type, fold_div=3, stride=1, inplace=False):nt, c, h, w = x.size()n_batch = nt // n_segmentx = x.view(n_batch, n_segment, c, h, w)fold = c // fold_div # 32/8 = 4if inplace:# Due to some out of order error when performing parallel computing. # May need to write a CUDA kernel.print("WARNING: use inplace shift. it has bugs")raise NotImplementedError else:out = torch.zeros_like(x)if not 'toFutureOnly' in shift_type:out[:, :-stride, :fold] = x[:, stride:, :fold] # backward (left shift)out[:, stride:, fold: 2 * fold] = x[:, :-stride, fold: 2 * fold] # forward (right shift)else:out[:, stride:, : 2 * fold] = x[:, :-stride, : 2 * fold] # right shift onlyout[:, :, 2 * fold:] = x[:, :, 2 * fold:] # not shiftreturn out.view(nt, c, h, w)
2. 推理阶段的网络实现
在推理阶段,网络实现就显得复杂一些了。大致的网络结构没变,但由于内部的TSM替换成了BBB, 因此没办法严格进行整体网络的加载,只能每一层单独加载训练出来的state_dict。并且,网络推理变成了流式推理,整个网络的定义显得比较凌乱,结构如下:
class BSVD(nn.Module):"""Bidirection-buffer based framework with pipeline-style inference"""def __init__(self, chns=[32, 64, 128], mid_ch=3, shift_input=False, in_ch=4, out_ch=3, norm='bn', act='relu', interm_ch=30, blind=False, pretrain_ckpt='./experiments/pretrained_ckpt/bsvd-64.pth'):super(BSVD, self).__init__()self.temp1 = DenBlock(chns=chns, out_ch=mid_ch, in_ch=in_ch, shift_input=shift_input, norm=norm, act=act, blind=blind, interm_ch=interm_ch)self.temp2 = DenBlock(chns=chns, out_ch=out_ch, in_ch=mid_ch, shift_input=shift_input, norm=norm, act=act, blind=blind, interm_ch=interm_ch)self.shift_num = self.count_shift()# Init weightsself.reset_params()if pretrain_ckpt is not None:self.load(pretrain_ckpt)def reset(self):self.temp1.reset()self.temp2.reset()def load(self, path):ckpt = torch.load(path)print("load from %s"%path)ckpt_state = ckpt['params']# split the dict hereif 'module' in list(ckpt_state.keys())[0]:base_name = 'module.base_model.'else:base_name = 'base_model.'ckpt_state_1 = extract_dict(ckpt_state, string_name=base_name+'nets_list.0.')ckpt_state_2 = extract_dict(ckpt_state, string_name=base_name+'nets_list.1.')self.temp1.load_from(ckpt_state_1)self.temp2.load_from(ckpt_state_2)@staticmethoddef weight_init(m):if isinstance(m, nn.Conv2d):nn.init.kaiming_normal_(m.weight, nonlinearity='relu')def reset_params(self):for _, m in enumerate(self.modules()):self.weight_init(m)def feedin_one_element(self, x):x = self.temp1(x)x = self.temp2(x)return xdef forward(self, input, noise_map=None):# N, F, C, H, W -> (N*F, C, H, W)if noise_map != None:input = torch.cat([input, noise_map], dim=2)N, F, C, H, W = input.shapeinput = input.reshape(N*F, C, H, W)base_out = self.streaming_forward(input)NF, C, H, W = base_out.shapebase_out = base_out.reshape(N, F, C, H, W)return base_outdef streaming_forward(self, input_seq):"""pipeline-style inferenceArgs:Noisy video streamReturns:Denoised video stream"""out_seq = []if isinstance(input_seq, torch.Tensor):n,c,h,w = input_seq.shapeinput_seq = [input_seq[i:i+1, ...] for i in np.arange(n)]assert type(input_seq) == list, "convert the input into a sequence"_,c,h,w = input_seq[0].shapewith torch.no_grad():for i, x in enumerate(input_seq):x_cuda = x.cuda()x_cuda = self.feedin_one_element(x_cuda)# if x_cuda is not None: x_cuda = x_cuda.cpu()if isinstance(x_cuda, torch.Tensor):out_seq.append(x_cuda)else:out_seq.append(x_cuda)end_out = self.feedin_one_element(None)out_seq.append(end_out)# end stagewhile 1:end_out = self.feedin_one_element(None)if len(out_seq) == (self.shift_num+len(input_seq)):breakout_seq.append(end_out)# number of temporal shift is 2, last element is 0# TODO fix init and end framesout_seq_clip = out_seq[self.shift_num:]self.reset()return torch.cat(out_seq_clip, dim=0)def count_shift(self):count = 0for name, module in self.named_modules():# print(type(module))if "BiBufferConv" in str(type(module)):count+=1return count两个UNet的定义(DenBlock)大体上没发生变化,但下采样模块和上采样模块的定义发生了改变。
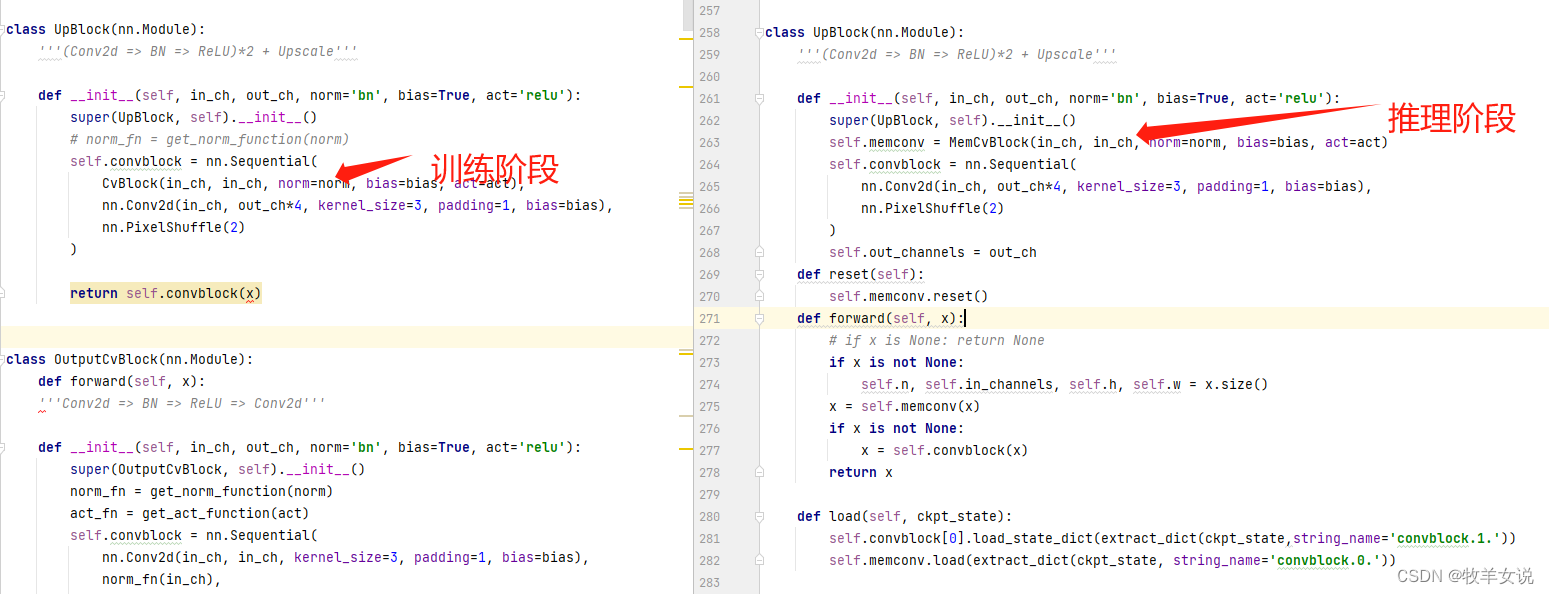
下采样层如下,原来带有TSM的CvBlock换成了MemCvBlock:
上采样模块也类似:
而MemCvBlock则调用了BBB模块,BBB模块的实现如下,这是整个算法的核心:
class BiBufferConv(nn.Module):def __init__(self,in_channels,out_channels,kernel_size,stride=1,padding=0,bias=True) -> None:super(BiBufferConv, self).__init__()self.op = ShiftConv(in_channels,out_channels,kernel_size,stride,padding,bias)self.out_channels = out_channelsself.left_fold_2fold = None# self.zero_tensor = Noneself.center = Nonedef reset(self):self.left_fold_2fold = Noneself.center = Nonedef forward(self, input_right, verbose=False):fold_div = 8if input_right is not None:self.n, self.c, self.h, self.w = input_right.size()self.fold = self.c//fold_div# Case1: In the start or end stage, the memory is emptyif self.center is None:self.center = input_right# if verbose:if input_right is not None:if self.left_fold_2fold is None:# In the start stage, the memory and left tensor is emptyself.left_fold_2fold = torch.zeros((self.n, self.fold, self.h, self.w), device=torch.device('cuda'))if verbose: print("%f+none+%f = none"%(torch.mean(self.left_fold_2fold), torch.mean(input_right)))else:# in the end stage, both feed in and memory are emptyif verbose: print("%f+none+none = none"%(torch.mean(self.left_fold_2fold)))# print("self.center is None")return None# Case2: Center is not None, but input_right is Noneelif input_right is None:# In the last procesing stage, center is 0output = self.op(self.left_fold_2fold, self.center, torch.zeros((self.n, self.fold, self.h, self.w), device=torch.device('cuda')))if verbose: print("%f+%f+none = %f"%(torch.mean(self.left_fold_2fold), torch.mean(self.center), torch.mean(output)))else:output = self.op(self.left_fold_2fold, self.center, input_right)if verbose: print("%f+%f+%f = %f"%(torch.mean(self.left_fold_2fold), torch.mean(self.center), torch.mean(input_right), torch.mean(output)))# if output == 57:# a = 1self.left_fold_2fold = self.center[:, self.fold:2*self.fold, :, :]self.center = input_rightreturn output这样,通过BBB模块,就实现了16个双向Buffer的填充、更新和清空。
限于篇幅,先梳理出个大体的思路,实际上还有很多细节需要特别关注,留待下一篇来写吧。