朋友们、伙计们,我们又见面了,本期来给大家解读一下有关list的模拟实现,如果看完之后对你有一定的启发,那么请留下你的三连,祝大家心想事成!
C 语 言 专 栏:C语言:从入门到精通
数据结构专栏:数据结构
个 人 主 页 :stackY、
C + + 专 栏 :C++
Linux 专 栏 :Linux

目录
1. 基本构造
2. 正向迭代器
2.1 非const迭代器
2.2 const迭代器
2.3 正向迭代器的改进优化
3. 修改相关接口
3.1 insert、erase
3.2 尾插、头插、尾删、头删、清理
4. 拷贝构造、赋值重载、析构
5. 完整代码
1. 基本构造
list的底层其实是一个带头双向循环的链表,所以在模拟实现之前可以看一下库里面怎么实现的:
namespace ywh
{//链表结构template<class T>struct list_node{T _data;                 //节点中的数据list_node<T>* _prev;    //指向前一个节点的指针list_node<T>* _next;    //指向后一个节点的指针//构造list_node(const T& x = T()):_data(x), _prev(nullptr), _next(nullptr){}};//list结构template<class T>class list{public:typedef list_node<T> Node;public://空初始化void empty_init(){_head = new Node;_head->_prev = _head;_head->_next = _next;}//构造list(){empty_init();}private:Node* _head;  //链表的头节点size_t _size; //节点个数};
}

2. 正向迭代器
在使用list的阶段的迭代器使用方法和之前的string、vector一样,但是了解过链表的结构都知道,链表要访问下一个节点就是使用节点中的next指针指向下一个节点,需要访问里面的数据需要找到里面的data,++和解引用并不能访问链表的节点,那么迭代器的使用在底层肯定是封装加运算符重载。
在实现迭代器的时候也需要采用封装和运算符重载,运算符重载需要用到++、--、!=、==、*、->等运算符。迭代器分为const迭代器和非const迭代器,首先先来看看非const迭代器:
2.1 非const迭代器
迭代器的实现一般使用struct来进行封装:
namespace ljm
{//链表结构template<class T>struct list_node{T _data;                 //节点中的数据list_node<T>* _prev;    //指向前一个节点的指针list_node<T>* _next;    //指向后一个节点的指针//构造list_node(const T& x = T()):_data(x), _prev(nullptr), _next(nullptr){}};//非const正向迭代器template<class T>struct __list_iterator{typedef list_node<T> Node;typedef __list_iterator<T> self;Node* _node;//迭代器构造__list_iterator(Node* node):_node(node){}//前置//operator++self& operator++(){return _node->_next;}//operator--self& operator--(){return _node->_prev;}//后置self operator++(int){self* tmp(_node);_node = _node->_next;return tmp;}//operator--self operator--(int){self* tmp(_node);_node = _node->_prev;return tmp;}//operator*T& operator*(){return _node->_data;}//operator->T* operator->(){return &_node->_data;}//operator!=bool operator!=(const self& s){return _node != s._node;}//operator==bool operator==(const self& s){return _node == s._node;}};//list结构template<class T>class list{public:typedef list_node<T> Node;public://空初始化void empty_init(){_head = new Node;_head->_prev = _head;_head->_next = _head;}//构造list(){empty_init();}///正向迭代器iterator begin(){return iterator(_head->_next); //使用匿名对象进行构造}iterator end(){return iterator(_head);}private:Node* _head;  //链表的头节点size_t _size; //节点个数};
}
2.2 const迭代器
迭代器中涉及到修改的就是*和->,const迭代器的作用是指向的内容不能修改,本身不能修改,所以需要重新进行封装:
namespace ljm
{//链表结构template<class T>struct list_node{T _data;                 //节点中的数据list_node<T>* _prev;    //指向前一个节点的指针list_node<T>* _next;    //指向后一个节点的指针//构造list_node(const T& x = T()):_data(x), _prev(nullptr), _next(nullptr){}};//非const正向迭代器//...//const正向迭代器template<class T>struct __list_const_iterator{typedef list_node<T> Node;typedef __list_const_iterator<T> self;Node* _node;//迭代器构造__list_const_iterator(Node* node):_node(node){}//前置//operator++self& operator++(){_node = _node->_next;return *this;}//operator--self& operator--(){_node = _node->_prev;return *this;}//后置self operator++(int){self* tmp(_node);_node = _node->_next;return tmp;}//operator--self operator--(int){self* tmp(_node);_node = _node->_prev;return tmp;}//operator*const T& operator*(){return _node->_data;}//operator->const T* operator->(){return &_node->_data;}//operator!=bool operator!=(const self& s){return _node != s._node;}//operator==bool operator==(const self& s){return _node == s._node;}};//list结构template<class T>class list{public:typedef list_node<T> Node;typedef __list_iterator<T> iterator;typedef __list_const_iterator<T> const_iterator;public:基本构造/////空初始化void empty_init(){_head = new Node;_head->_prev = _head;_head->_next = _head;}//构造list(){empty_init();}///正向迭代器iterator begin(){return iterator(_head->_next); //使用匿名对象进行构造}iterator end(){return iterator(_head);}const_iterator begin() const{return const_iterator(_head->_next);}const_iterator end() const{return const_iterator(_head);}private:Node* _head;  //链表的头节点size_t _size; //节点个数};
}
2.3 正向迭代器的改进优化
上面的这两种写法不难看出有很多代码都是重复出现的,使得代码非常冗余,那么怎么将这些冗余的代码进行合并呢?
我们可以看一下库里面如何实现:
采用泛型编程,使用模板,将这一转化的工作交给编译器,而我们只需传递const参数和非const参数即可:
namespace ywh
{//链表结构template<class T>struct list_node{T _data;                 //节点中的数据list_node<T>* _prev;    //指向前一个节点的指针list_node<T>* _next;    //指向后一个节点的指针//构造list_node(const T& x = T()):_data(x), _prev(nullptr), _next(nullptr){}};//非const正向迭代器//   类型模板参数   传递引用      传递指针template<class T, class Ref, class Ptr>struct __list_iterator{typedef list_node<T> Node;typedef __list_iterator<T, Ref, Ptr> self;Node* _node;//迭代器构造__list_iterator(Node* node):_node(node){}//前置//operator++self& operator++(){_node = _node->_next;return *this;}//operator--self& operator--(){_node = _node->_prev;return *this;}//后置self operator++(int){self* tmp(_node);_node = _node->_next;return tmp;}//operator--self operator--(int){self* tmp(_node);_node = _node->_prev;return tmp;}//operator*Ref operator*(){return _node->_data;}//operator->Ptr operator->(){return &_node->_data;}//operator!=bool operator!=(const self& s){return _node != s._node;}//operator==bool operator==(const self& s){return _node == s._node;}};//list结构template<class T>class list{public:typedef list_node<T> Node;typedef __list_iterator<T, T&, T*> iterator;   //非const迭代器typedef __list_iterator<T, const T&, const T*> const_iterator;  //const迭代器public:基本构造/////空初始化void empty_init(){_head = new Node;_head->_prev = _head;_head->_next = _head;}//构造list(){empty_init();}///正向迭代器iterator begin(){return iterator(_head->_next); //使用匿名对象进行构造}iterator end(){return iterator(_head);}const_iterator begin() const{return const_iterator(_head->_next);}const_iterator end() const{return const_iterator(_head);}private:Node* _head;  //链表的头节点size_t _size; //节点个数};
}

3. 修改相关接口
3.1 insert、erase
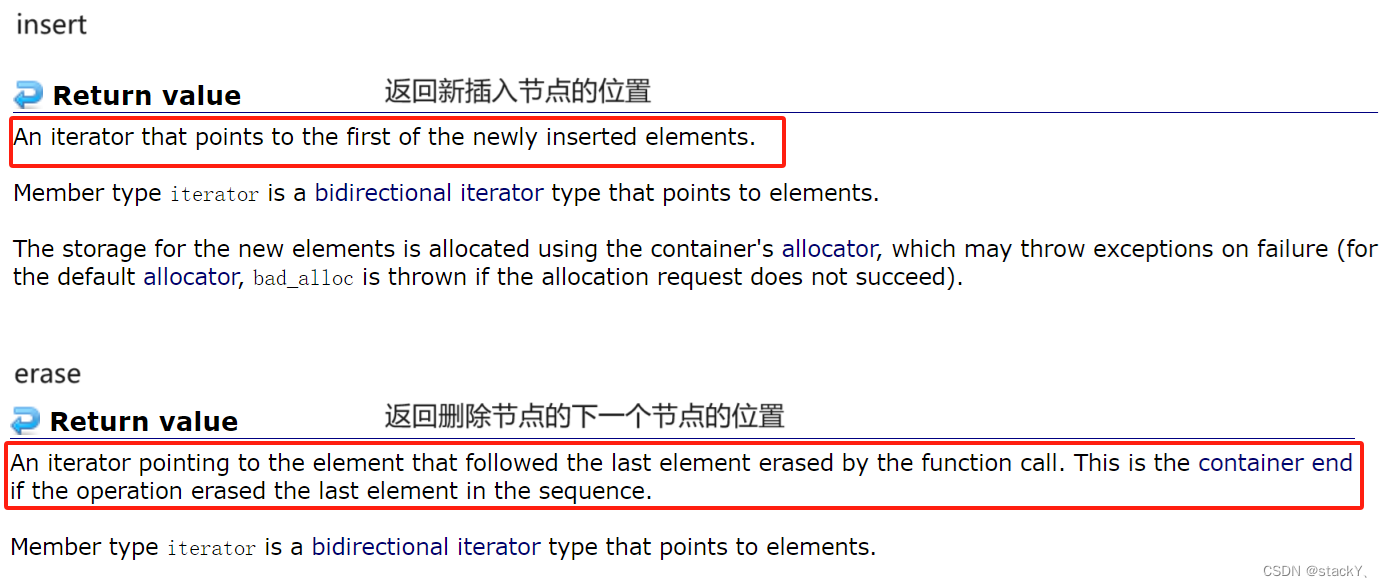
在pos位置进行插入删除比较简单,需要进行链接新节点,改变节点中指针的指向即可,库里面对于插入和删除都带有返回值,那么我们在实现的时候也加上返回值:
///修改相关接口//在pos位置插入节点iterator insert(iterator pos, const T& x){//创建新新节点Node* newnode = new Node(x);//链接节点Node* cur = pos._node;Node* prev = cur->_prev;prev->_next = newnode;newnode->_prev = prev;newnode->_next = cur;cur->_prev = newnode;//更新节点个数++_size;//返回新节点的位置return iterator(newnode);}//删掉pos位置的节点iterator erase(iterator pos){//保存相对位置Node* cur = pos._node;Node* prev = cur->_prev;Node* next = cur->_next;//链接节点delete cur;prev->_next = next;next->_prev = prev;//更新节点个数--_size;//返回pos的下一个位置return iterator(next);}在进行insert之后可以看到迭代器是不会失效的,但是在erase之后pos位置会被释放,因此erase之后迭代器会失效,在使用前先更新迭代器。
3.2 尾插、头插、尾删、头删、清理
当实现了insert和erase之后,实现这些接口直接复用即可:
//尾插void push_back(const T& x){insert(end(), x);}//头插void push_front(const T& x){insert(begin(), x);}//尾删void pop_back(){erase(--end());}//头删void pop_front(){erase(begin());}//清理void clear(){iterator it = begin();while (it != end()){it = erase(it);}}
4. 拷贝构造、赋值重载、析构
在这里我们都是采用现代写法:
拷贝构造直接使用迭代器依次遍历进行尾插。
//拷贝构造list(const list<T>& lt){//先创建空节点empty_init();//依次尾插即可for (auto e : lt){push_back(e);}}//operator=void swap(list<T>& lt){std::swap(_head, lt._head);std::swap(_size, lt._size);}list<T>& operator=(list<T> lt){swap(lt);return *this;}//析构~list(){clear();delete _head;_head = nullptr;_size = 0;}
5. 完整代码
头文件:List.h
#pragma oncenamespace ywh
{//链表结构template<class T>struct list_node{T _data;                 //节点中的数据list_node<T>* _prev;    //指向前一个节点的指针list_node<T>* _next;    //指向后一个节点的指针//构造list_node(const T& x = T()):_data(x), _prev(nullptr), _next(nullptr){}};//非const正向迭代器//   类型模板参数   传递引用      传递指针template<class T, class Ref, class Ptr>struct __list_iterator{typedef list_node<T> Node;typedef __list_iterator<T, Ref, Ptr> self;Node* _node;//迭代器构造__list_iterator(Node* node):_node(node){}//前置//operator++self& operator++(){_node = _node->_next;return *this;}//operator--self& operator--(){_node = _node->_prev;return *this;}//后置self operator++(int){self* tmp(_node);_node = _node->_next;return tmp;}//operator--self operator--(int){self* tmp(_node);_node = _node->_prev;return tmp;}//operator*Ref operator*(){return _node->_data;}//operator->Ptr operator->(){return &_node->_data;}//operator!=bool operator!=(const self& s){return _node != s._node;}//operator==bool operator==(const self& s){return _node == s._node;}};//list结构template<class T>class list{public:typedef list_node<T> Node;typedef __list_iterator<T, T&, T*> iterator;   //非const迭代器typedef __list_iterator<T, const T&, const T*> const_iterator;  //const迭代器public:基本构造/////空初始化void empty_init(){_head = new Node;_head->_prev = _head;_head->_next = _head;}//构造list(){empty_init();}//拷贝构造list(const list<T>& lt){//先创建空节点empty_init();//依次尾插即可for (auto e : lt){push_back(e);}}//operator=void swap(list<T>& lt){std::swap(_head, lt._head);std::swap(_size, lt._size);}list<T>& operator=(list<T> lt){swap(lt);return *this;}//析构~list(){clear();delete _head;_head = nullptr;_size = 0;}///正向迭代器iterator begin(){return iterator(_head->_next); //使用匿名对象进行构造}iterator end(){return iterator(_head);}const_iterator begin() const{return const_iterator(_head->_next);}const_iterator end() const{return const_iterator(_head);}///修改相关接口//在pos位置插入节点iterator insert(iterator pos, const T& x){//创建新新节点Node* newnode = new Node(x);//链接节点Node* cur = pos._node;Node* prev = cur->_prev;prev->_next = newnode;newnode->_prev = prev;newnode->_next = cur;cur->_prev = newnode;//更新节点个数++_size;//返回新节点的位置return iterator(newnode);}//删掉pos位置的节点iterator erase(iterator pos){//保存相对位置Node* cur = pos._node;Node* prev = cur->_prev;Node* next = cur->_next;//链接节点delete cur;prev->_next = next;next->_prev = prev;//更新节点个数--_size;//返回pos的下一个位置return iterator(next);}//尾插void push_back(const T& x){insert(end(), x);}//头插void push_front(const T& x){insert(begin(), x);}//尾删void pop_back(){erase(--end());}//头删void pop_front(){erase(begin());}//清理void clear(){iterator it = begin();while (it != end()){it = erase(it);}}//节点个数size_t size(){return _size;}private:Node* _head;  //链表的头节点size_t _size; //节点个数};
}
朋友们、伙计们,美好的时光总是短暂的,我们本期的的分享就到此结束,欲知后事如何,请听下回分解~,最后看完别忘了留下你们弥足珍贵的三连喔,感谢大家的支持!