文章目录
- Spring基础
- IoC容器基础
- IoC理论
- 第一个Spring程序
- Bean注册与配置
- 依赖注入
- 自动装配
- 生命周期与继承
- 工厂模式和工厂Bean
- 注解开发
- AOP面向切片
- 配置实现AOP
- 接口实现AOP
- 注解实现AOP
Spring基础
Spring是为了简化开发而生,它是轻量级的IoC和AOP的容器框架,主要是针对Bean的生命周期进行管理的轻量级容器,并且它的生态已经发展得极为庞大。
IoC容器基础
IoC理论
之前的Web应用各层角色分工都明确,流水线上的一套操作必须环环相扣,这是一种高度耦合的体系。目前App更新频繁,对于高耦合代码出现问题,无法高效进行维护和更新。
IOC是Inversion of Control的缩写,翻译为:“控制反转”,把复杂系统分解成相互合作的对象,这些对象类通过封装以后,内部实现对外部是透明的,从而降低了解决问题的复杂度,而且可以灵活地被重用和扩展。
将对象交给IoC容器进行管理,不用再关心我们要去使用哪一个实现类了,我们只需要关心,给到我的一定是一个可以正常使用的实现类,能用就完事了。
public static void main(String[] args) {A a = new A();a.test(IoC.getBean(Service.class));   //容器类//比如现在在IoC容器中管理的Service的实现是B,那么我们从里面拿到的Service实现就是B
}class A{private List<Service> list;   //一律使用Service,具体实现由IoC容器提供public Service test(Service b){return null;}
}interface Service{ }   //使用Service做一个顶层抽象class B implements Service{}  //B依然是具体实现类,并交给IoC容器管理
当具体实现类发生修改时,我们同样只需要将新的实现类交给IoC容器管理,这样我们无需修改之前的任何代码。
高内聚,低耦合,是现代软件的开发的设计目标,而Spring框架就给我们提供了这样的一个IoC容器进行对象的的管理,一个由Spring IoC容器实例化、组装和管理的对象,我们称其为Bean。
第一个Spring程序
创建实体类:
@ToString
public class Student {
}
注册Bean:
<?xml version="1.0" encoding="UTF-8"?>
<beans xmlns="http://www.springframework.org/schema/beans"xmlns:xsi="http://www.w3.org/2001/XMLSchema-instance"xsi:schemaLocation="http://www.springframework.org/schema/beanshttps://www.springframework.org/schema/beans/spring-beans.xsd"><bean name="student" class="com.test.bean.Student"/>
</beans>
获取Bean对象:
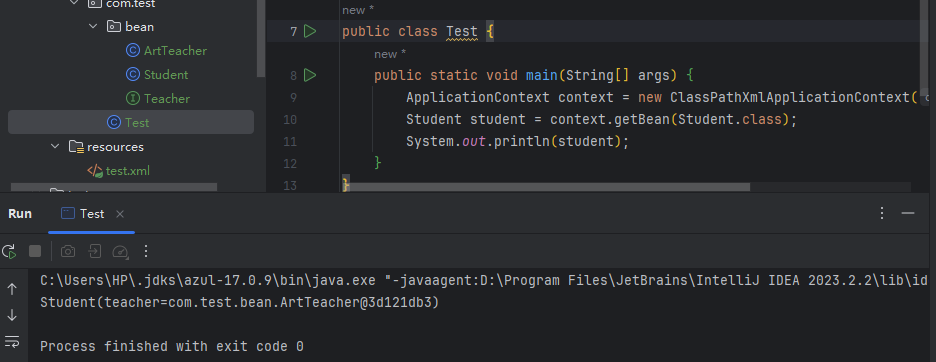
public class Test {public static void main(String[] args) {ApplicationContext context = new ClassPathXmlApplicationContext("test.xml");Student student = context.getBean(Student.class);System.out.println(student);}
}
这个对象不需要我们再去创建了,而是由IoC容器自动进行创建并提供,我们可以直接从上下文中获取到它为我们创建的对象,这里得到的Student对象是由Spring通过反射机制帮助我们创建的
Bean注册与配置
配置一个Bean,并指定对应的类:
<bean class="com.test.bean.Student"/>
据类型向容器索要Bean实例对象:
ApplicationContext context = new ClassPathXmlApplicationContext("test.xml");
//getBean有多种形式,其中第一种就是根据类型获取对应的Bean
//容器中只要注册了对应类的Bean或是对应类型子类的Bean,都可以获取到
Student student = context.getBean(Student.class);
为Bean指定一个名称用于区分:
<bean name="a" class="com.test.bean.Student"/>
<bean name="b" class="com.test.bean.Student"/>
<bean name="a" class="com.test.bean.Student"/>
<alias name="a" alias="test"/>#为Bean创建别名
默认情况下,通过IoC容器进行管理的Bean都是单例模式的,这个对象只会被创建一次。
对象作用域配置:
singleton,默认单例,全局唯一实例; prototype,原型模式,每次获取新的对象
当Bean的作用域为单例模式时,那么容器加载配置时就被创建,之后拿到的都是这个对象,容器没有被销毁,对象将一直存在;而原型模式下,只有在获取时才会被创建
单例模式下的Bean懒加载(获取时再加载):
<bean class="com.test.bean.Student" lazy-init="true"/>
维护Bean的加载顺序:
<bean name="teacher" class="com.test.bean.Teacher"/>
<bean name="student" class="com.test.bean.Student" depends-on="teacher"/>
xml配置文件是可以相互导入的:
<?xml version="1.0" encoding="UTF-8"?>
<beans ...><import resource="test.xml"/>
</beans>
依赖注入
依赖注入(Dependency Injection, DI)是一种设计模式,也是Spring框架的核心概念之一。
实体类需要其他实体类,创建时保证其他实体类也能进行动态加载。
public class Student {private Teacher teacher;//要使用依赖注入,我们必须提供一个set方法(无论成员变量的访问权限是什么)命名规则依然是驼峰命名法public void setTeacher(Teacher teacher) {this.teacher = teacher;}...
public interface Teacher {void teach();
}
public class ArtTeacher implements Teacher{@Overridepublic void teach() {System.out.println("我是美术老师,我教你画画!");}
}
public class ProgramTeacher implements Teacher{@Overridepublic void teach() {System.out.println("我是编程老师,我教你学Golang!");}
}
有了依赖注入之后,Student中的Teacher成员变量,可以由IoC容器来选择一个合适的Teacher对象进行赋值,也就是说,IoC容器在创建对象时,需要将我们预先给定的属性注入到对象中
使用property标签:
<bean name="teacher" class="com.test.bean.ProgramTeacher"/>
<bean name="student" class="com.test.bean.Student"><property name="teacher" ref="teacher"/>
</bean>
name指定成员对象名,ref指定依赖的Bean名称
依赖注入并不一定要注入其他的Bean,也可以是一个简单的值:
<bean name="student" class="com.test.bean.Student"><property name="name" value="卢本伟"/>
</bean>
在构造方法中去完成初始化:
public class Student {private final Teacher teacher; //构造方法中完成,所以说是一个final变量public Student(Teacher teacher){ //Teacher属性是在构造方法中完成的初始化this.teacher = teacher;}...
IoC容器默认只会调用无参构造,需要指明一个可以用的构造方法
constructor-arg标签:
<bean name="teacher" class="com.test.bean.ArtTeacher"/>
<bean name="student" class="com.test.bean.Student"><constructor-arg name="teacher" ref="teacher"/>
</bean>
constructor-arg就是构造方法的一个参数,这个参数可以写很多个,会自动匹配符合里面参数数量的构造方法
type指定参数的类型
<constructor-arg value="1" type="int"/>
其他特殊类型:
<bean name="student" class="com.test.bean.Student"><!--  对于集合类型,我们可以直接使用标签编辑集合的默认值  --><property name="list"><list><value>AAA</value><value>BBB</value><value>CCC</value></list></property>
</bean>
<bean name="student" class="com.test.bean.Student"><property name="map"><map><entry key="语文" value="100.0"/><entry key="数学" value="80.0"/><entry key="英语" value="92.5"/></map></property>
</bean>
自动装配
自动装配就是让IoC容器自己去寻找需要填入的值,只需要将set方法提供好就可以了
autowire属性有两个值普通,一个是byName,还有一个是byType,顾名思义,一个是根据类型去寻找合适的Bean自动装配,还有一个是根据名字去找,就不需要显式指定property了
<bean name="student" class="com.test.bean.Student" autowire="byType"/>
byName自动装配,依据的Name是setter方法的后缀和bean的name属性进行匹配:
public class Student {Teacher teacher;public void setArt(Teacher teacher) {this.teacher = teacher;}
}
<?xml version="1.0" encoding="UTF-8"?>
<beans xmlns="http://www.springframework.org/schema/beans"xmlns:xsi="http://www.w3.org/2001/XMLSchema-instance"xsi:schemaLocation="http://www.springframework.org/schema/beanshttps://www.springframework.org/schema/beans/spring-beans.xsd"><bean name="art" class="com.test.bean.ArtTeacher"/><bean name="student" class="com.test.bean.Student" autowire="byName"/>
</beans>
使用构造方法完成的依赖注入,也支持自动装配:
<bean name="student" class="com.test.bean.Student" autowire="constructor"/>
当自动装配发生歧义时:
Bean属性autowire-candidate设定false时,这个Bean将不再作为自动装配的候选Bean
Bean设定primary属性,当出现歧义时,也会优先选择
<bean name="teacher" class="com.test.bean.ArtTeacher" primary="true"/>
<bean name="teacher2" class="com.test.bean.ProgramTeacher" autowire-candidate="false"/>
<bean name="student" class="com.test.bean.Student" autowire="byType"/>
生命周期与继承
除了修改构造方法,我们也可以为Bean指定初始化方法和销毁方法,以便在对象创建和被销毁时执行一些其他的任务:
public void init(){System.out.println("我是对象初始化时要做的事情!");
}public void destroy(){System.out.println("我是对象销毁时要做的事情!");
}
通过init-method和destroy-method来指定:
<bean name="student" class="com.test.bean.Student" init-method="init" destroy-method="destroy"/>
如果Bean不是单例模式,而是采用的原型模式,那么就只会在获取时才创建,并调用init-method,而对应的销毁方法不会被调用(因此,对于原型模式下的Bean,Spring无法顾及其完整生命周期,而在单例模式下,Spring能够从Bean对象的创建一直管理到对象的销毁)
Bean之间也是继承属性的:
public class SportStudent {private String name;public void setName(String name) {this.name = name;}
}
public class ArtStudent {private String name;public void setName(String name) {this.name = name;}
}
配置Bean之间的继承关系了,我们可以让SportStudent这个Bean直接继承ArtStudent这个Bean配置的属性:
<bean name="artStudent" class="com.test.bean.ArtStudent"><property name="name" value="小明"/>
</bean>
<bean class="com.test.bean.SportStudent" parent="artStudent"/>
在ArtStudent Bean中配置的属性,会直接继承给SportStudent Bean(注意,所有配置的属性,在子Bean中必须也要存在,并且可以进行注入,否则会出现错误)
如果子类中某些属性比较特殊,也可以在继承的基础上单独配置:
<bean name="artStudent" class="com.test.bean.ArtStudent" abstract="true"><property name="name" value="小明"/><property name="id" value="1"/>
</bean>
<bean class="com.test.bean.SportStudent" parent="artStudent"><property name="id" value="2"/>
</bean>
只是希望某一个Bean仅作为一个配置模版供其他Bean继承使用,那么我们可以将其配置为abstract:
<bean name="artStudent" class="com.test.bean.ArtStudent" abstract="true"><property name="name" value="小明"/>
</bean>
<bean class="com.test.bean.SportStudent" parent="artStudent"/>
一旦声明为抽象Bean,那么就无法通过容器获取到其实例化对象了
全文Bean属性配置:
整个上下文中所有的Bean都采用某种配置,我们可以在最外层的beans标签中进行默认配置
即使Bean没有配置某项属性,但是只要在最外层编写了默认配置,那么同样会生效,除非Bean自己进行配置覆盖掉默认配置。
工厂模式和工厂Bean
正常情况下需要使用工厂才可以得到Student对象,现在我们希望Spring也这样做,不要直接去反射搞构造方法创建
public class Student {Student() {System.out.println("我被构造了");}
}
public class StudentFactory {public static Student getStudent(){System.out.println("欢迎光临电子厂");return new Student();}
}
通过factory-method进行指定:
<bean class="com.test.bean.StudentFactory" factory-method="getStudent"/>
public class Test {public static void main(String[] args) {ApplicationContext context = new ClassPathXmlApplicationContext("test.xml");Student student = context.getBean(Student.class);System.out.println(student);}
}
Bean类型需要填写为Student类的工厂类,并且添加factory-method指定对应的工厂方法
某些工厂类需要构造出对象之后才能使用:
public class StudentFactory {public Student getStudent(){System.out.println("欢迎光临电子厂");return new Student();}
}
将某个工厂类直接注册为工厂Bean,再使用factory-bean来指定Bean的工厂Bean
<bean name="studentFactory" class="com.test.bean.StudentFactory"/>
<bean factory-bean="studentFactory" factory-method="getStudent"/>
Student bean = (Student) context.getBean("studentFactory");
StudentFactory bean = (StudentFactory) context.getBean("&studentFactory");
注解开发
创建一个配置类:
@Configuration
public class MainConfiguration {
}
配置Bean:
@Configuration
public class MainConfiguration {@Bean("student")public Student student(){return new Student();}
}
获取Bean对象:
ApplicationContext context = new AnnotationConfigApplicationContext(MainConfiguration.class);
Student student = context.getBean(Student.class);
System.out.println(student);
其他属性配置:
@Bean(name = "", initMethod = "", destroyMethod = "", autowireCandidate = false)
public Student student(){return new Student();
}
@Bean
@Lazy(true)     //对应lazy-init属性
@Scope("prototype")    //对应scope属性
@DependsOn("teacher")    //对应depends-on属性
public Student student(){return new Student();
}
通过构造方法或是Setter完成依赖注入的Bean:
@Configuration
public class MainConfiguration {@Beanpublic Teacher teacher(){return new Teacher();}@Beanpublic Student student(Teacher teacher){return new Student(teacher);
//        return new Student().setTeacher(teacher);}
}
直接到Bean对应的类中使用自动装配:
public class Student {@Autowired   //使用此注解来进行自动装配,由IoC容器自动为其赋值private Teacher teacher;
}
甚至连构造方法和Setter都不需要去编写了,就能直接完成自动装配
@Autowired并不是只能用于字段,对于构造方法或是Setter,它同样可以:
public class Student {private Teacher teacher;@Autowiredpublic void setTeacher(Teacher teacher) {this.teacher = teacher;}
}
@Autowired默认采用byType的方式进行自动装配
发生歧义时配合@Qualifier进行名称匹配:
public class Student {@Autowired@Qualifier("a")   //匹配名称为a的Teacher类型的Beanprivate Teacher teacher;
}
@Resource,它的作用与@Autowired时相同的,也可以实现自动装配,但是在IDEA中并不推荐使用@Autowired注解对成员字段进行自动装配,而是推荐使用@Resource,如果需要使用这个注解,还需要额外导入包:
<dependency><groupId>jakarta.annotation</groupId><artifactId>jakarta.annotation-api</artifactId><version>2.1.1</version>
</dependency>
- @Resource默认ByName如果找不到则ByType,可以添加到set方法、字段上。
- @Autowired默认是byType,只会根据类型寻找,可以添加在构造方法、set方法、字段、方法参数上。
@PostConstruct和@PreDestroy,它们效果和init-method和destroy-method是一样的:
@PostConstruct
public void init(){System.out.println("我是初始化方法");
}@PreDestroy
public void destroy(){System.out.println("我是销毁方法");
}
使用@Bean来注册Bean,只是简单将一个类作为Bean的话,就是单纯的new一个对象出来,不能像之前一样让容器自己反射获取构造方法去生成这个对象
@Component注册Bean:
@Component("lbwnb")   //同样可以自己起名字
public class Student {}
配置一下包扫描:
@Configuration
@ComponentScan("com.test.bean")   //包扫描,这样Spring就会去扫描对应包下所有的类
public class MainConfiguration {}
Spring在扫描对应包下所有的类时,会自动将那些添加了@Component的类注册为Bean
无论是通过@Bean还是@Component形式注册的Bean,Spring都会为其添加一个默认的name属性
@Component默认名称生产规则依然是类名并按照首字母小写的驼峰命名法来的
@Component
public class Student {
}
Student student = (Student) context.getBean("student");   //这样同样可以获取到
System.out.println(student);
@Bean注册的默认名称是对应的方法名称
@Bean
public Student artStudent(){return new Student();
}
Student student = (Student) context.getBean("artStudent");
System.out.println(student);
@Component注册的Bean,如果其构造方法不是默认无参构造,那么默认会对其每一个参数都进行自动注入:
Spring也提供了接口,我们可以直接实现接口表示这个Bean是一个工厂Bean:
@Component
public class StudentFactory implements FactoryBean<Student> {@Overridepublic Student getObject() {   //生产的Bean对象return new Student();}@Overridepublic Class<?> getObjectType() {   //生产的Bean类型return Student.class;}@Overridepublic boolean isSingleton() {   //生产的Bean是否采用单例模式return false;}
}
AOP面向切片
AOP(Aspect Oriented Programming)思想实际上就是:在运行时,动态地将代码切入到类的指定方法、指定位置上。
可以使用AOP来帮助我们在方法执行前或执行之后,做一些额外的操作,实际上,它就是代理。
通过AOP我们可以在保证原有业务不变的情况下,,在不改变源代码的基础上进行了增强处理。
aop环境建立:
<?xml version="1.0" encoding="UTF-8"?>
<beans xmlns="http://www.springframework.org/schema/beans"xmlns:xsi="http://www.w3.org/2001/XMLSchema-instance"xmlns:aop="http://www.springframework.org/schema/aop"xsi:schemaLocation="http://www.springframework.org/schema/beans http://www.springframework.org/schema/beans/spring-beans.xsdhttp://www.springframework.org/schema/aop http://www.springframework.org/schema/aop/spring-aop.xsd">
</beans>
<dependency><groupId>org.springframework</groupId><artifactId>spring-aspects</artifactId><version>6.0.10</version>
</dependency>
配置实现AOP
实体类:
public class Student {public void study(){System.out.println("狠狠的学Java");}
}
代理类:
public class StudentAOP {public void afterStudy(){System.out.println("hahahaha");}
}
Bean注册:
<bean class="com.test.entity.Student"/><bean id="studentAop" class="com.test.entity.StudentAOP"/><aop:config><aop:pointcut id="test" expression="execution(public void com.test.entity.Student.study())"/><aop:aspect ref="studentAop"><aop:after method="afterStudy" pointcut-ref="test"/></aop:aspect></aop:config>
调用效果:
public class Main {public static void main(String[] args) {ApplicationContext context = new ClassPathXmlApplicationContext("test.xml");Student bean = context.getBean(Student.class);bean.study();}
}

说明:
实体和代理类都得注册为Bean,然后进行aop配置
添加一个新的切点,首先填写ID,再通过后面的expression表达式来选择到我们需要切入的方法
Spring AOP支持以下AspectJ切点指示器(PCD)用于表达式:
execution:用于匹配方法执行连接点。这是使用Spring AOP时使用的主要点切割指示器。within:限制匹配到某些类型的连接点(使用Spring AOP时在匹配类型中声明的方法的执行)。this:限制与连接点匹配(使用Spring AOP时方法的执行),其中bean引用(Spring AOP代理)是给定类型的实例。target:限制匹配连接点(使用Spring AOP时方法的执行),其中目标对象(正在代理的应用程序对象)是给定类型的实例。args:限制与连接点匹配(使用Spring AOP时方法的执行),其中参数是给定类型的实例。@target:限制匹配连接点(使用Spring AOP时方法的执行),其中执行对象的类具有给定类型的注释。@args:限制匹配到连接点(使用Spring AOP时方法的执行),其中传递的实际参数的运行时类型具有给定类型的注释。@within:限制与具有给定注释的类型中的连接点匹配(使用Spring AOP时在带有给定注释的类型中声明的方法的执行)。@annotation:与连接点主体(在Spring AOP中运行的方法)具有给定注释的连接点匹配的限制。
execution填写格式如下:
修饰符 包名.类名.方法名称(方法参数)
- 修饰符:public、protected、private、包括返回值类型、static等等(使用*代表任意修饰符)
- 包名:如com.test(* 代表全部,比如com.*代表com包下的全部包)
- 类名:使用*也可以代表包下的所有类
- 方法名称:可以使用*代表全部方法
- 方法参数:填写对应的参数即可,比如(String, String),也可以使用*来代表任意一个参数,使用…代表所有参数。
添加aop:aspect标签,并使用ref属性将其指向我们刚刚注册的AOP类Bean
添加后续动作了,当然,官方支持的有多种多样的,比如执行前、执行后、抛出异常后、方法返回后等等
Spring通过CGLib为我们生成的动态代理类,使得调用方法会直接得到增强
JoinPoint信息获取:
对于切入的方法添加一个JoinPoint参数,通过此参数就可以快速获取切点位置的一些信息:
public class Student {public void study(String str){System.out.println("狠狠的学"+str);}
}
public class StudentAOP {public void afterStudy(JoinPoint point){System.out.println("hahahaha"+point.getArgs()[0]+"无敌");}
}
public class Main {public static void main(String[] args) {ApplicationContext context = new ClassPathXmlApplicationContext("test.xml");Student bean = context.getBean(Student.class);bean.study("java");}
}
<aop:pointcut id="test" expression="execution(public void com.test.entity.Student.study(String))"/>//指定具体参数类型
<aop:pointcut id="test" expression="execution(public void com.test.entity.Student.study(..))"/>//模糊代指
环绕方法:
环绕方法相当于完全代理了此方法,它完全将此方法包含在中间,需要我们手动调用才可以执行此方法,并且我们可以直接获取更多的参数
通过proceed方法来执行代理的方法,也可以修改参数之后调用proceed(Object[]),在调用之后对返回值结果也进行处理
public Object around(ProceedingJoinPoint joinPoint) throws Throwable {System.out.println("before");String arg = joinPoint.getArgs()[0]+"666";Object ret = joinPoint.proceed(new Object[]{arg});System.out.println("after");return ret;}
<aop:aspect ref="studentAop"><aop:around method="around" pointcut-ref="test"/></aop:aspect>

AOP 领域中的特性术语:
- 通知(Advice): AOP 框架中的增强处理,通知描述了切面何时执行以及如何执行增强处理,也就是我们上面编写的方法实现。
- 连接点(join point): 连接点表示应用执行过程中能够插入切面的一个点,这个点可以是方法的调用、异常的抛出,实际上就是我们在方法执行前或是执行后需要做的内容。
- 切点(PointCut): 可以插入增强处理的连接点,可以是方法执行之前也可以方法执行之后,还可以是抛出异常之类的。
- 切面(Aspect): 切面是通知和切点的结合,我们之前在xml中定义的就是切面,包括很多信息。
- 引入(Introduction):引入允许我们向现有的类添加新的方法或者属性。
- 织入(Weaving): 将增强处理添加到目标对象中,并创建一个被增强的对象,我们之前都是在将我们的增强处理添加到目标对象,也就是织入
接口实现AOP
将一个类实现Advice接口,只有实现此接口,才可以被通知
使用MethodBeforeAdvice表示是一个在方法执行之前的动作;AfterReturningAdvice就需要实现一个方法执行之后的操作
public class StudentAOP implements MethodBeforeAdvice, AfterReturningAdvice {@Overridepublic void before(Method method, Object[] args, Object target) throws Throwable {System.out.println("before:");}@Overridepublic void afterReturning(Object returnValue, Method method, Object[] args, Object target) throws Throwable {System.out.println("after-return");}
}
<aop:advisor advice-ref="studentAop" pointcut-ref="test"/>
使用MethodInterceptor(同样也是Advice的子接口)进行更加环绕那样的自定义的增强
public class StudentAOP implements MethodInterceptor {@Overridepublic Object invoke(MethodInvocation invocation) throws Throwable {System.out.println("haha");Object ret = invocation.proceed();System.out.println("wuwu");return ret;}
}
注解实现AOP
实体类:
@Component//注册为Bean
public class Student {public void study(String str){System.out.println("狠狠的学"+str);}
}
代理类:
@Aspect//声明为切面
@Component//注册为Bean
public class StudentAOP {@Before("execution(* com.test.entity.Student.study(..))")public void before(JoinPoint point){System.out.println("before");System.out.println("args:"+Arrays.toString(point.getArgs()));}@After(value = "execution(* com.test.entity.Student.study(..)) && args(str)",argNames = "str")//命名绑定模式就是根据下面的方法参数列表进行匹配
//这里args指明参数,注意需要跟原方法保持一致,然后在argNames中指明public void after(String str){//获取指定参数System.out.println("get arg str:" + str);System.out.println("after");}
}
配置类:
@EnableAspectJAutoProxy//开启aop代理
@ComponentScan("com.test.entity")//扫描bean实体类
@Configuration//声明配置类
public class MainConfiguration {}
调用:
public class Main {public static void main(String[] args) {ApplicationContext context = new AnnotationConfigApplicationContext(MainConfiguration.class);Student bean = context.getBean(Student.class);bean.study("java");}
}
除了@Before,还有很多可以直接使用的注解,比如@AfterReturning、@AfterThrowing等
环绕注解:
@Around("execution(* com.test.bean.Student.test(..))")
public Object around(ProceedingJoinPoint point) throws Throwable {System.out.println("方法执行之前!");Object val = point.proceed();System.out.println("方法执行之后!");return val;
}
void after(String str){//获取指定参数
System.out.println(“get arg str:” + str);
System.out.println(“after”);
}
}
配置类:~~~java
@EnableAspectJAutoProxy//开启aop代理
@ComponentScan("com.test.entity")//扫描bean实体类
@Configuration//声明配置类
public class MainConfiguration {}
调用:
public class Main {public static void main(String[] args) {ApplicationContext context = new AnnotationConfigApplicationContext(MainConfiguration.class);Student bean = context.getBean(Student.class);bean.study("java");}
}
除了@Before,还有很多可以直接使用的注解,比如@AfterReturning、@AfterThrowing等
环绕注解:
@Around("execution(* com.test.bean.Student.test(..))")
public Object around(ProceedingJoinPoint point) throws Throwable {System.out.println("方法执行之前!");Object val = point.proceed();System.out.println("方法执行之后!");return val;
}

