目录
- 使用接口
- 界面效果
- 界面设计
- 界面逻辑设计
使用接口
微信小程序官方开发文档
| 接口 | 说明 |
|---|---|
wx.openBluetoothAdapter | 初始化蓝牙模块 |
wx.closeBluetoothAdapter | 关闭蓝牙模块(调用该方法将断开所有已建立的连接并释放系统资源) |
wx.startBluetoothDevicesDiscovery | 开始搜寻附近的蓝牙外围设备 |
wx.stopBluetoothDevicesDiscovery | 停止搜寻附近的蓝牙外围设备。若已经找到需要的蓝牙设备并不需要继续搜索时,建议调用该接口停止蓝牙搜索 |
wx.onBluetoothDeviceFound | 监听搜索到新设备的事件 |
wx.createBLEConnection | 连接蓝牙低功耗设备 |
wx.closeBLEConnection | 断开与蓝牙低功耗设备的连接 |
wx.getBLEDeviceServices | 获取蓝牙低功耗设备所有服务 |
wx.getBLEDeviceCharacteristics | 获取蓝牙低功耗设备某个服务中所有特征 (characteristic) |
wx.readBLECharacteristicValue | 读取蓝牙低功耗设备特征值的二进制数据 |
wx.writeBLECharacteristicValue | 向蓝牙低功耗设备特征值中写入二进制数据 |
wx.showToast | 显示消息提示框 |
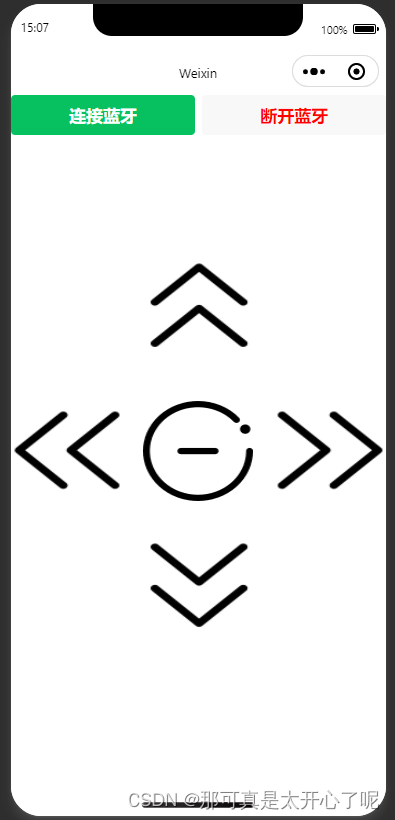
界面效果
图片素材库地址
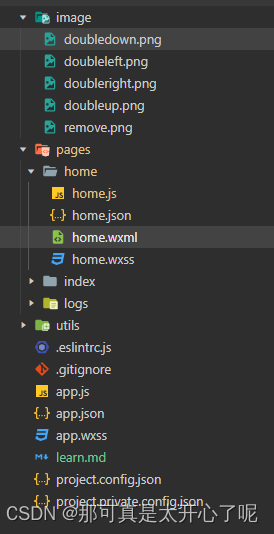
项目目录列表
界面设计
- 在
app.json中添加一个新页面"pages/home/home"
{"pages":["pages/home/home","pages/index/index","pages/logs/logs"],"window":{"backgroundTextStyle":"light","navigationBarBackgroundColor": "#fff","navigationBarTitleText": "Weixin","navigationBarTextStyle":"black"},"style": "v2","sitemapLocation": "sitemap.json"
}- 设计界面
home.wxml
<!--pages/home/home.wxml-->
<button type="primary" class = "connectBLE" bindtap = "openBluetoothAdapter">连接蓝牙</button>
<button class = "disconnectBLE" bindtap = "closeBluetoothAdapter">断开蓝牙</button>  <button class="custom-button" style="bottom: -395px" bindtap = "btnClickDown"><image class="button-image" src="/image/doubledown.png"></image>
</button><button class="custom-button" style="bottom: -15px" bindtap = "btnClickUp"><image class="button-image" src="/image/doubleup.png"></image>
</button><view><button class="custom-button" style="bottom: -60px; left: -35%" bindtap = "btnClickLeft"><image class="button-image-1" src="/image/doubleleft.png"></image></button>
</view><view><button class="custom-button" style="bottom: 40px; left: 35%" bindtap = "btnClickRight"><image class="button-image-1" src="/image/doubleright.png"></image></button>
</view><view><button class="custom-button" style="bottom: 134px; left: 0%" bindtap = "btnClickStop"><image class="button-image-2" src="/image/remove.png"></image></button>
</view>
- 画面渲染
home.wxss
/* pages/home/home.wxss */
.connectBLE {width: 49% !important;float: left;font-size: 100;
}.disconnectBLE {width: 49% !important;float: right;font-size: 100;color: red;
}.custom-button {position: relative;width: 100px;height: 100px;border: none;padding: 0;overflow: hidden;background: transparent;   /*设置背景颜色一致*/border-color: transparent; /*设置边框颜色一致*/
}.button-image {object-fit: contain;width: 75%;height: 110%;
}.button-image-1 {object-fit: contain;width: 75%;height: 110%;
}.button-image-2 {object-fit: contain;width: 60%;height: 100%;
}
界面逻辑设计
连接的目标蓝牙名称为ESP_SPP_SERVER
// pages/home/home.js
Page({/*** 页面的初始数据*/data: {connected: false,serviceId: "",},//蓝牙初始化openBluetoothAdapter() {if(this.data.connected){return}wx.openBluetoothAdapter({success: (res) => {console.log('bluetooth initialization success', res)this.startBluetoothDevicesDiscovery()},fail: (err) => {wx.showToast({title: '蓝牙适配器初始化失败',icon: 'none'})return}})},//关闭蓝牙初始化closeBluetoothAdapter() {wx.closeBluetoothAdapter({success: (res) => {console.log('bluetooth deinitialization success', res)},fail: (err) => {wx.showToast({title: '蓝牙适配器解初始化失败',icon: 'none'})return}})},//开始搜寻附近的蓝牙外围设备startBluetoothDevicesDiscovery() {wx.startBluetoothDevicesDiscovery({success: (res) => {console.log('startBluetoothDevicesDiscovery success', res)this.onBluetoothDeviceFound()},fail: (err) => {wx.showToast({title: '蓝牙适配器解初始化失败',icon: 'none'})return}})},//监听搜索到新设备的事件onBluetoothDeviceFound() {let found_device = falseconst timer = setTimeout(() => {if (!found_device) {console.error('未找到设备');wx.showToast({title: '未找到设备',icon: 'none'})}}, 2000); // 设置定时器为10秒wx.onBluetoothDeviceFound((res) => {res.devices.forEach(device => {if (device.name === 'ESP_SPP_SERVER') {console.log('find target device')found_device = true; // 找到目标设备,将标志变量设置为已找到clearTimeout(timer); // 取消定时器this.createBLEConnection(device.deviceId)}});});},//连接蓝牙低功耗设备createBLEConnection(deviceId) {wx.createBLEConnection({deviceId,success:() => {this.setData({connected: true,})console.log('connect device success')this.getBLEDeviceServices(deviceId)wx.stopBluetoothDevicesDiscovery()},fail:(err) => {wx.showToast({title: '建立蓝牙连接失败',icon: 'none'})}})},//获取蓝牙低功耗设备所有服务getBLEDeviceServices(deviceId) {wx.getBLEDeviceServices({deviceId,success:(res) => {for (let i = 0; i < res.services.length; i++) {if(res.services[i].isPrimary) {this.getBLEDeviceCharacteristics(deviceId, res.services[i].uuid)return}}},fail:(res) => {console.log('getBLEDeviceServices fail', res.errMsg)}})},//获取蓝牙低功耗设备某个服务中所有特征getBLEDeviceCharacteristics(deviceId, serviceId) {wx.getBLEDeviceCharacteristics({deviceId,serviceId,success: (res) => {for (let i = 0; i < res.characteristics.length; i++) {let item = res.characteristics[i]if(item.properties.read) {wx.readBLECharacteristicValue({deviceId,serviceId,characteristicId: item.uuid,})}if(item.properties.write){this._deviceId = deviceIdthis._serviceId = serviceIdthis._characteristicId = item.uuid}}},fail:(res) => {console.log('get characteristicId fail', res.errMsg)}})},//关闭蓝牙服务closeBluetoothAdapter() {wx.closeBLEConnection({deviceId: this._deviceId,success: (res) => {console.log('disconnect success')},fail: (res) => {console.log('disconnect fail',res.errMsg)}})wx.closeBluetoothAdapter({success: (res) => {console.log('close success')},fail: (res) => {console.log('close fail',res.errMsg)}})this.data.connected = falseconsole.log('close connection')},btnClickDown() {this.tipsBluetoothWarn()this.writeBluetoothValue('down')console.log('click down')},btnClickUp() {this.tipsBluetoothWarn()this.writeBluetoothValue('up')console.log('click up')},btnClickLeft() {this.tipsBluetoothWarn()this.writeBluetoothValue('left')console.log('click left')},btnClickRight() {this.tipsBluetoothWarn()this.writeBluetoothValue('right')console.log('click right')},btnClickStop() {this.tipsBluetoothWarn()this.writeBluetoothValue('stop')console.log('click stop')},tipsBluetoothWarn(){if(!this.data.connected){wx.showToast({title: '蓝牙未连接',icon: 'none'})}},writeBluetoothValue(value) {if(!this.data.connected){return}const buffer = new ArrayBuffer(value.length)const dataView = new DataView(buffer)for (let i = 0; i < value.length; i++) {dataView.setUint8(i, value.charCodeAt(i))}wx.writeBLECharacteristicValue({deviceId: this._deviceId,serviceId: this._serviceId,characteristicId: this._characteristicId,value: buffer,success (res) {console.log('writeBLECharacteristicValue success', res.errMsg)},fail (res) {console.log('writeBLECharacteristicValue fail', res.errMsg, res.errCode)}})},/*** 生命周期函数--监听页面加载*/onLoad(options) {},
})
20231113 优化改成按下车动,松开车停
- 修改文件
home.wxml
<!--pages/home/home.wxml-->
<button type="primary" class = "connectBLE" bindtap = "openBluetoothAdapter">连接蓝牙</button>
<button class = "disconnectBLE" bindtap = "closeBluetoothAdapter">断开蓝牙</button>  <button class="custom-button" style="bottom: -395px" bindtouchstart = "btnClickDown" bindtouchend = "btnClickStop"><image class="button-image" src="/image/doubledown.png"></image>
</button><button class="custom-button" style="bottom: -15px" bindtouchstart = "btnClickUp" bindtouchend = "btnClickStop"><image class="button-image" src="/image/doubleup.png"></image>
</button><view><button class="custom-button" style="bottom: -60px; left: -35%" bindtouchstart = "btnClickLeft" bindtouchend = "btnClickStop"><image class="button-image-1" src="/image/doubleleft.png"></image></button>
</view><view><button class="custom-button" style="bottom: 40px; left: 35%" bindtouchstart = "btnClickRight" bindtouchend = "btnClickStop"><image class="button-image-1" src="/image/doubleright.png"></image></button>
</view><view><button class="custom-button" style="bottom: 134px; left: 0%" bindtap = "btnClickStop"><image class="button-image-2" src="/image/remove.png"></image></button>
</view>