目录
一、生产者消费者模型的优点
二、基于BlockingQueue的生产者消费者模型
1、BlockingQueue
2、C++ queue模拟阻塞队列的生产消费模型
3、POSIX信号量
3.1、信号量接口
三、基于环形队列的生产消费模型
1、模型说明
2、代码实现
3、互斥锁与信号量
一、生产者消费者模型的优点
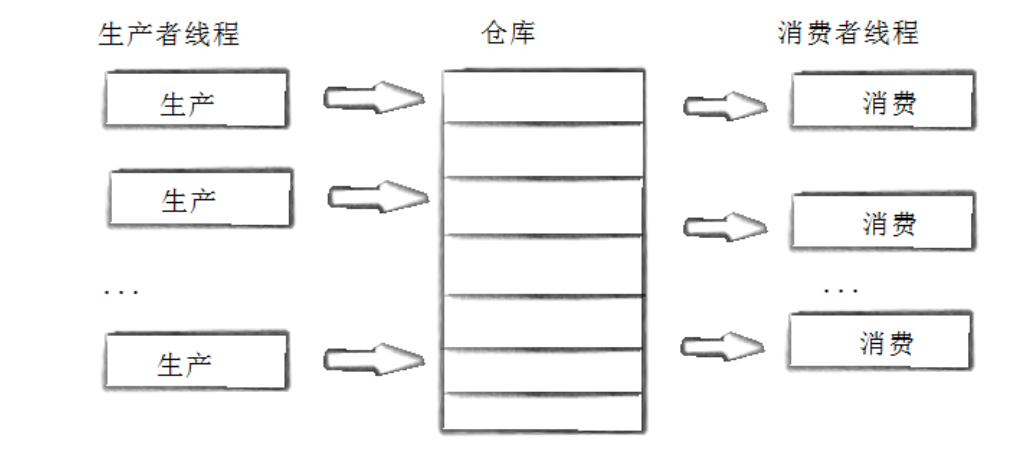
生产者消费者模式就是通过一个容器来解决生产者和消费者的强耦合问题。
生产者和消费者彼此之间不直接通讯,而通过阻塞队列来进行通讯,所以生产者生产完数据之后不用等待消费者处理,直接扔给阻塞队列,消费者不找生产者要数据,而是直接从阻塞队列里取,阻塞队列就相当于一个缓冲区,平衡了生产者和消费者的处理能力。这个阻塞队列就是用来给生产者和消费者解耦的。
生产者消费者模型优点:
- 解耦
- 支持并发
- 支持忙闲不均
- 高效:体现在生产者获取数据时,消费者可以从“仓库”中读取数据。消费者在处理数据时,生产者可以向“仓库”存放数据。互不影响。
在生产者消费者模型中,存在如下几个概念:
- 3种关系:
生产者与生产者之间:互斥关系
消费者与消费者之间:互斥关系
生产者与消费者之间:同步关系和互斥关系 - 2种角色:
生产者和消费者 - 1个交易场所:
通常是缓冲区
二、基于BlockingQueue的生产者消费者模型
1、BlockingQueue
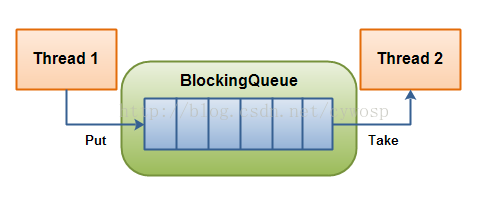
在多线程编程中阻塞队列(Blocking Queue)是一种常用于实现生产者和消费者模型的数据结构。其与普通的队列区别在于,当队列为空时,从队列获取元素的操作将会被阻塞,直到队列中被放入了元素;当队列满时,往队列里存放元素的操作也会被阻塞,直到有元素被从队列中取出。(以上的操作都是基于不同的线程来说的,线程在对阻塞队列进程操作时会被阻塞)
2、C++ queue模拟阻塞队列的生产消费模型
模拟单消费者单生产者模型的C++代码如下:
//BlockQueue.hpp
#pragma once#include <iostream>
#include <queue>
#include <pthread.h>
using namespace std;const int gcap = 5;template<class T>
class BlockQueue
{
public:BlockQueue(const int cap = gcap):_cap(cap){pthread_mutex_init(&_mutex, nullptr);pthread_cond_init(&_consumerCond, nullptr);pthread_cond_init(&_productorCond, nullptr);}bool isFull() { return _q.size() == _cap; }bool isEmpty() { return _q.size() == 0; }void push(const T& in){pthread_mutex_lock(&_mutex);//细节1:一定要保证,在任何时候,都是符合条件,才进行生产//为了防止误唤醒的操作,这里选择使用while判断,而不是if判断while(isFull()) //1.我们只能在临界区内部,判断临界资源是否就绪,这注定了我们当前一定是持有锁的{            //2.要让线程休眠等待,就不能持有锁等待//  所以phread_cond_wait函数要有锁的释放的能力pthread_cond_wait(&_productorCond, &_mutex);//3.休眠后,再醒来时,需要从临界区内部继续运行,因为线程是在临界区被切走的//4.所以当线程被唤醒时,继续从pthread_cond_wait函数向后运行,又要重新申请锁,申请成功才会彻底返回}// 没满_q.push(in);// 唤醒函数放在释放锁的前后都可以。因为唤醒另一个线程时,另一个线程会在申请锁的地方阻塞住等待pthread_cond_signal(&_consumerCond);pthread_mutex_unlock(&_mutex);}void pop(T* out){pthread_mutex_lock(&_mutex);//为了防止误唤醒,使用while进行判断while(isEmpty()){pthread_cond_wait(&_consumerCond, &_mutex);}*out = _q.front();_q.pop();pthread_cond_signal(&_productorCond);pthread_mutex_unlock(&_mutex);}~BlockQueue(){pthread_mutex_destroy(&_mutex);pthread_cond_destroy(&_consumerCond);pthread_cond_destroy(&_productorCond);}
private:queue<T> _q;int _cap;pthread_mutex_t _mutex; //访问同一个队列,所以只需要一把锁pthread_cond_t _consumerCond;  //消费者对应的条件变量,空,waitpthread_cond_t _productorCond; //生产者对应的条件变量,满,wait
}; //main.cc
#include "blockQueue.hpp"
#include <pthread.h>
#include <unistd.h>
#include <ctime>void* consumer(void* args)
{BlockQueue<int>* bq = static_cast<BlockQueue<int>*>(args);while(1){sleep(1);//1.从blockqueue中获取数据int data = 0;bq->pop(&data);//2.结合某种业务逻辑,处理数据cout << "consumer data: " << data << endl;}
}void* productor(void* args)
{BlockQueue<int>* bq = static_cast<BlockQueue<int>*>(args);while(1){//1.先通过某种渠道获取数据int data = rand() % 10 + 1;//2.将数据推送到blockqueue,完成生产过程bq->push(data);cout << "productor data: " << data << endl;}
}int main()
{srand((uint64_t)time(nullptr) ^ getpid());BlockQueue<int>* bq = new BlockQueue<int>();//单生产单消费pthread_t c, p;pthread_create(&c, nullptr, consumer, bq);pthread_create(&p, nullptr, productor, bq);pthread_join(c, nullptr);pthread_join(p, nullptr);delete bq;return 0;
}
阻塞队列不是只能放整数、字符串等数据类型的,也可以放对象。
下面是阻塞队列中存放任务的模拟实现代码:
//task.hpp
#pragma once
#include <iostream>
#include <string>class Task
{
public:Task(){}Task(int x, int y, int op): _x(x), _y(y), _op(op), _result(0), _exitCode(0){}void operator()(){switch (_op){case '+':_result = _x + _y;break;case '-':_result = _x - _y;break;case '*':_result = _x * _y;break;case '/':{if (_y == 0)_exitCode = -1;else_result = _x / _y;}break;case '%':{if (_y == 0)_exitCode = -2;else_result = _x % _y;}break;default:break;}}std::string formatArg(){return std::to_string(_x) + _op + std::to_string(_y) + '=';}std::string formatRes(){return std::to_string(_result) + "(" + std::to_string(_exitCode) + ")";}~Task(){}private:int _x;int _y;char _op;int _result;int _exitCode;
};//main.cc
#include "blockQueue.hpp"
#include "task.hpp"
#include <pthread.h>
#include <unistd.h>
#include <ctime>void* consumer(void* args)
{BlockQueue<Task>* bq = static_cast<BlockQueue<Task>*>(args);while(1){//1.从blockqueue中获取数据Task t;bq->pop(&t);t();//2.结合某种业务逻辑,处理数据cout << "consumer data: " << t.formatArg() << t.formatRes() << endl;}
}void* productor(void* args)
{BlockQueue<Task>* bq = static_cast<BlockQueue<Task>*>(args);string opers = "+-*/%";while(1){sleep(1);//1.先通过某种渠道获取数据int x = rand() % 20 + 1;int y = rand() % 10 + 1;char op = opers[rand() % opers.size()];//2.将数据推送到blockqueue,完成生产过程Task t(x, y, op);bq->push(t);cout << "productor Task: " << t.formatArg() << " ? " << endl;}
}int main()
{srand((uint64_t)time(nullptr) ^ getpid());BlockQueue<Task>* bq = new BlockQueue<Task>();//单生产单消费pthread_t c, p;pthread_create(&c, nullptr, consumer, bq);pthread_create(&p, nullptr, productor, bq);pthread_join(c, nullptr);pthread_join(p, nullptr);delete bq;return 0;
}
实际上,虽然我们模拟实现的是单生产者,单消费者的模型,但是上面的代码是可以直接承载多生产者多消费者的模型的,因为所有的生产和消费使用的都是同一把锁,根本原因在于,生产和消费访问的是同一个queue,queue被当作整体使用。
3、POSIX信号量
POSIX信号量和SystemV信号量作用相同,都是用于同步操作,达到无冲突的访问共享资源目的。 但POSIX可以用于线程间同步。
信号量本质是一个计数器,用于描述临界资源中资源数目。每一个线程,在访问对应的资源时,先申请信号量,申请成功,表示该线程在以后的某个时刻被允许使用该资源,否则不允许。信号量的工作机制是一种资源预定机制。
3.1、信号量接口
初始化信号量:
#include <semaphore.h>
int sem_init(sem_t *sem, int pshared, unsigned int value);
参数:
pshared:0表示线程间共享,非零表示进程间共享
value:信号量初始值
销毁信号量:
int sem_destroy(sem_t *sem);等待信号量:
功能:等待信号量,会将信号量的值减1
int sem_wait(sem_t *sem); //P()
发布信号量:
功能:发布信号量,表示资源使用完毕,可以归还资源了。将信号量值加1。
int sem_post(sem_t *sem);//V()
下面基于环形队列的生产消费模型,使用POSIX信号量重写上面的模型代码。
三、基于环形队列的生产消费模型
1、模型说明
环形队列采用数组模拟,用模运算来模拟环状特性:
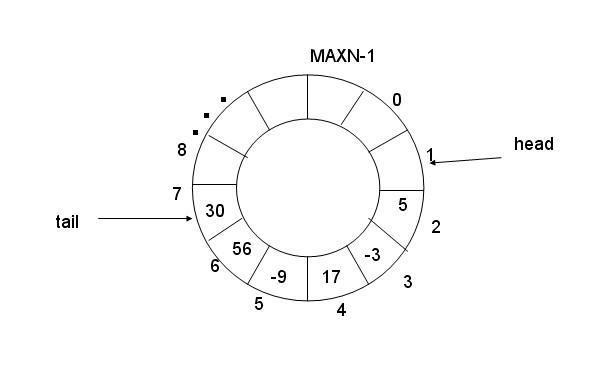
环形结构起始状态和结束状态都是一样的,不好判断为空或者为满,所以可以通过加计数器或者标记位来判断满或者空。另外也可以预留一个空的位置,作为满的状态:
我们现在有信号量这个计数器,就很简单的进行多线程间的同步过程。
需要注意的问题:
- 生产者与消费者关心的“资源”不同。生产者关心空间,消费者关心数据。
- 只要信号量不为0,就表示资源可用,表示线程可访问
- 只要访问环形队列不同的区域,生产和消费就可以同时进行。
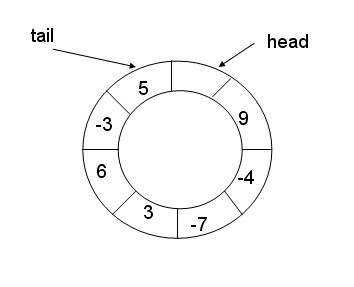
- 只有当队列为空或者为满时,生产者与消费者才会访问同一个位置。
当队列为空时,让生产者先动。
当队列为满时,让消费者先动。
2、代码实现
使用POSIX信号量来实现该模型。生产者关心的是空间资源,设置信号量初始值为 N ,消费者关心的资源是数据,设置信号量初始值为 0 。
下面是单生产单消费模型代码:
//RingQueue.hpp
#pragma once#include <iostream>
#include <vector>
#include <semaphore.h>using namespace std;static const int N = 5;template<class T>
class RingQueue
{
public:RingQueue(int num = N):_ring(num),_cap(num),_c_step(0),_p_step(0){sem_init(&_data_sem, 0, 0);sem_init(&_space_sem, 0, num);}void push(const T& in){//生产P(_space_sem);//一定拿到了对应的空间资源!不用再做判断//确定拿到了哪一个资源_ring[_p_step++] = in;_p_step %= _cap;V(_data_sem);}void pop(T* out){//消费P(_data_sem);*out = _ring[_c_step++];_c_step %= _cap;V(_space_sem);}~RingQueue(){sem_destroy(&_data_sem);sem_destroy(&_space_sem);}private:void P(sem_t& s){sem_wait(&s);}void V(sem_t& s){sem_post(&s);}private:std::vector<T> _ring;int _cap; //环形队列的容量sem_t _data_sem; //只有消费者关心sem_t _space_sem; //只有生产者关心int _c_step; //消费位置int _p_step; //生产位置
};//task.hpp
#pragma once
#include <iostream>
#include <string>
#include <unistd.h>class Task
{
public:Task(){}Task(int x, int y, int op): _x(x), _y(y), _op(op), _result(0), _exitCode(0){}void operator()(){switch (_op){case '+':_result = _x + _y;break;case '-':_result = _x - _y;break;case '*':_result = _x * _y;break;case '/':{if (_y == 0)_exitCode = -1;else_result = _x / _y;}break;case '%':{if (_y == 0)_exitCode = -2;else_result = _x % _y;}break;default:break;}usleep(100000);}std::string formatArg(){return std::to_string(_x) + _op + std::to_string(_y) + "= ?";}std::string formatRes(){return std::to_string(_result) + "(" + std::to_string(_exitCode) + ")";}~Task(){}private:int _x;int _y;char _op;int _result;int _exitCode;
};//main.cc
#include "RingQueue.hpp"
#include "task.hpp"
#include <time.h>
#include <pthread.h>
#include <memory>
#include <sys/types.h>
#include <unistd.h>
#include <cstring>const char* ops = "+-*/%";void* consumerRoutine(void* args)
{RingQueue<Task>* rq = static_cast<RingQueue<Task>*>(args);while(true){Task t;rq->pop(&t);t();cout << "consumer done: " << t.formatRes() << endl;sleep(1); }
}void* productorRoutine(void* args)
{RingQueue<Task>* rq = static_cast<RingQueue<Task>*>(args);while(true){int x = rand() % 100;int y = rand() % 100;char op = ops[(x + y) % strlen(ops)];Task t(x, y, op);rq->push(t);cout << "productor done: " << t.formatArg() << endl;}
}int main()
{srand(time(nullptr) ^ getpid());RingQueue<Task>* rq = new RingQueue<Task>();//单生产,单消费pthread_t c, p;pthread_create(&c, nullptr, consumerRoutine, rq);pthread_create(&p, nullptr, productorRoutine, rq);pthread_join(c, nullptr);pthread_join(p, nullptr);delete rq;return 0;
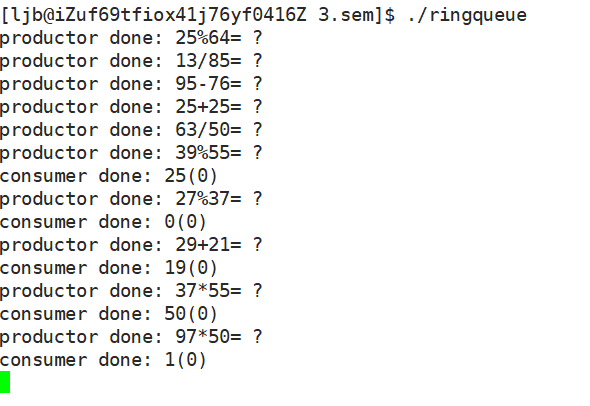
}运行观察结果:
如果要实现多生产、多消费的模型,需要修改代码。其中修改的本质是维护多生产与多消费之间的关系。
为了保证消费者与消费者之间、生产者与生产者之间的原子性,我们需要进行加锁操作。
注意:这里是信号量与锁配合使用,应该先申请信号量,再申请锁。这是因为:
- 如果先申请锁,那么其他线程就无法进入函数,没办法提前处理分配数据,会降低效率。
- 不用在临界区内部做判断,就可以知道临界资源的使用情况,如果已经没有资源了,那么申请锁没有任何意义,浪费资源。
//RingQueue.hpp
#pragma once#include <iostream>
#include <vector>
#include <mutex>
#include <semaphore.h>using namespace std;static const int N = 5;template<class T>
class RingQueue
{
public:RingQueue(int num = N):_ring(num),_cap(num),_c_step(0),_p_step(0){sem_init(&_data_sem, 0, 0);sem_init(&_space_sem, 0, num);pthread_mutex_init(&_c_mtx, nullptr);pthread_mutex_init(&_p_mtx, nullptr);}//生产void push(const T& in){P(_space_sem);Lock(_p_mtx);//一定拿到了对应的空间资源!不用再做判断//确定拿到了哪一个资源_ring[_p_step++] = in;_p_step %= _cap;Unlock(_p_mtx);V(_data_sem);}//消费void pop(T* out){P(_data_sem);Lock(_c_mtx);*out = _ring[_c_step++];_c_step %= _cap;Unlock(_c_mtx);V(_space_sem);}~RingQueue(){sem_destroy(&_data_sem);sem_destroy(&_space_sem);pthread_mutex_destroy(&_c_mtx);pthread_mutex_destroy(&_p_mtx);}private:void P(sem_t& s){sem_wait(&s);}void V(sem_t& s){sem_post(&s);}void Lock(pthread_mutex_t& m){pthread_mutex_lock(&m);}void Unlock(pthread_mutex_t& m){pthread_mutex_unlock(&m);}private:std::vector<T> _ring;int _cap; //环形队列的容量sem_t _data_sem; //只有消费者关心sem_t _space_sem; //只有生产者关心int _c_step;     //消费位置int _p_step;     //生产位置pthread_mutex_t _c_mtx;  //消费者的锁pthread_mutex_t _p_mtx;  //生产者的锁
};//task.hpp
#pragma once
#include <iostream>
#include <string>
#include <unistd.h>class Task
{
public:Task(){}Task(int x, int y, int op): _x(x), _y(y), _op(op), _result(0), _exitCode(0){}void operator()(){switch (_op){case '+':_result = _x + _y;break;case '-':_result = _x - _y;break;case '*':_result = _x * _y;break;case '/':{if (_y == 0)_exitCode = -1;else_result = _x / _y;}break;case '%':{if (_y == 0)_exitCode = -2;else_result = _x % _y;}break;default:break;}usleep(100000);}std::string formatArg(){return std::to_string(_x) + _op + std::to_string(_y) + "= ?";}std::string formatRes(){return std::to_string(_result) + "(" + std::to_string(_exitCode) + ")";}~Task(){}private:int _x;int _y;char _op;int _result;int _exitCode;
};//main.cc
#include "RingQueue.hpp"
#include "task.hpp"
#include <time.h>
#include <pthread.h>
#include <memory>
#include <sys/types.h>
#include <unistd.h>
#include <cstring>const char* ops = "+-*/%";void* consumerRoutine(void* args)
{RingQueue<Task>* rq = static_cast<RingQueue<Task>*>(args);while(true){Task t;rq->pop(&t);t();cout << "consumer done: " << t.formatRes() << endl;sleep(1); }
}void* productorRoutine(void* args)
{RingQueue<Task>* rq = static_cast<RingQueue<Task>*>(args);while(true){int x = rand() % 100;int y = rand() % 100;char op = ops[(x + y) % strlen(ops)];Task t(x, y, op);rq->push(t);cout << "productor done: " << t.formatArg() << endl;}
}int main()
{srand(time(nullptr) ^ getpid());RingQueue<Task>* rq = new RingQueue<Task>();// //单生产,单消费// pthread_t c, p;// pthread_create(&c, nullptr, consumerRoutine, rq);// pthread_create(&p, nullptr, productorRoutine, rq);// pthread_join(c, nullptr);// pthread_join(p, nullptr);//多生产,多消费pthread_t c[3], p[2];for(int i = 0; i < 3; i++)pthread_create(c + i, nullptr, consumerRoutine, rq);for(int i = 0; i < 2; i++)pthread_create(p + i, nullptr, productorRoutine, rq);for(int i = 0; i < 3; i++)pthread_join(c[i], nullptr);for(int i = 0; i < 2; i++)pthread_join(p[i], nullptr);delete rq;return 0;
}
多生产、多消费的意义不在于从缓冲区中放入和拿取,而在于放入前并发构建Task,获取后多线程可以并发处理Task,因为这些操作没有加锁。
3、互斥锁与信号量
什么时候使用锁,什么时候使用信号量,这取决于对应的临界资源是否被整体使用。如果被整体使用,则使用锁。如果被分开使用,则使用信号量。