目录
1. 光照
2. 环境光照
3. 漫反射光照
4. 代码实战
1. 光照
在OpenGL中主要分以下几个光照类型
- 环境光照(Ambient Lighting):即使在黑暗的情况下,世界上通常也仍然有一些光亮(月亮、远处的光),所以物体几乎永远不会是完全黑暗的。为了模拟这个,我们会使用一个环境光照常量,它永远会给物体一些颜色。
- 漫反射光照(Diffuse Lighting):模拟光源对物体的方向性影响(Directional Impact)。它是冯氏光照模型中视觉上最显著的分量。物体的某一部分越是正对着光源,它就会越亮。
- 镜面光照(Specular Lighting):模拟有光泽物体上面出现的亮点。镜面光照的颜色相比于物体的颜色会更倾向于光的颜色。

2. 环境光照
光通常都不是来自于同一个光源,而是来自于我们周围分散的很多光源,即使它们可能并不是那么显而易见。光的一个属性是,它可以向很多方向发散并反弹,从而能够到达不是非常直接临近的点。
我们将会先使用一个简化的全局照明模型,即环境光照,
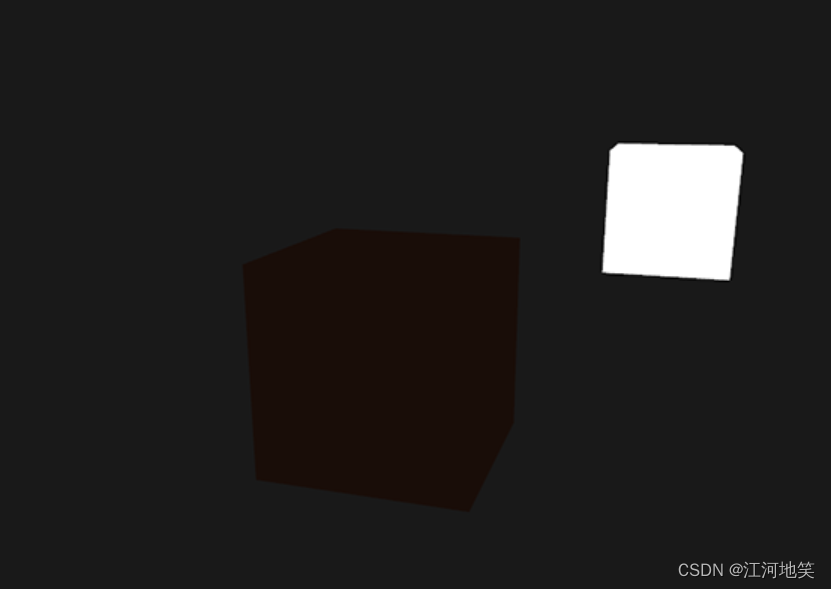
把环境光照添加到场景里非常简单。我们用光的颜色乘以一个很小的常量环境因子,再乘以物体的颜色,然后将最终结果作为片段的颜色:
void main()
{float ambientStrength = 0.1;vec3 ambient = ambientStrength * lightColor;vec3 result = ambient * objectColor;FragColor = vec4(result, 1.0);
}
3. 漫反射光照
为了测量光线和片段的角度,我们使用一个叫做法向量(Normal Vector)的东西,它是垂直于片段表面的一个向量(这里以黄色箭头表示)
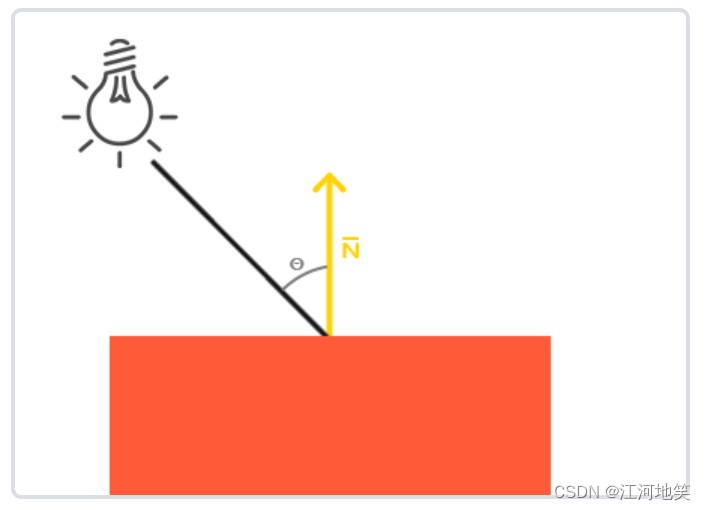
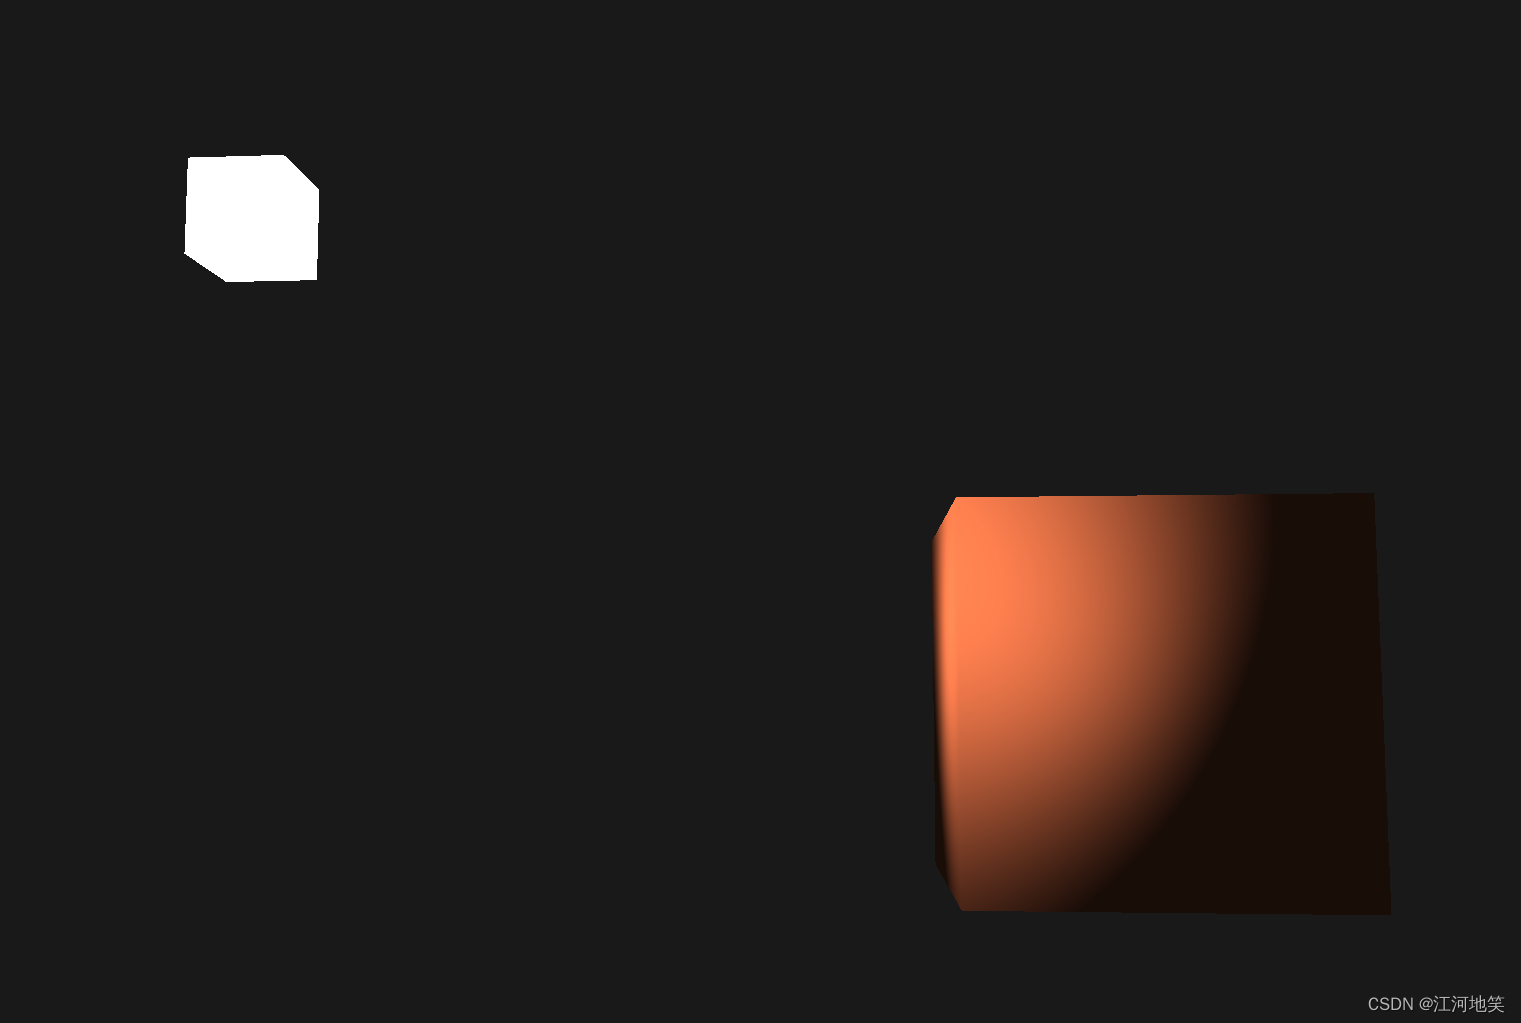
漫反射光照使物体上与光线方向越接近的片段能从光源处获得更多的亮度。
光线的方向接触该物体表面的角度决定是否可以获取更多的亮度
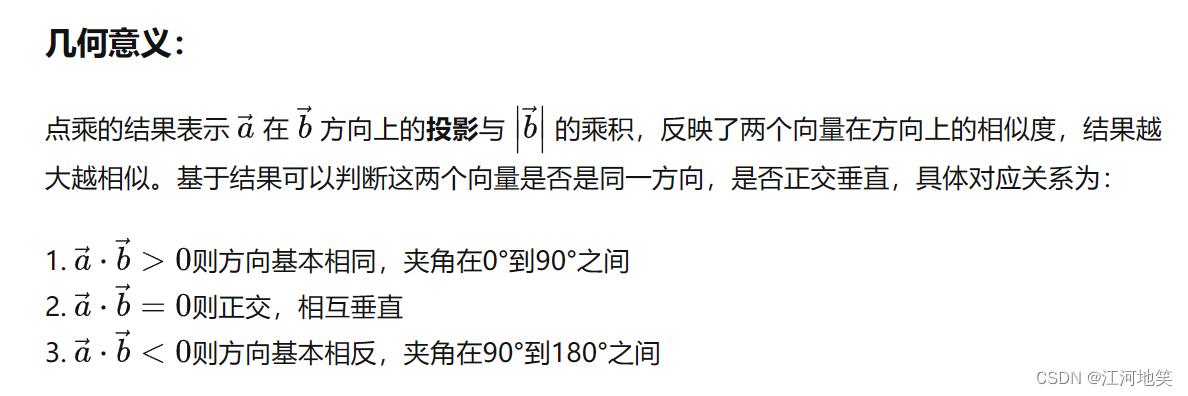
记得把,两个向量的点乘的几何意义就是判断两个向量之间相似程度。
所以,计算漫反射光照需要什么?
- 法向量:一个垂直于顶点表面的向量。
- 定向的光线:作为光源的位置与片段的位置之间向量差的方向向量。为了计算这个光线,我们需要光的位置向量和片段的位置向量。
4. 代码实战
所有光照的计算都是在片段着色器里进行,这里光照是作用于被照射的物体,也就是cube.vs
#version 330 core
layout (location = 0) in vec3 aPos;
layout (location =0 ) in vec3 aNormal;out vec3 FragPos;
out vec3 Normal;uniform mat4 model;
uniform mat4 view;
uniform mat4 projection;void main()
{FragPos=vec3(model*vec4(aPos,1.0));Normal=aNormal;gl_Position = projection * view  * vec4(FragPos, 1.0);
}
cube.fs
计算实际的颜色需要(环境光+漫反射的光,应该属于增强光)*物体的颜色
环境光容易得到
慢反射的变量取决于光线向量和物体表面法向量之间的夹角,夹角越小,这个漫反射变量越大,作用到物体上亮度越大。
#version 330 core
out vec4 FragColor;in vec3 Normal;
in vec3 FragPos;uniform vec3 objectColor;
uniform vec3 lightColor;
uniform vec3 lightPos;void main()
{//ambientfloat ambientStrength=0.1;vec3 ambient=ambientStrength*lightColor;//diffusevec3 norm=normalize(Normal);vec3 lightDir=normalize(lightPos-FragPos);//光的方向向量是光源位置向量与片段位置向量之间的向量差。//对norm和lightDir向量进行点乘,计算光源对当前片段实际的漫反射影响//两个向量之间的角度越大,漫反射分量就会越小,点乘的几何意义也如此float diff=max(dot(norm,lightDir),0.0);vec3 diffuse=diff*lightColor;vec3 result=(ambient+diffuse)*objectColor;FragColor = vec4(result, 1.0);
}
下面两个着色器就是光源点,无需进行其他操作。
light_cube.vs
#version 330 core
layout (location = 0) in vec3 aPos;uniform mat4 model;
uniform mat4 view;
uniform mat4 projection;void main()
{gl_Position = projection * view * model * vec4(aPos, 1.0);
}
light_cube.fs
#version 330 core
out vec4 FragColor;void main()
{FragColor = vec4(1.0); // set all 4 vector values to 1.0
}
main.cpp
#include <glad/glad.h>
#include <GLFW/glfw3.h>#include <iostream>
#include "stb_image.h"
#include <cmath>
#include "shader.h"
#include "camera.h"#include <glm/glm.hpp>
#include <glm/gtc/matrix_transform.hpp>
#include <glm/gtc/type_ptr.hpp>void framebuffer_size_callback(GLFWwindow* window, int width, int height);
void processInput(GLFWwindow* window);
void mouse_callback(GLFWwindow* window, double xpos, double ypos);
void scroll_callback(GLFWwindow* window, double xoffset, double yoffset);// settings
const unsigned int SCR_WIDTH = 1800;
const unsigned int SCR_HEIGHT = 1200;//camera
Camera camera(glm::vec3(0.0f, 0.0f, 3.0f));
float lastX = SCR_WIDTH / 2.0f;
float lastY = SCR_HEIGHT / 2.0f;
bool firstMouse = true;//timing
float deltaTime = 0.0f;//不同配置绘制速度不同,所以需要这个属性
float lastFrame = 0.0f;//lighting
glm::vec3 lightPos(1.2f, 1.0f, 2.0f);int main() {//glfw:initialize and configure//=============================glfwInit();glfwWindowHint(GLFW_CONTEXT_VERSION_MAJOR, 3);glfwWindowHint(GLFW_CONTEXT_VERSION_MINOR, 3);glfwWindowHint(GLFW_OPENGL_PROFILE, GLFW_OPENGL_CORE_PROFILE);#ifdef __APPLE__glfwWindowHint(GLFW_OPENGL_FORWARD_COMPAT, GL_TRUE);
#endif//glfw window creation//=============================GLFWwindow* window = glfwCreateWindow(SCR_WIDTH, SCR_HEIGHT, "Learn", NULL, NULL);if (window == NULL) {std::cout << "Failed to create GLFW window" << std::endl;glfwTerminate();return -1;}glfwMakeContextCurrent(window);glfwSetFramebufferSizeCallback(window, framebuffer_size_callback);glfwSetCursorPosCallback(window, mouse_callback);glfwSetScrollCallback(window, scroll_callback);//tell GLFW to capture our mouseglfwSetInputMode(window, GLFW_CURSOR, GLFW_CURSOR_DISABLED);//glad::load all OPenGL function pointers//=============================if (!gladLoadGLLoader((GLADloadproc)glfwGetProcAddress)) {std::cout << "Failed to initialize GLAD" << std::endl;return -1;}//configure gloabl opengl state//=============================glEnable(GL_DEPTH_TEST);//build and compile our shader zprogram//=============================Shader lightingShader("./cube.vs", "./cube.fs");Shader lightingCubeShader("./light_cube.vs", "./light_cube.fs");//set up vertex data float vertices[] = {-0.5f, -0.5f, -0.5f,  0.0f,  0.0f, -1.0f,0.5f, -0.5f, -0.5f,  0.0f,  0.0f, -1.0f,0.5f,  0.5f, -0.5f,  0.0f,  0.0f, -1.0f,0.5f,  0.5f, -0.5f,  0.0f,  0.0f, -1.0f,-0.5f,  0.5f, -0.5f,  0.0f,  0.0f, -1.0f,-0.5f, -0.5f, -0.5f,  0.0f,  0.0f, -1.0f,-0.5f, -0.5f,  0.5f,  0.0f,  0.0f, 1.0f,0.5f, -0.5f,  0.5f,  0.0f,  0.0f, 1.0f,0.5f,  0.5f,  0.5f,  0.0f,  0.0f, 1.0f,0.5f,  0.5f,  0.5f,  0.0f,  0.0f, 1.0f,-0.5f,  0.5f,  0.5f,  0.0f,  0.0f, 1.0f,-0.5f, -0.5f,  0.5f,  0.0f,  0.0f, 1.0f,-0.5f,  0.5f,  0.5f, -1.0f,  0.0f,  0.0f,-0.5f,  0.5f, -0.5f, -1.0f,  0.0f,  0.0f,-0.5f, -0.5f, -0.5f, -1.0f,  0.0f,  0.0f,-0.5f, -0.5f, -0.5f, -1.0f,  0.0f,  0.0f,-0.5f, -0.5f,  0.5f, -1.0f,  0.0f,  0.0f,-0.5f,  0.5f,  0.5f, -1.0f,  0.0f,  0.0f,0.5f,  0.5f,  0.5f,  1.0f,  0.0f,  0.0f,0.5f,  0.5f, -0.5f,  1.0f,  0.0f,  0.0f,0.5f, -0.5f, -0.5f,  1.0f,  0.0f,  0.0f,0.5f, -0.5f, -0.5f,  1.0f,  0.0f,  0.0f,0.5f, -0.5f,  0.5f,  1.0f,  0.0f,  0.0f,0.5f,  0.5f,  0.5f,  1.0f,  0.0f,  0.0f,-0.5f, -0.5f, -0.5f,  0.0f, -1.0f,  0.0f,0.5f, -0.5f, -0.5f,  0.0f, -1.0f,  0.0f,0.5f, -0.5f,  0.5f,  0.0f, -1.0f,  0.0f,0.5f, -0.5f,  0.5f,  0.0f, -1.0f,  0.0f,-0.5f, -0.5f,  0.5f,  0.0f, -1.0f,  0.0f,-0.5f, -0.5f, -0.5f,  0.0f, -1.0f,  0.0f,-0.5f,  0.5f, -0.5f,  0.0f,  1.0f,  0.0f,0.5f,  0.5f, -0.5f,  0.0f,  1.0f,  0.0f,0.5f,  0.5f,  0.5f,  0.0f,  1.0f,  0.0f,0.5f,  0.5f,  0.5f,  0.0f,  1.0f,  0.0f,-0.5f,  0.5f,  0.5f,  0.0f,  1.0f,  0.0f,-0.5f,  0.5f, -0.5f,  0.0f,  1.0f,  0.0f};//第一个unsigned int VBO, cubeVAO;glGenVertexArrays(1, &cubeVAO);glGenBuffers(1, &VBO);glBindBuffer(GL_ARRAY_BUFFER, VBO);glBufferData(GL_ARRAY_BUFFER, sizeof(vertices), vertices, GL_STATIC_DRAW);glBindVertexArray(cubeVAO);//position attributeglVertexAttribPointer(0, 3, GL_FLOAT, GL_FALSE, 6 * sizeof(float), (void*)0);glEnableVertexAttribArray(0);//normal attributeglVertexAttribPointer(1, 3, GL_FLOAT, GL_FALSE, 6 * sizeof(float), (void*)(3 * sizeof(float)));glEnableVertexAttribArray(1);//第二个unsigned int lightCubeVAO;glGenVertexArrays(1, &lightCubeVAO);glBindVertexArray(lightCubeVAO);glBindBuffer(GL_ARRAY_BUFFER, VBO);glVertexAttribPointer(0, 3, GL_FLOAT, GL_FALSE, 6 * sizeof(float), (void*)0);glEnableVertexAttribArray(0);// render loop// -----------while (!glfwWindowShouldClose(window)){// per-frame time logic// --------------------float currentFrame = static_cast<float>(glfwGetTime());deltaTime = currentFrame - lastFrame;lastFrame = currentFrame;// input// -----processInput(window);// render// ------glClearColor(0.1f, 0.1f, 0.1f, 1.0f);glClear(GL_COLOR_BUFFER_BIT | GL_DEPTH_BUFFER_BIT);// be sure to activate shader when setting uniforms/drawing objectslightingShader.use();lightingShader.setVec3("objectColor", 1.0f, 0.5f, 0.31f);lightingShader.setVec3("lightColor", 1.0f, 1.0f, 1.0f);lightingShader.setVec3("lightPos", lightPos);// view/projection transformationsglm::mat4 projection = glm::perspective(glm::radians(camera.Zoom), (float)SCR_WIDTH / (float)SCR_HEIGHT, 0.1f, 100.0f);glm::mat4 view = camera.GetViewMatrix();lightingShader.setMat4("projection", projection);lightingShader.setMat4("view", view);// world transformationglm::mat4 model = glm::mat4(1.0f);lightingShader.setMat4("model", model);// render the cubeglBindVertexArray(cubeVAO);glDrawArrays(GL_TRIANGLES, 0, 36);// also draw the lamp objectlightingCubeShader.use();lightingCubeShader.setMat4("projection", projection);lightingCubeShader.setMat4("view", view);model = glm::mat4(1.0f);model = glm::translate(model, lightPos);model = glm::scale(model, glm::vec3(0.2f)); // a smaller cubelightingCubeShader.setMat4("model", model);glBindVertexArray(lightCubeVAO);glDrawArrays(GL_TRIANGLES, 0, 36);// glfw: swap buffers and poll IO events (keys pressed/released, mouse moved etc.)// -------------------------------------------------------------------------------glfwSwapBuffers(window);glfwPollEvents();}glDeleteVertexArrays(1, &cubeVAO);glDeleteVertexArrays(1, &lightCubeVAO);glDeleteBuffers(1, &VBO);glfwTerminate();return 0;}
void processInput(GLFWwindow* window)
{if (glfwGetKey(window, GLFW_KEY_ESCAPE) == GLFW_PRESS)glfwSetWindowShouldClose(window, true);if (glfwGetKey(window, GLFW_KEY_W) == GLFW_PRESS)camera.ProcessKeyboard(FORWARD, deltaTime);if (glfwGetKey(window, GLFW_KEY_S) == GLFW_PRESS)camera.ProcessKeyboard(BACKWARD, deltaTime);if (glfwGetKey(window, GLFW_KEY_A) == GLFW_PRESS)camera.ProcessKeyboard(LEFT, deltaTime);if (glfwGetKey(window, GLFW_KEY_D) == GLFW_PRESS)camera.ProcessKeyboard(RIGHT, deltaTime);
}void framebuffer_size_callback(GLFWwindow* window, int width, int height)
{// make sure the viewport matches the new window dimensions; note that width and // height will be significantly larger than specified on retina displays.glViewport(0, 0, width, height);
}
// glfw: whenever the mouse moves, this callback is called
// -------------------------------------------------------
void mouse_callback(GLFWwindow* window, double xposIn, double yposIn)
{float xpos = static_cast<float>(xposIn);float ypos = static_cast<float>(yposIn);if (firstMouse){lastX = xpos;lastY = ypos;firstMouse = false;}float xoffset = xpos - lastX;float yoffset = lastY - ypos; // reversed since y-coordinates go from bottom to toplastX = xpos;lastY = ypos;camera.ProcessMouseMovement(xoffset, yoffset);
}// glfw: whenever the mouse scroll wheel scrolls, this callback is called
// ----------------------------------------------------------------------
void scroll_callback(GLFWwindow* window, double xoffset, double yoffset)
{camera.ProcessMouseScroll(static_cast<float>(yoffset));
}