目录
第一章 效果图
第二章 源代码
第一章 效果图
- 小编该案例主要实现的两个点的思路:1、有两个正常的经纬度就可以在地图中绘制出汽车从起点到终点的路线规划;2、当用户经纬度发生变化时,用户可以通过某个操作,或者程序员通过某种方式,再次调用接口,从而实现线路的变化
- 小编转换成两个情景:1、首次进入地图渲染汽车的规划路径;2、通过点击事件表示经纬度发生变化,需要重新规划路线

第二章 源代码
- 代码描述如下:(注意,以下代码只是小编的基本代码,细节优化暂时需要大家自己思考,并且小编在之后的文章中也会反应出来!!)
<template><div><a-button @click="refreshDriving">刷新路径</a-button><br><div><div id="container" ref="amap"></div><div id="panel"></div></div></div>
</template><script>
import AMapLoader from '@amap/amap-jsapi-loader'
export default {data () {return {map: null,lnglat: [], // [long,lat]driving: null,mapModule: null // AMap}},mounted () {window._AMapSecurityConfig = {securityJsCode: '申请key对应的秘钥' // 申请key对应的秘钥}this.initAMap()},destroyed () {this.map.destroy()},methods: {initAMap () {const _this = thisAMapLoader.load({key: '申请的key', // 申请好的Web端开发者Key,首次调用 load 时必填version: '2.0', // 指定要加载的 JSAPI 的版本,缺省时默认为 1.4.15plugins: []}).then((AMap) => {_this.mapModule = AMapconst map = new AMap.Map('container', {// 设置地图容器idviewMode: '3D', // 默认2d地图模式zoom: 12, // 初始化地图级别zooms: [5, 30],// 可以设置初始化当前位置// center: new AMap.LngLat(121.378945, 31.264033), // 上海// center: [118.118547, 24.475637], // 厦门center: [116.397428, 39.90923], // 北京resizeEnable: true})// 添加控件AMap.plugin(['AMap.ElasticMarker','AMap.Scale','AMap.ToolBar','AMap.HawkEye','AMap.MapType','AMap.Geolocation','AMap.Driving','AMap.AutoComplete','AMap.PlaceSearch','AMap.MarkerClusterer'],() => {map.addControl(new AMap.ElasticMarker())map.addControl(new AMap.Scale())map.addControl(new AMap.ToolBar())map.addControl(new AMap.HawkEye())map.addControl(new AMap.MapType())map.addControl(new AMap.Geolocation())})_this.map = map// 驾驶路线_this.toDriving()}).catch((e) => {console.log(e)})},toDriving () {const _this = thisconst driving = new _this.mapModule.Driving({map: this.map,panel: 'panel'})this.driving = drivingthis.driving.search(new _this.mapModule.LngLat(121.378945, 31.264033),new _this.mapModule.LngLat(121.504128, 31.318716),// [121.378945, 31.264033],// [121.504128, 31.318716],function (status, result) {// result 即是对应的驾车导航信息,相关数据结构文档请参考  https://lbs.amap.com/api/javascript-api/reference/route-search#m_DrivingResultif (status === 'complete') {console.log('绘制驾车路线完成', result)} else {console.log('获取驾车数据失败:' + result)}})},refreshDriving () {const _this = this_this.driving.search(new _this.mapModule.LngLat(121.378945, 32.265033),new _this.mapModule.LngLat(121.504128, 31.319716),function (status, result) {if (status === 'complete') {console.log('绘制驾车路线完成', result)} else {console.log('获取驾车数据失败:' + result)}})},}
}
</script>
<style lang='less' scoped>
#container {padding: 0px;margin: 0px;width: 100%;height: 900px;
}
</style>
- 配置panel后会展示每个路段的信息,这里我们也可以根据它自定义样式。

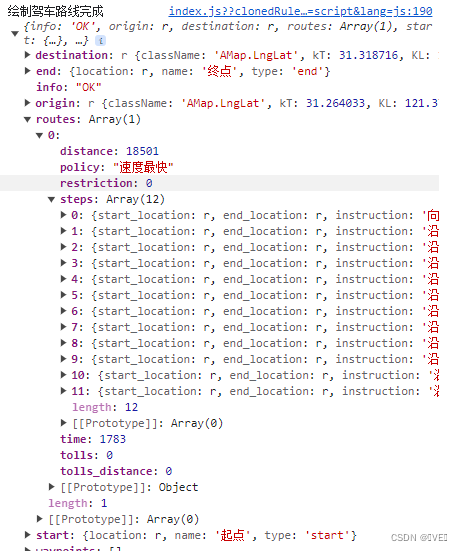
- 这是我们绘制完成的路线信息,相当于后端传给前端的数据,当我们前端有了这些数据之后就能想怎么做怎么做了!!
- 待扩展:
- 该案例还有许多不能的功能活用,暂时需要大家自行看官方文档了解每一个字段
- 知识延伸:使用时需要考虑经纬度没有值时怎么处理
- 知识延伸:实时获取用户经纬度,实时绘制路线
- 实例文档:
示例文档:位置经纬度 + 驾车规划路线-驾车路线规划-示例中心-JS API 2.0 示例 | 高德地图API
- 接口文档如下:
接口文档:参考手册-地图 JS API 2.0 | 高德地图API

