文章目录
- 部署web服务器
- 部署虚拟机web1
- 安装依赖包
- 解压NGINX压缩包
- 初始化
- 编译
- 编译安装
- 查看验证
- 配置动静分离
- 部署虚拟机web2
- 安装依赖包
- 解压NGINX压缩包
- 初始化
- 编译
- 编译安装
- 查看验证
- 配置动静分离
- 配置NGINX七层代理
- 测试健康检查功能
- 配置NGINX四层代理
- 部署代理服务器
- 总结
部署web服务器
实验准备(网卡名不一定必须为eth0)
- 可将虚拟机A改名为proxy
- 可将虚拟机B主机名修改为web1
- 使用web1克隆web2
| 主机名 | IP地址 | 角色 |
|---|---|---|
| proxy | eth0:192.168.8.100 eth1:192.168.4.5 | 代理服务器 |
| web1 | eth0:192.168.8.101 | web服务器 |
| web2 | eth0:192.168.8.102 | web服务器 |
web1主机配置IP地址(分配的IP地址以自己的为准)
[root@pc207 ~]# hostnamectl set-hostname web1
[root@web1 ~]# nmcli connection modify ens33 ipv4.method auto \
connection.autoconnect yes
[root@web1 ~]# nmcli connection up  ens33
[root@web1~]# yum clean all
[root@web1 ~]# yum repolist						#查看yum是否可用
web2主机配置IP地址(分配的IP地址以自己的为准)
[root@pc207 ~]# hostnamectl set-hostname web2
[root@web2 ~]# nmcli connection modify ens33 ipv4.method auto \
connection.autoconnect yes
[root@web2 ~]# nmcli connection up  ens33
[root@web2 ~]# yum clean all
[root@web2 ~]# yum repolist						#查看yum是否可用
proxy主机需要配置两个网段8.0和4.0,所以需要两块网卡,eth0和eth1
添加网卡
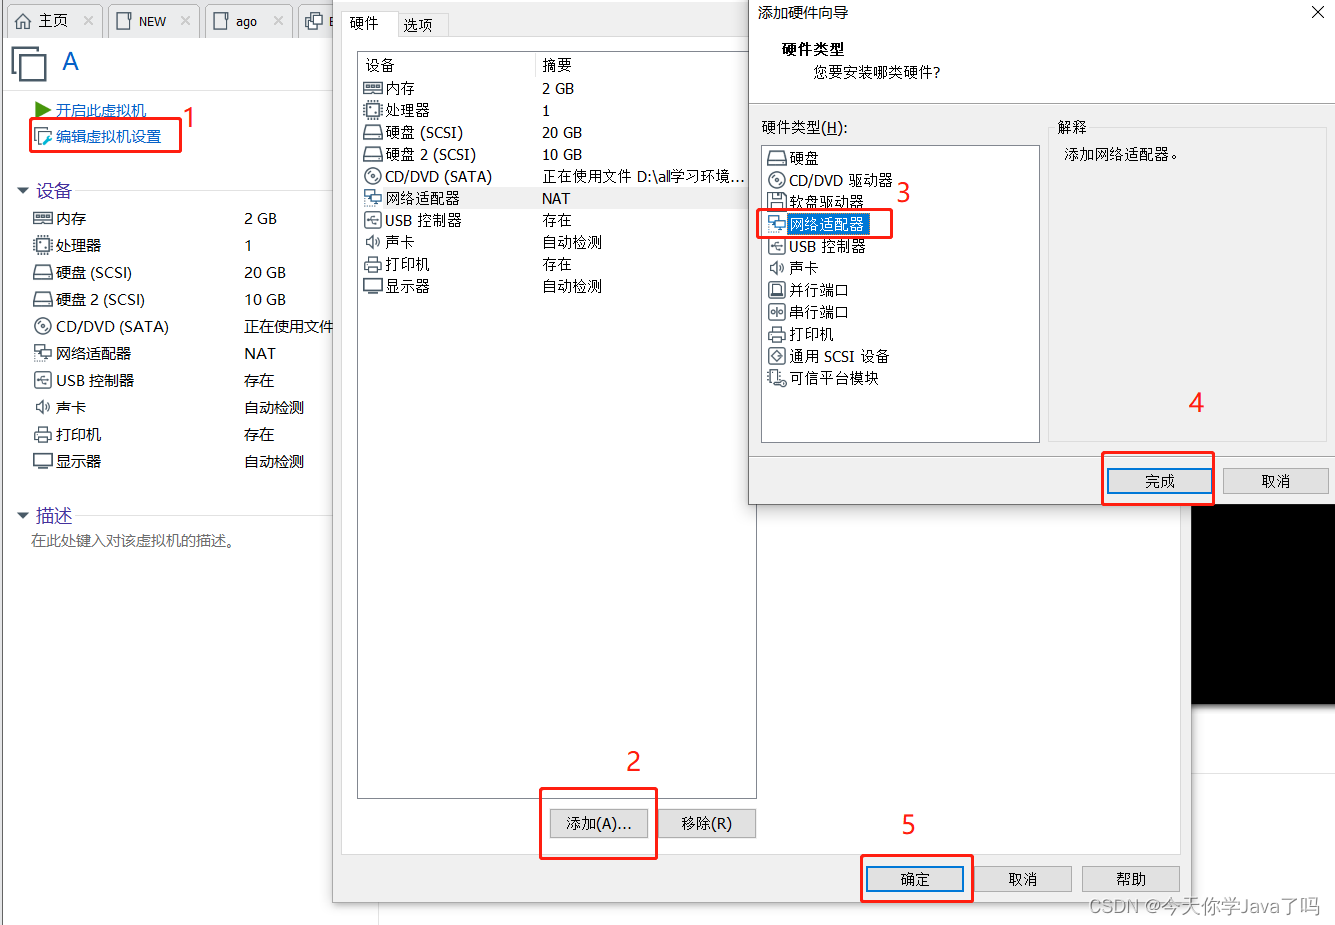
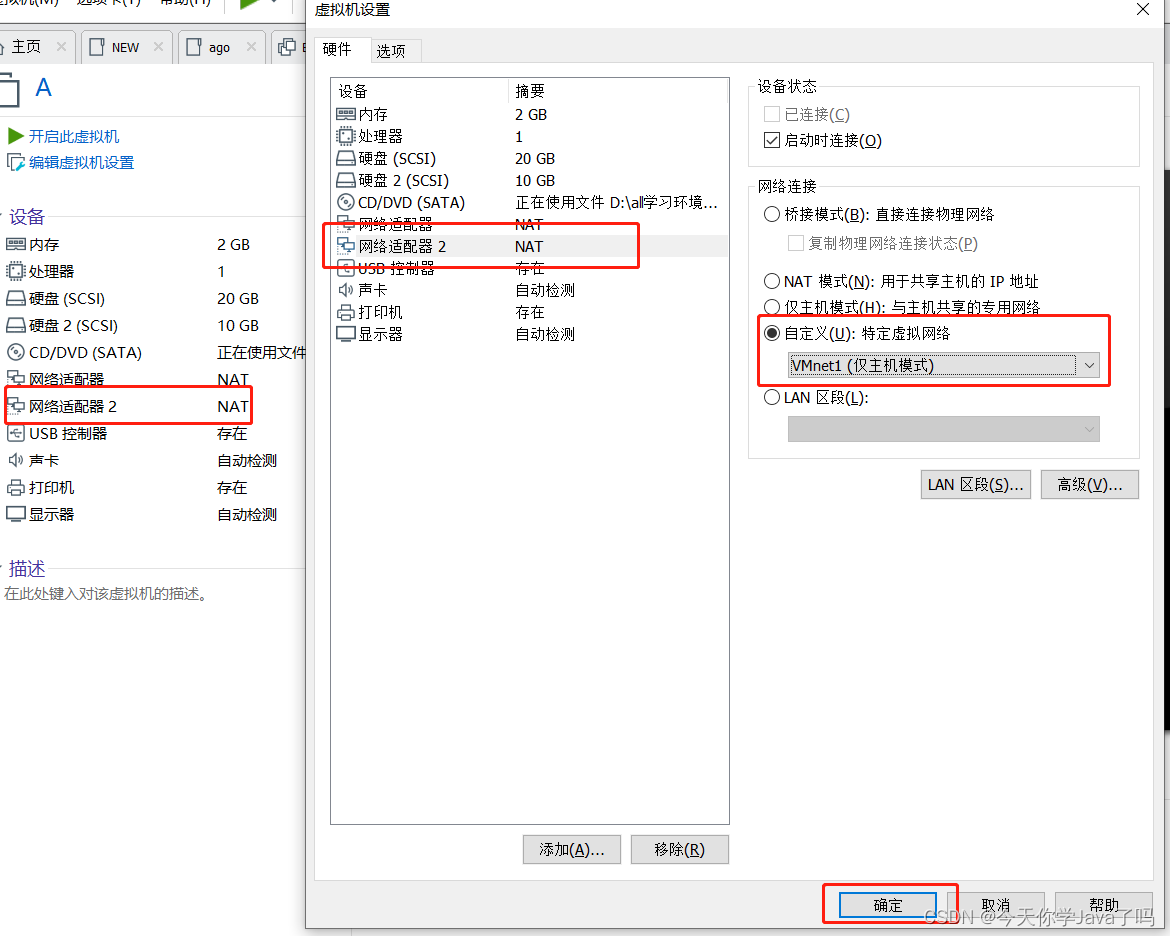
修改新增加网卡eth1的IP地址为:192.168.4.5
[root@som ~]# hostnamectl set-hostname proxy
[root@proxy ~]# nmcli  connection  add  con-name  eth1  ifname  eth1  type ethernet  																	   #添加一张网卡eth1
[root@proxy ~]# nmcli connection delete 有线连接\ 1
[root@proxy ~]# nmcli connection modify eth1 ipv4.method manual ipv4.addresses 192.168.4.5/24 connection.autoconnect yes
[root@proxy ~]# nmcli connection up eth1
此时可以正常从Windows连接虚拟机proxy,web1和web2
将proxy主机上的/root/som.tar.gz拷贝至web1、web2(web1、web2IP地址以自己为准)
[root@proxy ~]# scp /root/som.tar.gz root@192.168.8.101:/root
[root@proxy ~]# scp /root/som.tar.gz root@192.168.8.102:/root
部署虚拟机web1
虚拟机web1源码编译安装NGINX,配置动静分离
安装依赖包
[root@web1 ~]# yum -y install gcc make pcre-devel openssl-devel
解压NGINX压缩包
- 采用nginx-1.16.1.tar.gz
[root@web1 ~]# mkdir /root/som
[root@web1 ~]# tar -xf /root/som.tar.gz -C /root/som
[root@web1 ~]# cd som
[root@web1 som]# tar -xf nginx-1.16.1.tar.gz
[root@web1 som]# cd nginx-1.16.1
初始化
[root@web1 nginx-1.16.1]# ./configure --prefix=/usr/local/nginx --with-http_ssl_module
编译
[root@web1 nginx-1.16.1]# make
编译安装
[root@web1 nginx-1.16.1]# make install
查看验证
[root@web1 ~]# ls /usr/local/nginx/
conf sbin html logs
配置动静分离
安装软件
[root@web1 ~]# yum -y install mariadb mariadb-server mariadb-devel
[root@web1 ~]# yum -y install php   php-mysql php-fpm
启动Nginx服务
[root@web1 ~]# /usr/local/nginx/sbin/nginx
启动MySQL服务,设置开机自启
[root@web1 ~]# systemctl restart  mariadb
[root@web1 ~]# systemctl enable mariadb
启动PHP-FPM服务,设置开机自启
[root@web1 ~]# systemctl restart php-fpm
[root@web1 ~]# systemctl enable php-fpm
[root@web1 ~]# ss -utnlp | grep :80
[root@web1 ~]# ss -utnlp | grep :3306
[root@web1 ~]# ss -utnlp | grep :9000
修改Nginx配置文件并启动服务
[root@web1 ~]# vim /usr/local/nginx/conf/nginx.conf
server {location  ~  \.php$  {root           html;fastcgi_pass   127.0.0.1:9000;    	#将请求转发给本机9000端口,PHP解释器fastcgi_index  index.php;#fastcgi_param   SCRIPT_FILENAME  $document_root$fastcgi_script_name;include        fastcgi.conf;       	#加载其他配置文件}
[root@web1 ~]# /usr/local/nginx/sbin/nginx -s reload
创建PHP页面,测试LNMP架构能否解析PHP页面
创建PHP测试页面:
[root@web1 ~]# vim /usr/local/nginx/html/test.php
<?php
$i=33;
echo $i;
?>
访问测试(自己访问自己的IP,不要照抄)
[root@web1 ~]# curl 192.168.8.101/test.php
部署虚拟机web2
虚拟机web2源码编译安装NGINX,配置动静分离
安装依赖包
[root@web2 ~]# yum -y install gcc make pcre-devel openssl-devel
解压NGINX压缩包
- 采用nginx-1.16.1.tar.gz
[root@web2 ~]# mkdir /root/som
[root@web2 ~]# tar -xf /root/som.tar.gz -C /root/som
[root@web2 ~]# cd som
[root@web2 som]# tar -xf nginx-1.16.1.tar.gz
[root@web2 som]# cd nginx-1.16.1
初始化
[root@web2 nginx-1.16.1]# ./configure --prefix=/usr/local/nginx --with-http_ssl_module
编译
[root@web2 nginx-1.16.1]# make
编译安装
[root@web2 nginx-1.16.1]# make install
查看验证
[root@web2 ~]# ls /usr/local/nginx/
conf sbin html logs
配置动静分离
安装软件
[root@web2 ~]# yum -y install mariadb mariadb-server mariadb-devel
[root@web2 ~]# yum -y install php   php-mysql php-fpm
启动Nginx服务
[root@web2 ~]# /usr/local/nginx/sbin/nginx
启动MySQL服务,设置开机自启
[root@web2 ~]# systemctl restart  mariadb
[root@web2 ~]# systemctl enable mariadb
启动PHP-FPM服务,设置开机自启
[root@web2 ~]# systemctl restart php-fpm
[root@web2 ~]# systemctl enable php-fpm
[root@web2 ~]# ss -utnlp | grep :80
[root@web2 ~]# ss -utnlp | grep :3306
[root@web2 ~]# ss -utnlp | grep :9000
修改Nginx配置文件并启动服务
[root@web2 ~]# vim /usr/local/nginx/conf/nginx.conf
server {location  ~  \.php$  {root           html;fastcgi_pass   127.0.0.1:9000;    	#将请求转发给本机9000端口,PHP解释器fastcgi_index  index.php;#fastcgi_param   SCRIPT_FILENAME  $document_root$fastcgi_script_name;include        fastcgi.conf;       	#加载其他配置文件}
[root@web2 ~]# /usr/local/nginx/sbin/nginx -s reload
创建PHP页面,测试LNMP架构能否解析PHP页面
创建PHP测试页面:
[root@web2 ~]# vim /usr/local/nginx/html/test.php
<?php
$i=88;
echo $i;
?>
访问测试(自己访问自己的IP,不要照抄)
[root@web2 ~]# curl 192.168.8.101/test.php
配置NGINX七层代理
- 部署代理服务器,安装nginx服务,在这里由于proxy主机是之前的虚拟机A,nginx是已经安装好的,这里不再安装,如果是新的机器则需要重新安装
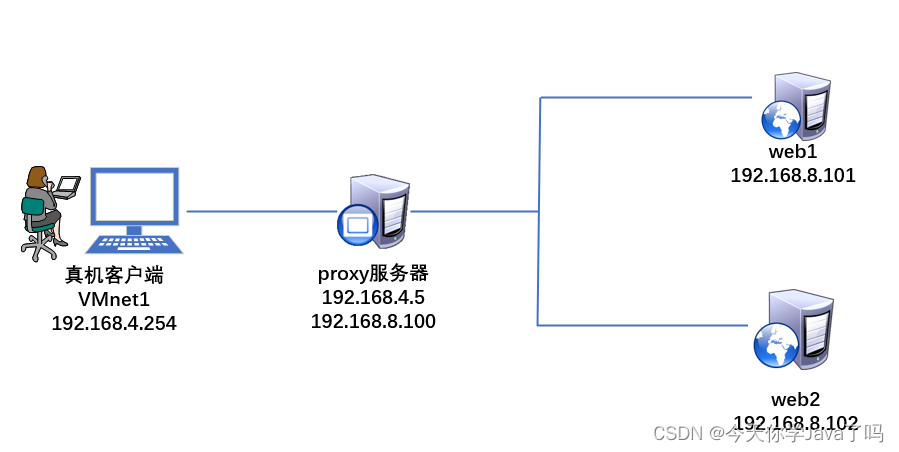
配置Nginx服务器,添加服务器池,实现反向代理功能, 使用upstream定义后端服务器集群,集群名称任意(如servers),使用server定义集群中的具体服务器和端口
[root@proxy ~]# vim /usr/local/nginx/conf/nginx.confupstream servers {                   #upstream模块要写到http的里面server 192.168.8.101:80;		 #自己web1的主机IP地址server 192.168.8.102:80;		 #自己web2主机的IP地址
}server {listen       80;server_name  localhost;location / {proxy_pass http://servers;     #通过proxy_pass将用户的请求转发给servers集群root   html;index  index.php index.html index.htm;}#由于proxy主机是web克隆出来的,所以需要把nginx配置文件里面的解析动态页面的配置注释掉#location ~ \.php$ {#    root           html;#    fastcgi_pass   127.0.0.1:9000;#    fastcgi_index  index.php;#    include        fastcgi.conf;#}
[root@proxy ~]# /usr/local/nginx/sbin/nginx -s reload	#重新加载
浏览器测试,反复访问代理服务器测试效果
http://192.168.4.5/test.php
测试健康检查功能
模拟web故障,将web1 的nginx关闭
[root@web1 ~]# /usr/local/nginx/sbin/nginx -s stop
测试,访问的是web2的内容
http://192.168.4.5/test.php
将web1 的nginx启动
[root@web1 ~]# /usr/local/nginx/sbin/nginx
测试,web1和web2的内容出现
http://192.168.4.5/test.php
配置upstream服务器集群池属性
[root@proxy ~]# vim /usr/local/nginx/conf/nginx.conf
……
upstream webserver {server 192.168.8.101:80 weight=2;server 192.168.8.102:80 max_fails=2 fail_timeout=30;}
#weight设置服务器权重值,默认值为1
#max_fails设置最大失败次数,测试服务器几次才确认服务器失败
#fail_timeout设置失败超时时间,单位为秒
#down标记服务器已关机,不参与集群调度
……
客户端反复访问代理服务器测试效果,web1 和web2都可以访问
http://192.168.4.5/test.php
模拟web2宕机
[root@web2 ~]# /usr/local/nginx/sbin/nginx -s stop
浏览器测试,只有web1提供页面
开机web2,20秒之后才能访问web2
[root@web2 ~]# /usr/local/nginx/sbin/nginx
配置NGINX四层代理
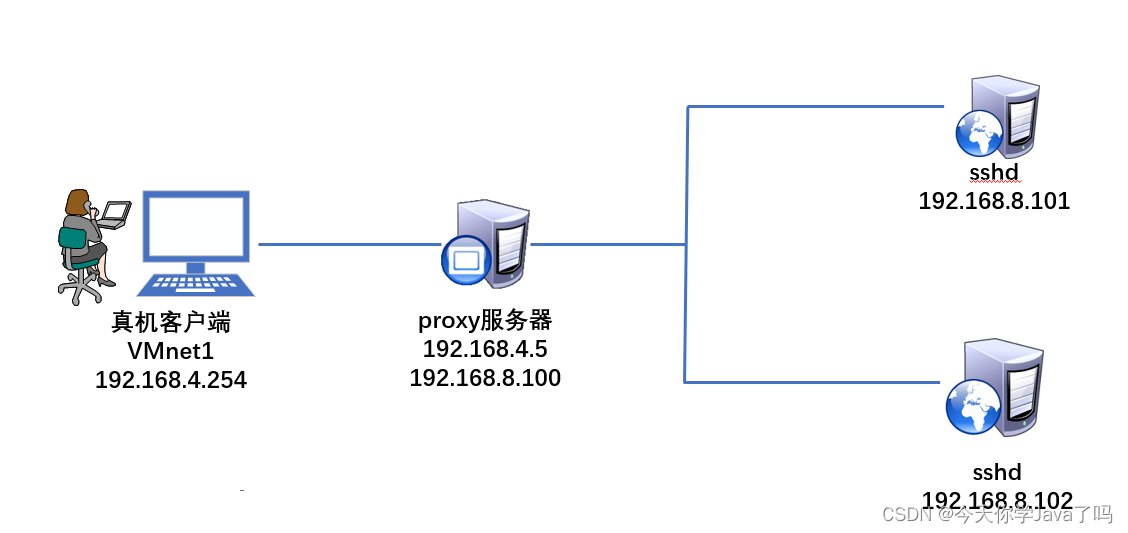
部署代理服务器
-
部署支持4层TCP/UDP代理的Nginx服务器
-
部署nginx服务器
编译安装必须要使用–with-stream参数开启4层代理模块。
[root@proxy ~]# /usr/local/nginx/sbin/nginx -s stop #停止Nginx服务
[root@proxy ~]# rm -rf /usr/local/nginx/            #清理环境
[root@proxy ~]# cd som/nginx-1.16.1/
[root@proxy nginx-1.16.1]# ./configure --with-http_ssl_module  --with-stream        #开启SSL加密功能,开启4层反向代理功能
[root@proxy nginx-1.16.1]# make 					#编译
[root@proxy nginx-1.16.1]# make install             #编译并安装
-
配置Nginx服务器,添加服务器池,实现TCP/UDP反向代理功能
-
在这里我们的配置不再是使用http协议,所以不能在配置到http里面
[root@proxy nginx-1.16.1]# vim /usr/local/nginx/conf/nginx.conf
stream {upstream backend {server 192.168.8.101:22;        	#后端SSH服务器的IP和端口server 192.168.8.102:22;}server {listen 12345;                     #Nginx监听的端口proxy_pass backend;}
}
http {.. ..
启动nginx
[root@proxy nginx-1.16.1]# /usr/local/nginx/sbin/nginx
客户端使用访问代理服务器测试轮询效果
[root@proxy nginx-1.16.1]# ssh 192.168.4.5 -p 12345
root@192.168.4.5's password:
[root@web1 ~]# exit
[root@proxy nginx-1.16.1]# ssh 192.168.4.5 -p 12345
root@192.168.4.5's password:
[root@web2 ~]#
总结
- 掌握NGINX七层代理
- 掌握NGINX四层代理
