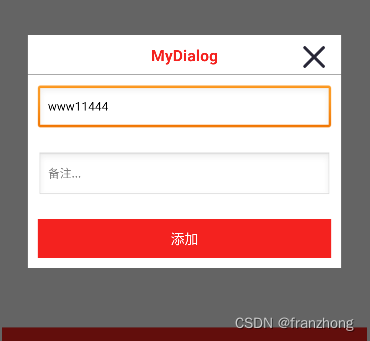
Android在任意Activity界面弹出一个自定义的对话框,效果如下图所示:
准备一张小图片,右上角的小X图标64*64,close_icon.png,随便找个小图片代替;
第一步:样式添加,注意:默认在values->thems下,如果版本较高,请至values->style.xml内定义,将以下代码添加在</resource>之前
<style name="CustomDialog" parent="android:style/Theme.Dialog"><!--背景颜色及和透明程度--><item name="android:windowBackground">@android:color/transparent</item><!--是否去除标题 --><item name="android:windowNoTitle">true</item><!--是否去除边框--><item name="android:windowFrame">@null</item><!--是否浮现在activity之上--><item name="android:windowIsFloating">true</item><!--是否模糊--><item name="android:backgroundDimEnabled">true</item></style><!--自定义dialog背景弹框设置--><style name="mydialog" parent="android:style/Theme.Dialog"><!-- 背景透明,设置圆角对话框必须设置背景透明,否则四角会有背景色小块--><item name="android:windowBackground">@android:color/transparent</item><!-- 没有标题 --><item name="android:windowNoTitle">true</item><!-- 背景模糊 --><item name="android:backgroundDimEnabled">true</item></style>第二步:专门为它创建两个类:DialogView + DialogManager
//DialogView.java
package com.example....//my packageimport android.app.Dialog;
import android.content.Context;
import android.view.Window;
import androidx.annotation.NonNull;public class DialogView extends Dialog {public DialogView(@NonNull Context context, int layout, int style, int gravity) {super(context, style);setContentView(layout);Window mWindow = getWindow();}
}
//DialogManager.java
package com.example....//my packageimport android.content.Context;
import android.view.Gravity;public class DialogManager {private static volatile DialogManager mInstance = null;private DialogManager() { }public static DialogManager getInstance() {if (mInstance == null) {synchronized (DialogManager.class) {if (mInstance == null) {mInstance = new DialogManager();}}}return mInstance;}public DialogView initView(Context context, int layout) {return new DialogView(context,layout, R.style.CustomDialog, Gravity.CENTER);}public DialogView initView(Context context,int layout,int gravity) {return new DialogView(context,layout, R.style.mydialog, gravity);} public void show(DialogView view) {//Showif (view != null) {if (!view.isShowing()) {view.show();}}}public void hide(DialogView view) {//Hideif (view != null) {if (view.isShowing()) {view.dismiss();}}}
}
第三步:给它创建样式布局xml my_dlg_layout.xml
<?xml version="1.0" encoding="utf-8"?>
<LinearLayout xmlns:android="http://schemas.android.com/apk/res/android"android:layout_width="match_parent"android:background="@color/white"android:layout_height="match_parent"><LinearLayoutandroid:layout_width="match_parent"android:orientation="vertical"android:layout_marginTop="5dp"android:layout_height="wrap_content"><RelativeLayoutandroid:layout_width="match_parent"android:orientation="horizontal"android:layout_height="34dp"><RelativeLayoutandroid:layout_width="match_parent"android:layout_height="match_parent"android:gravity="center"android:orientation="horizontal"><TextViewandroid:layout_width="wrap_content"android:layout_height="25dp"android:text="MyDialog"android:textColor="@color/red"android:textSize="16sp"android:textStyle="bold" /></RelativeLayout><RelativeLayoutandroid:layout_alignParentRight="true"android:layout_width="wrap_content"android:orientation="horizontal"android:layout_gravity="right"android:layout_marginRight="10dp"android:layout_height="wrap_content"><ImageViewandroid:id="@+id/btn_cancel"android:layout_width="25dp"android:src="@drawable/close_icon"android:layout_margin="5dp"android:layout_height="25dp"/></RelativeLayout></RelativeLayout><Viewandroid:layout_width="match_parent"android:background="@color/gray"android:layout_height="1dp"/><LinearLayoutandroid:layout_width="match_parent"android:layout_height="wrap_content"android:orientation="vertical"><EditTextandroid:layout_width="match_parent"android:layout_height="wrap_content"android:layout_margin="10dp"android:hint="名称:华山一区..."android:textSize="12sp"></EditText><EditTextandroid:layout_width="match_parent"android:layout_height="wrap_content"android:layout_margin="10dp"android:textSize="12sp"android:hint="备注..."></EditText><Buttonandroid:layout_width="match_parent"android:layout_height="wrap_content"android:id="@+id/MY_Test_Add"android:background="@color/red"android:textColor="@color/white"android:layout_margin="10dp"android:paddingTop="10dp"android:paddingBottom="10dp"android:text="添加"></Button></LinearLayout></LinearLayout></LinearLayout>
//这里用到了刚才提到的close_icon,随便替换为你的一个小图标
第四步:优化-圆角(可有可无)
<?xml version="1.0" encoding="utf-8"?>
<shape xmlns:android="http://schemas.android.com/apk/res/android"><corners android:radius="10dp"/><solid android:color="#FFEEEE" />
</shape>
//注意文件路径res/drawable/shapes.xml,添加进去别和你的东西冲突了,注意着点,边框颜色随便调整
第五步:已经完成了,分两步显示它:初始化+显示
import android.view.Gravity;//needed//myActivity(){.....private DialogView mDlgView;//公共变量
private ImageView btnCancel;//公共变量//protected void onCreate(Bundle savedInstanceState) {//my onCreate
//super.onCreate(savedInstanceState);
//setContentView(R.layout.activity_main);mDlgView= DialogManager.getInstance().initView(this, R.layout.my_dlg_layout, Gravity.BOTTOM);//这里要注意,这个对话框的View要单独绑定自己的布局
mDlgView.setCanceledOnTouchOutside(false);//这是设置区域外点击是否取消显示
btnCancel = mDlgView.findViewById(R.id.btn_cancel);//注意这个关闭图片X,在对话框布局里了,而不是在当前页面布局,不可用this.findViewBy...btnCancel.setOnClickListener(new OnClickListener() {//给返回按纽添加点击隐藏事件@Overridepublic void onClick(View view) {DialogManager.getInstance().hide(mDlgView);}
});
初始化完毕,在需要的地方进行调用,比如你的按钮被点击了,直接在里调用这一句即可;
DialogManager.getInstance().show(mDlgView);更多操作提示:
//mDlgView.dismiss(); //取消
//mDlgView.setCanceledOnTouchOutside(true);//允许区域外点击关闭
//mDlgView.setCanceledOnTouchOutside(false);//禁止区域外点击关闭//每次显示的时候其实应该清空Edittext里面的内容,返回关闭X的图标的ID都能绑定了,相同的方法上面的任何子控件绑定都是小菜一碟,给个ID,用mDialogView.findViewById(R.....)就出来了//my_dlg_layout.xml 样式随便调 padding是内部边距,margin是外边距
//那一根线条的颜色也是可调的,高度为1的View,android:background="@color/gray",你甚至可以改为:android:background="#AAAAAA"举一反三,祝你成功!