一、准备环境
1.1 Kubernetes 1.27.3 版本集群部署环境准备
1.1.1 主机硬件配置说明
| cpu | 内存 | 硬盘 | 角色 | 主机名 | 系统版本 |
| 8C | 8G | 1024GB | master | master01 | centos 7.9 |
| 8C | 16G | 1024GB | worker(node) | worker01 | centos 7.9 |
| 8C | 16G | 1024GB | worker(node) | worker02 | centos 7.9 |
1.1.2 主机配置
1.1.2.1 主机名配置
由于本次使用3台主机完成kubernetes集群部署,其中1台为master节点,名称为master01;其中2台为worker节点,名称分别为:worker01,worker02
master节点
# hostnamectl set-hostname master01worker01节点
# hostnamectl set-hostname worker01worker02节点
# hostnamectl set-hostname worker02
1.1.2.2 主机IP地址配置
1.1.2.3 主机名与IP地址解析
所有集群主机均需要进行配置
# cat /etc/hosts
127.0.0.1 localhost localhost.localdomain localhost4 localhost4.localdomain4
::1 localhost localhost.localdomain localhost6 localhost6.localdomain6
192.168.1.110 master01
192.168.1.111 worker01
192.168.1.112 worker02
1.1.2.4 防火墙配置
所有主机均需要操作。
关闭现有防火墙firewalld
# systemctl disable firewalld
# systemctl stop firewalld
# firewall-cmd --state
not running
1.1.2.5 SELINUX配置
所有主机均需要操作。修改SELinux配置需要重启操作系统。
# sed -ri 's/SELINUX=enforcing/SELINUX=disabled/' /etc/selinux/config1.1.2.6 时间同步配置
所有主机均需要操作。最小化安装系统需要安装ntpdate软件。
# crontab -l
0 */1 * * * /usr/sbin/ntpdate time1.aliyun.com
1.1.2.7 升级操作系统内核
所有主机均需要操作。
导入elrepo gpg key
# rpm --import https://www.elrepo.org/RPM-GPG-KEY-elrepo.org安装elrepo YUM源仓库
# yum -y install https://www.elrepo.org/elrepo-release-7.0-4.el7.elrepo.noarch.rpm安装kernel-ml版本,ml为长期稳定版本,lt为长期维护版本
# yum --enablerepo="elrepo-kernel" -y install kernel-lt.x86_64设置grub2默认引导为0
# grub2-set-default 0重新生成grub2引导文件
# grub2-mkconfig -o /boot/grub2/grub.cfg
更新后,需要重启,使用升级的内核生效。
# reboot重启后,需要验证内核是否为更新对应的版本
# uname -r
1.1.2.8 配置内核转发及网桥过滤
所有主机均需要操作。
添加网桥过滤及内核转发配置文件
# cat > /etc/sysctl.d/k8s.conf << EOF
net.bridge.bridge-nf-call-ip6tables = 1
net.bridge.bridge-nf-call-iptables = 1
net.ipv4.ip_forward = 1
vm.swappiness = 0
EOF加载br_netfilter模块
# modprobe br_netfilter查看是否加载
# lsmod | grep br_netfilter
br_netfilter           22256  0
bridge                151336  1 br_netfilter
1.1.2.9 安装ipset及ipvsadm
所有主机均需要操作。
# 安装ipset及ipvsadm
yum -y install ipset ipvsadm# 配置ipvsadm模块加载方式
# 添加需要加载的模块
cat > /etc/sysconfig/modules/ipvs.modules <<EOF
#!/bin/bash
modprobe -- ip_vs
modprobe -- ip_vs_rr
modprobe -- ip_vs_wrr
modprobe -- ip_vs_sh
modprobe -- nf_conntrack
EOF
授权、运行、检查是否加载
# chmod 755 /etc/sysconfig/modules/ipvs.modules && bash /etc/sysconfig/modules/ipvs.modules && lsmod | grep -e ip_vs -e nf_conntrack
1.1.2.10 关闭SWAP分区
修改完成后需要重启操作系统,如不重启,可临时关闭,命令为swapoff -a
永远关闭swap分区,需要重启操作系统
# cat /etc/fstab
......# /dev/mapper/centos-swap swap swap defaults 0 0在上一行中行首添加#
二、容器运行时 Containerd准备
2.1 Containerd准备
2.1.1 Containerd部署文件获取


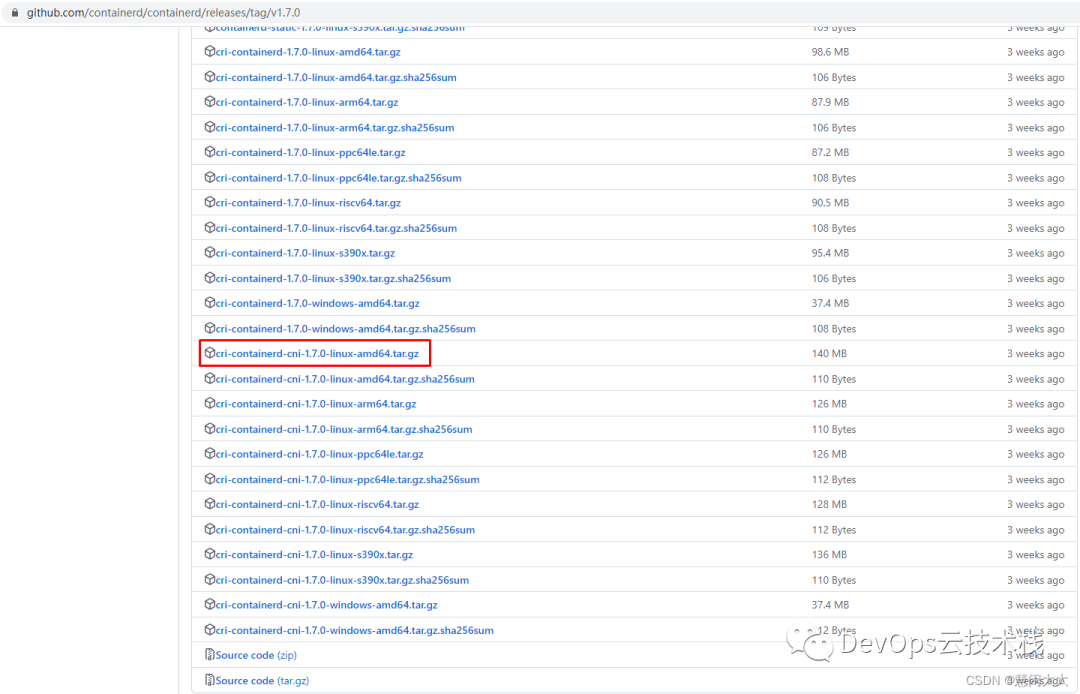
# wget https://github.com/containerd/containerd/releases/download/v1.7.0/cri-containerd-cni-1.7.0-linux-amd64.tar.gz# tar xf cri-containerd-cni-1.7.0-linux-amd64.tar.gz -C /2.1.2 Containerd配置文件生成并修改
# mkdir /etc/containerd# containerd config default > /etc/containerd/config.toml# vim /etc/containerd/config.tomlsandbox_image = "registry.k8s.io/pause:3.9" 由3.8修改为3.92.1.3 Containerd启动及开机自启动
# systemctl enable --now containerd验证其版本
# containerd --version
2.2 runc准备


2.2.1 libseccomp准备

# wget https://github.com/opencontainers/runc/releases/download/v1.1.5/libseccomp-2.5.4.tar.gz# tar xf libseccomp-2.5.4.tar.gz# cd libseccomp-2.5.4/# yum install gperf -y# ./configure && make && make install# find / -name "libseccomp.so"2.2.2 runc安装

# wget https://github.com/opencontainers/runc/releases/download/v1.1.5/runc.amd64# chmod +x runc.amd64查找containerd安装时已安装的runc所在的位置,然后替换
# which runc替换containerd安装已安装的runc
# mv runc.amd64 /usr/local/sbin/runc执行runc命令,如果有命令帮助则为正常
# runc
如果运行runc命令时提示:runc: error while loading shared libraries: libseccomp.so.2: cannot open shared object file: No such file or directory,则表明runc没有找到libseccomp,需要检查libseccomp是否安装,本次安装默认就可以查询到。
三、K8S集群部署
3.1 K8S集群软件YUM源准备
# cat > /etc/yum.repos.d/k8s.repo <<EOF
[kubernetes]
name=Kubernetes
baseurl=https://mirrors.aliyun.com/kubernetes/yum/repos/kubernetes-el7-x86_64/
enabled=1
gpgcheck=0
repo_gpgcheck=0
gpgkey=https://mirrors.aliyun.com/kubernetes/yum/doc/yum-key.gpg https://mirrors.aliyun.com/kubernetes/yum/doc/rpm-package-key.gpg
EOF
3.2 K8S集群软件安装
3.2.1 集群软件安装
所有节点均要安装
安装方法-:默认安装
# yum -y install kubeadm kubelet kubectl
安装方法二:查看指定版本
# yum list kubeadm.x86_64 --showduplicates | sort -r
# yum list kubelet.x86_64 --showduplicates | sort -r
# yum list kubectl.x86_64 --showduplicates | sort -r安装指定版本
# yum -y install kubeadm-1.27.3-0 kubelet-1.27.3-0 kubectl-1.27.3-03.2.2 配置kubelet
为了实现docker使用的cgroupdriver与kubelet使用的cgroup的一致性,建议修改如下文件内容。
# vim /etc/sysconfig/kubelet
KUBELET_EXTRA_ARGS="--cgroup-driver=systemd"设置kubelet为开机自启动即可,由于没有生成配置文件,集群初始化后自动启动
# systemctl enable kubelet
3.3 K8S集群初始化
[root@master01 ~]# kubeadm init --kubernetes-version=v1.27.3 --pod-network-cidr=10.200.0.0/16 --apiserver-advertise-address=192.168.1.110 --cri-socket unix:///var/run/containerd/containerd.sock
[init] Using Kubernetes version: v1.27.0
[preflight] Running pre-flight checks
[preflight] Pulling images required for setting up a Kubernetes cluster
[preflight] This might take a minute or two, depending on the speed of your internet connection
[preflight] You can also perform this action in beforehand using 'kubeadm config images pull'
[certs] Using certificateDir folder "/etc/kubernetes/pki"
[certs] Generating "ca" certificate and key
[certs] Generating "apiserver" certificate and key
[certs] apiserver serving cert is signed for DNS names [master01 kubernetes kubernetes.default kubernetes.default.svc kubernetes.default.svc.cluster.local] and IPs [10.96.0.1 192.168.10.160]
[certs] Generating "apiserver-kubelet-client" certificate and key
[certs] Generating "front-proxy-ca" certificate and key
[certs] Generating "front-proxy-client" certificate and key
[certs] Generating "etcd/ca" certificate and key
[certs] Generating "etcd/server" certificate and key
[certs] etcd/server serving cert is signed for DNS names [master01 localhost] and IPs [192.168.10.160 127.0.0.1 ::1]
[certs] Generating "etcd/peer" certificate and key
[certs] etcd/peer serving cert is signed for DNS names [master01 localhost] and IPs [192.168.10.160 127.0.0.1 ::1]
[certs] Generating "etcd/healthcheck-client" certificate and key
[certs] Generating "apiserver-etcd-client" certificate and key
[certs] Generating "sa" key and public key
[kubeconfig] Using kubeconfig folder "/etc/kubernetes"
[kubeconfig] Writing "admin.conf" kubeconfig file
[kubeconfig] Writing "kubelet.conf" kubeconfig file
[kubeconfig] Writing "controller-manager.conf" kubeconfig file
[kubeconfig] Writing "scheduler.conf" kubeconfig file
[kubelet-start] Writing kubelet environment file with flags to file "/var/lib/kubelet/kubeadm-flags.env"
[kubelet-start] Writing kubelet configuration to file "/var/lib/kubelet/config.yaml"
[kubelet-start] Starting the kubelet
[control-plane] Using manifest folder "/etc/kubernetes/manifests"
[control-plane] Creating static Pod manifest for "kube-apiserver"
[control-plane] Creating static Pod manifest for "kube-controller-manager"
[control-plane] Creating static Pod manifest for "kube-scheduler"
[etcd] Creating static Pod manifest for local etcd in "/etc/kubernetes/manifests"
[wait-control-plane] Waiting for the kubelet to boot up the control plane as static Pods from directory "/etc/kubernetes/manifests". This can take up to 4m0s
[apiclient] All control plane components are healthy after 20.502191 seconds
[upload-config] Storing the configuration used in ConfigMap "kubeadm-config" in the "kube-system" Namespace
[kubelet] Creating a ConfigMap "kubelet-config" in namespace kube-system with the configuration for the kubelets in the cluster
[upload-certs] Skipping phase. Please see --upload-certs
[mark-control-plane] Marking the node master01 as control-plane by adding the labels: [node-role.kubernetes.io/control-plane node.kubernetes.io/exclude-from-external-load-balancers]
[mark-control-plane] Marking the node master01 as control-plane by adding the taints [node-role.kubernetes.io/control-plane:NoSchedule]
[bootstrap-token] Using token: hd74hg.r8l1pe4tivwyjz73
[bootstrap-token] Configuring bootstrap tokens, cluster-info ConfigMap, RBAC Roles
[bootstrap-token] Configured RBAC rules to allow Node Bootstrap tokens to get nodes
[bootstrap-token] Configured RBAC rules to allow Node Bootstrap tokens to post CSRs in order for nodes to get long term certificate credentials
[bootstrap-token] Configured RBAC rules to allow the csrapprover controller automatically approve CSRs from a Node Bootstrap Token
[bootstrap-token] Configured RBAC rules to allow certificate rotation for all node client certificates in the cluster
[bootstrap-token] Creating the "cluster-info" ConfigMap in the "kube-public" namespace
[kubelet-finalize] Updating "/etc/kubernetes/kubelet.conf" to point to a rotatable kubelet client certificate and key
[addons] Applied essential addon: CoreDNS
[addons] Applied essential addon: kube-proxyYour Kubernetes control-plane has initialized successfully!To start using your cluster, you need to run the following as a regular user:mkdir -p $HOME/.kube
sudo cp -i /etc/kubernetes/admin.conf $HOME/.kube/config
sudo chown $(id -u):$(id -g) $HOME/.kube/configAlternatively, if you are the root user, you can run:export KUBECONFIG=/etc/kubernetes/admin.confYou should now deploy a pod network to the cluster.
Run "kubectl apply -f [podnetwork].yaml" with one of the options listed at:
https://kubernetes.io/docs/concepts/cluster-administration/addons/Then you can join any number of worker nodes by running the following on each as root:kubeadm join 192.168.1.110:6443 --token pm3ekl.y03qqkqxix111zp4 \
--discovery-token-ca-cert-hash sha256:c4aa683f5a5d7dc805e1c7966b8495485ff61cca88537f091c5bd7c996e8dbec
[root@worker01 ~]# mkdir /root/.kube[root@worker01 ~]# cp -i /etc/kubernetes/admin.conf /root/.kube/config3.4 工作节点加入集群
[root@worker01 ~]# kubeadm join 192.168.1.110:6443 --token pm3ekl.y03qqkqxix111zp4 \
> --discovery-token-ca-cert-hash sha256:c4aa683f5a5d7dc805e1c7966b8495485ff61cca88537f091c5bd7c996e8dbec --cri-socket unix:///var/run/containerd/containerd.sock
[root@worker02 ~]# kubeadm join 192.168.1.110:6443 --token pm3ekl.y03qqkqxix111zp4 \
> --discovery-token-ca-cert-hash sha256:c4aa683f5a5d7dc805e1c7966b8495485ff61cca88537f091c5bd7c996e8dbec --cri-socket unix:///var/run/containerd/containerd.sock3.5 验证K8S集群节点是否可用
[root@master01 ~]# kubectl get nodes
NAME STATUS ROLES AGE VERSION
master01 Ready control-plane 15m v1.27.3
worker01 Ready <none> 13m v1.27.3
worker02 Ready <none> 13m v1.27.3
四、网络插件calico部署
calico访问链接:https://projectcalico.docs.tigera.io/about/about-calico


# wget https://raw.githubusercontent.com/projectcalico/calico/v3.25.1/manifests/tigera-operator.yaml# wget https://raw.githubusercontent.com/projectcalico/calico/v3.25.1/manifests/custom-resources.yaml# vim custom-resources.yaml# cat custom-resources.yaml# This section includes base Calico installation configuration.
# For more information, see: https://projectcalico.docs.tigera.io/master/reference/installation/api#operator.tigera.io/v1.Installation
apiVersion: operator.tigera.io/v1
kind: Installation
metadata:
name: default
spec:
# Configures Calico networking.
calicoNetwork:
# Note: The ipPools section cannot be modified post-install.
ipPools:
- blockSize: 26
cidr: 10.200.0.0/16 修改此行内容为初始化时定义的pod network cidr
encapsulation: VXLANCrossSubnet
natOutgoing: Enabled
nodeSelector: all()---# This section configures the Calico API server.
# For more information, see: https://projectcalico.docs.tigera.io/master/reference/installation/api#operator.tigera.io/v1.APIServer
apiVersion: operator.tigera.io/v1
kind: APIServer
metadata:
name: default
spec: {}# kubectl create -f tigera-operator.yaml。。。。。。# kubectl create -f custom-resources.yamlinstallation.operator.tigera.io/default created
apiserver.operator.tigera.io/default created[root@master01 ~]# kubectl get pods -n calico-system
NAME READY STATUS RESTARTS AGEcalico-kube-controllers-789dc4c76b-7gt8p 1/1 Running 0 9mcalico-node-448bf 1/1 Running 0 9mcalico-node-4hqt7 1/1 Running 0 9mcalico-node-4j84d 1/1 Running 0 9mcalico-typha-55b5588bd6-d7xrf 1/1 Running 0 9mcalico-typha-55b5588bd6-q9jtx 1/1 Running 0 9mcsi-node-driver-6zgps 2/2 Running 0 9mcsi-node-driver-9zvhr 2/2 Running 0 9mcsi-node-driver-z2cfp 2/2 Running 0 9m

