目录
一、背景
二、安装docker
三、下载安装elasticsearch
四、下载安装elasticsearch-head
五、springboot集成elasticsearch
一、背景
前两年研究了一段时间elasticsearch,当时也是网上找了很多资料,最后解决个各种问题可以在springboot上运行了,本来是想记录下解决过程,但是由于某些原因就搁置了下来。最近手头有个项目正好需要用到elasticsearch,再拿起来的时候发现很多地方都不记得了,于是花了2天时间又搞了下,终于可以正常运行了,这次准备花点时间把遇到的一些问题、解决方法以及需要注意的地方记录下,便于日后需要时查看。
二、安装docker
2.1、从官网下载docker,好像需要科学上网,如果不行的话就随便百度个下载吧。
2.2、安装3个Windows功能,如下图
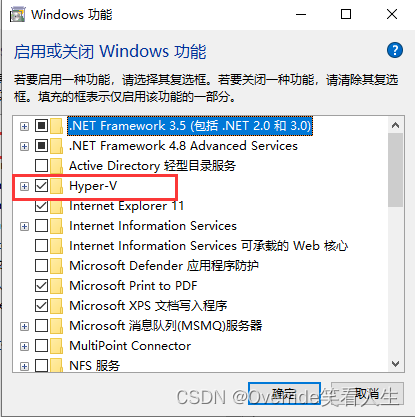
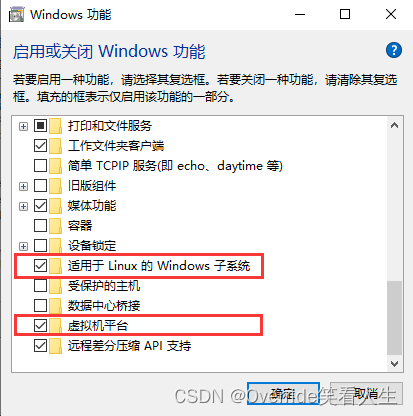
2.3、安装WSL,在命令行窗口执行wsl --install,如果安装不成功的话可以尝试从微软应用商店安装(好像只有win10可以搜到这个),搜索wsl,如下图

2.4、安装docker,这个没啥需要特别记录的
2.5、执行wsl --version查看当前使用的是不是wsl2,如果不是wsl2并且docker也确实不能正常启动的话,可以尝试切换到wsl2试试,切换命令为:wsl --set-default-version 2
三、下载安装elasticsearch
3.1、根据springboot版本下载对应的elasticsearch镜像,对应关系如下表:
| Spring Data Release Train | Spring Data Elasticsearch | Elasticsearch | Spring Framework | Spring Boot |
|---|---|---|---|---|
| 2023.1 (Vaughan) | 5.2.x | 8.11.1 | 6.1.x | 3.2.x |
| 2023.0 (Ullmann) | 5.1.x | 8.7.1 | 6.0.x | 3.1.x |
| 2022.0 (Turing) | 5.0.x[1] | 8.5.3 | 6.0.x | 3.0.x |
| 2021.2 (Raj) | 4.4.x[1] | 7.17.3 | 5.3.x | 2.7.x |
| 2021.1 (Q) | 4.3.x[1] | 7.15.2 | 5.3.x | 2.6.x |
| 2021.0 (Pascal) | 4.2.x[1] | 7.12.0 | 5.3.x | 2.5.x |
| 2020.0 (Ockham) | 4.1.x[1] | 7.9.3 | 5.3.2 | 2.4.x |
| Neumann | 4.0.x[1] | 7.6.2 | 5.2.12 | 2.3.x |
| Moore | 3.2.x[1] | 6.8.12 | 5.2.12 | 2.2.x |
| Lovelace | 3.1.x[1] | 6.2.2 | 5.1.19 | 2.1.x |
| Kay | 3.0.x[1] | 5.5.0 | 5.0.13 | 2.0.x |
| Ingalls | 2.1.x[1] | 2.4.0 | 4.3.25 | 1.5.x |
也可以到spring官网查看最新的对应关系
3.2、下载指定版本的elasticsearch镜像:
docker pull elasticsearch:8.11.03.3、安装镜像:
docker run --name elastic -p 9200:9200 -p 9300:9300 -e "discovery.type=single-node" -d elasticsearch:8.11.03.4、进入镜像修改配置
3.4.1、进入容器控制台:
docker exec -it elastic /bin/bash3.4.2、进入bin目录:cd bin
3.4.3、修改密码:
elasticsearch-setup-passwords interactive3.4.4、下载配置文件到本地修改:
docker cp elastic:/usr/share/elasticsearch/config/elasticsearch.yml d:/3.4.5、在文件末尾添加(不添加的话elasticsearch-head连接时会报跨域错误)
http.cors.enabled: true
http.cors.allow-origin: "*"
http.cors.allow-headers: Authorization
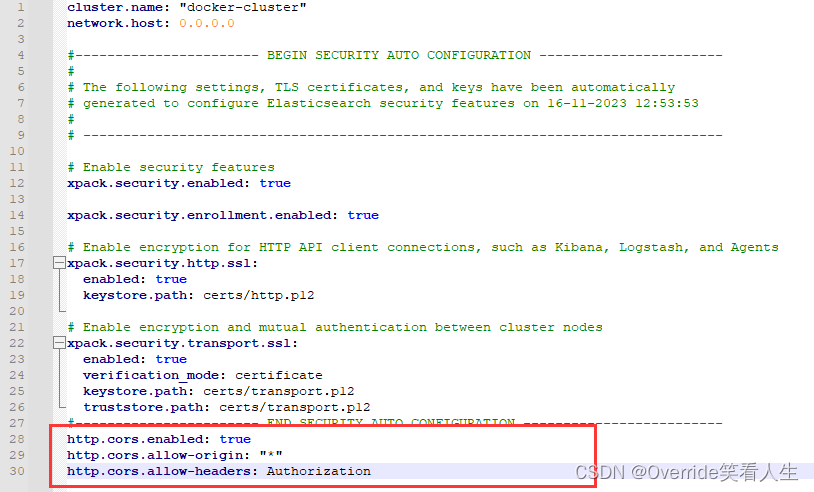
3.4.6、上传覆盖原文件:
docker cp d:\elasticsearch.yml elastic:/usr/share/elasticsearch/config/3.5、添加IK分词插件
3.5.1、下载IK分词插件,新建一个IK目录,解压到目录中。
3.5.2、上传IK文件夹
docker cp d:\xxx\ik elastic:\usr\share\elasticsearch\plugins\3.5.3、重启elastic
docker restart elastic3.6、JDK导入证书(不是必须)
3.6.1、从elasticsearch下载证书
docker cp elastic:/usr/share/elasticsearch/config/certs/http_ca.crt d:\下载目录3.6.2、打开控制台,进入JDK证书目录
cd C:\Program Files\Java\jdk-18.0.2.1\lib\security3.6.3、执行命令导入证书
C:\Program Files\Java\jdk-18.0.2.1\binkeytool -keystore cacerts -importcert -alias "es_http_ca" -file d:/下载目录/http_ca.crt四、下载安装elasticsearch-head
4.1、下载elasticsearch-head
docker pull mobz/elasticsearch-head:54.2、安装容器:
docker run --name elastic-head -p 9100:9100 -d mobz/elasticsearch-head:54.3、在地址栏输入http://localhost:9100/?auth_user=elastic&auth_password=xxxxx,查看连接elastic是否成功,注意:使用https连接elasticsearch:http://localhost:9200
五、springboot集成elasticsearch
5.1、springboot3.2.0集成elasticsearch8.11.0运行正常,不过从官方文档看3.2.x要求是8.11.1。下面是必须的一些包。
<?xml version="1.0" encoding="UTF-8"?>
<project xmlns="http://maven.apache.org/POM/4.0.0" xmlns:xsi="http://www.w3.org/2001/XMLSchema-instance"xsi:schemaLocation="http://maven.apache.org/POM/4.0.0 https://maven.apache.org/xsd/maven-4.0.0.xsd"><modelVersion>4.0.0</modelVersion><parent><groupId>org.springframework.boot</groupId><artifactId>spring-boot-starter-parent</artifactId><version>3.2.0-SNAPSHOT</version></parent><properties><java.version>17</java.version></properties><dependencies><dependency><groupId>io.github.hakky54</groupId><artifactId>sslcontext-kickstart</artifactId><version>7.4.7</version></dependency><dependency><groupId>org.springframework.boot</groupId><artifactId>spring-boot-starter-data-elasticsearch</artifactId></dependency><dependency><groupId>org.springframework.boot</groupId><artifactId>spring-boot-starter-web</artifactId></dependency></dependencies>
</project>
5.2、新建配置类
package com.rwzhang.elastic.elasticsearchdemo.config;import co.elastic.clients.elasticsearch.ElasticsearchClient;
import co.elastic.clients.json.jackson.JacksonJsonpMapper;
import co.elastic.clients.transport.ElasticsearchTransport;
import co.elastic.clients.transport.rest_client.RestClientTransport;
import nl.altindag.ssl.SSLFactory;
import org.apache.http.HttpHost;
import org.apache.http.auth.AuthScope;
import org.apache.http.auth.UsernamePasswordCredentials;
import org.apache.http.client.CredentialsProvider;
import org.apache.http.impl.client.BasicCredentialsProvider;
import org.elasticsearch.client.RestClient;
import org.elasticsearch.client.RestClientBuilder;
import org.springframework.context.annotation.Bean;
import org.springframework.context.annotation.Configuration;
import org.springframework.data.elasticsearch.repository.config.EnableElasticsearchRepositories;
import org.springframework.data.repository.query.QueryLookupStrategy;@Configuration
@EnableElasticsearchRepositories(queryLookupStrategy = QueryLookupStrategy.Key.CREATE_IF_NOT_FOUND,basePackages = "com.elastic.elasticsearchdemo.repository")
public class ElasticsearchConfig {@Beanpublic ElasticsearchClient elasticsearchClient(){SSLFactory sslFactory = SSLFactory.builder().withUnsafeTrustMaterial().withUnsafeHostnameVerifier().build();final CredentialsProvider credentialsProvider = new BasicCredentialsProvider();credentialsProvider.setCredentials(AuthScope.ANY, new UsernamePasswordCredentials("elastic", "密码"));RestClientBuilder builder = RestClient.builder(new HttpHost("localhost", 9200, "https"));builder = builder.setHttpClientConfigCallback(httpClientBuilder -> httpClientBuilder.setDefaultCredentialsProvider(credentialsProvider).setSSLContext(sslFactory.getSslContext()).setSSLHostnameVerifier(sslFactory.getHostnameVerifier()));RestClient restClient = builder.build();ElasticsearchTransport transport = new RestClientTransport(restClient, new JacksonJsonpMapper());return new ElasticsearchClient(transport);}
}
5.3、新建实体类
public class News implements Serializable {@Id@Field(store=true, index = false, type = FieldType.Integer)Integer id;@Field(analyzer="ik_max_word", searchAnalyzer="ik_smart", type = FieldType.Text)String title;@Field(analyzer="ik_max_word", searchAnalyzer="ik_smart", type = FieldType.Text)String content;public News(String title, String content) {this.title = title;this.content = content;}
}
5.4、新建repository
@Repository
public interface NewsRepository extends ElasticsearchRepository<News, Integer> {@Highlight(fields = {@HighlightField(name = "content")},parameters = @HighlightParameters(preTags = {"<span style='color:red'>"},postTags = {"</span>"},numberOfFragments = 10, //片段个数fragmentSize = 100  //片段长度))List<SearchHit<News>> findByContent(String content, Pageable pageable);long countByContent(String content);
}
5.5、新建测试类
@RunWith(SpringRunner.class)
@SpringBootTest
class ElasticsearchDemoApplicationTests {@ResourceNewsRepository newsRepository;@Testvoid countByContent() {long count = newsRepository.countByContent("足球");System.out.println(StrUtil.format("countByContent: {}", count));}
}
