- 视频教程:【黑马程序员】Java大型电商项目—品优购【配套源码+笔记】_哔哩哔哩_bilibili
- 源码下载:
- 链接:https://pan.baidu.com/s/1fECz5In_XCB-aW6ed6ZTbA
- 提取码:27xa
技术选型:
后端框架:Spring+SpringMVC+mybatis+Dubbox
前端:angularJS+Bootstrap
- 分布式:Dubbox框架
- 注册中心:Zookeeper
前端出错,先清理一下浏览器的缓存,再刷新一下页面,,还是报错,再去看代码
第一部分
运行环境
1、linux虚拟机
- 运行linux虚拟机
- 打开linux的终端,不可关闭虚拟机
- 打开SecureCRT代替linux的终端写命令,更清楚
- 启动zookeeper
- cd
- cd zookeeper-3.4.6
- cd bin
- ./zkServer.sh start
- ./zkServer.sh status 查看zookeeper运行状态,是否开启了
- 每次重启虚拟机,ip地址会发生变化,所以把虚拟机挂起就行,不用关机
- 查看ip地址的命令:ifconfig
- 如果ip地址变化,则相应地修改springmvc.xml文件里的zookeeper信息。2181是zookeeper的默认端口,如果配置文件里没有改动,就不变
- 后续写代码时,在浏览器访问html文件时,不报错,但就是不显示表格,除了表格什么都正常,很难排错。后来发现是zookeeper的端口发生了变化,但是代码里没有修改过来。
2、mysql数据库
- mysql如何导入.sql文件:http://t.csdnimg.cn/mhP9M
- 保持打开状态,才可运行其他代码
后端:在IDEA上搭建工程
1、先建父工程,后建子模块
2、引入依赖
- 主要问题:
- 有些依赖maven的本地仓库里没有,需要手动导入
- 解决教程:http://t.csdnimg.cn/m4fCs
- 有些依赖的版本需要修改,比如dubbo的2.8.4版本已经不维护了,要改成2.5.3;还有mysql的版本也要和自己电脑里8.0版本的mysql相对应,不能用5.0版本的。
- 解决办法:只需对着pom.xml文件里的依赖在maven的本地仓库里逐个寻找,把爆红的依赖版本改成仓库里现有的依赖版本
- 父工程的pom.xml文件需要手动导入的jar包命令如下
mvn install:install-file-Dfile=D:\各种jar包\fastdfs-client-java-1.29.jar-DgroupId=org.csource-DartifactId=fastdfs-client-java-Dversion=1.29 -Dpackaging=jarmvn install:install-file-Dfile=D:\各种jar包\spring-security-cas-4.1.0.RELEASE.jar-DgroupId=org.springframework.security-DartifactId=spring-security-cas-Dversion=4.1.0.RELEASE-Dpackaging=jarmvn install:install-file-Dfile=D:\各种jar包\cas-client-core-3.5.1.jar-DgroupId=org.jasig.cas.client-DartifactId=cas-client-core-Dversion=3.3.3-Dpackaging=jarmvn install:install-file-Dfile=D:\各种jar包\kaptcha-2.3.2.jar-DgroupId=com.github.penggle-DartifactId=kaptcha-Dversion=2.3.2 -Dpackaging=jarmvn install:install-file-Dfile=D:\各种jar包\solr-solrj-4.10.3.jar-DgroupId=org.apache.solr-DartifactId=solr-solrj-Dversion=4.10.3-Dpackaging=jarmvn install:install-file-Dfile=D:\各种jar包\activemq-all-5.11.2.jar-DgroupId=org.apache.activemq-DartifactId=activemq-all-Dversion=5.11.2 -Dpackaging=jarmvn install:install-file-Dfile=D:\各种jar包\ikanalyzer-2012_u6.jar-DgroupId=com.janeluo-DartifactId=ikanalyzer-Dversion=2012_u6-Dpackaging=jar3、逆向工程
- 目的:实现实体类与数据访问层代码的自动生成
- 老师发的资料里没有逆向工程的最新代码,把旧的代码修改一下,即可用,具体代码已放资源里
- 修改的地方主要有
- 1、mapper映射文件的生成位置
<!-- targetProject:mapper映射文件生成的位置 --><sqlMapGenerator targetPackage="com.pinyougou.mapper" targetProject=".\src\main\resources"><!-- enableSubPackages:是否让schema作为包的后缀 --><property name="enableSubPackages" value="false" /></sqlMapGenerator>- 2、数据库的连接密码
逆向代码运行教程:http://t.csdnimg.cn/Qt5ti
没有逆向工程源码也行,直接从老师发的资料里其他源码里拿到pojo包,接口包和mapper映射文件包三个包即可
容易出现的问题:逆向工程的代码生错了,要仔细辨别
4、编写后端代码
- 注意@Service和@Refrence(远程调用)注解引入要用dubbo的,否则会注入失败,报空指针异常
- import com.alibaba.dubbo.config.annotation.Reference;
- import com.alibaba.dubbo.config.annotation.Service;
5、测试
- 地址:http://localhost:9101/brand/findAll.do
- 错误一:
- 解决办法:http://t.csdnimg.cn/ZnSSP
- 修改了db.properties文件里的jdbc.url和jdbc.driver
jdbc.driver=com.mysql.cj.jdbc.Driver jdbc.url=jdbc:mysql://localhost:3306/pinyougoudb?serverTimezone=Asia/Shanghai&characterEncoding=utf-8&useSSL=false- 然后把pinyougou-dao该重新clean和install,真正修改完数据库文件后,再运行
- 测试成功后
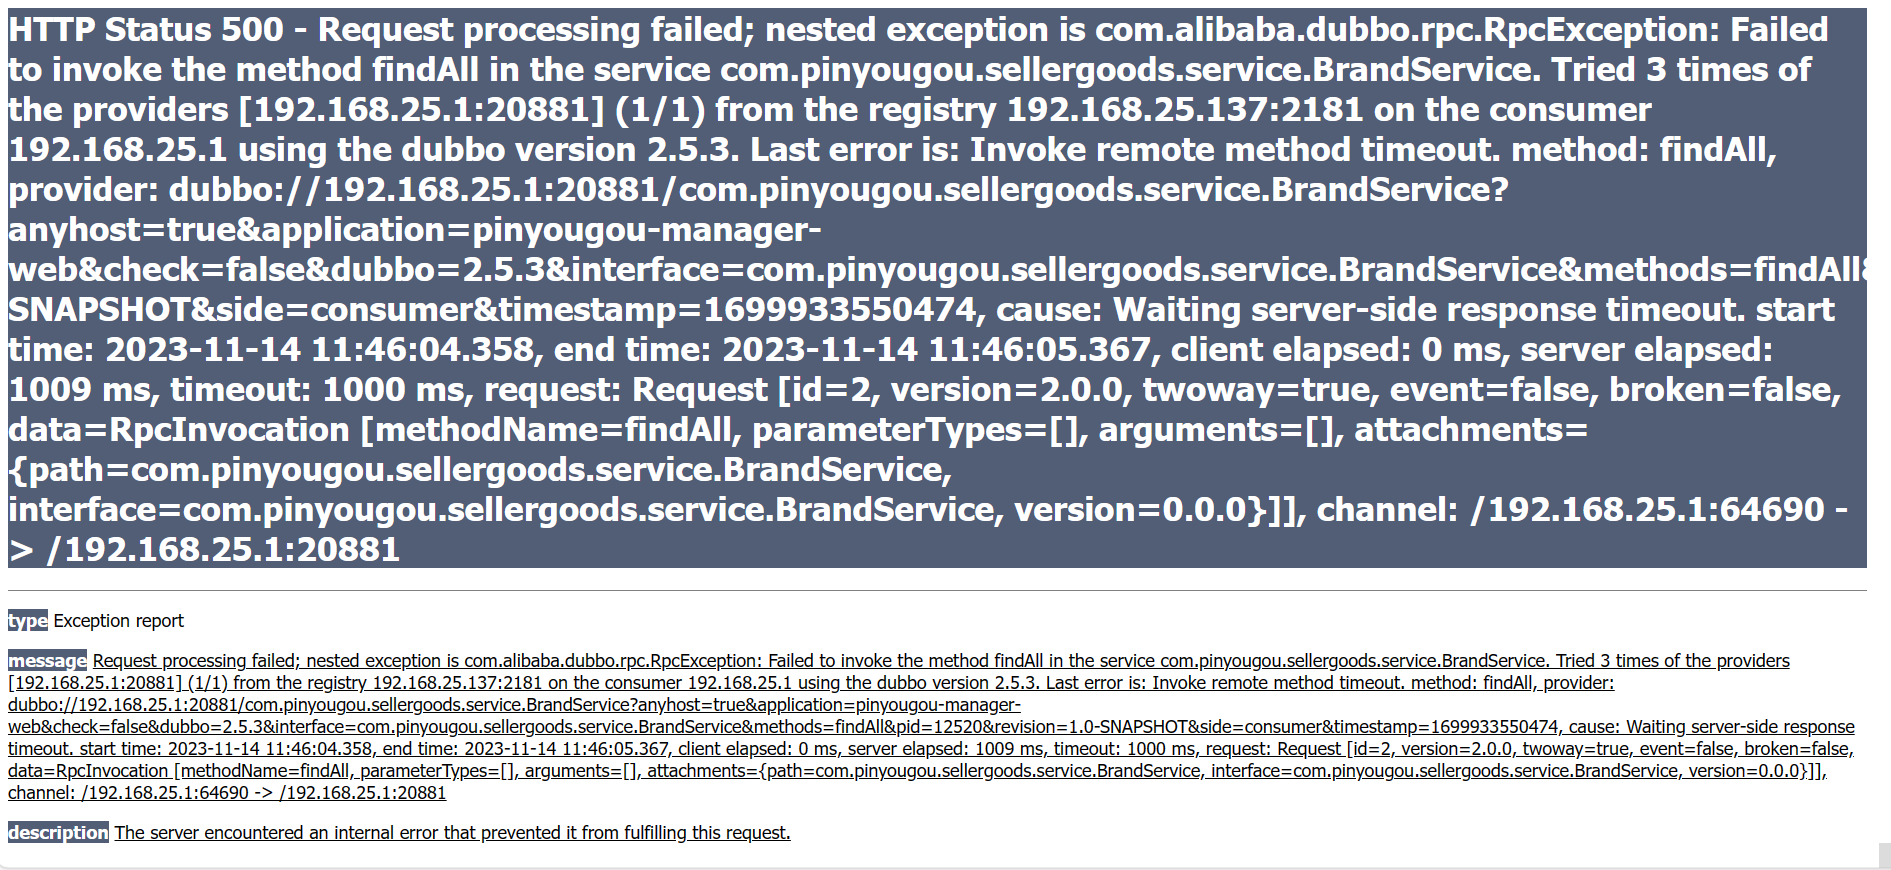
- 测试这里出了很多错,无奈之下,把项目又重新做了一遍,发现父工程的依赖无法爆红,无法正常导入;逆向工程代码出错了;zookeeper的ip地址也有变化;数据库的相关配置也没有修改完全,修改后又没有更新到数据库配置文件里……想过很多次放弃,但也没有更好的选择,所以还是坚持下来了,最大的收获还是可以静下心来好好分析报错信息了。
前端:框架AngularJS
四大特性
- 1、MVC模式
- 2、双向绑定
- 3、依赖注入
- 4、模块化设计
基本内容
- 表达式
<html> <head><title>angularJS demo 表达式</title><script src="angular.min.js"></script> </head> <body ng-app> {{100+100}} </body> </html>- 双向绑定
<html> <head><title>angularJS demo 双向绑定</title><script src="angular.min.js"></script> </head> <body ng-app> 请输入你的名称:<input ng-model="myname"> {{myname}},你好 </body> </html>- 初始化指令
<html> <head><title>angularJS demo 初始化指令</title><script src="angular.min.js"></script> </head> <body ng-app ng-init="myname='abc'"> 请输入你的名称:<input ng-model="myname"> {{myname}},你好 </body> </html>- 控制器
<html>
<head><title>angularJS demo 控制器</title><script src="angular.min.js"></script><script>// 定义一个名为myApp的模块,下面的<body>块内的代码都属于该模块var app=angular.module("myApp",[]);// 定义控制器,可以控制页面的某个功能// $scope在视图和控制器之间建立了一个通道,双向更新app.controller("myController",function($scope){$scope.add=function(){//parseInt把字符串类型转换成数值类型return parseInt($scope.x)+parseInt($scope.y);}});</script>
</head>
<body ng-app="myApp" ng-controller="myController">
<!--输入绑定变量x-->
x:<input ng-model="x">
<!--输入绑定变量y-->
y:<input ng-model="y">
<!--在页面显示x+y的结果add-->
{{add()}}
</body>
</html>
- 事件指令
<html> <head><title>angularJS demo 事件指令</title><script src="angular.min.js"></script><script>var app=angular.module("myApp",[]);app.controller("myController",function($scope){$scope.add=function(){$scope.z=parseInt($scope.x)+parseInt($scope.y);}});</script> </head> <body ng-app="myApp" ng-controller="myController"> x:<input ng-model="x"> y:<input ng-model="y"> <!--点击“运算”按钮后,触发add()方法,输出x+y的结果--> <button ng-click="add()">运算</button> {{z}} </body> </html>- 循环数组
<html> <head><title>angularJS demo 循环数组</title><script src="angular.min.js"></script><script>var app=angular.module("myApp",[]);app.controller("myController",function($scope){$scope.list=[100,200,300,400];});</script> </head> <body ng-app="myApp" ng-controller="myController"> <!-- 利用循环把list里的元素打印到表格中--><table><tr ng-repeat="x in list"><td>{{x}}</td></tr></table> </body> </html>- 循环对象数组
<html> <head><title>angularJS demo 循环对象数组</title><script src="angular.min.js"></script><script>var app=angular.module("myApp",[]);app.controller("myController",function($scope){$scope.list=[{name:"张三",chinese:1,math:1},{name:"李四",chinese:2,math:2},{name:"王五",chinese:3,math:3},{name:"赵六",chinese:4,math:4}];});</script> </head> <body ng-app="myApp" ng-controller="myController"><table><tr ng-repeat="x in list"><td>{{x.name}}</td><td>{{x.chinese}}</td><td>{{x.math}}</td></tr></table> </body> </html>- 内置服务
<html>
<head><title>angularJS demo 内置服务</title><meta charset="utf-8"><script src="angular.min.js"></script><script>var app=angular.module("myApp",[]);// $http从后端获取数据,数据修改更灵活app.controller("myController",function($scope,$http){$scope.findList=function(){$http.get("data.json").success(function(response){$scope.list=response;});}});</script>
</head>
<!--初始化时,顺便触发findList()方法-->
<body ng-app="myApp" ng-controller="myController" ng-init="findList()"><table><tr ng-repeat="x in list"><td>{{x.name}}</td><td>{{x.chinese}}</td><td>{{x.math}}</td></tr></table>
</body>
</html>
//json数据 [ // key用双引号括起,value若是字符串也要用双引号括起{"name":"张三","chinese":1,"math":1},{"name":"李四","chinese":2,"math":2},{"name":"王五","chinese":3,"math":3},{"name":"赵六","chinese":4,"math":4} ]常用指令
- ng-app:定义AngularJS应用程序的根元素
- ng-model:用于绑定变量(输入端和变量端,双向绑定)
- ng-init:初始化变量
- ng-controller:用于指定所用控制器
- ng-click:单击事件指令,点击时触发控制器的某个方法
- ng-repeat:用于循环数组变量
第二部分(实现功能)
品牌列表分页
1、后端
PageResult
pinyougou-pojo模块
package entity;import java.io.Serializable;
import java.util.List;/*** 分布结果实体类* 模块:pinyougou-pojo* 路径:src/main/java/entity*/
public class PageResult implements Serializable {private long total;//记录总条数private List rows;//当面页记录//getter,setter方法和构造器省略
}
BrandService
pinyougou-sellergoods-interface模块
package com.pinyougou.sellergoods.service;import com.pinyougou.pojo.TbBrand;
import entity.PageResult;import java.util.List;/*** 品牌业务接口*/
public interface BrandService {/*** 分布查询* @param pageNum* @param pageSize* @return*/public PageResult findPage(int pageNum,int pageSize);
}
BrandServiceImpl
pinyougou-sellergoods-service模块
package com.pinyougou.sellergoods.service.impl;import com.alibaba.dubbo.config.annotation.Service;
import com.github.pagehelper.Page;
import com.github.pagehelper.PageHelper;
import com.pinyougou.mapper.TbBrandMapper;
import com.pinyougou.pojo.TbBrand;
import com.pinyougou.sellergoods.service.BrandService;
import entity.PageResult;
import org.springframework.beans.factory.annotation.Autowired;import java.util.List;/*** 品牌服务层实现类*/
@Service
public class BrandServiceImpl implements BrandService {/*** 分页的服务层代码* @param pageNum* @param pageSize* @return*/@Overridepublic PageResult findPage(int pageNum, int pageSize) {PageHelper.startPage(pageNum,pageSize);//分页插件Page<TbBrand> page=(Page<TbBrand>)brandMapper.selectByExample(null);//使用分页可以简化前端工作量,不必返回全部内容return new PageResult(page.getTotal(),page.getResult());}
}
BrandController
pinyougou-manager-web模块
package com.pinyougou.manager.controller;import com.alibaba.dubbo.config.annotation.Reference;
import com.pinyougou.pojo.TbBrand;
import com.pinyougou.sellergoods.service.BrandService;
import entity.PageResult;
import org.springframework.web.bind.annotation.RequestMapping;
import org.springframework.web.bind.annotation.RestController;import java.util.List;/*** 品牌的控制器层*/
public class BrandController {@RequestMapping("/findPage")public PageResult findPage(int page,int rows){return brandService.findPage(page,rows);}
}
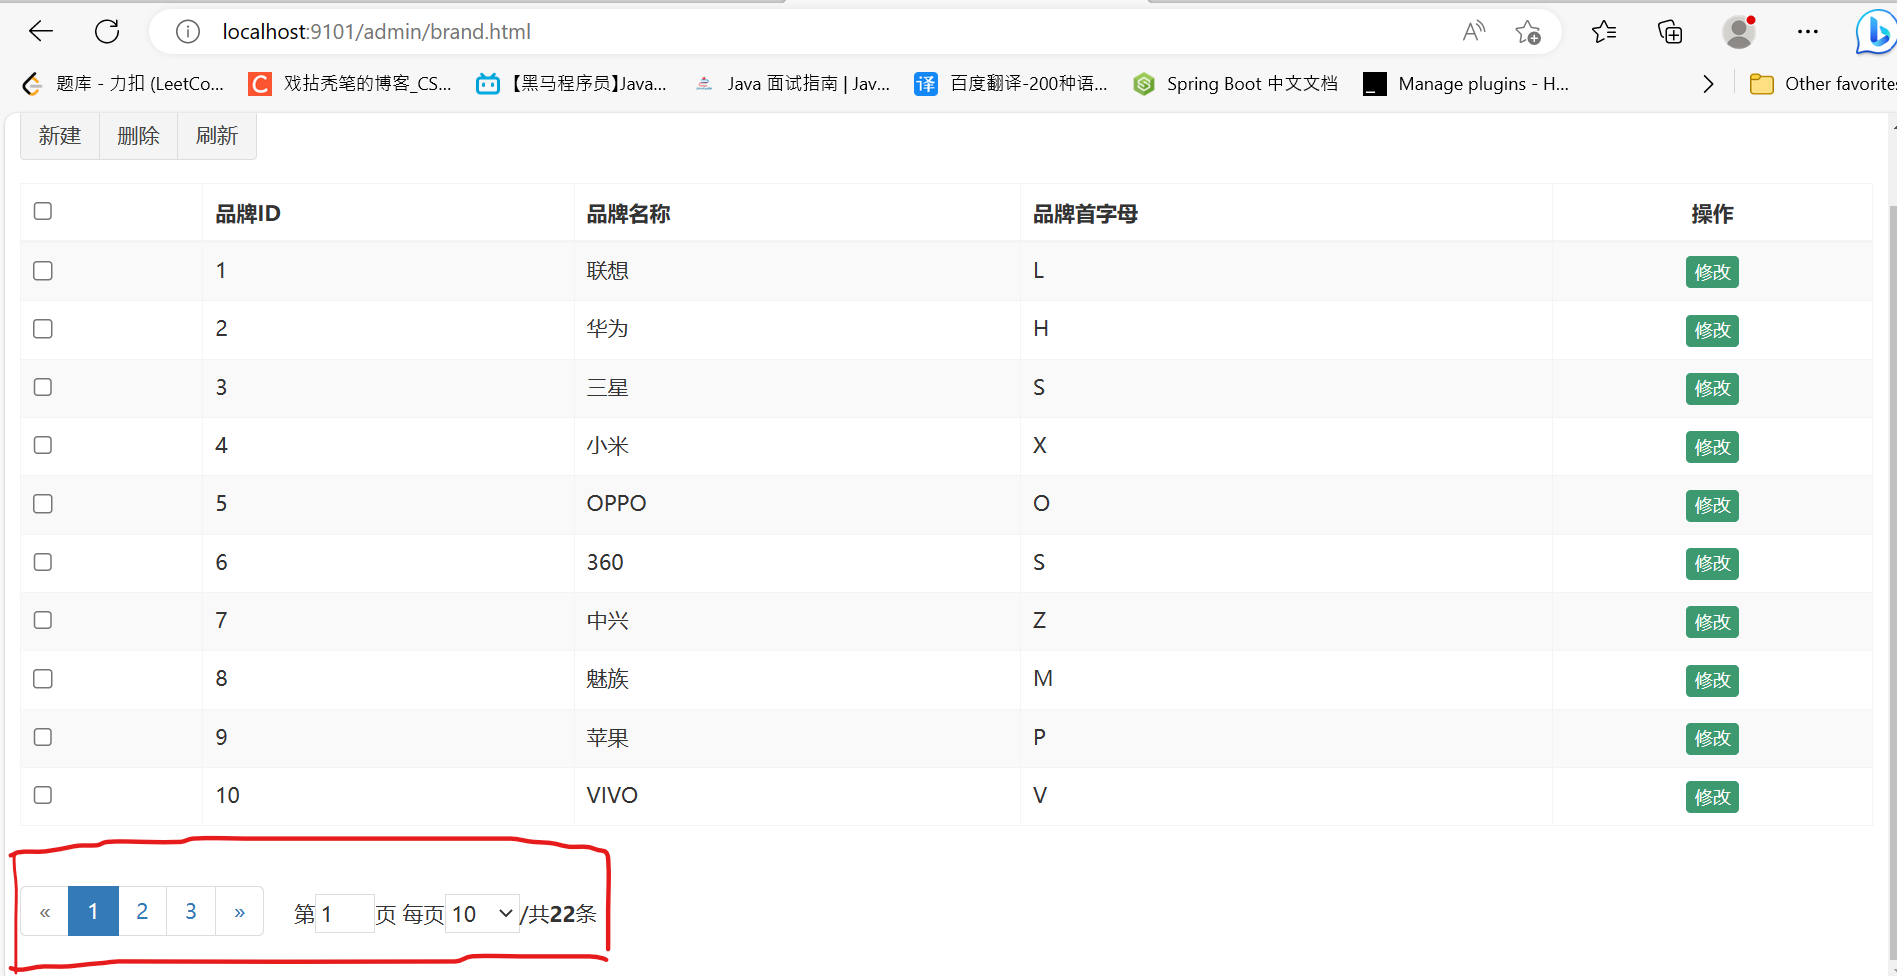
父工程重新install后,运行结果:

2、前端
<!DOCTYPE html>
<html>
<head><!--导入资源--><script src="../plugins/jQuery/jquery-2.2.3.min.js"></script><script src="../plugins/bootstrap/js/bootstrap.min.js"></script><script src="../plugins/angularjs/angular.min.js"></script><!--分页组件开始--><script src="../plugins/angularjs/pagination.js"></script><link rel="stylesheet" href="../plugins/angularjs/pagination.css"><!--分页组件结束--><script>//定义名为app的模块var app=angular.module("pinyougou",["pagination"]);app.controller("brandController",function ($scope,$http) {//读取列表数据绑定到表单中// $scope.findAll=function () {// 	$http.get("../brand/findAll.do").success(function(response){// 		$scope.list=response;// 	})//// }//分页$scope.findPage=function(page,rows) {$http.get("../brand/findPage.do?page="+page+"&rows="+rows).success(function(response){$scope.list=response.rows;$scope.paginationConf.totalItems=response.total;//定义总记录数})}//定义对象paginationConf,分布的配置$scope.paginationConf={currentPage: 1,//当前页totalItems: 10,//总记录条数itemsPerPage: 10,//每页的记录条数perPageOptions: [10,20,30,40,50],//页码选项,每页10条还是20还是...onChange: function () {//当页码发生变化时自动触发的方法$scope.reloadList();}}//重新加载记录$scope.reloadList=function () {$scope.findPage($scope.paginationConf.currentPage,$scope.paginationConf.itemsPerPage);}})</script></head>
<body class="hold-transition skin-red sidebar-mini" ng-app="pinyougou" ng-controller="brandController" ng-init="findAll()"><!-- .box-body --><!-- 数据表格 --><div class="table-box"><!--数据列表--><table id="dataList" class="table table-bordered table-striped table-hover dataTable"><!--表体--><tbody><!--使用循环填写表格--><tr ng-repeat="entity in list"><td><input  type="checkbox" ></td>			                              <td>{{entity.id}}</td><td>{{entity.name}}</td><td>{{entity.firstChar}}</td><td class="text-center">                                           <button type="button" class="btn bg-olive btn-xs" data-toggle="modal" data-target="#editModal"  >修改</button>                                           </td></tr></tbody></table><!--数据列表/--><!--在数据表格下放置分页组件,那个分页的小栏--><tm-pagination conf="paginationConf"></tm-pagination>	 </div><!-- 数据表格 /-->                                    </div>
</body>
</html>
运行结果:
增加品牌
1、后端
BrandService
pinyougou-sellergoods-interface
package com.pinyougou.sellergoods.service;import com.pinyougou.pojo.TbBrand;
import entity.PageResult;import java.util.List;/*** 品牌业务接口*/
public interface BrandService {/*** 增加品牌* @param brand*/public void add(TbBrand brand);
}
BrandServiceImpl
pinyougou-sellergoods-service
package com.pinyougou.sellergoods.service.impl;import com.alibaba.dubbo.config.annotation.Service;
import com.github.pagehelper.Page;
import com.github.pagehelper.PageHelper;
import com.pinyougou.mapper.TbBrandMapper;
import com.pinyougou.pojo.TbBrand;
import com.pinyougou.sellergoods.service.BrandService;
import entity.PageResult;
import org.springframework.beans.factory.annotation.Autowired;import java.util.List;/*** 品牌服务层实现类*/
@Service
public class BrandServiceImpl implements BrandService {/*** 增加品牌* @param brand*/@Overridepublic void add(TbBrand brand) {brandMapper.insert(brand);}
}
BrandController
pinyougou-manager-web
package com.pinyougou.manager.controller;import com.alibaba.dubbo.config.annotation.Reference;
import com.pinyougou.pojo.TbBrand;
import com.pinyougou.sellergoods.service.BrandService;
import entity.PageResult;
import entity.Result;
import org.springframework.web.bind.annotation.RequestBody;
import org.springframework.web.bind.annotation.RequestMapping;
import org.springframework.web.bind.annotation.RestController;import java.util.List;/*** 品牌的控制器层*/
@RestController
@RequestMapping("/brand")
public class BrandController {//增加品牌@RequestMapping("/add")public Result add(@RequestBody TbBrand brand){try {brandService.add(brand);return new Result(true,"添加成功☺");} catch (Exception e) {e.printStackTrace();return new Result(false,"添加失败🙃");}}
}
Result
pinyougou-pojo
package entity;import java.io.Serializable;/*** 增加品牌的返回结果实体类*/
public class Result implements Serializable {private boolean success;private String message;//getter,setter方法,构造器省略
}
2、前端
<!DOCTYPE html>
<html>
<head><script>//定义名为app的模块var app=angular.module("pinyougou",["pagination"]);app.controller("brandController",function ($scope,$http) {//增加品牌$scope.add=function () {$http.post("../brand/add.do",$scope.entity).success(function(response){if(response.success){$scope.reloadList();//刷新数据}else{alert(response.message);//打印信息}})}})</script></head>
<body class="hold-transition skin-red sidebar-mini" ng-app="pinyougou" ng-controller="brandController" ng-init="findAll()"><!-- .box-body --><div class="box-body"><!-- 数据表格 --><div class="table-box"><!--工具栏--><div class="pull-left"><div class="form-group form-inline"><div class="btn-group"><!--添加的ng-click可以让每次打开新建的窗口里,都保持空白页面--><button type="button" class="btn btn-default" title="新建" ng-click="entity={}" data-toggle="modal" data-target="#editModal" ><i class="fa fa-file-o"></i> 新建</button></div></div></div><!--工具栏/--><!--数据列表--><table id="dataList" class="table table-bordered table-striped table-hover dataTable"><!--表头--><thead><tr><th class="" style="padding-right:0px"><input id="selall" type="checkbox" class="icheckbox_square-blue"></th> <th class="sorting_asc">品牌ID</th><th class="sorting">品牌名称</th>									      <th class="sorting">品牌首字母</th>									     				<th class="text-center">操作</th></tr></thead></table>					 </div><!-- 数据表格 /--> </div><!-- /.box-body --><!-- 编辑窗口 -->
<div class="modal fade" id="editModal" tabindex="-1" role="dialog" aria-labelledby="myModalLabel" aria-hidden="true"><div class="modal-dialog" ><div class="modal-content"><div class="modal-body">		<table class="table table-bordered table-striped"  width="800px"><tr><td>品牌名称</td><!--此处的ng-model是将属性name和品牌名称绑定,获取到品牌名称后,绑定后name属性中--><td><input  class="form-control" ng-model="entity.name" placeholder="品牌名称" >  </td></tr>		      	<tr><td>首字母</td><td><input  class="form-control" ng-model="entity.firstChar" placeholder="首字母">  </td></tr>		      	</table>				</div><div class="modal-footer">	<!--此处的ng-click是为了在点击保存时,触发add()方法-->					<button class="btn btn-success" data-dismiss="modal" ng-click="add()" aria-hidden="true">保存</button></div></div></div>
</div></body>
</html>
运行结果:

修改品牌
1、后端
BrandService
pinyougou-sellergoods-interface
package com.pinyougou.sellergoods.service;import com.pinyougou.pojo.TbBrand;
import entity.PageResult;import java.util.List;/*** 品牌业务接口*/
public interface BrandService {/*** 根据ID查询实体* @param id* @return*/public TbBrand findOne(Long id);/*** 修改* @param brand*/public void update(TbBrand brand);
}
BrandServiceImpl
pinyougou-sellergoods-service
package com.pinyougou.sellergoods.service.impl;import com.alibaba.dubbo.config.annotation.Service;
import com.github.pagehelper.Page;
import com.github.pagehelper.PageHelper;
import com.pinyougou.mapper.TbBrandMapper;
import com.pinyougou.pojo.TbBrand;
import com.pinyougou.sellergoods.service.BrandService;
import entity.PageResult;
import org.springframework.beans.factory.annotation.Autowired;import java.util.List;/*** 品牌服务层实现类*/
@Service
public class BrandServiceImpl implements BrandService {//根据ID查询@Overridepublic TbBrand findOne(Long id) {return brandMapper.selectByPrimaryKey(id);}//修改@Overridepublic void update(TbBrand brand) {brandMapper.updateByPrimaryKey(brand);}
}
BrandController
pinyougou-manager-web
package com.pinyougou.manager.controller;import com.alibaba.dubbo.config.annotation.Reference;
import com.pinyougou.pojo.TbBrand;
import com.pinyougou.sellergoods.service.BrandService;
import entity.PageResult;
import entity.Result;
import org.springframework.web.bind.annotation.RequestBody;
import org.springframework.web.bind.annotation.RequestMapping;
import org.springframework.web.bind.annotation.RestController;import java.util.List;/*** 品牌的控制器层*/
public class BrandController {//根据ID查询@RequestMapping("/findOne")public TbBrand findOne(Long id){return brandService.findOne(id);}//修改@RequestMapping("/update")public Result update(@RequestBody TbBrand brand){try {brandService.update(brand);return new Result(true,"修改成功☺");} catch (Exception e) {e.printStackTrace();return new Result(false,"修改失败🙃");}}
}
运行结果:

2、前端
<!DOCTYPE html>
<html>
<head><script>//定义名为app的模块var app=angular.module("pinyougou",["pagination"]);app.controller("brandController",function ($scope,$http) {//保存(新增和修改)$scope.save=function () {var methodName="add";//新增时,id为空;但修改时,id不为空if($scope.entity.id!=null){methodName="update";}$http.post("../brand/"+methodName+".do",$scope.entity).success(function(response){if(response.success){$scope.reloadList();//刷新数据}else{alert(response.message);//打印信息}})}//根据ID查询$scope.findOne=function(id){$http.get("../brand/findOne.do?id="+id).success(function (response) {$scope.entity=response;})}})</script></head>
<body class="hold-transition skin-red sidebar-mini" ng-app="pinyougou" ng-controller="brandController" ng-init="findAll()"><!-- .box-body --><div class="box-body"><!-- 数据表格 --><div class="table-box"><!--数据列表--><table id="dataList" class="table table-bordered table-striped table-hover dataTable"><!--表体--><tbody><!--使用循环填写表格--><tr ng-repeat="entity in list"><td><input  type="checkbox" ></td><!--此处要加双花括号,是因为entity.id是表达式--><td>{{entity.id}}</td><td>{{entity.name}}</td><td>{{entity.firstChar}}</td><td class="text-center"><!--此处的findOne()里entity.id不用双括号是因为在这里它是变量--><button type="button" class="btn bg-olive btn-xs" data-toggle="modal" ng-click="findOne(entity.id)" data-target="#editModal"  >修改</button></td></tr></tbody></table>			 </div><!-- 数据表格 /--></div><!-- /.box-body --><!-- 编辑窗口 -->
<div class="modal fade" id="editModal" tabindex="-1" role="dialog" aria-labelledby="myModalLabel" aria-hidden="true"><div class="modal-dialog" ><div class="modal-content"><div class="modal-footer">						<button class="btn btn-success" data-dismiss="modal" ng-click="save()" aria-hidden="true">保存</button></div></div></div>
</div>
</body>
</html>
运行结果:

删除品牌
1、后端
BrandService
pinyougou-sellergoods-interface
package com.pinyougou.sellergoods.service;import com.pinyougou.pojo.TbBrand;
import entity.PageResult;import java.util.List;/*** 品牌业务接口*/
public interface BrandService {/*** 删除* @param ids*/public void delete(Long []ids);
}
BrandServiceImpl
pinyougou-sellergoods-service
package com.pinyougou.sellergoods.service.impl;import com.alibaba.dubbo.config.annotation.Service;
import com.github.pagehelper.Page;
import com.github.pagehelper.PageHelper;
import com.pinyougou.mapper.TbBrandMapper;
import com.pinyougou.pojo.TbBrand;
import com.pinyougou.sellergoods.service.BrandService;
import entity.PageResult;
import org.springframework.beans.factory.annotation.Autowired;import java.util.List;/*** 品牌服务层实现类*/
@Service
public class BrandServiceImpl implements BrandService {//删除@Overridepublic void delete(Long[] ids) {for(Long id:ids){brandMapper.deleteByPrimaryKey(id);}}
}
BrandController
pinyougou-manager-web
package com.pinyougou.manager.controller;import com.alibaba.dubbo.config.annotation.Reference;
import com.pinyougou.pojo.TbBrand;
import com.pinyougou.sellergoods.service.BrandService;
import entity.PageResult;
import entity.Result;
import org.springframework.web.bind.annotation.RequestBody;
import org.springframework.web.bind.annotation.RequestMapping;
import org.springframework.web.bind.annotation.RestController;import java.util.List;/*** 品牌的控制器层*/
@RestController
@RequestMapping("/brand")
public class BrandController {//删除@RequestMapping("/delete")public Result delete(Long []ids){try {brandService.delete(ids);return new Result(true,"删除成功☺");} catch (Exception e) {e.printStackTrace();return new Result(false,"删除失败🙃");}}
}
运行结果:

2、前端
<!DOCTYPE html>
<html>
<head><script>//定义名为app的模块var app=angular.module("pinyougou",["pagination"]);app.controller("brandController",function ($scope,$http) {//批量选中$scope.selectIds=[];//选中的ID数组,准备批量删除的数据$scope.updateSelection=function($event,id){if($event.target.checked){//判断是否选中$scope.selectIds.push(id);//向数组中添加数据}else{var idx=$scope.selectIds.indexOf(id);//id在选中数据的数组中的位置$scope.selectIds.splice(idx,1);//从数组中删除数据,重复点复选框,选择和取消选择反复横跳}}//删除$scope.dele=function () {$http.get("../brand/delete.do?ids="+$scope.selectIds).success(function (response) {if(response.success){$scope.reloadList();//刷新列表$scope.selectIds=[];}else{alert(response.message);//打印信息}})}})</script>
</head>
<body class="hold-transition skin-red sidebar-mini" ng-app="pinyougou" ng-controller="brandController" ng-init="findAll()"><!-- .box-body --><div class="box-body"><!-- 数据表格 --><div class="table-box"><!--工具栏--><div class="pull-left"><div class="form-group form-inline"><button type="button" class="btn btn-default" title="删除" ng-click="dele()"><i class="fa fa-trash-o"></i> 删除</button>                                    </div></div></div><!--工具栏/--><!--在数据表格下放置分页组件,那个分页的小栏--><tm-pagination conf="paginationConf"></tm-pagination>{{selectIds}}							 </div><!-- 数据表格 /-->             </div><!-- /.box-body -->
</body>
</html>
条件查询
1、后端
BrandService
pinyougou-sellergoods-interface
package com.pinyougou.sellergoods.service;import com.pinyougou.pojo.TbBrand;
import entity.PageResult;import java.util.List;/*** 品牌业务接口*/
public interface BrandService {/*** 条件查询* @param pageNum* @param pageSize* @return*///直接传递一个实体类TbBrand比逐个传递它的属性要更灵活public PageResult findPage(TbBrand brand,int pageNum,int pageSize);
}
BrandServiceImpl
pinyougou-sellergoods-service
package com.pinyougou.sellergoods.service.impl;import com.alibaba.dubbo.config.annotation.Service;
import com.github.pagehelper.Page;
import com.github.pagehelper.PageHelper;
import com.pinyougou.mapper.TbBrandMapper;
import com.pinyougou.pojo.TbBrand;
import com.pinyougou.pojo.TbBrandExample;
import com.pinyougou.sellergoods.service.BrandService;
import entity.PageResult;
import org.springframework.beans.factory.annotation.Autowired;import java.util.List;/*** 品牌服务层实现类*/
@Service
public class BrandServiceImpl implements BrandService {//条件查询@Overridepublic PageResult findPage(TbBrand brand, int pageNum, int pageSize) {//分页插件PageHelper.startPage(pageNum,pageSize);//封装查询条件TbBrandExample example = new TbBrandExample();//构建查询条件的类TbBrandExample.Criteria criteria = example.createCriteria();if(brand!=null){//如果有名称的条件if(brand.getName()!=null && brand.getName().length() > 0){//where name like %s%criteria.andNameLike("%"+brand.getName()+"%");}//如果有首字母的条件if(brand.getFirstChar()!=null && brand.getFirstChar().length() > 0){criteria.andFirstCharEqualTo(brand.getFirstChar());}}Page<TbBrand> page=(Page<TbBrand>)brandMapper.selectByExample(null);return new PageResult(page.getTotal(),page.getResult());}
}
BrandController
pinyougou-manager-web
package com.pinyougou.manager.controller;import com.alibaba.dubbo.config.annotation.Reference;
import com.pinyougou.pojo.TbBrand;
import com.pinyougou.sellergoods.service.BrandService;
import entity.PageResult;
import entity.Result;
import org.springframework.web.bind.annotation.RequestBody;
import org.springframework.web.bind.annotation.RequestMapping;
import org.springframework.web.bind.annotation.RestController;import java.util.List;/*** 品牌的控制器层*/
@RestController
@RequestMapping("/brand")
public class BrandController {//条件查询@RequestMapping("/search")public PageResult search(@RequestBody TbBrand brand, int page,int rows){return brandService.findPage(brand,page,rows);}
}
2、前端
<!DOCTYPE html>
<html>
<head><script>//定义名为app的模块var app=angular.module("pinyougou",["pagination"]);app.controller("brandController",function ($scope,$http) {//定义搜索对象$scope.searchEntity={};//条件查询+分页$scope.search=function(page,rows){$http.post("../brand/search.do?page="+page+"&rows="+rows,$scope.searchEntity).success(function (response) {$scope.list=response.rows;//给列表变量赋值$scope.paginationConf.totalItems=response.total;//定义总记录数})}//重新加载记录$scope.reloadList=function () {$scope.search($scope.paginationConf.currentPage,$scope.paginationConf.itemsPerPage);}})</script></head>
<body class="hold-transition skin-red sidebar-mini" ng-app="pinyougou" ng-controller="brandController" ng-init="findAll()"><!-- .box-body --><div class="box-body"><!-- 数据表格 --><div class="table-box"><!--工具栏--><div class="box-tools pull-right"><div class="has-feedback">名称: <input ng-model="searchEntity.name">首字母: <input ng-model="searchEntity.firstChar"><button ng-click="reloadList()">查询</button></div></div><!--工具栏/-->						 </div><!-- 数据表格 /-->     </div><!-- /.box-body -->
</body>
</html>
运行结果:


第三部分(简化开发)
前端分层开发(后端MVC的分层思想)
brand.html
<!DOCTYPE html>
<html>
<head><script src="../js/base_pagination.js"></script><script src="../js/service/brandService.js"></script><script src="../js/controller/brandController.js"></script>
</body>
</html>
base_pagination.js
//使用分页插件时,引入该资源
var app=angular.module("pinyougou",["pagination"]);
base.js
//不使用分页插件时,引入该资源
var app=angular.module("pinyougou",[]);
brandService.js
//构建前端服务层
//和后端打交道的代码写在服务层
app.service("brandService",function($http){//$get:传递属性,变量; $post:传递对象this.findAll=function () {return $http.get('../brand/findAll.do');}this.findPage=function (page,rows) {return $http.get("../brand/findPage.do?page="+page+"&rows="+rows);}this.search=function (page,rows,searchEntity) {return $http.post("../brand/search.do?page="+page+"&rows="+rows,searchEntity);}this.add=function (entity) {return $http.post("../brand/add.do?",entity);}this.update=function (entity) {return $http.post("../brand/update.do?",entity);}this.findOne=function (id) {return $http.get("../brand/findOne.do?id="+id);}this.dele=function (ids) {return $http.get("../brand/delete.do?ids="+ids);}
})
brandController.js
//构建前端的控制层
//和页面打交道的代码写在控制层
app.controller("brandController",function ($scope,brandService) {//读取列表数据绑定到表单中$scope.findAll=function () {brandService.findAll().success(function(response){$scope.list=response;})}//定义搜索对象$scope.searchEntity={};//条件查询+分页$scope.search=function(page,rows){brandService.search(page,rows,$scope.searchEntity).success(function (response) {$scope.list=response.rows;//给列表变量赋值$scope.paginationConf.totalItems=response.total;//定义总记录数})}//分页$scope.findPage=function(page,rows) {brandService.findPage(page,rows).success(function(response){$scope.list=response.rows;$scope.paginationConf.totalItems=response.total;//定义总记录数})}//定义对象paginationConf,分布的配置$scope.paginationConf={currentPage: 1,//当前页totalItems: 10,//总记录条数itemsPerPage: 10,//每页的记录条数perPageOptions: [10,20,30,40,50],//页码选项,每页10条还是20还是...onChange: function () {//当页码发生变化时自动触发的方法$scope.reloadList();}}//重新加载记录$scope.reloadList=function () {$scope.search($scope.paginationConf.currentPage,$scope.paginationConf.itemsPerPage);}//保存(新增和修改)$scope.save=function () {var object=null;//新增时,id为空;但修改时,id不为空if($scope.entity.id!=null){object=brandService.update($scope.entity);}else{object=brandService.add($scope.entity);}object.success(function(response){if(response.success){$scope.reloadList();//刷新数据}else{alert(response.message);//打印信息}})}//根据ID查询$scope.findOne=function(id){brandService.findOne(id).success(function (response) {$scope.entity=response;})}//批量选中$scope.selectIds=[];//选中的ID数组,准备批量删除的数据$scope.updateSelection=function($event,id){if($event.target.checked){//判断是否选中$scope.selectIds.push(id);//向数组中添加数据}else{var idx=$scope.selectIds.indexOf(id);//id在选中数据的数组中的位置$scope.selectIds.splice(idx,1);//从数组中删除数据,重复点复选框,选择和取消选择反复横跳}}//删除$scope.dele=function () {brandService.dele($scope.selectIds).success(function (response) {if(response.success){$scope.reloadList();//刷新列表$scope.selectIds=[];}else{alert(response.message);//打印信息}})}
})
控制器继承(提高代码复用率)

brand.html
<!DOCTYPE html>
<html>
<head><script src="../js/controller/baseController.js"></script><script src="../js/controller/brandController.js"></script>
</body>
</html>
baseController.js
//父控制器
app.controller("baseController",function ($scope) {//定义搜索对象$scope.searchEntity={};//定义对象paginationConf,分布的配置$scope.paginationConf={currentPage: 1,//当前页totalItems: 10,//总记录条数itemsPerPage: 10,//每页的记录条数perPageOptions: [10,20,30,40,50],//页码选项,每页10条还是20还是...onChange: function () {//当页码发生变化时自动触发的方法$scope.reloadList();}}//重新加载记录$scope.reloadList=function () {$scope.search($scope.paginationConf.currentPage,$scope.paginationConf.itemsPerPage);}//批量选中$scope.selectIds=[];//选中的ID数组,准备批量删除的数据$scope.updateSelection=function($event,id){if($event.target.checked){//判断是否选中$scope.selectIds.push(id);//向数组中添加数据}else{var idx=$scope.selectIds.indexOf(id);//id在选中数据的数组中的位置$scope.selectIds.splice(idx,1);//从数组中删除数据,重复点复选框,选择和取消选择反复横跳}}})
brandController.js
//构建前端的控制层
//和页面打交道的代码写在控制层
app.controller("brandController",function ($scope,$controller,brandService) {//把baseController的$scope传递给brandController的$scope,伪继承$controller("baseController",{$scope:$scope});//读取列表数据绑定到表单中$scope.findAll=function () {brandService.findAll().success(function(response){$scope.list=response;})}//条件查询+分页$scope.search=function(page,rows){brandService.search(page,rows,$scope.searchEntity).success(function (response) {$scope.list=response.rows;//给列表变量赋值$scope.paginationConf.totalItems=response.total;//定义总记录数})}//分页$scope.findPage=function(page,rows) {brandService.findPage(page,rows).success(function(response){$scope.list=response.rows;$scope.paginationConf.totalItems=response.total;//定义总记录数})}//保存(新增和修改)$scope.save=function () {var object=null;//新增时,id为空;但修改时,id不为空if($scope.entity.id!=null){object=brandService.update($scope.entity);}else{object=brandService.add($scope.entity);}object.success(function(response){if(response.success){$scope.reloadList();//刷新数据}else{alert(response.message);//打印信息}})}//根据ID查询$scope.findOne=function(id){brandService.findOne(id).success(function (response) {$scope.entity=response;})}//删除$scope.dele=function () {brandService.dele($scope.selectIds).success(function (response) {if(response.success){$scope.reloadList();//刷新列表$scope.selectIds=[];}else{alert(response.message);//打印信息}})}
})
规格管理(深入理解和使用双向绑定)
代码较散,前后端不断切换写代码,调试
第四部分
模板管理
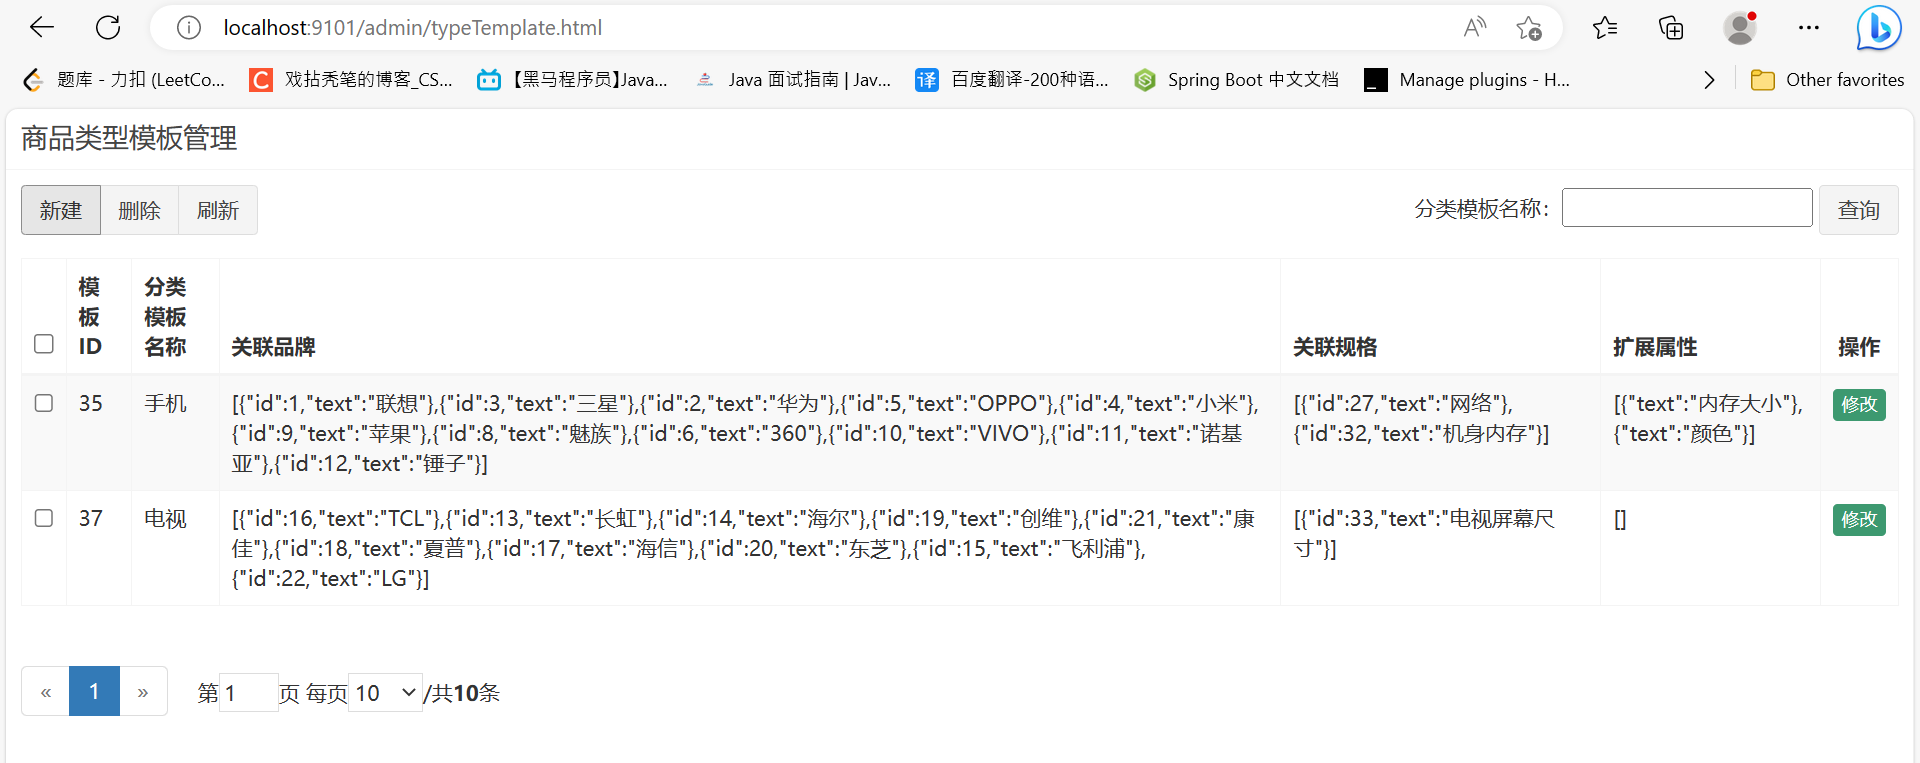
一、品牌下拉列表(使用select2实现下拉列表功能
写代码的思路、逻辑、顺序基本如下

后端
TbBrandMapper.xml
<select id="selectOptionList" resultType="java.util.Map">select id,name as text from tb_brand</select>TbBrandMapper
/*** 下拉列表数据* @return*/List<Map> selectOptionList();BrandService
public List<Map> selectOptionList();
BrandServiceImpl
@Overridepublic List<Map> selectOptionList() {return brandMapper.selectOptionList();}BrandController
@RequestMapping("/selectOptionList")public List<Map> selectOptionList(){return brandService.selectOptionList();}运行结果:

前端
brandService.js
this.selectOptionList=function () {return $http.get("../brand/selectOptionList.do")}typeTemplateController.js
 //控制层
app.controller('typeTemplateController' ,function($scope,$controller,typeTemplateService,brandService,specificationService){$controller('baseController',{$scope:$scope});//继承//搜索$scope.search=function(page,rows){			typeTemplateService.search(page,rows,$scope.searchEntity).success(function(response){$scope.list=response.rows;	$scope.paginationConf.totalItems=response.total;//更新总记录数}			);}$scope.brandList={data:[]};//品牌列表//查询品牌列表$scope.findBrandList=function(){brandService.selectOptionList().success(function(response){$scope.brandList={data:response};});		}
});
typeTemplate.html
<!DOCTYPE html>
<html><head><script src="../plugins/angularjs/angular.min.js"></script><!--分页组件开始--><script src="../plugins/angularjs/pagination.js"></script><link rel="stylesheet" href="../plugins/angularjs/pagination.css"><!--分页组件结束--><script src="../js/base_pagination.js"></script><script src="../js/angular-select2.js"></script><script src="../js/service/typeTemplateService.js"></script><script src="../js/service/brandService.js"></script><script src="../js/service/specificationService.js"></script><script src="../js/controller/baseController.js"></script><script src="../js/controller/typeTemplateController.js"></script>
</head><body class="hold-transition skin-red sidebar-mini" ng-app="pinyougou" ng-controller="typeTemplateController" ng-init="findAll();findBrandList()"><!-- .box-body --><div class="box-body"><!--工具栏/--><!--数据列表--><table id="dataList" class="table table-bordered table-striped table-hover dataTable"><tbody><tr ng-repeat="entity in list"><td><input  type="checkbox"></td><td>{{entity.id}}</td><td>{{entity.name}}</td><td>{{entity.brandIds}}</td><td>{{entity.specIds}}</td><td>{{entity.customAttributeItems}}</td><td class="text-center"><button type="button" class="btn bg-olive btn-xs" data-toggle="modal" data-target="#editModal">修改</button></td></tr></tbody></table><!--数据列表/--><tm-pagination conf="paginationConf"></tm-pagination></div><!-- 数据表格 /-->                        </div><!-- /.box-body --><!-- 编辑窗口 -->
<div class="modal fade" id="editModal" tabindex="-1" role="dialog" aria-labelledby="myModalLabel" aria-hidden="true"><div class="modal-dialog" ><div class="modal-content"><div class="modal-header"><button type="button" class="close" data-dismiss="modal" aria-hidden="true">×</button><h3 id="myModalLabel">商品类型模板编辑</h3></div><div class="modal-body">										<table class="table table-bordered table-striped"  width="800px">		   <tr><td>关联品牌</td><td><!--multiple表示可多选config用于配置数据来源select2-model用于指定用户选择后提交的变量--><input select2 select2-model="entity.brandIds" config="brandList" multiple placeholder="支持多选" class="form-control" type="text"/></td></tr><tr></tr>	<tr><td>扩展属性</td><td><div class="btn-group">                                                                    </div>         </td></tr>	</table>				</div></div></div>
</div></body></html>
运行结果:
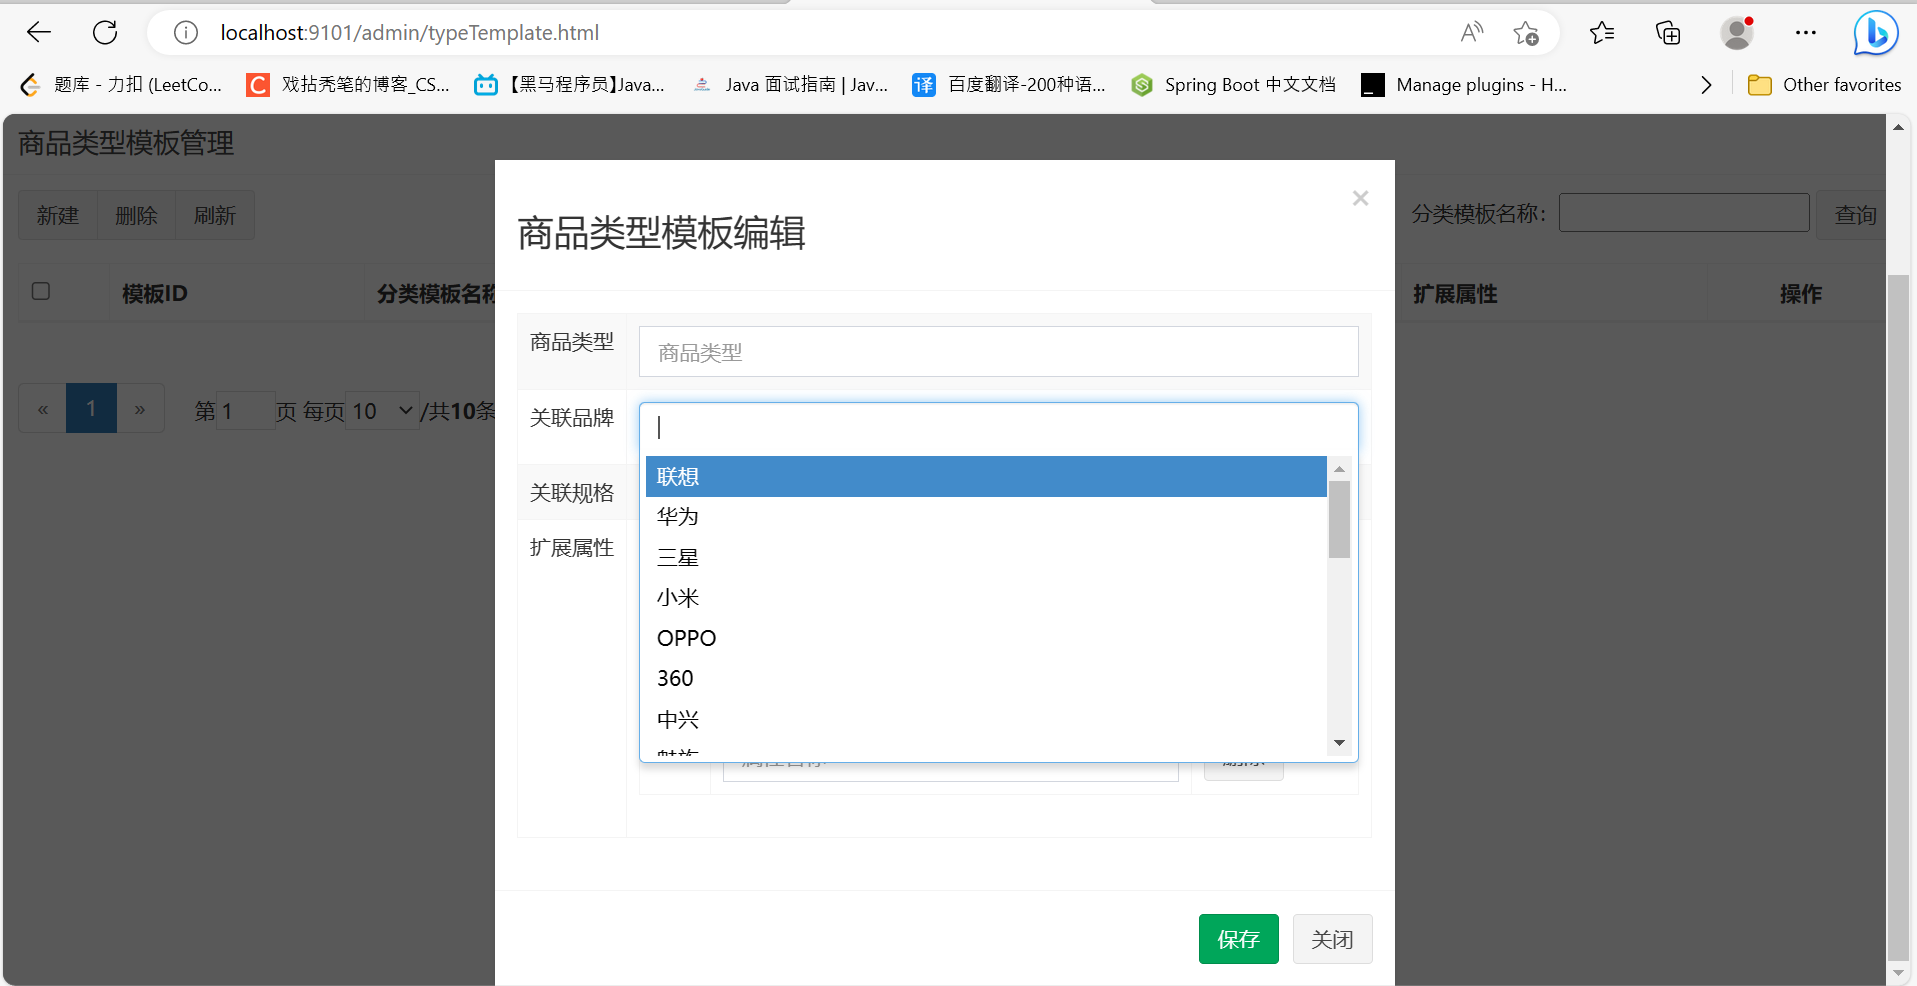
规格下拉列表(同上)
注意事项:
typeTemplate.html文件里的ng-init必须带上findAll()方法,用浏览器访问时才会正常显示表格
<body class="hold-transition skin-red sidebar-mini" ng-app="pinyougou" ng-controller="typeTemplateController" ng-init="findAll();findBrandList();findSpecList()">
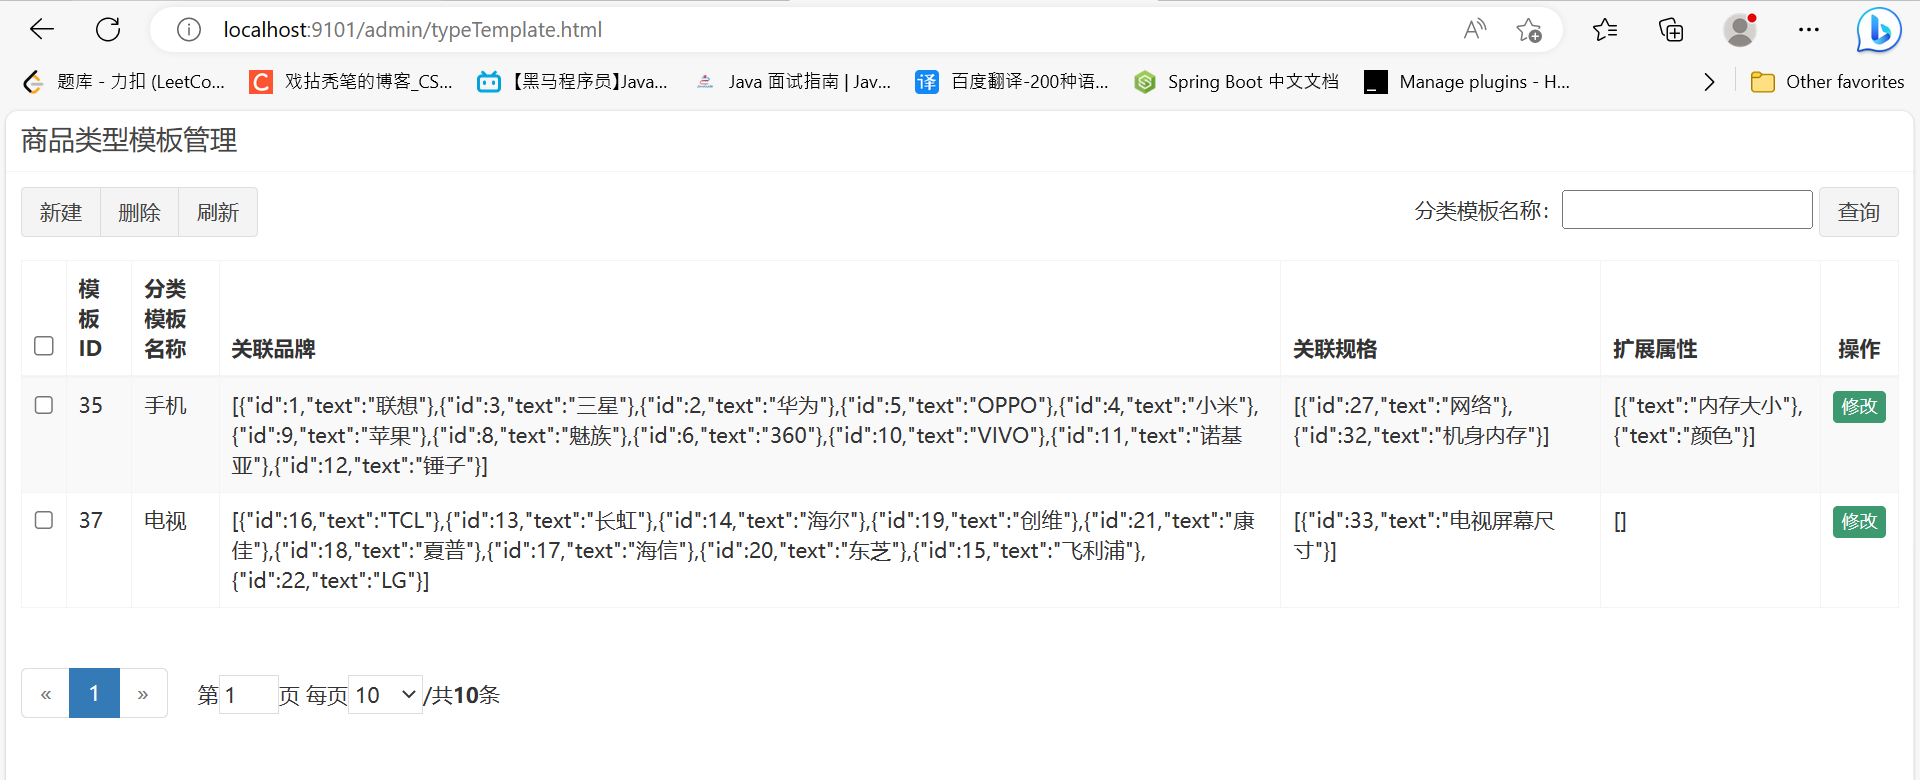
二、扩展属性(增加、删除行)
typeTemplateController.js
//增加扩展属性行$scope.addTableRow=function(){$scope.entity.customAttributeItems.push({});}//删除扩展属性行$scope.deleTableRow=function(index){$scope.entity.customAttributeItems.splice(index,1);}
typeTemplate.html
<!DOCTYPE html>
<html>
<body class="hold-transition skin-red sidebar-mini" ng-app="pinyougou" ng-controller="typeTemplateController" ng-init="findAll();findBrandList();findSpecList()"><!-- .box-body --><div class="box-body"><!-- 数据表格 --><div class="table-box"><!--工具栏--><div class="pull-left"><div class="form-group form-inline"><div class="btn-group"><button type="button" class="btn btn-default" title="新建" data-toggle="modal" data-target="#editModal" ng-click="entity={customAttributeItems:[]}"><i class="fa fa-file-o"></i> 新建</button></div></div></div><!--工具栏/--></div><!-- 数据表格 /--></div><!-- /.box-body -->
<!-- 编辑窗口 -->
<div class="modal fade" id="editModal" tabindex="-1" role="dialog" aria-labelledby="myModalLabel" aria-hidden="true"><div class="modal-dialog" ><div class="modal-content"><div class="modal-header"><button type="button" class="close" data-dismiss="modal" aria-hidden="true">×</button><h3 id="myModalLabel">商品类型模板编辑</h3></div><div class="modal-body">										<table class="table table-bordered table-striped"  width="800px"></tr><tr><td>关联规格</td><td><input select2 select2-model="entity.specIds" config="specList" multiple placeholder="支持多选" class="form-control" type="text"/></td></tr>	<tr><td>扩展属性</td><td><div class="btn-group"><button type="button" class="btn btn-default" title="新增扩展属性" ng-click="addTableRow()"><i class="fa fa-file-o"></i> 新增扩展属性</button></div><table class="table table-bordered table-striped"  width="800px"><tbody><tr ng-repeat="pojo in entity.customAttributeItems"><td><input type="checkbox" class="icheckbox_square-blue" ></td><td><input class="form-control" ng-model="pojo.text" placeholder="属性名称" ></td><td><button type="button" class="btn btn-default" title="删除" ng-click="deleTableRow($index)"><i class="fa fa-trash-o"></i> 删除</button></td></tr></tbody></table>	</td></tr>	</table>				</div></div></div>
</div></body></html>
运行结果:

三、新增模板
typeTemplate.html
1、绑定文本框
<tbody><tr ng-repeat="pojo in entity.customAttributeItems"><td><input type="checkbox" class="icheckbox_square-blue" ></td><td><input class="form-control" ng-model="pojo.text" placeholder="属性名称" ></td><td><button type="button" class="btn btn-default" title="删除" ng-click="deleTableRow($index)"><i class="fa fa-trash-o"></i> 删除</button></td></tr></tbody>2、保存按钮
<div class="modal-footer"> <button class="btn btn-success" data-dismiss="modal" aria-hidden="true" ng-click="save()">保存</button></div>运行结果:

四、修改模板
typeTemplateController.js
//查询实体 $scope.findOne=function(id){ typeTemplateService.findOne(id).success(function(response){$scope.entity= response; //转换字符串为json对象(集合)$scope.entity.brandIds= JSON.parse( $scope.entity.brandIds);//品牌$scope.entity.specIds= JSON.parse($scope.entity.specIds);//规格$scope.entity.customAttributeItems = JSON.parse($scope.entity.customAttributeItems);//自定义属性// JSON.parse(string): 将字符串转成对象// JSON.stringify(object): 将对象转成字符串}); }typeTemplate.html
修改按钮
<td class="text-center"><button type="button" class="btn bg-olive btn-xs" data-toggle="modal" data-target="#editModal" ng-click="findOne(entity.id)">修改</button></td>运行结果:
五、删除模板
typeTemplate.html
1、复选框勾选
<tr ng-repeat="entity in list"><td><input type="checkbox" ng-click="updateSelection($event,entity.id)"></td><td>{{entity.id}}</td><td>{{entity.name}}</td><td>{{entity.brandIds}}</td><td>{{entity.specIds}}</td><td>{{entity.customAttributeItems}}</td><td class="text-center"><button type="button" class="btn bg-olive btn-xs" data-toggle="modal" data-target="#editModal" ng-click="findOne(entity.id)">修改</button></td></tr>2、删除按钮
<div class="btn-group"><button type="button" class="btn btn-default" title="删除" ng-click="dele()"><i class="fa fa-trash-o"></i> 删除</button> </div>运行结果:
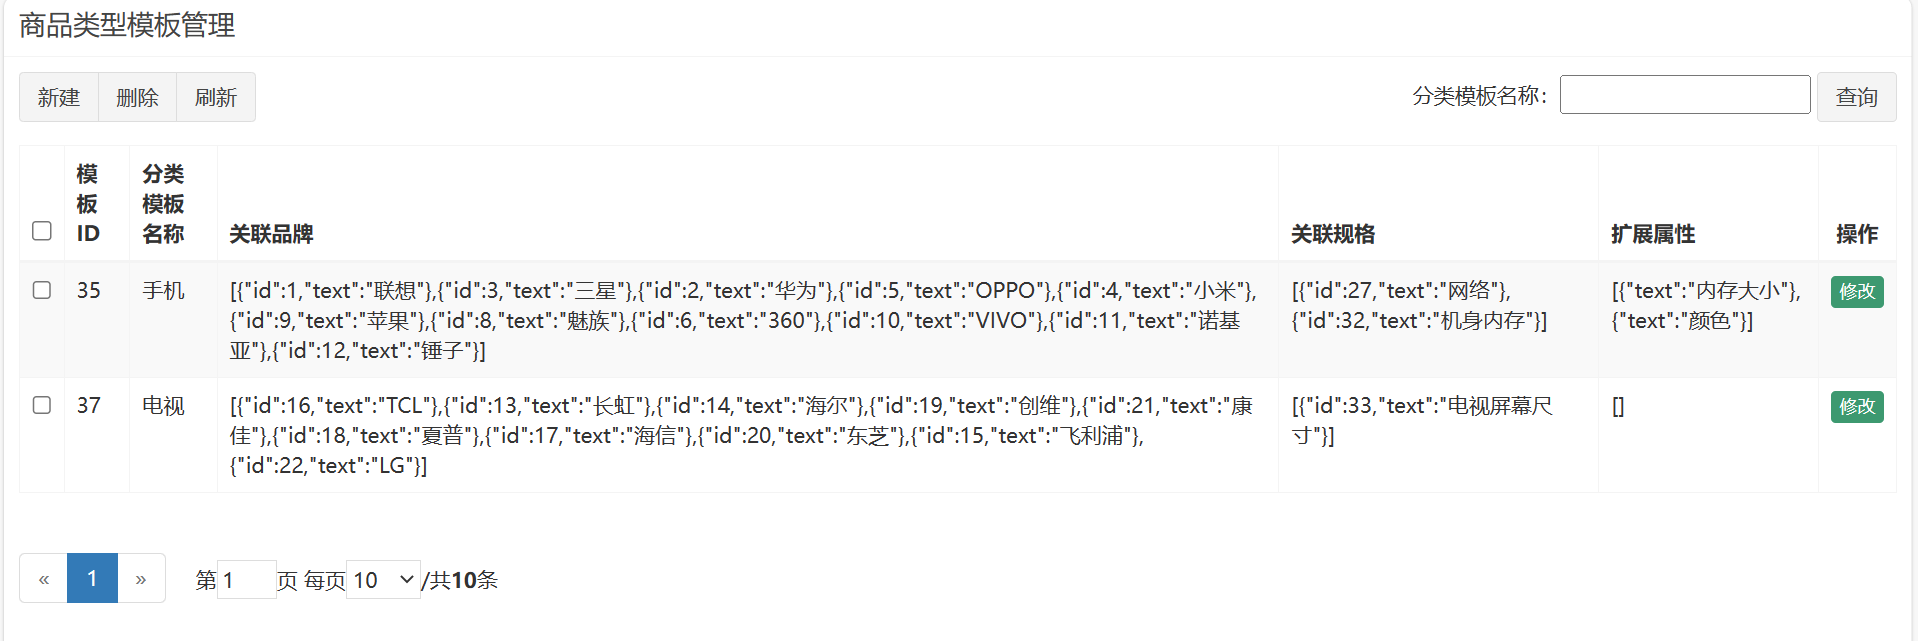
六、优化页面
baseController.js
//提取json字符串数据中某个属性,返回拼接字符串,逗号分隔// 让浏览器访问的html文件上的数据更通俗易懂$scope.jsonToString=function (jsonString,key) {var json=JSON.parse(jsonString);var value="";for(var i=0;i<json.length;i++){if(i>0){//第一个值前面不用加逗号分隔value+=",";//使用逗号分隔}value+=json[i][key];//key是json[i]的某个属性}return value;}typeTemplate.html
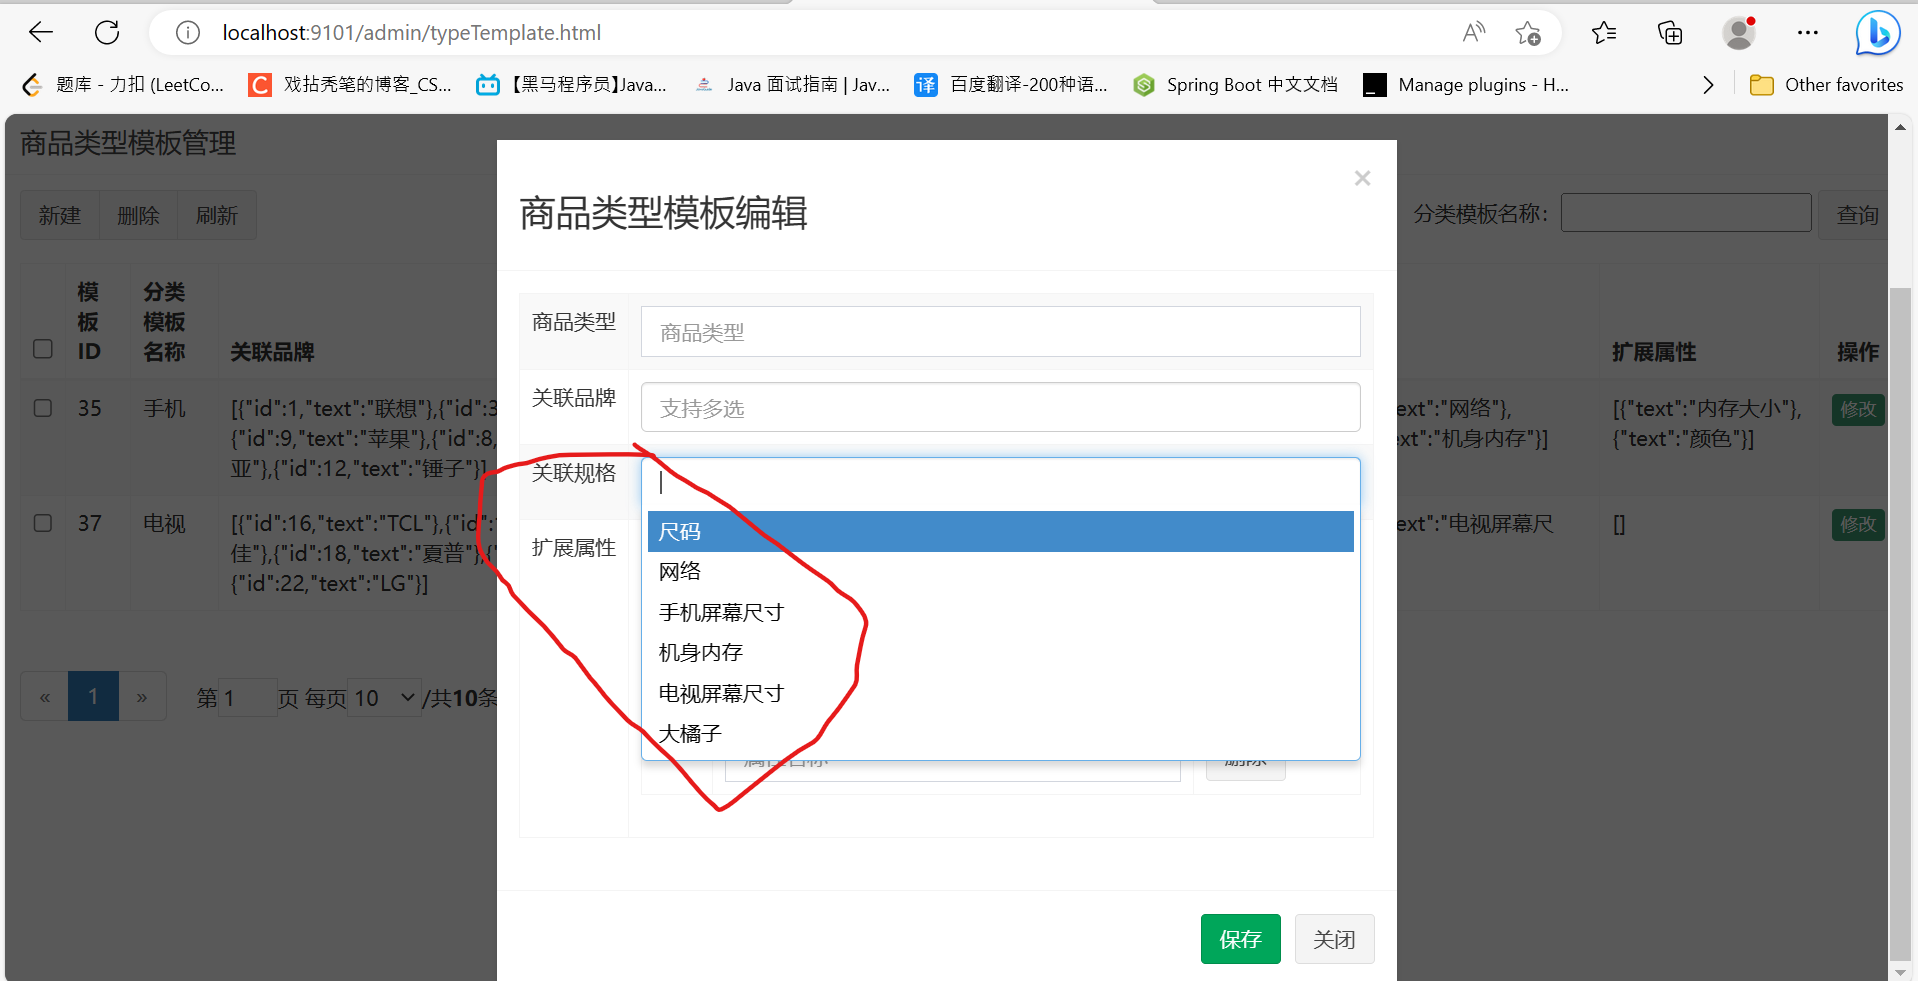
<tbody><tr ng-repeat="entity in list"><td><input type="checkbox" ng-click="updateSelection($event,entity.id)"></td><td>{{entity.id}}</td><td>{{entity.name}}</td><td>{{ jsonToString(entity.brandIds,"text") }}</td><td>{{ jsonToString(entity.specIds,"text") }}</td><td>{{ jsonToString(entity.customAttributeItems,"text") }}</td><td class="text-center"><button type="button" class="btn bg-olive btn-xs" data-toggle="modal" data-target="#editModal" ng-click="findOne(entity.id)">修改</button></td></tr></tbody>优化前:

优化后:

经常出现的问题:
如果出现更改了前端代码,前端代码没有问题,但前端页面显示不正常(一般是规定的数据不显示),就清除一下浏览器的数据(另外去百度),再刷新一下页面
商品分类
一、商品列表
后端
ItemCatService
public List<TbItemCat> findByParentId(Long parentId);
ItemCatServiceImpl
@Overridepublic List<TbItemCat> findByParentId(Long parentId) {TbItemCatExample example = new TbItemCatExample();TbItemCatExample.Criteria criteria = example.createCriteria();criteria.andParentIdEqualTo(parentId);return tbItemCatMapper.selectByExample(example);}ItemCatController
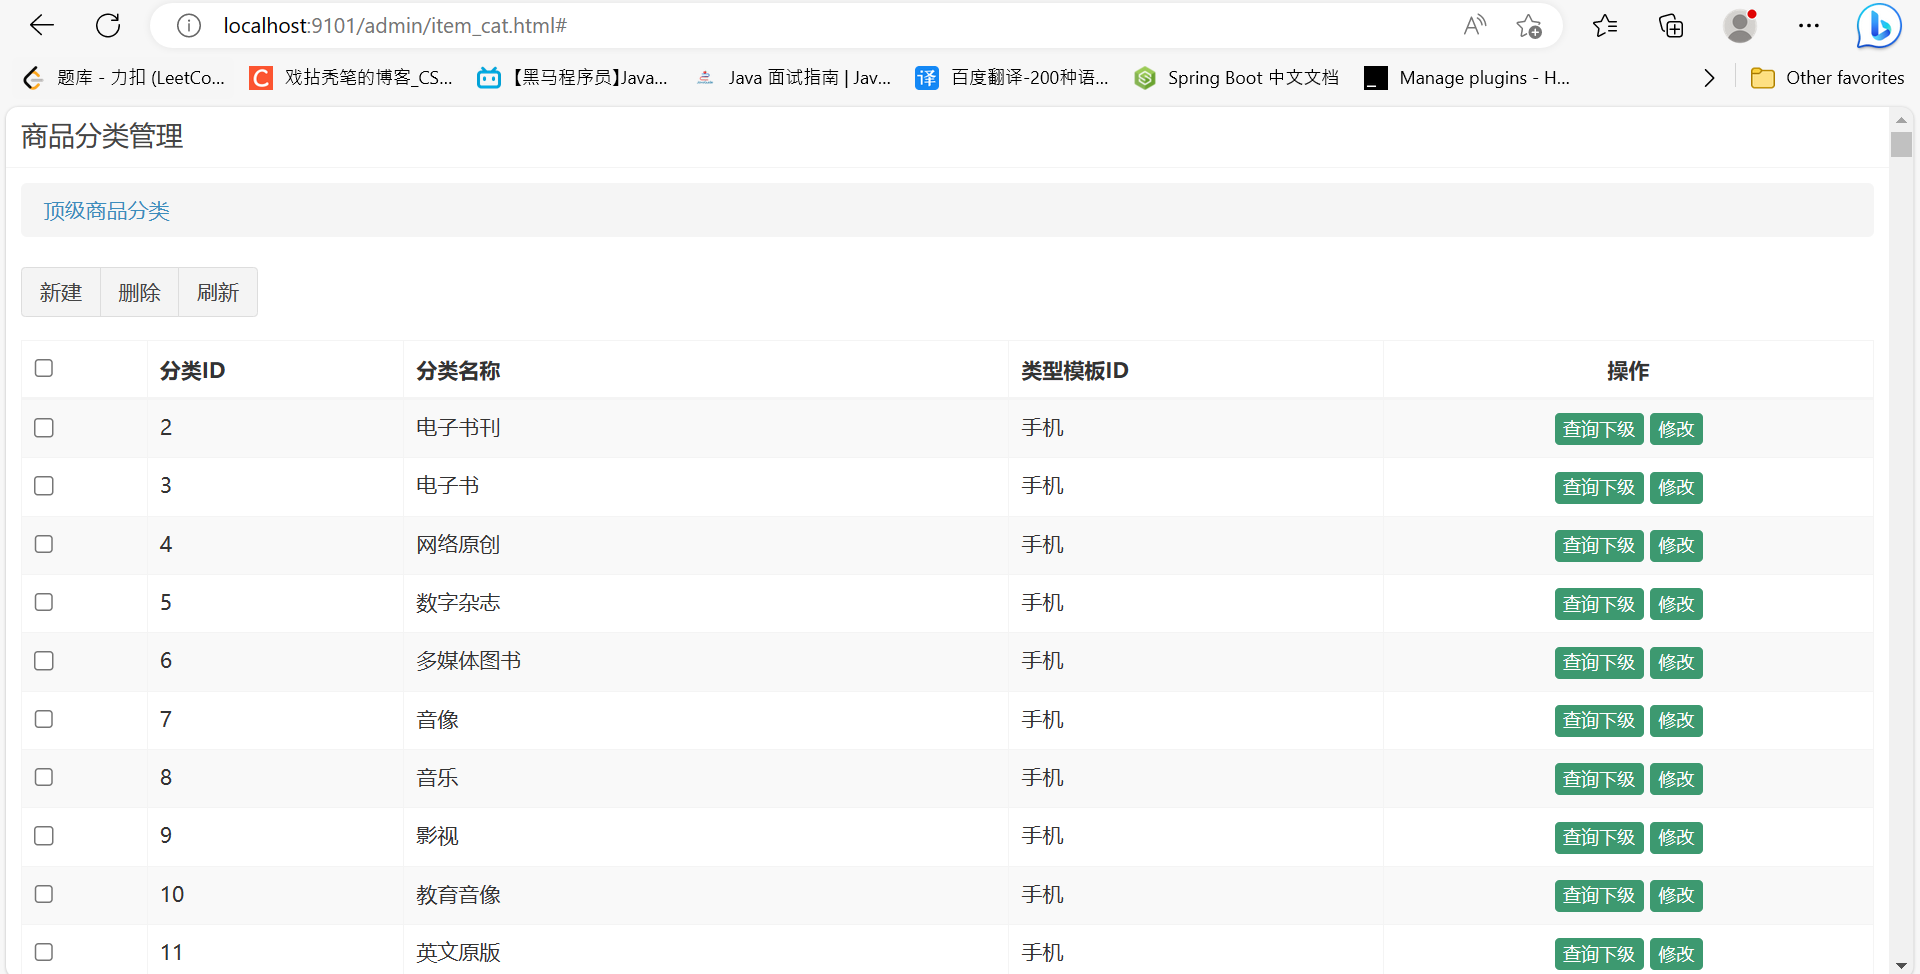
/*** 根据上级ID查询商品分类* @param parentId* @return*/@RequestMapping("/findByParentId")public List<TbItemCat> findByParentId(Long parentId){return itemCatService.findByParentId(parentId);}运行结果:

前端
itemCatService.js
//根据上级ID查询列表this.findByParentId=function (parentId) {return $http.get('../itemCat/findByParentId.do?parentId='+parentId);}itemCatController.js
//根据上级ID查询列表$scope.findByParentId=function (parentId) {itemCatService.findByParentId(parentId).success(function (response) {$scope.list=response;});}item_cat.html
<!DOCTYPE html>
<html>
<head><script src="../plugins/angularjs/angular.min.js"></script><script src="../js/base.js"></script><script src="../js/service/itemCatService.js"></script><script src="../js/controller/baseController.js"></script><script src="../js/controller/itemCatController.js"></script>
</head>
<body class="hold-transition skin-red sidebar-mini" ng-app="pinyougou" ng-controller="itemCatController" ng-init="findAll();findByParentId()"><tbody><tr ng-repeat="entity in list"><td><input  type="checkbox" ></td>			                              <td>{{entity.id}}</td><td>{{entity.name}}</td><td>{{entity.typeId}}</td><td class="text-center">		                                     <button type="button" class="btn bg-olive btn-xs" ng-click="findByParentId(entity.id)">查询下级</button><button type="button" class="btn bg-olive btn-xs" data-toggle="modal" data-target="#editModal" >修改</button>                                           </td></tr></tbody>
</body>
运行结果:

二、面包屑导航(Breadcrumb Navigation)

面包屑导航(Breadcrumb Navigation)这个概念来自童话故事“汉赛尔和格莱特”,当汉赛尔和格莱特穿过森林时,不小心迷路了,但是他们发现沿途走过的地方都撒下了面包屑,让这些面包屑来帮助他们找到回家的路。
itemCatController.js
//定义面包屑$scope.breadcrumb=[{id:0,name:"顶级分类列表"}];$scope.search=function (id,name) {//添加面包屑$scope.breadcrumb.push({id:id,name:name});$scope.findByParentId(id);}$scope.showList=function (index,id) {//截断面包屑//index+1: 表示从当前索引的后一个索引开始截断(从面包屑中去除)//2: 表示截断的个数,在此最大是3级,所以写2,写100也没关系$scope.breadcrumb.splice(index+1,2);$scope.findByParentId(id);}item_cat.html
1、查询下级按钮
<button ng-if="breadcrumb.length<3" type="button" class="btn bg-olive btn-xs" ng-click="search(entity.id,entity.name)">查询下级</button>
2、绑定面包屑
<ol class="breadcrumb"><!--绑定面包屑--><li ng-repeat="pojo in breadcrumb"><a href="#" ng-click="showList($index,pojo.id)">{{pojo.name}}</a></li></ol>运行结果:
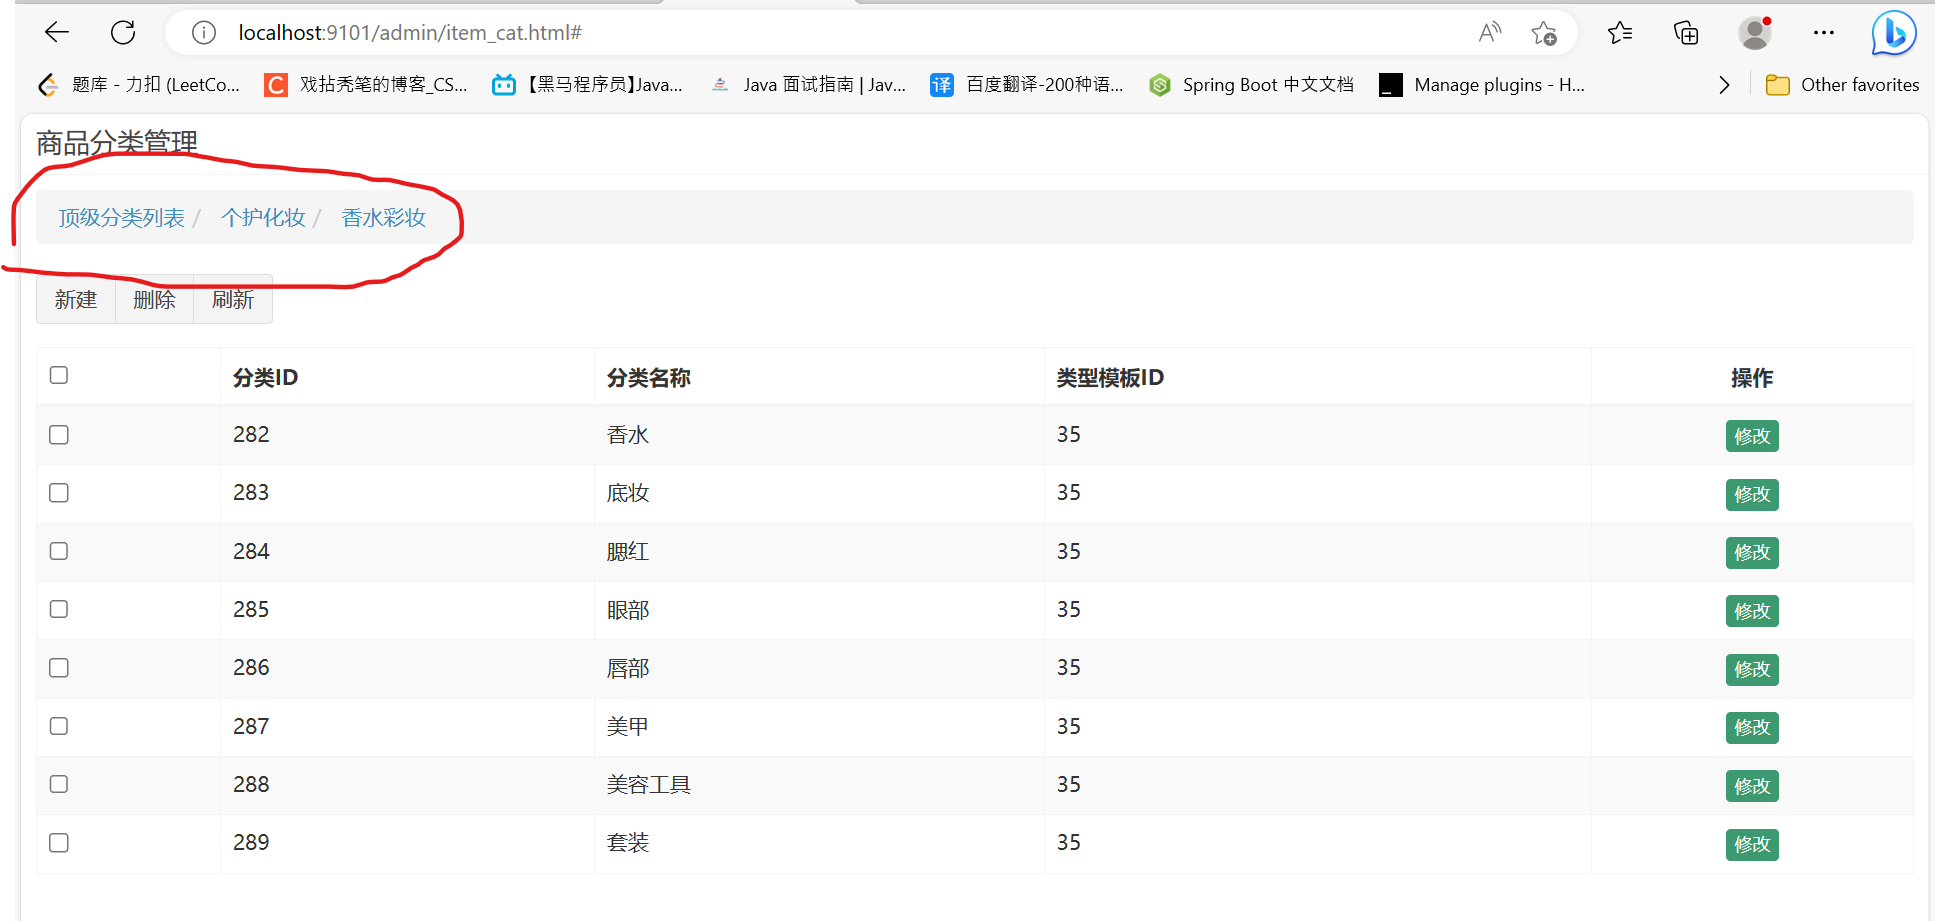
三、新增商品分类
在哪一级新增商品分类,那新增数据就应该显示在哪一级,而不是全部显示在顶级。
关键在于查询时记录下当前级parentId
itemCatController.js
//保存 $scope.save=function(){ var serviceObject;//服务层对象 if($scope.entity.id!=null){//如果有IDserviceObject=itemCatService.update( $scope.entity ); //修改 }else{serviceObject=itemCatService.add( $scope.entity );//增加 } serviceObject.success(function(response){if(response.success){//重新查询$scope.findByParentId($scope.entity.parentId);}else{alert(response.message);}} ); }$scope.searchEntity={};//定义搜索对象//定义变量parentId,记录本级的ID//entity是表单所绑定的实体// $socpe.entity={parentId:0};//根据上级ID查询列表$scope.findByParentId=function (parentId) {//查询时记录上级ID$scope.entity={parentId:parentId};itemCatService.findByParentId(parentId).success(function (response) {$scope.list=response;});}
item_cat.html
<div class="modal-body"> <table class="table table-bordered table-striped" width="800px"><tr><td>上级商品分类</td><td><!--绑定面包屑--><span ng-repeat="pojo in breadcrumb">{{pojo.name}}</span></td></tr><tr><td>商品分类名称</td><td><input ng-model="entity.name" class="form-control" placeholder="商品分类名称" > </td></tr> <tr><td>类型模板</td><td> <input ng-model="entity.typeId" placeholder="商品类型模板" class="form-control" type="text"/></td> </tr> </table> </div><div class="modal-footer"> <button class="btn btn-success" data-dismiss="modal" aria-hidden="true" ng-click="save()">保存</button></div>注意:
itemCatController.js文件去除了 $socpe.entity={parentId:0}; 这句给parentId赋初值的语句,因为parentId后续在function函数中再次被修改,这两个操作会发生冲突,导致前端引用$scope.entity对象时出错,如果要修改,最好使用深拷贝,而非直接赋值
运行结果:

四、模板下拉列表
itemCatController.js
//查询模板列表 (下拉框显示模板)$scope.findTypeTemplateList=function () {typeTemplateService.findAll().success(function (response) {$scope.typeTemplateList=response;//模板列表})}item_cat.html
<tr><td>类型模板</td><td><select ng-model="entity.typeId" ng-options="item.id as item.name for item in typeTemplateList"></select></td></tr> 运行结果:
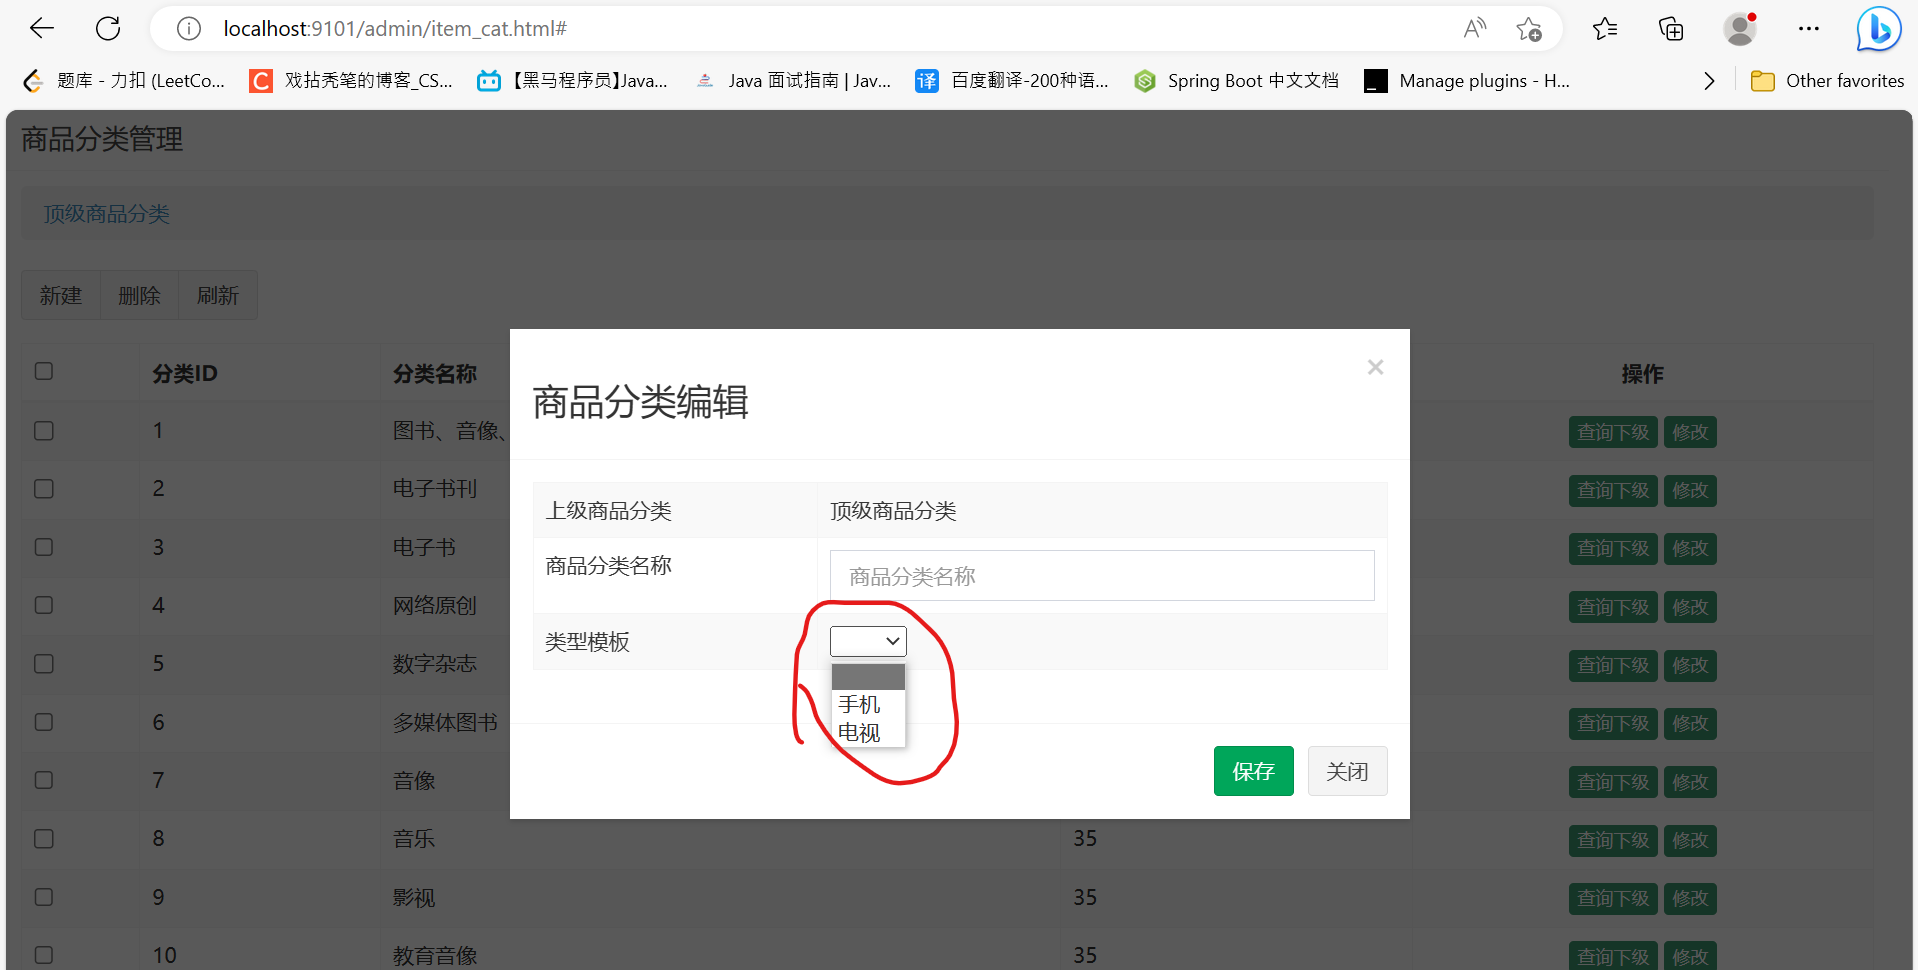
五、修改商品分类
item_cat.html
<button type="button" class="btn bg-olive btn-xs" data-toggle="modal" data-target="#editModal" ng-click="findOne(entity.id)">修改</button>
六、删除商品分类
itemCatServiceImpl
/*** 批量删除*/@Overridepublic void delete(Long[] ids) {for(Long id:ids){List<TbItemCat> list=findByParentId(id);if(list.size()>0){//要删除的商品有下级商品分类,抛出运行时异常throw new RuntimeException("不能删除有下级分类的商品分类!");}else{//删除tbItemCatMapper.deleteByPrimaryKey(id);}}}itemCatController
@RequestMapping("/delete")public Result delete(Long [] ids){try {itemCatService.delete(ids);return new Result(true, "删除成功"); } catch(RuntimeException e){//把抛出的运行时异常信息打印出来e.printStackTrace();return new Result(false,e.getMessage());} catch (Exception e) {e.printStackTrace();return new Result(false, "删除失败");}}itemCatController.js
//批量删除 $scope.dele=function(){ //获取选中的复选框 itemCatService.dele( $scope.selectIds ).success(function(response){if(response.success) {$scope.findByParentId($scope.entity.parentId);$scope.selectIds = [];}else{alert(response.message);//把异常信息显示在前端页面}} ); }item_cat.html
1、复选框,实现多选
<td><input type="checkbox" ng-click="updateSelection($event,entity.id)"></td>
2、删除按钮
<button type="button" class="btn btn-default" title="删除" ng-click="dele()"><i class="fa fa-trash-o" ></i> 删除</button>
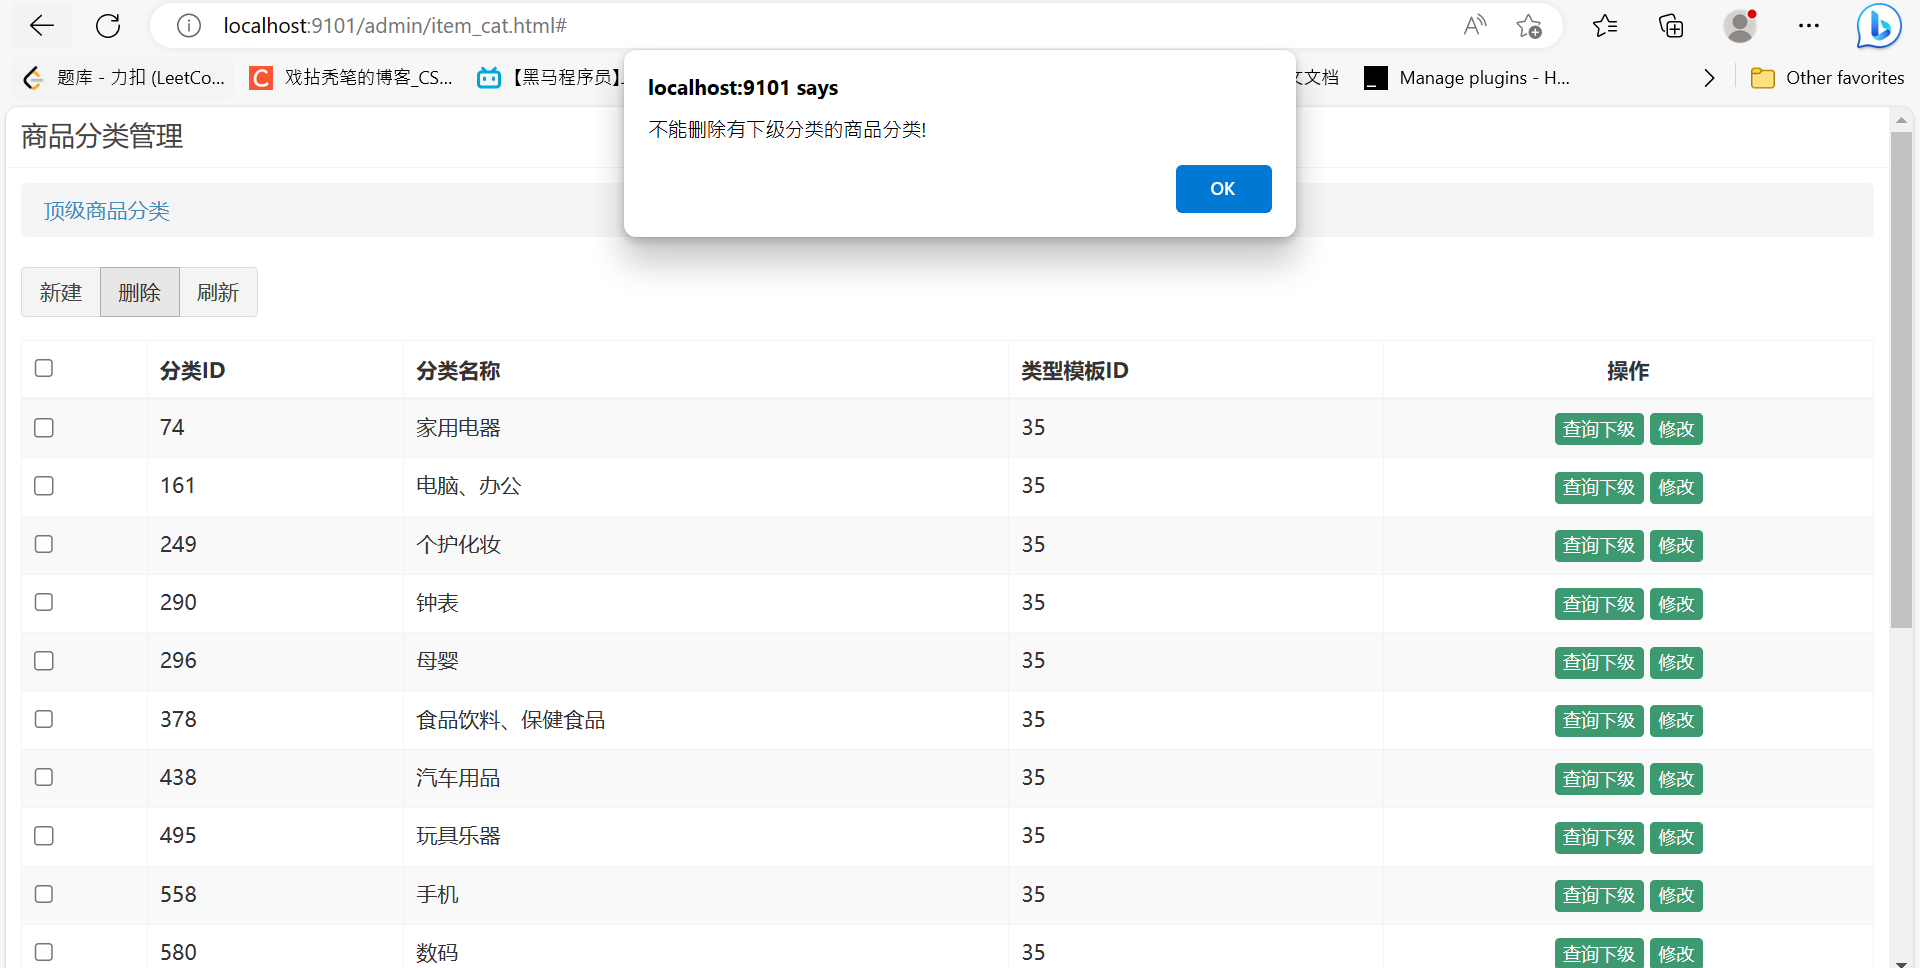
七、显示模板名称
itemCatController.js
//定义一个变量$scope.typeTemplateMap=[];//查询模板列表 (下拉框显示模板)$scope.findTypeTemplateList=function () {typeTemplateService.findAll().success(function (response) {$scope.typeTemplateList=response;//模板列表//构建模板数据,用于列表显示名称for(var i=0;i<$scope.typeTemplateList.length;i++){//得到一个对象var typeTemplate=$scope.typeTemplateList[i];//把对象的id值修改成name$scope.typeTemplateMap[typeTemplate.id]=typeTemplate.name;}})}item_cat.html
<tr ng-repeat="entity in list"><!--ng-click是勾选复选框,实现多选--><td><input type="checkbox" ng-click="updateSelection($event,entity.id)"></td><td>{{entity.id}}</td><td>{{entity.name}}</td><td>{{typeTemplateMap[entity.typeId]}}</td><td class="text-center"> <button ng-if="breadcrumb.length<3" type="button" class="btn bg-olive btn-xs" ng-click="search(entity.id,entity.name)">查询下级</button><button type="button" class="btn bg-olive btn-xs" data-toggle="modal" data-target="#editModal" ng-click="findOne(entity.id)">修改</button></td></tr>运行结果:






![P8599 [蓝桥杯 2013 省 B] 带分数(dfs+全排列+断点判断)](https://img-blog.csdnimg.cn/a340ed91cf984ee79e92afbfe35ac004.png)
