目录
- today
- torch.meshgrid()函数
today
今天我们主要来捋一捋AnchorsGenerator这部分代码,对应在network_files文件夹中的rpn_function文件中,从RegionProposalNetwork()类的forward()函数开始看,首先会进入head部分 也就是我们看到的RPNHead部分,也就是比较小的虚线框框起来的那部分,可以看到是从backbone得到特征矩阵后传入到RPNHead部分,先直接看代码:
class RPNHead(nn.Module):def __init__(self, in_channels, num_anchors):super(RPNHead, self).__init__()# 3x3 滑动窗口self.conv = nn.Conv2d(in_channels, in_channels, kernel_size=3, stride=1, padding=1)# 计算预测的目标分数(这里的目标只是指前景或者背景)self.cls_logits = nn.Conv2d(in_channels, num_anchors, kernel_size=1, stride=1)# 计算预测的目标bbox regression参数self.bbox_pred = nn.Conv2d(in_channels, num_anchors * 4, kernel_size=1, stride=1)for layer in self.children():if isinstance(layer, nn.Conv2d):torch.nn.init.normal_(layer.weight, std=0.01)torch.nn.init.constant_(layer.bias, 0)def forward(self, x):# type: (List[Tensor]) -> Tuple[List[Tensor], List[Tensor]]logits = []bbox_reg = []for i, feature in enumerate(x):t = F.relu(self.conv(feature))logits.append(self.cls_logits(t))bbox_reg.append(self.bbox_pred(t))return logits, bbox_reg
首先初始化了一个3x3的滑动窗口,输入的channels就是backbone输出的channels(1280),输出的channels(1280)没变,卷积核大小,步长,padding就不用了说了吧。接下来初始化了1x1大小的类别卷积层和1x1大小的预测卷积层,对应输入的channels都是上一层的输出channels,注意类别卷积层输出的channels是anchors的个数(因为用的是二分类交叉熵损失,所以每个anchor只需要一个分数就够了),用于计算预测的目标分数(这里的目标只是指前景或者背景),预测卷积层的输出channels是4倍anchor的个数,每个anchor对应4个坐标(左上角两个坐标,右下角两个坐标),接着遍历children层存在conv2d层,对conv2d层进行均值为0,标准差为0.01的权重初始化,偏置全为0的初始化。最后看正向传播,初始化两个列表分别存放预测的目标分数和预测的目标bbox regression参数,
遍历经过backbone特征提取后的特征层,因为前面讲过用的是MobileNetv2进行的特征提取,所以最后只有一个特征层,那么只会循环一次,进过一系列卷积操作后得到最后的结果,debug我们看一下logits和bbox_reg列表的结果:
可以看到最后logits和bbox_reg列表中都只有一个元素,我这里得到的形状分别是(8, 15, 25, 38), (8, 60, 25, 38),
8是一个batch有8张图片,15是最后输出15个anchor的结果,60是最后输出的15个anchor乘上4个坐标的结果,25x38就是卷积后的特征图的大小。注意:大家debug得到的形状最后两个维度可能跟我的不同,这是因为每次运行的时候dataloader选定的第一个batch的图片是随机的,尺寸也就可能变化了,backbone的输出的features尺寸自然也会变了
class AnchorsGenerator(nn.Module):# 注解组成的字典.注释下面两个变量里的元素类型__annotations__ = {"cell_anchors": Optional[List[torch.Tensor]],"_cache": Dict[str, List[torch.Tensor]]}"""anchors生成器Arguments:sizes (Tuple[Tuple[int]]):aspect_ratios (Tuple[Tuple[float]]):"""def __init__(self, sizes=(128, 256, 512), aspect_ratios=(0.5, 1.0, 2.0)):super(AnchorsGenerator, self).__init__()if not isinstance(sizes[0], (list, tuple)):# TODO change thissizes = tuple((s,) for s in sizes)if not isinstance(aspect_ratios[0], (list, tuple)):aspect_ratios = (aspect_ratios,) * len(sizes)assert len(sizes) == len(aspect_ratios)self.sizes = sizesself.aspect_ratios = aspect_ratiosself.cell_anchors = Noneself._cache = {}
一样的先对AnchorsGenerator类,先看参数,sizes就是原论文当中的尺度scale,这里传的是((32, 64, 128, 256, 512),),aspect_ratios就是原论文中的三种比例(1:2,1:1,2:1),这里传的就是((0.5, 1.0, 2.0),),注意都是元组形式,不过没关系,传的时候不是元组也不会报错,因为传入非元组和非列表时下面两个if语句会自动帮你转换成元组的形式,(aspect_ratios,) * len(sizes)就是将(aspect_ratios,)重复len(sizes)次,如下图
当然还要判断scale的长度是否等于比例的长度,因为每一组尺度都对应三个比例,所以需要进行判断,剩下的就是初始化各个变量,就不赘述了
def forward(self, image_list, feature_maps):# type: (ImageList, List[Tensor]) -> List[Tensor]# 获取每个预测特征层的尺寸(height, width)grid_sizes = list([feature_map.shape[-2:] for feature_map in feature_maps])# 获取输入图像的height和widthimage_size = image_list.tensors.shape[-2:]# 获取变量类型和设备类型dtype, device = feature_maps[0].dtype, feature_maps[0].device# one step in feature map equate n pixel stride in origin image# 计算特征层上的一步等于原始图像上的步长strides = [[torch.tensor(image_size[0] // g[0], dtype=torch.int64, device=device),torch.tensor(image_size[1] // g[1], dtype=torch.int64, device=device)] for g in grid_sizes]# 根据提供的sizes和aspect_ratios生成anchors模板self.set_cell_anchors(dtype, device)# 计算/读取所有anchors的坐标信息(这里的anchors信息是映射到原图上的所有anchors信息,不是anchors模板)# 得到的是一个list列表,对应每张预测特征图映射回原图的anchors坐标信息anchors_over_all_feature_maps = self.cached_grid_anchors(grid_sizes, strides)anchors = torch.jit.annotate(List[List[torch.Tensor]], [])# 遍历一个batch中的每张图像for i, (image_height, image_width) in enumerate(image_list.image_sizes):anchors_in_image = []# 遍历每张预测特征图映射回原图的anchors坐标信息for anchors_per_feature_map in anchors_over_all_feature_maps:anchors_in_image.append(anchors_per_feature_map)anchors.append(anchors_in_image)# 将每一张图像的所有预测特征层的anchors坐标信息拼接在一起# anchors是个list,每个元素为一张图像的所有anchors信息anchors = [torch.cat(anchors_per_image) for anchors_per_image in anchors]# Clear the cache in case that memory leaks.self._cache.clear()return anchors
老规矩,直接看正向传播过程,传入的image_list是ImageList类别,之前也说了,存储的是经过一个batch打包处理后的图片size和等比例缩放后的图片size,
feature_maps就是经过backbone特征提取后得到的一个特征层,
grid_sizes就是遍历特征层得到特征图的高和宽(debug得到的是25x38),
image_size是经过batch打包处理后的图片宽高(debug得到的是800x1216),
strides就是计算特征层上的一步等于原始图像上的步长,求得对应高宽的缩放因子(debug得到的是32),对应特征层上缩小了32倍,然后进入类方法set_cell_anchors()
def set_cell_anchors(self, dtype, device):# type: (torch.dtype, torch.device) -> Noneif self.cell_anchors is not None:cell_anchors = self.cell_anchorsassert cell_anchors is not None# suppose that all anchors have the same device# which is a valid assumption in the current state of the codebaseif cell_anchors[0].device == device:return# 根据提供的sizes和aspect_ratios生成anchors模板# anchors模板都是以(0, 0)为中心的anchorcell_anchors = [self.generate_anchors(sizes, aspect_ratios, dtype, device)for sizes, aspect_ratios in zip(self.sizes, self.aspect_ratios)]self.cell_anchors = cell_anchors
set_cell_anchors()方法用于生成anchor模板,现在我们还没有cell_anchors,所以会进入类方法generate_anchors(),传入的参数分别是要生成不同anchor的尺度大小和比例以及数据类型和设备
def generate_anchors(self, scales, aspect_ratios, dtype=torch.float32, device=torch.device("cpu")):# type: (List[int], List[float], torch.dtype, torch.device) -> Tensor"""compute anchor sizesArguments:scales: sqrt(anchor_area)aspect_ratios: h/w ratiosdtype: float32device: cpu/gpu"""scales = torch.as_tensor(scales, dtype=dtype, device=device)aspect_ratios = torch.as_tensor(aspect_ratios, dtype=dtype, device=device)h_ratios = torch.sqrt(aspect_ratios)w_ratios = 1.0 / h_ratios# [r1, r2, r3]' * [s1, s2, s3]# number of elements is len(ratios)*len(scales)ws = (w_ratios[:, None] * scales[None, :]).view(-1)hs = (h_ratios[:, None] * scales[None, :]).view(-1)# left-top, right-bottom coordinate relative to anchor center(0, 0)# 生成的anchors模板都是以(0, 0)为中心的, shape [len(ratios)*len(scales), 4]base_anchors = torch.stack([-ws, -hs, ws, hs], dim=1) / 2return base_anchors.round() # round 四舍五入
首先将尺度信息和比例信息转换为tensor格式
h_ratios = torch.sqrt(aspect_ratios)w_ratios = 1.0 / h_ratios
这一步为什么这么做呢,因为我们传入的是三种比例(1:2, 1:1, 2:1),高的因子开根号,1除宽的因子,这样得到高宽的因子可以保证面积不变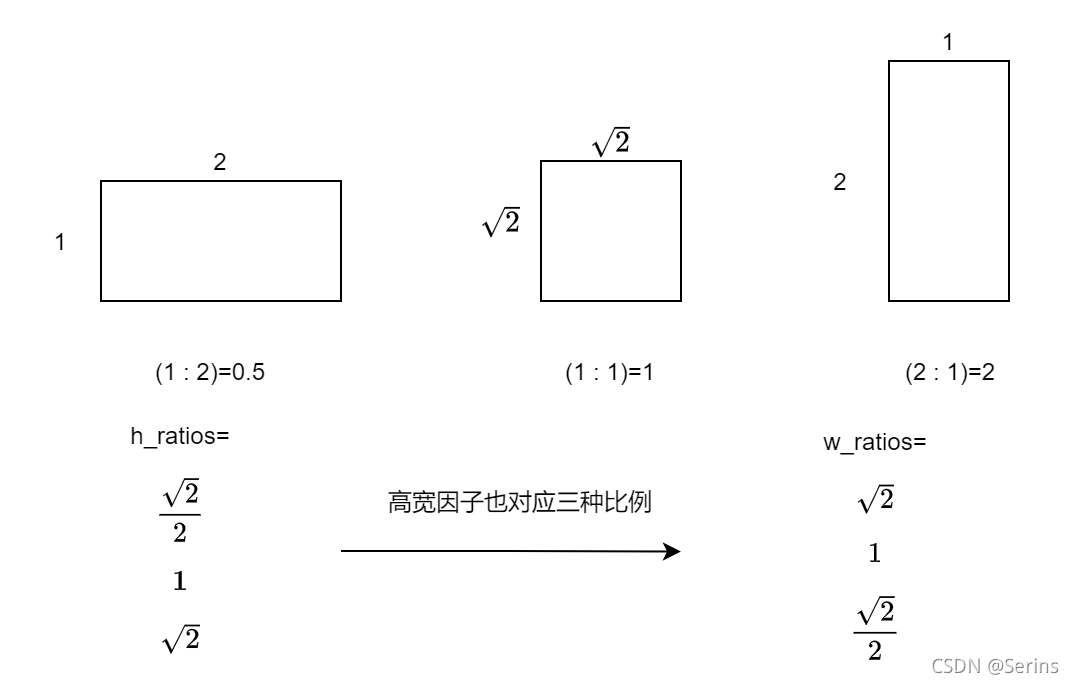
我们用第一种比例子:
2 × 1 = 1 × 2 2 × 2 × 2 = 2 2\times1=1\times\frac{\sqrt{2}}{2}\times2\times\sqrt{2}=2 2×1=1×22×2×2=2
通过这两个因子就可以得到不同尺度的三种比例的anchor,w_ratios[:, None]就是添加一个维度,形状从[3]->[3, 1],scales[None, :]的形状就从[5]->[1, 5],矩阵相乘就会得到[3, 5]的矩阵,通过view(-1)转换成一维向量
生成的3x5矩阵,每一列对应每一种尺度的三种比例的值
( 2 2 1 2 ) × ( 32 64 128 256 512 ) \begin{pmatrix} \frac{\sqrt{2}}{2}\\ 1\\ \sqrt{2} \end{pmatrix}\times\begin{pmatrix} 32 & 64 & 128 & 256 & 512\\ \end{pmatrix} 2212 ×(3264128256512) 这是对应生成的宽
( 2 1 2 2 ) × ( 32 64 128 256 512 ) \begin{pmatrix} \sqrt{2}\\ 1\\ \frac{\sqrt{2}}{2} \end{pmatrix}\times\begin{pmatrix} 32 & 64 & 128 & 256 & 512\\ \end{pmatrix} 2122 ×(3264128256512) 这是对应生成的高
生成了15个高和15个宽值后,我们需要对应图像坐标系来将这些值拼接成左上角右下角的坐标形式
我们知道图像中的坐标系是下面这样的,为什么拼接之后每个坐标值要除2,看下面这张图就知道了
这里只画了一种尺度的三种比例的anchor,因为生成的anchors模板都是以(0, 0)为中心的,我们把这些anchor模板放到坐标系中,anchor左上角右下角的坐标就对应着 [ − w s 2 , − h s 2 , w s 2 , h s 2 ] [\frac{-ws}{2},\frac{-hs}{2},\frac{ws}{2},\frac{hs}{2}] [2−ws,2−hs,2ws,2hs]对吧, dim=1是因为第0个维度是batch(多少张图片),所以从第一个维度拼接,最后四舍五入一下就得到最后的anchor模板对应着原点(0, 0)的坐标信息,我们可以看一下debug的结果
每五行对应一种比例,刚好三种比例。这时候类方法set_cell_anchors()就讲完啦,应该很好理解吧!接下来就是类方法cached_grid_anchors(),
def cached_grid_anchors(self, grid_sizes, strides):# type: (List[List[int]], List[List[Tensor]]) -> List[Tensor]"""将计算得到的所有anchors信息进行缓存"""key = str(grid_sizes) + str(strides)# self._cache是字典类型if key in self._cache:return self._cache[key]anchors = self.grid_anchors(grid_sizes, strides)self._cache[key] = anchorsreturn anchors
grid_sizes是传入的是特征提取后的特征层高宽(25x38),strides就是上面讲到得特征图对应原图上的缩放倍数对应高宽,所以是[32, 32],self._cache初始化的是一个空字典,存储对应原图像上(经过打包处理后高宽固定的图像)的anchor坐标,直接进类方法grid_anchors()
def grid_anchors(self, grid_sizes, strides):# type: (List[List[int]], List[List[Tensor]]) -> List[Tensor]"""anchors position in grid coordinate axis map into origin image计算预测特征图对应原始图像上的所有anchors的坐标Args:grid_sizes: 预测特征矩阵的height和widthstrides: 预测特征矩阵上一步对应原始图像上的步距"""anchors = []cell_anchors = self.cell_anchorsassert cell_anchors is not None# 遍历每个预测特征层的grid_size,strides和cell_anchorsfor size, stride, base_anchors in zip(grid_sizes, strides, cell_anchors):grid_height, grid_width = sizestride_height, stride_width = stridedevice = base_anchors.device# For output anchor, compute [x_center, y_center, x_center, y_center]# shape: [grid_width] 对应原图上的x坐标(列)shifts_x = torch.arange(0, grid_width, dtype=torch.float32, device=device) * stride_width# shape: [grid_height] 对应原图上的y坐标(行)shifts_y = torch.arange(0, grid_height, dtype=torch.float32, device=device) * stride_height# 计算预测特征矩阵上每个点对应原图上的坐标(anchors模板的坐标偏移量)# torch.meshgrid函数分别传入行坐标和列坐标,生成网格行坐标矩阵和网格列坐标矩阵# shape: [grid_height, grid_width]shift_y, shift_x = torch.meshgrid(shifts_y, shifts_x)shift_x = shift_x.reshape(-1)shift_y = shift_y.reshape(-1)# 计算anchors坐标(xmin, ymin, xmax, ymax)在原图上的坐标偏移量# shape: [grid_width*grid_height, 4]# 这里dim=1结果才是[grid_width*grid_height, 4],dim=0是batch的维度,如果dim=0结果就是[4, grid_width*grid_height]shifts = torch.stack([shift_x, shift_y, shift_x, shift_y], dim=1)# For every (base anchor, output anchor) pair,# offset each zero-centered base anchor by the center of the output anchor.# 将anchors模板与原图上的坐标偏移量相加得到原图上所有anchors的坐标信息(shape不同时会使用广播机制)shifts_anchor = shifts.view(-1, 1, 4) + base_anchors.view(1, -1, 4)anchors.append(shifts_anchor.reshape(-1, 4))return anchors # List[Tensor(all_num_anchors, 4)]
遍历所有特征图的高宽(25x38),由于mobilenetv2特征提取后只有一个特征层,所以只有25x34,放缩步长strides[32, 32],cell_anchors就是之前存储的anchor模板,
shifts_x = torch.arange(0, grid_width, dtype=torch.float32, device=device) * stride_width
# shape: [grid_height] 对应原图上的y坐标(行)
shifts_y = torch.arange(0, grid_height, dtype=torch.float32, device=device) * stride_height
这两步就是生成对应原图上的x坐标,y坐标,我们可以看一下

torch.meshgrid()函数
我们模拟一下上面那部分代码
import numpy as np
import matplotlib.pyplot as pltsize = [25, 38]
stride = [32, 32]
grid_height, grid_width = size
stride_height, stride_width = stride
x = np.arange(0, grid_width) * stride_width
y = np.arange(0, grid_height) * stride_height
y, x = np.meshgrid(y, x)
y = y.reshape(-1)
x = x.reshape(-1)
plt.figure()
plt.plot(x, y,color='limegreen',  # 设置颜色为limegreenmarker='.',  # 设置点类型为圆点linestyle='')  # 设置线型为空,也即没有线连接点
plt.grid(True)
plt.show()
print(x)
print(y)
自己可以去试试,看看输出的x,y是什么,得到结果
可以看到生成很多点,shifts = torch.stack([shift_x, shift_y, shift_x, shift_y], dim=1)代码得到的结果就是[x, y, x, y]这样的形式,我们发现左上角右下角的坐标都是(x, y),说白了就是一个点,那么就将这些点都当作原点来看,即图上这些绿点,再将anchor模板放上去,,每个点放上15个,这样就会生成很多anchor,
shifts_anchor = shifts.view(-1, 1, 4) + base_anchors.view(1, -1, 4)
anchors.append(shifts_anchor.reshape(-1, 4))
这一步就是将anchors模板与原图上的坐标偏移量相加得到原图上所有anchors的坐标信息(shape不同时会使用广播机制),相当于下图
三种颜色代表了三种尺度,这里我只画了三种,图上对应还有很多点,每个点都会得到5种尺度3比例3x5个anchor,将所有的anchor坐标存在一个列表中并返回
torch.jit.annotate()介绍
剩下的部分很简单,因为每张图片大小都是一样的,将刚刚得到的一张图上的所有anchor坐标重复一个batch(我设置的是8)的数量,最后再将一个batch的所有anchor坐标拼接到一起,debug结果如下
这样就得到了一个batch每张图上的anchor坐标信息了,本次的源码解析就到这里啦,主要就是anchor模板的生成以及如何将anchor模板坐标放到原图上的过程,最后再将一个batch的图片所有的anchor信息放在一个列表中。我们下节见,谢谢大家能坚持看到结尾,可能是很多,很杂,但慢慢理一下就能有个大概的体系了,不懂的可以评论区留言,我们下节见!!
