leetcode刷题之用栈实现队列(C语言版)
- 一、题目描述
- 二、题目要求
- 三、题目解析
- Ⅰ、typedef struct
- Ⅱ、MyQueue* myQueueCreate
- Ⅲ、void myQueuePush(MyQueue* obj, int x)
- Ⅳ、int myQueuePeek(MyQueue* obj)
- Ⅴ、int myQueuePop(MyQueue* obj)
- Ⅶ、bool myQueueEmpty(MyQueue* obj)
- Ⅷ、void myQueueFree(MyQueue* obj)
- 四、完整代码
一、题目描述
232、用栈实现队列
请你仅使用两个栈实现先入先出队列。队列应当支持一般队列支持的所有操作(push、pop、peek、empty):
实现 MyQueue 类:①、void push(int x) 将元素 x 推到队列的末尾
②、int pop() 从队列的开头移除并返回元素
③、int peek() 返回队列开头的元素
④、boolean empty() 如果队列为空,返回 true ;否则,返回 false
二、题目要求
①、你只能使用标准的栈操作 —— 也就是只有 push to top, peek/pop from top, size, 和 is empty 操作是合法的。
②、你所使用的语言也许不支持栈。你可以使用 list 或者 deque(双端队列)来模拟一个栈,只要是标准的栈操作即可。
三、题目解析
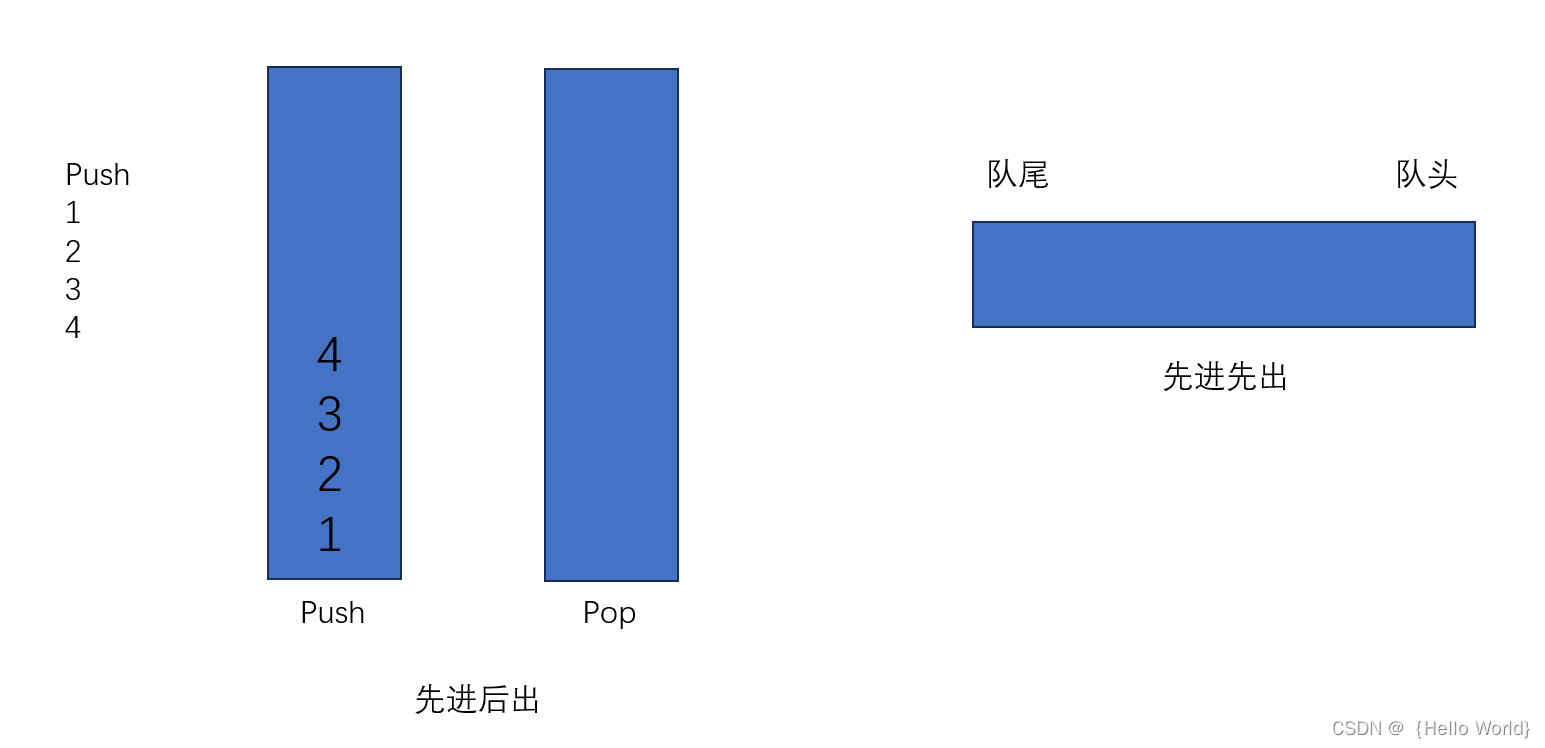
看到这道题目,我们首先要了解一些基础的知识,例如栈和队列的一些相关特性,比如栈是先进后出,队列是先进先出。如果有小伙伴还没有掌握这两种数据结构,建议先看一下博主之前有关栈和队列的文章,《数据结构——栈的详细介绍》和《数据结构——看完这篇保证你学会队列》,相信大家看完之后会有一个更深的了解。
首先解决这个问题我们 需要先用C语言完成一个栈的基本实现,其功能接口包括栈的创建,栈的销毁,压栈,出栈等基本操作。代码如下:
typedef int StDatatype;
typedef struct Stack
{StDatatype* a;int top;int capacity;
}ST;void InitStack(ST* pos);
void DestoryStack(ST* pos);
void PushStack(ST* pos,StDatatype x);
void PopStack(ST* pos);
StDatatype TopStack(ST* pos);
bool STEmpty(ST* pos);
int SizeST(ST* pos);
void InitStack(ST* pos)
{//断言assert(pos);pos->a = NULL;pos->top = 0;//指向栈顶元素的下一个//pos->top=-1为指向栈顶元素pos->capacity = 0;
}
void DestoryStack(ST* pos)
{assert(pos);free(pos->a);pos->a = NULL;pos->capacity = pos->top = 0;
}
void PushStack(ST* pos, StDatatype x)
{assert(pos);if (pos->top == pos->capacity){int newcapacity = pos->capacity == 0 ? 4 : pos->capacity * 2;StDatatype* tmp = (StDatatype*)realloc(pos->a, newcapacity * sizeof(StDatatype));if (tmp == NULL){perror("realloc fail");return;}pos->a = tmp;pos->capacity = newcapacity;}//插入数据pos->a[pos->top] = x;pos->top++;}
void PopStack(ST* pos)
{assert(pos);assert(!STEmpty(pos));pos->top--;
}
StDatatype TopStack(ST* pos)
{assert(pos);assert(!STEmpty(pos));return pos->a[pos->top - 1];
}
bool STEmpty(ST* pos)
{assert(pos);return pos->top == 0;
}
int SizeST(ST* pos)
{assert(pos);return pos->top;
}
接着我们便可以通过我们构建的栈的相关功能,通过我们的分析,用栈来构造一个属于我们自己的队列。
解决本题的基本思路便是:
①、通过上述代码,构建两个栈。一个为进数据的栈,一个为出数据的栈。
②、通过分析,完成题目中的上述接口。
Ⅰ、typedef struct
通过上述的分析,我们知道,我们需要用两个栈来完成我们的队列构造。所以我们将在结构体内构造两个栈。
typedef struct {ST pushst;ST popst;
} MyQueue;
Ⅱ、MyQueue* myQueueCreate
这部分的函数主要是我们队列的创建,我们需要在内存中开辟空间,来完成两个栈的初始化。我们直接调用栈里面的接口便可以完成本次的初始化。
MyQueue* myQueueCreate()
{MyQueue*obj=(MyQueue*)malloc(sizeof(MyQueue));if(obj==NULL){perror("malloc fail");return NULL;}InitStack(&obj->pushst);InitStack(&obj->popst);return obj;
}
Ⅲ、void myQueuePush(MyQueue* obj, int x)
通过前面的分析,我们可以知道,我们可以直接将需要压栈的数据压入pushst
代码如下:
void myQueuePush(MyQueue* obj, int x)
{PushStack(&obj->pushst,x);
}
Ⅳ、int myQueuePeek(MyQueue* obj)
首先我们需要对popst进行判空操作,如果其栈内不为空(有数据的话),我们便可以直接对其进行出栈操作,如果其中没有数据,我们便需要对其进行到数据,将Pushst内的数据,导入popst内。代码如下:
int myQueuePeek(MyQueue* obj)
{if(STEmpty(&obj->popst)){while(!STEmpty(&obj->pushst)){PushStack(&obj->popst,TopStack(&obj->pushst));PopStack(&obj->pushst);}}  return TopStack(&obj->popst);
}
Ⅴ、int myQueuePop(MyQueue* obj)
我们直接对myQueuePeek函数进行复用,然后对popst进行出栈操作,最后直接返回即可。
int myQueuePop(MyQueue* obj) {int front=myQueuePeek(obj);PopStack(&obj->popst);return front;}
Ⅶ、bool myQueueEmpty(MyQueue* obj)
判空操作,需要满足popst和pushst都为空,才能保证队列为空。
bool myQueueEmpty(MyQueue* obj) {return STEmpty(&obj->popst)&&STEmpty(&obj->pushst);}
Ⅷ、void myQueueFree(MyQueue* obj)
在freeobj之前,我们需要对两个栈进行销毁操作,以防止内存的泄漏。
void myQueueFree(MyQueue* obj) {DestoryStack(&obj->popst);DestoryStack(&obj->pushst);free(obj);
}
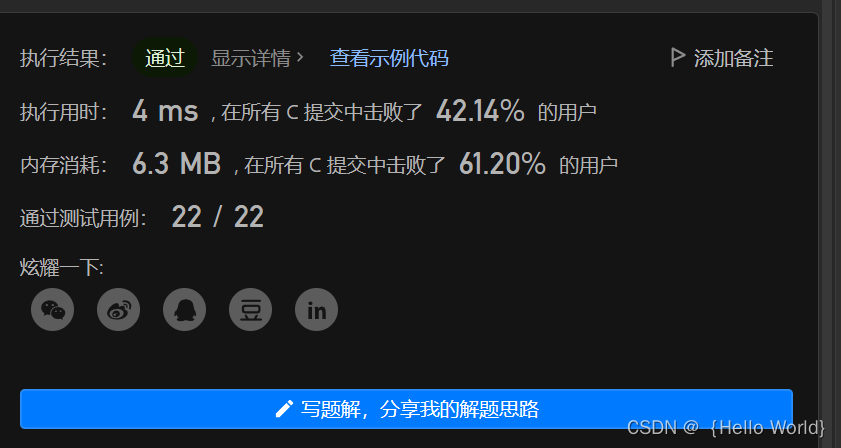
四、完整代码
typedef int StDatatype;
typedef struct Stack
{StDatatype* a;int top;int capacity;
}ST;void InitStack(ST* pos);
void DestoryStack(ST* pos);
void PushStack(ST* pos,StDatatype x);
void PopStack(ST* pos);
StDatatype TopStack(ST* pos);
bool STEmpty(ST* pos);
int SizeST(ST* pos);
void InitStack(ST* pos)
{//断言assert(pos);pos->a = NULL;pos->top = 0;//指向栈顶元素的下一个//pos->top=-1为指向栈顶元素pos->capacity = 0;
}
void DestoryStack(ST* pos)
{assert(pos);free(pos->a);pos->a = NULL;pos->capacity = pos->top = 0;
}
void PushStack(ST* pos, StDatatype x)
{assert(pos);if (pos->top == pos->capacity){int newcapacity = pos->capacity == 0 ? 4 : pos->capacity * 2;StDatatype* tmp = (StDatatype*)realloc(pos->a, newcapacity * sizeof(StDatatype));if (tmp == NULL){perror("realloc fail");return;}pos->a = tmp;pos->capacity = newcapacity;}//插入数据pos->a[pos->top] = x;pos->top++;}
void PopStack(ST* pos)
{assert(pos);assert(!STEmpty(pos));pos->top--;
}
StDatatype TopStack(ST* pos)
{assert(pos);assert(!STEmpty(pos));return pos->a[pos->top - 1];
}
bool STEmpty(ST* pos)
{assert(pos);return pos->top == 0;
}
int SizeST(ST* pos)
{assert(pos);return pos->top;
}typedef struct {ST pushst;ST popst;
} MyQueue;MyQueue* myQueueCreate()
{MyQueue*obj=(MyQueue*)malloc(sizeof(MyQueue));if(obj==NULL){perror("malloc fail");return NULL;}InitStack(&obj->pushst);InitStack(&obj->popst);return obj;}void myQueuePush(MyQueue* obj, int x)
{PushStack(&obj->pushst,x);
}
int myQueuePeek(MyQueue* obj)
{if(STEmpty(&obj->popst)){while(!STEmpty(&obj->pushst)){PushStack(&obj->popst,TopStack(&obj->pushst));PopStack(&obj->pushst);}}  return TopStack(&obj->popst);
}
int myQueuePop(MyQueue* obj) {int front=myQueuePeek(obj);PopStack(&obj->popst);return front;}bool myQueueEmpty(MyQueue* obj) {return STEmpty(&obj->pushst)&&STEmpty(&obj->popst);
}void myQueueFree(MyQueue* obj) {DestoryStack(&obj->popst);DestoryStack(&obj->pushst);free(obj);
}/*** Your MyQueue struct will be instantiated and called as such:* MyQueue* obj = myQueueCreate();* myQueuePush(obj, x);* int param_2 = myQueuePop(obj);* int param_3 = myQueuePeek(obj);* bool param_4 = myQueueEmpty(obj);* myQueueFree(obj);
*/