最近需求需要使用mlflow,去学习了下,记录。
简介
MLflow是一个开源平台,专门为了帮助机器学习的从业者和团队处理机器学习过程中的复杂性而设计的。MLflow关注机器学习项目的完整生命周期,确保每个阶段都是可管理的、可追溯的和可复现的。
MLflow目前提供了几个关键的组件:
MLflow AI Gateway:通过安全、简单的API与最先进的LLM进行交互。
MLflow LLM Evaluate:简化LLM和提示的评估。
MLflow Tracking:记录和查询实验:代码、数据、配置和结果。
MLflow Projects:将数据科学代码打包成一种格式,可以在任何平台上重现运行。
MLflow Models:在不同的服务环境中部署机器学习模型。
Model Registry:在一个中心仓库中存储、注释、发现和管理模型。
FE启动
(前提你需要有python环境和pip)
先安装mlflow
pip install mlflow
然后就可以直接启动sever
mlflow server --host 127.0.0.1 --port 8080
这个端口随便你,只要是你可用的端口就行。
启动完成之后打开浏览器输入localhost:8080 你的端口是什么就是什么,我是8080而已
就可以看到他的UI。
代码使用
创建实验
这里的实验类似于我们的project,独立的实验可以方便进行管理和查看
from mlflow import MlflowClient
client = MlflowClient(tracking_uri="http://127.0.0.1:8080")
all_experiments = client.search_experiments()default_experiment = [{"name": experiment.name, "lifecycle_stage": experiment.lifecycle_stage}for experiment in all_experimentsif experiment.name == "Default"
][0]
# Provide an Experiment description that will appear in the UI
experiment_description = ("This is the grocery forecasting project. ""This experiment contains the produce models for apples."
)# Provide searchable tags that define characteristics of the Runs that
# will be in this Experiment
experiment_tags = {"project_name": "grocery-forecasting","store_dept": "produce","team": "stores-ml","project_quarter": "Q3-2023","mlflow.note.content": experiment_description,
}# Create the Experiment, providing a unique name
produce_apples_experiment = client.create_experiment(name="Apple_Models", tags=experiment_tags
)
在FE里面可以看到 刚刚我们创建的实验。

查看实验
from mlflow import MlflowClient
from pprint import pprint
client = MlflowClient(tracking_uri="http://127.0.0.1:8080")
all_experiments = client.search_experiments()pprint(all_experiments) 
这样可以返回所有我们已经存在的实验,关于pprint()可以看我另一篇blog https://blog.csdn.net/Damien_J_Scott/article/details/134603880
Model准备
import mlflow
from mlflow.models import infer_signatureimport pandas as pd
from sklearn import datasets
from sklearn.model_selection import train_test_split
from sklearn.linear_model import LogisticRegression
from sklearn.metrics import accuracy_score, precision_score, recall_score, f1_score# Load the Iris dataset
X, y = datasets.load_iris(return_X_y=True)# Split the data into training and test sets
X_train, X_test, y_train, y_test = train_test_split(X, y, test_size=0.2, random_state=42
)# Define the model hyperparameters
params = {"solver": "lbfgs","max_iter": 1000,"multi_class": "auto","random_state": 8888,
}# Train the model
lr = LogisticRegression(**params)
lr.fit(X_train, y_train)# Predict on the test set
y_pred = lr.predict(X_test)# Calculate metrics
accuracy = accuracy_score(y_test, y_pred)
这里训练好了一个逻辑回归的模型。
Model记录
import mlflow
from mlflow.models import infer_signatureimport pandas as pd
from sklearn import datasets
from sklearn.model_selection import train_test_split
from sklearn.linear_model import LogisticRegression
from sklearn.metrics import accuracy_score, precision_score, recall_score, f1_score# Load the Iris dataset
X, y = datasets.load_iris(return_X_y=True)# Split the data into training and test sets
X_train, X_test, y_train, y_test = train_test_split(X, y, test_size=0.2, random_state=42
)# Define the model hyperparameters
params = {"solver": "lbfgs","max_iter": 1000,"multi_class": "auto","random_state": 8888,
}# Train the model
lr = LogisticRegression(**params)
lr.fit(X_train, y_train)# Predict on the test set
y_pred = lr.predict(X_test)# Calculate metrics
accuracy = accuracy_score(y_test, y_pred)#2nd part code# Set our tracking server uri for logging
mlflow.set_tracking_uri(uri="http://127.0.0.1:8080")# Create a new MLflow Experiment
mlflow.set_experiment("MLflow Quickstart")# Start an MLflow run
with mlflow.start_run():# Log the hyperparametersmlflow.log_params(params)# Log the loss metricmlflow.log_metric("accuracy", accuracy)# Set a tag that we can use to remind ourselves what this run was formlflow.set_tag("Training Info", "Basic LR model for iris data")# Infer the model signaturesignature = infer_signature(X_train, lr.predict(X_train))# Log the modelmodel_info = mlflow.sklearn.log_model(sk_model=lr,artifact_path="iris_model",signature=signature,input_example=X_train,registered_model_name="tracking-quickstart",)
这里在原有的代码基础上加入了模型记录的代码,其实也可以把训练模型和其他逻辑的代码放进 start_run 里面,但是官方不建议这么做,因为如果你训练或者其他逻辑代码报错有什么问题,会导致之前出现空或者无效记录,就需要手动去UI里面进行清理了
这里设置链接的方式使用的是 mlflow.set_tracking_uri(uri="http://127.0.0.1:8080"),
其实还有一种方式 client = MlflowClient(tracking_uri="http://127.0.0.1:8080"),他们的区别就是如下: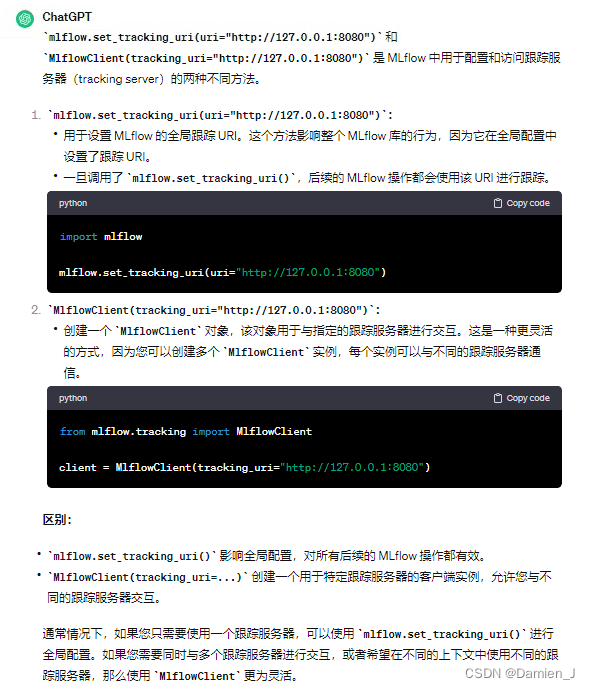
统而言之就是,client方式更加灵活,可以一份代码里面有多个跟踪服务器,另一种适合一份代码只有一个跟踪服务器来使用。
调用Model
import mlflow
from mlflow.models import infer_signatureimport pandas as pd
from sklearn import datasets
from sklearn.model_selection import train_test_split
from sklearn.linear_model import LogisticRegression
from sklearn.metrics import accuracy_score, precision_score, recall_score, f1_score# Load the Iris dataset
X, y = datasets.load_iris(return_X_y=True)# Split the data into training and test sets
X_train, X_test, y_train, y_test = train_test_split(X, y, test_size=0.2, random_state=42
)# Define the model hyperparameters
params = {"solver": "lbfgs","max_iter": 1000,"multi_class": "auto","random_state": 8888,
}# Train the model
lr = LogisticRegression(**params)
lr.fit(X_train, y_train)# Predict on the test set
y_pred = lr.predict(X_test)# Calculate metrics
accuracy = accuracy_score(y_test, y_pred)
print(accuracy)# Set our tracking server uri for logging
mlflow.set_tracking_uri(uri="http://127.0.0.1:8080")# Create a new MLflow Experiment
mlflow.set_experiment("MLflow Quickstart")# Start an MLflow run
with mlflow.start_run():# Log the hyperparametersmlflow.log_params(params)# Log the loss metricmlflow.log_metric("accuracy", accuracy)# Set a tag that we can use to remind ourselves what this run was formlflow.set_tag("Training Info", "Basic LR model for iris data")# Infer the model signaturesignature = infer_signature(X_train, lr.predict(X_train))# Log the modelmodel_info = mlflow.sklearn.log_model(sk_model=lr,artifact_path="iris_model",signature=signature,input_example=X_train,registered_model_name="tracking-quickstart",)print(f'{model_info.model_uri}')# Load the model back for predictions as a generic Python Function modelloaded_model = mlflow.pyfunc.load_model(model_info.model_uri)predictions = loaded_model.predict(X_test)iris_feature_names = datasets.load_iris().feature_namesresult = pd.DataFrame(X_test, columns=iris_feature_names)result["actual_class"] = y_testresult["predicted_class"] = predictionsprint(result[:4])
这里在之前基础上加了调用模型的代码
FE查看
 我们返回到FE中,可以看到1这里 RUN Name 会随机生成,如果你想要指定特殊的名字就可以这样
with mlflow.start_run(run_name="test1"):pass还有就是每有个一 with mlflow.start_run()就会有一条这个记录,可以看到3这里是没有model的,因为我测试的时候就是一个空的with mlflow.start_run()
点击某一个run name就可以进入详情页 红线这里就是model的url,可以直接通过这个url调用到该model,
左边文件栏里面可以看到具体记录了哪些文件。有pkl的模型,还有示例输入,还有该模型需要的依赖等等。
根据我的学习进度还在更新中....
参考链接: https://mlflow.org/docs/latest/getting-started/intro-quickstart/index.html