计算机毕业设计|基于SpringBoot+MyBatis框架的电脑商城的设计与实现(商品和购物车)
商品热销排行
1 商品-创建数据表
1.使用use命令先选中store数据库。
USE store;
2.在store数据库中创建t_product数据表。
CREATE TABLE t_product (id int(20) NOT NULL COMMENT '商品id',category_id int(20) DEFAULT NULL COMMENT '分类id',item_type varchar(100) DEFAULT NULL COMMENT '商品系列',title varchar(100) DEFAULT NULL COMMENT '商品标题',sell_point varchar(150) DEFAULT NULL COMMENT '商品卖点',price bigint(20) DEFAULT NULL COMMENT '商品单价',num int(10) DEFAULT NULL COMMENT '库存数量',image varchar(500) DEFAULT NULL COMMENT '图片路径',status int(1) DEFAULT '1' COMMENT '商品状态  1:上架   2:下架   3:删除',priority int(10) DEFAULT NULL COMMENT '显示优先级',created_time datetime DEFAULT NULL COMMENT '创建时间',modified_time datetime DEFAULT NULL COMMENT '最后修改时间',created_user varchar(50) DEFAULT NULL COMMENT '创建人',modified_user varchar(50) DEFAULT NULL COMMENT '最后修改人',PRIMARY KEY (id)
) ENGINE=InnoDB DEFAULT CHARSET=utf8;
2 商品-创建实体类
创建com.cy.store.entity.Product类,并继承自BaseEntity类。在类中声明与数据表中对应的属性。
package com.cy.store.entity;/** 商品数据的实体类 */
public class Product extends BaseEntity implements Serializable {private Integer id;private Integer categoryId;private String itemType;private String title;private String sellPoint;private Long price;private Integer num;private String image;private Integer status;private Integer priority;// Generate: Getter and Setter、Generate hashCode() and equals()、toString()
}
3 商品-热销排行-持久层
3.1 规划需要执行的SQL语句
查询热销商品列表的SQL语句大致是。
SELECT * FROM t_product WHERE status=1 ORDER BY priority DESC LIMIT 0,4
3.2 接口与抽象方法
在com.cy.store.mapper包下创建ProductMapper接口并在接口中添加查询热销商品findHotList()的方法。
package com.cy.store.mapper;
import com.cy.store.entity.Product;
import java.util.List;/** 处理商品数据的持久层接口 */
public interface ProductMapper {/*** 查询热销商品的前四名* @return 热销商品前四名的集合*/List<Product> findHotList();
}
3.3 配置SQL映射
1.在main\resources\mapper文件夹下创建ProductMapper.xml文件,并在文件中配置findHotList()方法的映射。
<?xml version="1.0" encoding="UTF-8" ?>
<!DOCTYPE mapperPUBLIC "-//mybatis.org//DTD Mapper 3.0//EN""http://mybatis.org/dtd/mybatis-3-mapper.dtd">
<mapper namespace="com.cy.store.mapper.ProductMapper"><resultMap id="ProductEntityMap" type="com.cy.store.entity.Product"><id column="id" property="id"/><result column="category_id" property="categoryId"/><result column="item_type" property="itemType"/><result column="sell_point" property="sellPoint"/><result column="created_user" property="createdUser"/><result column="created_time" property="createdTime"/><result column="modified_user" property="modifiedUser"/><result column="modified_time" property="modifiedTime"/></resultMap><!-- 查询热销商品的前四名:List<Product> findHostList() --><select id="findHotList" resultMap="ProductEntityMap">SELECT*FROMt_productWHEREstatus=1ORDER BYpriority DESCLIMIT 0,4</select>
</mapper>
2.在com.cy.store.mapper包下创建ProductMapperTests测试类,并添加测试方法。
package com.cy.store.mapper;
import com.cy.store.entity.Product;
import org.junit.Test;
import org.junit.runner.RunWith;
import org.springframework.beans.factory.annotation.Autowired;
import org.springframework.boot.test.context.SpringBootTest;
import org.springframework.test.context.junit4.SpringRunner;
import java.util.List;@RunWith(SpringRunner.class)
@SpringBootTest
public class ProductMapperTests {@Autowiredprivate ProductMapper productMapper;@Testpublic void findHotList() {List<Product> list = productMapper.findHotList();System.out.println("count=" + list.size());for (Product item : list) {System.out.println(item);}}
}
4 商品-热销排行-业务层
4.1 规划异常
说明:无异常。
4.2 接口与抽象方法
创建com.cy.store.service.IProductService接口,并在接口中添加findHotList()方法。
package com.cy.store.service;
import com.cy.store.entity.Product;
import java.util.List;/** 处理商品数据的业务层接口 */
public interface IProductService {/*** 查询热销商品的前四名* @return 热销商品前四名的集合*/List<Product> findHotList();
}
4.3 实现抽象方法
1.创建com.cy.store.service.impl.ProductServiceImpl类,并添加@Service注解;在类中声明持久层对象以及实现接口中的方法。
package com.cy.store.service.impl;
import com.cy.store.entity.Product;
import com.cy.store.mapper.ProductMapper;
import com.cy.store.service.IProductService;
import org.springframework.beans.factory.annotation.Autowired;
import org.springframework.stereotype.Service;
import java.util.List;/** 处理商品数据的业务层实现类 */
@Service
public class ProductServiceImpl implements IProductService {@Autowiredprivate ProductMapper productMapper;@Overridepublic List<Product> findHotList() {List<Product> list = productMapper.findHotList();for (Product product : list) {product.setPriority(null);product.setCreatedUser(null);product.setCreatedTime(null);product.setModifiedUser(null);product.setModifiedTime(null);}return list;}
}
2.在com.cy.store.service包下创建测试类ProductServiceTests,并编写测试方法。
package com.cy.store.service;
import com.cy.store.entity.Product;
import com.cy.store.service.ex.ServiceException;
import org.junit.Test;
import org.junit.runner.RunWith;
import org.springframework.beans.factory.annotation.Autowired;
import org.springframework.boot.test.context.SpringBootTest;
import org.springframework.test.context.junit4.SpringRunner;
import java.util.List;@RunWith(SpringRunner.class)
@SpringBootTest
public class ProductServiceTests {@Autowiredprivate IProductService productService;@Testpublic void findHotList() {try {List<Product> list = productService.findHotList();System.out.println("count=" + list.size());for (Product item : list) {System.out.println(item);}} catch (ServiceException e) {System.out.println(e.getClass().getSimpleName());System.out.println(e.getMessage());}}
}
5 商品-热销排行-控制器
5.1 处理异常
说明:无异常。
5.2 设计请求
1.设计用户提交的请求,并设计响应的方式。
请求路径:/products/hot_list
请求参数:无
请求类型:GET
响应结果:JsonResult<List<Product>>
是否拦截:否,需要将index.html和products/**添加到白名单
2.在LoginInterceptorConfigurer类中将index.html页面和products/**请求添加到白名单。
patterns.add("/web/index.html");
patterns.add("/products/**");
5.3 处理请求
1.创建com.cy.controller.ProductController类继承自BaseController类,类添加@RestController和@RequestMapping(“products”)注解,并在类中添加业务层对象。
package com.cy.store.controller;
import com.cy.store.entity.Product;
import com.cy.store.service.IProductService;
import com.cy.store.util.JsonResult;
import org.springframework.beans.factory.annotation.Autowired;
import org.springframework.web.bind.annotation.RequestMapping;
import org.springframework.web.bind.annotation.RestController;
import java.util.List;@RestController
@RequestMapping("products")
public class ProductController extends BaseController {@Autowiredprivate IProductService productService;
}
2.在类中添加处理请求的getHotList()方法。
@RequestMapping("hot_list")
public JsonResult<List<Product>> getHotList() {List<Product> data = productService.findHotList();return new JsonResult<List<Product>>(OK, data);
}
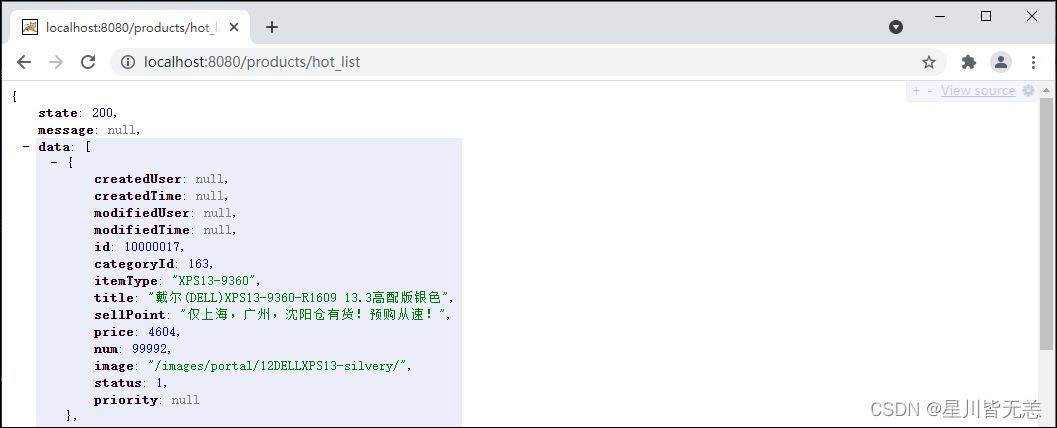
3.完成后启动项目,直接访问http://localhost:8080/products/hot_list进行测试。
6 商品-热销排行-前端页面
1.在index.html页面给“热销排行”列表的div标签设置id属性值。
<div id="hot-list" class="panel-body panel-item"><!-- ... -->
</div>
2.在index.html页面中body标签内部的最后,添加展示热销排行商品的代码。
<script type="text/javascript">
$(document).ready(function() {showHotList();
});function showHotList() {$("#hot-list").empty();$.ajax({url: "/products/hot_list",type: "GET",dataType: "JSON",success: function(json) {let list = json.data;console.log("count=" + list.length);for (let i = 0; i < list.length; i++) {console.log(list[i].title);let html = '<div class="col-md-12">'+ '<div class="col-md-7 text-row-2"><a href="product.html?id=#{id}">#{title}</a></div>'+ '<div class="col-md-2">¥#{price}</div>'+ '<div class="col-md-3"><img src="..#{image}collect.png" class="img-responsive" /></div>'+ '</div>';html = html.replace(/#{id}/g, list[i].id);html = html.replace(/#{title}/g, list[i].title);html = html.replace(/#{price}/g, list[i].price);html = html.replace(/#{image}/g, list[i].image);$("#hot-list").append(html);}}});
}
</script>
3.完成后启动项目,直接访问http://localhost:8080/web/index.html进行测试。
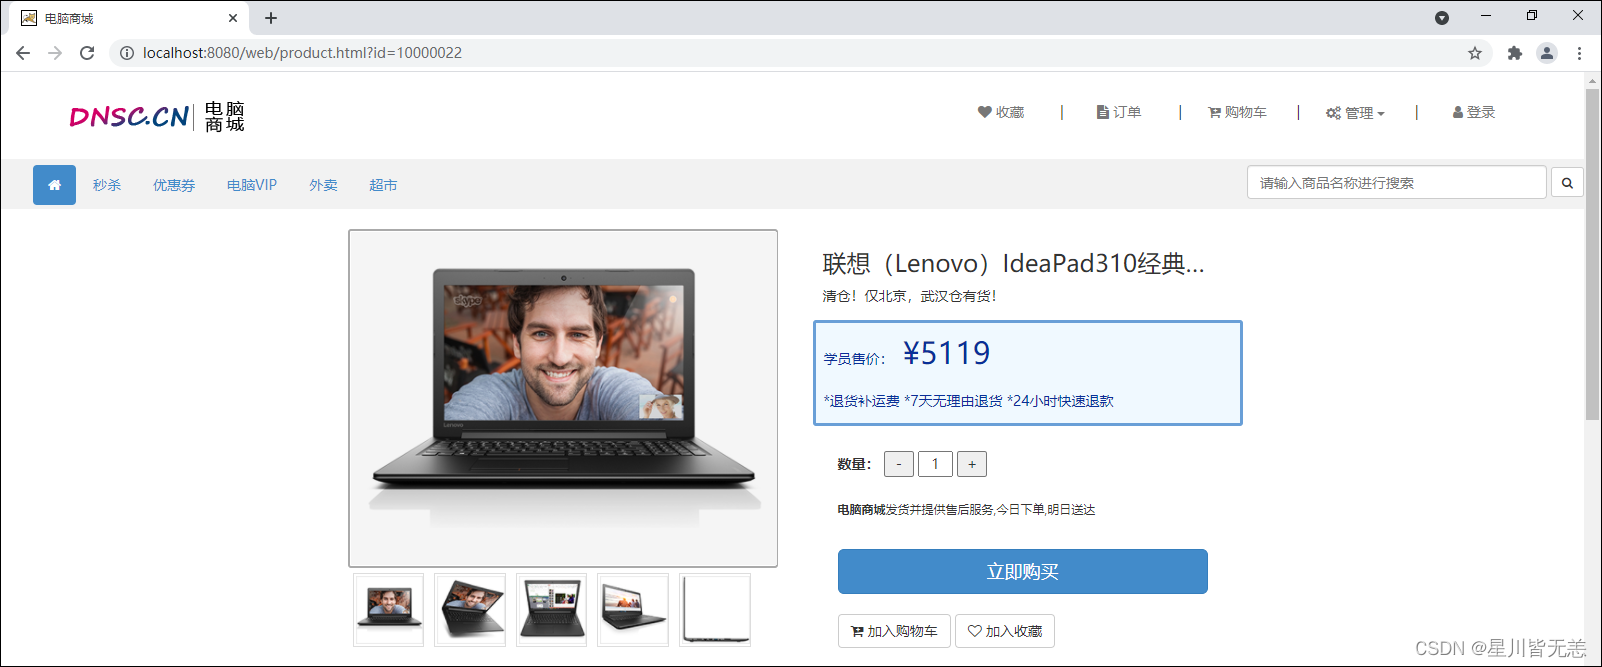
显示商品详情
1 商品-显示商品详情-持久层
1.1 规划需要执行的SQL语句
根据商品id显示商品详情的SQL语句大致是。
SELECT * FROM t_product WHERE id=?
1.2 接口与抽象方法
在ProductMapper接口中添加抽象方法。
/*** 根据商品id查询商品详情* @param id 商品id* @return 匹配的商品详情,如果没有匹配的数据则返回null*/
Product findById(Integer id);
1.3 配置SQL映射
1.在ProductMapper.xml文件中配置findById(Integer id)方法的映射。
<!-- 根据商品id查询商品详情:Product findById(Integer id) -->
<select id="findById" resultMap="ProductEntityMap">SELECT*FROMt_productWHEREid=#{id}
</select>
2.在ProductMapperTests测试类中添加测试方法。
@Test
public void findById() {Integer id = 10000017;Product result = productMapper.findById(id);System.out.println(result);
}
2 商品-显示商品详情-业务层
2.1 规划异常
如果商品数据不存在,应该抛出ProductNotFoundException,需要创建com.cy.store.service.ex.ProductNotFoundException异常。
package com.cy.store.service.ex;/** 商品数据不存在的异常 */
public class ProductNotFoundException extends ServiceException {// Override Methods...
}
2.2 接口与抽象方法
在业务层IProductService接口中添加findById(Integer id)抽象方法。
/*** 根据商品id查询商品详情* @param id 商品id* @return 匹配的商品详情,如果没有匹配的数据则返回null*/
Product findById(Integer id);
2.3 实现抽象方法
1.在ProductServiceImpl类中,实现接口中的findById(Integer id)抽象方法。
@Override
public Product findById(Integer id) {// 根据参数id调用私有方法执行查询,获取商品数据Product product = productMapper.findById(id);// 判断查询结果是否为nullif (product == null) {// 是:抛出ProductNotFoundExceptionthrow new ProductNotFoundException("尝试访问的商品数据不存在");}// 将查询结果中的部分属性设置为nullproduct.setPriority(null);product.setCreatedUser(null);product.setCreatedTime(null);product.setModifiedUser(null);product.setModifiedTime(null);// 返回查询结果return product;
}
2.在ProductServiceTests测试类中编写测试方法。
@Test
public void findById() {try {Integer id = 100000179;Product result = productService.findById(id);System.out.println(result);} catch (ServiceException e) {System.out.println(e.getClass().getSimpleName());System.out.println(e.getMessage());}
}
3 商品-显示商品详情-控制器
3.1 处理异常
在BaseController类中的handleException()方法中添加处理ProductNotFoundException的异常。
// ...
else if (e instanceof ProductNotFoundException) {result.setState(4006);
}
// ...
3.2 设计请求
设计用户提交的请求,并设计响应的方式。
请求路径:/products/{id}/details
请求参数:@PathVariable("id") Integer id
请求类型:GET
响应结果:JsonResult<Product>
3.3 处理请求
1.在ProductController类中添加处理请求的getById()方法。
@GetMapping("{id}/details")
public JsonResult<Product> getById(@PathVariable("id") Integer id) {// 调用业务对象执行获取数据Product data = productService.findById(id);// 返回成功和数据return new JsonResult<Product>(OK, data);
}
2.完成后启动项目,直接访问http://localhost:8080/products/10000017/details进行测试。

4 商品-显示商品详情-前端页面
1.检查在product.html页面body标签内部的最后是否引入jquery-getUrlParam.js文件,如果引入无需重复引入。
<script type="text/javascript" src="../js/jquery-getUrlParam.js"></script>
2.在product.html页面中body标签内部的最后添加获取当前商品详情的代码。
<script type="text/javascript">
let id = $.getUrlParam("id");
console.log("id=" + id);
$(document).ready(function() {$.ajax({url: "/products/" + id + "/details",type: "GET",dataType: "JSON",success: function(json) {if (json.state == 200) {console.log("title=" + json.data.title);$("#product-title").html(json.data.title);$("#product-sell-point").html(json.data.sellPoint);$("#product-price").html(json.data.price);for (let i = 1; i <= 5; i++) {$("#product-image-" + i + "-big").attr("src", ".." + json.data.image + i + "_big.png");$("#product-image-" + i).attr("src", ".." + json.data.image + i + ".jpg");}} else if (json.state == 4006) { // 商品数据不存在的异常location.href = "index.html";} else {alert("获取商品信息失败!" + json.message);}}});
});
</script>
3.完成后启动项目,先访问http://localhost:8080/web/index.html页面,然后点击“热销排行”中的某个子项,将跳转到product.html商品详情页,观察页面是否加载的是当前的商品信息。
<script type="text/javascript">
let id = $.getUrlParam("id");
console.log("id=" + id);
$(document).ready(function() {
$.ajax({
url: "/products/" + id + "/details",
type: "GET",
dataType: "JSON",
success: function(json) {
if (json.state == 200) {
console.log("title=" + json.data.title);
$("#product-title").html(json.data.title);
$("#product-sell-point").html(json.data.sellPoint);
$("#product-price").html(json.data.price);
for (let i = 1; i <= 5; i++) {
$("#product-image-" + i + "-big").attr("src", ".." +
json.data.image + i + "_big.png");
$("#product-image-" + i).attr("src", ".." + json.data.image
+ i + ".jpg");
}
} else if (json.state == 4006) { // 商品数据不存在的异常
location.href = "index.html";
} else {
alert("获取商品信息失败!" + json.message);
}
}
});
});
</script>
3.完成后启动项目,先访问http://localhost:8080/web/index.html页面,然后点击“热销排行”中的某个子项,将跳转到product.html商品详情页,观察页面是否加载的是当前的商品信息。
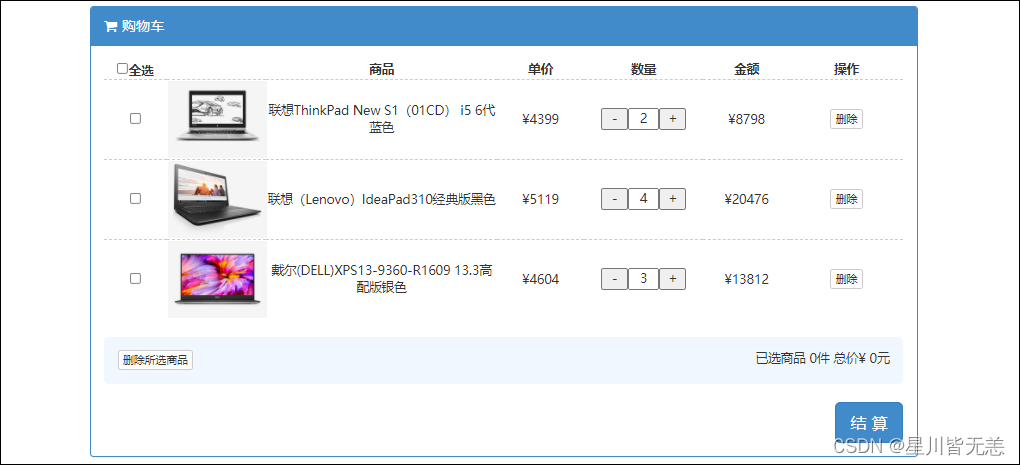
加入购物车
1 购物车-创建数据表
1.使用use命令先选中store数据库。
USE store;
2.在store数据库中创建t_cart用户数据表。
CREATE TABLE t_cart (cid INT AUTO_INCREMENT COMMENT '购物车数据id',uid INT NOT NULL COMMENT '用户id',pid INT NOT NULL COMMENT '商品id',price BIGINT COMMENT '加入时商品单价',num INT COMMENT '商品数量',created_user VARCHAR(20) COMMENT '创建人',created_time DATETIME COMMENT '创建时间',modified_user VARCHAR(20) COMMENT '修改人',modified_time DATETIME COMMENT '修改时间',PRIMARY KEY (cid)
) ENGINE=InnoDB DEFAULT CHARSET=utf8;
2 购物车-创建实体类
在com.cy.store.entity包下创建购物车的Cart实体类。
package com.cy.store.entity;
import java.io.Serializable;/** 购物车数据的实体类 */
public class Cart extends BaseEntity implements Serializable {private Integer cid;private Integer uid;private Integer pid;private Long price;private Integer num;// Generate: Getter and Setter、Generate hashCode() and equals()、toString()
}
3 购物车-添加购物车-持久层
3.1 规划需要执行的SQL语句
向购物车表中插入商品数据的SQL语句大致是:
insert into t_cart (除了cid以外的字段列表) values (匹配的值列表);
如果用户曾经将某个商品加入到购物车过,则点击“加入购物车”按钮只会对购物车中相同商品数量做递增操作。
update t_cart set num=? where cid=?
关于判断“到底应该插入数据,还是修改数量”,可以通过“查询某用户是否已经添加某商品到购物车”来完成。如果查询到某结果,就表示该用户已经将该商品加入到购物车了,如果查询结果为null,则表示该用户没有添加过该商品。
select * from t_cart where uid=? and pid=?
3.2 接口与抽象方法
在com.cy.store.mapper包下创建CartMapper接口,并添加抽象相关的方法。
package com.cy.store.mapper;
import com.cy.store.entity.Cart;
import org.apache.ibatis.annotations.Param;
import java.util.Date;/** 处理购物车数据的持久层接口 */
public interface CartMapper {/*** 插入购物车数据* @param cart 购物车数据* @return 受影响的行数*/Integer insert(Cart cart);/*** 修改购物车数据中商品的数量* @param cid 购物车数据的id* @param num 新的数量* @param modifiedUser 修改执行人* @param modifiedTime 修改时间* @return 受影响的行数*/Integer updateNumByCid(@Param("cid") Integer cid,@Param("num") Integer num,@Param("modifiedUser") String modifiedUser,@Param("modifiedTime") Date modifiedTime);/*** 根据用户id和商品id查询购物车中的数据* @param uid 用户id* @param pid 商品id* @return 匹配的购物车数据,如果该用户的购物车中并没有该商品,则返回null*/Cart findByUidAndPid(@Param("uid") Integer uid,@Param("pid") Integer pid);
}
3.3 配置SQL映射
1.在resources.mapper文件夹下创建CartMapper.xml文件,并在文件中配置以上三个方法的映射。
<?xml version="1.0" encoding="UTF-8" ?>
<!DOCTYPE mapperPUBLIC "-//mybatis.org//DTD Mapper 3.0//EN""http://mybatis.org/dtd/mybatis-3-mapper.dtd">
<mapper namespace="com.cy.store.mapper.CartMapper"><resultMap id="CartEntityMap" type="com.cy.store.entity.Cart"><id column="cid" property="cid"/><result column="created_user" property="createdUser"/><result column="created_time" property="createdTime"/><result column="modified_user" property="modifiedUser"/><result column="modified_time" property="modifiedTime"/></resultMap><!-- 插入购物车数据:Integer insert(Cart cart) --><insert id="insert" useGeneratedKeys="true" keyProperty="cid">INSERT INTO t_cart (uid, pid, price, num, created_user, created_time, modified_user, modified_time)VALUES (#{uid}, #{pid}, #{price}, #{num}, #{createdUser}, #{createdTime}, #{modifiedUser}, #{modifiedTime})</insert><!-- 修改购物车数据中商品的数量:Integer updateNumByCid(@Param("cid") Integer cid,@Param("num") Integer num,@Param("modifiedUser") String modifiedUser,@Param("modifiedTime") Date modifiedTime) --><update id="updateNumByCid">UPDATEt_cartSETnum=#{num},modified_user=#{modifiedUser},modified_time=#{modifiedTime}WHEREcid=#{cid}</update><!-- 根据用户id和商品id查询购物车中的数据:Cart findByUidAndPid(@Param("uid") Integer uid,@Param("pid") Integer pid) --><select id="findByUidAndPid" resultMap="CartEntityMap">SELECT*FROMt_cartWHEREuid=#{uid} AND pid=#{pid}</select>
</mapper>
2.在com.cy.store.mapper包下创建CartMapperTests测试类,并添加测试方法。
package com.cy.store.mapper;
import com.cy.store.entity.Cart;
import com.cy.store.entity.Product;
import org.junit.Test;
import org.junit.runner.RunWith;
import org.springframework.beans.factory.annotation.Autowired;
import org.springframework.boot.test.context.SpringBootTest;
import org.springframework.test.context.junit4.SpringRunner;
import java.util.Date;
import java.util.List;@RunWith(SpringRunner.class)
@SpringBootTest
public class CartMapperTests {@Autowiredprivate CartMapper cartMapper;@Testpublic void insert() {Cart cart = new Cart();cart.setUid(1);cart.setPid(2);cart.setNum(3);cart.setPrice(4L);Integer rows = cartMapper.insert(cart);System.out.println("rows=" + rows);}@Testpublic void updateNumByCid() {Integer cid = 1;Integer num = 10;String modifiedUser = "购物车管理员";Date modifiedTime = new Date();Integer rows = cartMapper.updateNumByCid(cid, num, modifiedUser, modifiedTime);System.out.println("rows=" + rows);}@Testpublic void findByUidAndPid() {Integer uid = 1;Integer pid = 2;Cart result = cartMapper.findByUidAndPid(uid, pid);System.out.println(result);}
}
4 购物车-添加购物车-业务层
4.1 规划异常
在插入数据时,可能抛出InsertException异常;在修改数据时,可能抛出UpdateException异常。如果不限制购物车中的记录的数量,则没有其它异常。
4.2 接口与抽象方法
在com.cy.store.service包下创建ICartService接口,并添加抽象方法。
package com.cy.store.service;/** 处理商品数据的业务层接口 */
public interface ICartService {/*** 将商品添加到购物车* @param uid 当前登录用户的id* @param pid 商品的id* @param amount 增加的数量* @param username 当前登录的用户名*/void addToCart(Integer uid, Integer pid, Integer amount, String username);
}
4.3 实现抽象方法
1.创建com.cy.store.service.impl.CartServiceImpl类,并实现ICartService接口,并在类的定义前添加@Service注解。在类中声明CartMapper持久层对象和IProductService处理商品数据的业务对象,并都添加@Autowired注修饰。
package com.cy.store.service.impl;
import com.cy.store.entity.Cart;
import com.cy.store.entity.Product;
import com.cy.store.mapper.CartMapper;
import com.cy.store.service.ICartService;
import com.cy.store.service.IProductService;
import com.cy.store.service.ex.InsertException;
import org.springframework.beans.factory.annotation.Autowired;
import org.springframework.stereotype.Service;
import java.util.Date;/** 处理购物车数据的业务层实现类 */
@Service
public class CartServiceImpl implements ICartService {@Autowiredprivate CartMapper cartMapper;@Autowiredprivate IProductService productService;
}
2.在CartServiceImpl类中实现业务层ICartService接口中定义的抽象方法。
@Override
public void addToCart(Integer uid, Integer pid, Integer amount, String username) {// 根据参数pid和uid查询购物车中的数据// 判断查询结果是否为null// 是:表示该用户并未将该商品添加到购物车// -- 创建Cart对象// -- 封装数据:uid,pid,amount// -- 调用productService.findById(pid)查询商品数据,得到商品价格// -- 封装数据:price// -- 封装数据:4个日志// -- 调用insert(cart)执行将数据插入到数据表中// 否:表示该用户的购物车中已有该商品// -- 从查询结果中获取购物车数据的id// -- 从查询结果中取出原数量,与参数amount相加,得到新的数量// -- 执行更新数量
}
3.addToCart(Integer uid, Integer pid, Integer amount, String username)方法的代码具体实现。
@Override
public void addToCart(Integer uid, Integer pid, Integer amount, String username) {// 根据参数pid和uid查询购物车中的数据Cart result = cartMapper.findByUidAndPid(uid, pid);Integer cid = result.getCid();Date now = new Date();// 判断查询结果是否为nullif (result == null) {// 是:表示该用户并未将该商品添加到购物车// 创建Cart对象Cart cart = new Cart();// 封装数据:uid,pid,amountcart.setUid(uid);cart.setPid(pid);cart.setNum(amount);// 调用productService.findById(pid)查询商品数据,得到商品价格Product product = productService.findById(pid);// 封装数据:pricecart.setPrice(product.getPrice());// 封装数据:4个日志cart.setCreatedUser(username);cart.setCreatedTime(now);cart.setModifiedUser(username);cart.setModifiedTime(now);// 调用insert(cart)执行将数据插入到数据表中Integer rows = cartMapper.insert(cart);if (rows != 1) {throw new InsertException("插入商品数据时出现未知错误,请联系系统管理员");}} else {// 否:表示该用户的购物车中已有该商品// 从查询结果中获取购物车数据的idInteger cid = result.getCid();// 从查询结果中取出原数量,与参数amount相加,得到新的数量Integer num = result.getNum() + amount;// 执行更新数量Integer rows = cartMapper.updateNumByCid(cid, num, username, now);if (rows != 1) {throw new InsertException("修改商品数量时出现未知错误,请联系系统管理员");}}
}
4.在com.cy.store.service包下创建测试类CartServiceTests类,并编写测试方法。
package com.cy.store.service;
import com.cy.store.entity.Product;
import com.cy.store.service.ex.ServiceException;
import org.junit.Test;
import org.junit.runner.RunWith;
import org.springframework.beans.factory.annotation.Autowired;
import org.springframework.boot.test.context.SpringBootTest;
import org.springframework.test.context.junit4.SpringRunner;
import java.util.List;@RunWith(SpringRunner.class)
@SpringBootTest
public class CartServiceTests {@Autowiredprivate ICartService cartService;@Testpublic void addToCart() {try {Integer uid = 2;Integer pid = 10000007;Integer amount = 1;String username = "Tom";cartService.addToCart(uid, pid, amount, username);System.out.println("OK.");} catch (ServiceException e) {System.out.println(e.getClass().getSimpleName());System.out.println(e.getMessage());}}
}
5 购物车-添加购物车-控制器
5.1 处理异常
说明:无异常。
5.2 设计请求
设计用户提交的请求,并设计响应的方式。
请求路径:/carts/add_to_cart
请求参数:Integer pid, Integer amount, HttpSession session
请求类型:POST
响应结果:JsonResult<Void>
5.3 处理请求
1.在com.cy.store.controller包下创建CartController类并继承自BaseController类,添加@RequestMapping(“carts”)和@RestController注解;在类中声明ICartService业务对象,并使用@Autowired注解修饰。
package com.cy.store.controller;
import com.cy.store.service.ICartService;
import org.springframework.beans.factory.annotation.Autowired;
import org.springframework.web.bind.annotation.RequestMapping;
import org.springframework.web.bind.annotation.RestController;@RestController
@RequestMapping("carts")
public class CartController extends BaseController {@Autowiredprivate ICartService cartService;}
2.在CartController类中添加处理请求的addToCart()方法。
@RequestMapping("add_to_cart")
public JsonResult<Void> addToCart(Integer pid, Integer amount, HttpSession session) {// 从Session中获取uid和usernameInteger uid = getUidFromSession(session);String username = getUsernameFromSession(session);// 调用业务对象执行添加到购物车cartService.addToCart(uid, pid, amount, username);// 返回成功return new JsonResult<Void>(OK);
}
3.完成后启动项目,先登录再访问http://localhost:8080/carts/add_to_cart?pid=10000017&amount=3进行测试。
6 购物车-添加购物车-前端页面
1.在product.html页面中的body标签内的script标签里为“加入购物车”按钮添加点击事件。
$("#btn-add-to-cart").click(function() {$.ajax({url: "/carts/add_to_cart",type: "POST",data: {"pid": id,"amount": $("#num").val()},dataType: "JSON",success: function(json) {if (json.state == 200) {alert("增加成功!");} else {alert("增加失败!" + json.message);}},error: function(xhr) {alert("您的登录信息已经过期,请重新登录!HTTP响应码:" + xhr.status);location.href = "login.html";}});
});
$.ajax函数中参数data提交请参数的方式:
// 1.适用于参数较多,且都在同一个表单中
data: $("#form表单id属性值").serialize()
// 2.仅适用于上传文件
data: new FormData($("##form表单id属性值")[0])
// 3.参数拼接形式提交
data: "pid=10000005&amount=3"
// 4.使用JSON格式提交参数
data: {"pid": 10000005,"amount": 3
}
2.完成后启动项目,先登录再访问http://localhost:8080/web/index.html页面进行测试。

显示购物车列表
1 购物车-显示列表-持久层
1.1 规划需要执行的SQL语句
显示某用户的购物车列表数据的SQL语句大致是。
SELECTcid,uid,pid,t_cart.price,t_cart.num,t_product.title,t_product.price AS realPrice,t_product.image
FROMt_cartLEFT JOIN t_product ON t_cart.pid = t_product.id
WHEREuid = #{uid}
ORDER BYt_cart.created_time DESC
1.2 接口与抽象方法
1.由于涉及多表关联查询,必然没有哪个实体类可以封装此次的查询结果,因此需要创建VO类。创建com.cy.store.vo.CartVO类。
package com.cy.store.vo;
import java.io.Serializable;/** 购物车数据的Value Object类 */
public class CartVO implements Serializable {private Integer cid;private Integer uid;private Integer pid;private Long price;private Integer num;private String title;private Long realPrice;private String image;// Generate: Getter and Setter、Generate hashCode() and equals()、toString()
}
2.在CartMapper接口中添加抽象方法。
/*** 查询某用户的购物车数据* @param uid 用户id* @return 该用户的购物车数据的列表*/
List<CartVO> findVOByUid(Integer uid);
1.3 配置SQL映射
1.在CartMapper.xml文件中添加findVOByUid()方法的映射。
<!-- 查询某用户的购物车数据:List<CartVO> findVOByUid(Integer uid) -->
<select id="findVOByUid" resultType="com.cy.store.vo.CartVO">SELECTcid,uid,pid,t_cart.price,t_cart.num,t_product.title,t_product.price AS realPrice,t_product.imageFROMt_cartLEFT JOIN t_product ON t_cart.pid = t_product.id WHEREuid = #{uid}ORDER BYt_cart.created_time DESC
</select>
2.在CartMapperTests测试类中添加findVOByUid()方法的测试。
@Test
public void findVOByUid() {List<CartVO> list = cartMapper.findVOByUid(31);System.out.println(list);
}
2 购物车-显示列表-业务层
2.1 规划异常
说明:无异常。
2.2 接口与抽象方法
在ICartService接口中添加findVOByUid()抽象方法。
/*** 查询某用户的购物车数据* @param uid 用户id* @return 该用户的购物车数据的列表*/
List<CartVO> getVOByUid(Integer uid);
2.3 实现抽象方法
1.在CartServiceImpl类中重写业务接口中的抽象方法。
@Override
public List<CartVO> getVOByUid(Integer uid) {return cartMapper.findVOByUid(uid);
}
2.在CartServiceTests测试类中添加getVOByUid()测试方法。
@Test
public void getVOByUid() {List<CartVO> list = cartService.getVOByUid(31);System.out.println("count=" + list.size());for (CartVO item : list) {System.out.println(item);}
}
3 购物车-显示列表-控制器
3.1 处理异常
说明:无异常。
3.2 设计请求
设计用户提交的请求,并设计响应的方式。
请求路径:/carts/
请求参数:HttpSession session
请求类型:GET
响应结果:JsonResult<List<CartVO>>
3.3 处理请求
1.在CartController类中编写处理请求的代码。
@GetMapping({"", "/"})
public JsonResult<List<CartVO>> getVOByUid(HttpSession session) {// 从Session中获取uidInteger uid = getUidFromSession(session);// 调用业务对象执行查询数据List<CartVO> data = cartService.getVOByUid(uid);// 返回成功与数据return new JsonResult<List<CartVO>>(OK, data);
}
2.完成后启动项目,先登录再访问http://localhost:8080/carts请求进行测试。
4 购物车-显示列表-前端页面
1.将cart.html页面的head头标签内引入的cart.js文件注释掉。
<!-- <script src="../js/cart.js" type="text/javascript" charset="utf-8"></script> -->
2.给form标签添加action="orderConfirm.html"属性、tbody标签添加id="cart-list"属性、结算按钮的类型改为type="button"值。如果以上属性值已经添加过无需重复添加。
3.在cart.html页面body标签内的script标签中编写展示购物车列表的代码。
$(document).ready(function() {showCartList();
});function showCartList() {$("#cart-list").empty();$.ajax({url: "/carts",type: "GET",dataType: "JSON",success: function(json) {let list = json.data;for (let i = 0; i < list.length; i++) {let tr = '<tr>'+ '<td>'+ 	'<input name="cids" value="#{cid}" type="checkbox" class="ckitem" />'+ '</td>'+ '<td><img src="..#{image}collect.png" class="img-responsive" /></td>'+ '<td>#{title}#{msg}</td>'+ '<td>¥<span id="price-#{cid}">#{realPrice}</span></td>'+ '<td>'+ 	'<input type="button" value="-" class="num-btn" οnclick="reduceNum(1)" />'+ 	'<input id="num-#{cid}" type="text" size="2" readonly="readonly" class="num-text" value="#{num}">'+ 	'<input class="num-btn" type="button" value="+" οnclick="addNum(#{cid})" />'+ '</td>'+ '<td>¥<span id="total-price-#{cid}">#{totalPrice}</span></td>'+ '<td>'+ 	'<input type="button" οnclick="delCartItem(this)" class="cart-del btn btn-default btn-xs" value="删除" />'+ '</td>'+ '</tr>';tr = tr.replace(/#{cid}/g, list[i].cid);tr = tr.replace(/#{title}/g, list[i].title);tr = tr.replace(/#{image}/g, list[i].image);tr = tr.replace(/#{realPrice}/g, list[i].realPrice);tr = tr.replace(/#{num}/g, list[i].num);tr = tr.replace(/#{totalPrice}/g, list[i].realPrice * list[i].num);if (list[i].realPrice < list[i].price) {tr = tr.replace(/#{msg}/g, "比加入时降价" + (list[i].price - list[i].realPrice) + "元");} else {tr = tr.replace(/#{msg}/g, "");}$("#cart-list").append(tr);}}});
}
4.完成后启动项目,先登录再访问http://localhost:8080/web/cart.html页面进行测试。
增加商品数量
1 购物车-增加商品数量-持久层
1.1 规划需要执行的SQL语句
1.首先进行查询需要操作的购物车数据信息。
SELECT * FROM t_cart WHERE cid=?
2.然后计算出新的商品数量值,如果满足更新条件则执行更新操作。此SQL语句无需重复开发。
UPDATE t_cart SET num=?, modified_user=?, modified_time=? WHERE cid=?
1.2 接口与抽象方法
在CartMapper接口中添加抽象方法。
/*** 根据购物车数据id查询购物车数据详情* @param cid 购物车数据id* @return 匹配的购物车数据详情,如果没有匹配的数据则返回null*/
Cart findByCid(Integer cid);
1.3 配置SQL映射
1.在CartMapper文件中添加findByCid(Integer cid)方法的映射。
<!-- 根据购物车数据id查询购物车数据详情:Cart findByCid(Integer cid) -->
<select id="findByCid" resultMap="CartEntityMap">SELECT*FROMt_cartWHEREcid = #{cid}
</select>
2.在CartMapperTests测试类中添加findByCid()测试方法。
@Test
public void findByCid() {Integer cid = 6;Cart result = cartMapper.findByCid(cid);System.out.println(result);
}
2 购物车-增加商品数量-业务层
2.1 规划异常
1.如果尝试访问的购物车数据不存在,则抛出CartNotFoundException异常。创建com.cy.store.service.ex.CartNotFoundException类。
/** 购物车数据不存在的异常 */
public class CartNotFoundException extends ServiceException {// Override Methods...
}
2.如果尝试访问的数据并不是当前登录用户的数据,则抛出AccessDeniedException异常。此异常类无需再次创建。
3.最终执行更新操作时,可能会抛出UpdateException异常。此异常类无需再次创建。
2.2 接口与抽象方法
在业务层ICartService接口中添加addNum()抽象方法。
/*** 将购物车中某商品的数量加1* @param cid 购物车数量的id* @param uid 当前登录的用户的id* @param username 当前登录的用户名* @return 增加成功后新的数量*/
Integer addNum(Integer cid, Integer uid, String username);
2.3 实现抽象方法
1.在CartServiceImpl类中,实现接口中的抽象方法并规划业务逻辑。
public Integer addNum(Integer cid, Integer uid, String username) {// 调用findByCid(cid)根据参数cid查询购物车数据// 判断查询结果是否为null// 是:抛出CartNotFoundException// 判断查询结果中的uid与参数uid是否不一致// 是:抛出AccessDeniedException// 可选:检查商品的数量是否大于多少(适用于增加数量)或小于多少(适用于减少数量)// 根据查询结果中的原数量增加1得到新的数量num// 创建当前时间对象,作为modifiedTime// 调用updateNumByCid(cid, num, modifiedUser, modifiedTime)执行修改数量
}
2.实现addNum()方法中的业务逻辑代码。
@Override
public Integer addNum(Integer cid, Integer uid, String username) {// 调用findByCid(cid)根据参数cid查询购物车数据Cart result = cartMapper.findByCid(cid);// 判断查询结果是否为nullif (result == null) {// 是:抛出CartNotFoundExceptionthrow new CartNotFoundException("尝试访问的购物车数据不存在");}// 判断查询结果中的uid与参数uid是否不一致if (!result.getUid().equals(uid)) {// 是:抛出AccessDeniedExceptionthrow new AccessDeniedException("非法访问");}// 可选:检查商品的数量是否大于多少(适用于增加数量)或小于多少(适用于减少数量)// 根据查询结果中的原数量增加1得到新的数量numInteger num = result.getNum() + 1;// 创建当前时间对象,作为modifiedTimeDate now = new Date();// 调用updateNumByCid(cid, num, modifiedUser, modifiedTime)执行修改数量Integer rows = cartMapper.updateNumByCid(cid, num, username, now);if (rows != 1) {throw new InsertException("修改商品数量时出现未知错误,请联系系统管理员");}// 返回新的数量return num;
}
3.在CartServiceTests测试类中添加addNum()测试方法。
@Test
public void addNum() {try {Integer cid = 6;Integer uid = 31;String username = "管理员";Integer num = cartService.addNum(cid, uid, username);System.out.println("OK. New num=" + num);} catch (ServiceException e) {System.out.println(e.getClass().getSimpleName());System.out.println(e.getMessage());}
}
3 购物车-增加商品数量-控制器
3.1 处理异常
在BaseController类中添加CartNotFoundException异常类的统一管理。
// ...
else if (e instanceof CartNotFoundException) {result.setState(4007);
}
// ...
3.2 设计请求
设计用户提交的请求,并设计响应的方式。
请求路径:/carts/{cid}/num/add
请求参数:@PathVariable("cid") Integer cid, HttpSession session
请求类型:POST
响应结果:JsonResult<Integer>
3.3 处理请求
1.在CartController类中添加处理请求的addNum()方法。
@RequestMapping("{cid}/num/add")
public JsonResult<Integer> addNum(@PathVariable("cid") Integer cid, HttpSession session) {// 从Session中获取uid和usernameInteger uid = getUidFromSession(session);String username = getUsernameFromSession(session);// 调用业务对象执行增加数量Integer data = cartService.addNum(cid, uid, username);// 返回成功return new JsonResult<Integer>(OK, data);
}
2.完成后启动项目,先登录再访问http://localhost:8080/carts/6/num/add页面进行测试。

4 购物车-增加商品数量-前端页面
1.首先确定在showCartList()函数中动态拼接的增加购物车按钮是绑定了addNum()事件,如果已经添加无需重复添加。
<input class="num-btn" type="button" value="+" onclick="addNum(#{cid})" />
2.在script标签中定义addNum()函数并编写增加购物车数量的逻辑代码。
function addNum(cid) {$.ajax({url: "/carts/" + cid + "/num/add",type: "POST",dataType: "JSON",success: function(json) {if (json.state == 200) {// showCartList();$("#num-" + cid).val(json.data);let price = $("#price-" + cid).html();let totalPrice = price * json.data;$("#total-price-" + cid).html(totalPrice);} else {alert("增加商品数量失败!" + json.message);}},error: function(xhr) {alert("您的登录信息已经过期,请重新登录!HTTP响应码:" + xhr.status);location.href = "login.html";}});
}
3.完成后启动项目,先登录再访问http://localhost:8080/web/cart.html页面点击“+”按钮进行测试。
显示勾选的购物车数据
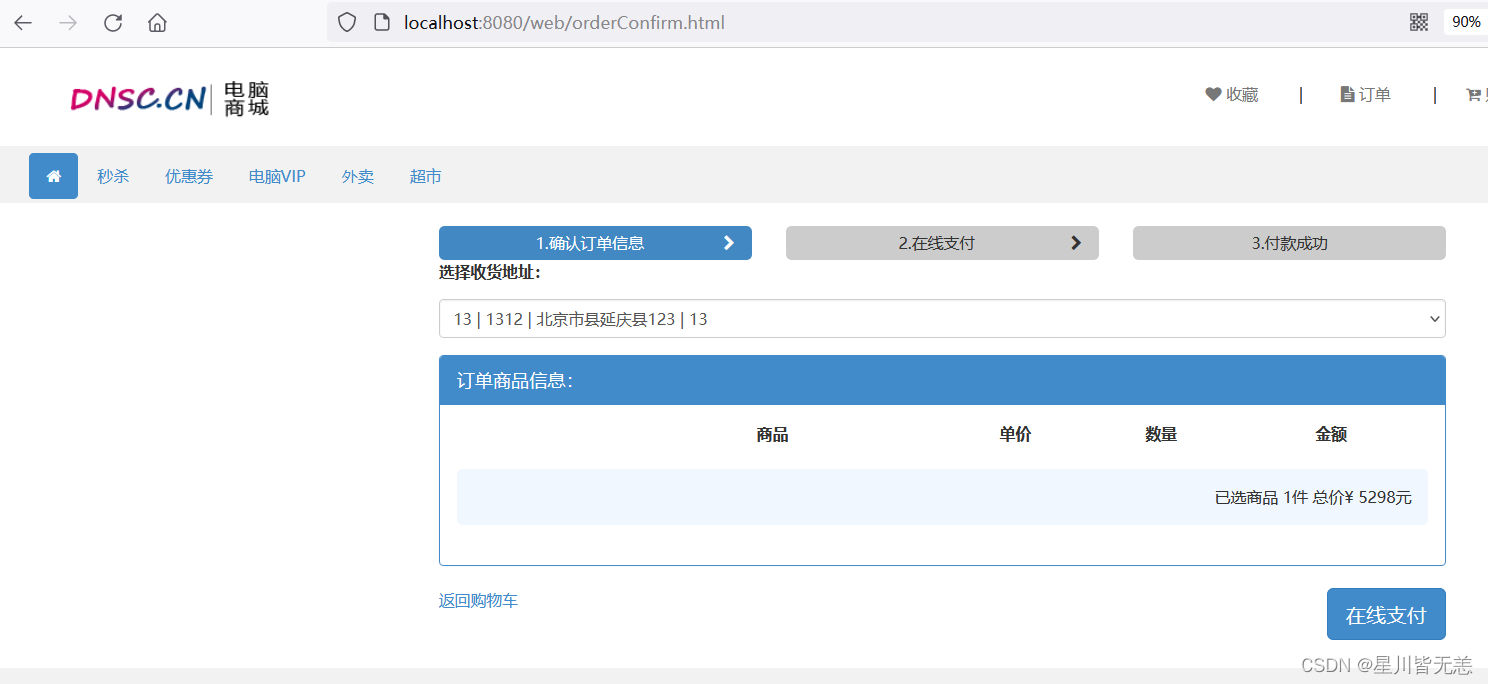
1 显示确认订单页-显示勾选的购物车数据-持久层
1.1 规划需要执行的SQL语句
在“确认订单页”显示的商品信息,应来自前序页面(购物车列表)中勾选的数据,所以显示的信息其实是购物车中的数据。到底需要显示哪些取决于用户的勾选操作,当用户勾选了若干条购物车数据后,这些数据的id应传递到当前“确认订单页”中,该页面根据这些id获取需要显示的数据列表。
所以在持久层需要完成“根据若干个不确定的id值,查询购物车数据表,显示购物车中的数据信息”。则需要执行的SQL语句大致是。
SELECTcid,uid,pid,t_cart.price,t_cart.num,t_product.title,t_product.price AS realPrice,t_product.image
FROMt_cartLEFT JOIN t_product ON t_cart.pid = t_product.id
WHEREcid IN (?, ?, ?)
ORDER BYt_cart.created_time DESC
1.2 接口与抽象方法
在CartMapper接口中添加findVOByCids(Integer[] cids)方法。
/*** 根据若干个购物车数据id查询详情的列表* @param cids 若干个购物车数据id* @return 匹配的购物车数据详情的列表*/
List<CartVO> findVOByCids(Integer[] cids);
1.3 配置SQL映射
1.在CartMapper.xml文件中添加SQL语句的映射配置。
<!-- 根据若干个购物车数据id查询详情的列表:List<CartVO> findVOByCids(Integer[] cids) -->
<select id="findVOByCids" resultType="com.cy.store.vo.CartVO">SELECTcid,uid,pid,t_cart.price,t_cart.num,t_product.title,t_product.price AS realPrice,t_product.imageFROMt_cartLEFT JOIN t_product ON t_cart.pid = t_product.idWHEREcid IN (<foreach collection="array" item="cid" separator=",">#{cid}</foreach>)ORDER BYt_cart.created_time DESC
</select>
2.在CartMapperTests测试类中添加findVOByCids()测试方法。
@Test
public void findVOByCids() {Integer[] cids = {1, 2, 6, 7, 8, 9, 10};List<CartVO> list = cartMapper.findVOByCids(cids);System.out.println("count=" + list.size());for (CartVO item : list) {System.out.println(item);}
}
2 显示确认订单页-显示勾选的购物车数据-业务层
2.1 规划异常
说明:无异常。
2.2 接口与抽象方法
在ICartService接口中添加getVOByCids()抽象方法。
/*** 根据若干个购物车数据id查询详情的列表* @param uid 当前登录的用户的id* @param cids 若干个购物车数据id* @return 匹配的购物车数据详情的列表*/
List<CartVO> getVOByCids(Integer uid, Integer[] cids);
2.3 实现抽象方法
1.在CartServiceImpl类中重写业务接口中的抽象方法。
@Override
public List<CartVO> getVOByCids(Integer uid, Integer[] cids) {List<CartVO> list = cartMapper.findVOByCids(cids);/**for (CartVO cart : list) {if (!cart.getUid().equals(uid)) {list.remove(cart);}}*/Iterator<CartVO> it = list.iterator();while (it.hasNext()) {CartVO cart = it.next();if (!cart.getUid().equals(uid)) {it.remove();}}return list;
}
2.在CartServiceTests测试类中添加getVOByCids()测试方法。
@Test
public void getVOByCids() {Integer[] cids = {1, 2, 6, 7, 8, 9, 10};Integer uid = 31;List<CartVO> list = cartService.getVOByCids(uid, cids);System.out.println("count=" + list.size());for (CartVO item : list) {System.out.println(item);}
}
3 显示确认订单页-显示勾选的购物车数据-控制器
3.1 处理异常
说明:无异常。
3.2 设计请求
设计用户提交的请求,并设计响应的方式。
请求路径:/carts/list
请求参数:Integer[] cids, HttpSession session
请求类型:GET
响应结果:JsonResult<List<CartVO>>
3.3 处理请求
1.在CartController类中添加处理请求的getVOByCids()方法。
@GetMapping("list")
public JsonResult<List<CartVO>> getVOByCids(Integer[] cids, HttpSession session) {// 从Session中获取uidInteger uid = getUidFromSession(session);// 调用业务对象执行查询数据List<CartVO> data = cartService.getVOByCids(uid, cids);// 返回成功与数据return new JsonResult<>(OK, data);
}
2.完成后启动项目,先登录再访问http://localhost:8080/carts/list?cids=7&cids=8&cids=13&cids=14&cids=17地址进行测试。
4 显示确认订单页-前端页面
4.1 显示勾选的购物车数据-前端页面
1.在orderConfirm.html页面的head标签里注释掉引入外部的orderConfirm.js文件。
<!-- <script src="../js/orderConfirm.js" type="text/javascript" charset="utf-8"></script> -->
2.在orderConfirm.html页面中检查必要控件的属性是否添加,如果已添加无需重复添加。
3.在orderConfirm.html页面中的body标签内的最后添加srcipt标签并在标签内部添加处理购物车“订单商品信息”列表展示的代码。
<script type="text/javascript">
$(document).ready(function() {// showAddressList();showCartList();
});function showCartList() {$("#cart-list").empty();$.ajax({url: "/carts/list",data: location.search.substr(1),type: "GET",dataType: "JSON",success: function(json) {let list = json.data;console.log("count=" + list.length);let allCount = 0;let allPrice = 0;for (let i = 0; i < list.length; i++) {console.log(list[i].title);let tr = '<tr>'+ '<td><img src="..#{image}collect.png" class="img-responsive" /></td>'+ '<td><input type="hidden" name="cids" value="#{cid}" />#{title}</td>'+ '<td>¥<span>#{realPrice}</span></td>'+ '<td>#{num}</td>'+ '<td>¥<span>#{totalPrice}</span></td>'+ '</tr>';tr = tr.replace(/#{cid}/g, list[i].cid);tr = tr.replace(/#{image}/g, list[i].image);tr = tr.replace(/#{title}/g, list[i].title);tr = tr.replace(/#{realPrice}/g, list[i].realPrice);tr = tr.replace(/#{num}/g, list[i].num);tr = tr.replace(/#{totalPrice}/g, list[i].realPrice * list[i].num);$("#cart-list").append(tr);allCount += list[i].num;allPrice += list[i].realPrice * list[i].num;}$("#all-count").html(allCount);$("#all-price").html(allPrice);}});
}
</script>
4.完成后启动项目,先登录再访问http://localhost:8080/web/cart.html页面,勾选商品再点击“结算”按钮进行测试。
4.2 显示选择收货地址-前端页面
1.在orderConfirm.html页面中的body标签内的srcipt标签中添加获取收货地址列表方法的定义。
function showAddressList() {$("#address-list").empty();$.ajax({url: "/addresses",type: "GET",dataType: "JSON",success: function(json) {let list = json.data;console.log("count=" + list.length);for (let i = 0; i < list.length; i++) {console.log(list[i].name);let opt = '<option value="#{aid}">#{name} | #{tag} | #{province}#{city}#{area}#{address} | #{phone}</option>';opt = opt.replace(/#{aid}/g, list[i].aid);opt = opt.replace(/#{tag}/g, list[i].tag);opt = opt.replace("#{name}", list[i].name);opt = opt.replace("#{province}", list[i].provinceName);opt = opt.replace("#{city}", list[i].cityName);opt = opt.replace("#{area}", list[i].areaName);opt = opt.replace("#{address}", list[i].address);opt = opt.replace("#{phone}", list[i].phone);$("#address-list").append(opt);}}});
}
2.在orderConfirm.html页面中的body标签内的srcipt标签中添加展示收货地址列表方法的调用。
<script type="text/javascript">$(document).ready(function() {showAddressList();showCartList();});
</script>
3.完成后启动项目,先登录再访问http://localhost:8080/web/orderConfirm.html页面进行测试。
![BUUCTF [MRCTF2020]你能看懂音符吗 1](https://img-blog.csdnimg.cn/3e1d1369a0c045bdaf93bda39167cfe9.png#pic_center)

![[leetCode]257. 二叉树的所有路径(两种方法)](https://img-blog.csdnimg.cn/81c2433379454c7fb569ac4dc40b9872.png)