Spring整合MyBatis

搭建环境
我们知道使用MyBatis时需要写大量创建SqlSessionFactoryBuilder、SqlSessionFactory、SqlSession等对象的代码,而Spring的作用是帮助我们创建和管理对象,所以我们可以使用Spring整合MyBatis,简化MyBatis开发。
创建maven项目,引入依赖。
<dependencies><!--  mybatis  --><dependency><groupId>org.mybatis</groupId><artifactId>mybatis</artifactId><version>3.5.7</version></dependency><!--  mysql驱动包  --><dependency><groupId>mysql</groupId><artifactId>mysql-connector-java</artifactId><version>8.0.26</version></dependency><!-- spring --><dependency><groupId>org.springframework</groupId><artifactId>spring-context</artifactId><version>5.3.13</version></dependency><dependency><groupId>org.springframework</groupId><artifactId>spring-tx</artifactId><version>5.3.13</version></dependency><dependency><groupId>org.springframework</groupId><artifactId>spring-jdbc</artifactId><version>5.3.13</version></dependency><!-- MyBatis与Spring的整合包,该包可以让Spring创建MyBatis的对象 --><dependency><groupId>org.mybatis</groupId><artifactId>mybatis-spring</artifactId><version>2.0.6</version></dependency>
</dependencies>
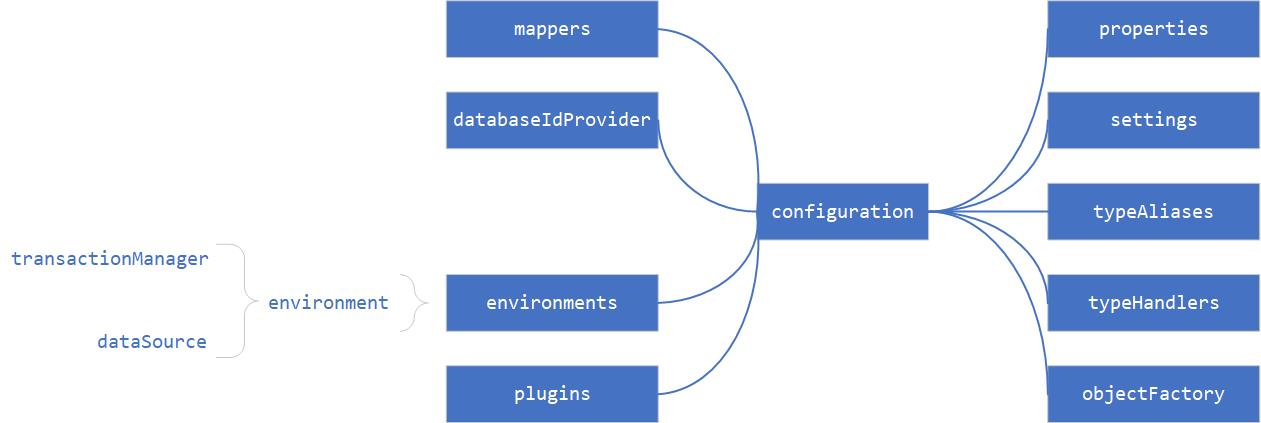
编写配置文件
-
编写数据库配置文件db.properties
jdbc.driverClassName=com.mysql.jdbc.Driver jdbc.url=jdbc:mysql:///student jdbc.username=root jdbc.password=root -
创建MyBatis配置文件SqlMapConfig.xml,数据源、扫描接口都交由Spring管理,不需要在MyBatis配置文件中设置。
<?xml version="1.0" encoding="UTF-8"?> <!DOCTYPE configurationPUBLIC "-//mybatis.org//DTD Config 3.0//EN""http://mybatis.org/dtd/mybatis-3-config.dtd"> <configuration></configuration> -
创建Spring配置文件applicationContext.xml
<?xml version="1.0" encoding="UTF-8"?>
<beans xmlns="http://www.springframework.org/schema/beans"xmlns:context="http://www.springframework.org/schema/context"xmlns:xsi="http://www.w3.org/2001/XMLSchema-instance"xsi:schemaLocation="http://www.springframework.org/schema/beanshttp://www.springframework.org/schema/beans/spring-beans.xsdhttp://www.springframework.org/schema/contexthttp://www.springframework.org/schema/context/spring-context.xsd"><!--配置扫描包--><context:component-scan base-package="com.Spring"/><!--读取配置文件--><context:property-placeholder location="classpath:db.properties"/><!--创建druid数据源对象--><bean name="dataSource" class="com.alibaba.druid.pool.DruidDataSource"><property name="driverClassName" value="${jdbc.driverClassName}"/><property name="url" value="${jdbc.url}"/><property name="username" value="${jdbc.username}"/><property name="password" value="${jdbc.password}"/></bean><!-- Spring创建封装过的SqlSessionFactory --><bean name="sqlSessionFactory" class="org.mybatis.spring.SqlSessionFactoryBean"><property name="dataSource" ref="dataSource"/></bean><!-- Spring创建封装过的SqlSession --><bean name="sqlSession" class="org.mybatis.spring.SqlSessionTemplate"><constructor-arg name="sqlSessionFactory" ref="sqlSessionFactory"/></bean></beans>
准备数据库和实体类
准备数据库
CREATE DATABASE `student`;
USE `student`;
DROP TABLE IF EXISTS `student`;
CREATE TABLE `student` (`id` int(11) NOT NULL AUTO_INCREMENT,`name` varchar(255) DEFAULT NULL,`sex` varchar(10) DEFAULT NULL,`address` varchar(255) DEFAULT NULL,PRIMARY KEY (`id`)
) ENGINE=InnoDB AUTO_INCREMENT=3 DEFAULT CHARSET=utf8;insert into `student`(`id`,`name`,`sex`,`address`) values (1,'李四','男','北京'),(2,'张三','女','北京');
准备实体类
public class Student {private int id;private String name;private String sex;private String address;// 省略构造方法/getter/setter/tostring
}
编写持久层接口和service类
编写持久层接口
@Repository
public interface StudentDao {//查询所有学生@Select("select * from student")List<Student> findAll();//添加学生@Insert("insert into student values (null,#{name},#{sex},#{address})")void add(Student student);
}
编写service类
@Service
public class StudentService {//SqlSession对象@Autowiredprivate SqlSessionTemplate sqlSession;// 使用SqlSession获取代理对象public List<Student> findAllStudent(){StudentDao studentDao = sqlSession.getMapper(StudentDao.class);return studentDao.findAll();}
}
Spring整合Junit进行单元测试
之前进行单元测试时都需要手动创建Spring容器,能否在测试时让Spring自动创建容器呢?
-
引入Junit和Spring整合Junit依赖
<!-- junit,如果Spring5整合junit,则junit版本至少在4.12以上 --> <dependency><groupId>junit</groupId><artifactId>junit</artifactId><version>4.12</version><scope>test</scope> </dependency> <!-- spring整合测试模块 --> <dependency><groupId>org.springframework</groupId><artifactId>spring-test</artifactId><version>5.3.13</version> </dependency> -
编写测试类
// JUnit使用Spring方式运行代码,即自动创建spring容器。
@RunWith(SpringJUnit4ClassRunner.class)
// 告知创建spring容器时读取哪个配置类或配置文件
// 配置类写法:@ContextConfiguration(classes=配置类.class)
@ContextConfiguration(locations="classpath:applicationContext.xml")
public class StudentServiceTest {@Autowiredprivate StudentService studentService;@Testpublic void testFindAll(){List<Student> allStudent = studentService.findAllStudent();allStudent.forEach(System.out::println);}
}
注:使用SqlSessionTemplate创建代理对象还是需要注册接口或者映射文件的。
在MyBatis配置文件注册接口
<configuration><mappers><mapper class="com.Spring.dao.StudentDao"></mapper></mappers>
</configuration>
创建sqlSessionFactory时指定MyBatis配置文件
<!-- 创建Spring封装过的SqlSessionFactory -->
<bean id="sqlSessionFactory" class="org.mybatis.spring.SqlSessionFactoryBean"><property name="dataSource" ref="dataSource"></property><property name="configLocation" value="classpath:SqlMapConfig.xml"></property>
</bean>
自动创建代理对象
Spring提供了MapperScannerConfigurer对象,该对象可以自动扫描包创建代理对象,并将代理对象放入容器中,此时不需要使用SqlSession手动创建代理对象。
-
创建MapperScannerConfigurer对象
<!-- 该对象可以自动扫描持久层接口,并为接口创建代理对象 --> <bean id="mapperScanner" class="org.mybatis.spring.mapper.MapperScannerConfigurer"><!-- 配置扫描的接口包 --><property name="basePackage" value="com.Spring.dao"></property> </bean> -
Service类直接使用代理对象即可
@Service public class StudentService {// 直接注入代理对象@Autowiredprivate StudentDao studentDao;// 直接使用代理对象public void addStudent(Student student){studentDao.add(student);} } -
测试
@RunWith(SpringJUnit4ClassRunner.class)
@ContextConfiguration(locations="classpath:applicationContext.xml")
public class StudentServiceTest {@Autowiredprivate StudentService studentService;@Testpublic void testAddStudent(){Student student = new Student("郭家旗","男","上海");studentService.addStudent(student);}
}
SpringAOP

AOP简介
AOP的全称是Aspect Oriented Programming,即面向切面编程。是实现功能统一维护的一种技术,它将业务逻辑的各个部分进行隔离,使开发人员在编写业务逻辑时可以专心于核心业务,从而提高了开发效率。
- 作用:在不修改源码的基础上,对已有方法进行增强。
- 实现原理:动态代理技术。
- 优势:减少重复代码、提高开发效率、维护方便
- 应用场景:事务处理、日志管理、权限控制、异常处理等方面。
AOP相关术语
为了更好地理解AOP,就需要对AOP的相关术语有一些了解
| 名称 | 说明 |
|---|---|
| Joinpoint(连接点) | 指能被拦截到的点,在Spring中只有方法能被拦截。 |
| Pointcut(切点) | 指要对哪些连接点进行拦截,即被增强的方法。 |
| Advice(通知) | 指拦截后要做的事情,即切点被拦截后执行的方法。 |
| Aspect(切面) | 切点+通知称为切面 |
| Target(目标) | 被代理的对象 |
| Proxy(代理) | 代理对象 |
| Weaving(织入) | 生成代理对象的过程 |
AOP入门
AspectJ是一个基于Java语言的AOP框架,在Spring框架中建议使用AspectJ实现AOP。
接下来我们写一个AOP入门案例:dao层的每个方法结束后都可以打印一条日志:
-
引入依赖
<!-- spring --> <dependency><groupId>org.springframework</groupId><artifactId>spring-context</artifactId><version>5.3.13</version> </dependency> <!-- AspectJ --> <dependency><groupId>org.aspectj</groupId><artifactId>aspectjweaver</artifactId><version>1.8.7</version> </dependency> <!-- junit --> <dependency><groupId>junit</groupId><artifactId>junit</artifactId><version>4.12</version><scope>test</scope> </dependency> -
编写连接点
@Repository public class UserDao {public void add(){System.out.println("用户新增");}public void delete(){System.out.println("用户删除");}public void update(){System.out.println("用户修改");} } -
编写通知类
public class MyAspectJAdvice {// 后置通知public void myAfterReturning() {System.out.println("打印日志...");} } -
配置切面
<?xml version="1.0" encoding="UTF-8"?> <beans xmlns="http://www.springframework.org/schema/beans"xmlns:context="http://www.springframework.org/schema/context"xmlns:aop="http://www.springframework.org/schema/aop"xmlns:xsi="http://www.w3.org/2001/XMLSchema-instance"xsi:schemaLocation="http://www.springframework.org/schema/beanshttp://www.springframework.org/schema/beans/spring-beans.xsdhttp://www.springframework.org/schema/contexthttp://www.springframework.org/schema/context/spring-context.xsdhttp://www.springframework.org/schema/aophttp://www.springframework.org/schema/aop/spring-aop.xsd"><context:component-scan base-package="com.Spring"></context:component-scan><!-- 通知对象 --><bean id="myAspectJAdvice" class="com.Spring.advice.MyAspectAdvice"></bean><!-- 配置AOP --><aop:config><!-- 配置切面 --><aop:aspect ref="myAspectJAdvice"><!-- 配置切点 --><aop:pointcut id="myPointcut" expression="execution(* com.Spring.dao.UserDao.*(..))"/><!-- 配置通知 --><aop:after-returning method="myAfterReturning" pointcut-ref="myPointcut"/></aop:aspect></aop:config> </beans> -
测试
public class UserDaoTest {@Testpublic void testAdd(){ApplicationContext ac = new ClassPathXmlApplicationContext("bean.xml");UserDao userDao = (UserDao) ac.getBean("userDao");userDao.add();}@Testpublic void testDelete(){ApplicationContext ac = new ClassPathXmlApplicationContext("bean.xml");UserDao userDao = (UserDao) ac.getBean("userDao");userDao.delete();}@Testpublic void testUpdate(){ApplicationContext ac = new ClassPathXmlApplicationContext("bean.xml");UserDao userDao = (UserDao) ac.getBean("userDao");userDao.update();}
}
通知类型
AOP有以下几种常用的通知类型:
| 通知类型 | 描述 |
|---|---|
| 前置通知 | 在方法执行前添加功能 |
| 后置通知 | 在方法正常执行后添加功能 |
| 异常通知 | 在方法抛出异常后添加功能 |
| 最终通知 | 无论方法是否抛出异常,都会执行该通知 |
| 环绕通知 | 在方法执行前后添加功能 |
-
编写通知方法
// 通知类 public class MyAspectAdvice {// 后置通知public void myAfterReturning(JoinPoint joinPoint) {System.out.println("切点方法名:" + joinPoint.getSignature().getName());System.out.println("目标对象:" + joinPoint.getTarget());System.out.println("打印日志" + joinPoint.getSignature().getName() + "方法被执行了!");}// 前置通知public void myBefore() {System.out.println("前置通知...");}// 异常通知public void myAfterThrowing(Exception ex) {System.out.println("异常通知...");System.err.println(ex.getMessage());}// 最终通知public void myAfter() {System.out.println("最终通知");}// 环绕通知public Object myAround(ProceedingJoinPoint proceedingJoinPoint) throws Throwable {System.out.println("环绕前");Object obj = proceedingJoinPoint.proceed(); // 执行方法System.out.println("环绕后");return obj;} } -
配置切面
<!-- 配置AOP -->
<aop:config><!-- 配置切面 --><aop:aspect ref="myAspectJAdvice"><!-- 配置切点 --><aop:pointcut id="myPointcut" expression="execution(* com.Spring.dao.UserDao.*(..))"/><!-- 前置通知 --><aop:before method="myBefore" pointcut-ref="myPointcut"></aop:before><!-- 后置通知 --><aop:after-returning method="myAfterReturning" pointcut-ref="myPointcut"/><!-- 异常通知 --><aop:after-throwing method="myAfterThrowing" pointcut-ref="myPointcut" throwing="ex"/><!-- 最终通知 --><aop:after method="myAfter" pointcut-ref="myPointcut"></aop:after><!-- 环绕通知 --><aop:around method="myAround" pointcut-ref="myPointcut"></aop:around></aop:aspect>
</aop:config>
切点表达式
使用AspectJ需要使用切点表达式配置切点位置,写法如下:
- 标准写法:访问修饰符 返回值 包名.类名.方法名(参数列表)
- 访问修饰符可以省略。
- 返回值使用
*代表任意类型。 - 包名使用
*表示任意包,多级包结构要写多个*,使用*..表示任意包结构 - 类名和方法名都可以用
*实现通配。 - 参数列表
- 基本数据类型直接写类型
- 引用类型写
包名.类名 *表示匹配一个任意类型参数..表示匹配任意类型任意个数的参数
- 全通配:
* *..*.*(..)
多切面配置
我们可以为切点配置多个通知,形成多切面,比如希望dao层的每个方法结束后都可以打印日志并发送邮件:
-
编写发送邮件的通知:
public class MyAspectJAdvice2 {// 后置通知public void myAfterReturning(JoinPoint joinPoint) {System.out.println("发送邮件");} } -
配置切面:
<!-- 通知对象 -->
<bean id="myAspectJAdvice" class="com.Spring.advice.MyAspectAdvice"></bean>
<bean id="myAspectJAdvice2" class="com.Spring.advice.MyAspectAdvice2"></bean><!-- 配置AOP -->
<aop:config><!-- 配置切面 --><aop:aspect ref="myAspectJAdvice"><!-- 配置切点 --><aop:pointcut id="myPointcut" expression="execution(* *..*.*(..))"/><!-- 后置通知 --><aop:after-returning method="myAfterReturning" pointcut-ref="myPointcut"/></aop:aspect><aop:aspect ref="myAspectJAdvice2"><aop:pointcut id="myPointcut2" expression="execution(* com.Spring.dao.UserDao.*(..))"/><aop:after-returning method="myAfterReturning" pointcut-ref="myPointcut2"/></aop:aspect>
</aop:config>
注解配置AOP
Spring可以使用注解代替配置文件配置切面:
-
在xml中开启AOP注解支持
<!-- 开启注解配置Aop --> <aop:aspectj-autoproxy></aop:aspectj-autoproxy> -
在通知类上方加入注解
@Aspect -
在通知方法上方加入注解
@Before/@AfterReturning/@AfterThrowing/@After/@Around@Aspect @Component public class MyAspectAdvice {// 后置通知@AfterReturning("execution(* com.Spring.dao.UserDao.*(..))")public void myAfterReturning(JoinPoint joinPoint) {System.out.println("切点方法名:" + joinPoint.getSignature().getName());System.out.println("目标对象:" + joinPoint.getTarget());System.out.println("打印日志" + joinPoint.getSignature().getName() + "方法被执行了!");}// 前置通知@Before("execution(* com.Spring.dao.UserDao.*(..))")public void myBefore() {System.out.println("前置通知...");}// 异常通知@AfterThrowing(value = "execution(* com.Spring.dao.UserDao.*(..))",throwing = "ex")public void myAfterThrowing(Exception ex) {System.out.println("异常通知...");System.err.println(ex.getMessage());}// 最终通知@After("execution(* com.Spring.dao.UserDao.*(..))")public void myAfter() {System.out.println("最终通知");}// 环绕通知@Around("execution(* com.Spring.dao.UserDao.*(..))")public Object myAround(ProceedingJoinPoint proceedingJoinPoint) throws Throwable {System.out.println("环绕前");Object obj = proceedingJoinPoint.proceed(); // 执行方法System.out.println("环绕后");return obj;} } -
测试:
@Test
public void testAdd2(){ApplicationContext ac = new ClassPathXmlApplicationContext("bean1.xml");UserDao userDao = (UserDao) ac.getBean("userDao");userDao.update();
}
如何为一个类下的所有方法统一配置切点:
在通知类中添加方法配置切点
@Pointcut("execution(* com.Spring.dao.UserDao.*(..))")
public void pointCut(){}
在通知方法上使用定义好的切点
@Before("pointCut()")
public void myBefore(JoinPoint joinPoint) {System.out.println("前置通知...");
}
@AfterReturning(“pointCut()”)
public void myAfterReturning(JoinPoint joinPoint) {
System.out.println(“后置通知…”);
}
配置类如何代替xml中AOP注解支持?
在配置类上方添加@EnableAspectJAutoProxy即可
@Configuration
@ComponentScan("com.Spring")
@EnableAspectJAutoProxy
public class SpringConfig {}
原生Spring实现AOP
除了AspectJ,Spring支持原生方式实现AOP。
-
引入依赖
<!-- AOP --> <dependency><groupId>org.springframework</groupId><artifactId>spring-aop</artifactId><version>5.3.13</version> </dependency> -
编写通知类
// Spring原生Aop的通知类
public class SpringAop implements MethodBeforeAdvice, AfterReturningAdvice, ThrowsAdvice, MethodInterceptor {/*** 前置通知* @param method 目标方法* @param args 目标方法的参数列表* @param target 目标对象* @throws Throwable*/@Overridepublic void before(Method method, Object[] args, Object target) throws Throwable {System.out.println("前置通知");}/*** 后置通知* @param returnValue 目标方法的返回值* @param method 目标方法* @param args 目标方法的参数列表* @param target 目标对象* @throws Throwable*/@Overridepublic void afterReturning(Object returnValue, Method method, Object[] args, Object target) throws Throwable {System.out.println("后置通知");}/*** 环绕通知* @param invocation 目标方法* @return* @throws Throwable*/@Overridepublic Object invoke(MethodInvocation invocation) throws Throwable {System.out.println("环绕前");Object proceed = invocation.proceed();System.out.println("环绕后");return proceed;}/*** 异常通知* @param ex 异常对象*/public void afterThrowing(Exception ex){System.out.println("发生异常了!");}
}
Spring原生方式实现AOP时,只支持四种通知类型:
通知类型 实现接口 前置通知 MethodBeforeAdvice 后置通知 AfterReturningAdvice 异常通知 ThrowsAdvice 环绕通知 MethodInterceptor -
编写配置类
<!-- 通知对象 --> <bean id="springAop" class="com.Spring.advice.SpringAop"></bean><!-- 配置代理对象 --> <bean id="userDaoProxy" class="org.springframework.aop.framework.ProxyFactoryBean"><!-- 配置目标对象 --><property name="target" ref="userDao"></property><!-- 配置通知 --><property name="interceptorNames"><list><value>springAop</value></list></property><!-- 代理对象的生成方式 true:使用CGLib false:使用原生JDK生成--><property name="proxyTargetClass" value="true"></property> </bean> -
编写测试类
public class UserDaoTest2 {@Testpublic void testAdd(){ApplicationContext ac = new ClassPathXmlApplicationContext("bean2.xml");UserDao userDao = (UserDao) ac.getBean("userDaoProxy"); // 获取的是代理对象userDao.update();}
}
SchemaBased实现AOP
SchemaBased(基础模式)配置方式是指使用Spring原生方式定义通知,而使用AspectJ框架配置切面。
-
编写通知类
public class SpringAop implements MethodBeforeAdvice, AfterReturningAdvice, ThrowsAdvice, MethodInterceptor {/*** 前置通知* @param method 目标方法* @param args 目标方法的参数列表* @param target 目标对象* @throws Throwable*/@Overridepublic void before(Method method, Object[] args, Object target) throws Throwable {System.out.println("前置通知");}/*** 后置通知* @param returnValue 目标方法的返回值* @param method 目标方法* @param args 目标方法的参数列表* @param target 目标对象* @throws Throwable*/@Overridepublic void afterReturning(Object returnValue, Method method, Object[] args, Object target) throws Throwable {System.out.println("后置通知");}/*** 环绕通知* @param invocation 目标方法* @return* @throws Throwable*/@Overridepublic Object invoke(MethodInvocation invocation) throws Throwable {System.out.println("环绕前");Object proceed = invocation.proceed();System.out.println("环绕后");return proceed;}/*** 异常通知* @param ex 异常对象*/public void afterThrowing(Exception ex){System.out.println("发生异常了!");} } -
配置切面
<!-- 通知对象 --> <bean id="springAop2" class="com.Spring.aop.SpringAop2"/><!-- 配置切面 --> <aop:config><!-- 配置切点--><aop:pointcut id="myPointcut" expression="execution(* com.Spring.dao.UserDao.*(..))"/><!-- 配置切面:advice-ref:通知对象 pointcut-ref:切点 --><aop:advisor advice-ref="springAop2" pointcut-ref="myPointcut"/> </aop:config> -
测试
@Test
public void t6(){ApplicationContext ac = new ClassPathXmlApplicationContext("aop3.xml");UserDao userDao = (UserDao) ac.getBean("userDao");userDao.add();
}
Spring事务
事务简介
事务:不可分割的原子操作。即一系列的操作要么同时成功,要么同时失败。
开发过程中,事务管理一般在service层,service层中可能会操作多次数据库,这些操作是不可分割的。否则当程序报错时,可能会造成数据异常。
如:张三给李四转账时,需要两次操作数据库:张三存款减少、李四存款增加。如果这两次数据库操作间出现异常,则会造成数据错误。
-
准备数据库
CREATE DATABASE `spring` ; USE `spring`; DROP TABLE IF EXISTS `account`;CREATE TABLE `account` (`id` int(11) NOT NULL AUTO_INCREMENT,`username` varchar(255) DEFAULT NULL,`balance` double DEFAULT NULL,PRIMARY KEY (`id`) ) ENGINE=InnoDB AUTO_INCREMENT=3 DEFAULT CHARSET=utf8;insert into `account`(`id`,`username`,`balance`) values (1,'张三',1000),(2,'李四',1000); -
创建maven项目,引入依赖
<dependencies><!-- mybatis --><dependency><groupId>org.mybatis</groupId><artifactId>mybatis</artifactId><version>3.5.7</version></dependency><!-- mysql驱动包 --><dependency><groupId>mysql</groupId><artifactId>mysql-connector-java</artifactId><version>8.0.26</version></dependency><!-- druid连接池 --><dependency><groupId>com.alibaba</groupId><artifactId>druid</artifactId><version>1.2.8</version></dependency><!-- spring --><dependency><groupId>org.springframework</groupId><artifactId>spring-context</artifactId><version>5.3.13</version></dependency><dependency><groupId>org.springframework</groupId><artifactId>spring-tx</artifactId><version>5.3.13</version></dependency><dependency><groupId>org.springframework</groupId><artifactId>spring-jdbc</artifactId><version>5.3.13</version></dependency><!-- MyBatis与Spring的整合包,该包可以让Spring创建MyBatis的对象 --><dependency><groupId>org.mybatis</groupId><artifactId>mybatis-spring</artifactId><version>2.0.6</version></dependency><!-- junit,如果Spring5整合junit,则junit版本至少在4.12以上 --><dependency><groupId>junit</groupId><artifactId>junit</artifactId><version>4.12</version><scope>test</scope></dependency><!-- spring整合测试模块 --><dependency><groupId>org.springframework</groupId><artifactId>spring-test</artifactId><version>5.3.13</version><scope>test</scope></dependency> </dependencies> -
创建配置文件
<?xml version="1.0" encoding="UTF-8"?> <beans xmlns="http://www.springframework.org/schema/beans"xmlns:context="http://www.springframework.org/schema/context"xmlns:xsi="http://www.w3.org/2001/XMLSchema-instance"xsi:schemaLocation="http://www.springframework.org/schema/beanshttp://www.springframework.org/schema/beans/spring-beans.xsdhttp://www.springframework.org/schema/contexthttp://www.springframework.org/schema/context/spring-context.xsd"><!-- 包扫描 --><context:component-scan base-package="com.Spring"></context:component-scan><!-- 创建druid数据源对象 --><bean id="dataSource" class="com.alibaba.druid.pool.DruidDataSource"><property name="driverClassName" value="com.mysql.jdbc.Driver"></property><property name="url" value="jdbc:mysql:///spring"></property><property name="username" value="root"></property><property name="password" value="root"></property></bean><bean id="sqlSessionFactory" class="org.mybatis.spring.SqlSessionFactoryBean"><property name="dataSource" ref="dataSource"></property></bean><bean id="mapperScanner" class="org.mybatis.spring.mapper.MapperScannerConfigurer"><property name="basePackage" value="com.Spring.dao"></property></bean> </beans> -
编写Java代码
// 账户 public class Account {private int id; // 账号private String username; // 用户名private double balance; // 余额// 省略getter/setter/tostring/构造方法 }@Repository public interface AccountDao {// 根据id查找用户@Select("select * from account where id = #{id}")Account findById(int id);// 修改用户@Update("update account set balance = #{balance} where id = #{id}")void update(Account account); }@Service public class AccountService {@Autowiredprivate AccountDao accountDao;/*** 转账* @param id1 转出人id* @param id2 转入人id* @param price 金额*/public void transfer(int id1, int id2, double price) {// 转出人减少余额Account account1 = accountDao.findById(id1);account1.setBalance(account1.getBalance()-price);accountDao.update(account1);int i = 1/0; // 模拟程序出错// 转入人增加余额Account account2 = accountDao.findById(id2);account2.setBalance(account2.getBalance()+price);accountDao.update(account2);} } -
测试转账
@RunWith(SpringJUnit4ClassRunner.class)
@ContextConfiguration(locations="classpath:applicationContext.xml")
public class AccountServiceTest {@Autowiredprivate AccountService accountService;@Testpublic void testTransfer(){accountService.transfer(1,2,500);}
}
此时没有事务管理,会造成张三的余额减少,而李四的余额并没有增加。所以事务处理位于业务层,即一个service方法是不能分割的。
Spring事务管理方案
在service层手动添加事务可以解决该问题:
@Autowired
private SqlSessionTemplate sqlSession;public void transfer(int id1, int id2, double price) {try{// account1修改余额Account account1 = accountDao.findById(id1);account1.setBalance(account1.getBalance()-price);accountDao.update(account1);int i = 1/0; // 模拟转账出错// account2修改余额Account account2 = accountDao.findById(id2);account2.setBalance(account2.getBalance()+price);accountDao.update(account2); sqlSession.commit();}catch(Exception ex){sqlSession.rollback();}
}
但在Spring管理下不允许手动提交和回滚事务。此时我们需要使用Spring的事务管理方案,在Spring框架中提供了两种事务管理方案:
- 编程式事务:通过编写代码实现事务管理。
- 声明式事务:基于AOP技术实现事务管理。
在Spring框架中,编程式事务管理很少使用,我们对声明式事务管理进行详细学习。
Spring的声明式事务管理在底层采用了AOP技术,其最大的优点在于无需通过编程的方式管理事务,只需要在配置文件中进行相关的规则声明,就可以将事务规则应用到业务逻辑中。
使用AOP技术为service方法添加如下通知:
Spring事务管理器
Spring依赖事务管理器进行事务管理,事务管理器即一个通知类,我们为该通知类设置切点为service层方法即可完成事务自动管理。由于不同技术操作数据库,进行事务操作的方法不同。如:JDBC提交事务是connection.commit(),MyBatis提交事务是sqlSession.commit(),所以Spring提供了多个事务管理器。
| 事务管理器名称 | 作用 |
|---|---|
| org.springframework.jdbc.datasource.DataSourceTransactionManager | 针对JDBC技术提供的事务管理器。适用于JDBC和MyBatis。 |
| org.springframework.orm.hibernate3.HibernateTransactionManager | 针对于Hibernate框架提供的事务管理器。适用于Hibernate框架。 |
| org.springframework.orm.jpa.JpaTransactionManager | 针对于JPA技术提供的事务管理器。适用于JPA技术。 |
| org.springframework.transaction.jta.JtaTransactionManager | 跨越了多个事务管理源。适用在两个或者是多个不同的数据源中实现事务控制。 |
我们使用MyBatis操作数据库,接下来使用DataSourceTransactionManager进行事务管理。
-
引入依赖
<!-- 事务管理 --> <dependency><groupId>org.springframework</groupId><artifactId>spring-tx</artifactId><version>5.3.13</version> </dependency> <!-- AspectJ --> <dependency><groupId>org.aspectj</groupId><artifactId>aspectjweaver</artifactId><version>1.8.7</version> </dependency> -
在配置文件中引入约束
xmlns:aop="http://www.springframework.org/schema/aop" xmlns:tx="http://www.springframework.org/schema/tx"http://www.springframework.org/schema/aop http://www.springframework.org/schema/aop/spring-aop.xsd http://www.springframework.org/schema/tx http://www.springframework.org/schema/tx/spring-tx.xsd -
进行事务配置
<!-- 事务管理器  -->
<bean id="transactionManager" class="org.springframework.jdbc.datasource.DataSourceTransactionManager"><property name="dataSource" ref="dataSource"></property>
</bean><!-- 进行事务相关配置 -->
<tx:advice id = "txAdvice"><tx:attributes><tx:method name="*"/></tx:attributes>
</tx:advice><!-- 配置切面 -->
<aop:config><!-- 配置切点 --><aop:pointcut id="pointcut" expression="execution(* com.Spring.service.*.*(..))"/><!-- 配置通知 --><aop:advisor advice-ref="txAdvice" pointcut-ref="pointcut"></aop:advisor>
</aop:config>
事务控制的API
Spring进行事务控制的功能是由三个接口提供的,这三个接口是Spring实现的,在开发中我们很少使用到,只需要了解他们的作用即可:
PlatformTransactionManager接口
PlatformTransactionManager是Spring提供的事务管理器接口,所有事务管理器都实现了该接口。该接口中提供了三个事务操作方法:
- TransactionStatus getTransaction(TransactionDefinition definition):获取事务状态信息。
- void commit(TransactionStatus status):事务提交
- void rollback(TransactionStatus status):事务回滚
TransactionDefinition接口
TransactionDefinition是事务的定义信息对象,它有如下方法:
- String getName():获取事务对象名称。
- int getIsolationLevel():获取事务的隔离级别。
- int getPropagationBehavior():获取事务的传播行为。
- int getTimeout():获取事务的超时时间。
- boolean isReadOnly():获取事务是否只读。
TransactionStatus接口
TransactionStatus是事务的状态接口,它描述了某一时间点上事务的状态信息。它有如下方法:
- void flush() 刷新事务
- boolean hasSavepoint() 获取是否存在保存点
- boolean isCompleted() 获取事务是否完成
- boolean isNewTransaction() 获取是否是新事务
- boolean isRollbackOnly() 获取是否回滚
- void setRollbackOnly() 设置事务回滚
事务的相关配置
在<tx:advice>中可以进行事务的相关配置:
<tx:advice id="txAdvice"><tx:attributes><tx:method name="*"/><tx:method name="find*" read-only="true"/></tx:attributes>
</tx:advice>
<tx:method>中的属性:
- name:指定配置的方法。
*表示所有方法,find*表示所有以find开头的方法。- read-only:是否是只读事务,只读事务不存在数据的修改,数据库将会为只读事务提供一些优化手段,会对性能有一定提升,建议在查询中开启只读事务。
- timeout:指定超时时间,在限定的时间内不能完成所有操作就会抛异常。默认永不超时
- rollback-for:指定某个异常事务回滚,其他异常不回滚。默认所有异常回滚。
- no-rollback-for:指定某个异常不回滚,其他异常回滚。默认所有异常回滚。
- propagation:事务的传播行为
- isolation:事务的隔离级别
事务的传播行为
事务传播行为是指多个含有事务的方法相互调用时,事务如何在这些方法间传播。
如果在service层的方法中调用了其他的service方法,假设每次执行service方法都要开启事务,此时就无法保证外层方法和内层方法处于同一个事务当中。
// method1的所有方法在同一个事务中
public void method1(){// 此时会开启一个新事务,这就无法保证method1()中所有的代码是在同一个事务中method2();System.out.println("method1");
}public void method2(){System.out.println("method2");
}
事务的传播特性就是解决这个问题的,Spring帮助我们将外层方法和内层方法放入同一事务中。
| 传播行为 | 介绍 |
|---|---|
| REQUIRED | 默认。支持当前事务,如果当前没有事务,就新建一个事务。这是最常见的选择。 |
| SUPPORTS | 支持当前事务,如果当前没有事务,就以非事务方式执行。 |
| MANDATORY | 支持当前事务,如果当前没有事务,就抛出异常。 |
| REQUIRES_NEW | 新建事务,如果当前存在事务,把当前事务挂起。 |
| NOT_SUPPORTED | 以非事务方式执行操作,如果当前存在事务,就把当前事务挂起。 |
| NEVER | 以非事务方式执行,如果当前存在事务,则抛出异常。 |
| NESTED | 必须在事务状态下执行,如果没有事务则新建事务,如果当前有事务则创建一个嵌套事务 |
事务的隔离级别
事务隔离级别反映事务提交并发访问时的处理态度,隔离级别越高,数据出问题的可能性越低,但效率也会越低。
| 隔离级别 | 脏读 | 不可重复读 | 幻读 |
|---|---|---|---|
| READ_UNCOMMITTED(读取未提交内容) | Yes | Yes | Yes |
| READ_COMMITTED(读取提交内容) | No | Yes | Yes |
| REPEATABLE_READ(重复读) | No | No | Yes |
| SERIALIZABLE(可串行化) | No | No | No |
如果设置为DEFAULT会使用数据库的隔离级别。
- SqlServer , Oracle默认的事务隔离级别是READ_COMMITTED
- Mysql的默认隔离级别是REPEATABLE_READ
注解配置声明式事务
Spring支持使用注解配置声明式事务。用法如下:
-
注册事务注解驱动
<!-- 注册事务注解驱动 --> <tx:annotation-driven transaction-manager="transactionManager"></tx:annotation-driven> -
在需要事务支持的方法或类上加@Transactional
@Service // 作用于类上时,该类的所有public方法将都具有该类型的事务属性 @Transactional(propagation = Propagation.REQUIRED,isolation = Isolation.DEFAULT) public class AccountService {@Autowiredprivate AccountDao accountDao;/*** 转账* @param id1 转出人id* @param id2 转入人id* @param price 金额*/// 作用于方法上时,该方法将都具有该类型的事务属性@Transactional(propagation = Propagation.REQUIRED,isolation = Isolation.DEFAULT)public void transfer(int id1, int id2, double price) {// account1修改余额Account account1 = accountDao.findById(id1);account1.setBalance(account1.getBalance()-price);accountDao.update(account1);int i = 1/0; // 模拟转账出错// account2修改余额Account account2 = accountDao.findById(id2);account2.setBalance(account2.getBalance()+price);accountDao.update(account2);} } -
配置类代替xml中的注解事务支持:在配置类上方写@EnableTranscationManagement
@Configuration
@ComponentScan("com.Spring")
@EnableTransactionManagement
public class SpringConfig {@Beanpublic DataSource getDataSource(){DruidDataSource druidDataSource = new DruidDataSource();druidDataSource.setDriverClassName("com.mysql.jdbc.Driver");druidDataSource.setUrl("jdbc:mysql:///spring");druidDataSource.setUsername("root");druidDataSource.setPassword("root");return druidDataSource;}@Beanpublic SqlSessionFactoryBean getSqlSession(DataSource dataSource){SqlSessionFactoryBean sqlSessionFactoryBean = new SqlSessionFactoryBean();sqlSessionFactoryBean.setDataSource(dataSource);return sqlSessionFactoryBean;}@Beanpublic MapperScannerConfigurer getMapperScanner(){MapperScannerConfigurer mapperScannerConfigurer = new MapperScannerConfigurer();mapperScannerConfigurer.setBasePackage("com.Spring.dao");return mapperScannerConfigurer;}@Beanpublic DataSourceTransactionManager getTransactionManager(DataSource dataSource){DataSourceTransactionManager dataSourceTransactionManager = new DataSourceTransactionManager();dataSourceTransactionManager.setDataSource(dataSource);return dataSourceTransactionManager;}
}


