使用本文代码需要预先设置一点开发环境,请阅读另外一篇博文:
C#图像处理OpenCV开发指南(CVStar,03)——基于.NET 6的图像处理桌面程序开发实践第一步![]() https://blog.csdn.net/beijinghorn/article/details/134684471?spm=1001.2014.3001.5502
https://blog.csdn.net/beijinghorn/article/details/134684471?spm=1001.2014.3001.5502
1 功能需求
(1)读取图片;并显示于窗口;可缩放;
(2)可访问图片指定位置像素信息;
(3)提取局部图片(ROI)
(4)有 拾取框;
(5)局部放大(连续型放大);
(6)支持 大像素 型得局部放大;
(7)支持 圆形 像素的局部放大;
2 代码分段讲解
前面一个博文中出现过的代码不再赘述。
2.1 访问图片指定位置像素信息
Vec3b cx = zmt.At<Vec3b>(y, x);y,x 指定的位置;顺序不要搞错啦!
返回的数据类型 Vec3b 是 byte[] 类型的;BGR顺序;cx[0] 为 Blue,cx[1] 为 Green;cx[2] 为 Red;这个与一般的图片信息 RGB 顺序不同;
2.2 提取局部图片(ROI)
Mat zmt = new Mat(src, new Rect(gx, gy, gw, gh));gx,gy 为左上角坐标;
gw,gh 为局部图片的宽度与高度(像素)。
2.3 拾取框绘制
int gw = picResult.Width / PixelSize;
int gh = picResult.Height / PixelSize;
Bitmap bmp = new Bitmap(picSource.Width, picSource.Height);
Graphics g = Graphics.FromImage(bmp);
g.DrawImage(image: img,destRect: new Rectangle(0, 0, bmp.Width, bmp.Height),srcX: 0,srcY: 0,srcWidth: img.Width,srcHeight: img.Height,srcUnit: GraphicsUnit.Pixel);
g.DrawRectangle(new Pen(Color.Yellow), mouseAtX - gw / 2, mouseAtY - gh / 2, gw, gh);
picSource.Image = bmp;
2.4 光滑的(插值的)局部放大
图片的局部放大是取局部图片,放大显示。或者直接将图片放大显示并进行移位。
非 OpenCV 方式:
Bitmap bmp = new Bitmap(picResult.Width, picResult.Height);
Graphics g = Graphics.FromImage(bmp);
g.DrawImage(image: picSource.Image,destRect: new Rectangle(0, 0, bmp.Width, bmp.Height),srcX: gx,srcY: gy,srcWidth: gw,srcHeight: gh,srcUnit: GraphicsUnit.Pixel);
picResult.Image = bmp;
OpenCV方式
Mat zmt = new Mat(src, new Rect(gx, gy, gw, gh));
picResult.Image = CVUtility.Mat2Bitmap(zmt);
PicAutosize(picResult);
2.5 非插值的大像素型放大
非插值的大像素型放大是指将原图的每个像素放大为一个矩形(块)显示。
Mat zmt = new Mat(src, new Rect(gx, gy, gw, gh));
Bitmap bmp = new Bitmap(picResult.Width, picResult.Height);
Graphics g = Graphics.FromImage(bmp);
g.InterpolationMode = System.Drawing.Drawing2D.InterpolationMode.HighQualityBicubic;
g.CompositingQuality = System.Drawing.Drawing2D.CompositingQuality.HighQuality;
for (int y = 0; y < gh; y++)
{for (int x = 0; x < gw; x++){Vec3b cx = zmt.At<Vec3b>(y, x);SolidBrush sb = new SolidBrush(Color.FromArgb(cx[2], cx[1], cx[0]));g.FillRectangle(sb, new Rectangle(x * PixelSize, y * PixelSize, PixelSize, PixelSize));}
}
picResult.Image = bmp;
2.6 圆圈型像素放大算法
圆圈型像素放大算法是指将原图的每个像素放大为一个圆圈(派)显示。
Mat zmt = new Mat(src, new Rect(gx, gy, gw, gh));
Bitmap bmp = new Bitmap(picResult.Width, picResult.Height);
Graphics g = Graphics.FromImage(bmp);
g.InterpolationMode = System.Drawing.Drawing2D.InterpolationMode.HighQualityBicubic;
g.CompositingQuality = System.Drawing.Drawing2D.CompositingQuality.HighQuality;
for (int y = 0; y < gh; y++)
{for (int x = 0; x < gw; x++){Vec3b cx = zmt.At<Vec3b>(y, x);SolidBrush sb = new SolidBrush(Color.FromArgb(cx[2], cx[1], cx[0]));g.FillEllipse(sb, new Rectangle(x * PixelSize, y * PixelSize, PixelSize, PixelSize));}
}
picResult.Image = bmp;
2.7 鼠标事件与拾取框
private void PicSource_MouseMove(object? sender, MouseEventArgs? e)
{if (picSource == null) { return; }if (picSource.Image == null) { return; }mouseAtX = e.X;mouseAtY = e.Y;abLocation.Text = mouseAtX + "," + mouseAtY + " " + (int)(mouseAtX / original_scale) + "," + (int)(mouseAtY / original_scale);int gw = picResult.Width / PixelSize;int gh = picResult.Height / PixelSize;Bitmap bmp = new Bitmap(picSource.Width, picSource.Height);Graphics g = Graphics.FromImage(bmp);g.DrawImage(image: img,destRect: new Rectangle(0, 0, bmp.Width, bmp.Height),srcX: 0,srcY: 0,srcWidth: img.Width,srcHeight: img.Height,srcUnit: GraphicsUnit.Pixel);g.DrawRectangle(new Pen(Color.Yellow), mouseAtX - gw / 2, mouseAtY - gh / 2, gw, gh);picSource.Image = bmp;Zoom();
}
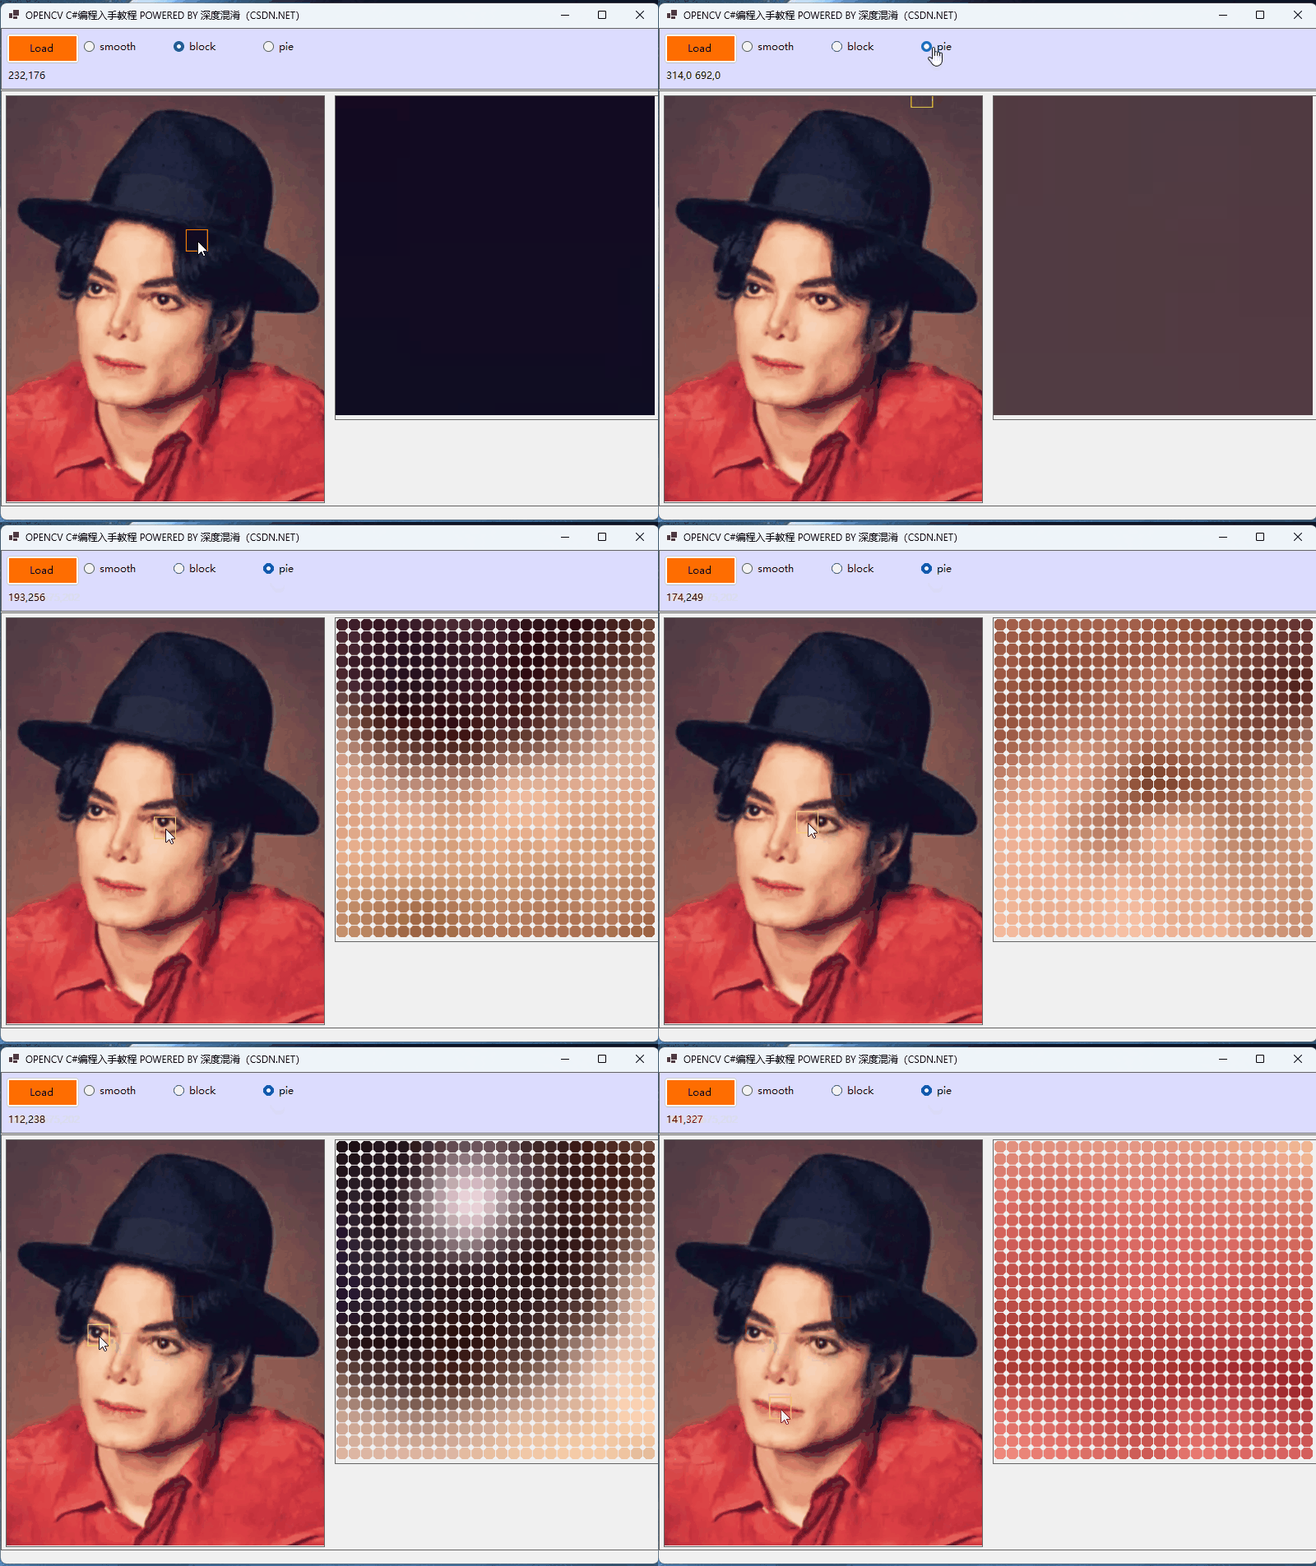
3 运行效果
3.1 一般的插值放大算法效果

3.2 块状大像素放大效果

3.3 圆圈像素放大效果
4 完整的源代码
无需做修改,界面设计,直接复制粘贴替换原来的 Form1.cs 即可。
using OpenCvSharp;#pragma warning disable CS8602namespace Legal.Truffer.CVStar
{public partial class Form1 : Form{string[] ImgExtentions = {"*.*|*.*","JPEG|*.jpg;*.jpeg","GIF|*.gif","PNG|*.png","TIF|*.tif;*.tiff","BMP|*.bmp"};private int original_width { get; set; } = 0;private int original_height { get; set; } = 0;private double original_scale { get; set; } = 0.0;private string sourceImage { get; set; } = "";private int PixelSize { get; set; } = 15;private int mouseAtX { get; set; } = 0;private int mouseAtY { get; set; } = 0;Panel? panelTop { get; set; } = null;Panel? panelBotton { get; set; } = null;PictureBox? picSource { get; set; } = null;PictureBox? picResult { get; set; } = null;Button? btnLoad { get; set; } = null;RadioButton? rbSmooth { get; set; } = null;RadioButton? rbBlock { get; set; } = null;RadioButton? rbPie { get; set; } = null;Label? abLocation { get; set; }Image? img { get; set; } = null;Mat? src { get; set; } = null;public Form1(){InitializeComponent();this.Text = "OPENCV C#编程入手教程 POWERED BY 深度混淆(CSDN.NET)";this.StartPosition = FormStartPosition.CenterScreen;GUI();this.Resize += FormResize;this.DoubleBuffered = true;}private void FormResize(object? sender, EventArgs? e){if (this.Width < 200) { this.Width = 320; return; }if (this.Height < 200) { this.Height = 320; return; }mouseAtX = 0;mouseAtY = 0;GUI();}private void GUI(){if (panelTop == null) panelTop = new Panel();panelTop.Parent = this;panelTop.Top = 5;panelTop.Left = 5;panelTop.Height = 75;panelTop.Dock = DockStyle.Top;panelTop.BorderStyle = BorderStyle.FixedSingle;panelTop.BackColor = Color.FromArgb(220, 220, 255);if (panelBotton == null) panelBotton = new Panel();panelBotton.Parent = this;panelBotton.Top = panelTop.Top + panelTop.Height + 1;panelBotton.Left = 0;panelBotton.Width = panelTop.Width;panelBotton.Height = this.Height - panelBotton.Top - 55;panelBotton.BorderStyle = BorderStyle.FixedSingle;if (picSource == null) picSource = new PictureBox();picSource.Parent = panelBotton;picSource.Left = 5;picSource.Top = 5;picSource.Width = (panelBotton.Width - 10) / 2;picSource.Height = (panelBotton.Height - 10);picSource.BorderStyle = BorderStyle.FixedSingle;picSource.MouseMove += PicSource_MouseMove;picSource.DoubleClick += Load_Image;original_width = picSource.Width;original_height = picSource.Height;if (picResult == null) picResult = new PictureBox();picResult.Parent = panelBotton;picResult.Left = picSource.Left + picSource.Width + 5;picResult.Top = picSource.Top;picResult.Width = picSource.Width - (picSource.Width % PixelSize);picResult.Height = picResult.Width;picResult.BorderStyle = BorderStyle.FixedSingle;if (btnLoad == null) btnLoad = new Button();btnLoad.Parent = panelTop;btnLoad.Left = 5;btnLoad.Top = 5;btnLoad.Width = 90;btnLoad.Height = 38;btnLoad.Cursor = Cursors.Hand;btnLoad.Text = "Load";btnLoad.BackColor = Color.FromArgb(255, 110, 0);btnLoad.Click += Load_Image;if (rbSmooth == null) rbSmooth = new RadioButton();rbSmooth.Parent = panelTop;rbSmooth.Left = btnLoad.Left + btnLoad.Width + 5;rbSmooth.Top = btnLoad.Top + 5;rbSmooth.Text = "smooth";rbSmooth.Cursor = Cursors.Hand;rbSmooth.Checked = true;if (rbBlock == null) rbBlock = new RadioButton();rbBlock.Parent = panelTop;rbBlock.Left = rbSmooth.Left + rbSmooth.Width + 5;rbBlock.Top = btnLoad.Top + 5;rbBlock.Text = "block";rbBlock.Cursor = Cursors.Hand;if (rbPie == null) rbPie = new RadioButton();rbPie.Parent = panelTop;rbPie.Left = rbBlock.Left + rbBlock.Width + 5;rbPie.Top = btnLoad.Top + 5;rbPie.Text = "pie";rbPie.Cursor = Cursors.Hand;if (abLocation == null) abLocation = new Label();abLocation.Parent = panelTop;abLocation.Left = btnLoad.Left;abLocation.Top = btnLoad.Top + btnLoad.Height + 5;abLocation.Text = mouseAtX + "," + mouseAtY;PicAutosize(picSource);Zoom();}private void Load_Image(object? sender, EventArgs? e){OpenFileDialog openFileDialog = new OpenFileDialog();openFileDialog.Filter = String.Join("|", ImgExtentions);if (openFileDialog.ShowDialog() == DialogResult.OK){sourceImage = openFileDialog.FileName;img = Image.FromFile(sourceImage);picSource.Image = img;src = Cv2.ImRead(sourceImage);PicAutosize(picSource);Zoom();}}private void PicAutosize(PictureBox pb){if (pb == null) return;if (pb.Image == null) return;Image img = pb.Image;int w = original_width;int h = w * img.Height / img.Width;if (h > original_height){h = original_height;w = h * img.Width / img.Height;}if (pb == picSource){original_scale = (double)w / (double)src.Width;}pb.SizeMode = PictureBoxSizeMode.Zoom;pb.Width = w;pb.Height = h;pb.Image = img;pb.Refresh();}private void Zoom(){if (picSource == null) return;if (picSource.Image == null) return;// ROIint gw = picResult.Width / PixelSize;int gh = picResult.Height / PixelSize;int gx = (int)(mouseAtX / original_scale) - gw / 2;if (gx < 0) gx = 0;int gy = (int)(mouseAtY / original_scale) - gh / 2;if (gy < 0) gy = 0;if (rbSmooth.Checked){
#if GRAPHICS_METHODBitmap bmp = new Bitmap(picResult.Width, picResult.Height);Graphics g = Graphics.FromImage(bmp);g.DrawImage(image: picSource.Image,destRect: new Rectangle(0, 0, bmp.Width, bmp.Height),srcX: gx,srcY: gy,srcWidth: gw,srcHeight: gh,srcUnit: GraphicsUnit.Pixel);picResult.Image = bmp;
#elseMat zmt = new Mat(src, new Rect(gx, gy, gw, gh));picResult.Image = CVUtility.Mat2Bitmap(zmt);PicAutosize(picResult);
#endif}else if (rbBlock.Checked){Mat zmt = new Mat(src, new Rect(gx, gy, gw, gh));Bitmap bmp = new Bitmap(picResult.Width, picResult.Height);Graphics g = Graphics.FromImage(bmp);g.InterpolationMode = System.Drawing.Drawing2D.InterpolationMode.HighQualityBicubic;g.CompositingQuality = System.Drawing.Drawing2D.CompositingQuality.HighQuality;for (int y = 0; y < gh; y++){for (int x = 0; x < gw; x++){Vec3b cx = zmt.At<Vec3b>(y, x);SolidBrush sb = new SolidBrush(Color.FromArgb(cx[2], cx[1], cx[0]));g.FillRectangle(sb, new Rectangle(x * PixelSize, y * PixelSize, PixelSize, PixelSize));}}picResult.Image = bmp;}else if (rbPie.Checked){Mat zmt = new Mat(src, new Rect(gx, gy, gw, gh));Bitmap bmp = new Bitmap(picResult.Width, picResult.Height);Graphics g = Graphics.FromImage(bmp);g.InterpolationMode = System.Drawing.Drawing2D.InterpolationMode.HighQualityBicubic;g.CompositingQuality = System.Drawing.Drawing2D.CompositingQuality.HighQuality;for (int y = 0; y < gh; y++){for (int x = 0; x < gw; x++){Vec3b cx = zmt.At<Vec3b>(y, x);SolidBrush sb = new SolidBrush(Color.FromArgb(cx[2], cx[1], cx[0]));g.FillEllipse(sb, new Rectangle(x * PixelSize, y * PixelSize, PixelSize, PixelSize));}}picResult.Image = bmp;}}private void PicSource_MouseMove(object? sender, MouseEventArgs? e){if (picSource == null) { return; }if (picSource.Image == null) { return; }mouseAtX = e.X;mouseAtY = e.Y;abLocation.Text = mouseAtX + "," + mouseAtY + " " + (int)(mouseAtX / original_scale) + "," + (int)(mouseAtY / original_scale);int gw = picResult.Width / PixelSize;int gh = picResult.Height / PixelSize;Bitmap bmp = new Bitmap(picSource.Width, picSource.Height);Graphics g = Graphics.FromImage(bmp);g.DrawImage(image: img,destRect: new Rectangle(0, 0, bmp.Width, bmp.Height),srcX: 0,srcY: 0,srcWidth: img.Width,srcHeight: img.Height,srcUnit: GraphicsUnit.Pixel);g.DrawRectangle(new Pen(Color.Yellow), mouseAtX - gw / 2, mouseAtY - gh / 2, gw, gh);picSource.Image = bmp;Zoom();}}
}


