用户反馈组件实现(Vue3+ElementPlus)含图片拖拽上传
- 1. 页面效果
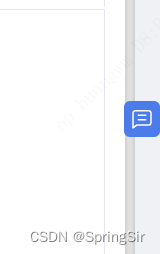
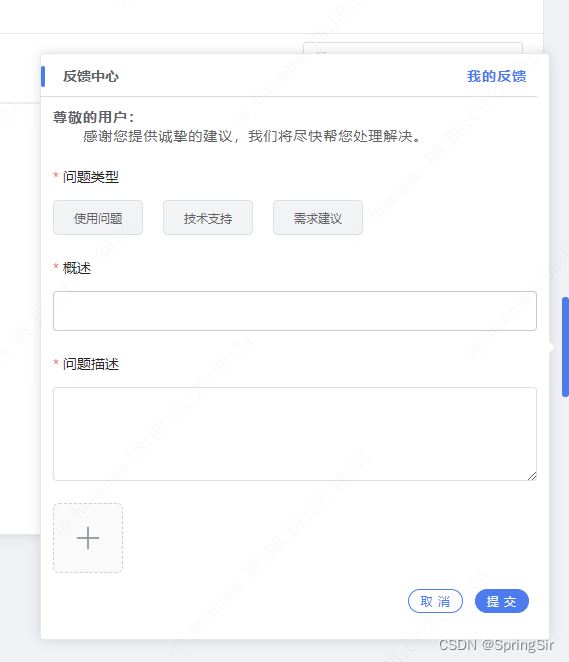
- 1.1 正常展示
- 1.2 鼠标悬浮
- 1.3 表单
- 2. 代码部分
- 1.2 html、ts
- 1.2 less部分
- 3. 编码过程遇到的问题
1. 页面效果
1.1 正常展示
1.2 鼠标悬浮

1.3 表单
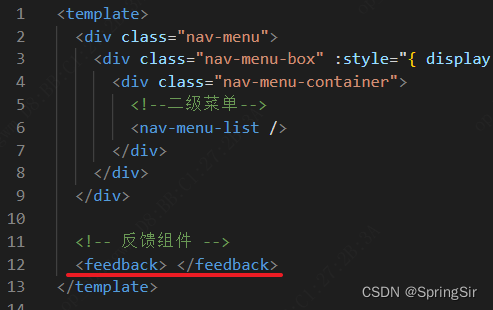
2. 代码部分
1.2 html、ts
<template><Teleport><divclass="feedback"@mouseenter="() => (showText = true)"@mouseleave="() => (showText = false)"><el-popover :visible="visible" trigger="manual" placement="left" :width="510"><div class="feedback-content" @dragover="handleDragOver" @drop="handleDrop"><header class="flex"><strong>反馈中心</strong><el-link type="primary" @click="toJiraPage"> <strong>我的反馈</strong> </el-link></header><hr style="margin: 10px 0 0 -13px; border-top: 1px solid #dbdbdb" /><section><p style="margin-top: 10px; letter-spacing: 1px"><strong>尊敬的用户:</strong></p><p style="letter-spacing: 1px; text-indent: 4ch">感谢您提供诚挚的建议,我们将尽快帮您处理解决。</p><el-formref="refForm":model="fromData":rules="fromRules"label-position="top"size="large"style="margin-top: 20px"class="from-content"><el-form-itemlabel="问题类型"prop="issueType":rules="{ required: true, message: '请选择问题类型', trigger: ['blur', 'change'] }"><div class="card-list"><divv-for="t in feedbackType":key="t.name":class="['card-item', { active: fromData.issueType === t.id }]"@click="fromData.issueType = t.id">{{ t.name }}</div></div></el-form-item><el-form-item label="概述" prop="summary"><el-input v-model="fromData.summary"></el-input></el-form-item><el-form-item label="问题描述" prop="description"><el-input v-model="fromData.description" type="textarea" :rows="4"></el-input></el-form-item><el-uploadaction="none"list-type="picture-card":auto-upload="false":before-upload="beforeAvatarUpload":on-exceed="handleExceed":file-list="fromData.imgs":on-preview="handlePictureCardPreview"><el-icon><Plus /></el-icon><template #file="{ file }"><div><img class="el-upload-list__item-thumbnail" :src="file.url" alt="" /><span class="el-upload-list__item-actions"><spanclass="el-upload-list__item-preview"@click="handlePictureCardPreview(file)"><el-icon><zoom-in /></el-icon></span><spanv-if="!disabled"class="el-upload-list__item-delete"@click="handleRemove(file)"><el-icon><Delete /></el-icon></span></span></div></template></el-upload><div class="btn-row"><el-button class="btn-row-left" type="default" size="small" round @click="close">取 消</el-button><el-buttonclass="btn-row-right"size="small"type="primary"round:disabled="loading"@click="handleSubmit(refForm)">提 交</el-button></div></el-form></section><div class="dot"></div></div><template #reference><div v-if="visible" class="line"></div><div v-else class="slot-content" @click="visible = true"><ChatLineSquare class="feedback-icon" /><div v-if="showText" class="feedback-text">意见反馈 </div></div></template></el-popover></div><el-dialog v-model="dialogVisible"><img w-full :src="dialogImageUrl" alt="Preview Image" /></el-dialog></Teleport>
</template><script setup lang="ts">import { ElMessage } from 'element-plus';import type { UploadFile, ElForm, UploadProps } from 'element-plus';import { ChatLineSquare, Delete, Plus, ZoomIn } from '@element-plus/icons-vue';import { submitFeedback } from '@/api/config-center';+(() => {// 初始化数据准备。。。})();const handleDragOver = (event) => {event.preventDefault();};const allowedFormats = ['image/jpeg','image/png','image/gif','image/bmp','image/tiff','image/x-icon','image/svg+xml',] as const;const handleDrop = (event) => {event.preventDefault();const file = event.dataTransfer.files[0];if (!allowedFormats.includes(file.type)) {ElMessage.warning('只能上传 JPEG、PNG、GIF、BMP、TIFF、ICO 或 SVG 格式的图片');return;}if (fromData.value.imgs?.length >= 5) {ElMessage.warning('抱歉,最多只能上传5张图片!');return;}if (file.size > 2 * 1024 * 1024) {ElMessage.warning('图片大小不能超过 2MB');return;}const reader = new FileReader();reader.onload = () => {const image = {name: file.name,url: reader.result, // 用于页面回显raw: file, // 将图片的原始文件对象存储到 raw 属性中};fromData.value.imgs.push(image);};reader.readAsDataURL(file);};const showText = ref(false);const visible = ref(false);type FormInstance = InstanceType<typeof ElForm>;const refForm = ref<FormInstance>();const feedbackType = ref([]);const toJiraPage = () => {};const loading = ref(false);const handleSubmit = (formEl: FormInstance | undefined): void => {if (!formEl) return;formEl.validate((valid: any) => {if (valid) {loading.value = true;let fd = new FormData();fd.append('issueType', fromData.value.issueType);fd.append('summary', fromData.value.summary);fd.append('description', fromData.value.description);fromData.value.imgs.forEach((v) => fd.append('files', v.raw));submitFeedback(fd).then((res: any) => {if (res.code === 200) {ElMessage.success('反馈成功,感谢您的关注!');visible.value = false;fromData.value = {issueType: 0,summary: '',description: '',imgs: [],};} else {ElMessage.error('反馈失败:' + res.message);}}).catch((e) => ElMessage.error('反馈失败:' + e)).finally(() => (loading.value = false));} else {return false;}});};const fromData = ref({issueType: '', // 问题类型summary: '', // 概要description: '', // 描述imgs: [], // 图片});const close = () => {visible.value = false;showText.value = false;refForm.value?.resetFields();fromData.value = {issueType: '',summary: '',description: '',imgs: [],};};const dialogImageUrl = ref('');const dialogVisible = ref(false);const disabled = ref(false);const handlePictureCardPreview = (file: UploadFile) => {dialogImageUrl.value = file.url!;dialogVisible.value = true;};const handleRemove = (file: UploadFile) => {const index = fromData.value.imgs.findIndex((f: any) => f.uid === file.uid);fromData.value.imgs.splice(index, 1);};const fromRules = reactive({// issueType: [{ required: true, message: '请选择问题类型', trigger: 'blur' }],summary: [{ required: true, message: '请输入概要', trigger: 'blur' }],description: [{ required: true, message: '请输入描述', trigger: 'blur' }],});
</script>
由于我这边项目的需求,反馈组件我是和菜单组件放在一起
1.2 less部分
<style lang="less" scoped>::v-deep(.el-upload-list--picture-card .el-upload-list__item-actions span + span) {margin-left: 0.6rem !important;}::v-deep(.el-upload.el-upload--picture-card),::v-deep(li.el-upload-list__item) {width: 70px !important;height: 70px !important;}::v-deep .el-upload-dragger {width: 100%;height: 100%;display: flex;justify-content: center;align-items: center;}.feedback-content {height: 561px;position: relative;header {display: flex;justify-content: space-between;margin: 0 10px;}section {.from-content {height: 454px;// overflow-y: scroll;}.card-list {display: flex;gap: 20px;.card-item {padding: 0 20px;border-radius: 5px;background-color: #f2f3f5;border: 1px solid #dfdfdf;cursor: pointer;width: 100%;height: 35px;line-height: 35px;font-size: 12px;&.active {color: #fff;background-color: #4c7cee;}}}.upload {width: 60px;height: 60px;cursor: pointer;border: 1px dashed var(--el-border-color-darker);background-color: #fafafa;&:hover {border-color: var(--el-color-primary);color: var(--el-color-primary);}}}.dot {position: absolute;left: -12px;top: 0;width: 4px;height: 21px;border-radius: 5px;background-color: #4c7cee;}}.feedback {position: fixed;top: 50%;right: 0;color: #fff;cursor: pointer;border-radius: 6px;transform: translateY(-50%);background-color: #4c7cea;z-index: 999999999999;.line {width: 7px;height: 100px;border-radius: 6px;background-color: #4c7cea;}.feedback-text {letter-spacing: 0.3em;writing-mode: vertical-lr;text-orientation: upright;}@media only screen and (min-width: 1280px) {.slot-content {margin: 6px;.feedback-icon {width: 24px;height: 24px;margin-bottom: 5px;}.feedback-text {font-size: 16px;}}}@media only screen and (max-width: 1280px) {.slot-content {margin: 3px;.feedback-icon {width: 19px;height: 19px;margin-bottom: 3px;}.feedback-text {font-size: 13px;}}}}.btn-row {margin: 16px 8px 0;text-align: end;&-left {border-color: #4c7cee;color: #4c7cee;}}
</style>
3. 编码过程遇到的问题
- Teleport 是 Vue3 的一个内置组件,详细使用请查阅 Vue3官网
- 关于图片拖拽
- 最初的时候,是采用
el-upload的drag属性,来实现,但是后面有用户提出拖拽上传目标的框太小,建议可以把图片拖拽进整个表单,最开始时候的想法是在最外层的div加一个拖拽事件,但是实现起来有一个问题,el-upload拖拽事件添加.stop,会造成下方区域无法实现拖拽上传,其他区域OK,后采取的解决方式是,el-upload去除拖拽属性,全部采用最外层的原生拖拽事件上传
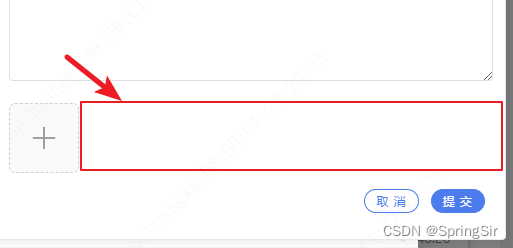
- 最初的时候,是采用
- 图片的上传
图片需要和文字一起上传,最初的时候实在没有想到实现方式,后面查了好些文章,发现是通过FormData实现