@Component的使用
基本Bean注解,主要是使用注解的方式替代原有的xml的<bean>标签及其标签属性的配置,使用@Component注解替代<bean>标签中的id以及class属性,而对于是否延迟加载或是Bean的作用域,则是其他注解
| xml配置 | 注解 | 描述 |
| <bean scope=""> | @Scope | 在类上或使用了@Bean标注的方法上,标注Bean的作用范围,取值为singleton或prototype |
| <bean lazy-init=""> | @Lazy | 在类上或使用了@Bean标注的方法上,标注Bean是否延迟加载,取值为true或false |
| <bean init-method=""> | @PostConstruct | 在方法上使用,标注Bean的实例化后执行的方法 |
| <bean destroy-method=""> | @PreDestroy | 在方法上使用,标注Bean的销毁前执行方法 |
下面就是基于注解的测试案例
首先需要开启自动扫描注解功能,这个功能还是需要在XML文件配置的
<?xml version="1.0" encoding="UTF-8"?>
<beans xmlns="http://www.springframework.org/schema/beans"xmlns:xsi="http://www.w3.org/2001/XMLSchema-instance"xmlns:context="http://www.springframework.org/schema/context"xsi:schemaLocation="http://www.springframework.org/schema/beans http://www.springframework.org/schema/beans/spring-beans.xsd http://www.springframework.org/schema/context https://www.springframework.org/schema/context/spring-context.xsd"><!--开启自动扫描--><context:component-scan base-package="com.zmt"/>
</beans>
@Component("userService")
@Lazy(true)//开启懒加载
@Scope("singleton")//单例模式
public class UserServiceImpl implements UserService {public UserServiceImpl() {System.out.println("UserService被构造");}@PostConstructprivate void init(){System.out.println("执行init方法");}@PreDestroyprivate void destroy(){System.out.println("执行销毁方法");}
}测试代码
public class Test {public static void main(String[] args) {ClassPathXmlApplicationContext context = new ClassPathXmlApplicationContext("application.xml");Object bean = context.getBean("userService");System.out.println(bean);context.close();}
}
执行结果如下
UserService被构造
执行init方法
com.zmt.service.impl.UserServiceImpl@45afc369
执行销毁方法
为了方便区分不同的业务层,@Component注解又衍生了三个注解
- @Service:Component的派生注解,多添加在Service的实现类上
- @Controller:Component的派生注解,多添加在Controller类上
- @Repository:Component的派生注解,多添加在Dao实现类上
依赖注解的使用
Bean的依赖注入的注解,主要是替代xml中的<property>标签中的注入操作
<bean id="" class=""><property name="" ref=""/><property name="" value=""/>
</bean>
Spring提供的注解如下,用于Bean内部进行属性注入的
| 属性注入注解 | 描述 |
| @Value | 使用在字段或方法上,用于注入普通数据 |
| @Autowired | 使用在字段或方法上,用于根据类型(byType)注入引用数据 |
| @Qualifier | 使用在字段或方法上,结合@Autowired使用,根据名称注入 |
| @Resource | 使用在字段或方法上,根据类型或名称进行注入 |
这些注解的工作原理实际上是通过暴力反射然后赋值,因此不需要set方法,但是添加了set方法在set方法上添加注解也可以使用。
下面是简单的使用案例
@Value该注解可以对普通数据类型进行赋值,一种是直接指定需要注入的值,一种是通过占位符读取需要注入的值信息
<?xml version="1.0" encoding="UTF-8"?>
<beans xmlns="http://www.springframework.org/schema/beans"xmlns:xsi="http://www.w3.org/2001/XMLSchema-instance"xmlns:context="http://www.springframework.org/schema/context"xsi:schemaLocation="http://www.springframework.org/schema/beans http://www.springframework.org/schema/beans/spring-beans.xsd http://www.springframework.org/schema/context https://www.springframework.org/schema/context/spring-context.xsd"><!--开启自动扫描--><context:component-scan base-package="com.zmt"/><!--将test.txt文件加载到Spring中,供赋值使用--><context:property-placeholder location="classpath:test.txt"/>
</beans>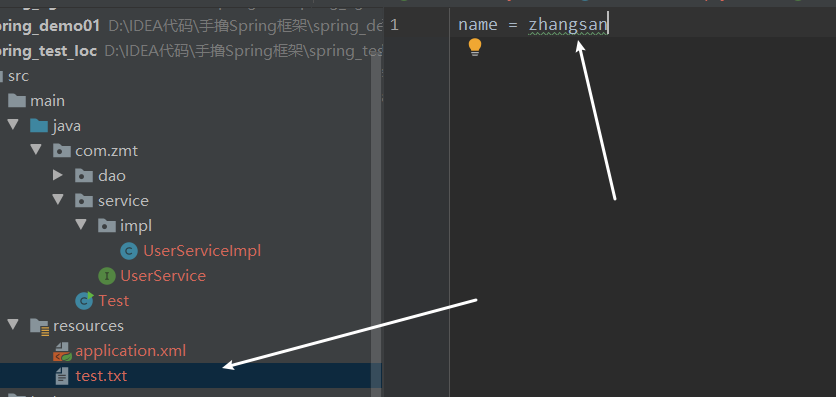
@Component("userService")
public class UserServiceImpl implements UserService {
//    @Value("zhangsan")@Value("${name}")private String name;@Overridepublic void show() {System.out.println(name);}
}
以上两种都可以将值赋值给name变量,但通常我们使用用后者。
@Autowired的使用默认是根据类型注入,但如果相同类型存在多个,则根据名称进行注入,但是如果不存在属性变量名的Bean对象,那么注入失败
@Component("userService")
public class UserServiceImpl implements UserService {@Autowiredprivate UserDao userDao;@Autowiredpublic void setUserDao(UserDao userDao) {this.userDao = userDao;}//以上两种写一个即可@Overridepublic void show() {}
}
@Qualifier需要搭配@Autowired注解使用,特定指定在多个相同类型的Bean对象时,注入哪个名称的bean对象
@Component("userService")
public class UserServiceImpl implements UserService {@Autowired@Qualifier("userDao")private UserDao userDao2;@Overridepublic void show() {}
}
这里即使属性变量名为userDao2但是实际上注入的还是名为userDao的bean对象。
@Resource既可以类型注入也可以名称注入
@Component("userService")
public class UserServiceImpl implements UserService {@Resource(name = "userDao")private UserDao userDao2;//实际上注入的是名称为userDao的bean对象@Overridepublic void show() {}
}
@Autowired的扩展使用,实际上该注解不仅仅可以添加在set方法上,可以添加在任何方法上,下面是一个测试案例
@Component("userService")
public class UserServiceImpl implements UserService {@Overridepublic void show() {}@Autowiredpublic void xxx(UserDao userDao){System.out.println("xxx:"+userDao);}@Autowiredpublic void yyy(List<UserDao> userDaoList){System.out.println("yyy:"+userDaoList);}
}
运行结果如下


