引言
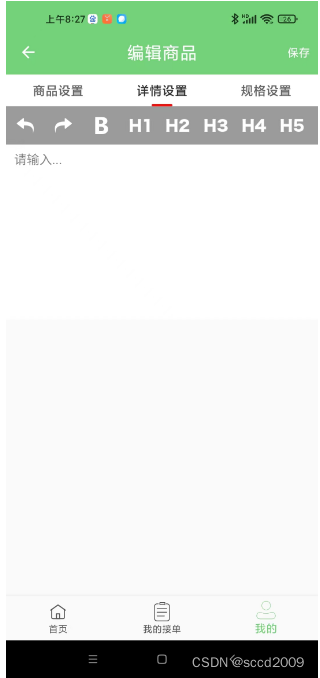
项目需要用到编辑器,采用RichEditor,如下效果
实现
1. 引入库2
implementation 'jp.wasabeef:richeditor-android:2.0.0'2. XML
<LinearLayout xmlns:android="http://schemas.android.com/apk/res/android"android:layout_width="match_parent"android:layout_height="match_parent"android:orientation="vertical"android:layout_marginBottom="@dimen/dp_60"android:theme="@style/customTheme"><HorizontalScrollViewandroid:layout_width="match_parent"android:layout_height="wrap_content"android:background="@color/app_color_9b"><LinearLayoutandroid:orientation="horizontal"android:layout_width="wrap_content"android:layout_height="wrap_content"><ImageButtonandroid:id="@+id/action_undo"android:layout_width="48dp"android:layout_height="48dp"android:background="@null"android:contentDescription="@null"android:src="@mipmap/undo" /><ImageButtonandroid:id="@+id/action_redo"android:layout_width="48dp"android:layout_height="48dp"android:background="@null"android:contentDescription="@null"android:src="@mipmap/redo" /><ImageButtonandroid:id="@+id/action_bold"android:layout_width="48dp"android:layout_height="48dp"android:background="@null"android:contentDescription="@null"android:src="@mipmap/bold" /><ImageButtonandroid:id="@+id/action_heading1"android:layout_width="48dp"android:layout_height="48dp"android:background="@null"android:contentDescription="@null"android:src="@mipmap/h1" /><ImageButtonandroid:id="@+id/action_heading2"android:layout_width="48dp"android:layout_height="48dp"android:background="@null"android:contentDescription="@null"android:src="@mipmap/h2" /><ImageButtonandroid:id="@+id/action_heading3"android:layout_width="48dp"android:layout_height="48dp"android:background="@null"android:contentDescription="@null"android:src="@mipmap/h3" /><ImageButtonandroid:id="@+id/action_heading4"android:layout_width="48dp"android:layout_height="48dp"android:background="@null"android:contentDescription="@null"android:src="@mipmap/h4" /><ImageButtonandroid:id="@+id/action_heading5"android:layout_width="48dp"android:layout_height="48dp"android:background="@null"android:contentDescription="@null"android:src="@mipmap/h5" /><ImageButtonandroid:id="@+id/action_heading6"android:layout_width="48dp"android:layout_height="48dp"android:background="@null"android:contentDescription="@null"android:src="@mipmap/h6" /><ImageButtonandroid:id="@+id/action_insert_image"android:layout_width="48dp"android:layout_height="48dp"android:background="@null"android:contentDescription="@null"android:src="@mipmap/insert_image" /></LinearLayout></HorizontalScrollView><androidx.core.widget.NestedScrollViewandroid:layout_width="match_parent"android:layout_height="wrap_content"><jp.wasabeef.richeditor.RichEditorandroid:id="@+id/editor"android:layout_width="match_parent"android:layout_height="wrap_content" /></androidx.core.widget.NestedScrollView><TextViewandroid:layout_width="match_parent"android:layout_height="wrap_content"android:layout_marginTop="20dp"android:text="详情预览"android:visibility="gone"android:textSize="12sp" /><TextViewandroid:id="@+id/preview"android:layout_width="match_parent"android:layout_height="wrap_content"android:layout_marginTop="15dp"android:visibility="gone"/></LinearLayout>3. fragement片段初始化
private void initEditor(){mPreview = (TextView) mActivity.findViewById(R.id.preview);mEditor = (RichEditor) mActivity.findViewById(R.id.editor);//初始化编辑高度mEditor.setEditorHeight(200);//初始化字体大小mEditor.setEditorFontSize(16);//初始化字体颜色mEditor.setEditorFontColor(Color.BLACK);//初始化内边距mEditor.setPadding(10, 10, 10, 10);//设置默认显示语句mEditor.setPlaceholder("请输入...");//设置编辑器是否可用mEditor.setInputEnabled(true);//mPreview = (TextView) mActivity.findViewById(R.id.preview);mEditor.setOnTextChangeListener(new RichEditor.OnTextChangeListener() {@Overridepublic void onTextChange(String text) {mPreview.setText(text);}});mActivity.findViewById(R.id.action_undo).setOnClickListener(new View.OnClickListener() {@Overridepublic void onClick(View v) {mEditor.undo();}});mActivity.findViewById(R.id.action_redo).setOnClickListener(new View.OnClickListener() {@Overridepublic void onClick(View v) {mEditor.redo();}});mActivity.findViewById(R.id.action_heading1).setOnClickListener(new View.OnClickListener() {@Overridepublic void onClick(View v) {mEditor.setHeading(1);}});mActivity.findViewById(R.id.action_heading2).setOnClickListener(new View.OnClickListener() {@Overridepublic void onClick(View v) {mEditor.setHeading(2);}});mActivity.findViewById(R.id.action_heading3).setOnClickListener(new View.OnClickListener() {@Overridepublic void onClick(View v) {mEditor.setHeading(3);}});mActivity.findViewById(R.id.action_heading4).setOnClickListener(new View.OnClickListener() {@Overridepublic void onClick(View v) {mEditor.setHeading(4);}});mActivity.findViewById(R.id.action_heading5).setOnClickListener(new View.OnClickListener() {@Overridepublic void onClick(View v) {mEditor.setHeading(5);}});mActivity.findViewById(R.id.action_heading6).setOnClickListener(new View.OnClickListener() {@Overridepublic void onClick(View v) {mEditor.setHeading(6);}});
