一、介绍
MyBatis-Plus(简称 MP,是由baomidou(苞米豆)组织开源的)是一个基于 MyBatis 的增强工具,它对 Mybatis 的基础功能进行了增强,但未做任何改变,Mybatis-Plus 其实可以看作是对 Mybatis 的再一次封装。
1.特性
无侵入:只做增强不做改变,引入它不会对现有工程产生影响。
损耗小:启动即会自动注入基本 CURD,性能基本无损耗,直接面向对象操作。
强大的 CRUD 操作:内置通用 Mapper、通用 Service,仅仅通过少量配置即可实现单表大部分 CRUD 操作,更有强大的条件构造器,满足各类使用需求。
支持 Lambda 形式调用:通过 Lambda 表达式,方便的编写各类查询条件,无需再担心字段写错。
支持多种数据库:支持 MySQL、MariaDB、Oracle、DB2、H2、HSQL、SQLite、Postgre、SQLServer2005、SQLServer 等多种数据库。
支持主键自动生成:支持多达 4 种主键策略(内含分布式唯一 ID 生成器 - Sequence),可自由配置,完美解决主键问题。
支持 XML 热加载:Mapper 对应的 XML 支持热加载,对于简单的 CRUD 操作,甚至可以无 XML 启动。
支持 ActiveRecord 模式:支持 ActiveRecord 形式调用,实体类只需继承 Model 类即可进行强大的 CRUD 操作。
支持自定义全局通用操作:支持全局通用方法注入( Write once, use anywhere )。
支持关键词自动转义:支持数据库关键词(order、key......)自动转义,还可自定义关键词。
内置代码生成器:采用代码或者Maven 插件可快速生成 Mapper 、Model 、Service 、Controller 层代码,支持模板引擎,更有超多自定义配置等您来使用。
内置分页插件:基于 MyBatis 物理分页,开发者无需关心具体操作,配置好插件之后,写分页等同于普通 List 查询。
内置性能分析插件:可输出 Sql 语句以及其执行时间,建议开发测试时启用该功能,能快速揪出慢查询。
内置全局拦截插件:提供全表 delete 、 update 操作智能分析阻断,也可自定义拦截规则,预防误操作。
内置 Sql 注入剥离器:支持 Sql 注入剥离,有效预防 Sql 注入攻击。
二、快速入门
1. 引入依赖
<dependencies><!-- mybatis-plus框架 --><dependency><groupId>com.baomidou</groupId><artifactId>mybatis-plus-boot-starter</artifactId><version>3.5.2</version></dependency><!--mysql数据库库--><dependency><groupId>mysql</groupId><artifactId>mysql-connector-java</artifactId><version>8.0.26</version></dependency>
</dependencies>
2. 配置数据源
# 数据源配置
spring:datasource:driver-class-name: com.mysql.cj.jdbc.Driverurl: jdbc:mysql://127.0.0.1:3306/mp?useUnicode=true&characterEncoding=UTF-8&serverTimezone=Asia/Shanghaiusername: rootpassword: root
# 日志级别配置
logging:level:com.xxx.mapper: trace
3. 创建实体类
4. 创建映射接口
-
接口继承BaseMapper接口
-
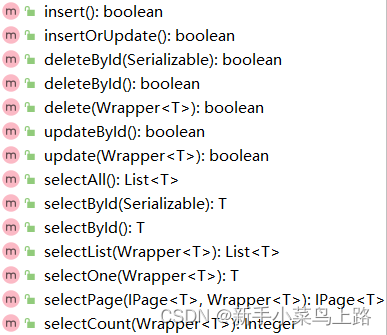
BaseMapper中提供了很多的方法,继承后可以直接使用。
5. 启动类扫描映射接口
在启动器类上添加@MapperScan("com.xxx.mapper")
三、通用CRUD
1. MybatisPlus日志配置
mybatis-plus:configuration:#mybatis-plus日志控制台输出log-impl: org.apache.ibatis.logging.stdout.StdOutImplglobal-config:#关闭bannerbanner: false2. 插入操作
int insert(T entity)。需要设置ID生成策略
2.1 @TableId
| 名称 | @TableId |
|---|---|
| 类型 | 属性注解 |
| 位置 | 模型类中用于表示主键的属性定义上方 |
| 作用 | 设置当前类中主键属性的生成策略 |
| 相关属性 | value(默认):设置数据库表主键名称,字段名和属性名相同可以省略 type:设置主键属性的生成策略,值查照IdType的枚举值 |
type可以设置的值:
AUTO:数据库ID自增。
NONE: 跟随全局的设置。
INPUT:手动输入或使用插件生成id。
ASSIGN_ID:可以在分布式的情况下使用,生成的是Long类型的数字,可以排序性能也高,但是生成的策略和服务器时间有关,如果修改了系统时间就有可能导致出现重复主键。
ASSIGN_UUID:可以在分布式的情况下使用,而且能够保证唯一,但是生成的主键是32位的字符串,长度过长占用空间而且还不能排序,查询性能也慢。
雪花算法(SnowFlake),是Twitter官方给出的算法实现 是用Scala写的。其生成的结果是一个64bit大小整数,它的结构如下图:
2.2 映射匹配设置
2.4.1 @TableField
| 名称 | @TableField |
|---|---|
| 类型 | 属性注解 |
| 位置 | 模型类属性定义上方 |
| 作用 | 设置当前属性对应的数据库表中的字段关系 |
| 相关属性 | value(默认):设置数据库表字段名称 exist:设置属性在数据库表字段中是否存在,默认为true,此属性不能与value合并使用 select:设置属性是否参与查询,此属性与select()映射配置不冲突 |
2.4.2 @TableName
| 名称 | @TableName |
|---|---|
| 类型 | 类注解 |
| 位置 | 模型类定义上方 |
| 作用 | 设置当前类对应于数据库表关系 |
| 相关属性 | value(默认):设置数据库表名称 |
3. 更新操作
/*** 1.根据 ID 更新记录**int updateById(T entity)*/
@Test
void contextLoads() {User user = new User();user.setId(6L);user.setName("Arvin");int i = userMapper.updateById(user);
}/*** 2.根据 whereEntity 条件,更新记录*int update(T entity,Wrapper<T> updateWrapper)* */
@Test
void contextLoads() {User user = new User();//设置更新的字段user.setEmail("Arvin@123.com");QueryWrapper<User> queryWrapper = new QueryWrapper<>();//设置更新的条件queryWrapper.eq("uid", 6L);int i = userMapper.update(user, queryWrapper);
}
4. 删除操作
/*** 1.根据 ID 删除* int deleteById(Serializable id);*/@Testvoid contextLoads() {int i = userMapper.deleteById(1);}/*** 2.根据指定字段删除* 根据 columnMap 条件,删除记录* int deleteByMap(Map<String, Object> columnMap);*/@Testvoid contextLoads() {Map<String, Object> columnMap = new HashMap<>();columnMap.put("uname", "Jack");columnMap.put("age", 20);//将columnMap中的键值对设置为删除的条件,多个之间为and关系int i = this.userMapper.deleteByMap(columnMap);}/*** 3.根据Wrapper删除* int delete(Wrapper<T> queryWrapper);*/@Testvoid contextLoads() {QueryWrapper<User> queryWrapper = new QueryWrapper<>();queryWrapper.eq("uname", "Tom");queryWrapper.eq("age", "28");int i = userMapper.delete(queryWrapper);}/*** 4.根据id批量删除* int deleteBatchIds( Collection<?> idList);*/@Testvoid contextLoads() {int i = userMapper.deleteBatchIds(Arrays.asList(4L, 5L));}5. 查询操作
/*** 1.根据 ID 查询* T selectById(Serializable id);*/@Testvoid contextLoads() {User user = userMapper.selectById(1L);}/*** 2.根据id批量查询* List<T> selectBatchIds(Collection<? extends Serializable> idList);*/@Testvoid contextLoads() {List<User> list = userMapper.selectBatchIds(Arrays.asList(1L, 2L));}/*** 3.查询一条数据* 限制取一条记录, 注意:多条数据会报异常* T selectOne(Wrapper<T> queryWrapper)*/@Testvoid contextLoads() {QueryWrapper<User> queryWrapper = new QueryWrapper<>();queryWrapper.eq("uname", "Jack");queryWrapper.eq("age", 20);User user = userMapper.selectOne(queryWrapper);}/*** 4.查询记录数* 根据 Wrapper 条件,查询总记录数* Long selectCount( Wrapper<T> queryWrapper);*/@Testvoid contextLoads() {Long aLong = userMapper.selectCount(null);}/*** 5.查询多条数据* List<T> selectList(Wrapper<T> queryWrapper);*/@Testvoid contextLoads() {//条件为null查询全部数据List<User> list = userMapper.selectList(null);}/*** 6.分页查询** @param page 分页查询条件(可以为 RowBounds.DEFAULT)* IPage<T> selectPage(P page, Wrapper<T> queryWrapper);* 必须配置mybatis拦截器才能生效。*///注解为配置类@Configuration,也可以在引导类@Import({MybatisPlusConfig.class})@Configurationpublic class MybatisPlusConfig {//被Spring容器管理@Beanpublic MybatisPlusInterceptor mybatisPlusInterceptor() {//1 创建mp拦截器对象MybatisPlusInterceptorMybatisPlusInterceptor mpInterceptor = new MybatisPlusInterceptor();//2 添加内置拦截器,参数为分页内置拦截器对象PaginationInnerInterceptormpInterceptor.addInnerInterceptor(new PaginationInnerInterceptor());return mpInterceptor;}@Testvoid contextLoads() {//1 创建IPage分页对象,设置分页参数,1为当前页码,2为每页显示的记录数IPage<User> page = new Page<>(1, 3);//2 执行分页查询userMapper.selectPage(page, null);//3 获取分页结果,不配置拦截器就只能获取到current和size的数据,pages,total都是0,records是全部数据System.out.println("当前页码值:" + page.getCurrent());System.out.println("每页显示数:" + page.getSize());System.out.println("一共多少页:" + page.getPages());System.out.println("一共多少条数据:" + page.getTotal());System.out.println("数据:" + page.getRecords());}}四、配置文件
1. configLocation
MyBatis 配置文件位置,如果有单独的 MyBatis 配置,将其路径配置到 configLocation 中。
Spring Boot配置文件中:
mybatis-plus:config-location: classpath:mybatis-config.xml2. mapperLocations
MyBatis Mapper 所对应的 XML 文件位置,在 Mapper 中有自定义方法(XML 中有自定义实现), 需要进行该配置,告诉 Mapper 所对应的 XML 文件位置。
mybatis-plus:#Maven 多模块项目的扫描路径需以 classpath*: 开头 (即可以加载jar包下的 XML 文件)mapper-locations: classpath*:mybatis/*.xml3. typeAliasesPackage
MyBaits 别名包扫描路径。
mybatis-plus:type-aliases-package: com.xxx.pojo4. cacheEnabled
开启Mybatis二级缓存,默认为 true。
mybatis-plus:configuration:cache-enabled: false五、DQL高级篇
1. 条件查询
1.1 Wrapper包装器类
- 查询数据的时候,有一个
Wrapper类,这个类就是用来构建查询条件的。- 包装器Wrapper<T>是接口,实际开发中主要使用它的两个实现类:
1.QueryWrapper
2.LambdaQueryWrapper
- 两种方式各有优劣:
1.QueryWrapper存在属性名写错的危险,但是支持聚合、分组查询;
2.LambdaQueryWrapper没有属性名写错的危险,但不支持聚合、分组查询;
1.2 基本查询条件
alleq 全部eq或个别isNull。eq 等于 =ne 不等于 <>gt 大于 >ge 大于等于 >=lt 小于 <le 小于等于 <=between BETWEEN 值1 AND 值2notBetween NOT BETWEEN 值1 AND 值2in 字段 IN (...)notIn 字段 NOT IN (...)like() 前后加百分号,如 %J%likeLeft() 左边加百分号,如 %JlikeRight() 后面加百分号,如 J%1.3 构建条件查询
//方法一(不建议):QueryWrapper@Testvoid contextLoads() {QueryWrapper<User> queryWrapper = new QueryWrapper<>();queryWrapper.eq("uname", "Tom").gt("age", 20);List<User> list = userMapper.selectList(queryWrapper);}//方法二(推荐):LambdaQueryWrapper@Testvoid contextLoads() {LambdaQueryWrapper<User> wrapper = new LambdaQueryWrapper<>();wrapper.eq(User::getName, "Tom").gt(User::getAge, 20);List<User> list = userMapper.selectList(wrapper);}//注意:查询条件默认使用and连接,使用or需要自己指定@Testvoid contextLoads() {LambdaQueryWrapper<User> wrapper = new LambdaQueryWrapper<>();wrapper.eq(User::getName, "Tom").or().gt(User::getAge, 20);List<User> list = userMapper.selectList(wrapper);}2. 查询投影
不查询所有字段,只查询出指定字段的数据。
//方法一(推荐):使用Lambda@Testvoid contextLoads() {LambdaQueryWrapper<User> wrapper = new LambdaQueryWrapper<>();wrapper.eq(User::getName, "Tom").gt(User::getAge, 20);wrapper.select(User::getId, User::getName);List<User> list = userMapper.selectList(wrapper);}//方法二(不建议):不用lambda@Testvoid contextLoads() {QueryWrapper<User> queryWrapper = new QueryWrapper<>();queryWrapper.eq("uname", "Tom").gt("age", 20);queryWrapper.select("uid", "uname");List<User> list = userMapper.selectList(queryWrapper);}3. 逻辑删除
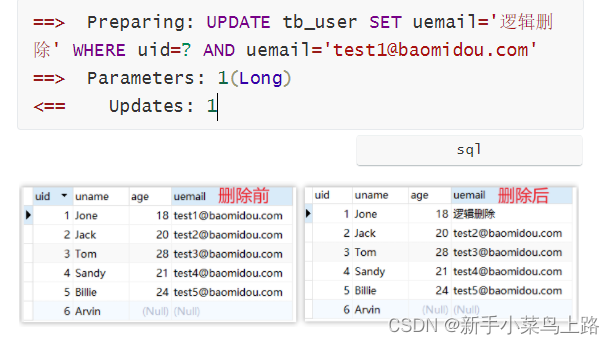
-
逻辑删除的本质其实是修改操作。
3.1 @TableLogic
| 名称 | @TableLogic |
|---|---|
| 类型 | 属性注解 |
| 位置 | 模型类中用于表示删除字段的属性定义上方 |
| 作用 | 标识该字段为进行逻辑删除的字段 |
| 相关属性 | value:逻辑未删除值(删除前的值) delval:逻辑删除值(删除后更新的值) |
@TableName("tb_user")
public class User {@TableId(value = "uid", type = IdType.AUTO)private Long id;@TableField("uname")private String name;private Integer age;@TableField("uemail")@TableLogic(value = "test1@baomidou.com", delval = "逻辑删除")private String email;
}
@Test
void contextLoads() {int i = userMapper.deleteById(1L);
}
4. 悲观锁与乐观锁
4.1 悲观锁
悲观锁在操作数据时比较悲观,每次更新数据的时候认为别的线程也会同时更新数据,所以每次更新数据是都会上锁,这样别的线程就会阻塞等待获取锁。
4.2 乐观锁
乐观锁在更新数据时非常乐观,认为别的线程不会同时更新数据,所以不会上锁,但是在更新之前会判断在此期间别的线程是否有更新过该数据。
4.2.1 乐观锁实现思路
数据库表中添加version列,比如默认值给1。
第一个线程要修改数据之前,取出记录时,获取当前数据库中的version=1。
第二个线程要修改数据之前,取出记录时,获取当前数据库中的version=1。
第一个线程执行更新时,set version = newVersion where version = oldVersion
newVersion = version+1 [2]
oldVersion = version [1]
第二个线程执行更新时,set version = newVersion where version = oldVersion
newVersion = version+1 [2]
oldVersion = version [1]
4.2.2 乐观锁实现
1.添加version属性,添加@Version注解
@TableName("tb_user")
public class User {@TableId(value = "uid", type = IdType.AUTO)private Long id;@TableField("uname")private String name;private Integer age;@TableField("uemail")private String email;@Versionprivate Integer version;
}
2.配置mybatis拦截器
@Configuration
public class MpConfig {@Beanpublic MybatisPlusInterceptor mpInterceptor() {//1.定义Mp拦截器MybatisPlusInterceptor mpInterceptor = new MybatisPlusInterceptor();//2.添加乐观锁拦截器mpInterceptor.addInnerInterceptor(new OptimisticLockerInnerInterceptor());return mpInterceptor;}
}
3.表中添加version字段

4.先查询version再更新操作
@Test
void contextLoads() {User user = userMapper.selectById(2L);user.setAge(30);int i = userMapper.updateById(user);
}

六、Service的CRUD
1. 快速入门
-
IService<User> -
ServiceImpl<UserMapper, User>
public interface UserService extends IService<User> {
}@Service
public class UserServiceImpl extends ServiceImpl<UserMapper, User> implements UserService {
}
2. 查询
2.1 Get
// 根据 ID 查询
T getById(Serializable id);
// 根据 Wrapper,查询一条记录。结果集,如果是多个会抛出异常,随机取一条加上限制条件 wrapper.last("LIMIT 1")
T getOne(Wrapper<T> queryWrapper);
// 根据 Wrapper,查询一条记录,有多个 result 是否抛出异常
T getOne(Wrapper<T> queryWrapper, boolean throwEx);
// 根据 Wrapper,查询一条记录
Map<String, Object> getMap(Wrapper<T> queryWrapper);
// 根据 Wrapper,查询一条记录,转换函数
<V> V getObj(Wrapper<T> queryWrapper, Function<? super Object, V> mapper);
2.2 List
// 查询所有
List<T> list();
// 查询列表
List<T> list(Wrapper<T> queryWrapper);
// 查询(根据ID 批量查询)
Collection<T> listByIds(Collection<? extends Serializable> idList);
// 查询(根据 columnMap 条件)
Collection<T> listByMap(Map<String, Object> columnMap);
// 查询所有列表
List<Map<String, Object>> listMaps();
// 查询列表
List<Map<String, Object>> listMaps(Wrapper<T> queryWrapper);
// 查询全部记录
List<Object> listObjs();
// 查询全部记录
<V> List<V> listObjs(Function<? super Object, V> mapper);
// 根据 Wrapper 条件,查询全部记录
List<Object> listObjs(Wrapper<T> queryWrapper);
// 根据 Wrapper 条件,查询全部记录
<V> List<V> listObjs(Wrapper<T> queryWrapper, Function<? super Object, V> mapper);
2.3 Page
// 无条件分页查询
IPage<T> page(IPage<T> page);
// 条件分页查询
IPage<T> page(IPage<T> page, Wrapper<T> queryWrapper);
// 无条件分页查询
IPage<Map<String, Object>> pageMaps(IPage<T> page);
// 条件分页查询
IPage<Map<String, Object>> pageMaps(IPage<T> page, Wrapper<T> queryWrapper);
2.4 Count
// 查询总记录数
int count();
// 根据 Wrapper 条件,查询总记录数
int count(Wrapper<T> queryWrapper);
3. 添加
3.1 Save
// 插入一条记录(选择字段,策略插入)
boolean save(T entity);
// 插入(批量)
boolean saveBatch(Collection<T> entityList);
// 插入(批量)
boolean saveBatch(Collection<T> entityList, int batchSize);
3.2 SaveOrUpdate
// TableId 注解存在更新记录,否插入一条记录
boolean saveOrUpdate(T entity);
// 根据updateWrapper尝试更新,否继续执行saveOrUpdate(T)方法
boolean saveOrUpdate(T entity, Wrapper<T> updateWrapper);
// 批量修改插入
boolean saveOrUpdateBatch(Collection<T> entityList);
// 批量修改插入,插入批次数量
boolean saveOrUpdateBatch(Collection<T> entityList, int batchSize);
4. 删除
// 根据 entity 条件,删除记录
boolean remove(Wrapper<T> queryWrapper);
// 根据 ID 删除
boolean removeById(Serializable id);
// 根据 columnMap 条件,删除记录
boolean removeByMap(Map<String, Object> columnMap);
// 删除(根据ID 批量删除)
boolean removeByIds(Collection<? extends Serializable> idList);
5. 更新
// 根据 UpdateWrapper 条件,更新记录 需要设置sqlset
boolean update(Wrapper<T> updateWrapper);
// 根据 whereWrapper 条件,更新记录
boolean update(T updateEntity, Wrapper<T> whereWrapper);
// 根据 ID 选择修改
boolean updateById(T entity);
// 根据ID 批量更新
boolean updateBatchById(Collection<T> entityList);
// 根据ID 批量更新
boolean updateBatchById(Collection<T> entityList, int batchSize);七、ActiveRecord简介
1. 介绍
- ActiveRecord属于ORM(对象关系映射)层,由Rails最早提出,遵循标准的ORM模型:表映射到记录,记录映射到对象,字段映射到对象属性。配合遵循的命名和配置惯例,能够很大程度的快速实现模型的操作,而且简洁易懂。
- ActiveRecord的主要思想是: 每一个数据库表对应创建一个类,类的每一个对象实例对应于数据库中表的一行记录;通常 表的每个字段在类中都有相应的Field; ActiveRecord同时负责把自己持久化,在ActiveRecord中封装了对数据库的访问,即 CURD。
- ActiveRecord是一种领域模型(Domain Model),封装了部分业务逻辑。
2. CRUD
class User extends Model<User>{
// fields...
}
