SpringSecurity初始化的本质
一、对SpringSecurity初始化的几个疑问
通过前面第一次请求访问的分析我们明白了一个请求就来后的具体处理流程
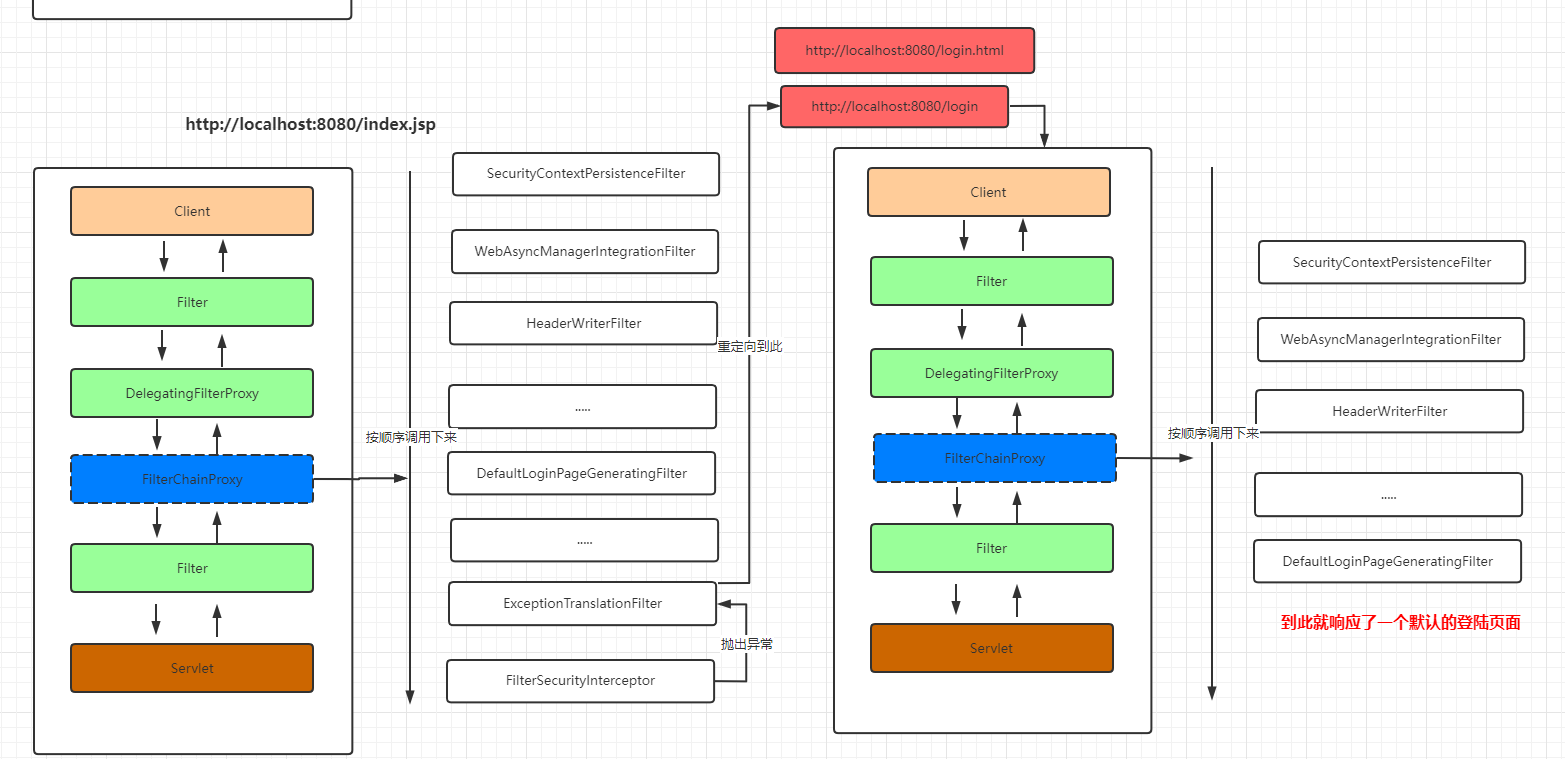
对于一个请求到来后会通过FilterChainProxy来匹配一个对应的过滤器链来处理该请求。那么这里我们就有几个疑惑。
- FilterChainProxy什么时候创建的?
- 过滤器链和对应的过滤器什么时候创建的?
- 怎么把自定义的过滤器添加到过滤器链中?
- 请求和过滤器的匹配规则是什么?
二、解析配置文件的过程
1.解析前的处理
接下来我们来分析下Spring初始化的时候是如果解析SpringSecurity的配置文件的,并且存储在哪了?同时来解释我们上面的几个疑问。
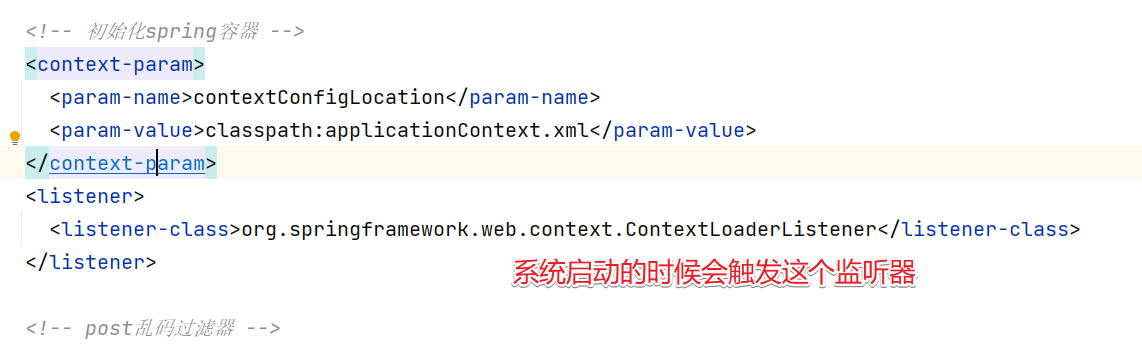
首先系统启动的时候会触发在 web.xml中配置的ContextLoaderListener监听器
然后会执行对应的initWebApplicationContext方法
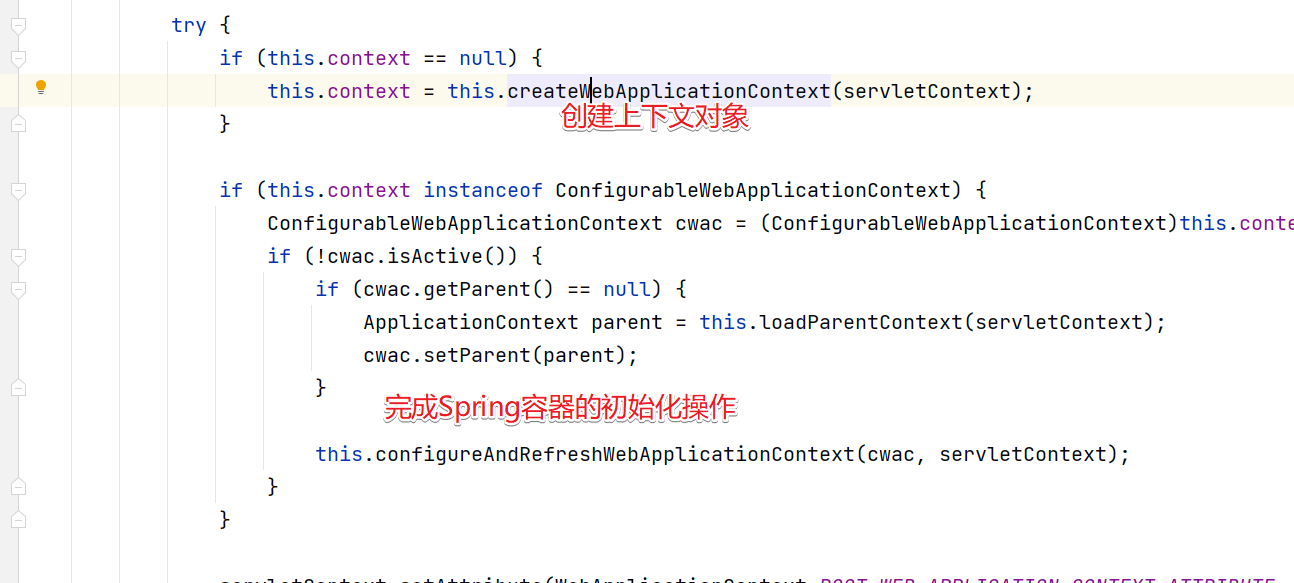
然后进入configureAndRefreshWebApplicationContext方法中。
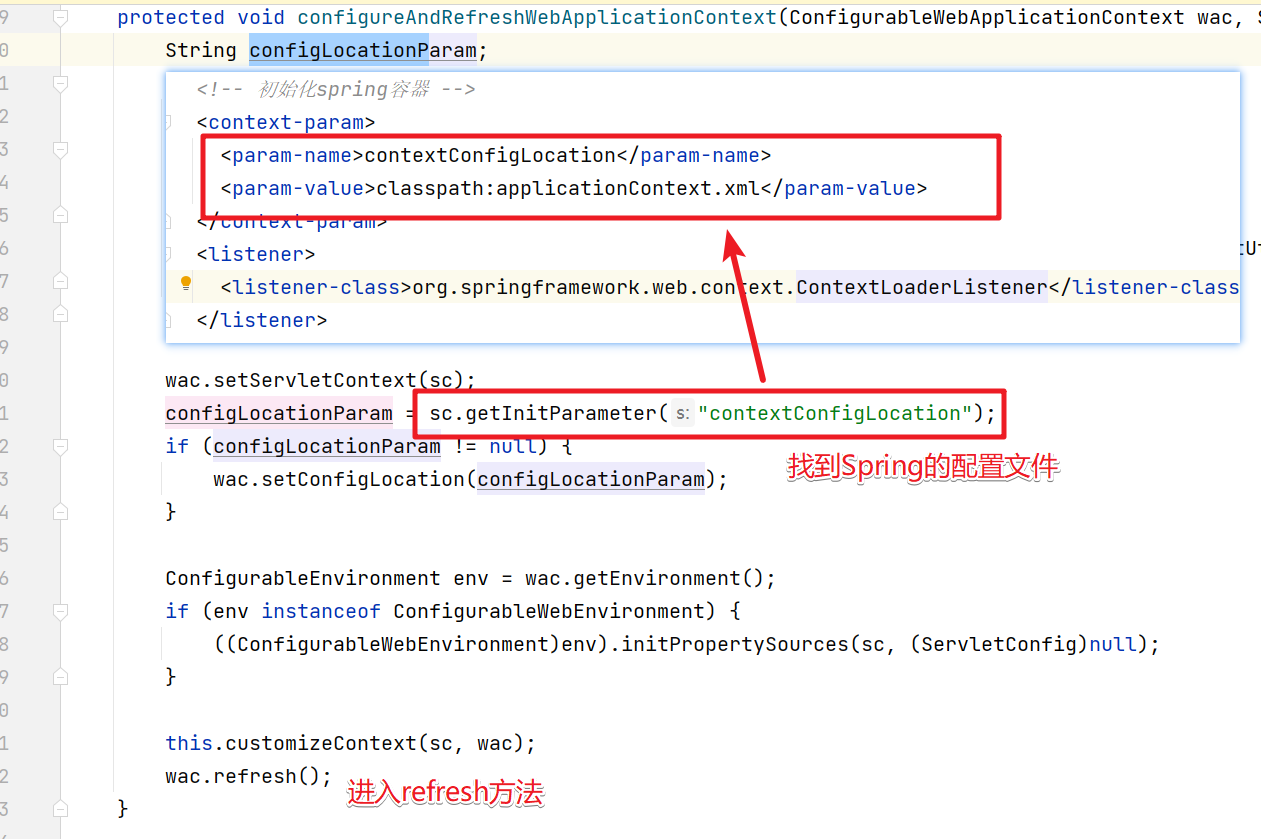
然后进入refresh()方法
@Overridepublic void refresh() throws BeansException, IllegalStateException {synchronized (this.startupShutdownMonitor) {// Prepare this context for refreshing./*** 前戏,做容器刷新前的准备工作* 1、设置容器的启动时间* 2、设置活跃状态为true* 3、设置关闭状态为false* 4、获取Environment对象,并加载当前系统的属性值到Environment对象中* 5、准备监听器和事件的集合对象,默认为空的集合*/prepareRefresh();// Tell the subclass to refresh the internal bean factory.// 创建容器对象:DefaultListableBeanFactory// 加载xml配置文件的属性值到当前工厂中,最重要的就是BeanDefinitionConfigurableListableBeanFactory beanFactory = obtainFreshBeanFactory();// Prepare the bean factory for use in this context.// beanFactory的准备工作,对各种属性进行填充prepareBeanFactory(beanFactory);try {// Allows post-processing of the bean factory in context subclasses.// 子类覆盖方法做额外的处理,此处我们自己一般不做任何扩展工作,但是可以查看web中的代码,是有具体实现的postProcessBeanFactory(beanFactory);// Invoke factory processors registered as beans in the context.// 调用各种beanFactory处理器invokeBeanFactoryPostProcessors(beanFactory);// Register bean processors that intercept bean creation.// 注册bean处理器,这里只是注册功能,真正调用的是getBean方法registerBeanPostProcessors(beanFactory);// Initialize message source for this context.// 为上下文初始化message源,即不同语言的消息体,国际化处理,在springmvc的时候通过国际化的代码重点讲initMessageSource();// Initialize event multicaster for this context.// 初始化事件监听多路广播器initApplicationEventMulticaster();// Initialize other special beans in specific context subclasses.// 留给子类来初始化其他的beanonRefresh();// Check for listener beans and register them.// 在所有注册的bean中查找listener bean,注册到消息广播器中registerListeners();// Instantiate all remaining (non-lazy-init) singletons.// 初始化剩下的单实例(非懒加载的)finishBeanFactoryInitialization(beanFactory);// Last step: publish corresponding event.// 完成刷新过程,通知生命周期处理器lifecycleProcessor刷新过程,同时发出ContextRefreshEvent通知别人finishRefresh();}catch (BeansException ex) {if (logger.isWarnEnabled()) {logger.warn("Exception encountered during context initialization - " +"cancelling refresh attempt: " + ex);}// Destroy already created singletons to avoid dangling resources.// 为防止bean资源占用,在异常处理中,销毁已经在前面过程中生成的单件beandestroyBeans();// Reset 'active' flag.// 重置active标志cancelRefresh(ex);// Propagate exception to caller.throw ex;}finally {// Reset common introspection caches in Spring's core, since we// might not ever need metadata for singleton beans anymore...resetCommonCaches();}}}
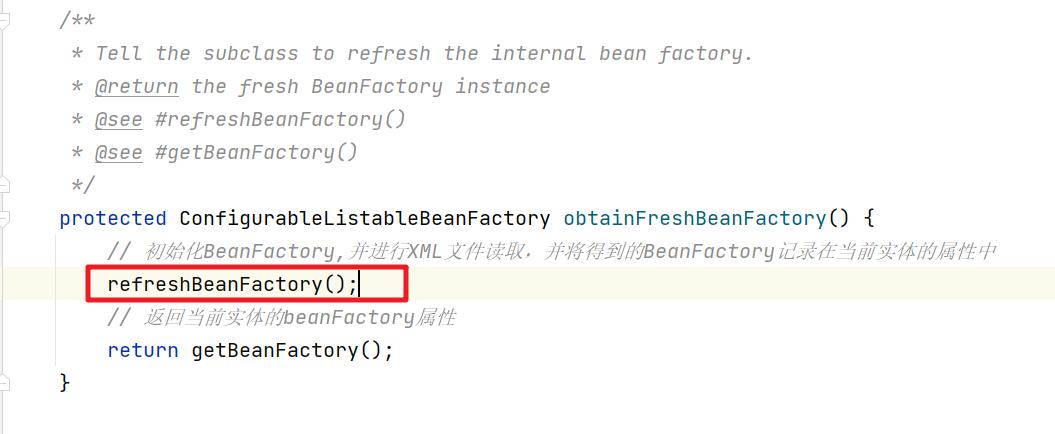
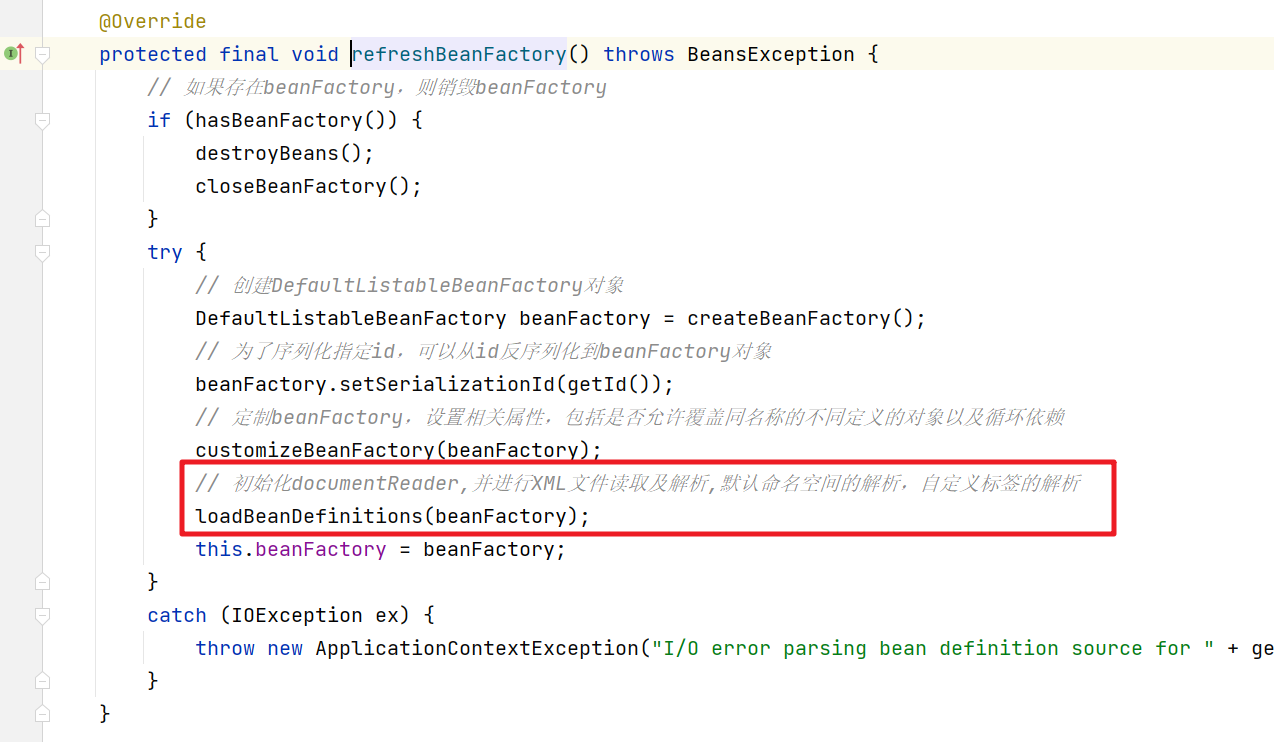
我们要看配置文件的加载解析需要进入obtainFreshBeanFactory()方法中。
再继续进入
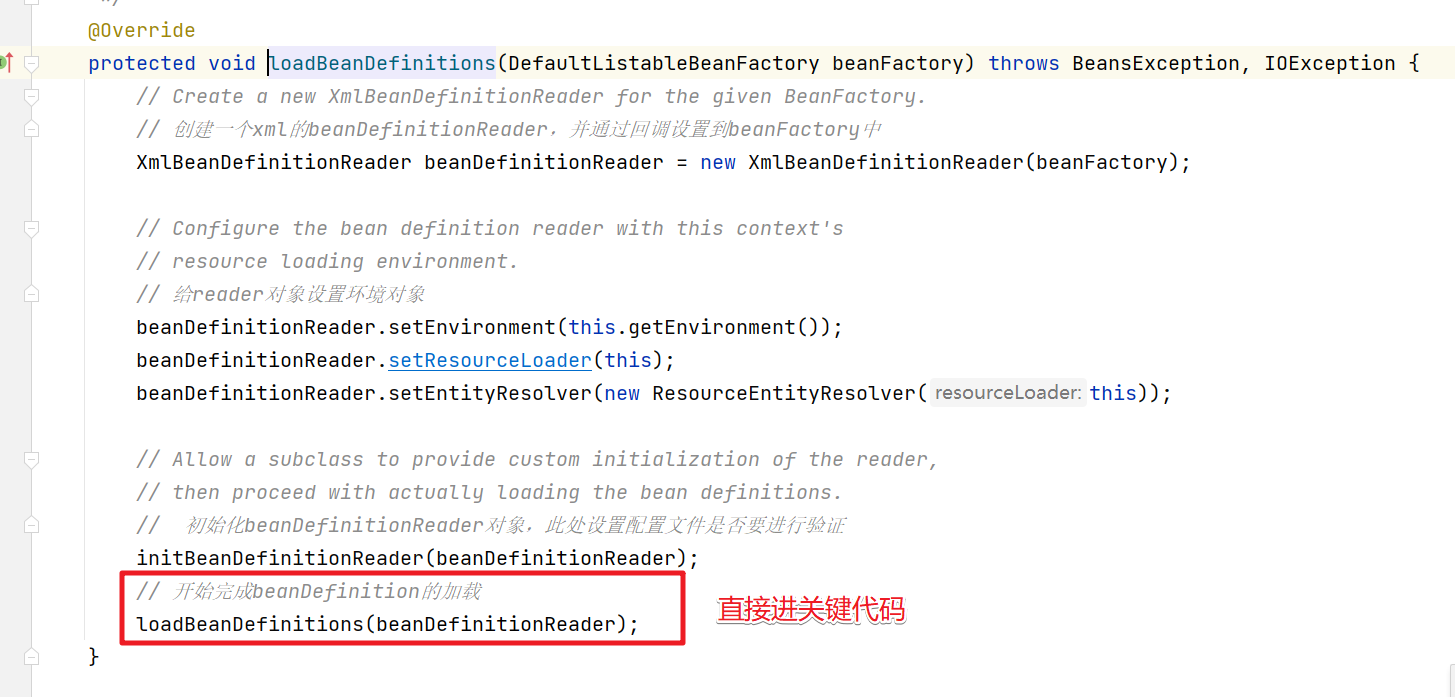
继续

这块会比较绕,直接截图进关键代码
一步
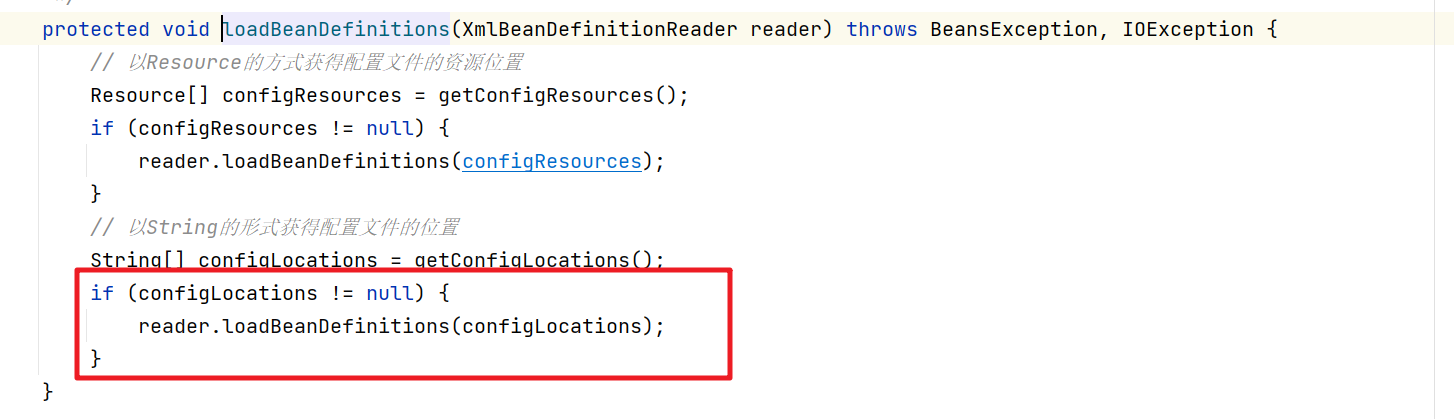
两步
三步

慢慢进入
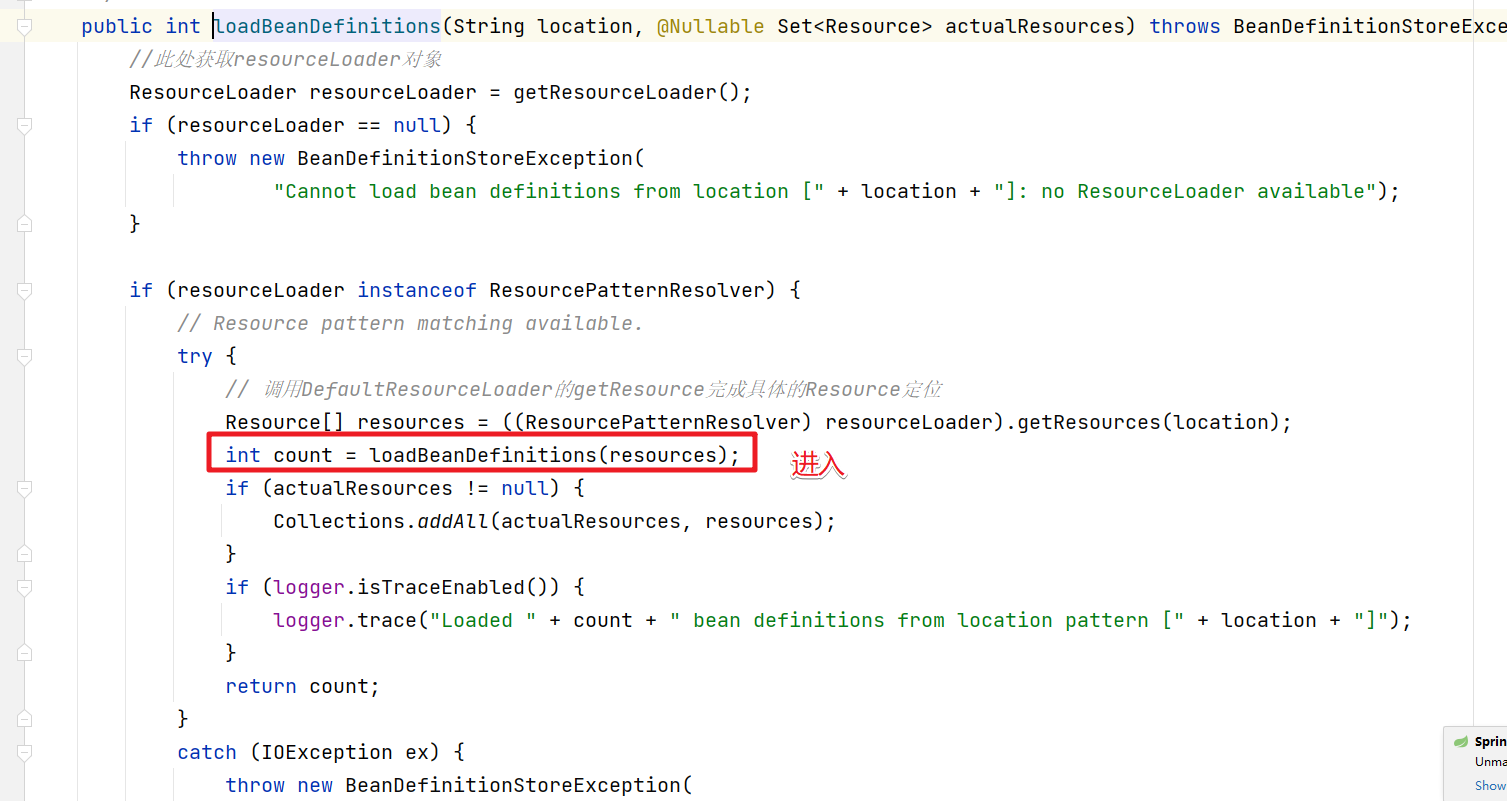
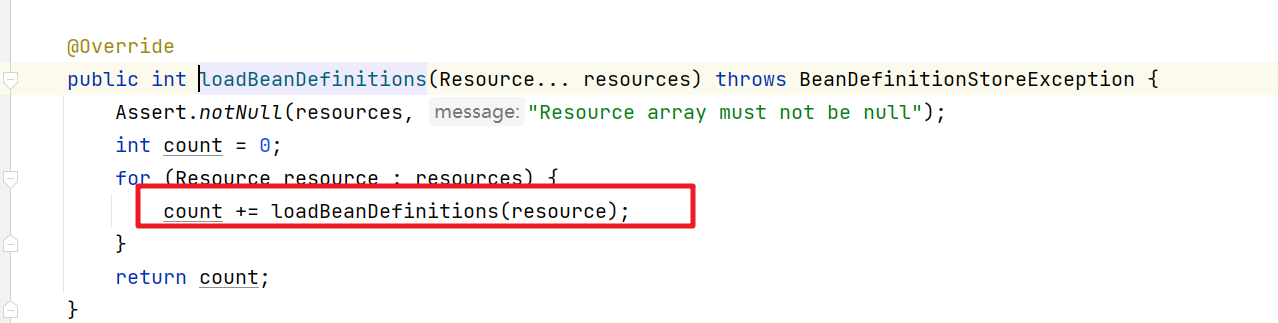
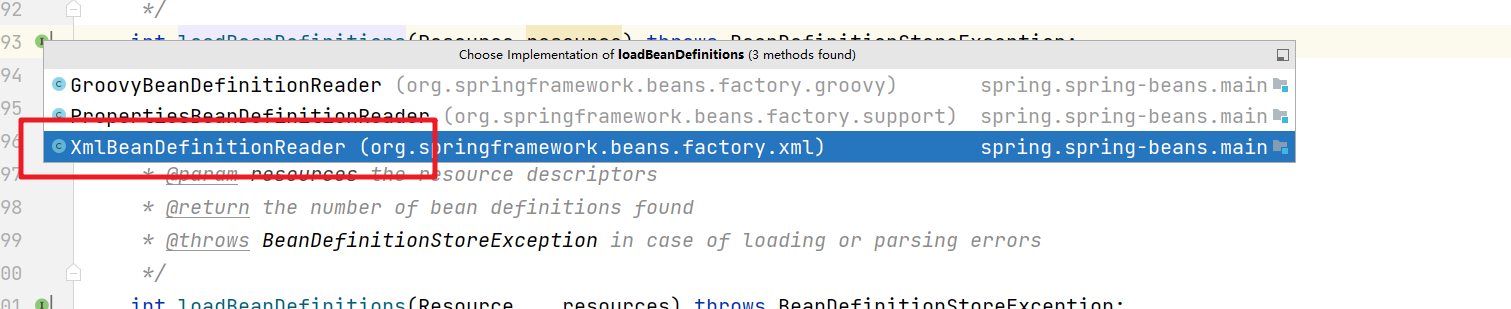

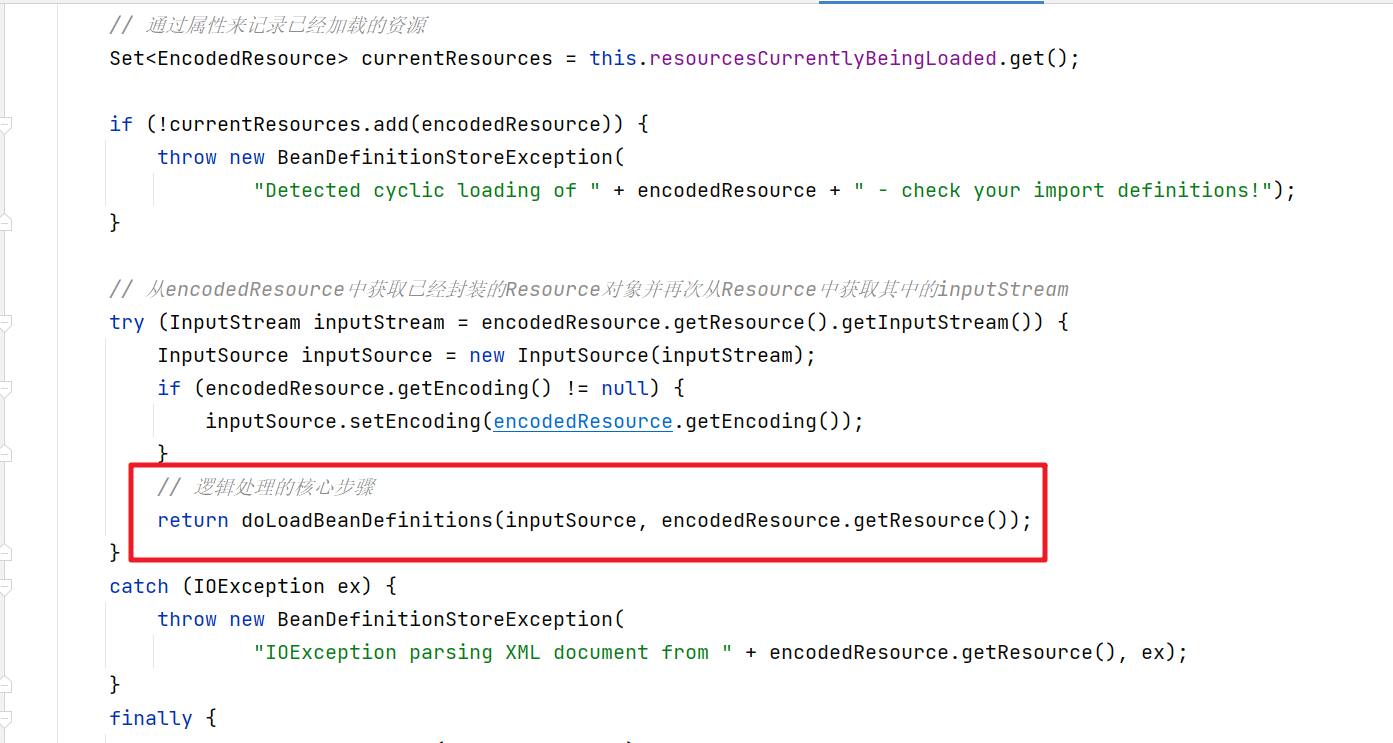
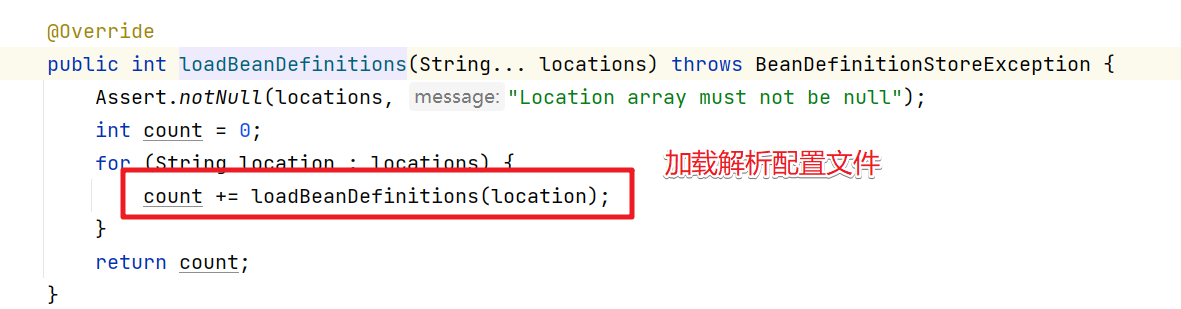
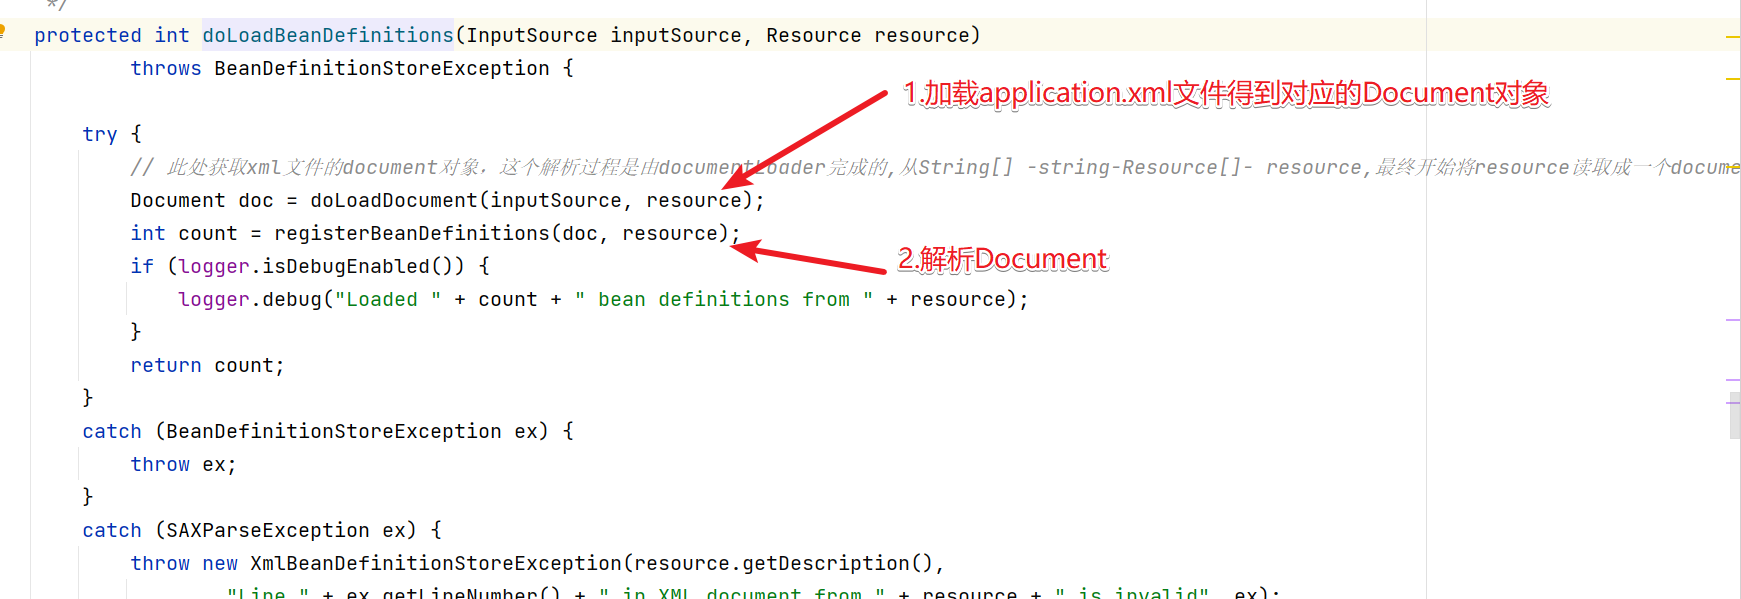
开始具体的配置文件的加载解析
2.解析过程
在上面的步骤基础上我们进入registerBeanDefinitions方法中来看看是如何具体实现配置文件的解析操作

然后进入registerBeanDefinitions方法中

继续
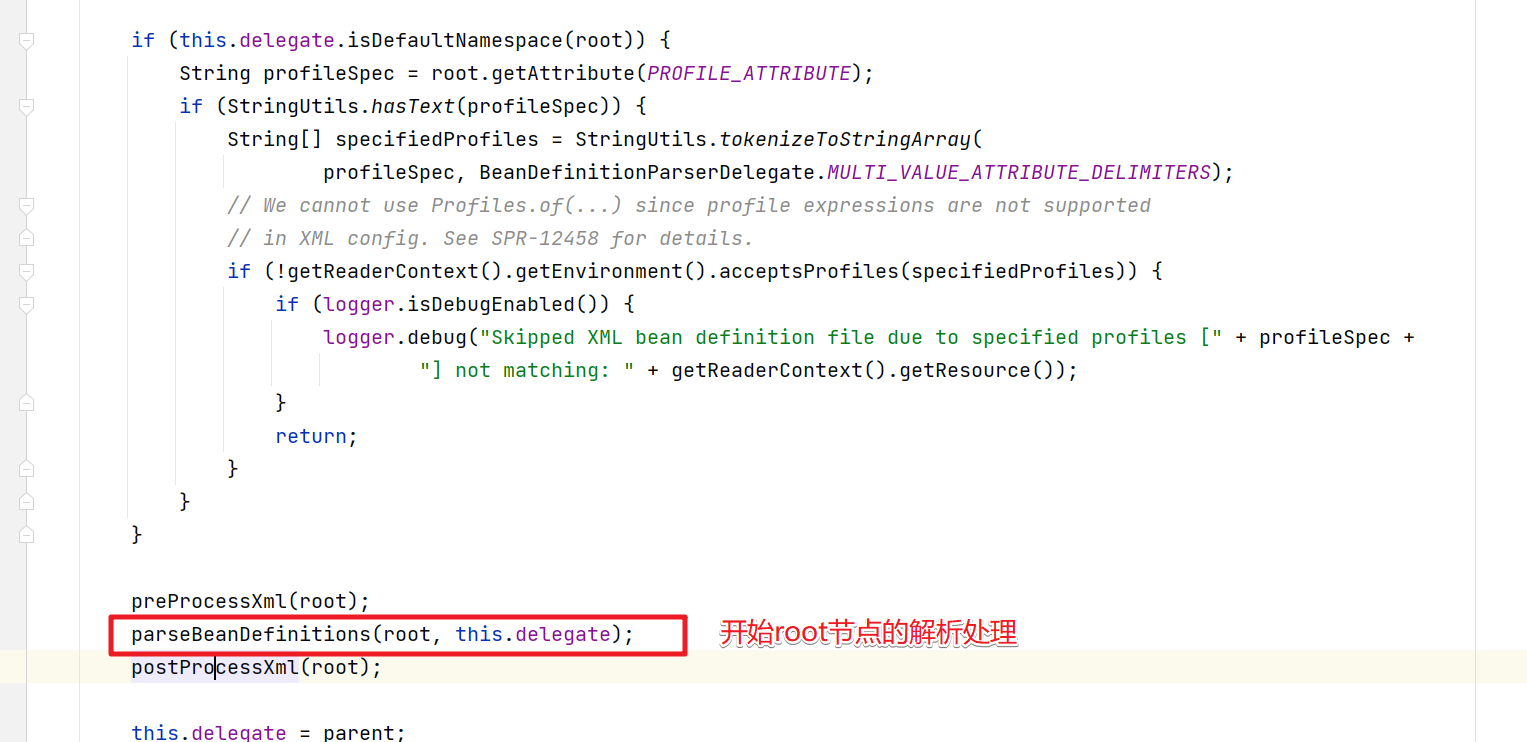
进入parseBeanDefinitions方法中,就会开始对应的节点解析。
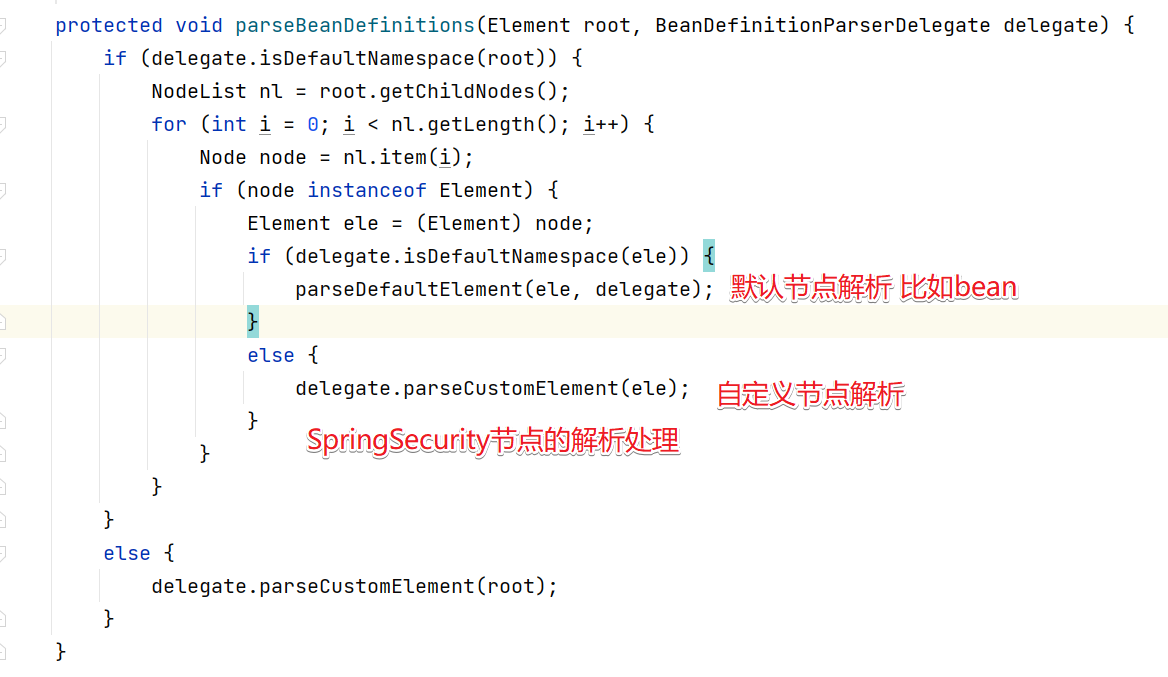
parseDefaultElement方法会完成Spring中提供的默认方法解析,具体如下:

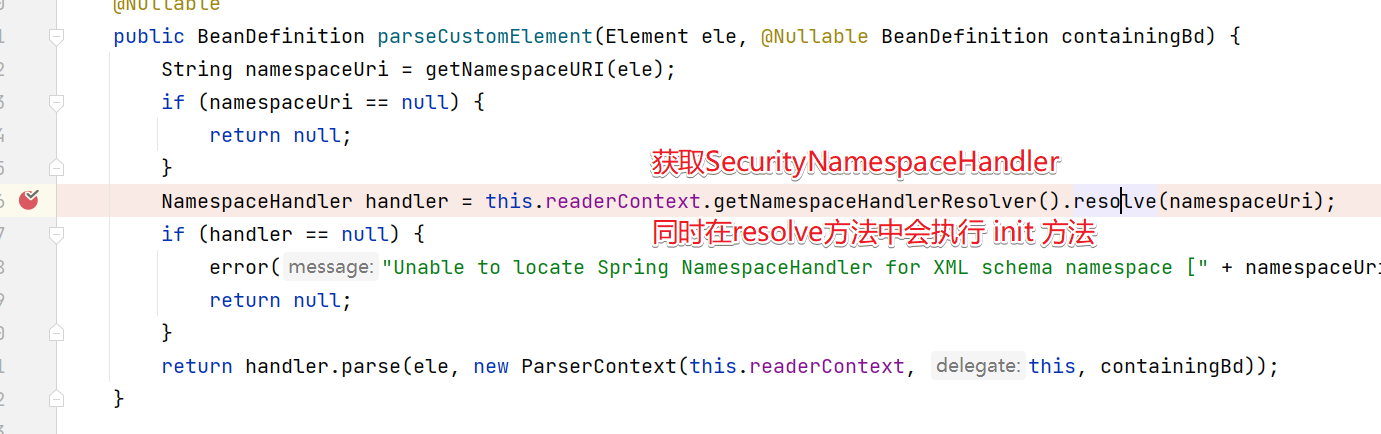
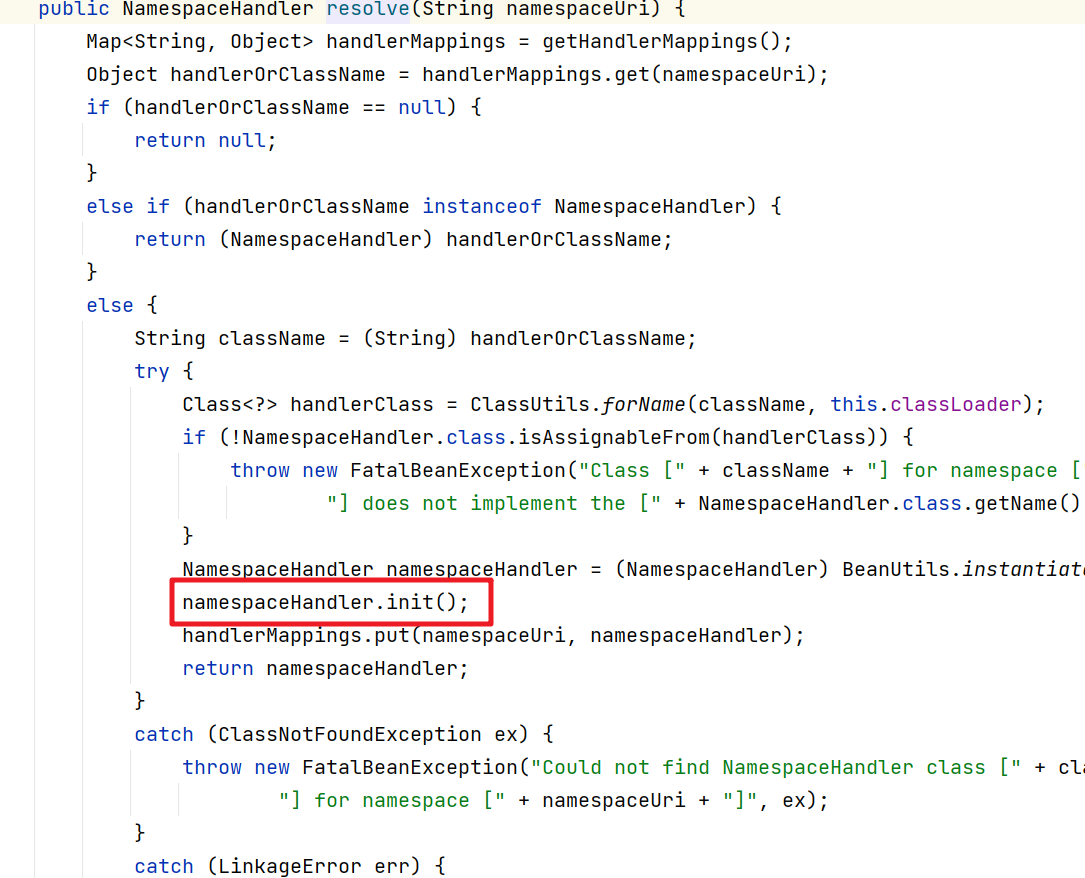
而SpringSecurity的解析是先进入import中,然后进入到parseCustomElement()方法来解析。

继续进入
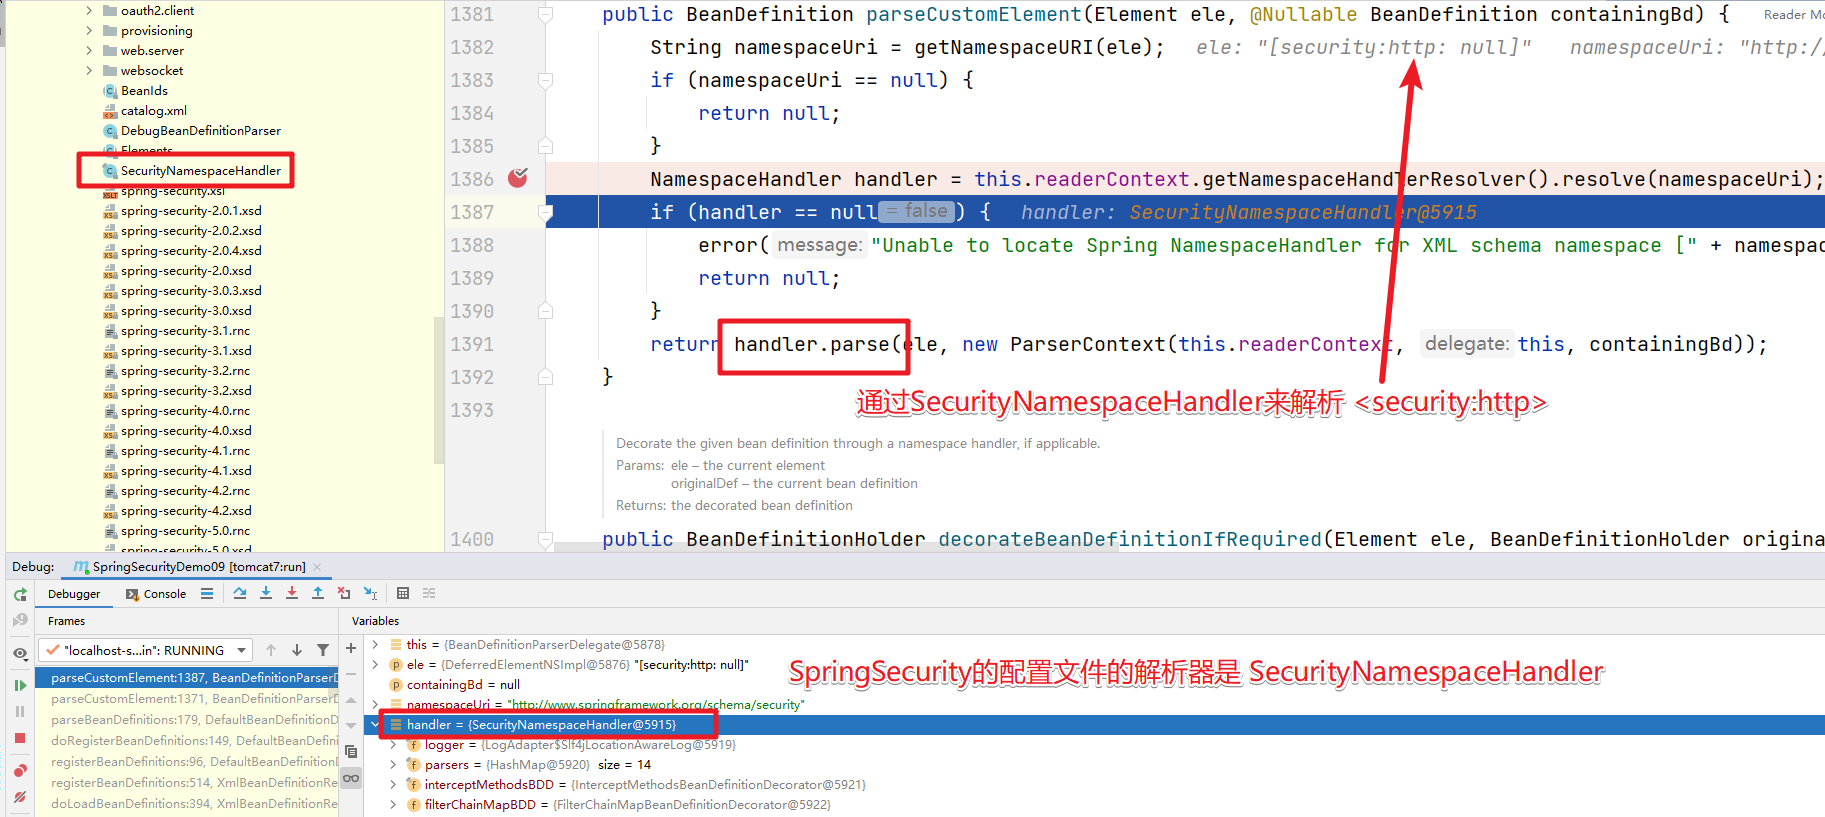
3.解析器
我们在SpringSecurity的配置文件中使用了几个标签。
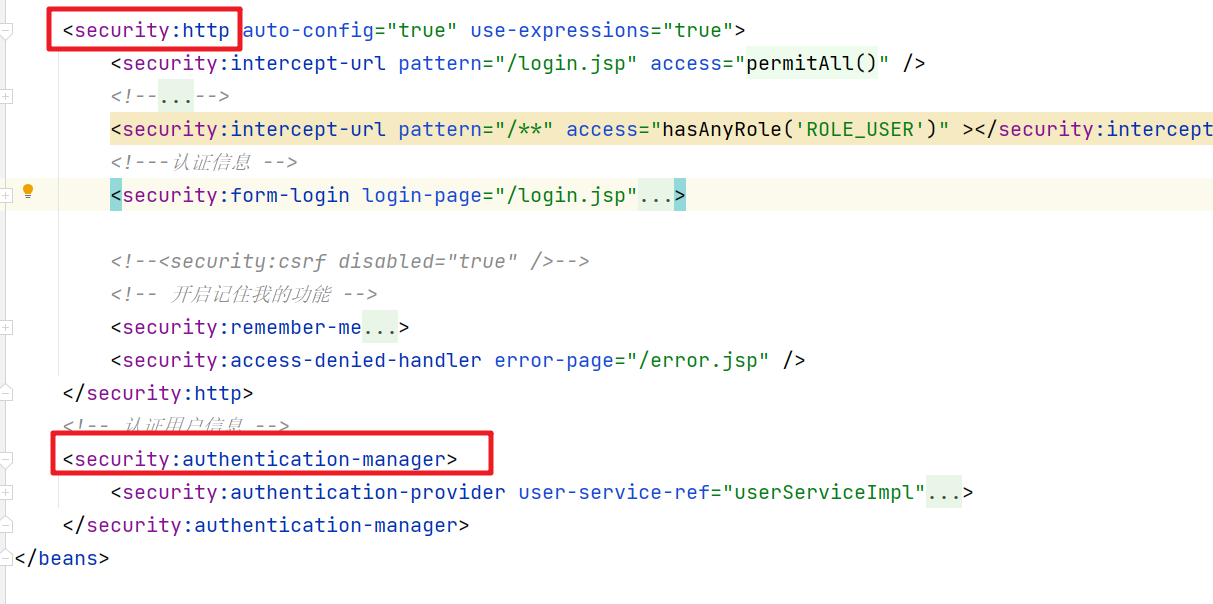
其实每个标签都有对应的解析器。
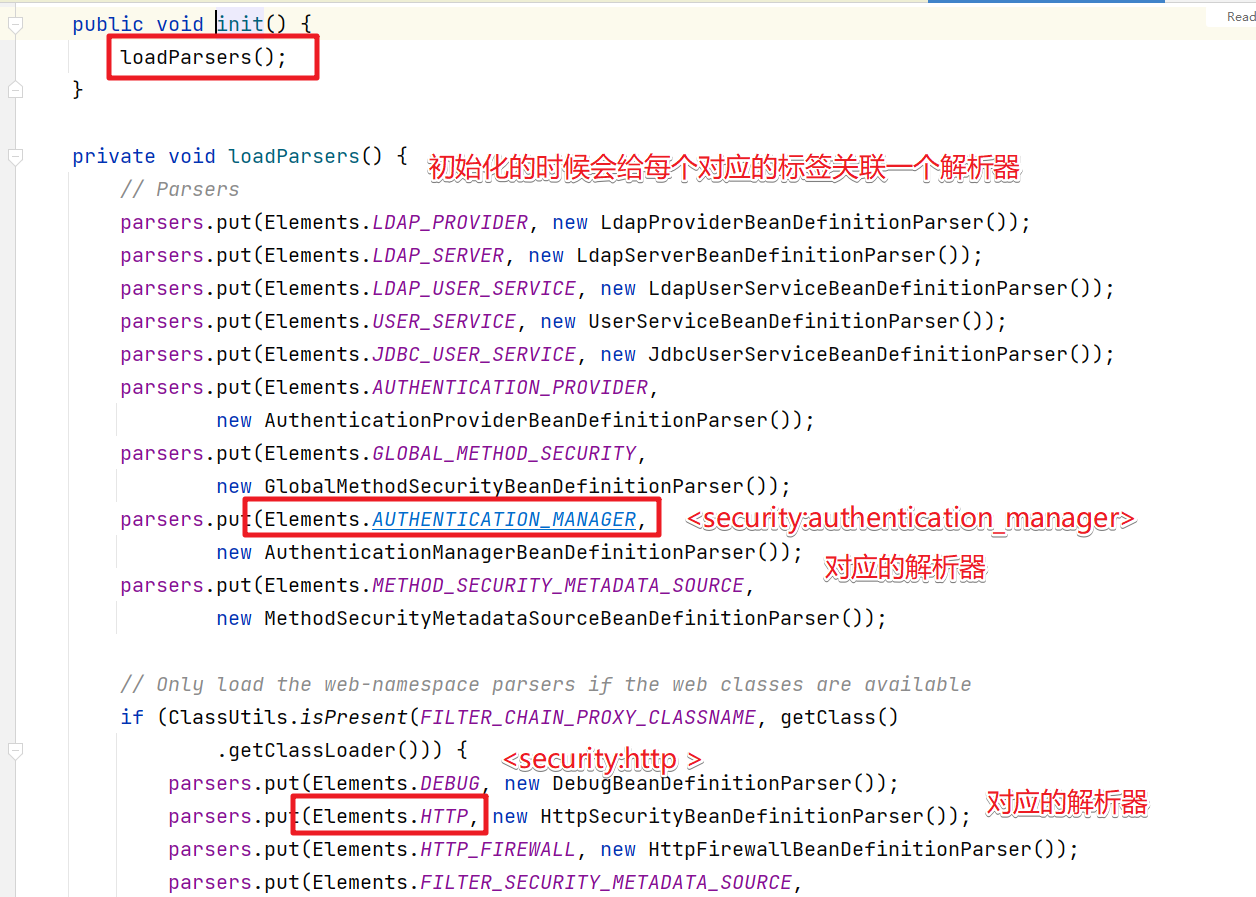
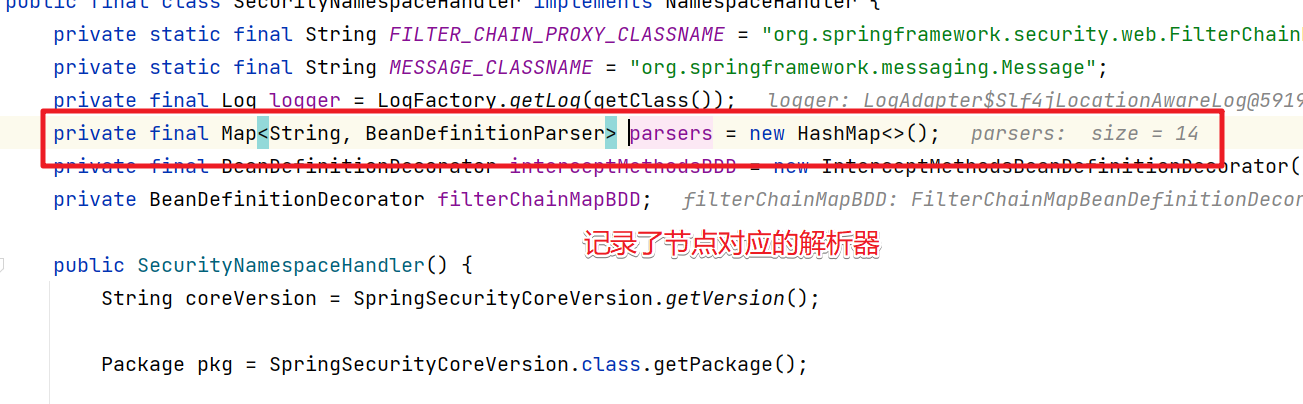
在SecurityNamespaceHandler中的 parsers中保存的就是 节点对应的解析器。
4.http解析
继续跟踪代码肯定是会先解析security:http标签了。

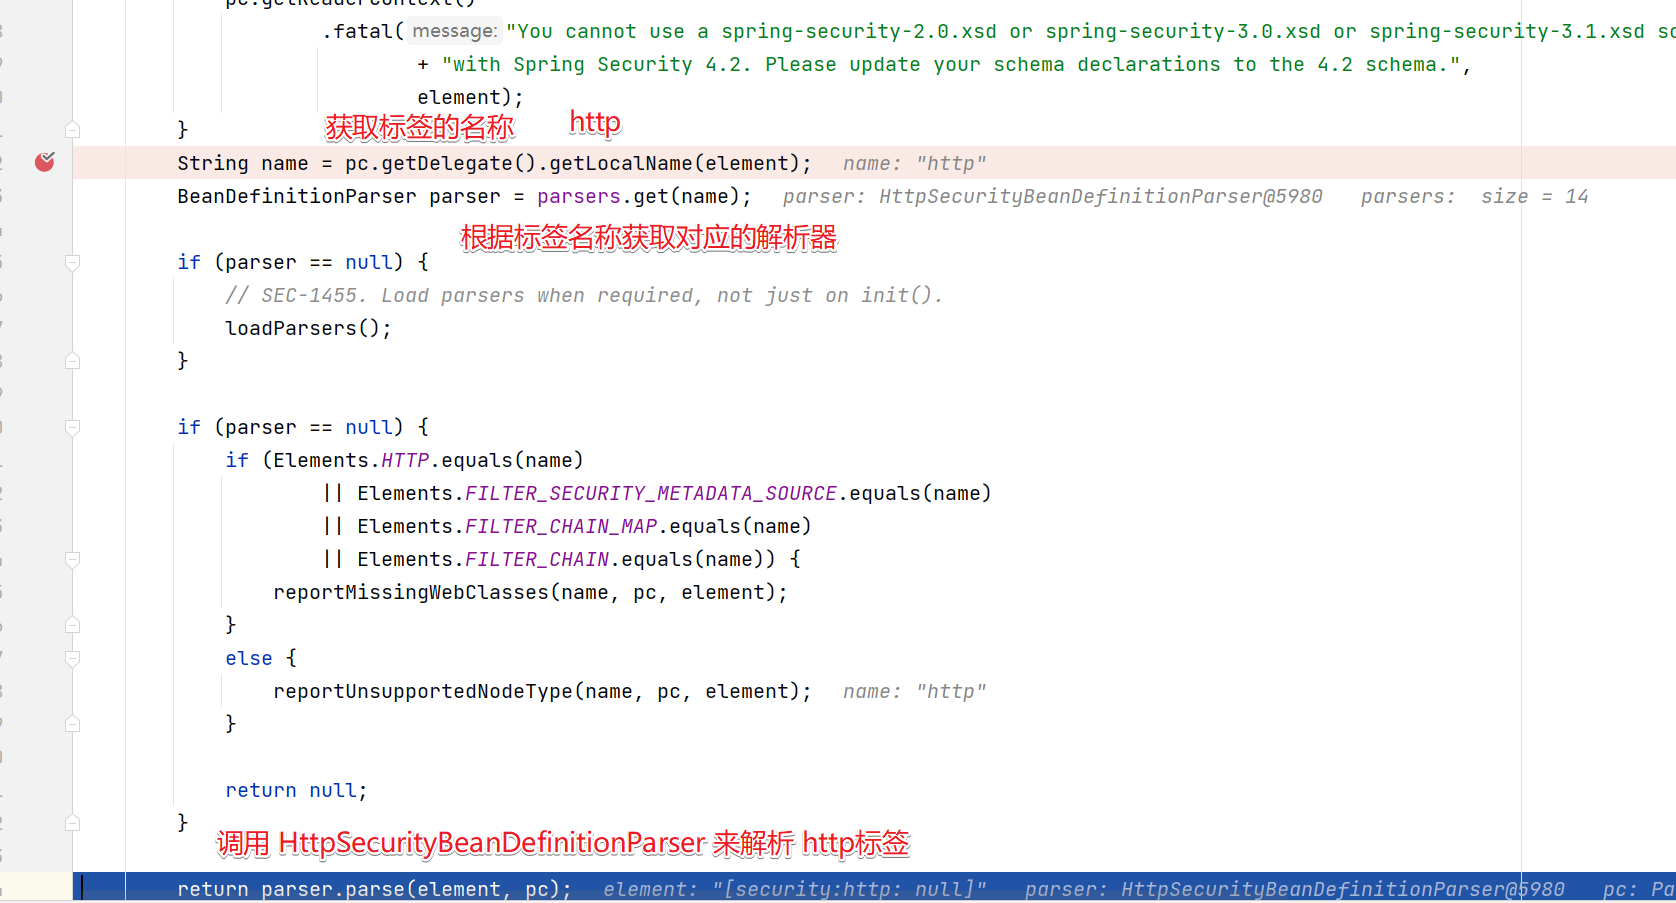
下面的逻辑也很清晰
- 先判断是否合法
- 然后获取标签名称
- 根据标签名称获取对应的解析器
- 然后通过解析器来解析标签
进入HttpSecurityBeanDefinitionParser中看看解析http标签做了什么事情。
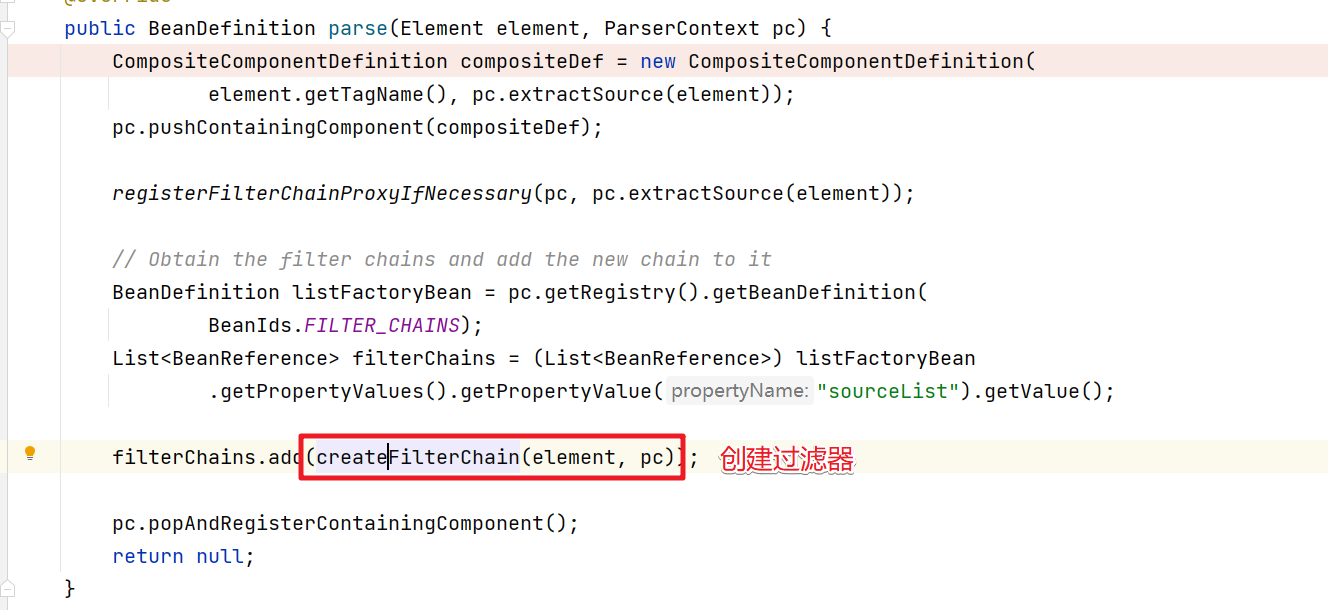
@Overridepublic BeanDefinition parse(Element element, ParserContext pc) {// CompositeComponentDefinition 保存内嵌的BeanDefinitionCompositeComponentDefinition compositeDef = new CompositeComponentDefinition(element.getTagName(), pc.extractSource(element));// compositeDef定义保存在了 父容器中pc.pushContainingComponent(compositeDef);// 完成FilterChainProxy的注册registerFilterChainProxyIfNecessary(pc, pc.extractSource(element));// Obtain the filter chains and add the new chain to itBeanDefinition listFactoryBean = pc.getRegistry().getBeanDefinition(BeanIds.FILTER_CHAINS);List<BeanReference> filterChains = (List<BeanReference>) listFactoryBean.getPropertyValues().getPropertyValue("sourceList").getValue();// createFilterChain(element, pc) 创建对应的过滤器并添加到了filterChains这个过滤器链中filterChains.add(createFilterChain(element, pc));pc.popAndRegisterContainingComponent();return null;}
上面代码的几个关键带你
- CompositeComponentDefinition保存配置文件中的嵌套的BeanDefinition信息
- 完成了FilterChainProxy的注册
- 完成了处理请求的过滤器和过滤器链的处理
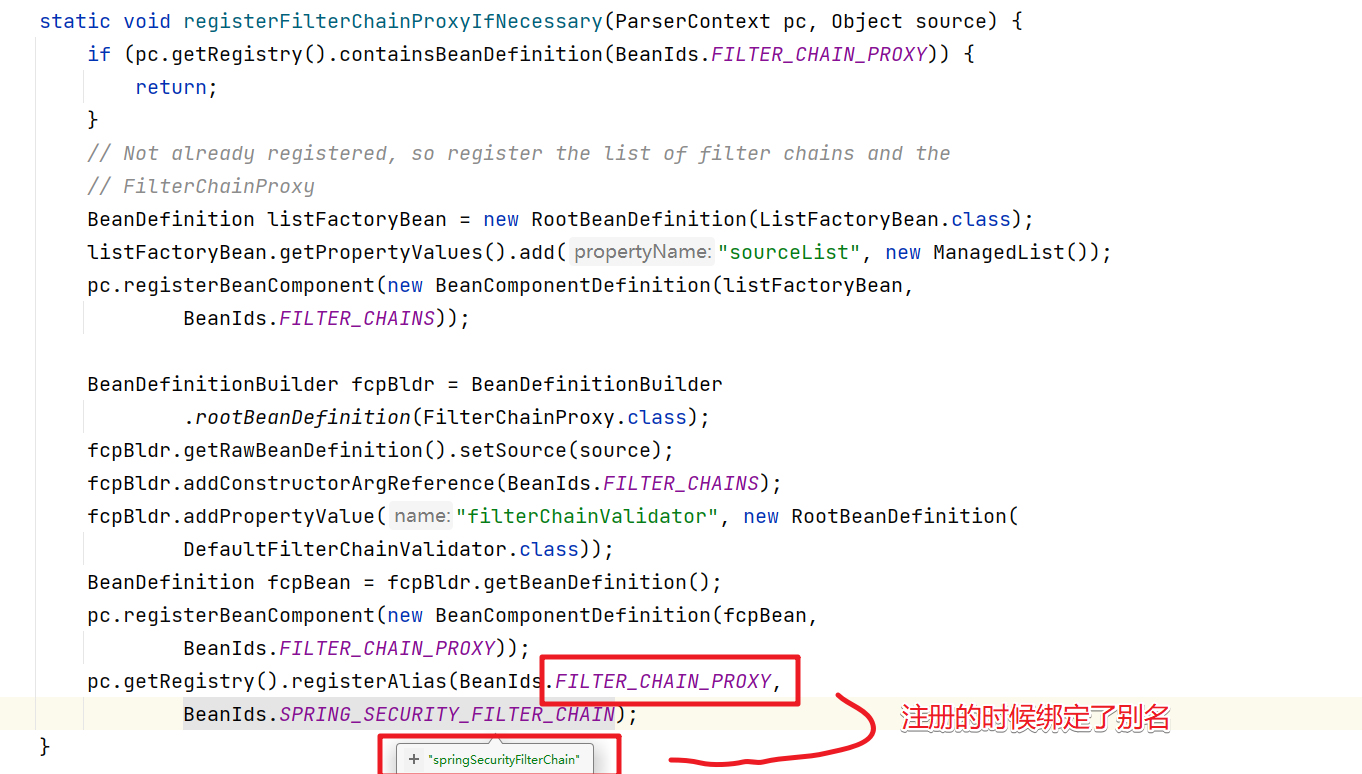
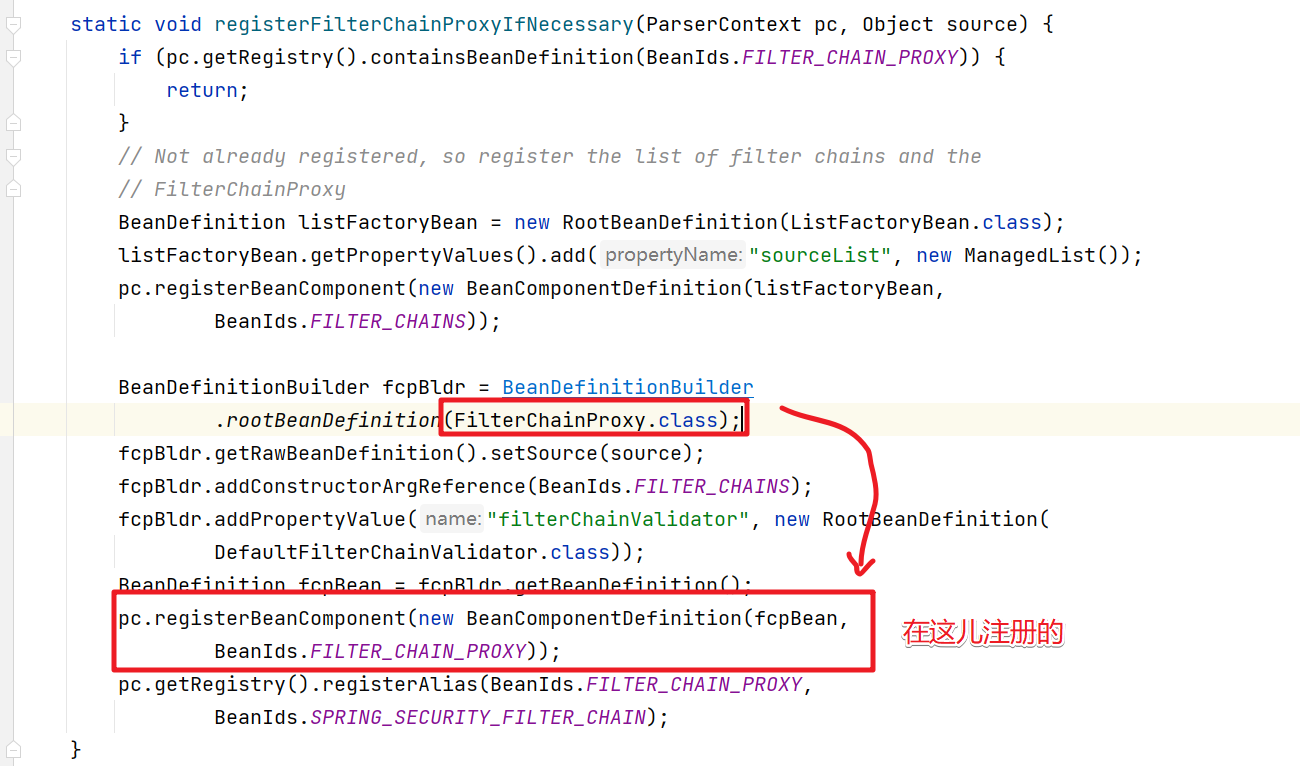
5.FilterChainProxy的注册
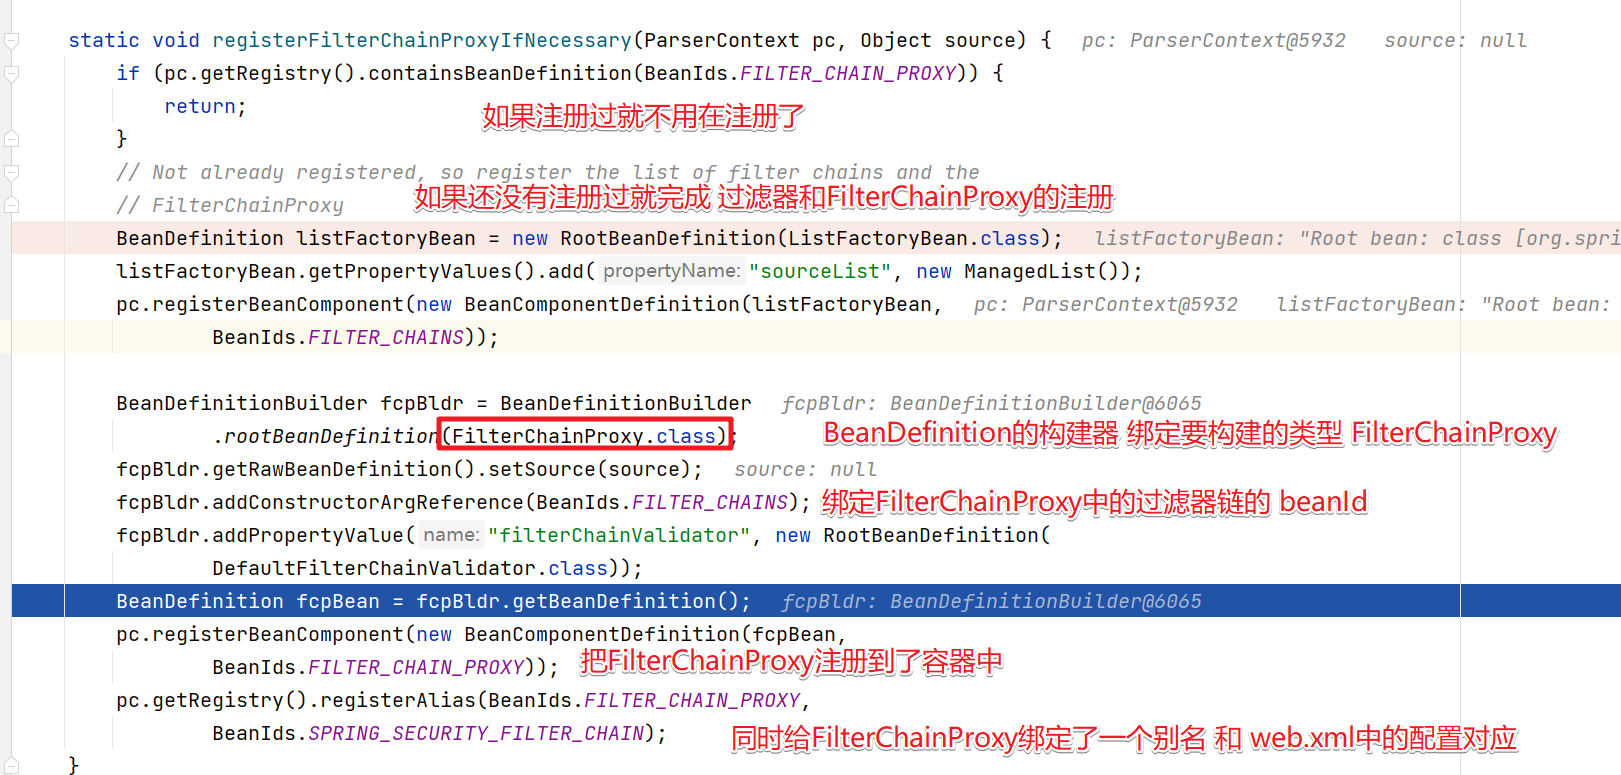
然后我们可以进入到registerFilterChainProxyIfNecessary()方法来查看FilterChainProxy的注册过程
SpringSecurity在BeanId中定义了相关的固定beanId值。
public abstract class BeanIds {private static final String PREFIX = "org.springframework.security.";/*** The "global" AuthenticationManager instance, registered by the* <authentication-manager> element*/public static final String AUTHENTICATION_MANAGER = PREFIX + "authenticationManager";/** External alias for FilterChainProxy bean, for use in web.xml files */public static final String SPRING_SECURITY_FILTER_CHAIN = "springSecurityFilterChain";public static final String CONTEXT_SOURCE_SETTING_POST_PROCESSOR = PREFIX+ "contextSettingPostProcessor";public static final String USER_DETAILS_SERVICE = PREFIX + "userDetailsService";public static final String USER_DETAILS_SERVICE_FACTORY = PREFIX+ "userDetailsServiceFactory";public static final String METHOD_ACCESS_MANAGER = PREFIX+ "defaultMethodAccessManager";public static final String FILTER_CHAIN_PROXY = PREFIX + "filterChainProxy";public static final String FILTER_CHAINS = PREFIX + "filterChains";public static final String METHOD_SECURITY_METADATA_SOURCE_ADVISOR = PREFIX+ "methodSecurityMetadataSourceAdvisor";public static final String EMBEDDED_APACHE_DS = PREFIX+ "apacheDirectoryServerContainer";public static final String CONTEXT_SOURCE = PREFIX + "securityContextSource";public static final String DEBUG_FILTER = PREFIX + "debugFilter";
}
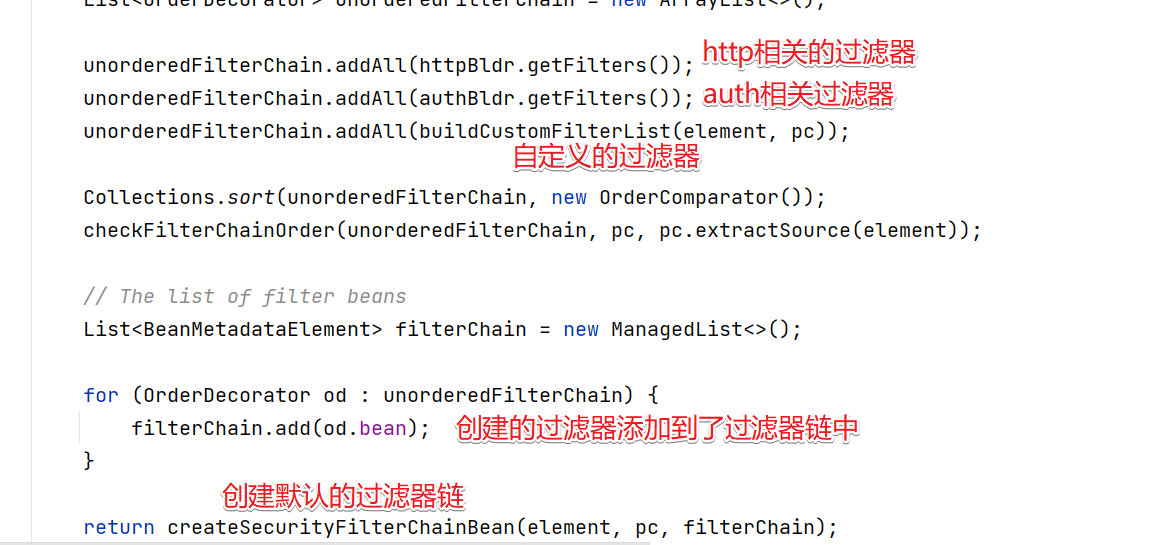
6.创建过滤器
接下来看看SpringSecurity中默认的过滤器是如何创建
我们进入createFilterChainProxy方法中。
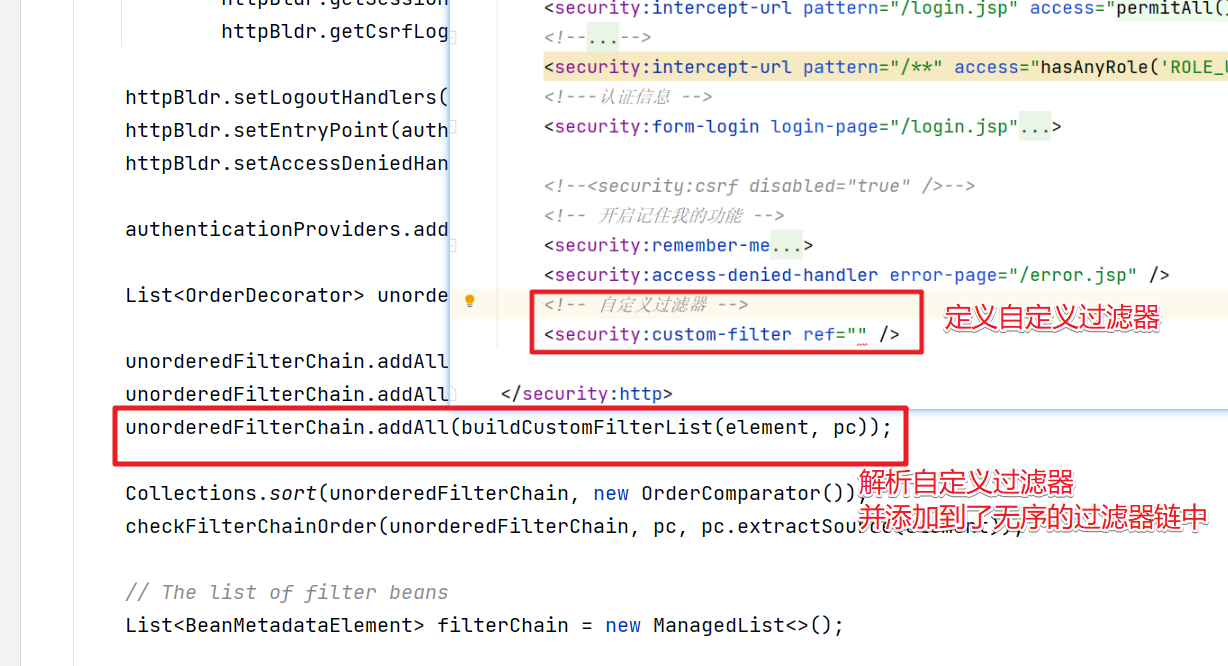
private BeanReference createFilterChain(Element element, ParserContext pc) {// 判断是否需要Security拦截boolean secured = !OPT_SECURITY_NONE.equals(element.getAttribute(ATT_SECURED));if (!secured) {// 如果没配置pattern属性并且配置了request-matcher-ref为空 添加错误信息if (!StringUtils.hasText(element.getAttribute(ATT_PATH_PATTERN)) && !StringUtils.hasText(ATT_REQUEST_MATCHER_REF)) {pc.getReaderContext().error("The '" + ATT_SECURED + "' attribute must be used in combination with" + " the '" + ATT_PATH_PATTERN + "' or '" + ATT_REQUEST_MATCHER_REF + "' attributes.", pc.extractSource(element));}for (int n = 0; n < element.getChildNodes().getLength(); n++) {// 如果有子节点则添加错误信息if (element.getChildNodes().item(n) instanceof Element) {pc.getReaderContext().error("If you are using <http> to define an unsecured pattern, " + "it cannot contain child elements.", pc.extractSource(element));}}// 创建过滤器链return createSecurityFilterChainBean(element, pc, Collections.emptyList());}// portMapper、portResolver主要提供给SSL相关类使用final BeanReference portMapper = createPortMapper(element, pc);final BeanReference portResolver = createPortResolver(portMapper, pc);// 新建一个空的authenticationProviders集合 ManagedList<BeanReference> authenticationProviders = new ManagedList<BeanReference>();// 通过空的authenticationProviders集合产生一个AuthenticationManager的bean定义BeanReference authenticationManager = createAuthenticationManager(element, pc, authenticationProviders);// 是否全采用默认配置boolean forceAutoConfig = isDefaultHttpConfig(element);// 看下面HttpConfigurationBuilder httpBldr = new HttpConfigurationBuilder(element, forceAutoConfig, pc, portMapper, portResolver, authenticationManager);// 看下面AuthenticationConfigBuilder authBldr = new AuthenticationConfigBuilder(element, forceAutoConfig, pc, httpBldr.getSessionCreationPolicy(), httpBldr.getRequestCache(), authenticationManager, httpBldr.getSessionStrategy(), portMapper, portResolver, httpBldr.getCsrfLogoutHandler());// 配置logoutHandlershttpBldr.setLogoutHandlers(authBldr.getLogoutHandlers());httpBldr.setEntryPoint(authBldr.getEntryPointBean());httpBldr.setAccessDeniedHandler(authBldr.getAccessDeniedHandlerBean());// 向AuthenticationProviders中添加provider  authenticationProviders.addAll(authBldr.getProviders());List<OrderDecorator> unorderedFilterChain = new ArrayList<OrderDecorator>();// 向FilterChain链中添加filters  unorderedFilterChain.addAll(httpBldr.getFilters());unorderedFilterChain.addAll(authBldr.getFilters());// 添加自定义的Filter,也就是custom-filter标签定义的Filter  unorderedFilterChain.addAll(buildCustomFilterList(element, pc));// 对过滤器进行排序Collections.sort(unorderedFilterChain, new OrderComparator());// 校验过滤器是否有效checkFilterChainOrder(unorderedFilterChain, pc, pc.extractSource(element));// The list of filter beansList<BeanMetadataElement> filterChain = new ManagedList<BeanMetadataElement>();for (OrderDecorator od : unorderedFilterChain) {filterChain.add(od.bean);}// 创建SecurityFilterChain return createSecurityFilterChainBean(element, pc, filterChain);
}
先看HttpConfigurationBuilder的构造方法
public HttpConfigurationBuilder(Element element, boolean addAllAuth, ParserContext pc, BeanReference portMapper, BeanReference portResolver, BeanReference authenticationManager) {this.httpElt = element;this.addAllAuth = addAllAuth;this.pc = pc;this.portMapper = portMapper;this.portResolver = portResolver;this.matcherType = MatcherType.fromElement(element);// 获取子标签intercept-urlinterceptUrls = DomUtils.getChildElementsByTagName(element, Elements.INTERCEPT_URL);for (Element urlElt : interceptUrls) {// 判断子标签intercept-url是否配置了filters属性// 如果配置了filters属性添加错误消息,因为Security已经不再支持filters属性了if (StringUtils.hasText(urlElt.getAttribute(ATT_FILTERS))) {pc.getReaderContext().error("The use of \"filters='none'\" is no longer supported. Please define a" + " separate <http> element for the pattern you want to exclude and use the attribute" + " \"security='none'\".", pc.extractSource(urlElt));}}// 获取标签create-session属性String createSession = element.getAttribute(ATT_CREATE_SESSION);if (StringUtils.hasText(createSession)) {sessionPolicy = createPolicy(createSession);} else {// 默认策略sessionPolicy = SessionCreationPolicy.IF_REQUIRED;}// 创建一系列过滤器createCsrfFilter();createSecurityContextPersistenceFilter();createSessionManagementFilters();createWebAsyncManagerFilter();createRequestCacheFilter();createServletApiFilter(authenticationManager);createJaasApiFilter();createChannelProcessingFilter();createFilterSecurityInterceptor(authenticationManager);createAddHeadersFilter();
}
然后进入AuthenticationConfigBuilder中来查看,发向其实也创建了很多的过滤器
public AuthenticationConfigBuilder(Element element, boolean forceAutoConfig, ParserContext pc, SessionCreationPolicy sessionPolicy, BeanReference requestCache, BeanReference authenticationManager, BeanReference sessionStrategy, BeanReference portMapper, BeanReference portResolver, BeanMetadataElement csrfLogoutHandler) {this.httpElt = element;this.pc = pc;this.requestCache = requestCache;// 是否自动配置autoConfig = forceAutoConfig | "true".equals(element.getAttribute(ATT_AUTO_CONFIG));// 是否允许sessionthis.allowSessionCreation = sessionPolicy != SessionCreationPolicy.NEVER && sessionPolicy != SessionCreationPolicy.STATELESS;this.portMapper = portMapper;this.portResolver = portResolver;this.csrfLogoutHandler = csrfLogoutHandler;// 创建一系列过滤器createAnonymousFilter();createRememberMeFilter(authenticationManager);createBasicFilter(authenticationManager);createFormLoginFilter(sessionStrategy, authenticationManager);createOpenIDLoginFilter(sessionStrategy, authenticationManager);createX509Filter(authenticationManager);createJeeFilter(authenticationManager);createLogoutFilter();createLoginPageFilterIfNeeded();createUserDetailsServiceFactory();createExceptionTranslationFilter();
}
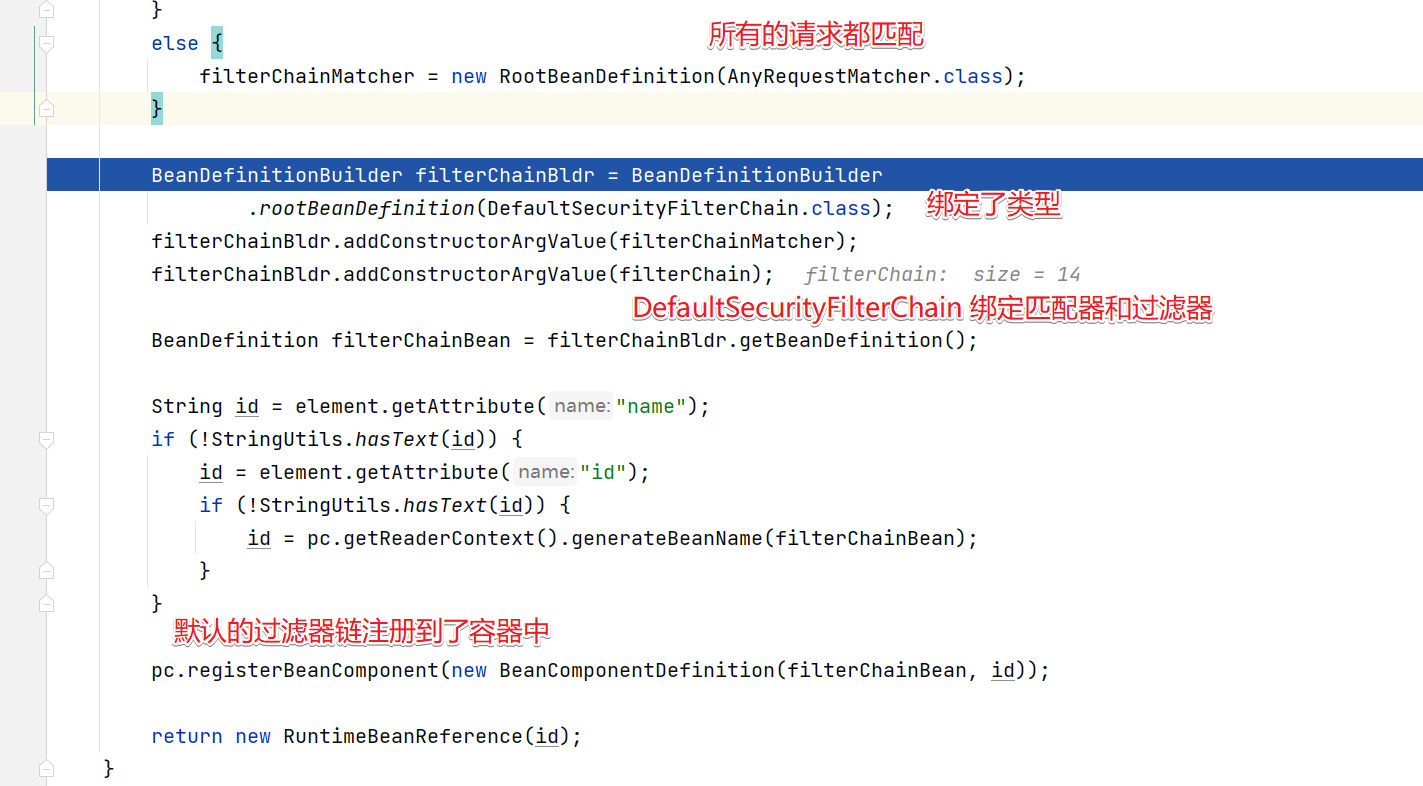
创建SecurityFilterChain
到这http标签的解析就差不多了。到这儿也解释了我们前面的几个问题
7.解决的几个问题
问题1:web.xml配置的过滤器为什么必须是springSecurityFilterChain
问题2:FilterChainProxy什么时候创建的?
问题3:过滤器链和对应的过滤器什么时候创建的?
问题4:怎么把自定义的过滤器添加到过滤器链中?
问题5:请求和过滤器的匹配规则是什么?