目录
- ArkTS 复用代码块
- 弹窗提醒
- 网络请求
- 消息通知
- 如何给任意组件添加 multiState?
- 如何给 ListItem 添加删除按钮,
ArkTS 复用代码块
记录一下自己这几天学习成果,我发官方文档很全,都是有时候查找起来不是很容易,因此总结该文章
PS: 此文章将保持持续更新
系统 API 版本

弹窗提醒
系统内置弹窗
@Entry
@Component
struct DialogPage {// ...build() {Row() {Column() {Button("AlertDialog 警告弹窗").onClick(() => {AlertDialog.show({message: "Hello",primaryButton: {value: "取消",action: () => {console.log("你点击了取消按钮");}},secondaryButton: {value: "确认",action: () => {console.log("你点击了确认按钮")}},// 控制显示位置,默认居中alignment: DialogAlignment.Bottom,// 相对偏移量offset: {dx: 0,dy: 0//   dy -20,使弹窗距离屏幕底部 20vp}})})Button("日期选择 弹窗").onClick(() => {DatePickerDialog.show({start: new Date("1900-1-1"),end: new Date(),selected: new Date("2021-7-1"),lunar: false, // 默认公历。 true 表示农历onAccept: (value: DatePickerResult) => {let year = value.year;let month = value.month + 1;let day = value.day;console.log(`你选择了 ${year}年 ${month}月 ${day}日`);}})})// ....}
}
警告弹窗

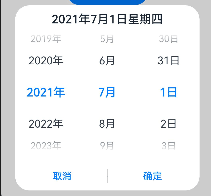
日期弹窗
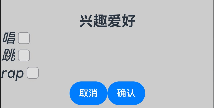
自定义弹窗: (开发者可以自行定制弹窗样式,极大的丰富了弹窗的类型)
我们需要先编写自定义弹窗的样式
// 自定义 dialog
import CommonConstants from '../container/common/constants/CommonConstants';
import HobbyBean from './HobbyBean'// 上面引入的内容
class HobbyBean {label: stringisChecked: boolean
}@CustomDialog
export default struct CustomDialogWidget {@State hobbyBeans: HobbyBean[] = [];@Link hobbies: string;private controller: CustomDialogController;aboutToAppear() {// let Context = getContext(this);// let manager = Context.resourceManager;// manager.getStringArrayValue($r("app.strarray.hobbies_data"), (err, hoobyResult) => {//   hoobyResult.forEach((hobbyItem: string) => {//     let hobbyBean = new HobbyBean();//     hobbyBean.label = hobbyBean.label;//     hobbyBean.isChecked = false;//     this.hobbyBeans.push(hobbyBean);//   })// });this.hobbyBeans = [{label: "唱",isChecked: false}, {label: "跳",isChecked: false,}, {label: "rap",isChecked: false}]console.log(JSON.stringify(this.hobbyBeans))}setHobbiesValue(hobbyBeans: HobbyBean[]) {let hobbiesText: string = '';hobbiesText = hobbyBeans.filter((icCheckItem: HobbyBean) => icCheckItem.isChecked).map((checkedItem: HobbyBean) => {return checkedItem.label;}).join(',');this.hobbies = hobbiesText;}// 创建弹窗组件build() {Column() {Text($r("app.string.text_title_hobbies")).fontSize(24).fontWeight(FontWeight.Bold)List() {ForEach(this.hobbyBeans, (itemHobby: HobbyBean, HobbyBean) => {ListItem() {Row() {Text(itemHobby.label).fontSize(24).fontWeight(FontWeight.Medium).fontStyle(FontStyle.Italic)Toggle({ type: ToggleType.Checkbox, isOn: false }).onChange((isCheck: boolean) => {itemHobby.isChecked = isCheck;})}}}, (itemHobby: HobbyBean) => itemHobby.label)}Row() {Button($r("app.string.cancel_button")).onClick(() => {this.controller.close();})Button("确认").onClick(() => {this.setHobbiesValue(this.hobbyBeans);this.controller.close();})}.width(CommonConstants.BUTTON_WIDTH).justifyContent(FlexAlign.Center)}}}
// 使用自定义弹窗
   // 定义 builder,实例化一个自定义弹窗
  customDialogController: CustomDialogController = new CustomDialogController({
    builder: CustomDialogWidget({
      hobbies: $hobbies}),
    alignment: DialogAlignment.Bottom,
    customStyle: true,
    offset: {dx: 0, dy: -20}});// 使用自定义弹窗build() {Row() {Button("CustomDialog").onClick(() => {this.customDialogController.open();})}}
自定义弹窗效果
网络请求
网络请求封装,返回 JSON 固定格式数据
import http from '@ohos.net.http';class ResponseResult {/*** Code returned by the network request: success, fail.*/code: string;/*** Message returned by the network request.*/msg: string | Resource;/*** Data returned by the network request.*/data: string | Object | ArrayBuffer;constructor() {this.code = '';this.msg = '';this.data = '';}
}export function httpRequestGet(url: string): Promise<ResponseResult> {let httpRequest = http.createHttp();let responseResult = httpRequest.request(url, {method: http.RequestMethod.GET,readTimeout: Const.HTTP_READ_TIMEOUT,header: {'Content-Type': ContentType.JSON},connectTimeout: Const.HTTP_READ_TIMEOUT,extraData: {}});let serverData: ResponseResult = new ResponseResult();// Processes the data and returns.return responseResult.then((value: http.HttpResponse) => {if (value.responseCode === Const.HTTP_CODE_200) {// Obtains the returned data.let result = `${value.result}`;let resultJson: ResponseResult = JSON.parse(result);if (resultJson.code === Const.SERVER_CODE_SUCCESS) {serverData.data = resultJson.data;}serverData.code = resultJson.code;serverData.msg = resultJson.msg;} else {serverData.msg = `${$r('app.string.http_error_message')}&${value.responseCode}`;}return serverData;}).catch(() => {serverData.msg = $r('app.string.http_error_message');return serverData;})
}
消息通知
官方文档
import notification from '@ohos.notificationManager';publishNotification() {let notificationRequest: notification.NotificationRequest = { // 描述通知的请求id: 1, // 通知IDslotType: notification.SlotType.SERVICE_INFORMATION,content: { // 通知内容contentType: notification.ContentType.NOTIFICATION_CONTENT_BASIC_TEXT, // 普通文本类型通知normal: { // 基本类型通知内容title: '通知内容标题',text: '通知内容详情',additionalText: '通知附加内容', // 通知附加内容,是对通知内容的补充。}}}notification.publish(notificationRequest).then(() => { // 发布通知console.info('publish success');}).catch((err) => {console.error(`publish failed, dcode:${err.code}, message:${err.message}`);});}
如何给任意组件添加 multiState?
详情见多态样式
当我们给 button 设置 startEffect 为 true 时,button 此时有一个点击效果,但是我们有一个 Row 容器,但是需要如何实现相同的效果?
- 绑定点击事件
- 设置 stateStyles
struct XX {@Styles list() {.backgroundColor($r("app.color.default_btn_normal_background")).opacity(1)}@Styles pressedList() {.backgroundColor($r("app.color.default_btn_pressed_background")).opacity(0.8)}build() {// ....Row() {}.onClick(() => {console.log(`item is => ${item.type}`)})// 两种写法等价// .gesture(//   TapGesture()//     .onAction(() => {//       if (item.type === "FAMILY") {////       } else if (item.type === "VERSION_UPADTED") {////       }//       console.log("click the item " + `${item.type}`)//     })).stateStyles({normal: this.list,    // 这里很容易写错,不要加括号,不然会报错,不是标准语法!pressed: this.pressedList})// ....}
}
如何给 ListItem 添加删除按钮,
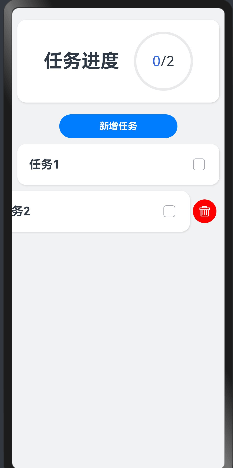
效果预览
实现思路
ListItem 有一个
swipeAction的选项, 我们可以通过 传入一个 button 组件实现对应的效果
List({ space: 10 }) {ForEach(this.tasks, (item: Task, index: number) => {ListItem() {// ListItem 的内容需要自行填充// ...}.swipeAction({ end: this.DeleteButton(index)})}, (item: Task) => JSON.stringify(item))}@Builder DeleteButton(index: number) {Button({ stateEffect: true }) {Image($r("app.media.delete")).fillColor(0xffffff).width(20)}.width(40).height(40).type(ButtonType.Circle).backgroundColor(Color.Red).margin(5).onClick(() => {this.tasks.splice(index, 1);this.handleTaskChange();})}




![读书笔记-《数据结构与算法》-摘要6[快速排序]](https://img-blog.csdnimg.cn/direct/66a3b6f0d0354ac8a43b572a88f71a30.png)
