1、环境搭建
创建conda虚拟环境并激活。
conda create -n mmtrack python=3.8 -y
conda activate mmtrack
按照官方说明安装 PyTorch 和 torchvision
可以通过指定版本号切换到其他版本。
#如果网不好,可以这样安装
pip3 install torch==1.8.2+cu102 torchvision==0.9.2+cu102 torchaudio===0.8.2 -f https://download.pytorch.org/whl/lts/1.8/torch_lts.html  -i http://mirrors.aliyun.com/pypi/simple/ --trusted-host mirrors.aliyun.compip install torch==1.11.0+cu115 torchvision==0.12.0+cu115 torchaudio==0.11.0 -f https://download.pytorch.org/whl/torch_stable.html  -i http://mirrors.aliyun.com/pypi/simple/ --trusted-host mirrors.aliyun.com
#验证是否安装成功>>> import torchvision
>>> import torch
>>> import.__version__File "<stdin>", line 1import.__version__^
SyntaxError: invalid syntax
>>> torch.__version__
'1.8.2+cu102'
这里我们使用 PyTorch 1.10.0 和 CUDA 11.1。
使用 conda 安装
conda install pytorch=1.11.0 torchvision cudatoolkit=11.3 -c pytorch
使用 pip 安装
pip install torch==1.11.0+cu113 torchvision==0.12.0+cu113 --extra-index-url https://download.pytorch.org/whl/cu113
安装mmengine
pip install mmengine -f https://download.pytorch.org/whl/lts/1.8/torch_lts.html -i http://mirrors.aliyun.com/pypi/simple/ --trusted-host mirrors.aliyun.com
安装mmcv
我们建议您安装预构建包,如下所示。
pip install 'mmcv>=2.0.0rc1' -f https://download.openmmlab.com/mmcv/dist/{cu_version}/{torch_version}/index.htmlpip install 'mmcv>=2.0.0rc1' -f https://download.openmmlab.com/mmcv/dist/cu102/torch1.8.0/index.html -i http://mirrors.aliyun.com/pypi/simple/ --trusted-host mirrors.aliyun.com
mmcv 仅在 PyTorch 1.x.0 上编译,因为兼容性通常在 1.x.0 和 1.x.1 之间。如果你的PyTorch版本是1.x.1,你可以安装用PyTorch 1.x.0编译的mmcv,通常效果很好。
We can ignore the micro version of PyTorch
pip install 'mmcv>=2.0.0rc1' -f https://download.openmmlab.com/mmcv/dist/cu113/torch1.11.0/index.html
请参阅此处,了解与不同 PyTorch 和 CUDA 版本兼容的不同版本的 MMCV。或者您可以选择通过以下命令从源代码编译 mmcv
git clone -b 2.x https://github.com/open-mmlab/mmcv.git
cd mmcv
MMCV_WITH_OPS=1 pip install -e .  # package mmcv, which contains cuda ops, will be installed after this step
# pip install -e .  # package mmcv, which contains no cuda ops, will be installed after this step
cd ..
重要提示:如果安装了 mmcv,则需要先运行 pip uninstall mmcv-lite。因为如果mmcv-lite和mmcv都安装的话,就会出现ModuleNotFoundError。
安装MMDetection
pip install 'mmdet>=3.0.0rc0' -i http://mirrors.aliyun.com/pypi/simple/ --trusted-host mirrors.aliyun.com
或者,如果您想修改代码,您也可以从源代码构建 MMDetection:
git clone -b 3.x https://github.com/open-mmlab/mmdetection.git
cd mmdetection
pip install -r requirements/build.txt
pip install -v -e .  # or "python setup.py develop"  -i http://mirrors.aliyun.com/pypi/simple/ --trusted-host mirrors.aliyun.com
Clone the MMTracking repository.
git clone -b 1.x https://github.com/open-mmlab/mmtracking.git
cd mmtracking
安装构建需求,然后安装MMTracking。
pip install -r requirements/build.txt
pip install -v -e .  # or "python setup.py develop"
安装额外的依赖项
对于 MOT 评估(必填):
pip install git+https://github.com/JonathonLuiten/TrackEval.git
用于 VOT 评估(可选)
pip install git+https://github.com/votchallenge/toolkit.git
对于 LVIS 评估(可选):
pip install git+https://github.com/lvis-dataset/lvis-api.git
对于 TAO 评估(可选):
pip install git+https://github.com/TAO-Dataset/tao.git
笔记:
A。按照上述说明,MMTracking 安装在devmode 下,任何本地对代码的修改都会生效,无需重新安装。
b. 如果您想使用opencv-python-headless而不是opencv-python,可以在安装 MMCV 之前安装它。
从头开始的设置脚本
假设您已经安装了 CUDA 10.1,这里有一个使用 conda 设置 MMTracking 的完整脚本。
conda create -n open-mmlab python=3.9 -y
conda activate open-mmlabconda install pytorch=1.11.0 torchvision cudatoolkit=11.3 -c pytorchpip install mmengine# install the latest mmcv
pip install 'mmcv>=2.0.0rc1' -f https://download.openmmlab.com/mmcv/dist/cu113/torch1.11.0/index.html# install mmdetection
pip install 'mmdet>=3.0.0rc0'# install mmtracking
git clone -b 1.x https://github.com/open-mmlab/mmtracking.git
cd mmtracking
pip install -r requirements/build.txt
pip install -v -e .
pip install git+https://github.com/JonathonLuiten/TrackEval.git
pip install git+https://github.com/votchallenge/toolkit.git (optional)
pip install git+https://github.com/lvis-dataset/lvis-api.git (optional)
pip install git+https://github.com/TAO-Dataset/tao.git (optional)
安装库版本
(mmtrack) lhy@thales-Super-Server:/media/lhy/mmtracking$ pip list
Package                Version     Editable project location
---------------------- ----------- -------------------------
addict                 2.4.0
albumentations         1.3.0
astroid                2.11.7
asynctest              0.13.0
attributee             0.1.5
attrs                  21.4.0
charset-normalizer     2.0.12
click                  8.1.3
click-plugins          1.1.1
cligj                  0.7.2
codecov                2.1.12
colorama               0.4.5
coverage               6.4.1
cycler                 0.11.0
Cython                 0.29.30
dotty-dict             1.3.0
Fiona                  1.8.22
flake8                 4.0.1
flatbuffers            2.0
fonttools              4.33.3
geojson                2.5.0
geopandas              0.12.1
idna                   3.3
imagecorruptions       1.1.2
imageio                2.19.3
importlib-metadata     6.8.0
iniconfig              1.1.1
interrogate            1.5.0
isort                  4.3.21
joblib                 1.3.1
kiwisolver             1.4.3
kwarray                0.6.2
lap                    0.4.0
lazy-object-proxy      1.7.1
Markdown               3.4.3
markdown-it-py         3.0.0
matplotlib             3.5.2
mccabe                 0.6.1
mdurl                  0.1.2
mmcls                  1.0.0rc6
mmcv                   2.0.0rc4
mmdet                  3.0.0rc2
mmengine               0.7.1
mmtrack                1.0.0rc1    /media/lhy/mmtracking
model-index            0.1.11
modelindex             0.0.2
motmetrics             1.2.5
mpmath                 1.2.1
munch                  2.5.0
networkx               2.8.4
numpy                  1.22.4
opencv-python          4.8.0.74
opencv-python-headless 4.6.0.66
ordered-set            4.1.0
packaging              23.1
pandas                 1.3.5
Pillow                 10.0.0
pip                    23.1.2
platformdirs           3.8.1
pluggy                 1.0.0
pretrainedmodels       0.7.4
py                     1.11.0
pycocotools            2.0.2
pycodestyle            2.8.0
pyflakes               2.4.0
Pygments               2.15.1
pylint                 2.14.5
pyparsing              3.1.0
pyproj                 3.4.0
pyshp                  2.3.1
pytest                 7.1.2
python-dateutil        2.8.2
pytz                   2022.1
PyWavelets             1.3.0
PyYAML                 6.0
qudida                 0.0.4
requests               2.28.0
rich                   13.4.2
scikit-image           0.19.3
scikit-learn           1.3.0
scipy                  1.7.3
seaborn                0.11.2
setuptools             65.5.0
setuptools-scm         6.4.2
Shapely                1.7.0
six                    1.16.0
sympy                  1.10.1
tabulate               0.8.9
termcolor              2.3.0
terminaltables         3.1.10
threadpoolctl          3.1.0
tifffile               2022.5.4
toml                   0.10.2
tomli                  2.0.1
tomlkit                0.11.1
torch                  1.8.2+cu102
torchaudio             0.8.2
torchvision            0.9.2+cu102
tqdm                   4.65.0
trackeval              1.0.dev1
typing_extensions      4.7.1
ubelt                  1.1.1
urllib3                1.26.9
wheel                  0.40.0
wrapt                  1.14.1
xdoctest               1.0.0
xmltodict              0.13.0
yapf                   0.40.1
zipp                   3.16.1
确认
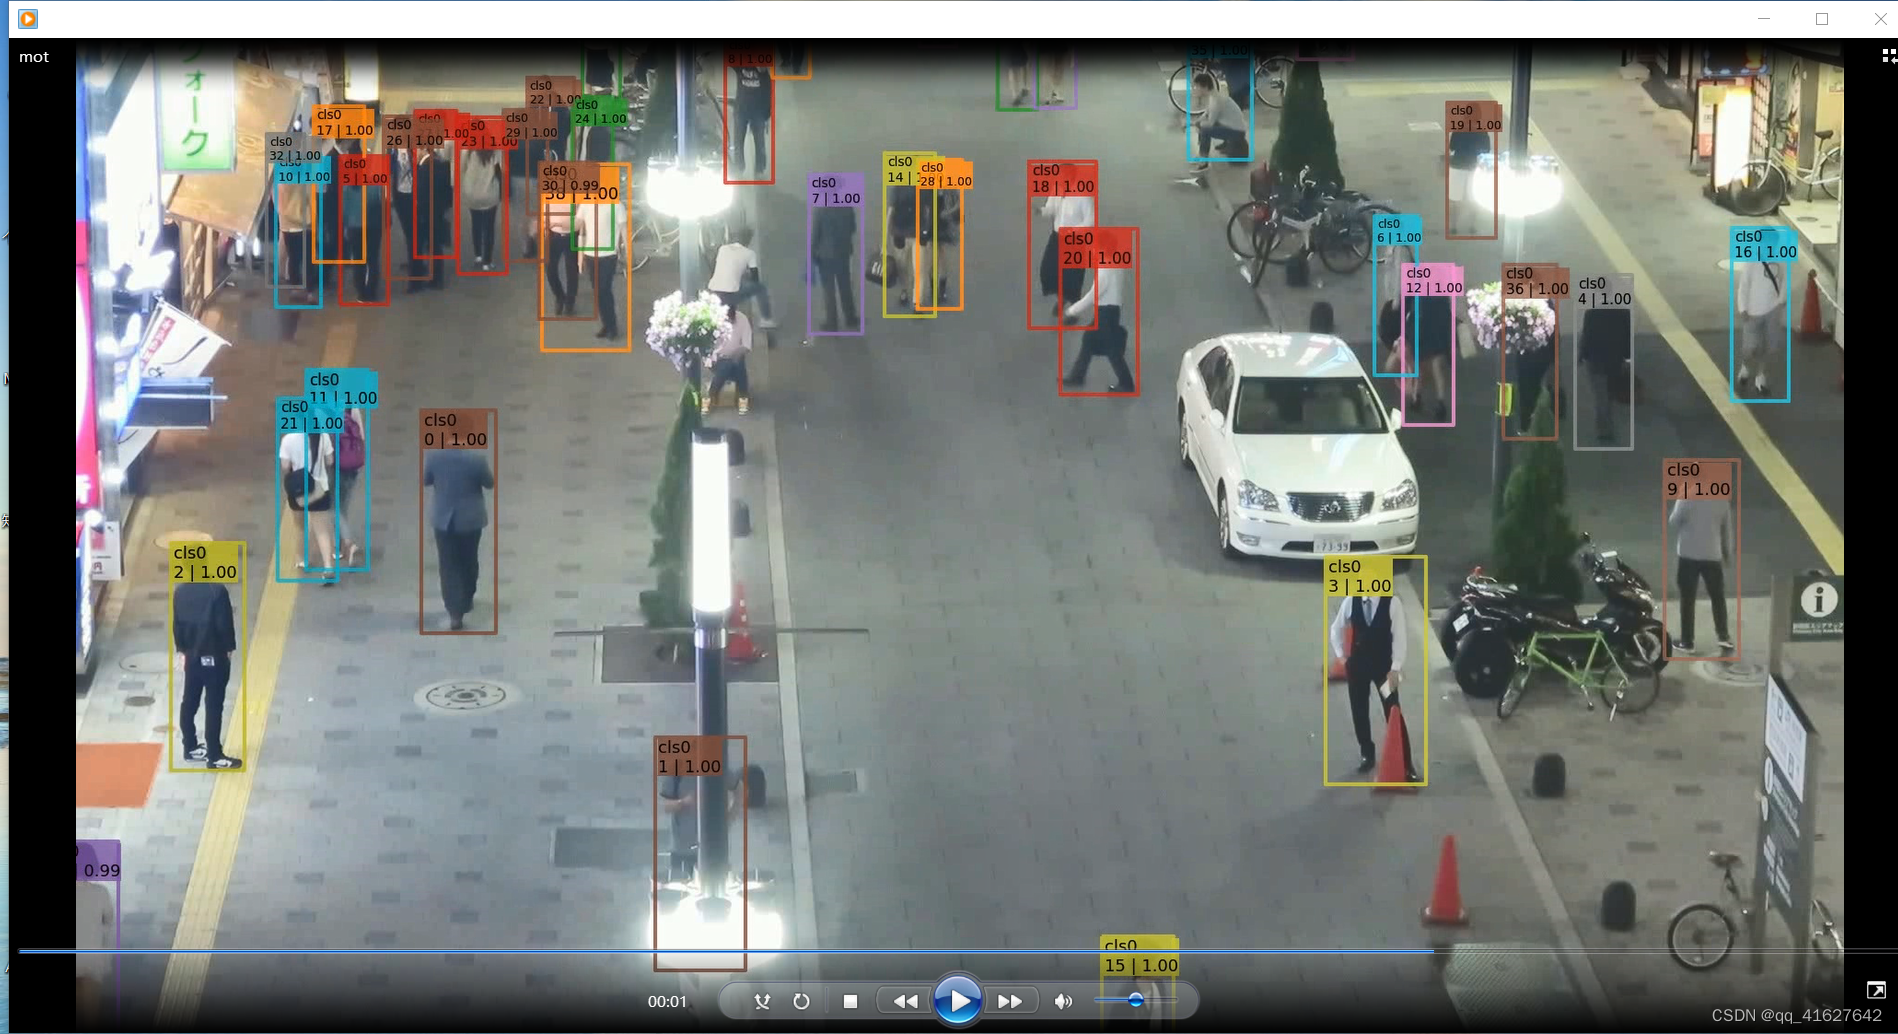
要验证 MMTracking 和所需环境是否已正确安装,我们可以运行MOT、VIS、VID 和 SOT演示脚本之一:
这是 MOT 演示的示例:
python demo/demo_mot_vis.py configs/mot/deepsort/deepsort_faster-rcnn_r50_fpn_8xb2-4e_mot17halftrain_test-mot17halfval.py --input demo/demo.mp4 --output mot.mp4