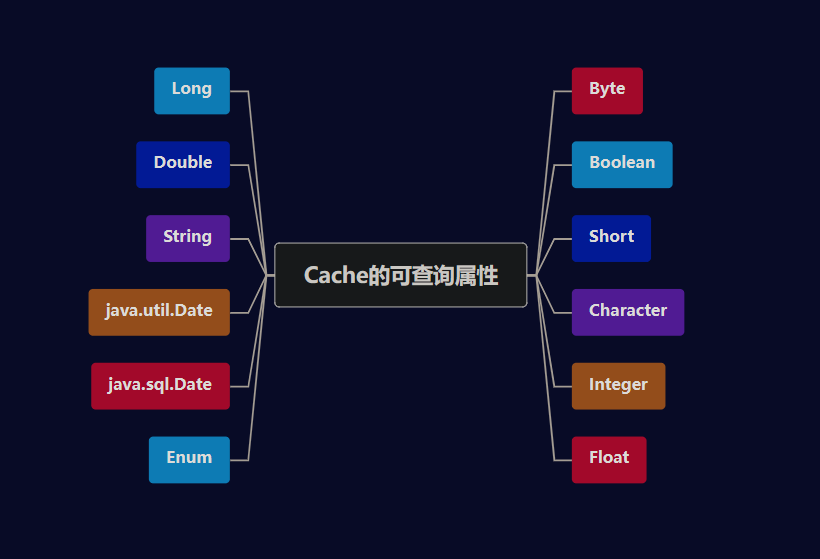
Flink API总共分为4层这里主要整理Table API的使用
Table API是流处理和批处理通用的关系型API,Table API可以基于流输入或者批输入来运行而不需要进行任何修改。Table API是SQL语言的超集并专门为Apache Flink设计的,Table API是Scala和Java语言集成式的API。与常规SQL语言中将查询指定为字符串不同,Table API查询是以Java或Scala中的语言嵌入样式来定义的,具有IDE支持如:自动完成和语法检测。需要引入的pom依赖如下:
<dependency><groupId>org.apache.flink</groupId><artifactId>flink-table_2.12</artifactId><version>1.7.2</version>
</dependency>
Table API & SQL
TableAPI: WordCount案例
tab.groupBy("word").select("word,count(1) as count")
SQL: WordCount案例
SELECT word,COUNT(*) AS cnt FROM MyTable GROUP BY word
【1】声明式: 用户只关系做什么,不用关心怎么做;
【2】高性能: 支持查询优化,可以获取更好的执行性能,因为它的底层有一个优化器,跟SQL底层有优化器是一样的。
【3】流批统一: 相同的统计逻辑,即可以流模型运行,也可以批模式运行;
【4】标准稳定: 语义遵循SQL标准,不易改动。当升级等底层修改,不用考虑API兼容问题;
【5】易理解: 语义明确,所见即所得;
Table API 特点
Table API使得多声明的数据处理写起来比较容易。
1 #例如,我们将a<10的数据过滤插入到xxx表中
2 table.filter(a<10).insertInto("xxx")
3 #我们将a>10的数据过滤插入到yyy表中
4 table.filter(a>10).insertInto("yyy")
Talbe是Flink自身的一种API使得更容易扩展标准的SQL(当且仅当需要的时候),两者的关系如下:
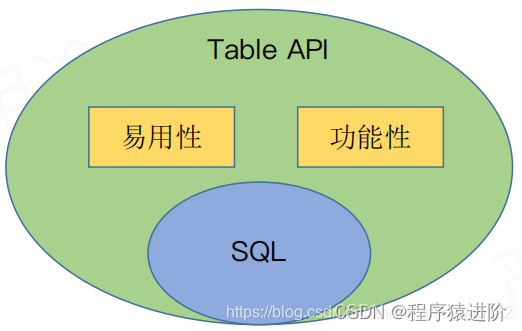
Table API 编程
WordCount编程示例
package org.apache.flink.table.api.example.stream;import org.apache.flink.api.common.typeinfo.Types;
import org.apache.flink.streaming.api.environment.StreamExecutionEnvironment;
import org.apache.flink.table.api.Table;
import org.apache.flink.table.api.TableEnvironment;
import org.apache.flink.table.api.java.StreamTableEnvironment;
import org.apache.flink.table.descriptors.FileSystem;
import org.apache.flink.table.descriptors.OldCsv;
import org.apache.flink.table.descriptors.Schema;
import org.apache.flink.types.Row;public class JavaStreamWordCount {public static void main(String[] args) throws Exception {//获取执行环境:CTRL + ALT + VStreamExecutionEnvironment env = StreamExecutionEnvironment.getExecutionEnvironment();StreamTableEnvironment tEnv = TableEnvironment.getTableEnvironment(env);//指定一个路径String path = JavaStreamWordCount.class.getClassLoader().getResource("words.txt").getPath();//指定文件格式和分隔符,对应的Schema(架构)这里只有一列,类型是StringtEnv.connect(new FileSystem().path(path)).withFormat(new OldCsv().field("word", Types.STRING).lineDelimiter("\n")).withSchema(new Schema().field("word", Types.STRING)).inAppendMode().registerTableSource("fileSource");//将source注册到env中//通过 scan 拿到table,然后执行table的操作。Table result = tEnv.scan("fileSource").groupBy("word").select("word, count(1) as count");//将table输出tEnv.toRetractStream(result, Row.class).print();//执行env.execute();}
}
怎么定义一个 Table
Table myTable = tableEnvironment.scan("myTable") 都是从Environment中scan出来的。而这个myTable 又是我们注册进去的。问题就是有哪些方式可以注册Table。
【1】Table descriptor: 类似于上述的WordCount,指定一个文件系统fs,也可以是kafka等,还需要一些格式和Schema等。
tEnv.connect(new FileSystem().path(path)).withFormat(new OldCsv().field("word", Types.STRING).lineDelimiter("\n")).withSchema(new Schema().field("word", Types.STRING)).inAppendMode().registerTableSource("fileSource");//将source注册到env中
【2】自定义一个 Table source: 然后把自己的Table source注册进去。
TableSource csvSource = new CsvTableSource(path,new String[]{"word"},new TypeInformation[]{Types.STRING});
tEnv.registerTableSource("sourceTable2", csvSource);
【3】注册一个 DataStream: 例如下面一个String类型的DataStream,命名为myTable3对应的schema只有一列叫word。
DataStream<String> stream = ...
// register the DataStream as table " myTable3" with
// fields "word"
tableEnv.registerDataStream("myTable3", stream, "word");
动态表
如果流中的数据类型是case class可以直接根据case class的结构生成table
tableEnv.fromDataStream(ecommerceLogDstream)
或者根据字段顺序单独命名:用单引放到字段前面来标识字段名。
tableEnv.fromDataStream(ecommerceLogDstream,'mid,'uid ......)
最后的动态表可以转换为流进行输出,如果不是简单的插入就使用toRetractStream
table.toAppendStream[(String,String)]
如何输出一个table
当我们获取到一个结构表的时候(table类型)执行insertInto目标表中:resultTable.insertInto("TargetTable");
【1】Table descriptor: 类似于注入,最终使用Sink进行输出,例如如下输出到targetTable中,主要是最后一段的区别。
tEnv
.connect(new FileSystem().path(path)).withFormat(new OldCsv().field("word", Types.STRING)
.lineDelimiter("\n")).withSchema(new Schema()
.field("word", Types.STRING))
.registerTableSink("targetTable");
【2】自定义一个 Table sink: 输出到自己的 sinkTable2注册进去。
TableSink csvSink = new CsvTableSink(path,new String[]{"word"},new TypeInformation[]{Types.STRING});
tEnv.registerTableSink("sinkTable2", csvSink);
【3】输出一个 DataStream: 例如下面产生一个RetractStream,对应要给Tuple2的联系。Boolean这行记录时add还是delete。如果使用了groupby,table 转化为流的时候只能使用toRetractStream。得到的第一个boolean型字段标识 true就是最新的数据(Insert),false表示过期老数据(Delete)。如果使用的api包括时间窗口,那么窗口的字段必须出现在groupBy中。
// emit the result table to a DataStream
DataStream<Tuple2<Boolean, Row>> stream = tableEnv.toRetractStream(resultTable, Row.class)
stream.filter(_._1).print()
案例代码:
package com.zzx.flinkimport java.util.Propertiesimport com.alibaba.fastjson.JSON
import org.apache.flink.api.common.serialization.SimpleStringSchema
import org.apache.flink.streaming.api.TimeCharacteristic
import org.apache.flink.streaming.api.functions.timestamps.BoundedOutOfOrdernessTimestampExtractor
import org.apache.flink.streaming.api.scala._
import org.apache.flink.streaming.api.windowing.time.Time
import org.apache.flink.streaming.connectors.kafka.FlinkKafkaConsumer011
import org.apache.flink.table.api.java.Tumble
import org.apache.flink.table.api.{StreamTableEnvironment, Table, TableEnvironment}object FlinkTableAndSql {def main(args: Array[String]): Unit = {//执行环境val env: StreamExecutionEnvironment = StreamExecutionEnvironment.getExecutionEnvironment//设置 时间特定为 EventTimeenv.setStreamTimeCharacteristic(TimeCharacteristic.EventTime)//读取数据  MyKafkaConsumer 为自定义的 kafka 工具类,并传入 topicval dstream: DataStream[String] = env.addSource(MyKafkaConsumer.getConsumer("FLINKTABLE&SQL"))//将字符串转换为对象val ecommerceLogDstream:DataStream[SensorReding] = dstream.map{/* 引入如下依赖<dependency><groupId>com.alibaba</groupId><artifactId>fastjson</artifactId><version>1.2.36</version></dependency>*///将 String 转换为 SensorRedingjsonString => JSON.parseObject(jsonString,classOf[SensorReding])}//告知 watermark 和 evetTime如何提取val ecommerceLogWithEventTimeDStream: DataStream[SensorReding] =ecommerceLogDstream.assignTimestampsAndWatermarks(new BoundedOutOfOrdernessTimestampExtractor[SensorReding](Time.seconds(0)) {override def extractTimestamp(t: SensorReding): Long = {t.timestamp}})//设置并行度ecommerceLogDstream.setParallelism(1)//创建 Table 执行环境val tableEnv: StreamTableEnvironment = TableEnvironment.getTableEnvironment(env)var ecommerceTable: Table = tableEnv.fromTableSource(ecommerceLogWithEventTimeDStream ,'mid,'uid,'ch,'ts.rowtime)//通过 table api进行操作//每10秒统计一次各个渠道的个数 table api解决//groupby window=滚动式窗口 用 eventtime 来确定开窗时间val resultTalbe: Table = ecommerceTable.window(Tumble over 10000.millis on 'ts as 'tt).groupBy('ch,'tt).select('ch,'ch.count)var ecommerceTalbe: String = "xxx"//通过 SQL 执行val resultSQLTable: Table = tableEnv.sqlQuery("select ch,count(ch) from "+ ecommerceTalbe +"group by ch,Tumble(ts,interval '10' SECOND")//把 Table 转化成流输出//val appstoreDStream: DataStream[(String,String,Long)] = appstoreTable.toAppendStream[(String,String,Long)]val resultDStream: DataStream[(Boolean,(String,Long))] = resultSQLTable.toRetractStream[(String,Long)]//过滤resultDStream.filter(_._1)env.execute()}
}
object MyKafkaConsumer {def getConsumer(sourceTopic: String): FlinkKafkaConsumer011[String] ={val bootstrapServers = "hadoop1:9092"// kafkaConsumer 需要的配置参数val props = new Properties// 定义kakfa 服务的地址,不需要将所有broker指定上props.put("bootstrap.servers", bootstrapServers)// 制定consumer groupprops.put("group.id", "test")// 是否自动确认offsetprops.put("enable.auto.commit", "true")// 自动确认offset的时间间隔props.put("auto.commit.interval.ms", "1000")// key的序列化类props.put("key.deserializer", "org.apache.kafka.common.serialization.StringDeserializer")// value的序列化类props.put("value.deserializer", "org.apache.kafka.common.serialization.StringDeserializer")//从kafka读取数据,需要实现 SourceFunction 他给我们提供了一个val consumer = new FlinkKafkaConsumer011[String](sourceTopic, new SimpleStringSchema, props)consumer}
}
关于时间窗口
【1】用到时间窗口,必须提前声明时间字段,如果是processTime直接在创建动态表时进行追加就可以。如下的ps.proctime。
val ecommerceLogTable: Table = tableEnv.fromDataStream( ecommerceLogWithEtDstream,`mid,`uid,`appid,`area,`os,`ps.proctime )
【2】如果是EventTime要在创建动态表时声明。如下的ts.rowtime。
val ecommerceLogTable: Table = tableEnv.fromDataStream( ecommerceLogWithEtDstream,'mid,'uid,'appid,'area,'os,'ts.rowtime)
【3】滚动窗口可以使用Tumble over 10000.millis on来表示
val table: Table = ecommerceLogTable.filter("ch = 'appstore'").window(Tumble over 10000.millis on 'ts as 'tt).groupBy('ch,'tt).select("ch,ch.count")
如何查询一个 table
为了会有GroupedTable等,为了增加限制,写出正确的API。
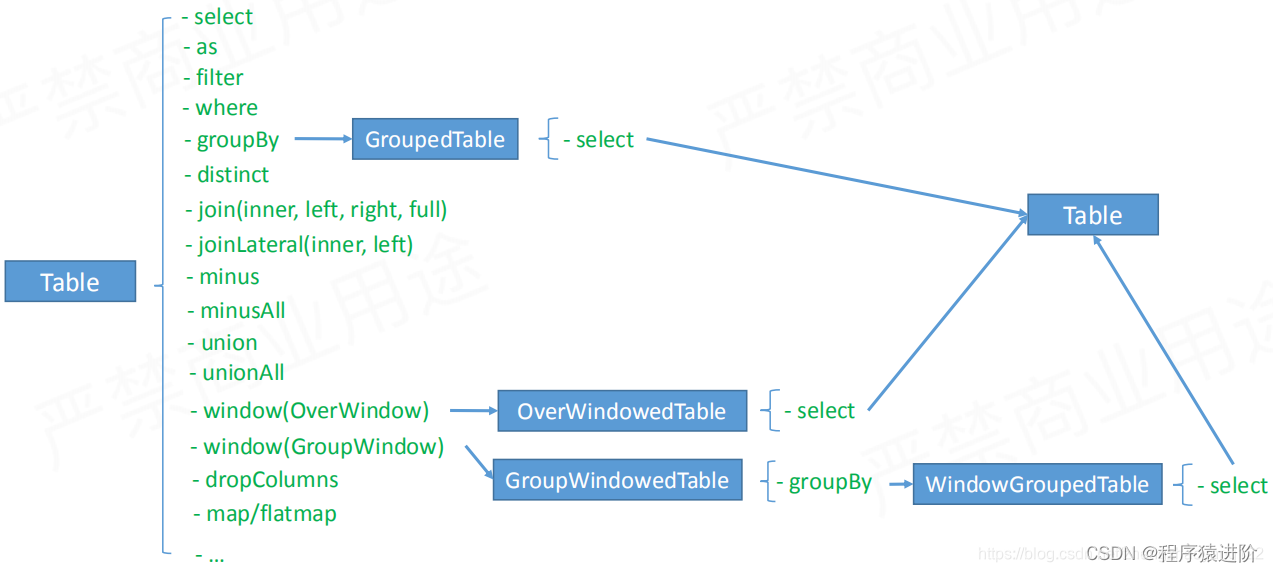
Table API 操作分类
1、与sql对齐的操作,select、as、filter等;
2、提升Table API易用性的操作;
——Columns Operation易用性: 假设有一张100列的表,我们需要去掉一列,需要怎么操作?第三个API可以帮你完成。我们先获取表中的所有Column,然后通过dropColumn去掉不需要的列即可。主要是一个Table上的算子。
| Operators | Examples |
|---|---|
| AddColumns | Table orders = tableEnv.scan(“Orders”); Table result = orders.addColumns(“concat(c,‘sunny’)as desc”); 添加新的列,要求是列名不能重复。 |
| addOrReplaceColumns | Table orders = tableEnv.scan(“Orders”); Table result = order.addOrReplaceColumns(“concat(c,‘sunny’) as desc”);添加列,如果存在则覆盖 |
| DropColumns | Table orders = tableEnv.scan(“Orders”); Table result = orders.dropColumns(“b c”); |
| RenameColumns | Table orders = tableEnv.scan(“Orders”); Table result = orders.RenameColumns("b as b2,c as c2);列重命名 |
——Columns Function易用性: 假设有一张表,我么需要获取第20-80列,该如何获取。类似一个函数,可以用在列选择的任何地方,例如:Table.select(withColumns(a,1 to 10))、GroupBy等等。
| 语法 | 描述 |
|---|---|
| withColumns(…) | 选择你指定的列 |
| withoutColumns(…) | 反选你指定的列 |

列的操作语法(建议): 如下,它们都是上层包含下层的关系。
columnOperation:withColumns(columnExprs) / withoutColumns(columnExprs) #可以接收多个参数 columnExpr
columnExprs:columnExpr [, columnExpr]*  #可以分为如下三种情况
columnExpr:columnRef | columnIndex to columnIndex | columnName to columnName #1 cloumn引用  2下标范围操作  3名字的范围操作
columnRef:columnName(The field name that exists in the table) | columnIndex(a positive integer starting at 1)Example: withColumns(a, b, 2 to 10, w to z)
Row based operation/Map operation易用性:
//方法签名: 接收一个 scalarFunction 参数,返回一个 Table
def map(scalarFunction: Expression): Tableclass MyMap extends ScalarFunction {var param : String = ""//eval 方法接收一些输入def eval([user defined inputs]): Row = {val result = new Row(3)// Business processing based on data and parameters// 根据数据和参数进行业务处理,返回最终结果result}//指定结果对应的类型,例如这里 Row的类型,Row有三列override def getResultType(signature: Array[Class[_]]):TypeInformation[_] = {Types.ROW(Types.STRING, Types.INT, Types.LONG)}
}//使用 fun('e) 得到一个 Row 并定义名称 abc 然后获取 ac列
val res = tab
.map(fun('e)).as('a, 'b, 'c)
.select('a, 'c)//好处:当你的列很多的时候,并且每一类都需要返回一个结果的时候
table.select(udf1(), udf2(), udf3()….)
VS
table.map(udf())
Map是输入一条输出一条

FlatMap operation易用性:
//方法签名:出入一个tableFunction
def flatMap(tableFunction: Expression): Table
#tableFunction 实现的列子,返回一个 User类型,是一个 POJOs类型,Flink能够自动识别类型。
case class User(name: String, age: Int)
class MyFlatMap extends TableFunction[User] {def eval([user defined inputs]): Unit = {for(..){collect(User(name, age))}}
}//使用
val res = tab
.flatMap(fun('e,'f)).as('name, 'age)
.select('name, 'age)
Benefit//好处
table.joinLateral(udtf) VS table.flatMap(udtf())
FlatMap是输入一行输出多行

FlatAggregate operation功能性:
#方法签名:输入 tableAggregateFunction 与 AggregateFunction 很相似
def flatAggregate(tableAggregateFunction: Expression): FlatAggregateTable
class FlatAggregateTable(table: Table, groupKey: Seq[Expression], tableAggFun: Expression)
class TopNAcc {var data: MapView[JInt, JLong] = _ // (rank -> value)...}class TopN(n: Int) extends TableAggregateFunction[(Int, Long), TopNAccum] {def accumulate(acc: TopNAcc, [user defined inputs]) {...}#可以那多 column,进行多个输出def emitValue(acc: TopNAcc, out: Collector[(Int, Long)]): Unit = {...}...retract/merge
}#用法
val res = tab
.groupBy(‘a)
.flatAggregate(
flatAggFunc(‘e,’f) as (‘a, ‘b, ‘c))
.select(‘a, ‘c)#好处
新增了一种agg,输出多行
FlatAggregate operation输入多行输出多行

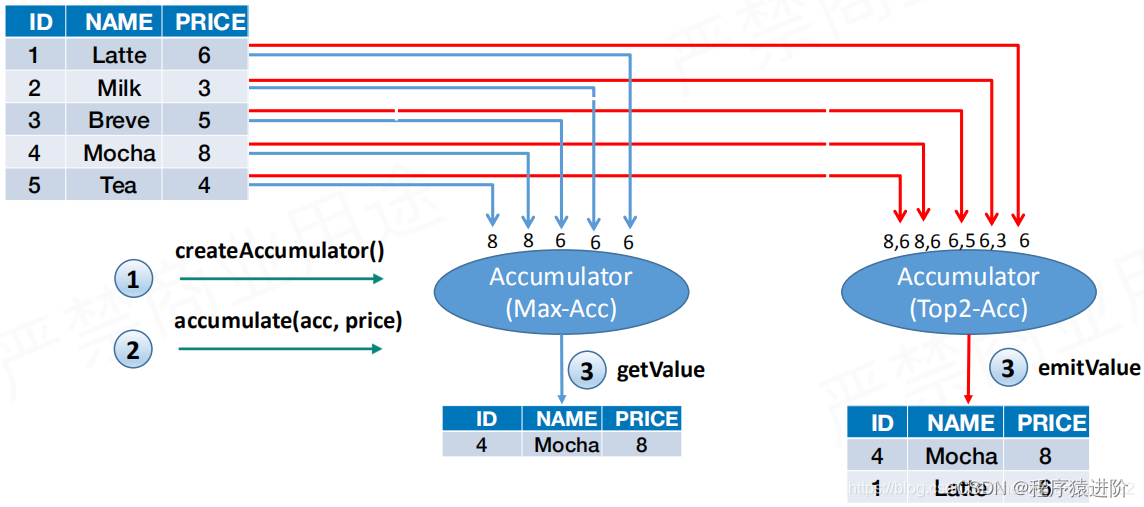
Aggregate与FlatAggregate的区别: 使用Max和Top2的场景比较Aggregate和FlatAggregate之间的差别。如下有一张输入表,表有三列(ID、NAME、PRICE),然后对Price求最大指和Top2。
Max操作是蓝线,首先创建累加器,然后在累加器上accumulate操作,例如6过去是6,3过去没有6大还是6等等。得到最终得到8的结果。
TOP2操作时红线,首先创建累加器,然后在累加器上accumulate操作,例如6过去是6,3过去因为是两个元素所以3也保存,当5过来时,和最小的比较,3就被淘汰了等等。得到最终得到8和6的结果。
总结:


