一、整体结构
- 框架组成:pytest+requests+allure
- 设计模式:
- 关键字驱动
- 项目结构:
- 工具层:api_keyword/
- 参数层:params/
- 用例层:case/
- 数据驱动:data_driver/
- 数据层:data/
- 逻辑层:logic/
二、具体步骤及代码
1、工具层
将get、post等常用行为进行二次封装。
代码(api_key.py)如下:
import allure
import json
import jsonpath
import requests# 定义一个关键字类
class ApiKey:# 将get请求行为进行封装@allure.step("发送get请求")def get(self, url, params=None, **kwargs):return requests.get(url=url, params=params, **kwargs)# 将post请求行为进行封装@allure.step("发送post请求")def post(self, url, data=None, **kwargs):return requests.post(url=url, data=data, **kwargs)# 由于接口之间可能相互关联,因此下一个接口需要上一个接口的某个返回值,此处采用jsonpath对上一个接口返回的值进行定位并取值@allure.step("获取返回结果字典值")def get_text(self, data, key):# json数据转换为字典json_data = json.loads(data)# jsonpath取值value = jsonpath.jsonpath(json_data, '$..{0}'.format(key))return value[0]- 其中引用allure.step()装饰器进行步骤详细描述,使测试报告更加详细。
- 使用jsonpath对接口的返回值进行取值。
2、数据层
数据采用yaml文件。
代码(user.yaml)如下:
-user:username: adminpassword: '123456'msg: successtitle: 输入正确账号、密码,登录成功
-user:username: admin1password: '1234561'msg: 用户名或密码错误title: 输入错误账号1、密码1,登录失败
-user:username: admin2password: '1234562'msg: 用户名或密码错误title: 输入错误账号2、密码2,登录失败- 其中title是为了在用例进行时动态获取参数生成标题。
3、数据驱动层
对数据进行读写。
代码(yaml.driver.py)如下:
import yamldef load_yaml(path):file = open(path, 'r', encoding='utf-8')data = yaml.load(file, Loader=yaml.FullLoader)return data
4、参数层
参数层存放公共使用的参数,在使用时对其进行调用。
代码(allParams.py)如下:
'''规则:全局变量使用大写字母表示
'''# 地址
URL = 'http://39.98.138.157:'# 端口
PORT = '5000'
5、逻辑层
用例一:进行登录的接口请求,此处登录请求在yaml文件里设置了三组不同的数据进行请求。
用例二:进行个人查询的接口请求,此处需要用到登录接口返回的token值。
用例三、进行添加商品到购物车的接口请求,此处需要用到登录接口返回的token值以及个人查询接口返回的openid、userid值
用例四、进行下单的接口请求,此处需要用到登录接口返回的token值以及个人查询接口返回的openid、userid、cartid值
注意:由于多数接口需要用到登录接口返回的token值,因此封装一个conftest.py定义项目级前置fixture,在整个项目只执行一次,可以在各个用例中进行调用(其他共用参数也可以采取类似前置定义)。同时由于此处定义的项目级fixture,因此可以将初始化工具类ak = ApiKey()也放入其中。
代码(conftest.py)如下:
from random import randomimport allure
import pytestfrom pytest_demo_2.api_keyword.api_key import ApiKey
from pytest_demo_2.params.allParams import *def pytest_collection_modifyitems(items):"""测试用例收集完成时,将收集到的item的name和nodeid的中文显示在控制台上"""for item in items:item.name = item.name.encode("utf-8").decode("unicode_escape")item._nodeid = item.nodeid.encode("utf-8").decode("unicode_escape")# 项目级fix,整个项目只初始化一次
@pytest.fixture(scope='session')
def token_fix():# 初始化工具类ak = ApiKey()with allure.step("发送登录接口请求,并获取token,整个项目只生成一次"):# 请求接口# url = 'http://39.98.138.157:5000/api/login'url = URL + PORT + '/api/login'# 请求参数userInfo = {'username': 'admin','password': '123456'}# post请求res = ak.post(url=url, json=userInfo)# 获取tokentoken = ak.get_text(res.text, 'token')# 验证代码,验证token只生成一次token_random = random()return ak, token, res, token_random
- 其中也包含了防止中文乱码,加入了pytest_collection_modifyitems(函数)。
设置好conftest后,就可以应用在逻辑层里面了。
代码(shopingApi.py)如下:
import pytest
import allure
from pytest_demo_2.api_keyword.api_key import ApiKey
from pytest_demo_2.params.allParams import *class ApiCase():# 登录逻辑def params_login(self, userdata):# 动态获取参数生成标题allure.dynamic.title(userdata['title'])# 初始化工具类ak = ApiKey()# 请求接口url = URL + PORT + '/api/login'# 请求参数userInfo = {'username': userdata['user']['username'],'password': userdata['user']['password']}res = ak.post(url=url, json=userInfo)with allure.step("接口返回信息校验及打印"):print("/api/login登录接口请求响应信息")print(res.text)# 获取响应结果msg = ak.get_text(res.text, 'msg')print(msg)# 断言assert msg == userdata['msg']def params_getuserinfo(self, token_fix):# 从fix中获取预置的工具类和token,所有返回值都需要接收ak, token, res, token_random01 = token_fixwith allure.step("发送个人查询接口请求"):url = URL + PORT + '/api/getuserinfo'headers = {'token': token}res1 = ak.get(url=url, headers=headers)with allure.step("接口返回信息校验及打印"):print("/api/getuserinfo个人用户查询接口请求响应信息")print(res1.text)# print("验证的random值,测试用")# print(token_random01)name = ak.get_text(res1.text, 'nikename')# 断言assert "风清扬" == namereturn res1def params_addcart(self, token_fix):# 从fix中获取预置的工具类和token# 所有返回都要获取,不然会报错ak, token, res, token_random01 = token_fixwith allure.step("调用getuserinfo接口获取返回信息"):res1 = self.params_getuserinfo(token_fix)with allure.step("发送添加商品到购物车请求"):# 添加商品到购物车,基于token、userid、openid、productidurl = URL + PORT + '/api/addcart'hd = {"token": token}data = {"userid": ak.get_text(res1.text, 'userid'),"openid": ak.get_text(res1.text, 'openid'),"productid": 8888}# 发送请求res2 = ak.post(url=url, headers=hd, json=data)with allure.step("接口返回信息校验及打印"):print("/api/addcart添加商品到购物车请求响应信息")print(res2.text)# print("验证的random值,测试用")# print(token_random01)result = ak.get_text(res2.text, 'result')assert 'success' == resultreturn res2def params_createorder(self, token_fix):ak, token, res, token_random01 = token_fixwith allure.step("调用addcart接口获取返回信息"):res1 = self.params_addcart(token_fix)with allure.step("发送下单请求"):url = URL + PORT + '/api/createorder'# 从项目级fix中获取tokenhd = {"token": token}# 从添加商品到购物车接口中获取userid,openid,cartiddata = {"userid": ak.get_text(res1.text, 'userid'),"openid": ak.get_text(res1.text, 'openid'),"productid": 8888,"cartid": ak.get_text(res1.text, 'cartid')}res2 = ak.post(url=url, headers=hd, json=data)with allure.step("接口返回信息校验及打印"):print("/api/createorder下单请求响应信息")print(res2.text)# print("验证的random值,测试用")# print(token_random01)result = ak.get_text(res1.text, 'result')assert 'success' == result
6、用例层
调用逻辑层进行用例管理和数据传输。
代码(test_Tree.py)如下:
import allure
import pytest
from pytest_demo_2.data_driver import yaml_driver
from pytest_demo_2.logic.shopingApi import ApiCase@allure.epic("shopXo电商平台接口-接口测试")
class TestTree():# 初始化用例库actions1 = ApiCase()@allure.feature("01.登陆")@allure.story("02.一般场景")@pytest.mark.parametrize('userdata', yaml_driver.load_yaml('./data/user.yaml'))def test_case01(self, userdata):self.actions1.params_login(userdata)@allure.feature("02.个人查询")@allure.story("01.典型场景")@allure.title("个人查询")def test_case02(self, token_fix):self.actions1.params_getuserinfo(token_fix)@allure.feature("03.添加商品到购物车")@allure.story("01.典型场景")@allure.title("添加商品到购物车")def test_case03(self, token_fix):self.actions1.params_addcart(token_fix)@allure.feature("04.下单")@allure.story("01.典型场景")@allure.title("下单")def test_case04(self, token_fix):self.actions1.params_createorder(token_fix)
7、运行
代码(main_run.py)如下:
import os
import pytestdef run():pytest.main(['-v', './case/test_Tree.py','--alluredir', './result', '--clean-alluredir'])os.system('allure serve result')# os.system('allure generate ./result/ -o ./report_allure/ --clean')if __name__ == '__main__':run()
8、结果
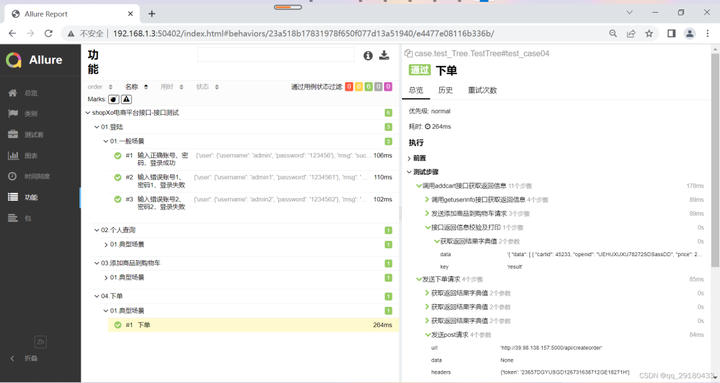
2023最新Jmeter接口测试从入门到精通(全套项目实战教程)
![[已解决]HttpMessageNotReadableException: JSON parse error: Unexpected character:解析JSON时出现异常的问题分析与解决方案](https://img-blog.csdnimg.cn/b2cbd913c75642ac89a2fdd597f62daf.png)