(关注博主后,在“粉丝专栏”,可免费阅读此文)
先看效果:


上面的绑定值都是我们自定义的属性,有了以上的提示,那么我们可以轻松绑定字段,再也不用担心错误了。附带源码。
目录
1.建立mvvm项目
2.cs后台使用DataContext绑定
3.xaml前台使用DataContext绑定
4.xaml前台使用DataContext单例模式绑定
1.建立mvvm项目
1.首先建立一个项目,采用mvvm模式,其中MainWindow.xaml相当于View层,其余各层都比较简单。

2.BindingBase.cs
using System;
using System.Collections.Generic;
using System.ComponentModel;
using System.Linq;
using System.Runtime.CompilerServices;
using System.Text;
using System.Threading.Tasks;namespace WpfDataContextDemo.Common
{public class BindingBase : INotifyPropertyChanged{public event PropertyChangedEventHandler PropertyChanged;//protected virtual void OnPropertyChanged(string propertyName)protected virtual void OnPropertyChanged([CallerMemberName] string propertyName = "")//此处使用特性{PropertyChanged?.Invoke(this, new PropertyChangedEventArgs(propertyName));}}
}
3.StudentInfo.cs
using System;
using System.Collections.Generic;
using System.Linq;
using System.Text;
using System.Threading.Tasks;
using WpfDataContextDemo.Common;namespace WpfDataContextDemo.Model
{public class StudentInfo : BindingBase{private int id;public int Id{get { return id; }set { id = value; OnPropertyChanged(); }}private string name;public string Name{get { return name; }set { name = value; OnPropertyChanged(); }}private int age;public int Age{get { return age; }set { age = value; OnPropertyChanged(); }}private bool b;public bool B{get { return b; }set { b = value; OnPropertyChanged(); }}}
}
4.MainWindowViewModel.cs
using System;
using System.Collections.Generic;
using System.Collections.ObjectModel;
using System.Linq;
using System.Text;
using System.Threading.Tasks;
using WpfDataContextDemo.Model;namespace WpfDataContextDemo.ViewModel
{public class MainWindowViewModel{public ObservableCollection<StudentInfo> Infos { get; set; }public MainWindowViewModel(){Infos = new ObservableCollection<StudentInfo>(){new StudentInfo(){ Id=1, Age=11, Name="Tom",B=false},new StudentInfo(){ Id=2, Age=12, Name="Darren",B=false},new StudentInfo(){ Id=3, Age=13, Name="Jacky",B=false},new StudentInfo(){ Id=4, Age=14, Name="Andy",B=false}};}}
}
2.cs后台使用DataContext绑定
1.MainWindow.xaml.cs
只有一句话最重要
using System;
using System.Collections.Generic;
using System.Linq;
using System.Text;
using System.Threading.Tasks;
using System.Windows;
using System.Windows.Controls;
using System.Windows.Data;
using System.Windows.Documents;
using System.Windows.Input;
using System.Windows.Media;
using System.Windows.Media.Imaging;
using System.Windows.Navigation;
using System.Windows.Shapes;
using WpfDataContextDemo.ViewModel;namespace WpfDataContextDemo
{/// <summary>/// Interaction logic for MainWindow.xaml/// </summary>public partial class MainWindow : Window{public MainWindow(){InitializeComponent();this.DataContext = new MainWindowViewModel();}}
}
2.其中MainWindow.xaml
<Window x:Class="WpfDataContextDemo.MainWindow"xmlns="http://schemas.microsoft.com/winfx/2006/xaml/presentation"xmlns:x="http://schemas.microsoft.com/winfx/2006/xaml"xmlns:d="http://schemas.microsoft.com/expression/blend/2008"xmlns:mc="http://schemas.openxmlformats.org/markup-compatibility/2006"xmlns:local="clr-namespace:WpfDataContextDemo"mc:Ignorable="d"Title="MainWindow" Height="450" Width="800"><Grid><StackPanel Height="295" HorizontalAlignment="Left" Margin="10,10,0,0" Name="stackPanel1" VerticalAlignment="Top" Width="427"><TextBlock  Text="{Binding Infos.Count  }" Margin="5" /><TextBlock Height="23" Name="textBlock1" Text="学员编号:" /><TextBox Height="23" Name="txtStudentId"  Width="301" HorizontalAlignment="Left"   /><TextBlock Height="23" Name="textBlock2" Text="学员列表:" /><ListBox Height="156" Name="lbStudent" Width="305" HorizontalAlignment="Left" ItemsSource="{Binding   Infos}"><ListBox.ItemTemplate><DataTemplate><StackPanel Name="stackPanel2" Orientation="Horizontal"><TextBlock  Text="{Binding Id  ,Mode=TwoWay}" Margin="5" Background="Red"/><TextBlock x:Name="aa" Text="{Binding Name,Mode=TwoWay, UpdateSourceTrigger=Explicit}" Margin="5"/><TextBlock  Text="{Binding  Age,Mode=TwoWay}" Margin="5"/><TextBlock  Text="{Binding B,Mode=TwoWay}" Margin="5"/></StackPanel></DataTemplate></ListBox.ItemTemplate></ListBox></StackPanel></Grid>
</Window>
此时,我们输入Binding的时候,不会显示Id,Name这些字段。
3.xaml前台使用DataContext绑定
1.先屏蔽后台cs的代码
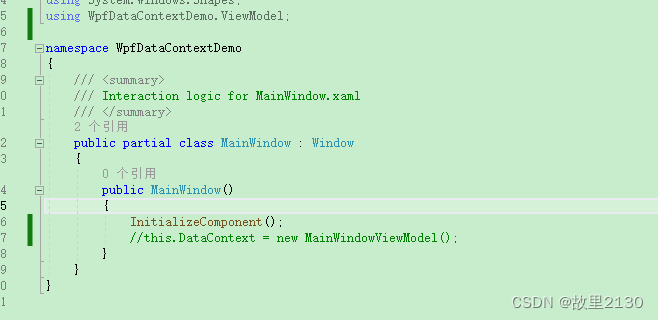
2.前台MainWindow.xaml
<Window x:Class="WpfDataContextDemo.MainWindow"xmlns="http://schemas.microsoft.com/winfx/2006/xaml/presentation"xmlns:x="http://schemas.microsoft.com/winfx/2006/xaml"xmlns:d="http://schemas.microsoft.com/expression/blend/2008"xmlns:mc="http://schemas.openxmlformats.org/markup-compatibility/2006"xmlns:local="clr-namespace:WpfDataContextDemo" xmlns:local1="clr-namespace:WpfDataContextDemo.ViewModel"mc:Ignorable="d"Title="MainWindow" Height="450" Width="800"><Window.DataContext><local1:MainWindowViewModel /></Window.DataContext><Grid><StackPanel Height="295" HorizontalAlignment="Left" Margin="10,10,0,0" Name="stackPanel1" VerticalAlignment="Top" Width="427"><TextBlock  Text="{Binding Infos.Count  }" Margin="5" /><TextBlock Height="23" Name="textBlock1" Text="学员编号:" /><TextBox Height="23" Name="txtStudentId"  Width="301" HorizontalAlignment="Left"   /><TextBlock Height="23" Name="textBlock2" Text="学员列表:" /><ListBox Height="156" Name="lbStudent" Width="305" HorizontalAlignment="Left" ItemsSource="{Binding  in}"><ListBox.ItemTemplate><DataTemplate><StackPanel Name="stackPanel2" Orientation="Horizontal"><TextBlock  Text="{Binding Id  ,Mode=TwoWay}" Margin="5" Background="Red"/><TextBlock x:Name="aa" Text="{Binding Name,Mode=TwoWay, UpdateSourceTrigger=Explicit}" Margin="5"/><TextBlock  Text="{Binding  Age,Mode=TwoWay}" Margin="5"/><TextBlock  Text="{Binding B,Mode=TwoWay}" Margin="5"/></StackPanel></DataTemplate></ListBox.ItemTemplate></ListBox></StackPanel></Grid>
</Window>
3.最主要的是,可以点击出来,非常的清晰明了


4.xaml前台使用DataContext单例模式绑定
1.MainWindowViewModel.cs
using System;
using System.Collections.Generic;
using System.Collections.ObjectModel;
using System.Linq;
using System.Text;
using System.Threading.Tasks;
using WpfDataContextDemo.Model;namespace WpfDataContextDemo.ViewModel
{public class MainWindowViewModel{//public ObservableCollection<StudentInfo> Infos { get; set; }//public MainWindowViewModel()//{//    Infos = new ObservableCollection<StudentInfo>()//    {//        new StudentInfo(){ Id=1, Age=11, Name="Tom",B=false},//        new StudentInfo(){ Id=2, Age=12, Name="Darren",B=false},//        new StudentInfo(){ Id=3, Age=13, Name="Jacky",B=false},//        new StudentInfo(){ Id=4, Age=14, Name="Andy",B=false}//    };//}private static readonly MainWindowViewModel instance = new MainWindowViewModel();public static MainWindowViewModel Instance{get { return instance; }}public ObservableCollection<StudentInfo> Infos { get; set; }public MainWindowViewModel(){Infos = new ObservableCollection<StudentInfo>(){new StudentInfo(){ Id=1, Age=11, Name="Tom",B=false},new StudentInfo(){ Id=2, Age=12, Name="Darren",B=false},new StudentInfo(){ Id=3, Age=13, Name="Jacky",B=false},new StudentInfo(){ Id=4, Age=14, Name="Andy",B=false}};}}
}
2.MainWindow.xaml
<Window x:Class="WpfDataContextDemo.MainWindow"xmlns="http://schemas.microsoft.com/winfx/2006/xaml/presentation"xmlns:x="http://schemas.microsoft.com/winfx/2006/xaml"xmlns:d="http://schemas.microsoft.com/expression/blend/2008"xmlns:mc="http://schemas.openxmlformats.org/markup-compatibility/2006"xmlns:local="clr-namespace:WpfDataContextDemo" xmlns:local1="clr-namespace:WpfDataContextDemo.ViewModel"mc:Ignorable="d"DataContext="{x:Static local1:MainWindowViewModel.Instance}"Title="MainWindow" Height="450" Width="800"><!--<Window.DataContext><local1:MainWindowViewModel /></Window.DataContext>--><Grid><StackPanel Height="295" HorizontalAlignment="Left" Margin="10,10,0,0" Name="stackPanel1" VerticalAlignment="Top" Width="427"><TextBlock  Text="{Binding Infos.Count  }" Margin="5" /><TextBlock Height="23" Name="textBlock1" Text="学员编号:" /><TextBox Height="23" Name="txtStudentId"  Width="301" HorizontalAlignment="Left"   /><TextBlock Height="23" Name="textBlock2" Text="学员列表:" /><ListBox Height="156" Name="lbStudent" Width="305" HorizontalAlignment="Left" ItemsSource="{Binding  Infos}"><ListBox.ItemTemplate><DataTemplate><StackPanel Name="stackPanel2" Orientation="Horizontal"><TextBlock  Text="{Binding Id  ,Mode=TwoWay}" Margin="5" Background="Red"/><TextBlock x:Name="aa" Text="{Binding Name ,Mode=TwoWay, UpdateSourceTrigger=Explicit}" Margin="5"/><TextBlock  Text="{Binding  Age,Mode=TwoWay}" Margin="5"/><TextBlock  Text="{Binding B,Mode=TwoWay}" Margin="5"/></StackPanel></DataTemplate></ListBox.ItemTemplate></ListBox></StackPanel></Grid>
</Window>
源码:https://download.csdn.net/download/u012563853/88407490
来源:
WPF中DataContext的绑定技巧-粉丝专栏-CSDN博客


