1.STM32分文件实现代码
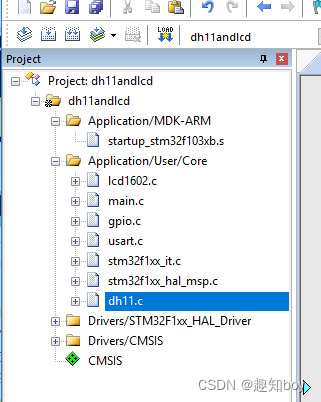
编译的总文件夹dh11andlcd,C文件不能跨文件夹查找,新增的分文件,需要都放调用的文件夹下
C文件和H文件理解:H文件是门脸,放在前面给别人的,别人一看就知道有什么东西。C是给内部人用的,不用放在门脸上。
2.CubeMX设置
stm32GPIO口不能直接作为输入和输出引脚——是需要初始化的
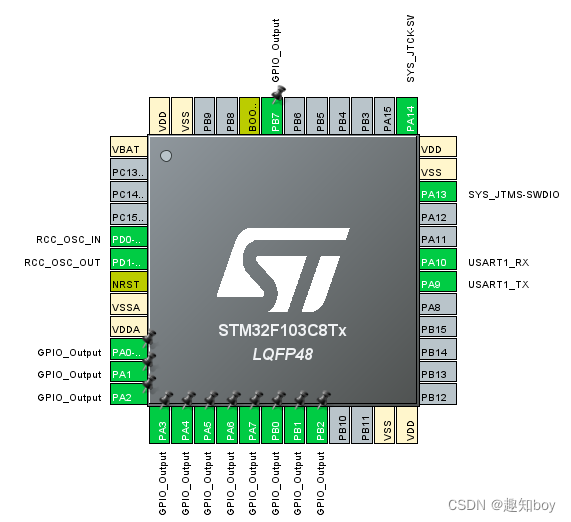
基本上没有什么需要设置的
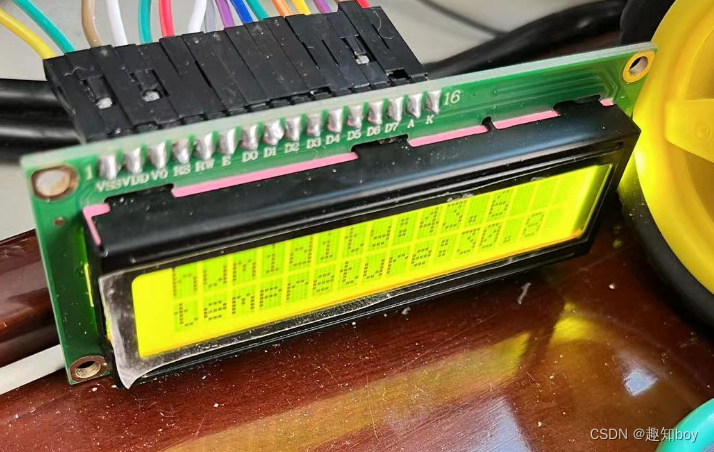
PA0——PA7接LCD1602的D0——D7
//电源
VSS -- GND
VDD -- 5V
//对比度
VO -- GND
//控制线
RS -- P1.0
RW -- P1.1
E -- P1.4
//背光灯
A -- 5V
K -- GDN
DH11的数据线接PB6(在程序里设置其为输入IO还是输出IO)
3.函数代码
DH11.h
只用 void DH11_to_data1(uint8_t data1[]);但是需要注意格式
#ifndef __DH11_H__
#define __DH11_H__
#include "gpio.h"void DH11_to_data1(uint8_t data1[]);#endif
DH11.c
#include "gpio.h"
#define tp_data_low HAL_GPIO_WritePin(GPIOB,GPIO_PIN_6,GPIO_PIN_RESET)
#define tp_data_high HAL_GPIO_WritePin(GPIOB,GPIO_PIN_6,GPIO_PIN_SET)void delay_us(uint16_t cnt)
{uint8_t i;while(cnt){for (i = 0; i < 10; i++){}cnt--;}
}void MX_GPIO_pin_pp(void)
{GPIO_InitTypeDef GPIO_InitStruct = {0};/* GPIO Ports Clock Enable */__HAL_RCC_GPIOB_CLK_ENABLE();/*Configure GPIO pins : PB0 PB1 PB2 PB7 */GPIO_InitStruct.Pin = GPIO_PIN_6;GPIO_InitStruct.Mode = GPIO_MODE_OUTPUT_PP;GPIO_InitStruct.Pull = GPIO_NOPULL;GPIO_InitStruct.Speed = GPIO_SPEED_FREQ_LOW;HAL_GPIO_Init(GPIOB, &GPIO_InitStruct);
}
void MX_GPIO_pin_input(void)
{GPIO_InitTypeDef GPIO_InitStruct = {0};/* GPIO Ports Clock Enable */__HAL_RCC_GPIOB_CLK_ENABLE();/*Configure GPIO pins : PB0 PB1 PB2 PB7 */GPIO_InitStruct.Pin = GPIO_PIN_6;GPIO_InitStruct.Mode = GPIO_MODE_INPUT;GPIO_InitStruct.Pull = GPIO_NOPULL;GPIO_InitStruct.Speed = GPIO_SPEED_FREQ_LOW;HAL_GPIO_Init(GPIOB, &GPIO_InitStruct);
}void init_DHT(void)
{MX_GPIO_pin_pp(); //需要写东西tp_data_high;tp_data_low;HAL_Delay(25); //µÍµÄ½×¶Îtp_data_high;//Delay30us();delay_us(30);//Delay30us(); //¿ªÊ¼ÏìÓ¦½×¶Î µã¿¨delay_us(30);MX_GPIO_pin_input();//需要读东西while(!HAL_GPIO_ReadPin(GPIOB,GPIO_PIN_6)); //¿¨DHTΪµÍ ×ßÍêwhile(HAL_GPIO_ReadPin(GPIOB,GPIO_PIN_6)); //¿¨DHTÀ¸ß ×ßÍê ºóÃæÊÇÊý¾Ý½ÓÊÜ}void DH11_to_data1(uint8_t data1[])
{int i,j; //i±íʾ8bitµÄÊý¾Ý j±íʾÿ¸öbitµÄÖµchar tmp,flag;init_DHT(); //³õʼ»¯ºó½ÓÊÜ8λÊý¾Ý+8λ +8λ+8λ +8λfor(i=0;i<5;i++){ for(j=0;j<8;j++){MX_GPIO_pin_input();//需要读东西while(!HAL_GPIO_ReadPin(GPIOB,GPIO_PIN_6)); //ÀµÍ×ßÍê//HAL_Delay()35us();delay_us(35);if(HAL_GPIO_ReadPin(GPIOB,GPIO_PIN_6)==1){flag=1;while(HAL_GPIO_ReadPin(GPIOB,GPIO_PIN_6)); //×ßÍê¸ßµçƽ}else{flag=0;}tmp=tmp<<1; //tmp±íʾ½ÓÊܵÄÒ»¸ö8λÊý¾Ýtmp |=flag; }data1[i]=tmp;}}LCD1602.h
#ifndef __LCD1602_H__
#define __LCD1602_H__void lcd_line_show(char row,char line,char *string);
#endif
LCD1602.c
#include "gpio.h"#define RS_low    HAL_GPIO_WritePin(GPIOB,GPIO_PIN_0,GPIO_PIN_RESET)
#define RS_high    HAL_GPIO_WritePin(GPIOB,GPIO_PIN_0,GPIO_PIN_SET)
#define RW_low    HAL_GPIO_WritePin(GPIOB,GPIO_PIN_1,GPIO_PIN_RESET)
#define RW_high    HAL_GPIO_WritePin(GPIOB,GPIO_PIN_1,GPIO_PIN_SET)
#define EN_low    HAL_GPIO_WritePin(GPIOB,GPIO_PIN_2,GPIO_PIN_RESET)
#define EN_high    HAL_GPIO_WritePin(GPIOB,GPIO_PIN_2,GPIO_PIN_SET)
int site[2][16]={{0x00,0x01,0x02,0x03,0x04,0x05,0x06,0x07,0x08,0x09,0x0A,0x0B,0x0C,0x0D,0x0E,0x0F},{0x40,0x41,0x42,0x43,0x44,0x45,0x46,0x47,0x48,0x49,0x4A,0x4B,0x4C,0x4D,0x4E,0x4F}};void cmd_write(char a)
{RS_low;RW_low;  //RS 和 R/W 共同为低电平时可以写入指令(地址)EN_low; GPIOA->ODR = a;//_nop_();  //延迟1.085usHAL_Delay(5);EN_high;//_nop_();HAL_Delay(5);EN_low;}void data_write(char a)
{RS_high;RW_low;  // RS 为高电平 R/W 为低电平时可以写入数据EN_low;  GPIOA->ODR = a;HAL_Delay(5);EN_high;HAL_Delay(5);EN_low;}void lcd_line_show(char row,char line,char *string)
{switch (row){case 1:cmd_write(0x80+line);while(*string){data_write(*string);string++;}break;	case 2:cmd_write(0x80+0x40+line);while(*string){data_write(*string);string++;}break;}
}void init_lcd(void)
{HAL_Delay(15);	//(1)延时 15mscmd_write(0x38);  //(2)写指令 38H(不检测忙信号)HAL_Delay(5);		  // (3)延时 5ms// (4)以后每次写指令,读/写数据操作均需要检测忙信号cmd_write(0x38);	 //(5)写指令 38H:显示模式设置cmd_write(0x08);	 //	   (6)写指令 08H:显示关闭cmd_write(0x01);	 //(7)写指令 01H:显示清屏cmd_write(0x06);	 //	(8)写指令 06H:显示光标移动设置cmd_write(0x0C);	 //	 (9)写指令 0CH:显示开及光标设置
}
32里面微秒的延时函数
void delay_us(uint16_t cnt)
{uint8_t i;while(cnt){for (i = 0; i < 10; i++){}cnt--;}
}
main函数代码
#include "lcd1602.h"
#include "dh11.h"
#include "stdio.h"int fputc(int ch, FILE *f)
{unsigned char temp[1]={ch};HAL_UART_Transmit(&huart1,temp,1,0xffff);return ch;
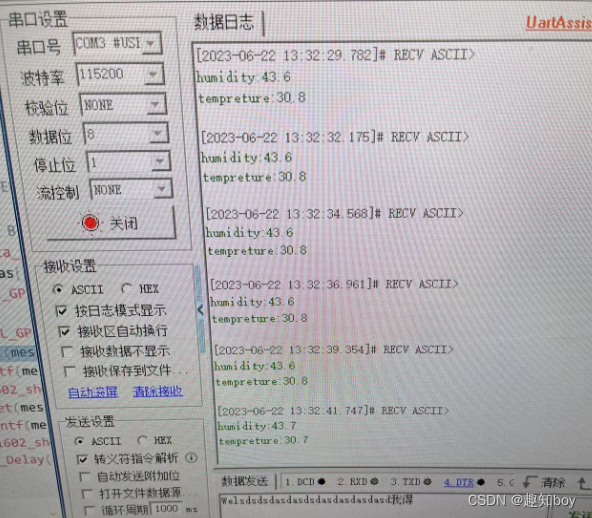
}//main中代码uint8_t data1[4]={'0'};char meseege1[16];char meseege2[16];init_lcd();	   //(1) 在对液晶模块的初始化中要先设置其显示模式//(2) 在液晶模块显示字符时光标是自动右移的,无霿人工干预//(3) 每次输入指令前都要判断液晶模块是否处于忙的状怿while (1){/* USER CODE END WHILE *//* USER CODE BEGIN 3 */DH11_to_data1(data1);printf("humidity:");printf("%d.%d\r",data1[0],data1[1]);printf("tempreture:");printf("%d.%d\r",data1[2],data1[3]);sprintf(meseege1,"humidity:%d.%d",data1[0],data1[1]);lcd_line_show(1,0,meseege1);sprintf(meseege2,"tempreture:%d.%d",data1[2],data1[3]);lcd_line_show(2,0,meseege2);HAL_Delay(2000);}
4.实现效果
