Opencv_CUDA实现推理图像前处理与后处理
- 通过trt 或者 openvino部署深度学习算法时,往往会通过opencv的Mat及算法将图像转换为固定的格式作为输入
- openvino图像的前后处理后边将在单独的文章中写出
- 今晚空闲搜了一些opencv_cuda的使用方法,在此总结一下
- 前提是已经通过CMake将cuda和opencv重新编译好了C++库
1.前处理
- 参考:【基于opencv-cuda的常见图像预处理】
#include <opencv2/opencv.hpp>
#include <opencv2/core/core.hpp>
#include <opencv2/highgui/highgui.hpp>
#include <opencv2/cudawarping.hpp>
#include <opencv2/cudaarithm.hpp>
#include <opencv2/cudaimgproc.hpp>
#include <cuda_runtime_api.h>
#include "NvInfer.h"
#include <iostream>
#include <assert.h>
#include <string>
#include <vector>void preprocessImage(const std::string& image_path, float* gpu_input,nvinfer1::Dims3& dims)
{cv::Mat frame = cv::imread(image_path);if(frame.empty()){std::cerr << "failed to load image: " << image_path << "!" << std::endl;return;}cv::cuda::GpuMat gpu_frame;gpu_frame.upload(frame);auto input_width = dims.d[2];auto input_height = dims.d[1];auto channels = dims.d[0];auto input_size = cv::Size(input_width, input_height);cv::cuda::GpuMat resized;cv::cuda::resize(gpu_frame, resized, input_size, 0, 0, cv::INTER_LINEAR);cv::cuda::GpuMat flt_image;resized.convertTo(flt_image, CV_32FC3, 1.f/255.f);cv::cuda::subtract(flt_image, cv::Scalar(0.485f, 0.346f, 0.406f), flt_image,cv::noArray(), -1);cv::cuda::divide(flt_image, cv::Scalar(0.229f, 0.224f, 0.225f), flt_image, 1, -1);cv::cuda::GpuMat rgb;cv::cuda::cvtColor(flt_image, rgb, cv::COLOR_BGR2RGB);std::vector<cv::cuda::GpuMat> rgb_out;for(size_t i=0; i<channels; ++i){rgb_out.emplace_back(cv::cuda::GpuMat(cv::Size(input_width, input_height), CV_32FC1, gpu_input + i * input_width * input_height));}cv::cuda::split(flt_image, rgb_out);
}
size_t getSizeByDim(const nvinfer1::Dims& dims)
{size_t size = 1;for (size_t i = 0; i < dims.nbDims; ++i){size *= dims.d[i];}return size;
}int main()
{std::string image_path = "./turkish_coffee.jpg";nvinfer1::Dims3 input_dim(3, 640, 640);auto input_size = getSizeByDim(input_dim) * sizeof(float);std::vector<void*> buffers(1);cudaMalloc(&buffers[0], input_size);preprocessImage(image_path, (float*)buffers[0], input_dim);cv::cuda::GpuMat gpu_output;std::vector<cv::cuda::GpuMat> resized;for (size_t i = 0; i < 3; ++i){resized.emplace_back(cv::cuda::GpuMat(cv::Size(input_dim.d[2], input_dim.d[1]), CV_32FC1, (float*)buffers[0] + i * input_dim.d[2] * input_dim.d[1]));}cv::cuda::merge(resized, gpu_output);cv::cuda::GpuMat image_out;gpu_output.convertTo(image_out, CV_32FC3, 1.f * 255.f);cv::Mat dst;image_out.download(dst);cv::imwrite("../01_test_demo.jpg", dst);for(void* buf:buffers){cudaFree(buf);}return 0;
}
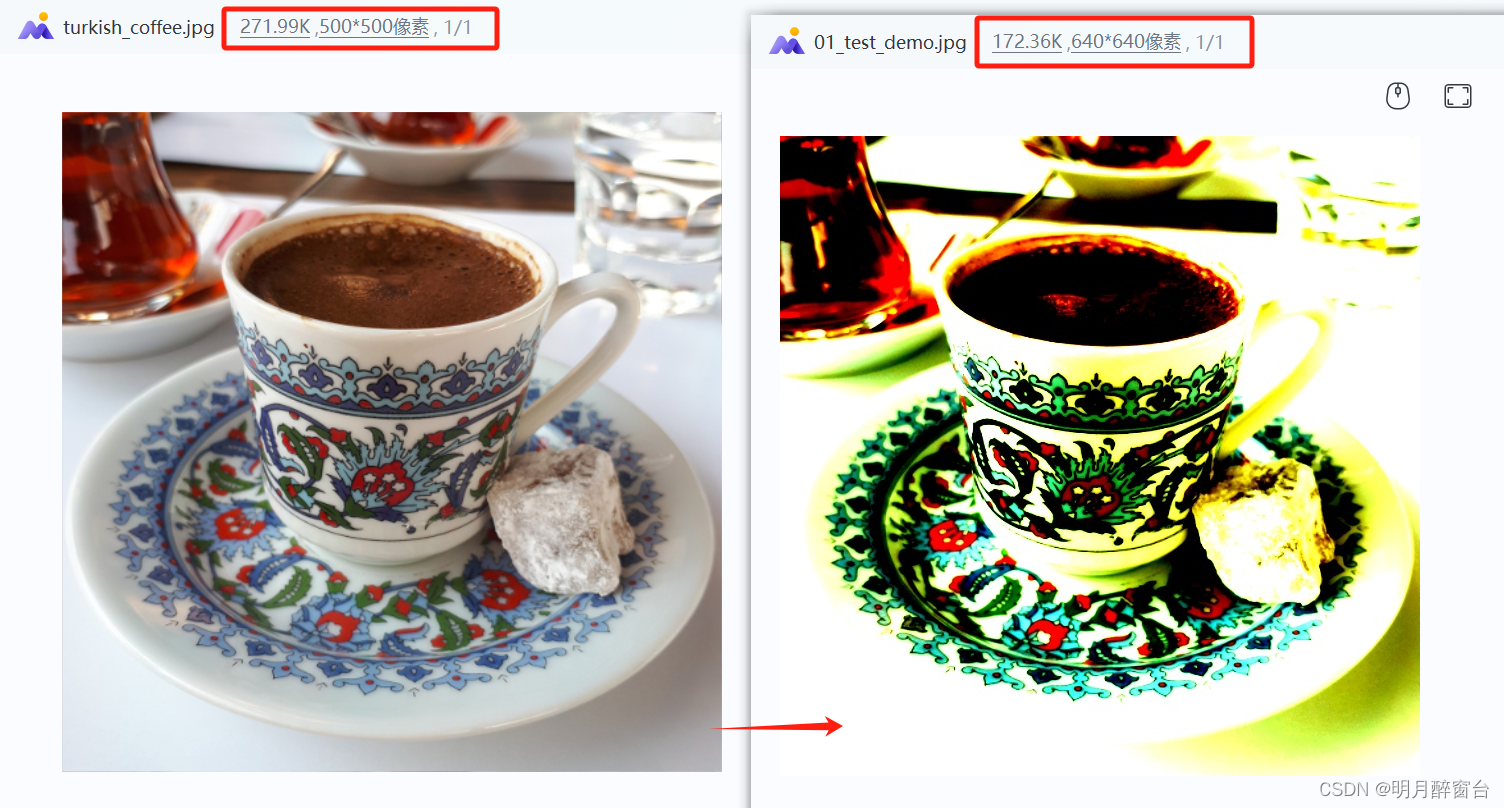
- 原图与结果图:
2. 输出后处理
- 下边通过一个trt demo展示一下后处理操作
- 源码实现如下:
#include <iostream>
#include <fstream>
#include <NvInfer.h>
#include <memory>
#include <NvOnnxParser.h>
#include <vector>
#include <cuda_runtime_api.h>
#include <opencv2/imgcodecs.hpp>
#include <opencv2/core/cuda.hpp>
#include <opencv2/cudawarping.hpp>
#include <opencv2/core.hpp>
#include <opencv2/cudaarithm.hpp>
#include <algorithm>
#include <numeric>
struct TRTDestroy
{template <class T>void operator()(T* obj) const{if (obj){obj->destroy();}}
};template <class T>
using TRTUniquePtr = std::unique_ptr<T, TRTDestroy>;
size_t getSizeByDim(const nvinfer1::Dims& dims)
{size_t size = 1;for (size_t i = 0; i < dims.nbDims; ++i){size *= dims.d[i];}return size;
}
std::vector<std::string> getClassNames(const std::string& imagenet_classes)
{std::ifstream classes_file(imagenet_classes);std::vector<std::string> classes;if (!classes_file.good()){std::cerr << "ERROR: can't read file with classes names.\n";return classes;}std::string class_name;while (std::getline(classes_file, class_name)){classes.push_back(class_name);}return classes;
}
void preprocessImage(const std::string& image_path, float* gpu_input, const nvinfer1::Dims& dims)
{cv::Mat frame = cv::imread(image_path);if (frame.empty()){std::cerr << "Input image " << image_path << " load failed\n";return;}cv::cuda::GpuMat gpu_frame;gpu_frame.upload(frame);auto input_width = dims.d[2];auto input_height = dims.d[1];auto channels = dims.d[0];auto input_size = cv::Size(input_width, input_height);cv::cuda::GpuMat resized;cv::cuda::resize(gpu_frame, resized, input_size, 0, 0, cv::INTER_NEAREST);cv::cuda::GpuMat flt_image;resized.convertTo(flt_image, CV_32FC3, 1.f / 255.f);cv::cuda::subtract(flt_image, cv::Scalar(0.485f, 0.456f, 0.406f), flt_image, cv::noArray(), -1);cv::cuda::divide(flt_image, cv::Scalar(0.229f, 0.224f, 0.225f), flt_image, 1, -1);std::vector<cv::cuda::GpuMat> chw;for (size_t i = 0; i < channels; ++i){chw.emplace_back(cv::cuda::GpuMat(input_size, CV_32FC1, gpu_input + i * input_width * input_height));}cv::cuda::split(flt_image, chw);
}
void postprocessResults(float *gpu_output, const nvinfer1::Dims &dims, int batch_size)
{auto classes = getClassNames("imagenet_classes.txt");std::vector<float> cpu_output(getSizeByDim(dims) * batch_size);cudaMemcpy(cpu_output.data(), gpu_output, cpu_output.size() * sizeof(float), cudaMemcpyDeviceToHost);std::transform(cpu_output.begin(), cpu_output.end(), cpu_output.begin(), [](float val) {return std::exp(val);});auto sum = std::accumulate(cpu_output.begin(), cpu_output.end(), 0.0);std::vector<int> indices(getSizeByDim(dims) * batch_size);std::iota(indices.begin(), indices.end(), 0); std::sort(indices.begin(), indices.end(), [&cpu_output](int i1, int i2) {return cpu_output[i1] > cpu_output[i2];});int i = 0;while (cpu_output[indices[i]] / sum > 0.005){if (classes.size() > indices[i]){std::cout << "class: " << classes[indices[i]] << " | ";}std::cout << "confidence: " << 100 * cpu_output[indices[i]] / sum << "% | index: " << indices[i] << "\n";++i;}
}
int main(int argc, char* argv[])
{if (argc < 3){std::cerr << "usage: " << argv[0] << " model.onnx image.jpg\n";return -1;}std::string model_path(argv[1]);std::string image_path(argv[2]);int batch_size = 1;TRTUniquePtr<nvinfer1::ICudaEngine> engine{nullptr};std::vector<nvinfer1::Dims> input_dims; std::vector<nvinfer1::Dims> output_dims; std::vector<void*> buffers(engine->getNbBindings()); for (size_t i = 0; i < engine->getNbBindings(); ++i){auto binding_size = getSizeByDim(engine->getBindingDimensions(i)) * batch_size * sizeof(float);cudaMalloc(&buffers[i], binding_size);if (engine->bindingIsInput(i)){input_dims.emplace_back(engine->getBindingDimensions(i));}else{output_dims.emplace_back(engine->getBindingDimensions(i));}}if (input_dims.empty() || output_dims.empty()){std::cerr << "Expect at least one input and one output for network\n";return -1;}preprocessImage(image_path, (float *) buffers[0], input_dims[0]);context->enqueue(batch_size, buffers.data(), 0, nullptr);postprocessResults((float *) buffers[1], output_dims[0], batch_size);for (void* buf : buffers){cudaFree(buf);}return 0;
}