在实现美妆算法过程中,需要定位到目标区域,常规的图像处理技术很难准确定位。随着AI技术快速发展,人脸关键点成为面部特征提取技术之一。
常见开源的关键点有dlib、mtcnn等。
由于本人对dlib有所了解,且支持C++、python等。故本人选择dlib库作为提取人脸关键点。
一、skills 前瞻
插值
一次插值:https://blog.csdn.net/m0_37264397/article/details/124002551
二次插值:https://blog.csdn.net/m0_37264397/article/details/124006610
二、dlib编译配置
下载-编译:略
已编译好的文件包
链接:链接:https://pan.baidu.com/s/1ju38P1YAk8HoEIdw6lw4wA?pwd=5oyo
提取码:5oyo
VisualStudio 配置dlib1921、OpenCV455
属性表cv455_dlib19.props:
<?xml version="1.0" encoding="utf-8"?>
<Project ToolsVersion="4.0" xmlns="http://schemas.microsoft.com/developer/msbuild/2003"><ImportGroup Label="PropertySheets" /><PropertyGroup Label="UserMacros" /><PropertyGroup><IncludePath>package\dlib19.21;package\dlib19.21\dlib\external;package\opencv455\include;package\opencv455\include\opencv2;$(IncludePath)</IncludePath><LibraryPath>package\dlib19.21\build\dlib\Release;package\opencv455\x64\vc14\lib;$(LibraryPath)</LibraryPath></PropertyGroup><ItemDefinitionGroup><Link><AdditionalDependencies>dlib19.21.0_release_64bit_msvc1900.lib;opencv_world455.lib;%(AdditionalDependencies)</AdditionalDependencies></Link></ItemDefinitionGroup><ItemGroup />
</Project>
三、dlib使用
3.1、人脸检测
//加载模型dlib::shape_predictor sp;dlib::deserialize(modelPath) >> sp;//人脸检测器dlib::frontal_face_detector detector = dlib::get_frontal_face_detector();dlib::cv_image<dlib::bgr_pixel> cimg(img);//人脸检测std::vector<dlib::rectangle> faces = detector(cimg); unsigned faceNumber = faces.size();//faces//发现每一个脸的pos估计 std::vector<dlib::full_object_detection> shapes;//将所有脸的区域放入集合之中for (unsigned i = 0; i < faceNumber; i++)shapes.push_back(sp(cimg, faces[i]));std::vector<cv::Point2i> landmarks;if (!shapes.empty()) {int faceNumber = shapes.size();for (int j = 0; j < faceNumber; j++){dlib::rectangle rect = shapes[j].get_rect();//左上右下坐标点std::cout<<"face_num:"<<j << " left_x:" << rect.left() << ",top_y:" << rect.top() << ",right_x:" << rect.right() << ",bottom_y:" << rect.bottom() << std::endl;cv::rectangle(srcImage, cv::Point(rect.left(), rect.top()), cv::Point(rect.right(), rect.bottom()), cv::Scalar(0, 0, 255));}}

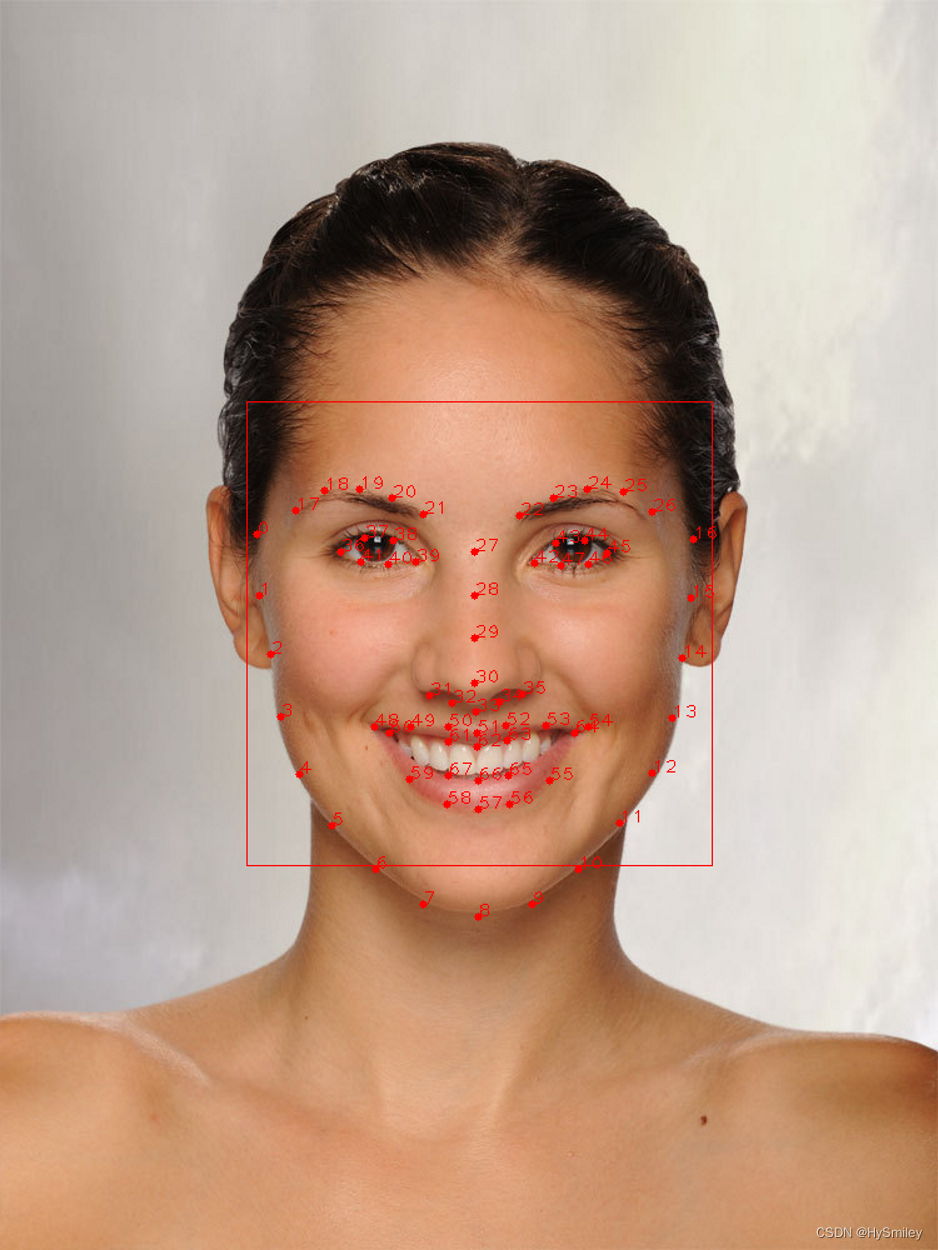
3.2、关键点检测
if (!shapes.empty()) {int faceNumber = shapes.size();for (int j = 0; j < faceNumber; j++){dlib::rectangle rect = shapes[j].get_rect();//左上右下坐标点std::cout<<"face_num:"<<j << " left_x:" << rect.left() << ",top_y:" << rect.top() << ",right_x:" << rect.right() << ",bottom_y:" << rect.bottom() << std::endl;for (int i = 0; i < 68; i++){用来画特征值的点cv::circle(srcImage, cvPoint(shapes[j].part(i).x(), shapes[j].part(i).y()), 3, cv::Scalar(0, 0, 255), -1);显示数字cv::putText(srcImage, std::to_string(i), cvPoint(shapes[0].part(i).x(), shapes[0].part(i).y()), cv::FONT_HERSHEY_PLAIN, 1, cv::Scalar(0, 0, 255));landmarks.push_back(cv::Point(shapes[j].part(i).x(), shapes[j].part(i).y()));}}}
3.3、关键点拟合
关键点拟合

拟合后轮廓存在折角,不平滑。
关键点插值拟合
一次插值
float FaceShape::linearInter(int x1, int y1, int x2, int y2, int nx)
{float k = float(y2 - y1) * 1.0f / float(x2 - x1);float b = float(y1) - k * float(x1);return k * float(nx) + b;
}
同样存在折角。
二次插值
float FaceShape::quadraticInter(int x1, int y1, int x2, int y2, int x3, int y3, int nx)
{float a = -((y2 - y3) * x1 - (x2 - x3) * y1 + x2 * y3 - x3 * y2) * 1.0f / ((x2 - x3) * (x1 - x2) * (x1 - x3));float b = ((y2 - y3) * x1 * x1 + x2 * x2 * y3 - x3 * x3 * y2 - (x2 * x2 - x3 * x3) * y1) * 1.0f / ((x2 - x3) * (x1 - x2) * (x1 - x3));float c = ((x2 * y3 - x3 * y2) * x1 * x1 - (x2 * x2 * y3 - x3 * x3 * y2) * x1 + (x2 * x2 * x3 - x2 * x3 * x3) * y1) * 1.0f / ((x2 - x3) * (x1 - x2) * (x1 - x3));return a * nx * nx + b * nx + c;
}
基本实现眉形轮廓。
四、code
五、思考
插值法有很多种,本篇仅使用了两种方法测试。可以尝试使用其他的插值法在不同人脸上验证,从而选取最佳的方法。