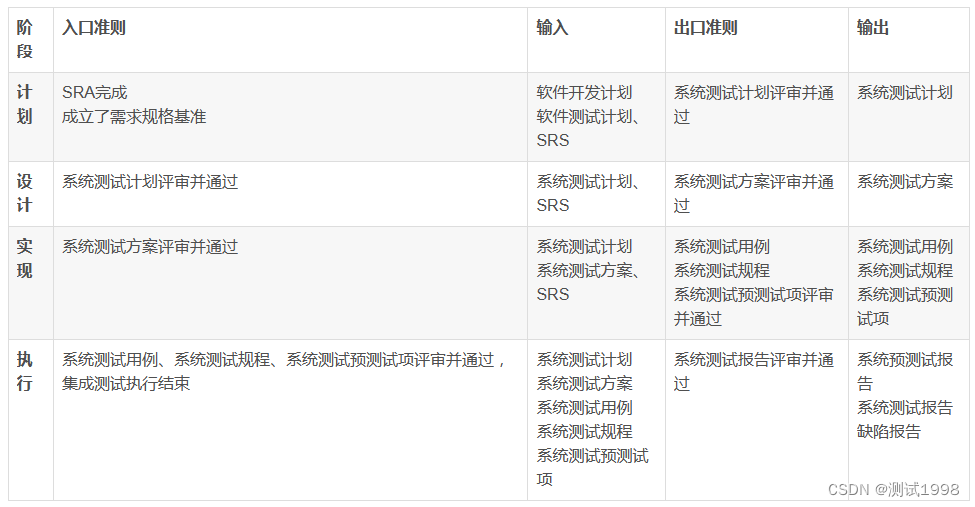
00. 目录
文章目录
- 00. 目录
- 01. ADC简介
- 02. ADC相关API
- 2.1 RCC_ADCCLKConfig
- 2.2 ADC_RegularChannelConfig
- 2.3 ADC_Init
- 2.4 ADC_InitTypeDef
- 2.5 ADC_Cmd
- 2.6 ADC_ResetCalibration
- 2.7 ADC_GetResetCalibrationStatus
- 2.8 ADC_StartCalibration
- 2.9 ADC_GetCalibrationStatus
- 2.10 ADC_SoftwareStartConvCmd
- 2.11 ADC_GetFlagStatus
- 2.12 ADC_GetConversionValue
- 03. ADC单通道接线图
- 04. ADC单通道示例
- 05. ADC多通道接线图
- 06. 热敏传感器
- 07. 光敏传感器
- 08. 反射式红外传感器
- 09. ADC多通道示例
- 10. 程序下载
- 11. 附录
01. ADC简介
小容量产品是指闪存存储器容量在16K至32K字节之间的STM32F101xx、STM32F102xx和STM32F103xx微控制器。
中容量产品是指闪存存储器容量在64K至128K字节之间的STM32F101xx、STM32F102xx和STM32F103xx微控制器。
大容量产品是指闪存存储器容量在256K至512K字节之间的STM32F101xx和STM32F103xx微控制器。
互联型产品是指STM32F105xx和STM32F107xx微控制器。
12位ADC是一种逐次逼近型模拟数字转换器。它有多达18个通道,可测量16个外部和2个内部信号源。各通道的A/D转换可以单次、连
续、扫描或间断模式执行。ADC的结果可以左对齐或右对齐方式存储在16位数据寄存器中。
模拟看门狗特性允许应用程序检测输入电压是否超出用户定义的高/低阀值。
ADC的输入时钟不得超过14MHz,它是由PCLK2经分频产生。
02. ADC相关API
2.1 RCC_ADCCLKConfig
/*** @brief  Configures the ADC clock (ADCCLK).* @param  RCC_PCLK2: defines the ADC clock divider. This clock is derived from *   the APB2 clock (PCLK2).*   This parameter can be one of the following values:*     @arg RCC_PCLK2_Div2: ADC clock = PCLK2/2*     @arg RCC_PCLK2_Div4: ADC clock = PCLK2/4*     @arg RCC_PCLK2_Div6: ADC clock = PCLK2/6*     @arg RCC_PCLK2_Div8: ADC clock = PCLK2/8* @retval None*/
void RCC_ADCCLKConfig(uint32_t RCC_PCLK2)
功能:设置 ADC 时钟(ADCCLK)
参数:RCC_ADCCLKSource: 定义 ADCCLK,该时钟源自 APB2 时钟(PCLK2)
返回值:无
2.2 ADC_RegularChannelConfig
/*** @brief  Configures for the selected ADC regular channel its corresponding*         rank in the sequencer and its sample time.* @param  ADCx: where x can be 1, 2 or 3 to select the ADC peripheral.* @param  ADC_Channel: the ADC channel to configure. *   This parameter can be one of the following values:*     @arg ADC_Channel_0: ADC Channel0 selected*     @arg ADC_Channel_1: ADC Channel1 selected*     @arg ADC_Channel_2: ADC Channel2 selected*     @arg ADC_Channel_3: ADC Channel3 selected*     @arg ADC_Channel_4: ADC Channel4 selected*     @arg ADC_Channel_5: ADC Channel5 selected*     @arg ADC_Channel_6: ADC Channel6 selected*     @arg ADC_Channel_7: ADC Channel7 selected*     @arg ADC_Channel_8: ADC Channel8 selected*     @arg ADC_Channel_9: ADC Channel9 selected*     @arg ADC_Channel_10: ADC Channel10 selected*     @arg ADC_Channel_11: ADC Channel11 selected*     @arg ADC_Channel_12: ADC Channel12 selected*     @arg ADC_Channel_13: ADC Channel13 selected*     @arg ADC_Channel_14: ADC Channel14 selected*     @arg ADC_Channel_15: ADC Channel15 selected*     @arg ADC_Channel_16: ADC Channel16 selected*     @arg ADC_Channel_17: ADC Channel17 selected* @param  Rank: The rank in the regular group sequencer. This parameter must be between 1 to 16.* @param  ADC_SampleTime: The sample time value to be set for the selected channel. *   This parameter can be one of the following values:*     @arg ADC_SampleTime_1Cycles5: Sample time equal to 1.5 cycles*     @arg ADC_SampleTime_7Cycles5: Sample time equal to 7.5 cycles*     @arg ADC_SampleTime_13Cycles5: Sample time equal to 13.5 cycles*     @arg ADC_SampleTime_28Cycles5: Sample time equal to 28.5 cycles	*     @arg ADC_SampleTime_41Cycles5: Sample time equal to 41.5 cycles	*     @arg ADC_SampleTime_55Cycles5: Sample time equal to 55.5 cycles	*     @arg ADC_SampleTime_71Cycles5: Sample time equal to 71.5 cycles	*     @arg ADC_SampleTime_239Cycles5: Sample time equal to 239.5 cycles	* @retval None*/
void ADC_RegularChannelConfig(ADC_TypeDef* ADCx, uint8_t ADC_Channel, uint8_t Rank, uint8_t ADC_SampleTime)
功能:设置指定 ADC 的规则组通道,设置它们的转化顺序和采样时间
参数:ADCx:x 可以是 1 或者 2 来选择 ADC 外设 ADC1 或 ADC2ADC_Channel:被设置的 ADC 通道Rank:规则组采样顺序。取值范围 1 到 16。ADC_SampleTime:指定 ADC 通道的采样时间值
返回值:无
2.3 ADC_Init
/*** @brief  Initializes the ADCx peripheral according to the specified parameters*         in the ADC_InitStruct.* @param  ADCx: where x can be 1, 2 or 3 to select the ADC peripheral.* @param  ADC_InitStruct: pointer to an ADC_InitTypeDef structure that contains*         the configuration information for the specified ADC peripheral.* @retval None*/
void ADC_Init(ADC_TypeDef* ADCx, ADC_InitTypeDef* ADC_InitStruct)
功能:根据 ADC_InitStruct 中指定的参数初始化外设 ADCx 的寄存器
参数:ADCx:x 可以是 1 或者 2 来选择 ADC 外设 ADC1 或 ADC2ADC_InitStruct:指向结构 ADC_InitTypeDef 的指针,包含了指定外设 ADC 的配置信息
返回值:无
2.4 ADC_InitTypeDef
/** * @brief  ADC Init structure definition  */typedef struct
{uint32_t ADC_Mode;                      /*!< Configures the ADC to operate in independent ordual mode. This parameter can be a value of @ref ADC_mode */FunctionalState ADC_ScanConvMode;       /*!< Specifies whether the conversion is performed inScan (multichannels) or Single (one channel) mode.This parameter can be set to ENABLE or DISABLE */FunctionalState ADC_ContinuousConvMode; /*!< Specifies whether the conversion is performed inContinuous or Single mode.This parameter can be set to ENABLE or DISABLE. */uint32_t ADC_ExternalTrigConv;          /*!< Defines the external trigger used to start the analogto digital conversion of regular channels. This parametercan be a value of @ref ADC_external_trigger_sources_for_regular_channels_conversion */uint32_t ADC_DataAlign;                 /*!< Specifies whether the ADC data alignment is left or right.This parameter can be a value of @ref ADC_data_align */uint8_t ADC_NbrOfChannel;               /*!< Specifies the number of ADC channels that will be convertedusing the sequencer for regular channel group.This parameter must range from 1 to 16. */
}ADC_InitTypeDef;
ADC_mode
/** @defgroup ADC_mode * @{*/#define ADC_Mode_Independent                       ((uint32_t)0x00000000)
#define ADC_Mode_RegInjecSimult                    ((uint32_t)0x00010000)
#define ADC_Mode_RegSimult_AlterTrig               ((uint32_t)0x00020000)
#define ADC_Mode_InjecSimult_FastInterl            ((uint32_t)0x00030000)
#define ADC_Mode_InjecSimult_SlowInterl            ((uint32_t)0x00040000)
#define ADC_Mode_InjecSimult                       ((uint32_t)0x00050000)
#define ADC_Mode_RegSimult                         ((uint32_t)0x00060000)
#define ADC_Mode_FastInterl                        ((uint32_t)0x00070000)
#define ADC_Mode_SlowInterl                        ((uint32_t)0x00080000)
#define ADC_Mode_AlterTrig                         ((uint32_t)0x00090000)
ADC_ExternalTrigConv
/** @defgroup ADC_external_trigger_sources_for_regular_channels_conversion * @{*/#define ADC_ExternalTrigConv_T1_CC1                ((uint32_t)0x00000000) /*!< For ADC1 and ADC2 */
#define ADC_ExternalTrigConv_T1_CC2                ((uint32_t)0x00020000) /*!< For ADC1 and ADC2 */
#define ADC_ExternalTrigConv_T2_CC2                ((uint32_t)0x00060000) /*!< For ADC1 and ADC2 */
#define ADC_ExternalTrigConv_T3_TRGO               ((uint32_t)0x00080000) /*!< For ADC1 and ADC2 */
#define ADC_ExternalTrigConv_T4_CC4                ((uint32_t)0x000A0000) /*!< For ADC1 and ADC2 */
#define ADC_ExternalTrigConv_Ext_IT11_TIM8_TRGO    ((uint32_t)0x000C0000) /*!< For ADC1 and ADC2 */#define ADC_ExternalTrigConv_T1_CC3                ((uint32_t)0x00040000) /*!< For ADC1, ADC2 and ADC3 */
#define ADC_ExternalTrigConv_None                  ((uint32_t)0x000E0000) /*!< For ADC1, ADC2 and ADC3 */#define ADC_ExternalTrigConv_T3_CC1                ((uint32_t)0x00000000) /*!< For ADC3 only */
#define ADC_ExternalTrigConv_T2_CC3                ((uint32_t)0x00020000) /*!< For ADC3 only */
#define ADC_ExternalTrigConv_T8_CC1                ((uint32_t)0x00060000) /*!< For ADC3 only */
#define ADC_ExternalTrigConv_T8_TRGO               ((uint32_t)0x00080000) /*!< For ADC3 only */
#define ADC_ExternalTrigConv_T5_CC1                ((uint32_t)0x000A0000) /*!< For ADC3 only */
#define ADC_ExternalTrigConv_T5_CC3                ((uint32_t)0x000C0000) /*!< For ADC3 only */
ADC_data_align
/** @defgroup ADC_data_align * @{*/#define ADC_DataAlign_Right                        ((uint32_t)0x00000000)
#define ADC_DataAlign_Left                         ((uint32_t)0x00000800)
2.5 ADC_Cmd
/*** @brief  Enables or disables the specified ADC peripheral.* @param  ADCx: where x can be 1, 2 or 3 to select the ADC peripheral.* @param  NewState: new state of the ADCx peripheral.*   This parameter can be: ENABLE or DISABLE.* @retval None*/
void ADC_Cmd(ADC_TypeDef* ADCx, FunctionalState NewState)
功能:使能或者失能指定的 ADC
参数:ADCx:x 可以是 1 或者 2 来选择 ADC 外设 ADC1 或 ADC2NewState:外设 ADCx 的新状态
返回值:无
2.6 ADC_ResetCalibration
/*** @brief  Resets the selected ADC calibration registers.* @param  ADCx: where x can be 1, 2 or 3 to select the ADC peripheral.* @retval None*/
void ADC_ResetCalibration(ADC_TypeDef* ADCx)
功能:重置指定的 ADC 的校准寄存器
参数:ADCx:x 可以是 1 或者 2 来选择 ADC 外设 ADC1 或 ADC2
返回值:无
2.7 ADC_GetResetCalibrationStatus
/*** @brief  Gets the selected ADC reset calibration registers status.* @param  ADCx: where x can be 1, 2 or 3 to select the ADC peripheral.* @retval The new state of ADC reset calibration registers (SET or RESET).*/
FlagStatus ADC_GetResetCalibrationStatus(ADC_TypeDef* ADCx)
功能:获取 ADC 重置校准寄存器的状态
参数:ADCx:x 可以是 1 或者 2 来选择 ADC 外设 ADC1 或 ADC2
返回值:ADC 重置校准寄存器的新状态(SET 或者 RESET)
2.8 ADC_StartCalibration
/*** @brief  Starts the selected ADC calibration process.* @param  ADCx: where x can be 1, 2 or 3 to select the ADC peripheral.* @retval None*/
void ADC_StartCalibration(ADC_TypeDef* ADCx)
功能:开始指定 ADC 的校准状态
参数:ADCx:x 可以是 1 或者 2 来选择 ADC 外设 ADC1 或 ADC2
返回值:无
2.9 ADC_GetCalibrationStatus
/*** @brief  Gets the selected ADC calibration status.* @param  ADCx: where x can be 1, 2 or 3 to select the ADC peripheral.* @retval The new state of ADC calibration (SET or RESET).*/
FlagStatus ADC_GetCalibrationStatus(ADC_TypeDef* ADCx)
功能:获取指定 ADC 的校准程序状态
参数:ADCx:x 可以是 1 或者 2 来选择 ADC 外设 ADC1 或 ADC2
返回值:ADC 校准的新状态(SET 或者 RESET)
2.10 ADC_SoftwareStartConvCmd
/*** @brief  Enables or disables the selected ADC software start conversion .* @param  ADCx: where x can be 1, 2 or 3 to select the ADC peripheral.* @param  NewState: new state of the selected ADC software start conversion.*   This parameter can be: ENABLE or DISABLE.* @retval None*/
void ADC_SoftwareStartConvCmd(ADC_TypeDef* ADCx, FunctionalState NewState)
功能:使能或者失能指定的 ADC 的软件转换启动功能
参数:ADCx:x 可以是 1 或者 2 来选择 ADC 外设 ADC1 或 ADC2 NewState:指定 ADC 的软件转换启动新状态
返回值:无
2.11 ADC_GetFlagStatus
/*** @brief  Checks whether the specified ADC flag is set or not.* @param  ADCx: where x can be 1, 2 or 3 to select the ADC peripheral.* @param  ADC_FLAG: specifies the flag to check. *   This parameter can be one of the following values:*     @arg ADC_FLAG_AWD: Analog watchdog flag*     @arg ADC_FLAG_EOC: End of conversion flag*     @arg ADC_FLAG_JEOC: End of injected group conversion flag*     @arg ADC_FLAG_JSTRT: Start of injected group conversion flag*     @arg ADC_FLAG_STRT: Start of regular group conversion flag* @retval The new state of ADC_FLAG (SET or RESET).*/
FlagStatus ADC_GetFlagStatus(ADC_TypeDef* ADCx, uint8_t ADC_FLAG)
功能:检查制定 ADC 标志位置 1 与否
参数:ADCx:x 可以是 1 或者 2 来选择 ADC 外设 ADC1 或 ADC2 ADC_FLAG:指定需检查的标志位
返回值:ADC状态(SET 或者 RESET)
2.12 ADC_GetConversionValue
/*** @brief  Returns the last ADCx conversion result data for regular channel.* @param  ADCx: where x can be 1, 2 or 3 to select the ADC peripheral.* @retval The Data conversion value.*/
uint16_t ADC_GetConversionValue(ADC_TypeDef* ADCx)
功能:返回最近一次 ADCx 规则组的转换结果
参数:ADCx:x 可以是 1 或者 2 来选择 ADC 外设 ADC1 或 ADC2
返回值:转换结果
03. ADC单通道接线图

04. ADC单通道示例
单次转换,非扫描模式
adc.h
#ifndef __ADC_H__
#define __ADC_H__#include "stm32f10x.h"                  // Device headervoid adc_init(void);uint16_t adc_getvalue(void);#endif /*__ADC_H__*/
adc.c
#include "adc.h"void adc_init(void)
{GPIO_InitTypeDef GPIO_InitStructure;ADC_InitTypeDef ADC_InitStruct;//开启ADC时钟  PA0 --> ADC1_0RCC_APB2PeriphClockCmd(RCC_APB2Periph_ADC1, ENABLE);//开启GPIOA的时钟RCC_APB2PeriphClockCmd(RCC_APB2Periph_GPIOA, ENABLE);//设置为6分频  72M / 6 = 12M RCC_ADCCLKConfig(RCC_PCLK2_Div6);//GPIO配置 GPIO_InitStructure.GPIO_Pin = GPIO_Pin_0;GPIO_InitStructure.GPIO_Mode = GPIO_Mode_AIN;GPIO_InitStructure.GPIO_Speed =   GPIO_Speed_50MHz;GPIO_Init(GPIOA, &GPIO_InitStructure);//ADC配置ADC_InitStruct.ADC_ContinuousConvMode = DISABLE;ADC_InitStruct.ADC_ScanConvMode = DISABLE;ADC_InitStruct.ADC_DataAlign = ADC_DataAlign_Right;ADC_InitStruct.ADC_ExternalTrigConv = ADC_ExternalTrigConv_None;ADC_InitStruct.ADC_Mode = ADC_Mode_Independent;ADC_InitStruct.ADC_NbrOfChannel = 1;ADC_Init(ADC1, &ADC_InitStruct);ADC_RegularChannelConfig(ADC1, ADC_Channel_0, 1, ADC_SampleTime_55Cycles5);//使能ADCADC_Cmd(ADC1, ENABLE);//校准ADCADC_ResetCalibration(ADC1);while(ADC_GetResetCalibrationStatus(ADC1));ADC_StartCalibration(ADC1);while(ADC_GetCalibrationStatus(ADC1));}uint16_t adc_getvalue(void)
{ADC_SoftwareStartConvCmd(ADC1, ENABLE);while(ADC_GetFlagStatus(ADC1, ADC_FLAG_EOC) != SET);return ADC_GetConversionValue(ADC1);
}
main.c
#include "stm32f10x.h"#include "delay.h"
#include "oled.h"
#include "adc.h"int main(void){	uint16_t value = 0;float volate = 0;//初始化OLED_Init();adc_init();//显示字符串OLED_ShowString(1, 1, "ADCValue: ");OLED_ShowString(2, 1, "Volate:0.00V");while(1){value = adc_getvalue();volate = (float)value / 4095 * 3.3;OLED_ShowNum(1, 10, value, 4);OLED_ShowNum(2, 8, volate, 1);		 OLED_ShowNum(2, 10, (uint16_t)(volate * 100) % 100, 2);	delay_ms(100);}}
连续转换,非扫描模式
adc.h
#ifndef __ADC_H__
#define __ADC_H__#include "stm32f10x.h"                  // Device headervoid adc_init(void);uint16_t adc_getvalue(void);#endif /*__ADC_H__*/
adc.c
#include "adc.h"void adc_init(void)
{GPIO_InitTypeDef GPIO_InitStructure;ADC_InitTypeDef ADC_InitStruct;//开启ADC时钟  PA0 --> ADC1_0RCC_APB2PeriphClockCmd(RCC_APB2Periph_ADC1, ENABLE);//开启GPIOA的时钟RCC_APB2PeriphClockCmd(RCC_APB2Periph_GPIOA, ENABLE);//设置为6分频  72M / 6 = 12M RCC_ADCCLKConfig(RCC_PCLK2_Div6);//GPIO配置 GPIO_InitStructure.GPIO_Pin = GPIO_Pin_0;GPIO_InitStructure.GPIO_Mode = GPIO_Mode_AIN;GPIO_InitStructure.GPIO_Speed =   GPIO_Speed_50MHz;GPIO_Init(GPIOA, &GPIO_InitStructure);//ADC配置ADC_InitStruct.ADC_ContinuousConvMode = ENABLE; //连续转换模式ADC_InitStruct.ADC_ScanConvMode = DISABLE;ADC_InitStruct.ADC_DataAlign = ADC_DataAlign_Right;ADC_InitStruct.ADC_ExternalTrigConv = ADC_ExternalTrigConv_None;ADC_InitStruct.ADC_Mode = ADC_Mode_Independent;ADC_InitStruct.ADC_NbrOfChannel = 1;ADC_Init(ADC1, &ADC_InitStruct);ADC_RegularChannelConfig(ADC1, ADC_Channel_0, 1, ADC_SampleTime_55Cycles5);//使能ADCADC_Cmd(ADC1, ENABLE);//校准ADCADC_ResetCalibration(ADC1);while(ADC_GetResetCalibrationStatus(ADC1));ADC_StartCalibration(ADC1);while(ADC_GetCalibrationStatus(ADC1));//启动一次转换即可ADC_SoftwareStartConvCmd(ADC1, ENABLE);}uint16_t adc_getvalue(void)
{while(ADC_GetFlagStatus(ADC1, ADC_FLAG_EOC) != SET);return ADC_GetConversionValue(ADC1);
}
main.c
#include "stm32f10x.h"#include "delay.h"
#include "oled.h"
#include "adc.h"int main(void){	uint16_t value = 0;float volate = 0;//初始化OLED_Init();adc_init();//显示字符串OLED_ShowString(1, 1, "ADCValue: ");OLED_ShowString(2, 1, "Volate:0.00V");while(1){value = adc_getvalue();volate = (float)value / 4095 * 3.3;OLED_ShowNum(1, 10, value, 4);OLED_ShowNum(2, 8, volate, 1);		 OLED_ShowNum(2, 10, (uint16_t)(volate * 100) % 100, 2);	delay_ms(100);} }
05. ADC多通道接线图

06. 热敏传感器

07. 光敏传感器

08. 反射式红外传感器

09. ADC多通道示例
adc.h
#ifndef __ADC_H__
#define __ADC_H__#include "stm32f10x.h"                  // Device headervoid adc_init(void);uint16_t adc_getvalue(uint8_t ADC_Channel);#endif /*__ADC_H__*/
adc.c
#include "adc.h"void adc_init(void)
{GPIO_InitTypeDef GPIO_InitStructure;ADC_InitTypeDef ADC_InitStruct;//开启ADC时钟  PA0 --> ADC1_0RCC_APB2PeriphClockCmd(RCC_APB2Periph_ADC1, ENABLE);//开启GPIOA的时钟RCC_APB2PeriphClockCmd(RCC_APB2Periph_GPIOA, ENABLE);//设置为6分频  72M / 6 = 12M RCC_ADCCLKConfig(RCC_PCLK2_Div6);//GPIO配置 GPIO_InitStructure.GPIO_Pin = GPIO_Pin_0 | GPIO_Pin_1 | GPIO_Pin_2 | GPIO_Pin_3;GPIO_InitStructure.GPIO_Mode = GPIO_Mode_AIN;GPIO_InitStructure.GPIO_Speed =   GPIO_Speed_50MHz;GPIO_Init(GPIOA, &GPIO_InitStructure);//ADC配置ADC_InitStruct.ADC_ContinuousConvMode = DISABLE; ADC_InitStruct.ADC_ScanConvMode = DISABLE;ADC_InitStruct.ADC_DataAlign = ADC_DataAlign_Right;ADC_InitStruct.ADC_ExternalTrigConv = ADC_ExternalTrigConv_None;ADC_InitStruct.ADC_Mode = ADC_Mode_Independent;ADC_InitStruct.ADC_NbrOfChannel = 1;ADC_Init(ADC1, &ADC_InitStruct);//使能ADCADC_Cmd(ADC1, ENABLE);//校准ADCADC_ResetCalibration(ADC1);while(ADC_GetResetCalibrationStatus(ADC1));ADC_StartCalibration(ADC1);while(ADC_GetCalibrationStatus(ADC1));}uint16_t adc_getvalue(uint8_t ADC_Channel)
{ADC_RegularChannelConfig(ADC1, ADC_Channel, 1, ADC_SampleTime_55Cycles5);ADC_SoftwareStartConvCmd(ADC1, ENABLE);while(ADC_GetFlagStatus(ADC1, ADC_FLAG_EOC) != SET);return ADC_GetConversionValue(ADC1);
}
main.c
#include "stm32f10x.h"#include "delay.h"
#include "oled.h"
#include "adc.h"int main(void){	uint16_t ad0 = 0;uint16_t ad1 = 0;uint16_t ad2 = 0;uint16_t ad3 = 0;float volate = 0;//初始化OLED_Init();adc_init();//显示字符串OLED_ShowString(1, 1, "AD0: ");OLED_ShowString(2, 1, "AD1: ");OLED_ShowString(3, 1, "AD2: ");OLED_ShowString(4, 1, "AD3: ");while(1){ad0 = adc_getvalue(ADC_Channel_0);ad1 = adc_getvalue(ADC_Channel_1);ad2 = adc_getvalue(ADC_Channel_2);ad3 = adc_getvalue(ADC_Channel_3);		 OLED_ShowNum(1, 5, ad0, 4);OLED_ShowNum(2, 5, ad1, 4);OLED_ShowNum(3, 5, ad2, 4);OLED_ShowNum(4, 5, ad3, 4);		 delay_ms(100);}}
10. 程序下载
16-ADC单通道连续转换.rar
17-ADC单通道单次转换.rar
18-ADC多通道.rar
11. 附录
参考: 【STM32】江科大STM32学习笔记汇总