文章目录
- 一. Spring初始化流程
- 二. 源码分析
- 1. 初步分析
- 2. 核心方法refresh()
- 三. 事件发布机制
- 1. 简介
- 2. 源码分析
一. Spring初始化流程
前面的内容我们已经把Bean的生命周期的源码已经分析完了。现在我们从容器的角度去分析源码,这一部分首先着重分析一下Spring这个框架到底是如何启动的,看看spring在我们创建bean之前给我们做了哪些准备工作。
二. 源码分析
1. 初步分析
首先我们看一下容器启动时的代码:
AnnotationConfigApplicationContext applicationContext = new AnnotationConfigApplicationContext(AppConfig.class);
进入构造函数
public AnnotationConfigApplicationContext(Class<?>... componentClasses) {// 构造DefaultListableBeanFactory、AnnotatedBeanDefinitionReader、ClassPathBeanDefinitionScannerthis();register(componentClasses);refresh();}
进入this方法
public AnnotationConfigApplicationContext() {StartupStep createAnnotatedBeanDefReader = this.getApplicationStartup().start("spring.context.annotated-bean-reader.create");// 额外会创建StandardEnvironmentthis.reader = new AnnotatedBeanDefinitionReader(this);createAnnotatedBeanDefReader.end();this.scanner = new ClassPathBeanDefinitionScanner(this);}
public GenericApplicationContext() {this.beanFactory = new DefaultListableBeanFactory();}
GenericApplicationContext是AnnotationConfigApplicationContext的父类,在父类的构造函数就将DefaultListableBeanFactory这个核心工作赋值给了当前的beanFactory属性。
this方法首先创建了一个AnnotatedBeanDefinitionReader,有了这个reader我们就可以完成BeanDefitnition的扫描。
public AnnotatedBeanDefinitionReader(BeanDefinitionRegistry registry, Environment environment) {Assert.notNull(registry, "BeanDefinitionRegistry must not be null");Assert.notNull(environment, "Environment must not be null");this.registry = registry;// 用来解析@Conditional注解的this.conditionEvaluator = new ConditionEvaluator(registry, environment, null);// 注册AnnotationConfigUtils.registerAnnotationConfigProcessors(this.registry);}
上面的BeanDefinitionRegistry 其实就是我们创建好的DefaultListableBeanFactory 。在注册AnnotatedBeanDefinitionReader它底层其实会做很多事,后面再详细分析。回到this,它后面又创建了一个ClassPathBeanDefinitionScanner,顾名思义它就是一个扫描器,底层配置了应该扫描哪些东西等。
这里我们总结一下Spring启动过程到底会做哪些事:
- 构建一个BeanFacoty对象
- 解析配置类,得到BeanDefitnition,并注册到BeanFactory中
(1) 解析@ComponentScan,此时会完成扫描
(2)解析@Import
(3)解析@Bean
…
- 因为ApplicationContext还支持国际化,所以还需要初始化Message Source对象
- 因为ApplicationContext还支持事务机制,所以还需要初始化ApplicationEventMulticaster对象
- 把用户定义的ApplicationListener对象添加到ApplicationContext中,等Spring启动完了就要发布事件了
- 创建非懒加载的单例Bean对象,并存再BeanFactory(这个我们已经详细分析过了)
- 调用Lifecycle Bean的Start方法
- 发布ContextRefreshedEvent事件
由于在Spring启动过程中要创建非懒加载的单例对象,那么就需要用到BeanPostProcessor,所以Spring在启动过程中就需要做两件事:
9. 生成默认的BeanPostProcessor,并添加到BeanFactory中
AutowiredAnnotationBeanPostProcessor:处理@Autowired @Value
CommonAnnotationBeanPostProcessor:处理@Resource @PostConstruct @PreDestroy
ApplicatoinContextAwareProcessor:处理ApplicationContextAware回调
- 找到外部用户所定义的BeanPostProccessor对象(类型为BeanPostProcessor对象),并添加到BeanFactory中
继续回到构造方法:
public AnnotationConfigApplicationContext(Class<?>... componentClasses) {// 构造DefaultListableBeanFactory、AnnotatedBeanDefinitionReader、ClassPathBeanDefinitionScannerthis();register(componentClasses);refresh();}
接下来调用 register(componentClasses);方法将我们传入的配置类注册到容器中,其实就是将componentClasses通过register(前面说到register就是我们的Bean工厂)方法将配置类解析为一个BeanDefinition然后传入到容器中。
经过下面两行代码,容器的一些核心配置我们就设置完了,下面就开始真正的启动容器了。
this();
register(componentClasses);
2. 核心方法refresh()
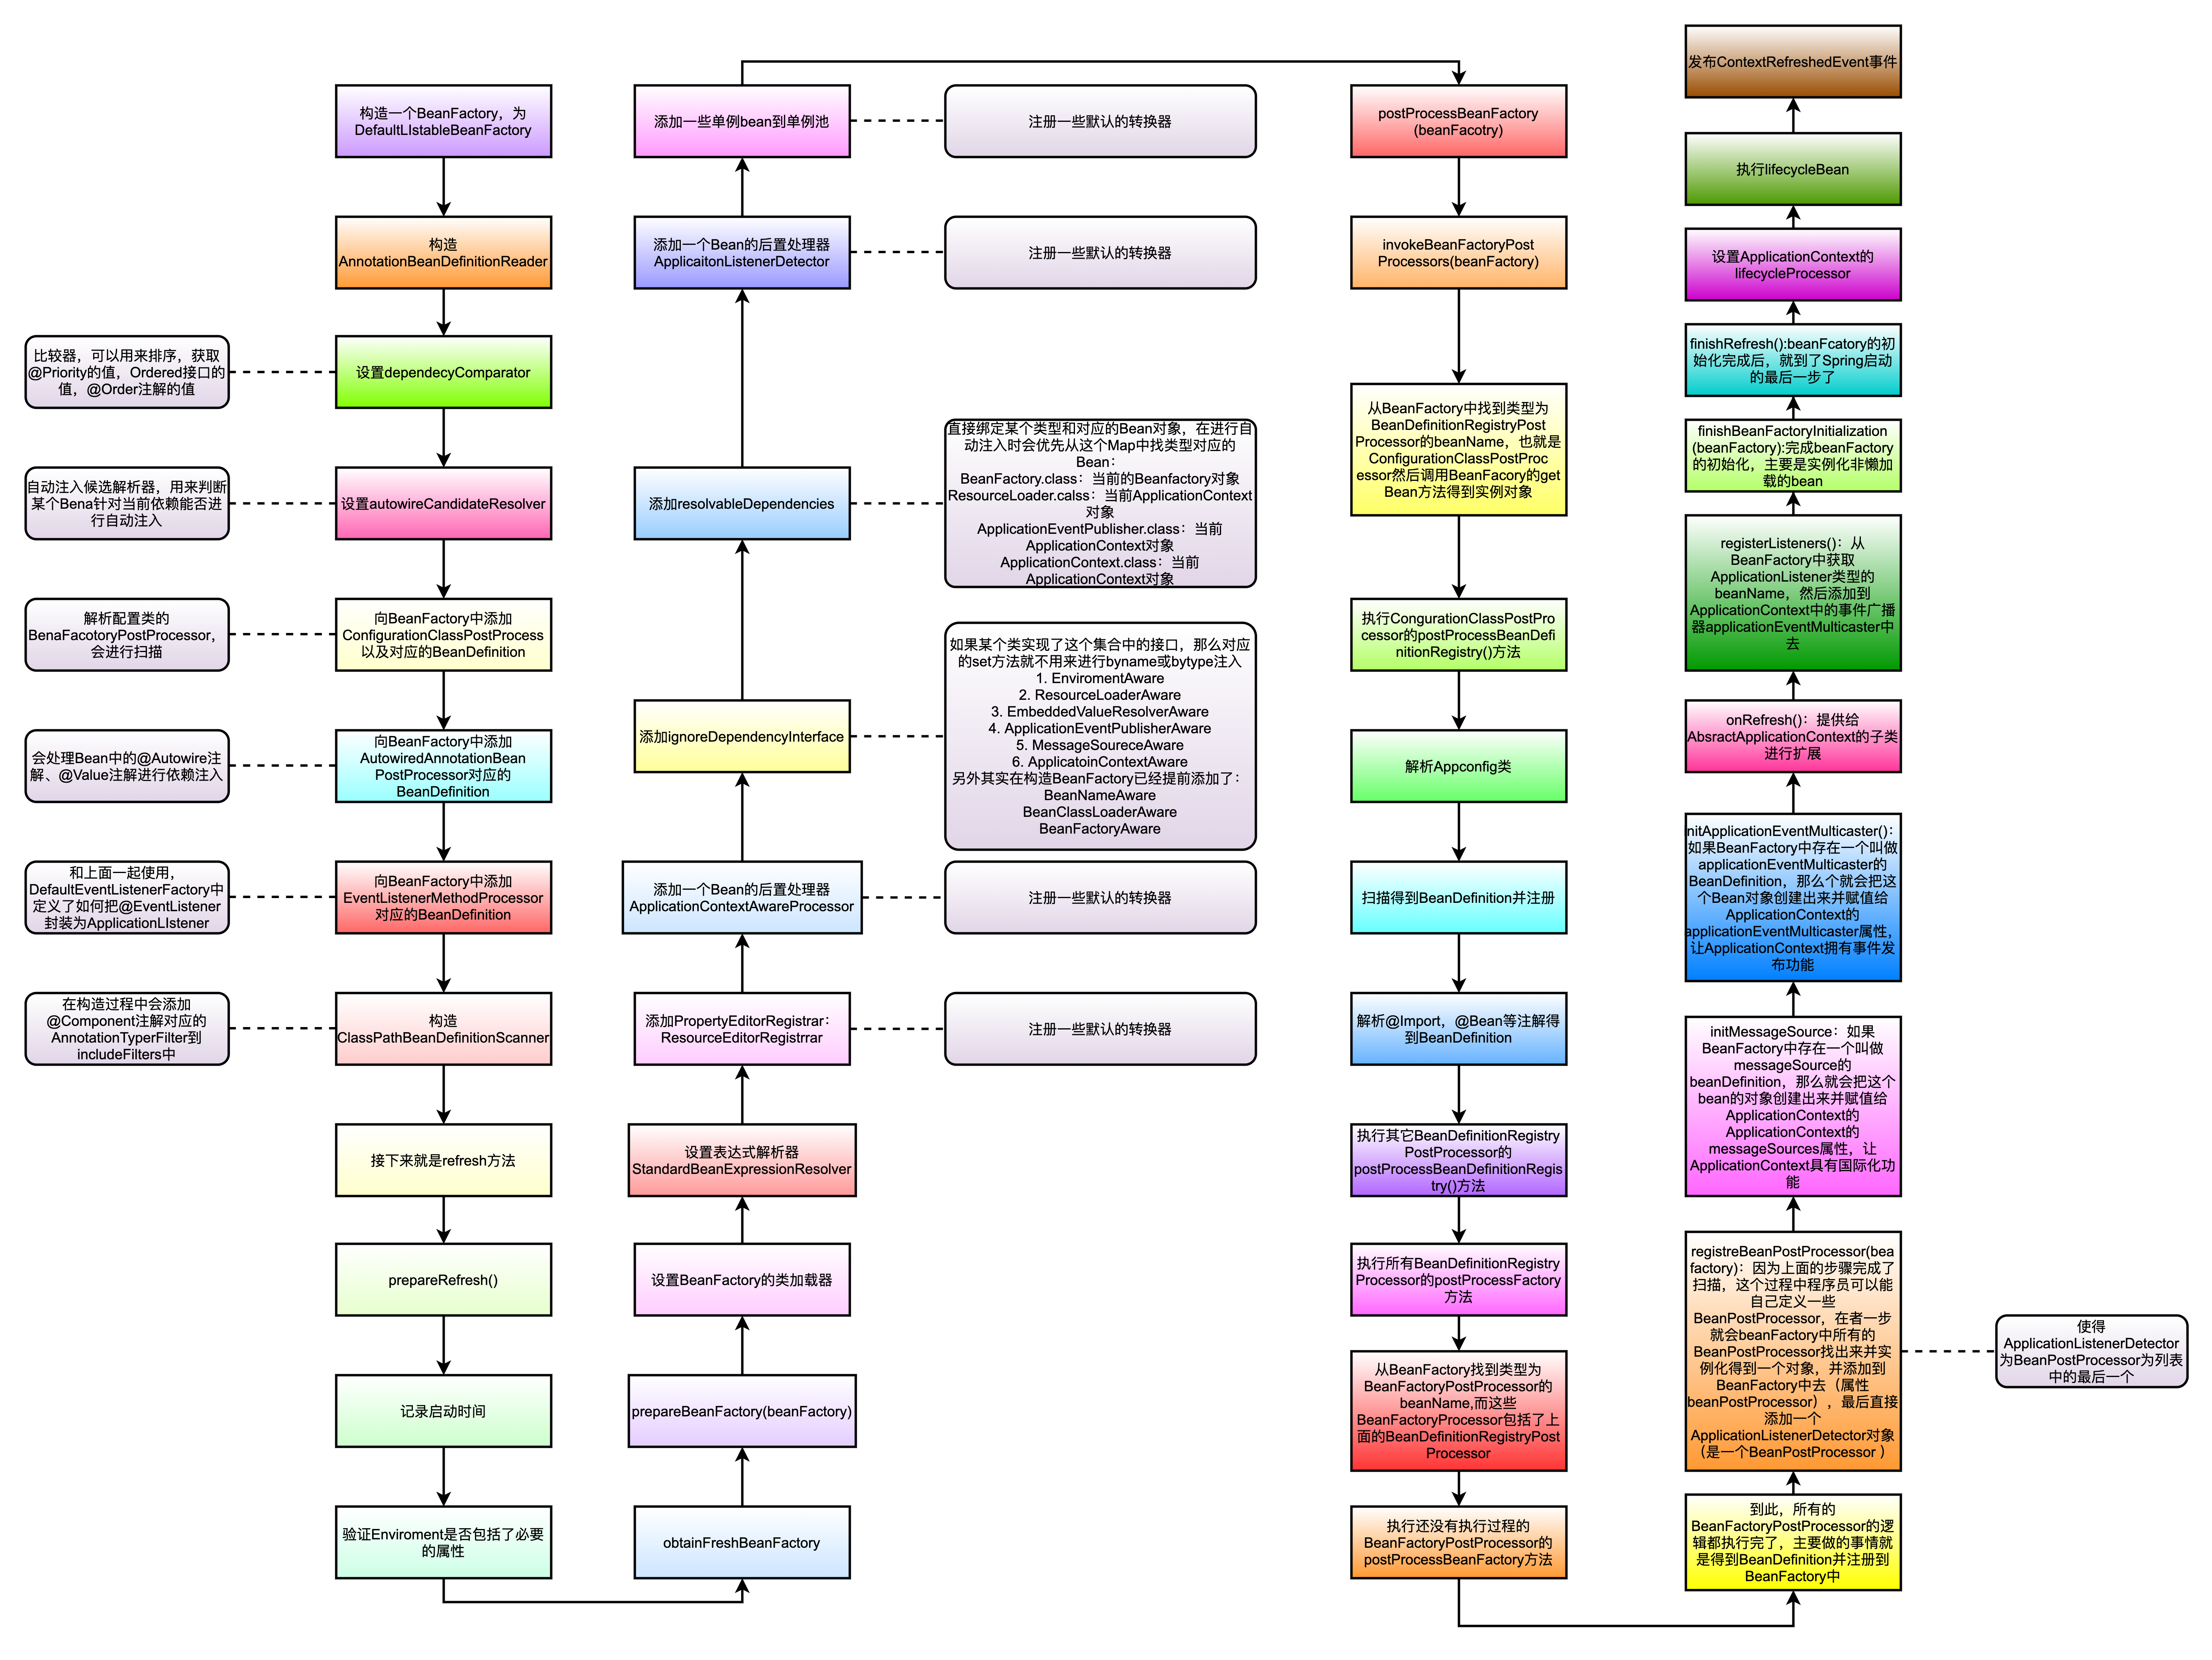
@Overridepublic void refresh() throws BeansException, IllegalStateException {synchronized (this.startupShutdownMonitor) {StartupStep contextRefresh = this.applicationStartup.start("spring.context.refresh");// Prepare this context for refreshing.prepareRefresh();// Tell the subclass to refresh the internal bean factory.// 这里会判断能否刷新,并且返回一个BeanFactory, 刷新不代表完全情况,主要是先执行Bean的销毁,然后重新生成一个BeanFactory,再在接下来的步骤中重新去扫描等等ConfigurableListableBeanFactory beanFactory = obtainFreshBeanFactory();// Prepare the bean factory for use in this context.// 准备BeanFactory// 1. 设置BeanFactory的类加载器、SpringEL表达式解析器、类型转化注册器// 2. 添加三个BeanPostProcessor,注意是具体的BeanPostProcessor实例对象// 3. 记录ignoreDependencyInterface// 4. 记录ResolvableDependency// 5. 添加三个单例BeanprepareBeanFactory(beanFactory);try {// Allows post-processing of the bean factory in context subclasses.// 子类来设置一下BeanFactorypostProcessBeanFactory(beanFactory);StartupStep beanPostProcess = this.applicationStartup.start("spring.context.beans.post-process");// Invoke factory processors registered as beans in the context.// BeanFactory准备好了之后,执行BeanFactoryPostProcessor,开始对BeanFactory进行处理// 默认情况下:// 此时beanFactory的beanDefinitionMap中有6个BeanDefinition,5个基础BeanDefinition+AppConfig的BeanDefinition// 而这6个中只有一个BeanFactoryPostProcessor:ConfigurationClassPostProcessor// 这里会执行ConfigurationClassPostProcessor进行@Component的扫描,扫描得到BeanDefinition,并注册到beanFactory中// 注意:扫描的过程中可能又会扫描出其他的BeanFactoryPostProcessor,那么这些BeanFactoryPostProcessor也得在这一步执行invokeBeanFactoryPostProcessors(beanFactory); // scanner.scan()// Register bean processors that intercept bean creation.// 将扫描到的BeanPostProcessors实例化并排序,并添加到BeanFactory的beanPostProcessors属性中去registerBeanPostProcessors(beanFactory);beanPostProcess.end();// Initialize message source for this context.// 设置ApplicationContext的MessageSource,要么是用户设置的,要么是DelegatingMessageSourceinitMessageSource();// Initialize event multicaster for this context.// 设置ApplicationContext的applicationEventMulticaster,要么是用户设置的,要么是SimpleApplicationEventMulticasterinitApplicationEventMulticaster();// Initialize other special beans in specific context subclasses.// 给子类的模板方法onRefresh();// Check for listener beans and register them.// 把定义的ApplicationListener的Bean对象,设置到ApplicationContext中去,并执行在此之前所发布的事件registerListeners();// Instantiate all remaining (non-lazy-init) singletons.finishBeanFactoryInitialization(beanFactory);// Last step: publish corresponding event.finishRefresh();}catch (BeansException ex) {if (logger.isWarnEnabled()) {logger.warn("Exception encountered during context initialization - " +"cancelling refresh attempt: " + ex);}// Destroy already created singletons to avoid dangling resources.destroyBeans();// Reset 'active' flag.cancelRefresh(ex);// Propagate exception to caller.throw ex;}finally {// Reset common introspection caches in Spring's core, since we// might not ever need metadata for singleton beans anymore...resetCommonCaches();contextRefresh.end();}}}
首先会调用prepareRefresh();方法。
protected void prepareRefresh() {// 设置一些容器的标志this.startupDate = System.currentTimeMillis();this.closed.set(false);this.active.set(true);if (logger.isDebugEnabled()) {if (logger.isTraceEnabled()) {logger.trace("Refreshing " + this);}else {logger.debug("Refreshing " + getDisplayName());}}// Initialize any placeholder property sources in the context environment.// 比如子类可以把ServletContext中的参数对设置到Environment//这里体现了一种模版设计模式,父类提供了方法,但不实现,交给子类去实现initPropertySources();// Validate that all properties marked as required are resolvable:// see ConfigurablePropertyResolver#setRequiredPropertiesgetEnvironment().validateRequiredProperties();// Store pre-refresh ApplicationListeners...if (this.earlyApplicationListeners == null) {this.earlyApplicationListeners = new LinkedHashSet<>(this.applicationListeners);}else {// Reset local application listeners to pre-refresh state.this.applicationListeners.clear();this.applicationListeners.addAll(this.earlyApplicationListeners);}// Allow for the collection of early ApplicationEvents,// to be published once the multicaster is available...this.earlyApplicationEvents = new LinkedHashSet<>();}
initPropertySources();在当前类AbstractApplicationContext中是没有实现的,这是提供了一个模版方法,用于交给子类去实现。这里我们举一个它子类的例子。
@Overrideprotected void initPropertySources() {ConfigurableEnvironment env = getEnvironment();if (env instanceof ConfigurableWebEnvironment) {((ConfigurableWebEnvironment) env).initPropertySources(this.servletContext, this.servletConfig);}}
上面这个方法是AbstractApplicationContext的子类AbstractRefreshableWebApplicationContext,这个是Spring容器的Web版本,我们知道在SpringMVC的web.xml文件中的配置都会放到SpringMVCthis.servletContext容器里面,通过上面代码,SpringMVC的一些配置就被成功注入到Spring的Enviroment里面了。继续回到prepareRefresh();方法。
接着就是会执行这句代码getEnvironment().validateRequiredProperties();。这句代码的作用就是检查Enviroment中是否有一些必须有的属性(Enviroment底层的属性的key-values形式)。必须的属性都会放在一个Set集合中。
private final Set<String> requiredProperties = new LinkedHashSet<>();
下面我们用代码来验证一下,我直接给出测试类了。
public static void main(String[] args) {AnnotationConfigApplicationContext applicationContext = new AnnotationConfigApplicationContext();applicationContext.register(AppConfig.class);//设置必须的属性applicationContext.getEnvironment().setRequiredProperties("ggg");applicationContext.refresh();applicationContext.close();}
上面代码我们就设置了一个必须属性ggg,然后执行代码

直接报错了,因为此时上面的代码验证到当前的环境变量Enviroment中没有这个必须属性,所以报错了,现在我们设置一下这个ggg,让其加入到环境遍历中。这个设置方法有很多,可以在配置文件中设置,也可以在JVM的环境变量设置都可以。这里结果就不演示了。继续回到prepareRefresh();方法。其实该方法主要是做一些容器的检查与设置工作,执行完了回到refresh方法,执行这句代码ConfigurableListableBeanFactory beanFactory = obtainFreshBeanFactory();,这个代码就是处理容器重复刷新的情况,并获取当前上下文对应的BeanFactory。
protected ConfigurableListableBeanFactory obtainFreshBeanFactory() {refreshBeanFactory();return getBeanFactory();}
protected abstract void refreshBeanFactory() throws BeansException, IllegalStateException;
refreshBeanFactory();方法同样是一个模版方法,交给子类去实现,只是这里是直接写成了抽象方法,上面那个模版方法是写成一个空方法了。这个方法有两个类重写了:

上面这两个实现类有什么区别,首先是AbstractRefreshableApplicationContext,最终是由AnnotationConfigWebApplicationContext这个类实现的,而GenericApplicationContext是由AnnotationConfigApplicationContext实现的,所以这两个类对应的不同的实现。AnnotationConfigWebApplicationContext 和 AnnotationConfigApplicationContext 都是 Spring Framework 中用于配置和管理应用程序上下文的类,它们之间的主要区别在于它们的应用场景和使用方式。下面我们简单分析一下这两个类的区别。
- 应用场景:
AnnotationConfigWebApplicationContext: 主要用于基于注解的 Spring Web 应用程序。它扩展了 GenericWebApplicationContext,提供了与Web应用相关的功能,例如处理ServletContext、注册Servlet和Filter等。AnnotationConfigApplicationContext: 主要用于非 Web 应用程序,即普通的 Java 应用程序。它是 GenericApplicationContext 的子类,不依赖于任何特定的环境,可以用于任何类型的应用。- 依赖关系:
AnnotationConfigWebApplicationContext 是 GenericWebApplicationContext 的子类,它依赖于 Spring Web 模块。AnnotationConfigApplicationContext 是 GenericApplicationContext 的子类,不依赖于 Spring Web 模块,适用于更通用的应用场景。- 使用方式:
在配置 AnnotationConfigWebApplicationContext 时,通常用于配置 Spring MVC,并支持通过 register 方法注册配置类。AnnotationConfigApplicationContext 用于非 Web 应用程序,通过 register 方法注册配置类,或者通过构造函数传递配置类。
下面给出一个案例,这里我先给出两份代码:
public static void main(String[] args) {AnnotationConfigApplicationContext applicationContext = new AnnotationConfigApplicationContext();//AnnotationConfigWebApplicationContext applicationContext=new AnnotationConfigWebApplicationContext();applicationContext.register(AppConfig.class);applicationContext.refresh();applicationContext.refresh();applicationContext.close();}

public static void main(String[] args) {//AnnotationConfigApplicationContext applicationContext = new AnnotationConfigApplicationContext();AnnotationConfigWebApplicationContext applicationContext=new AnnotationConfigWebApplicationContext();applicationContext.register(AppConfig.class);applicationContext.refresh();applicationContext.refresh();applicationContext.close();}

上面代码和实验结果说明,AnnotationConfigWebApplicationContext是支持重复刷新的,而AnnotationConfigApplicationContext是不支持重复刷新的。这里为什么会这样我们就需要回到,这两个类对这下面这个方法的实现上来的。
protected abstract void refreshBeanFactory() throws BeansException, IllegalStateException;
首先看AbstractRefreshableApplicationContext(AnnotationConfigWebApplicationContext的父类)类中refreshBeanFactory的实现
protected final void refreshBeanFactory() throws BeansException {//判断我们现在是否有一个Beanfactory了if (hasBeanFactory()) {//如果有关闭并销毁这个Beanfactory(执行bean的销毁逻辑,destroy方法)destroyBeans();//真正的关闭容器closeBeanFactory();}try {//创建一个新的BeanFactoryDefaultListableBeanFactory beanFactory = createBeanFactory();beanFactory.setSerializationId(getId());customizeBeanFactory(beanFactory);loadBeanDefinitions(beanFactory);this.beanFactory = beanFactory;}catch (IOException ex) {throw new ApplicationContextException("I/O error parsing bean definition source for " + getDisplayName(), ex);}}
上面进入方法的if条件就可以看出AnnotationConfigWebApplicationContext是支持重复刷新的。
再看GenericApplicationContext(AnnotationConfigApplicationContext的父类)对这个方法的实现。
@Overrideprotected final void refreshBeanFactory() throws IllegalStateException {if (!this.refreshed.compareAndSet(false, true)) {throw new IllegalStateException("GenericApplicationContext does not support multiple refresh attempts: just call 'refresh' once");}this.beanFactory.setSerializationId(getId());}
if (!this.refreshed.compareAndSet(false, true)) 通过一个CAS操作判断容器是否刷新过,如果刷鞋过就抛出了上面的异常。这也是AnnotationConfigApplicationContext不支持重复刷新的原因所在。继续回到refresh方法。下面接着执行prepareBeanFactory(beanFactory);。这句代码主要做了下面几件事:
- 设置BeanFactory的类加载器、SpringEL表达式解析器、类型转化注册器
- 添加三个BeanPostProcessor,注意是具体的BeanPostProcessor实例对象
- 记录ignoreDependencyInterface
- 记录ResolvableDependency
- 添加三个单例Bean
让我们具体看一下代码细节:
//参数为前面设置的beanfactory对象
protected void prepareBeanFactory(ConfigurableListableBeanFactory beanFactory) {//设置beanFactory的ClassLoaderbeanFactory.setBeanClassLoader(getClassLoader());// Spring5.3中新增的功能,可以选择是否开启Spel功能,shouldIgnoreSpel默认为false,表示开启if (!shouldIgnoreSpel) {//构造一个SPel表达式的解析器beanFactory.setBeanExpressionResolver(new StandardBeanExpressionResolver(beanFactory.getBeanClassLoader()));}// 添加一个ResourceEditorRegistrar,注册一些级别的类型转化器(添加一些默认的类型转换器)beanFactory.addPropertyEditorRegistrar(new ResourceEditorRegistrar(this, getEnvironment()));// Configure the bean factory with context callbacks.// 组成一个BeanPostProcessor,用来处理EnvironmentAware、EmbeddedValueResolverAware等回调beanFactory.addBeanPostProcessor(new ApplicationContextAwareProcessor(this));// 如果一个属性对应的set方法在ignoredDependencyInterfaces接口中被定义了,则该属性不会进行自动注入(是Spring中的自动注入,不是@Autowired)beanFactory.ignoreDependencyInterface(EnvironmentAware.class);beanFactory.ignoreDependencyInterface(EmbeddedValueResolverAware.class);beanFactory.ignoreDependencyInterface(ResourceLoaderAware.class);beanFactory.ignoreDependencyInterface(ApplicationEventPublisherAware.class);beanFactory.ignoreDependencyInterface(MessageSourceAware.class);beanFactory.ignoreDependencyInterface(ApplicationContextAware.class);beanFactory.ignoreDependencyInterface(ApplicationStartupAware.class);// BeanFactory interface not registered as resolvable type in a plain factory.// MessageSource registered (and found for autowiring) as a bean.beanFactory.registerResolvableDependency(BeanFactory.class, beanFactory);beanFactory.registerResolvableDependency(ResourceLoader.class, this);beanFactory.registerResolvableDependency(ApplicationEventPublisher.class, this);beanFactory.registerResolvableDependency(ApplicationContext.class, this);// Register early post-processor for detecting inner beans as ApplicationListeners.// ApplicationListenerDetector负责把ApplicantsListener类型的Bean注册到ApplicationContext中beanFactory.addBeanPostProcessor(new ApplicationListenerDetector(this));// Detect a LoadTimeWeaver and prepare for weaving, if found.// Aspectj本身是通过编译期进行代理的,在Spring中就跟LoadTimeWeaver有关if (!NativeDetector.inNativeImage() && beanFactory.containsBean(LOAD_TIME_WEAVER_BEAN_NAME)) {beanFactory.addBeanPostProcessor(new LoadTimeWeaverAwareProcessor(beanFactory));// Set a temporary ClassLoader for type matching.beanFactory.setTempClassLoader(new ContextTypeMatchClassLoader(beanFactory.getBeanClassLoader()));}// Register default environment beans.if (!beanFactory.containsLocalBean(ENVIRONMENT_BEAN_NAME)) {beanFactory.registerSingleton(ENVIRONMENT_BEAN_NAME, getEnvironment());}if (!beanFactory.containsLocalBean(SYSTEM_PROPERTIES_BEAN_NAME)) {beanFactory.registerSingleton(SYSTEM_PROPERTIES_BEAN_NAME, getEnvironment().getSystemProperties());}if (!beanFactory.containsLocalBean(SYSTEM_ENVIRONMENT_BEAN_NAME)) {beanFactory.registerSingleton(SYSTEM_ENVIRONMENT_BEAN_NAME, getEnvironment().getSystemEnvironment());}if (!beanFactory.containsLocalBean(APPLICATION_STARTUP_BEAN_NAME)) {beanFactory.registerSingleton(APPLICATION_STARTUP_BEAN_NAME, getApplicationStartup());}}
beanFactory.addBeanPostProcessor(new ApplicationContextAwareProcessor(this));这句代码添加了一个BeanPostProcessor对象实例。
@Overridepublic void addBeanPostProcessor(BeanPostProcessor beanPostProcessor) {Assert.notNull(beanPostProcessor, "BeanPostProcessor must not be null");// Remove from old position, if anythis.beanPostProcessors.remove(beanPostProcessor);// Add to end of listthis.beanPostProcessors.add(beanPostProcessor);}
ApplicationContextAwareProcessor就是用于处理Aware回调的。在 Spring 框架中,Aware 接口提供了对容器底层资源的访问,它是通过回调方式实现的。Aware 接口包括多个子接口,例如 BeanFactoryAware、ApplicationContextAware 等,每个接口都定义了一个回调方法,当相应的资源准备好时,容器会调用这些方法。以下是一些常见的 Aware 接口及其回调方法:
- BeanFactoryAware:
public class MyBean implements BeanFactoryAware {private BeanFactory beanFactory;@Overridepublic void setBeanFactory(BeanFactory beanFactory) throws BeansException {this.beanFactory = beanFactory;// 可以在这里使用 BeanFactory 进行一些操作}
}- ApplicationContextAware:
public class MyBean implements ApplicationContextAware {private ApplicationContext applicationContext;@Overridepublic void setApplicationContext(ApplicationContext applicationContext) throws BeansException {this.applicationContext = applicationContext;// 可以在这里使用 ApplicationContext 进行一些操作}
}- BeanNameAware:
public class MyBean implements BeanNameAware {private String beanName;@Overridepublic void setBeanName(String name) {this.beanName = name;// 可以在这里使用 Bean 的名称进行一些操作}
}继续回到prepareBeanFactory方法。开始记录ignoreDependencyInterface。
beanFactory.ignoreDependencyInterface(EnvironmentAware.class);
beanFactory.ignoreDependencyInterface(EmbeddedValueResolverAware.class);
beanFactory.ignoreDependencyInterface(ResourceLoaderAware.class);
beanFactory.ignoreDependencyInterface(ApplicationEventPublisherAware.class);
beanFactory.ignoreDependencyInterface(MessageSourceAware.class);
beanFactory.ignoreDependencyInterface(ApplicationContextAware.class);
beanFactory.ignoreDependencyInterface(ApplicationStartupAware.class);
首先我们看EnvironmentAware.class这个类。
public interface EnvironmentAware extends Aware {/*** Set the {@code Environment} that this component runs in.*/void setEnvironment(Environment environment);}
首先给出一个案例:
public class AService implements EnvironmentAware {//获取环境遍历private Environment environment;@Autowired@Overridepublic void setEnvironment(Environment environment) {System.out.println("environment");this.environment = environment;}public void test() {System.out.println(environment);}
}@ComponentScan("****")
@EnableScheduling
@PropertySource("classpath:spring.properties")
@EnableTransactionManagement
public class AppConfig {@Beanpublic AService aService() {return new AService();}
}
问上面的System.out.println("environment");代码会执行几次,答案是两次,首先@Autowired注解,在进行依赖注入的时候会调用setEnvironment执行set方法注入。然后spring发现你实现了EnvironmentAware接口,其会自动给的调用setEnvironment方法,这个输出语句执行了两次。

但其实我们不需要执行两次,我们去掉@Autowired注解,然后,使用byname或者bytype注入。
@ComponentScan("****")
@EnableScheduling
@PropertySource("classpath:spring.properties")
@EnableTransactionManagement
public class AppConfig {@Bean(autowire=Autowire.BY_NAME)public AService aService() {return new AService();}
}
此时就只会输出一次

这是为什么呢,我们分析一下byname或bytype的源码。首先进入doCreateBean方法,在进行属性填充时会执行populateBean(beanName, mbd, instanceWrapper);这句代码。我们进去看看。
int resolvedAutowireMode = mbd.getResolvedAutowireMode();if (resolvedAutowireMode == AUTOWIRE_BY_NAME || resolvedAutowireMode == AUTOWIRE_BY_TYPE) {// MutablePropertyValues是PropertyValues具体的实现类MutablePropertyValues newPvs = new MutablePropertyValues(pvs);// Add property values based on autowire by name if applicable.if (resolvedAutowireMode == AUTOWIRE_BY_NAME) {autowireByName(beanName, mbd, bw, newPvs);}// Add property values based on autowire by type if applicable.if (resolvedAutowireMode == AUTOWIRE_BY_TYPE) {autowireByType(beanName, mbd, bw, newPvs);}pvs = newPvs;}
populate方法中,这一块就是处理bytype或byname的情况的代码。我们进入autowireByType方法。
// 当前Bean中能进行自动注入的属性名String[] propertyNames = unsatisfiedNonSimpleProperties(mbd, bw);
进入unsatisfiedNonSimpleProperties方法
protected String[] unsatisfiedNonSimpleProperties(AbstractBeanDefinition mbd, BeanWrapper bw) {Set<String> result = new TreeSet<>();PropertyValues pvs = mbd.getPropertyValues();PropertyDescriptor[] pds = bw.getPropertyDescriptors();// 什么样的属性能进行自动注入?// 1.该属性有对应的set方法// 2.没有在ignoredDependencyTypes中// 3.如果该属性对应的set方法是实现的某个接口中所定义的,那么接口没有在ignoredDependencyInterfaces中// 4.属性类型不是简单类型,比如int、Integer、int[]for (PropertyDescriptor pd : pds) {if (pd.getWriteMethod() != null && !isExcludedFromDependencyCheck(pd) && !pvs.contains(pd.getName()) &&!BeanUtils.isSimpleProperty(pd.getPropertyType())) {result.add(pd.getName());}}return StringUtils.toStringArray(result);}
isExcludedFromDependencyCheck(pd)这句代码就是检查属性类型是否在ignoredDependencyTypes中。
protected boolean isExcludedFromDependencyCheck(PropertyDescriptor pd) {// 属性类型是否在ignoredDependencyTypes中// 该属性的set方法是否是实现的某个接口中所定义的,该接口是否在ignoredDependencyInterfaces中return (AutowireUtils.isExcludedFromDependencyCheck(pd) ||this.ignoredDependencyTypes.contains(pd.getPropertyType()) ||AutowireUtils.isSetterDefinedInInterface(pd, this.ignoredDependencyInterfaces));}
发现上面的setEnviroment在this.ignoredDependencyInterfaces这个集合中,所以不会执行这个set方法。prepareBeanFactory的下面这段代码就是在设置这个集合。
beanFactory.ignoreDependencyInterface(EnvironmentAware.class);beanFactory.ignoreDependencyInterface(EmbeddedValueResolverAware.class);beanFactory.ignoreDependencyInterface(ResourceLoaderAware.class); beanFactory.ignoreDependencyInterface(ApplicationEventPublisherAware.class);beanFactory.ignoreDependencyInterface(MessageSourceAware.class);beanFactory.ignoreDependencyInterface(ApplicationContextAware.class);beanFactory.ignoreDependencyInterface(ApplicationStartupAware.class);
继续执行prepareBeanFactory的下面这段代码。
beanFactory.registerResolvableDependency(BeanFactory.class, beanFactory);
beanFactory.registerResolvableDependency(ResourceLoader.class, this);
beanFactory.registerResolvableDependency(ApplicationEventPublisher.class, this);
beanFactory.registerResolvableDependency(ApplicationContext.class, this);
上面就是在BeanFactory中的依赖关系集合中提前注入了一些对象,这些对象在我们的Bean是可以直接注入使用的,因为Spring已经帮我们创建好了。然后继续执行代码:
beanFactory.addBeanPostProcessor(new ApplicationListenerDetector(this));
上面代码也是添加了一个BeanPostProcessor,ApplicationListenerDetector是一个事件监听器。
在 Spring Framework 中,ApplicationListenerDetector 是一个类或组件,用于检测和处理应用程序中的事件监听器。在 Spring 框架中,事件(Event)和监听器(Listener)是一种用于处理应用程序中事件的机制。当应用程序中发生某些事件时,可以通过注册监听器来捕获并响应这些事件。ApplicationListenerDetector 的具体功能和用途取决于上下文和实际使用的代码。通常,它负责检测并管理应用程序中注册的事件监听器,以确保它们能够正确地接收和处理相应的事件。
继续执行代码。
// Register default environment beans.if (!beanFactory.containsLocalBean(ENVIRONMENT_BEAN_NAME)) {beanFactory.registerSingleton(ENVIRONMENT_BEAN_NAME, getEnvironment());}if (!beanFactory.containsLocalBean(SYSTEM_PROPERTIES_BEAN_NAME)) {beanFactory.registerSingleton(SYSTEM_PROPERTIES_BEAN_NAME, getEnvironment().getSystemProperties());}if (!beanFactory.containsLocalBean(SYSTEM_ENVIRONMENT_BEAN_NAME)) {beanFactory.registerSingleton(SYSTEM_ENVIRONMENT_BEAN_NAME, getEnvironment().getSystemEnvironment());}if (!beanFactory.containsLocalBean(APPLICATION_STARTUP_BEAN_NAME)) {beanFactory.registerSingleton(APPLICATION_STARTUP_BEAN_NAME, getApplicationStartup());}
上面代码主要就是判断当前工厂有没有一些特定的bean,如果没有就将这个特定的bean注册到单例池中。到此prepareBeanFactory方法就执行完了。会到refresh方法。继续执行:
postProcessBeanFactory(beanFactory);
这个也是一个模版方法,子类利用实现这个方法,对beanFactory执行一些特定的动作。下面就会执行下面一句代码
invokeBeanFactoryPostProcessors(beanFactory);
上面代码我们先不在这里着重分析,它的作用其实就是扫描BeanDefinition然后将其注册到BeanFactory中,其实这个函数在spring的生命周期中我们分析过。
registerBeanPostProcessors(beanFactory);
这个方法就是用来注册BeanPostProcessor的。因为invokeBeanFactoryPostProcessors(beanFactory);可能扫描到用户自定义的BeanPostProcessor,所以需要注册。这个方法同样后面分析。
initMessageSource();
然后我们进入initMessageSource();这个方法看看。
protected void initMessageSource() {//获得当前的beanfacoryConfigurableListableBeanFactory beanFactory = getBeanFactory();//判断当亲啊beanFactory中是否包含一个MESSAGE_SOURCE_BEAN_NAME这个beanif (beanFactory.containsLocalBean(MESSAGE_SOURCE_BEAN_NAME)) {//然后获取这个bean,赋值给ApplicationContext的this.messageSource属性(getbean没有就会创建)this.messageSource = beanFactory.getBean(MESSAGE_SOURCE_BEAN_NAME, MessageSource.class);// Make MessageSource aware of parent MessageSource.if (this.parent != null && this.messageSource instanceof HierarchicalMessageSource) {HierarchicalMessageSource hms = (HierarchicalMessageSource) this.messageSource;if (hms.getParentMessageSource() == null) {// Only set parent context as parent MessageSource if no parent MessageSource// registered already.// 拿父ApplicationContext的messageSource作为this.messageSource的父messageSourcehms.setParentMessageSource(getInternalParentMessageSource());}}if (logger.isTraceEnabled()) {logger.trace("Using MessageSource [" + this.messageSource + "]");}}//如果没有定义就生成一个默认的else {// Use empty MessageSource to be able to accept getMessage calls.DelegatingMessageSource dms = new DelegatingMessageSource();dms.setParentMessageSource(getInternalParentMessageSource());this.messageSource = dms;beanFactory.registerSingleton(MESSAGE_SOURCE_BEAN_NAME, this.messageSource);if (logger.isTraceEnabled()) {logger.trace("No '" + MESSAGE_SOURCE_BEAN_NAME + "' bean, using [" + this.messageSource + "]");}}}
上面代码就是将用户自定义的MessageSource的bean拿到,然后赋值给this.messageSource属性,然后进行一些处理。没有就使用默认的国际化。继续回到refresh方法。
initApplicationEventMulticaster();
这个就是初始化一个事件发布器,其逻辑和初始化MessageSource的原理是一样的,也需要用户定义一个名为applicationEventMulticaster这个bean,如果有就赋值给ApplicationContext的applicationEventMulticaster属性,没有就使用spring默认的事件发布器。
registerListeners();
这个方法用于注册监听器。
protected void registerListeners() {// Register statically specified listeners first.for (ApplicationListener<?> listener : getApplicationListeners()) {//将程序员定义好的事件监听器加入到事件发布器中getApplicationEventMulticaster().addApplicationListener(listener);}// Do not initialize FactoryBeans here: We need to leave all regular beans// uninitialized to let post-processors apply to them!String[] listenerBeanNames = getBeanNamesForType(ApplicationListener.class, true, false);for (String listenerBeanName : listenerBeanNames) {getApplicationEventMulticaster().addApplicationListenerBean(listenerBeanName);}// Publish early application events now that we finally have a multicaster...// 添加了事件监听器后,判断是否有earlyApplicationEvents,如果有就使用事件广播器发布earlyApplicationEvents// earlyApplicationEvents表示在事件广播器还没生成好之前ApplicationContext所发布的事件Set<ApplicationEvent> earlyEventsToProcess = this.earlyApplicationEvents;this.earlyApplicationEvents = null;if (!CollectionUtils.isEmpty(earlyEventsToProcess)) {for (ApplicationEvent earlyEvent : earlyEventsToProcess) {getApplicationEventMulticaster().multicastEvent(earlyEvent);}}}
上面代码就是将事件监听器和定义好的事件发布器进行绑定。继续执行refresh方法。
finishBeanFactoryInitialization(beanFactory);
这个方法已经很熟悉了,就是加载一些解析器,以及加载非懒加载的单例bean。
finishRefresh();
最后完成刷新。
protected void finishRefresh() {// Clear context-level resource caches (such as ASM metadata from scanning).clearResourceCaches();// Initialize lifecycle processor for this context.// 设置lifecycleProcessor,默认为DefaultLifecycleProcessorinitLifecycleProcessor();// Propagate refresh to lifecycle processor first.// 调用LifecycleBean的start()getLifecycleProcessor().onRefresh();// Publish the final event.publishEvent(new ContextRefreshedEvent(this));// Participate in LiveBeansView MBean, if active.if (!NativeDetector.inNativeImage()) {LiveBeansView.registerApplicationContext(this);}}
我们知道bean有生命周期,然后我们可以使用BeanPostProcessor来介入bean得生命周期。其实容器也是有自己的生命周期的,上面整个过程都是在进行spring容器的初始化,即是Spring容器初始化的生命周期。那么我们该怎么介入容器的生命周期呢?下面给出一个案例。
@Component
public class jackLifeCycle implements SmartLifecycle {@Overridepublic void start() {System.out.println(1);}@Overridepublic void stop() {System.out.println(2);}@Overridepublic boolean isRunning() {return false;}
}
上面代码就是实现了SmartLifecycle接口,然后重写了start,stop和isRunning方法,作用是start在容器启动后调用,stop在容器停止后调用,isRunning判断容器是否在运行。下面给出测试代码。
public static void main(String[] args) {AnnotationConfigApplicationContext applicationContext = new AnnotationConfigApplicationContext();applicationContext.register(AppConfig.class);applicationContext.refresh();applicationContext.close();}

上面为什么会只调用start方法,上面代码执行的逻辑时,当调用start方法之前,先会调用isRunning方法,如果返回时false才会调用start方法,为true时只会调用stop方法。我们修改一下就可以看到不一样的效果。
@Component
public class jackLifeCycle implements SmartLifecycle {@Overridepublic void start() {System.out.println(1);}@Overridepublic void stop() {System.out.println(2);}@Overridepublic boolean isRunning() {return true;}
}

上面代码的逻辑就是在finishRefresh() 方法中实现的,关键是下面代码:
initLifecycleProcessor();// Propagate refresh to lifecycle processor first.// 调用LifecycleBean的start()
getLifecycleProcessor().onRefresh();
我们首先看initLifecycleProcessor方法。
protected void initLifecycleProcessor() {ConfigurableListableBeanFactory beanFactory = getBeanFactory();//检查beanfactory中是否有一个名为lifecycleProcessor的beanif (beanFactory.containsLocalBean(LIFECYCLE_PROCESSOR_BEAN_NAME)) {this.lifecycleProcessor =beanFactory.getBean(LIFECYCLE_PROCESSOR_BEAN_NAME, LifecycleProcessor.class);if (logger.isTraceEnabled()) {logger.trace("Using LifecycleProcessor [" + this.lifecycleProcessor + "]");}}//没有就构造一个默认的else {DefaultLifecycleProcessor defaultProcessor = new DefaultLifecycleProcessor();defaultProcessor.setBeanFactory(beanFactory);this.lifecycleProcessor = defaultProcessor;beanFactory.registerSingleton(LIFECYCLE_PROCESSOR_BEAN_NAME, this.lifecycleProcessor);if (logger.isTraceEnabled()) {logger.trace("No '" + LIFECYCLE_PROCESSOR_BEAN_NAME + "' bean, using " +"[" + this.lifecycleProcessor.getClass().getSimpleName() + "]");}}}
然后执行getLifecycleProcessor().onRefresh()。
LifecycleProcessor getLifecycleProcessor() throws IllegalStateException {if (this.lifecycleProcessor == null) {throw new IllegalStateException("LifecycleProcessor not initialized - " +"call 'refresh' before invoking lifecycle methods via the context: " + this);}return this.lifecycleProcessor;}
就是拿出我们前面构造的(或spring默认的)lifecycleProcessor的bean,并调用onRefresh方法。
@Overridepublic void onRefresh() {startBeans(true);this.running = true;}
startBeans(true);会检查拿过来的那个lifecycleProcessor的bean是否实现了SmartLifecycle接口,如果实现了就调用start方法(底层细节就不讲了),然后将this.running 设置为true,后面就会调用stop方法。回到finishRefresh该方法就执行完了,至此refresh方法的大致逻辑就执行完了。
三. 事件发布机制
1. 简介
Spring框架的事件发布机制是一种用于在应用程序内部模块之间进行松散耦合通信的机制。它允许一个组件发布事件,而其他组件监听并响应这些事件,从而实现模块之间的解耦。事件可以是任何Java对象,而事件的发布者和监听者之间不需要直接的引用。
- 事件(Event): 事件是一个普通的Java对象,它封装了与应用程序相关的状态信息。通常,事件类包含了一些数据或者消息,用于传递给监听者。
public class MyEvent {private String message;public MyEvent(String message) {this.message = message;}public String getMessage() {return message;}
}
- 事件发布者(Event Publisher): 事件发布者是负责发布事件的组件。在Spring中,ApplicationEventPublisher 接口定义了事件发布的方法,而 ApplicationEventPublisherAware 接口可以被实现的类获取到 ApplicationEventPublisher 实例。
import org.springframework.context.ApplicationEventPublisher;
import org.springframework.context.ApplicationEventPublisherAware;public class MyEventPublisher implements ApplicationEventPublisherAware {private ApplicationEventPublisher eventPublisher;@Overridepublic void setApplicationEventPublisher(ApplicationEventPublisher eventPublisher) {this.eventPublisher = eventPublisher;}public void publishEvent(String message) {MyEvent myEvent = new MyEvent(message);eventPublisher.publishEvent(myEvent);}
}
- 事件监听者(Event Listener): 事件监听者是负责接收和响应事件的组件。在Spring中,可以通过实现 ApplicationListener 接口或使用 @EventListener 注解来创建事件监听者。
import org.springframework.context.event.EventListener;public class MyEventListener {@EventListenerpublic void handleEvent(MyEvent myEvent) {System.out.println("Received event with message: " + myEvent.getMessage());}
}
- 配置: 在Spring中,需要进行相应的配置以启用事件发布机制。通常,通过配置文件或使用注解来声明事件发布者和监听者。
import org.springframework.context.annotation.Bean;
import org.springframework.context.annotation.Configuration;@Configuration
public class AppConfig {@Beanpublic MyEventPublisher myEventPublisher() {return new MyEventPublisher();}@Beanpublic MyEventListener myEventListener() {return new MyEventListener();}
}
2. 源码分析
前面源码中涉及到了Spring的事件发布机制,但没有着重分析,这一部分来详细分析一下。在前面的源码分析中,有四个和事件相关的bean被加入到容器中了。分别是:
- ApplicationListenerDetector
- SimpleApplicationEventMulticaster
- EventListenerMethodProcessor
- DefaultEventListenerFactory
我们首先定义一个事件监听器:
@Component
public class JackListner implements ApplicationListener {@Overridepublic void onApplicationEvent(ApplicationEvent event) {System.out.println(event);}
}
用户自定义的监听器需要被识别加入容器,所以需要一个BeanPostProcessor来识别所有的监听器,而这个BeanPostProcessor就是ApplicationListenerDetector 。
@Overridepublic Object postProcessAfterInitialization(Object bean, String beanName) {if (bean instanceof ApplicationListener) {// potentially not detected as a listener by getBeanNamesForType retrievalBoolean flag = this.singletonNames.get(beanName);if (Boolean.TRUE.equals(flag)) {// singleton bean (top-level or inner): register on the flythis.applicationContext.addApplicationListener((ApplicationListener<?>) bean);}else if (Boolean.FALSE.equals(flag)) {if (logger.isWarnEnabled() && !this.applicationContext.containsBean(beanName)) {// inner bean with other scope - can't reliably process eventslogger.warn("Inner bean '" + beanName + "' implements ApplicationListener interface " +"but is not reachable for event multicasting by its containing ApplicationContext " +"because it does not have singleton scope. Only top-level listener beans are allowed " +"to be of non-singleton scope.");}this.singletonNames.remove(beanName);}}return bean;}
上面这个类是ApplicationListenerDetector类的postProcessAfterInitialization方法,它在bean初始化后调用,if (bean instanceof ApplicationListener) {这句代码就可以看出如果一个bean实现了ApplicationListener接口,就会执行this.applicationContext.addApplicationListener((ApplicationListener<?>) bean);将这个bean加入到监听器集合中。
所以ApplicationListenerDetector的作用就是将事件监听器加入到ApplicationContext中
public static void main(String[] args) {AnnotationConfigApplicationContext applicationContext = new AnnotationConfigApplicationContext();applicationContext.register(AppConfig.class);applicationContext.refresh();//发布事件applicationContext.publishEvent("1234");applicationContext.close();}

从测试结果我们可以看出,我们定义的监听器监听到了3个事件,分别是容器启动事件,我们自己发布的事件,以及容器关闭发布的事件。
我们自己发布事件前面调用的函数是applicationContext.publishEvent,我们看一下这个函数。
protected void publishEvent(Object event, @Nullable ResolvableType eventType) {Assert.notNull(event, "Event must not be null");// Decorate event as an ApplicationEvent if necessaryApplicationEvent applicationEvent;//如果我们的事件类型是ApplicationEventif (event instanceof ApplicationEvent) {//将事件直接赋值给applicationEventapplicationEvent = (ApplicationEvent) event;}else {//如果我们的事件不是ApplicationEvent类型,则将我们的事件封装为一个PayloadApplicationEvent类型,然后赋值给applicationEventapplicationEvent = new PayloadApplicationEvent<>(this, event);if (eventType == null) {eventType = ((PayloadApplicationEvent<?>) applicationEvent).getResolvableType();}}// Multicast right now if possible - or lazily once the multicaster is initializedif (this.earlyApplicationEvents != null) {this.earlyApplicationEvents.add(applicationEvent);}else {getApplicationEventMulticaster().multicastEvent(applicationEvent, eventType);}// Publish event via parent context as well...if (this.parent != null) {if (this.parent instanceof AbstractApplicationContext) {((AbstractApplicationContext) this.parent).publishEvent(event, eventType);}else {this.parent.publishEvent(event);}}}
上面的代码首先会对我们的事件类型进行处理,然后将我们事件保存到applicationcontext的this.earlyApplicationEvents集合中,然后执行getApplicationEventMulticaster().multicastEvent(applicationEvent, eventType);对事件进行发布。
@Overridepublic void multicastEvent(final ApplicationEvent event, @Nullable ResolvableType eventType) {ResolvableType type = (eventType != null ? eventType : resolveDefaultEventType(event));//处理发布器的线程池Executor executor = getTaskExecutor();//遍历所有的事件监听器for (ApplicationListener<?> listener : getApplicationListeners(event, type)) {//如果线程池不为空,就异步执行事件发布if (executor != null) {executor.execute(() -> invokeListener(listener, event));}else {//否则当前线程串形的执行事件发布invokeListener(listener, event);}}}
上面这个函数用于进行事件发布的,分为同步发布和异步发布两种模式,默认是同步发布模式。
SimpleApplicationEventMulticaster就是一个事件发布器
处理上面事件监听器的定义方式,还有没有其它事件监听器的定义形式,答案是有的。
@Component
public class AService  {@Autowiredprivate MessageSource messageSource;public String getLocalizedGreeting(String name, Locale locale) {return messageSource.getMessage("greeting.message", new Object[]{name}, locale);}@EventListenerpublic void a(ApplicationEvent event){System.out.println(event);}
}
对于这种定义类型的监听器Spring该如何处理呢,答案就是EventListenerMethodProcessor。
/**
SmartInitializingSingleton: 表示容器中所有的非懒加载的单例bean都价值完后,会执行void afterSingletonsInstantiated();这个方法
ApplicationContextAware:表示回调用
BeanFactoryPostProcessor:表示它是一个BeanFactoryPostProcessor,这个后面再分析。**/
public class EventListenerMethodProcessorimplements SmartInitializingSingleton, ApplicationContextAware, BeanFactoryPostProcessor {
......
@Overridepublic void afterSingletonsInstantiated() {ConfigurableListableBeanFactory beanFactory = this.beanFactory;Assert.state(this.beanFactory != null, "No ConfigurableListableBeanFactory set");//拿到bean工厂中所有的bean String[] beanNames = beanFactory.getBeanNamesForType(Object.class);for (String beanName : beanNames) {if (!ScopedProxyUtils.isScopedTarget(beanName)) {// 拿到当前Bean对象的类型Class<?> type = null;try {type = AutoProxyUtils.determineTargetClass(beanFactory, beanName);}catch (Throwable ex) {// An unresolvable bean type, probably from a lazy bean - let's ignore it.if (logger.isDebugEnabled()) {logger.debug("Could not resolve target class for bean with name '" + beanName + "'", ex);}}if (type != null) {if (ScopedObject.class.isAssignableFrom(type)) {try {Class<?> targetClass = AutoProxyUtils.determineTargetClass(beanFactory, ScopedProxyUtils.getTargetBeanName(beanName));if (targetClass != null) {type = targetClass;}}catch (Throwable ex) {// An invalid scoped proxy arrangement - let's ignore it.if (logger.isDebugEnabled()) {logger.debug("Could not resolve target bean for scoped proxy '" + beanName + "'", ex);}}}try {processBean(beanName, type);}catch (Throwable ex) {throw new BeanInitializationException("Failed to process @EventListener " +"annotation on bean with name '" + beanName + "'", ex);}}}}}
......}
拿到bean工厂中所有的bean后会调用核心方法 processBean(beanName, type);。
private void processBean(final String beanName, final Class<?> targetType) {if (!this.nonAnnotatedClasses.contains(targetType) &&AnnotationUtils.isCandidateClass(targetType, EventListener.class) &&!isSpringContainerClass(targetType)) {// 找到所有加了@EventListener注解的方法Map<Method, EventListener> annotatedMethods = null;try {annotatedMethods = MethodIntrospector.selectMethods(targetType,(MethodIntrospector.MetadataLookup<EventListener>) method ->AnnotatedElementUtils.findMergedAnnotation(method, EventListener.class));}catch (Throwable ex) {// An unresolvable type in a method signature, probably from a lazy bean - let's ignore it.if (logger.isDebugEnabled()) {logger.debug("Could not resolve methods for bean with name '" + beanName + "'", ex);}}if (CollectionUtils.isEmpty(annotatedMethods)) {this.nonAnnotatedClasses.add(targetType);if (logger.isTraceEnabled()) {logger.trace("No @EventListener annotations found on bean class: " + targetType.getName());}}else {// Non-empty set of methodsConfigurableApplicationContext context = this.applicationContext;Assert.state(context != null, "No ApplicationContext set");List<EventListenerFactory> factories = this.eventListenerFactories;Assert.state(factories != null, "EventListenerFactory List not initialized");for (Method method : annotatedMethods.keySet()) {for (EventListenerFactory factory : factories) {// 利用EventListenerFactory来对加了@EventListener注解的方法生成ApplicationListener对象if (factory.supportsMethod(method)) {Method methodToUse = AopUtils.selectInvocableMethod(method, context.getType(beanName));ApplicationListener<?> applicationListener =factory.createApplicationListener(beanName, targetType, methodToUse);if (applicationListener instanceof ApplicationListenerMethodAdapter) {((ApplicationListenerMethodAdapter) applicationListener).init(context, this.evaluator);}context.addApplicationListener(applicationListener);break;}}}if (logger.isDebugEnabled()) {logger.debug(annotatedMethods.size() + " @EventListener methods processed on bean '" +beanName + "': " + annotatedMethods);}}}}
上面就会找出所有加有@EventListener注解的方法,然后封装到一个集合中,接着遍历这个集合,执行ApplicationListener<?> applicationListener =factory.createApplicationListener(beanName, targetType, methodToUse);将这些个方法构造成一个ApplicationListener对象,然后加入到ApplicationContext中。
EventListenerMethodProcessor的作用是遍历所有的bean,找到所有有EventListener注解的方法,并将其构
造为ApplicationListener对象,加入到容器中。
在上面的过程中,具体将方法构造为ApplicationListener对象的是什么?其实就是最后一个beanDefaultEventListenerFactory。
上面四个bean是spring事件发布监听机制的核心bean。