轻松玩转书生·浦语大模型趣味 Demo
大模型及 InternLM 模型简介
什么是大模型
大模型通常指的是机器学习或人工智能领域中参数数量巨大、拥有庞大计算能力和参数规模的模型。这些模型利用大量数据进行训练,并且拥有数十亿甚至数千亿个参数。大模型的出现和发展得益于增长的数据量、计算能力的提升以及算法优化等因素。这些模型在各种任务中展现出惊人的性能,比如自然语言处理、计算机视觉、语音识别等。这种模型通常采用深度神经网络结构,如 Transformer、BERT、GPT( Generative Pre-trained Transformer )等
InternLM 模型
InternLM 是一个开源的轻量级训练框架,旨在支持大模型训练而无需大量的依赖。通过单一的代码库,它支持在拥有数千个 GPU 的大型集群上进行预训练,并在单个 GPU 上进行微调,同时实现了卓越的性能优化。在 1024 个 GPU 上训练时,InternLM 可以实现近 90% 的加速效率。
Lagent 是一个轻量级、开源的基于大语言模型的智能体(agent)框架,支持用户快速地将一个大语言模型转变为多种类型的智能体,并提供了一些典型工具为大语言模型赋能。通过 Lagent 框架可以更好的发挥 InternLM 的全部性能。

InternLM-Chat-7B 智能对话 Demo
环境准备


进入开发机后,在页面的左上角可以切换 JupyterLab、终端和 VScode,并在终端输入 bash 命令,进入 conda 环境

进入 conda 环境之后,使用以下命令从本地克隆一个已有的 pytorch 2.0.1 的环境
bash # 请每次使用 jupyter lab 打开终端时务必先执行 bash 命令进入 bash 中
/root/share/install_conda_env_internlm_base.sh internlm-demo

然后使用以下命令激活环境
conda activate internlm-demo

并在环境中安装运行 demo 所需要的依赖
# 升级pip
python -m pip install --upgrade pippip install modelscope==1.9.5
pip install transformers==4.35.2
pip install streamlit==1.24.0
pip install sentencepiece==0.1.99
pip install accelerate==0.24.1
模型下载
InternStudio平台的 share 目录下已经为我们准备了全系列的 InternLM 模型,所以我们可以直接复制即可
mkdir -p /root/model/Shanghai_AI_Laboratory
cp -r /root/share/temp/model_repos/internlm-chat-7b /root/model/Shanghai_AI_Laboratory
# -r 选项表示递归地复制目录及其内容


也可以使用 modelscope 中的 snapshot_download 函数下载模型,第一个参数为模型名称,参数 cache_dir 为模型的下载路径。
在 /root 路径下新建目录 model,在目录下新建 download.py 文件并在其中输入以下内容,粘贴代码后记得保存文件,如下图所示。并运行 python /root/model/download.py 执行下载,模型大小为 14 GB,下载模型大概需要 10~20 分钟
import torch
from modelscope import snapshot_download, AutoModel, AutoTokenizer
import os
model_dir = snapshot_download('Shanghai_AI_Laboratory/internlm-chat-7b', cache_dir='/root/model', revision='v1.0.3')

代码准备
首先 clone 代码,在 /root 路径下新建 code 目录,然后切换路径, clone 代码
mkdir -p /root/codecd /root/code git clone https://gitee.com/internlm/InternLM.git

切换 commit 版本,与教程 commit 版本保持一致,可以让大家更好的复现
cd InternLM
git checkout 3028f07cb79e5b1d7342f4ad8d11efad3fd13d17
将 /root/code/InternLM/web_demo.py 中 29 行和 33 行的模型更换为本地的 /root/model/Shanghai_AI_Laboratory/internlm-chat-7b

终端运行
我们可以在 /root/code/InternLM 目录下新建一个 cli_demo.py 文件,将以下代码填入其中
import torch
from transformers import AutoTokenizer, AutoModelForCausalLMmodel_name_or_path = "/root/model/Shanghai_AI_Laboratory/internlm-chat-7b"tokenizer = AutoTokenizer.from_pretrained(model_name_or_path, trust_remote_code=True)
model = AutoModelForCausalLM.from_pretrained(model_name_or_path, trust_remote_code=True, torch_dtype=torch.bfloat16, device_map='auto')
model = model.eval()system_prompt = """You are an AI assistant whose name is InternLM (书生·浦语).
- InternLM (书生·浦语) is a conversational language model that is developed by Shanghai AI Laboratory (上海人工智能实验室). It is designed to be helpful, honest, and harmless.
- InternLM (书生·浦语) can understand and communicate fluently in the language chosen by the user such as English and 中文.
"""messages = [(system_prompt, '')]print("=============Welcome to InternLM chatbot, type 'exit' to exit.=============")while True:input_text = input("User  >>> ")input_text = input_text.replace(' ', '')if input_text == "exit":breakresponse, history = model.chat(tokenizer, input_text, history=messages)messages.append((input_text, response))print(f"robot >>> {response}")
然后在终端运行以下命令,即可体验
 InternLM-Chat-7B 模型的对话能力。对话效果如下所示
python /root/code/InternLM/cli_demo.py

绷不住了,这是啥问题???哈哈哈哈哈
web demo 运行
我们切换到 VScode 中,运行 /root/code/InternLM 目录下的 web_demo.py 文件,输入以下命令后,查看本教程5.2配置本地端口后,将端口映射到本地。在本地浏览器输入http://127.0.0.1:6006即可
bash
conda activate internlm-demo  # 首次进入 vscode 会默认是 base 环境,所以首先切换环境
cd /root/code/InternLM
streamlit run web_demo.py --server.address 127.0.0.1 --server.port 6006


Lagent 智能体工具调用 Demo
环境准备
同上InternLM-Chat-7B
模型下载
同上InternLM-Chat-7B
Lagent 安装
首先切换路径到 /root/code 克隆 lagent 仓库,并通过 pip install -e . 源码安装 Lagent
cd /root/code
git clone https://gitee.com/internlm/lagent.git
cd /root/code/lagent
git checkout 511b03889010c4811b1701abb153e02b8e94fb5e # 尽量保证和教程commit版本一致
pip install -e . # 源码安装

修改代码
由于代码修改的地方比较多,大家直接将 /root/code/lagent/examples/react_web_demo.py 内容替换为以下代码
import copy
import osimport streamlit as st
from streamlit.logger import get_loggerfrom lagent.actions import ActionExecutor, GoogleSearch, PythonInterpreter
from lagent.agents.react import ReAct
from lagent.llms import GPTAPI
from lagent.llms.huggingface import HFTransformerCasualLMclass SessionState:def init_state(self):"""Initialize session state variables."""st.session_state['assistant'] = []st.session_state['user'] = []#action_list = [PythonInterpreter(), GoogleSearch()]action_list = [PythonInterpreter()]st.session_state['plugin_map'] = {action.name: actionfor action in action_list}st.session_state['model_map'] = {}st.session_state['model_selected'] = Nonest.session_state['plugin_actions'] = set()def clear_state(self):"""Clear the existing session state."""st.session_state['assistant'] = []st.session_state['user'] = []st.session_state['model_selected'] = Noneif 'chatbot' in st.session_state:st.session_state['chatbot']._session_history = []class StreamlitUI:def __init__(self, session_state: SessionState):self.init_streamlit()self.session_state = session_statedef init_streamlit(self):"""Initialize Streamlit's UI settings."""st.set_page_config(layout='wide',page_title='lagent-web',page_icon='./docs/imgs/lagent_icon.png')# st.header(':robot_face: :blue[Lagent] Web Demo ', divider='rainbow')st.sidebar.title('模型控制')def setup_sidebar(self):"""Setup the sidebar for model and plugin selection."""model_name = st.sidebar.selectbox('模型选择:', options=['gpt-3.5-turbo','internlm'])if model_name != st.session_state['model_selected']:model = self.init_model(model_name)self.session_state.clear_state()st.session_state['model_selected'] = model_nameif 'chatbot' in st.session_state:del st.session_state['chatbot']else:model = st.session_state['model_map'][model_name]plugin_name = st.sidebar.multiselect('插件选择',options=list(st.session_state['plugin_map'].keys()),default=[list(st.session_state['plugin_map'].keys())[0]],)plugin_action = [st.session_state['plugin_map'][name] for name in plugin_name]if 'chatbot' in st.session_state:st.session_state['chatbot']._action_executor = ActionExecutor(actions=plugin_action)if st.sidebar.button('清空对话', key='clear'):self.session_state.clear_state()uploaded_file = st.sidebar.file_uploader('上传文件', type=['png', 'jpg', 'jpeg', 'mp4', 'mp3', 'wav'])return model_name, model, plugin_action, uploaded_filedef init_model(self, option):"""Initialize the model based on the selected option."""if option not in st.session_state['model_map']:if option.startswith('gpt'):st.session_state['model_map'][option] = GPTAPI(model_type=option)else:st.session_state['model_map'][option] = HFTransformerCasualLM('/root/model/Shanghai_AI_Laboratory/internlm-chat-7b')return st.session_state['model_map'][option]def initialize_chatbot(self, model, plugin_action):"""Initialize the chatbot with the given model and plugin actions."""return ReAct(llm=model, action_executor=ActionExecutor(actions=plugin_action))def render_user(self, prompt: str):with st.chat_message('user'):st.markdown(prompt)def render_assistant(self, agent_return):with st.chat_message('assistant'):for action in agent_return.actions:if (action):self.render_action(action)st.markdown(agent_return.response)def render_action(self, action):with st.expander(action.type, expanded=True):st.markdown("<p style='text-align: left;display:flex;'> <span style='font-size:14px;font-weight:600;width:70px;text-align-last: justify;'>插    件</span><span style='width:14px;text-align:left;display:block;'>:</span><span style='flex:1;'>"  # noqa E501+ action.type + '</span></p>',unsafe_allow_html=True)st.markdown("<p style='text-align: left;display:flex;'> <span style='font-size:14px;font-weight:600;width:70px;text-align-last: justify;'>思考步骤</span><span style='width:14px;text-align:left;display:block;'>:</span><span style='flex:1;'>"  # noqa E501+ action.thought + '</span></p>',unsafe_allow_html=True)if (isinstance(action.args, dict) and 'text' in action.args):st.markdown("<p style='text-align: left;display:flex;'><span style='font-size:14px;font-weight:600;width:70px;text-align-last: justify;'> 执行内容</span><span style='width:14px;text-align:left;display:block;'>:</span></p>",  # noqa E501unsafe_allow_html=True)st.markdown(action.args['text'])self.render_action_results(action)def render_action_results(self, action):"""Render the results of action, including text, images, videos, andaudios."""if (isinstance(action.result, dict)):st.markdown("<p style='text-align: left;display:flex;'><span style='font-size:14px;font-weight:600;width:70px;text-align-last: justify;'> 执行结果</span><span style='width:14px;text-align:left;display:block;'>:</span></p>",  # noqa E501unsafe_allow_html=True)if 'text' in action.result:st.markdown("<p style='text-align: left;'>" + action.result['text'] +'</p>',unsafe_allow_html=True)if 'image' in action.result:image_path = action.result['image']image_data = open(image_path, 'rb').read()st.image(image_data, caption='Generated Image')if 'video' in action.result:video_data = action.result['video']video_data = open(video_data, 'rb').read()st.video(video_data)if 'audio' in action.result:audio_data = action.result['audio']audio_data = open(audio_data, 'rb').read()st.audio(audio_data)def main():logger = get_logger(__name__)# Initialize Streamlit UI and setup sidebarif 'ui' not in st.session_state:session_state = SessionState()session_state.init_state()st.session_state['ui'] = StreamlitUI(session_state)else:st.set_page_config(layout='wide',page_title='lagent-web',page_icon='./docs/imgs/lagent_icon.png')# st.header(':robot_face: :blue[Lagent] Web Demo ', divider='rainbow')model_name, model, plugin_action, uploaded_file = st.session_state['ui'].setup_sidebar()# Initialize chatbot if it is not already initialized# or if the model has changedif 'chatbot' not in st.session_state or model != st.session_state['chatbot']._llm:st.session_state['chatbot'] = st.session_state['ui'].initialize_chatbot(model, plugin_action)for prompt, agent_return in zip(st.session_state['user'],st.session_state['assistant']):st.session_state['ui'].render_user(prompt)st.session_state['ui'].render_assistant(agent_return)# User input form at the bottom (this part will be at the bottom)# with st.form(key='my_form', clear_on_submit=True):if user_input := st.chat_input(''):st.session_state['ui'].render_user(user_input)st.session_state['user'].append(user_input)# Add file uploader to sidebarif uploaded_file:file_bytes = uploaded_file.read()file_type = uploaded_file.typeif 'image' in file_type:st.image(file_bytes, caption='Uploaded Image')elif 'video' in file_type:st.video(file_bytes, caption='Uploaded Video')elif 'audio' in file_type:st.audio(file_bytes, caption='Uploaded Audio')# Save the file to a temporary location and get the pathfile_path = os.path.join(root_dir, uploaded_file.name)with open(file_path, 'wb') as tmpfile:tmpfile.write(file_bytes)st.write(f'File saved at: {file_path}')user_input = '我上传了一个图像,路径为: {file_path}. {user_input}'.format(file_path=file_path, user_input=user_input)agent_return = st.session_state['chatbot'].chat(user_input)st.session_state['assistant'].append(copy.deepcopy(agent_return))logger.info(agent_return.inner_steps)st.session_state['ui'].render_assistant(agent_return)if __name__ == '__main__':root_dir = os.path.dirname(os.path.dirname(os.path.abspath(__file__)))root_dir = os.path.join(root_dir, 'tmp_dir')os.makedirs(root_dir, exist_ok=True)main()
Demo 运行
streamlit run /root/code/lagent/examples/react_web_demo.py --server.address 127.0.0.1 --server.port 6006
用同样的方法我们依然切换到 VScode 页面,运行成功后,查看本教程5.2配置本地端口后,将端口映射到本地。在本地浏览器输入 http://127.0.0.1:6006 即可。
我们在 Web 页面选择 InternLM 模型,等待模型加载完毕后,输入数学问题 已知 2x+3=10,求x ,此时 InternLM-Chat-7B 模型理解题意生成解此题的 Python 代码,Lagent 调度送入 Python 代码解释器求出该问题的解。

浦语·灵笔图文理解创作 Demo
环境准备
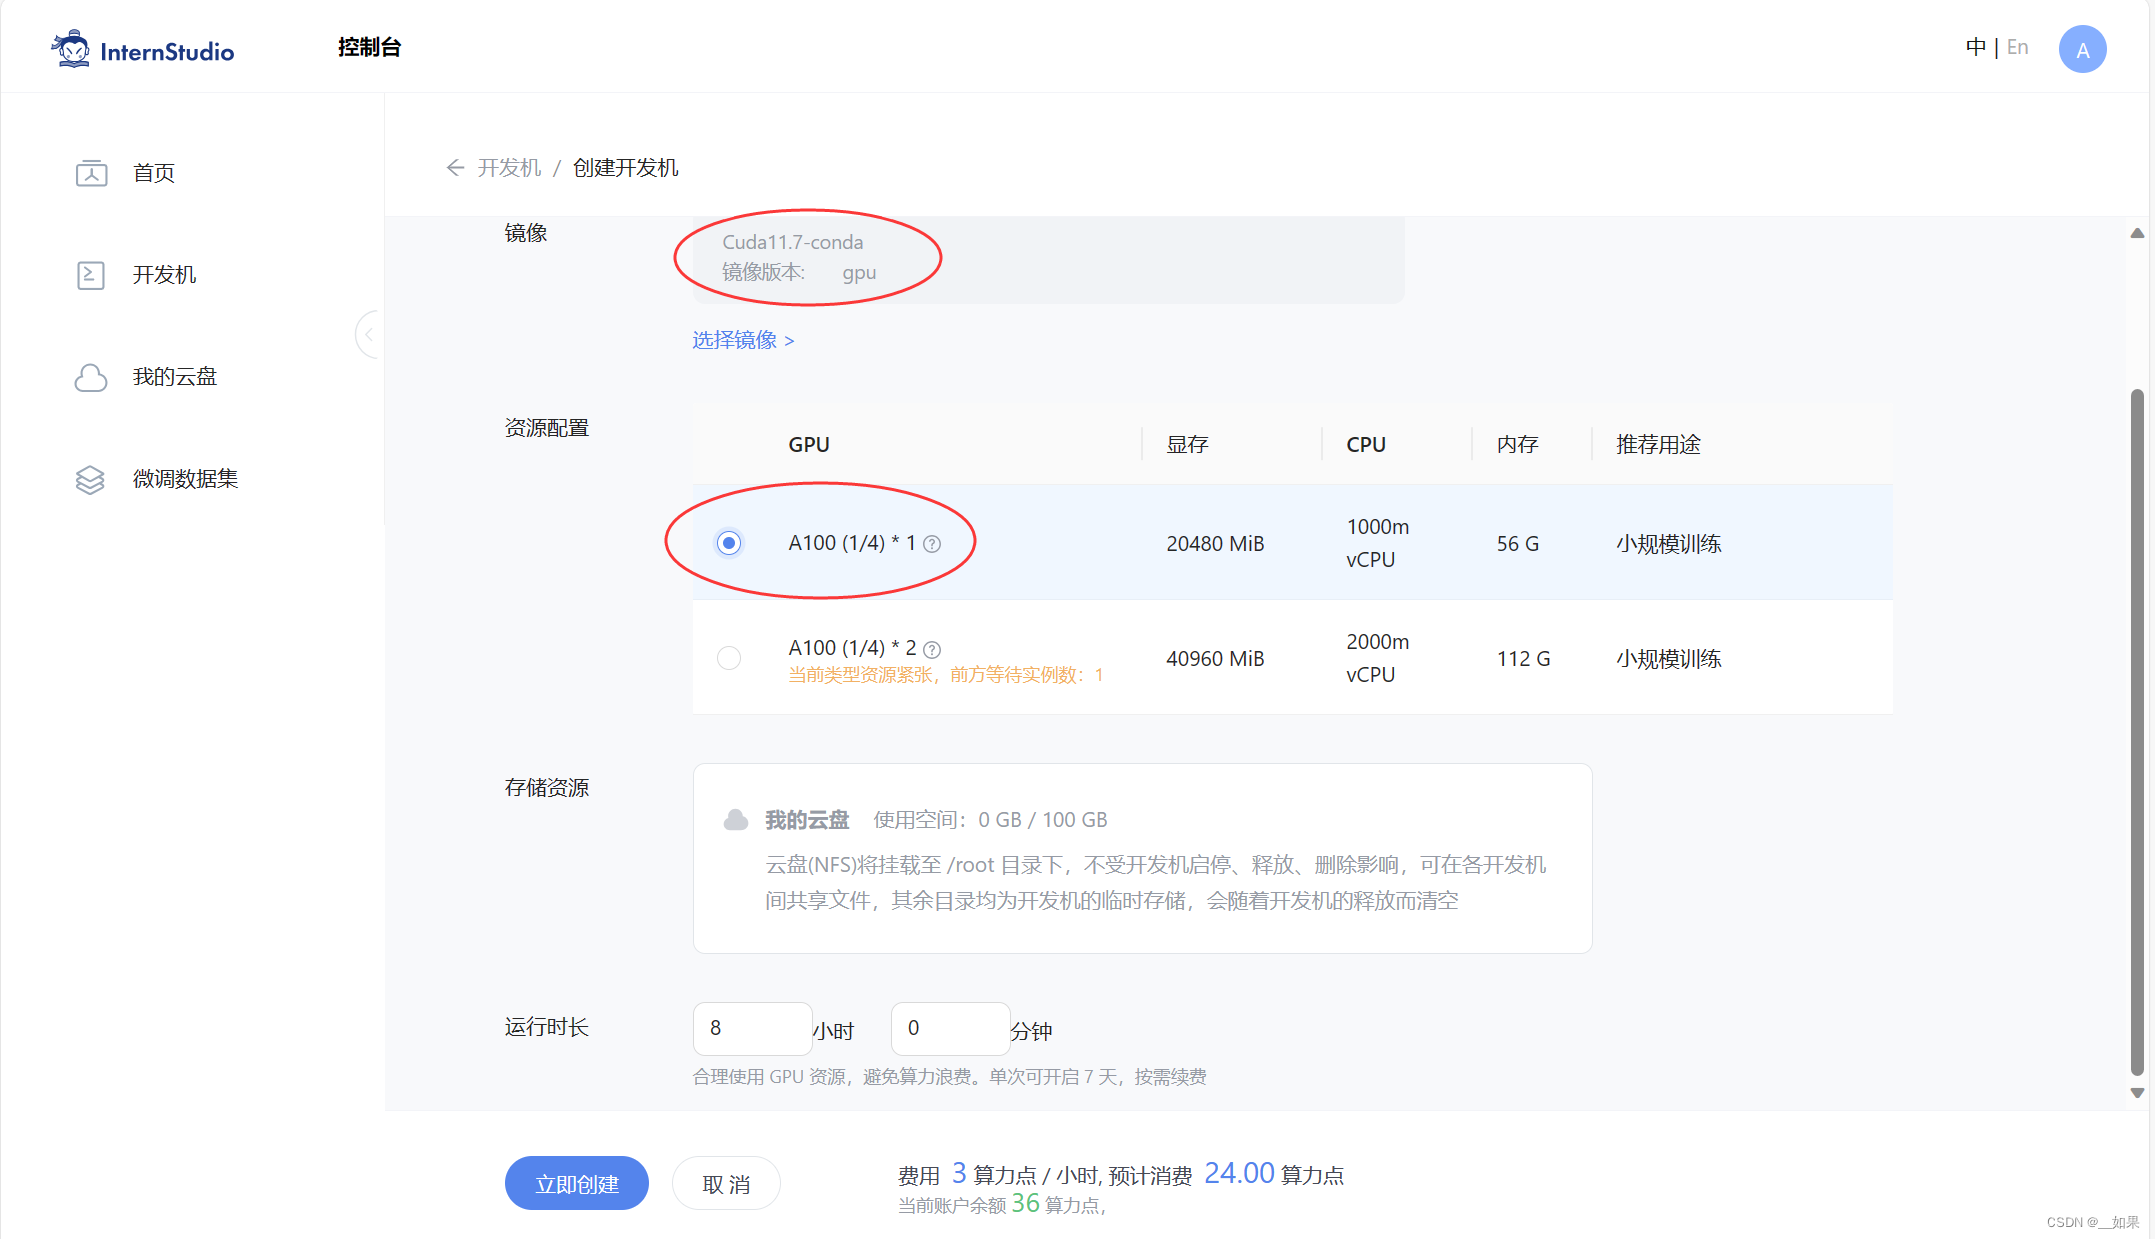
首先在 InternStudio 上选择 A100(1/4)*2 的配置

接下来打开刚刚租用服务器的 进入开发机,并在终端输入 bash 命令,进入 conda 环境,接下来就是安装依赖。
进入 conda 环境之后,使用以下命令从本地克隆一个已有的pytorch 2.0.1 的环境
/root/share/install_conda_env_internlm_base.sh xcomposer-demo
然后使用以下命令激活环境
conda activate xcomposer-demo
接下来运行以下命令,安装 transformers、gradio 等依赖包。请严格安装以下版本安装!
pip install transformers==4.33.1 timm==0.4.12 sentencepiece==0.1.99 gradio==3.44.4 markdown2==2.4.10 xlsxwriter==3.1.2 einops accelerate
模型下载
InternStudio平台的 share 目录下已经为我们准备了全系列的 InternLM 模型,所以我们可以直接复制即可
mkdir -p /root/model/Shanghai_AI_Laboratory
cp -r /root/share/temp/model_repos/internlm-xcomposer-7b /root/model/Shanghai_AI_Laboratory
代码准备
在 /root/code git clone InternLM-XComposer 仓库的代码
cd /root/code
git clone https://gitee.com/internlm/InternLM-XComposer.git
cd /root/code/InternLM-XComposer
git checkout 3e8c79051a1356b9c388a6447867355c0634932d  # 最好保证和教程的 commit 版本一致
Demo 运行
cd /root/code3/InternLM-XComposer
python examples/web_demo.py  \--folder /root/model2/Shanghai_AI_Laboratory/internlm-xcomposer-7b \--num_gpus 1 \--port 6006
这里 num_gpus 1 是因为InternStudio平台对于 A100(1/4)*2 识别仍为一张显卡。但如果有小伙伴课后使用两张 3090 来运行此 demo,仍需将 num_gpus 设置为 2
查看本教程5.2配置本地端口后,将端口映射到本地。在本地浏览器输入 http://127.0.0.1:6006
通用环境配置
pip、conda 换源
pip 换源
临时使用镜像源安装,如下所示:some-package 为你需要安装的包名
pip install -i https://mirrors.cernet.edu.cn/pypi/web/simple some-package
设置pip默认镜像源,升级 pip 到最新的版本 (>=10.0.0) 后进行配置,如下所示:
python -m pip install --upgrade pip
pip config set global.index-url https://mirrors.cernet.edu.cn/pypi/web/simple
如果您的 pip 默认源的网络连接较差,临时使用镜像源升级 pip:
python -m pip install -i https://mirrors.cernet.edu.cn/pypi/web/simple --upgrade pip
conda 换源
镜像站提供了 Anaconda 仓库与第三方源(conda-forge、msys2、pytorch 等),各系统都可以通过修改用户目录下的 .condarc 文件来使用镜像站。
不同系统下的 .condarc 目录如下:
Linux:${HOME}/.condarcmacOS:${HOME}/.condarcWindows:C:\Users\<YourUserName>\.condarc
注意:
Windows用户无法直接创建名为.condarc的文件,可先执行conda config --set show_channel_urls yes生成该文件之后再修改。
快速配置
cat <<'EOF' > ~/.condarc
channels:- defaults
show_channel_urls: true
default_channels:- https://mirrors.tuna.tsinghua.edu.cn/anaconda/pkgs/main- https://mirrors.tuna.tsinghua.edu.cn/anaconda/pkgs/r- https://mirrors.tuna.tsinghua.edu.cn/anaconda/pkgs/msys2
custom_channels:conda-forge: https://mirrors.tuna.tsinghua.edu.cn/anaconda/cloudpytorch: https://mirrors.tuna.tsinghua.edu.cn/anaconda/cloud
EOF
模型下载
Hugging Face
使用 Hugging Face 官方提供的 huggingface-cli 命令行工具。安装依赖:
pip install -U huggingface_hub
然后新建 python 文件,填入以下代码,运行即可。
- resume-download:断点续下
- local-dir:本地存储路径。(linux 环境下需要填写绝对路径)
import os# 下载模型
os.system('huggingface-cli download --resume-download internlm/internlm-chat-7b --local-dir your_path')
以下内容将展示使用 huggingface_hub 下载模型中的部分文件
import os
from huggingface_hub import hf_hub_download  # Load model directly hf_hub_download(repo_id="internlm/internlm-7b", filename="config.json")
ModelScope
使用 modelscope 中的 snapshot_download 函数下载模型,第一个参数为模型名称,参数 cache_dir 为模型的下载路径。
注意:cache_dir 最好为绝对路径。
安装依赖:
pip install modelscope==1.9.5
pip install transformers==4.35.2
在当前目录下新建 python 文件,填入以下代码,运行即可。
import torch
from modelscope import snapshot_download, AutoModel, AutoTokenizer
import os
model_dir = snapshot_download('Shanghai_AI_Laboratory/internlm-chat-7b', cache_dir='your path', revision='master')
OpenXLab
OpenXLab 可以通过指定模型仓库的地址,以及需要下载的文件的名称,文件所需下载的位置等,直接下载模型权重文件。
使用python脚本下载模型首先要安装依赖,安装代码如下:pip install -U openxlab 安装完成后使用 download 函数导入模型中心的模型。
from openxlab.model import download
download(model_repo='OpenLMLab/InternLM-7b', model_name='InternLM-7b', output='your local path')
课后作业
Chat

Lagent
灵笔

hugging face下载

![[蓝桥杯学习] 树状数组的二分](https://img-blog.csdnimg.cn/direct/b23c16322fa14705bf7b4421eceed3af.png)
![OSError: [WinError 126] 找不到指定的模块](https://img-blog.csdnimg.cn/direct/51b3b482f75d4a65ad6d7337ce84222a.png)