这篇文章主要给大家介绍了关于vue element-ui的table列表中展示多张图片(可放大)效果的相关资料,文中通过代码示例介绍的非常详细,需要的朋友可以参考下
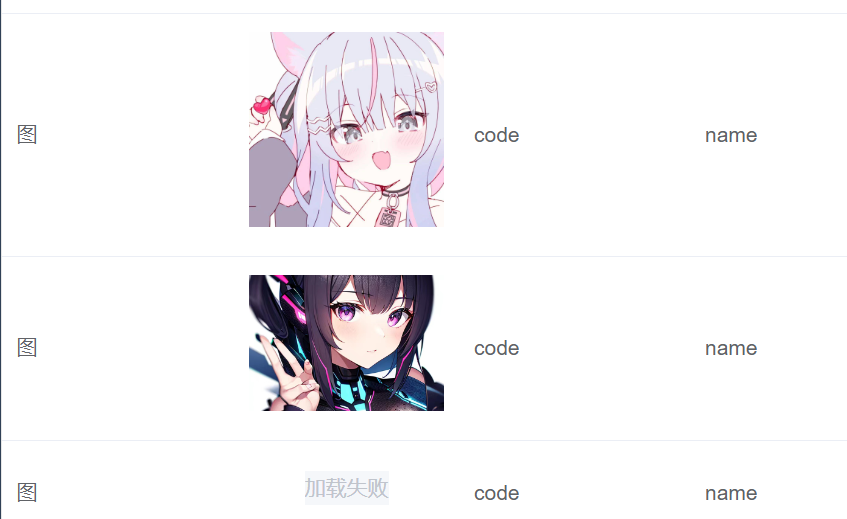
一、效果图
二、代码部分
1、原理
使用 `<el-table-column>` 和 `<el-image>` 组件来在表格中插入缩略图
2、template部分
我们使用 `<el-table>` 组件来创建一个表格。在 `<el-table-column>` 中,我们使用了 `<template>` 标签来定义插槽(slot),并通过 `slot-scope="scope"` 获取当前行的数据。
在插槽内部,我们使用了 `<el-image>` 组件来显示缩略图。使用 `v-for` 指令来循环遍历 `getImageUrls(scope.row)` 方法返回的缩略图 URL 数组,然后将每个 URL 绑定到 `<el-image>` 的 `:src` 属性上。
同时,我们使用 `:preview-src-list` 属性来设置点击缩略图时弹窗中显示的图片列表。 你需要根据实际需求,将 `tableData` 中的数据和 `getImageUrls` 方法进行相应的修改。
另外:想要调整缩略图大小在width更改
<template><el-table :data="tableData"><el-table-column prop="panoramic_image" label="全景图" align="center" width="150"><template slot-scope="scope"><el-imagev-for="(item, index) in getImageUrls(scope.row)":key="index":src="getImagePath(item)":preview-src-list="[getImagePath(item)]"></el-image></template></el-table-column></el-table>
</template>
3、script
请根据你的项目实际情况,使用适合你的方法导入图片并设置正确的路径。 注意:如果你修改了图片的路径,也要相应地更新代码中的路径,确保能正确引用到图片。
<script>
export default {data() {return {tableData: [{panoramic_image: 'img1.jpg',},{panoramic_image: 'img2.jpg',},// ...],imagePathPrefix: 'assets/images/', // 图片文件夹路径前缀};},methods: {getImageUrls(row) {// 返回缩略图文件名数组},getImagePath(filename) {return this.imagePathPrefix + filename; // 拼接完整的图片路径},},
};
</script>
另一种写法
<script>
export default {data() {return {tableData: [{panoramic_image: '@src/assets/img/image/image2.jpg',},{panoramic_image: '@src/assets/img/image/image1.jpg',},// ...],};},methods: {getImageUrls(row) {// 返回缩略图文件名数组},getImagePath(filename) {return this.imagePathPrefix + filename; // 拼接完整的图片路径},
};
</script>
总结
src不要写错了
一些疑问
Q:请逐句分析每句话:
<el-imagev-for="(item, index) in getImageUrls(scope.row)":key="index":src="getImagePath(item)":preview-src-list="[getImagePath(item)]"></el-image>A:
1. `v-for="(item, index) in getImageUrls(scope.row)"`:这是 Vue 的循环指令,它会根据 `getImageUrls(scope.row)` 返回的图片链接数组进行循环渲染,每次循环将数组中的元素绑定到 `item` 变量,循环的索引绑定到 `index` 变量。
2. `:key="index"`:这是 Vue 的关键字属性绑定,它用来标识每个循环渲染的元素的唯一性。在这里,将使用 `index` 作为每个 `<el-image>` 的唯一标识。
3. `:src="getImagePath(item)"`:这是将 `getImagePath(item)` 方法返回的图片链接绑定到 `<el-image>` 组件的 `src` 属性上,从而将图片的地址传递给组件用于显示。
4. `:preview-src-list="[getImagePath(item)]"`:这是将 `getImagePath(item)` 方法返回的图片链接封装到一个数组中,然后将该数组作为 `<el-image>` 组件的 `preview-src-list` 属性的值。`preview-src-list` 属性通常用于定义图片预览时的图片地址列表。
通过以上代码,可以实现根据 `scope.row` 对象中的数据,在每次循环中渲染出对应的图片。`getImageUrls` 方法用于获取图片链接,`getImagePath` 方法用于生成图片的完整地址。每次循环将会创建一个 `<el-image>` 组件,并设置对应的图片链接和预览图片链接。
Q:能否精简这句代码呢?舍去不重要的部分,告诉我哪些是必要留下的。
<el-imagev-for="(item, index) in getImageUrls(scope.row)":key="index":src="getImagePath(item)":preview-src-list="[getImagePath(item)]"></el-image>A:
<el-imagev-for="(item, index) in getImageUrls(scope.row)" :key="index" :src="getImagePath(item)"></el-image>在这个精简的代码中,我们保留了以下部分:
1. `v-for="(item, index) in getImageUrls(scope.row)"`:循环遍历 `getImageUrls(scope.row)` 返回的图片链接数组,`item` 是当前循环的元素,`index` 是当前循环的索引。
2. `:key="index"`:为每个 `<el-image>` 组件添加唯一的 `key` 值,以辅助 Vue 进行渲染。
3. `:src="getImagePath(item)"`:将 `getImagePath(item)` 方法返回的图片链接绑定到 `<el-image>` 组件的 `src` 属性,用于显示图片。
通过以上精简后的代码,我们可以实现根据 `scope.row` 对象中的数据,在每次循环中渲染出对应的图片。
