scrapy爬虫实战
- Scrapy 简介
- 主要特性
- 示例代码
- 安装scrapy,并创建项目
- 运行单个脚本
- 代码示例
- 配置
- item
- setting
- 爬虫脚本
- 代码解析
- xpath基本语法:
- 路径表达式示例:
- 通配符和多路径:
- 函数:
- 示例:
- 批量运行
- 附录1,持久化存入数据库
- 附录2,如何在本地启动数据库
Scrapy 简介
Scrapy 是一个强大的开源网络爬虫框架,用于从网站上提取数据。它以可扩展性和灵活性为特点,被广泛应用于数据挖掘、信息处理和历史数据抓取等领域。官网链接(外)
主要特性
-
模块化结构:Scrapy 的设计采用了模块化结构,包括引擎、调度器、下载器、爬虫和管道等组件。这使得用户能够根据需要选择性地使用或扩展不同的功能。
-
选择器:Scrapy 提供了灵活强大的选择器,可以通过 CSS 或 XPath 表达式轻松地提取网页中的数据。
-
中间件支持:用户可以通过中间件自定义处理请求和响应,例如修改请求头、实现代理、或者处理异常情况。
-
自动限速:Scrapy 具备自动限速功能,避免对目标网站造成过大的负担,同时支持自定义的下载延迟。
-
并发控制:支持异步处理和并发请求,提高爬取效率。
-
扩展性:Scrapy 提供了丰富的扩展接口,用户可以通过编写扩展插件实现定制化的功能。
-
数据存储:通过管道(Pipeline)机制,Scrapy 支持将抓取到的数据存储到多种格式,如 JSON、CSV、数据库等。
-
用户友好的命令行工具:Scrapy 提供了一套直观易用的命令行工具,方便用户创建、运行和管理爬虫项目。
示例代码
import scrapyclass MySpider(scrapy.Spider):name = 'my_spider' # 爬虫名字,后续是根据这个名字运行相关代码,而不是类名start_urls = ['http://example.com'] # 爬虫的入口网站def parse(self, response):# 使用选择器提取数据title = response.css('h1::text').get()body = response.css('p::text').get()# 返回抓取到的数据yield {'title': title,'body': body,}
这是一个简单的爬虫示例,通过定义爬虫类、指定起始 URL 和解析方法,用户可以快速创建一个基本的爬虫。
以上是 Scrapy 的简要介绍,它的灵活性和强大功能使其成为网络爬虫领域的瑞士军刀。
安装scrapy,并创建项目
使用python包管理工具pip安装scrapy
pip install scrapy
安装完成后使用scrapy创建项目
scrapy startproject sw
创建完成后,我的目录格式如下:
sw/
│
├── sw/
│   ├── __init__.py
│   ├── items.py
│   ├── middlewares.py
│   ├── pipelines.py
│   ├── settings.py
│   └── spiders/
│       └── __init__.py
│
├── scrapy.cfg
└── README.md
解释一下各个目录和文件的作用:
-
sw/sw/: 项目的 Python 模块,包含了爬虫项目的主要代码。
- init.py: 空文件,用于指示该目录是一个 Python 包。
- items.py: 定义用于存储爬取数据的数据模型。
- middlewares.py: 包含自定义中间件的文件,用于处理请求和响应。
- pipelines.py: 包含自定义管道的文件,用于处理抓取到的数据的存储和处理。
- settings.py: 包含项目的设置和配置信息。
(如果要链接数据库,记得在这个文件里填写相应信息) - spiders/: 存放爬虫代码的目录。
- init.py: 空文件,用于指示该目录是一个 Python 包。
-
scrapy.cfg: Scrapy 项目的配置文件,包含有关项目的元数据和设置。
-
README.md: 项目的说明文档,可以包含有关项目的描述、使用说明等信息。
这是一个标准的 Scrapy 项目结构,您可以根据实际需求和项目规模进行调整和扩展。
运行单个脚本
代码示例
配置
先配置相关信息
item
item.py中的内容如下:
# Define here the models for your scraped items
#
# See documentation in:
# https://docs.scrapy.org/en/latest/topics/items.htmlimport scrapyclass SwItem(scrapy.Item):# define the fields for your item here like:# name = scrapy.Field()url = scrapy.Field()title = scrapy.Field()time = scrapy.Field()content = scrapy.Field()scrapy_time = scrapy.Field()trans_title = scrapy.Field()trans_content = scrapy.Field()org = scrapy.Field()trans_org = scrapy.Field()
setting
setting.py中的内容如下:
# Scrapy settings for sw project
#
# For simplicity, this file contains only settings considered important or
# commonly used. You can find more settings consulting the documentation:
#
#     https://docs.scrapy.org/en/latest/topics/settings.html
#     https://docs.scrapy.org/en/latest/topics/downloader-middleware.html
#     https://docs.scrapy.org/en/latest/topics/spider-middleware.htmlBOT_NAME = "sw"SPIDER_MODULES = ["sw.spiders"]
NEWSPIDER_MODULE = "sw.spiders"
DOWNLOAD_DELAY = 3
RANDOMIZE_DOWNLOAD_DELAY = True
USER_AGENT = 'Mozilla/5.0 (Windows NT 10.0; Win64; x64) AppleWebKit/537.36 (KHTML, like Gecko) Chrome/91.0.4472.124 Safari/537.36'
COOKIES_ENABLED = True# Crawl responsibly by identifying yourself (and your website) on the user-agent
#USER_AGENT = "sw (+http://www.yourdomain.com)"# Obey robots.txt rules
ROBOTSTXT_OBEY = True# Configure maximum concurrent requests performed by Scrapy (default: 16)
#CONCURRENT_REQUESTS = 32# Configure a delay for requests for the same website (default: 0)
# See https://docs.scrapy.org/en/latest/topics/settings.html#download-delay
# See also autothrottle settings and docs
#DOWNLOAD_DELAY = 3
# The download delay setting will honor only one of:
#CONCURRENT_REQUESTS_PER_DOMAIN = 16
#CONCURRENT_REQUESTS_PER_IP = 16# Disable cookies (enabled by default)
#COOKIES_ENABLED = False# Disable Telnet Console (enabled by default)
#TELNETCONSOLE_ENABLED = False# Override the default request headers:
#DEFAULT_REQUEST_HEADERS = {
#    "Accept": "text/html,application/xhtml+xml,application/xml;q=0.9,*/*;q=0.8",
#    "Accept-Language": "en",
#}# Enable or disable spider middlewares
# See https://docs.scrapy.org/en/latest/topics/spider-middleware.html
#SPIDER_MIDDLEWARES = {
#    "sw.middlewares.SwSpiderMiddleware": 543,
#}# Enable or disable downloader middlewares
# See https://docs.scrapy.org/en/latest/topics/downloader-middleware.html
#DOWNLOADER_MIDDLEWARES = {
#    "sw.middlewares.SwDownloaderMiddleware": 543,
#}# Enable or disable extensions
# See https://docs.scrapy.org/en/latest/topics/extensions.html
#EXTENSIONS = {
#    "scrapy.extensions.telnet.TelnetConsole": None,
#}# Configure item pipelines
# See https://docs.scrapy.org/en/latest/topics/item-pipeline.html
#ITEM_PIPELINES = {
#    "sw.pipelines.SwPipeline": 300,
#}
# ITEM_PIPELINES = {
#    "sw.pipelines.SwPipeline": 300,
# }# 数据库的相关配置
# DB_SETTINGS = {
#     'host': '127.0.0.1',
#     'port': 3306,
#     'user': 'root',
#     'password': '123456',
#     'db': 'scrapy_news_2024_01_08',
#     'charset': 'utf8mb4',
# }# Enable and configure the AutoThrottle extension (disabled by default)
# See https://docs.scrapy.org/en/latest/topics/autothrottle.html
#AUTOTHROTTLE_ENABLED = True
# The initial download delay
#AUTOTHROTTLE_START_DELAY = 5
# The maximum download delay to be set in case of high latencies
#AUTOTHROTTLE_MAX_DELAY = 60
# The average number of requests Scrapy should be sending in parallel to
# each remote server
#AUTOTHROTTLE_TARGET_CONCURRENCY = 1.0
# Enable showing throttling stats for every response received:
#AUTOTHROTTLE_DEBUG = False# Enable and configure HTTP caching (disabled by default)
# See https://docs.scrapy.org/en/latest/topics/downloader-middleware.html#httpcache-middleware-settings
#HTTPCACHE_ENABLED = True
#HTTPCACHE_EXPIRATION_SECS = 0
#HTTPCACHE_DIR = "httpcache"
#HTTPCACHE_IGNORE_HTTP_CODES = []
#HTTPCACHE_STORAGE = "scrapy.extensions.httpcache.FilesystemCacheStorage"# Set settings whose default value is deprecated to a future-proof value
REQUEST_FINGERPRINTER_IMPLEMENTATION = "2.7"
TWISTED_REACTOR = "twisted.internet.asyncioreactor.AsyncioSelectorReactor"
FEED_EXPORT_ENCODING = "utf-8"
# REDIRECT_ENABLED = False
爬虫脚本
过程非常简单,只需要在spiders/目录下,创建自己的代码即可。示例代码p3_new_39.py (tips: 直接把这个代码放到spiders/目录下,在控制台中输入scrapy crawl p3_new_39 -o p3_new_39.csv即可运行!-o 后面接的是输出文件。) 如下:
"""
Created on 2024/01/06 14:00 by Fxy
"""
import scrapy
from sw.items import SwItem
import time
from datetime import datetimeclass SWSpider(scrapy.Spider):'''scrapy变量'''# 爬虫名称(自己定义)name = "p3_new_39"# 允许爬取的域名allowed_domains = ["www.meduniwien.ac.at"]# 爬虫的起始链接start_urls = ["https://www.meduniwien.ac.at/web/en/about-us/news/"]# 创建一个VidoItem实例item = SwItem()'''自定义变量'''# 机构名称org = "奥地利维也纳医科大学病毒学中心"# 机构英文名称org_e = "Med Univ Vienna, Ctr Virol"# 日期格式site_date_format = '%Y-%m-%d %H:%M' # 网页的日期格式date_format = '%d.%m.%Y %H:%M:%S' # 目标日期格式# 网站语言格式language_type = "zh2zh"  # 中文到中文的语言代码, 调用翻译接口时,使用#爬虫的主入口,这里是获取所有的归档文章链接def parse(self,response): achieve_links = response.xpath('//*[@id="c4345"]//div[@class="news-teaser__caption"]/h2/a/@href').extract()print("achieve_links",achieve_links)for achieve_link in achieve_links:if "http" in achieve_link:continuefull_achieve_link = "https://www.meduniwien.ac.at" + achieve_linkprint("full_achieve_link", full_achieve_link)# 进入每个归档链接yield scrapy.Request(full_achieve_link, callback=self.parse_item, dont_filter=True)#翻页逻辑xpath_expression = f'//*[@id="c4345"]//ul[@class="pagination"]/li[@class="next"]/a/@href'next_page = response.xpath(xpath_expression).extract_first()print("next_page = ", next_page)# 翻页操作if next_page != None:print(next_page)print('next page')full_next_page = "https://www.meduniwien.ac.at" + next_pageprint("full_next_page",full_next_page)yield scrapy.Request(full_next_page, callback=self.parse, dont_filter=True)#获取每个文章的内容,并存入itemdef parse_item(self,response):source_url = response.urlprint("source_url:", source_url)title_o = response.xpath('//*[@id="main"]/header/div/div[2]/div[1]/h1/text()').extract_first().strip()# title_t = my_tools.get_trans(title_o, "de2zh") *[@id="c4342"]/div/div/div[2]/spanprint("title_o:", title_o) #//*[@id="c4342"]/div/div/div[2]/spanyear_string = response.xpath('//div[@class="news-detail__meta"]/span/@data-year').extract_first().strip()month_string = response.xpath('//div[@class="news-detail__meta"]/span/@data-month').extract_first().strip()day_string = response.xpath('//div[@class="news-detail__meta"]/span/@data-day').extract_first().strip()hour_string = response.xpath('//div[@class="news-detail__meta"]/span/@data-hour').extract_first().strip()minute_string = response.xpath('//div[@class="news-detail__meta"]/span/@data-minute').extract_first().strip()publish_time = f'{year_string}-{month_string}-{day_string} {hour_string}:{minute_string}'print("publish_time:", publish_time)date_object = datetime.strptime(publish_time, self.site_date_format) # 先读取成网页的日期格式date_object = date_object.strftime(self.date_format) # 转换成目标的日期字符串publish_time = datetime.strptime(date_object, self.date_format) # 从符合格式的字符串,转换成日期content_o = [content.strip() for content in response.xpath('//div[@class="content__block"]//text()').extract()]content_o = ' '.join(content_o) # 这个content_o提取出来是一个字符串数组,所以要拼接成字符串# content_t = my_tools.get_trans(content_o, "de2zh")print("source_url:", source_url)print("title_o:", title_o)# print("title_t:", title_t)print("publish_time:", publish_time) #15.01.2008print("content_o:", content_o)# print("content_t:", content_t)print("-" * 50)page_data = { 'source_url': source_url,'title_o': title_o,# 'title_t' : title_t,'publish_time': publish_time,'content_o': content_o,# 'content_t': content_t,'org' : self.org,'org_e' : self.org_e,}self.item['url'] = page_data['source_url']self.item['title'] = page_data['title_o']# self.item['title_t'] = page_data['title_t']self.item['time'] = page_data['publish_time']self.item['content'] = page_data['content_o']# self.item['content_t'] = page_data['content_t']# 获取当前时间current_time = datetime.now()# 格式化成字符串formatted_time = current_time.strftime(self.date_format)# 将字符串转换为 datetime 对象datetime_object = datetime.strptime(formatted_time, self.date_format)self.item['scrapy_time'] = datetime_objectself.item['org'] = page_data['org']self.item['trans_org'] = page_data['org_e']yield self.item
在控制台中输入scrapy crawl p3_new_39 -o p3_new_39.csv即可运行!-o 后面接的是输出文件。
代码解析
接下来我们来分析,上面p3_new_39.py代码中的response.xpath()中的参数如何确定。
1、首先进入网页: https://www.meduniwien.ac.at/web/en/about-us/news/(外):

2、确定自己要爬取的数据,这里我假定为每一条新闻。

3、打开浏览器的调试工具(默认f12)找到跳转的链接。
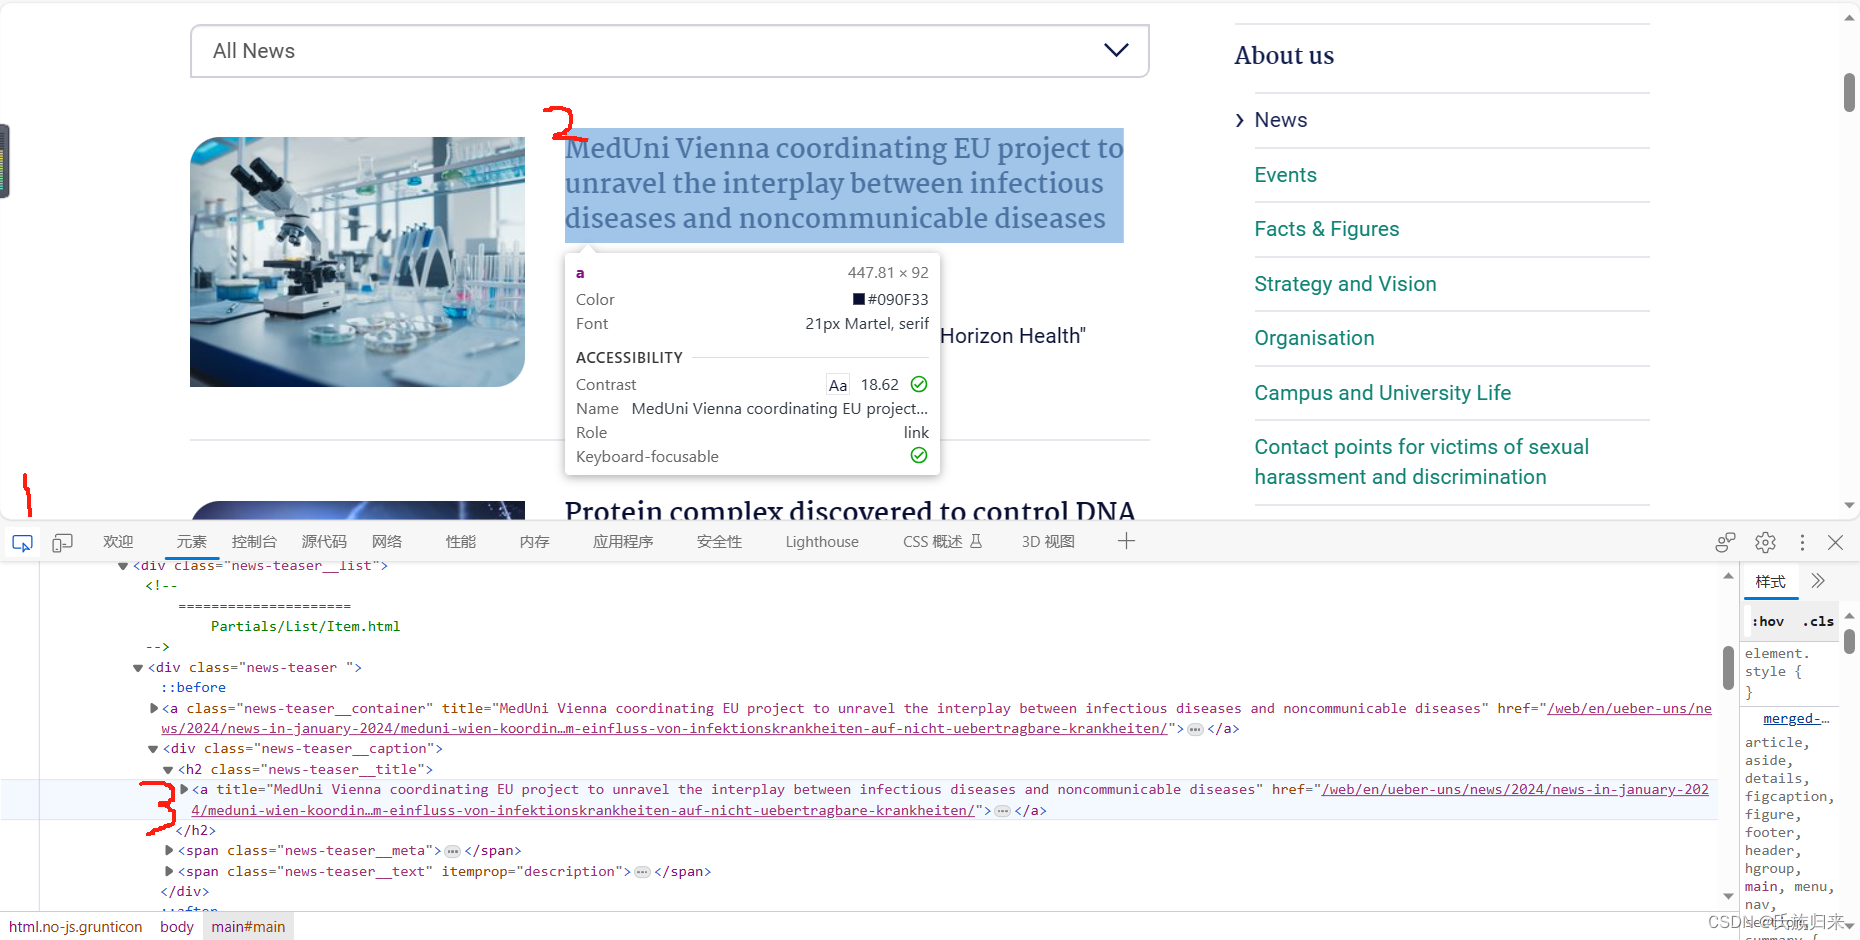
4、右键元素,复制xpath即可。

我的复制结果如下://*[@id="c4345"]/div/div[1]/div/h2/a
xpath基本语法:
XPath(XML Path Language)是一种用于在 XML 文档中定位和选择节点的查询语言。它不仅可以用于 XML,还可以用于 HTML 和其他标记语言。以下是XPath的主要语法和一些常见用法:
-
节点选择:
/: 从根节点开始选择。//: 选择节点,不考虑它们的位置。.: 选取当前节点。..: 选取当前节点的父节点。
-
节点名称:
elementName: 选取所有名称为elementName的节点。*: 选取所有子节点。
-
谓语:
[condition]: 通过添加条件筛选节点。- 例如:
//div[@class='example']选取所有 class 属性为 ‘example’ 的 div 节点。
- 例如:
路径表达式示例:
/bookstore/book[1]: 选取第一个<book>元素。/bookstore/book[last()]: 选取最后一个<book>元素。/bookstore/book[position()<3]: 选取前两个<book>元素。//title[@lang='en']: 选取所有带有 lang 属性为 ‘en’ 的<title>元素。//title[@lang='en']/text(): 选取所有带有 lang 属性为 ‘en’ 的<title>元素的文本内容。//title[not(@lang='en')]/text(): 选取所有 lang 属性不为 ‘en’ 的<title>元素的文本内容。//title[@lang='en' or @lang='zh']/text(): 选取所有带有 lang 属性为 ‘en’ 或 ‘zh’ 的<title>元素的文本内容。//title[contains(@lang, 'en')]/text()选取所有带有 lang 属性包含 'en’子串 的<title>元素的文本内容。
通配符和多路径:
*: 通配符,匹配任何元素节点。@*: 匹配任何属性节点。//book/title | //book/price: 选取所有<book>元素的<title>和<price>子元素。
函数:
XPath 还支持一些内置函数,例如:
text(): 获取节点的文本内容。contains(str1, str2): 判断一个字符串是否包含另一个字符串。
示例:
考虑以下 XML 结构:
<bookstore><book><title lang="en">Introduction to XPath</title><price>29.95</price></book><book><title lang="fr">XPath et ses applications</title><price>39.99</price></book>
</bookstore>
使用 XPath 可以选择如下:
/bookstore/book: 选取所有<book>元素。/bookstore/book/title[@lang='en']: 选取所有带有 lang 属性为 ‘en’ 的<title>元素。
这是XPath的基本语法和用法示例,它允许您灵活而精确地定位和提取 XML 或 HTML 文档中的数据。
批量运行
在sw项目目录下可以创建一个mian.py
from scrapy.crawler import CrawlerProcess
from scrapy.utils.project import get_project_settingssettings = get_project_settings()crawler = CrawlerProcess(settings)bot_list = ["p3_new_39"] # 把要运行的通通放进去for bot in bot_list:crawler.crawl(bot)crawler.start()
附录1,持久化存入数据库
scrapy有个非常好的特点,就是支持自动存入数据库。我们只要将代码写好,然后每次scrapy都会自动调用该代码,不需要自己显示的调用,非常省心。我的piplines.py代码如下:
# Define your item pipelines here
#
# Don't forget to add your pipeline to the ITEM_PIPELINES setting
# See: https://docs.scrapy.org/en/latest/topics/item-pipeline.html# useful for handling different item types with a single interface
from itemadapter import ItemAdapter
import pymysqlclass SwPipeline:def __init__(self, db_settings):self.db_settings = db_settings@classmethoddef from_crawler(cls, crawler):db_settings = crawler.settings.get("DB_SETTINGS")return cls(db_settings)def open_spider(self, spider):self.connection = pymysql.connect(**self.db_settings)self.cursor = self.connection.cursor()def close_spider(self, spider):self.connection.close()def process_item(self, item, spider):# Assuming your item keys match the column names in your database tablekeys = ', '.join(item.keys())values = ', '.join(['%s'] * len(item))query = f"INSERT INTO org_news ({keys}) VALUES ({values})" #这里记得确认我们item.py中定义的类型名字,是否和数据库中的一样,不一样,这个查询语句需要进行相应的修改,我这里就不一样,所以没法直接运行哦,我懒得改了!!!!哈哈哈# Check if the record already exists based on a combination of fields, 如果记录已经存在则取消插入,如果有键的话直接用键就行,我这里没有键unique_fields = ["title_o", "source_url"]  # Replace with the actual field names you want to usecheck_query = f"SELECT * FROM org_news WHERE {' AND '.join(f'{field} = %s' for field in unique_fields)}"check_values = tuple(item.get(field) for field in unique_fields)try:# Check if the record already existsself.cursor.execute(check_query, check_values)existing_record = self.cursor.fetchone()if existing_record:spider.logger.warning("Record already exists. Skipping insertion.")else:# If the record doesn't exist, insert it into the databaseself.cursor.execute(query, tuple(item.values()))self.connection.commit()except Exception as e:self.connection.rollback()spider.logger.error(f"Error processing item and inserting data into database: {e}")return item
我创建数据库的代码如下:
/*Navicat Premium Data TransferSource Server         : 172.16.6.165Source Server Type    : MySQLSource Server Version : 80035Source Host           : 172.16.6.165:3306Source Schema         : swaqTarget Server Type    : MySQLTarget Server Version : 80035File Encoding         : 65001Date: 08/01/2024 10:01:57
*/SET NAMES utf8mb4;
SET FOREIGN_KEY_CHECKS = 0;-- ----------------------------
-- Table structure for org_news
-- ----------------------------
DROP TABLE IF EXISTS `org_news`;
CREATE TABLE `org_news`  (`id` int(0) NOT NULL AUTO_INCREMENT,`title_t` varchar(1000) CHARACTER SET utf8mb3 COLLATE utf8mb3_general_ci NULL DEFAULT NULL COMMENT '翻译标题名称',`title_o` varchar(1000) CHARACTER SET utf8mb3 COLLATE utf8mb3_general_ci NULL DEFAULT NULL COMMENT '原消息标题',`content_t` longtext CHARACTER SET utf8mb3 COLLATE utf8mb3_general_ci NULL COMMENT '翻译',`publish_time` datetime(0) NULL DEFAULT NULL COMMENT '发布时间',`content_o` longtext CHARACTER SET utf8mb3 COLLATE utf8mb3_general_ci NULL COMMENT '原文',`site` varchar(255) CHARACTER SET utf8mb3 COLLATE utf8mb3_general_ci NULL DEFAULT NULL COMMENT '新闻源',`tag` varchar(255) CHARACTER SET utf8mb3 COLLATE utf8mb3_general_ci NULL DEFAULT NULL COMMENT '标签',`author` varchar(255) CHARACTER SET utf8mb3 COLLATE utf8mb3_general_ci NULL DEFAULT NULL COMMENT '作者',`create_time` datetime(0) NULL DEFAULT NULL COMMENT '爬取时间',`source_url` varchar(1000) CHARACTER SET utf8mb3 COLLATE utf8mb3_general_ci NULL DEFAULT NULL COMMENT 'url',`country` varchar(100) CHARACTER SET utf8mb3 COLLATE utf8mb3_general_ci NULL DEFAULT NULL COMMENT '国家/地区',`imgurl` varchar(255) CHARACTER SET utf8mb3 COLLATE utf8mb3_general_ci NULL DEFAULT NULL COMMENT '图片存放地址',`org` varchar(255) CHARACTER SET utf8mb3 COLLATE utf8mb3_general_ci NULL DEFAULT NULL COMMENT '机构名称',`org_e` varchar(255) CHARACTER SET utf8mb3 COLLATE utf8mb3_general_ci NULL DEFAULT NULL COMMENT '机构英文名称',PRIMARY KEY (`id`) USING BTREE
) ENGINE = InnoDB AUTO_INCREMENT = 314 CHARACTER SET = utf8mb3 COLLATE = utf8mb3_general_ci ROW_FORMAT = Dynamic;SET FOREIGN_KEY_CHECKS = 1;
附录2,如何在本地启动数据库
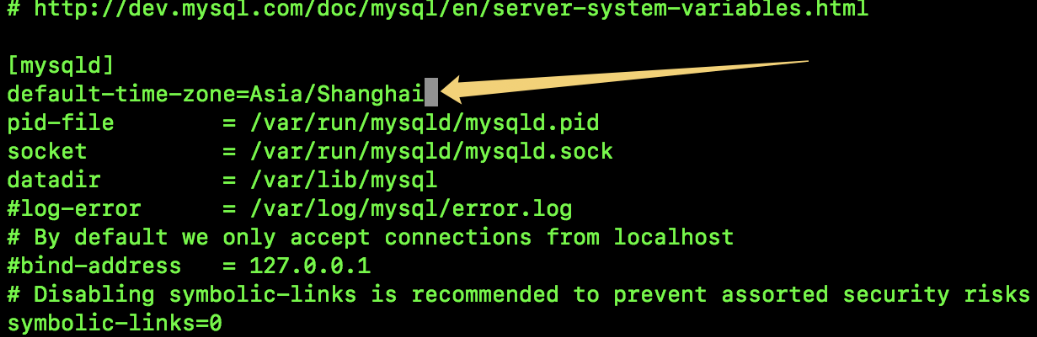
1、先安装mysql
2、配置好?(我电脑的mysql几年前安装的,下载了一个navicat)
3、windows控制台输入mysqld --console应该就能启动了。
注意: mysqld 是服务端程序 ,mysql是命令行客户端程序
4、然后应该就能够连接了