导入ImGui:
下载链接:
GitHub - TheCherno/imgui: Dear ImGui: Bloat-free Immediate Mode Graphical User interface for C++ with minimal dependencies
新建文件夹,把下载好的文件放入对应路径:

SRC下的premake5.lua文件:添加ImGui
workspace "YOTOEngine"		-- sln文件名architecture "x64"	configurations{"Debug","Release","Dist"}
-- https://github.com/premake/premake-core/wiki/Tokens#value-tokens
-- 组成输出目录:Debug-windows-x86_64
outputdir = "%{cfg.buildcfg}-%{cfg.system}-%{cfg.architecture}"
-- 包含相对解决方案的目录
IncludeDir={}
IncludeDir["GLFW"]="YOTOEngine/vendor/GLFW/include"
IncludeDir["Glad"]="YOTOEngine/vendor/Glad/include"
IncludeDir["ImGui"] ="YOTOEngine/vendor/imgui"
--项目中包含某包
include "YOTOEngine/vendor/GLFW"
include "YOTOEngine/vendor/Glad"
include "YOTOEngine/vendor/imgui"project "YOTOEngine"		--YOTOEngine项目location "YOTOEngine"--在sln所属文件夹下的YOTOEngine文件夹kind "SharedLib"--dll动态库language "C++"targetdir ("bin/" .. outputdir .. "/%{prj.name}") -- 输出目录objdir ("bin-int/" .. outputdir .. "/%{prj.name}")-- 中间目录pchheader "ytpch.h"pchsource "YOTOEngine/src/ytpch.cpp"-- 包含的所有h和cpp文件files{"%{prj.name}/src/**.h","%{prj.name}/src/**.cpp"}-- 包含目录includedirs{"%{prj.name}/src","%{prj.name}/vendor/spdlog-1.x/include","%{IncludeDir.GLFW}","%{IncludeDir.Glad}","%{IncludeDir.ImGui}"}links{"GLFW",-- GLFW.lib库链接到YOTOEngine项目中"Glad",-- Glad.lib库链接到YOTOEngine项目中"ImGui",-- ImGui.lib库链接到YOTOEngine项目中"opengl32.lib"}-- 如果是window系统filter "system:windows"cppdialect "C++17"-- On:代码生成的运行库选项是MTD,静态链接MSVCRT.lib库;-- Off:代码生成的运行库选项是MDD,动态链接MSVCRT.dll库;打包后的exe放到另一台电脑上若无这个dll会报错staticruntime "On"	systemversion "latest"	-- windowSDK版本-- 预处理器定义defines{"YT_PLATFORM_WINDOWS","YT_BUILD_DLL","YT_ENABLE_ASSERTS","GLFW_INCLUDE_NONE"-- 让GLFW不包含OpenGL}-- 编译好后移动Hazel.dll文件到Sandbox文件夹下postbuildcommands{("{COPY} %{cfg.buildtarget.relpath} ../bin/" .. outputdir .. "/Sandbox")}-- 不同配置下的预定义不同filter "configurations:Debug"defines "YT_DEBUG"buildoptions"/MDd"symbols "On"filter "configurations:Release"defines "YT_RELEASE"buildoptions"/MD"optimize "On"filter "configurations:Dist"defines "YT_DIST"buildoptions"/MD"optimize "On"project "Sandbox"location "Sandbox"kind "ConsoleApp"language "C++"targetdir ("bin/" .. outputdir .. "/%{prj.name}")objdir ("bin-int/" .. outputdir .. "/%{prj.name}")files{"%{prj.name}/src/**.h","%{prj.name}/src/**.cpp"}-- 同样包含spdlog头文件includedirs{"YOTOEngine/vendor/spdlog-1.x/include","YOTOEngine/src"}-- 引用YOTOEnginelinks{"YOTOEngine","GLFW","opengl32.lib"}filter "system:windows"cppdialect "C++17"staticruntime "On"systemversion "latest"defines{"YT_PLATFORM_WINDOWS"}filter "configurations:Debug"defines "YT_DEBUG"buildoptions"/MDd"symbols "On"filter "configurations:Release"defines "YT_RELEASE"buildoptions"/MD"optimize "On"filter "configurations:Dist"defines "YT_DIST"buildoptions"/MD"optimize "On"
在Platform下创建OpenGl,将imgui_impl_opengl3.cpp和.h加入到该文件夹。
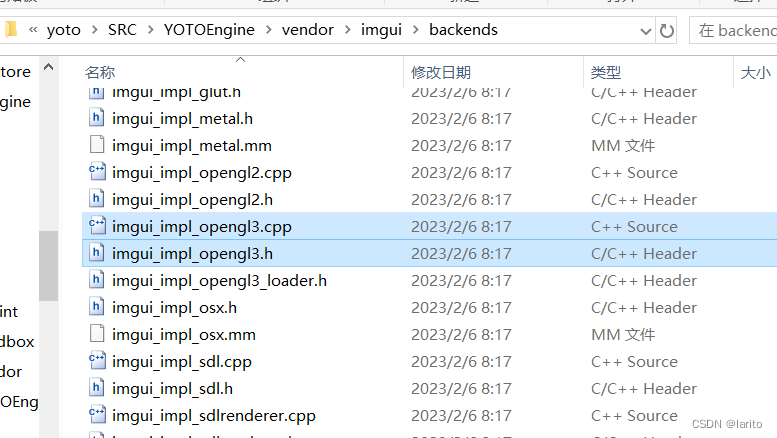
并且更名:

150行改为:#include "backends/imgui_impl_opengl3_loader.h"

96行添加:#include"ytpch.h"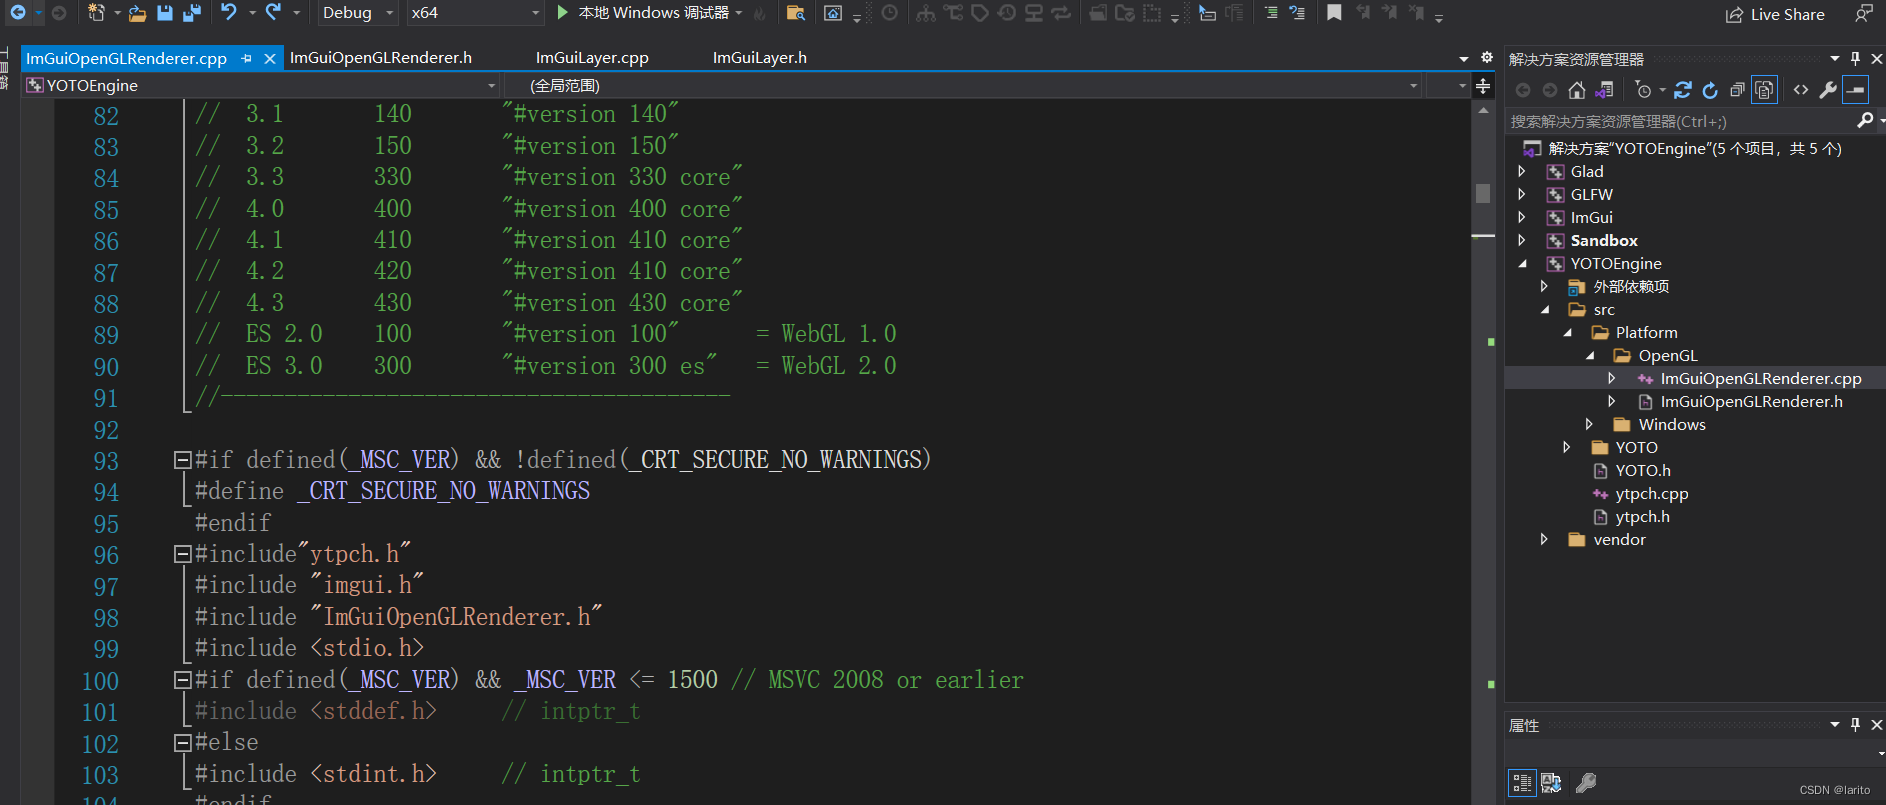 至此错误消除,导入成功。
创建ImGui层:
在YOTO下创建ImGui文件夹创建ImGuiLayer.cpp和.h:

ImGuiLayer.h:UI层的.h文件
#pragma once
#include"YOTO/Layer.h"
namespace YOTO {class YOTO_API ImGuiLayer:public Layer{public:ImGuiLayer();~ImGuiLayer();void OnAttach();void OnDetach();void OnUpdate();void OnEvent(Event& event);private:float m_Time = 0.0f;};}
ImGuiLayer.cpp:在层初始化的时候和刷新的时候对io的参数进行修改,达到修改UI的目的
#include"ytpch.h"
#include"ImGuiLayer.h"
#include"Platform/OpenGL/ImGuiOpenGLRenderer.h"
#include"GLFW/glfw3.h"
#include"YOTO/Application.h"
namespace YOTO {ImGuiLayer::ImGuiLayer():Layer("ImGuiLayer") {}ImGuiLayer::~ImGuiLayer() {}void ImGuiLayer::OnAttach(){//创建上下文ImGui::CreateContext();//设置颜色ImGui::StyleColorsDark();//配置类:ImGuiIOImGuiIO& io = ImGui::GetIO();io.BackendFlags |= ImGuiBackendFlags_HasMouseCursors;// 光标io.BackendFlags |= ImGuiBackendFlags_HasSetMousePos;// imgui输入key对应glfw的key,临时的:最终会对应引擎自身的keyio.KeyMap[ImGuiKey_Tab] = GLFW_KEY_TAB;io.KeyMap[ImGuiKey_LeftArrow] = GLFW_KEY_LEFT;io.KeyMap[ImGuiKey_RightArrow] = GLFW_KEY_RIGHT;io.KeyMap[ImGuiKey_UpArrow] = GLFW_KEY_UP;io.KeyMap[ImGuiKey_DownArrow] = GLFW_KEY_DOWN;io.KeyMap[ImGuiKey_PageUp] = GLFW_KEY_PAGE_UP;io.KeyMap[ImGuiKey_PageDown] = GLFW_KEY_PAGE_DOWN;io.KeyMap[ImGuiKey_Home] = GLFW_KEY_HOME;io.KeyMap[ImGuiKey_End] = GLFW_KEY_END;io.KeyMap[ImGuiKey_Insert] = GLFW_KEY_INSERT;io.KeyMap[ImGuiKey_Delete] = GLFW_KEY_DELETE;io.KeyMap[ImGuiKey_Backspace] = GLFW_KEY_BACKSPACE;io.KeyMap[ImGuiKey_Space] = GLFW_KEY_SPACE;io.KeyMap[ImGuiKey_Enter] = GLFW_KEY_ENTER;io.KeyMap[ImGuiKey_Escape] = GLFW_KEY_ESCAPE;io.KeyMap[ImGuiKey_A] = GLFW_KEY_A;io.KeyMap[ImGuiKey_C] = GLFW_KEY_C;io.KeyMap[ImGuiKey_V] = GLFW_KEY_V;io.KeyMap[ImGuiKey_X] = GLFW_KEY_X;io.KeyMap[ImGuiKey_Y] = GLFW_KEY_Y;io.KeyMap[ImGuiKey_Z] = GLFW_KEY_Z;ImGui_ImplOpenGL3_Init("#version 410");}void ImGuiLayer::OnDetach(){}void ImGuiLayer::OnUpdate() {//每帧刷新UI配置ImGuiIO& io = ImGui::GetIO();Application& app = Application::Get();//显示的size大小io.DisplaySize = ImVec2(app.GetWindow().GetWidth(), app.GetWindow().GetHeight());float time = (float)glfwGetTime();//时间io.DeltaTime = m_Time > 0.0f ? (time - m_Time) : (1.0f / 60.0f);m_Time = time;ImGui_ImplOpenGL3_NewFrame();ImGui::NewFrame();static bool show = true;// 显示ImGui DemoImGui::ShowDemoWindow(&show);ImGui::Render();ImGui_ImplOpenGL3_RenderDrawData(ImGui::GetDrawData());}void ImGuiLayer::OnEvent(Event& event) {}
}
Application.h:将Application变为单例,添加Get方法和GetWindow方法
#pragma once
#include"Core.h"
#include"Event/Event.h"
#include"Event/ApplicationEvent.h"
#include "YOTO/Window.h"
#include"YOTO/LayerStack.h"
namespace YOTO {class YOTO_API Application{public:Application();virtual ~Application();void Run();void OnEvent(Event &e);void PushLayer(Layer* layer);void PushOverlay(Layer* layer);inline static Application& Get() {return * s_Instance;}inline Window& GetWindow() { return *m_Window; }private:bool  OnWindowClosed(WindowCloseEvent& e);std::unique_ptr<Window>  m_Window;bool m_Running = true;LayerStack m_LayerStack;static Application* s_Instance;};//在客户端定义Application* CreateApplication();
}
Application.cpp:构造时候令s_Instance = this
#include"ytpch.h"
#include "Application.h"#include"Log.h"
#include<glad/glad.h>
namespace YOTO {
#define BIND_EVENT_FN(x) std::bind(&x, this, std::placeholders::_1)Application* Application::s_Instance = nullptr;Application::Application() {YT_CORE_ASSERT(!s_Instance, "Application需要为空!")s_Instance = this;//智能指针m_Window = std::unique_ptr<Window>(Window::Creat());//设置回调函数m_Window->SetEventCallback(BIND_EVENT_FN(Application::OnEvent));unsigned int id;glGenBuffers(1, &id);}Application::~Application() {}/// <summary>/// 所有的Window事件都会在这触发,作为参数e/// </summary>/// <param name="e"></param>void Application::OnEvent(Event& e) {//根据事件类型绑定对应事件EventDispatcher dispatcher(e);dispatcher.Dispatch<WindowCloseEvent>(BIND_EVENT_FN(Application::OnWindowClosed));//输出事件信息YT_CORE_INFO("{0}",e);for (auto it = m_LayerStack.end(); it != m_LayerStack.begin();) {(*--it)->OnEvent(e);if (e.m_Handled)break;}}bool Application::OnWindowClosed(WindowCloseEvent& e) {m_Running = false;return true;}void Application::Run() {WindowResizeEvent e(1280, 720);if (e.IsInCategory(EventCategoryApplication)) {YT_CORE_TRACE(e);}if (e.IsInCategory(EventCategoryInput)) {YT_CORE_ERROR(e);}while (m_Running){glClearColor(1,0,1,1);glClear(GL_COLOR_BUFFER_BIT);for (Layer* layer : m_LayerStack) {layer->OnUpdate();}m_Window->OnUpdate();}}void Application::PushLayer(Layer* layer) {m_LayerStack.PushLayer(layer);layer->OnAttach();}void Application::PushOverlay(Layer* layer) {m_LayerStack.PushOverlay(layer);layer->OnDetach();}
}
YOTO.h:添加ImGuiLayer.h
#pragma once
#include "YOTO/Application.h"
#include"YOTO/Layer.h"
#include "YOTO/Log.h"
#include"YOTO/ImGui/ImGuiLayer.h"
//入口点
#include"YOTO/EntryPoint.h"
SandboxApp.cpp:new且push这个层
#include<YOTO.h>
#include<stdio.h>class ExampleLayer:public YOTO::Layer
{
public:ExampleLayer():Layer("Example") {}void OnUpdate()override {//YT_CLIENT_INFO("测试update");}void	OnEvent(YOTO::Event& e)override {YT_CLIENT_TRACE("测试event{0}",e);}private:};class Sandbox:public YOTO::Application
{
public:Sandbox() {PushLayer(new ExampleLayer());PushLayer(new YOTO::ImGuiLayer());}~Sandbox() {}private:};YOTO::Application* YOTO::CreateApplication() {printf("helloworld");return new Sandbox();
}
测试:
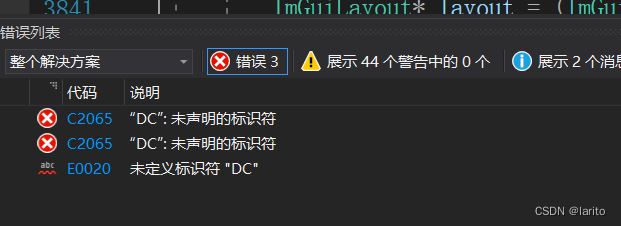
Bug:这里莫名爆红

注释掉:
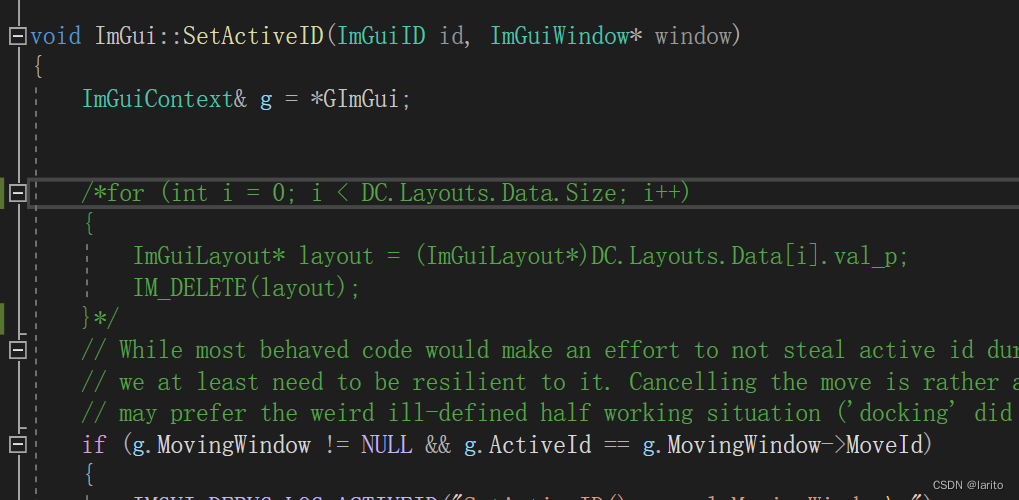
暂时解决(不知道这个bug会不会未来给我一脚)
运行成功但是什么都不能点,因为没添加事件。

谢谢大家的支持,我会把每次可成改动的整个代码、类都粘上来,虽然有点儿多,但是防止迷路然后出现一些蜜汁bug。有问题欢迎评论区讨论(博主也是菜鸡,希望大佬指点)
ImGui事件:
ImGuiLayer.h:创建各种事件的函数声明
#pragma once
#include"YOTO/Layer.h"
#include"YOTO/Event/KeyEvent.h"
#include"YOTO/Event/MouseEvent.h"
#include"YOTO/Event/ApplicationEvent.h"
namespace YOTO {class YOTO_API ImGuiLayer:public Layer{public:ImGuiLayer();~ImGuiLayer();void OnAttach();void OnDetach();void OnUpdate();void OnEvent(Event& event);private:bool OnMouseButtonPressedEvent(MouseButtonPressedEvent& e);bool OnMouseButtonReleasedEvent(MouseButtonReleasedEvent& e);bool OnMouseMovedEvent(MouseMovedEvent& e);bool OnMouseScrolledEvent(MouseScrolledEvent& e);bool OnKeyPressedEvent(KeyPressedEvent& e);bool OnKeyReleasedEvent(KeyReleasedEvent& e);bool OnKeyTypedEvent(KeyTypedEvent& e);bool OnWindowResizedEvent(WindowResizeEvent& e);float m_Time = 0.0f;};}
ImGuiLayer.h:绑定拦截器,实现方法
#include"ytpch.h"
#include"ImGuiLayer.h"
#include"Platform/OpenGL/ImGuiOpenGLRenderer.h"#include"YOTO/Application.h"#include<GLFW/glfw3.h>
#include<glad/glad.h>namespace YOTO {ImGuiLayer::ImGuiLayer():Layer("ImGuiLayer") {}ImGuiLayer::~ImGuiLayer() {}void ImGuiLayer::OnAttach(){//创建上下文ImGui::CreateContext();//设置颜色ImGui::StyleColorsDark();//配置类:ImGuiIOImGuiIO& io = ImGui::GetIO();io.BackendFlags |= ImGuiBackendFlags_HasMouseCursors;// 光标io.BackendFlags |= ImGuiBackendFlags_HasSetMousePos;// imgui输入key对应glfw的key,临时的:最终会对应引擎自身的keyio.KeyMap[ImGuiKey_Tab] = GLFW_KEY_TAB;io.KeyMap[ImGuiKey_LeftArrow] = GLFW_KEY_LEFT;io.KeyMap[ImGuiKey_RightArrow] = GLFW_KEY_RIGHT;io.KeyMap[ImGuiKey_UpArrow] = GLFW_KEY_UP;io.KeyMap[ImGuiKey_DownArrow] = GLFW_KEY_DOWN;io.KeyMap[ImGuiKey_PageUp] = GLFW_KEY_PAGE_UP;io.KeyMap[ImGuiKey_PageDown] = GLFW_KEY_PAGE_DOWN;io.KeyMap[ImGuiKey_Home] = GLFW_KEY_HOME;io.KeyMap[ImGuiKey_End] = GLFW_KEY_END;io.KeyMap[ImGuiKey_Insert] = GLFW_KEY_INSERT;io.KeyMap[ImGuiKey_Delete] = GLFW_KEY_DELETE;io.KeyMap[ImGuiKey_Backspace] = GLFW_KEY_BACKSPACE;io.KeyMap[ImGuiKey_Space] = GLFW_KEY_SPACE;io.KeyMap[ImGuiKey_Enter] = GLFW_KEY_ENTER;io.KeyMap[ImGuiKey_Escape] = GLFW_KEY_ESCAPE;io.KeyMap[ImGuiKey_A] = GLFW_KEY_A;io.KeyMap[ImGuiKey_C] = GLFW_KEY_C;io.KeyMap[ImGuiKey_V] = GLFW_KEY_V;io.KeyMap[ImGuiKey_X] = GLFW_KEY_X;io.KeyMap[ImGuiKey_Y] = GLFW_KEY_Y;io.KeyMap[ImGuiKey_Z] = GLFW_KEY_Z;ImGui_ImplOpenGL3_Init("#version 410");}void ImGuiLayer::OnDetach(){}void ImGuiLayer::OnUpdate() {//每帧刷新UI配置ImGuiIO& io = ImGui::GetIO();Application& app = Application::Get();//显示的size大小io.DisplaySize = ImVec2(app.GetWindow().GetWidth(), app.GetWindow().GetHeight());float time = (float)glfwGetTime();//时间io.DeltaTime = m_Time > 0.0f ? (time - m_Time) : (1.0f / 60.0f);m_Time = time;ImGui_ImplOpenGL3_NewFrame();ImGui::NewFrame();static bool show = true;// 显示ImGui DemoImGui::ShowDemoWindow(&show);ImGui::Render();ImGui_ImplOpenGL3_RenderDrawData(ImGui::GetDrawData());}void ImGuiLayer::OnEvent(Event& event) {EventDispatcher dispatcher(event);dispatcher.Dispatch<MouseButtonPressedEvent>(YT_BIND_EVENT_FN(ImGuiLayer::OnMouseButtonPressedEvent));dispatcher.Dispatch<MouseButtonReleasedEvent>(YT_BIND_EVENT_FN(ImGuiLayer::OnMouseButtonReleasedEvent));dispatcher.Dispatch<MouseMovedEvent>(YT_BIND_EVENT_FN(ImGuiLayer::OnMouseMovedEvent));dispatcher.Dispatch<MouseScrolledEvent>(YT_BIND_EVENT_FN(ImGuiLayer::OnMouseScrolledEvent));dispatcher.Dispatch<KeyPressedEvent>(YT_BIND_EVENT_FN(ImGuiLayer::OnKeyPressedEvent));dispatcher.Dispatch<KeyReleasedEvent>(YT_BIND_EVENT_FN(ImGuiLayer::OnKeyReleasedEvent));dispatcher.Dispatch<KeyTypedEvent>(YT_BIND_EVENT_FN(ImGuiLayer::OnKeyTypedEvent));dispatcher.Dispatch<WindowResizeEvent>(YT_BIND_EVENT_FN(ImGuiLayer::OnWindowResizedEvent));}	bool ImGuiLayer::OnMouseButtonPressedEvent(MouseButtonPressedEvent& e){ImGuiIO& io = ImGui::GetIO();io.MouseDown[e.GetMouseButton()] = true;return false;//返回false是因为希望其他层也处理这个事件(事件穿透)}bool ImGuiLayer::OnMouseButtonReleasedEvent(MouseButtonReleasedEvent& e){ImGuiIO& io = ImGui::GetIO();io.MouseDown[e.GetMouseButton()] = false;return false;//返回false是因为希望其他层也处理这个事件(事件穿透)}bool ImGuiLayer::OnMouseMovedEvent(MouseMovedEvent& e){ImGuiIO &io = ImGui::GetIO();io.MousePos = ImVec2(e.GetX(), e.GetY());return false;//返回false是因为希望其他层也处理这个事件(事件穿透)}bool ImGuiLayer::OnMouseScrolledEvent(MouseScrolledEvent& e){ImGuiIO&io = ImGui::GetIO();io.MouseWheel += e.GetXOffset();io.MouseWheelH += e.GetYOffset();return false;//返回false是因为希望其他层也处理这个事件(事件穿透)}bool ImGuiLayer::OnKeyPressedEvent(KeyPressedEvent& e){ImGuiIO& io = ImGui::GetIO();io.KeysDown[e.GetKeyCode()] = true;io.KeyCtrl = io.KeysDown[GLFW_KEY_LEFT_CONTROL] || io.KeysDown[GLFW_KEY_RIGHT_CONTROL];io.KeyShift = io.KeysDown[GLFW_KEY_LEFT_SHIFT] || io.KeysDown[GLFW_KEY_RIGHT_SHIFT];io.KeyAlt = io.KeysDown[GLFW_KEY_LEFT_ALT] || io.KeysDown[GLFW_KEY_RIGHT_ALT];io.KeySuper = io.KeysDown[GLFW_KEY_LEFT_SUPER] || io.KeysDown[GLFW_KEY_RIGHT_SUPER];return false;}bool ImGuiLayer::OnKeyReleasedEvent(KeyReleasedEvent& e){ImGuiIO& io = ImGui::GetIO();io.KeysDown[e.GetKeyCode()] = false;return false;}bool ImGuiLayer::OnKeyTypedEvent(KeyTypedEvent& e){ImGuiIO& io = ImGui::GetIO();int keycode = e.GetKeyCode();if (keycode > 0 && keycode < 0x10000)io.AddInputCharacter((unsigned short)keycode);return false;}bool ImGuiLayer::OnWindowResizedEvent(WindowResizeEvent& e){ImGuiIO& io = ImGui::GetIO();io.DisplaySize = ImVec2(e.GetWidth(), e.GetHeight());io.DisplayFramebufferScale = ImVec2(1.0f, 1.0f);glViewport(0, 0, e.GetWidth(), e.GetHeight());return false;}
}
KeyEvent.h:添加KeyTypedEvent类
#pragma once
#include"Event.h"
#include "ytpch.h"namespace YOTO {/// <summary>/// 键盘事件基类/// </summary>class YOTO_API KeyEvent:public Event{public:inline int GetKeyCode() const { return m_KeyCode; }EVENT_CLASS_CATEGORY(EventCategoryKeyboard | EventCategoryInput)protected:KeyEvent(int keycode):m_KeyCode(keycode){}int m_KeyCode;};/// <summary>/// 键盘按下回调/// </summary>class YOTO_API KeyPressedEvent :public KeyEvent{public:KeyPressedEvent(int keycode, int repeatCount):KeyEvent(keycode),m_RepeatCount(repeatCount){}inline int GetRepeatCount() const { return m_RepeatCount; }std::string ToString() const override{std::stringstream ss;ss << "键盘按下事件:" << m_KeyCode << "(" << m_RepeatCount << "重复)";return ss.str();}//static EventType GetStaticType() { return EventType::KeyPressed; }//virtual EventType GetEventType()const override { return GetStaticType(); }//virtual const char* GetName()const override { return "KeyPressed"; }EVENT_CLASS_TYPE(KeyPressed)private:int m_RepeatCount;};/// <summary>/// 键盘释放回调/// </summary>class YOTO_API KeyReleasedEvent:public KeyEvent{public:KeyReleasedEvent(int keycode):KeyEvent(keycode){}std::string ToString()const override {std::stringstream ss;ss << "键盘释放事件:" << m_KeyCode;return ss.str(); }EVENT_CLASS_TYPE(KeyReleased)};/// <summary>/// 输入字符回调/// </summary>class YOTO_API KeyTypedEvent :public KeyEvent{public:KeyTypedEvent(int keycode):KeyEvent(keycode) { }std::string ToString()const override {std::stringstream ss;ss << "键盘类型事件:" << m_KeyCode;return ss.str();}EVENT_CLASS_TYPE(KeyTyped)};}
WindowsWindow.cpp:Init里添加KeyTyped的回调:
#include "ytpch.h"
#include "WindowsWindow.h"
#include"YOTO/Event/ApplicationEvent.h"
#include"YOTO/Event/MouseEvent.h"
#include"YOTO/Event/KeyEvent.h"
#include<glad/glad.h>namespace YOTO {static bool s_GLFWInitialized = false;Window* Window::Creat(const WindowProps& props) {return new WindowsWindow(props);}WindowsWindow::WindowsWindow(const WindowProps& props) {Init(props);}WindowsWindow::~WindowsWindow() {ShutDown();}void WindowsWindow::Init(const WindowProps& props) {m_Data.Title = props.Title;m_Data.Width = props.Width;m_Data.Height = props.Height;YT_CORE_INFO("创建了{0},{1},{2}", props.Title, props.Width, props.Height);if (!s_GLFWInitialized) {int success = glfwInit();YT_CLIENT_ASSERT("不能创建新的glfw,{0}",success );glfwSetErrorCallback([](int error_code, const char* description) {YT_CORE_ERROR("GLFW错误:错误码({0}):{1} ", error_code, description);});s_GLFWInitialized = true;}m_Window = glfwCreateWindow((int)props.Width, (int)props.Height, m_Data.Title.c_str(), nullptr, nullptr);glfwMakeContextCurrent(m_Window); //在运行时获取OpenGL函数地址并将其保存在函数指针中供以后使用int status = gladLoadGLLoader((GLADloadproc)glfwGetProcAddress);YT_CORE_ASSERT(status, "glad初始化错误");glfwSetWindowUserPointer(m_Window, &m_Data);SetVSync(true);//GLFW回调,每次改变调用lambda里的部分//窗口大小回调glfwSetWindowSizeCallback(m_Window, [](GLFWwindow* window, int width, int height) {WindowData& data=*(WindowData*)glfwGetWindowUserPointer(window);data.Width = width;data.Height = height;WindowResizeEvent event(width, height);//调用回调函数data.EventCallback(event);});//窗口关闭回调glfwSetWindowCloseCallback(m_Window, [](GLFWwindow* window) {WindowData& data = *(WindowData*)glfwGetWindowUserPointer(window);WindowCloseEvent event;data.EventCallback(event);});//键盘按键回调glfwSetKeyCallback(m_Window, [](GLFWwindow* window, int key, int scancode, int action, int mods) {WindowData& data = *(WindowData*)glfwGetWindowUserPointer(window);switch (action) {case GLFW_PRESS:{KeyPressedEvent event(key, 0);data.EventCallback(event);break;}case GLFW_RELEASE:{KeyReleasedEvent event(key);data.EventCallback(event);break;}case GLFW_REPEAT:{KeyPressedEvent event(key, 1);data.EventCallback(event);break;}}});//鼠标按键回调glfwSetMouseButtonCallback(m_Window, [](GLFWwindow* window, int button, int action, int mods) {WindowData& data = *(WindowData*)glfwGetWindowUserPointer(window);switch (action){case GLFW_PRESS:{MouseButtonPressedEvent event(button);data.EventCallback(event);break;}case GLFW_RELEASE:{MouseButtonReleasedEvent event(button);data.EventCallback(event);break;}}});//滚轮回调glfwSetScrollCallback(m_Window, [](GLFWwindow* window, double xoffset, double yoffset) {WindowData& data = *(WindowData*)glfwGetWindowUserPointer(window);MouseScrolledEvent event((float)xoffset, (float)yoffset);data.EventCallback(event);});//鼠标位置回调glfwSetCursorPosCallback(m_Window, [](GLFWwindow* window, double xpos, double ypos) {WindowData& data = *(WindowData*)glfwGetWindowUserPointer(window);MouseMovedEvent event((float)xpos, (float)ypos);data.EventCallback(event);});//字符回调glfwSetCharCallback(m_Window, [](GLFWwindow* window, unsigned int codepoint) {WindowData& data = *(WindowData*)glfwGetWindowUserPointer(window);KeyTypedEvent event(codepoint);data.EventCallback(event);});}void WindowsWindow::ShutDown() {glfwDestroyWindow(m_Window);}void WindowsWindow::OnUpdate(){//轮询事件glfwPollEvents();//交换缓冲区glfwSwapBuffers(m_Window);}void WindowsWindow::SetVSync(bool enable) {if (enable)glfwSwapInterval(1);elseglfwSwapInterval(0);m_Data.VSync = enable;}bool WindowsWindow::IsVSync() const {return m_Data.VSync;}
}
Core.h:添加绑定事件的定义
#pragma once
//用于dll的宏
#ifdef YT_PLATFORM_WINDOWS
#ifdef YT_BUILD_DLL
#define YOTO_API __declspec(dllexport)
#else
#define YOTO_API __declspec(dllimport) #endif // DEBUG
#else
#error YOTO_ONLY_SUPPORT_WINDOWS
#endif // YOTO_PLATFORM_WINDOWS#ifdef YT_ENABLE_ASSERTS
#define YT_CLIENT_ASSERT(x,...) {if(!(x)){YT_CLIENT_ERROR("断言错误:{0}",__VA_ARGS__);__debugbreak();}}
#define YT_CORE_ASSERT(x,...) {if(!(x)){YT_CORE_ERROR("断言错误:{0}",__VA_ARGS__);__debugbreak();}}
#else
#define YT_CLIENT_ASSERT(x,...)
#define YT_CORE_ASSERT(x,...)#endif // YT_ENABLE_ASSERTS#define BIT(x)(1<<x)
//绑定事件定义
#define YT_BIND_EVENT_FN(fn) std::bind(&fn, this, std::placeholders::_1)
测试:
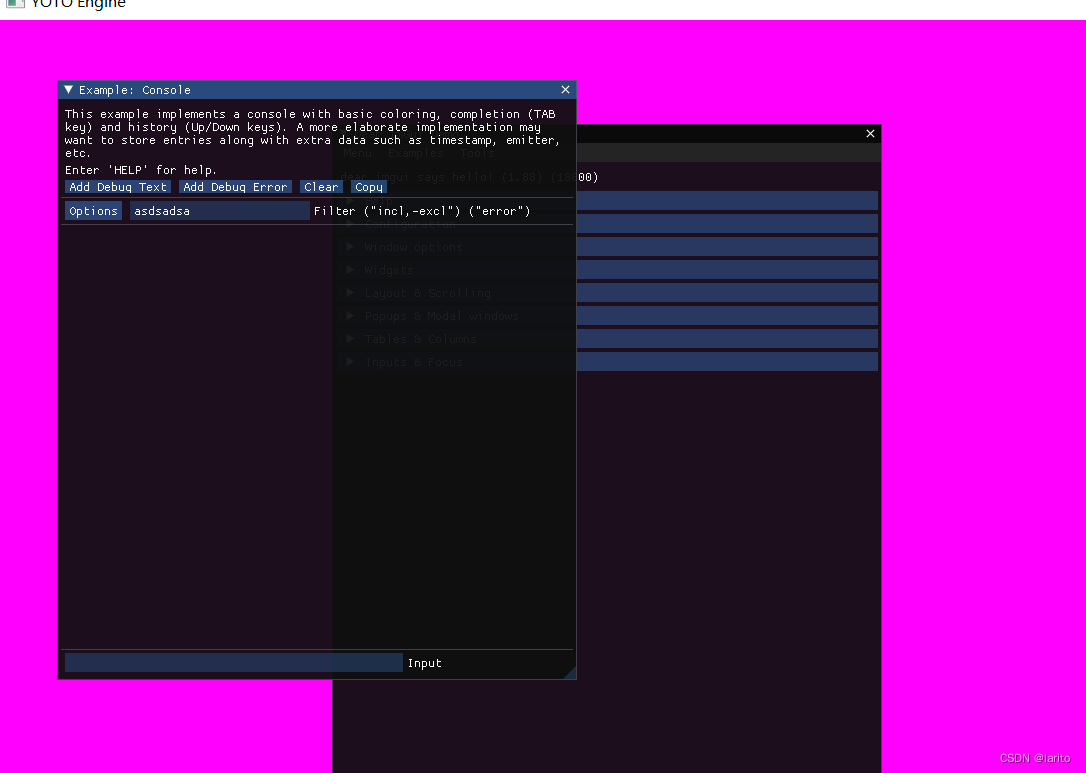
cool现在ImGui就能接收到咱的事件了。
