目录
1.配置访问控制鉴权流程的2种方式
2.Shiro内置过滤器
3.权限控制流程解析
3.1 权限(Permissions)配置和初始化流程
3.1.1 通过filterChainDefinitionMap配置url权限
3.1.1.1 应用层配置方式
3.1.1.2 配置解析过程
3.1.1.2.1 FilterChainManager解析权限配置
3.1.1.2.1.1 获取过滤器实例
3.1.1.2.1.2 对过滤器进行配置
3.1.1.2.1.3 创建过滤器链
3.1.1.2.2 FilterChainManager注入SpringShiroFilter中
3.2 用户权限校验流程
3.2.1 isPermitted权限校验
3.2.2 Realm解析
3.2.2.1 Realm
3.2.2.2 Authorizer
3.2.2.3 AuthenticatingRealm
3.2.2.4 AuthorizingRealm
3.2.2.4.1 getAuthorizationInfo获取App用户权限数据
3.2.2.4.2 isPermitted方法校验用户是否具有该权限
3.2.2.5 AuthorizingRealm实现子类
3.2.2.5.1 SimpleAccountRealm
3.2.2.5.2 JdbcRealm
3.2.2.5.3 TextConfigurationRealm
3.2.2.5.4 PropertiesRealm
Shiro作为一款比较流行的登录认证、访问控制安全框架,被广泛应用在程序员社区;Shiro登录验证、访问控制、Session管理等流程内部都是委托给SecurityManager安全管理器来完成的,SecurityManager安全管理器前面文章已经进行了详细解析,详见:Shiro框架:Shiro SecurityManager安全管理器解析;在此基础上,上篇文章已对Shiro用户登录认证流程(详见:Shiro框架:Shiro登录认证流程源码解析)进行了源码跟踪,本篇文章继续对下一个核心流程---用户访问控制鉴权流程进行源码解析;
想要深入了解Shiro框架整体原理,可移步:
Shiro框架:ShiroFilterFactoryBean过滤器源码解析、
Shiro框架:Shiro内置过滤器源码解析
1.配置访问控制鉴权流程的2种方式
Shiro对配置访问控制鉴权功能提供了2种方式:
- 通过内置过滤器的方式,比如:RolesAuthorizationFilter和PermissionsAuthorizationFilter
- 通过应用层代码注解的方式,比如:@RequiresRoles和@RequiresPermissions
本篇文章主要详细解析通过内置过滤器的配置方式,通过注解的方式下篇文章再进行解析;
2.Shiro内置过滤器
用户访问控制鉴权流程主要包括两部分,角色控制流程和权限控制流程,在Shiro框架:Shiro内置过滤器源码解析一文中,我们知道角色控制和权限控制分别是由内置过滤器RolesAuthorizationFilter和PermissionsAuthorizationFilter完成的,2个过滤器继承结构如下:
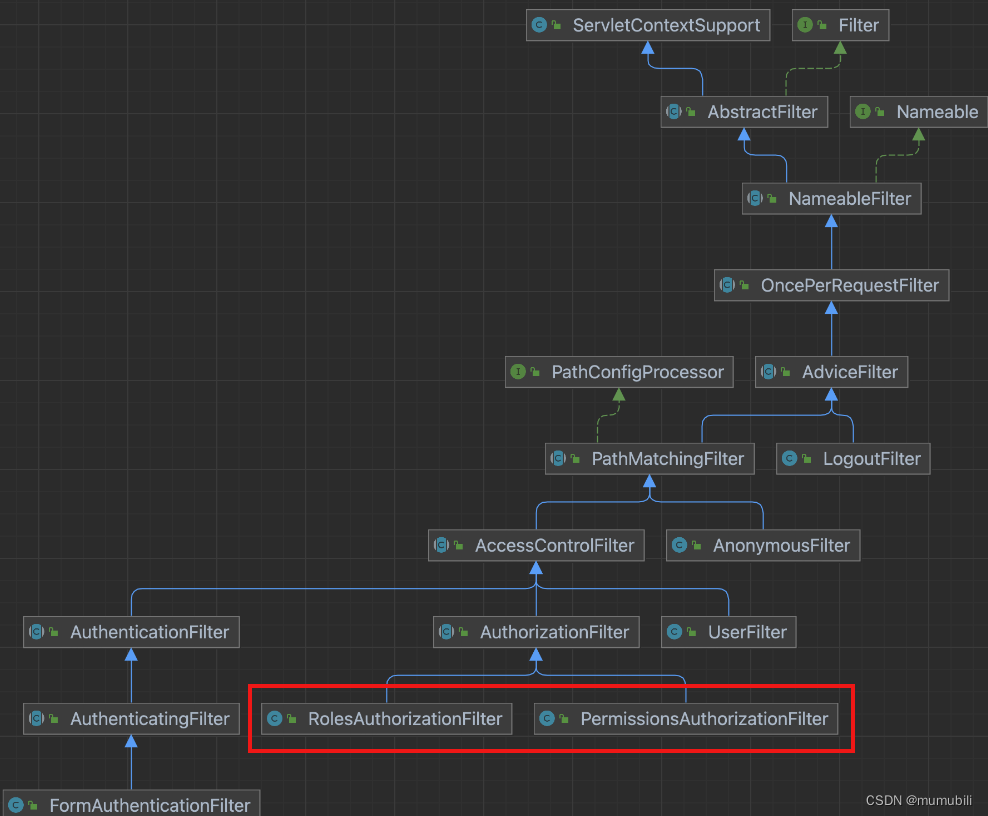
这里可以看到2个内置过滤器的继承层次结构完全一致,实际Shiro内部流程处理时,角色控制和权限控制流程也大致相似,所以,下面主要以权限控制流程进行说明;
3.权限控制流程解析
Shiro的权限控制是在内置过滤器PermissionsAuthorizationFilter中处理的,如下:
public class PermissionsAuthorizationFilter extends AuthorizationFilter {//TODO - complete JavaDocpublic boolean isAccessAllowed(ServletRequest request, ServletResponse response, Object mappedValue) throws IOException {Subject subject = getSubject(request, response);String[] perms = (String[]) mappedValue;boolean isPermitted = true;if (perms != null && perms.length > 0) {if (perms.length == 1) {if (!subject.isPermitted(perms[0])) {isPermitted = false;}} else {if (!subject.isPermittedAll(perms)) {isPermitted = false;}}}return isPermitted;}
}
如上,首先获取当前登录用户,然后根据请求url已配置的权限(mappedValue),判断当前登录用户是否已配置该权限;
这里需要着重分析的环节主要有2个:
- 请求url配置的权限是如何注册和初始化的?
- 如何校验当前登录用户是否已配置该权限?
下面分别进行分析;
3.1 权限(Permissions)配置和初始化流程
配置url所需权限是通过配置filterChainDefinitionMap完成的,下面进行详细解析;
3.1.1 通过filterChainDefinitionMap配置url权限
下面主要从2个角度进行分析:
- 应用层代码是如何进行配置的
- 应用层的配置在Shiro框架中是如何解析的
3.1.1.1 应用层配置方式
通过filterChainDefinitionMap配置方式如下:
filterChainDefinitionMap.put("/admin/role/list", "perms[角色管理]");如上表示:针对url:/admin/role/list,应用了内置过滤器perms(PermissionsAuthorizationFilter的别名),并且针对该内置过滤器配置了需要有“角色管理”的权限,才能够访问该url;
3.1.1.2 配置解析过程
配置解析过程是在ShiroFilterFactoryBean中初始化时进行解析的,在Shiro框架:ShiroFilterFactoryBean过滤器源码解析中也有提及,源码如下:
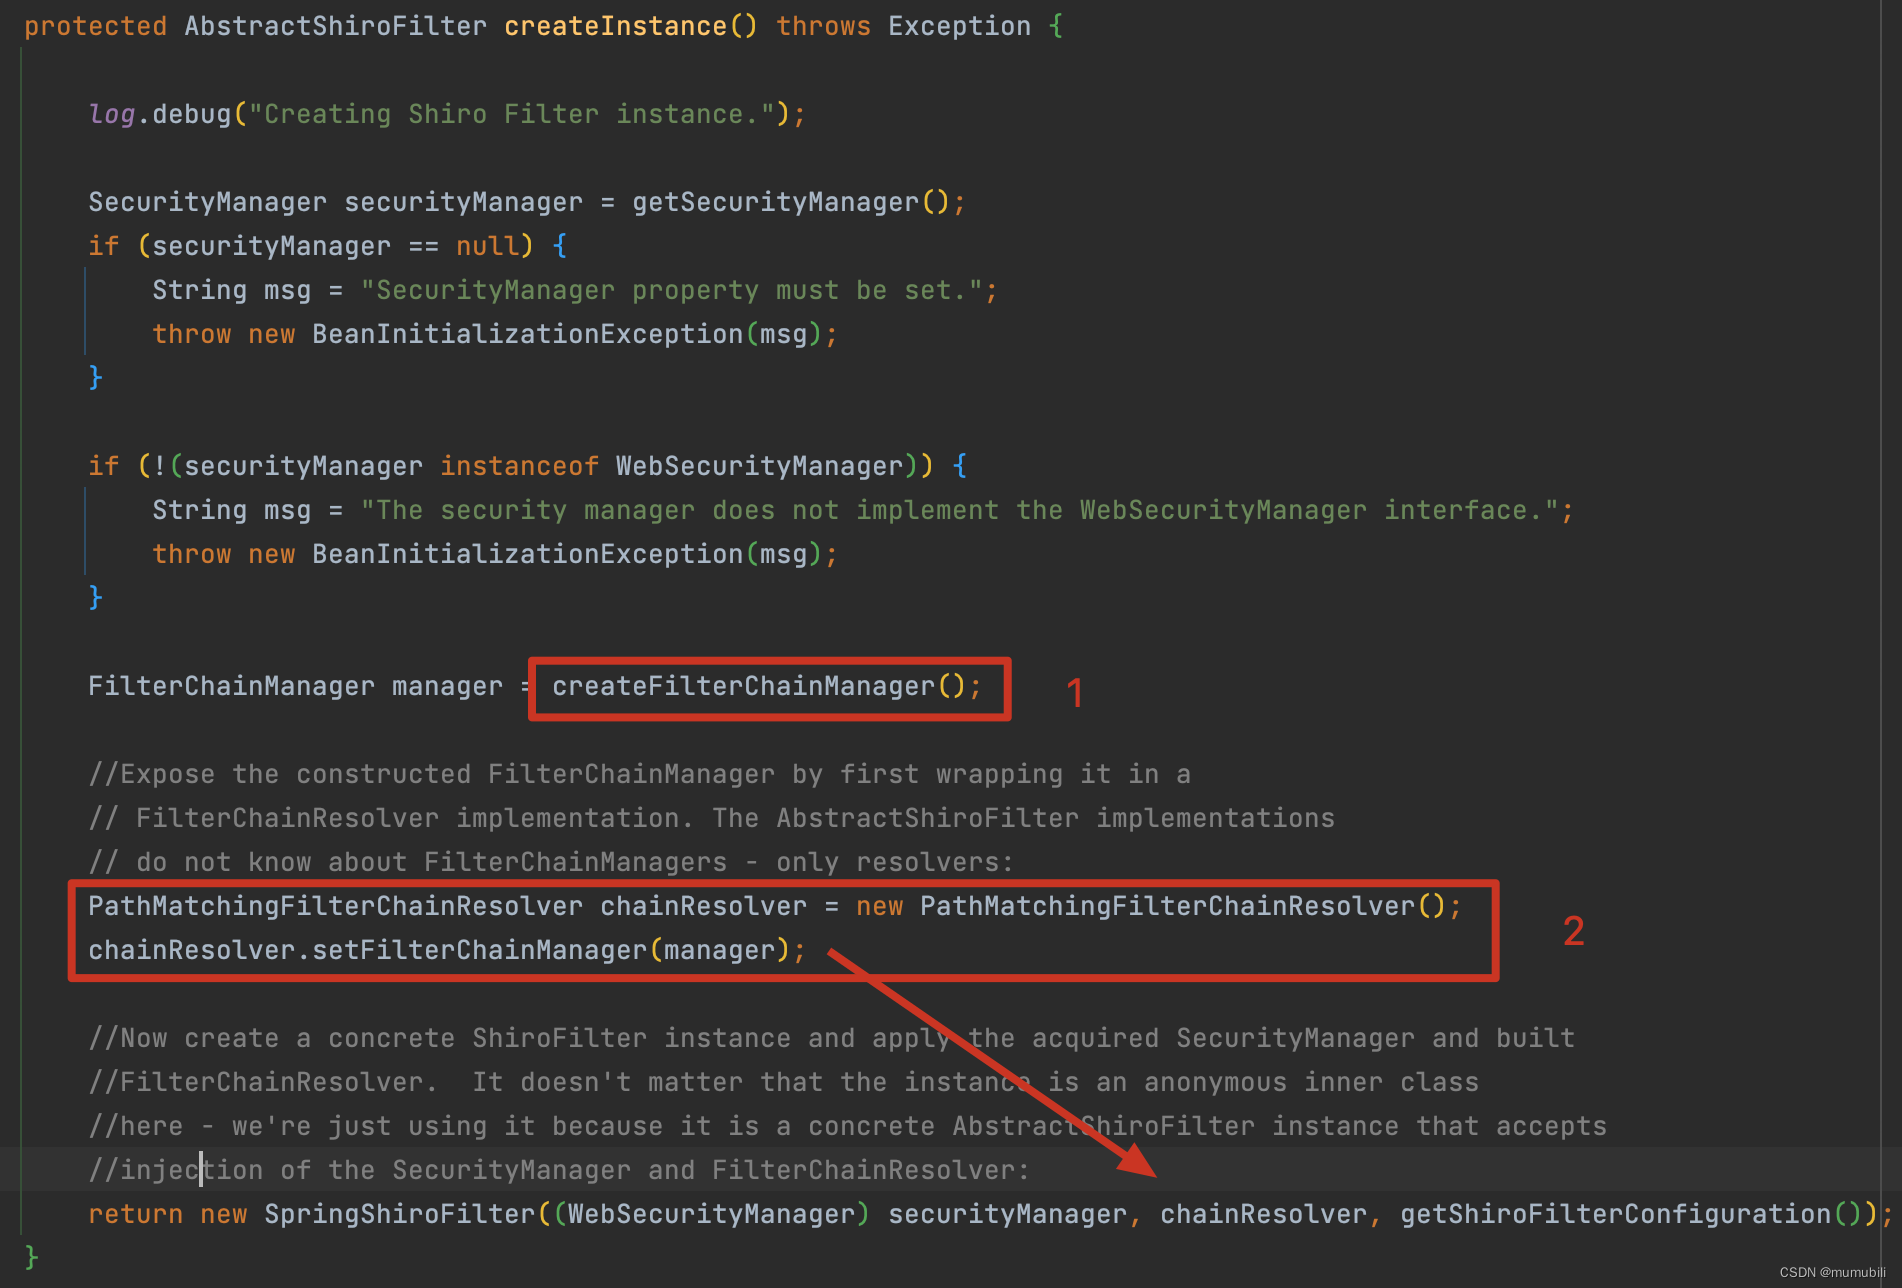
ShiroFilterFactoryBean的方法createInstance实现中,第一部分会创建过滤链管理器FilterChainManager;创建完成后,第二部分会设置到PathMatchingFilterChainResolver中,并进一步设置到Shiro自定义Servlet过滤器SpringShiroFilter中,下面分别进行说明;
3.1.1.2.1 FilterChainManager解析权限配置
FilterChainManager的创建过程如下:
protected FilterChainManager createFilterChainManager() {DefaultFilterChainManager manager = new DefaultFilterChainManager();Map<String, Filter> defaultFilters = manager.getFilters();//apply global settings if necessary:for (Filter filter : defaultFilters.values()) {applyGlobalPropertiesIfNecessary(filter);}//Apply the acquired and/or configured filters:Map<String, Filter> filters = getFilters();if (!CollectionUtils.isEmpty(filters)) {for (Map.Entry<String, Filter> entry : filters.entrySet()) {String name = entry.getKey();Filter filter = entry.getValue();applyGlobalPropertiesIfNecessary(filter);if (filter instanceof Nameable) {((Nameable) filter).setName(name);}//'init' argument is false, since Spring-configured filters should be initialized//in Spring (i.e. 'init-method=blah') or implement InitializingBean:manager.addFilter(name, filter, false);}}//build up the chains:Map<String, String> chains = getFilterChainDefinitionMap();if (!CollectionUtils.isEmpty(chains)) {for (Map.Entry<String, String> entry : chains.entrySet()) {String url = entry.getKey();String chainDefinition = entry.getValue();manager.createChain(url, chainDefinition);}}return manager;}前2部分主要是注册Shiro内置过滤器以及注册自定义过滤器,第三部分中通过方法getFilterChainDefinitionMap获取url对应的权限配置, 然后通过方法createChain创建过滤器链,如下:
public void createChain(String chainName, String chainDefinition) {//……String[] filterTokens = splitChainDefinition(chainDefinition);for (String token : filterTokens) {String[] nameConfigPair = toNameConfigPair(token);//now we have the filter name, path and (possibly null) path-specific config. Let's apply them:addToChain(chainName, nameConfigPair[0], nameConfigPair[1]);}}splitChainDefinition的作用是:对url对应的权限配置分割,比如配置了多个内置过滤器,这里会以逗号分割为多个内置过滤器;
toNameConfigPair的作用是:针对每个内置过滤器,通过中括号"["分割为过滤器名称和过滤器配置;这里以"perms[角色管理]"为例,解析后,nameConfigPair[0]="perms",nameConfigPair[1]="角色管理";
然后调用addToChain方法,如下:
public void addToChain(String chainName, String filterName, String chainSpecificFilterConfig) {if (!StringUtils.hasText(chainName)) {throw new IllegalArgumentException("chainName cannot be null or empty.");}Filter filter = getFilter(filterName);if (filter == null) {throw new IllegalArgumentException("There is no filter with name '" + filterName +"' to apply to chain [" + chainName + "] in the pool of available Filters. Ensure a " +"filter with that name/path has first been registered with the addFilter method(s).");}applyChainConfig(chainName, filter, chainSpecificFilterConfig);NamedFilterList chain = ensureChain(chainName);chain.add(filter);}这里的方法实现中又包括了3部分,具体如下:
3.1.1.2.1.1 获取过滤器实例
通过方法getFilter根据过滤器名称获取到对应的过滤器实例,如下:
public Filter getFilter(String name) {return this.filters.get(name);}3.1.1.2.1.2 对过滤器进行配置
通过方法applyChainConfig对过滤器进行配置:
protected void applyChainConfig(String chainName, Filter filter, String chainSpecificFilterConfig) {if (log.isDebugEnabled()) {log.debug("Attempting to apply path [" + chainName + "] to filter [" + filter + "] " +"with config [" + chainSpecificFilterConfig + "]");}if (filter instanceof PathConfigProcessor) {((PathConfigProcessor) filter).processPathConfig(chainName, chainSpecificFilterConfig);} else {if (StringUtils.hasText(chainSpecificFilterConfig)) {//they specified a filter configuration, but the Filter doesn't implement PathConfigProcessor//this is an erroneous config:String msg = "chainSpecificFilterConfig was specified, but the underlying " +"Filter instance is not an 'instanceof' " +PathConfigProcessor.class.getName() + ". This is required if the filter is to accept " +"chain-specific configuration.";throw new ConfigurationException(msg);}}}过滤器实现接口PathConfigProcessor时(PermissionsAuthorizationFilter实现了PathConfigProcessor),配置实现如下:
public Filter processPathConfig(String path, String config) {String[] values = null;if (config != null) {values = split(config);}this.appliedPaths.put(path, values);return this;}如上,通过split分割过滤器配置,然后添加到过滤器内成员变量appliedPaths中,key为url;
3.1.1.2.1.3 创建过滤器链
通过ensureChain创建该url对应的过滤器链,并将该过滤器添加进过滤器链;后续通过请求的url可以获取对应的过滤器链,下文会具体分析;
protected NamedFilterList ensureChain(String chainName) {NamedFilterList chain = getChain(chainName);if (chain == null) {chain = new SimpleNamedFilterList(chainName);this.filterChains.put(chainName, chain);}return chain;}如上,url的权限配置,通过解析后,存放到了2个位置:
- FilterChainManager的成员变量:Map<String, NamedFilterList> filterChains中(Key为url,value为多个过滤器实例)
- url配置的过滤器(实现PathConfigProcessor接口)的成员变量:Map<String, Object> appliedPaths中(Key为url,value为过滤器配置,比如针对"perms[角色管理]",这里的过滤器为:PermissionsAuthorizationFilter,value即为"角色管理")
3.1.1.2.2 FilterChainManager注入SpringShiroFilter中
FilterChainManager首先注入到过滤器链解析器FilterChainResolver中,然后通过SpringShiroFilter的构造方法将FilterChainResolver又注入SpringShiroFilter中,如下:
protected SpringShiroFilter(WebSecurityManager webSecurityManager, FilterChainResolver resolver) {super();if (webSecurityManager == null) {throw new IllegalArgumentException("WebSecurityManager property cannot be null.");}setSecurityManager(webSecurityManager);if (resolver != null) {setFilterChainResolver(resolver);}}因为SpringShiroFilter为Servlet过滤器,在执行过滤方法时,在SpringShiroFilter中即为doFilterInternal,会获取请求url对应的过滤链,具体实现在方法executeChain中:
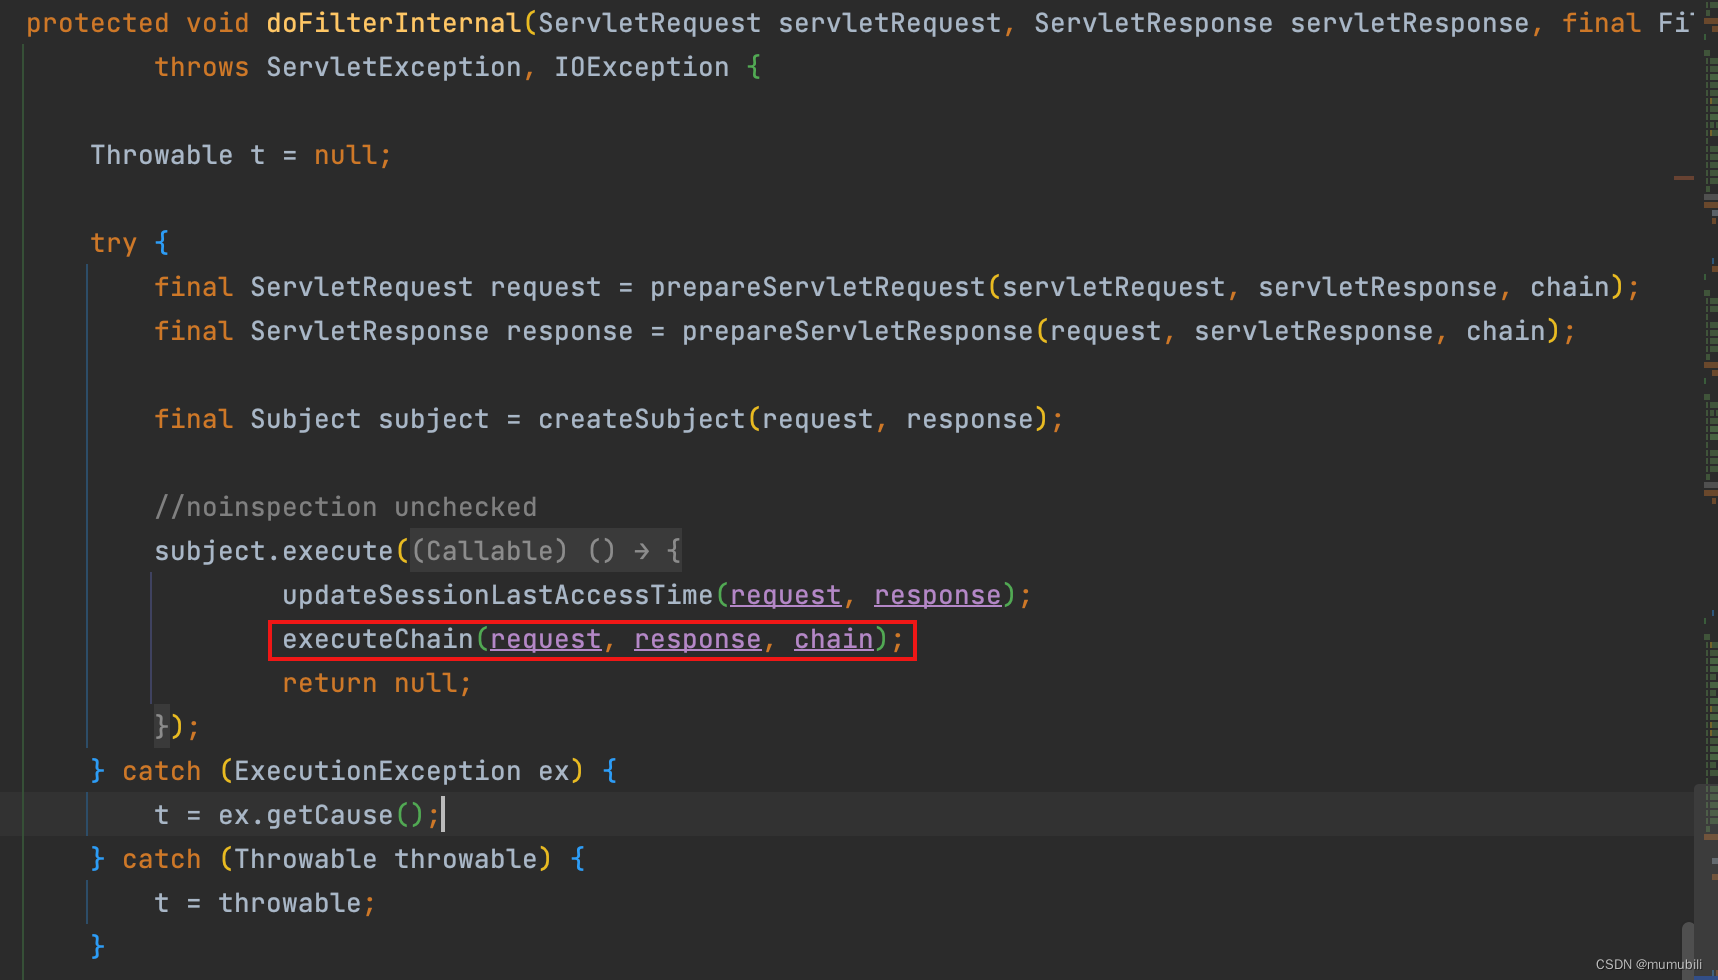
executeChain实现如下:
protected void executeChain(ServletRequest request, ServletResponse response, FilterChain origChain)throws IOException, ServletException {FilterChain chain = getExecutionChain(request, response, origChain);chain.doFilter(request, response);}进一步,getExecutionChain方法获取过滤器链,实现如下:
protected FilterChain getExecutionChain(ServletRequest request, ServletResponse response, FilterChain origChain) {FilterChain chain = origChain;FilterChainResolver resolver = getFilterChainResolver();if (resolver == null) {log.debug("No FilterChainResolver configured. Returning original FilterChain.");return origChain;}FilterChain resolved = resolver.getChain(request, response, origChain);if (resolved != null) {log.trace("Resolved a configured FilterChain for the current request.");chain = resolved;} else {log.trace("No FilterChain configured for the current request. Using the default.");}return chain;}方法getFilterChainResolver获取到了前面通过构造方法注入的FilterChainResolver, 然后通过方法getChain获取url对应的过滤器链,具体如下:
public FilterChain getChain(ServletRequest request, ServletResponse response, FilterChain originalChain) {FilterChainManager filterChainManager = getFilterChainManager();if (!filterChainManager.hasChains()) {return null;}String requestURI = getPathWithinApplication(request);//the 'chain names' in this implementation are actually path patterns defined by the user. We just use them//as the chain name for the FilterChainManager's requirementsfor (String pathPattern : filterChainManager.getChainNames()) {// If the path does match, then pass on to the subclass implementation for specific checks:if (pathMatches(pathPattern, requestURI)) {if (log.isTraceEnabled()) {log.trace("Matched path pattern [" + pathPattern + "] for requestURI [" + requestURI + "]. " +"Utilizing corresponding filter chain...");}return filterChainManager.proxy(originalChain, pathPattern);}}return null;}这里通过方法getFilterChainManager获取到了前面注册的FilterChainManager(其内部保存着url对应的过滤器链配置),然后通过pathMatches获取请求url所有匹配的过滤器链,并通过方法proxy对originalChain进行代理(这里实际上是多层代理,对应匹配的多个过滤器链),实现如下:
public FilterChain proxy(FilterChain original, String chainName) {NamedFilterList configured = getChain(chainName);if (configured == null) {String msg = "There is no configured chain under the name/key [" + chainName + "].";throw new IllegalArgumentException(msg);}return configured.proxy(original);} public FilterChain proxy(FilterChain orig) {return new ProxiedFilterChain(orig, this);}public class ProxiedFilterChain implements FilterChain {private FilterChain orig;private List<Filter> filters;private int index = 0;public ProxiedFilterChain(FilterChain orig, List<Filter> filters) {if (orig == null) {throw new NullPointerException("original FilterChain cannot be null.");}this.orig = orig;this.filters = filters;this.index = 0;}public void doFilter(ServletRequest request, ServletResponse response) throws IOException, ServletException {if (this.filters == null || this.filters.size() == this.index) {//we've reached the end of the wrapped chain, so invoke the original one:if (log.isTraceEnabled()) {log.trace("Invoking original filter chain.");}this.orig.doFilter(request, response);} else {if (log.isTraceEnabled()) {log.trace("Invoking wrapped filter at index [" + this.index + "]");}this.filters.get(this.index++).doFilter(request, response, this);}}
}如上通过index递增的方式依次调用匹配的过滤链中的多个过滤器(这里的实现过程和Servlet中多个过滤器的执行过程是一致的),最后执行Servlet的过滤器链orig;言而总之,这里将所有的过滤器成功的串接了起来。
3.2 用户权限校验流程
在上述Part-3:权限控制流程解析一节中,在获取到请求url对应的权限过滤器的配置,上述举例中,mappedValue即为"角色管理",然后调用subject.isPermitted方法校验登录用户是否具有"角色管理"的权限,所以用户权限校验的处理在方法isPermitted中,下面进行具体说明;
3.2.1 isPermitted权限校验
跟踪isPermitted实现如下:
public boolean isPermitted(String permission) {return hasPrincipals() && securityManager.isPermitted(getPrincipals(), permission);}这里会校验当登录用户已包含登录账户Principals,然后委托给securityManager校验用户是否具有该权限,继续跟踪isPermitted实现:
public boolean isPermitted(PrincipalCollection principals, String permissionString) {return this.authorizer.isPermitted(principals, permissionString);}这里进一步委托给了鉴权器authorizer校验用户权限,这里的authorizer具体类型为ModularRealmAuthorizer,其继承结构如下:

可以看出:
- 实现了Authorizer接口,可以执行鉴权操作
- 实现了PermissionResolverAware,Aware类型接口,支持注入PermissionResolver权限解析器
- 实现了RolePermissionResolverAware,Aware类型接口,支持注入RolePermissionResolver角色权限解析器
继续跟踪authorizer.isPermitted实现如下:
/*** Returns <code>true</code> if any of the configured realms'* {@link #isPermitted(org.apache.shiro.subject.PrincipalCollection, String)} returns <code>true</code>,* <code>false</code> otherwise.*/public boolean isPermitted(PrincipalCollection principals, String permission) {assertRealmsConfigured();for (Realm realm : getRealms()) {if (!(realm instanceof Authorizer)) continue;if (((Authorizer) realm).isPermitted(principals, permission)) {return true;}}return false;}这里会获取已注册的权限组件Realm(Realm的注册是通过安全管理器的setRealms方法注册的),并过滤出实现鉴权器Authorizer接口的Realm, 然后调用其isPermitted进行权限校验,下面先对Real整体的结构和概念进行解析;
3.2.2 Realm解析
Realm整体继承层次结构如下:
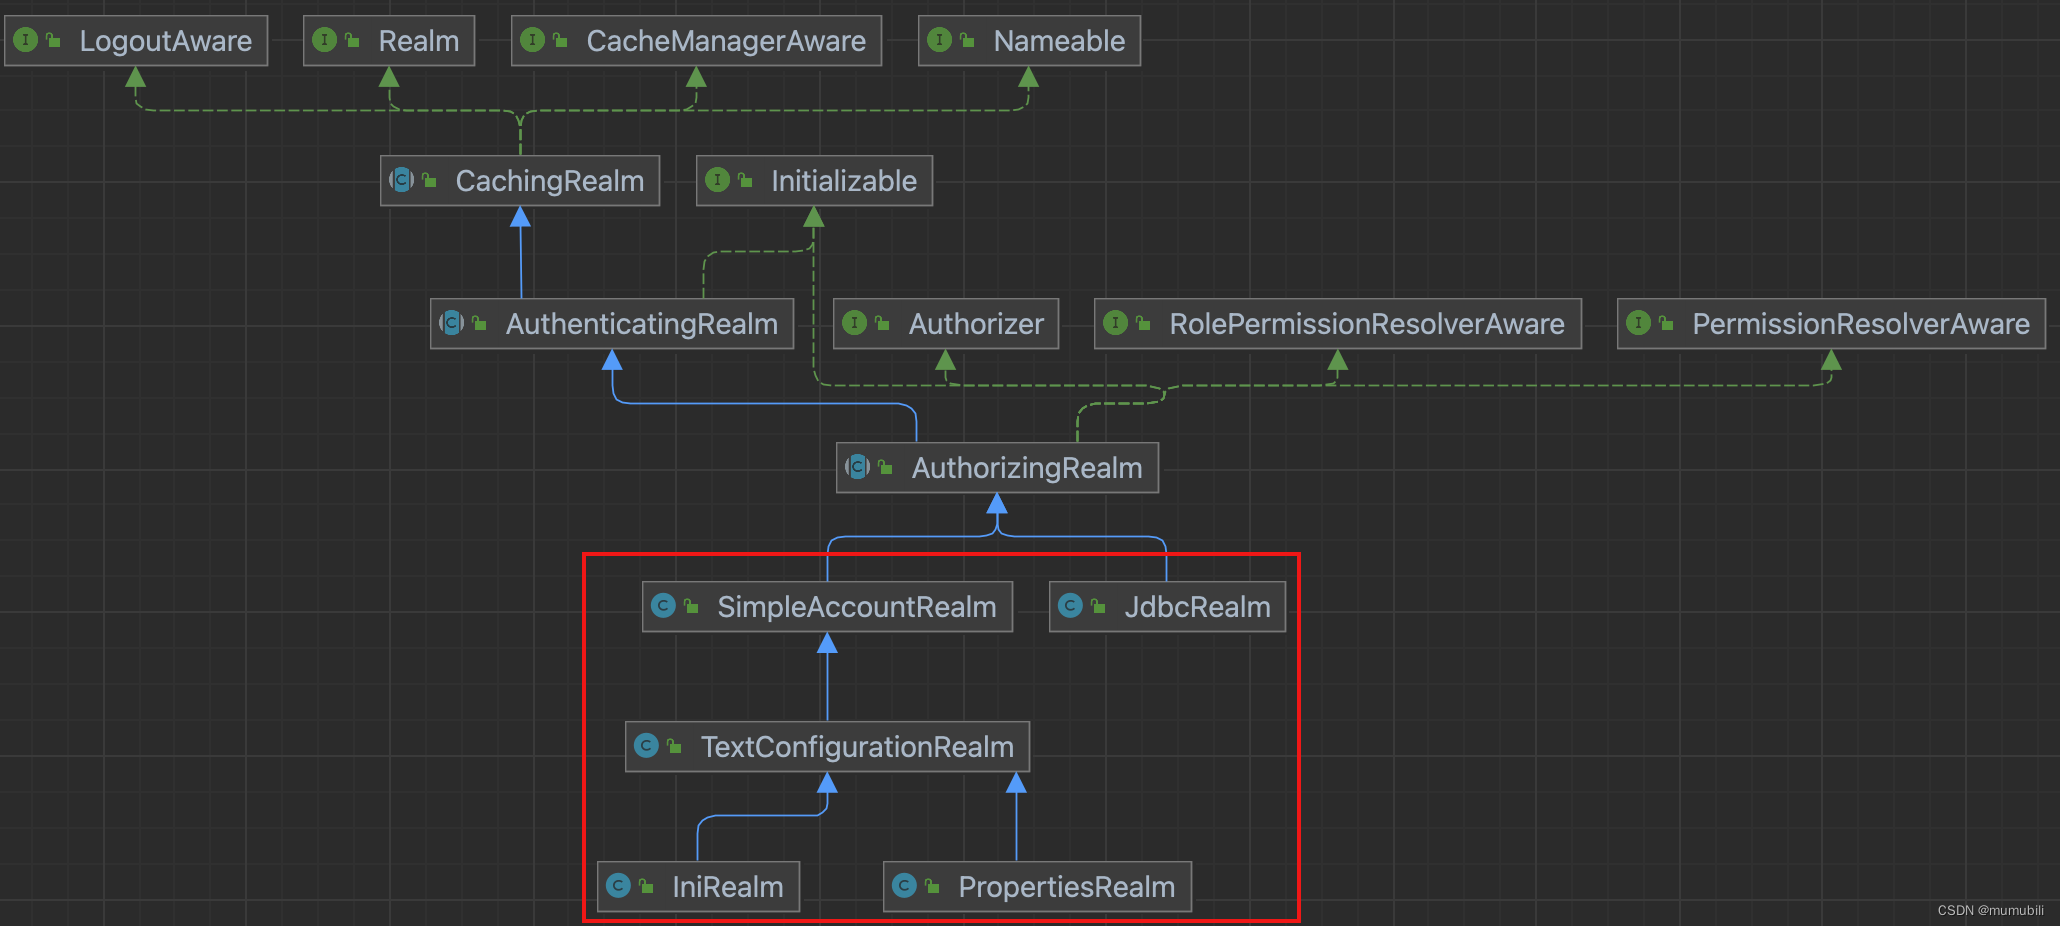
主要的几个类型说明如下;
3.2.2.1 Realm
权限组件顶层接口,定义了Real的名称,支持的Token类型,以及登录认证方法:
public interface Realm {/*** Returns the (application-unique) name assigned to this <code>Realm</code>. All realms configured for a single* application must have a unique name.** @return the (application-unique) name assigned to this <code>Realm</code>.*/String getName();/*** Returns <tt>true</tt> if this realm wishes to authenticate the Subject represented by the given* {@link org.apache.shiro.authc.AuthenticationToken AuthenticationToken} instance, <tt>false</tt> otherwise.*         <tt>false</tt> otherwise.*/boolean supports(AuthenticationToken token);/*** Returns an account's authentication-specific information for the specified <tt>token</tt>,* or <tt>null</tt> if no account could be found based on the <tt>token</tt>.*/AuthenticationInfo getAuthenticationInfo(AuthenticationToken token) throws AuthenticationException;
}
3.2.2.2 Authorizer
顶层鉴权器接口,主要定义了多个鉴权方法:
public interface Authorizer {boolean isPermitted(PrincipalCollection principals, String permission);boolean isPermitted(PrincipalCollection subjectPrincipal, Permission permission);//……
}
3.2.2.3 AuthenticatingRealm
实现了Realm顶层接口,并默认实现了getAuthenticationInfo方法,同时引入了抽象方法doGetAuthenticationInfo交由子类实现,获取App中用户登录认证信息,用于登录认证,用户登录认证流程详见:Shiro框架:Shiro用户登录认证流程源码解析
public final AuthenticationInfo getAuthenticationInfo(AuthenticationToken token) throws AuthenticationException {AuthenticationInfo info = getCachedAuthenticationInfo(token);if (info == null) {//otherwise not cached, perform the lookup:info = doGetAuthenticationInfo(token);log.debug("Looked up AuthenticationInfo [{}] from doGetAuthenticationInfo", info);if (token != null && info != null) {cacheAuthenticationInfoIfPossible(token, info);}} else {log.debug("Using cached authentication info [{}] to perform credentials matching.", info);}if (info != null) {assertCredentialsMatch(token, info);} else {log.debug("No AuthenticationInfo found for submitted AuthenticationToken [{}]. Returning null.", token);}return info;} /*** Retrieves authentication data from an implementation-specific datasource (RDBMS, LDAP, etc) for the given* authentication token.*/protected abstract AuthenticationInfo doGetAuthenticationInfo(AuthenticationToken token) throws AuthenticationException;
3.2.2.4 AuthorizingRealm
AuthorizingRealm继承了AuthenticatingRealm,并实现了Authorizer,聚合了登录认证和权限控制2方面功能:
这里详细展开解析下前面的权限校验方法:isPermitted,具体如下:
public boolean isPermitted(PrincipalCollection principals, String permission) {Permission p = getPermissionResolver().resolvePermission(permission);return isPermitted(principals, p);}这里首先获取权限解析器(实际初始化类型为WildcardPermissionResolver,通配符权限解析器),然后利用权限解析器解析String类型权限为Permission类型,具体为:
public Permission resolvePermission(String permissionString) {return new WildcardPermission(permissionString, caseSensitive);}然后继续调用重载方法isPermitted进行权限校验,实现如下:
public boolean isPermitted(PrincipalCollection principals, Permission permission) {AuthorizationInfo info = getAuthorizationInfo(principals);return isPermitted(permission, info);}这里主要包含2部分内容:
1.通过getAuthorizationInfo获取App用户权限数据
2.通过isPermitted方法校验用户是否具有该权限
3.2.2.4.1 getAuthorizationInfo获取App用户权限数据
getAuthorizationInfo实现如下:
protected AuthorizationInfo getAuthorizationInfo(PrincipalCollection principals) {if (principals == null) {return null;}AuthorizationInfo info = null;if (log.isTraceEnabled()) {log.trace("Retrieving AuthorizationInfo for principals [" + principals + "]");}Cache<Object, AuthorizationInfo> cache = getAvailableAuthorizationCache();if (cache != null) {if (log.isTraceEnabled()) {log.trace("Attempting to retrieve the AuthorizationInfo from cache.");}Object key = getAuthorizationCacheKey(principals);info = cache.get(key);if (log.isTraceEnabled()) {if (info == null) {log.trace("No AuthorizationInfo found in cache for principals [" + principals + "]");} else {log.trace("AuthorizationInfo found in cache for principals [" + principals + "]");}}}if (info == null) {// Call template method if the info was not found in a cacheinfo = doGetAuthorizationInfo(principals);// If the info is not null and the cache has been created, then cache the authorization info.if (info != null && cache != null) {if (log.isTraceEnabled()) {log.trace("Caching authorization info for principals: [" + principals + "].");}Object key = getAuthorizationCacheKey(principals);cache.put(key, info);}}return info;}如上,首先从缓存中获取用户权限数据,不存在时,通过抽象方法doGetAuthorizationInfo获取权限数据,该方法需要交由子类具体实现;
应用层代码可以自定义实现该方法获取自定义用户权限数据,Shiro框架也提供了一些默认的实现类,比如下面要介绍的:SimpleAccountRealm、 JdbcRealm、TextConfigurationRealm、PropertiesRealm;
3.2.2.4.2 isPermitted方法校验用户是否具有该权限
isPermitted实现如下:
protected boolean isPermitted(Permission permission, AuthorizationInfo info) {Collection<Permission> perms = getPermissions(info);if (perms != null && !perms.isEmpty()) {for (Permission perm : perms) {if (perm.implies(permission)) {return true;}}}return false;}首先通过方法getPermissions从已获取的对象AuthorizationInfo中获取用户拥有的权限:
protected Collection<Permission> getPermissions(AuthorizationInfo info) {Set<Permission> permissions = new HashSet<Permission>();if (info != null) {Collection<Permission> perms = info.getObjectPermissions();if (!CollectionUtils.isEmpty(perms)) {permissions.addAll(perms);}perms = resolvePermissions(info.getStringPermissions());if (!CollectionUtils.isEmpty(perms)) {permissions.addAll(perms);}perms = resolveRolePermissions(info.getRoles());if (!CollectionUtils.isEmpty(perms)) {permissions.addAll(perms);}}if (permissions.isEmpty()) {return Collections.emptySet();} else {return Collections.unmodifiableSet(permissions);}}然后通过Permission的implies方法判断用户拥有的权限是否包含当前请求url需要的权限,如包含则返回true,表示权限校验通过。
3.2.2.5 AuthorizingRealm实现子类
根据用户拥有权限存储以及获取方法的不同,Shiro框架中预置了如下一些AuthorizingRealm的实现子类;当然,也支持自定义AuthorizingRealm实现子类通过自定义的方式获取用户拥有的权限数据;
3.2.2.5.1 SimpleAccountRealm
通过Map结构存储用户权限数据,如下:

protected AuthorizationInfo doGetAuthorizationInfo(PrincipalCollection principals) {String username = getUsername(principals);USERS_LOCK.readLock().lock();try {return this.users.get(username);} finally {USERS_LOCK.readLock().unlock();}}3.2.2.5.2 JdbcRealm
通过JDBC查询的方式获取用户权限数据:
@Overrideprotected AuthorizationInfo doGetAuthorizationInfo(PrincipalCollection principals) {//null usernames are invalidif (principals == null) {throw new AuthorizationException("PrincipalCollection method argument cannot be null.");}String username = (String) getAvailablePrincipal(principals);Connection conn = null;Set<String> roleNames = null;Set<String> permissions = null;try {conn = dataSource.getConnection();// Retrieve roles and permissions from databaseroleNames = getRoleNamesForUser(conn, username);if (permissionsLookupEnabled) {permissions = getPermissions(conn, username, roleNames);}} catch (SQLException e) {final String message = "There was a SQL error while authorizing user [" + username + "]";if (log.isErrorEnabled()) {log.error(message, e);}// Rethrow any SQL errors as an authorization exceptionthrow new AuthorizationException(message, e);} finally {JdbcUtils.closeConnection(conn);}SimpleAuthorizationInfo info = new SimpleAuthorizationInfo(roleNames);info.setStringPermissions(permissions);return info;}3.2.2.5.3 TextConfigurationRealm
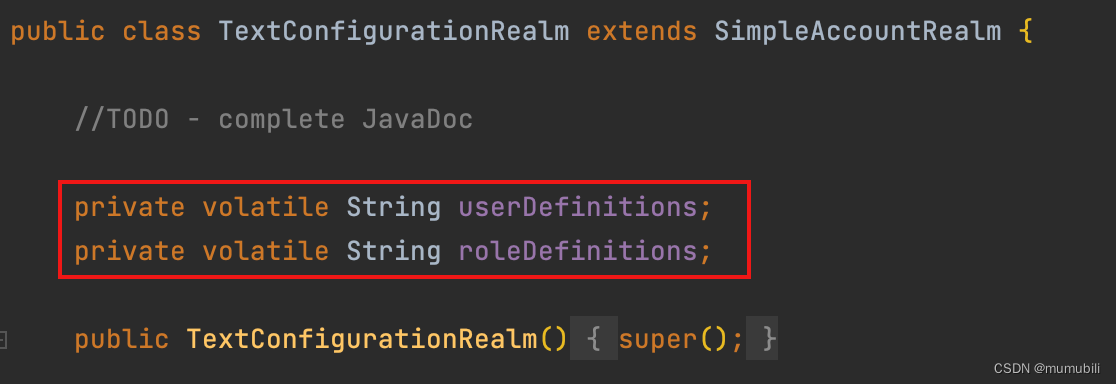
通过字符串文本的方式获取用户配置权限数据:
3.2.2.5.4 PropertiesRealm
通过配置Properites文件Url的方式获取用户权限数据:
private void loadProperties() {if (resourcePath == null || resourcePath.length() == 0) {throw new IllegalStateException("The resourcePath property is not set. " +"It must be set prior to this realm being initialized.");}if (log.isDebugEnabled()) {log.debug("Loading user security information from file [" + resourcePath + "]...");}Properties properties = loadProperties(resourcePath);createRealmEntitiesFromProperties(properties);}至此,Shiro用户访问控制鉴权流程-使用内置过滤器方式源码解析完毕,Over~~