文章目录
- 前言
- 一、ARGWHERE
- 二、CAT、CONCAT、CONCATENATE
- 三、CHUNK
- 四、GATHER
- 五、MOVEDIM和MOVEAXIS
- 六、PERMUTE
- 七、RESHAPE
- 八、SELECT
- 九、SPLIT
- 十、SQUEEZE
- 十一、T
- 十二、TAKE
- 十三、TILE
- 十四、TRANSPOSE
- 十五、UNBIND
- 十六、UNSQUEEZE
- 十七、WHERE
前言
介绍常用的PyTorch之Tensors索引切片等
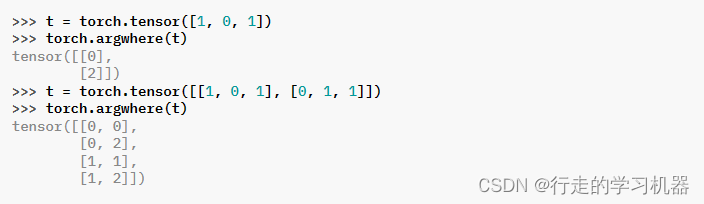
一、ARGWHERE
torch.argwhere(input) → Tensor
返回一个张量,其中包含输入张量中所有非零元素的索引。结果中的每一行都包含输入中一个非零元素的索引。结果按字典序排序,最后一个索引变化最快(C风格)。
如果输入具有n维,则生成的索引张量out的大小为(z×n),其中z是输入张量中非零元素的总数。
此函数类似于 NumPy 的 argwhere 函数。当输入位于 CUDA 上时,此函数会导致主机和设备的同步。
二、CAT、CONCAT、CONCATENATE
*torch.cat(tensors, dim=0, , out=None) → Tensor
Parameters:
tensors (sequence of Tensors) – any python sequence of tensors of the same type. Non-empty tensors provided must have the same shape, except in the cat dimension.
dim (int, optional) – the dimension over which the tensors are concatenated
Keyword Arguments:
out (Tensor, optional) – the output tensor.
在给定维度上连接给定的 seq 张量序列。所有张量必须具有相同的形状(除了连接的维度之外)或为空。
torch.cat() 可以被看作是 torch.split() 和 torch.chunk() 的逆操作。
通过示例,可以更好地理解 torch.cat()。
torch.stack() 沿新维度连接给定的序列。
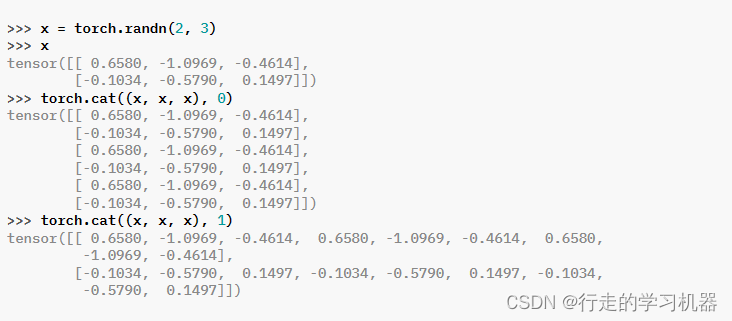
CONCAT和CONCATENATE是CAT的别名,操作相同。
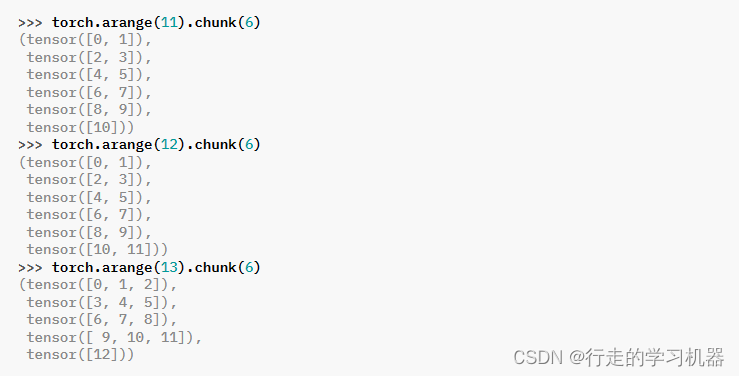
三、CHUNK
torch.chunk(input, chunks, dim=0) → List of Tensors
Parameters:
input (Tensor) – the tensor to split
chunks (int) – number of chunks to return
dim (int) – dimension along which to split the tensor
尝试将张量分割成指定数量的块。每块都是输入张量的视图。不同于torch.tensor_split(),一个始终返回确切指定数量块的函数,此函数可能返回少于指定数量的块!
如果沿着给定的维度 dim 的张量大小可被 chunks 整除,则所有返回的块将具有相同的大小。如果沿着给定的维度 dim 的张量大小不能被 chunks 整除,则所有返回的块将具有相同的大小,除了最后一个。如果这样的划分不可能,此函数可能返回少于指定数量的块。
四、GATHER
*torch.gather(input, dim, index, , sparse_grad=False, out=None) → Tensor
Parameters:
input (Tensor) – the source tensor
dim (int) – the axis along which to index
index (LongTensor) – the indices of elements to gather
Keyword Arguments:
sparse_grad (bool, optional) – If True, gradient w.r.t. input will be a sparse tensor.
out (Tensor, optional) – the destination tensor
沿着由 dim 指定的轴收集数值。
对于 3-D 张量,输出由以下规定:
如果 dim == 0,则 out[i][j][k] = input[index[i][j][k]][j][k];
如果 dim == 1,则 out[i][j][k] = input[i][index[i][j][k]][k];
如果 dim == 2,则 out[i][j][k] = input[i][j][index[i][j][k]];
input 和 index 必须具有相同数量的维度。还要求对于所有维度 d != dim,index.size(d) <= input.size(d)。out 将具有与 index 相同的形状。请注意,input 和 index 不会相互广播。
如果有其他问题或需要进一步解释,请随时告诉我。我很乐意帮助你。

五、MOVEDIM和MOVEAXIS
torch.movedim(input, source, destination) → Tensor
Parameters:
input (Tensor) – the input tensor.
source (int or tuple of ints) – Original positions of the dims to move. These must be unique.
destination (int or tuple of ints) – Destination positions for each of the original dims. These must also be unique.
将输入张量中的维度从源位置移动到目标位置。
未明确移动的输入的其他维度保持在其原始顺序中,并出现在目标中未指定的位置。
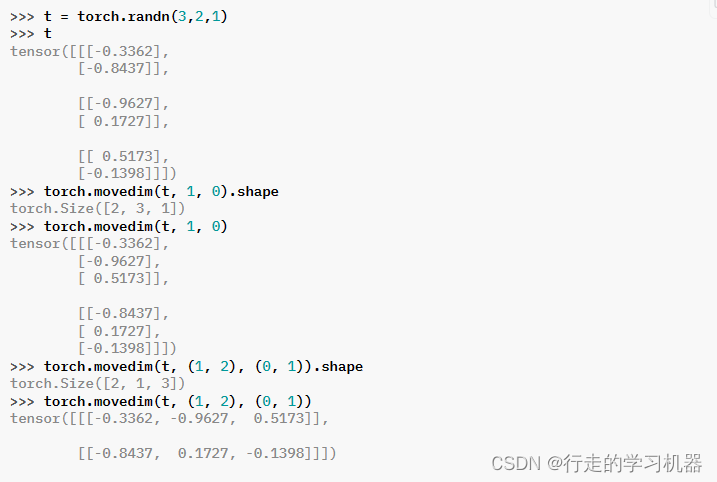
MOVEAXIS是MOVEDIM的别名。
六、PERMUTE
torch.permute(input, dims) → Tensor
Parameters:
input (Tensor) – the input tensor.
dims (tuple of int) – The desired ordering of dimensions
返回原始张量输入的视图,对维度重新进行排列。

七、RESHAPE
torch.reshape(input, shape) → Tensor
Parameters:
input (Tensor) – the tensor to be reshaped
shape (tuple of int) – the new shape
返回一个与输入相同的数据和元素数量的张量,但具有指定的形状。在可能的情况下,返回的张量将是输入的视图。否则,它将是一个副本。具有连续内存布局和兼容步幅的输入可以在不复制的情况下重新形状,但不应依赖于复制与视图的行为。
请参阅 torch.Tensor.view(),了解何时可能返回视图。
单个维度可以为 -1,在这种情况下,它将从剩余维度和输入中的元素数量中推断出。

八、SELECT
torch.select(input, dim, index) → Tensor
Parameters:
input (Tensor) – the input tensor.
dim (int) – the dimension to slice
index (int) – the index to select with
沿着给定索引在选定的维度上对输入张量进行切片。此函数返回原始张量的视图,其中删除了给定的维度。
注意:
如果输入是稀疏张量,并且无法返回张量的视图,则会引发 RuntimeError 异常。在这种情况下,考虑使用 torch.select_copy() 函数。
select() 等同于切片。例如,tensor.select(0, index) 等同于 tensor[index],而 tensor.select(2, index) 等同于 tensor[:,:,index]。
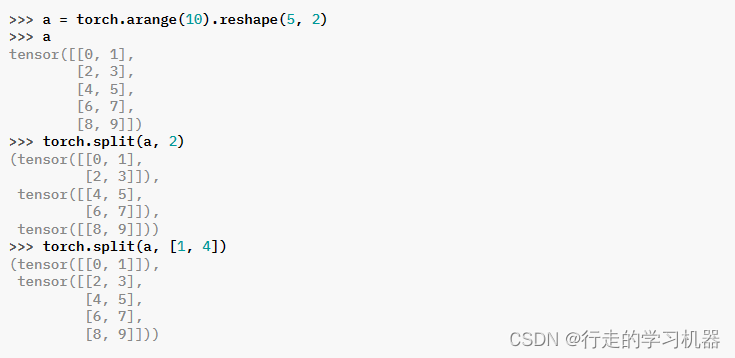
九、SPLIT
torch.split(tensor, split_size_or_sections, dim=0)
Parameters:
tensor (Tensor) – tensor to split.
split_size_or_sections (int) or (list(int)) – size of a single chunk or list of sizes for each chunk
dim (int) – dimension along which to split the tensor.
Return type:
Tuple[Tensor, …]
将张量分割成块。每个块都是原始张量的视图。
如果 split_size_or_sections 是整数类型,则张量将被均匀分割成大小相等的块(如果可能的话)。如果沿着给定的维度 dim 的张量大小不能被 split_size 整除,最后一个块将更小。
如果 split_size_or_sections 是一个列表,则张量将根据列表中的元素在维度 dim 上分割为具有相应大小的块。
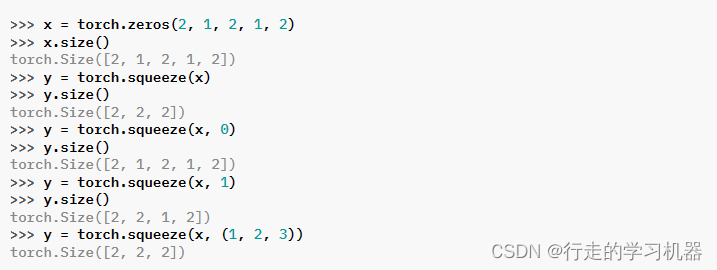
十、SQUEEZE
torch.squeeze(input, dim=None) → Tensor
Parameters:
input (Tensor) – the input tensor.
dim (int or tuple of ints, optional) –if given, the input will be squeezed
only in the specified dimensions.
返回一个将输入张量中所有指定维度大小为1的维度移除的张量。
例如,如果输入的形状为:
(A×1×B×C×1×D)
那么 input.squeeze() 的形状将为:
(A×B×C×D)
当指定了 dim 参数时,squeeze 操作只在给定的维度中执行。如果输入的形状为:
(A×1×B)
那么 squeeze(input, 0) 将保持张量不变,但 squeeze(input, 1) 将使张量的形状变为:
(A×B)
注意:
返回的张量与输入张量共享存储,因此更改其中一个的内容将更改另一个的内容。
警告:
如果张量具有大小为1的批处理维度,那么 squeeze(input) 也会删除批处理维度,这可能导致意外的错误。考虑仅指定要挤压的维度。
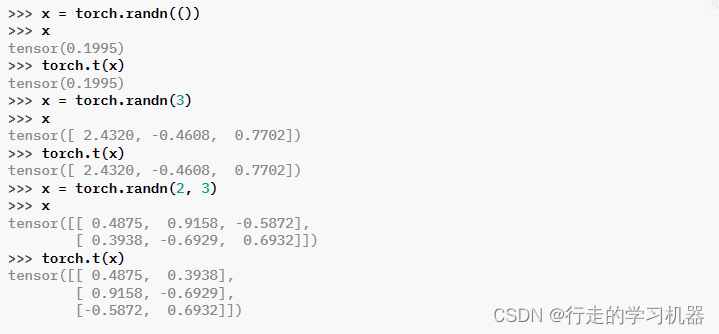
十一、T
torch.t(input) → Tensor
Parameters:
input (Tensor) – the input tensor.
期望输入为 <= 2-D 张量,并转置维度 0 和 1。
0-D 和 1-D 张量保持不变。当输入为 2-D 张量时,这等效于 transpose(input, 0, 1)。
十二、TAKE
torch.take(input, index) → Tensor
Parameters:
input (Tensor) – the input tensor.
index (LongTensor) – the indices into tensor
返回一个新的张量,该张量包含输入张量在给定索引处的元素。输入张量被视为一个 1-D 张量。结果的形状与索引相同。

十三、TILE
torch.tile(input, dims) → Tensor
Parameters:
input (Tensor) – the tensor whose elements to repeat.
dims (tuple) – the number of repetitions per dimension.
通过重复输入的元素构造一个张量。dims 参数指定每个维度的重复次数。
如果 dims 指定的维度少于输入的维度,则在 dims 前面添加 1 直到所有维度都被指定。例如,如果输入的形状为 (8, 6, 4, 2),而 dims 为 (2, 2),那么 dims 就被视为 (1, 1, 2, 2)。
类似地,如果输入的维度少于 dims 指定的维度,则将输入视为在维度零处插入 1,直到具有与 dims 指定的维度相同。例如,如果输入的形状为 (4, 2),而 dims 为 (3, 3, 2, 2),那么输入就被视为具有形状 (1, 1, 4, 2)。
注意:
这个函数类似于 NumPy 的 tile 函数。

十四、TRANSPOSE
torch.transpose(input, dim0, dim1) → Tensor
Parameters:
input (Tensor) – the input tensor.
dim0 (int) – the first dimension to be transposed
dim1 (int) – the second dimension to be transposed
返回一个张量,该张量是输入的转置版本。给定的维度 dim0 和 dim1 被交换。
如果输入是一个分步张量(strided tensor),那么生成的输出张量与输入张量共享其基础存储,因此更改其中一个的内容将更改另一个的内容。
如果输入是一个稀疏张量,则生成的输出张量与输入张量不共享基础存储。
如果输入是具有压缩布局(SparseCSR、SparseBSR、SparseCSC 或 SparseBSC)的稀疏张量,则参数 dim0 和 dim1 必须同时是批处理维度或同时是稀疏维度。稀疏张量的批处理维度是稀疏维度之前的维度。
注意:
交换 SparseCSR 或 SparseCSC 布局张量的稀疏维度将导致布局在两种选项之间变化。类似地,转置 SparseBSR 或 SparseBSC 布局张量的稀疏维度将生成具有相反布局的结果。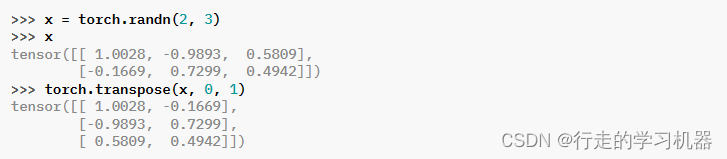
十五、UNBIND
torch.unbind(input, dim=0) → seq
Parameters:
input (Tensor) – the tensor to unbind
dim (int) – dimension to remove
移除张量的一个维度。返回沿着给定维度的所有切片的元组,这些切片已经没有该维度。

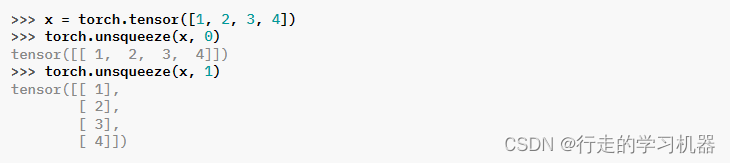
十六、UNSQUEEZE
torch.unsqueeze(input, dim) → Tensor
Parameters:
input (Tensor) – the input tensor.
dim (int) – the index at which to insert the singleton dimension
返回一个在指定位置插入大小为一的维度的新张量。
返回的张量与此张量共享相同的基础数据。
可以使用范围在 [-input.dim() - 1, input.dim() + 1) 内的 dim 值。负的 dim 将对应于在 dim = dim + input.dim() + 1 处应用 unsqueeze()。
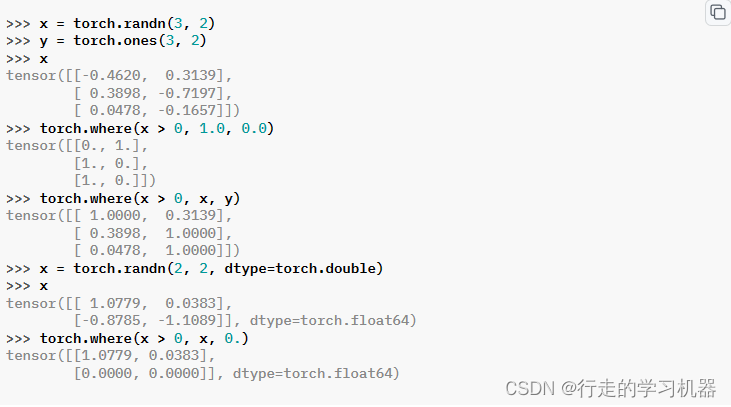
十七、WHERE
*torch.where(condition, input, other, , out=None) → Tensor
Parameters:
condition (BoolTensor) – When True (nonzero), yield input, otherwise yield other
input (Tensor or Scalar) – value (if input is a scalar) or values selected at indices where condition is True
other (Tensor or Scalar) – value (if other is a scalar) or values selected at indices where condition is False
Keyword Arguments:
out (Tensor, optional) – the output tensor.
Returns:
A tensor of shape equal to the broadcasted shape of condition, input, other
Return type:
Tensor
返回从输入或其他张量中选择的元素的张量,取决于条件。
该操作的定义为:
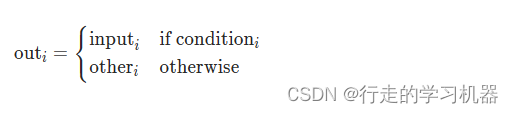
张量 condition、input 和 other 必须是可广播的。torch.where(condition) → tuple of LongTensor 与 torch.nonzero(condition, as_tuple=True) 完全相同