📚博客主页:爱敲代码的小杨.
✨专栏:《Java SE语法》
❤️感谢大家点赞👍🏻收藏⭐评论✍🏻,您的三连就是我持续更新的动力❤️
🙏小杨水平有限,欢迎各位大佬指点,相互学习进步!

文章目录
- 0. 前言
- 1. 双链表的定义
- 2. LinkedList 模拟实现
- 2.1 接口
- 2.2 定义双向链表类
- 2.3 定义两个指针,分别指向头节点和尾节点
- 2.4 头插法
- 2.5 尾插法
- 2.6 指定位置插入元素
- 2.7 查找指定元素
- 2.8 删除指定元素
- 2.9 删除链表中所有指定元素
- 2.10 统计链表元素个数
- 2.11 清空链表
- 2.12 打印链表
- 2.13 测试
- 3.代码
- 4. ArrayList和LinkedList的区别
0. 前言
上一篇【数据结构与算法】4.自主实现单链表的增删查改 我们自主实现了单链表的操作,在Java的集合类中LinkedList底层实现是无头双向循环链表。所以今天我们模拟LinkedList的实现。
1. 双链表的定义
学习双链表之前,做个回顾。
单链表的特点:
- 我们可以轻松的到达下一个节点,但是回到前一节点是很难的。
- 只能从头遍历到尾或者从尾遍历到头(一般是从头到尾)
双链表的特点:
- 每次在插入或删除某个节点时, 需要处理四个节点的引用, 而不是两个. 实现起来要困难一些
- 相对于单向链表, 必然占用内存空间更大一些.
- 既可以从头遍历到尾, 又可以从尾遍历到头
双链表的定义:
双向链表也叫双链表,是链表的一种,它的每个数据结点中都有两个指针,分别指向直接后继和直接前驱。所以,从双向链表中的任意一个结点开始,都可以很方便地访问它的前驱结点和后继结点。
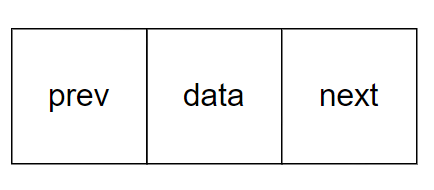
指针域(prev):用于指向当前节点的直接前驱节点;
数据域(data):用于存储数据元素;
指针域(next):用于指向当前节点的直接后继节点。
2. LinkedList 模拟实现
2.1 接口
public interface IList {//头插法public void addFirst(int data);//尾插法public void addLast(int data);//任意位置插入,第一个数据节点为0号下标public void addIndex(int index,int data);//查找是否包含关键字key是否在单链表当中public boolean contains(int key);//删除第一次出现关键字为key的节点public void remove(int key);//删除所有值为key的节点public void removeAllKey(int key);//得到单链表的长度public int size();// 清空链表public void clear();// 打印链表public void display();
}
2.2 定义双向链表类
static class ListNode {public int val; // 数值域 - 存放当前节点的值public ListNode next; // next域 指向下一个节点public ListNode prev; // prev域 指向上一个节点public ListNode(int val) {this.val = val;}
}
2.3 定义两个指针,分别指向头节点和尾节点
// 链表的属性 链表的头节点
public ListNode head;
// 链表的属性 链表的尾节点
public ListNode last;
2.4 头插法
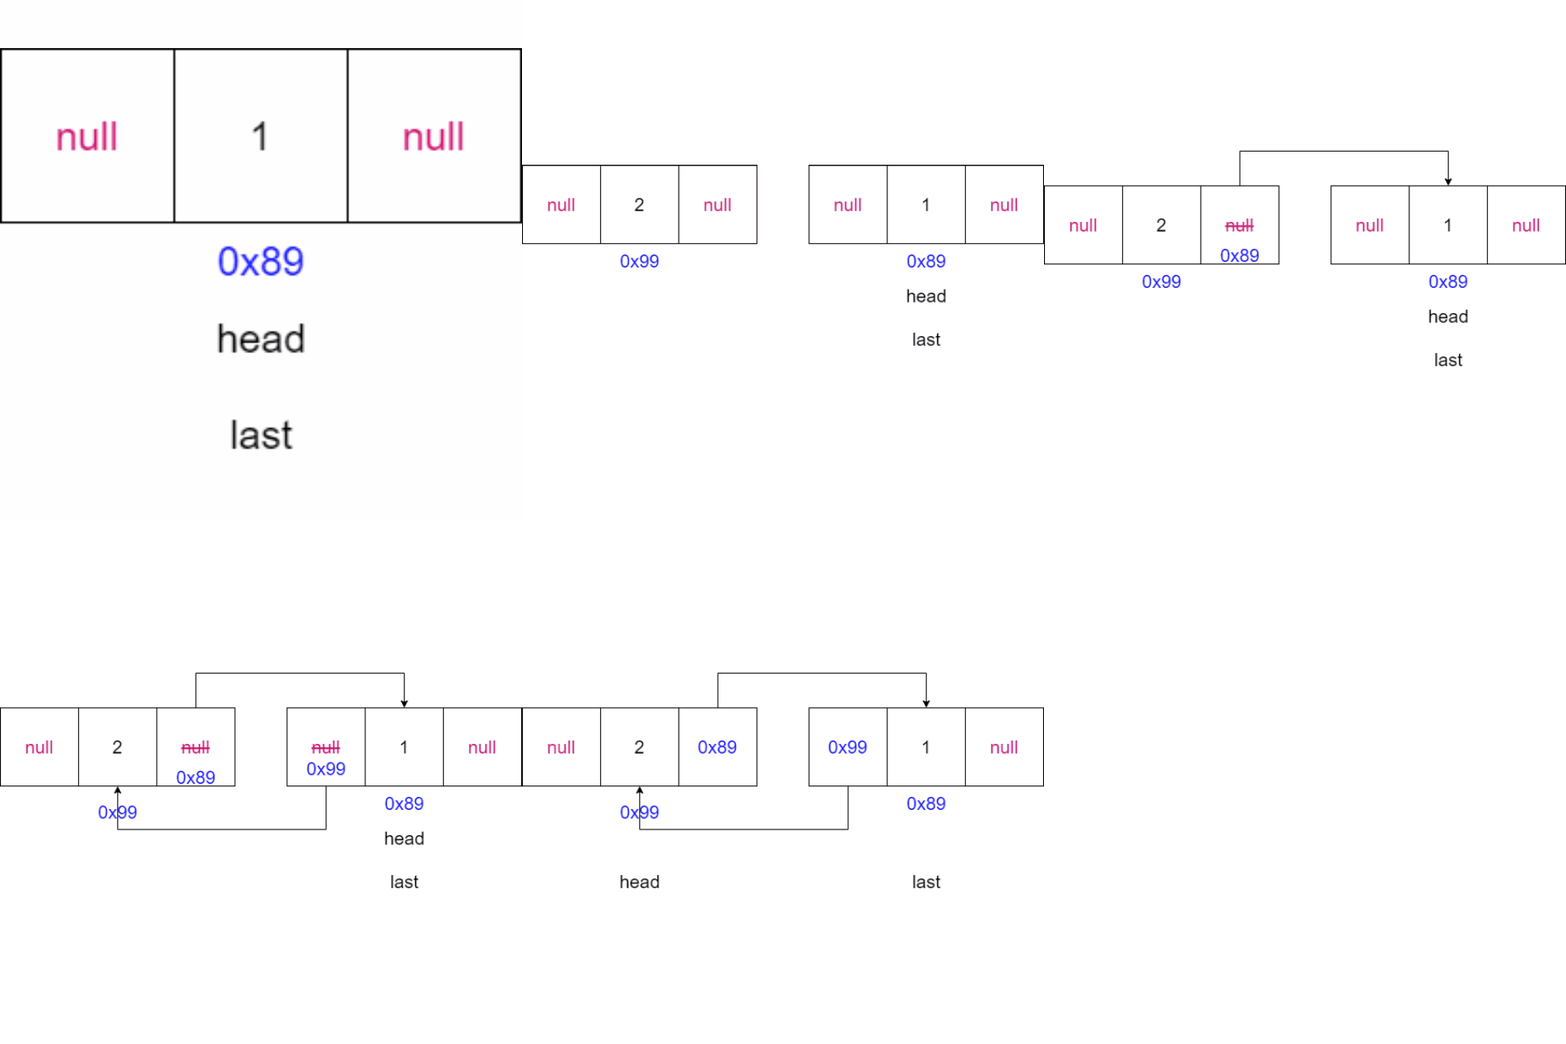
-
判断链表是否为空,如果为空,将新节点的
node设置为头节点,将新节点的node设置为尾节点head = node; last = node; -
如果链表不为空,将新节点的
node的next域设置为头节点,将当前头节点的prev设置为新节点的node,更新头节点为新节点的nodenode.next = head; head.prev = node; head = node;
动画演示:
代码:
/**
* 头插法
* @param data
*/
@Override
public void addFirst(int data) {ListNode node = new ListNode(data);if (head == null) {head = node;last = node;}else {node.next = head;head.prev = node;head = node;}
}
2.5 尾插法
-
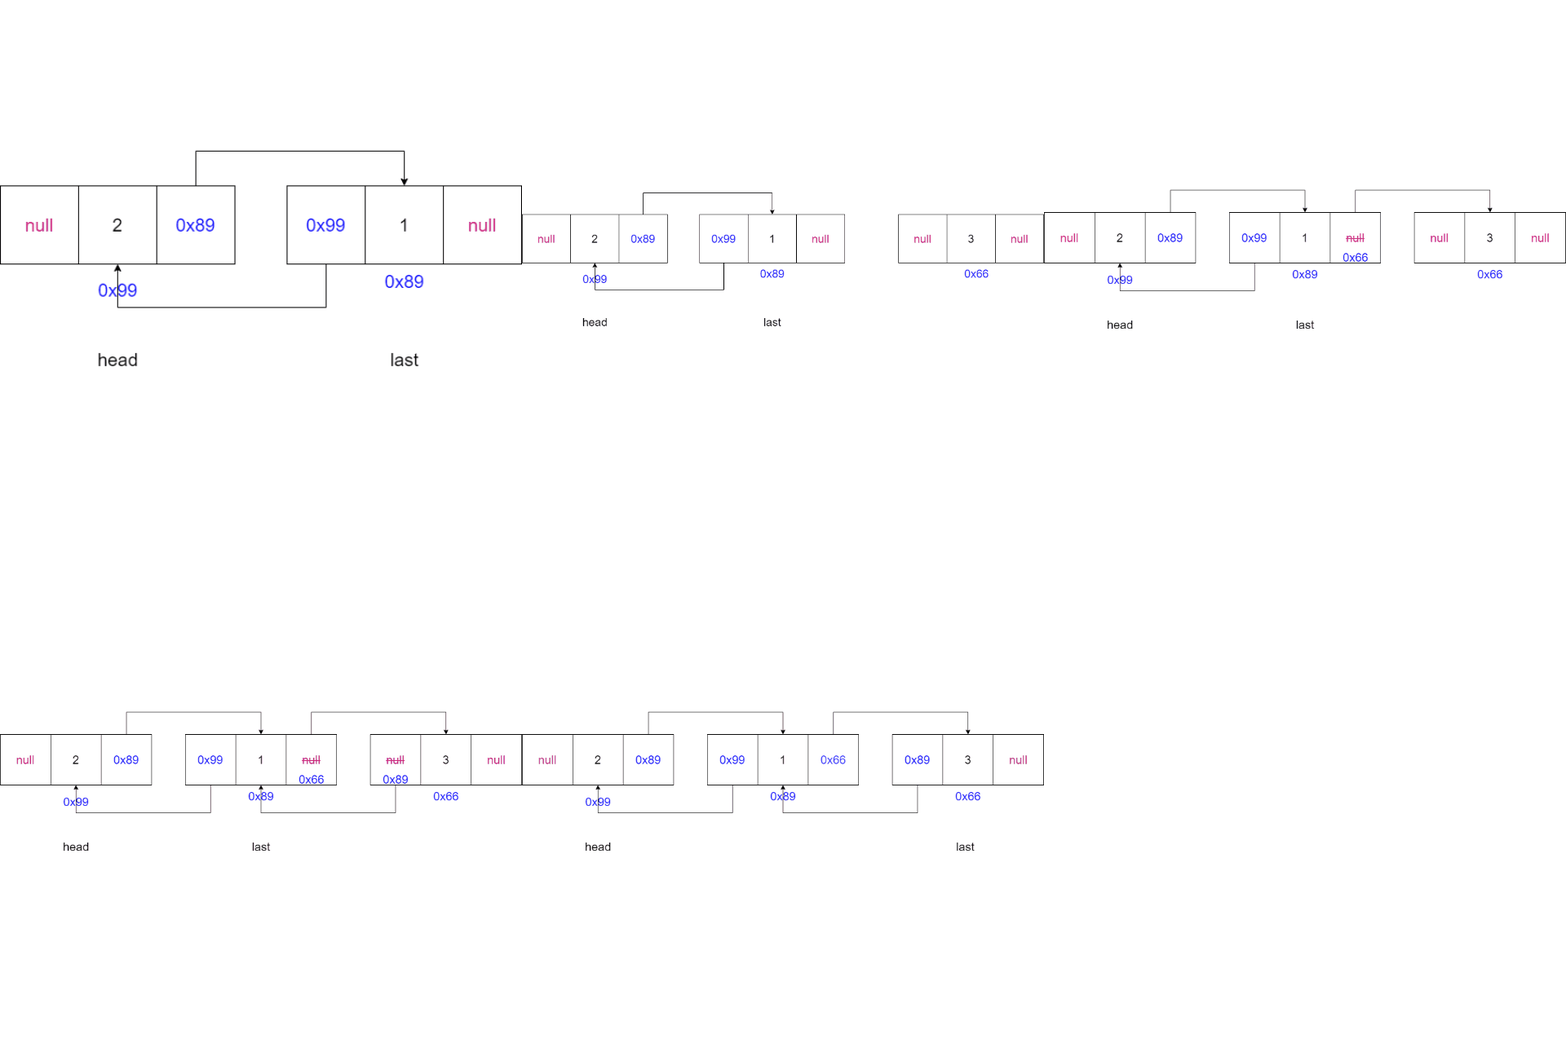
判断链表是否为空,如果为空,将新节点的
node设置为头节点,将新节点的node设置为尾节点head = node; last = node; -
如果链表不为空,将最后一个节点
last的next域指向新节点,新节点的prev域指向最后一个节点,更新尾节点为新节点last.next = node; node.prev = last; last = node;
动画演示:
代码:
/**** 尾插法* @param data*/@Overridepublic void addLast(int data) {ListNode node = new ListNode(data);if (head == null) {head = node;last = node;} else {last.next = node;node.prev = last;last = node;}}
2.6 指定位置插入元素
-
判断索引
idnex是否合法,如果不合法则抛出异常。if (index < 0 || index > size()) {throw new IndexException("index不合法:" + index); } -
判断链表是否为空,如果为空则将新节点设置为头节点和尾节点
if (head == null) {head = node;last = node;return; } -
如果索引
index == 0,则使用头插法,如果索引index = 链表长度,则使用尾插法if (index == 0) {addFirst(data);return; } if (index == size()) {addLast(data);return; } -
找到索引节点(当前节点)
private ListNode findIndex(int index) {ListNode cur = head;while (index != 0) {cur = cur.next;index--;}return cur;} -
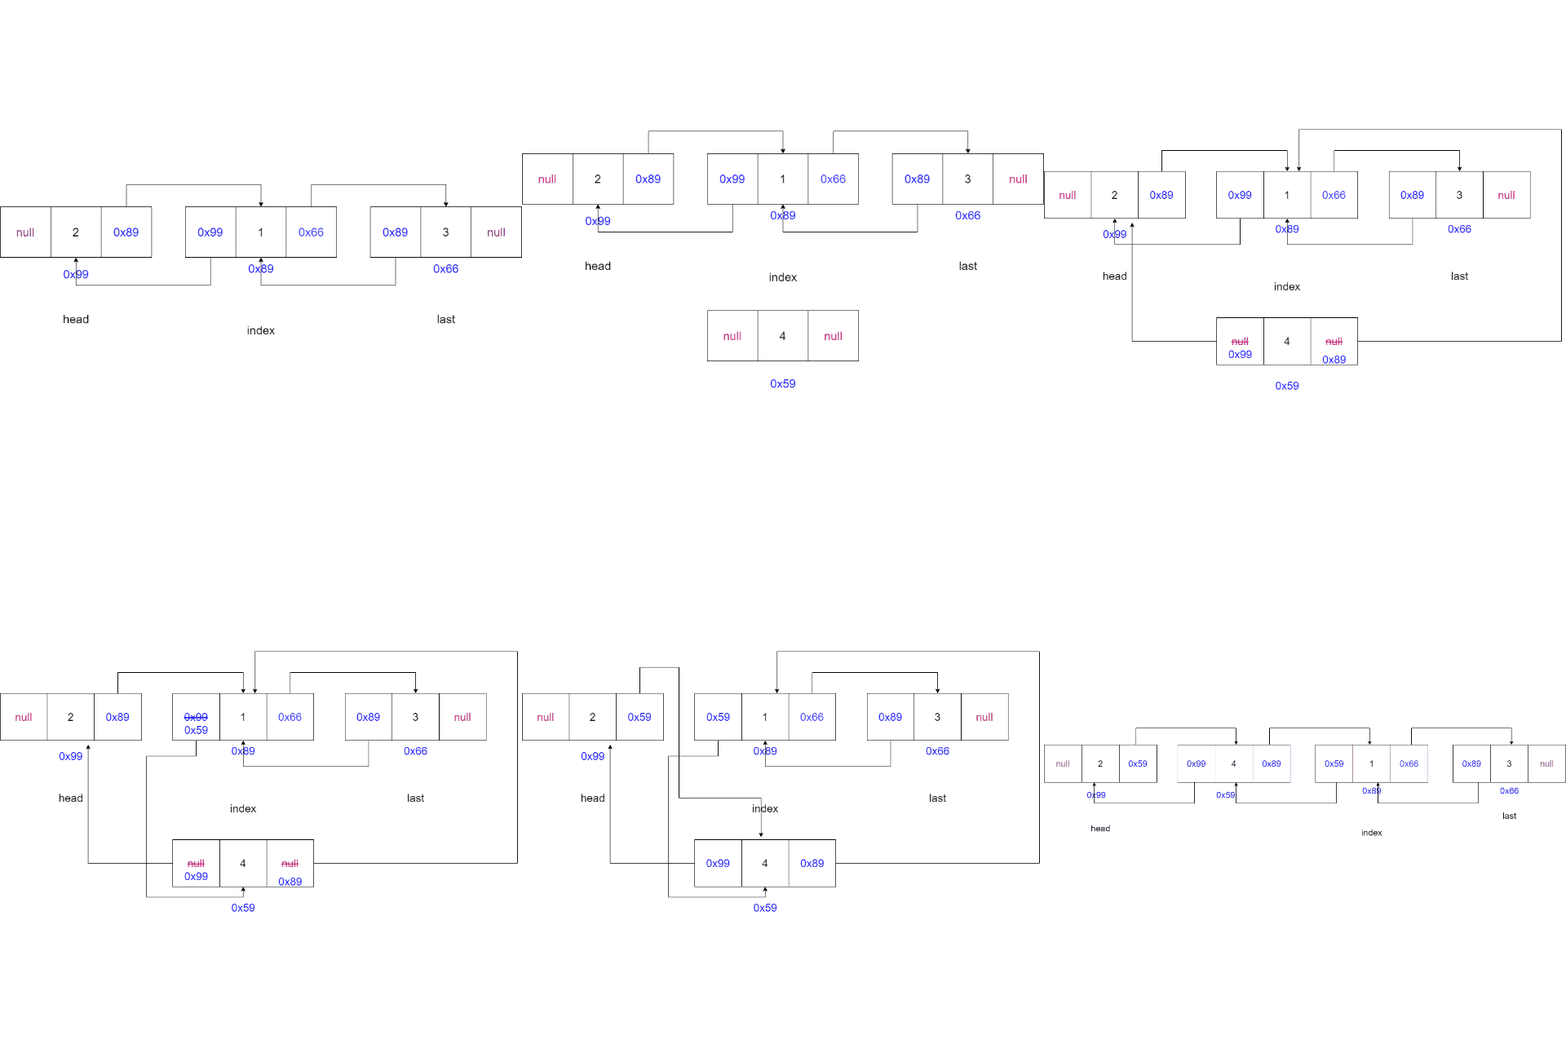
将新节点的
next域指向当前节点,新节点的prev域指向当前节点的前一个节点,当前节点的prev域指向新节点,更新新节点的上一个节点的next域指向当前节点。ListNode cur = findIndex(index); node.next = cur; node.prev = cur.prev; cur.prev = node; node.prev.next = node;
动画演示:
2.7 查找指定元素
- 从头节点开始遍历链表,如果当前节点的值与要查找的
key相等,则返回ture,如果不相等则移动下一个节点继续查找。如果遍历完链表都没有找到key则返回false.
代码:
@Overridepublic boolean contains(int key) {ListNode cur = head;while (cur != null) {if (cur.val == key) {return true;}cur = cur.next;}return false;}
2.8 删除指定元素
-
从头节点开始遍历链表,找到要删除的节点
-
情况一:删除的节点为头节点,更新头节点为下一个节点,更新下一个节点的
prev域置为空。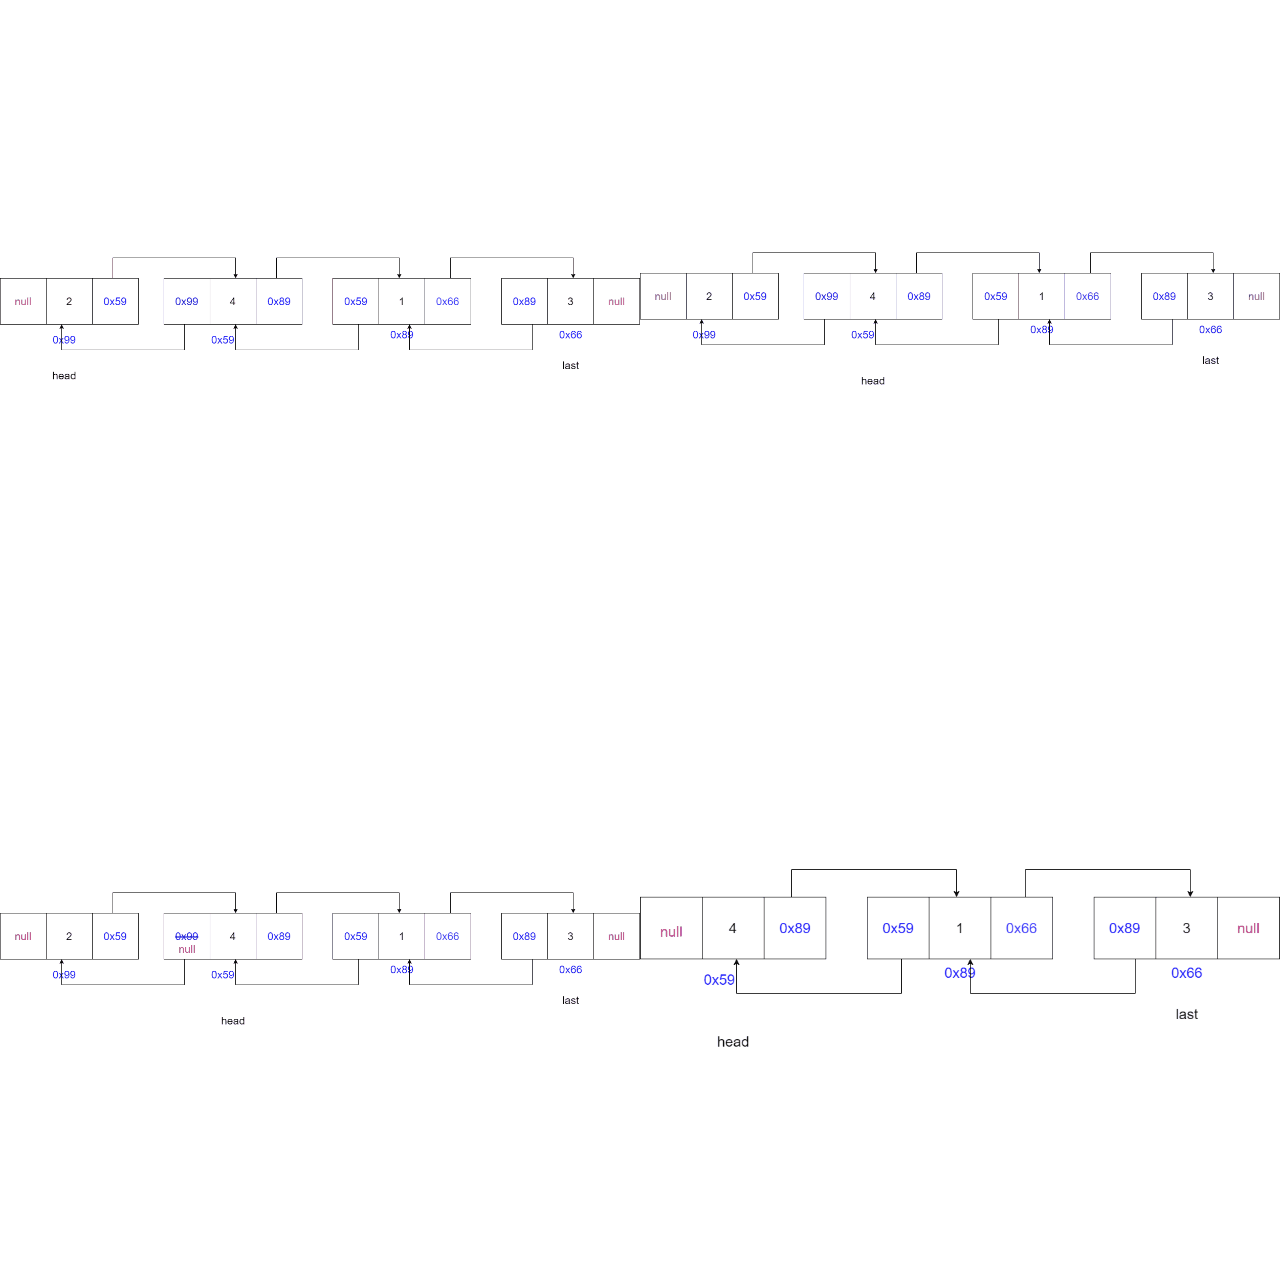
-
情况二:链表中只有一个元素,且正好要删除这个元素。
-
情况三:删除的节点为尾节点,更新尾节点为当前节点的上一个节点,上一个节点的
next域置为空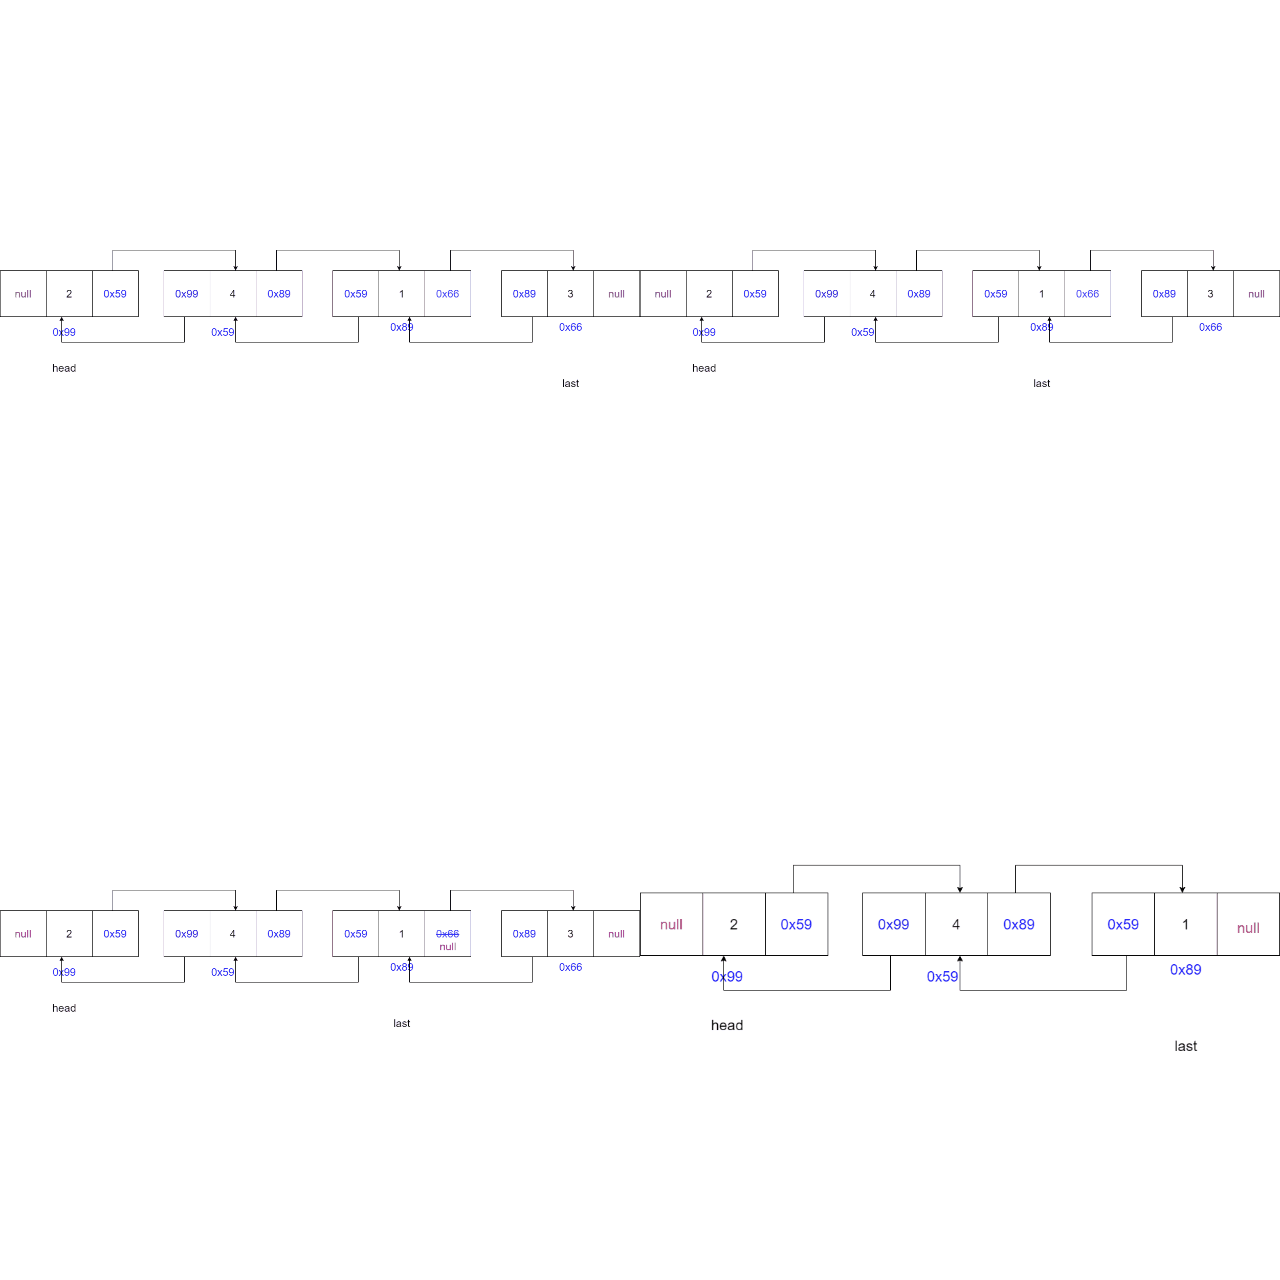
-
情况四:删除中间节点,当前节点的上一个节点的
next域指向当前节点的下一个节点,更新下一个节点的prev域指向当前节点的上一个节点
-
删除了节点就结束方法的执行
代码:
@Overridepublic void remove(int key) {ListNode cur = head;while (cur != null) {if (cur.val == key) { // 找到要删除的元素了if (cur == head) { // 删除头节点head = head.next;if (head != null) {head.prev = null;} else { // 链表中只有一个元素,且这个正好删除这个元素last = null;}} else { // 删除中间节点cur.prev.next = cur.next;if (cur.next != null) {cur.next.prev = cur.prev;} else {// 删除尾节点last = cur.prev;}}return;// 删除了节点就结束方法}cur = cur.next;}}
2.9 删除链表中所有指定元素
从头节点遍历链表,与删除指定元素的方式一样,删除节点后继续遍历链表,直到遍历完链表,删除所有指定的元素即可。
代码:
@Overridepublic void removeAllKey(int key) {ListNode cur = head;while (cur != null) {if (cur.val == key) { // 找到要删除的元素了if (cur == head) { // 删除头节点head = head.next;if (head != null) {head.prev = null;} else { // 链表中只有一个元素,且这个正好删除这个元素last = null;}} else { // 删除中间节点cur.prev.next = cur.next;if (cur.next != null) {cur.next.prev = cur.prev;} else {// 删除尾节点last = cur.prev;}}}cur = cur.next;}}
2.10 统计链表元素个数
代码:
@Overridepublic int size() {int count = 0;ListNode cur = head;while (cur != null) {count++;cur = cur.next;}return count;}
2.11 清空链表
将头节点和尾节点置为空,没有引用指向直接被JVM回收
@Overridepublic void clear() {head = null;last = null;}
2.12 打印链表
@Overridepublic void display() {ListNode cur = head;while (cur != null) {System.out.print(cur.val + " ");cur = cur.next;}System.out.println();}
2.13 测试
public class Test {public static void main(String[] args) {MyLinkedList myLinkedList = new MyLinkedList();// 头插法myLinkedList.addFirst(1);myLinkedList.addFirst(2);myLinkedList.addFirst(3);// 打印链表myLinkedList.display();System.out.println("=========");// 尾插法myLinkedList.addLast(4);myLinkedList.addLast(5);myLinkedList.addLast(6);// 打印链表myLinkedList.display();System.out.println("=========");// 在4 位置插入7myLinkedList.addIndex(4,7);// 打印链表myLinkedList.display();System.out.println("=========");// 查找元素 7 8System.out.println(myLinkedList.contains(7));System.out.println(myLinkedList.contains(8));System.out.println("=========");// 删除3 6 4myLinkedList.remove(3);myLinkedList.display();System.out.println("=========");myLinkedList.remove(6);myLinkedList.display();System.out.println("=========");myLinkedList.remove(4);myLinkedList.display();System.out.println("=========");// 删除全部的2myLinkedList.addLast(2);myLinkedList.addLast(2);myLinkedList.addLast(2);myLinkedList.display();myLinkedList.removeAllKey(2);myLinkedList.display();System.out.println("=========");// 统计个数System.out.println(myLinkedList.size());System.out.println("=========");// 清空链表myLinkedList.clear();myLinkedList.display();System.out.println("=========");// 统计个数System.out.println(myLinkedList.size());}
}// 运行结果
3 2 1
=========
3 2 1 4 5 6
=========
3 2 1 4 7 5 6
=========
true
false
=========
2 1 4 7 5 6
=========
2 1 4 7 5
=========
2 1 7 5
=========
2 1 7 5 2 2 2
1 7 5
=========
3
==================
0
3.代码
MyLinkedList类:
public class MyLinkedList implements IList{static class ListNode {public int val; // 数值域 - 存放当前节点的值public ListNode next; // next域 指向下一个节点public ListNode prev; // prev域 指向上一个节点public ListNode(int val) {this.val = val;}}// 链表的属性 链表的头节点public ListNode head;// 链表的属性 链表的尾节点public ListNode last;/*** 头插法* @param data*/@Overridepublic void addFirst(int data) {ListNode node = new ListNode(data);if (head == null) {head = node;last = node;}else {node.next = head;head.prev = node;head = node;}}/**** 尾插法* @param data*/@Overridepublic void addLast(int data) {ListNode node = new ListNode(data);if (head == null) {head = node;last = node;} else {last.next = node;node.prev = last;last = node;}}@Overridepublic void addIndex(int index, int data) {if (index < 0 || index > size()) {throw new IndexException("index不合法:" + index);}ListNode node = new ListNode(data);if (head == null) {head = node;last = node;return;}if (index == 0) {addFirst(data);return;}if (index == size()) {addLast(data);return;}ListNode cur = findIndex(index);node.next = cur;node.prev = cur.prev;cur.prev = node;node.prev.next = node;}private ListNode findIndex(int index) {ListNode cur = head;while (index != 0) {cur = cur.next;index--;}return cur;}@Overridepublic boolean contains(int key) {ListNode cur = head;while (cur != null) {if (cur.val == key) {return true;}cur = cur.next;}return false;}@Overridepublic void remove(int key) {ListNode cur = head;while (cur != null) {if (cur.val == key) { // 找到要删除的元素了if (cur == head) { // 删除头节点head = head.next;if (head != null) {head.prev = null;} else { // 链表中只有一个元素,且这个正好删除这个元素last = null;}} else { // 删除中间节点cur.prev.next = cur.next;if (cur.next != null) {cur.next.prev = cur.prev;} else {// 删除尾节点last = cur.prev;}}return;}cur = cur.next;}}@Overridepublic void removeAllKey(int key) {ListNode cur = head;while (cur != null) {if (cur.val == key) { // 找到要删除的元素了if (cur == head) { // 删除头节点head = head.next;if (head != null) {head.prev = null;} else { // 链表中只有一个元素,且这个正好删除这个元素last = null;}} else { // 删除中间节点cur.prev.next = cur.next;if (cur.next != null) {cur.next.prev = cur.prev;} else {// 删除尾节点last = cur.prev;}}}cur = cur.next;}}@Overridepublic int size() {int count = 0;ListNode cur = head;while (cur != null) {count++;cur = cur.next;}return count;}@Overridepublic void clear() {head = null;last = null;}@Overridepublic void display() {ListNode cur = head;while (cur != null) {System.out.print(cur.val + " ");cur = cur.next;}System.out.println();}
}
接口:
public interface IList {//头插法public void addFirst(int data);//尾插法public void addLast(int data);//任意位置插入,第一个数据节点为0号下标public void addIndex(int index,int data);//查找是否包含关键字key是否在单链表当中public boolean contains(int key);//删除第一次出现关键字为key的节点public void remove(int key);//删除所有值为key的节点public void removeAllKey(int key);//得到单链表的长度public int size();// 清空链表public void clear();// 打印链表public void display();
}
异常类:
public class IndexException extends RuntimeException{public IndexException() {}public IndexException(String msg) {super(msg);}
}
4. ArrayList和LinkedList的区别
| 不同点 | ArrayList | LinkedList |
|---|---|---|
| 存储空间上 | 物理上一定连续 | 逻辑上连续,但物理上不一定连续 |
| 随机访问 | 支持O(1) | 不支持O(n) |
| 头插 | 需要搬移元素,效率低O(n) | 只需要修改引用的指向,时间复杂度为O(1) |
| 插入 | 空间不够时需要扩容 | 没有容量的概念 |
| 应用场景 | 元素高效存储 + 频繁访问 | 任意位置插入和删除频繁 |


