目录
Spring简介
Spring Framework五大功能模块
IOC容器
IOC思想
IOC容器在Spring中的实现
基于XML管理bean
配置bean
获取bean
依赖注入之setter注入
依赖注入之构造器注入
特殊值处理
字面量赋值
null值
xml实体
CDATA节
为类类型属性赋值
为数组类型属性赋值
为集合类型属性赋值
为List集合类型属性赋值
为Map集合类型属性赋值
引用集合类型的bean
p命名空间
引入外部属性文件
加入依赖
创建外部属性文件
引入属性文件
配置bean
bean的作用域
bean的生命周期
具体的生命周期过程
配置bean
bean的后置处理器
FactoryBean
基于xml的自动装配
基于注解管理bean
标记
扫描
基于注解的自动装配
Spring简介
Spring Framework五大功能模块
| 功能模块 | 功能介绍 |
| Core Container | 核心容器,在 Spring 环境下使用任何功能都必须基于 IOC 容器。 |
| AOP&Aspects | 面向切面编程 |
| Testing | 提供了对 junit 或 TestNG 测试框架的整合。 |
| Data Access/Integration | 提供了对数据访问/集成的功能。 |
| Spring MVC | 提供了面向Web应用程序的集成功能。 |
IOC容器
IOC思想
IOC:Inversion of Control,翻译过来是反转控制。反转控制的思想完全颠覆了应用程序组件获取资源的传统方式:反转了资源的获取方向——改由容器主动的将资源推送给需要的组件,开发人员不需要知道容器是如何创建资源对象的,只需要提供接收资源 的方式即可,极大的降低了学习成本,提高了开发的效率。这种行为也称为查找的被动形式。
DI:Dependency Injection,翻译过来是依赖注入。 DI 是 IOC 的另一种表述方式:即组件以一些预先定义好的方式(例如:setter 方法)接受来自于容器 的资源注入。相对于IOC而言,这种表述更直接。 所以结论是:IOC 就是一种反转控制的思想, 而 DI 是对 IOC 的一种具体实现。
IOC容器在Spring中的实现
Spring 的 IOC 容器就是 IOC 思想的一个落地的产品实现。IOC 容器中管理的组件也叫做 bean。在创建 bean 之前,首先需要创建 IOC 容器。Spring 提供了 IOC 容器的两种实现方式: ①BeanFactory :这是 IOC 容器的基本实现,是 Spring 内部使用的接口。面向 Spring 本身,不提供给开发人员使用。
②ApplicationContext :BeanFactory 的子接口,提供了更多高级特性。面向 Spring 的使用者,几乎所有场合都使用 ApplicationContext 而不是底层的 BeanFactory。
③ApplicationContext的主要实现类

| 类型名 | 简介 |
| ClassPathXmlApplicationContext | 通过读取类路径下的 XML 格式的配置文件创建 IOC 容器 对象 |
| FileSystemXmlApplicationContext | 通过文件系统路径读取 XML 格式的配置文件创建 IOC 容 器对象 |
| ConfigurableApplicationContext | ApplicationContext 的子接口,包含一些扩展方法 refresh() 和 close() ,让 ApplicationContext 具有启动、 关闭和刷新上下文的能力。 |
| WebApplicationContext | 专门为 Web 应用准备,基于 Web 环境创建 IOC 容器对 象,并将对象引入存入 ServletContext 域中。 |
基于XML管理bean
配置bean
<!--配置HelloWorld所对应的bean,即将HelloWorld的对象交给Spring的IOC容器管理通过bean标签配置IOC容器所管理的bean属性:id:设置bean的唯一标识class:设置bean所对应类型的全类名
-->
<bean id="helloworld" class="com.demo.spring.bean.HelloWorld"></bean>
注意 :
Spring 底层默认通过反射技术调用组件类的无参构造器来创建组件对象,这一点需要注意。如果在需要 无参构造器时,没有无参构造器,则会抛出异常BeanCreationException
获取bean
//根据id获取
ApplicationContext ac = new
ClassPathXmlApplicationContext("applicationContext.xml");
HelloWorld helloworld = (HelloWorld) ac.getBean("helloworld");
//根据类型获取
HelloWorld bean = ac.getBean(HelloWorld.class);
//根据id和类型获取
HelloWorld bean = ac.getBean("helloworld", HelloWorld.class);
注意 :
当根据类型获取bean时,要求IOC容器中指定类型的bean有且只能有一个,否则会抛出异常NoUniqueBeanDefinitionException。
根据接口类型获取bean只能获取只有一个实现类的bean。
依赖注入之setter注入
配置bean时为属性赋值
<bean id="studentOne" class="com.demo.spring.bean.Student"><!-- property标签:通过组件类的setXxx()方法给组件对象设置属性 --><!-- name属性:指定属性名(这个属性名是getXxx()、setXxx()方法定义的,和成员变量无关)--><!-- value属性:指定属性值 --><property name="id" value="1001"></property><property name="name" value="张三"></property><property name="age" value="23"></property><property name="sex" value="男"></property>
</bean>
依赖注入之构造器注入
<bean id="studentTwo" class="com.demo.spring.bean.Student"><constructor-arg value="1002"></constructor-arg><constructor-arg value="李四"></constructor-arg><constructor-arg value="33"></constructor-arg><constructor-arg value="女"></constructor-arg>
</bean>
注意:
constructor-arg标签还有两个属性可以进一步描述构造器参数: index属性:指定参数所在位置的索引(从0开始) name属性:指定参数名
特殊值处理
字面量赋值
<!-- 使用value属性给bean的属性赋值时,Spring会把value属性的值看做字面量 -->
<property name="name" value="张三"/>
null值
<property name="name"><null />
</property><!-- 以下写法,为name所赋的值是字符串null -->
<property name="name" value="null"></property>
xml实体
<!-- 小于号在XML文档中用来定义标签的开始,不能随便使用 -->
<!-- 解决方案一:使用XML实体来代替 -->
<property name="expression" value="a < b"/>CDATA节
<property name="expression"><!-- 解决方案二:使用CDATA节 --><!-- CDATA中的C代表Character,是文本、字符的含义,CDATA就表示纯文本数据 --><!-- XML解析器看到CDATA节就知道这里是纯文本,就不会当作XML标签或属性来解析 --><!-- 所以CDATA节中写什么符号都随意 --><value><![CDATA[a < b]]></value>
</property>
为类类型属性赋值
引用外部已声明的bean
<bean id="clazzOne" class="com.demo.spring.bean.Clazz"><property name="clazzId" value="1111"></property><property name="clazzName" value="财源滚滚班"></property>
</bean><bean id="studentFour" class="com.demo.spring.bean.Student"><property name="id" value="1004"></property><property name="name" value="赵六"></property><property name="age" value="26"></property><property name="sex" value="女"></property><!-- ref属性:引用IOC容器中某个bean的id,将所对应的bean为属性赋值 --><property name="clazz" ref="clazzOne"></property>
</bean>
内部bean
<bean id="studentFour" class="com.demo.spring.bean.Student"><property name="id" value="1004"></property><property name="name" value="赵六"></property><property name="age" value="26"></property><property name="sex" value="女"></property><property name="clazz"><!-- 在一个bean中再声明一个bean就是内部bean --><!-- 内部bean只能用于给属性赋值,不能在外部通过IOC容器获取,因此可以省略id属性 --><bean id="clazzInner" class="com.atguigu.spring.bean.Clazz"><property name="clazzId" value="2222"></property><property name="clazzName" value="远大前程班"></property></bean></property>
</bean>
级联属性赋值
<bean id="studentFour" class="com.demo.spring.bean.Student"><property name="id" value="1004"></property><property name="name" value="赵六"></property><property name="age" value="26"></property><property name="sex" value="女"></property><!-- 一定先引用某个bean为属性赋值,才可以使用级联方式更新属性 --><property name="clazz" ref="clazzOne"></property><property name="clazz.clazzId" value="3333"></property><property name="clazz.clazzName" value="最强王者班"></property>
</bean>
为数组类型属性赋值
<bean id="studentFour" class="com.demo.spring.bean.Student"><property name="id" value="1004"></property><property name="name" value="赵六"></property><property name="age" value="26"></property><property name="sex" value="女"></property><!-- ref属性:引用IOC容器中某个bean的id,将所对应的bean为属性赋值 --><property name="clazz" ref="clazzOne"></property><property name="hobbies"><array><value>抽烟</value><value>喝酒</value><value>烫头</value></array></property>
</bean>
为集合类型属性赋值
为List集合类型属性赋值
<bean id="clazzTwo" class="com.demo.spring.bean.Clazz"><property name="clazzId" value="4444"></property><property name="clazzName" value="Javaee0222"></property><property name="students"><list><ref bean="studentOne"></ref><ref bean="studentTwo"></ref><ref bean="studentThree"></ref></list></property>
</bean>
为Map集合类型属性赋值
<bean id="teacherOne" class="com.demo.spring.bean.Teacher"><property name="teacherId" value="10010"></property><property name="teacherName" value="大宝"></property>
</bean><bean id="teacherTwo" class="com.demo.spring.bean.Teacher"><property name="teacherId" value="10086"></property><property name="teacherName" value="二宝"></property>
</bean><bean id="studentFour" class="com.demo.spring.bean.Student"><property name="id" value="1004"></property><property name="name" value="赵六"></property><property name="age" value="26"></property><property name="sex" value="女"></property><!-- ref属性:引用IOC容器中某个bean的id,将所对应的bean为属性赋值 --><property name="clazz" ref="clazzOne"></property><property name="hobbies"><array><value>抽烟</value><value>喝酒</value><value>烫头</value></array></property><property name="teacherMap"><map><entry><key><value>10010</value></key><ref bean="teacherOne"></ref></entry><entry><key><value>10086</value></key><ref bean="teacherTwo"></ref></entry></map></property>
</bean>
引用集合类型的bean
<!--list集合类型的bean-->
<util:list id="students"><ref bean="studentOne"></ref><ref bean="studentTwo"></ref><ref bean="studentThree"></ref>
</util:list><!--map集合类型的bean-->
<util:map id="teacherMap"><entry><key><value>10010</value></key><ref bean="teacherOne"></ref></entry><entry><key><value>10086</value></key><ref bean="teacherTwo"></ref></entry>
</util:map>
<bean id="clazzTwo" class="com.demo.spring.bean.Clazz"><property name="clazzId" value="4444"></property><property name="clazzName" value="Javaee0222"></property><property name="students" ref="students"></property></bean><bean id="studentFour" class="com.atguigu.spring.bean.Student"><property name="id" value="1004"></property><property name="name" value="赵六"></property><property name="age" value="26"></property><property name="sex" value="女"></property><!-- ref属性:引用IOC容器中某个bean的id,将所对应的bean为属性赋值 --><property name="clazz" ref="clazzOne"></property><property name="hobbies"><array><value>抽烟</value><value>喝酒</value><value>烫头</value></array></property><property name="teacherMap" ref="teacherMap"></property>
</bean>
p命名空间
<bean id="studentSix" class="com.demo.spring.bean.Student"
p:id="1006" p:name="小明" p:clazz-ref="clazzOne" p:teacherMapref="teacherMap">
</bean>
引入外部属性文件
加入依赖
<!-- MySQL驱动 -->
<dependency><groupId>mysql</groupId><artifactId>mysql-connector-java</artifactId><version>8.0.16</version>
</dependency>
<!-- 数据源 -->
<dependency><groupId>com.alibaba</groupId><artifactId>druid</artifactId><version>1.0.31</version>
</dependency>
创建外部属性文件
jdbc.user=root
jdbc.password=atguigu
jdbc.url=jdbc:mysql://localhost:3306/ssm?serverTimezone=UTC
jdbc.driver=com.mysql.cj.jdbc.Driver
引入属性文件
<!-- 引入外部属性文件 -->
<context:property-placeholder location="classpath:jdbc.properties"/>
配置bean
<bean id="druidDataSource" class="com.alibaba.druid.pool.DruidDataSource"><property name="url" value="${jdbc.url}"/><property name="driverClassName" value="${jdbc.driver}"/><property name="username" value="${jdbc.user}"/><property name="password" value="${jdbc.password}"/>
</bean>
bean的作用域
在Spring中可以通过配置bean标签的scope属性来指定bean的作用域范围,各取值含义参加下表:
| 取值 | 含义 | 创建对象的时机 |
| singleton(默认) | 在IOC容器中,这个bean的对象始终为单实例 | IOC容器初始化时 |
| prototype | 这个bean在IOC容器中有多个实例 | 获取bean时 |
如果是在WebApplicationContext环境下还会有另外两个作用域
| 取值 | 含义 |
| request | 在一个请求范围内有效 |
| session | 在一个会话范围内有效 |
bean的生命周期
具体的生命周期过程
bean对象创建(调用无参构造器)
给bean对象设置属性
bean对象初始化之前操作(由bean的后置处理器负责)
bean对象初始化(需在配置bean时指定初始化方法)
bean对象初始化之后操作(由bean的后置处理器负责)
bean对象就绪可以使用
bean对象销毁(需在配置bean时指定销毁方法)
IOC容器关闭
配置bean
<!-- 使用init-method属性指定初始化方法 -->
<!-- 使用destroy-method属性指定销毁方法 -->
<bean class="com.demo.bean.User" scope="prototype" init-method="initMethod"
destroy-method="destroyMethod"><property name="id" value="1001"></property><property name="username" value="admin"></property><property name="password" value="123456"></property><property name="age" value="23"></property>
</bean>
bean的后置处理器
bean的后置处理器会在生命周期的初始化前后添加额外的操作,需要实现BeanPostProcessor接口, 且配置到IOC容器中,需要注意的是,bean后置处理器不是单独针对某一个bean生效,而是针对IOC容 器中所有bean都会执行
FactoryBean
FactoryBean是Spring提供的一种整合第三方框架的常用机制。和普通的bean不同,配置一个 FactoryBean类型的bean,在获取bean的时候得到的并不是class属性中配置的这个类的对象,而是 getObject()方法的返回值。通过这种机制,Spring可以帮我们把复杂组件创建的详细过程和繁琐细节都 屏蔽起来,只把最简洁的使用界面展示给我们。
基于xml的自动装配
使用bean标签的autowire属性设置自动装配效果
自动装配方式:byType
byType:根据类型匹配IOC容器中的某个兼容类型的bean,为属性自动赋值
若在IOC中,没有任何一个兼容类型的bean能够为属性赋值,则该属性不装配,即值为默认值 null
若在IOC中,有多个兼容类型的bean能够为属性赋值,则抛出异常 NoUniqueBeanDefinitionException
自动装配方式:byName
byName:将自动装配的属性的属性名,作为bean的id在IOC容器中匹配相对应的bean进行赋值
基于注解管理bean
标记
@Component:将类标识为普通组件
@Controller:将类标识为控制层组件
@Service:将类标 识为业务层组件
@Repository:将类标识为持久层组件
@Controller、@Service、@Repository这三个注解只是在@Component注解 的基础上起了三个新的名字。 对于Spring使用IOC容器管理这些组件来说没有区别。所以@Controller、@Service、@Repository这 三个注解只是给开发人员看的,让我们能够便于分辨组件的作用。
扫描
<context:component-scan base-package="com.demo" use-default-filters="false"><!-- context:include-filter标签:指定在原有扫描规则的基础上追加的规则 --><!-- use-default-filters属性:取值false表示关闭默认扫描规则 --><!-- 此时必须设置use-default-filters="false",因为默认规则即扫描指定包下所有类 --><!--type:设置排除或包含的依据type="annotation",根据注解排除,expression中设置要排除的注解的全类名type="assignable",根据类型排除,expression中设置要排除的类型的全类名--><context:include-filter type="annotation"
expression="org.springframework.stereotype.Controller"/><!--<context:include-filter type="assignable"
expression="com.demo.controller.UserController"/>-->
</context:component-scan>
在我们使用XML方式管理bean的时候,每个bean都有一个唯一标识,便于在其他地方引用。现在使用 注解后,每个组件仍然应该有一个唯一标识。 默认情况 类名首字母小写就是bean的id。例如:UserController类对应的bean的id就是userController。 自定义bean的id 可通过标识组件的注解的value属性设置自定义的bean的id @Service("userService")//默认为userServiceImpl public class UserServiceImpl implements UserService {}
基于注解的自动装配

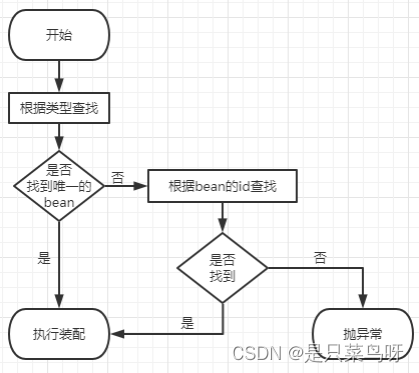
首先根据所需要的组件类型到 IOC 容器中查找能够找到唯一的bean :直接执行装配如果完全找不到匹配这个类型的bean :装配失败和所需类型匹配的bean 不止一个没有@Qualifier注解:根据 @Autowired 标记位置成员变量的变量名作为 bean 的 id 进行匹配能够找到:执行装配找不到:装配失败使用@Qualifier注解:根据 @Qualifier 注解中指定的名称作为 bean 的 id 进行匹配能够找到:执行装配找不到:装配失败
注意:
@Autowired 中有属性 required ,默认值为 true ,因此在自动装配无法找到相应的 bean 时,会装配失败可以将属性 required 的值设置为 true ,则表示能装就装,装不上就不装,此时自动装配的属性为默认值但是实际开发时,基本上所有需要装配组件的地方都是必须装配的,用不上这个属性。@Autowired 注解可以标记在构造器和 set 方法上


![[docker] 关于docker的面试题](https://img-blog.csdnimg.cn/direct/62f295027e974dacbbd2f86b3e687230.jpeg)


