1.首先我们得用例写好之后放入文档中,把不用的案例类型、前置条件去掉之后,如图:
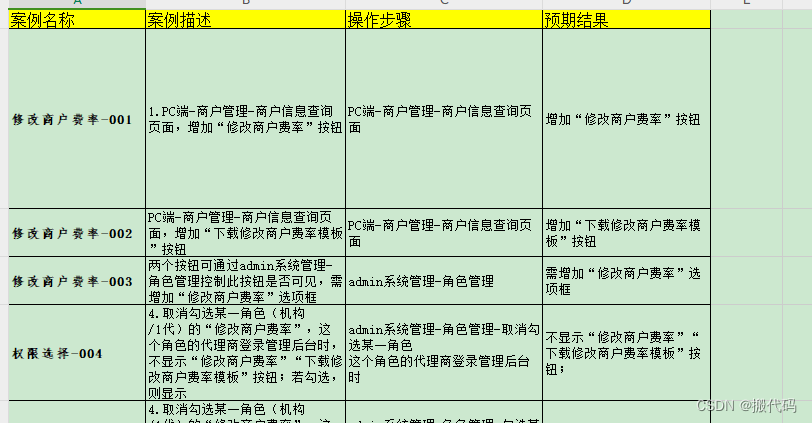
放到桌面后,先看执行结果:
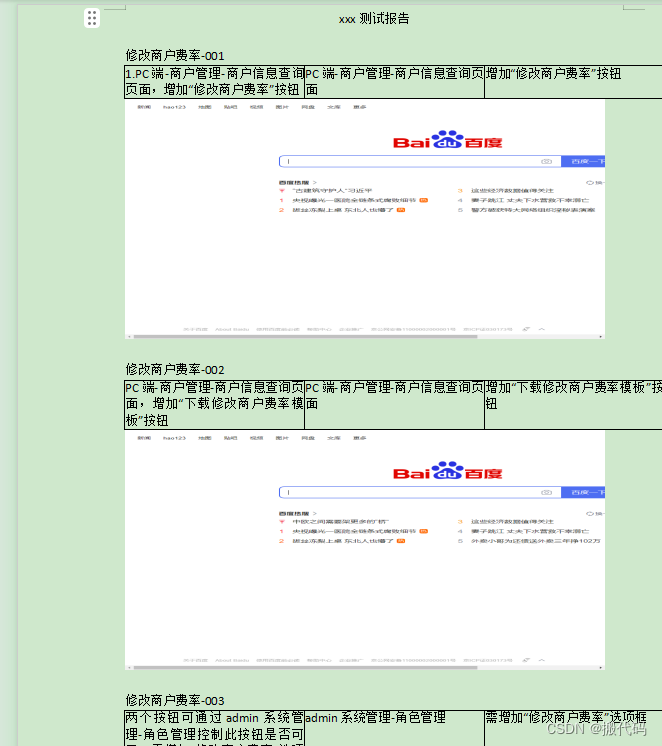
首先,我们先创建一个时间,这个时间主要是给图片创建名称,并且要在插入world中使用该时间去查找对应的图片名称,且该图片名称是唯一值
其次,我们就要创建一个截图的方法,截图主要用于我们对结果的记录,并且保存到对应的文件夹中,方便时间值来查找到并使用它
//截图放起来,并且返回一个截图时间public static String Screen(ChromeDriver driver) throws IOException {File file=((TakesScreenshot)driver).getScreenshotAs(OutputType.FILE);//直接添加E:/idear/idearxm/jiekou,前面没有。。String times = times();FileUtils.copyFile(file,new File("E:/idear/idearxm/jiekou/test-output/images/"+times+".png"));driver.quit();return times;//把截图时间也返回去}
然后我们就要创建测试用例的代码,执行测试用例,当然我们在这里不是讲解selenium的断言等,主要是使用截图,来创建自动化测试文档给其中放置图片使用。
其实我们在编写selenium的代码时,完全可以将每一个步骤编写成对应的方法,写在一个文件内,等待调用。因为这样我们可以避免代码重复堆叠,最后形成庞大的屎山代码,但是屎山代码完全可以让我们在这个公司越来越稳,后面准备写一篇如何正确使用屎山代码,并且保留bug的文章,和httpclient的自动化测试报告
//这里是编写测试用例执行代码地方public static void test002() throws IOException, InvalidFormatException, InterruptedException {ChromeDriver driver = new ChromeDriver();System.setProperty("webdriver.chrome.bin","C:\\Users\\Administrator\\AppData\\Local\\Google\\Chrome\\Application\\chrome.exe");System.setProperty("webdriver.chrome.driver","C:\\Users\\Administrator\\AppData\\Local\\Google\\Chrome\\Application\\chromedriver.exe");driver.get("http://www.baidu.com");Thread.sleep(5000);String screen = Screen(driver);//调用方法,将截图的时间获取到,放入插入图片那里//        创建一个段落对象。XWPFParagraph paragraph=document.createParagraph();
//        创建一个run。run具体是什么,我也不知道。但是run是这里面的最小单元了。XWPFRun run=paragraph.createRun();
//        插入图片,将screen时间截图的时间获取到,放入插入图片这里run.addPicture(new FileInputStream("E:/idear/idearxm/jiekou/test-output/images/"+screen+".png"),XWPFDocument.PICTURE_TYPE_PNG,screen+".png",Units.toEMU(400),Units.toEMU(200));}
最后呢,我们创建表并且将上述的代码带入其中,在其中放置图片使用
public static final XWPFDocument document = new XWPFDocument();public static void main(String[] args) {try{// 添加段落内容,也就是标题XWPFParagraph p = document.createParagraph();p.setStyle("标题4");//设置标题2p.setFontAlignment(2);//字体对齐方式:1左对齐 2居中3右对齐XWPFRun run = p.createRun();run.setText("xxx测试报告");//添加标题//urlexcel,这个地址是你用例的地址String path="D:\\桌面\\Eworld1.xls";//解析路径Workbook workbook=Workbook.getWorkbook(new File(path));//获取第一张表Sheet sheet = workbook.getSheet(0);//循环获取第一行数据,因为默认第一行为标题行,我们可以从1开始循环,如果需要读取标题行,从0开始for (int i = 1; i <sheet.getRows() ; i++) {//获取第一行的第i行信息 sheet.getcell(列,行);下标从0开始String name = sheet.getCell(0, i).getContents();System.out.println("标题::"+name);//获取第二行的第i行信息String miaoshu = sheet.getCell(1,i).getContents();System.out.println("描述::"+miaoshu);//获取第三行的第i行信息String buzhou = sheet.getCell(2,i).getContents();System.out.println("步骤:"+buzhou);//获取第四行的第i行信息String yuqi = sheet.getCell(3,i).getContents();System.out.println("预期结果:"+yuqi);System.out.println("===========================");//将获取到每行的内容放到数组中String data[]={name,miaoshu,buzhou,yuqi};// 添加段落内容,也就是标题XWPFParagraph paragraph1 = document.createParagraph();paragraph1.setStyle("标题4");//设置标题2paragraph1.setFontAlignment(1);//字体对齐方式:1左对齐 2居中3右对齐XWPFRun run1 = paragraph1.createRun();run1.addBreak();//换行run1.setText(data[0]);//添加第一行段落文本// 添加表格 1行3列XWPFTable table = document.createTable(1,3);// 设置表格的行高和列宽table.setWidth(9000);// 设置列宽table.getRow(0).getCell(0).setWidth("3000");//设置获取第一行1列设置宽度table.getRow(0).getCell(1).setWidth("3000");//设置获取第一行2列设置宽度table.getRow(0).getCell(2).setWidth("3000");//设置获取第一行3列设置宽度int rowCount = 1;int colCount = 3;for (int a = 0; a < rowCount; a++) {XWPFTableRow row = table.getRow(a);if (row == null) {row = table.createRow();}for (int j = 0; j < colCount; j++) {XWPFTableCell cell = row.getCell(j);if (cell == null) {cell = row.addNewTableCell();}if (j==0){XWPFParagraph cellPara = cell.getParagraphArray(0);XWPFRun cellRun = cellPara.createRun();cellRun.setText(data[1]);}else if (j==1){XWPFParagraph cellPara = cell.getParagraphArray(0);XWPFRun cellRun = cellPara.createRun();cellRun.setText(data[2]);}else if (j==2){XWPFParagraph cellPara = cell.getParagraphArray(0);XWPFRun cellRun = cellPara.createRun();cellRun.setText(data[3]);}}}// 保存为Word文件FileOutputStream outStream = new FileOutputStream("output.docx");document.write(outStream);outStream.close();System.out.println("成功生成Word文件!");}catch (Exception e){e.printStackTrace();}}
