文章目录
- 1 实现程序保存操作记录的思路
- 2 XML文档基本结构
- 3 QDomDocument实现XML读写
- 3.1 QDomDocument实现生成XML文件
- 3.2 QDomDocument实现读取XML文件
- 4 QXmlStreamWriter实现读写
- 4.1 QXmlStreamWriter实现生成XML
- 4.2 QXmlStreamWriter实现读取XML
1 实现程序保存操作记录的思路
思路来源: 由于在一些绘图工具中,有些将操作的历史记录,缓存的操作配置保存在了json文件,也有的保存到了xml文件中,如下图所示。经过个人的对比发现xml的文件结构简单、文件的可读性强,节点和内容项之间关系层次清晰,能够实现简单、快速、清晰的内容缓存,非常适合做复杂数据类型的操作记录、工程操作文件记录、配置文件工具。
- json 示例(来自一个友商的算法标注工具)
{"version": "4.5.6","flags": {},"shapes": [{"description": null,"mask": null,"label": "7","points": [[574.5679012345677,630.8641975308642],[701.7283950617282,0.0],[822.7160493827159,193.82716049382702],[1091.8518518518517,169.1358024691358]],"group_id": null,"shape_type": "polygon","flags": {}},{"description": null,"mask": null,"label": "7","points": [[970.5472636815921,377.96019900497504],[763.2246176524784,204.6395798783858],[689.9502487562188,457.0646766169153],[689.9502487562188,639.1542288557212],[882.4875621890546,636.1691542288554],[1222.7860696517412,583.9303482587063]],"group_id": null,"shape_type": "polygon","flags": {}},{"description": null,"mask": null,"label": "7","points": [[536.8694885361556,394.21340388007053],[596.1287477954147,430.01587301587324]],"group_id": null,"shape_type": "circle","flags": {}}],"imagePath": "微信图片_20231027144505.png","imageData": null,"imageHeight": 1080,"imageWidth": 1920
}
- xml示例 (qdraw)
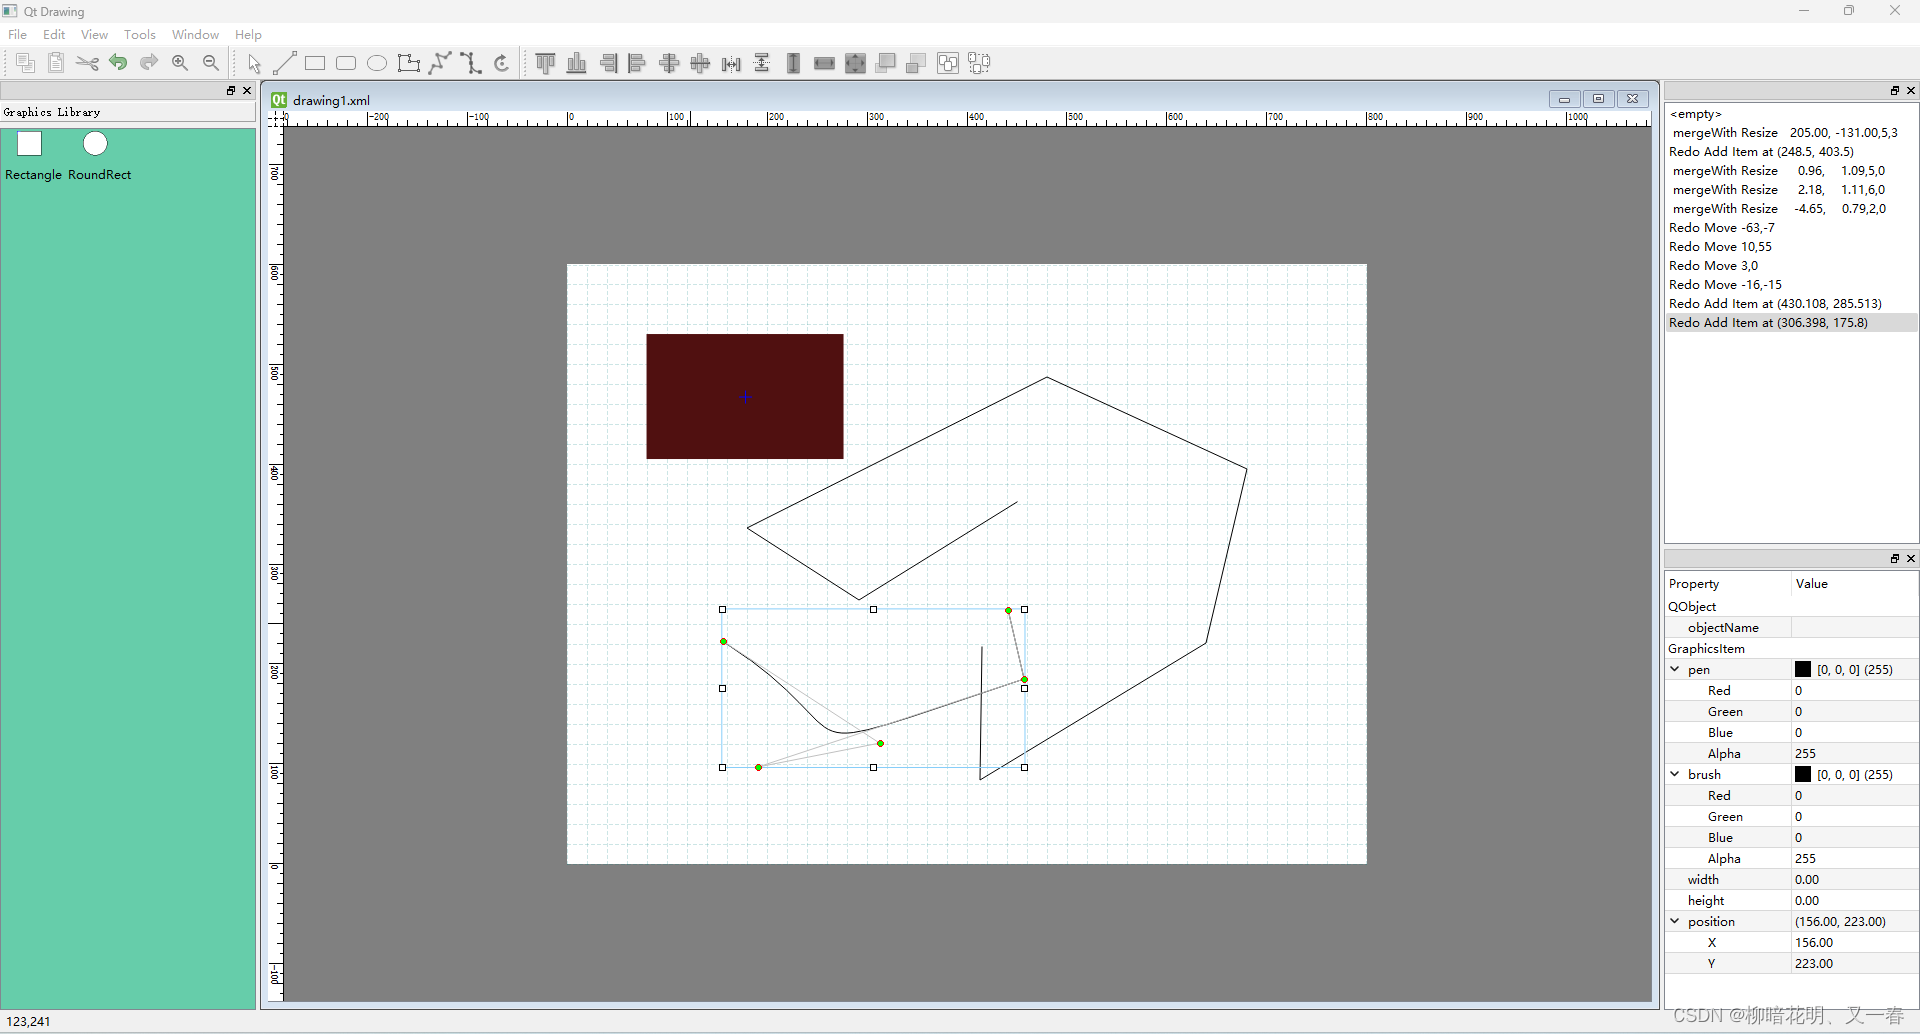
<?xml version="1.0" encoding="UTF-8"?>
<!DOCTYPE qdraw>
<canvas width="800" height="600"><polyline rotate="0" x="469.004" y="326.484" z="0" width="394" height="289"><point x="-88.0041" y="20.5161"/><point x="76.9959" y="144.516"/><point x="196.996" y="65.5161"/><point x="150.996" y="-144.484"/><point x="-24.0041" y="-59.4839"/><point x="-163.004" y="-63.4839"/><point x="-197.004" y="53.5161"/><point x="-116.004" y="56.5161"/><point x="-150.004" y="11.5161"/></polyline><polyline rotate="0" x="164.945" y="321.008" z="0" width="218" height="134"><point x="-71.9446" y="26.9924"/><point x="27.0554" y="66.9924"/><point x="109.055" y="8.99239"/><point x="-44.9446" y="-67.0076"/><point x="-108.945" y="17.9924"/><point x="-70.9446" y="25.9924"/></polyline><ellipse startAngle="40" spanAngle="400" rotate="0" x="155" y="125.5" z="0" width="174" height="125"/><roundrect rx="0.1" ry="0.333333" rotate="0" x="357.5" y="461" z="0" width="141" height="108"/><rect rotate="0" x="104" y="488.5" z="0" width="152" height="163"/>
</canvas>
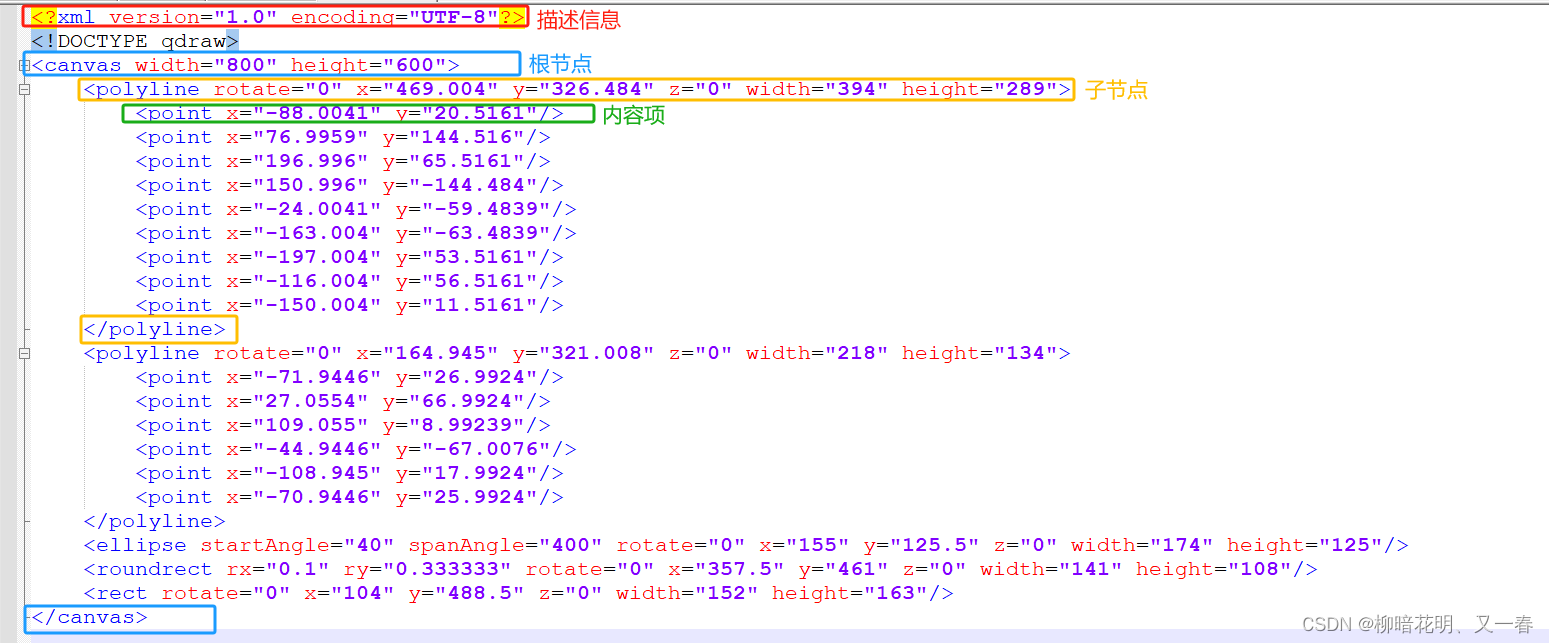
2 XML文档基本结构
3 QDomDocument实现XML读写
原理说明: 和json文件处理发方式相同。根据节点、子节点、内容项的关系生成、加载XML文件的内容。
方案缺点: 生成的xml文档中的内容项的顺序是随机的,如下图所示。需要添加随机方法处理,参见文章Qt中使用QDomDocument生成XML文件元素属性随机乱序解决办法 、解决QDomDocument的setattribute乱序,这样能保证每行顺序都是一样的,但是也和自己生成顺序不同。该方法逐渐被淘汰,请参见下文,方法2QXmlStreamWriter实现。
<!-->自己期望的结果<!-->
<?xml version="1.0" encoding="UTF-8"?>
<!DOCTYPE algoConfig>
<baseConfig><algolist><algo algId="101001" algName="未戴安全帽" serverType="图片服务" depModel1="1030" depLable1="NO_HELMET" depModel2="" depLable2="" depModel3="" depLable3=""/><algo algId="101002" algName="未穿长袖" serverType="图片服务" depModel1="1030" depLable1="PERSON" depModel2="" depLable2="" depModel3="" depLable3=""/>
</algolist><modelMap><model modelName="1303" reName="2303"/></modelMap>
</baseConfig>
<!-->生成的结果<!-->
<?xml version="1.0" encoding="UTF-8"?>
<!DOCTYPE algoConfig>
<baseConfig><algolist><algo serverType="图片服务" algName="未戴安全帽" algId="101001"  depModel1="1030" depLable1="NO_HELMET" depModel2="" depLable2="" depModel3="" depLable3=""/><algo serverType="图片服务" algName="未穿长袖" algId="101002"   depModel1="1030" depLable1="PERSON" depModel2="" depLable2="" depModel3="" depLable3=""/>
</algolist><modelMap><model modelName="1303" reName="2303"/></modelMap>
</baseConfig>
3.1 QDomDocument实现生成XML文件
方法说明: 采用QDomDocument实现,方案传统优缺点。
#include <QDomDocument>
#include <QFile>
#include <QTextStream>// Method to generate XML file
void generateXMLFile() {QDomDocument document;// Making the root elementQDomElement root = document.createElement("baseConfig");// Making elements of algolistQDomElement algolist = document.createElement("algolist");QDomElement algo1 = document.createElement("algo");algo1.setAttribute("algId", "101001");algo1.setAttribute("algName", "未戴安全帽");algo1.setAttribute("serverType", "图片服务");algo1.setAttribute("depModel1", "1030");algo1.setAttribute("depLable1", "NO_HELMET");algolist.appendChild(algo1);QDomElement algo2 = document.createElement("algo");algo2.setAttribute("algId", "101002");algo2.setAttribute("algName", "未穿长袖");algo2.setAttribute("serverType", "图片服务");algo2.setAttribute("depModel1", "1030");algo2.setAttribute("depLable1", "PERSON");algolist.appendChild(algo2);root.appendChild(algolist);// Making elements of modelMapQDomElement modelMap = document.createElement("modelMap");QDomElement model = document.createElement("model");model.setAttribute("modelName", "1303");model.setAttribute("reName", "2303");modelMap.appendChild(model);root.appendChild(modelMap);document.appendChild(root);// Writing to a fileQFile file("Config.xml");if(!file.open(QIODevice::WriteOnly | QIODevice::Text)) {qDebug() << "Failed to open file for writing.";return;} else {QTextStream stream(&file);stream << document.toString();file.close();qDebug() << "File written.";}
}
3.2 QDomDocument实现读取XML文件
#include <QDomDocument>
void loadXMLFile() {QDomDocument document;QFile file("Config.xml");if(!file.open(QIODevice::ReadOnly | QIODevice::Text)) {qDebug() << "Failed to open file for reading.";return;} else {if(!document.setContent(&file)) {qDebug() << "Failed to load document.";return;}file.close();}QDomElement root = document.firstChildElement();QDomNodeList algos = root.firstChildElement("algolist").elementsByTagName("algo");for(int i = 0; i < algos.count(); i++) {QDomNode algoNode = algos.at(i);if(algoNode.isElement()) {QDomElement algo = algoNode.toElement();qDebug() << "Algo ID: " << algo.attribute("algId");qDebug() << "Algo Name: " << algo.attribute("algName");}}QDomNodeList models = root.firstChildElement("modelMap").elementsByTagName("model");for(int i = 0; i < models.count(); i++) {QDomNode modelNode = models.at(i);if(modelNode.isElement()) {QDomElement model = modelNode.toElement();qDebug() << "Model Name: " << model.attribute("modelName");qDebug() << "Renamed as: " << model.attribute("reName");}}
}
4 QXmlStreamWriter实现读写
- 使用QXmlStreamWriter方法,读写超级简单,实现容易快速。
4.1 QXmlStreamWriter实现生成XML
#include <QXmlStreamReader>
void genConfForm::genXmlFile()
{QFile file("conf.xml");if (!file.open(QIODevice::WriteOnly | QIODevice::Text)) {qDebug() << "Failed to open file for writing.";return;}QXmlStreamWriter xmlWriter(&file);xmlWriter.setAutoFormatting(true);xmlWriter.writeStartDocument();xmlWriter.writeDTD("<!DOCTYPE algoConfig>");xmlWriter.writeStartElement("baseConfig");xmlWriter.writeStartElement("algolist");int rows = ui->tableView_gc->model()->rowCount();for(int r = 0; r < rows; r++){/*|0算法ID|1算法名称|2服务类型|3依赖模型1|4依赖label1|5依赖模型2|6依赖label2|7依赖模型3|8依赖label3|*/QString algId = ui->tableView_gc->model()->index(r,0).data().toString();QString algName = ui->tableView_gc->model()->index(r,1).data().toString();QString serverType = ui->tableView_gc->model()->index(r,2).data().toString();QString depModel1 = ui->tableView_gc->model()->index(r,3).data().toString();QString depLabel1 = ui->tableView_gc->model()->index(r,4).data().toString();QString depModel2 = ui->tableView_gc->model()->index(r,5).data().toString();QString depLabel2 = ui->tableView_gc->model()->index(r,6).data().toString();QString depModel3 = ui->tableView_gc->model()->index(r,7).data().toString();QString depLabel3 = ui->tableView_gc->model()->index(r,8).data().toString();xmlWriter.writeEmptyElement("algo");xmlWriter.writeAttribute("algId", algId);xmlWriter.writeAttribute("algName", algName);xmlWriter.writeAttribute("serverType", serverType);xmlWriter.writeAttribute("depModel1", depModel1);xmlWriter.writeAttribute("depLable1", depLabel1);xmlWriter.writeAttribute("depModel2", depModel2);xmlWriter.writeAttribute("depLable2", depLabel2);xmlWriter.writeAttribute("depModel3", depModel3);xmlWriter.writeAttribute("depLable3", depLabel3);}xmlWriter.writeEndElement();//algolistxmlWriter.writeStartElement("modelMap");for(auto& model:m_modelRename){//第一次修改后的值,第二次修改前的值auto& modName = model.first;auto& reName = model.second;xmlWriter.writeEmptyElement("model");xmlWriter.writeAttribute("modelName", modName);xmlWriter.writeAttribute("reName", reName);}xmlWriter.writeEndElement();//modelMapxmlWriter.writeEndElement(); // baseConfigxmlWriter.writeEndDocument();file.close();qDebug() << "XML file generated successfully.";
}
4.2 QXmlStreamWriter实现读取XML
#include <QXmlStreamReader>
struct DepAllModelInfo{QString m_model1;QString m_label1;QString m_model2;QString m_label2;QString m_model3;QString m_label3;
};
using depModel = std::vector<DepModelInfo>;
struct algInfo{QString m_alg_name;QString m_server_type;DepAllModelInfo m_dep_model;
};
using algFullCapacity = std::map<QString,algInfo>;
/*以上是读取config.xml文件结构在程序中的数据结构*/
void genConfForm::loadXmlFile()
{algFullCapacity afc;QFile file("config.xml");if (!file.open(QIODevice::ReadOnly | QIODevice::Text)) {qDebug() << "Failed to open file for reading.";return;}QXmlStreamReader xmlReader(&file);while (!xmlReader.atEnd() && !xmlReader.hasError()) {// Read next elementQXmlStreamReader::TokenType token = xmlReader.readNext();// If token is just StartDocument, we'll go to nextif (token == QXmlStreamReader::StartDocument) {continue;}// If token is StartElement - read itif (token == QXmlStreamReader::StartElement){if (xmlReader.name() == "algo"){DepAllModelInfo dam;QXmlStreamAttributes attributes = xmlReader.attributes();QString algId = attributes.value("algId").toString();QString algName = attributes.value("algName").toString();QString serverType = attributes.value("serverType").toString();dam.m_model1 = attributes.value("depModel1").toString();dam.m_label1 = attributes.value("depLable1").toString();dam.m_model2 = attributes.value("depModel2").toString();dam.m_label2 = attributes.value("depLable2").toString();dam.m_model3 = attributes.value("depModel3").toString();dam.m_label3 = attributes.value("depLable3").toString();if(!algId.isEmpty() && !algName.isEmpty()){afc.insert(std::pair<QString,algInfo>(algId, {algName,serverType,dam}));}}if (xmlReader.name() == "model"){QXmlStreamAttributes attributes = xmlReader.attributes();QString dbModelName = attributes.value("modelName").toString();QString modifyName = attributes.value("reName").toString();m_modelRename.insert(std::pair<QString,QString>(dbModelName,modifyName));}}}if(!afc.empty())slotAlgInfo(afc);if (xmlReader.hasError()) {qDebug() << "XML error: " << xmlReader.errorString();}file.close();
}

